usb temperature and humidity data logger instruction manual · model:kg100 usb temperature and...
TRANSCRIPT

Model:KG100
USB Temperature and Humidity Data Logger
Instruction Manual
1. Display
2. - key
3. + key
4. Set key
5. USB port
6.Reset
- 1 -

① ② 1.Temperature
2. Humidity
3. Memory status display ⑤
4. Record interval
5. Time/Date/year
③ ④
1. Introduction
Thank you for choosing this item for your data logging requirement. Small simple
and affordable, data logger can measure and record data at specified intervals
ranging from once every 60 seconds to once every 4hours. It is our goal to bring you
accurate, low-cost, easy-to use data logger that integrate easily into the user’s
working environment.
1.1 Package Contents
z 1x data logger unit
z 1x USB cable
z 1x CD ROM
z 1x 3 V lithium battery CR2032
z Instruction manual
- 2 -
1.2 Features:
z Measure and log termperatuer and humidity data
z Instant data download with PC/laptop
z USB interface for set-up and data download
z Easily re-configurable using included software
z Selectable logging intervals from 1minute to 4 hours (default 1minute)
z Selectable measurement in °F or °C
z Time, date and unit synchronized your PC
2. Installation
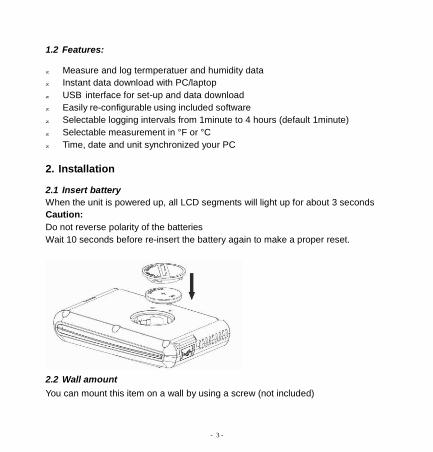
2.1 Insert battery
When the unit is powered up, all LCD segments will light up for about 3 seconds
Caution:
Do not reverse polarity of the batteries
Wait 10 seconds before re-insert the battery again to make a proper reset.
2.2 Wall amount
You can mount this item on a wall by using a screw (not included)
- 3 -

3. Function:
“SET” BUTTON:
z In normal display, press “SET” button to alternate the display of time
and logging intervals
z In normal display, long press ”SET” button to enter setting mode
“+” BUTTON:
z In normal display, press “+” button to alternate the display of time and date
z In setting mode, press “+” button to increase the value of information being set.
“-” BUTTON:
In setting mode, press “-” button to decrease the value of information being set.
“RESET” BUTTON:
When the unit is "dead" such as only displaying "888" or no response to button
operation press RESET key.
4. Program Mode
SETTING MODE:
z Long press “SET” button to enter Set Mode
z Press the “SET” button to select the following setting in sequence:
1) 12/24 hour format
2) Manual time setting (hour/minutes)
3) Calendar setting (year/month/date)
4) Temperature display unit degree Celsius or Fahrenheit
z The setting mode will return to normal display while button idle 30s
SLEEP MODE:
z The device will automatically enter sleep mode if no button is pressed
for 2 minutes. Press any button to exit sleep mode.
- 4 -

z Time, date and weather trackers still function while in sleep mode. Battery life is
extended if in sleep mode.
MEMORY MODE:
There are 10 bar graphs to indicate the memory store capacity. One bar graph is
indicate 10% memory. In case the memory capacity is exhausted the oldest data
sets stored will be overwritten by the new ones entered.
If a battery change or "RESET" for the unit happened, the history date of the logger
will be lost.
5. Software
5.1 System requirements
To install the software onto your PC, the minimum requirements are as follows:
Operating System: Windows XP, Windows Vista, Windows 7.
Internet Explorer 6.0 or above
Processor: Pentium III 500 MHz or above
Memory: at least 128MB, 256MB recommended
CD-ROM Drive
Data logger and PC must be connected by USB cable
5.2 Installation of the Software
1. Switch on your PC and insert the CD-ROM into the CD-ROM Drive.
2. Double click “USB Data Logger.exe”
3. click next and select the destination folder(change directory when needed)
4. click next and select the shortcut folder
- 5 -

5. click next
6. click install and the software will be installed automatically
7. Press finish to exit the setup.
8. From “Start—All Programs—USB data logger” path and double click the
“Data logger” icon to start application.
Note: The graphic function needs the software to be installed under the
administrator account. If it is installed under limited user accounts, the graphic
function of the software might not be working correctly.
5.3 Basic Settings of the “USB Datalogger” Software
After the “Datalogger.exe” program has been started, the following main window will
appear on the PC screen:
1 2 3 4 5 6 7 8 9 10
22
21
11
12
20
13
19 18 17 16 15 14
- 6 -

1. Save the diagram or text to the destination folder to keep a back up history file
2. Set the parameter
3. Clear history data on PC
4. Data logger software version information
5. Select different time range of data display:.
Period: 1 hour/1 day/ 1week/1mont/1year
Segment: you can set max. 4 segments data through the setting menu
Time Select: to specify a start and end time
6. Select start date
7. Select start time
8. Record interval time
9. Select end date
10. Select end time
11. The humidity scale in the recording period
12. The graph of temperature
13. The graph of humidity
14. While data logger connected to PC successfully, the icon of will be
displayed. Otherwise the will be displayed.
15. The latest data of the last measurement
16. The MAX and MIN of humidity in the recording period
17. The Scale of the recording period
- 7 -

18. The MAX and MIN of temperature in the recording period
19 It show the current status of data transfer between software and data logger
20. The temperature scale in the recording period
21. Display selectable between diagram and text
22. The data loggers to be numbered in the order of connection to PC
All the settings from the base unit is mirrored into the PC software, so once you
have done your setting on the base unit, then you don’t need to make any setting
changes on the PC software. However you can still easily make any setting
changes you wanted from the PC and download the changes into the base station
(the setting change will be refreshed when next full minute arrives on the base
station).
Function button:
: Export image or csv file
Select this button from the file menu to display the window as shown below:
- 8 -

Diagram can be saved as *.bmp file. Text can be saved as *.csv file which is directly
readable by Microsoft Excel®
and other spreadsheet programs.
You can choose the diagram or text by pull-down list of “Display” field
- 9 -

: Set the parameter
Select this button from the file menu to display the window as shown below:
1 2
3
9
4
5
8
7 6
- 10 -

1. Select the temperature unit between degree Celsius and Fahrenheit
2. Select the logger date format (MD=Month/Day, DM=Day/Month)
3. Select the record intervals from 1minute to 240minutes (default 1minute)
4. Set the segments data end time
5. Active the segment data start time and end time
6. Cancel the setting
7. Confirm the setting
8. Set the segments data start time
9. Description of the data logger
This section is used to set up PC software display. Once you made your choice,
press OK to make the setting effective.
Clear PC data:
Choose the relevant data logger, press OK to clear all its history data on PC.
- 11 -

SPECIFICATION:
Memory : Max 16,320 temperature and relative humidity
readings
Logging Interval : 60 seconds to 4 hours
Measure Temperature Range : -40 to 60°C
Temperature accuracy : +/-1.0°C under 0-50°C
Measures humidity range : 10%-99%RH
Humidity accuracy : +/-4% under 20%-80%
Software : Windows XP, windows Vista, windows7
Power : single 3 V lithium battery (included)
Battery Life : 1 year typical
(Depends on sample rate, ambient temperature)
Dimensions : 87x60x19mm
- 12 -