usb rh/temperature data logger with lcd … rh/temperature data logger with lcd display user’s...
TRANSCRIPT

USB RH/TEMPERATUREDATA LOGGER with
LCD DISPLAYUSER’S MANUAL
HT20Please read this manual carefully and thoroughly before using this product.
HT20 - Manual–FINAL_REV_0316121_awb 3/16/12 4:02 PM Page 1

TABLE OF CONTENTS Introduction . . . . . . . . . . . . . . . . . . . . . . . . . . . . . . . . . . 3 – 4
Key Features . . . . . . . . . . . . . . . . . . . . . . . . . . . . . . . . . 4 – 5
Safety Instruction . . . . . . . . . . . . . . . . . . . . . . . . . . . . . . . . . 5
What’s in the Blister Pack. . . . . . . . . . . . . . . . . . . . . . . . . . . 5
Product Overview. . . . . . . . . . . . . . . . . . . . . . . . . . . . . . 6 – 7
Setup Instructions . . . . . . . . . . . . . . . . . . . . . . . . . . . . 7 – 12
Installing/Replacing the Battery . . . . . . . . . . . . . . 7 – 8
Install Software and Drivers . . . . . . . . . . . . . . . . . 8 – 9
Configure the Unit . . . . . . . . . . . . . . . . . . . . . . 10 – 13
Operating Instructions . . . . . . . . . . . . . . . . . . . . . . . . 13 – 17
Deploy the Unit . . . . . . . . . . . . . . . . . . . . . . . . 13 – 14
Stop Logging and Import Logs . . . . . . . . . . . . . 14 – 15
Viewing, Printing and Exporting Data Logs . . . . 15 – 16
Other Indications . . . . . . . . . . . . . . . . . . . . . . . 16 – 17
Specifications . . . . . . . . . . . . . . . . . . . . . . . . . . . . . . . . . . 18
Maintenance Tips. . . . . . . . . . . . . . . . . . . . . . . . . . . . . . . . 19
Warranty Information . . . . . . . . . . . . . . . . . . . . . . . . . . . . . 19
Return for Repair Policy . . . . . . . . . . . . . . . . . . . . . . . . . . . 20
2
HT20 - Manual–FINAL_REV_0316121_awb 3/16/12 4:02 PM Page 2

INTRODUCTIONThank you for purchasing General Tools & Instruments’ HT20 USB RH/Temperature Data Logger with LCD Display.Please read this user’s manual carefully and thoroughlybefore using the instrument.
The HT20 is a low-cost, compact, battery-powered thermo-hygrometer capable of unattended logging (recording) of theambient temperature and relative humidity (RH) of anenvironment for days, weeks or months. Data logging can be started or stopped by pushing a button on the unit,eliminating the need to bring a laptop to the job site.
After a data log has been captured and stored, it can beuploaded as a .txt file to any PC running the Windows®7 orWindows® XP operating system after plugging the HT20 intoone of the computer’s USB ports. The HT20’s internal flashmemory is large enough to store up to 8000 pairs of humidityand temperature readings.
Included with the product—which is slightly larger than athumb drive—is a mini-disc with the drivers needed tointerface the unit to the computer, as well as software thatcan display a data log file as a table or graph and/or export itto Microsoft Excel. Exporting to Excel is recommended forsophisticated trending and analysis of humidity andtemperature data and easy detection of unexpectedexcursions.
3Windows® 7 and Windows® XP are registered trademarks of Microsoft Corporation.
HT20 - Manual–FINAL_REV_0316121_awb 3/16/12 4:02 PM Page 3
Applications for the HT20 include:
• Water damage restoration—Because the HT20 isdesigned to be deployed and left in place over theduration of the job, it is always in equilibrium with theenvironment.
• Process control—The HT20 enables, simplifies and cutsthe cost of environmental monitoring of office buildings,greenhouses, food and equipment storage facilities,wineries, freezers, shipping containers, HVAC/Rinstallations, computer rooms, labs, libraries, museumsand saunas.
• Electronics manufacturing—Alerts provided by the low-humidity alarm function of the HT20 can mitigate the riskof damaging high-voltage static discharges.
KEY FEATURES• One button starts/stops data logging without a PC
• Plug-and-play USB 2.0 interface; no need for cables,cradles or docks
• Large storage capacity: Up to 8000 pairs of humidity andtemperature readings
• 3-1/2-digit LCD displays real-time temperature andhumidity readings; also indicates device working statusand “memory full”
• Included software is used to set: Sampling time from 10 seconds to 12 hours; Hi/Lo alarm setpoints forhumidity and temperature; Temperature unit (°F or °C)
• Software also calculates dew point and displays data logsas time-based graphs synchronized to your PC’s clock
4
HT20 - Manual–FINAL_REV_0316121_awb 3/16/12 4:02 PM Page 4

• One-click exporting of logs to Excel or Word
• Long battery life (up to one year)
• Includes USB extension cable
• One-year warranty
SAFETY INSTRUCTIONDo not use the HT20 in the presence of flammable orexplosive gases.
WHAT’S IN THE BLISTER PACKThe HT20 comes in a blister pack that also contains
• One “1/2 AA” battery
• A disc with software drivers for Windows7 or WindowsXP computers, a program for capturing data logs anddisplaying them as curves, and a PDF of this user’smanual
• A USB extension cable
• A hard copy of this user’s manual (inside the fold-overcard)
5
HT20 - Manual–FINAL_REV_0316121_awb 3/16/12 4:02 PM Page 5

6
ABCD
EF
Fig. 1a. The components, controls and connector of the HT20
PRODUCT OVERVIEWFig. 1a below shows the main components, controls andconnectors of the HT20. Fig. 1b (on the facing page) shows all possible indications on the HT20’s display. Familiarizeyourself with their names and functions before moving on tothe Setup Instructions.
,
A. Temperature and humidity sensor window
B. Battery compartment (latch is on rear of unit)
C. 3-1/2-digit LCD (displays temperature and humidityreadings; also indicates device working status and“memory full”)
D. USB plug
E. Protective cap
F. MODE button
HT20 - Manual–FINAL_REV_0316121_awb 3/16/12 4:02 PM Page 6

Display Legend▲: indicates reading is higher than high alarm setpoint
for that parameter▼: indicates reading is lower than low alarm setpoint
for that parameter%RH: relative humidity unit
°C: Celsius temperature unit°F: Fahrenheit temperature unit
[-]188.8: Humidity or temperture value or one of thefollowing four working status indications
LOG: Unit is logging data- - -: Unit is in standby mode, ready to log dataFUL: Internal memory is full (and logging has been
stopped)CON: Unit needs to be configured by software
SETUP INSTRUCTIONSINSTALLING/REPLACING THE BATTERY
The HT20 uses a 3.6VDC “1/2 AA” Lithium-ion battery. To open the battery compartment, use a paper clip or ascrewdriver with a fine point to push in the silver flangeshowing through the small square hole in the rear of the unit
7
Fig. 1b. All possibledisplayindications on the HT20
LATCH
HT20 - Manual–FINAL_REV_0316121_awb 3/16/12 4:02 PM Page 7
(left photo on previous page). Push back the cover (middlephoto), remove the old battery (right photo) and insert a freshbattery in the correct orientation. Then replace the cover,pushing it forward until you feel and hear a click.After you replace the battery, the LCD will “wake up” andbegin displaying real-time readings. If the MODE button is notpressed within 60 seconds, the LCD will be automaticallypowered off.Note: If the battery is removed from a unit before it has beenset up from software or while it is recording, the unit must bereconfigured before it can be reactivated. If it is notreconfigured, the unit will remain in standby mode.INSTALL SOFTWARE AND DRIVERS1. Place mini-disc in tray of CD/DVD drive, shiny side down.Close tray.
2. When the AutoPlay window appears, click on “Open folderto view files using Windows Explorer.”
3. Windows Explorer will indicate that there are two “FilesCurrently on the Disc”. One is actually a folder containing a PDF of the HT20 user’s manual (as well as PDFs of themanuals for the HT10 and HT50—versions of the HT20without an LCD and with an IR thermometer). Copy theHT20 manual to your computer’s hard drive for permanentstorage. The other file is a Windows Installer Package(.msi file) named “ELUSB V1.0”. Double-click its icon.
4. A window titled “Welcome to the ELUsb Setup Wizard” will appear. Click Next to continue.
5. Within the window that appears next, click the box next to“I accept the terms in the License Agreement”. Then clickNext to continue.
8
HT20 - Manual–FINAL_REV_0316121_awb 3/16/12 4:02 PM Page 8

6. The next window advises that the ELUSB application will be installed in your computer’s C:\Program Files folder ina new subfolder named <ELUSB>. If you want to installthe software elsewhere, click Browse and choose anotherlocation. After selecting either the default location oranother location, click Next to continue.
7. When the “Ready to install ELUsb” window appears, click Install to continue.
8. Before the installation begins, a User Account Controlwindow may appear and ask, “Do you want to allow[ELUSB V1.0.msi] to make changes to this computer?”Click Yes to continue.
9. The ELUsb Setup Wizard will now install the program onyour computer. On the next window that appears, clickFinish.
10. At the bottom of the Device Driver Installation Wizard thatappears next, click Next to continue.
11. The next window to appear is a Windows Securitywindow. Click on “Install this driver software anyway” to continue.
12. The next Device Driver Installation Wizard window willadvise you that an HT10/20/50 driver from General Toolsor Kecheng Laboratories was successfully installed andthat your device is now “Ready to use.” Click Finish tocontinue.
9
HT20 - Manual–FINAL_REV_0316121_awb 3/16/12 4:02 PM Page 9
CONFIGURE THE UNITNote that the software installation has added a icon toyour desktop. To facilitate access to the program, right-clickon the icon and pin it to both your Start button and the QuickStart area at the left of your taskbar. You can now eject theinstallation mini-disc and store it with your other importantsoftware.
Plug the HT20 into an available USB port of your computer. Ifyour computer is a laptop and the only available USB jackdoes not have enough vertical clearance to accommodatethe HT20 without mechanically stressing its USB plug, donot plug the HT20 directly into the jack. You do not wantthe plug of the HT20 to support any of the weight of thelaptop. If that is the case, plug the HT20 into the jack of theincluded USB extension cable and insert the plug of theextension cable into the computer’s USB jack.
The first time you plug the HT20 into your computer, yoursystem tray will notify you that the computer is “InstallingDevice Driver Software”. When the notification disappears,open the ELUSB program by selecting it via your Start button,clicking on its icon on your taskbar, or double-clicking itsdesktop icon.
If the software has installed correctly and you have pluggedthe HT20 into a working USB port of your computer, thefollowing screen should appear on your computer’s display.
10
HT20 - Manual–FINAL_REV_0316121_awb 3/16/12 4:02 PM Page 10
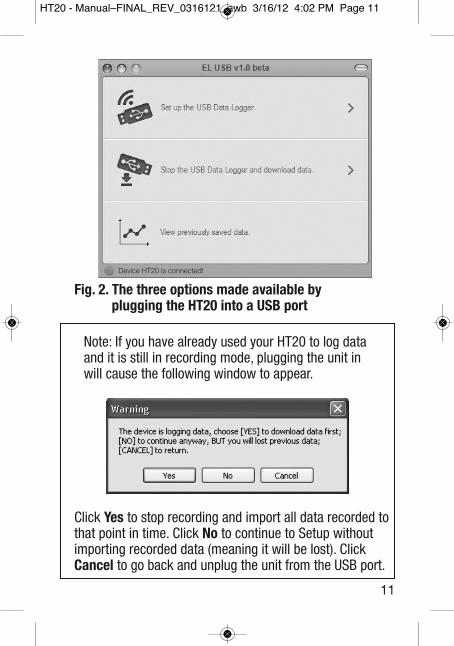
Note: If you have already used your HT20 to log dataand it is still in recording mode, plugging the unit inwill cause the following window to appear.
Click Yes to stop recording and import all data recorded tothat point in time. Click No to continue to Setup withoutimporting recorded data (meaning it will be lost). ClickCancel to go back and unplug the unit from the USB port.
11
Fig. 2. The three options made available by plugging the HT20 into a USB port
Device HT20 is connected!
HT20 - Manual–FINAL_REV_0316121_awb 3/16/12 4:02 PM Page 11

You can now use the software to “configure” your HT20.Configuring the device means choosing four key parameters:
• Sampling time—How often it makes and storeshumidity and temperature measurements.
• Temperature unit—degrees Fahrenheit or Celsius (°F or °C).
• High and low temperature alarm setpoints
• High and low humidity alarm setpoints
To begin, click on “Set up the USB Data Logger” in thewindow shown in the figure above. Doing so will cause thefollowing window to appear.
Using your mouse, trackball or touchpad, first choose yourTemp Scale and Sample Rate (sampling time). With regard tosampling time, using the shortest setting of 10 seconds mayresult in too much essentially identical data being stored in
12
Device HT20 is connected!
Fig. 3. The HT20 configuration (Setup) window
HT20 - Manual–FINAL_REV_0316121_awb 3/16/12 4:02 PM Page 12
memory, potentially limiting its capacity to capture importantevents such as an unexpected excursion of temperature orhumidity. Conversely, using the longest sampling time settingof 12 hours will likely cause important events to goundetected.
If you are an experienced data logger, you already know howto choose the optimum sampling time for your application. Ifyou are a novice, pick a sampling time closer to the minimumsampling time than the maximum, on the assumption that theHT20 probably has enough memory (8000 pairs of humidityand temperature readings) to store all the data you ask themeter to log—unless you use it to log data for months, ratherthan weeks or days.
If you wish, you can also drag the sliders shown in the figure toset high and low alarm setpoints for temperature and humidity.
Once you have chosen your data logging parameters, clickSetup. A window will appear advising that “The device is setup successfully.” Clicking Setup also synchronizes the HT20’sinternal clock with your computer’s clock, giving all data logsto be captured an absolute time reference.
You can now unplug the HT20 from your computer’s USB port.The unit is in “standby” mode, ready to begin logging data.
OPERATING INSTRUCTIONSDEPLOY THE UNITThe HT20 is particularly easy to deploy on a job site becausethe unit does not need to be plugged into a computer to beactivated (ready to start logging data). Working together, theMODE button and the LCD serve as the control and indicatorsneeded to: 1) start and stop data logging and 2) verify andchange the unit’s working status.
13
HT20 - Manual–FINAL_REV_0316121_awb 3/16/12 4:02 PM Page 13

That leaves only two things to be sure of when choosing aplace to deploy the HT20:
• The temperature and humidity sensor window (Fig. 1a, Callout A) is not covered
• The humidity and temperature values at the unit’slocation are “representative” of the room
The HT20—with its protective cap on—can be deployedeither by laying it on a horizontal surface or by hanging itvertically within the included plastic mounting bracket. Theback of the bracket features both a magnet and a hanger hole.
Once you have deployed the HT20, you can initiate datalogging. To start data logging, press and hold the MODEbutton for at least 3 seconds. The LCD will display the word“LOG” to confirm that logging has begun.
STOP LOGGING AND IMPORT LOGSTo stop data logging, press and hold the MODE button for atleast 3 seconds. The LCD will display three dashes (- - -)to confirm that logging has stopped.That is how you should stop data logging if you plan to initiateanother logging session later without uploading logged datato your computer in the interim. If you allow logging tocontinue and you do not upload your data to your computersoon, you risk filling up the HT20’s memory.
A simpler and safer way to stop data logging is to plug theHT20 into your computer’s USB port immediately aftercompleting a logging session and then use the ELUSBsoftware to stop logging.
Each time you plug the HT20 into the USB port, the windowshown in Fig. 2 will appear. When you plug in the unit, itmakes no difference whether it is still logging; the procedure14
HT20 - Manual–FINAL_REV_0316121_awb 3/16/12 4:02 PM Page 14

for uploading (importing) data logs is identical. Just click onthe middle selection—Stop the USB Data Logger anddownload data—to instantly execute both functions. Thedata will be imported as a .txt file. A “Save As” window willappear, asking you to identify where you want the file to bestored and what you want to name it.
VIEWING, PRINTING AND EXPORTING DATA LOGSImmediately after you close the “Save As” window by clicking on Save, the uploaded data log will automatically bedisplayed as a set of curves representing all loggable values.Fig. 4 is a typical example. The initial display includes allparameters, including dew point (which the softwareautomatically calculates) and alarm setpoints that you mayhave entered during Setup. To remove any parameter orhorizontal and vertical grid lines from the overall plot,uncheck its box at right.
Fig. 4. A typical initial plot of an imported data log
15
HT20 - Manual–FINAL_REV_0316121_awb 3/16/12 4:02 PM Page 15
There are several features shown in Fig. 4 worth noting:
• To mark the position of every recorded data point on thecurve, check the “Mark Points” box at the top of thesidebar at right.
• To get a higher-resolution view of the data recordedduring a specific period of time, scale up and down thecurves by dragging the slider at the bottom of thewindow left and right.
• Hovering the cursor over a particular point of the curvedisplays all data related to this point—including themaximum, minimum and average values of the entirecurve—in a shaded box at upper left.
• The dates and times shown on the x-axis scale and inthe upper left corner are in sync with your computer’sclock.
• To print the .txt file of any data log, click the Print virtualbutton.
• To open a previously saved data log, click the Openbutton. This function is also available as the “Viewpreviously saved data” option shown in Fig. 2.
• To export a file to Excel for advanced trending andanalysis, click the Export to Excel button.
OTHER INDICATIONSAs mentioned earlier, the MODE button and the LCD can beused together to display real-time temperature and humiditymeasurements, and to indicate the current working status ofthe HT20.
Circuitry inside the HT20 automatically shuts down the LCD(to conserve battery life) if the MODE button has not been
16
HT20 - Manual–FINAL_REV_0316121_awb 3/16/12 4:02 PM Page 16

pressed within the past 60 seconds. That is the case evenwhen the unit is logging data. In other words, the LCD isnormally “asleep”.
To wake up the LCD, briefly press the MODE button. Thisfirst press of the button will cause the LCD to resumedisplaying the same indication that was on-screen when theLCD was last put to sleep.
There are four possible display indications: (1) currenttemperature in Celsius, (2) current temperature in Fahrenheit,(3) current relative humidity (in %), and (4) current workingstatus. Each press of the MODE button changes the display to the next indication in the sequence; pressing the MODEbutton when the LCD is displaying the unit’s current workingstatus (4) resets the cycle to (1).
There are four possible working status indications:
• LOG: The unit is currently logging data• - - -: The unit is in standby mode, ready to log data• FUL: The unit’s internal memory is full and logging has been
stopped
• CON: The unit needs to be configured by softwareWhen the LCD is displaying a temperature or humidityreading, it also gives an indication if the reading is outside the“acceptable” range of readings for that parameter—assuming that high and/or low alarm setpoints were enteredduring the Setup procedure. If an “up” arrow appears at theleft of the reading (see Fig. 1b on p. 7), the measured value ofthat parameter is higher than its high alarm setpoint. If a“down” arrow appears at the left of the reading, it is lowerthan the low alarm setpoint for that parameter.
17
HT20 - Manual–FINAL_REV_0316121_awb 3/16/12 4:02 PM Page 17
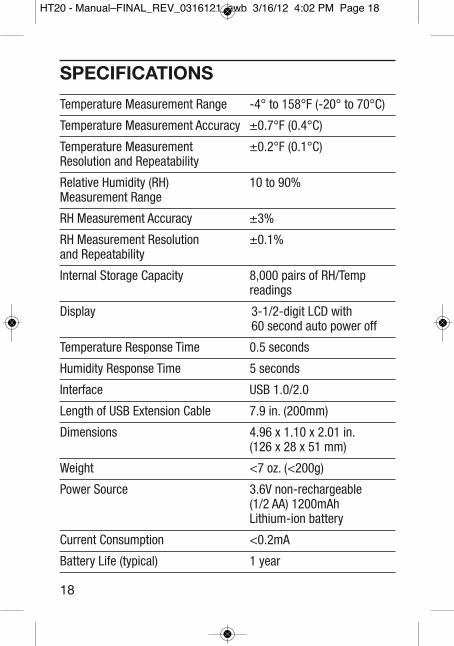
SPECIFICATIONS
Temperature Measurement Range -4° to 158°F (-20° to 70°C)
Temperature Measurement Accuracy ±0.7°F (0.4°C)
Temperature Measurement ±0.2°F (0.1°C)Resolution and Repeatability
Relative Humidity (RH) 10 to 90%Measurement Range
RH Measurement Accuracy ±3%
RH Measurement Resolution ±0.1%and Repeatability
Internal Storage Capacity 8,000 pairs of RH/Tempreadings
Display 3-1/2-digit LCD with 60 second auto power off
Temperature Response Time 0.5 seconds
Humidity Response Time 5 seconds
Interface USB 1.0/2.0
Length of USB Extension Cable 7.9 in. (200mm)
Dimensions 4.96 x 1.10 x 2.01 in. (126 x 28 x 51 mm)
Weight <7 oz. (<200g)
Power Source 3.6V non-rechargeable (1/2 AA) 1200mAh Lithium-ion battery
Current Consumption <0.2mA
Battery Life (typical) 1 year
18
HT20 - Manual–FINAL_REV_0316121_awb 3/16/12 4:02 PM Page 18
MAINTENANCE TIPS• Avoid dropping the unit. Do not subject it to violent shock orvibration or expose it to strong electromagnetic fields (forexample, near arc welders or induction heaters).
• Keep the unit out of direct sunlight.• Do not use chemicals or abrasive cloth to clean the displaywindow or housing.
• Before storing the HT20 for an extended period of time(several months or more), remove the battery to avoidhaving it leak and damage the unit.
WARRANTY INFORMATIONGeneral Tools & Instruments’ (General’s) HT20 USB RH/TemperatureData Logger with LCD Display is warranted to the original purchaserto be free from defects in material and workmanship for a period ofone year. Subject to certain restrictions, General will repair orreplace this instrument if, after examination, the companydetermines it to be defective in material or workmanship.This warranty does not apply to damages that General determinesto be from an attempted repair by non-authorized personnel ormisuse, alterations, normal wear and tear, or accidental damage—including dropping the unit. The defective unit must be returned toGeneral Tools & Instruments or to a General-authorized servicecenter, freight prepaid and insured.Acceptance of the exclusive repair and replacement remediesdescribed herein is a condition of the contract for purchase of this product. In no event shall General be liable for any incidental,special, consequential or punitive damages, or for any cost,attorneys’ fees, expenses, or losses alleged to be a consequence of damage due to failure of, or defect in any product including, but not limited to, any claims for loss of profits.
19
HT20 - Manual–FINAL_REV_0316121_awb 3/16/12 4:02 PM Page 19

RETURN FOR REPAIR POLICYEvery effort has been made to provide you with a reliable product of superior quality. However, in the event your instrument requiresrepair, please contact our Customer Service to obtain an RGA(Return Goods Authorization) number before forwarding the unit viaprepaid freight to the attention of our Service Center at this address:
General Tools & Instruments80 White Street New York, NY 10013 212-431-6100
Remember to include a copy of your proof of purchase, your returnaddress, and your phone number and/or e-mail address.
GENERAL TOOLS & INSTRUMENTS80 White Street
New York, NY 10013-3567PHONE (212) 431-6100FAX (212) 431-6499
TOLL FREE (800) 697-8665e-mail: [email protected]
www.generaltools.com
HT20 User’s Manual
Specifications subject to change without notice
©2011 GENERAL TOOLS & INSTRUMENTS
NOTICE - WE ARE NOT RESPONSIBLE FOR TYPOGRAPHICAL ERRORS.
MAN#HT20 3/16/12
HT20 - Manual–FINAL_REV_0316121_awb 3/16/12 4:02 PM Page 20