usage instructions for jpmorgan smartdata system " & & "...
TRANSCRIPT

1
Table of Contents
Logging onto the JPMorgan Chase SmartData Reporting System Page 1
How to Code and Review Credit Card Transactions Single line charges Page 3
Split charges Page 7
How to Approve Charges Page 16
How to run reports
Account Statement (Ver2) Page 26
Account Code Detail Page 30
Schedule for Reporting Charges Page 34
Submission of Receipts Page 34
Status of Charges in SmartData Page 35

2
Logging onto JPMorgan Chase SmartData
• Initial Login
http://smartdata.jpmorgan.com – click the link to go to the following internet page
We recommend that you add this page to your favorites in Windows internet Explorer or bookmark it if you are using Firefox. Your initial User ID: is your 14 digit card number Your initial password is: Fairfield11 + the last 4 digits of your card (Password is case sensitive).

3
When you initially login in, you will be asked to create your User id, password, and establish three security questions that you will need to know for logging onto your account in the future. Going
forward, you will use the ID and password you have just created.
How to Code Credit Card Transactions
• Single line charges From you home page (first screen you come to after signing onto the system, see below)
Click on Account Activity (top left of screen) and then click on Transaction Summary and you will be
brought to the next screen (see next page).

4
For the screen below -‐ Select the date ranges containing activity you wish to code and click search.
If you have charges to code, the screen will look like this (see next page)

5
Click on the icon that looks like a bar graph (we will use the one on the bottom left hand side of the
screen shown above) for the un-‐review transaction want to code

6
You will be brought to the screen below
Fill the following fields – Expense Description – provide brief description of item or services purchased
Organization – Click on the down arrow and it will provide a list of organizations that you are authorized to charge. Click on the organization that you wish to charge for this transaction. Account – Click on the down arrow and it will provide a list of accounts that you typically use to charge
your expenses. Click on the appropriate account or contact the Purchase Card Smart Data Administrator to add the account to the system.
Once the above information is entered correctly, click on the reviewed box and then hit save. You may continue on the next transaction, return to the home page, or log off the system if you are done.

7
• Split charges
This process will show you how to split a single charge between two or more organizations. From you home page (first screen you come to after signing onto the system, see below)
Click on Account Activity (top left of screen) and then click on Transaction Summary and you will be
brought to the next screen (see next page).

8
For the screen below -‐ Select the date ranges containing activity you wish to code and click search.
If you have charges to code, the screen will look like this (see next page).

9
Click on the icon that looks like a bar graph (we will use the one on the bottom left hand side of the
screen shown above) for the un-‐review transaction want to code.

10
You will be brought to the screen below
Enter a brief description of the items purchased, click on save, and then click on the tab that says split
detail and you will be brought to the next screen.

11
If you wish to split the charge between three organizations, enter 3 in the box that says split and click on add. The system will bring up three lines with the charge split equally between the three lines.

12
Click save and the system will bring you to a screen that will enable you to code the three charges. You will also be able to change the amounts if the splits are not to be spread equally across the three
organizations.

13
On the following screen you will be need to click on expand all.

14
The screen will appears as follows
On this screen you will need to click on edit accounting codes and the screen will appear as follows.

15
Select the organization and account to charge, then click save. Repeat the process for the other two charges. Once you have reviewed the distribution of the charges, click on reviewed, and then click on
save. Once this is done, you can code another charge or logout of the system.

16
How to approve charges
All card holders may mark their charges as reviewed, however only those cardholders with signing authority, or supervisors of cardholders who do not have signing authority, may approve charges for
payment. These users have been established as Level Managers in the Smartdata reporting. It should be noted that any cardholder with signing authority has been established as level manager and will be able to review and approve their charges from the same User ID.
Once a charge has been coded and reviewed, the level manager may sign into the system and approve
the charge for payment.
When logging onto the system, the level manager will see the following screen
First click the financial tab, then click on account summary and you will be brought to the following
screen (see next page)
17
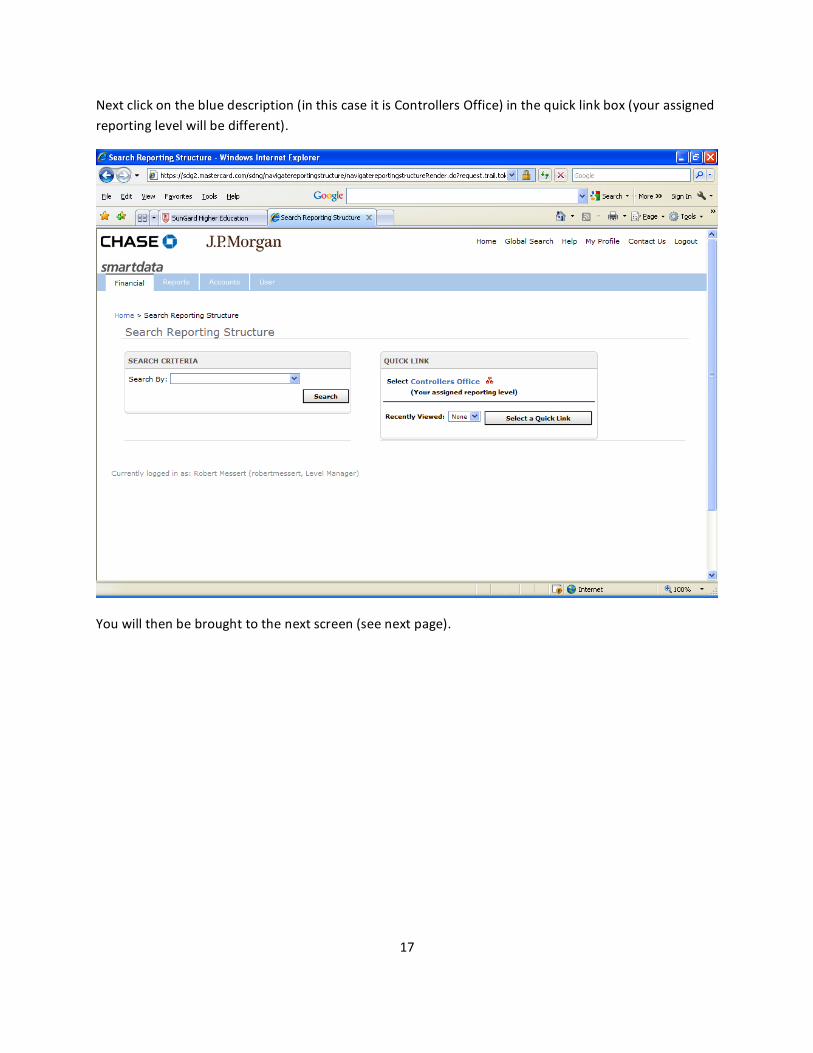
Next click on the blue description (in this case it is Controllers Office) in the quick link box (your assigned reporting level will be different).
You will then be brought to the next screen (see next page).

18
Set the “From” and “to” dates for the period you wish to view and approve. Then click on Search.
You will be brought to the next screen (see next page).

19
This screen contains a list of accounts that can be approved by the level manager (in this case, only one account has activity). Click on the account number (shaded in blue) to go to the screen containing the
charges for this time period.
(See next page)
20
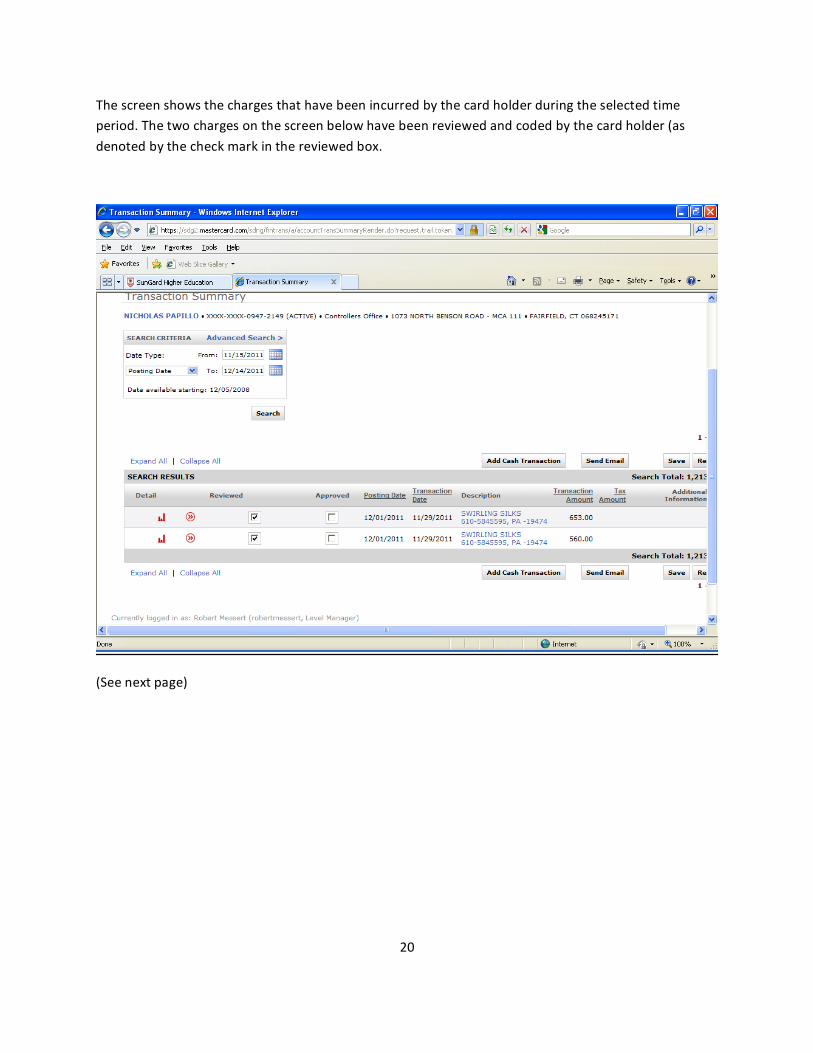
The screen shows the charges that have been incurred by the card holder during the selected time period. The two charges on the screen below have been reviewed and coded by the card holder (as
denoted by the check mark in the reviewed box.
(See next page)

21
When reviewing a charge for approval, the level manager should look at the details of the charge.
For regular transactions, this is done by clicking on the circle with two arrows ( ). The screen will
change to show the detail shown below. The card holder is required to provide a brief description of what was purchased and enter the organization and account to be charged for the purchase. If the level manager is satisfied with data provided, he/she may approve the charge by click on the approved box.
The level manager will then need to click on save to complete the approval process.
(See next page)

22
In the instance when there is a split transaction, an icon appears. To review this type of charge, you
will need to click on the icon, which will be bring you to a new screen (see next page)

23
At this point the level manager can either review the charges individually by clicking on the icon or
he/she can click on Expand All.
When Expand All is clicked, the screen will change to show the accounting detail of for all the charges. (See the next page)

24
Once the data has been reviewed, the level manager may approve the charge by returning to the transaction summary level. This is done by clicking on transaction summary in the following path (appears near the top of the screen):
Home > Search Reporting Structure > Account Summary > Transaction Summary > Split Transaction
This will take you back to the following screen (see next page).

25
From this screen you will simply need to click on the approved box (next to the charge) to approve it and then click on save to complete the process.

26
How to run reports
• Account statement (Ver2) – go to Account Activity, then click on Schedule Report. You will be brought the screen below
Click on Account Statement (Version 2) and the system will bring you to the next screen

27
You may delete the email address in the “Notify Me At” box if you wish, but no additional change needs
to be made on this screen. Simply click on next and you will see the next screen

28
You should select the “From” and “To” dates for the statement you are running. Your statement will usually end on the 14th of the month, so the “From Date” should be XX/15/2011 and the “To Date”
should be XX/14/2011
Click Save, You will be able to access the report from the home page when it completes processing.

29
The report can be accessed by click on the report name in your inbox and will be downloaded from the internet.

30
• Account Code Detail Report – go to Account Activity and then click on Schedule Report. You will be brought the screen below
Click on Accounting Code Detail and you will be brought to the next screen

31
Leave settings as shown above and click on next. You will be brought to the next screen.

32
No changes are needed on the screen. Click next and you will be brought to the next screen.

33
Click on the box next to Additional Options so the report will include splits
Then click next.

34
Schedule for reporting data:
• Cardholder/Reviewer (Account level) – are required to review and code their charges on a weekly basis. An Email will be sent on Sunday evening to inform the card holder of any charge
that is older than seven days and that has not been coded and reviewed by the cardholder. You are required to review and code that charge by Tuesday afternoon. If you are current, no email will be sent
• Approvers (Level Managers) – are required to review and approve (if charges are valid and properly coded) charges on a weekly basis (the previous week of charges should be approved by Tuesday afternoon of the current week).
• Program Administrator – Each Wednesday, the program administrator will export all reviewed and approved charges (not previously exported) and provide a journal entry to accounting for posting in Banner.
Submission of receipts:
On the 17th of each month (after the end of the statement period), cardholders are required to generate the following reports:
• Account statement (Ver2) – Directions on running this report are listed above • Account Code Detail Report – Directions on running this report are listed above
The reporting period will normally run from the 15th of the month to the 14th of the next month. The
program administrator will notify all cardholders of any changes made to the period end date by Chase.
Both reports should be run for the same time period and the balances should agree. If the balances do not agree, it is likely that you need to code and review any charges that appear on your Account Statement report, but not on your Account Code Detail Report.
Once the reports agree, attached the corresponding receipts for the charges incurred during the period
and forward the complete package to the purchase card program administrator at MCA316.

35
Status of Charges in SmartData
The following screen show examples of all the possible statuses for a purchase card charge:
The first charge -‐ Towel Trading Group in the amount of $801.27 has been coded, reviewed, approved
and downloaded for posting to Banner. The icon denotes that fact that charge has been exported for posting. If you discover that this charge is improperly coded, you must submit a charge revision to
accounting to move the expense to the organization and account that needs to be charged.
The second charge – Swirling Silks in the amount of $653.00 has been coded, reviewed and approved. This charge will be exported by the program administrator on Wednesday following the day the charge is approved. Until the charge is exported, the level manager/approver may charge the coding of the
charge.
The third charge – Swirling Silks in the amount of $560.00 has been coded and reviewed by the cardholder and needs to be approved by the level manager/approver (cardholders with signing authority are also set up as approvers).
The fourth charge – Swirling Silks in the amount of $152.95 has been coded and reviewed by the
cardholder.