usa reports outlines memos letters tables - centralia high school
TRANSCRIPT

i
Reports
Outlines
Memo
s
Letters
Tables
USA

ii
Table of Contents
Introduction .................................................................................................................................................... 1
Correspondence
Standard Memo Instructions ...............................................................................................................2
Standard Memo Sample .........................................................................................................................3
Personal Business Letter Instructions ...............................................................................................4
Personal Business Letter Sample .........................................................................................................5
Business Letter Instructions................................................................................................................6
Business Letter Sample .........................................................................................................................7
Manuscripts
Theme Instructions ................................................................................................................................8
Theme Sample ........................................................................................................................................ 10
Research Papers
Introduction .................................................................................................................................... 12
Parenthetical Citation Instructions ........................................................................................... 12
Long Quotation Instructions ....................................................................................................... 13
Works Cited Instructions ............................................................................................................ 13
Works Cited Sample Citation Formats ...................................................................................... 14
Works Cited Electronic Citation Formats ................................................................................ 15
Format Instructions ...................................................................................................................... 16
Research Paper (Without Title Page) Sample .......................................................................... 18
Works Cited Page Sample ............................................................................................................ 20
Title Page Formatting .................................................................................................................... 21
Title Page Sample .......................................................................................................................... 22
Research Paper Page One (When Title Page Used) Sample ................................................. 23
Outlines
Topic Outline Instructions ................................................................................................................. 24
Topic Outline Sample ........................................................................................................................... 25
Science Lab Reports
Lab Report Instructions ..................................................................................................................... 26
Lab Report Sample ............................................................................................................................... 27
Tables
Table Instructions ............................................................................................................................... 28
Table Sample ......................................................................................................................................... 30
1
Introduction
Intent of Manual
The purpose of the Centralia High School Style Manual is to provide standardized school-wide document
formatting instructions. By utilizing these standardized document formats, students will be better able to
produce quality work in a shorter amount of time. Teachers will be able to focus instruction upon their
curriculum content rather than upon the mechanics of formatting the document. All CHS teachers and
students should follow this manual for all written work.
Formatting Style
The formatting style and sample documents included in this manual are from the following sources: Century
21 Keyboarding & Information Processing by Jerry W. Robinson, et. al., South-Western Publishing Co., 1997;
MLA Handbook of Writers of Research Papers Eighth Edition, by Joseph Gibaldi, The Modern Language
Association of America, 2003; and The Research Paper by Sharon Sorenson, Amsco School Publications,
1994. Sample documents are from these texts also. Information on MLA formatting is taken from these
web sites:
www.mla.org
http://owl.english.purdue.edu/handouts/research/r_mla.html
The following website has great examples for writing a paper in MLA style
http://webster.commnet.edu/mla/index.shtml
MLA handbooks can be found in the CHS library and any English instructor.
Software
The software instructions included are for Microsoft Word 2003 (Microsoft Word 2000 should be the same
or similar). These instructions direct the user to specific menus and commands rather than toolbar icons or
shortcuts. The menus and commands will appear in italics. Always click OK after selecting the final
command.

2
Correspondence
Standard Memo
A memo (memorandum) is an informal written means
of communication used by individuals within the same
organization. Read the sample memo for additional
formatting instructions.
Create a new word processing document
Set margins
File/Page Setup Margins Tab Section
2" Top
1" Left/Right
1" Bottom
Vertical spacing
Use Word default (preset option) for single spacing
Tab settings
Use Word default (preset option) for tabs
Key the memo
Follow the sample memo document for spacing within the memo
Save document before keying File/Save As Enter filename
Save document every 5" while keying File/Save Spell check Tools/Spelling and Grammar
Proofread carefully
Print document File/Print
Remember
Personal titles are not used in the To: and From: lines
Spell out the month (no abbreviations)
Allow word wrap within each paragraph
O
u
t
l
i
n
e
s
On Your
Mark
2
Get Set
4
Winning
Tips
3
Go

3
TO: Receiver’s Name
FROM: Sender’s Name
DATE: October 3, 2010
SUBJECT: Standard Memo Format
The headings begin at the left margin. Align the data following the TO:, FROM:, DATE:, and SUBJECT:
using the tab key. Leave one blank line between lines in the heading by pressing the enter key twice after
keying the appropriate data after each heading. Press the enter key twice after the SUBJECT line and
begin keying the body of the memo.
At the end of each paragraph in the body of the memo, press the enter key twice. Be sure to allow word
wrap to control line endings within each paragraph. If someone other than the writer keys the memo, that
person’s lowercase initials should be keyed at the left margin one blank line below the last paragraph. If
any attachments are included, key Enclosure at the left margin one blank line below the last line in the
memo.
Study the formatting instructions carefully. Remember to spell check and proofread the document
carefully!
mlw
Enclosure
Tab twice
Press enter key two times
Press enter key two times
Press enter key two times
Press enter key two times
Press enter key two times
Press enter key two times
Press enter key two times
Standard Memo
Font shown in Times New Roman/Size 12
Document shown reduced
Press enter key two times
Tab once
Tab once

4
Correspondence
Personal Business Letter
A personal-business letter is used by an individual to
communicate with family/friends or with
businesses/organizations. Study the sample personal
business letter for formatting instructions.
Create a new word processing document
Set margins
File/Page Setup Margins Tab
2" Top (See note below on use of letterhead)
1" Left/Right
1" Bottom
Vertical spacing
Use Word default (preset option) for single spacing
Key the letter
Follow sample letter document for spacing within the letter
Save document before keying File/Save As Enter filename
Save document every 5" while keying File/Save
Spell check Tools/Spelling and Grammar
Proofread carefully
Print document File/Print
Remember
If you print on personal letterhead, omit the Return
Address and leave at least one blank line between the
letterhead and the date
State abbreviations: Use 2 capital letters with no
space between them and no ending period
Salutation: Use first name for friends and family
Use title plus last name for business letters
Date: Spell out the month (no abbreviations)
Space between closing & writer's name is for written signature
1
On Your
Mark
3
Go
2
Get Set
4
Winning
Tips

5
1000 East Third Street
Centralia, IL 62801
October 3, 2010
Mr. Thomas L. Carter
7247 West Jefferson Street
Omaha, NE 68114
Dear Thomas
Your telephone call Wednesday was a really pleasant surprise. Life for both of us since college has
been exciting as well as challenging, it seems. I enjoyed your call.
You asked me for a sample of a personal-business letter to use as a guide; here it is! This is block style
(all lines start at the left margin) with open punctuation (no punctuation after the salutation and closing).
If you are printing on plain paper, don’t forget to include your two-line address before the date. If you
use personal letterhead, begin keying with the date. You press the enter key after keying each line
except in the body. Allow word wrap as you key the paragraphs in the body of the letter. Spell check
and proofread your letter very carefully.
I am looking forward to seeing you over the Thanksgiving holiday!
Sincerely
Andrea Riley
Personal Business Letter
Font shown in Times New Roman/Size 12
Document Shown Reduced
Press enter key 2 times
Press enter key 2 times
Press enter key 2 times
Press enter key 2 times
Press enter key 2 times
Press enter key 2 times
Press enter key 4 times
Alternative Punctuation Style
Mixed Punctuation places a
colon after salutation and
comma after the closing
Dear Thomas:
Sincerely,
Press enter key 4 times
Return
Address
Date
Letter
Address
Salutation
Body
Closing
Writer’s
Name
Andrea Riley

6
Correspondence
Business Letter
A business letter is used by a business/organization to
communicate with people outside its company. Business
letters will be printed on letterhead stationery so the
two-line return address is not needed. The remainder of
the letter resembles the personal-business letter. If
the sender did not key the letter, initials of the person
who keyed the letter (reference initials) are placed at
the left margin after the keyed name of the sender.
Create a new word processing document
Set margins
File/Page Setup Margins Tab Section
2" Top (See note below on use of letterhead)
1" Left/Right
1" Bottom
Vertical spacing
Use Word default (preset option) for single spacing
Key the letter
Follow the sample letter document for spacing within the letter
Save document before keying File/Save As Enter filename
Save document every 5" while keying File/Save Spell check Tools/Spelling and Grammar
Proofread carefully
Print document File/Print
Remember
If you create the letterhead, use .5” top margin; leave at
least one blank line between the letterhead and the date
State abbreviations: Use 2 capital letters with no space
between them and no ending period
Salutation: Use title plus last name
Date: Spell out the month (No abbreviations)
3
Go
1
On Your
Mark
2
Get Set
4
Winning
Tips

7
OFFICE CONSULTANTS, INC. 7245 INDUSTRIAL PLAZA ST. LOUIS, MO 60611
314.543.1234
October 3, 2010
Mrs. Nelda Byers
Central High School
65 Union Avenue
Omaha, NE 68114
Dear Mrs. Byers
Your question about the effect of word processing equipment on the need for keying accuracy is a
good one.
Accuracy of documents processed is just as important now as ever before. The ease with which
keying errors can now be corrected, however, has shifted the emphasis from number of input errors
made to skill in finding and correcting these errors.
A major weakness of those who take employment tests is their inability to detect and correct the errors
they make. Therefore, we suggest that employee training should emphasize proofreading and error
correction rather than error-free input.
Sincerely
Leslie Bancroft, President
mlw
Business Letter
Font shown in Times New Roman/Size 12
Document Shown Reduced
Press enter key 2 times
Press enter key 2 times
Press enter key 2 times
Press enter key 2 times
Press enter key 4 times
Press enter key 2 times
Press enter key 2 times
Leslie Bancroft
Press enter key 4 times
Alternative Punctuation Style
Mixed Punctuation places a
colon after salutation and
comma after the closing
Dear Mrs. Byers:
Sincerely,
Date
Letter
Address
Salutation
Body
Closing
Writer’s
Name
Reference
Initials

8
Themes
Themes assigned in various classes should be formatted in the MLA
(Modern Language Association) style. If research is conducted and
cited, use the research paper style contained in this manual. See the
sample research report for a description of distinctive features of an
MLA report (pages 18-19).
Spacing After Punctuation
CHS will use two spaces after all punctuation ending a sentence to
improve readability. MLA style will allow either one or two spaces at
the end of a sentence as long as there is consistency. To facilitate
keying citations in a Works Cited page, space one time after any
punctuation mark.
Italics or Underlining
Because the type style of every letter and punctuation
mark must be easily recognizable, italic type is sometimes not
distinctive enough. In printed material submitted for grading and
editing, therefore, words that would be italicized in a publication are
usually underlined to avoid ambiguity. Check with your instructor on
how to represent italicization.
Create a new word processing document
Set margins (MLA uses 1" for all margins)
File/Page Setup Margins Tab Section
1" top, bottom, left, right (Use default .5 for header margin)
Set vertical spacing (Entire report is double spaced)
Format/Paragraph Indents & Spacing Tab Section
Spacing Section Line Spacing/Double
Set page numbering (Top right corner Last Name #)
View/Header and Footer
(A dotted-line box labeled Header will appear)
Format/Paragraph Indents and Spacing Tab Section
Alignment Section In drop down menu select Right Some teachers prefer that no number page number appear on the first page in the running head.
Follow your teacher’s preference. View/Header and Footer/Lay Out Tab/ √ Different First Page Insert the page number
Inside dotted-line box, key your last name then press the spacebar one time
Click the # icon in the header and footer toolbar to insert page number
Click Close button in the header and footer toolbar
(Displaying page number on page one is default setting)
Set font & size
Format/Font Times New Roman Regular 12
Paragraph tabs
Press the tab key to indent paragraph; use Word tab default (preset option)
1
On Your
Mark
2
Get Set

9
Key the theme
Allow word wrap when keying paragraphs
Save document before keying File/Save As Enter filename
Save document every 5" while keying File/Save Spell check Tools/Spelling and Grammar
Proofread carefully
Print document File/Print
Remember these special Word features
Control orphan/widow lines (a single line of a paragraph
by itself at the bottom or top a page)
Format/Paragraph Line and Page Breaks Tab Section
Pagination Section Widow/Orphan Control
Use thesaurus to use just the right word
Select word
Tools/Language/Thesaurus
Check the length of the theme
Edit/Select All Tools/Word Count
4
Winning
Tips
3
Go

10
Colin Barker
Mrs. Sue Shepard
English III
17 October 2010
Homeland Book Review
Homeland, John Jake's formidable novel about the final explosive events of the nineteenth
century, is the first in a series that will focus attention on a new "Jakes" family, the Crowns.
Multiple characters and settings are the norm for Jakes; however, this story rivets primary
attention on Paul Crown, a young German immigrant. Paul leaves behind a Germany of cholera,
poverty, and political upheaval only to face problems of equal magnitude in America.
Undaunted by a difficult ocean crossing, Paul arrives at Ellis Island penniless but naively
optimistic about his future. He makes his weary way to the opulent home of his uncle, Joe Crown,
a well-established brewer in Chicago. Jakes uses the Chicago setting as a backdrop for his "class
struggle" motif which is central to the plot of his story.
Paul's uncle, Joe, and cousin, Joe Jr., are foils in this class struggle that ultimately fractures
the Crown family and forces Paul to leave his uncle's home to find work on his own. The
behavior and work ethic of Joe Jr., who is born to wealth and privilege in America, is juxtaposed
with that of immigrant Paul. Jakes portrays Joe Jr. as spoiled and without focus, especially when
compared to Paul's mature approach to life and work.
Jakes utilizes the character of Paul to introduce the reader to the fledgling business of
moving pictures. Paul is fascinated with this new "art form" which involves him in many
adventures including war, a brush with death, and marrying his first love.
Barker 1
Press enter key 1 time
Press enter key 1 time
Press enter key 1 time
Press enter key 1 time
Press enter
key 1 time
Press enter
key 1 time
Press enter
key 1 time
Press enter
key 1 time
Press enter
key 1 time
Press enter
key 1 time
Theme
Font shown in Times New Roman/Size 12
Document Shown Reduced
Remember line spacing should be
set on double before keying!

11
This first novel of the Crown series does a creditable job in setting the stage for future
adventures of Paul Crown and his budding new family.
Barker 2
Theme
Font shown in Times New Roman/Size 12
Document Shown Reduced

12
Research Papers
Often formatting your report is almost as challenging as writing the
report. To simplify this process, Centralia High School will use the
MLA (Modern Language Association) style for reports and research
papers. This style is widely used for scholarly manuscripts and
student research papers. Distinctive features of the MLA style are
described in the sample report (pages 18-19). Read this report before
you begin keying your paper.
Spacing After Punctuation
CHS will use two spaces after all punctuation ending a sentence to
improve readability. MLA style will allow either one or two spaces at
the end of a sentence as long as there is consistency. To facilitate
keying citations in a Works Cited page, space one time after any
punctuation mark.
Italics or Underlining
Because the type style of every letter and punctuation mark must be
easily recognizable, italic type is sometimes not distinctive enough. In
printed material submitted for grading and editing, therefore, words
that would be italicized in a publication are usually underlined to avoid
ambiguity. Consult your instructor for their preference.
Distinctive MLA Features
Parenthetical Citation
Parenthetical citation is used to credit the use of another's
exact words or ideas. The source is placed inside parentheses one
space after a phrase or a quote. The specific content for this type
of notation depends upon the wording in the report. See the sample
research report for examples of parenthetical notation (pages 18-19).
Examples :
Key only the page number in parentheses if the author's name is used
in the sentence or quote (54).
Key both author's name and page number in parentheses if the author's
name is not used in the sentence or quote (Jones 54).
Key author's name, text, and page number if more than one work by the
author is used. Separate the name from the title with a comma (Jones, The Last
Dinosaur on Earth 54).
1
On Your
Mark
1
On Your
Mark

13
Long Quotations (more than 4 lines)
A quotation of more than four lines will be keyed without the use of
quotation marks. It will start on a new line and will be indented one
inch from the report's left margin. If this quotation contains multiple
paragraphs, each one begins on a new line and is indented an additional
half inch (a total of 1½ inches from the report's left margin). At the
conclusion of the quotation, a new line begins at the report's left margin
of one inch. See the sample research report for an example of a long
quotation (page 19).
Instructions:
Press enter key once to create a new line for the quote
To set one-inch indent for a long quotation
Format/Paragraph Indents and Spacing Tab Section
Indentation Section Left Key 1
Key the quote
If it is more than one paragraph, press the tab key
to indent the first line of each paragraph an additional
one-half inch
Press enter key once after keying the last line of the quote
To remove the one-inch indent to return to report text
Format/Paragraph Indents and Spacing Tab Section Indentation Section Left Key 0
Works Cited
Any references used in writing the research paper are listed on the
Works Cited page. These appear on a separate page following the body
of the research paper. The entries for references used in the paper
are arranged in alphabetical order using a hanging indent format. See
sample citations on pages 14-15 and in the sample research paper (page 20).
Books and magazines should be underlined. Titles of articles are enclosed
in quotation marks. Within each entry, space only one time after any
punctuation mark. The entry ends with a period.
Instructions
A page break allows you to force the beginning of a new page.
Press enter key after you key the last line of your report Insert/Break/Page Break
Use a hanging indent for source entries
Format/Paragraph Indents and Spacing Tab Section
Indentation Section Special Option
From drop down menu select Hanging then key .5
1
On Your
Mark
14
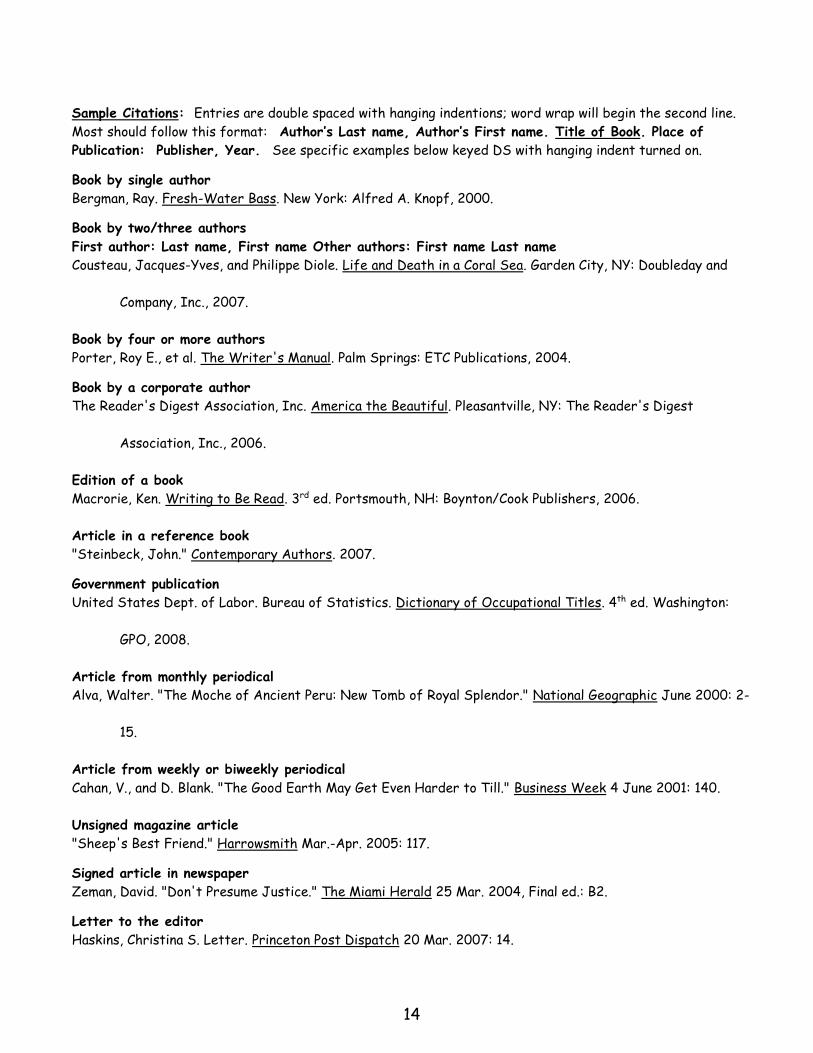
Sample Citations: Entries are double spaced with hanging indentions; word wrap will begin the second line.
Most should follow this format: Author’s Last name, Author’s First name. Title of Book. Place of
Publication: Publisher, Year. See specific examples below keyed DS with hanging indent turned on.
Book by single author
Bergman, Ray. Fresh-Water Bass. New York: Alfred A. Knopf, 2000.
Book by two/three authors
First author: Last name, First name Other authors: First name Last name
Cousteau, Jacques-Yves, and Philippe Diole. Life and Death in a Coral Sea. Garden City, NY: Doubleday and
Company, Inc., 2007.
Book by four or more authors
Porter, Roy E., et al. The Writer's Manual. Palm Springs: ETC Publications, 2004.
Book by a corporate author
The Reader's Digest Association, Inc. America the Beautiful. Pleasantville, NY: The Reader's Digest
Association, Inc., 2006.
Edition of a book
Macrorie, Ken. Writing to Be Read. 3rd ed. Portsmouth, NH: Boynton/Cook Publishers, 2006.
Article in a reference book
"Steinbeck, John." Contemporary Authors. 2007.
Government publication
United States Dept. of Labor. Bureau of Statistics. Dictionary of Occupational Titles. 4th ed. Washington:
GPO, 2008.
Article from monthly periodical
Alva, Walter. "The Moche of Ancient Peru: New Tomb of Royal Splendor." National Geographic June 2000: 2-
15.
Article from weekly or biweekly periodical
Cahan, V., and D. Blank. "The Good Earth May Get Even Harder to Till." Business Week 4 June 2001: 140.
Unsigned magazine article
"Sheep's Best Friend." Harrowsmith Mar.-Apr. 2005: 117.
Signed article in newspaper
Zeman, David. "Don't Presume Justice." The Miami Herald 25 Mar. 2004, Final ed.: B2.
Letter to the editor
Haskins, Christina S. Letter. Princeton Post Dispatch 20 Mar. 2007: 14.

15
Pamphlet
Wetlands: Indiana's Endangered Natural Resource. Indianapolis, IN: Indiana Department of Natural
Resources, 2008.
Letter
Stallings, Karen. Letter to the author. 4 July 2003.
Interview
Muldoon, Bridgette. Personal interview. 27 Sept. 2008.
Lecture, speech, or address
Gillespie, Marcia Ann. Address. Opening General Sess. NCTE Spring Conference. Indianapolis, 15 Mar. 2008.
Electronic sources
Electronic source citation formatting is based upon MLA style. See the official MLA Handbook for more info
or check the following websites:
http://webster.commnet.edu/mla/index.shtml
http://owl.english.purdue.edu/handouts/research/r_mla.html
www.mla.org Frequently Asked Questions
MLA normally requires at least 2 dates to be fully identified.
Date of posting of electronic publication
Date of access—if accessed more than once give the last date of access.
Display in this style: 15 Oct. 2010
Date of print publication if provided
MLA requires the use of angled brackets around the electronic address (URL). To display the angled
brackets < and > (shift of , and .) you must turn off the default setting in Word that creates hyperlinks:
Tools/AutoCorrect/AutoFormat Tab/Replace Section
Remove from option Internet and Network Paths with hyperlinks
Sample Electronic Citations: Entries are double spaced with hanging indentions; word wrap will begin the
second line. Most should follow this format:
Author (last name first). “Title of Article. (if any)” Title of Site Date of Electronic Publication or Update.
Name of Institution that sponsors site. Date of Access <URL>.
See specific examples below keyed DS with hanging indent turned on.
Web page format
Author (last name first if given). Name of Page. Date of Posting/Revision. Date of Access <URL>.
The Purdue OWL. 26 Aug. 2008. The Writing Lab and OWL at Purdue and Purdue University. 23 April 2008
<http://owl.english.purdue.edu>.

16
Article in online journal or magazine
Author (last name first). “Title of Article.” Title of Journal Volume. Issue (Year): Pages/Paragraphs. Date of
Access <URL>.
Fitter, Chris. "The Poetic Nocturne: From Ancient Motif to Renaissance Genre." Early Modern Literary
Studies 3.1 (Sept. 1997): 60 pars. 4 Mar. 2004
<www.humanities.ualberta.ca/emls/03-2/fittnoct.html>.
Article in a Discussion Group or BLOG
Norton, J.R.. "Torture at Abu Ghraib: A Timeline." The O'Franken Factor (June 2004): 34 pars. 24 May
2004 <http://www.airamericaradio.com/bin/blogExcerpts.cfm?blogId=1&prg=3>.
Author (last name first). “Title of Message (if any)” E-mail to Author. Date of Message.
Listserv posting
Author (last name first if given). “Title of Posting.” Online Posting. Date of Posting. Name of listserv. Date of
Access <URL>.
Electronic database
Author (last name first). “Title of Article. (if any)” Title of Site Date of Electronic Publication or Update.
Name of Institution that sponsors site. Date of Access <URL>.
Create a new word processing document
Set margins (MLA uses 1" for all margins)
File/Page Setup Margins Tab Section
1" top, bottom, left, right
Set Vertical Spacing (Entire report is double spaced)
Format/Paragraph Indents & Spacing Tab Section Spacing Section Line Spacing/Double
Set Page Numbering (MLA displays the page number in the top
right corner of every page preceded by the writer's last name)
View/Header and Footer (Dotted line Header box will appear) Format/Paragraph Indents and Spacing Tab Section
Alignment Section In drop down menu select Right While in the dotted line box, key your last name then press
the spacebar one time
2
Get Set

17
To insert the page number: Click the # icon in the header
and footer toolbar
Click Close button in the header and footer toolbar
Word by default setting will display the page number on page one
Set Font & Size
Format/Font Times New Roman Regular 12
Paragraph Tabs
Use Word default tab setting; press the tab key to indent paragraphs
Key the report
Allow word wrap when keying paragraphs and entries in Works Cited
Save document before keying File/Save As Enter filename
Save document every 5" while keying File/Save
Spell check Tools/Spelling and Grammar
Proofread carefully
Print document File/Print
Review distinctive feature notes
Remember
Control orphan/widow lines (a single line of a paragraph by
itself at the bottom or top a page)
Format/Paragraph Line and Page Breaks Tab Section
Pagination Section Widow/Orphan Control
Use thesaurus to use just the right word
Select word
Tools/Language/Thesaurus
Check the length of the research paper
Edit/Select All Tools/Word Count
Space one time after any punctuation that separates
data in the Works Cited entries
Proofread the entire paper carefully paying particular
attention to the Works Cited page
Don't forget the period at the end of each Works Cited entry
Make a back-up copy of your report on a different disk
SAVE! SAVE! SAVE!
4
Winning
Tips
3
Go

18
Research Report Without Title Page
Student Name
Instructor Name
Name of Class
17 October 2010
Standard Format for an MLA-Style Research Report
A contemporary method of documentation is appropriate for reports that contain information
from only a few sources (Harcourt 448). Place the parenthetical notation at the end of a sentence, at the
end of a clause, or at the end of a phrase. One space after the text cited, enclose in parentheses the last
name of the source and the page number. If there are two authors, key both names; if there is no author,
use a shortened version of the title. If you are citing more than one work by any author, key the author's
last name, title of the work, and the page number. Separate the name and title of the work with a
comma.
The MLA-style (Modern Language Association of America) report that is illustrated here is a
popular style that can be used. There are several key differences between this style and other formats. An
MLA-style report has one-inch side, top, and bottom margins. The entire report is double-spaced,
including quotations, documentation, and the space below the title.
A title page is optional. Information normally found on the title page (writer's name, teacher's
name, course title, and date) is keyed on the first page beginning one inch from the top margin starting at
the left margin.
MLA Formatted Report
Font shown in Times New Roman/Size 12
Document Shown Reduced
Student Last Name 1
Press enter key 1 time
Press enter key 1 time
Press enter key 1 time
Press enter key 1 time
Press enter key 1 time
Press enter
key 1 time
Press enter
key 1 time
Remember line spacing should be
set on double before keying!
Press enter
key 1 time

19
Page numbers for all pages (including the first) are keyed at the right margin one-half inch from
the top edge of the paper. The writer's last name precedes the page number.
Another difference is the way that long quotations are keyed in the MLA style. In the MLA
Handout for Writers of Research Papers, Gibaldi provides these guides for keying long quotations:
If a quotation runs four or more typed lines, set it off by beginning a new line indented
one inch from the left margin; key it (still using double-spacing) without adding
quotation marks. A colon may introduce a quotation displayed in this way, though
sometimes the context may require a different mark of punctuation, or none at all. If you
quote only a single paragraph, do not indent the first line more than the rest. If your quote
is more than one paragraph in length, indent line one (only) of each paragraph an
additional half inch. A parenthetical reference to the long quotation follows the last word
of the quotation (73).
Continue to double-space the text following the quotation, indenting only the first line of each
paragraph one-half inch (five spaces). An example of the "Works Cited" page is illustrated on page 3.
Notice that it is also double-spaced and that entries are arranged in alphabetical order with the second and
succeeding lines of each entry indented one-half inch.
MLA Formatted Report
Font shown in Times New Roman/Size 12
Document Shown Reduced
Force new page for Works Cited
Student Last Name 2
Press enter to start a new line then
remove the 1" Paragraph Indention
Press enter to start a new
line then set the 1"
Paragraph Indention
Press enter
key 1 time

20
Works Cited
Gibaldi, Joseph. MLA Handbook for Writers of Research Papers. 6th ed. New York: The Modern
Language Association of America, 2008.
Harcourt, Jules, A. C. Krizan, and Patricia Merrier. Business Communication. 3d ed. Cincinnati: South-
Western Educational Publishing, 2006.
MLA Formatted Report
Font shown in Times New Roman/Size 12
Document Shown Reduced
Student Last Name 3
Set hanging indent
Press enter
key 1 time
Press enter
key 1 time
Press enter
key 1 time
Allow word wrap when keying
source entries

21
Title Page
A MLA research paper does not need a title page. If your teacher
requires a title page, format it according to the instructions you are
given. Ususally you will omit the author, course, teacher, and date
from page one of the paper when a title page is used.
Page one will contain the running head with author's last name page
number and the title of the paper. See the sample title page and
sample page one of the paper on pages 22 and 23.
Create a new word processing document
Set margins
File/Page Setup Margins Tab Section
2" top, bottom, left, right
Set vertical spacing (Entire title page double-spaced)
Format/Paragraph Indents & Spacing Tab Section Spacing Section Line Spacing/Double
Set alignment on center
Format/Paragraph Indents and Spacing Tab Section Alignment Section In the drop down menu select Centered
Key the title page
See the sample title page for vertical spacing
Key the title in initial uppercase letters
(No underscore, quotation marks, or periods)
Key the word by in lowercase
Key your name in initial uppercase
Key the following information on 3 separate lines:
Course title and/or number
Teacher's name
Date in day/month/year order (month spelled out)
Save document File/Save As Enter filename
Spell check Tools/Spelling and Grammar
Proofread carefully
Print document File/Print
Remember
Don’t forget to remove the four paper identification
lines from page one Proofread title page carefully; it creates a first impression
1
On Your
Mark
2
Get Set
3
Go
W
i
n
n
Winning
Tips
4

22
Optional Title Page
Standard Format for an MLA Style
Research Report
by
Student Name
Course Name
Instructor Name
17 October 2010
Press enter key once
Press enter key once
Press enter key once
Press enter key once
Press enter key 3 times
Press enter key 3 times
Title page
Font shown in Times New Roman/Size 12
Document Shown Reduced
Text appears off center because of
vertical spacing instructions

23
Page One of Research Paper with Title Page
Standard Format for an MLA-Style Research Report
A contemporary method of documentation is appropriate for reports that contain information
from only a few sources (Harcourt 448). Place the parenthetical notation at the end of a sentence, at the
end of a clause, or at the end of a phrase. One space after the text cited, enclose in parentheses the last
name of the source and the page number. If there are two authors, key both names; if there is no author,
use a shortened version of the title. If you are citing more than one work by any author, key the author's
last name, title of the work, and the page number. Separate the name and title of the work with a
comma.
The MLA-style (Modern Language Association of America) report that is illustrated here is a
method that can be used. There are several key differences between this style and other formats. An
MLA-style report has one-inch side, top, and bottom margins. The entire report is double-spaced,
including quotations, documentation, and the space below the title.
A title page is optional. Information normally found on the title page (writer's name, teacher's
name, course title, and date) is keyed on the first page beginning one inch from the top margin starting at
the left margin.
Page numbers for all pages (including the first) are keyed at the right margin one-half inch from
the top edge of the paper. The writer's last name precedes the page number.
Student Last Name 1
Press enter
key 1 time
Press enter
key 1 time
Page One of Report Using Title Page
Font shown in Times New Roman/Size 12
Document Shown Reduced
Press enter
key 1 time
Press enter
key 1 time

24
Outlines
An outline organizes the writer's material; it shows the order in which
topics will be presented and the relationships among the information.
Topic outlines are more popular, but sentence outlines are sometimes
used. In a topic outline, use words, phrases, or clauses; in a sentence
outline, use complete sentences. Do not mix the two.
If your teacher requires a title page, format it according to the
instructions you are given. If an outline is required with a research
paper, include a thesis statement before the first point in the outline.
Create a new word processing document
Set margins
File/Page Setup Margins Tab Section
1" top, bottom, left, right
Set tabs
Format/Tabs Key .25 Right Set
Key .5 Left Set
Key .75 Left Set
Key 1 Left Set
Key 1.25 Left Set
Key 1.5 Left Set OK Set vertical spacing to double-spacing
Key the outline
Follow the sample outline document for proper format
Use the tab key to align the points in the outline
Save document before keying File/Save As Enter filename
Save document every 5" while keying File/Save
Spell check Tools/Spelling and Grammar
Proofread carefully
Print document File/Print
Remember
Keep points of similar importance ranked equally
A single subpoint may not stand alone
Points that are equal in importance should be parallel in form
Align points of the same rank (I, II, III, or A, B, C for example)
Remember to use your tab key not the space bar to align points
Do not key periods at the end of the phrase in a topic outline
3
Go
4
Winning
Tips
1
On Your
Mark
2
Get Set

25
Outline
Thesis statement: The final outline used in the MLA research paper should contain a thesis
statement. It should briefly describe the content of the paper.
I. Purpose of outlines
A. Writer's or speaker's plan
B. Order topics will be presented
1. Importance of topics
2. Relationships of topics
II. Types of outlines
A. Topic
B. Sentence
III. Rules for outlining
A. Arrangement
1. Main points
2. Subpoints
B. Points equal in importance
1. Should be parallel
2. Should be indented equally
3. Should be coordinated
C. Cannot use single subpoints
Press enter key 1 time
Press enter key 1 time
Topic Outline
Font shown in Times New Roman/Size 12
Document Shown Reduced

26
Science Department
Lab Report
Read the sample lab report to see what content should
be included in reporting the results of a lab. When
writing the report, no personal references such as "I,
we, my, our, etc." should be used.
Create a new word processing document
Set margins
File/Page Setup Margins Tab Section
1" top, bottom, left, right
Vertical Spacing
Use Word default (preset option) for single spacing
Key the lab report
Key your name and hour in the top right corner
Follow the sample report document for spacing within the lab report
Save document before keying File/Save As Enter filename
Save document every 5" while keying File/Save
Spell check Tools/Spelling and Grammar
Proofread carefully
Print document File/Print
Remember
Space two times after a colon (:)
1
On Your
Mark
2
Get Set
3
Go
4
Winning
Tips

27
Student Name
Class & Hour
TITLE: A short phase telling what is investigated in the experiment
PARTNER: List lab partner(s) here
PURPOSE: There should be at least two purposes stated; the direct purpose of the experiment and the
educational purpose. The educational purpose is the concept the experiment is reinforcing or new
equipment or laboratory techniques that are being used.
EQUIPMENT: List of the equipment and/or apparatus used during the experiment.
PROCEDURE: A step-wise listing of what is done during the experiment. The procedure should be
complete enough that a person with laboratory experience comparable to the student but with no prior
knowledge of the experiment could repeat it from the procedure given. Diagrams and drawings of
assembled apparatus are helpful and recommended when they add to the understanding of the procedure.
OBSERVATIONS: List as needed
DATA: Organize the information collected during the experiment into table form, if possible.
CALCULATIONS: Any calculations necessary to the interpretation of the data. Section is not necessary
if the laboratory is qualitative in nature or calculations are not required to draw a conclusion from the
data.
ERROR: Calculation of percent error and/or discussion of sources of error
CONCLUSIONS: The interpretation of the data presented with no personal reference, such as "I, we, my,
our, etc." and in sentence form.
Press enter
key 2 times
Press enter
key 2 times
Press enter
key 2 times
Press enter
key 2 times
Press enter
key 2 times
Press enter
key 2 times
Science Lab Report
Font shown in Times New Roman/Size 12
Document Shown Reduced
Press enter
key 2 times
Press enter
key 2 times
Press enter
key 2 times
Press enter
key 2 times

28
Tables
To make data easier to read and understand, it is often arranged in
rows and columns—a table. Rows are horizontal and columns are
vertical; the intersection of a row and column is called a cell. Data is
keyed into each cell and formatted. The entire table may be centered
horizontally. The borders may be displayed or hidden. Use the table
menu and commands to create a table.
To create a table
Position the cursor on the line where the table should begin
Press enter key twice to leave room for title
Table/Insert/Table Key in the number of columns & rows
To key data
Click mouse pointer in cell and key data
Press Tab key to move to next cell
To delete data highlight data and press Delete Key
To end table
Click on the blank line below table
To enter a title for the table
Click mouse pointer on a line above table
Key and format title
To format data
To align data horizontally in a cell
Click in cell
Format/Paragraph Indents & Spacing Tab Section
Alignment In drop down menu select left or centered or right
To apply character format (such as bold, italics) to data in cell
Highlight data Format/Font Select desired features
To format table
To change width of column
Place mouse pointer on divider line between columns
When you see drag the line left/right
To change height of row
Place mouse pointer on divider line between rows
When you see drag the line up/down
On Your
Mark
1
2
Get Set
3
Go

29
To center entire table horizontally click somewhere within table
Table/Table Properties Table Tab Section
Alignment Select center
To delete:
Table Click within table Table/Delete Table
Row Click in row to be deleted Table/Delete Row
Column Click in column to be deleted Table/Delete Column
To insert:
Row Click in row beside where new row will be
Table/Insert Row above or below Column Click in column beside where new column will be
Table/Insert Column above or below
To hide row/column borders click somewhere within table
Table/Table Properties Table Tab Section
Borders and Shading None Icon
To restore row/column borders click somewhere within table
Table/Table Properties Table Tab Section
Borders and Shading All Icon
Save document before keying File/Save As Enter filename
Save document every 5" while keying File/Save
Spell check Tools/Spelling and Grammar
Proofread carefully
Print document File/Print
Remember
Enter column headings in row 1
Use the Help Menu to use other table commands
3
Go
4
Winning
Tips
30
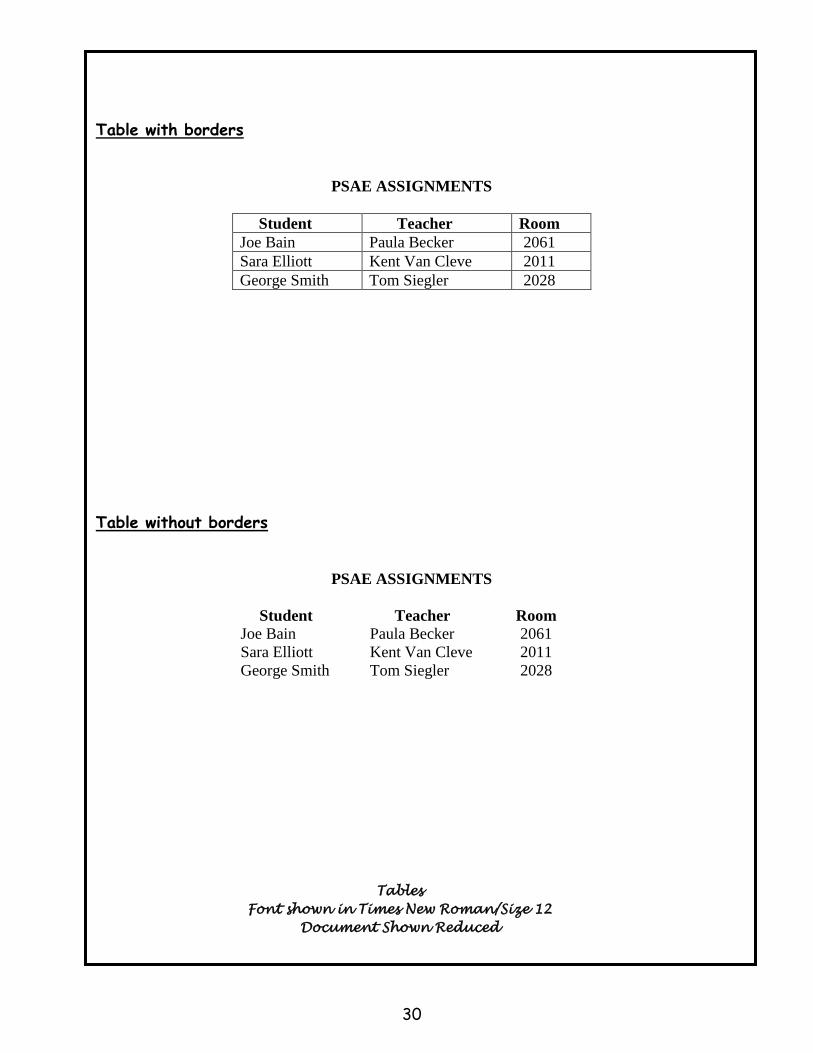
Table with borders
PSAE ASSIGNMENTS
Student Teacher Room
Joe Bain Paula Becker 2061
Sara Elliott Kent Van Cleve 2011
George Smith Tom Siegler 2028
Table without borders
PSAE ASSIGNMENTS
Student Teacher Room
Joe Bain Paula Becker 2061
Sara Elliott Kent Van Cleve 2011
George Smith Tom Siegler 2028
Tables
Font shown in Times New Roman/Size 12
Document Shown Reduced