usa - axis communications - leader in network … · different transport protocols. ... in both...
TRANSCRIPT


Preface
Preface
Thank you for purchasing the AXIS 150/152 Network Print Server. Our goal in developing this product is to enable you to connect your printers anywhere in your network, allowing all network users access to shared printer resources.
About Axis
Axis Communications, is dedicated to providing innovative solutions for the network connection of computer peripherals. Since the start in 1984, it has been one of the fastest growing companies in the market and is now a leader in its field. The headquarters are located in Lund, Sweden, with subsidiaries in Beijing, Boston, Hong Kong, London, Paris, Seoul, Shanghai, Singapore, Taipei and Tokyo.
Axis Communications has a distributor network operating in more than 60 countries world-wide, marketing four major product lines:
Network Print Servers - These intelligent Ethernet and Token Ring print servers support a wide range of LAN protocols. The AXIS 150, 152, 540, 542, 560, 570 and 570 MIO are Ethernet print servers, while the AXIS 640, 642, 660, 670 and 670 MIO are Token Ring print servers. The new AXIS PrintPoint 560/100 and AXIS PrintPoint 1P 560/100 print servers support 10baseT (Ethernet) or 100baseTX (Fast Ethernet) technology.
Network CD-ROM Servers - Multi-protocol CD-ROM servers provide a flexible and cost efficient solution for sharing CD-ROMs across the network. The AXIS StorPoint CD is available as standalone or tower module in both Ethernet and Token Ring versions. The tower module variant is also available in a 100Mbps Fast Ethernet version.
Network Camera Server - The AXIS NetEye 200 Network Camera is a digital camera with built-in Web server that supports TCP/IP, PPP and Internet-related protocols. Connectingdirectly to Ethernet, it produces high quality pictures that can be published around the globe, over Internet and intranet networks.
IBM Mainframe and S/3x - AS/400 Printer Interfaces. These products include a wide range of plug-in interfaces and standalone products such as the AXIS Cobra+, AXIS 330/370 Co-bra, AXIS HP MIO, the AXIS AFP IPDS-to-PostScript converter and the AXIS AFP MIO/IOP IPDS-to-PCL converters.
AXIS 150/152 User’s Manual 1

Preface
About this manual
The AXIS 150 and the AXIS 152 are standalone network print servers, collectively described as AXIS 150/152 throughout this manual. This manual will guide you through simple step-by-step installation and set up procedures.
Introduction - The AXIS 150/152 Print Server, how it works, where to use it, its main features.
Basic Installation - How to connect your AXIS 150/152 to your printers and network.
Setting Up... - Three sections; one for each of the network environments for your AXIS 150/152.
Every care has been taken in the preparation of this manual; if you detect any inaccuracies or omissions, please inform us at the address on the back cover. Axis Communications AB cannot be held responsible for any technical or typographical errors and reserves the right to make changes to the product and manuals without prior notice.
Electromagnetic Compatibility (EMC) notices
USAThis equipment generates, uses, and can radiate radio frequency energy and if not installed and used in accordance with the instruction manual, may cause interference to radio communications. It has been tested and found to comply with the limits for a Class A computing device pursuant to Subpart B of Part 15 of FCC rules, which are designed to provide reasonable protection against such interference when operated in a commercial environment. Operation of this equipment in a residential area is likely to cause interference in which case the user at his own expense will be required to take whatever measures may be required to correct the interference. Shielded cables should be used with this unit to ensure compliance with the Class A limits.
EuropeThis digital equipment fulfils the requirements for radiated emission according to limit B of EN55022/1994, and the requirements for immunity according to EN50082-1/1992 residential, commercial, and light industry. (Compliance is not valid for unshielded network and printer cables.)
Trademark acknowledgements
AIX, Apple, DEC, DOS, Ethernet, EtherTalk, HP, IBM, LAN Manager, LAN Server, Macintosh, Microsoft, MVS, Netscape, Novell NetWare, OS/2, OS/400, PostScript, PS/2, SCO, TokenTalk, UNIX, VM, VMS, VSE, Windows, are registered trademarks of the respective holders.
AXIS 150/152 User’s Manual Revision 2.3
Part No: 15017 Dated: October 1997
Copyright © Axis Communications AB, 1996-97
2 AXIS 150/152 User’s Manual
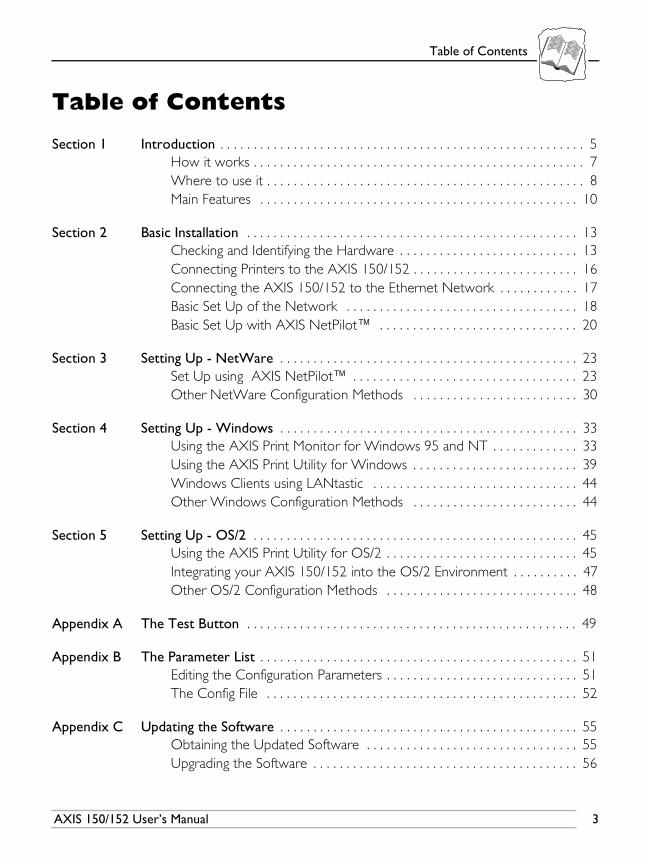
Table of Contents
Table of Contents
Section 1 Introduction . . . . . . . . . . . . . . . . . . . . . . . . . . . . . . . . . . . . . . . . . . . . . . . . . . . . . . . 5How it works . . . . . . . . . . . . . . . . . . . . . . . . . . . . . . . . . . . . . . . . . . . . . . . . . . 7Where to use it . . . . . . . . . . . . . . . . . . . . . . . . . . . . . . . . . . . . . . . . . . . . . . . . 8Main Features . . . . . . . . . . . . . . . . . . . . . . . . . . . . . . . . . . . . . . . . . . . . . . . . 10
Section 2 Basic Installation . . . . . . . . . . . . . . . . . . . . . . . . . . . . . . . . . . . . . . . . . . . . . . . . . . 13Checking and Identifying the Hardware . . . . . . . . . . . . . . . . . . . . . . . . . . . 13Connecting Printers to the AXIS 150/152 . . . . . . . . . . . . . . . . . . . . . . . . . 16Connecting the AXIS 150/152 to the Ethernet Network . . . . . . . . . . . . 17Basic Set Up of the Network . . . . . . . . . . . . . . . . . . . . . . . . . . . . . . . . . . . 18Basic Set Up with AXIS NetPilot™ . . . . . . . . . . . . . . . . . . . . . . . . . . . . . . 20
Section 3 Setting Up - NetWare . . . . . . . . . . . . . . . . . . . . . . . . . . . . . . . . . . . . . . . . . . . . . 23Set Up using AXIS NetPilot™ . . . . . . . . . . . . . . . . . . . . . . . . . . . . . . . . . . 23Other NetWare Configuration Methods . . . . . . . . . . . . . . . . . . . . . . . . . 30
Section 4 Setting Up - Windows . . . . . . . . . . . . . . . . . . . . . . . . . . . . . . . . . . . . . . . . . . . . . 33Using the AXIS Print Monitor for Windows 95 and NT . . . . . . . . . . . . . 33Using the AXIS Print Utility for Windows . . . . . . . . . . . . . . . . . . . . . . . . . 39Windows Clients using LANtastic . . . . . . . . . . . . . . . . . . . . . . . . . . . . . . . 44Other Windows Configuration Methods . . . . . . . . . . . . . . . . . . . . . . . . . 44
Section 5 Setting Up - OS/2 . . . . . . . . . . . . . . . . . . . . . . . . . . . . . . . . . . . . . . . . . . . . . . . . . 45Using the AXIS Print Utility for OS/2 . . . . . . . . . . . . . . . . . . . . . . . . . . . . . 45Integrating your AXIS 150/152 into the OS/2 Environment . . . . . . . . . . 47Other OS/2 Configuration Methods . . . . . . . . . . . . . . . . . . . . . . . . . . . . . 48
Appendix A The Test Button . . . . . . . . . . . . . . . . . . . . . . . . . . . . . . . . . . . . . . . . . . . . . . . . . . 49
Appendix B The Parameter List . . . . . . . . . . . . . . . . . . . . . . . . . . . . . . . . . . . . . . . . . . . . . . . . 51Editing the Configuration Parameters . . . . . . . . . . . . . . . . . . . . . . . . . . . . . 51The Config File . . . . . . . . . . . . . . . . . . . . . . . . . . . . . . . . . . . . . . . . . . . . . . . 52
Appendix C Updating the Software . . . . . . . . . . . . . . . . . . . . . . . . . . . . . . . . . . . . . . . . . . . . . 55Obtaining the Updated Software . . . . . . . . . . . . . . . . . . . . . . . . . . . . . . . . 55Upgrading the Software . . . . . . . . . . . . . . . . . . . . . . . . . . . . . . . . . . . . . . . . 56
AXIS 150/152 User’s Manual 3

Table of Contents
Appendix D Technical Specifications . . . . . . . . . . . . . . . . . . . . . . . . . . . . . . . . . . . . . . . . . . . . 57
Appendix E How To Contact Axis . . . . . . . . . . . . . . . . . . . . . . . . . . . . . . . . . . . . . . . . . . . . . 59
Index . . . . . . . . . . . . . . . . . . . . . . . . . . . . . . . . . . . . . . . . . . . . . . . . . . . . . . . . . . . . 63
4 AXIS 150/152 User’s Manual
Section 1: Introduction
Section 1 Introduction
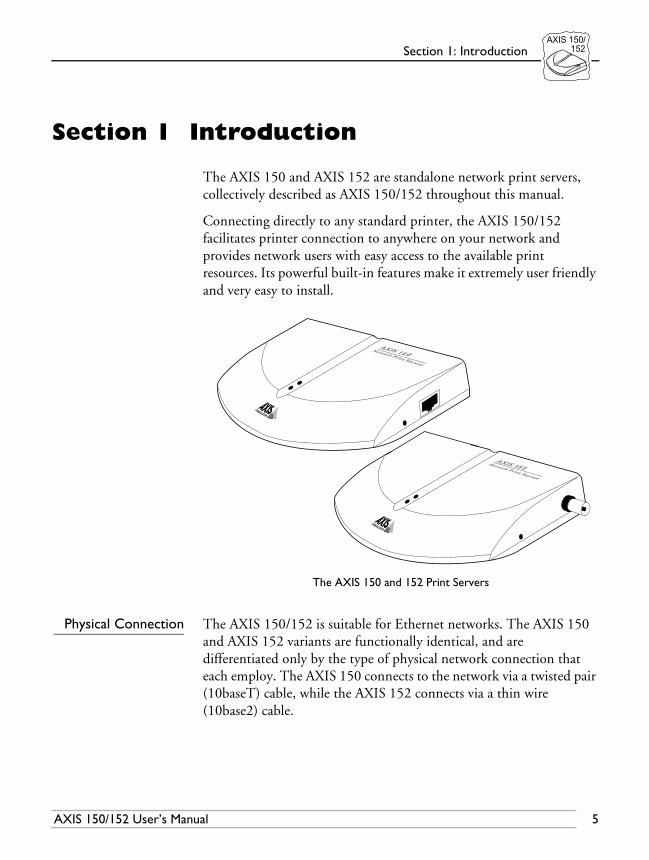
The AXIS 150 and AXIS 152 are standalone network print servers, collectively described as AXIS 150/152 throughout this manual.
Connecting directly to any standard printer, the AXIS 150/152 facilitates printer connection to anywhere on your network and provides network users with easy access to the available print resources. Its powerful built-in features make it extremely user friendly and very easy to install.
The AXIS 150 and 152 Print Servers
Physical Connection The AXIS 150/152 is suitable for Ethernet networks. The AXIS 150 and AXIS 152 variants are functionally identical, and are differentiated only by the type of physical network connection that each employ. The AXIS 150 connects to the network via a twisted pair (10baseT) cable, while the AXIS 152 connects via a thin wire (10base2) cable.
AXIS 150/152 User’s Manual 5

Section 1: Introduction
Environments Using state-of-the-art technology, the AXIS 150/152 offers excellent print flexibility. It supports NetWare including NDS, Windows for Workgroups, Windows 95, Windows NT, LANtastic and OS/2 simultaneously.
Data Communication The AXIS 150/152 is designed for use on 10 Mbps Ethernet networks.
Printer Ports The AXIS 150/152 is provided with two high-speed parallel ports, that can connect to any standard printer. Print data may be directed to any of the two ports simultaneously, which means that you can print to two different printers at the same time, regardless of protocol.
Information For more detailed information that is not included in this manual, you are invited to visit our WWW Home Page, where you can download further technical information. You may also download on-line manuals, tools such as the Acrobat Reader and the latest versions of the software utilities.
Your Axis dealer will also be pleased to provide you with any additional information or assistance that you might require. For details on the appropriate WWW address in your region, please refer to Appendix E - How To Contact Axis.
WorldWideWeb
6 AXIS 150/152 User’s Manual
Section 1: Introduction
How it works
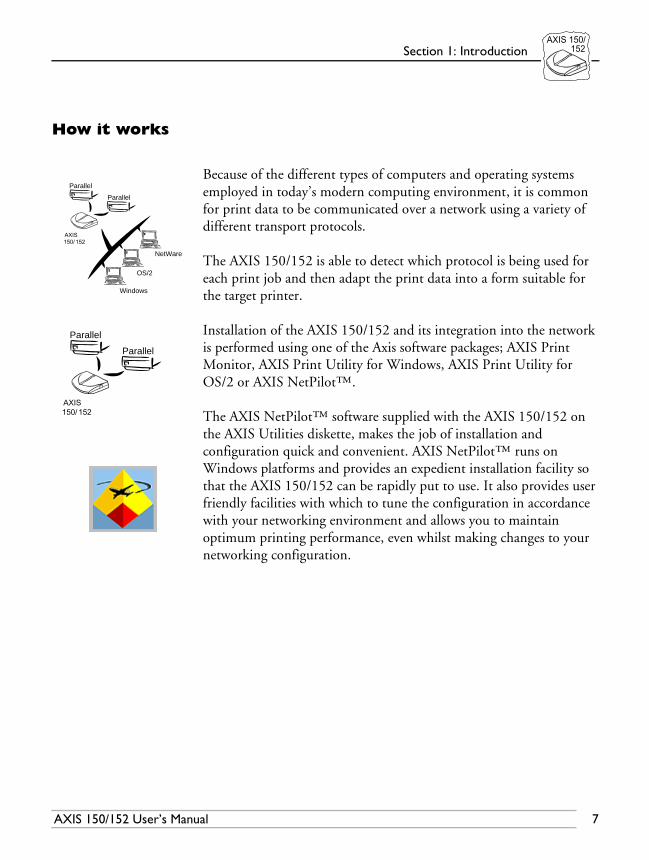
Because of the different types of computers and operating systems employed in today’s modern computing environment, it is common for print data to be communicated over a network using a variety of different transport protocols.
The AXIS 150/152 is able to detect which protocol is being used for each print job and then adapt the print data into a form suitable for the target printer.
Installation of the AXIS 150/152 and its integration into the network is performed using one of the Axis software packages; AXIS Print Monitor, AXIS Print Utility for Windows, AXIS Print Utility for OS/2 or AXIS NetPilot™.
The AXIS NetPilot™ software supplied with the AXIS 150/152 on the AXIS Utilities diskette, makes the job of installation and configuration quick and convenient. AXIS NetPilot™ runs on Windows platforms and provides an expedient installation facility so that the AXIS 150/152 can be rapidly put to use. It also provides user friendly facilities with which to tune the configuration in accordance with your networking environment and allows you to maintain optimum printing performance, even whilst making changes to your networking configuration.
Parallel
Parallel
Windows
OS/2
NetWare
Parallel
Parallel
AXIS 150/152 User’s Manual 7

Section 1: Introduction
Where to use it
Environments The AXIS 150/152 is optimized for smaller PC based LANs. It can communicate with several of the major computer systems and network protocols. These different protocols can be handled simultaneously making the AXIS 150/152 an ideal print server solution for mixed computing environments.
NetWareEnvironment
AXIS NetPilot™ is the preferred utility for installing and integrating the AXIS 150/152 into a NetWare environment. The AXIS 150/152 can be operated in both Print Server Mode and Remote Printer Mode.
It is compatible with both NetWare 4.10 NDS and bindery emulation, as well as NetWare 3.11, 3.12.
In Print Server Mode, the AXIS 150/152 emulates a NetWare Print Server, while in Remote Printer Mode it emulates a workstation running RPRINTER or NPRINTER. Logical printers are supported in both bindery and NDS modes for both PSERVER and NPRINTER.
Parallel
Parallel
Windows
OS/2
NetWare
8 AXIS 150/152 User’s Manual

Section 1: Introduction
WindowsEnvironments
Unless you wish to change the default name of your AXIS 150/152, the setup operation for Windows environments may be performed solely with the supplied AXIS Print Monitor, or the AXIS Print Utility for Windows.
Windows 3.1, Windows for Workgroups, Windows 95 and Windows NT are all supported. The AXIS 150/152 is also fully compatible with Windows clients operating on LANtastic networks.
The AXIS Print Monitor, supplied on the AXIS Utilities diskette, is the recommended tool for network printing within Windows 95 and Windows NT environments. It allows users to connect AXIS Network Print Server ports in the same simple fashion as any local printer port. Pop-up messages can also be appropriately displayed to show the status of peer-to-peer print jobs.
Use the AXIS Print Utility for Windows, supplied on the AXIS Utilities diskette, for printing within Windows for Workgroups and Windows 3.1 environments.
OS/2 Environments Unless you wish to change the default name of your AXIS 150/152, the setup operation in an OS/2 environment may be performed solely with the supplied AXIS Print Utility for OS/2.
Use the AXIS Print Utility for OS/2 to install and integrate the AXIS 150/152 into the OS/2 spool system. The printers attached to the AXIS 150/152 will then appear to be directly connected to the file server, and may be used by any client on your network.
AXIS 150/152 User’s Manual 9

Section 1: Introduction
Main Features
Reliability The AXIS 150/152 hardware provides high performance and reliability combined with low power consumption. The electronic circuits are based on the proven AXIS ETRAX chip that comprises an integrated 32-bit RISC processor with associated network controllers.
Flexibility The AXIS 150/152 supports NetWare, Windows 95, Windows NT, Windows for Workgroups and OS/2 simultaneously. It also allows you to print on two printers simultaneously.
Speed The AXIS ETRAX chip has been specifically designed for LAN products and benefits users with a significantly faster throughput than a direct PC-to-printer connection. With a sustained data throughput of up to 390 kbytes per second, the AXIS 150/152 is fast. It also supports high speed Centronics communication such as Hewlett-Packard Fast Mode, High Speed and IBM Fast Byte.
Easy to Install Without being a “computer expert”, you can install the AXIS 150/152 in minutes, allowing you to quickly realize the benefits afforded by workgroup printing. The AXIS NetPilot™ installation software includes a user friendly Installation Wizard, which allows installation into all of the AXIS 150/152 networking environments.
Security You may set up passwords for all users, restricting both login and printer access.
Monitoring The AXIS NetPilot™ software provided allows you to continuously monitor printer status.
The AXIS Print Monitor for Windows 95 and Windows NT also enables appropriate pop-up messages to be displayed to show the status of peer-to-peer print jobs.
10 AXIS 150/152 User’s Manual

Section 1: Introduction
Futureproof The AXIS 150/152 has the ability to have its Flash memory updated. This allows you to quickly update and enhance the operational features of your AXIS 150/152 when new print server software becomes available.
All software updates are free of charge. You may perform the update operation over the network, which makes the job of updating your AXIS 150/152 quick and easy.
AXIS 150/152 User’s Manual 11

Section 1: Introduction
12 AXIS 150/152 User’s Manual

Section 2: Basic Installation
Section 2 Basic Installation
Checking and Identifying the Hardware
Unpack and check all the items using the check list below. Please contact your dealer if anything is missing or damaged. All packing materials are recyclable:
o AXIS 150, part no: 0047-1, or AXIS 152, part no: 0047-2
o AXIS 150/152 User’s Manual, part no: 15017
o AXIS 150/152 User’s Printing Guide, part no: 15018
o AXIS 150/152 Quick Installation Guide, part no: 13925
o Product Brochure, part no: 14412
o Axis User Group Registration Card, part no: 15119
o 3.5” AXIS Utilities diskette comprising the AXIS NetPilot™ Configuration Software, AXIS Print Monitor for Windows 95 & Windows NT, AXIS Print Utility for Windows, part no: 15425
o 3.5” OS/2 Utilities diskette with AXIS Print Utility for OS/2,part no: 14232
AXIS 150/152 User’s Manual 13
Section 2: Basic Installation
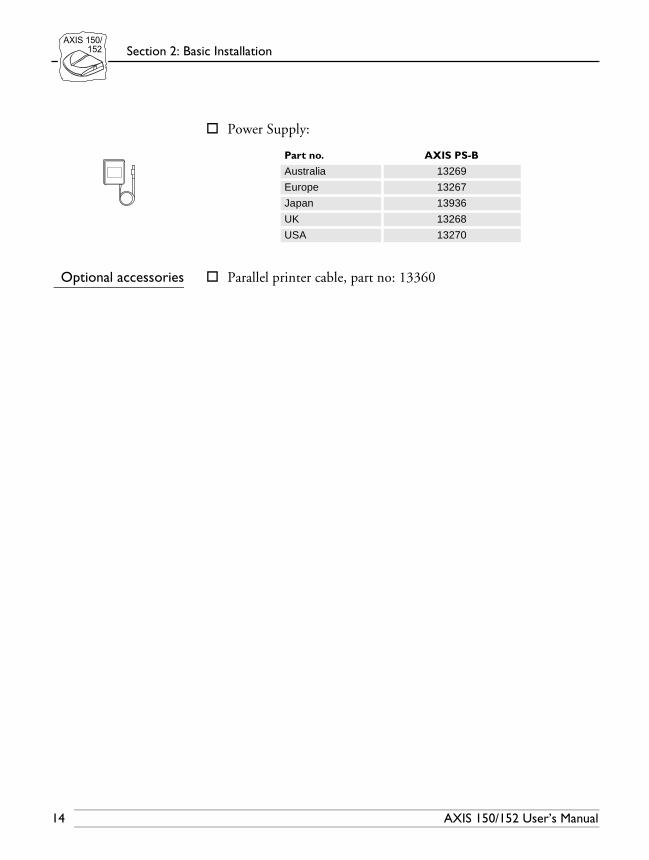
o Power Supply:
Optional accessories o Parallel printer cable, part no: 13360
Part no. AXIS PS-B
Australia 13269
Europe 13267
Japan 13936
UK 13268
USA 13270
14 AXIS 150/152 User’s Manual

Section 2: Basic Installation
AXIS 150/152 Physical Description
Plan view of the AXIS 150 Print Server
Test Button The Test button is used for:
• Printing a test page to check the connection to the printer.
• Printing the parameter list showing all the AXIS 150/152 settings.
• Resetting the AXIS 150/152 parameters to the factory default settings.
Refer to Appendix A - The Test Button for more information about printing and resetting the parameters.
Network Indicator This flashes to indicate network activity.
Power Indicator Is normally on while power is applied. If it is not lit, or it flashes, there is a problem with the AXIS 150/152 or its power supply.
LPT1 PrinterConnector
LPT2 PrinterConnector
External PowerSupply Connector
EthernetConnector
Test Button
Network Indicator
Power Indicator
AXIS 150/152 User’s Manual 15

Section 2: Basic Installation
Connecting Printers to the AXIS 150/152
Caution M Make sure that the external power supply is marked with the correct mains voltage.
Connect a Printer: 1. Switch off the printer.
2. Connect the printer to either the LPT1 or LPT2 port on the AXIS 150/152 using an appropriate printer cable.
3. Connect the external power supply to the AXIS 150/152. The Power Indicator should now be permanently lit and the Network Indicator will start to flash during the power up and self test routines. The AXIS 150/152 is ready for use when the Network Indicator stops flashing and remains off.
Test the Connection: 1. Switch on the printer.
2. Press and release the test button on the AXIS 150/152 to print a test page.
The AXIS 150/152 will print to the first printer it finds on its ports LPT1 and LPT2, in that order.
The test page shows the most important parameters and the firmware version number.
However, all you need to be concerned with at this stage, is whether the test page has been printed satisfactorily or not.
Note: o The AXIS 150/152 supports high speed Centronics Communication. For use with older printers not supporting high speed, this function may be disabled by changing the parameter L1_CENTR and/or L2_CENTR, as defined in Appendix B - The Parameter List.
Parallel
➚
16 AXIS 150/152 User’s Manual

Section 2: Basic Installation
Connecting the AXIS 150/152 to the Ethernet Network
1. Switch off the printer and disconnect the AXIS 150/152 external power supply.
2. For future reference, make a note the AXIS 150/152 serial number found on the underside label of the print server. You will need to know this number to perform the network configuration.
3. AXIS 150 only: Connect your AXIS 150 to the network using a shielded twisted pair (10baseT) cable.
4. AXIS 152 only: Connect your AXIS 152 to the network using a shielded thin wire (10base2) cable.
5. Switch on the printer and connect the external power supply to the AXIS 150/152.
6. Successful connection of the AXIS 150/152 to your network will be confirmed by the intermittent flashing of the Network Indicator.
7. You are now ready to install your server onto your network using one of the methods detailed in the Installation Guide, on page 18. By commencing with your preferred installation method, you can further verify that your AXIS 150/152 is properly connected to your network.
Note: ❏ Each AXIS 150/152 Print Server is preconfigured with a unique Node Address that is identical to the serial number. This can be changed using the AXIS NetPilot™, if required.
AXIS 150/152 User’s Manual 17

Section 2: Basic Installation
Basic Set Up of the Network
Installation Guide After connecting the AXIS 150/152 to your network, you are now ready to perform the basic setup procedures. The method of installation that you choose should be dictated by your printing requirement and the type of network into which you are integrating. Proceed with an appropriate installation method from the list below:
NetWare • If you have access to a Windows platform which uses NetWare you should firstly follow the instructions defined in:- Basic Set Up with AXIS NetPilot™. Then proceed to:- Section 3 - Setting Up - NetWare
Windows • If your Windows platform uses NetBIOS/NetBEUI, use the AXIS NetPilot™ only if you want to change the default print server name. If this is unnecessary, proceed directly to:- Section 4 - Setting Up - Windows
OS/2 • If your network uses OS/2 workstations, use the AXIS NetPilot™ only if you want to change the default print server name. If this is unnecessary, proceed directly to:- Section 5 - Setting Up - OS/2
18 AXIS 150/152 User’s Manual

Section 2: Basic Installation
Installation Summary The appropriate Installation, Management and Configuration tools for the AXIS 150/152 are summarized in the following table:
Recommended tools for the AXIS 150/152
Notes: ❏ IPX/SPX: used in Novell NetWare.
❏ NetBIOS/NetBEUI: used in Windows NT, Windows 95, Windows for Workgroups, Windows 3.1, LAN server, LAN Manager.
Operating System Protocols
Installation Configuration Management
IPX/SPX (NetWare) AXIS NetPilot™ AXIS NetPilot™
NetBIOS/NetBEUI (Windows 95/ NT)
AXIS Print Monitor AXIS NetPilot™
NetBIOS/NetBEUI (Windows)
AXIS Print Utilityfor Windows
AXIS NetPilot™
NetBIOS/NetBEUI (OS/2)
AXIS Print Utility for OS/2 AXIS NetPilot™
AXIS 150/152 User’s Manual 19

Section 2: Basic Installation
Basic Set Up with AXIS NetPilot™
Follow the instructions on the AXIS Utilities diskette label to install the AXIS NetPilot™ software on to your computer. AXIS NetPilot™ runs on any of the Windows platforms; Windows 3.x, Windows 95, Windows NT, Windows for Workgroups, or in a WinOS/2 window under OS/2.
When AXIS NetPilot™ is started, the program searches the network for new Axis units that have not yet been installed. If any new units are found the user is given the option of installing them. To proceed, start the Installation Wizard.
The AXIS Installation Wizard Main window
The user is guided through the installation process by a Wizard, which asks for the relevant information concerning your network environment. You will find more information about AXIS NetPilot™ in Section 3 - Setting Up - NetWare.
Wizard A special form of user assistance that automates a task (in this case the installation) through a dialog with the user. Wizards help the user to accomplish tasks that are complex and require experience, and even for the experienced user can help to speed up an operation.
20 AXIS 150/152 User’s Manual

Section 2: Basic Installation
Environments You may choose which networking environments you want to configure the AXIS 150/152 for, i.e. NetWare, Windows or OS/2. If your network comprises various different platforms you can, if you wish, enable all three environments.
NetWare NDS You may place NetWare Print Queues on a specific bindery server, or alternatively into a NDS Tree.
Print Queues The default Print Queue names comprise of the print server name followed by the Port name.
Default Print Queue Names and Print Server Port Names for each of the operating environments
The Installation Wizard allows you to amend the default names if you wish.
Test Page The final user prompt in the Installation Wizard allows you to print a test page through NetWare. This page displays the name of all the NetWare servers the AXIS 150/152 is connected to and shows the status of each connection. This will assist diagnosis in the event of a configuration error.
Environment Default Names
NetWare AXIS1A0003_LPT1_QNetWare AXIS1A0003_LPT2_Q Windows & OS/2 AX1A0003.LP1Windows & OS/2 AX1A0003.LP2
AXIS 150/152 User’s Manual 21

Section 2: Basic Installation
Notes: ❏ The parameters entered during installation are not permanent; they can be altered at any time according to your network printing requirements.
❏ No serious or permanent damage will be caused if you make a mistake during installation. If, at any time, you find that printing is not satisfactory, the parameters can easily be changed to tune the system to your requirements.
❏ For information on advanced functions, please refer to the AXIS Network Print Server Technical Reference. You may download this, or other technical information, over the Internet by accessing the Axis WWW Home Page at http://www.axis.com/. Please refer also to Appendix E - How To Contact Axis.
Additional References Refer to one or more of the following sections to learn how you might fine tune the AXIS 150/152 configuration and manage your network printing. Proceed as is appropriate to your type of network.
Section 3 Setting Up - NetWare
Section 4 Setting Up - Windows
Section 5 Setting Up - OS/2
22 AXIS 150/152 User’s Manual

Section 3: Setting Up - NetWareNetWare
Section 3 Setting Up - NetWare
If you have not already done so, you should use the Installation Wizard in AXIS NetPilot™ to install your network print server; refer to Section 2 - Basic Installation.
After performing the basic installation, the AXIS 150/152 is ready for printing within the NetWare environment. This section provides information for making further adjustments to the configuration.
If you intend to operate your AXIS 150/152 in a multiprotocol environment, you should also proceed to the other relevant sections in this manual, namely:
Section 4 Setting Up - WindowsSection 5 Setting Up - OS/2
Set Up using AXIS NetPilot™
You may use the AXIS NetPilot™ to:
• set up the print queues, printers, and print servers.
• set up the configuration parameters of the AXIS 150/152.
• monitor the printers on the network.
• upgrade the AXIS 150/152.
Notes: ❏ AXIS NetPilot™ contains an extensive on-line help facility to assist you with any of the operations listed above.
❏ The AXIS NetPilot™ software is designed to set up a range of different network environments. Therefore you will encounter windows that are relevant to other systems as well as NetWare.
Caution M Any network configuration should involve the Network Administrator.
Parallel
Parallel
Windows
OS/2
NetWare
➚
AXIS 150/152 User’s Manual 23
Section 3: Setting Up - NetWareNetWare
Using AXIS NetPilot™to Manage your
Print Servers
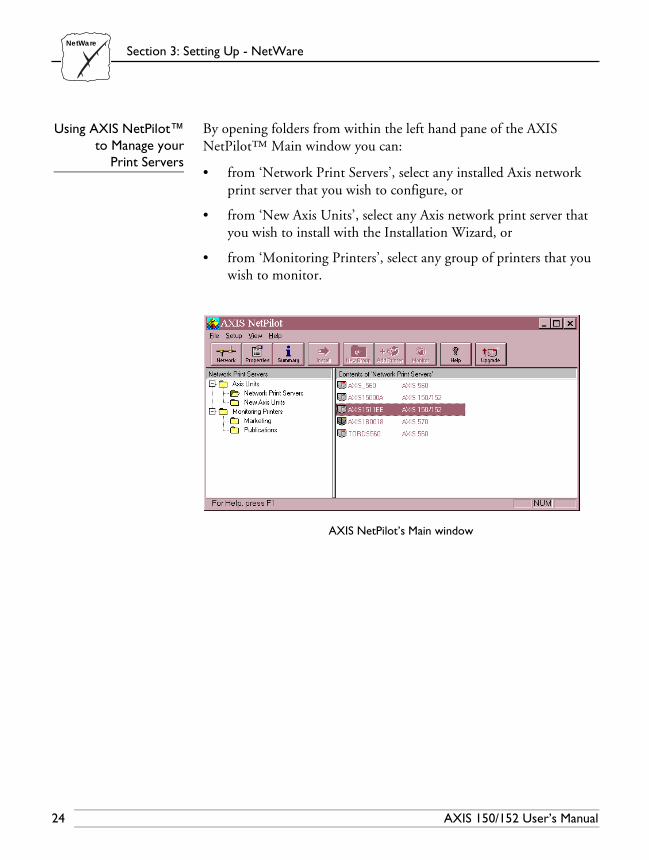
By opening folders from within the left hand pane of the AXIS NetPilot™ Main window you can:
• from ‘Network Print Servers’, select any installed Axis network print server that you wish to configure, or
• from ‘New Axis Units’, select any Axis network print server that you wish to install with the Installation Wizard, or
• from ‘Monitoring Printers’, select any group of printers that you wish to monitor.
AXIS NetPilot’s Main window
24 AXIS 150/152 User’s Manual

Section 3: Setting Up - NetWareNetWare
Managing Printers andPrint Queues
Having installed your AXIS 150/152 in accordance with the basic installation procedures described in Section 2 - Basic Installation, your AXIS 150/152 should now feature in the Contents of the ‘Network Print Servers’ pane of the AXIS NetPilot™ Main window.
Examine Queuesand Servers
The NetWare Network Environment window detailed below, allows you to examine all Print Queues and NetWare Print Servers connected to the AXIS 150/152.
To gain access to this window, simply select the required Network Print Server from the AXIS NetPilot™ Main window, and then choose Network from the Setup menu. Alternatively, you may click on the Network Icon on the Toolbar. A dialog box will then ask you to log on to your NetWare file server, if you have not already done so.
The AXIS NetPilot™ NetWare Network Environment window
The AXIS 150/152 periodically updates the configuration by searching the NDS tree, or in the case of NetWare versions 3.x, the file servers.
AXIS 150/152 User’s Manual 25

Section 3: Setting Up - NetWareNetWare
Print QueueConnection
To connect a print queue to a print server port, select the print server port you wish to connect from the NetWare Network Environment window. Click Connect...
The Connect NetWare Print Queues window detailed below, will then be displayed.
The AXIS NetPilot™ Connect NetWare Print Queues window
Select the location of the print queue from the Resources box.Click either on an existing NetWare print queue for connection to the server port, or alternatively create a new print queue by clicking on Create Queue...
To define the method of printing to be used, select either Print Server Mode or Remote Printer Mode. If you use Remote Printer Mode you must enter the NetWare Print Server name, or make an appropriate selection that will work with the AXIS 150/152 print server, using the Browse... button.
Finally, click the OK button to return to the Network Environments window.
26 AXIS 150/152 User’s Manual
Section 3: Setting Up - NetWareNetWare
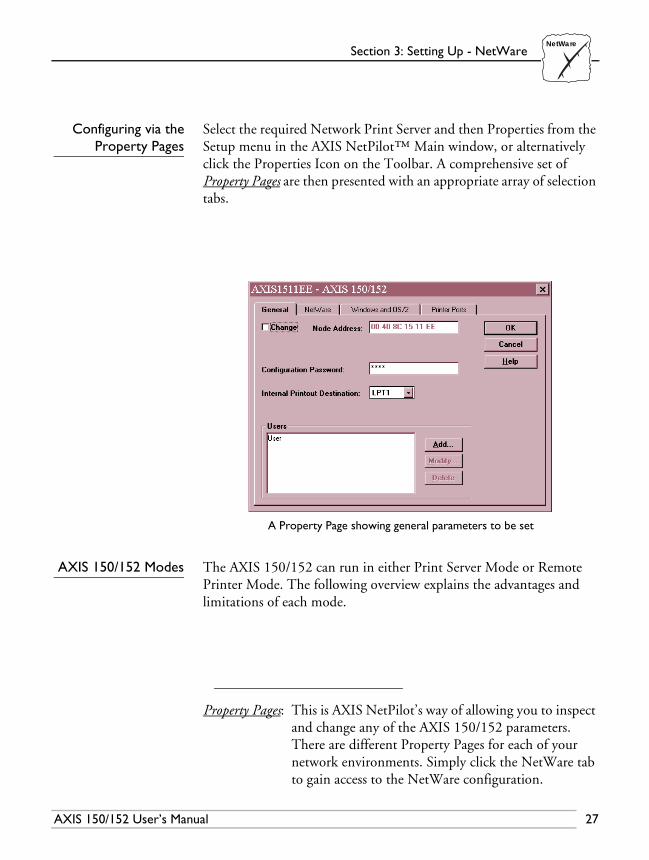
Configuring via theProperty Pages
Select the required Network Print Server and then Properties from the Setup menu in the AXIS NetPilot™ Main window, or alternatively click the Properties Icon on the Toolbar. A comprehensive set of Property Pages are then presented with an appropriate array of selection tabs.
A Property Page showing general parameters to be set
AXIS 150/152 Modes The AXIS 150/152 can run in either Print Server Mode or Remote Printer Mode. The following overview explains the advantages and limitations of each mode.
Property Pages: This is AXIS NetPilot’s way of allowing you to inspect and change any of the AXIS 150/152 parameters. There are different Property Pages for each of your network environments. Simply click the NetWare tab to gain access to the NetWare configuration.
AXIS 150/152 User’s Manual 27

Section 3: Setting Up - NetWareNetWare
Print Server Mode In the Print Server Mode, the AXIS 150/152 logs in to a file server(s) and repeatedly polls the print queues for print jobs. In this fashion, the AXIS 150/152 emulates a NetWare print server, that is a workstation running PSERVER. It provides high printing speed with low network load and is the recommended mode for medium to large sized networks. Each print server in PSERVER mode will occupy one NetWare license.
Advantages • Easy to set up.
• High performance (typically 390 kbytes/s).
Limitations • Requires a NetWare user licence for each AXIS 150/152 to file server link.
Remote Printer Mode In the Remote Printer Mode, the AXIS 150/152 connects itself to a PSERVER NetWare program running on the file server, or alternatively to a dedicated workstation running PSERVER.EXE. It then automatically receives print jobs from the file server. In this fashion, the AXIS 150/152 emulates a workstation running the NetWare remote printer software RPRINTER, or NPRINTER. This mode is only recommended for small networks where the number of NetWare user licences is a major issue.
Advantages • NetWare user licences are not required.
• Easy to set up.
Limitations • Lower performance, e.g. typically 20 - 70 kbytes/s for NLM.
• Higher network load.
28 AXIS 150/152 User’s Manual
Section 3: Setting Up - NetWareNetWare
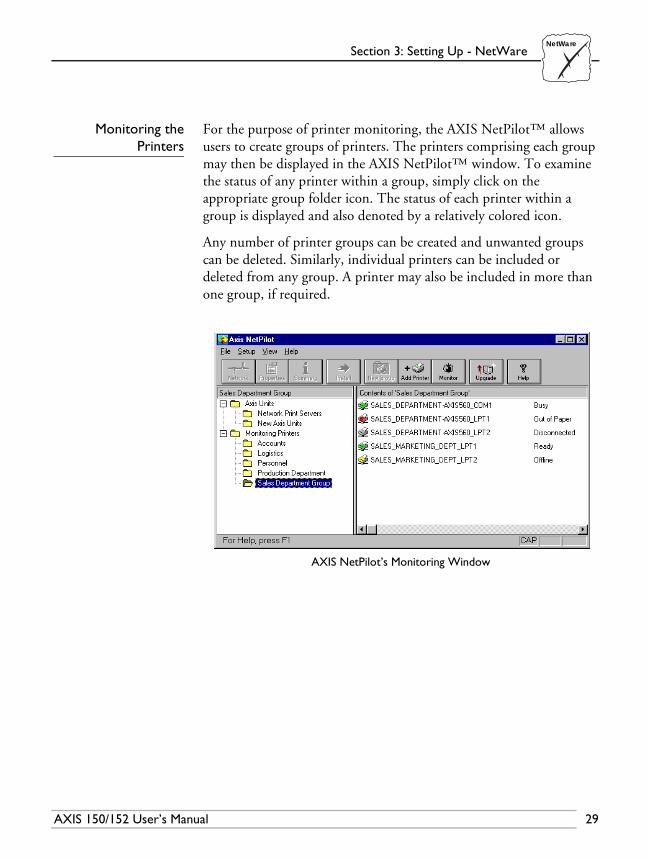
Monitoring thePrinters
For the purpose of printer monitoring, the AXIS NetPilot™ allows users to create groups of printers. The printers comprising each group may then be displayed in the AXIS NetPilot™ window. To examine the status of any printer within a group, simply click on the appropriate group folder icon. The status of each printer within a group is displayed and also denoted by a relatively colored icon.
Any number of printer groups can be created and unwanted groups can be deleted. Similarly, individual printers can be included or deleted from any group. A printer may also be included in more than one group, if required.
AXIS NetPilot’s Monitoring Window
AXIS 150/152 User’s Manual 29

Section 3: Setting Up - NetWareNetWare
Other NetWare Configuration Methods
Novell Utilities After installing the AXIS 150/152 into the NetWare environment using the AXIS NetPilot™, adjustments to the configuration can be made at any time, using the AXIS NetPilot™. Alternatively, you may wish to configure and manage your AXIS 150/152 using either Novell’s NetWare Administrator, or PCONSOLE.
Some useful features provided by the NetWare Administrator are described in more detail below:
Printer Status The NetWare dialog Printer Status menu detailed below, shows the status of an active print job serviced by an AXIS 150/152 network print server. Detailed information concerning the active job is displayed including, Print Queue, print job description, size of print file, percentage of job completed, etc. The administrator also has the ability to abort or pause the print job from this menu.
NetWare Administrator Printer Status Menu
30 AXIS 150/152 User’s Manual

Section 3: Setting Up - NetWareNetWare
Notification Using the NetWare Administrator, you may also enable/disable status notification messages for printers connected to the AXIS 150/152, i.e. Busy, Off-line, Out of paper, Paper jam...etc. Print job owners and chosen administrators may be added or removed from the list of persons to be notified.
Print Layout A print layout of installed AXIS 150/152 Network Print Servers and their relative print queues may be viewed for any NetWare Organisational Unit. Summary information is also displayed simply by right-clicking on the printer object you wish to examine.
NetWare Print Layout with corresponding information summary
AXIS 150/152 User’s Manual 31

Section 3: Setting Up - NetWareNetWare
32 AXIS 150/152 User’s Manual
Section 4: Setting Up - Windows
Section 4 Setting Up - Windows
Having connected the AXIS 150/152 to your network, this section now describes how to set up your AXIS 150/152 for printing in the Windows environment.
The following Windows platforms are supported:
• Windows 3.1 (requires add-on network support, see page 40)• Windows for Workgroups• Windows 95• Windows NT• Windows clients using LANtastic
If you intend to use the AXIS 150/152 in a multiprotocol environment, you should also refer to the following sections:
Section 3 Setting Up - NetWareSection 5 Setting Up - OS/2
Using the AXIS Print Monitor for Windows 95 and NT
Supplied on the AXIS Utilities diskette, the AXIS Print Monitor should be used for network printing within Windows 95 and Windows NT environments. It allows AXIS Network Print Servers to be connected in the same simple fashion as a local printer port and once installed, is automatically initialized upon system startup.
Install this software now if you have not already done so - see the instructions on the AXIS Utilities diskette label.
Should you wish to change the default names or amend any of the AXIS 150/152 default parameters, you may do so using the AXIS NetPilot™.
Parallel
Parallel
Windows
OS/2
NetWare
➚
AXIS 150/152 User’s Manual 33

Section 4: Setting Up - Windows
AboutAXIS Print Monitor
AXIS Print Monitor is a Windows component that has been developed for peer-to-peer printing under Windows 95 and Windows NT that allows your print jobs to be sent directly to the print server.
Peer-to-Peer Printing The AXIS Print Monitor needs to be installed on each workstation performing peer-to-peer printing. Once installed, the AXIS Print Monitor then allows users to access to all network printers, just as if they were connected directly to their workstation. Peer-to-peer printing affords the following benefits:
• You can monitor the printer status and enable pop-up messages that notify you when the printer is off-line, out of paper, or not responding.
• You do not have to rely on a server.
Client-Server Printing Pop-up messages should not be enabled on the server as the status of shared printers will not be reported to the client platforms. Pop-up messages are only issued on the server and must be acknowledged before a print job can be released.
User Dialog Although the AXIS Print Monitor user dialog will vary dependent upon which platform you are using, i.e. Windows 95, Windows NT 4.0 or Windows NT 3.5x, the functionality of these variants is exactly the same. Follow the appropriate procedures below to install Axis printer ports.
Notes: ❏ The AXIS Print Monitor uses NetBIOS/NetBEUI for printing, so please ensure that your client is running this protocol.
❏ The AXIS Print Monitor may be used for DOS printing when installed on Windows NT platforms. However, in Windows 95 this is only possible from a client workstation, in a client-server configuration. The AXIS Print Utility for Windows should be used if DOS peer-to-peer printing is necessary from a Windows 95 platform.
34 AXIS 150/152 User’s Manual

Section 4: Setting Up - Windows
Using theAXIS Print Monitor
with Windows 95
Follow the procedure below to install Axis printer ports from a Windows 95 workstation:
1. To start the Add Printer Wizard, select Settings - Printers from the Start menu and double-click the Add Printer icon.
2. After clicking Next> in the first dialog, the Wizard asks you to select between Local Printer and Network Printer. Select Local Printer. Click Next>.
3. Choose the appropriate print driver for your printer. If the desired print driver already appears within the displayed manufacturer and model lists dialog, click Next> and proceed directly to step 6.
4. Click the Have Disk... button. Insert the printer driver diskette into the floppy disk drive of your computer. If the floppy disk drive is A:/ then click OK, otherwise type the letter of your disk drive and then click OK.
5. Select the desired printer you want to install from the diskette and click Next>.
6. Select an AXIS printer port from the Available Ports list. The port names appear as <name>.LP1 and <name>.LP2, where <name> is AX followed by the last six digits of the AXIS 150/152 serial number, e.g. AX560B35. Click the Configure Port button.
The Configure AXIS Printer Ports dialog
AXIS 150/152 User’s Manual 35

Section 4: Setting Up - Windows
7. Choose when pop-up messages are to be displayed from the Configure AXIS Printer Ports dialog. It is possible to to configure AXIS Ports to issue pop-up messages when the printer is Off-line, Out of paper or Not responding. Check the appropriate boxes and then click Next>.
8. Enter an appropriate name for your printer and click Next>.
9. Choose whether you wish to produce a Test Page and then click Finish.
Note: ❏ Even if the desired print driver is available from the manufacturer and model lists, use the driver on the diskette that comes along with the printer. This assures you of the latest driver software.
Using theAXIS Print Monitor
with Windows NT 4.0
Follow the procedure below to install Axis Printer Ports from a Windows NT 4.0 workstation:
1. To start the Add Printer Wizard, select Settings - Printers from the Start menu and double-click on the Add Printer icon.
2. The Wizard asks you to select between My Computer and Network Printer Server. Select My Computer.
3. Before an AXIS Port can be used, it must be added. When the Available ports dialog is active, click Add Port..., select AXIS Port and then click New Port...
4. Select an AXIS Port you wish to add and then click OK. The ports appear as <name>.LP1 and <name>.LP2, where <name> is AX followed by the last six digits of the AXIS 150/152 serial number, e.g. AX560B35. Click OK.
5. Close the Printer Ports window.
36 AXIS 150/152 User’s Manual

Section 4: Setting Up - Windows
6. Click the Configure Port... button and choose when pop-up messages are to be displayed. It is possible to configure AXIS Ports to issue pop-up messages when the printer is Off-line, Out of paper or Not responding. Check the appropriate boxes and then click OK. Continue the installation by clicking Next>.
7. Choose the appropriate print driver for your printer. If the desired print driver already appears within the displayed manufacturer and model lists dialog, click Next> and proceed directly to step 10.
8. Click the Have Disk... button. Insert the print driver diskette into the floppy disk drive of your computer. If the floppy disk drive is A:/ then click OK, otherwise type the letter of your disk drive and then click OK.
9. Select the desired printer you want to install from the diskette and click Next>.
10. Enter an appropriate name for your printer and click Next>.
11. Choose whether you wish to share the printer with other network users and click Next>.
12. Choose whether you wish to produce a Test Page and then click Finish.
Note: Even if the desired printer is available from the manufacturer and model lists, use the driver on the diskette that comes along with the printer. This assures you of the latest driver software.
AXIS 150/152 User’s Manual 37

Section 4: Setting Up - Windows
Using the AXIS PrintMonitor with
Windows NT 3.5x
Follow the procedure below to install AXIS printer ports from a Windows NT 3,5x workstation:
1. Open the Print Manager and select Create Printer from the Printer Menu.
2. Enter an appropriate name in the Printer Name field.
3. Choose an appropriate print driver for your printer. If the desired print driver already appears within the driver drop down list, proceed directly to step 6.
4. Select Other... in the driver list. Insert the print driver diskette into the floppy disk drive of your computer. If the floppy disk drive is A:/ then click OK, otherwise type the letter of your disk drive and then click OK.
5. Select the desired printer you want to install from the diskette.
6. Select Other... in the “Print to” list box.
7. Select Axis Port in the list of available Print Monitors and click OK.
8. Select the AXIS ports you wish to add and then click OK. The ports appears as <name>.LP1 and <name>.LP2, where <name> is AX followed by the last six digits of the AXIS 150/152 serial number, e.g. AX560B35.
9. Click on Settings to configure the ports and choose when pop-up messages are to be displayed. It is possible to configure AXIS ports to issue pop-up messages when the printer is Off-line, Out of paper and Not responding. Check the appropriate boxes and then click OK.
10. Click OK.
Note: Even if the desired printer is available from the manufacturer and model lists, use the driver on the diskette that comes along with the printer. This assures you of the latest driver software.
38 AXIS 150/152 User’s Manual
Section 4: Setting Up - Windows
Using the AXIS Print Utility for Windows
The AXIS Print Utility for Windows is supplied on the AXIS Utilities diskette and is the tool for network printing within Windows for Workgroups and Windows 3.1 environments.
You should install this utility now if you have not already done so - see the instructions on the AXIS Utilities diskette label.
If you wish, you may change the default name of your AXIS 150/152 or amend any of the default parameters, using the AXIS NetPilot™.
AboutAXIS Print Utility
for Windows
AXIS Print Utility for Windows is a dual purpose application for network printing in the Windows environment. It has two fundamental purposes:
1. Install and maintain AXIS 150/152 printer ports as Windows printer ports.
2. Capture and monitor print jobs directed to the AXIS 150/152 ports. Print jobs are directed through a spool directory either at your local hard disk (peer-to-peer mode), or at the file server (client-server mode). The printer port status of your AXIS 150/152 may be monitored and pop-up notification messages can be generated, keeping you informed of completed print jobs or any problematic condition.
For more information about AXIS Print Utility for Windows, see the on-line help.
Notes: ❏ Microsoft Network (NetBIOS/NetBEUI) must be running when using AXIS Print Utility for Windows.
❏ AXIS Print Utility for Windows must be running when printing in peer-to-peer mode.
❏ The AXIS Print Utility for Windows is not needed on the client platforms for client server printing.
❏ If you wish to change the default name of your AXIS 150/152 or amend any of the default parameters, you may do so using the AXIS NetPilot™.
AXIS 150/152 User’s Manual 39

Section 4: Setting Up - Windows
Peer-to-Peer vs.Client-Server Printing
Windows for Workgroups and Windows 3.1 users, requiring access to a network printer in peer-to-peer mode, will need to install the AXIS Print Utility for Windows software onto their workstation. Users may then add the required network printer to their systems and use the printer as if it was connected directly to their workstation. Peer-to-peer printing affords the following benefits:
• You can monitor the printer status at all times and be notified when a print job is complete.
• You do not have to rely on a server.
Client-server operation requires only one user to install the AXIS Print Utility for Windows software onto their workstation. This user then adds the printer to his or her workstation (the server) and shares the printer with other users on the network. The other users (the clients) may connect to the printer through the server via the Windows Print Manager.
The client-server mode provides a way of maintaining queue ordering and job priority, but at a price. This is because:
• You cannot receive printer status or print job notification.
• The workstation set up as the server must be available at all times. It must also have the capacity to handle the print jobs that pass through it.
Notes: ❏ When using client-server mode, other users may still install the AXIS Print Utility for Windows software, for printing directly to the network printer in Peer-to-Peer mode.
❏ When using the client-server mode, it is recommended that the server is setup only on a Windows for Workgroups workstation.
Windows 3.1 In order to print to a network printer, Windows 3.1 requires the installation of network support, such as the LAN Server or LAN Manager Workstation software. When installed, proceed as described under Windows for Workgroups below.
40 AXIS 150/152 User’s Manual

Section 4: Setting Up - Windows
Windows forWorkgroups
Peer-to-Peer Printing Follow these steps to install your AXIS 150/152 for peer-to-peer printing at a Windows for Workgroups workstation:
1. Double-click the AXIS Print Utility icon.
2. In the Port menu, click Add.
3. In the NPS Port list, select the AXIS 150/152 port to be installed. The ports will appear as <name>.LP1 and <name>.LP2, where <name> is AX followed by last six digits of your print server number, e.g. AX100086.LP1. However, this alphanumeric name will be superseded by any new name given to your AXIS 150/152 when using AXIS NetPilot™.
4. Accept or change the suggested Windows port name and type any required comment in the Description field. Make a note of the Windows port name as you will need this later, then click OK to install the Windows port.
5. In the Port menu, click Connect... to bring up the Windows Printers dialog.
6. Select a printer driver from the list of Installed Printers (or click Add>> to install a new driver), then click Connect...
7. Select the Windows port name from step 4 above (this name can be found at the bottom of the Ports list).
8. Click OK to close the Connect dialog, and Close to close Printers.
The setup is completed and you can now print through yourAXIS 150/152.
Note: ❏ AXIS Print Utility for Windows must be running when you print through your AXIS 150/152. We strongly recommend that you copy the AXIS Print Utility icon into your StartUp folder.
.
AXIS 150/152 User’s Manual 41
Section 4: Setting Up - Windows
Client-Server Printing:Server Setup
Follow these steps to install your AXIS 150/152 for client-server printing at a Windows for Workgroups server:
1. Choose a workstation that you want to use as server for network printing. The server must be available at all times and must have sufficient hard disk space for spooling print jobs.
2. Make sure that the printer sharing option is enabled. (Open Network Setup, click Sharing..., check the ‘I want to be able to allow others to print to my printer(s)’ box).
3. Install AXIS Print Utility for Windows on the server.
4. Set up your AXIS 150/152 as described under Peer-to-Peer Printing, on page 41.
5. Open Print Manager and select your printer.
6. In the Printer menu, select Share Printer As...
7. Type a printer name in the Share As field (this is the printer name seen by the clients, see Client Setup below).Check the Re-share at Startup box, then click OK.
The server setup is now completed. Set up the clients as described below.
Note: ❏ The AXIS Print Utility for Windows must be running when you print through your AXIS 150/152. We strongly recommend that you copy the AXIS Print Utility icon into your StartUp folder.
42 AXIS 150/152 User’s Manual

Section 4: Setting Up - Windows
Client-Server Printing:Client Setup
Follow these steps to use your AXIS 150/152 for client-server printing at a Windows for Workgroups client:
1. In the Control Panel, select Printers.
2. Select a printer driver from the list of Installed Printers, or click Add>> to install a new driver. Click Connect...
3. Select Network... and in the Device Name list, select a local port (LPT1 - LPT3) to redirect to your network printer.
4. In the Show Shared Printers on list, select the server from Server Setup above.
5. In the Shared Printers list, select the printer you want to use.
6. Click OK, OK and Close.
7. Exit the Control Panel.
The client setup is completed and you can now print through your AXIS 150/152.
AXIS 150/152 User’s Manual 43

Section 4: Setting Up - Windows
Windows Clients using LANtastic
From any Windows client, the AXIS 150/152 may also be used for network printing within LANtastic environments.
LANtastic users may use the AXIS Utilities in exactly the same manner as described in the proceeding Windows sections, using a choice of Axis utility software that is guided by the type of Windows client employed:
• Refer to Using the AXIS Print Utility for Windows if you are using a Windows for Workgroups client.
• Refer to Using the AXIS Print Monitor for Windows 95 and NT if you are using either a Windows 95 or Windows NT client.
Note: ❏ AXIS Print Monitor and AXIS Print Utility for Windows uses NetBIOS/NetBEUI for printing, so make sure that your LANtastic client is running this protocol.
Other Windows Configuration Methods
AXIS NetPilot™ After installing your printers using either AXIS Print Monitor or AXIS Print Utility for Windows, adjustments to the AXIS 150/152 configuration can be made at any time using the AXIS NetPilot™.
44 AXIS 150/152 User’s Manual

Section 5: Setting Up - OS/2
Section 5 Setting Up - OS/2
Having connected the AXIS 150/152 to your network, this section now describes how to set up your AXIS 150/152 for printing in the OS/2 environment.
If you intend to operate your AXIS 150/152 in a multiprotocol environment, you should also proceed to the other relevant sections in this manual, namely:
Section 3 Setting Up - NetWareSection 4 Setting Up - Windows
Using the AXIS Print Utility for OS/2
The installation and setup operations are performed with the AXIS Print Utility for OS/2. You should install this utility now if you have not already done so - see the instructions on the OS/2 Utilities diskette label.
Should you require to change the default name of your AXIS 150/152 or amend any of default parameters, use the AXIS NetPilot™ from any Windows platform that is connected to your network, or WinOS/2 window under OS/2.
The AXIS Print Utility for OS/2 is not needed on the client platforms when using a client-server configuration.
Parallel
Parallel
Windows
OS/2
NetWare
➚
AXIS 150/152 User’s Manual 45

Section 5: Setting Up - OS/2
About AXIS PrintUtility for OS/2
AXIS Print Utility for OS/2 is a dual purpose application for network printing in the OS/2 environment. Its fundamental purpose is to:
1. Install and maintain the AXIS 150/152 printer port as an OS/2 printer port.
2. Capture and monitor print jobs directed to the AXIS 150/152 port. Print jobs may be directed through a spool directory either at your local hard disk, or at the file server. The printer port status of your AXIS 150/152 may be monitored and pop-up notification messages can be generated, keeping you informed of completed print jobs or any problematic condition.
Note: ❏ The NetBEUI protocol must be active. If not, use MPTS/LAPS (LAN Server) or SETUP (LAN Manager) to activate it.
Install the AXIS150/152
1. When AXIS Print Utility for OS/2 is running, click Install to install your AXIS 150/152. Its ports will then appear in the list as <name>.LP1 and <name>.LP2, where <name> is AX followed by last six digits of your print server number. e.g. AX100086.LP1. However, this alphanumeric name will be superseded by any new name given to your AXIS 150/152 when using AXIS NetPilot™.
2. Select the port that you wish to install, then click Install.
Repeat this procedure for each server using the AXIS 150/152.
Note: ❏ The AXIS Print Utility for OS/2 must be running in order to print using your AXIS 150/152.
46 AXIS 150/152 User’s Manual

Section 5: Setting Up - OS/2
Integrating your AXIS 150/152 into the OS/2 Environment
Create a Print Queue(OS/2 version 1.x)
1. Double-click the Print Manager icon, click Setup, then select Printers...
2. Click Add to make a new printer definition, then type a name of your choice in the Name field.
3. Select \PIPE\<name>.LP1 from the Device list, then select a printer driver suitable for your printer.
4. Click Add, then click OK to confirm the printer definition.
5. Click Setup, then select Queues...
6. Click Add to create a print queue, and type a name in the Name field.
7. Click Add, then click OK to confirm the queue definition.
Create a Print Queue(OS/2 version 2.xand OS/2 Warp)
1. Double-click the Templates folder, which is located in the OS/2 systems folder. Drag the Printer icon out to the Workplace Shell (or into a folder) while holding the right mouse button down.
2. Type a name of your choice in the Name field.
3. Select \PIPE\<name>.LP1 or \PIPE\<name>.LP2 from the Output port list, and select a printer driver suitable for your printer from the Default printer driver list.
4. Click Create to confirm the printer definition.
Share the PrintQueue
A print queue must be made a shared resource before it can be accessed from other computers (clients or other servers).Open an OS/2 window and issue the following command:
NET SHARE <queue_name> /PRINT
Where <queue_name> is the name of the queue created above.
AXIS 150/152 User’s Manual 47

Section 5: Setting Up - OS/2
To share a printer resource when using OS/2 Warp with IBM Peer service, follow the steps below:
1. Click the right mouse button on the printer object.
2. Select Share and then Start sharing. In the dialogue box, enter a Description.
3. Select the check-box Start sharing at LAN workstation startup.
4. Click OK.
To share a printer resource when using LAN server 4.0, follow the steps below:
1. Open LAN Server Administration.
2. Open your domain and then Resource Definition.
3. Drag and drop a printer from the template.
4. Enter the Alias name, select a Server name and the previously created Spooler Queue Name.
5. Click OK.
The setup is completed and you can now print through your AXIS 150/152.
Other OS/2 Configuration Methods
AXIS NetPilot™ After installing your printers using the AXIS Print Utility for OS/2, adjustments to the AXIS 150/152 configuration can be made at any time using the AXIS NetPilot™.
Note: ❏ AXIS NetPilot™ runs in a WinOS/2 window.
48 AXIS 150/152 User’s Manual

Appendix A: The Test Button
Appendix A The Test Button
The Test Button is located on the front right hand side of the AXIS 150/152. By depressing this button you are able to:
• Print a test page, to check the connection to the printer.
• Print a parameter list, to define the current settings within your AXIS 150/152.
• Reset the AXIS 150/152 parameters to the original factory default settings.
The functionality of the Test Button is determined by the power status of the AXIS 150/152 and the number of times the button is depressed.
A description of these functions complete with instructions for their implementation, are detailed in the following sections of this appendix.
The Test Page After connecting your printer(s) to the port(s) of your AXIS 150/152, it is recommended that you print out a test page to verify that the cable interface is functioning correctly. The simplest way to do this, is to simply depress the Test Button once. The printed Test Page contains basic information about the AXIS 150/152.
Note: ❏ The Test Page is defaulted to print out on the LPT1 port of your AXIS 150/152. However, should you require the Test Page to be output to LPT2, you may do so by amending the Printer Port parameter in the Properties page, using AXIS NetPilot™.
The Parameter List By simply double clicking on the Test Button, the current parameter settings installed in your AXIS 150/152 print server can be output to the connected printer.
This list provides comprehensive details of all of the parameters and their current status. The parameters may be changed according to your requirements using the AXIS NetPilot™ software.
AXIS 150/152 User’s Manual 49

Appendix A: The Test Button
Notes: ❏ By default the Parameter List is printed to the LPT1 port of your AXIS 150/152. However, should you require the Parameter List to be output to LPT2, you may do so by amending the Printer Port parameter in the Properties page, using AXIS NetPilot™.
❏ Some of the parameters require that the AXIS 150/152 is restarted before becoming effective.
Factory DefaultSettings
Should you wish to reset the AXIS 150/152 to the factory default settings, the best way to do this is to use the Test Button. This procedure involves switching the AXIS 150/152 off and on.
1. Remove the power cord to switch off the AXIS 150/152.
2. Press and hold down the Test Button. Whilst continuing to press the Test Button, simultaneously switch on the AXIS 150/152 by replacing the power cord. Keep the Test Button pressed for at least 20 seconds after restoring power until the Network Indicator flashes at one second intervals.
3. Release the Test Button and wait at least five seconds (five indicator flashes).
4. Press and hold the Test Button again for at least five seconds until the Network Indicator remains constantly lit.
The AXIS 150/152 is now reset to factory default settings. Restart the AXIS 150/152 by switching it off and on.
Note: ❏ The NODE_ADDR parameter remains unchanged, although it can be changed via the General Property page, using AXIS NetPilot™.
50 AXIS 150/152 User’s Manual

Appendix B: The Parameter List
Appendix B The Parameter List
This appendix provides an overview of the AXIS 150/152 parameters and describes how they may be edited. A sample parameter list is also included. However, please note that because of recent print server software updates, some differences may exist between the parameters installed on your print server and those that are described within this document.
Please refer to the AXIS Network Print Server Technical Reference for a complete description of the parameters. Alternatively, you may wish to access the Axis WWW Home Page at http://www.axis.com/, where you can download the latest technical information. For details of the appropriate WWW address in your region, please refer to Appendix E - How To Contact Axis.
Editing the Configuration Parameters
Editing usingAXIS NetPilot™
All parameter settings are stored in the AXIS 150/152 config file, which may be edited via the Property Pages of the AXIS NetPilot™ software. Each Property Page comprises an array of selection tabs that are appropriate to your operating environments. Each parameter may be defined by using the relevant box. For more further information on the Property Pages, please refer to Section 3 - Setting Up - NetWare.
Printing parameterson the printer
The current parameter list may output to a printer connected to the AXIS 150/152 by double-clicking the Test Button.
AXIS 150/152 User’s Manual 51

Appendix B: The Parameter List
The Config File
The remainder of this appendix contains the complete AXIS 150/152 parameter list. The left-hand column shows the parameters and their default values as they appear in the config file, and the right column contains brief descriptions of the parameters.
Most parameters will take effect in the print server for the next incoming print job after being changed. However, those parameters marked (Requires Restart), will require the print server to be restarted before the new parameter setting can take effect.
Please note that the password relates to parameters, e.g. ROOT_PWD and PROS_PWD will only be shown when logged in as root, i.e. not when printing the parameters using the Test Button.
--- CONFIG MENU
NODE_ADDR. : 00 40 8C 15 11 EF Node Address (Requires Restart)ROOT_PWD. : pass Root Password
--- LAN SERV/LAN MGR MENU
LSLM_ENB. : YES LAN Server/LAN Manager Protocol EnabledNB_FR_TYPE. : FR_AUTO (FR_AUTO, FR_802_2, FR_DIX) Frame Type (Requires Restart)LPRINT_1. : AX1511EF.LP1 Printer 1 Name (1511EF are the last six characters of the serial number)LLOGIC_1. : LPT1 (LPT1, LPT2) Printer 1 Logical PrinterLPRINT_2. : AX1511EF.LP2 Printer 2 NameLLOGIC_2. : LPT2 (LPT1, LPT2) Printer 2 Logical PrinterLPRINT_3. : Printer 3 NameLLOGIC_3. : LPT1 (LPT1, LPT2) Printer 3 Logical PrinterLPRINT_4. : Printer 4 Name LLOGIC_4. : LPT2 (LPT1, LPT2) Printer 4 Logical Printer
--- OUTPUT MENU
L1_CENTR. : HISPEED (IBM_PC, STNDRD, FAST, HISPEED) LPT1 Centronics Interface TimingL1_BSYTM. : 60 LPT1 Busy Status Time-OutL2_CENTR. : HISPEED (IBM_PC, STNDRD, FAST, HISPEED) LPT2 Centronics Interface TimingL2_BSYTM. : 60 LPT2 Busy Status Time-Out
--- PANEL MENU
DEF_OUT. : LPT1 (LPT1, LPT2) Internal Printout DestinationLOCK_KEY. : NO
52 AXIS 150/152 User’s Manual

Appendix B: The Parameter List
--- NETWARE MENU
NETW_ENB. : YES NetWare Protocol EnabledPS_NAME. : AXIS1511EF Print Server Name (1511EF are the last six digits of the serial number)JOB_CHECK_DELAY. : 5 Print Server queue polling intervalCONF_CHECK_DELAY. : 300 Interval between automatic configuration checksFR_802_3. : YES IEEE 802.3 Frame Type EnabledFR_ETH_2. : YES Ethernet II Frame Type EnabledFR_802_2. : YES IEEE 802.2 Frame Type EnabledFR_SNAP. : YES SNAP Frame Type EnabledNCP_BURST_MODE. : YES NetWare Burst Mode Enabled (Requires Restart)PSERVER_NDS. : TREE: <tree name> or File server & Name of print server (inc. context)PSERVER_BINDERY1. : Bindery file server namePSERVER_BINDERY2. : Bindery file server namePSERVER_BINDERY3. : Bindery file server namePSERVER_BINDERY4. : Bindery file server namePSERVER_BINDERY5. : Bindery file server namePSERVER_BINDERY6. : Bindery file server namePSERVER_BINDERY7. : Bindery file server namePSERVER_BINDERY8. : Bindery file server namePSERVER_BINDERY9. : Bindery file server namePSERVER_BINDERY10. : Bindery file server namePSERVER_BINDERY11. : Bindery file server namePSERVER_BINDERY12. : Bindery file server namePSERVER_BINDERY13. : Bindery file server namePSERVER_BINDERY14. : Bindery file server namePSERVER_BINDERY15. : Bindery file server namePSERVER_BINDERY16. : Bindery file server nameNPRINTER1. : Print Server name. SlotNPRINTER2. : Print Server name. SlotNPRINTER3. : Print Server name. SlotNPRINTER4. : Print Server name. SlotNPRINTER5. : Print Server name. SlotNPRINTER6. : Print Server name. SlotNPRINTER7. : Print Server name. SlotNPRINTER8. : Print Server name. Slot
AXIS 150/152 User’s Manual 53

Appendix B: The Parameter List
54 AXIS 150/152 User’s Manual

Appendix C: Updating the Software
Appendix C Updating the Software
The following software can be updated free of charge:
• AXIS NetPilot™ configuration software
• AXIS Print Monitor for Windows 95 and Windows NT
• AXIS Print Utility for Windows
• AXIS Print Utility for OS/2
• The AXIS 150/152 print server software held in Flash Memory
Obtaining the Updated Software
Over the Internet You may wish to check the Axis WWW Home Page at http://www.axis.com/, where you can download the latest versions of the software utilities.
Anonymous FTP Files and information are also available through anonymous ftp; log in to ftp.axis.com and go to the /pub/axis directory.
Flash Memory The AXIS 150/152 server software is stored in Flash Memory. This memory is provided by a silicon chip that, like any other ROM device, retains data content even after power is removed. However, Flash Memory is unique because it allows its data to be erased and re-written. This means that you can install software updates for your AXIS 150/152 as soon as they become available, without having to replace any parts. The new software is simply loaded into the AXIS 150/152 over the network.
AXIS 150/152 User’s Manual 55

Appendix C: Updating the Software
Your dealer Contact your dealer to check if there have been any new releases of the software. You should have your present version number ready to compare against the latest software release.
Upgrading the Software
There are two methods with which to update the AXIS 150/152 Flash Memory:
• Using the AXIS NetPilot™ over IPX/SPX, or
• through the parallel port LPT1
Note: ❏ Updating instructions are also supplied with the software update.
Updating using theAXIS NetPilot™
This is the preferred method for updating AXIS Network Print Servers software. An Upgrade Wizard is available to guide you through the necessary procedures. Simply click on the Upgrade icon of AXIS NetPilot™ Toolbar to display the Upgrade Wizard menu.
To upgrade using AXIS NetPilot™, you will need the file with the new print server software. The name of this file is in the form product.version, e.g. 150_520.exe for software release 5.20. You may use any of the aforementioned methods to obtain the new file.
Notes: ❏ The upgrading must be performed from a computer on a network that supports NetWare, as the AXIS NetPilot™ Upgrade Wizard only uses the IPX/SPX protocol.
❏ Should you encounter any problem that prevents a successful upgrade over your network, it may become necessary to perform the flash loading operation via the parallel port, LPT1. In this instance, you are advised to contact your dealer, or Axis via the WWW. Please refer to Appendix E - How To Contact Axis.
56 AXIS 150/152 User’s Manual

Appendix D: Technical Specifications
Appendix D Technical Specifications
Supported Systems
Novell NetWare: Versions 3.11, 3.12, 4.10 and above, supporting both NDS and Bindery Emulation. Up to 16 bindery file servers and 96 print queues can be served. User messages are also supported. Print Methods: RPRINTER/NPRINTER, PSERVER
Microsoft LAN Manager: LAN Manager 2.0c and above, running under OS/2 ver 1.3 and above are supported. Enables printing from DOS, Windows and OS/2.
IBM LAN Server: LAN Server 1.3 and above, running under OS/2 ver 1.3 and above including OS/2 Warp, OS/2 Warp Connect.
Microsoft Windows: Windows NT ver. 3.5 and above, Windows for Workgroups, Windows 95.
LANtastic: LANtastic 7.0, from any of the supported Windows clients, defined above,
Supported ProtocolsNetWare: IPX, SAP, RIP, LIP, SPX and NCP (extended with NDS).
Windows and OS/2: NetBIOS/NetBEUI
LAN Managementand LAN Server
NetBIOS/NetBEUI
Hardware 32 bit RISC CPU, 512 kbytes Flash memory, 128 kbytes RAM.
Front Panel 2 LED indicators: Power and Network. Push button for information printouts.
Logical Connection Running simultaneously any combination of the supported protocols. Use of IEEE802.2, IEEE802.3, SNAP and Ethernet II frame types simultaneously.
Attachments
AXIS 150 10baseT (RJ-45) Twisted Pair Ethernet.
AXIS 152 10base2 (BNC) Thin Wire Ethernet.
AXIS 150/152 User’s Manual 57

Appendix D: Technical Specifications
Security
NetWare Encrypted passwords.
Parallel Printer Two IEEE 1284 compliant, high-speed parallel ports with 25-pin DSUB connectors. Sustained throughput up to 390 kbytes/s.
Power Consumption Maximum 150 mA at 12 V DC.Power provided by external power supply (type PS-B, 12V 500mA).
Dimensions Height x Width x Depth 1.0 x 6.1 x 4.7 inches (2.5 x 15.5 x 12.0 cm)
Weight 0.55 lb. (0.25 kg)
Environmental Temperature: 40° - 105° F (5° - 40° C).Humidity: 10 - 95% non-condensing.
Approvals
EMC: EN 55 022/1994, EN50082-1/1992. FCC Class A.
Safety: EN 60950. Approved power supplies for all countries.
All specifications are subject to change without prior notice
58 AXIS 150/152 User’s Manual

Appendix E: How To Contact Axis
Lund - Bosto
n - Toky
COMMUNICATIONS
®
Appendix E How To Contact Axis
Technical Support Should you require any technical assistance, please contact your Axis dealer. If your questions can not be answered immediately, your Axis dealer will forward your queries through the appropriate channels to ensure that you get an expedient response.
Internet andWorld Wide Web
If you are connected to Internet, please take the time to look at the Axis WWW Home Page at http://www.axis.com/ (North America) or http://www.se.axis.com/ (Europe). Here you can find information about the company and our products. You can also download on-line manuals, tools such as the Acrobat Reader for different platforms, and the latest versions of the software utilities. Your Axis dealer will be pleased to provide you with any additional assistance or information that you might require.
The Axis WWW Home Page.
FTP You may also obtain files and information through anonymous ftp: log in to ftp.axis.com or ftp.se.axis.com and go to the /pub/axis directory. Alternatively, enter ftp://ftp.axis.com/pub/axis or ftp://ftp.se.axis.com/pub/axis in your WWW browser.
AXIS 150/152 User’s Manual 59

Appendix E: How To Contact Axis
Lund - Bosto
n - Toky
COMMUNICATIONS
®
The Axis Offices To contact an Axis office, choose the one nearest to your region:
North America Axis Communications Inc.4 Constitution Way, Suite GWoburn, MA 01801-1030, USAPhone: 1-800-444-AXIS, (781) 938-1188Fax: (781) 938-6161Email: [email protected]: http://www.axis.com/
France Axis Communications SA191 avenue Aristide Briand94230 Cachan, FrancePhone: +33 1 49 69 15 50Fax: +33 1 49 69 15 59Email: [email protected]
United Kingdom Axis Communications LtdShirley Lodge470 London RoadSloughBerkshire SL3 8QY, EnglandPhone: +44 1753 714310Fax: +44 1753 540990Email: [email protected]
Europe, Middle East,Latin America,
Africa, Australia
Axis Communications ABScheelevägen 16S-223 70 Lund, SwedenPhone: +46 46 270 18 00Fax: +46 46 13 61 30Email: [email protected]: http://www.se.axis.com/
60 AXIS 150/152 User’s Manual

Appendix E: How To Contact Axis
Lund - Bosto
n - Toky
COMMUNICATIONS
®
Singapore,Southeast Asia,
The Pacific
Axis Communications Pte Ltd.51 Thomson Road187B Goldhill CentreSingapore 307630Phone: +65 250 8077Fax: +65 352 1655Email: [email protected]
China Axis Communications Ltd. Beijing OfficeRoom 1719, 17/F, Tower 2Bright China Chang An Building7 Jian Guo Men Nei StreetBeijing 100005, ChinaPhone: +86 - 10 6510 2705/6/7/8Fax: +86 - 10 6510 2703Email: [email protected]
Axis Communications Ltd. Shanghai OfficeRoom A, 19/F, New Hua Lian Mansion755 Huai Hai Zhong RoadShanghai 200020, ChinaPhone: +86 - 21 6445 4522Fax: +86 - 21 6445 4757Email: [email protected]
Hong Kong,Northeast Asia, India
Axis Communications Ltd.Room 602, Asian House, 1 Hennessy Road, Wanchai, Hong KongPhone: +852 2836 0813Fax: +852 2573 5935Email: [email protected]
AXIS 150/152 User’s Manual 61

Appendix E: How To Contact Axis
Lund - Bosto
n - Toky
COMMUNICATIONS
®
Taiwan Axis Communications Ltd.Floor 8-7No. 495 Kuang Fu South RoadTaipei, TaiwanPhone: +886 2 8780 5972Fax: +886 2 8780 5975
Korea Axis Communications Ltd.42F, KLI 63 Building 60, Yoido-dongYeongdeungpo-KuSeoul, KoreaPhone: +82 2 780 9636Fax: +82 2 780 5802
Japan Axis Communications K.K.Sumitomo-Fudosan Tsukiji Building 1F7-17-1 Tsukiji, Chuo-ku,Tokyo 104-0045, JapanPhone: +81 3 3545 8282/8Fax: +81 3 3545 8280Email: [email protected]: http://www.axiscom.co.jp/
62 AXIS 150/152 User’s Manual

Index
Index
AAcrobat Reader, 6Anonymous FTP, 59Approvals, 58AXIS NetPilot, 20, 24Axis Offices, 60, 61AXIS Print Monitor, 33, 34AXIS Print Utility for OS/2, 46AXIS Print Utility for Windows, 39AXIS Utilities, 33Axis WWW Home Page, 59
BBasic Set Up with AXIS NetPilot, 20Bindery Emulation, 8
CConfig File, 52Configuring
IBM OS/2, 45NetWare, 23Windows, 33
Connecting a Printer, 16Connectors, 15
DDimensions, 58
EEnvironmental, 58Environments
NetWare, 8OS/2, 9Windows, 9
Ethernet10base2, 5, 1710baseT, 5, 17
ETRAX, 10
FFactory Default Settings, 49Flash Memory, 11Flash ROM, 55
HHardware, 13, 57
IIBM LAN Server, 57Installation Summary, 19Installation using AXIS NetPilot, 23Internet, 59Internet Axis Home Page, 59IPX, 19
LLANtastic, 9, 44, 57Logical Connection, 57
MMicrosoft LAN Manager, 57Microsoft Windows, 57Monitoring, 10Monitoring the Printers, 29
NNDS, 8, 25Network Indicator LED, 15Novell NetWare, 8, 57NPRINTER, 8
OOS/2 Systems, 45OS/2 Warp, 47
AXIS 150/152 User’s Manual 63

Index
PParameter editing
Factory Defaults, 49, 50from a Windows Platform
(AXIS NetPilot), 51Parameter List, 49, 51Peer-to-Peer Printing (Windows), 41Physical Description, 15Power Indicator LED, 15Power Requirements, 58Print Queue (OS/2), 47Print Server Mode (NetWare), 28Printer Ports, 6Property Pages, 27Protocols, 57PSERVER, 8
RRemote Printer Mode (NetWare), 28RPRINTER, 8
SSecurity, 10, 58Set up of the Network, 18Setting up
NetWare, 23OS/2, 45Windows, 33
SPX, 19Supported Systems, 57
TTechnical Specifications, 57Technical Support, 59Test Button, 15, 50Testing the Printer Connection, 16
WWeight, 58Windows, 33, 57Wizard, 20World Wide Web, 59
64 AXIS 150/152 User’s Manual