unusual point of view, glowing light, stopping action and showing action
TRANSCRIPT

For a wheel’s-eye view, clamp your camera to a fender and go
Along for the RideWHEN THE German magazine Stern approached Donald Miralle (www.donaldmiralle.com) to shoot a new line of Harley-Davidson motorcycles, the Carlsbad, CA-based commercial and editorial photographer was thrilled. Then it hit him: “I’d had
very little experience shooting moving vehicles!”
It helped, though, that Miralle had a particular image in mind—the one shown here. “My aim was to fi nd an angle on this subject that no one had yet documented,” he says. “While I
HOW * YOU CAN DO IT
DO
NAL
D M
IRAL
LE F
OR
STE
RN
may not have entirely succeeded, I feel I did place my own per-spective and spin on it.”
Capturing that image required some very specialized gear. Miralle attached his camera to the Harley using a redundantly secured set of clamps and brack-
48 POPULAR PHOTOGRAPHY DECEMBER 2009
SIMPLE COMPLEX
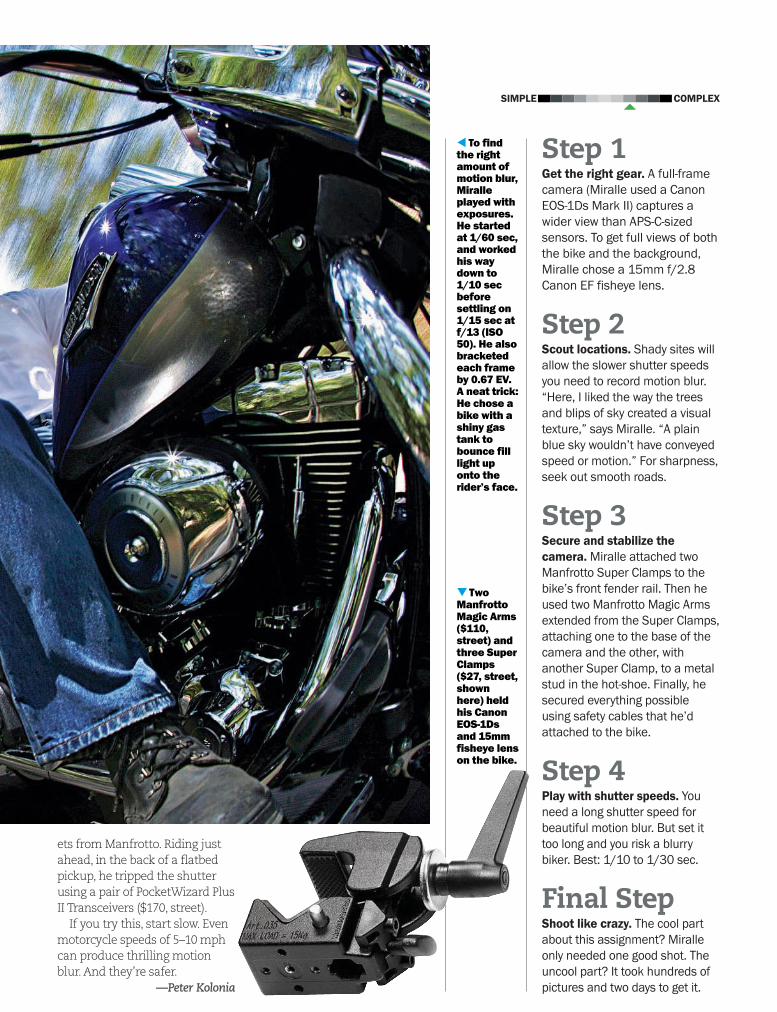
TTwo Manfrotto Magic Arms ($110, street) and three Super Clamps ($27, street, shown here) held his Canon EOS-1Ds and 15mm fisheye lens on the bike.
W�To find the right amount of motion blur, Miralle played with exposures. He started at 1/60 sec, and worked his way down to 1/10 sec before settling on 1/15 sec at f/13 (ISO 50). He also bracketed each frame by 0.67 EV. A neat trick: He chose a bike with a shiny gas tank to bounce fill light up onto the rider’s face.
Step 1 Get the right gear. A full-frame camera (Miralle used a Canon EOS-1Ds Mark II) captures a wider view than APS-C-sized sensors. To get full views of both the bike and the background, Miralle chose a 15mm f/2.8 Canon EF fisheye lens.
Step 2 Scout locations. Shady sites will allow the slower shutter speeds you need to record motion blur. “Here, I liked the way the trees and blips of sky created a visual texture,” says Miralle. “A plain blue sky wouldn’t have conveyed speed or motion.” For sharpness, seek out smooth roads.
Step 3 Secure and stabilize the camera. Miralle attached two Manfrotto Super Clamps to the bike’s front fender rail. Then he used two Manfrotto Magic Arms extended from the Super Clamps, attaching one to the base of the camera and the other, with another Super Clamp, to a metal stud in the hot-shoe. Finally, he secured everything possible using safety cables that he’d attached to the bike.
Step 4 Play with shutter speeds. You need a long shutter speed for beautiful motion blur. But set it too long and you risk a blurry biker. Best: 1/10 to 1/30 sec.
Final Step Shoot like crazy. The cool part about this assignment? Miralle only needed one good shot. The uncool part? It took hundreds of pictures and two days to get it.
ets from Manfrotto. Riding just ahead, in the back of a flatbed pickup, he tripped the shutter using a pair of PocketWizard Plus II Transceivers ($170, street).
If you try this, start slow. Even motorcycle speeds of 5–10 mph can produce thrilling motion blur. And they’re safer. —Peter Kolonia
POPPHOTO.COM POPULAR PHOTOGRAPHY 49

NOTICE HOW shadow-free and radiant the face in this minimally retouched portrait is? That’s because Nashua, NH-based photographer Sid Ceaser (www.ceaserphotography.com) nailed 1:1 clamshell lighting for it. The technique got its name because
it’s often done with two softboxes set at angles so their diffusion panels nearly touch, like an open clamshell. It’s particularly good for 1:1 lighting ratios.
In standard portrait lighting, if you want to bring out the shape of a person’s face, you often use two frontlights—a main and a fill, the former brighter than the latter. This very popular light-ing style (a 1:2 ratio) paints faint
shadows below the cheekbones, nose, and chin that pop the face three-dimensionally. These shadows, however, can be tricky, because they will also appear under wrinkles and blemishes, to unflattering effect.
Luckily, there’s an easy fix: Dial up your fill until it matches the main. This shadowless 1:1 light-ing can downplay, even erase, signs of an iffy complexion.
For the smoothest skin possible, try a clamshell
Glow Light
CEAS
ER P
HO
TOG
RAP
HY
HOW * LIGHTING
Sometimes called a “light-over-light” setup, the clam- shell technique and a 1:1 lighting ratio Sid Ceaser used here can make skin glow.
48 POPULAR PHOTOGRAPHY JUNE 2010

Ceaser set his lights in the clas-sic clamshell position, with one above (usually on a boom) and aimed down at the subject, the other below and aimed upward. The space between the two was wide enough to give him a clear line of sight into his subject’s face. This setup effec-tively places the head and chest inside a light tent made up of the two diffusion panels.
“Clamshell lighting works best when the two primary light sources are close to the subject, where they can produce a gor-geously soft, wraparound light,” says Ceaser. “I avoid backing the lights too far from the subject, because the sources get small and the lighting harsh.”
If you can’t make a clam-shell because you don’t have two umbrellas or softboxes,
try putting a diffused light above and a reflector below your subject’s face. To achieve
something close to 1:1 lighting, experiment with the reflector’s position. You will almost cer-tainly have to place it closer in than the top light.
With proper lighting on model Vanessa Leigh’s face, Ceaser placed a third light behind her and off to the side. He powered it 1 stop over the main lights to put
some life in her hair and defini-tion on her cheek and jawline.
“Be careful when lighting subjects with dark hair against a dark background,” he warns. “The hair can disappear unless you have some kind of light to help separate it.”
Exposure also played an important role in achieving the glowing skin tone here. “I tend to shoot on the brighter side because I like a face to have a luminous quality,” says Ceaser. “Usually I will overexpose just a tiny bit from my metered read-ing to add a pinch of luminos-ity. The background hair light I adjust to taste.”
Want a more brilliant look? Remove the diffusion panels from silver-lined softboxes and set up a clamshell. You won’t believe the silvery glow the light-ing takes on. —Peter Kolonia
POPPHOTO.COM POPULAR PHOTOGRAPHY 49
KR
IS H
OLL
AND
/MAF
IC S
TUD
IOS
SIMPLE COMPLEX
THE GEAR
The top “shell” of Sid Ceaser’s clamshell setup was a ceiling-mounted AlienBees B800 monolight in a softbox (A). The bottom was a B800 shot through a translucent umbrella (B). To get this light low enough, he mounted it on a mini lightstand whose legs sit flat on the floor for a lower-than-usual height (similar to Lowel's UN-33 Uni-stand). A third B800 focused by a 20-degree gridspot (C) and a household fan (D) added life to the hair. He metered his strobes using a Sekonic L-358 flash meter, and fired them wirelessly with a Paul C. Buff CyberSync flash trigger. The background? A roll of black seamless suspended from a background stand (E).
HOW TO SET UP YOUR LIGHTS
A
B
C
D
E
AlienBees B800 studio monolight with standard reflector ($280, direct)
Paul C. Buff CyberSync CST wireless flash trigger ($60, direct)
Sekonic L-358 Flash Master flash and ambient light meter ($260, street)

Light can stop motion, but sound can help, too
DancingPaint
HOW * LIGHTING
38 POPULAR PHOTOGRAPHY AUGUST 2010
RYA
N T
AYLO
R

like this, I want the power as low as possible to eliminate motion blur, but high enough that I can set a small aperture such as f/22 for maximum depth of fi eld.”
After some trial and error, he determined exposure and was ready to shoot. He dimmed the room lights, opened the camera’s shutter, and hit the laptop’s Play button. The sound blasted, the paint jumped, the fl ash popped, and the picture was his. —Peter Kolonia
beam is broken,” explains Tay-lor. “I set its adjustable timer to delay fl ash fi ring for 50 mil-liseconds, just enough time to ensure that the paint drops would reach maximum height.”
Finally, to render his active subject as sharply as possible, Taylor set the Speedlites to low manual-power settings (1/32 power) for extremely short fl ashes of about 1/20,000 sec. “The shorter your fl ash dura-tion, the sharper your moving subject,” Taylor says. “For shots
Taylor made his paint drops by thinning Crayola waterbased paints to an optimum viscosity. He placed the paints on the deflated white balloon using an eyedropper, three or four drops per color.
POPPHOTO.COM POPULAR PHOTOGRAPHY 39
SIMPLE COMPLEX
THE GEAR
To freeze these paint drops in flight, photographer Ryan Taylor started by downloading a free audio signal generator, Multisine, to his laptop (A). He used it to send a 120-Hz signal through a conventional amplifier (B) and on to a stereo speaker (C). When the microphone (D) of Taylor’s StopShot audio trigger (E) sensed the signal, it responded by firing two Canon 580EX II Speedlites (F) whose 1/20,000-sec bursts illuminated and froze the paint drops (G) in midair. In an otherwise dark room, Taylor captured the moment with a tripod-mounted Canon EOS Rebel T1i (H) and 55–250mm f/4–5.6 Canon EF-S IS zoom. Exposure: 1.3 sec at f/22, ISO 100.
HOW TO USE FLASH TO STOP ACTION
Canon EOS Rebel T1i
($610, street,
body only)
HE
A
B
C
Canon 580EX II Speedlite shoe-mount
flash ($445, street)
KR
IS H
OLL
AND
/MAF
IC S
TUD
IOS
AN EARTHQUAKE in an art sup-ply store? No, but close.
Like Mark Watson, who showed us in the February 2010 You Can Do It how to use a sound-activated fl ash trigger to freeze a shattering pencil point, Ryan Taylor (www.ryantaylorphotography.com) of Cedar Rapids, IA, used one to capture fl ying paint. But his strategy had a twist: The sound that activated his fl ash also triggered his subject —by making the paint fl y off an elastic, latex sheet stretched over a conventional stereo speaker. Here’s how he made the image in more detail:
First, to generate the rever-berating, low-frequency pulse that sent these paint drops into fl ight, Taylor used a free soft-ware download called Multisine. This allowed him to create a 120-Hz sine wave, which he played through a laptop con-nected to the amplifi ed speaker.
Next, he stretched a defl ated white balloon (the latex ele-ment) over a plastic insert set in the speaker. Since the balloon and paint drops were small, he didn’t need a larger surface. The balloon’s elasticity held it in place—no rubber bands or tacks required.
To illuminate the set, he put a lightstand-mounted Canon Speedlite 580EX II fl ash, with an 8-inch, infl atable softbox, to the front right of the speaker. A second 580EX II fl ash to the left of the speaker lit both the subject and backdrop—white paper draped in the shape of a seamless sweep. Taylor fi red both Speedlites with a StopShot fl ash trigger ($300, direct; www.cognisys-inc.com).
“The StopShot is a multi-purpose fl ash/camera trigger that fi res either when it detects a sound or when its infrared
StopShot camera and flash trigger
($300, direct)
G
F
FD

Panning TrickSHOOTING FOR a blurred panning effect —by moving with your subject to keep it sharp while the background goes fuzzy—isn’t easy. It takes planning, practice, and often some cooperation from your subject. And sometimes you find yourself in a situation where, as much as you’d like the effect,
you’re unable to manage it—such as when you’re shooting a moving subject out the window of a train, as with the image here. Fortu-nately, motion blur, like many photographic effects, is possible to recreate with software.
Here’s how to create a panning effect using Adobe
Photoshop. This tutorial takes advantage of CS5’s new tools like Content-Aware Fill and Smart Objects, but the instructions can be used in older versions of Photoshop and Photoshop Elements—you only really need Layers and the Motion Blur filter.
—Debbie Grossman
Emphasize motion by faking some blur
HOW * SOFTWARE WORKSHOP
40 POPULAR PHOTOGRAPHY AUGUST 2010
LLU
IS G
ERAR
D L
OPE
Z (O
RIG
INAL
)

F.Y.I. THE MOST COMPLICATED PART of this tutorial is making the selec-tion. We used the Quick Selection tool, followed by the Brush tool, in Quick Mask mode. But other meth-ods could work, too. If the subject you want to separate is, on the whole, a different color from the background, try using Select > Color Range. Hold down the Shift key and click on mul-tiple points of your subject to get a selection. The Magic Wand is usually inferior to the newer Quick Selec-tion tool, but it will occasionally work when Quick Selection has failed you.
POPPHOTO.COM POPULAR PHOTOGRAPHY 41
Duplicating the Back-ground Layer ensures that you always have your original to go back to, even if you mess up.
Step 1First, as always, duplicate your Background Layer before you start. To fake the blur, you’ll need to select the subject, move her to her own separate layer, then blur the background. If you blur the back-ground without fi rst cloning out the cyclist, you’ll see a blurry cyclist behind a sharp one. So before you add the motion effect, remove her.
Step 2Begin by selecting the fi gure and her bicycle. Type W for the Quick Selection tool and paint to make the selection. Hold down the Alt key (Option on a Mac) to paint and remove a selection from where it
shouldn’t be. Then zoom in, and with a small brush, paint to cor-rect any over- or underselecting that this tool has done.
1
2
SIMPLE COMPLEX
POPPHOTO.COM42 POPULAR PHOTOGRAPHY AUGUST 2010
HOW * SOFTWARE WORKSHOP
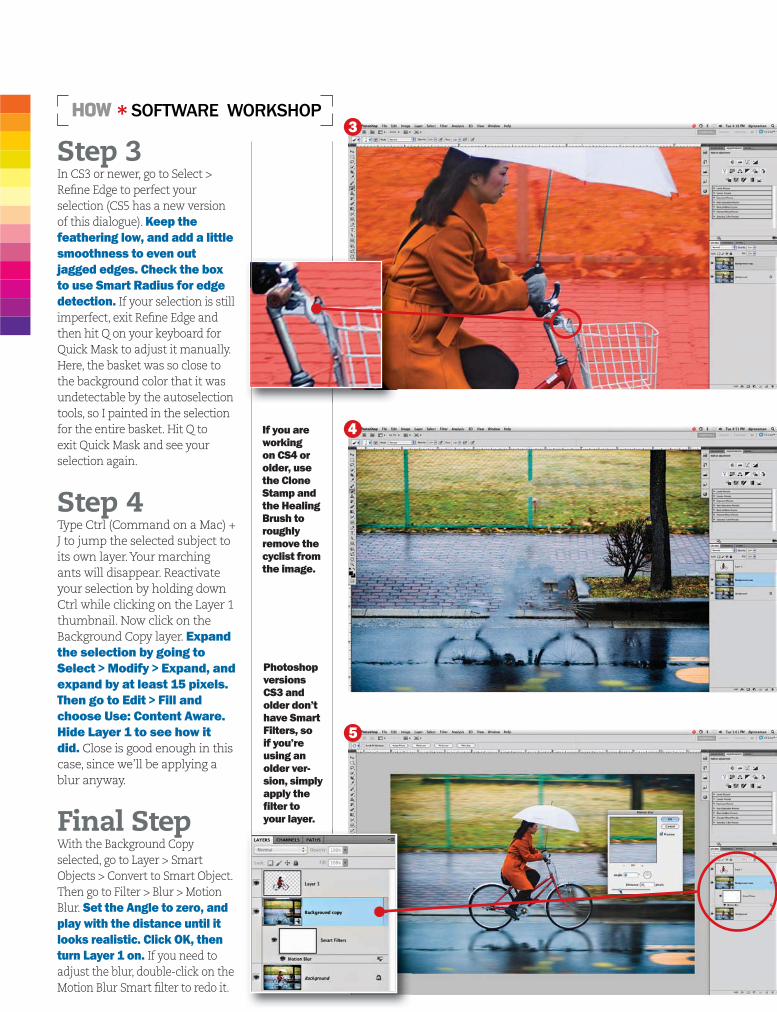
Step 3In CS3 or newer, go to Select > Refi ne Edge to perfect your selection (CS5 has a new version of this dialogue). Keep the feathering low, and add a little smoothness to even out jagged edges. Check the box to use Smart Radius for edge detection. If your selection is still imperfect, exit Refi ne Edge and then hit Q on your keyboard for Quick Mask to adjust it manually. Here, the basket was so close to the background color that it was undetectable by the autoselection tools, so I painted in the selection for the entire basket. Hit Q to exit Quick Mask and see your selection again.
Step 4Type Ctrl (Command on a Mac) + J to jump the selected subject to its own layer. Your marching ants will disappear. Reactivate your selection by holding down Ctrl while clicking on the Layer 1 thumbnail. Now click on the Background Copy layer. Expand the selection by going to Select > Modify > Expand, and expand by at least 15 pixels. Then go to Edit > Fill and choose Use: Content Aware. Hide Layer 1 to see how it did. Close is good enough in this case, since we’ll be applying a blur anyway.
Final StepWith the Background Copy selected, go to Layer > Smart Objects > Convert to Smart Object. Then go to Filter > Blur > Motion Blur. Set the Angle to zero, and play with the distance until it looks realistic. Click OK, then turn Layer 1 on. If you need to adjust the blur, double-click on the Motion Blur Smart fi lter to redo it.
If you are working on CS4 or older, use the Clone Stamp and the Healing Brush to roughly remove the cyclist from the image.
3
4
5
Photoshop versions CS3 and older don’t have Smart Filters, so if you’re using an older ver-sion, simply apply the fi lter to your layer.