university of florida student academic support system...
TRANSCRIPT

University of Florida
Student Academic Support System
Coordinator's Guide
Table of Contents
A. Sass Web Sign on
B. Introduction
C. Understanding The Student Audit
D. SASS Web Menu
E. Requirement Definition
F. Degree Program Definition
G. Student Program Exceptions
1.1 Data Entry Hints
1. Advisor Comment
2. Course Substitution
3. Course Waiver
4. Requirement Add
5. Requirement Revise
6. Requirement Substitution
7. Requirement Update
H. Management
I. Universal Tracking (UT)
J. Frequently Asked Questions
APPENDICES

1. PRINT CODES
A. SASS WEB SIGN ON
To begin the sign on process, access the UF home page at WWW.UFL.EDU from your Internet
Browser. In most cases it will either be Internet Explorer or Mozilla. Once the UF home page is
displayed, click on the ‘MyUFL’ link.


MyUFL ACCESS
To continue, click the ‘Access myUFL’ button.

GATORLINK SIGN ON
To continue the sign on process, enter your Gatorlink ID (Username) and password. Then click
the ‘Login’ button.

MyUFL Menu
Continue the sign on process by selecting ‘ISIS Admin’ under ‘Quick Links’ from your myUFL
Menu.

This will display your access to the ISIS Admin system. The menu items listed on the left will
vary depending on your security access.

B. INTRODUCTION
This document was created to help guide you through the various screen of the Student Academic Advisement
System (SASS) using the web. If you have any questions or comments, please feel free to email them to SASSWEB-
The Student Academic Advisement System (SASS) is an automated system, which evaluates a
student's academic record (transcript) in reference to the completion of the requirements of a
particular degree program. The result of this evaluation is an audit, which may be viewed on-line
or in a printed report.
In order for SASS to produce audits three primary files must be created and maintained by each
individual College. The files are as follows:
I. REQUIREMENT DEFINITION files serve two functions:
1) They control what courses and conditions are necessary to satisfy the requirements of a degree
program.
2) They determine the format in which the audit will be displayed or printed.
II. DEGREE PROGRAM DEFINITION file contain all of the requirements used to produce the
audit. This file determines the order in which requirements will appear on the audit and if
courses are allowed to satisfy only one requirement or multiple requirements.
III. STUDENT PROGRAM EXCEPTION file provide the College the flexibility to allow
curriculum exceptions for an individual student for a particular degree program.
The Data Processing department within the Registrar's Office maintains the following files:
I. GRADES/CONDITION CODES file, which controls the quality points, associated with each
grade and the condition codes that identify transfer course work and work taken at UF before and
after earning 60 hours. Refer to the Requirement Definition section for more information on the
use of condition codes.
II. COURSE EQUIVALENCY files which contains a list of course prefix and numbering
changes.
Training on the creation, use, and maintenance of the Requirement Definition file, Degree
Program file, and Student Exception file will be provided to each individual College by the
SASS Coordinator.

C. UNDERSTANDING THE STUDENT AUDIT
A student audit is an evaluation of the student's transcript in reference to the requirements of a
particular major and degree. The results may be viewed on-line or in a printed report called an
audit. The audit begins with general information, including:
UFID
Student’s name
Catalog year
Degree program
Following this general information are numerous groupings of course work known as
REQUIREMENTS. A horizontal line separates each grouping. The individual College
determines the content and order of these groupings, as well as, the amount of information
displayed or printed following standardized formatting guidelines established by the Office of
Undergraduate Affairs. Courses do not necessarily appear in chronological order, but appear
grouped according to the sub-categories listed in each requirement.
To read the SASS audit, it is important to understand the indicators used on the audit to denote
the status of a particular requirement. Indicators are listed below and denoted within quotation
marks.
‘ ‘ indicates the student has NOT SATISFIED all of the elements of a requirement.
‘ ‘ indicates the student has satisfied all of the elements of a requirement.
‘IP’ indicates the student is currently registered for the last class necessary to satisfy all of the
elements of a requirement.
‘AA’ indicates the student was awarded an Associate of Arts degree, which satisfies all of the
elements of a requirement.
‘+’ indicates this particular sub requirement (sub-category) of the requirement has been satisfied.
‘-’ indicates this particular sub requirement (sub-category) has not been satisfied.
‘RG’ in the grade field which appears after the credit hours of the course means the student is
currently registered for the course.
‘P’ in the grade field means the student was awarded AP, IB or CLEP credit for the course.
‘T’ following the actual grade means the course was taken at another 4 year institution.

‘J’ following the actual grade indicates the course was taken at a junior college (some now
known as State Colleges.
‘_’ (underscore) following the actual grade indicates the course was taken at UF prior to earning
60 credit hours.
‘ ‘(blank) following the actual grade indicates the course was taken at UF after earning 60 credit
hours.
‘EARNED: 30.00 HOURS 3.450 GPA’ indicates the total number of hours used to satisfy the
requirement. The total GPA for the courses used is 3.450.
‘NEEDS: l SUB-REQ’ indicates the number of sub requirements not satisfied.
9608 ENC1101 3.00 B _
9608 indicates the course was completed in the Fall of 1996.
ENC1101 indicates the course prefix and number.
The _ (underscore) following the grade is a symbol which indicates the course was completed
within the first 60 hours of acceptable course work at UF.
To exit the audit display, click the ‘Degree Audit’ link located on the left menu bar or in the
menu bar located at the top of the page.

STANDARDIZED AUDIT FORMATTING GUIDELINES
MAJOR NAME – SPECIALIZATION (IF APPLICABLE)
COLLEGE NAME
CLICK TO VIEW CRITICAL TRACKING & SEMESTER PLAN
(This links to the Undergraduate catalog and is maintained by the SASS coordinator)
1. SUMMARY OF UNIVERSAL TRACKING CRITERIA
2. CRITICAL TRACKING GPA (if based on all attempts)
3. ADDITIONAL PREREQUISITE COURSEWORK
4. REVIEW OF GENERAL EDUCATION REQUIREMENTS
GRADE OF C OR BETTER (NO S GRADES)
5. INTERNATIONAL AND DIVERSITY FOCUS
GRADE OF C OR BETTER (NO S GRADES)
6. SUMMARY OF MAJOR CORE COURSES

7. SUMMARY OF SPECIALIZATION COURSES
8. ELECTIVES (IF REQUIRED)
9. EXIT REQUIREMENT (IF APPLICABLE) This is manually waived by the College.
10. GPA IN DEPARTMENTAL COURSES
11. UPPER DIVISION HOURS
12. UPPER DIVISION GRADE POINTS
13. UPPER DIVISION GPA
HONORS AWARDED BASED ON A MINIMUM GPA OF X.XX
CLICK TO VIEW THE HONORS CRITERIA FOR YOUR COLLEGE
#.## GPA
14. SUMMER ENROLLMENT AT ANY STATE OF FLORIDA UNIVERSITY.
WORK AT STATE/COMMUNITY COLLEGES DOESN'T COUNT.
15. RESIDENCY: LAST 30 HOURS MUST BE TAKEN AT UF.
16. COLLEGE LEVEL ACADEMIC SKILLS REQUIREMENT
PLEASE SEE YOUR ADVISOR IF YOU HAVE ANY QUESTIONS
17. UNIVERSITY WRITING REQUIREMENT
18. UNIVERSITY MATH REQUIREMENT
19. UNIVERSITY OF FLORIDA CUMULATIVE GPA

20. UNIVERSITY ADMISSION REQUIREMENT: LANGUAGE
21. HOURS EARNED (INCLUDES CURRENT REGISTRATION)

D. SASS WEB MENU
The SASS Web menu consists of menu items listed down the left side of the screen and
additional links for selected menu items listed across the top. You can access any of these items
by clicking on the underline words or links.
Depending on the level of access you request or need, will determine the availability of some
screens. For example, if you need to create or modify requirements or degree programs, you will
have a link labeled ‘Management’ under the ‘Administrative’ tab on the left menu bar. If you can
only post student exceptions, then the ‘Management’ link will not appear.
The default screen displayed is the Degree Audit and is located under the Student tab.
To run an audit, enter the student's UFID and press ENTER or click the Submit button. The
screen will display the default degree program and catalog year for the student. Click on the
‘Complete Audit’ button to run a full audit, ‘Unmet Audit’ button to view only the unmet
requirements or ‘Critical Tracking Criteria’ to view the Universal Tracking requirements used
for monitoring.
To run an audit with a different degree program or catalog year, simply enter the new degree
program in the field labeled ‘Degree Program Code’ and/or enter a new catalog year in the field
labeled ‘New Catalog Year’ and click the ‘Complete Audit’ button. You can also use the ‘Shop
by Major’ under Degree Shopping.
To run an audit to Generate Free Electives, click the dot labeled ‘Yes’. This function is used
mostly for graduating seniors to verify the ‘Total Hours Used Toward the Degree’ equals or
exceeds the total hours required for the degree.
If you would like to run the audit to display only the Unmet requirements for the student, then
click the ‘Unmet Audit’ button.


E. REQUIREMENTS
A REQUIREMENT is either an informational box or a set of courses from which a student must
select one, some or all to meet an academic regulation. For example, a Requirement may identify
course work required for a particular MAJOR. It may contain a variety of information such as,
course prefixes and numbers, number of hours required for the major, minimum GPA etc.
You must utilize the Requirements List or Develop Requirements List link initially to locate the
first requirement you wish to view. If you wish to view an additional requirement, you may
return to the Browse List and enter in the requirement name in the field labeled Requirement or
enter the Requirement name and catalog year directly in the Requirements or Develop
Requirements screen.
Naming conventions for Requirements in the Graduation audits:
There are naming conventions to following when creating new requirements. All requirements in
the graduation audit to monitor things such as Universal Tracking, Prerequisites, Major core
coursework and/or specialization course work must begin with the 2 character college code,
followed by a hyphen, then the 3 character major or specialization code. The last 3 characters are
used to denote what the requirement is such as GPA, MAJ(major), UT(Universal Tracking), etc.
For example, HH-HEBUT would denote the requirements for Universal Tracking for the major
of HEB in the College of Health and Human Performance.
Naming conventions for Requirements in the Universal Tracking audits:
All requirements in the Universal Tracking audit to monitor things such as Critical coursework,
GPA, General Education must begin with the 3 characters UT-. In the remaining 6 characters are
used to denote what the requirement is such as GPA, Courses, Gen Ed, etc. and must contain the
Semester number in which the coursework, GPA or Gen Ed are requirement.
For example, UT-HEB1GE would be a requirement which would monitor for the completion of
some amount of General Education coursework in Semester 1.

To display a requirement, click on the Administrative tab and then click the Requirement link on
the left menu. The Requirement List link is the default link displayed. To begin the list, enter all
or part of the Requirement name. Then click the Submit button. Click the View button to the left
of the Requirement you wish to see. The Requirement is displayed in a Read Only mode
indicated by the gray (smoke) background color of the screen.
REQUIREMENT LIST (Production not updatable)

REQUIREMENT VIEW (Production not updatable)

To create or modify Requirements, click on the ‘Development’ link on the left menu. The
Develop Requirements List link is the default link display. The screen will appear with a peach

background. To begin the list, enter all or part of the Requirement name. Then click the Submit
button. Click the View button to the left of the Requirement you wish to see. The Development
Requirement displayed will be in an Update mode.
You may then change any data on the screen you wish. You are always in UPDATE mode on
this screen and once you press enter any information typed on the screen becomes a part of the
record.
DEVELOPMENT REQUIREMENT LIST
DEVELOPMENT REQUIREMENT VIEW (Updatable)


REQUIREMENT CONTINUED
To Delete a requirement, click on the Delete box above the ‘Requirement’ name. Then click the
Submit button. NOTE: This can only be done in Development.
SHORT CUTS IN WRITING NEW REQUIREMENTS: If you have various groups of courses
which can be used for additional hours for the major but are not required
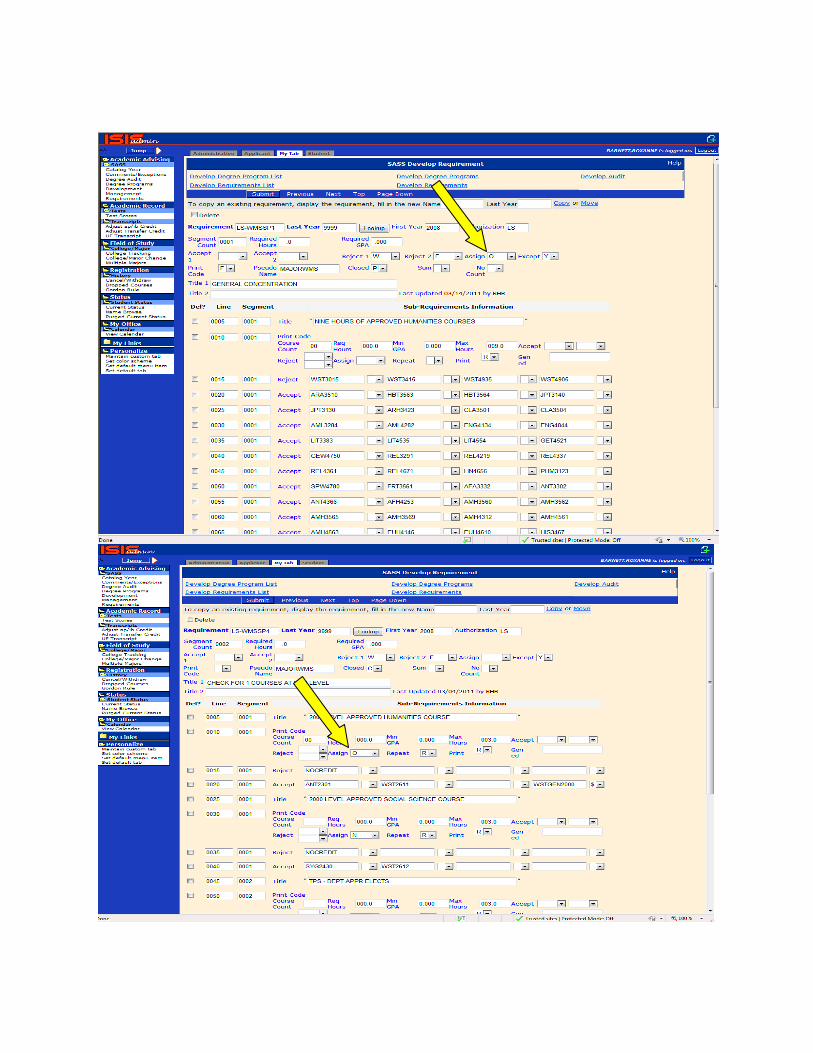
1. Create a new requirement. Create each sub-requirement with the list of all the courses on the
‘ACCEPT’ line you want to be used. For example, you want to monitor for a maximum of one
2000 level course toward the major.
2. In the Assign field, assign a unique assign code not being used by any other Requirement on
the Degree Program. NOTE: These assign codes are used to identify General Education courses
therefore they cannot be used 1, <, >, ?, \, !
3. On the ‘CONTROL’ line, REQ HRS = 0000; MAX HRS = 9999 (or the maximum number of
hours you want the requirement to capture).
4. Insert the new Requirement on the Degree Program after the general education and give it a
‘B’ code to hide it the same way gen ed requirements are hidden.
5. In a separate requirement, ask for the specific assign code you asked for in the previous
requirement & code ****** D000001999999 on the ACCEPT line.


REQUIREMENT CONTINUED
NEW NAME - Enter your 2 digit college code followed by a dash followed by 1-6 letters or
numbers. For example, EG-SEM1. This field is used only for the COPY function.
LAST YEAR (In Gray box) - Enter the last year for which this requirement should be used.
Usually 9999 is used to designate this requirement applies to all future catalog years until further
notice. Should this change you would then enter the modified last year to the appropriate final
year for which it should apply. This field used only for the COPY function.
ADD A NEW REQUIREMENT – a link that will take you to another screen display where you
can enter the Requirement and Last Year to create a new requirement.
DELETE – This is used to Delete the entire Requirement. It will only delete the requirement if
your SASS authorization matches the Authorization of the requirement.
SUBMIT – Used to apply modifications made to any field of the requirement.
REQUIREMENT - Enter your 2-digit college code followed by a dash followed by 1-6 letters or
numbers. For example, EG-SEM1.
LAST YEAR - Enter the last year for which this requirement should be used. Usually 9999 is
used to designate the requirement applies to all future catalog years until further notice. Should
this change you would then enter the modified last year to the appropriate final year for which it
should apply.
FIRST YEAR - Enter the first year for which the requirement should be used.
AUTHORIZATION - The two letter college code assigned on the security file to the person creating the
requirement.
DEPT – The three letter major code assigned on the security file to the person creating the
requirement.
SEGMENT COUNT - This field tells the system how many sub-requirements must be satisfied
for this requirement. Usually this number matches the number of sub-requirements listed,
although there are exceptions.
LAST UPDATED - Each time the requirement is modified, the system notes the date of the
update.
BY - Each time the requirement is modified, the system notes the initials of the person making
the update.
REQUIRED HOURS - If you wish to check to ensure all of the courses used for all sub-
requirements combined equal some number, then you would enter the number is this field. The

number should be entered as 5 digits, for example 36 hours would be entered as 03600. Entering
data in this field is optional if you are checking for the necessary hours within each sub-
requirement.
REQUIRED GPA - If you wish to check for a GPA based on all courses used for all sub-
requirements, you would specify the GPA in this field. The GPA should be enter as a 5 digit
number for example 2.00 would be entered as 20000. Once you press enter the system places the
decimal point in the correct position.
ACCEPT 1 & 2 – This is a two byte field which allows you to specify grades, assign codes or
condition codes which you wish all courses which satisfy the requirement must meet. If you wish
to specify a particular grade for all courses used to satisfy all sub-requirements, enter the letter in
this field. For example, if you require a grade of ‘B’ or higher enter the letter B in this field. If
you require all courses with an assign code of ‘Z’ AND have a grade of ‘B’ or higher, you would
enter Z in the ACCEPT 1 field and B in the ACCEPT 2 field. You may also specify any code
which you may have previously assigned to a group of courses using the assign code field.
REJECT 1 & 2 - This is a two byte field which allows you to specify grades, assign codes or
condition codes which you wish to reject. For example, WF would reject all courses with a grade
of ‘W’ (withdrawals) OR ‘F’ (failed).
ASSIGN - You may assign any single character code, numerical or alpha in this field. This code
will then be assigned to all courses used to meet this requirement. For example, you may want to
compute a GPA for the courses listed in this requirement and call it GPA 4. You may enter the
number 4 in this field and then write another requirement in which you ACCEPT (Accept field)
all courses with a ‘4’ and display the computed GPA.
EXCEPT - This field determines who may post to this requirement. An N or a blank in this field
limits this ability to the college writing the requirement. A Y means anyone from any college
with the ability to write Student Exceptions may make an Exception to this Requirement.
PRINT CODE - This code determines the format of the SASS audit. Valid codes are listed
below: See Appendix for examples. #EXAMPLES
· Blank = all available information should be printed.
· A = Requirement will not appear on the printed audit. However, it will appear in the audit
file.
NOTE: This option may be used ONLY at the requirement header level. Overrides all other
print options at the sub-requirement level.
· D = suppresses the ‘earned line’ at the header level and the ‘added’ line at the sub-
requirement level.
· E = suppresses the ‘earned line’ at the header level and the ‘added line’ at the sub-
requirement level. It also suppresses the listing of courses applied toward a requirement's
completion
· F = suppresses the ‘earned line’ at the header level and the ‘added line’ at the sub-
requirement level. It also suppresses the listing of courses to select from to meet the

requirement.
· G = suppresses the ‘earned line’ at the header level and the ‘added’ line at the sub-
requirement level. It also suppresses the printing of the courses a student may select from
beginning with the first pseudo-course.
· H = suppresses the ‘earned line’ at the header level and the ‘added’ line at the sub-
requirement level. Also, it collapses the sub-requirement data to a listing of courses used toward
the requirement’s completion even when the requirement is NOT completed. NOTE: This
option may be used ONLY at the requirement header level. Overrides all other print options at
the sub-requirement level.
· I = functions exactly like the ‘T’ print code except the SELECT FROM and NOT FROM
lines are displayed. This print option is one of two most commonly used.
· K = prints everything except the ‘ADDED’ line at the sub-requirement level.
· L = prints only the SELECT FROM and the NEEDS info.
· N = prints the list of courses from which a student may select to satisfy the requirement
but does NOT print the courses the student has taken.
· O = normal processing except courses a student may select from to satisfy a sub-
requirement that has not yet been satisfied are suppressed.
· P = prints all the data from the SELECT FROM list until it reaches a pseudo-name
indicated by $.
· Q = prints the courses the student has taken but NOT the list of available courses.
· R = suppresses the ‘earned line’ at the header level and the ‘added’ line at the sub-
requirement level. Also, it collapses the sub-requirement data to a listing of the courses used
towards a requirement’s completion only when a requirement is NOT completed. When the
requirement is completed, it suppresses the listing of courses.
· S = normal processing except sub- requirement information will be suppressed. Only
courses used to satisfy the requirement are displayed.
· T = Resembles Option F. However, it also suppresses the ‘needs line’ at the sub-
requirement level. This print option is one of two most commonly used.
· U = Prevents the collapsing of the sub-requirement data when a requirement is completed.
It resembles Option L, however, it suppresses the printing of the ‘earned line’ at the header level
and the ‘added line’ at the sub-requirement level.
· X = prints only summary information.
· Y = Prints ‘earned line’ and ‘needs line’ at header level. Also, it prints titles, ‘added lines’
and Needs lines’ at the sub-requirement level without printing the courses used to satisfy the
sub-requirement. This option is ONLY used at the header print level.
· Z = Eliminates the sub-requirement title lines and allows the printing of only the courses
used toward satisfying the sub-requirement. This option is used ONLY at the sub-requirement
print option level.
7/97 software update: All print codes were modified to stop printing when it reaches the
pseudocourse. This means if you list courses on the accept line after the pseudocourse (identified
by $), the courses will be used for processing but will not appear on the SELECT FROM line on
the audit.
PSEUDO NAME - This field is used for GORDON, CLASR (CLAST) and GEN-ED. Flags are
generated by the system to indicate if the Requirements have been satisfied. This field is also

now being coded to help identify requirements created with coursework for the major, Universal
Tracking and specialization. Flags are generated by the system to indicate if the Requirements
have been satisfied.
CLOSED - Use the CLOSED INDICATOR field on the Requirement file to close a satisfied
requirement when max hours or course count is reached.
· 'C' - the sub-requirement is satisfied upon reaching the hours specified in the Max Hours
field on the C line of the sub-requirement. There is no additional consideration given to using
the courses in a more efficient manner. The sub-requirement is closed immediately when the
Max Hours is reached. Courses are in year-term order from oldest to most recent, and are used
in that order.
· 'P' - courses are placed in the sub-requirement and then the courses go through the
reshuffle process, when the requirement is grouped. The sub-requirement however is not closed
until courses are reshuffled for grouped requirement. After the courses are reshuffled, the
requirement is then closed if maximum hours are met.
· 'S' - the requirement will be satisfied if the required number of Segment Count is met.
SUM – Use in conjunction with the ACCEPT field on a requirement to summarize only previous
multiple requirements that have assign codes attached to them.
NO COUNT – This field determines whether or not the courses used to satisfy the requirement
count in the TOTAL HOURS USED TOWARD THE DEGREE. If the field is blank, then all
courses count in total. If the field is ‘Y’, then all courses are not counted.
TITLE 1 - Text fields. Information in this field will appear as the Title of the Requirement on the
audit. For example, ‘GENERAL EDUCATION REQUIREMENTS’.
TITLE 2 - Allows you a second line of header text.
NOTE:
Data entered in the fields above apply to the entire Requirement. This means it will apply
to all Sub-Requirements in the Requirement.
Data entered in the fields below apply to a particular Sub-Requirement. This allows you to
vary the conditions per Sub-Requirement. These fields appear under the section of the
screen labeled ‘Sub-Requirements Information’.
DEL? – Used to Delete the specific line from the requirement. You must click the Del? Box and
then click the Submit button.
LINE - Four digit field which indicates the line number of this Sub-Requirement.
SEGMENT: Four digit field which indicates the Sub-Requirement segment number or grouping

of courses.
Two or more, adjacent, sub-requirements given the SAME segment number will be considered
as OPTIONS or OR’D to satisfy this sub-requirement. For example:
This sets up the situation that whenever a course from whichever area is taken (Either 3
Anthropology courses OR 2 Anthropology courses and Statistics), then the sub-requirement has
been satisfied.

A Requirement may also contain several different required sub-requirements. Each sub-
requirement will have a different segment number.
This sets up the situation of two different areas are required (One CHM prefixed course AND 1
MAC prefixed course), then the sub-requirement has been satisfied.
TITLE - You are provided 74 spaces per line to enter additional descriptive text if you choose.
Information entered here will serve as the title for the sub-requirement. A maximum of twenty
lines may be entered per sub-requirement.
CONTROL - This is called the control line and consists of the following fields:
COURSE COUNT - Two digit field which indicates the MINIMUM number of courses that
must be taken to satisfy this particular Sub-Requirement. Possible entries are blank, 00-99.
REQ HOURS - Four digit field which indicates the MINIMUM number of credit hours needed
to satisfy the Sub-requirement. Valid entries range from blank to 9999. If the sub-requirement is
monitoring for 3 credit hours it will appear as 003.0.

MIN GPA - Specifies a MINIMUM GPA (if appropriate) for the courses listed in this sub-
requirement. Valid entries range from blank to 4.000.
MAX HOURS - Indicates the MAXIMUM number of credit hours that may be used to satisfy
this Sub-requirement. Valid entries range from Blank to 9999. 12 credit hours appear as 012.0.
PLEASE NOTE: SASS will list all courses completed that may be accepted, even if they exceed
the MAX HOURS. However, only the number indicated in the MAX HOURS field will be
subtracted from the number indicated in the HRS field (at the top of the Requirement).
For example: A 9 hour physical/biological science requirement could be written as follows: 9
hours in the HRS field, 3 hours in the REQ HOURS and 6 in the MAX HOURS field. This
would indicate that a minimum of 3 hours is required and that a maximum of 6 hours will be
applied towards the 9 total hours required.
ACCEPT - A maximum of 2 condition codes (previously defined in Grades/Condition Codes
Table or a previous Requirement) may be specified as ACCEPT criteria. This may or may not be
in addition to those indicated in the header information field Accept 1 & 2. The ACCEPT criteria
entered at the sub-requirement applies only to that particular sub-requirement. The ACCEPT
criteria entered in the ACCEPT 1 & 2 field applies to all sub-requirements in this Requirement.
You may use either or both or neither depending on what you wish to accomplish. Using both the
ACCEPT 1 & 2 and ACCEPT fields allows you to utilize a maximum of 4 condition codes.
REJECT - A maximum of 2 condition codes may be used as rejection criteria for the courses in
this sub-requirement. These condition codes will be rejected in addition to those that may have
been specified in the REJECT 1 & 2 field. (see above).
ASSIGN - This is a single character field in which you may choose to assign a code. The code
may be alpha or numeric but must not be one of the codes already predefined in the Grade Table.
This code will be assigned to all courses in this sub-requirement, i.e., you may wish to assign the
number 1 to all courses in this sub-requirement and later collect these courses for GPA purposes,
that is you may wish to calculate a major GPA or a General Education GPA etc.
REPEAT - This field allows you to indicate a reuse code. Possible entries are blank, R or S.
Blank = normal processing.
R= normal processing except that any course which satisfies this sub-requirement will not be
restricted from meeting
other requirements or sub-requirements. This code is useful when writing a Requirement to
check things such-as
overall GPA.
S = special purpose logic designed primarily to test for residency requirements. When this option
is selected, courses are
scanned for meeting this sub-requirement from the last course entered rather than from the first.
PRINT - Codes indicated in the PRINT field on the ‘Control’ line of a sub-requirement apply
ONLY to that Sub- Requirement.

See appendix for examples.
GEN ED - This field is used for GORDON, CLAST and GEN-ED only. Flags are generated by
the system that indicates the Requirements have been satisfied.
REJECT/ACCEPT/REUSE - This is the line on which you indicate the actual courses or course
prefixes that you wish to reject, accept or repeat for this sub-requirement. Always begin by
listing any courses you may wish to reject. For example, you want to accept all math courses
except MAT 1013. You would enter the following:
In this example, the sub-requirement would reject course MAT1013, accept all other courses
with a MAT prefix and additional accept MAC2312. In turn, the MAC2312 if used to satisfy this
sub-requirement would then be allow to satisfy another sub-requirement further on in the audit

regardless of whether the requirements were grouped or not.
NOTE: Reuse line can't be used in conjunction with ‘R’ code in the REPEAT field on the
‘Control’ line.
You may enter a maximum of 4 courses per line. Each course field is 14 spaces long. The
specific field location is indicated by a box. The symbol ***** following a prefix means that any
course number with that prefix will satisfy the selection i.e., MAT**** means MAT0000 thru
MAT9999 will be acceptable. The symbol #, i.e., MAT#013 means that any number in the #
symbol location will be acceptable i.e., MAT1013, MAT2013 etc. would be acceptable.

The single character box at the end of this field allows you to perform additional functions.
The possible codes that may be entered in this field are:
Blank - when this field is left blank the courses indicated on the accept line will be matched
accordingly.
$ allows you to enter a name which will be used later in identifying this particular sub-
requirement. This is called a pseudo-name and is utilized in entering data in the STUDENT
EXCEPTION file. An example of a pseudo-name is HUMANITY $. The $ sign is always
entered in the 14th space of the COURSE*******: field.
: indicates that a range comparison is needed. This value is assigned to the first course of a
course range check.
D indicates this course as one with which a particular date range is to be associated. The date
range will be entered in the next available box following the D code as two 6 digit term dates
using the format YYYYTTYYYYTT where YYYY = 4 digit year and TT = 2 digit term. For
example, 200308999999. This would only allow the course if it was taken in Fall 2003 and later.

SUB-REQUIREMENT
You have created a record using the Copy function and you are now ready to enter data in the
SUB-REQUIREMENT section of the screen. If you have created a record using the COPY
function, type over existing data to modify the record. You may also need to delete certain data
using one of the delete functions.
A sub-requirement may contain THE FOLLOWING:
‘Title’ line for text
‘Control’ line for control data
‘Reject’ line to reject courses
‘Accept’ line to accept courses
‘Reuse’ line to accept and reuse courses (This allows the course to be reused in another sub-
requirement in the audit one additional time. This overrides any Grouping code function on the
degree program.
Once you have created a new record you can updated the existing data as follows:
To enter data for a TITLE line, type your text in the box provided and press ENTER or click the
Submit button. The maximum number of characters for a Title line is 58. The maximum number
of Title lines allowed per sub-requirement is 20.
To enter data for a CONTROL line, tab to the first field you wish to use and enter the appropriate
data. Use the Tab key to access any additional fields for which you wish to enter data. To apply
the data, press enter or click the Submit button located at the top of the screen. A Control line
must be entered for each group of Course Selections.
For example, if you want to require 6 hours, you would key in the following: 0006 in the Req
Hours field and press ENTER or click the Submit button. The 6 hours will automatically display
as 006.0
To enter data on the Course selection line, place the cursor in the first box following the word
Reject, Accept or Reuse. NOTE: When using a combination of Reject, Accept or Reuse lines,
they must be listed in the sub-requirement in the following order: REJECT, then ACCEPT
and then REUSE. If you wish to enter more than one course, use the Tab key to skip to the next
big box and enter the next course. You may enter a maximum of 4 courses per line. The little
boxes following each of the bigger boxes are used to denote a Date Range or Pseudo Course
name. You may enter as many Reject, Accept or Reuse lines as necessary to list all courses to be
rejected, accepted or reused (total number of lines available for Requirement is 98).

SUBREQUIREMENT CONTINUED
To insert a sub-requirement, enter data in the boxes labeled Line, Segment, Type and # of lines
to add. Make sure the line number specified falls between two existing line numbers. Then click
the Add a new Sub-Requirement button. For example, if you wanted to insert a line between line
0080 and 0085, you would enter line number 0081 to insert.
To delete a line of a sub-requirement, click on the Del? box located at the left of each line. Then
click Submit button.
If the requirement has more than 20 sub-requirement lines, you can access the remainder of the
requirement by clicking the button Page Down located at the top or PG FWD bottom of the
display.
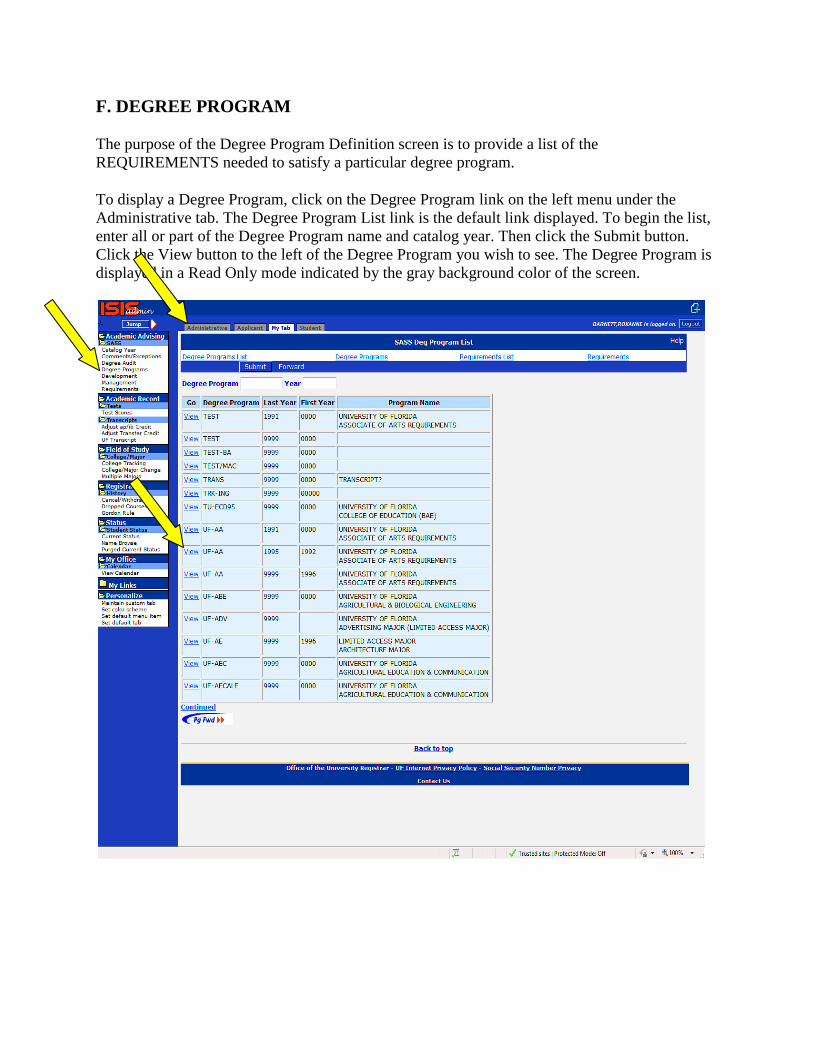
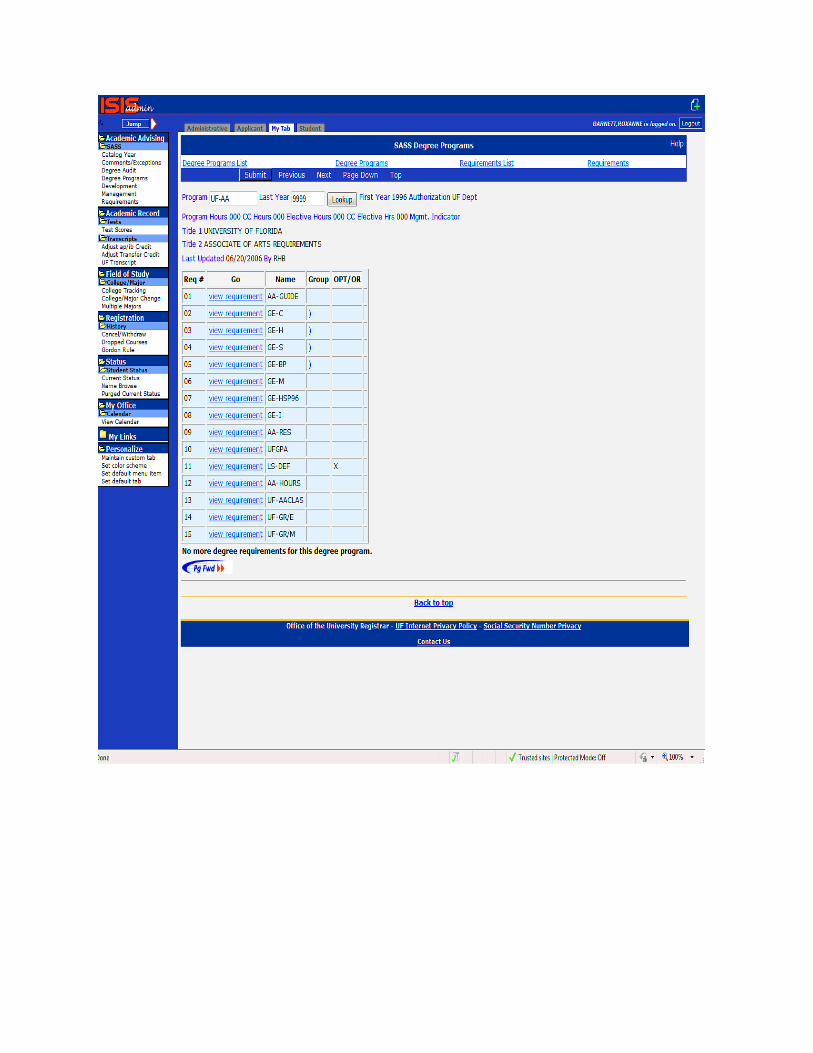
F. DEGREE PROGRAM
The purpose of the Degree Program Definition screen is to provide a list of the
REQUIREMENTS needed to satisfy a particular degree program.
To display a Degree Program, click on the Degree Program link on the left menu under the
Administrative tab. The Degree Program List link is the default link displayed. To begin the list,
enter all or part of the Degree Program name and catalog year. Then click the Submit button.
Click the View button to the left of the Degree Program you wish to see. The Degree Program is
displayed in a Read Only mode indicated by the gray background color of the screen.

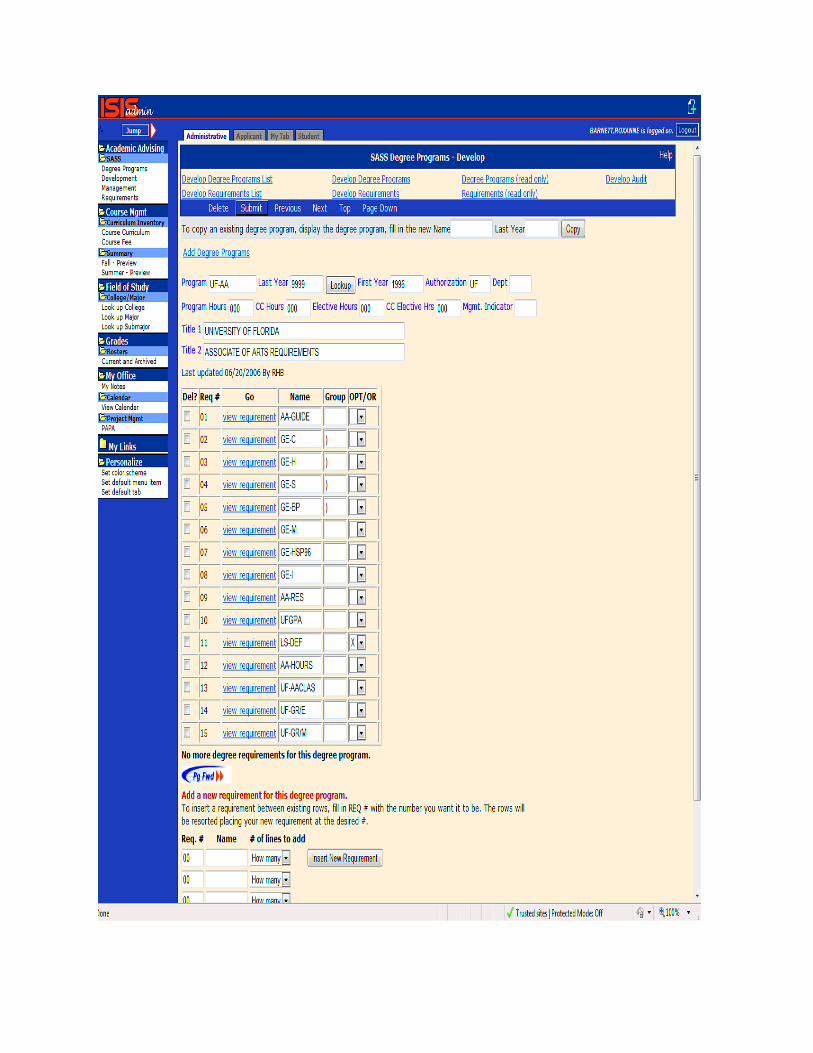
For those authorized to create or modify Degree Programs, click on the Development link on the
left menu under the Administrative tab. Then click on the Develop Degree Programs List link at
the top. The screen will appear with a peach background. To begin the list, enter all or part of the
Degree Program name and catalog year. Then click the Submit button. Click the View button to
the left of the Degree Program you wish to see. The Development Degree Program displayed
will be in an Update mode.
If you wish to view an additional Degree Program, you may return to the browse and enter in the
Degree Program name in the field labeled Degree Program or enter the Degree Program name
and catalog year directly in the Degree Programs or Develop Degree Programs screen.

DEGREE PROGRAM CONTINUED
To create a new Degree program, copy an existing Degree Program.
To COPY an existing Degree Program, display the existing Degree Program by typing the
PROGRAM name and LAST YEAR fields of an existing Degree Program and press ENTER. If
no exact match is found, you will be sent to the Development Degree Program List. Select the
appropriate entry from the list and click the View button. Next, fill in the New Name and Last
year fields in the gray area located at the top. Then click the Copy button.
The new Degree Program will be displayed.
You may then change any data on the screen you wish. You are always in UPDATE mode on
this screen and once you press enter any information typed on the screen becomes a part of the
record.
To Delete a Degree Program, click on the Delete box next to the Submit button. Then click the
Submit button.

CREATE A NEW DEGREE PROGRAM

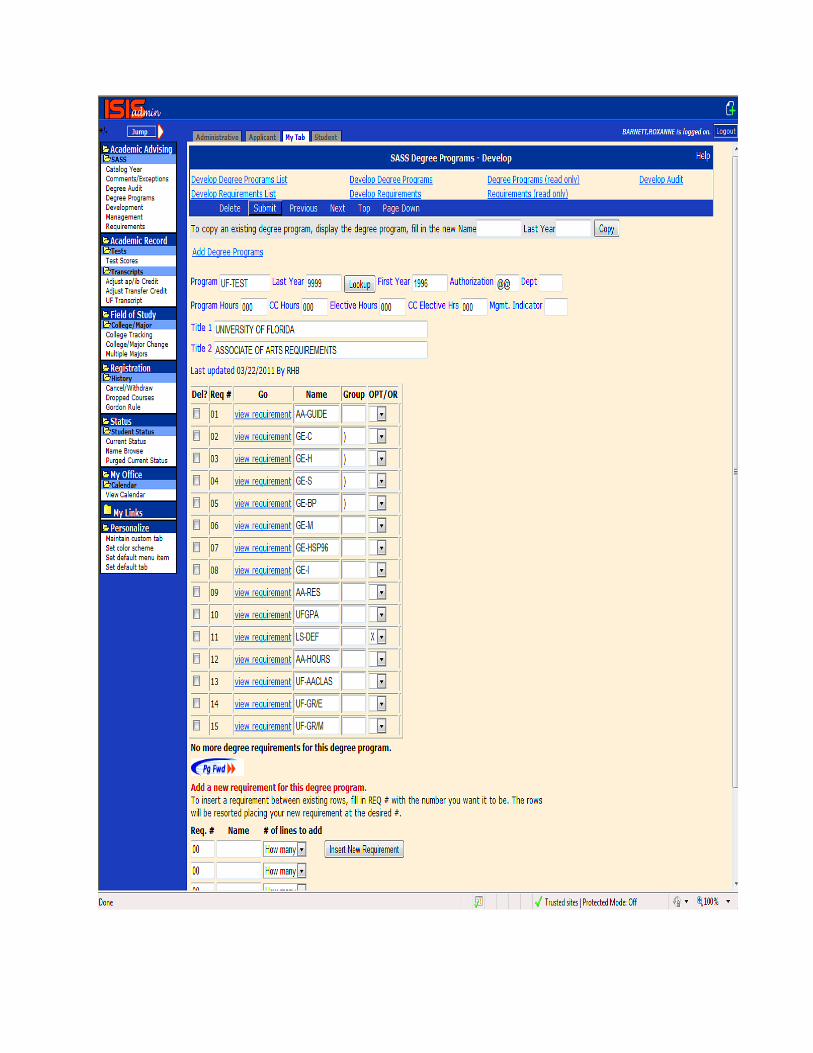

DEGREE PROGRAM CONTINUED
You have created a record using Copy function and you are now ready to enter the individual
requirement needed for the particular Degree Program by type over existing data to modify the
record.
To add requirements to a degree program, enter the fields labeled Req.#, Name and # of lines to
add. Then click the Insert New Requirement button.
To insert a requirement into a degree Program, enter the fields labeled Req.#, Name and # of
lines to add. Then click the Insert New Requirement button. If you wish to insert a requirement
between two existing requirements, enter the Req.# you want it to be. The screen will renumber
the remaining requirements.
To delete a requirement, click on the Del? box located at the left of the particular requirement
name. Then click Submit button.
To view a particular requirement, click the View Requirement link located to the left of the
requirement you wish to view. If no exact match on last year of the requirement with the last
year of the degree program is found, the Requirement List will display beginning with the
particular requirement name you were trying to view. Find the correct catalog year span of the
requirement you wished to view and then click on the VIEW button located on the left.
Requirements on a Degree Program can be coded to function differently depending on the
following:
Group Codes - This is a 2 character data field which allows you to link Requirements together.
The effect is any courses used to satisfy one requirement will not be used to satisfy any other
requirement that it is linked with. Any alphabetic or numeric character may be used to
accomplish this. If another grouping is created, the selected code must be entered in the second
space of this 2 character field.
OPT/OR - The following codes may appear after a requirement on the degree program to provide
additional functionality.
The code ‘O’ links this requirement and the next requirement. Either requirement may be
satisfied.
The code ‘A’ indicates that this requirement will be viewed on the on-line audit but will not
appear on the printed audit.
The code ‘B’ prevents the requirement from appearing on the on-line or printed audit. It is used
to collect courses and then assign those courses an assign code. The assign code then allows
other requirements to reference these courses without listing those courses within additional
requirements. All GE- requirements have a ‘B’ code placed in the OPT/OR field on the degree

program so that they can be collected and summarized in the General Education Summary
Requirement.
The ‘X’ code means that this requirement is optional and it is not necessary for it to be
completed for the student to graduate.
If the degree program has more than 20 requirements, you can access the remainder of the
requirements by clicking on the PG FWD button located at the top and bottom of the display.
NEW NAME (In Gray box) - Enter your 2 digit college code followed by a dash followed by 1-6
letters or numbers. For example, EG-SEM1. This field is used only for the COPY function.
LAST YEAR (In Gray box) - Enter the last year for which this degree program should be used.
Usually 9999 is used to designate that this degree program applies to all future catalog years until
further notice. Should this change you would then enter the modified last year to the appropriate
final year for which it should apply. This field used only for the COPY function.
DELETE – This is used to Delete the entire Degree Program. It will only delete the Degree
Program if your SASS authorization matches the Authorization of the Degree program.
SUBMIT – Used to apply modifications made to any field of the Degree program.
PROGRAM - A 9 character field used to identify the degree program. All degree program names
should begin with the college abbreviation followed by a hyphen, the major code and
subprogram (if applicable) used on the Current Student Record’s file for the student. i.e., BA-
FIN, FA-ARTCER etc.
LAST YEAR – This field indicates the last catalog year for which the Degree Program is valid.
Usually 9999.
FIRST YEAR – This field indicates the first catalog year for which this Degree Program is valid.
Usually 0000, unless restricting to a particular year or range of years. The field consists of 6
character spaces so that a year and month may be specified if necessary i.e., 198908 however, we
only code the Year and not the term.
AUTHORIZATION - The two letter college code assigned on the security file to the person
creating the Degree Program.
DEPT – The three letter major code assigned on the security file to the person creating the
Degree Program.
PROGRAM HOURS – This is the hours approved by the Board of Governors for the degree for
the catalog year range specified in last year and first year.
CC HOURS - Maximum number of community college hours to be used when utilizing the
‘generate free electives function’.

MGMT INDICATOR - The SASS software generates three fields automatically at the end of
each audit: 1) Total Hours Used Toward Degree Program, 2) Florida CC Hours Used Toward
Degree Program and 3) Other Courses. If you do not wish these fields to be generated and
displayed on the audit you may disable this function by entering ‘Y’ in this field.
TITLE 1 - The degree or major name will always appear on the audit as the first line of text. All
title information is centered automatically by the system on the audit display. For example,
BACHELOR OF SCIENCE IN BUSINESS ADMINISTRATION or BACHELOR OF
SCIENCE IN PUBLIC RELATIONS - MAJOR PUBLIC RELATIONS.
TITLE 2 – The college name should always be entered on this line. This information is centered
automatically by the system on the audit display. This line is used to identify the College. For
example, COLLEGE OF JOURNALISM AND COMMUNICATIONS.
LAST UPDATED - The system enters the date every time the Degree Program is updated or
when a new Degree Program is added.
BY - The system enters the initials of the person updating or adding the new Degree Program.
DEL? – Used to Delete the specific requirement from the Degree Program. You must click the
Del? Box and then click the Submit button.
GO – When you click on the ‘VIEW REQUIREMENT’ link you will either be taken directly to
the requirement with the same ending catalog year or to the Browse List matching on the
requirement name and starting the display with the first ending catalog year.
REQ # - This number identifies the particular Requirement listed in the NAME field. List the
Requirements in the order that you wish them to appear on the ADVISEMENT REPORT.
NAME - This is the exact name as it appears in the REQ- NAME field on the REQUIREMENT
DEFINITION SCREEN. List in order all the Requirements to be used to satisfy this Degree
Program.
GROUP - This is a 2 character data field which allows you to link Requirements together. The
effect is that any courses used to satisfy one requirement will NOT be used to satisfy any other
requirement that it is linked with. Any alphabetic or numeric character may be used to
accomplish this. If another grouping is created, the selected code must be entered in the second
space of this 2 character field.
OPT/OR - A single character data element which identifies a requirement as being optional,
display only on the on-line SASS audit and audit file or links two or more requirements and
requires that only one be satisfied. Valid codes are blank, O for an OR requirement (this
requirement or the next), A for display requirement on an on-line audit and audit file only and X
for optional requirement.
Software update 7/97 ‘B’ codes on Degree Program file:

* The ‘B’ code when used in the OPT/OR field on the SASS Degree Program screen hides the
requirement on the printed audit and the online AO. This feature allows you to write
requirements in which you collect courses and assign them an assign code. The ‘B’ code
prevents them from being viewed and the assign code then allows you to parcel the courses out
into other requirements on the audit. An example of this is the way in which the general
education requirements are handled. All GE- requirements have a ‘B’ code placed in the
OPT/OR field on the degree program.
.

G. EXCEPTIONS MENU
The STUDENT EXCEPTION file allows the college the flexibility to make exceptions to
specific degree requirements for individual students. There are seven different types of
exceptions that may be applied to a student's SASS record. Each type of exception is entered on
its own screen.
The Student Exception screens are as follows:
ADVISOR COMMENTS
COURSE SUBSTITUTION
COURSE WAIVER
REQUIREMENT ADD
REQUIREMENT REVISE
REQUIREMENT SUBSTITUTION
REQUIREMENT UPDATE
NOTE: When you post an exception to a student's record it is your responsibility to review any
exceptions that may have been previously posted by another college. If you do not wish to honor
previously posted exceptions, please contact the Sass Coordinator.
To post an exception to a record follow the instructions below:
To access the SASS Exception screen, click the ‘SASS’ menu link located on the left. Then click
the ‘Comments/Exceptions’ link located at the top. Enter the student's UFID and press enter. The
Advisor Comments for that student will display as the default if the student has Advisor
Comments on file. If not, a RECORD NOT FOUND MESSAGE will be displayed.
To create a new exception of any type for any student, fill in the boxes provided under the Add
New Exception button and click the ‘Add New Exception’ button. The same function applies
when adding exceptions to an existing record.
G.1.1 DATA ENTRY HINTS:
Remember that you are always in update mode on these screens.
ALWAYS use your TAB key to go from field to field. This will ensure that you are always positioned in the field correctly.
TO Clear a field, hold the SHIFT key and press END. This will highlight the entire field and you can begin entering your data.
To enter data in the CREDIT HOURS, REQ HRS, MAX HRS fields on the Requirement Revise, Course Waiver and Requirement Update screens, always tab to
the field and enter 4 digits; for example:
0030 = 3 credit hours
0120 = 12 credit hours

1240 = 124 credit hours
Use this same procedure when updating these fields.
NOTE: The AUTHORIZED COLLEGE & DEPT, DATE and INIT fields are updated by the
system automatically for all student exception screens.
To Delete one or more entries of an exception type, click the ‘Delete?’ box for each line you
wish to delete and click the ‘Update’ button. Your SASS authorization code must match the Auth
field on the exception entry for the delete to be successful.
You may browse the different types of exceptions for a student by clicking on the PG FWD
button.

G.1. ADVISOR COMMENTS
The Advisor Comment screen allows the college to post notes about a particular student. Its
primary use is to serve as a historical record of student’s advisement sessions. These notes or text
can be displayed on the student’s audit as a reminder for the student or can be hidden. Default
display is HIDDEN.
To post an Advisor Comment:
Access the SASS Exception screen, by clicking on the link ‘Exceptions’ located under the
‘SASS’ menu link. Enter the student's UFID and select the Advisor Comment from the drop
down box labeled TYPE. Then press ENTER. The Advisor Comments for that student will
display if the student has Advisor Comments on file.
Create a new advisor comment by entering the text in the box labeled COMMENT under the
Add New Exception button and click the ‘Add New Exception’ button. You have a maximum of
49 characters per line. If your comment extents more than 49 characters, just continue entering
the remainder of your text on the next blank line in the box labeled COMMENT. The same
function applies when adding exceptions to an existing record.
To Delete an Advisor Comment, click on the Delete? Box located to left of the individual line
you wish to remove. Then click the UPDATE button.
NOTE: If you do not see the Delete? Box, you either can’t delete the exception or the screen is in
a non-update mode. The comment will only be deleted if your authorization matched the
authorization posted. A maximum of 999 Advisor Comment lines may be entered for one
student.


G.2. COURSE SUBSTITUTION
The Course Substitution screen allows the college to accept an alternate course in the place of a
required UF course.
Course Taken for Course Required
CAP3802 for COP3210
ENC0000 for GE-H
CAP0000 for COP3210 198908
IDH2931 for SOCSCI 198908
To post a Course Substitution:
1. Access the Course Substitution screen by clicking on the link ‘Exceptions’ located under the
‘SASS’ menu link. Enter the student's UFID and select ‘Course Substitution’ under the ‘TYPE’
box. Press ENTER. If the student has an existing Course Substitution, it will display.
2. Create a new Course Substitution by entering the Substituted Course and Required Course
fields located at the bottom of the screen and click the ‘Add New Exception’ button. The same
function applies when adding exceptions to an existing record.
NOTE: The SUBSTITUTED COURSE field is the course the student actually took posted on the
left hand side of the UF transcript. The REQUIRED COURSE field is the course actually
required in the Requirement. Both fields must be entered in order for substitution to be added to
the file.
If the course you wish to use from the student’s transcript has the same prefix and course number
as another course on the student’s transcript, you must enter the year and term of the specific
course you wish to use. For example, you wish to use ENC0000 199808 for General Education
Composition. However, the student took another ENC0000 200101. You must post the course
substitution as ENC0000 for GE-C 199808. If you do not put the term, it will use both courses
and equate them as General Education Composition.
WARNING: You can’t substitute two or more courses with the same prefix and course number taken in the same
semester to different areas of the audit.
WARNING: In the event that two colleges have posted an exception for the same student, where the
SUBSTITUTED COURSE is the same:
STA1000 for STA2023 (college A)
STA1000 for GEB1000 (college B)

The substitution posted first is the only one that is considered if there is no ‘Degree applies’
enter. It is as if the second one did not exist. If the ‘Degree applies’ field is entered then each
exception applies individually. Contact the SASS Coordinator to see if the duplicate course
substitution can be removed.
To Delete a particular Course Substitution, click the ‘Delete?’ box for each line of comments you
wish to delete and click the ‘Update’ button.
NOTE: If you do not see the Delete? Box, you either can’t delete the exception or the screen is in
a non-update mode. The course substitution will only be deleted if your authorization matched
the authorization posted.


G.3. COURSE WAIVER
The Course Waiver screen allows the college to waive a course normally required for a specific
Degree Program for an individual student. For example, if ECO2013 is a required core course for
the Degree Program BA-MKG, you may waive this course for an individual student and Degree
Program by posting a Course Waiver Student Exception.
To post a Course Waiver:
1. Access the Course Waiver screen by clicking on the link ‘Exceptions’ located under the
‘SASS’ menu link. Enter the student's UFID and select ‘Course Waiver’ under the ‘TYPE’ box.
Press ENTER. If the student has an existing Course Waiver, it will display. If not, a RECORD
NOT FOUND MESSAGE will be displayed.
2. Create a new Course Waiver by entering the Course Waived, Year, Term and credit fields
located at the bottom of the screen and click the ‘Add New Exception’ button. The same function
applies when adding exceptions to an existing record. You must enter the Course Waived,
Year and Term fields for the exception to be posted.
WAIVED COURSE: ECO2013 CREDIT HOURS: 0040 See notes I, II and III. TERM: 201008
(current month and year) DEG/PROG: BA-MKG See note IV.
COURSE WAIVER prints the message at the bottom of the audit ‘COURSE WAS WAIVED’ and displays the
course in the appropriate section of the audit with a ‘CW’ as a grade indicator. I.E., ‘ECO2013 0.00 CW’ (when
CREDIT HOURS field is blank or ‘ECO2013 4.00 CW’ (when 40 is entered in CREDIT HOURS field).
WARNING: COURSE WAIVERS function differently depending on how the REQUIREMENT is written.
NOTES:
I. At the sub-requirement level, if a number greater than 01 exists in the Course Count field
and you post a Course Waiver (regardless of whether you enter a number in the CREDIT
HOURS field) it will subtract this course from the number of courses required e.g., ‘NEEDS 4
COURSES’ changes to ‘NEEDS 3 COURSES’.
II. At the sub-requirement level, if a number exists in the REQ HRS field and you post a
Course Waiver with the CREDIT HOURS field blank, it will waive that particular course but
require the same number of hours be fulfilled as originally indicated e.g., ‘NEEDS 12
HOURS’ remains ‘NEEDS 12 HOURS’.
III. At the sub-requirement level, if a number exists in the REQ HRS field and you post a
Course Waiver and indicate a number in the CREDIT HOURS field, the number of hours
posted will be deducted from the hours required in that category e.g., ‘NEEDS 12 HOURS
changes to ‘NEEDS 9 HOURS’.
In other words if you want to waive the course, but have them take another course from that
grouping, do not post hours in CREDIT HOURS field. If you want to waive the course and
you do not want them to take another course from that category, then you should enter the
hours in the CREDIT HOURS field.
IV. Enter the Degree Program in the Degree Applies field if you wish to restrict this waiver to
a specific Degree Program.

V. Course Waiver Student Exceptions may be used to create and print the
message ’SUMMER WAS WAIVED’ by entering the pseudo-course, SUMMER in the
Course Waived field.
VI. Course Waivers DO NOT apply when the requirement ask for a grade of ‘C’ or better.
To Delete a particular Course Waiver, click the ‘Delete?’ box for each Course Waiver you wish
to delete and click the ‘Update’ button.


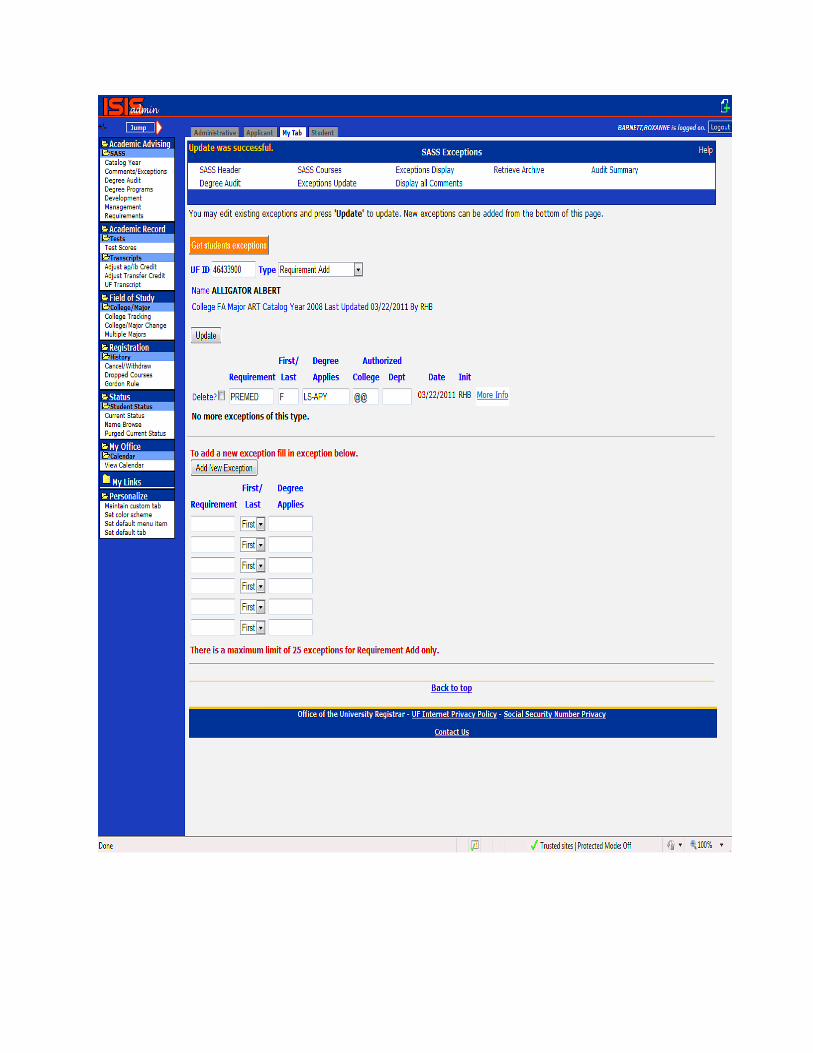
G.4. REQUIREMENT ADD
The Requirement Add screen allows the college to add a Requirement to a particular student’s
Degree Program and to specify if it will appear as the FIRST of LAST Requirement on the audit.
To post a Requirement Add:
1. Access the Requirement Add screen by clicking on the link ‘Exceptions’ located under the
‘SASS’ menu link. Enter the student's UFID and select ‘Requirement Add’ under the ‘TYPE’
box. Press ENTER. If the student has an existing Requirement Add, it will display.
2. Create a new Requirement Add by entering the Requirement, First/Last and Degree Applies
fields located at the bottom of the screen and click the ‘Add New Exception’ button. The same
function applies when adding exceptions to an existing record.
NOTE: ‘F’ in the First/Last field indicates the Requirement will appear at the FIRST of the audit
and is the default selection. ‘L’ in the First/Last field indicates the Requirement will appear at the
LAST of the audit. If you do not enter a degree program, the requirement will NOT be added.
A maximum of 25 Requirement Adds may be entered for one student.
To Delete a particular Requirement Add, click the ‘Delete?’ box for each Requirement you wish
to delete and click the ‘Update’ button.
NOTE: If you do not see the Delete? Box, you either can’t delete the exception or the screen is in
a non-update mode. The Requirement Add will only be deleted if your authorization matched the
authorization posted.

G.5. REQUIREMENT REVISE
A Requirement Revise exception modifies the entire Requirement. It modifies the data in the
Segment Count, Required Hours and Required GPA fields that appear above the TITLE 1 line in
the requirement.
To post a Requirement Revise:
1. Access the Requirement Revise screen by clicking on the link ‘Exceptions’ located under the
‘SASS’ menu link. Enter the student's UFID and select ‘Requirement Revise’ under the ‘TYPE’
box. Press ENTER. If the student has an existing Requirement Revise, it will display.
2. Create a new Requirement Revise by entering the Requirement Name in the Name field
located at the bottom of the screen and click the ‘Add New Exception’ button. The same function
applies when adding exceptions to an existing record. If you enter the NAME only and do not
modify any other fields, the Requirement will ALWAYS be considered satisfied for that
student and the ‘NO’ changes to ‘YES’ for that Requirement. You must be carefully in using
Requirement Revises if a student is currently enrolled in a course that is needed to satisfy the
requirement.
NOTES:
I. Enter the new number of Sub-Requirements that must be met in the Requirement Count field. For example, if
06 is entered in the Requirement Count field and the original Segment Count required = 07; then Sub-Requirement
Count required would = 06. The Requirement Count field refers to the number of Sub-Requirements that must be
satisfied.
II. Enter the new total hours that must be met in the Requirement Hours field. For example, if 3.0 is entered in
the Requirement Hours and the original Required Hours = 12.00; then Required Hours would change =003.0. This
field refers to the TOTAL hours that must be satisfied.
III. Enter the new GPA required for all courses accepted by this REQUIREMENT in the GPA field. For example,
if 2.0 is entered in the GPA field and the original Required GPA = 2.5;the Required GPA would = 2.0. This field
specifies the overall GPA that must be satisfied.
IV. Enter a degree program in the DEG/PROG field if you wish this exception to apply to a specific degree
program ONLY.
To Delete a particular Requirement Revise, click the ‘Delete?’ box for each line you wish to
delete and click the ‘Update’ button.
NOTE: If you do not see the Delete? Box, you either can’t delete the exception or the screen is in
a non-update mode. The Requirement Revise will only be deleted if your authorization matched
the authorization posted.


G.6. REQUIREMENT SUBSTITUTION
The Requirement Substitution allows you to substitute a new Requirement for an existing
Requirement on a degree program. The new Requirement will appear on the audit in the same
location as the original requirement.
To post a Requirement Substitution:
1. Access the Requirement Substitution screen by clicking on the link ‘Exceptions’ located under
the ‘SASS’ menu link. Enter the student's UFID and select ‘Requirement Substitution’ under the
‘TYPE’ box. Press ENTER. If the student has an existing Requirement Substitution, it will
display.
2. Create a new Requirement Substitution by entering the Original Requirement Name in the
Requirement Old field and the New Substituted Requirement Name in the Requirement New
field located at the bottom of the screen and click the ‘Add New Exception’ button. The same
function applies when adding exceptions to an existing record.
NOTES:
I. Name of the Old Requirement as it appears listed on a Degree Program.
II. The name of the New Requirement you wish to replace the Old requirement for a specific
Degree Program for a particular student.
III. Name of Degree Program to which the exception is to be applied. This data is optional. If
field is left blank it will apply to all Degree Programs that contain the OLD REQUIREMENT
name.
To Delete a particular Requirement Substitution, click the ‘Delete?’ box for each line you wish
to delete and click the ‘Update’ button.
NOTE: If you do not see the Delete? Box, you either can’t delete the exception or the screen is in
a non-update mode. The Requirement Substitution will only be deleted if your authorization
matched the authorization posted.


G.7. REQUIREMENT UPDATE
The Requirement Update screen allows a user to decrease of increase the specifications coded on
the Control line of a particular sub-requirement for a particular student.
To post a Requirement Update:
1. Access the Requirement Update screen by clicking on the link ‘Exceptions’ located under the
‘SASS’ menu link. Enter the student's UFID and select ‘Requirement Update’ under the ‘TYPE’
box. Press ENTER. If the student has an existing Requirement Update, it will display.
2. Create a new Requirement Update by entering the Requirement Name in the Name field
located at the bottom of the screen and click the ‘Add New Exception’ button. The same function
applies when adding exceptions to an existing record.
NOTES:
I. It will be most helpful before posting a Requirement Update to access the particular
Requirement from the Requirement file to see how the sub-requirement is written. You need to
make a note of the name of the Requirement, Pseudo-name (this is denoted with a $ at the end of
the course field on the ACCEPT line within the particular sub-requirement) and whether the
Course Count, Required Hours or Max Hours have data in them.
II. You must specify the REQUIREMENT, PSEUDO-NAME and + or -.
A minus sign (-) indicates you are reducing the COUNT, REQ HOURS or MAX HOURS
field(s).
A plus sign (+) indicates you are increasing the COUNT, REQ HOURS, or MAX
HOURS fields(s).
III. COUNT, REQ HOURS, MAX HOURS: To increase or decrease the original amount
specified, enter the amount you want added or subtracted to or from the original amount. For
example, if REQ HOURS = 006.0 and you want the revised total to = 010.0, you will enter 004.0
(the amount that you are adding) and a plus sign. If REQ HOURS = 006.0 and you want the
revised total to = 003.0, you will enter 003.0 (the amount that you are subtracting) and a minus
sign.
IV. Enter the Degree Program in the DEG/PROG field if you wish to restrict this exception to a
specific Degree Program.
To Delete a particular Requirement Update, click the ‘Delete?’ box for each line you wish to
delete and click the ‘Update’ button.
NOTE: If you do not see the Delete? Box, you either can’t delete the exception or the screen is in
a non-update mode. The Requirement Update will only be deleted if your authorization matched

the authorization posted. A maximum of 25 Requirement Updates may be entered for one
student.

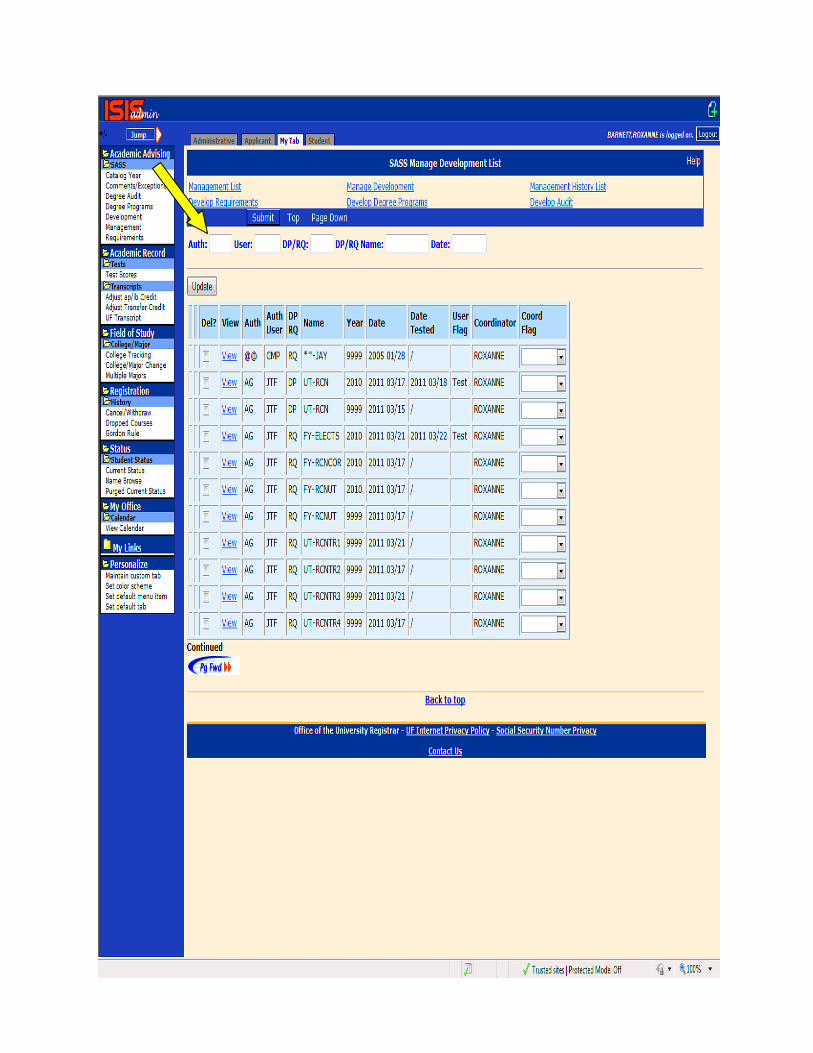
H. MANAGEMENT
The Management screens allow users to test modifications made to Degree Programs or
Requirements and review the results before moving the changes to the production files. This
helps to ensure changes made will not produce incorrect results on the audits.
For those authorized to access the Management screen, click on the Management link located on
the left menu bar under the ‘Administrative’ tab. This will take you to the SASS Management
Development List screen.
To reposition the list to your college, enter your SASS authorization code in the AUTH field and
then click the Submit button.

To create a new entry: (Used to circumvent a one day delay in the testing process)
Click the VIEW link located to left of any entry on the SASS Management Development List
screen.
Using the Delete key on your keyboard, remove the existing DP/RQ Name and enter the new
Degree Program or Requirement name.
Using the Delete key on your keyboard, remove the existing Year and enter the correct Last Year
of the Degree Program of Requirement you are adding.
Check to make sure the ‘Type’ field reflects whether the entry you are adding is a Requirement
or Degree program.
Click the Add button located to the left of the Delete button. Your new entry will be added and
redisplayed on the Management Development screen. The User Flag is automatically set to
TEST.

NOTE: You can skip this process, if you want the overnight job to handle adding any
modifications made to the Degree Programs or Requirements. When the overnight job runs it
will add any Requirement or Degree Program that has been modified based on the LAST
UPDATE DATE equal to the current date.
It is important that you check the Management link the following day to determine if your changes
successfully tested.
To view your entries type your SASS Authorization code in the AUTH field and click the
Submit button.
For each requirement or degree program tested, the FLAG field will read <TEST> and a date
will appear in the TEST DATE field.
Test results output should be at your SASS designated printer. You should receive two reports.
One report should be a Summary Count of Students Checked But Did Not Have Audit
Discrepancies. The other should be Differences Between Production and Development –
Changes Made Using SASS Development Menu. If you do not receive the second report that
means NO discrepancies were found. If you do not receive the test results, email SASSWEB-
[email protected] immediately.
Review the output. Pay close attention to the columns on the report labeled ‘PRD HRS
EARNED’ and ‘DEV HRS EARNED’ for any requirement you have modified. If the ‘DEV HRS
EARNED’ is less than ‘PRD HRS EARNED’ and the requirement MET status changed from
YES to NO and you choose to move this change to production, you need to notify the student of
the change. Call the SASS Coordinator to discuss if you are not clear on its meaning.
Once you are satisfied with the test results, change the <TEST> flag to <MOVE>. This indicates
to the SASS Coordinator to move the changes to production.
If you do not like the test results and want to start over, change the <TEST> flag to
<RESTORE> to restore the files.
If you are unable to successfully test, move or restore a Development Requirement or
Development Degree program, contact the SASS Coordinator @ 846-2036.
If your testing results in an <ERROR> code, this means we were not able to successfully test
your updates. Possible Causes:
No one is currently enrolled who is being monitored by that requirement.
The update had an error and we were unable to generate an audit.
If you cannot determine the problem, send an email to [email protected] for assistance.
To Delete an entry from the Management Development List, click on the box under the Del?
Heading next to the entry you wish to delete and then click the Update button.

MANAGEMENT CONTINUED
To restore a Degree Program or Requirement to its original form from Production to
Development:
Click the VIEW link located to left of any entry on the SASS Management Development List
screen.
Select RESTORE by using the drop down box for the User Flag field.

I. UNIVERSAL TRACKING
ASSIGNING UT TERMS TO UT STUDENTS WHO CHANGE COLLEGES/MAJORS:
UT Terms are not based on hours earned.
UT Terms are not based on classification.
Terms are based on what UT courses have been completed.
A student should be assigned the highest UT term for which they will be ON TRACK the term in
which they matriculate into a new college. Confusion sometimes occurs because the major
change may be effective immediately or it may not be effective until some future term. This
impacts on what is the appropriate UT Term to indicate for the new major. Here is a summary of
the logic you should use when making these decisions:
1. If the major change is to be effective for the current term, you should run a UT audit to
determine the highest term for which the student is ON Track and enter that UT term on the
College Designation Screen.
2. If the major change will be effective for the NEXT FALL or NEXT SPRING, enter the UT
term for which the student should be monitored for the next Fall or next Spring.
3. If the major change will be effective for the next Summer, enter the UT Term for which the
student should be monitored for the NEXT FALL.
In all of the above cases, on the College Designation Screen indicate the new major, the term for
which this major is effective and the UT Term to be used to monitor the student for the effective
term. You may then view a log of your changes on the College Tracking Screen.
For students for whom a major change has been indicated for a future term, these students are
NOT incremented. Instead, they will be monitored for that future term for the UT Term entered
for that major on the College Tracking Screen.
ASSIGNING UT TERMS TO BEGINNING FRESHMEN:
UT terms for beginning freshmen and AA transfers are assigned automatically by The Office of
the University Registrar. A first time in college freshmen admitted Fall 2010 without any
previous credit would be assigned a UT term of 1 and would be evaluated for the following UT
terms listed below provided he/she remained continuously enrolled in the same college. If the
student enters UF with hours earned (excluding Accelerated Mechanism work such as AP, IB,
Dual Enrollment), additional steps will be taken to ensure the correct UT term is assigned.
UT 1 Fall 2010
UT2 Spring 2011

UT3 Fall 2011
UT4 Spring 2012
UT5 Fall 2012
UT6 Spring 2013
UT7 Fall 2013
UT8 Spring 2014
UT9 Fall 2014
UT10 Spring 2015
UT11 Fall 2015
If the student changes colleges, the UT Term will be reevaluated by the new college and reset to
the appropriate UT Term if necessary. IF THE INITIAL UT TERM IS NOT SET
CORRECTLY, ALL FUTURE EVALUATIONS WILL BE INCORRECT. UT Terms are then
incremented each Fall and Spring term the student is enrolled.
NOTE: STUDENTS WHO ARE STUDY ABROAD DO NOT GET INCREMENTED.
ASSIGNING UT TERM TO COMMUNITY/STATE COLLEGE TRANSFERS WHO
HAVE EARNED AN AA DEGREE:
All AA transfers will be assigned a UT term of 5 the Fall or Spring of matriculation at UF. They
will be incremented each Fall and Spring of enrollment just as indicated above for the freshmen
who begin at UF. An AA transfer admitted Fall 2010 would be assigned a UT term of 5 and
would be evaluated for the following UT terms provided he/she remained continuously enrolled
in the same college.
UT Term 5 Fall 2010
UT Term 6 Spring 2011
UT Term 7 Fall 2011
UT Term 8 Spring 2012
UT Term 9 Fall 2012
UT Term 10 Spring 2013
UT Term 11 Fall 2013
ASSIGNING UT TERM TO 4 YEAR TRANSFER STUDENTS:
The college must evaluate all 4-year transfer students and assign them the appropriate UT Term
using the same logic you would use for a native student who is changing colleges. See beginning
of this document.
UT EVALUATION AND SIGN OFF
Students who are currently enrolled and assigned a UT Term of 1-5 will be evaluated
approximately 5-6 weeks prior to the beginning of Advance Registration. Students who are
Study Abroad will not be evaluated. The results of this evaluation will be posted on screen OF1
in GATA. Each college will need to review these results to verify there were no errors in the
evaluation and submit a signoff job indicating the review is complete. Each college will
designate a person authorized to do the signoff. After all colleges have reviewed and signed off
by the specified deadline, the files will be closed and the appropriate UT hold will be applied to
the student’s record. If the college marked the student as an override, the system will NOT apply
a hold. NOTE: If the student is OFF Track 2 consecutive times and is OFF Track at the end
of the semester, the student will NOT get a UT4 (Registration Cancellation) hold. The
student must see an academic advisor and have the hold removed before the student will be
allowed to advance register.
There is another evaluation done at the end of the semester on Monday night when final grades
are posted. The results of this evaluation will be posted on screen OF2 in GATA and only reflect
the students who were NOT Predicted OFF Track in the evaluation prior to advance registration.
Only students who are listed on the screens in this results and are evaluated 2 or more
consecutive times OFF Track will get the UT4 (Registration Cancellation) hold. Students who
were evaluated OFF Track for the first time will not receive a hold. Each college representative
authorized to sign off must do so by the specified deadline by submitting the sign off job.
UT CHANGE MAJORS
The Universal Tracking process allows student to be evaluated OFF Track two consecutive times
in the same major before requiring a student change majors. In some cases, students are not in
the best of an academic situation for the college to admit the student into the major and give
them two semesters to get ON Track for their major. In this situation, a college may use the
‘CHANGE’ major. By doing this, the student is allowed one semester to pursue the new major.
The student will have a UTCHANGE hold applied to their record which will keep them from
advance registering for the next semester. At the end of the semester, these students will be
evaluated by the Universal Tracking process. If evaluated ON Track, the student is then
reclassified into the degree seeking major. If OFF Track, the student must either find a college
which will admit them directly into a degree seeking major or leave the university. Students can
only be classified in a ‘CHANGE’ major once in their undergraduate academic career. Since
Summer is considered a catch up semester, it is recommended to place students into the
‘CHANGE’ major for Fall or Spring semesters only.

J. FREQUENTLY ASKED QUESTIONS
Q: What is the URL for the SASS Coordinator's Manual?
A: http://www.aa.ufl.edu/aa/dass/sass
If you forget this, go to the UF home page http://www.ufl.edu and use the search UF Web with Google function on
the orange header bar. Enter SASS Web in the Search box and click on . The URL will be located under SASS
WEB INFO.
Q: How do I stay informed about SASS and Advising?
A: Subscribe to the UF Advisors listserv. Send a one-line message to [email protected]. Leave the Subject line
blank. On the top line of the message area type Subscribe UFADVISORS-L your name
For example, Subscribe UFADVISORS-L Roxanne Barnett
You will receive a reply from the listserv asking you to confirm the request. You must do so within 24 hours to
complete the subscription process.
Q: The curriculum has changed, how do I create a new Requirement?
A: Go to the Administrative tab. Click the Development link under the SASS folder. Display the existing
Requirement by entering the Requirement name in the field labeled Requirement and click Submit. Then click
‘View’ to the left of the specific catalog year range of the requirement you would like to view. In most cases, this
will be the requirement with the last year of 9999. On the grayed line below the Submit button, enter the new
requirement name (can be the same as the currently displayed requirement) and the last year in which you would
like the current requirement to end and click the COPY link located in the grayed box to the right of the last year
field at the top of the screen. When you click the COPY link, it creates a copy of the existing requirement with the
last year you specified and displays it. Press the NEXT button to display the record you just copied from. On this
Requirement, update the FIRST year to the first year in which the new curriculum will be required. Press enter or
click Submit. You are now ready to enter the new curriculum changes on this Requirement.
Q: What print codes do I use when I write a new requirement?
A: The most frequently used print code symbols are ‘T’ and ‘I’. ‘T’ will display only the Title line of every sub-
requirement. ‘I’ will only display the information on the REJECT and ACCEPT lines as well as the TITLE line of
each sub-requirement. ‘T’ is used when there is only one course accepted to fulfill the sub-requirement and ‘I’ is
used when there are several courses accepted to fulfill the sub-requirement. A complete list of print code symbols
can be found in the section of the SASS Coordinator's Manual labeled ‘PRINT CODES’ or under the section labeled
REQUIREMENTS.
Q: What are the General Education assign codes?
A:
GE-C 1
GE-H >
GE-S <
GE-BP \
GE-M ?

Q: Why does the Gordon Rule requirement read ‘NO’ when a student is enrolled in a Gordon Rule course?
A: SASS does not actually check the courses accepted for completion of the Gordon Rule requirement. They are
checked by the Office of the University Registrar (OUR) and SASS reads a MET/NOT MET flag set by OUR. They
do not have an ‘IN PROGRESS’ flag that we can read and so the SASS audit reads NO until the student completes
the course and has earned a grade of ‘C’ or better and met the writing component. So for students completing
Gordon Rule the semester they intend to graduate the audit will not read ‘all requirements met’ until after final
grades are applied to the SASS courses file.
Q: How do I insert a requirement on the Develop Degree Program screen
A: Enter the REQ number of where you want the requirement to be inserted and the requirement name and click the
INSERT NEW REQUIREMENT button in the fields provided at the bottom of the screen. For example, if you want
a requirement insert between REQ 01 and REQ 02, you would enter a REQ number of 02.
Q: How do you allow a course, transferred from another school, to satisfy a UF course requirement?
A: This must be done on an individual student basis and is considered a student exception. Course substitutions are
entered on the Exceptions screen for an individual student.
Q: I want the transfer course to satisfy two different areas. How do I get this course to show up in two different
requirements?
A: You will substitute the course to satisfy one requirement and then use the Requirement Update screen to reduce
the hours required in the other requirement so that both requirements are met.
Q: What does the GENED code on the ‘Control’ line of a sub-requirement mean?
A: This means that if the student has earned an AA degree from a community college, you would like this particular
sub-requirement to be considered MET regardless of courses taken.
Q: What does the message 'UNKNOWN OPERATOR' mean when I attempt to create a Degree Audit or Develop
Audit?
A: Following the 'Unknown Operator' message is the name of the Requirement with the problem. On the
Development Requirement screen look at the requirement. Carefully check the 'Control', ‘Reject’ and 'Accept' lines
of each sub-requirement. All courses and pseudo-names should begin in the first position of the box.
Q: What does ‘FREE ELECTIVES (Yes/No): mean on the Degree Audit or Development Audit screen?
A: This field defaults to No and should only be set to Yes when reviewing an audit for a graduating senior. It looks
at the ‘Total Hours Used Field’ at the bottom of the audit to verify that the Total Hours Used is at least equal to the
total hours required for the degree. If the Total Hours Used is less than the total hours required, the system will
generate an additional requirement at the bottom of the audit called ADDITIONAL HOURS USED TO
COMPLETE THE DEGREE and it will pull courses from the OTHER COURSES category as needed to generate
sufficient electives to equal the total hours required for the degree. At degree certification time all graduating
seniors’ audits are generated with this field set to Yes.
Q: Once I have updated a Requirement or Degree Program, how do I get the changes tested and moved to
production?

A: Any Requirement or Degree Program, which has been updated, will be listed by the system overnight on the
Management Browse List screen. You must then select ‘TEST’ from the drop down box to ask the system to test
your changes. The following day, look at the Management Browse list to see if a TEST DATE has been entered in
the field just prior to the FLAG field. If yes, you should have output at your printer that tells you the students, if any,
who were affected by the changes that you made. Review the results carefully. If you are satisfied, go to
Management Browse List screen. Change the ‘TEST’ flag to ‘MOVE’ to indicate that it is OK to move these
changes to production. The changes coded ‘MOVE’ will then be reviewed by the Coordinator. The Coordinator will
move the changes to production. NOTE: You can expedite the process by adding the changes to the Management
Browse List yourself. The screen defaults to the ‘TEST’ flag if you need them tested on the day in which you made
the changes.
Q: On the Management Browse List Screen, what does an ‘ERROR’ code mean?
A: It means that when data processing attempted to compare the Development Files to the Production Files they
were not able to do so. Here are some possible reasons:
Develop Degree Program screen contains requirements that Degree Program screen does not.
The Requirement does not exist for all catalog years.
There are no students currently enrolled who are being monitored by the catalog year you are testing.
There was a problem with the testing job.
Q: What do I do if I have an ‘ERROR’ code on Management Browse List screen?
A: Review the list above and try to determine what the problem might be.
If it is a new Requirement that did not exist before, contact the SASS Coordinator and asked to have it moved to
production once you have tested it using the Develop Audit.
If you can’t figure out why you received an ‘ERROR’ code, contact the SASS Coordinator for further explanation.
You must resolve the problem or get assistance in order to move the changes to production if you received an
‘ERROR’ code.
Q: What is ISIS?
A: ISIS stands for Integrated Student Information System. ISIS is the University of Florida web application which
allows the student to look at his Complete, Unmet Requirements or Critical Tracking degree audit, register, access
financial aid information, etc via the web at http://www.isis.ufl.edu.
Q: What is the requirement CPM- used for on the degree program?
A: This requirement is used to monitor for the Common Prerequisites for Transfer students and is not displayed on
the degree audit. When a student gets ready to graduate, if this requirement has not been met, then the system will
automatically waive the requirement once the student applies for their degree.
Q: What is a UT degree program and how is it used?
A: UT- degree programs only monitor the critical tracking courses and criteria. They are used each Fall and Spring
semesters to determine if a student is predicted on/off track prior to advance registration and at the end of the term to
determine if a student is ON/OFF Track based on the courses completed and grades attained for the current
semester.
Q: When are UT HOLDS applied?

A: About 1 month prior to advance registration, students are evaluated using the UT degree programs. Those
predicted to be OFF Track will have a UT HOLD applied to their record. The purpose of the HOLD is to ensure that
the student will receive academic advising prior to registering again.
At the end of the semester, students who are OFF Track for the second time, and were not predicted to be OFF
Track will have a UT4 HOLD applied to their record .The student must see an advisor before the last day of
drop/add for the next semester or their registration for that term will be cancelled.
Q: When do students evaluated OFF Track receive notification?
A: Students who are evaluated OFF Track at the end of the semester and were not predicted OFF Track prior to
advance registration receive an email at the end of the term.
Q: The general education courses are being used in earlier semesters as electives. How can I prevent this from
happening?
A: On the control line of the sub-requirement which is checking for electives, code <** > in the Reject field defined
for the control line. The <**> code will reject any course which has an assign code. All general education courses
are given an assign code.
Q: How does the No Count field function?
A: A code of ‘Y’ in this field indicates the courses accepted by this requirement are not to be considered as courses
used to satisfy the degree. Only courses which fall into requirements coded BLANK in this field are considered
'used courses' for the degree. This allows you to create requirements to calculate GPA's and requirements which
ensure courses will distribute into each requirement in the proper way.
Q: How do you request an audit?
A: From the SASS folder chose Degree Audit, enter the UFID and press <enter>. To request multiple audits
overnight, select the Retrieve Archive link from the top menu. Under the orange ADD button, enter the UFID of the
students for whom you would like audits produced in the boxes provided. Then click the ADD button. You should
then see the UFID’s added to the table below the UPDATE button. The audits of the student’s requested will print
overnight at your printer.
Q: CHM 2040 is showing up in two different requirements that are grouped on the degree program. Why?
A: Courses listed on a REUSE line are allowed to be used one more time in the current requirement or another
requirement and overrides the grouping code function on the degree program file.
Q: Same requirement name appears on a degree program more than once. When doing a Requirement Revise
exception to make the requirement met, it clears out the 1st one on the audit but the 2nd one will not and I cannot
figure out why.
A: The audit program does not expect the same requirement to appear multiple times on the audit, so if you want it
to function this way you would need to give each requirement a unique name and then enter a Requirement Revise
for each. Exceptions will apply only once on the audit to the same requirement.
Q: Who would I need to contact regarding coding of an out-of-state transcript? She has several EDF0000 courses
listed in the same semester. I need them coded 0001,0002, ETC.
A: This is done nightly except between terms when files are in transition.
Q: All the requirements on the audit say OK, but I do not have the message at the top of the audit ‘All
Requirements Identified Below Have Been Met’. What is wrong?
A: On your degree program all requirements coded with a ‘B’ code in the OPT/OR field are not displayed on the

audit and so you cannot see if they are met or not met. If you are not getting the ‘All Requirements Met...’ message
it means one of the requirements coded with a ‘B’ has not been satisfied. Run an audit for the student using the
degree program code of UF-AA. This will let you know if it is a General Education requirement that isn’t being met.
If the UF-AA audit is met, then look for any other requirement on the original degree program that has a ‘B’ code in
the OPT/OR field. Then use the Requirement Revise on the Exception screen to waive that particular requirement.
An alternative method would be to modify the Degree program in the Develop Degree Program screen and remove
the ‘B’ codes from the temporary DP and run an audit using the temporary degree program. You will immediately
find a requirement on the audit with a ‘ ’. Once you have identified and fixed the problem, you can then restore
the Develop Degree program to its original state via the Management Development screen.
Q: Only 45 hours of AP/IB credit is allowed to apply towards the degree. Sometimes the Registrar's office will split
a course in order to give a student exactly 45 hours. In other words they take a 3 credit course and post it as a 2
credit and again as a 1 credit course. If it so happens that this is a course you want to use and you want to 'disallow' a
different course, how do you accomplish this?
A: Select the Adjust ap/ib Credit screen and change the 'Nocredit' to Blank in the drop down boxes to the right of
both occurrences and select ‘Nocredit’ on the other course for which you wish to disallow credit. Click the Submit
button to update the changes to the student’s transcript file. You must then contact Melissa Sisk in the Registrar's
office and ask to post it as one course, not two so that it will process correctly in SASS. If the course is not posted as
a split course you will not need to contact the Registrar's office.
Q: Is there a screen on which all of the courses used to satisfy general education are listed?
A: Yes. You can go to the Schedule of Courses www.registrar.ufl.edu/soc . Click on the Gen Ed Courses link under
the semester you wish to view. Then click on the specific General Education category you wish to view.
Appendix 1 - PRINT CODES
7/97 software update: All print codes were modified to stop printing when it reaches the
pseudocourse. This means that if you list courses on the accept line after the pseudocourse
(identified by $), the courses will be used for processing but will not appear on the SELECT
FROM line on the audit.
Blank = all available information should be printed.
A = Requirement will not appear on the printed audit. However, it will appear in the audit file.
NOTE: This option may be used ONLY at the requirement header level. Overrides all other
print options at the sub-requirement level.
D = suppresses the ‘earned line’ at the header level and the ‘added’ line at the sub-requirement
level.
E = suppresses the ‘earned line’ at the header level and the ‘added line’ at the sub-requirement
level. It also suppresses the listing of courses applied toward a requirement's completion
F = suppresses the ‘earned line’ at the header level and the ‘added line’ at the sub-requirement
level. It also suppresses the listing of courses that may be selected.
G = suppresses the ‘earned line’ at the header level and the ‘added’ line at the sub-requirement
level. It also suppresses the printing of the courses that a student may select from beginning with
the first pseudo-course.
H = suppresses the ‘earned line’ at the header level and the ‘added’ line at the sub-requirement
level. Also, it collapses the sub-requirement data to a listing of courses used toward the
requirement’s completion even when the requirement is NOT completed. NOTE: This option
may be used ONLY at the requirement header level. Overrides all other print options at the sub-
requirement level.
I = functions exactly like the ‘T’ print code except the SELECT FROM line is printed.

K = prints everything except the ‘ADDED’ line at the sub-requirement level.
L = prints only the SELECT FROM and the NEEDS info.
N = prints the list of courses from which a student may select to satisfy the requirement but does
NOT print the courses that the student has taken.
O = normal processing except that courses that may be used to satisfy a sub-requirement that has
not yet been satisfied are suppressed.
P = prints all the data from the SELECT FROM list until it reaches a pseudo-name indicated by
$.
Q = prints the courses the student has taken but NOT the list of available courses.
R = suppresses the ‘earned line’ at the header level and the ‘added’ line at the sub-requirement
level. Also, it collapses the sub-requirement data to a listing of the courses used towards a
requirement’s completion only when a requirement is NOT completed. When the requirement is
completed, it suppresses the listing of courses.
S = normal processing except that sub- requirement information will be suppressed. Only
courses that are used to satisfy the requirement are displayed.
T = Resembles Option F. However, it also suppresses the ‘needs line’ at the sub-requirement
level.
U = Prevents the collapsing of the sub-requirement data when a requirement is completed. It
resembles Option L, however, it suppresses the printing of the ‘earned line’ at the header level
and the ‘added line’ at the sub-requirement level.
X = prints only summary information.
Y = Prints ‘earned line’ and ‘needs line’ at header level. Also, it prints titles, ‘added lines’ and
Needs lines’ at the sub-requirement level without printing the courses used to satisfy the sub-
requirement. This option is ONLY used at the header print level.
Z = Eliminates the sub-requirement title lines and allows the printing of only the courses used
toward satisfying the sub-requirement. This option is used ONLY at the sub-requirement print
option level.
Examples of print codes when used at the requirement level:
‘BLANK’ UNMET:
NO 1
-----> NEEDS:
- 1) ### MAC 2311 - ANALYTIC GEOMETRY & CALCULUS 1
NEEDS: 3.00 HOURS
SELECT FROM: MAC#311, MAC#472, MAC020#
‘BLANK’ MET:
OK 1
EARNED: 3.00 HOURS 4.000 GPA
9401 MAC3311 4.00 A _
----------------------------------------------------
‘D’ UNMET:
NO 1
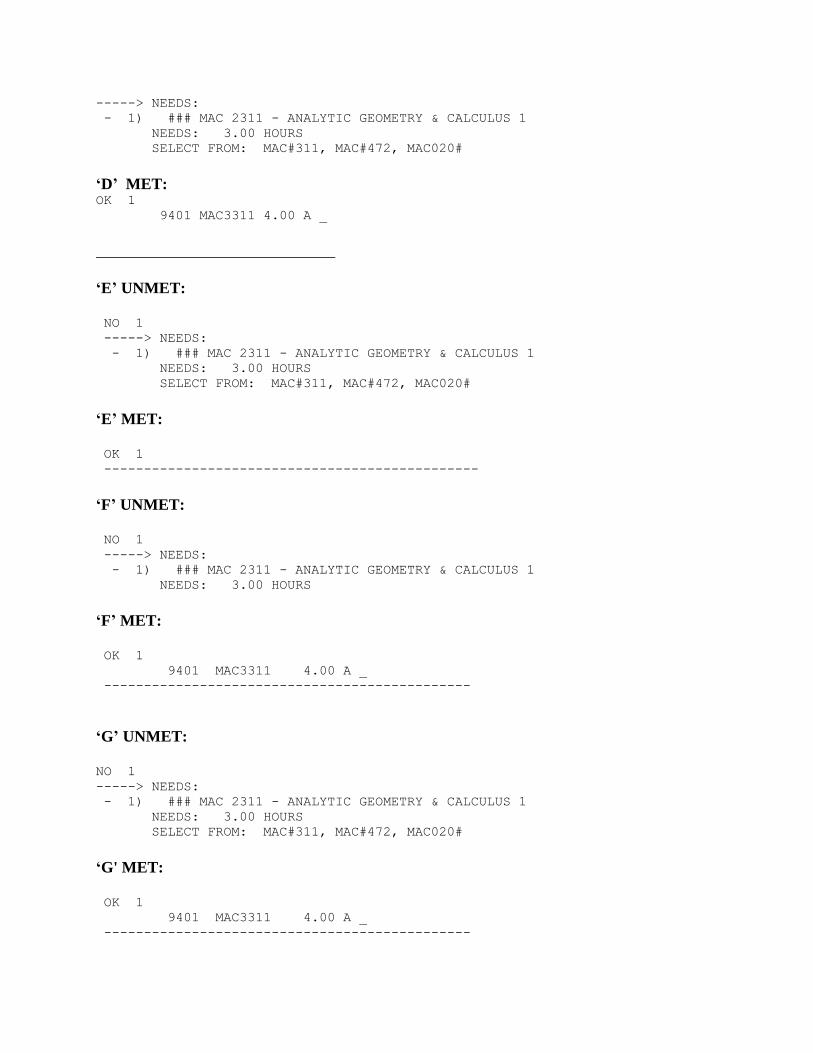
-----> NEEDS:
- 1) ### MAC 2311 - ANALYTIC GEOMETRY & CALCULUS 1
NEEDS: 3.00 HOURS
SELECT FROM: MAC#311, MAC#472, MAC020#
‘D’ MET: OK 1
9401 MAC3311 4.00 A _
______________________________
‘E’ UNMET:
NO 1
-----> NEEDS:
- 1) ### MAC 2311 - ANALYTIC GEOMETRY & CALCULUS 1
NEEDS: 3.00 HOURS
SELECT FROM: MAC#311, MAC#472, MAC020#
‘E’ MET:
OK 1
-----------------------------------------------
‘F’ UNMET:
NO 1
-----> NEEDS:
- 1) ### MAC 2311 - ANALYTIC GEOMETRY & CALCULUS 1
NEEDS: 3.00 HOURS
‘F’ MET:
OK 1
9401 MAC3311 4.00 A _
----------------------------------------------
‘G’ UNMET:
NO 1
-----> NEEDS:
- 1) ### MAC 2311 - ANALYTIC GEOMETRY & CALCULUS 1
NEEDS: 3.00 HOURS
SELECT FROM: MAC#311, MAC#472, MAC020#
‘G' MET:
OK 1
9401 MAC3311 4.00 A _
----------------------------------------------

‘H’ UNMET:
NO 1
-----> NEEDS:
‘H’ MET:
OK 1
9401 MAC3311 4.00 A _
--------------------------------------------
‘I’ UNMET:
NO 1
-----> NEEDS:
- 1) ### MAC 2311 - ANALYTIC GEOMETRY & CALCULUS 1
‘I’ MET:
OK 1
9401 MAC3311 4.00 A _
--------------------------------------------
‘K’ UNMET:
NO 1
-----> NEEDS:
- 1) ### MAC 2311 - ANALYTIC GEOMETRY & CALCULUS 1
NEEDS: 3.00 HOURS
SELECT FROM: MAC#311, MAC#472, MAC020#
‘K’ MET:
OK 1
EARNED: 3.00 HOURS 4.000 GPA
9401 MAC3311 4.00 A _
----------------------------------------------------
‘L’ UNMET:
NO 1
-----> NEEDS:
- 1) ### MAC 2311 - ANALYTIC GEOMETRY & CALCULUS 1
NEEDS: 3.00 HOURS
SELECT FROM: MAC#311, MAC#472, MAC020#
‘L’ MET:

OK 1
EARNED: 3.00 HOURS 4.000 GPA
+ 1) ### MAC 2311 - ANALYTIC GEOMETRY & CALCULUS 1
( 4.00 HOURS TAKEN) 1 COURSE TAKEN 4.000 GPA
9401 MAC3311 4.00 A _
----------------------------------------------------
‘N’ UNMET:
NO 1
-----> NEEDS:
- 1) ### MAC 2311 - ANALYTIC GEOMETRY & CALCULUS 1
NEEDS: 3.00 HOURS
SELECT FROM: MAC#311, MAC#472, MAC020#
‘N’ MET:
OK 1
EARNED: 3.00 HOURS 4.000 GPA
----------------------------------------------------
‘O’ UNMET:
NO 1
-----> NEEDS:
- 1) ### MAC 2311 - ANALYTIC GEOMETRY & CALCULUS 1
‘O’ MET:
OK 1
EARNED: 3.00 HOURS 4.000 GPA
9401 MAC3311 4.00 A _
----------------------------------------------------
‘P’ UNMET:
NO 1
-----> NEEDS:
- 1) ### MAC 2311 - ANALYTIC GEOMETRY & CALCULUS 1
NEEDS: 3.00 HOURS
SELECT FROM: MAC#311, MAC#472, MAC020#
‘P’ MET:
OK 1
EARNED: 3.00 HOURS 4.000 GPA
9401 MAC3311 4.00 A _
-----------------------------------------------------
‘Q’ UNMET:

NO 1
-----> NEEDS:
- 1) ### MAC 2311 - ANALYTIC GEOMETRY & CALCULUS 1
‘Q’ MET:
OK 1
EARNED: 3.00 HOURS 4.000 GPA
9401 MAC3311 4.00 A _
----------------------------------------------------
‘R’ UNMET:
NO 1
-----> NEEDS:
‘R’ MET:
OK 1
--------------------------------------------------
‘S’ UNMET:
NO 1
-----> NEEDS:
‘S’ MET:
OK 1
EARNED: 3.00 HOURS 4.000 GPA
9401 MAC3311 4.00 A _
----------------------------------------------------
‘T’ UNMET:
NO 1
-----> NEEDS:
- 1) ### MAC 2311 - ANALYTIC GEOMETRY & CALCULUS 1
‘T’ MET:
OK 1
9401 MAC3311 4.00 A _
----------------------------------------------
‘U’ UNMET:
NO 1

-----> NEEDS:
- 1) ### MAC 2311 - ANALYTIC GEOMETRY & CALCULUS 1
‘U’ MET:
OK 1
EARNED: 3.00 HOURS 4.000 GPA
+ 1) ### MAC 2311 - ANALYTIC GEOMETRY & CALCULUS 1
9401 MAC3311 4.00 A _
------------------------------------------------
‘X’ UNMET:
NO 2 PRINT CODE=X AT HEADER
-----> NEEDS:
- 1) ### MAC 2233 - SURVEY OF CALCULUS(PROFESSIONAL)
‘X’ MET:
OK 1 PRINT CODE=X AT HEADER
EARNED: 4.00 HOURS 4.000 GPA
------------------------------------------------
‘Y’ UNMET:
NO 4 PRINT CODE=Y AT HEADER
-----> NEEDS:
- 1) ### MAC 2233 - SURVEY OF CALCULUS(PROFESSIONAL)
NEEDS: 1 COURSE
‘Y’ MET:
OK 3 PRINT CODE=X AT HEADER
EARNED: 4.00 HOURS 4.000 GPA
------------------------------------------------
‘Z’ UNMET:
NO 6 PRINT CODE=Z ONLY AT SUB LEVEL
-----> NEEDS:
‘Z’ MET:
OK 5 PRINT CODE=Z ONLY AT SUB LEVEL
EARNED: 4.00 HOURS 4.000 GPA
9508 MAC3311 4.00 A _
------------------------------------------------

Print codes used at the sub-requirement level will give different results in some cases. Print
codes used at the top of the requirement apply to all sub-requirements. Print codes used at
the sub-requirement level may vary from sub-requirement to sub-requirement or they may
all be the same. In additional, the print codes of ‘X’ and ‘R’ may be combined to achieve
yet a different results by placing the ‘X’ at the top of the requirement and the ’R’ at the
sub-requirement level. This is particularly useful when reporting hours earned such as in
the requirement uf-120.