unity3d/arduino integration - mcmullen · pdf filemerging physical and virtual - 1 merging...
TRANSCRIPT

Merging Physical and Virtual - 1
Merging Physical and Virtual:
A Workshop about connecting Unity with Arduino
v1.0
R. Yagiz Mungan | [email protected]
Purdue University - AD41700 Variable Topics in ETB: Computer Games
Fall 2013
September 30

Merging Physical and Virtual - 2
Contents 1. Introduction .............................................................................................................................................. 3
2. Unity .......................................................................................................................................................... 4
2.1. Server ................................................................................................................................................. 7
2.2. Object to Rotate ............................................................................................................................... 10
2.3. Trigger Zone ..................................................................................................................................... 11
2.4. Integrating the Scene ....................................................................................................................... 13
3. Processing ............................................................................................................................................... 14
3.1. Arduino Interface (via Serial Port): .................................................................................................. 15
3.2. Unity Interface (via TCP/IP): ............................................................................................................. 16
4. Arduino.................................................................................................................................................... 18
4.1. Software ........................................................................................................................................... 18
4.2. Hardware ......................................................................................................................................... 19
4. Integration .............................................................................................................................................. 20
5. Conclusions ............................................................................................................................................. 21

Merging Physical and Virtual - 3
1. Introduction This workshop is about creating mixed-reality interactive objects (games, art installations, gadgets,
unique interfaces) by combining 3D gaming (Unity) and physical computing (Arduino). This workshop
assumes basic understanding of Unity (interface and scripting), Processing, Arduino and programming or
scripting in general. However, some basic instructions will be provided about the platforms.
The workshop has been created and tested with the following versions of the software:
Unity version 4.2.1
o Unity can be downloaded from http://unity3d.com/
o C# will be used for scripting.
Processing version 1.5.1 and 2.0.1
o Arduino library for Processing is also required. It can be downloaded from
http://playground.arduino.cc/interfacing/processing note that v2.x and v1.5.1 have
different packages.
Arduino version 1.0
o Software: http://arduino.cc/en/Main/Software
o Hardware: http://arduino.cc/en/Main/Buy
o Arduino UNO is used.
Unity and Arduino will be connected via Processing. Unity and Processing will talk to each other via
TCP/IP and Processing and Arduino will talk to each other via firmata.
Figure 1: Connections from Unity to Arduino
Since we are using TCP/IP, Processing and Unity do not need to be in the same computer. They talk
through internet.
We will create a simple example with simple scripts, which means the system we will create will work.
However, it will not be the most efficient or robust system. The system will work such that, we will use a
potentiometer to rotate an object Unity and we will use a trigger in Unity to switch on and off the built
in LED in Arduino UNO. The codes provided with this document will have multiple lines of debug code
(println() in Processing and Debug.Log() in Unity) that can be enabled to debug and understand the
signals that is being transmitted.
TCP/IP Firmata

Merging Physical and Virtual - 4
2. Unity On the Unity side, for this example, we will create the following items:
A server!
An object to rotate.
A way to create a trigger in the game.
The server will be a script that will be attached to an object. Make sure that the object is passed through
all the scenes. The Main Camera or the character controller can be used.
For the rotation, any object is sufficient. However, for this workshop, I will use a light source with a
cookie (world map) attached to a textured (world map) sphere.
For the trigger, I will use OnTriggerEnter and OnTriggerExit functions with a Box Collider.
Before starting to write scripts, we need to create our project and a scene. Go to
File -> New Project
On the Project Wizard window, choose the location of the project and from the packages click on
‘Character Controller.unityPackage . Once the project is ready, press CTRL+S or APPLE+S to save your
scene1.
Figure 2: Creating a new project in Unity
1 A consistent folder structure is always recommended. For example: create a folder named Scenes and save the scene inside that folder.

Merging Physical and Virtual - 5
Create at least a plane to have something where our character will stand. If you are not familiar with
Unity, you should know that you can create primitive geometric objects inside Unity. To create a plane:
GameObject -> Create Other -> Plane
Figure 3: Creating an object in Unity
The plane will be our extremely simple level. Now, we will create a First Person controller by using a
prefab2. Drag and drop ‘First Person Controller’ from Project Window to Hierarchy window. Put it
somewhere on the plane. On the top of the Inspector Window, change the tag of the object to Player.
2 Prefabs are template objects that are packaged and ready to use.

Merging Physical and Virtual - 6
Figure 4: Unity Project Window
When you have time, feel free to improve your scene in any way you like. Below image shows the scene
from the First Person view.
Figure 5: A fancy object to rotate

Merging Physical and Virtual - 7
2.1. Server The server will be the recipient entity of the TCP/IP connection. For the server, we will use a C#3 script
and we will not go into the details of the script for this workshop. However, we will look at how it works
in order to expand it to support more features. Create a C# script labeled TCPHost4.
External Libraries
We need libraries additional to UnityEngine for the server.
Variables
The first set of variables is required for the server and the second set is required for the game
mechanics. The ‘incoming_client’ object of class TcpClient will be the Processing that connects to the
server, the ‘netStream’ object of class NetworkStream will be the stream or the connection between the
server and the ‘server’ object of class TcpListener will be the server.
As for the game, we need a game object, which we will rotate. This object is referenced as
‘targetObjcet’. We need a Boolean variable to control the LED at pin 13 on Arduino. And we need
another Boolean for a simple improvement of the system, so that we only send data when the LED13
value changes.
3 In the case, where your C# script needs to reach a variable from a JavaScript/UnityScript script and vice versa, check Unity’s documentation about the order in which codes are compiled: http://docs.unity3d.com/Documentation/Manual/ScriptCompileOrderFolders.html 4 C# scripts name must have the same name as the class name.
using UnityEngine; using System.Collections; using System; using System.Text; using System.Net; using System.Net.Sockets; using System.IO;
//be sure that the port is open and available public int portNo = 8090; private TcpClient incoming_client; private NetworkStream netStream; private TcpListener server; private bool waiting; // Add variables as required // I will use a gameobject to rotate with the potentiometer public GameObject targetObjcet; // variable for LED13 in Arduino public bool LED13 = false; public bool IsLED13Changed = false;

Merging Physical and Virtual - 8
Start Function
In the ‘Start()’, we initialize and start the server. For more details of the TcpListener object see the
reference: http://msdn.microsoft.com/en-us/library/system.net.sockets.tcplistener.aspx
Parse (string Parse) Function
The Parse Function, processes the String received from client (Processing) and does the necessary
actions. Here I have used a simple handshaking signal: Blank space is defined as the end of a message.
Thus, the received data package is split from the blank spaces. The server uses the first part and
disregards the rest.
Update Function
The ‘Update’ is the heart of the server: It checks whether the server is busy or not. If it is not, the code
looks for the next client and reads the data if it is available. After a successful read attempt, LED13
activation data is sent to the Processing patch. It is important to note that the server employs error
caching in order to sustain functioning after any corrupted data or connection problems.
The data s first suffixed with the end signal (single blank space) and then the new String is converted
into an array of bytes. The array sent to the Processing patch through the ‘netstream’ object.
// Use this for initialization void Start () { waiting = false; server = new TcpListener(IPAddress.Any, portNo); server.Start(); }
void Parse2(string toParse) { //Debug.Log(toParse); //you can use multiple commands and use string.Split() to split them //Using and an end signal is always good, here we are using blank space (" ") string[] values = toParse.Split(' '); //Debug.Log("first is " + values[0]); //access the script attached to target object targetObjcet.GetComponent<Rotator>().RotationAngle = float.Parse(values[0]); }

Merging Physical and Virtual - 9
void Update () { string s; string[] values; if (server.Pending()) { incoming_client = server.AcceptTcpClient(); netStream = incoming_client.GetStream(); waiting = true; } while (waiting && netStream.DataAvailable) { try { int numread = 0; byte[] tmpbuf = new byte[1024]; numread = netStream.Read(tmpbuf, 0, tmpbuf.Length); s = Encoding.ASCII.GetString(tmpbuf, 0, numread); s = s.Replace("\n",""); values = s.Split(';'); //print ("values"+values.ToString()); //for debugging if (values.Length > 1) { for (int i = 0; i < (values.Length-1); i++) { Parse2(values[i]); } } else Parse2(values[0]); //sending data //Test //Byte[] data = System.Text.Encoding.ASCII.GetBytes("HelloThere"); //netStream.Write(data, 0, data.Length); //Send only and only if the state of LED13 has changed if(LED13 != IsLED13Changed) { //send //again using space as end character! string TempSend = LED13.ToString(); TempSend += " "; //Debug.Log(TempSend); Byte[] data = System.Text.Encoding.ASCII.GetBytes(TempSend); netStream.Write(data, 0, data.Length); IsLED13Changed = LED13; } } //Called when netStream fails to read from the stream. catch (IOException e) { waiting = false; netStream.Close(); incoming_client.Close(); } //Called when netStream has been closed already. catch (ObjectDisposedException e) { waiting = false; incoming_client.Close(); } } }

Merging Physical and Virtual - 10
2.2. Object to Rotate Here we need an object. We will create a cube similar to creating a plane. To create a ‘Cube’ go to:
GameObject -> Create Other -> Cube
Rename the ‘Cube’ to something more specific and recognizable. Place the object somewhere. We need
to attach a script to the object. The script will be used to link the data that the server received to the
object. Let us create C# script and call the script ‘Rotator’:
The main idea of the script is to map the Arduino input to the rotation of the object. In Unity, the
rotation of an object can be accessed from transform.Rotate5. The rotation is a vector with three
elements that maps to the X, Y and Z-Axes. We will only rotate the Y-Axis. The data that is received from
Arduino ranges from 0 to 1023 since the analog-to-digital converters have 10-bits. We need to convert
this range to 0-360 degrees before applying. In the ‘Start’ function this conversion is done. In the
‘Update’, the script does not only scale the value with the degree-conversion rate but it also scales the
value with ‘Time.deltaTime’. Scaling with the unit time-change allows us to have numerically correct
change that is related with the real time rather than the number of frames. Thus, once scaled with
‘Time.deltaTime’, our object rotates X degrees per second rather than X degree per frame.
5 http://docs.unity3d.com/Documentation/ScriptReference/Transform.Rotate.html
using UnityEngine; using System.Collections; public class Rotator : MonoBehaviour { public float RotationAngle = 0; private Vector3 V3 = Vector3.zero; private float Conversion; public float ArduinoInputMax = 1023; //Arduino uses 10bits // Use this for initialization void Start () { Conversion = 360/ArduinoInputMax; //scale the data read from Arduino to degrees } // Update is called once per frame void Update () { //rotate the object around Y-axis //with unit time (degree/second) V3.y = RotationAngle*Time.deltaTime*Conversion; //Debug.Log("v3y = "+V3.y.ToString()); transform.Rotate(V3); } }

Merging Physical and Virtual - 11
2.3. Trigger Zone Creating a trigger zone in Unity can be simple. The easiest way to do is to create a ‘Cube’ following:
GameObject -> Create Other -> Cube
Rename the object to something definitive. Scale the object so that it is easy to trigger. In the ‘Inspector
Window’, find ’Box Collider’ and click on ‘Is Trigger’. This turns the object to a trigger zone such that
objects that collide with the trigger zone can go through without reflection; however, the game engine
sends a signal when the collision happens.
Figure 6: Box Collider window in the Inspector
Now create a script and label it TriggerActivation. When another game object enters or exits the trigger
zone. Our script will look at that object’s tag. If it is “Player”, it will make the Boolean variable, ‘IsInside’
true when the player enters and false when the players exits. The Boolean will be sent to the TCPHost
script via the variable ‘TCPSendReference’.

Merging Physical and Virtual - 12
using UnityEngine; using System.Collections; public class TriggerActivation : MonoBehaviour { public GameObject TCPSendReference; private bool IsInside = false; void OnTriggerEnter(Collider other) { if(other.CompareTag("Player")) { //Debug.Log("enter"); IsInside = true; TCPSendReference.GetComponent<TCPHost>().LED13 = IsInside; } } void OnTriggerExit(Collider other) { if(other.CompareTag("Player")) { //Debug.Log("exit"); IsInside = false; TCPSendReference.GetComponent<TCPHost>().LED13 = IsInside; } } }

Merging Physical and Virtual - 13
2.4. Integrating the Scene Before hitting Play, we need to attach the scripts and link the game objects to the reference variables.
1. Server
First, attach the ‘TCPHost’ script to the ‘First Person Controller’ object by dragging and dropping it from
Project View on to the object in Hierarchy View. In the Inspector View, set variable as follows:
Figure 7: Setting up TCPHost script
Here, the name of the object in my scene that I will rotate is ‘World’. Thus for the ‘Target Object’,
choose the object that you created.
2. Rotating Object
Attach the script, ‘Rotator’, to the object you have created. You do not need to change any of the
variables.
3. Trigger Zone
Attach the script, ‘ActivationTrigger’, to the trigger zone object that you have created. For the
‘TCPSendReference’ variable drag and drop ‘First Person Controller’ from Hierarchy View.
Now, our scene should be ready and we will move on to Processing. Do not forget to save your scene!

Merging Physical and Virtual - 14
3. Processing The Processing sketch is relatively simple it has two important parts: Arduino interface and Unity
interface. We will read from the Analog 0 pin of the board, while writing to the Digital 13 pin of the
board. On the Unity side, we will connect to a defined IP address through a defined port. Through this
connection, we will send the data that is read from Analog 0 pin and the received data will carry the
value that will control LED13 on Arduino UNO.
Here is some reference information:
Arduino Library6 for Processing: http://playground.arduino.cc/interfacing/processing
Client object from Net Library for Processing: http://processing.org/reference/libraries/net/Client.html
Here is some select information from the references:
Arduino Library
Arduino.list(): returns a list of the available serial devices. If your Arduino board is connected to
the computer when you call this function, its device will be in the list.
Arduino(parent, name, rate): create an Arduino object. Parent should be "this" (without the
quotes); name is the name of the serial device (i.e. one of the names returned by Arduino.list());
rate is the speed of the connection (115200 for the v2 version of the firmware, 57600 for v1).
Note that in the v2 library, the rate parameter is optional.
pinMode(pin, mode): set a digital pin to input or output mode (Arduino.INPUT or
Arduino.OUTPUT).
digitalWrite(pin, value): writes Arduino.LOW or Arduino.HIGH to a digital pin.
analogRead(pin): returns the value of an analog input (from 0 to 1023).
Client Object Methods
available() : Returns the number of bytes in the buffer waiting to be read
readString(): Returns the buffer as a String
write(): Writes bytes, chars, ints, bytes[], Strings
6 To install a library copy the extracted ZIP package, "arduino" folder, into the "libraries" sub-folder of your Processing Sketchbook. (You can find the location of your Sketchbook by opening the Processing Preferences. If you haven't made a "libraries" sub-folder, create one.)
Merging Physical and Virtual - 15
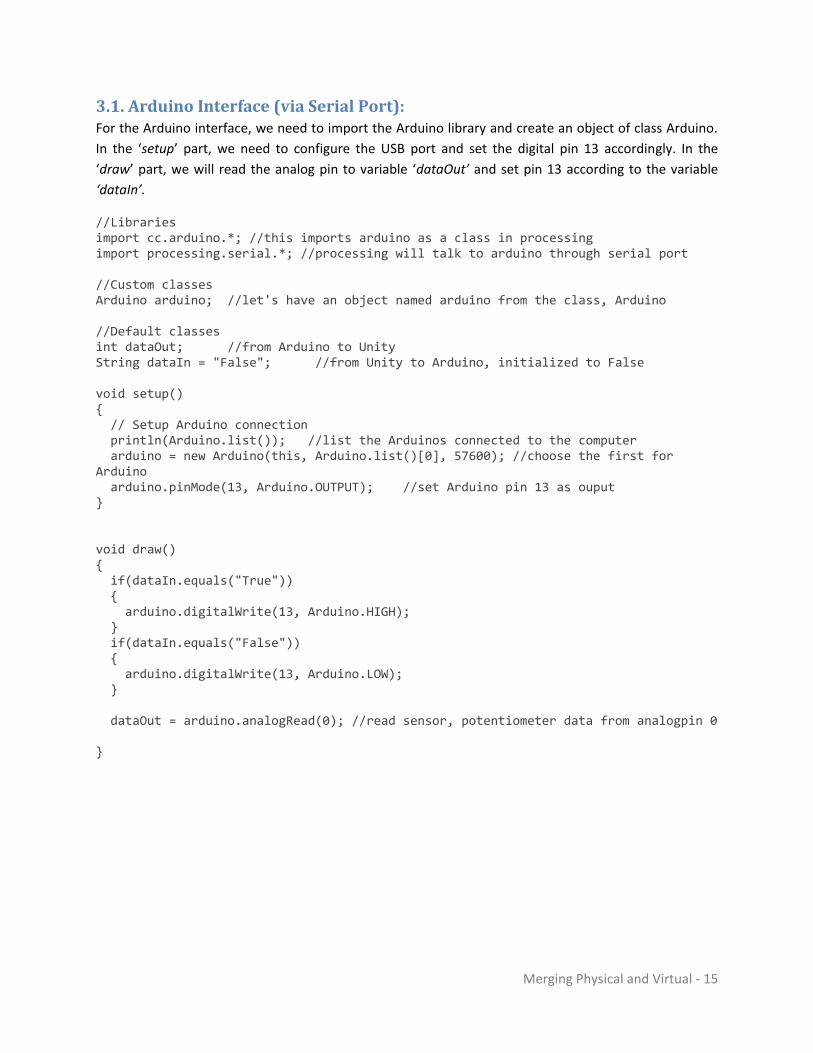
3.1. Arduino Interface (via Serial Port): For the Arduino interface, we need to import the Arduino library and create an object of class Arduino.
In the ‘setup’ part, we need to configure the USB port and set the digital pin 13 accordingly. In the
‘draw’ part, we will read the analog pin to variable ‘dataOut’ and set pin 13 according to the variable
‘dataIn’.
//Libraries import cc.arduino.*; //this imports arduino as a class in processing import processing.serial.*; //processing will talk to arduino through serial port //Custom classes Arduino arduino; //let's have an object named arduino from the class, Arduino //Default classes int dataOut; //from Arduino to Unity String dataIn = "False"; //from Unity to Arduino, initialized to False void setup() { // Setup Arduino connection println(Arduino.list()); //list the Arduinos connected to the computer arduino = new Arduino(this, Arduino.list()[0], 57600); //choose the first for Arduino arduino.pinMode(13, Arduino.OUTPUT); //set Arduino pin 13 as ouput } void draw() { if(dataIn.equals("True")) { arduino.digitalWrite(13, Arduino.HIGH); } if(dataIn.equals("False")) { arduino.digitalWrite(13, Arduino.LOW); } dataOut = arduino.analogRead(0); //read sensor, potentiometer data from analogpin 0 }

Merging Physical and Virtual - 16
3.2. Unity Interface (via TCP/IP): The Unity interface will use the ‘processing.net’ library for the necessary objects. Unity will be the server
and Processing will act as a client to the server. Thus, before running Processing, we need to run Unity
first. We need to create an object of ‘Client’ class. In the ‘setup’, we will map this client to a server with
IP7 and port8 number. The connection is followed by a test message that can be tracked from the other
hand. In ‘draw’, we read the data from the buffer, process it and pass it to the variable ‘dataIn’ and we
pass the data that we got from Arduino to Unity via the variable ‘dataOut’.
7 127.0.0.1 is the local host (same computer), if you need to reach another computer use that computer’s IP. 8 Make sure that the port is open.
//Libraries import processing.net.*; //TCP/IP libraries //Custom object types Client myClient; //and an object named myClient //Default object types int dataOut; //from Arduino to Unity String dataIn = "False"; //from Unity to Arduino, initialized to False String tempdataIn; //temporary variable to parse received data void setup() { // Setup Unity connection // Local host at port 8090. // Change IP if Unity is on a remote machine myClient = new Client(this, "127.0.0.1", 8090); myClient.write("Connected to Unity!"); } void draw() { //See if there is something on the buffer if (myClient.available() > 0) { //read it //println(myClient.readString()); tempdataIn = myClient.readString(); //LED13 on/off String[] list = split(tempdataIn, ' '); dataIn = list[0]; } myClient.write(str(dataOut)+" "); //send it to Unity }

Merging Physical and Virtual - 17
3.3. Combined patch
//Libraries import processing.net.*; //TCP/IP libraries import processing.serial.*; //processing will talk to arduino through serial port import cc.arduino.*; //this imports arduino as a class in processing //Custom object types Arduino arduino; //let's have an object named arduino from the class, Arduino Client myClient; //and an object named myClient //Default object types int dataOut; //from Arduino to Unity String dataIn = "False"; //from Unity to Arduino, initialized to False String tempdataIn; //temporary variable to parse received data void setup() { // Setup Unity connection // Local host at port 8090. // Change IP if Unity is on a remote machine myClient = new Client(this, "127.0.0.1", 8090); myClient.write("Connected to Unity!"); // Setup Arduino connection println(Arduino.list()); //list the Arduinos connected to the computer arduino = new Arduino(this, Arduino.list()[0], 57600); //choose the first Arduino arduino.pinMode(13, Arduino.OUTPUT); //set Arduino pin 13 as ouput } void draw() { //See if there is something on the buffer if (myClient.available() > 0) { //read it //println(myClient.readString()); tempdataIn = myClient.readString(); //LED13 on/off String[] list = split(tempdataIn, ' '); dataIn = list[0]; } //If it is 1 turn on LED13 //println(dataIn+"lalal"); if(dataIn.equals("True")) { //println("True here"); arduino.digitalWrite(13, Arduino.HIGH); } if(dataIn.equals("False")) { //println("False here"); arduino.digitalWrite(13, Arduino.LOW); } dataOut = arduino.analogRead(0); //read sensor, potentiometer data from analogpin 0 //println(dataOut); myClient.write(str(dataOut)+" "); //send it to Unity }

Merging Physical and Virtual - 18
4. Arduino The Arduino part is relatively easy:
4.1. Software
We will only load Standard Firmata. Firmata allows us to talk to the Processing in real time through the
serial port. See the image below to load Firmata.
File -> Examples -> Firmata -> Standard Firmata
Figure 8: Loading Standard Firmata
Once StandarFirmata patch is loaded. Click on to upload the programming.

Merging Physical and Virtual - 19
4.2. Hardware
We will connect a potentiometer9 to the board in order to create a variable input. Regular
potentiometers have the three nodes:
1. Power reference: Connect this to 3V or 5V output of the board.
2. Ground reference: Connect this to the GDD output of the board.
3. Output reference: Connect this to the analog input (A0) of the board.
Figure 9: Connecting the potentiometer
9 Potentiometer is a variable resistor. For this workshop any element that provides an analog input to Arduino can be used.

Merging Physical and Virtual - 20
4. Integration Upload the StandardFirmata to Arduino
Start the Unity scene
Run the Processing patch
Once the patch is up and running, return to Unity window. Unity Game Window works only when it is in
focus. If another software (Arduino or Processing) is on the foreground, the game (thus the server) is
paused. If the Processing patch is started before Unity, it will give errors; however, this can be improved.
For troubleshooting, follow these steps (in any order):
Make sure there is no mistake between the manual and your implementation.
Make sure the port is open and the local host is accessible.
Make sure that correct port is chosen for Arduino.
Use the debug lines to see if the signals are correct and are received correctly.

Merging Physical and Virtual - 21
5. Conclusions The documentation and the final Unity project and Processing can be found from the following link:
https://dl.dropboxusercontent.com/u/265455/MergingPhysicalandVirtual.rar
Use this tool to create unique experiences.