unity 2 daams tube v1.3 - ingenieria-analitica.com€¦ · routine operation of a uni-daams is...
TRANSCRIPT

QUI-1055 Uni-DAAMS Manual 1
UNITY 2
Uni-DAAMS Manual
Version 1.3 (Changes to Section 1.1)
March 2010
1. Introduction.................................................................................................................2
1.1. Installing the DAAMS tube ovens ....................................................................................2
1.2. Swapping between tube types ........................................................................................5
1.3. Changing tube oven o-rings ...........................................................................................6

QUI-1055 Uni-DAAMS Manual 2
1. Introduction
Routine operation of a Uni-DAAMS is identical to a standard UNITY 2, see UNITY 2 operators manual
on the technical CD for instructions. The differences between the 2 instruments concern swapping
tube types (4.5 inch DAAMS tubes only) and the size of o-ring used in the tube oven receivers.
1.1. Installing the DAAMS tube ovens
Switch power off to UNITY 2. Remove
all covers.
Lift the tube receiver arm and remove
any sample tube present.
Remove the 2 screws highlighted.
Disconnect the tube oven heater and
thermocouple connector.
Remove the tube oven assembly.
The oven clamp assembly that seals
onto the rear of the tube needs to be
adjusted for the longer tubes.
Remove the 2 highlighted screws, the
right one first so the plate underneath
can be rotated and retained while the
left screw is removed.
Re-attach the oven clamp using the 2
holes further forward (highlighted in
blue) attaching one screw to the plate
then rotating it for the second screw.

QUI-1055 Uni-DAAMS Manual 3
Install the DAAMS tube oven with the
highlighted spacer block for 6 mm
O.D. DAAMS tubes and without for 10
mm O.D. tubes.
Connect the tube oven heater and
thermocouple connector.
Take care when routing the cables
so they can not become trapped
under the heated valve cover.
Route them inside the 1/16”
stainless steel nut.
Secure the tube oven assembly with
the 2 screws removed earlier.
The o-rings that seal each end of the
tube need to be replaced with U-
COV45 o-rings (supplied). See section
1.3 for more details.
The tube oven cover must also be
replaced with the longer version
(supplied).
Note: If installing an ULTRA to the
UNITY 2 then this cover does not
need to be removed
Remove the black knob and replace
the oven cover.
Place an appropriate sized tube into
the tube oven and check that the tube
is held at the correct height to seal on
the o-rings (both front and rear).
If not then the height of the tube oven
must be adjusted.
Note: Incorrect alignment can lead to
damaged tubes and leaks.

QUI-1055 Uni-DAAMS Manual 4
To adjust the tube oven height,
remove the 2 securing grub screws.
The height can then be adjusted with
the 2 screws on the underside.
Caution: Do not over tighten the
screws as damage can occur to the
heater wiring.
Once adjusted retighten the grub
screws and re-fit the oven. Check the
alignment again and repeat the
adjustment is necessary.
To align the oven clamp assembly
place a tube in the oven and loosen
the 2 screws shown in the step above.
Now close the oven clamp assembly
and gently push to slide the assembly
so it seals the tube into place then
move back 1 mm and, while still
holding it, retighten the 2 screws.
Note: Ensuring there is some slack
means that when the tube heats and
expands it will not crack.
The same procedure can be repeated
on the split tube side if required.

QUI-1055 Uni-DAAMS Manual 5
1.2. Swapping between tube types
The UNITY 2 DAAMS ships correctly
adjusted for 6 mm O.D. DAAMS tubes,
as shown.
To swap to 10 mm O.D. tubes (with 6
mm ends) remove the 2 screws
highlighted.
Lift the tube oven assembly and
remove the aluminium spacing block
highlighted.
Note: Keep the spacing block for
future use.
Re-secure the tube oven assembly
with the 2 screws removed earlier.
QUI-1055 Uni-DAAMS Manual 6
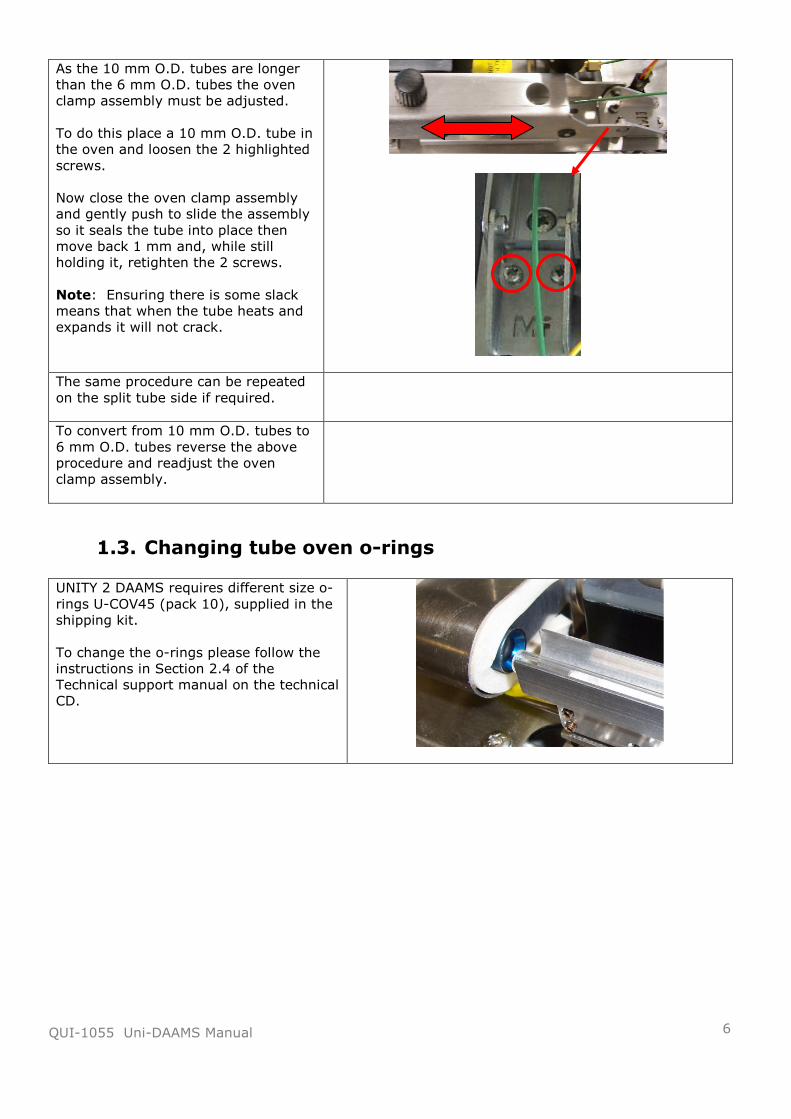
As the 10 mm O.D. tubes are longer
than the 6 mm O.D. tubes the oven
clamp assembly must be adjusted.
To do this place a 10 mm O.D. tube in
the oven and loosen the 2 highlighted
screws.
Now close the oven clamp assembly
and gently push to slide the assembly
so it seals the tube into place then
move back 1 mm and, while still
holding it, retighten the 2 screws.
Note: Ensuring there is some slack
means that when the tube heats and
expands it will not crack.
The same procedure can be repeated
on the split tube side if required.
To convert from 10 mm O.D. tubes to
6 mm O.D. tubes reverse the above
procedure and readjust the oven
clamp assembly.
1.3. Changing tube oven o-rings
UNITY 2 DAAMS requires different size o-
rings U-COV45 (pack 10), supplied in the
shipping kit.
To change the o-rings please follow the
instructions in Section 2.4 of the
Technical support manual on the technical
CD.