unit plan mixtures & solutions and solutions... · mixtures of matter can be separated...
TRANSCRIPT

Desired Results BVSD Standard(s)/Grade Level Expectations Fifth Grade Science GLE1. Mixtures of matter can be separated regardless of how they were created; all weight and mass of the mixture are the same as the sum of weight and mass of its parts* Fifth Grade Language Arts GLE2.2. Ideas found in a variety of informational texts need to be compared and understood* GLE3.2. The recursive writing process creates stronger informational and persuasive texts for a variety of audiences and purposes*
Unit Essential Questions 1. How do mixtures act similarly and differently from their original materials?* 2. What are some ways that mixtures can be separated?*
Students will know… a) Properties help determine how to
separate mixtures. * b) When a mixture is separated into parts,
the total mass of the parts equals the mass of the original mixture. No matter is lost when a mixture is separated into parts. *
c) A mixture combines two or more materials that retain their own properties.
d) A solution forms when a material dissolves in a liquid (solvent) and cannot be retrieved with a filter.
e) Evaporation can separate a liquid from a solid in a solution.
f) When a change results from mixing two or more materials, that change is a chemical reaction. A reaction results in new materials.
g) Formation of a gas is one change that occurs in some reactions.
h) Formation of a precipitate occurs in some chemical reactions.
i) Not all chemicals react when they are mixed.
Students will be able to… a) Develop, communicate, and justify a procedure to separate simple mixtures based on physical properties. * b) Identify any changes to objects or systems by comparing measurable physical properties before and after an investigation.* c) Share evidence-‐based conclusions and an understanding of the impact on the weight/mass of a liquid or gas mixture before and after it is separated into parts. * d) Measure physical properties of objects using metric units (mass, weight, volume). * e) Ask testable questions about mixtures; make a falsifiable hypothesis, design an inquiry based method of finding the answer, collect data, and form a conclusion. * f) Select appropriate tools to conduct an experiment, use them correctly, and report the data in proper units. * g) Share results of experiments with others and respectfully discuss results that are not expected. * h) Express questions, predictions, data, claims and evidence using complete sentences in a science notebook. i) Conduct investigations safely in the classroom.
* From Fifth Grade Curriculum Essentials
FOSS Mixtures and Solutions Unit Plan
1

Academic Vocabulary
Investigation 1 compare
contrast
diatomaceous earth/powder
dissolve
evaporate
filter
funnel
gravel
liquid
mixture
particle size
properties
salt
screen
separate
solid
solution
syringe
venn diagram
Investigation 2 average closed system conservation of mass estimated error
Investigation 2 baking soda calcium chloride calcium citrate
chemical reaction citric acid fizz gas precipitate
2

Assessment Evidence
Pre/post assessment Science notebook entries Informal observation and discussion
Materials and Resources
Materials • Science notebooks for students • Document Camera (optional) • FOSS Mixtures and Solutions kit • Additional informational texts related to
mixtures, solutions, and matter
3

FOSS Mixtures and Solutions: Investigation 1 – Separating Mixtures Session Content Objectives Language Objectives 1 Pre-‐assessment
KWHL Chart
• Complete a KWHL Chart as group to share pre-‐existing knowledge
2 Set-‐up • Kit inventory • Introduce science notebooks • Create Table of Contents • Create Glossary • Review safety
• Students will be able to conduct investigations safely in the classroom
• Students will be introduced to and will practice academic vocabulary (diatomaceous earth, syringe, salt, gravel, solid, liquid, screen, filter, funnel)
• Use words related to table of contents and keeping a science notebook (notebook, page, table of contents)
• Define academic vocabulary with support from the word wall
3 Compare and contrast solid materials • Discuss properties and add
“property” to glossary and word wall
• Use a Venn Diagram or other graphic organizer to compare and contrast solid materials (gravel, salt, powder)
• Make predictions about what will happen when water is added to substances
• Students will be able to use properties to compare and contrast solid materials
• Use words and phrases for comparison and contrast in context (similar to, same as, different from, differ, share, are different, etc.)
• Complete sentence stems to make predictions with reasoning
4 Separating Mixtures • Observe what happens when
water is added to each substance • Introduce the term “mixture” • Introduce the three mixtures
(gravel and water, powder and water, salt and water)
• Brainstorm methods for
• Students will know that a mixture combines two or more materials that retain their own properties
• Students will record observations accurately
• Students will form a prediction and explain their reasoning about methods for separating mixtures
• Use academic vocabulary with support from the word wall to describe observations and make predictions
• Use appropriate language to write a procedure as a numbered list
4
separating mixtures • Predict which method for
separating each mixture into its component parts will work (see student sheet)
• Design a procedure to test which methods work for separating each mixture
• Students will write a procedure
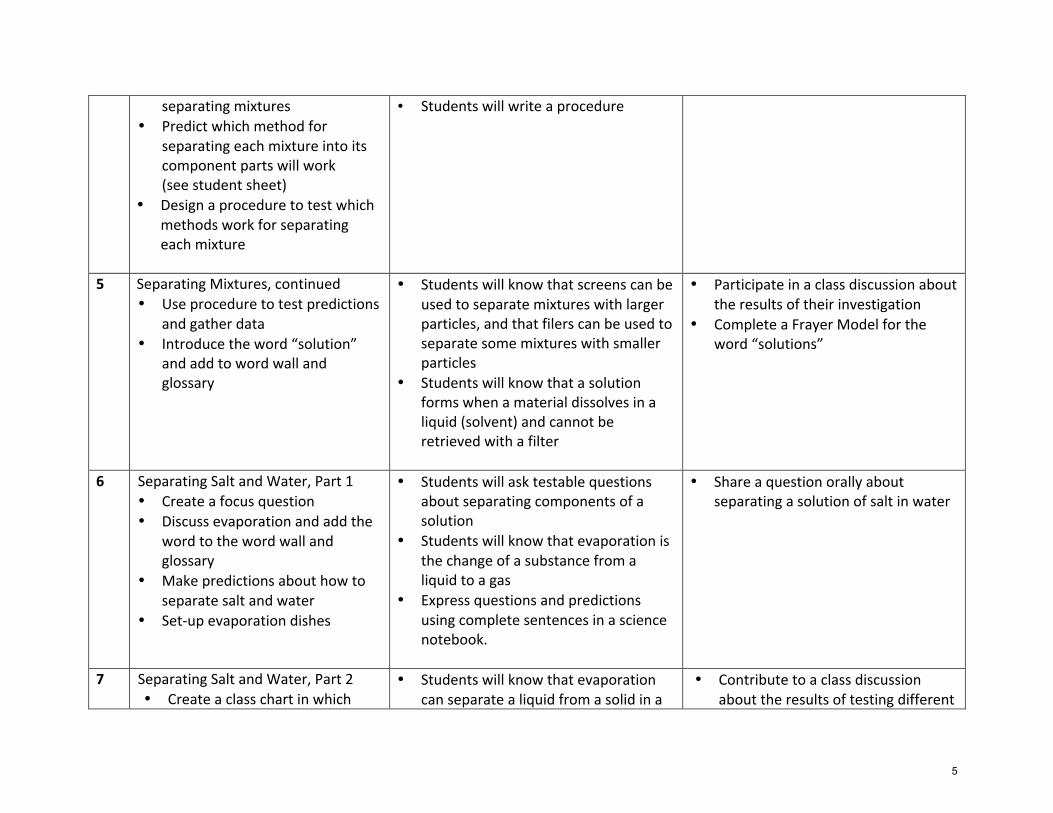
5
Separating Mixtures, continued • Use procedure to test predictions
and gather data • Introduce the word “solution”
and add to word wall and glossary
• Students will know that screens can be used to separate mixtures with larger particles, and that filers can be used to separate some mixtures with smaller particles
• Students will know that a solution forms when a material dissolves in a liquid (solvent) and cannot be retrieved with a filter
• Participate in a class discussion about the results of their investigation
• Complete a Frayer Model for the word “solutions”
6 Separating Salt and Water, Part 1 • Create a focus question • Discuss evaporation and add the
word to the word wall and glossary
• Make predictions about how to separate salt and water
• Set-‐up evaporation dishes
• Students will ask testable questions about separating components of a solution
• Students will know that evaporation is the change of a substance from a liquid to a gas
• Express questions and predictions using complete sentences in a science notebook.
• Share a question orally about separating a solution of salt in water
7 Separating Salt and Water, Part 2 • Create a class chart in which
• Students will know that evaporation can separate a liquid from a solid in a
• Contribute to a class discussion about the results of testing different
5

every group can record the data from their student sheets
• Discuss results and look for patterns
• Discuss which properties of each material made it possible for them to be separated by the methods that worked
• Write Claims and Evidence
solution • Students will share results of
experiments with others and respectfully discuss results that are not expected
• Students will write claims and evidence
methods for separating mixtures • Use the word “property” in talking
about the separation of mixtures
8 Separating a Dry Mixture • Present the challenge of
designing a method for separating a complex mixture (gravel, powder, salt and water)
• Students write procedures • Test procedures
• Develop, communicate, and justify a procedure to separate simple mixtures based on physical properties
• Express procedures using complete sentences in a science notebook
• Collaborate with a group to write a procedure as a sequence of steps
9 Wrapping-‐up Separating Mixtures • Have each group present their
data • Discuss results and look for
patterns. • Discuss which order of steps is
best for separating mixtures • Revisit KWHL chart
• Students will share results of experiments with others and respectfully discuss results that are not expected
• Contribute to a class discussion about separating mixtures
10 Separating Mixtures Based on Properties • Introduce challenge of
• Students will apply their understanding of properties and mixtures and solutions to design a procedure to
• Participate in a discussion about how to separate mixtures based on properties
6

separating a new mixture • Students design a procedure to
separate the material
separate a novel mixture • Write a procedure in sequential order as a numbered list of steps
7

FOSS Mixtures & Solutions Investigation 1: Separating Mixtures Session 1: Pre Assessment and KWHL chart [30-‐45 minutes]
• Students will complete the pre-‐assessment. • Students will contribute to a class KWHL chart to access prior knowledge
Materials needed Papers to copy and cut Students will need Chart paper/KWHL prepared Marker
Pre/Post Assessment KWHL Chart
Pencil
1. Pre/Post Assessment
While students are seated at their desks, tell them that will be beginning a new unit soon, but first we will give a pre-‐test to see how much they already know. Let them know that the exact same assessment will be given at the end of the unit in order to see how much they learned. Pass out the pre-‐assessment and make sure that student names are on the papers.
2. Introduction to unit Ask students, Based on the pretest, what do you think we will be studying in this unit? Tell students, Today we will be exploring some materials from our science kit called Mixtures And Solutions.
3. KWHL chart Have KWHL chart prepared either hanging up on the board or under the document camera. Tell students, this is a KWHL Chart. We’re going to use it to describe what we know, what we want to know, and how we will investigate. At the end of the unit, we’ll come back to this chart and record what we have learned. Pass out student copies of the KWHL chart. Ask students to help you fill in the K column (what I know) about mixtures of solids and the liquids. Under the W column (what I want to know), ask students What do you WANT to know about mixtures of solids and liquids? Do you have any questions you’ve always wondered about? Under the H column (how would I investigate), ask students HOW would you propose we INVESTIGATE your idea? Write your ideas under the column heading “H” which stands for “How I’ll Learn It” Leave the L column blank to be discussed after students have learned the material. While students are sharing with the class, listen for any prior knowledge of, or misunderstandings about, solids and liquids. Use this information to guide your teaching in terms of clarifying any of the misunderstandings or solidifying correct prior knowledge. Collect the KWHL papers to later be glued into students’ science notebooks.
4. Verbally articulate the goal of the lesson:
8

Teacher says: “In these lessons, we are going to investigate mixtures of solids and liquids using a variety of tools and techniques, and we will separate mixtures based on their properties.”
9

Pre/Post Assessment Mixtures and Solutions
Mixtures and Solution Name: ______KEY__________
1. When a (valid answers = gas, new substance, new chemical, precipitate) forms after two or more materials are mixed, a chemical reaction has occurred. 2. Adam’s friend gave him a cup filled with a water solution. Adam did not know what solid material was used to make the solution. He evaporated the water and found crystals in the dish after all of the water was gone. How will the crystals help him decide what solid material was used to make the solution? Crystals of different materials have different shapes. The crystal______
shape will help him identify the material.___________________________________
___________________________________________________________________________________ 3. When you mix two clear liquids, what kinds of observations would tell you that a chemical reaction occurred? Mark an x next to each statement that indicates a chemical reaction has occurred.
___x__ A gas is produced. _____ The solid dissolves. __x___ A precipitate forms. _____ You can see through the mixture.
10

3. Which of the following is an example of a chemical reaction? a. Water boiling b. A candle burning c. Wax melting d. Bubbles escaping from soda
4. A solution is a type of mixture.
a. How is a solution different from other mixtures?
A solution is a special mixture that forms when a solid
dissolves in a liquid.________________________________________
b. Give two examples of solutions.
Sample answers:__________________________________________________________
_(1.) salt and water, tea__________________________ _
_(2.) Sugar and water, apple juice____________________________________ _
5. Gerry used a screen to separate a mixture of gravel, sand and water. Think about the particle size and answer the question: Why did the sand go through the filter, but the gravel didn’t?
The sand particles are small enough to go through the holes in
the filter screen, but the gravel is too large._____________________ _
__________________________________________________________________________ _
11

6. Which of the following statements about mixtures and solutions is correct? a. All solutions are mixtures, but not all mixtures are solutions. b. Some mixtures are solutions, and some solutions are mixtures. c. All mixtures are solutions, but not all solutions are mixtures. d. All mixtures are solutions, and all solutions are mixtures.
7. A solid dissolved in water can be separated from the water by a. precipitation b. evaporation c. filtration d. weighing
8. All of the following would be helpful in separating a mixture of sand and salt except a. A magnet b. A glass cup c. A filter paper and funnel d. Water
9. A student uses a knife to cut a stick of butter on a dish into smaller pieces. The student weighs the dish, knife, wrapper, and butter before and after cutting the butter into pieces.
12

Will the dish, knife, wrapper, and butter weigh more, less, or the same when the butter is in small pieces and why?
a. They will weigh more because there are more pieces of butter. b. They will weigh less because the butter is in smaller pieces. c. They will weigh less because some of the butter disappears when it is
cut. d. They will weigh the same because the amount of butter has not
changed. 10. If a student dissolves 50 grams of sugar in water and then lets the water evaporate, how much sugar will be left? a. 45 grams because some of the sugar gets destroyed b. 65 grams because the sugar crystals are larger c. 50 grams because the mass of the sugar stays the same
13

Pre/Post Assessment Mixtures and Solutions
Mixtures and Solution Name: ___________________________ 1. When a _________________________________ forms after two or more materials are mixed, a chemical reaction has occurred. 2. Adam’s friend gave him a cup filled with a water solution. Adam did not know what solid material was used to make the solution. He evaporated the water and found crystals in the dish after all of the water was gone. How will the crystals help him decide what solid material was used to make the solution? ___________________________________________________________________________________ ___________________________________________________________________________________ ___________________________________________________________________________________ 3. When you mix two clear liquids, what kinds of observations would tell you that a chemical reaction occurred? Mark an x next to each statement that indicates a chemical reaction has occurred.
_____ A gas is produced. _____ The solid dissolves. _____ A precipitate forms. _____ You can see through the mixture.
3. Which of the following is an example of a chemical reaction? a. Water boiling b. A candle burning c. Wax melting d. Bubbles escaping from soda
14

4. A solution is a type of mixture.
a. How is a solution different from other mixtures?
____________________________________________________________________________ ____________________________________________________________________________
b. Give two examples of solutions.
____________________________________________________________________________ ____________________________________________________________________________
5. Gerry used a screen to separate a mixture of gravel, sand and water. Think about the particle size and answer the question: Why did the sand go through the filter, but the gravel didn’t?
____________________________________________________________________________ ____________________________________________________________________________ ____________________________________________________________________________ ____________________________________________________________________________
6. Which of the following statements about mixtures and solutions is correct? a. All solutions are mixtures, but not all mixtures are solutions. b. Some mixtures are solutions, and some solutions are mixtures. c. All mixtures are solutions, but not all solutions are mixtures. d. All mixtures are solutions, and all solutions are mixtures.
15

7. A solid dissolved in water can be separated from the water by a. precipitation b. evaporation c. filtration d. weighing
8. All of the following would be helpful in separating a mixture of sand and salt except a. A magnet b. A glass cup c. A filter paper and funnel d. Water
9. A student uses a knife to cut a stick of butter on a dish into smaller pieces. The student weighs the dish, knife, wrapper, and butter before and after cutting the butter into pieces.
Will the dish, knife, wrapper, and butter weigh more, less, or the same when the butter is in small pieces and why?
a. They will weigh more because there are more pieces of butter. b. They will weigh less because the butter is in smaller pieces. c. They will weigh less because some of the butter disappears when it is
cut. d. They will weigh the same because the amount of butter has not
changed.
16

10. If a student dissolves 50 grams of sugar in water and then lets the water evaporate, how much sugar will be left?
a. 45 grams because some of the sugar gets destroyed b. 65 grams because the sugar crystals are larger c. 50 grams because the mass of the sugar stays the same
17

KWHL
K What do we know about mixtures of solids and liquids?
W What do we want to know about mixtures of solids and liquids?
H How would you propose we investigate your idea?
L What have we
learned?
KWHL
K What do we know about mixtures of solids and liquids?
W What do we want to know about mixtures of solids and liquids?
H How would you propose we investigate your idea?
L What have we
learned?
18

Session 2: Separating mixtures Set-‐up [30-‐35 minutes] • Students will be able to conduct investigations safely in the classroom. • Students will be introduced to and will practice academic vocabulary (diatomaceous earth, syringe, salt,
gravel, solid, liquid, screen, filter, funnel). Materials needed Papers to copy and cut Students will need Items from kit inventory Gravel Diatomaceous Earth Salt (sodium chloride)
Pencil Science Notebooks Glue
1. Conduct “Kit Inventory” with students.
Now that you are fifth graders, you are prepared to use some chemicals that you have not used before, and are now ready to follow some safety guidelines. Discuss safety guidelines as outlined in FOSS lesson. Safety goggles need to be worn at all times when working with chemicals. Remember to never taste any of the materials. Never blow on any chemicals. Why would it be important to follow these safety guidelines? Before we get started with our materials, you should know that we have the following materials to investigate: gravel, a powder called diatomaceous earth, and salt. Add “gravel”, “diatomaceous earth”, and “salt” to the word wall. Select 5-‐10 additional items from the kit that students will be using in this unit. Gather students’ attention and, one at a time, hold up each item for the kit inventory. Ask students:
● Where have you seen something like this before? ● Does anyone know the word used for this item? ● What do you think we are going to do with this item?
Put these words and pictures/items on the word wall, and do so with any new vocabulary words as they arise. Later in this lesson, students will add these words to their glossary.
2. Model and set up science notebooks Tell students, All scientists record their thinking, observations and data in order to share with other people. Use an example teacher science notebook to model putting your name on the outside of the notebook. Number the pages at the bottom and explain the use of a table of contents. Model for students how to write “Table of Contents” into the first or second page of the science notebook. Model for students how to make an entry in the table of contents with the corresponding page number. The first entry will be the Glossary, which will start on the last page of the notebook. Turn your notebook upside down so that you can still read it from left to right. Write in page numbers starting from this back page towards the “front,” and after every page number, put the letter G for Glossary. This allows students to continue to add new vocabulary as the investigation proceeds, but does not interfere with their other work (and helps
19

distinguish glossary pages from work pages). If the pages are all numbered, they would end up with numbers at the top going backwards (with G) and numbers at the bottom going forwards. Ask students why it would be important to have a glossary. Explain that we want to keep track of new words just like on the word wall in case we forget (this should be identical to the word wall) and make sure to put the correct page number in the table of contents. Each time that students update their science notebooks, you should update the teacher science notebook as a model for them to follow. Pass back student KWHL charts and have them glue them a few pages after the Table of Contents page. Remind students to update the table of contents with the corresponding page number. Also, have students add the new words from the word wall into the glossary in their science notebooks. Words should include “gravel”, “diatomaceous earth”, and “salt” and any other words that have came up during the kit inventory.
20
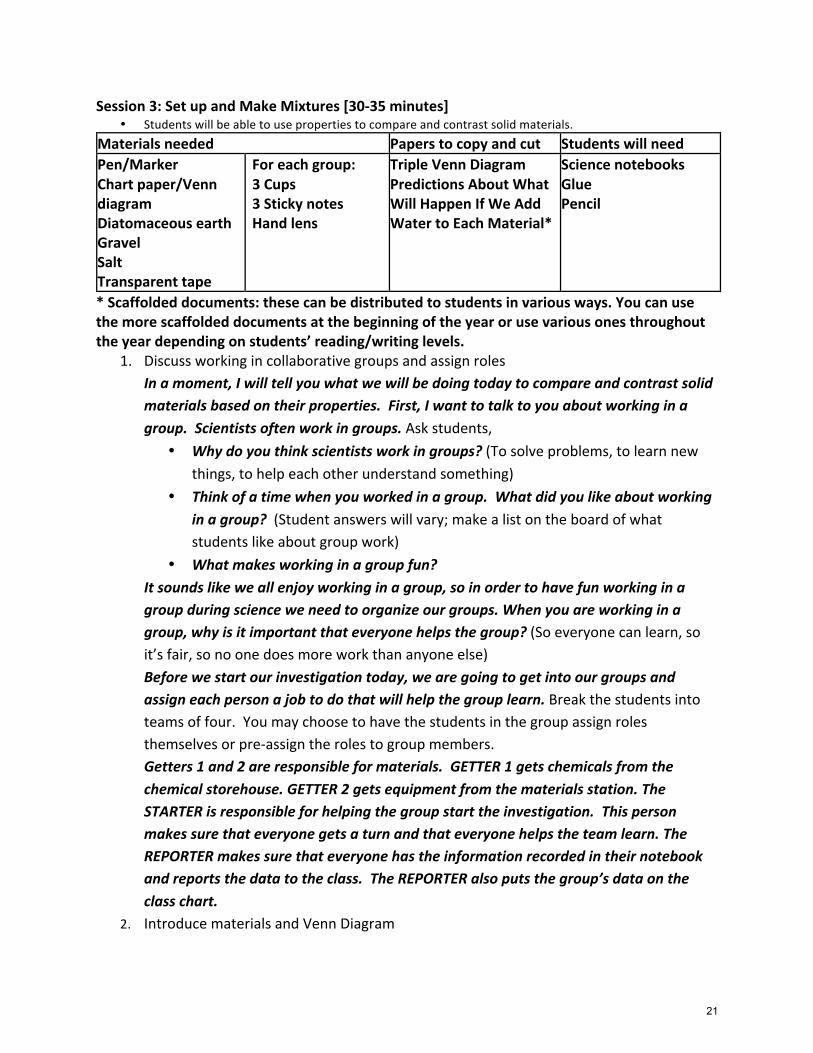
Session 3: Set up and Make Mixtures [30-‐35 minutes] • Students will be able to use properties to compare and contrast solid materials.
Materials needed Papers to copy and cut Students will need Pen/Marker Chart paper/Venn diagram Diatomaceous earth Gravel Salt Transparent tape
For each group: 3 Cups 3 Sticky notes Hand lens
Triple Venn Diagram Predictions About What Will Happen If We Add Water to Each Material*
Science notebooks Glue Pencil
* Scaffolded documents: these can be distributed to students in various ways. You can use the more scaffolded documents at the beginning of the year or use various ones throughout the year depending on students’ reading/writing levels.
1. Discuss working in collaborative groups and assign roles In a moment, I will tell you what we will be doing today to compare and contrast solid materials based on their properties. First, I want to talk to you about working in a group. Scientists often work in groups. Ask students,
• Why do you think scientists work in groups? (To solve problems, to learn new things, to help each other understand something)
• Think of a time when you worked in a group. What did you like about working in a group? (Student answers will vary; make a list on the board of what students like about group work)
• What makes working in a group fun? It sounds like we all enjoy working in a group, so in order to have fun working in a group during science we need to organize our groups. When you are working in a group, why is it important that everyone helps the group? (So everyone can learn, so it’s fair, so no one does more work than anyone else) Before we start our investigation today, we are going to get into our groups and assign each person a job to do that will help the group learn. Break the students into teams of four. You may choose to have the students in the group assign roles themselves or pre-‐assign the roles to group members. Getters 1 and 2 are responsible for materials. GETTER 1 gets chemicals from the chemical storehouse. GETTER 2 gets equipment from the materials station. The STARTER is responsible for helping the group start the investigation. This person makes sure that everyone gets a turn and that everyone helps the team learn. The REPORTER makes sure that everyone has the information recorded in their notebook and reports the data to the class. The REPORTER also puts the group’s data on the class chart.
2. Introduce materials and Venn Diagram
21

Show students the materials they will be using: gravel, powder (diatomaceous earth) and salt (sodium chloride). Introduce a triple Venn Diagram here for comparing and contrasting initial observation of the three solids: gravel, powder (diatomaceous earth), and salt. Tell students, The first step today is to compare and contrast the three materials we will be working with. What do we mean by the word compare? To compare, we discuss the things that are the same. What do we mean by contrast? To contrast we discuss the things that we notice are different. If the idea of compare and contrast is new, add it to the word wall and have students add it to the glossary in their science notebooks. We will be comparing and contrasting the PROPERTIES of each material. Properties (add to the class word wall and have students add it to the glossary in their science notebooks) are descriptions of a material that are special or unique to that material. What are some properties of a pencil? (Mostly made of wood or plastic, shaped like a cylinder with a pointed end, has a smooth surface, has graphite in the center, has an eraser on one end made of rubber, eraser is held onto the pencil with shiny metal, etc.) Can anyone describe the properties of sand? (Made up of many small pieces, pieces are hard and sharp, tan colored, can pour, etc.) Here you will want to demonstrate the first Venn Diagram comparison as a group lesson. Give each table group a cup of gravel and a cup of powder. Remind students that they can feel the chemicals but not taste them or blow on them. Ask the students:
● What are some of the properties of the gravel? ● What are some of the properties of the powder? ● What do you notice about the gravel as it compares to the powder? ● What is the same about the powder and the gravel? ● What is different?
Model how to write where the “same” properties should go and so on for each chemical. Then, based on student answers, begin the Venn Diagram on the document camera/overhead or on chart paper.
Gravel
Powder
Salt
Same (gravel & powder)
Same for all 3
Same (gravel & powder)
Same (powder & salt)
22
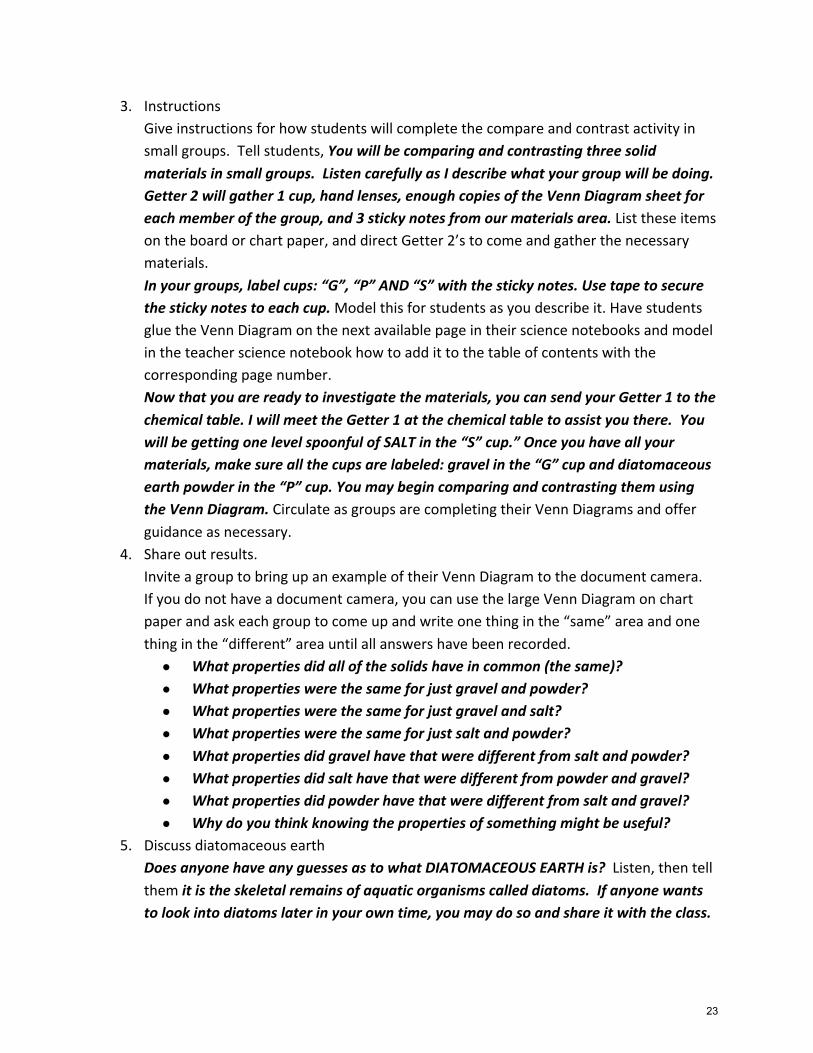
3. Instructions Give instructions for how students will complete the compare and contrast activity in small groups. Tell students, You will be comparing and contrasting three solid materials in small groups. Listen carefully as I describe what your group will be doing. Getter 2 will gather 1 cup, hand lenses, enough copies of the Venn Diagram sheet for each member of the group, and 3 sticky notes from our materials area. List these items on the board or chart paper, and direct Getter 2’s to come and gather the necessary materials. In your groups, label cups: “G”, “P” AND “S” with the sticky notes. Use tape to secure the sticky notes to each cup. Model this for students as you describe it. Have students glue the Venn Diagram on the next available page in their science notebooks and model in the teacher science notebook how to add it to the table of contents with the corresponding page number. Now that you are ready to investigate the materials, you can send your Getter 1 to the chemical table. I will meet the Getter 1 at the chemical table to assist you there. You will be getting one level spoonful of SALT in the “S” cup.” Once you have all your materials, make sure all the cups are labeled: gravel in the “G” cup and diatomaceous earth powder in the “P” cup. You may begin comparing and contrasting them using the Venn Diagram. Circulate as groups are completing their Venn Diagrams and offer guidance as necessary.
4. Share out results. Invite a group to bring up an example of their Venn Diagram to the document camera. If you do not have a document camera, you can use the large Venn Diagram on chart paper and ask each group to come up and write one thing in the “same” area and one thing in the “different” area until all answers have been recorded. ● What properties did all of the solids have in common (the same)? ● What properties were the same for just gravel and powder? ● What properties were the same for just gravel and salt? ● What properties were the same for just salt and powder? ● What properties did gravel have that were different from salt and powder? ● What properties did salt have that were different from powder and gravel? ● What properties did powder have that were different from salt and gravel? ● Why do you think knowing the properties of something might be useful?
5. Discuss diatomaceous earth Does anyone have any guesses as to what DIATOMACEOUS EARTH is? Listen, then tell them it is the skeletal remains of aquatic organisms called diatoms. If anyone wants to look into diatoms later in your own time, you may do so and share it with the class.
23

6. Predictions What is a prediction? When scientists make predictions, they say what they think is going to happen in an investigation. But they don’t just guess. They also state the reason why they think something is going to happen. What do you predict might happen if you add water to each cup containing the dry materials? Why do you think that? Do you think the same thing will happen when you add water to the three different materials? Why or why not? Have students go to the next available blank page in their notebooks and title it Predictions About What Will Happen If We Add Water to Each Material. If you have students that need extra writing support, you may provide a scaffolded Prediction* sheet. Using the board, chart paper or document camera, title a section “Gravel” and write the following sentence frame for them “I think__________________________, because_________________________.” Tell them to complete this sentence frame in their science notebook. Using the board, chart paper or document camera, title a section “Powder” and write the following sentence frame for them “I think__________________________, because_________________________.” Tell them to complete this sentence frame in their science notebook. Using the board, chart paper or document camera, title a section “Salt” and write the following sentence frame for them “I think__________________________, because_________________________.” Tell them to complete this sentence frame in their science notebook. When they are finished, make sure everyone adds these predictions to their table of contents with the corresponding page number.
24

Comparing and Contrasting Solids -‐ Venn Diagram
Comparing and Contrasting Solids -‐ Venn Diagram
Gravel Powder
Salt
Gravel Powder
Salt
25

Prediction about What Will Happen If We Add Water to Each Material
Gravel
I think ________________________________
______________________________________
______________________________________
because_________________________________
______________________________________
_______________________________________.
Prediction about What Will Happen If We Add Water to Each Material Continued
Powder
I think ________________________________
______________________________________
______________________________________
because_________________________________
______________________________________
_______________________________________.
26

Prediction about What Will Happen If We Add Water to Each Material Continued
Salt
I think ________________________________
______________________________________
______________________________________
because_________________________________
______________________________________
_______________________________________.
27

Session 4: Separating Mixtures (45-‐50 minutes) • Students will know that a mixture combines two or more materials that retain their own properties. • Students will record observations accurately. • Students will form a prediction and explain their reasoning about methods for separating mixtures. • Students will write a procedure.
Materials needed Papers to copy and cut Students will need Chart paper Paper strips or sheets Pen/Marker Enlarged Observation sheet
Each group: 1 Syringe 3 Stirring stick ½ L water Paper towel Basin Cups from session 4
Observations of What Happened When We Added Water Prediction of Which Mixtures Can Be Separated
Science notebooks Glue Pencil
1. Review predictions
Have students get out their predictions from Session 3 and introduce the procedure for adding water to materials. Tell students, In our last science lesson, we compared and contrasted properties of three different materials, and we made predictions about what would happen if we added water to them. What are some of the predictions we made about gravel? About powder? About salt? Now we are going to test our predictions.
2. Conduct experiment and make observations Give each student a copy of the student sheet Observations of What Happened When We Added Water to Each Material. Have students glue this into their science notebook on the next available page and update the table of contents with the corresponding page number. Have GETTER 2s get a basin containing a 50-‐ml syringe, three stirring sticks, a ½ liter container of water, and a paper towel. Have GETTER 1s get the 3 cups from the previous session. Write the following instructions on the board or chart paper or display on the document camera.
• STARTERs will use the syringe to put 50 ml of water into each cup. • Stir the contents with a stick • All students will observe what happens and record on the student sheet.
NOTE: If students are not familiar with the 50 ml syringe, show them how to submerge the tip in water and pull up on the plunger until it stops.
3. Discuss observations Create a large version of the observation student sheet on the board or chart paper or use the document camera to display your copy in your teacher science notebook. Ask students to share out their observations and record them in this class data sheet. When
28

finished gathering data from the class, ask students, Based on our observations, were your predictions accurate? What happened?
4. Define mixture Ask students, What do we call it when you put two or more materials together, but those materials keep their original properties? A mixture. Add “mixture” to the word wall and have students add it to the glossary in their science notebooks. Review the mixtures in each of the cups aloud with the class-‐ the G cup has a mixture of gravel and water, etc. Ask the students what mixtures they use in everyday life (cereal and milk, hot chocolate, etc.). Because the materials in a mixture keep their original properties, mixtures can always be taken apart or separated. What does it mean to separate things? If separate is a new word for your students, add it to the word wall and have students add it to the glossary in their science notebooks.
5. Focus question Introduce the idea of a focus question. When scientists investigate things, they typically have a question in mind. A good scientific focus question should be something we can investigate with the materials we have. It should also be a question that can’t be answered just “yes” or “no”. The focus question we are going to investigate is “How can we separate the three different mixtures: gravel and water, powder and water, salt and water?” Write the focus question on the chart paper or in the teacher science notebook using the document camera. Model for students how to make an entry in the table of contents titled Focus Question and put the corresponding page number.
6. Students write focus question in notebooks Have students make a new entry in the science notebooks labeled Focus Question on the next available page. Have students write the question in their science notebooks and update the table of contents with the corresponding page number.
7. Think, Pair, Share about Focus Question Tell students, I want you to think about the focus question. Then, I’m going to ask you to share your thinking with a partner. Silently, think about the focus question -‐-‐ How can we separate the three different mixtures: gravel and water, powder and water, salt and water? Wait 30-‐60 seconds for everyone to think. Turn to a partner and share your thinking. Give pairs 2 minutes to share their thinking. What are some of the ideas you came up with? If you pulled out the screens or filters during the kit inventory, students may reference these.
8. Introduce screens and filters and discuss predictions Tell students: One way to possibly separate mixtures of solids and liquids is to use a screen. Add “screen” to the word wall or refer to it if it is already there. Have students add it to the glossary in their science notebooks if it is not already there. Another way
29

to separate mixtures of solids and liquids is to use a filter. Add “filter” to the word wall or refer to it if it is already there. Have students add it to the glossary in their science notebooks if it is not already there. Which of these three mixtures do you predict we could successfully separate with a screen? Why? Which of these mixtures do you predict we could successfully separate with a filter? Why?
9. Students write predictions in notebooks Give each student a copy of the student sheet Prediction of Which Mixtures Can Be Separated with a Screen and with a Filter. Have students glue this to their notebook below their focus question and update their table of contents with the corresponding page number. Have students complete these.
10. Discuss and write procedures Tell students, Now that we have written our predictions, we are going to design a procedure to test our predictions. A procedure is a set of steps or actions that you do. I want you to brainstorm with your group what some actions or steps are that we should take in our procedure. Allow groups about three minutes to brainstorm. While students are brainstorming, prepare some strips or sheets of paper to write the brainstormed steps on. When students are finished brainstorming, ask them to share the steps they came up with while you write them for the class to see. Model for students by writing their steps of the procedure. Be sure to write only one step per strip or sheet. When scientists write a procedure, they write the steps in order exactly as they should be performed. Which of all these steps that we wrote should go first? With help from the students, place the steps in order, and eliminate any redundant steps. Leave the strips available for students to see them. When scientists write a procedure, they typically write it as a numbered list. Model for the students how to start a procedure using the document camera and your teacher science notebook. Make sure to title it “Procedure” and add it to the table of contents with the corresponding page number. Write the first numbered step in the procedure, then have students finish writing the procedure on their own. In the next session, we will use our procedures to test our predictions.
30

Observations,of,What,Happened,When,We,Added,Water,to,Each,Material,
!
Gravel!and!Water!!!!!!!!Powder!and!Water!!!!!!!Salt!and!Water!!!!!!!
Observations,of,What,Happened,When,We,Added,Water,to,Each,Material,
!
Gravel!and!Water!!!!!!!!Powder!and!Water!!!!!!!Salt!and!Water!!!!!!!!!!!!
31

Predictions of Which Mixtures Can Be Separated with a Screen and a Filter
Do you predict that this mixture can be separated with a screen?
Do you predict that this mixture can be separated with a filter?
Gravel &
Water Yes/No
Why:
Yes/No Why:
Powde
r & W
ater Yes/No
Why:
Yes/No Why:
Salt and Water
Yes/No Why:
Yes/No Why:
Predictions of Which Mixtures Can Be Separated with a Screen and a Filter
Do you predict that this mixture can be separated with a screen?
Do you predict that this mixture can be separated with a filter?
Gravel &
Water Yes/No Why:
Yes/No Why:
Powde
r & W
ater Yes/No
Why:
Yes/No Why:
Salt and Water
Yes/No Why:
Yes/No Why:
32

Session 5: Separating Mixtures Continued (45-‐50 minutes) • Students will know that screens can be used to separate mixtures with larger particles, and that filers can
be used to separate some mixtures with smaller particles. • Students will know that a solution forms when a material dissolves in a liquid (solvent) and cannot be
retrieved with a filter. Materials needed Papers to copy and cut Students will need Chart paper Pen/Marker Diatomaceous earth Gravel Salt Paper towels ½-‐L Container of water Observations Class Data
For each student group: Hand Lenses 3 cups Sticky notes 50-‐ml syringe Stirring sticks
Observations of Which Mixtures Can Be Separated Solution Frayer Model
Science notebooks Pencil Glue
Before this session, make a class data table on chart paper to use during the discussion or use the data table provided in the student sheet and use a document camera to display it on your teacher science notebook. If the class designs their own data table during this lesson, you can draw a large version of that while groups are gathering their data.
1. Review question, predictions, and procedure Ask students: Who can remind me what our focus question was that we came up with during our last science lesson? (How can we separate the three different mixtures: gravel and water, powder and water, salt and water?) What were some of our predictions? Who can remind everyone what the first step in our procedure will be to test our predictions? Second step? (Continue through the steps of the procedure.) It is fine if different groups have different procedures as long as they are in a sequential order.
2. Introduce data table A table is a means of organizing information in rows and columns. Data is the information we gather from our investigations. Our data table will help us to organize the information we learn from our experiment. It’s much like a graph in that it helps us to see data in a quick view. Before we start conducting the procedure, we will need a data table to gather and organize our observations. Either give students the student sheet Observations of Which Mixtures Can Be Separated with a Screen and a Filter for them to glue into their notebooks, or have students design a data table to match the procedure you came up with. Make sure students add this to their table of contents and add the corresponding page number.
3. Students conduct the procedure and gather data Remind students what each role should be doing during the investigation. Getters 1 and 2 are responsible for materials. GETTER 1 gets chemicals from the chemical storehouse. GETTER 2 gets equipment from the materials station. The STARTER is responsible for helping the group start the investigation. This person makes sure that
33
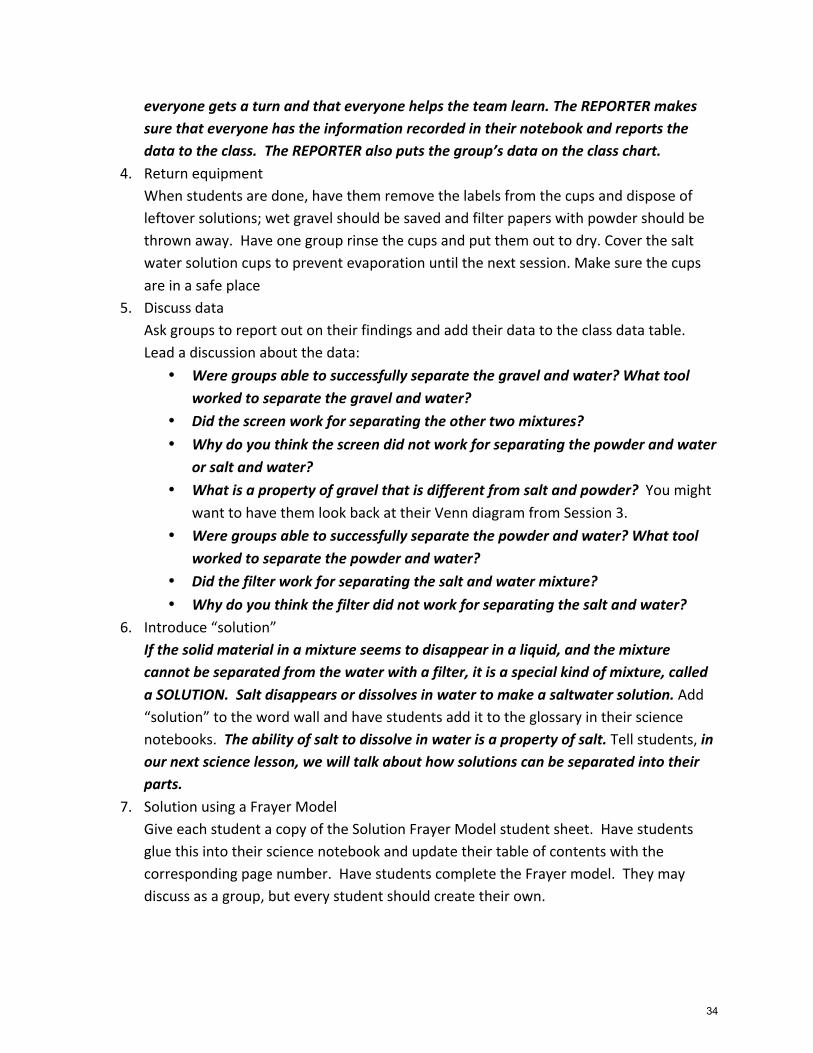
everyone gets a turn and that everyone helps the team learn. The REPORTER makes sure that everyone has the information recorded in their notebook and reports the data to the class. The REPORTER also puts the group’s data on the class chart.
4. Return equipment When students are done, have them remove the labels from the cups and dispose of leftover solutions; wet gravel should be saved and filter papers with powder should be thrown away. Have one group rinse the cups and put them out to dry. Cover the salt water solution cups to prevent evaporation until the next session. Make sure the cups are in a safe place
5. Discuss data Ask groups to report out on their findings and add their data to the class data table. Lead a discussion about the data:
• Were groups able to successfully separate the gravel and water? What tool worked to separate the gravel and water?
• Did the screen work for separating the other two mixtures? • Why do you think the screen did not work for separating the powder and water
or salt and water? • What is a property of gravel that is different from salt and powder? You might
want to have them look back at their Venn diagram from Session 3. • Were groups able to successfully separate the powder and water? What tool
worked to separate the powder and water? • Did the filter work for separating the salt and water mixture? • Why do you think the filter did not work for separating the salt and water?
6. Introduce “solution” If the solid material in a mixture seems to disappear in a liquid, and the mixture cannot be separated from the water with a filter, it is a special kind of mixture, called a SOLUTION. Salt disappears or dissolves in water to make a saltwater solution. Add “solution” to the word wall and have students add it to the glossary in their science notebooks. The ability of salt to dissolve in water is a property of salt. Tell students, in our next science lesson, we will talk about how solutions can be separated into their parts.
7. Solution using a Frayer Model Give each student a copy of the Solution Frayer Model student sheet. Have students glue this into their science notebook and update their table of contents with the corresponding page number. Have students complete the Frayer model. They may discuss as a group, but every student should create their own.
34
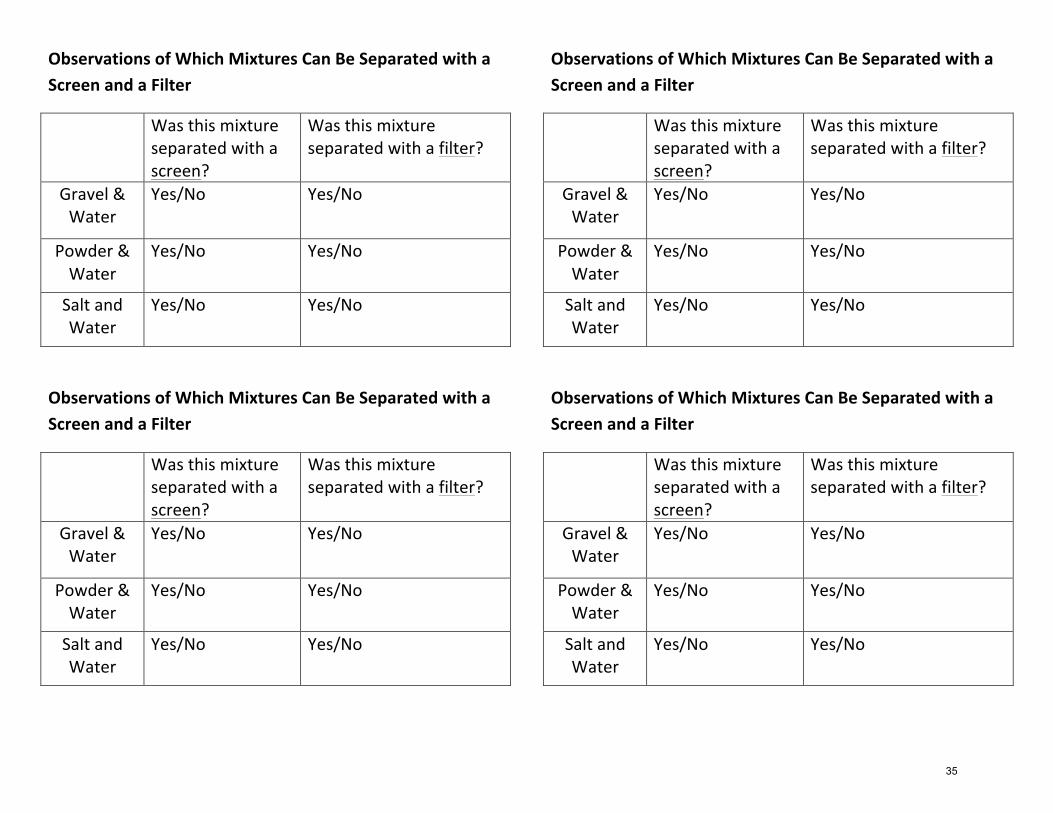
Observations of Which Mixtures Can Be Separated with a Screen and a Filter
Was this mixture separated with a screen?
Was this mixture separated with a filter?
Gravel & Water
Yes/No
Yes/No
Powder & Water
Yes/No Yes/No
Salt and Water
Yes/No
Yes/No
Observations of Which Mixtures Can Be Separated with a Screen and a Filter
Was this mixture separated with a screen?
Was this mixture separated with a filter?
Gravel & Water
Yes/No
Yes/No
Powder & Water
Yes/No Yes/No
Salt and Water
Yes/No
Yes/No
Observations of Which Mixtures Can Be Separated with a Screen and a Filter
Was this mixture separated with a screen?
Was this mixture separated with a filter?
Gravel & Water
Yes/No
Yes/No
Powder & Water
Yes/No Yes/No
Salt and Water
Yes/No
Yes/No
Observations of Which Mixtures Can Be Separated with a Screen and a Filter
Was this mixture separated with a screen?
Was this mixture separated with a filter?
Gravel & Water
Yes/No
Yes/No
Powder & Water
Yes/No Yes/No
Salt and Water
Yes/No
Yes/No
35

Observations of Which Mixtures Can Be Separated Class Data Table
Was this mixture separated with a screen?
Was this mixture separated with a filter?
Gravel & Water
Group 1:Yes/No
Group 2:Yes/No
Group 3:Yes/No
Group 4:Yes/No
Group 5:Yes/No
Group 1:Yes/No
Group 2:Yes/No
Group 3:Yes/No
Group 4:Yes/No
Group 5:Yes/No
Powder & Water
Group 1:Yes/No
Group 2:Yes/No
Group 3:Yes/No
Group 4:Yes/No
Group 5:Yes/No
Group 1:Yes/No
Group 2:Yes/No
Group 3:Yes/No
Group 4:Yes/No
Group 5:Yes/No
Salt and Water Group 1:Yes/No
Group 2:Yes/No
Group 3:Yes/No
Group 4:Yes/No
Group 5:Yes/No
Group 1:Yes/No
Group 2:Yes/No
Group 3:Yes/No
Group 4:Yes/No
Group 5:Yes/No
36

Solution
Definition Examples
Non-‐examples Draw a picture
Solution
Definition Examples
Non-‐examples Draw a picture
37

Session 6: Separating Salt and Water – Part 1 [25-‐30 minutes] • Students will ask testable questions about separating components of a solution. • Students will know that evaporation is the change of a substance from a liquid to a gas. • Express questions and predictions using complete sentences in a science notebook.
Materials needed Papers to copy and cut Students will need
Evaporation Dishes Chart paper Each group: 2 Evaporation dishes Salt solution cups
Science notebooks Pencil
1. Review solutions and separating mixtures
Who can tell me what we did in our last session? In the last session, we tried to separate three different mixtures. Which of the mixtures were we not able to separate using a screen or a filter? What was the word we used to describe the mixture of salt and water? (Solution) In this session, we’re going to try to figure out how to separate the salt from the water. We’re going to need a focus question for this investigation. If you remember, a good focus question cannot be answered “yes” or “no”. We have to be able to answer it using the materials we have, and it has to address the problem we are trying to solve. Can anyone recommend a good focus question for this next part of our investigation? Examples: “How can we separate a solution of salt dissolved in water?” or “How can we separate a mixture of salt and water?” Write student suggestions and select a class focus question from the suggestions. Have students go to the next available blank page in their science notebooks and title it “Focus Question About Separating a Salt and Water Solution”. Have students write the class focus question in their notebook. Make sure students add this to the table of contents with the corresponding page number.
2. Predictions Does anyone remember when you studied water or states of matter in fourth grade? Does anyone remember what we call it when water turns from a liquid to a gas? (Evaporation) Evaporation is when a liquid turns into a gas. Add evaporation to the word wall and have students write it in the glossary in their science notebooks. If the water in this solution of salt mixed with water evaporated, what do you think would be left? (Salt) Let’s make a prediction about how we could separate the salt from this solution. Remember that when scientists make predictions, they say what they think is going to happen in an investigation or what they think the answer to the focus question is. But they don’t just guess. They also state the reason why. How do you predict that you
38

could separate the salt and water solution? Example: “I think we could separate the salt from the salt and water solution by evaporating the water, because when water evaporates, it turns into a gas and it leaves the other materials behind.” Write student predictions and choose one as a class. Have students write the class prediction below the focus question in their science notebooks and title it Prediction About Separating a Salt and Water Solution. Remind students to update their table of contents and add the corresponding page number.
3. Set up evaporation dishes. Have GETTER 1’s get two evaporation dishes for their group. Have the REPORTER label their dishes then place the dishes in a tray. Two groups will have to share each tray. Have GETTER 2’s get their salt solution for their group. Have the STARTER pour enough liquid into each dish to cover the bottom – about 25 ml. Collect the trays carefully, and put them in a safe place. Tell students, Now we will need to wait until the water has time to evaporate. Then we will observe our evaporation dishes. Evaporation should take 1-‐2 days depending on how humid the classroom is. Make sure not to place the dishes near a window or door or fan.
39

Session 7: Separating Salt and Water – Part 2 [45 minutes] • Students will know that evaporation can separate a liquid from a solid in a solution. • Students will share results of experiments with others and respectfully discuss results that are not
expected. • Students will write claims and evidence.
Materials needed Papers to copy and cut Students will need
Chart paper Markers/Pen Evaporation Dishes Hand lenses
Observations of Evaporated Salt and Water Solution Properties and Separating Mixtures
Science notebooks Glue Pencil
1. Observe results of evaporation
When the saltwater solutions have evaporated, ask the GETTER’s to get the evaporating dishes and hand lenses. Give each student a copy of the student sheet Observations of Evaporated Salt and Water Solution. Have students glue this into their science notebook and update the table of contents with the corresponding page number. Let the students observe the salt in the dishes and record their observations in their notebooks. If possible provide microscopes for the analysis. Discuss students’ answers to the questions and the various techniques students have used to separate mixtures. • What happened when the saltwater solution evaporated? • What is the material in the dish? • What happened to the water that was in the mixture? • How does the salt look compared to the way it looked originally? • What method worked to separate the salt from the water? • How do we know that it worked? • What method worked to separate gravel from water? • How do we know that it worked? • What method worked to separate powder from water? • How do we know that it worked? • Why do you think the screen could separate the gravel from the water, but it
couldn’t separate the salt or the powder from the water? (The gravel has larger particles.)
• Which of the three solid materials we tested could dissolve in water? (Salt) 2. Discuss properties of substances that impact how to separate them
Give each student a copy of the student sheet Properties and Separating Mixtures. Have students glue it into their science notebooks on the next available page and update the table of contents with the corresponding page number. Use a document camera to display the table in your teacher science notebook or draw on the board and fill it out as a class.
40

Substance Properties How it can be separated from a mixture with water Particle size Dissolves in water?
Gravel
large no screen
Powder
small no filter
Salt
small yes evaporation
• What properties of a substance allow it to be separated by a screen? • What properties of a substance allow it to be separated by a filter? • What properties of a substance allow it to be separated using evaporation?
3. Write Claims and Evidence Tell the students, When scientists look at their data, they make claims about the patterns that they see. For example, if I wanted to make a claim about the evidence from our investigations into mixtures and solutions so far, what can I claim about the size of particles and how they can be separated? Can anyone tell me a claim about this? I might say…”I claim that a mixture of a solid material with large particles and water can be separated with a screen.” Write the claim on the chart paper, board, or in the teacher science notebook using a document camera.
Claims Evidence
Whenever scientists make a claim, they also have to give evidence to support the claim. Claims always have to have evidence that goes with them. What might be some evidence that I could use to support this claim that I wrote? What did we see from our experiment? You may use your table from Observations of Which Mixture Can be Separated with a Screen and Filter in your science notebooks. Model how to write a “Claims and Evidence” statement for the class in the teacher science notebook.
I claim that a mixture of a solid material with large particles and water can be separated with a screen.
41

Claims Evidence
Remember to update the teacher notebook by gluing in Claims and Evidence and filling in the Table of Contents with the corresponding page number.
4. Students write Claims and Evidence Have students write the Claims and Evidence into their science notebooks and add Claims and Evidence to the table of contents with the corresponding page number. Let the students see if they can come up with any more claims and evidence. Students may come up with different claims depending on their evidence.
I claim that a mixture of a solid material with large particles and water can be separated with a screen.
I claim this because gravel is a solid with large particles, and we were able to separate it from the water with a screen.
42

Observations of Evaporated Salt and Water Solution
Draw what you observe in your evaporating dish.
Answer the following questions:
What happened when the saltwater solution evaporated?
______________________________________
______________________________________
______________________________________
Observations of Evaporated Salt and Water Solution Continued
What is the material in the dish? ______________________________________
______________________________________
What happened to the water that was in the mixture? ______________________________________
______________________________________
How does the salt look compared to the way it looked originally?
______________________________________
______________________________________
43
Properties and Separating Mixtures
Substance Properties How it can be separated from a mixture with water Particle size Dissolves in water?
Gravel
Powder
Salt
Properties and Separating Mixtures
Substance Properties How it can be separated from a mixture with water Particle size Dissolves in water?
Gravel
Powder
Salt
44

Session 8: Separating a Dry Mixture [40 minutes] • Develop, communicate, and justify a procedure to separate simple mixtures based on physical properties. • Express procedures using complete sentences in a science notebook.
Materials needed Papers to copy and cut Students will need
8 Screens 8 Foss funnels 24 Craft sticks 16 Filter papers 24 Plastic cups 8 Evaporating dishes 8 Hand lenses 6 Spoons, 5-‐ml 2 Containers of kosher salt 2 Containers of gravel
2 Containers of diatomaceous earth Sticky notes 8 containers, ½-‐liter 8 Syringes, 50-‐ml 8 Basins 2 Pitchers Water Safety goggles Paper towels Transparent tape
Making a Dry Mixture
Science notebooks Pencil Glue
Before class: Get water -‐ Fill a ½-‐liter container with water for each group. Have two pitchers of water on hand. Set up a chemical storehouse of the following materials
2 Containers of gravel 2 Containers of diatomaceous earth 2 Containers of salt 8 Plastic cups 8 Craft sticks Put a 5-‐ml spoon in each container.
Set up a materials station Students will design their own plan to separate a dry mixture. Have all the materials available on the table; students will choose what is needed.
1. Make a dry mixture Explain to students that you will make a dry mixture of gravel, powder, and salt. As students watch, put one 5-‐ml spoon each of gravel, powder, and salt in a ½-‐liter container and stir. Your challenge is to design a method to separate this mixture of three solid materials so that the gravel ends up in a G cup, the powder in a P cup, and the salt in an S cup. You will need to use what you know about the properties of these materials to separate them. Pass out the sheet called Making a Dry Mixture. Ask students to read it over and glue it into their science notebooks. Make sure that students update their table of contents with the corresponding page number.
2. Students make the dry mixture After the groups have read the sheet, let the GETTER 1s go to the chemical storehouse and make up a dry mixture (one 5-‐ml spoon each of gravel, powder, and salt in a ½-‐liter container and stir.)
45

3. Plan the separation Tell students, in Session 4, we wrote a procedure together. This time, you will work with your group to write a procedure in the correct order describing how you think you can separate this dry mixture. Remember to think carefully about the order of the steps and write your procedure as a numbered list of steps. You may refer back to your observation sheets from the last experiment. Allow the time for students to plan how they will separate the mixture. Visit each group and check to see that they have a written plan before they start their separation. If it helps students, have them write each step of the procedure on slips of paper like they did in the previous sessions. If there are problems with their procedure, you may want to ask probing questions, but do not correct their procedures for them at this point. Make sure that each group has a list of the materials that they need in order to separate the dry mixture.
4. Start the separation Have the equipment from Part 1 available at the materials station. As students complete their plans, let the GETTER 2s get the materials they need for the separation.
5. Assess progress through teacher observation Circulate from group to group. Ask the students to describe briefly their plan for separation and the results they achieved so far. If students have made a mistake in their procedure, allow them to re-‐do it if there is available time. Students will probably want to let their salt solutions evaporate before discussing the results.
6. Return materials to the materials station Clean up in the same manner as in previous sessions. Have students remove the labels from the cups and dispose of leftover solutions; wet gravel should be saved and filter papers with powder should be thrown away. Have one group rinse the cups and put them out to dry.
46

Making a Dry Mixture
1. Get one of the empty cups. Label the cup “dry mixture”
2. Put one 5-‐ml spoon of each of the three
dry materials in the cup: a. gravel b. powder c. salt.
3. Stir the dry mixture
Making a Dry Mixture
1. Get one of the empty cups. Label the cup “dry mixture”
2. Put one 5-‐ml spoon of each of the three
dry materials in the cup: a. gravel b. powder c. salt.
3. Stir the dry mixture
47
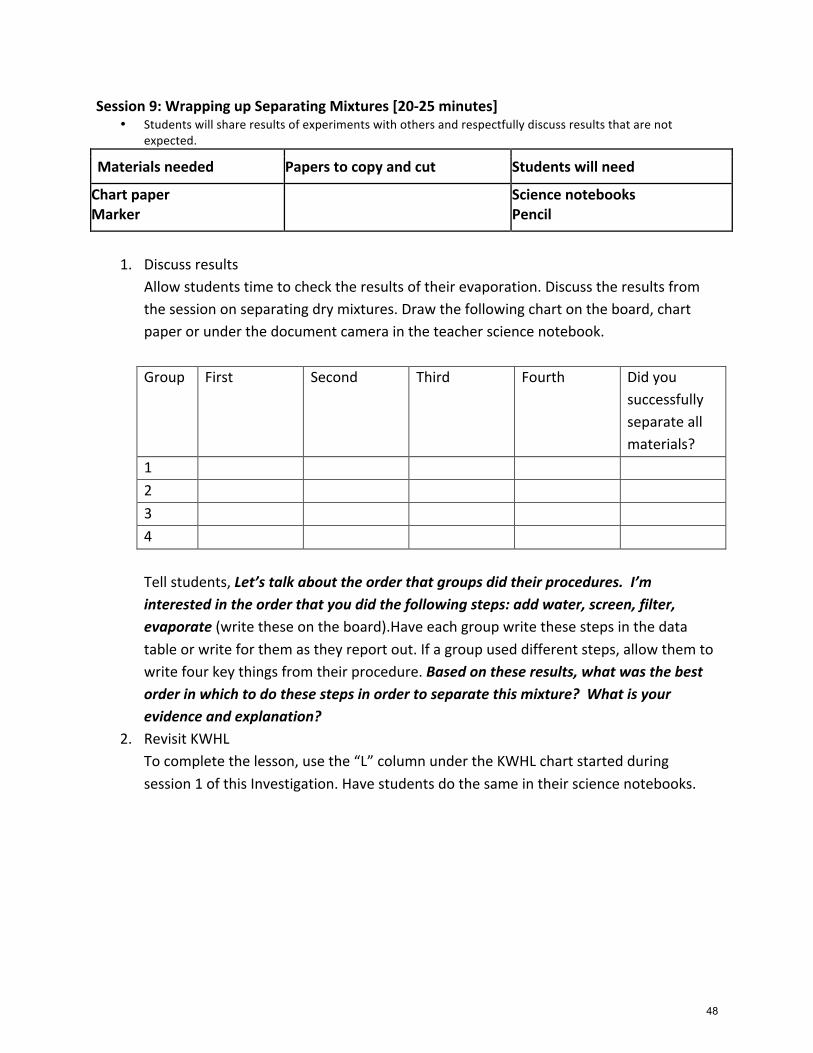
Session 9: Wrapping up Separating Mixtures [20-‐25 minutes] • Students will share results of experiments with others and respectfully discuss results that are not
expected.
Materials needed Papers to copy and cut Students will need
Chart paper Marker
Science notebooks Pencil
1. Discuss results
Allow students time to check the results of their evaporation. Discuss the results from the session on separating dry mixtures. Draw the following chart on the board, chart paper or under the document camera in the teacher science notebook.
Group First Second Third Fourth Did you
successfully separate all materials?
1 2 3 4
Tell students, Let’s talk about the order that groups did their procedures. I’m interested in the order that you did the following steps: add water, screen, filter, evaporate (write these on the board).Have each group write these steps in the data table or write for them as they report out. If a group used different steps, allow them to write four key things from their procedure. Based on these results, what was the best order in which to do these steps in order to separate this mixture? What is your evidence and explanation?
2. Revisit KWHL To complete the lesson, use the “L” column under the KWHL chart started during session 1 of this Investigation. Have students do the same in their science notebooks.
48

Session 10: Separating Mixtures Based on Properties [35-‐40 minutes] • Students will apply their understanding of properties and mixtures and solutions to design a procedure to
separate a novel mixture.
Materials needed Papers to copy and cut Students will need
Chart paper Marker Strips of paper
Mixture reflection Science notebooks Pencil
1. Review
Tell students, You are now going to have an opportunity to apply what you learned in Investigation 1. Can anyone tell me what the big idea was from all of our sessions in Investigation 1? The big idea for Investigation 1 was that mixtures of substances can be separated based on their properties. Who can remind me what our definition of a mixture is? What do we call a mixture in which one substance can dissolve in another? How can you separate a solution? What were some of the properties of substances that we used to separate them from mixtures? (Particle size, dissolves in water.)
2. Introduce the challenge Write the following substances on the board or chart paper:
• Iron filings • Sawdust • Sugar • Plastic beads
If we had a mixture of these substances, what might be some of the properties that would help us separate them? Turn to a partner and discuss some ideas you have about properties of these substances that could be used to separate them from a mixture. Allow students time to talk, then ask them to report out. What might be some tools or methods we could use to help us separate these? Write answers on the board. Give each student a copy of the student sheet titled Mixture Reflection. Have students glue or tape this into their notebooks and add it to the table of contents with the corresponding page number. As you can see on this table, I’ve given you the properties of these different substances. Based on this information, I want you to come up with a procedure for how you would separate this mixture into its original four substances.
3. Procedure Pass out strips of paper for students to write down the steps of their procedure. Allow students time to complete this in small groups. As you visit groups, ask them about their reasoning for why they are writing the steps in the order that they are. Help students organize their strips of paper in sequential order. What’s important is that
49

students are explaining their reasoning for why they do each step in that particular order. Once they have organized their strips of paper, have them write each step in their science notebook, but in between each strip or step, have them write why and explain their reasoning. Some guiding questions may be:
• Why did you decide to use a magnet? • Why did you decide to use the magnet before adding water? • Why did you use the screen before you used the filter?
Remind students to update their table of contents and add the corresponding page number.
50

Mixture Reflection
Substance Properties
Particle size
Dissolves in water
Attracted to
magnet
Floats in water
Iron filings
small no yes no
Sawdust
small no no yes
Sugar
small yes no no
Plastic beads
large no no yes
Mixture Reflection
Substance Properties
Particle size
Dissolves in water
Attracted to
magnet
Floats in water
Iron filings
small no yes no
Sawdust
small no no yes
Sugar
small yes no no
Plastic beads
large no no yes
51

FOSS Mixtures and Solutions: Investigation 2 – Conservation of Mass Session Content Objectives Language Objectives 1 Making a New Mixture Based on
Mass • Students make a new mixture of
20 grams each of salt, powder and gravel
• Introduce focus question • Predict what the mass will be of
each component once it is separated from the mixture
• Design a procedure for measuring the mass of each separated substance as accurately as possible
• Students measure physical properties of objects using metric units (mass, weight, volume)*
• Students select appropriate tools to conduct an experiment, use them correctly, and report the data in proper units
• Participate in a think-‐pair-‐share to form a prediction
• Write a prediction using a sentence frame
• Participate in a group activity to write a procedure
2 Separating Mixtures • Conduct procedures up to
evaporation
• Students select appropriate tools to conduct an experiment, use them correctly, and report the data in proper units
• Follow directions in a procedure
3 Measure Mass after Separation • Measure mass of substances
separated from mixture
• Students measure physical properties of objects using metric units (mass, weight, volume)*
• Students select appropriate tools to conduct an experiment, use them correctly, and report the data in proper units
• Record and report data in appropriate units
4 Claims and Evidence • Students share evidence-‐based • Participate in a class discussion about
52

• Discuss results • Write Claims and Evidence
conclusions and an understanding of the impact on the weight/mass of a mixture before and after it is separated into parts*
results • Write claims and evidence using
sentence frame and word bank
5 Conservation of Mass in a Closed System • Write reflection about
conservation of mass
• Students will know that when a mixture is separated into parts, the total mass of the parts equals the mass of the original mixture. No matter is lost when a mixture is separated into parts.
• Participate in a small group discussion about a new scenario
• Write a reflection
53

FOSS Mixtures & Solutions Investigation 2 Conservation of Mass Session 1: Making a New Mixture Based on Mass (45-‐50 minutes)
• Students measure physical properties of objects using metric units (mass, weight, volume). • Students select appropriate tools to conduct an experiment, use them correctly, and report the data in
proper units. Materials needed Papers to copy and cut Students will need Chart paper Paper strips or sheets Pen/Marker
Each group: FOSS balance 3 20g Pieces 1 Cup gravel 1 Cup powder 1 Cup salt ½ L Container 1 Spoon
Predictions About Mass Science notebooks Glue Pencil
1. Introduction
Tell students that they will be making the same mixture they made in Investigation 1, but this time they will measuring out an exact mass of each substance when they add it. In the last investigation, we separated a mixture of gravel, salt and powder. How did we measure the amount of gravel, salt and powder we added to the mixture? (Using a 5 ml spoon) What do milliliters measure? (Volume) This time when we make the dry mixture, we will measure out an equal mass of each part – 20 grams of gravel, 20 grams of powder, and 20 grams of salt.
2. Students create dry mixture Review how to measure mass with a FOSS balance accurately, including how to calibrate the balance with the slider. Write the following instructions on the board or chart paper or display on the document camera. Have GETTER 1 get one plastic cup each of gravel, powder, and salt and GETTER 2 get a ½ liter container, a complete balance (with plastic cups), 20 gram pieces, and a plastic spoon. In small groups students will: • Calibrate the balance using the slider • Label a ½ liter container with group name • Measure 20 grams of gravel and add it to the ½ liter container • Measure 20 grams of powder and add it to the ½ liter container • Measure 20 grams of salt and add it to the ½ liter container
Once each group has the ½ L container appropriately labeled and measured, place mixtures in a safe location for later use. Have GETTERS return other materials (FOSS balance and 20g pieces, 3 cups and spoon) to the materials station.
54

3. Introduce Focus Question Remember that when scientists investigate things, they typically have a question in mind. A good scientific focus question should be something we can investigate with the materials we have. It should also be a question that can’t be answered just “yes” or “no.” The focus question we are going to investigate is “How will the mass of the parts of a mixture compare before we mix them and after we separate them?” Model for students how to make an entry in the teacher science notebook table of contents labeled Focus Question and put the corresponding page number (use the document camera if you have one).
4. Think, Pair, Share to form predictions Tell students, Now we are going to make predictions about our focus question. Remember that with a good prediction, you have to say what you think will happen and give a reason why. Write the following sentence frame on the board, chart paper or using document camera for students to refer to as they think. “I think__________________________, because_________________________.” I want you to think about the focus question, and try to come up with a good prediction. Then, I’m going to ask you to share your thinking with a partner. Silently, think about the focus question -‐-‐ How will the mass of the parts of a mixture compare before we mix them and after we separate them? What do you predict and why? Do you think the parts will have more or less mass or the same before and after? Wait 30-‐60 seconds for everyone to think. Turn to a partner and share your thinking. Please use the sentence frame to help you express your thinking. Give pairs 3 minutes to share their thinking. What are some of the predictions you came up with?
5. Discuss and write predictions Ask pairs to share predictions as you write their predictions on the board, chart paper or in the teacher science notebook using a document camera. Ask students to give their reasoning if they forget. Give each student a copy of the student sheet Predictions About Mass. Have students glue this in their science notebooks, update the table of contents with the corresponding page number, and complete them.
6. Discuss and write procedure Tell students, We already have procedures for separating dry mixtures of these three substances based on their properties. We know how many grams of each substance are in the mixture (20 g each), and we have predictions about how the mass of each substance will compare after we separate them. Now we are going to design a procedure to test our predictions about the mass of the substances after we separate them. We will need a procedure that can measure the mass of each substance as accurately as possible after we separate them. How will we separate the gravel? (Screen) How will we measure the mass of the gravel after we’ve screened it? How
55

will we separate the powder? (Filter) How will we measure the mass of the powder after we’ve filtered it? How will we separate the salt? (Evaporate out of solution) How will we measure the mass of the salt after we evaporate it out of solution? How do you think it will affect the mass of the substance if it is wet? Remember that a procedure is a set of steps or actions that you do. I want you to brainstorm with your group what actions or steps we should make in our procedure to measure the mass of each substance after we’ve separated it. Allow groups about three minutes to brainstorm. While students are brainstorming, pass out strips or sheets of paper to write the brainstormed steps on. When students are finished brainstorming, ask them to report out while you model writing the steps that they have come up with. I am going to write only one step per strip or sheet of paper. Please write the steps on strips of paper just like I am. Make sure that students are writing out full sentences on each strip of paper as they are shared out to the class. Once all the steps are on sheets of paper, I’m going to try and put them in order. When scientists write a procedure, they write the steps in order exactly as they should be performed. Which of all these steps that we wrote should go first? With help from the students, place the steps in order, and eliminate any redundant steps. Have students also organize their own strips of paper so that they match the order in which you have them. When scientists write a procedure, they typically write it as a numbered list. Model for the students using the document camera how to start a procedure in your teacher science notebook. Make sure to title it and add it to the table of contents with the corresponding page number. Write the first numbered step in the procedure, then have students finish copying the procedure on their own. In the next session, we will use our procedures to test our predictions.
Example Procedure 1. Put the screen over an empty ½ L container and pour the contents of the ½ L
container into it. 2. Collect the gravel that is left on top of the screen and pour it into an empty cup. 3. Label the cup with gravel “G”. 4. Set up the funnel with filter paper and an empty cup below it. 5. Fill a syringe with 50 mL of water and pour it into the ½ L container with the
remaining mixture. 6. Stir the contents of the ½ L container to make sure that all the contents are mixed
together. 7. Pour the contents from the ½ L container into the filter, making sure the contents
drain into the cup below. 8. Take off the filter paper and rest it either in the drying rack or on another empty cup
to dry.
56

9. Get out 2 evaporating dishes. 10. Pour the solution that was caught under the funnel in the cup onto the evaporating
dishes, making sure to cover the bottom of each dish. 11. Set the evaporating dishes out safely to dry.
57

Predictions+of+How+the+Mass+of+Each+Substance+in+a+Mixture+Will+Compare+Before+We+Mix+Them+and+After+We+Separate+Them+
!!!
Mass!added!to!mixture!at!beginning!!
Predicted!mass!of!substance!after!being!separated!
Gravel!
!Mass!_______!!!!!
!Predicted!mass!_______!Why:!!!!!!
Powde
r!
!Mass!_______!!!!!
!Predicted!mass!_______!Why:!!!!!!
Salt!
!Mass!_______!!!!!
!Predicted!mass!_______!Why:!!!!!!
58

Session 2: Separating Mixtures (30 minutes) • Students select appropriate tools to conduct an experiment, use them correctly, and report the data in
proper units. Materials needed Papers to copy and cut Students will need
Dry mixtures from session 1 50-‐ml syringe Stirring sticks Water Paper towels Basins
Filter paper Funnels Screens Cups Evaporation dishes
Science notebooks Pencil
1. Review question, predictions, and procedure
Ask students: Who can remind me what our focus question was that we came up with during our last science lesson? (How will the mass of the parts of a mixture compare before we mix them and after we separate them?) What were some of our predictions? Who can remind everyone what the first step in our procedure will be to test our predictions? Second step? (Continue through steps of the procedure).
2. Students conduct experiment Have students conduct the procedure as far they can before needing to wait for water to evaporate from the substances. Circulate the room to make sure students are following the procedures written in their science notebooks. When students are finished, they should have 3 cups, each labeled with the corresponding letter: “P” for powder, “S” for salt and “G” for gravel. The gravel should be in the cup, while the powder may still be drying on the filter paper. The salt solution should be poured onto the evaporation dishes and left for a few days to evaporate.
59

Session 3: Measure Mass after Separation (45-‐50 minutes) • Students measure physical properties of objects using metric units (mass, weight, volume). • Students select appropriate tools to conduct an experiment, use them correctly, and report the data in
proper units. Materials needed Papers to copy and cut Students will need
Separated mixtures FOSS Balances 20g pieces
Data Table of Mass Before Mixing and After Separation
Science notebooks Pencil
1. Review question, predictions, and procedure
Ask students: Who can remind me what our focus question was that we came up with for this Investigation? (How will the mass of the parts of a mixture compare before we mix them and after we separate them?) What were some of our predictions? We started our procedures, but we needed to wait until the water evaporated from each substance. Why did we need to wait for water to evaporate before we measured the mass? Who can remind me how we are going to measure the mass of each substance? Give each student a copy of the student sheet Data Table of Mass before Mixing and after Separation. Have students glue this in their science notebooks and update the table of contents with the corresponding page number. Tell students, We will use this data table to record our data as we measure the mass of each substance. When we measure mass, what do we need to include besides the number? (Units) Have students complete their measurements and record the data in their data tables. Return materials to materials center and clean up.
60

Data Table: Mass of Each Substance in a Mixture Before We Mixed Them and After We Separated Them
Mass added to mixture at beginning
Predicted mass of substance after being separated
Observed mass after separation
Gravel
Powde
r
Salt
Data Table: Mass of Each Substance in a Mixture Before We Mixed Them and After We Separated Them
Mass added to mixture at beginning
Predicted mass of substance after being separated
Observed mass after separation
Gravel
Powde
r
Salt
61

Session 4: Claims and Evidence • Students share evidence-‐based conclusions and an understanding of the impact on the weight/mass of a
mixture before and after it is separated into parts. • Students will estimate error in measuring mass. • Students will calculate averages after measuring mass. • Students will write a claim and use evidence to support it.
Materials needed Papers to copy and cut Students will need
Chart paper or document camera Marker/Pen
Class Data Table Science notebooks Pencil
1. Make a class data table
Ask students: Who can remind me what our focus question was that we came up with for this Investigation? (How will the mass of the parts of a mixture compare before we mix them and after we separate them?) In order to answer that question, we collected data that you have recorded in your science notebooks. Please open your science notebook to the data table from the last session. Use a document camera to display the following class data table in your teacher science notebook or draw it on the board. Have student groups report their data to the class. Mass of substances added to the mixture in the beginning = 20 g Mass of Substances After Separation from the Mixture
Mass of Substances After Separation from the Mixture Gravel
Powder
Salt
Group 1 Group 2 Group 3 Group 4 Group 5
2. Discuss results as a group
• What were some patterns in our data? • What did you notice about our data? • Were everyone’s results the same? • How could we summarize our data across groups? (Calculate the average)
Calculate the average for each column and write it on your class data table. • What do you think could have caused results in different groups to be
different?
62

• Do you think our measurements were perfectly accurate? • About how much error do you think there might be in our measurements?
Write the estimated error there might be for each measurement. In general, potential error for students will range from 1-‐4 grams. There should be less error for measuring gravel since it is fairly easy to screen (1-‐2g error). There may be more error for the powder since it has to be filtered (2-‐4g error), and the same for the salt since it has to be filtered and evaporated (2-‐4g error).
Mass of Substances After Separation from the Mixture
Mass of Substances After Separation from the Mixture Gravel
Powder
Salt
Group 1 Group 2 Group 3 Group 4 Group 5 Average = = = Estimated Error = = =
Give each student a copy of the student sheet for the Class Data Table. Have them glue it into their science notebook update the table of contents with the corresponding page number and fill it out.
• What was our focus question? (How will the mass of the parts of a mixture compare before we mix them and after we separate them?)
• What were some of our predictions? • What do our data tell us about how the mass of the parts of a mixture compare
before we mix them and after we separate them? • Did the mass increase, decrease, or stay the same?
If the students observed that the mass increased or decreased, ask them by how much it increased or decreased and remind them how much error they estimated in their measurement. Have them subtract the mass at the end (after separation) from the mass at the beginning (before mixing).
Mass gravel before mixing – Ave. mass gravel after separation = ____20g____________ -‐ ___________________________ = _______
63

Mass powder before mixing – Ave. mass powder after separation = ____20g____________ -‐ ___________________________ = _______
Mass salt before mixing – Ave. mass salt after separation = ____20g____________ -‐ ___________________________ = _______
If the difference is smaller than the estimated error, ask, If our estimated error in measuring mass was 2 grams, and the difference from before mixing to after separation was 1.5 grams, then how can we know that difference was real and not because of measurement error? Hopefully with the class average the results are around 20g for each substance (with error factored in). If not, you can discuss as a class the potential sources of error more in depth or possibly redo the experiment to get more accurate data.
3. Write Claims and Evidence Tell the students When scientists look at their data, they make claims about the patterns that they see. For example, if I wanted to make a claim about the evidence from our investigations into mixtures and solutions so far, I might say…I claim that the mass of the components of a mixture is the same before we mix them and after we separate them .” Write the claim on the chart paper, board, or document camera.
Claims Evidence
Whenever scientists make a claim, they also have to give evidence to support the claim. Claims always have to have evidence that goes with them. What might be some evidence that I could use to support this claim that the mass of the parts of the mixture is the same before we mix them and after we separate them?
Model how to write a “Claims and Evidence” statement for the class.
I claim that the mass of the parts of a mixture is the same before we mix them and after we separate them.
64

Claims Evidence
Remember to update the teacher notebook by gluing in Claims and Evidence and update the table of contents with the corresponding page number.
4. Students write Claims and Evidence Have students write the Claims and Evidence into their notebooks and add Claims and Evidence to their table of contents with the corresponding page number. Let the students see if they can come up with any more claims and evidence. Students may come up with different claims depending on their evidence.
5. Introduce the concept of conservation of mass Scientists have demonstrated through a series of experiments like the one that we did that mass cannot be created or destroyed. This idea is called the law of conservation of mass. What does it mean to conserve something? This law states that mass is always conserved. Mass cannot just go away but it can change it’s state of matter (solid, liquid or gas). Add conservation of mass to the word wall and have students add it to the glossary in their science notebooks.
I claim that the mass of the parts of a mixture is the same before we mix them and after we separate them.
I claim this because the mass we mixed 20g of each substance, and the average mass of each substance after separation was about 20g if you consider the amount of estimated error.
65

Class Data Table
Mass of substances added to the mixture in the beginning = 20 g
Mass of Substances after Separation from the Mixture
Mass of Substances after Separation from the Mixture
Gravel
Powder
Salt
Group 1
Group 2
Group 3
Group 4
Group 5
Average = = =
Estimated Error = = =
Mass gravel before mixing – Avg. mass gravel after separation = ____20g____________ -‐ ___________________________ = _______ Mass powder before mixing – Avg. mass powder after separation = ____20g____________ -‐ ___________________________ = _______ Mass salt before mixing – Avg. mass salt after separation = ____20g____________ -‐ ___________________________ = _______
Class Data Table
Mass of substances added to the mixture in the beginning = 20 g
Mass of Substances after Separation from the Mixture
Mass of Substances after Separation from the Mixture
Gravel
Powder
Salt
Group 1
Group 2
Group 3
Group 4
Group 5
Average = = =
Estimated Error = = =
Mass gravel before mixing – Ave. mass gravel after separation = ____20g____________ -‐ ___________________________ = _______ Mass powder before mixing – Ave. mass powder after separation = ____20g____________ -‐ ___________________________ = _______ Mass salt before mixing – Ave. mass salt after separation = ____20g____________ -‐ ___________________________ = _______
66

Session 5: Conservation of Mass in a Closed System • Students will know that when a mixture is separated into parts, the total mass of the parts equals the
mass of the original mixture. No matter is lost when a mixture is separated into parts.
Materials needed Papers to copy and cut Students will need
2-‐liter bottle with 50 ml of salt solution in it
Cookie Crumbles Conservation of Mass Reflection
Science notebooks Pencil
1. Review the concept of conservation of mass.
Pass out Cookie Crumbles student sheet and have students glue them into their science notebooks on the next available page. Remind them to update the table of contents and add the corresponding page number. Have students work independently on the student sheet and circulate the room to answer any questions. Once students are finished, have them share out their responses. • Which letter did you choose? Explain why you chose that option? • Did anyone choose differently? Explain why you chose that option?
Who can remind me what conservation of mass is? What have we learned about conservation of mass and mixtures? Show students the 2 liter bottle with 50 ml of salt solution in it. I dissolved some salt in 50 ml water inside this clear two liter bottle. Then I closed the lid on the bottle tightly. Because nothing can get into or out of the bottle, this is called a closed system. A closed system is a collection of things that interact with each other, but they are inside a closed space where nothing can get in or out. Add closed system to the word wall and have students add it to the glossary in their science notebooks.
2. Reflection Give each student a copy of the Conservation of Mass reflection. Have students glue it into their science notebooks and update their table of contents and add the corresponding page number. Read the scenario out loud together and ask if anyone has any questions. Tell students, you can talk about this with your group and decide on your answers together, but I want everyone to do their own writing. Give students time to complete their reflections.
3. Feedback Collect the science notebooks and evaluate student’s responses. Check whether they • Correctly predict that the mass will be the same • Explain their answers with reasoning • Use scientific vocabulary (conservation of mass, closed system)
Give them constructive feedback on sticky notes or using stickers. During the next session, give students the opportunity to correct their answers.
67

4. Revisit KWHL To complete the lesson, use the “L” column under the KWHL chart started during session 1 of this Investigation. Have students do the same in their science notebooks.
68

Cookie Crumbles Imagine that you have a whole cookie in front of you. You break the cookie into small pieces and crumbs. You measure the mass of all the pieces and crumbs. How do you think the mass of the whole cookie compares to the total mass of all the pieces and crumbs? Circle the best answer. A. The whole cookie has a mass more than all the
cookie crumbs.
B. All the cookie crumbs have more mass than the whole cookie.
C. The mass of the whole cookie and the mass of all the cookie crumbs is the same.
Provide an explanation for your answer. Use scientific vocabulary to support your answer. __________________________________________
__________________________________________
_______________________________________
_______________________________________
_______________________________________
_______________________________________
_______________________________________
_______________________________________
_______________________________________
_______________________________________
_______________________________________
_______________________________________
_______________________________________
69

Conservation of Mass Reflection
A fifth grade class decided to dissolve some salt in 50 ml water inside a clear two liter bottle. They closed the lid on the bottle tightly and measured its mass. The mass of the bottle, lid and salt and water solution was 190 grams. They placed the sealed bottle in the sun. A few hours later, there were some dry crystals on the bottom of the bottle, but the students could not see any water.
What do you think happened to the water?
________________________________________________
________________________________________________
________________________________________________
________________________________________________
____________________________________________
Conservation of Mass Reflection Continued
What do you think the mass of the sealed bottle would be when they made this observation?
________________________________________________
Explain your reasoning.
________________________________________________
________________________________________________
________________________________________________
________________________________________________
_____________________________________________
70

FOSS Mixtures and Solutions: Investigation 3 – Fizz Quiz Session Content Objectives Language Objectives 1 Fix Quiz Solutions Part 1
• Predict solubility of different substances (baking soda, citric acid, calcium chloride)
• Test solubility of these substances (baking soda, citric acid, calcium chloride)
• Students will make predictions about the solubility of different chemical mixtures
• Students will draw and write their observations about the solubility of different chemical mixtures
• Make predictions • Create a visual representation of
testing the solubility of a substance
2 Fizz Quiz Part 1 • Predict what will happen when
substances are mixed together • Conduct investigation and make
observations • Write claims and evidence
• Students will know that when a change results from mixing two or more materials, that change is a chemical reaction. A reaction results in new materials
• Students will write a claim and support it with evidence
• Students will know that formation of a gas is one change that occurs in some reactions
• Make claims and evidence statements using academic vocabulary
• Use appropriate language to discuss a change (before/after)
3 Fizz Quiz Part 2 • Complete chemical reactions
review activity • Investigate the precipitate and
liquid in Cup 1 from Session 2 Breakpoint
• Observe results of evaporation • Complete reflection
• Students will learn what a precipitate is
• Students will know that formation of a precipitate occurs in some chemical reactions
• Students will know that when a change results from mixing two or more materials, that change is a chemical
• Participate in class discussions • Use academic vocabulary to write a
reflection about the Fizz Quiz activity
71

reaction. A reaction results in new materials
• Students will identify changes to objects or systems (mixtures) by comparing measurable physical properties before and after an investigation
4 Reaction in a Zip Bag • Review chemical reactions • Predict what will happen if baking
soda, water and calcium chloride are mixed together in a zip bag
• Test predictions and make observations
• Predict what will happen if baking soda, water and citric acid are mixed together in a zip bag.
• Test predictions and make observations
• Predict what will happen if baking soda, water, calcium chloride, and citric acid are mixed together in a zip bag
• Test predictions and make observations
• Students will ask testable questions about mixtures; make a prediction, design an inquiry based method of finding the answer, collect data, and form a conclusion
• Follow verbal instructions to complete a simple investigation
• Write predictions with reasoning
5 Precipitate Tests • Test precipitates with vinegar • Discuss results and determine in
which bags chemical reactions
• Students will ask testable questions about mixtures; make a prediction, design an inquiry based method of finding the answer, collect data, and
• Express new learnings in a KWHL chart
72

took place • Revisit KWHL
form a conclusion • Students will know that when a change
results from mixing two or more materials, that change is a chemical reaction. A reaction results in new materials
• Students will know that formation of a precipitate occurs in some chemical reactions
• Students will know that not all chemicals react when they are mixed
6 Chemical Reaction Reflection • Review chemical reactions • Introduce challenge • Complete reflections
• Apply knowledge about chemical reactions to a new situation
• Write a reflection about chemical reactions after discussing in a small group
73

FOSS Mixtures & Solutions Investigation 3 Session 1: Fizz Quiz Solutions [45 minutes]
• Students will make predictions about the solubility of different chemical mixtures. • Students will draw and write their observations about the solubility of different chemical
mixtures. Materials needed Papers to copy and cut Students will need Chart Paper Marker Baking Soda Calcium Chloride Citric Acid Paper Towels Spoons
For each student group: 1 Basin 1 Cup 1 Craft Stick 1 Syringe 1 Container of water Safety Goggles
Solutions Observations
Pencil Science Notebook Glue
1. Review Solutions
Ask students if they remember what a solution is from the experiments in Investigations 2 and 3. Ask students, How can you make a solution? How do you know if a mixture is a solution? What does solubility refer to? [A mixture of materials can’t be separated from water with a filter because they have dissolved]
2. Introduce chemical mixtures Tell students, I have in front of me 3 different chemicals. I have baking soda -‐-‐ has anyone ever heard of baking soda? Does anyone know what baking soda is used for? (Baking Soda is also called sodium bicarbonate and is used as a leavening agent in baked goods, antacid, fire extinguisher and a deodorizer in the refrigerator) Do you think that baking soda will be soluble in water? Will it dissolve and create a solution? Why or why not? I also have calcium chloride -‐-‐ has anyone ever heard of calcium chloride? Does anyone know what calcium chloride is used for? (Calcium chloride is used for melting ice on roads and sidewalks, reducing dust on dirt roads and is a drying agent.) Do you think that calcium chloride will be soluble in water (will it dissolve and create a solution)? Why or why not? The last chemical mixture that I have is citric acid -‐-‐ has anyone ever heard of citric acid? Does anyone know what citric acid is used for? (Citric acid comes from fruit and is a common food additive that makes things taste sour-‐ it’s in many drinks and candies.) Do you think that citric acid will be soluble in water (will it dissolve and create a solution)? Why or why not?
74

3. Predictions Have students get out their science notebooks and open to the next available page. Have students title the page “Solution Predictions”, and ask them to predict which chemical mixture will be soluble and why or why not. Using the board, chart paper or document camera, title a section “Baking soda” and write the following sentence frame for them “I think baking soda will/will not dissolve __________________________, because_________________________.” Have students complete this sentence frame in their science notebook. Using the board, chart paper or document camera, title a section “Calcium chloride” and write the following sentence frame for them “I think calcium chloride will/will not dissolve __________________________, because_________________________.” Have students complete this sentence frame in their science notebook. Using the board, chart paper or document camera, title a section “Citric acid” and write the following sentence frame for them “I think citric acid will/will not dissolve __________________________, because_________________________.” Have students complete this sentence frame in their science notebook. Then write the following table on chart paper or under the document camera for students to see and either write in their own notebooks or print them copies to be glued into their science notebooks (Solution Observations student sheet). Remind students to update their table of contents with the corresponding page number.
Solutions Observations Chemical Mixture Soluble Not Soluble Other Observations Baking Soda Calcium Chloride Citric Acid
Assign a third of your groups to test the baking soda, a third of your groups to test the calcium chloride and a third of your groups to test the citric acid. Each group is to be responsible for sharing their observations and whether or not the solutions are soluble. Before students get their materials, ask them, What are we going to be looking for? How do we know if we’ve created a solution or not? What are some other observations we can make? Encourage students to put their hands around the cups to feel if the temperature changes, to watch for color changes, and to see if all the materials have dissolved or not.
75
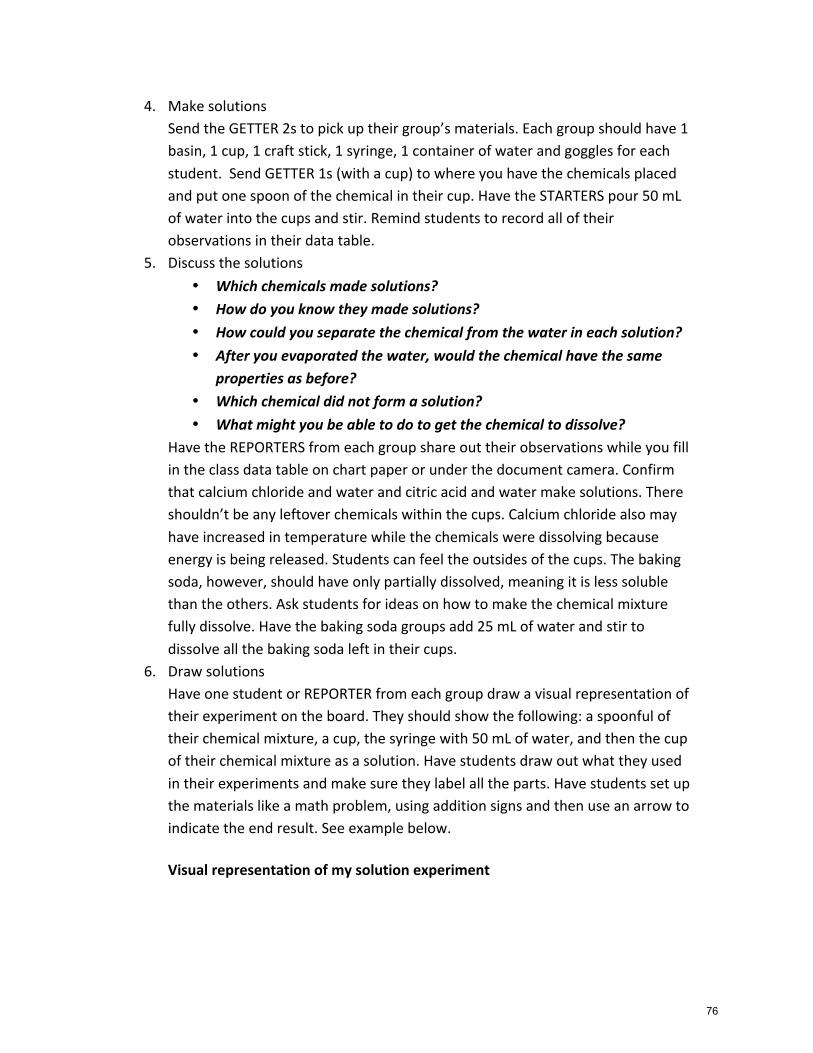
4. Make solutions Send the GETTER 2s to pick up their group’s materials. Each group should have 1 basin, 1 cup, 1 craft stick, 1 syringe, 1 container of water and goggles for each student. Send GETTER 1s (with a cup) to where you have the chemicals placed and put one spoon of the chemical in their cup. Have the STARTERS pour 50 mL of water into the cups and stir. Remind students to record all of their observations in their data table.
5. Discuss the solutions • Which chemicals made solutions? • How do you know they made solutions? • How could you separate the chemical from the water in each solution? • After you evaporated the water, would the chemical have the same
properties as before? • Which chemical did not form a solution? • What might you be able to do to get the chemical to dissolve?
Have the REPORTERS from each group share out their observations while you fill in the class data table on chart paper or under the document camera. Confirm that calcium chloride and water and citric acid and water make solutions. There shouldn’t be any leftover chemicals within the cups. Calcium chloride also may have increased in temperature while the chemicals were dissolving because energy is being released. Students can feel the outsides of the cups. The baking soda, however, should have only partially dissolved, meaning it is less soluble than the others. Ask students for ideas on how to make the chemical mixture fully dissolve. Have the baking soda groups add 25 mL of water and stir to dissolve all the baking soda left in their cups.
6. Draw solutions Have one student or REPORTER from each group draw a visual representation of their experiment on the board. They should show the following: a spoonful of their chemical mixture, a cup, the syringe with 50 mL of water, and then the cup of their chemical mixture as a solution. Have students draw out what they used in their experiments and make sure they label all the parts. Have students set up the materials like a math problem, using addition signs and then use an arrow to indicate the end result. See example below. Visual representation of my solution experiment
76

Have each student draw the visual representation for their specific chemical mixture (the one above has an extra step because more water was required to make a baking soda and water solution) and remind them to draw accurately. Also, have students update their table of contents using any title that depicts the visual representation of their solution experiment, and add the corresponding page number.
77

Solutions Observations Chemical Mixture Soluble Not
Soluble Other Observations
Baking Soda
Calcium Chloride
Citric Acid
Solutions Observations Chemical Mixture Soluble Not
Soluble Other Observations
Baking Soda
Calcium Chloride
Citric Acid
78

Session 2: Fizz Quiz Part 1 [45 minutes] • Students will know that when a change results from mixing two or more materials, that change is
a chemical reaction. A reaction results in new materials. • Students will write a claim and support it with evidence. • Students will know that formation of a gas is one change that occurs in some reactions.
Materials needed Papers to copy and cut Students will need Chart Paper Marker Baking Soda Calcium Chloride Citric Acid Paper Towels Spoons FOSS Science Stories
For each student group: 3 Cups 3 Sticky Notes 3 Craft Stick 1 Syringe 1 Container of water Safety Goggles
Fizz Quiz Placemat Fizz Quiz Observations Claims and Evidence Fizz Quiz Reflection
Pencil Science Notebook Glue
This is part 1 of a 2 part activity. You must keep the cups labeled from each group because you will need them for part 2.
1. Focus question and prediction Ask students, We now know that citric acid, calcium chloride and baking soda all form solutions when they are mixed with water. What do you think will happen when we combine the mixtures of these materials together? For instance, if we mix the baking soda and calcium chloride with water, what do you predict will happen? Why? Our focus questions for this next experiment will be:
• What happens when you combine water, calcium chloride and baking soda?
• What happens when you combine water, calcium chloride and citric acid?
• What happens when you combine water, citric acid and baking soda? Please write the focus questions in your science notebooks on the next available page. Remember to update your table of contents with the corresponding page number. Below your focus questions, please write a prediction for the combination of the mixtures: Have students title the page “Fizz Quiz Predictions”, and ask them to predict what will happen for each mixture. Using the board, chart paper or document camera, write the following sentence frame for them “I think when you combine water, calcium chloride and baking soda __________________________, because_________________________.” Have students complete this sentence frame in their science notebook. Using the board, write the following sentence frame for them “I think when you combine water, calcium chloride and citric acid __________________________, because_________________________.” Have students complete this sentence frame in their science notebook. Using the board, write the following sentence frame for them
79

“I think when you combine water, citric acid and baking soda __________________________, because_________________________.” Have students complete this sentence frame in their science notebook. You may discuss with your group members but remember to write why you think your prediction will happen. Walk around and listen to student ideas and remind students to always add their reasons why to each prediction.
2. Set-‐up experiment Distribute the Fizz Quiz Placemat to each group. Explain that the placemat will help them organize their experiments. Have the GETTER 2s get 3 cups, 3 sticky notes, 3 craft sticks, 1 syringe, 1 container of water and safety goggles. Have the RECORDERS label the 3 cups according to the placemat:
• Cup 1: calcium chloride and baking soda • Cup 2: calcium chloride and citric acid • Cup 3: baking soda and citric acid
Have students set the cups in the corresponding circles on the placemat. Hand each student a Fizz Quiz Observation sheet and have them glue it into their science notebook on the next available page. Remind students to update their table of contents and add the corresponding page number. Ask students what they should be looking for during their experiment. Ask them to remind you of what the focus question is, and have students share out a few predictions.
3. Students conduct experiment Once all the groups are ready with the cups labeled, predictions written and observation sheets glued into their science notebooks, send the GETTER 1s to bring cup 1 to the area where the chemical mixtures are and measure one spoonful of calcium chloride and one spoonful of baking soda into the cup. Send them back to their groups and have the REPORTERs use the syringe to put 50 mL of water to cup 1 and stir. Encourage students to not only look at the cup, but to also touch the sides of the cup and to listen for fizz or put their hand slightly over the cup. Cup 1 should produce fizz, and a cloudy or milky white liquid with white material that settles to the bottom. Make sure students write their observations down before moving on to the next cup. Have another group member prepare cup 2 (calcium chloride and citric acid). They should mix the materials with 50 mL of water and draw and write their observations. Cup 2 should produce clear liquid, the solids will all dissolve and there is no fizz (no chemical reaction). Have another group member prepare cup 3 (citric acid and baking soda). They should mix the materials with 50 mL of water and draw and write their observations. Cup 3 should produce fizz and a clear liquid (solution).
4. Discuss results Ask students, What do you think caused the fizzing in cups 1 and 3? Remind students that there are 3 states of matter (solid, liquid and gas) to help guide them to the conclusion that fizz is the production of gas. Fizzing in a liquid is caused by gas escaping and coming to the surface. When calcium chloride and
80

baking soda are mixed with water, the gas carbon dioxide (CO2) is formed. Carbon dioxide is the same gas that makes the bubbles in soda. What do you think the white stuff is in cup 1? Some students may think the white material is one or both of the solid materials that did not dissolve-‐ they observed that baking soda is not very soluble from session 1. The white material is a new chemical that formed when calcium chloride and baking soda mixed with water. The new material, called calcium carbonate, or chalk, is not soluble in water, so it settles to the bottom of the cup. When a new chemical forms and settles out of a liquid it is called precipitate. Has anyone heard that word before? Add precipitate to the word wall and have students add the word to the glossary in their science notebooks.
5. Introduce chemical reaction Tell students, The production of gas and the formation of a precipitate are both changes that result in new substances with new properties. When two or more materials (chemicals) are mixed together and a change occurs, the change is evidence that a chemical reaction has taken place. A chemical reaction occurs when new materials are formed with properties that are different from the properties of the original chemicals. Let’s look back at our 3 different cups and determine if a chemical reaction occurred.
• Did a chemical reaction take place in cup 1? (Yes) How do you know? (gas formation and precipitate)
• Did a chemical reaction take place in cup 2? (No) How do you know? (No evidence-‐ only a solution formed)
• Did a chemical reaction take place in cup 3? (Yes) How do you know? (Gas formation)
• What new materials formed? (Carbon dioxide gas, calcium carbonate-‐ chalk)
Add chemical reaction to the word wall and have students add it to the glossary in their science notebooks. Let’s make a Claims and Evidence chart to show our understandings. Draw a T chart on chart paper or under the document camera, and have students do the same in their science notebooks on the next available page. Remind them to update their table of contents with the corresponding page number. Whenever scientists make a claim, they also have to give evidence to support the claim or give us proof that our claim is accurate. Claims always have to have evidence that goes with them. What claim can I make about the experiments we just did?
Claims Evidence
I claim that baking soda mixed with citric acid and water creates a chemical reaction.
81

What might be some evidence that I could use to support this claim that I wrote? Look through your observations in your science notebook to help find evidence to support this claim.
Claims Evidence
What is another claim that we can make from our experiment? Have students come up with a group claims and evidence statement. A possible claim could be -‐-‐ sometimes when two or more chemicals are mixed, chemical changes take place and new materials form. They should have 2 or more claims and evidence T charts in their science notebooks. You will need to keep cup 1 from each group for part 2 of the investigation, so make sure the names of the groups are still on the cups and store them in a safe place. Have the GETTERs return all the materials and assign one group to remove the labels and rinse the cups and sticks in the sink.
6. Dissolving vs. chemical reaction Students often have a difficult time grasping the concept of a chemical reaction. It may help to have them clarify the differences between a mixture dissolving in water and a mixture having a chemical reaction in/with water. Hand out Fizz Quiz Reflections sheet to students and have them glue them into their science notebooks on the next available page. Remind students to update the table of contents and add the corresponding page number. Have students complete the reflection, and guide students that are having difficulties distinguishing between the two. Evidence of a chemical reaction are changes in properties, such as heat, gas formation and precipitate formation-‐ and cannot be separated (easily) back into original components again. A solution is a mixture formed when materials dissolve in water-‐ and can be separated again to original components with the same original properties.
7. Optional Extension Literacy: Read “What a Reaction!” and “What is Matter Made Of” from the FOSS Science Stories.
I claim that baking soda mixed with citric acid and water creates a chemical reaction.
I claim this because in cups 3 where there was baking soda and citric acid, fizz was produced (gas being released) which has different properties than the original substances.
82

DIR
EC
TIO
NS
1. N
umbe
r thr
ee cu
ps an
d pl
ace t
hem
on
the n
umbe
red
circle
s.
2. P
ut th
e sol
id m
ater
ials
in cu
p 1 (
one s
poon
of c
alciu
m ch
lorid
e and
one
spoo
n of
bak
ing
soda
).
3. C
aref
ully
add
50 m
l of w
ater
to cu
p 1.
4. O
bser
ve th
e res
ults
and
reco
rd o
bser
vatio
ns o
n th
e Fizz
-Qui
z Obs
erva
tions
shee
t.
5. R
epea
t the
pro
cedu
re fo
r cup
s 2 an
d 3.
(Tak
e tur
ns p
uttin
g th
e che
mica
ls in
to cu
ps.)
1 sp
oon
of ca
lciu
m ch
lorid
ean
d 1
spoo
n of
bak
ing
soda
in 5
0 m
l of w
ater
31
21
spoo
n of
bak
ing
soda
and
1 sp
oon
of ci
tric a
cid
in 5
0 m
l of w
ater
1 sp
oon
of ca
lciu
m ch
lorid
ean
d 1
spoo
n of
citri
c aci
din
50
ml o
f wat
er
FOS
S M
ixtu
res
and
Sol
utio
ns M
odul
e©
The
Reg
ents
of t
he U
nive
rsity
of C
alifo
rnia
Can
be
dupl
icat
ed fo
r cla
ssro
om o
r wor
ksho
p us
e.
FIZZ
-QUI
Z PL
ACE
MAT
Nam
eD
ate
Inve
stig
atio
n 4:
Fiz
z Q
uiz
No.
14—
Stu
dent
She
et
83

Fizz Quiz Observations Draw your observations and describe what you see. Cup 1: 1 spoon calcium chloride, 1 spoon baking soda, 50 mL water
_____________________ _____________________ _____________________ _____________________
__________________________________________ __________________________________________ __________________________________________ Did Cup 1 create fizz? ________________________ What do you think fizz is? ____________________
Fizz Quiz Observations Continued Draw your observations and describe what you see. Cup 2: 1 spoon calcium chloride, 1 spoon citric acid, 50 mL water
_____________________ _____________________ _____________________ _____________________
__________________________________________ __________________________________________ __________________________________________ Did Cup 2 create fizz? ________________________ What do you think fizz is? ____________________
84

Fizz Quiz Observations Continued Draw your observations and describe what you see. Cup 3: 1 spoon baking soda, 1 spoon citric acid, 50 mL water
_____________________ _____________________ _____________________ _____________________
__________________________________________ __________________________________________ __________________________________________ Did Cup 3 create fizz? ________________________ What do you think fizz is? ____________________
85

Claims and Evidence
Claims Evidence
Claims and Evidence
Claims Evidence
I claim that …. I claim this because… I claim that …. I claim this because…
86

Fizz Quiz Reflection
1. How do you know when a solution occurs when you mix a chemical and water? _________________________________________________________________________ _________________________________________________________________________ _________________________________________________________________________ 2. How do you know when a chemical reaction occurs? _______________________________________________ _______________________________________________ _______________________________________________ 3. Describe the differences between dissolving and a chemical reaction. _______________________________________________ _______________________________________________ _______________________________________________ _______________________________________________
Fizz Quiz Reflection 1. How do you know when a solution occurs when you mix a chemical and water? _________________________________________________________________________ _________________________________________________________________________ _________________________________________________________________________ 2. How do you know when a chemical reaction occurs? _______________________________________________ _______________________________________________ _______________________________________________ 3. Describe the differences between dissolving and a chemical reaction. _______________________________________________ _______________________________________________ _______________________________________________ _______________________________________________
87

Session 3: Fizz Quiz Part 2 [45 minutes] • Students will learn what a precipitate is. • Students will know that formation of a precipitate occurs in some chemical reactions. • Students will know that when a change results from mixing two or more materials, that change is
a chemical reaction. A reaction results in new materials. • Students will identify changes to objects or systems (mixtures) by comparing measurable physical
properties before and after an investigation. Materials needed Papers to copy and cut Students will need Chart Paper Marker Chalk Drying Trays 12 Vials Paper Towels Tape FOSS Science Stories Vinegar
For each group: Cup 1 from Session 2 1 Funnel 1 Filter paper 1 Cup 2 Evaporating dishes Scratch paper
Review Chemical Reactions Visual Representation of Filtering & Evaporating Cup 1 Fizz Quiz Evaporation Observations Fizz Quiz Reflection 2
Pencil Science Notebook Glue
1. Review chemical reactions
Pass out Review Chemical Reactions worksheet and have students work on them in groups. After students glue them into their science notebooks, remind them to update their table of contents and add the corresponding page number. Once students are finished, have them share out their answers to the class while you write their responses under the document camera or on chart paper. Students may be wondering how they can tell if the precipitate from cup 1 is really a new substance or if it is part of the mixture not dissolved. This will lead to part 2 of Fizz Quiz, which will separate the products.
2. Separate the products of cup 1 What is a precipitate? (an insoluble material that forms during a chemical reaction) What is a solution? (a mixture formed when materials dissolve in water). Hold up one of the cups from part 1. Ask students Can anyone tell me how we can separate the precipitate from the liquid? If they don’t suggest filtering, ask them to recall the diatomaceous earth mixture they used in Investigation 1. Let’s filter what is in cup 1 and see if we can tell whether or not we have a new substance (which will help us determine if a chemical reaction occurred). Have GETTER 1s get a filter setup and a cup to catch the liquid that comes through the filter. Have GETTER 2s get their group cup 1 from the previous session. Have the STARTERs pour the mixture from cup 1 through the filter. Have the REPORTERs put the filter with the precipitate in a safe place to dry. Make sure they have their name written on a piece of scratch paper to label the
88

precipitate. Have students keep the cups with the leftover liquid at their tables for the next step.
3. Discuss Chalk Show the students a piece of chalk and tell them, a precipitate formed from the reaction of calcium chloride and baking soda and water. Another name for chalk is calcium carbonate, and one of the properties is that it reacts with vinegar. Once our precipitates are dry, we can put a small amount of vinegar and see if it reacts. It should be noted that both calcium carbonate AND baking soda both chemically react with vinegar. If your students have done experiments before with baking soda and vinegar (volcanoes) they will point this out. This is an excellent observation that can lead you to the next step in the investigation. Since both react with vinegar, we still don’t know if a chemical reaction occurred and a new product formed (calcium carbonate) or if we have residual baking soda leftover. How will we really know? What else can we test to determine if there was a change in our chemical mixture? What about our leftover liquid? What do you think is in that liquid? Do you think it is a solution? How could we find out if it is a solution or not? (Students should suggest evaporation, like what they did in investigation 1.) What do you think it is a solution of? What solid do you think might be dissolved in the water?
4. Evaporate the clear liquid from cup 1 Have the GETTERs get 2 evaporation dishes. After the STARTERs transfer a small amount of liquid to the two evaporation dishes, they should place their dishes in a FOSS drying tray. Again, make sure that the dishes are labeled with the group names with scratch paper. Use vials in the corners of the FOSS trays to stack them. It will take a few days for the solutions to evaporate. Have the GETTERs return the materials, and have the REPORTERs from each group sort and wash the equipment and put it out to dry. Make sure that each group still has the filter papers with the precipitates safely drying. BREAKPOINT – While you are waiting for the precipitate and clear liquid to dry (2-‐4 days), pass out Visual Representation of Filtering and Evaporating Cup 1 Contents student sheet and have students glue them on the next available page in their science notebooks and update the table of contents with the corresponding page number. Model for students what is expected in the drawing. Ask students, What cup did we just filter? What is the name of the white stuff? (Precipitate) What do we think the precipitate is? (Chalk-‐ calcium carbonate) What are the names of the materials that helps us filter the precipitate? (Filter paper and funnel). Label each of these things on the sheet in
89
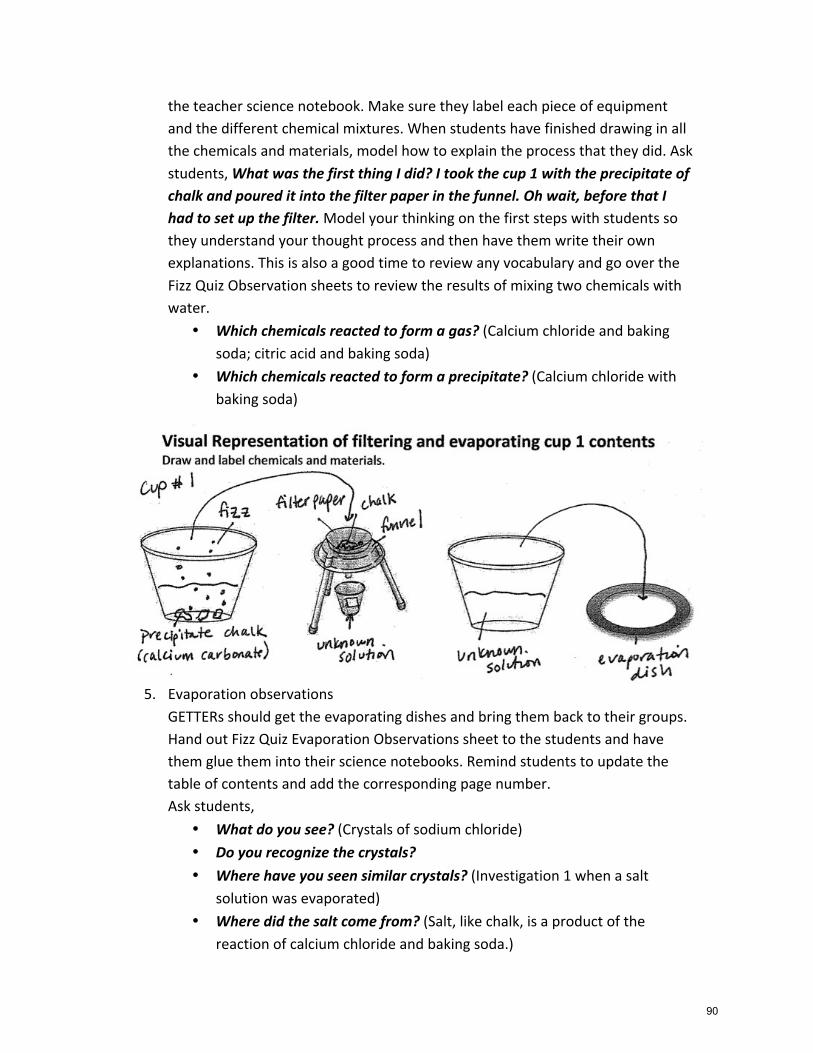
the teacher science notebook. Make sure they label each piece of equipment and the different chemical mixtures. When students have finished drawing in all the chemicals and materials, model how to explain the process that they did. Ask students, What was the first thing I did? I took the cup 1 with the precipitate of chalk and poured it into the filter paper in the funnel. Oh wait, before that I had to set up the filter. Model your thinking on the first steps with students so they understand your thought process and then have them write their own explanations. This is also a good time to review any vocabulary and go over the Fizz Quiz Observation sheets to review the results of mixing two chemicals with water.
• Which chemicals reacted to form a gas? (Calcium chloride and baking soda; citric acid and baking soda)
• Which chemicals reacted to form a precipitate? (Calcium chloride with baking soda)
5. Evaporation observations GETTERs should get the evaporating dishes and bring them back to their groups. Hand out Fizz Quiz Evaporation Observations sheet to the students and have them glue them into their science notebooks. Remind students to update the table of contents and add the corresponding page number. Ask students,
• What do you see? (Crystals of sodium chloride) • Do you recognize the crystals? • Where have you seen similar crystals? (Investigation 1 when a salt
solution was evaporated) • Where did the salt come from? (Salt, like chalk, is a product of the
reaction of calcium chloride and baking soda.)
90
• How did the salt get into the cups? (Calcium carbonate was visible immediately as a new product because it formed a precipitate. But the new product salt dissolved, making it invisible until the water was evaporated.)
• Let’s review what substances we put in to start with and what substances were created. What substances did we start with? (Calcium chloride, baking soda, water) What substances were created? (Calcium carbonate, sodium chloride, carbon dioxide) Where did these new substances come from? (They were created from the existing chemicals in the cup due to a chemical change.)
It is important to emphasize that salt and calcium carbonate were created from the existing chemicals in the cup due to a chemical change. Make sure to emphasize that matter cannot be created nor destroyed, but it can change states and recombine with other matter to form new substances with new properties. While students are drawing and writing down their observations, circulate the room and make sure students are drawing accurate observations. Keep the precipitates that students have out drying in a safe place -‐-‐ they will be used in session 4.
6. Reflection Hand out Fizz Quiz Reflection 2 sheets to students and have them glue the sheet into their science notebook on the next available page. Remind students to update the table of contents and add the corresponding page number. Once students have completed the reflection, join together as a class and write out the chemicals that went into the reaction and the chemicals that came out of the reaction.
7. Optional extensions Literacy: Read “Ask a Chemist” and “The Periodic Table?” from the FOSS Science Stories.
91
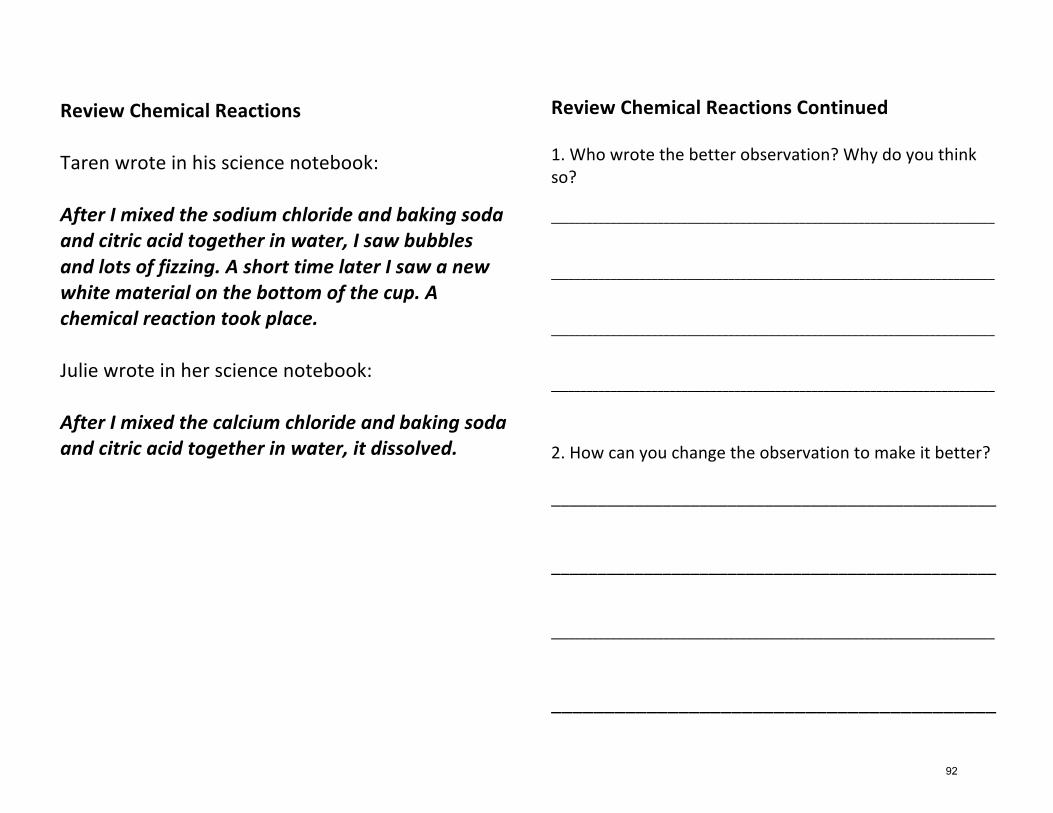
Review Chemical Reactions Taren wrote in his science notebook: After I mixed the sodium chloride and baking soda and citric acid together in water, I saw bubbles and lots of fizzing. A short time later I saw a new white material on the bottom of the cup. A chemical reaction took place. Julie wrote in her science notebook: After I mixed the calcium chloride and baking soda and citric acid together in water, it dissolved.
Review Chemical Reactions Continued 1. Who wrote the better observation? Why do you think so? ___________________________________________________________________________
___________________________________________________________________________
___________________________________________________________________________
___________________________________________________________________________
2. How can you change the observation to make it better? ________________________________________________
________________________________________________
___________________________________________________________________________
__________________________________________
92

Visual Representation of Filtering and Evaporating Cup 1 Contents Draw and label chemicals and materials.
Explain how you filtered and evaporated the contents of cup 1. ___________________________________________________________________________________ ___________________________________________________________________________________ ___________________________________________________________________________________ ___________________________________________________________________________________ ___________________________________________________________________________________ ___________________________________________________________________________________
93

Fizz Quiz Evaporation Observations Draw the crystals below.
1. Where have you seen similar crystals before? ___________________________________________________________________________ 2. Where did the crystals come from? How did the crystals get into the cup? __________________________________________ __________________________________________ __________________________________________
94
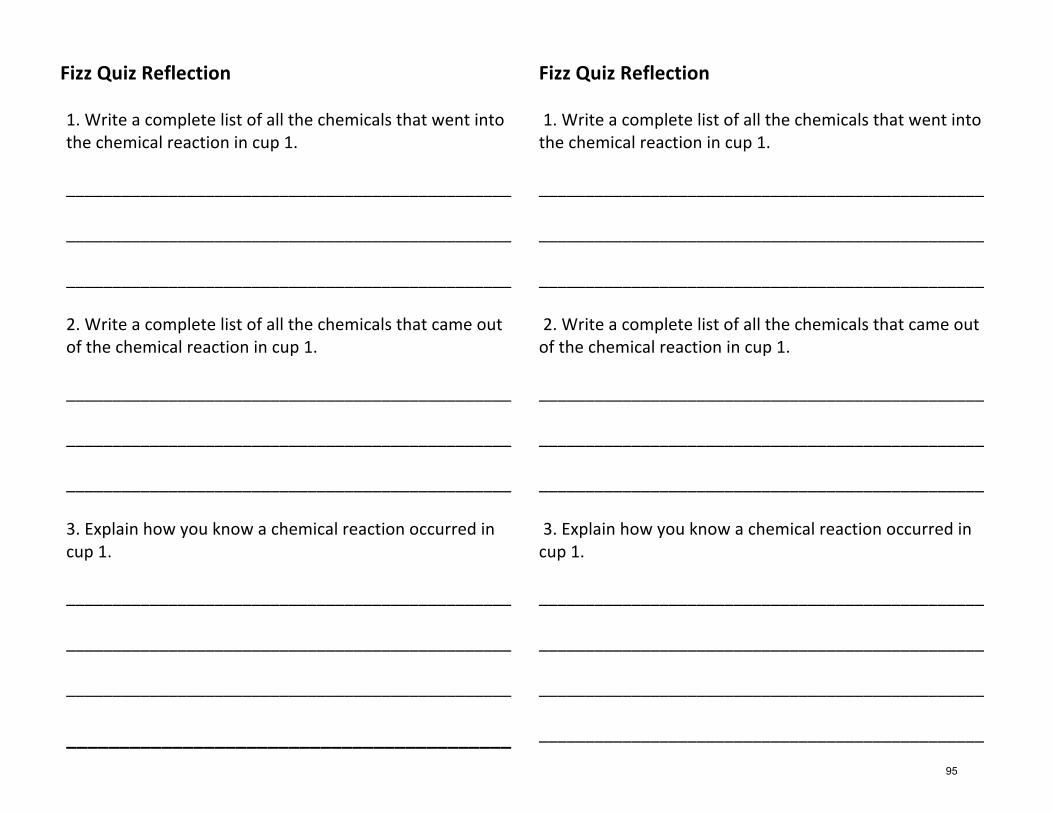
Fizz$Quiz$Reflection$!1.!Write!a!complete!list!of!all!the!chemicals!that!went!into!the!chemical!reaction!in!cup!1.!!________________________________________________!!________________________________________________!!________________________________________________!!2.!Write!a!complete!list!of!all!the!chemicals!that!came!out!of!the!chemical!reaction!in!cup!1.!!________________________________________________!!________________________________________________!!________________________________________________!!3.!Explain!how!you!know!a!chemical!reaction!occurred!in!cup!1.!!________________________________________________!!________________________________________________!!________________________________________________!$__________________________________________$
Fizz$Quiz$Reflection$!!1.!Write!a!complete!list!of!all!the!chemicals!that!went!into!the!chemical!reaction!in!cup!1.!!________________________________________________!!________________________________________________!!________________________________________________!!!2.!Write!a!complete!list!of!all!the!chemicals!that!came!out!of!the!chemical!reaction!in!cup!1.!!________________________________________________!!________________________________________________!!________________________________________________!!!3.!Explain!how!you!know!a!chemical!reaction!occurred!in!!!!!!!!!!!!!!!!cup!1.!!________________________________________________!!________________________________________________!!________________________________________________!!________________________________________________!
95

Session 4: Reaction in a zip bag [60 minutes] • Students will ask testable questions about mixtures; make a prediction, design an inquiry based
method of finding the answer, collect data, and form a conclusion.
Materials needed Papers to copy and cut Students will need Chart paper Marker Calcium Chloride Baking soda Citric Acid Water Chalk Cups 5 mL Spoons Sticky notes Paper towels
Filter paper Funnel For each student group: Evaporating dishes with precipitates 1 Syringe 2 Zip bags 2 Cups 1 Container of water Safety Goggles Balance scale
Zip Bag Data & Observations 1 Zip Bag Data & Observations 2 3 Chemicals Zip Bag Observation
Pencil Science Notebook Glue
**The last experiment requires up to an hour for observations.** 1. Review chemical reactions
Ask students, What happened when we combined calcium chloride and baking soda? (A chemical reaction occurred) And how do we know a chemical reaction occurred? (It fizzed, and a precipitate formed that was not one of the original chemicals.) When the cup was fizzing, what was being released from the reaction? (Gas) How do you know? Who can tell me how we could collect the gas that is released from this chemical reaction? (Put a zip bag over it.) What will happen if you put calcium chloride, baking soda and water in a zip baggie? This is going to be our focus question. Please write this focus question on the next available page in your science notebooks, and remember to update your table of contents with the corresponding page number.
2. Predictions Now I’d like you to write out your predictions below your focus question. What do you think is going to happen and why? Using the board, chart paper or document camera, title a section “Zip bag Prediction 1” and write the following sentence frame for them “When we combine calcium chloride, baking soda and water in a zip bag, I think __________________________, because ________________________.” Have students complete this sentence frame in their science notebook. Remind students to also add the prediction to the table of contents with the corresponding page number. Before we set up for the experiment, I think we should write down what we are going to put into our bags. I’d like us to be very good scientists and measure the mass of all of our chemical mixtures. Why would we do that? I’d like for us to see if we end up with the same amount of
96

stuff after the chemical reaction! Do you think we will have the same amount of stuff after the reaction is complete? Less? More? Why do you think that? Students should reference the law of conservation of matter from Investigation 2. I’d like you to talk with your groups and write a prediction that answers this new question. Remember to explain why you think what you do. Using the board, chart paper or document camera, title a section “Zip bag Prediction 2” and write the following sentence frame for them “I think __________________________, because ________________________.” Have students complete this sentence frame in their science notebook. Remind students to also add the prediction to the table of contents with the corresponding page number. Students should have two predictions in their science notebook -‐-‐ the first is what will happen when the chemicals combine in the bag and the second is if they will have the same stuff in bag after the chemical reaction is complete.
3. Zip bag measurements Have the STARTERs pass out Zip Bag Data & Observations 1 sheet to each student. Have students glue the sheets on the next available page and update the table of contents with the corresponding page number. Have GETTER 1s get a zip bag and have the GETTER 2s measure out one level spoon of calcium chloride and one level spoon of baking soda and pour them into the zip baggie. Remind them to push out as much air as possible from the bag and measure the mass of the zip bag. Have them record the mass in their science notebook. Have the REPORTERs measure the mass of the empty syringe and record the measurement in their science notebook. Have the REPORTERs fill up the syringe with 50 mL of water and measure the mass again and record. Keep the bag closed except for an opening just big enough to insert the syringe-‐ remind students to push out any excess air. Have the STARTERs quickly add the 50 mL of water to the mixture in the bag and immediately zip it closed. Have the students take turns holding and gently shaking the bag. Remind students to record their observations in their science notebooks. Once the reaction has completed, have the STARTERs measure the mass of the bag once again. The bag should inflate (but not pop), and a precipitate of calcium carbonate will be present (it is not soluble).
4. Discuss Zip Bag Data & Observations 1 Have students complete their Zip Bag Data & Observations 1 sheet within their groups and then go over their responses as a class. Possible guiding questions may be:
97

• Did any group end up with more mass after the reaction than before? Why do you think that happened?
• Did any group end up with less mass after the reaction than before? Why do you think that happened?
• Did any group end up with the same amount of mass after the reaction? Why do you think that happened? (Because mass was neither created nor destroyed-‐ just changed into new substances.)
• What are some possible reasons why some groups came up with different masses? (Air trapped in the bag, measuring errors, etc.)
• What happened to the chemicals in the bag? (Chemicals inside the bag reacted and changed into new chemical combinations, making new substances.)
• Where did the gas come from? (The chemical reaction) • Why did we use a bag? (To show that gas was released during the
chemical reaction.) • What can you see better when you use a bag? (Gas) • What is the law called that explains what happened in the bag? (Law of
conservation of matter-‐ from Investigation 2.) What is important is that students understand the conservation of matter that should be demonstrated during the experiment by having the same mass before and after the reaction. Bags should be opened carefully and the solutions dumped down the sink. The bags can be recycled if you wash them thoroughly with soap and warm water or they can be discarded. Have the GETTERs return the materials to the designated storage place.
5. Citric acid/Baking soda reaction What do you think will happen if you repeat the same experiment but with citric acid and baking soda instead? On the next available page in your science notebooks, please write a prediction for a citric acid and baking soda reaction in a zip bag. Using the board, chart paper or document camera, title a section “Zip bag Prediction 3” and write the following sentence frame for them “When we combine citric acid, baking soda and water in a zip bag, I think __________________________, because ________________________.” Have students complete this sentence frame in their science notebook. Remind students to also add the prediction to the table of contents with the corresponding page number. You may look through your science notebook observations from the Fizz Quiz to help guide your predictions. Remember to add because to your predictions.
6. Zip bag 2 measurements
98

Have the STARTERs pass out Zip Bag Data & Observations 2 sheet to each student. Have students glue the sheets on the next available page and update the table of contents with the corresponding page number. Have GETTER 1s collect a zip bag and have the GETTER 2s measure out one level spoon of citric acid and one level spoon of baking soda and pour them into the zip baggie. Remind them to push out as much air as possible from the bag and measure the mass of the zip bag. Have them record the mass in their science notebook. Have the REPORTERs measure the mass of the empty syringe and record the number in their science notebook. Have the REPORTERs fill up the syringe with 50 mL of water and measure the mass again and record. Keep the bag closed except for an opening just big enough to insert the syringe-‐ remind students to push out any excess air. Have the STARTERs quickly add the 50 mL of water to the mixture in the bag and immediately zip it closed. Have the students take turns holding and gently shaking the bag. Remind students to record their observations in their science notebooks. Once the reaction has completed, have the STARTERs measure the mass of the bag once again. The citric acid and baking soda reaction will produce more gas than the calcium chloride and baking soda reaction. The bag will get very tight, but should not burst.
7. Discuss results from zip bag 2 experiment Once students have finished their Zip Bag Data & Observations 2 sheet, ask the following questions. Have students complete their Zip Bag Data & Observations 2 sheet within their groups and then go over their responses as a class. Possible guiding questions may be:
• Did any group end up with more mass after the reaction than before? Why do you think that happened?
• Did any group end up with less mass after the reaction than before? Why do you think that happened?
• Did any group end up with the same amount of mass after the reaction? Why do you think that happened? (Because mass was neither created nor destroyed-‐ just changed into new substances.)
• What are some possible reasons why some groups came up with different masses? (Air trapped in the bag, measuring errors, etc.)
• What happened to the chemicals in the bag? (Chemicals inside the bag reacted and changed into new chemical combinations, making new substances.)
• Where did the gas come from? (The chemical reaction) • Why did we use a bag? (To show that gas was released during the
chemical reaction.)
99
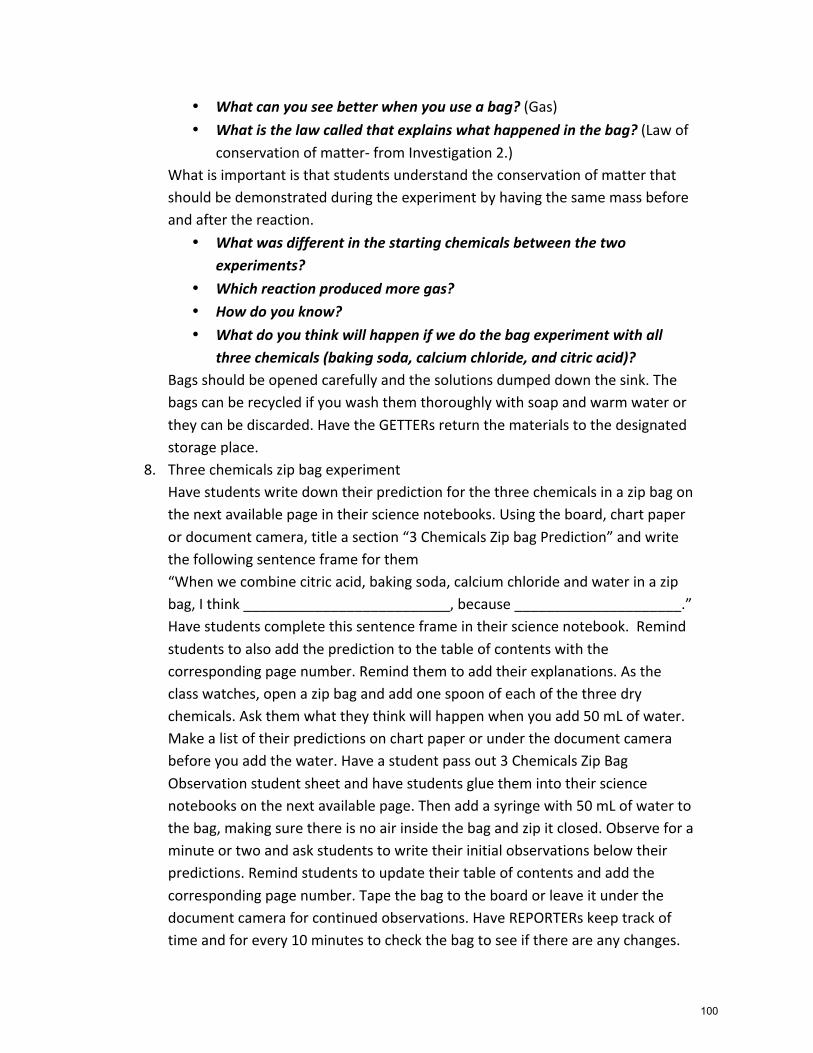
• What can you see better when you use a bag? (Gas) • What is the law called that explains what happened in the bag? (Law of
conservation of matter-‐ from Investigation 2.) What is important is that students understand the conservation of matter that should be demonstrated during the experiment by having the same mass before and after the reaction.
• What was different in the starting chemicals between the two experiments?
• Which reaction produced more gas? • How do you know? • What do you think will happen if we do the bag experiment with all
three chemicals (baking soda, calcium chloride, and citric acid)? Bags should be opened carefully and the solutions dumped down the sink. The bags can be recycled if you wash them thoroughly with soap and warm water or they can be discarded. Have the GETTERs return the materials to the designated storage place.
8. Three chemicals zip bag experiment Have students write down their prediction for the three chemicals in a zip bag on the next available page in their science notebooks. Using the board, chart paper or document camera, title a section “3 Chemicals Zip bag Prediction” and write the following sentence frame for them “When we combine citric acid, baking soda, calcium chloride and water in a zip bag, I think __________________________, because _____________________.” Have students complete this sentence frame in their science notebook. Remind students to also add the prediction to the table of contents with the corresponding page number. Remind them to add their explanations. As the class watches, open a zip bag and add one spoon of each of the three dry chemicals. Ask them what they think will happen when you add 50 mL of water. Make a list of their predictions on chart paper or under the document camera before you add the water. Have a student pass out 3 Chemicals Zip Bag Observation student sheet and have students glue them into their science notebooks on the next available page. Then add a syringe with 50 mL of water to the bag, making sure there is no air inside the bag and zip it closed. Observe for a minute or two and ask students to write their initial observations below their predictions. Remind students to update their table of contents and add the corresponding page number. Tape the bag to the board or leave it under the document camera for continued observations. Have REPORTERs keep track of time and for every 10 minutes to check the bag to see if there are any changes.
100

After 30-‐60 minutes a precipitate will begin to form inside the bag. Students should draw their observations after 5 minutes, 30 minutes and 60 minutes. This precipitate is calcium citrate, which does not react with vinegar. Ask your students what they think the precipitate may be and how they will be able to determine what it is. Have a student volunteer filter the contents of the bag and set it out to dry in a safe place. We will use the precipitate in the next session.
101
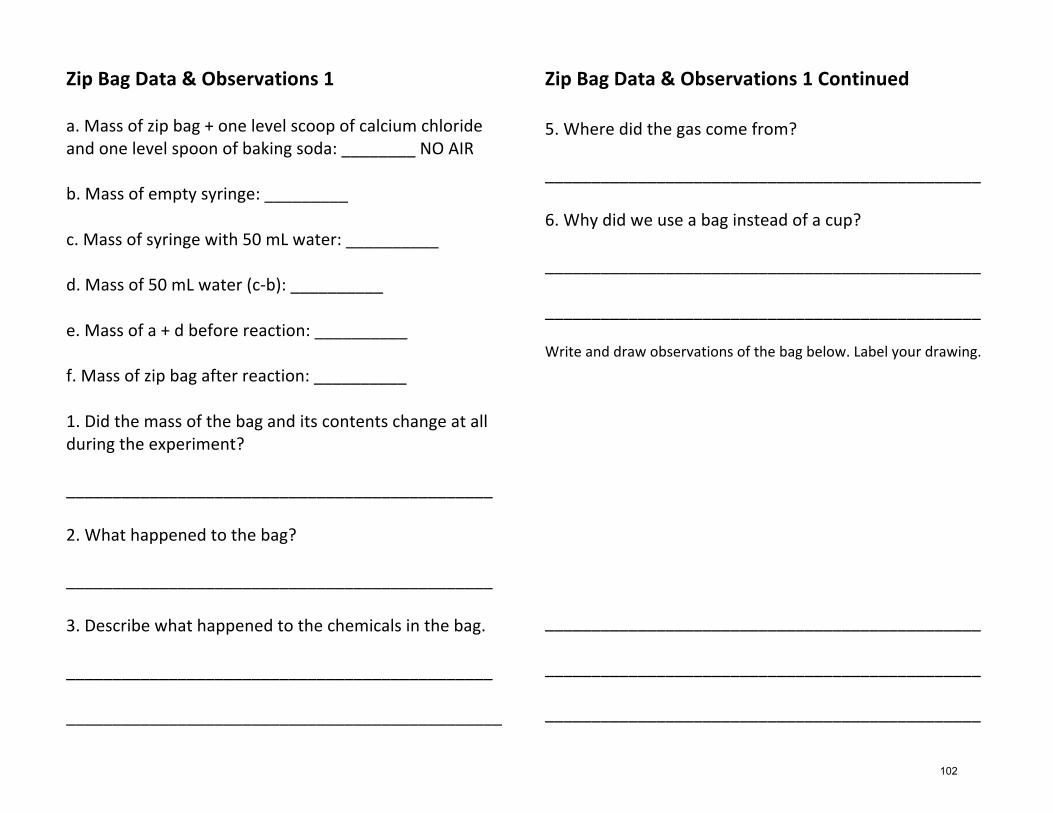
Zip Bag Data & Observations 1
a. Mass of zip bag + one level scoop of calcium chloride and one level spoon of baking soda: ________ NO AIR b. Mass of empty syringe: _________ c. Mass of syringe with 50 mL water: __________ d. Mass of 50 mL water (c-‐b): __________ e. Mass of a + d before reaction: __________ f. Mass of zip bag after reaction: __________ 1. Did the mass of the bag and its contents change at all during the experiment? ______________________________________________ 2. What happened to the bag? ______________________________________________
3. Describe what happened to the chemicals in the bag. ______________________________________________ _______________________________________________
Zip Bag Data & Observations 1 Continued 5. Where did the gas come from? _______________________________________________ 6. Why did we use a bag instead of a cup? _______________________________________________ _______________________________________________
Write and draw observations of the bag below. Label your drawing.
_______________________________________________ _______________________________________________ _______________________________________________
102

Zip Bag Data & Observations 2
a. Mass of zip bag + one level scoop of citric acid and one level spoon of baking soda: ________ NO AIR b. Mass of empty syringe: _________ c. Mass of syringe with 50 mL water: __________ d. Mass of 50 mL water (c-‐b): __________ e. Mass of a + d before reaction: __________ f. Mass of zip bag after reaction: __________ 1. Did the mass of the bag and its contents change at all during the experiment? ______________________________________________ 2. What happened to the bag? ______________________________________________
3. Describe what happened to the chemicals in the bag. ______________________________________________ _______________________________________________
Zip Bag Data & Observations 2 Continued 5. Where did the gas come from? _______________________________________________ 6. Why did we use a bag instead of a cup? _______________________________________________ _______________________________________________
Write and draw observations of the bag below. Label your drawing.
_______________________________________________ _______________________________________________ _______________________________________________
103

3 Chemicals Zip Bag Observation Draw below what you see in the bag after 5 minutes. Draw below what you see in the bag after 30 minutes.
3 Chemicals Zip Bag Observation Continued Draw below what you see in the bag after 60 minutes. Is a chemical reaction taking place within the bag? ______ How do you know? _______________________________ _______________________________________________ _______________________________________________ What do you think is in the bag after 60 minutes? _______________________________________________ _______________________________________________
104

Session 5: Precipitate Tests [35-‐40 minutes] • Students will ask testable questions about mixtures; make a prediction, design an inquiry based
method of finding the answer, collect data, and form a conclusion. • Students will know that when a change results from mixing two or more materials, that change is
a chemical reaction. A reaction results in new materials. • Students will know that formation of a precipitate occurs in some chemical reactions. • Students will know that not all chemicals react when they are mixed.
Materials needed Papers to copy and cut Students will need Chart paper Marker White Vinegar 250 mL Baking Soda Calcium Chloride Chalk Cups Paper towels
Filter paper with precipitate from session 4 Safety Goggles
Chalk Observation 3 Chemical Bag Precipitate + Vinegar Observation
Pencil Science Notebook Glue
1. Vinegar reaction observations
Put a piece of chalk in a cup and add 5 mL of vinegar to cover the chalk. Carry the cup around the room for students to observe the bubbling reaction. Ask students, What is happening in the cup? Is this a chemical reaction? How do you know? What observations can you make that support the conclusion that there is chemical reaction taking place? Let’s test the precipitate that formed during our Zip bag experiments. Send GETTER 1s to retrieve their dried chalk precipitates from the previous session, and send GETTER 2s to get a cup. Pass out Chalk Observation student sheet and have students glue it into their science notebooks on the next available page. Remind them to update the table of contents with the corresponding page number. Make sure all students have updated their science notebooks before pouring in the vinegar. Once you have poured 5 mL of vinegar into the cup, students should draw and write their observations in their science notebooks.
• How do we really know that the precipitate is calcium carbonate and not baking soda? (It chemically reacts with vinegar)
• Does baking soda or calcium chloride also react with vinegar? (Students may remember making volcanoes with baking soda and vinegar, which create a strong chemical reaction. Calcium chloride, however, does not react with vinegar. Vinegar neutralizes calcium chloride, which can kill lawns after use for melting snow.)
Let’s test the two chemicals with vinegar and see if there is a reaction. Put a spoonful of each (baking soda and calcium chloride) in different cups and add 5 mL of vinegar to each up. Students will see that baking soda and vinegar
105

chemically react. Do we have enough evidence to say that the precipitate is definitely calcium carbonate and not baking soda? (No, because vinegar reacts with both chemicals, so the precipitate could be either baking soda or calcium carbonate.) What other evidence tells us that a chemical reaction took place and that our starting substances changed into different substances? Let’s look back at our starting substances and ending substances from the reaction in a zip bag. What other ending substances do you see? Salt was the other ending substance in the reaction. Was salt there at the beginning? (No) Was salt a new substance with new properties? (Yes) What does that tell us about whether a chemical reaction occurred? Because salt was not a starting substance, it provides evidence that there was a chemical change.
2. Claims and Evidence Let’s write a claim about what we observed from this experiment. Who can tell me what our focus question was? (What do you think will happen if we do the bag experiment with all three chemicals (baking soda, calcium chloride, and citric acid)?) And what did we observe in the zip bag when we put all 3 chemicals together? (A precipitate formed) How do we know that a precipitate formed and that it wasn’t leftover chemicals that didn’t dissolve? Remember that whenever scientists make a claim, they also have to give evidence to support the claim. Claims always have to have evidence that goes with them. What claim can I make about the experiment we just did?
Claims Evidence
What might be some evidence that I could use to support this claim that I wrote? What do we know about vinegar and how it reacts with calcium carbonate? (It produces a lot of fizz, a precipitate formed, indicating a chemical reaction.)
Claims Evidence
I claim that a chemical reaction occurred in the 3 chemicals zip bag experiment.
I claim that a chemical reaction occurred in the 3 chemicals zip bag experiment.
I claim this because the bag inflated, and after 50 minutes a new precipitate formed.
106

Students should also add the evidence that salt crystals formed after evaporation, indicating a new substance was created from the original chemicals. Remind students to add the Claims and Evidence into the table of contents and add the corresponding page number.
3. Three chemicals zip bag reaction with vinegar Ask students, Who can tell me what the precipitate is from the 3 chemicals bag reaction? Is it chalk (calcium carbonate)? How can we test to see if it is chalk? (Test it with vinegar) Please write a prediction on the next available page in your science notebooks: Do you think the precipitate will chemically react with vinegar, and remember to add why or why not. Using the board, chart paper or document camera, title a section “Three Chemicals Zip Bag Reaction with Vinegar Prediction” and write the following sentence frame for them “I think __________________________, because ________________________.” Have students complete this sentence frame in their science notebook. Remind students to also add the prediction to the table of contents with the corresponding page number. While students are writing their predictions, pass out 3 Chemical Bag Precipitate + Vinegar Observation sheet and have students glue them in below their predictions or on the next available page. Remind students to update their table of contents with the title of the prediction and the observation sheet and the corresponding page numbers. Take a sample of the precipitate from the 3 chemicals bag filter and put it in a cup. Pour 5 mL of vinegar on it and have students observe either by walking around or put it under the document camera. Ask students, Is the precipitate calcium carbonate? What evidence to you see? (No, the white precipitate does not react with vinegar.) The white precipitate is an insoluble material called calcium citrate. Calcium from the calcium chloride reacted with citrate from the citric acid to form calcium citrate.
4. Claims and Evidence Let’s write a claim about what we observed from this experiment. Is the precipitate calcium carbonate? How do you know? Remember that whenever scientists make a claim, they also have to give evidence to support the claim. Claims always have to have evidence that goes with them. What claim can I make about the experiment we just did?
Claims Evidence
I claim that the precipitate from the 3 chemicals zip bag experiment is not calcium carbonate.
107

What might be some evidence that I could use to support this claim that I wrote? What do we know about vinegar and how it reacts with calcium carbonate? (It produces a lot of fizz, indicating a chemical reaction.)
Claims Evidence
5. Revisit KWHL
To complete the lesson, use the “L” column under the KWHL chart started during session 1 of this Investigation. Have students do the same in their science notebooks.
I claim that the precipitate from the 3 chemicals zip bag experiment is not calcium carbonate.
I claim this because there was not fizzing or releasing of gas when we added vinegar to the precipitate (we know calcium carbonate chemically reacts with vinegar).
108
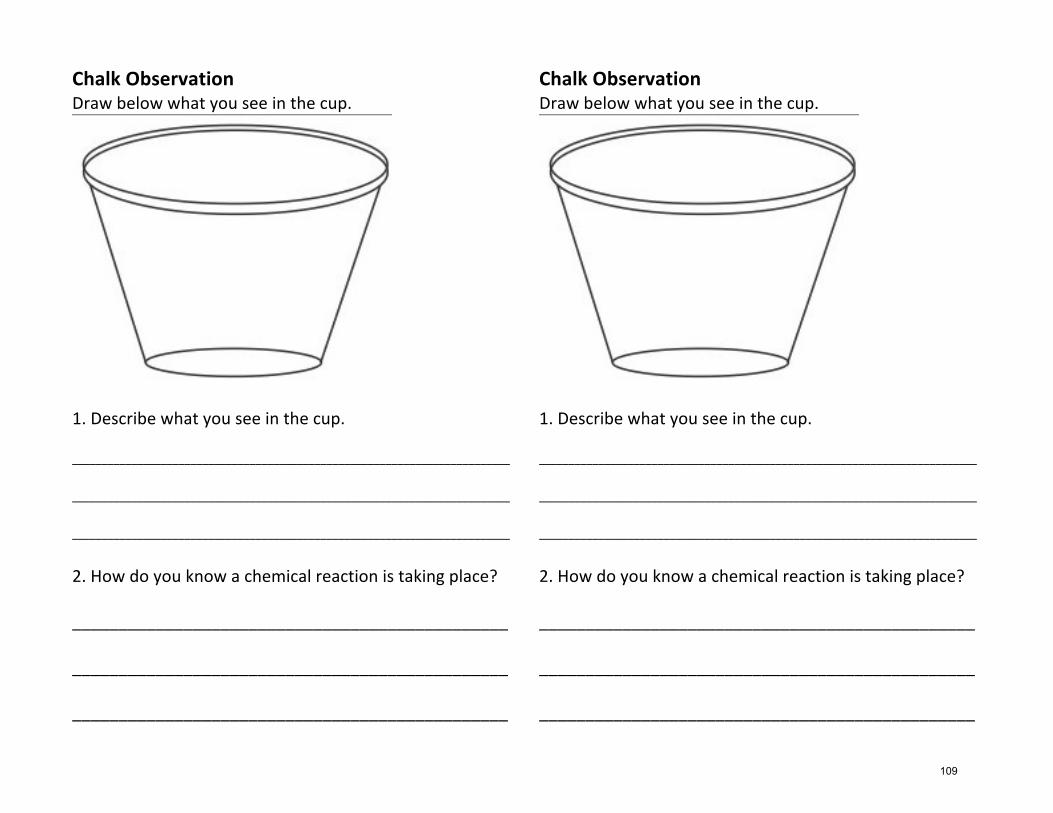
Chalk Observation Draw below what you see in the cup.
1. Describe what you see in the cup. __________________________________________________________________________ __________________________________________________________________________ __________________________________________________________________________ 2. How do you know a chemical reaction is taking place? _______________________________________________ _______________________________________________ _______________________________________________
109

3 Chemical Bag Precipitate + Vinegar Observation Draw below what you see in the bag. 1. Describe what you see in the bag. __________________________________________________________________________ __________________________________________________________________________ __________________________________________________________________________ 2. How do you know a chemical reaction is taking place? _______________________________________________ _______________________________________________ _______________________________________________
3 Chemical Bag Precipitate + Vinegar Observation Draw below what you see in the bag. 1. Describe what you see in the bag. __________________________________________________________________________ __________________________________________________________________________ __________________________________________________________________________ 2. How do you know a chemical reaction is taking place? _______________________________________________ _______________________________________________ _______________________________________________
110

Session 6: Chemical Reactions Reflection [35-‐40 minutes] • Apply knowledge about chemical reactions to a new situation.
Materials needed Papers to copy and cut Students will need
Chemical Reaction Reflection
Chemical Reaction Reflection
Science notebooks Pencil Glue
1. Tell students: you are now going to have an opportunity to apply what you
learned in Investigation 3. Can anyone tell me what the big idea was for this last investigation? The big idea for Investigation 3 was that when we mix two or more substances that form new substances with new properties, a chemical reaction has occurred.
• What chemical reactions did we study in this investigation? • What was one of the new substances we formed as a result a chemical
reaction? • What were the properties of that new substance? • What were the original substances that we started with before the
chemical reaction that produced the new substance? 2. Introduce the challenge
Give each student a copy of the student sheet titled Chemical Reaction Reflection. Have students glue this into their notebooks and add it to the table of contents with the corresponding page number. Read the scenario out loud together: Some students decided to mix together iron filings, sugar and water. They used filter paper to remove the iron filings from the water. Then they set the filter paper and iron filings aside to dry. Then they put the sugar and water solution in an evaporating dish. After several days, they observed the following.
• The water in the evaporating dish had evaporated, and there were white crystals in the dish.
• On the filter paper, instead of black iron filings, there was some brownish-‐orange powder. They tested the brownish-‐orange powder with a magnet, and it did not stick to the magnet.
Have students fill in the table on their student sheet. While they may not know the name for rust, they should note that a new substance has been made from the existing materials (using the evidence of a new colored substance that is no longer magnetic). Guiding questions may be:
• What do you think happened here? • What were the substances we started with? What were their
properties?
111

• What were the substances we ended with? What were their properties? • Did a chemical reaction occur? • How do you know?
Starting Substances Properties Ending Substances Properties
Water Liquid, clear Sugar-‐water solution Gas (evaporated) Sugar Solid, small particles Sugar-‐water solution White crystals
Iron filings Black, feathery, magnetic
Rust (Iron oxide) Brownish-‐orange powder, not magnetic
112
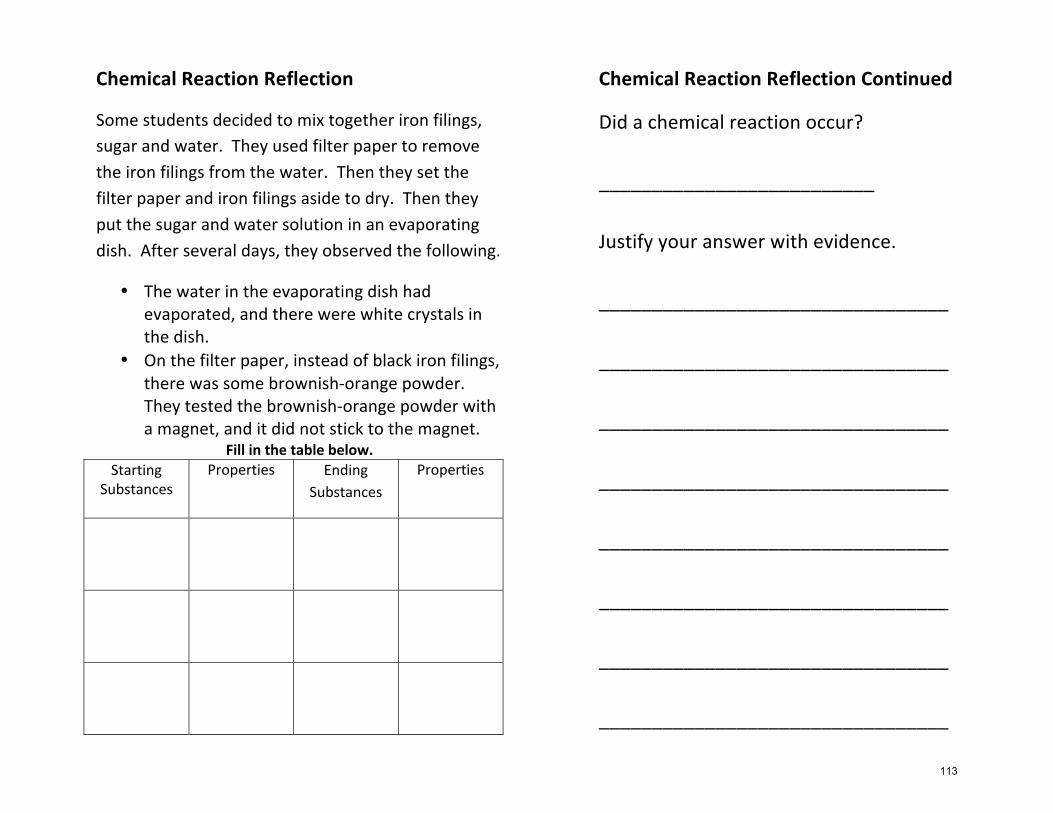
Chemical Reaction Reflection
Some students decided to mix together iron filings, sugar and water. They used filter paper to remove the iron filings from the water. Then they set the filter paper and iron filings aside to dry. Then they put the sugar and water solution in an evaporating dish. After several days, they observed the following.
• The water in the evaporating dish had evaporated, and there were white crystals in the dish.
• On the filter paper, instead of black iron filings, there was some brownish-‐orange powder. They tested the brownish-‐orange powder with a magnet, and it did not stick to the magnet.
Fill in the table below. Starting
Substances Properties Ending
Substances Properties
Chemical Reaction Reflection Continued
Did a chemical reaction occur? __________________________ Justify your answer with evidence. _________________________________ _________________________________ _________________________________ _________________________________ _________________________________ _________________________________ _________________________________ _________________________________
113