unit 10 light reflection of light discover physics for gce ‘o’ level science
TRANSCRIPT

Unit 10 LightReflection of Light
Discover PHYSICS for GCE ‘O’ Level Science
10.1 What is Light?
Learning OutcomesIn this section, you’ll be able to:• Understand how light travels and how we are
able to see.

10.1 What is Light?
• Light is a form of energy.
• Our eyes detect light in a range of colours – red, orange, yellow, green, blue, indigo and violet.
• Light travels at a speed of 3.0 × 10⁸ m s-1 in vacuum.
10.1 What is Light?
How does light travel?
Light travels in straight lines.
10.1 What is Light?
What are luminous and non-luminous objects?
• Luminous objects are objects which give off light of their own e.g. Lighted lamp, images on a TV screen
• Non-luminous objects are objects that do not give off light.
10.1 What is Light?
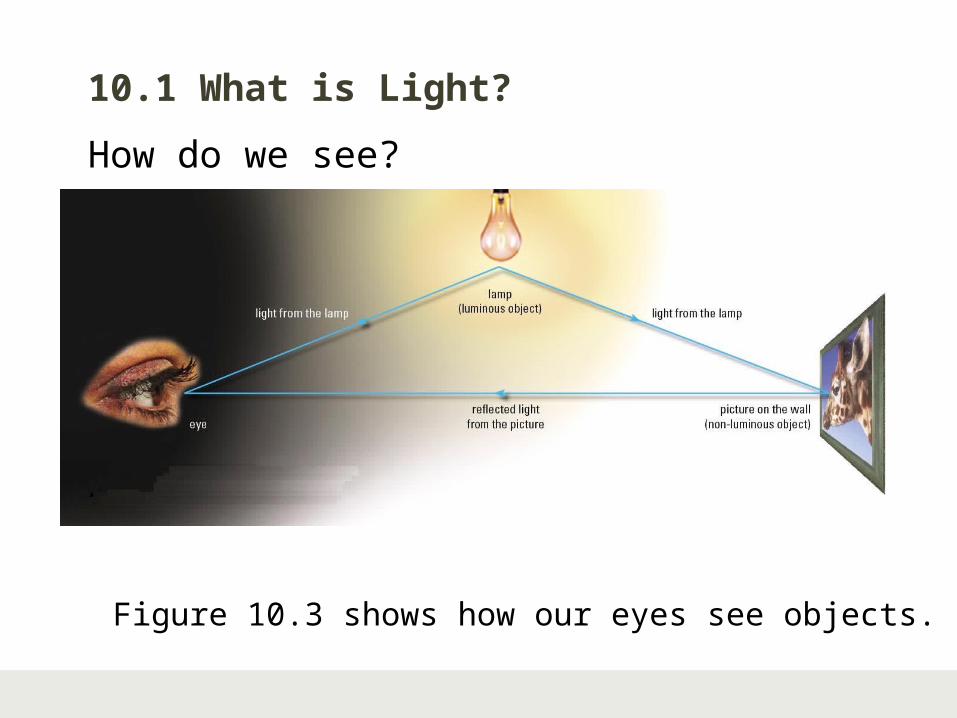
How do we see?
Figure 10.3 shows how our eyes see objects.
10.1 What is Light?
Key Ideas1. Light is a form of energy.2. Light travels in straight lines called
rays.
10.1 What is Light?
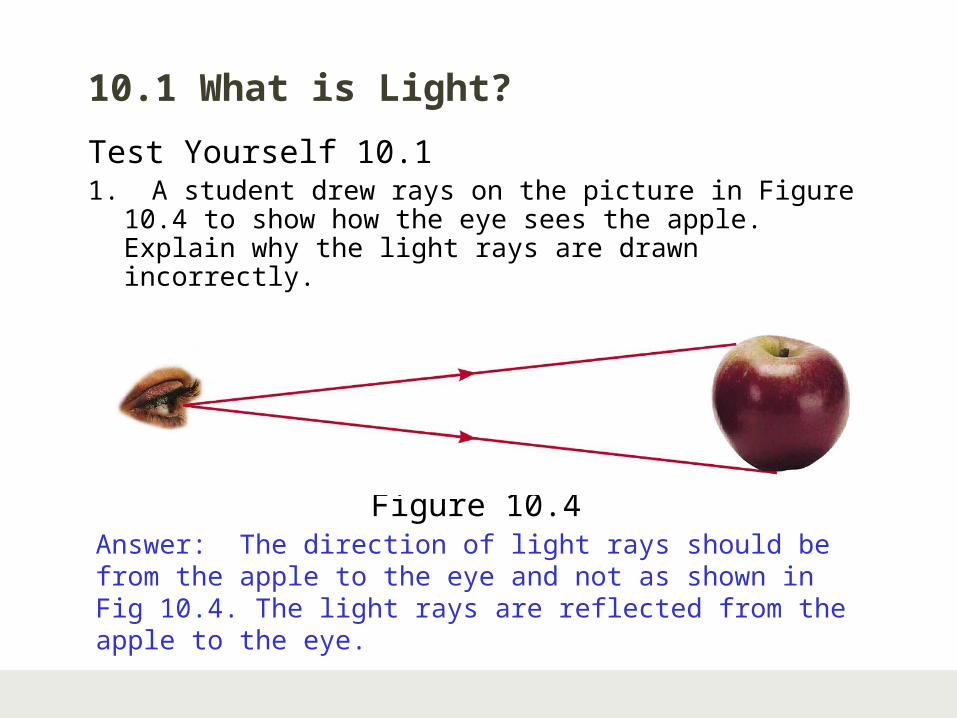
Test Yourself 10.11. A student drew rays on the picture in Figure 10.4 to
show how the eye sees the apple. Explain why the light rays are drawn incorrectly.
Figure 10.4Answer: The direction of light rays should be from the apple to the eye and not as shown in Fig 10.4. The light rays are reflected from the apple to the eye.

10.2 Reflection of Light
Learning OutcomesIn this section, you’ll be able to:• Understand the terms used for reflection:
• Normal• Angle of incidence• Angle of reflection
• State that, for reflection, the angle of incidence is equal to the angle of reflection
• Apply the principle of reflection in constructing ray diagrams and performing calculations

10.2 Reflection of Light
Laws of Reflection:1. 1st Law of Reflection
The incident ray, the reflected ray and the normal to the reflecting surface all lie in the same plane.
2. 2nd Law of ReflectionThe angle of incidence is equal to the angle of reflection
i = r
10.2 Reflection of Light
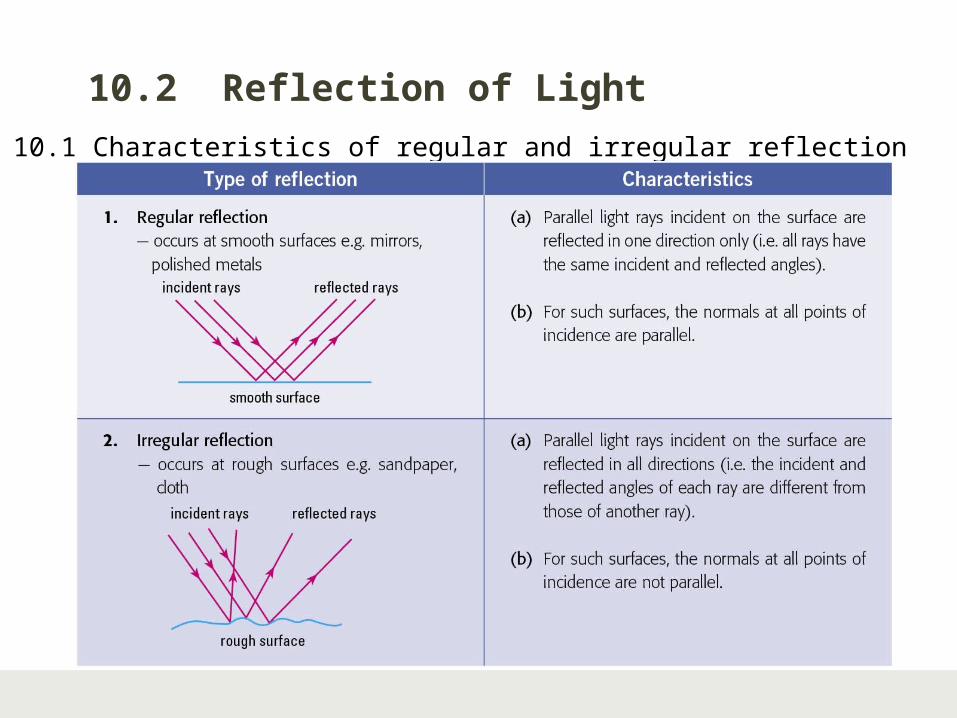
Table 10.1 Characteristics of regular and irregular reflection

10.2 Reflection of Light
Characteristics of the image formed by aplane mirror:1. The image is of the same size as the
object.2. It undergoes lateral inversion.3. It is upright.4. It is virtual.5. The distance of the image from the
mirror is equal to the distance of the object from the mirror.

10.2 Reflection of LightKey Ideas1. The two laws of reflection are:• The incident ray, reflected ray and the normal at a
point of incidence all lie in the same plane.• The angle of incidence is equal to the angle of
reflection
i = r2. The image formed by a plane mirror is:• Same size as the object• Laterally inverted• Upright• Virtual• Distance of image from mirror is equal to the
distance of object from the mirror

10.2 Reflection of LightTest Yourself 10.21. Draw a diagram to show clearly the incident ray,
normal, reflected ray, angle of incidence and the angle of reflection. What is the relationship between angle of incidence and angle of reflection.
Answer:
ir
incident ray
reflected ray
normal
mirror
The angle of incidence is equal to the angle of reflection.

10.2 Reflection of Light
Test Yourself 10.22. What are the characteristics of an image
formed in a plane mirror?
Answer:The image is• Upright• Laterally inverted• Same size as object• Virtual• Distance of image from mirror is equal to the
distance of object from mirror
10.3 Constructing Ray Diagrams
Learning OutcomeIn this section, you’ll be able to:• Apply the principle of reflection in
constructions, measurements and calculations.

10.3 Constructing Ray Diagrams
Ray Diagrams for plane mirrorsBy drawing accurate ray diagrams, we can locate the position of a mirror image.
Figure 10.15

10.3 Constructing Ray Diagrams
Fig 10.16
Step 1: Image distance from mirror = object distance from
mirrori) Measure accurately the perpendicular distance
between object O and the mirror surface.ii) Mark off the same distance behind the mirror to locate
image I

10.3 Constructing Ray DiagramsStep 2: Draw the light rays from the image tothe eyei) Use dotted lines behind the mirrorii) Use bold lines in front of the mirror surface.
Fig 10.17
10.3 Constructing Ray Diagrams
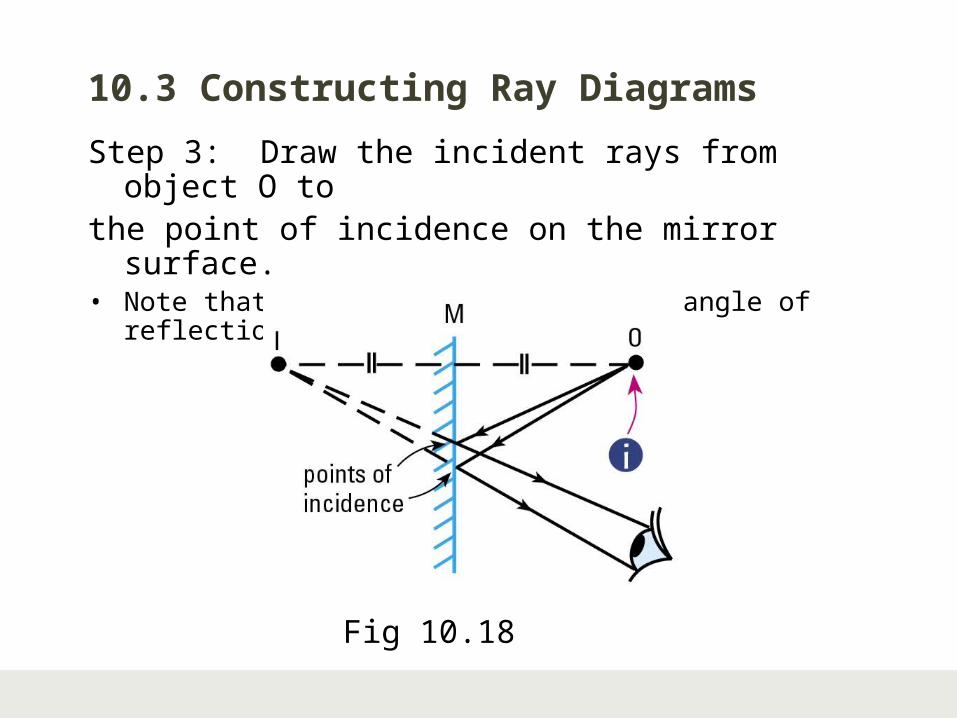
Step 3: Draw the incident rays from object O tothe point of incidence on the mirror surface.• Note that the angle of incidence = angle of reflection
Fig 10.18

10.3 Constructing Ray DiagramsDrawing ray diagram for extended object
By considering the extended object as a number of points, we apply the same 3 steps to locate the image.
Figure 10.19

10.3 Constructing Ray Diagrams
Multiple images in plane mirrorsWhen two mirrors are placed 90o to each other, and an object O is placed between them, 3 images are formed.
Figure 10.20
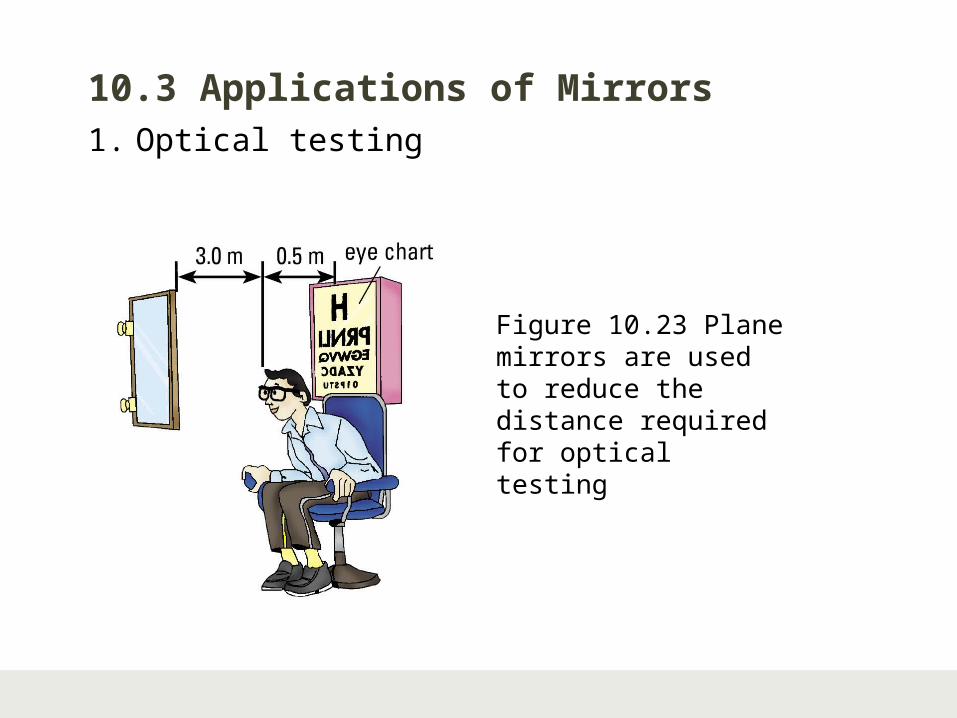
10.3 Applications of Mirrors1. Optical testing
Figure 10.23 Plane mirrors are used to reduce the distance required for optical testing

10.3 Applications of Mirrors2. Mirrors at blind corners• Such mirrors can be installed in shops to
allow shopkeepers to watch out for shoplifters• Can also be installed at blind corners to allow
drivers to make a turn safely
Figure 10.24 A blind corner mirror
10.3 Applications of Mirrors
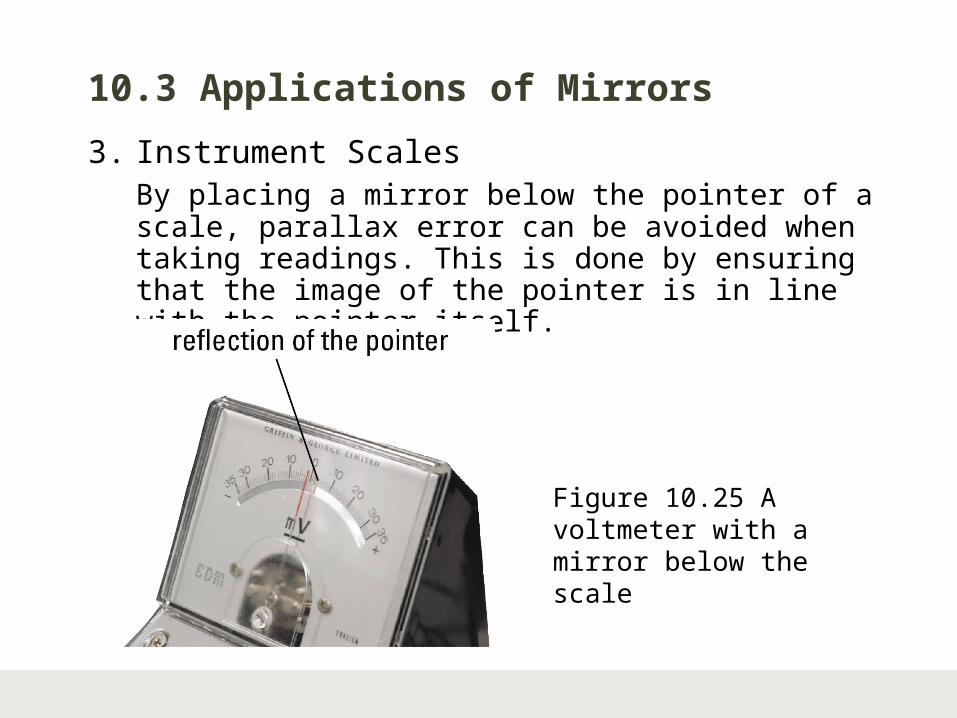
3. Instrument ScalesBy placing a mirror below the pointer of a scale, parallax error can be avoided when taking readings. This is done by ensuring that the image of the pointer is in line with the pointer itself.
Figure 10.25 A voltmeter with a mirror below the scale

10.3 Applications of Mirrors
4. PeriscopeUsing two plane mirrors inclined at 45°, a periscope allows a person to look over a high wall or obstacles.
Figure 10.26 A periscope

10.3 Applications of Mirrors
5. Other usesMirrors can be found in many optical instruments such as telescopes, overhead projectors and CD players.

10.3 Constructing Ray Diagrams
Key Ideas1. Ray diagrams are used to locate the
position of a mirror image.2. Some applications of mirrors include
the periscope, for observing blind corners and avoiding parallax error on instrument scales.

10.3 Constructing Ray DiagramsTest Yourself 10.31. Figure 10.27 shows an extended object. Using
ray diagrams, locate the image of the arrow. Describe the image formed.
Answer:
10.3 Constructing Ray Diagrams
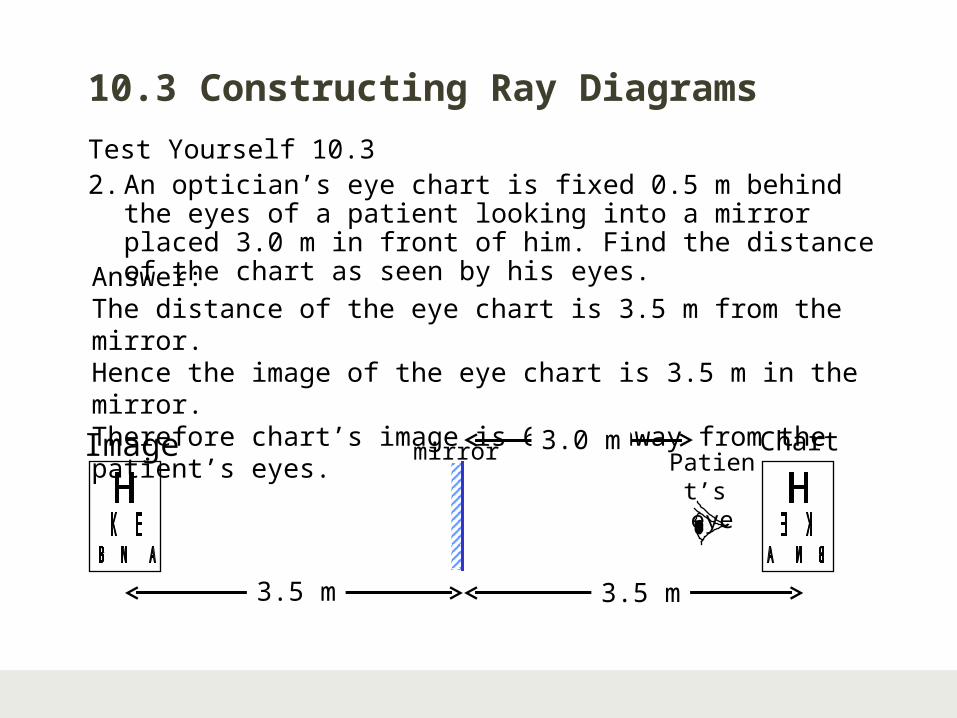
Test Yourself 10.32. An optician’s eye chart is fixed 0.5 m behind the eyes of
a patient looking into a mirror placed 3.0 m in front of him. Find the distance of the chart as seen by his eyes.
Answer:The distance of the eye chart is 3.5 m from the mirror.Hence the image of the eye chart is 3.5 m in the mirror.Therefore chart’s image is 6.5 m away from the patient’s eyes.
mirror Patient’s eye
Chart
3.5 m3.5 m
3.0 mImage