unemployment insurance benefits data validation web-based data
TRANSCRIPT

Unemployment Insurance Benefits Data Validation Web-Based Data Validation Software Software Tutorial
June 2005

Unemployment Insurance Web-Based Software System TUTORIAL TABLE OF CONTENTS PAGE 1. Introduction and Overview: The Data Validation Program . . . . . . 3
1.1 Background . . . . . . . . . . . . . . . . . . . . . . . . . . . . . . . . . . . . . . 3
1.2 Definitions . . . . . . . . . . . . . . . . . . . . . . . . . . . . . . . . . . . . . . 4
1.3 Basic Methodology: Report Validation (RV) . . . . . . . . . . . . . 4
1.4 Basic Methodology: Data Element Validation (DEV) . . . . . . 5
1.5 System Navigation . . . . . . . . . . . . . . . . . . . . . . . . . . . . . . . . . 6 2. Logging On . . . . . . . . . . . . . . . . . . . . . . . . . . . . . . . . . . . . . . . . . . . . . . 8 3. Loading Extract Files . . . . . . . . . . . . . . . . . . . . . . . . . . . . . . . . . . . . . 10
3.1 Import Messages . . . . . . . . . . . . . . . . . . . . . . . . . . . . . . . . . . . 12
3.2 Error Conditions in Incoming Files . . . . . . . . . . . . . . . . . . . . . 14 3.3 Duplicate Records . . . . . . . . . . . . . . . . . . . . . . . . . . . . . . . . . . 16
3.4 Source Table . . . . . . . . . . . . . . . . . . . . . . . . . . . . . . . . . . . . . . 16
4. Report Validation (RV) . . . . . . . . . . . . . . . . . . . . . . . . . . . . . . . . . . . . 19
4.1 Overview . . . . . . . . . . . . . . . . . . . . . . . . . . . . . . . . . . . . . . . . . 19
4.2 System Navigation . . . . . . . . . . . . . . . . . . . . . . . . . . . . . . . . . 19
4.3 View Validation Counts . . . . . . . . . . . . . . . . . . . . . . . . . . . . . 20
4.4 View Sub-Populations . . . . . . . . . . . . . . . . . . . . . . . . . . . . . . . 21
4.5 View Reported Counts . . . . . . . . . . . . . . . . . . . . . . . . . . . . . . . 22
- - 1

TABLE OF CONTENTS PAGE
4.6 View Reported Dollars . . . . . . . . . . . . . . . . . . . . . . . . . . . . . . . 24 4.7 Comments . . . . . . . . . . . . . . . . . . . . . . . . . . . . . . . . . . . . . . . . 26
5. Data Element Validation (DEV) . . . . . . . . . . . . . . . . . . . . . . . . . . . . 28
5.1 Overview . . . . . . . . . . . . . . . . . . . . . . . . . . . . . . . . . . . . . . . . . 28
5.2 System Navigation . . . . . . . . . . . . . . . . . . . . . . . . . . . . . . . . . . 28
5.3 View Samples . . . . . . . . . . . . . . . . . . . . . . . . . . . . . . . . . . . . . 30 5.4 Data Element Validation Report . . . . . . . . . . . . . . . . . . . . . . . 33
5.5 Comments . . . . . . . . . . . . . . . . . . . . . . . . . . . . . . . . . . . . . . . . 34
- - 2

1. INTRODUCTION AND OVERVIEW: THE DATA VALIDATION PROGRAM 1.1 Background State Unemployment Insurance (UI) operations are required to file a series of standardized reports with the Employment and Training Administration (ETA) of the U.S. Department of Labor (DOL). Reports covered by the data validation program are required on a monthly or quarterly basis. These reports are used to establish the volume of activity conducted by state UI administrations and are a factor in establishing funding levels. They provide information about state compliance with UI requirements. They also provide information about the amount of benefits paid, the number of claimants served and other information useful in measuring the U.S. economy and projecting trends. Since state programs differ significantly within established parameters and states utilize a variety of accounting and data processing arrangements, the issue of the comparability among state reports has emerged. State reporting requirements are standardized, but states use a variety of reporting arrangements and must interpret reporting requirements within the context of their own laws and accounting conventions. The UI Data Validation (DV) program was established in an attempt to identify and address discrepancies. The program basically requires that states reproduce their reported numbers in a controlled environment, compare these numbers with actual numbers reported to DOL, and correct significant discrepancies. The DV program also requires that states examine a sample of reported cases to verify that the correct information is being counted. During the initial stages of the program, PC-based software was produced to facilitate the validation process at the state level and to generate standardized outputs which document state participation in the DV program. These reports establish the level of errors discovered in the validation process. States are said to have “passed” validation when observed error rates are within established tolerance levels. This PC-based software is being replaced by Web-based software which runs on DOL Sun computers in state UI offices. This computer has an established interface with DOL for report transmission and can retrieve reported numbers from the state database of reported numbers. This tutorial provides basic operating instructions for this Web-based software. One purpose of the tutorial is to assist users familiar with the prior DV system in transitioning to the new web-based Data Validation system. This tutorial provides users with a step-by-step guide for using the web-based Data Validation application.
- - 3
1.2 Definitions Certain terms are used in the validation process which have a specialized meaning within the context of the DV program:
1. Populations. Populations are sets of transaction records specific to a given kind of activity. “Population 1”, for example, refers to the set of transactions which must be counted to satisfy reporting requirements specific to “weeks claimed”. Populations are specific to a given reporting period (e.g., weeks claimed during January) and do not overlap. That means that a given record appears in only one population.
2. Sub-population. Each record in a given population record set is assigned to a
specific sub-population by the software in the process of loading the data set. Records in sub-populations yield the actual report counts. Each record counted for reporting purposes must be assigned to a sub-population. If a given record does not satisfy the requirements for assignment to a sub-population, this record cannot be counted and is said to be in error.
3. Extract Files. These files must be prepared by each state individually and consist
of information extracted from state production databases. They are used as input for the DV software. The format of extract files must strictly conform to the specifications (record layouts). The software performs a series of tests on these files in the process of loading. Before being loaded to the DV software each record must pass both syntax and logic tests. Duplicate records are also rejected.
4. Report Validation (RV). This refers to the validation of summary counts provided
to DOL. Reported numbers must be reproduced in a controlled environment and shown to match reported counts in order to pass validation.
5. Data Element Validation (DEV). This refers to the investigation of samples of
records from a given extract file to establish that the information in individual records is accurate and appropriate for reporting purposes and conforms to federal reporting requirements.
6. Record Layouts. These provide detailed information required for the preparation
of extract files. Module Three of state-specific Data Validation Handbooks can be used to map the data elements in the record layouts to elements in individual state systems.
1.3 Basic Methodology: Report Validation (RV) Report validation consists of verifying that groups of report elements are within established tolerance levels. An extract file is prepared for each population and loaded to the software. The loading process identifies records with syntax errors, records with
- - 4

logic errors (which prohibit them from being assigned to a sub-population), and duplicate records. All of these records are diverted to an error table in the database. The Sun software retrieves reported numbers from the state database of reported numbers. This is accomplished with reference to the beginning and ending dates entered by the operator when the extract file is loaded. A report is displayed giving the reported numbers, validation numbers derived from the extract file, and the extent of any discrepancy. If the percent of error for individual groups of numbers is within tolerance, the state has passed this aspect of validation. These results are then forwarded to DOL where they are stored in a national database. State staff should save a copy of summary reports as well as a copy of the extract file to satisfy audit requirements.
1.4 Basic Methodology: Data Element Validation (DEV) A series of samples is produced by the software from each extract file. Several kinds of samples are drawn, although only random samples are used for evaluation of pass/fail status. The other samples are included for diagnostic purposes and should be investigated by the state and the results forwarded to DOL. However failure of a non-random sample does not require any corrective action by states. The sample frame for each sample consists of a set of specific sub-populations within a given extract file. Records included in a sample are displayed along with the data elements to be validated in a data entry screen. Investigators review each record, identify any elements found to be erroneous, and data-enter this information into the system. The software calculates an error rate for the entire sample. If the level of errors discovered through the investigation process is within established error tolerance levels, the state has passed. Summary reports of DEV validations are forwarded to DOL. State staff should save a copy of summary reports as well as a copy of the extract to satisfy audit requirements. States are also encouraged to save individual sample worksheets as documentation of the DEV process. NOTES:
• Validations must be performed for specific reports which have been provided to DOL by states. Thus, extract files must be prepared for time periods which match the time period covered by an actual report (e.g., the ETA 5159 Report for January 1 – 31). The Period Start Date and Period End Date variables on the Benefits Selection Criteria screen allow users to create and load extract data sets which do not conform to actual reporting time periods. This option is included for diagnostic purposes only. Time periods that do not match reporting time periods cannot be used to validate actual reports.
• DEV and DV validations, including summary validation of counts and dollar
amounts, should be performed using the same extract file.
- - 5

1.5 System Navigation The Sun-based DV software is a web-based application with certain characteristics that the user should be aware of, particularly with reference to the prior, PC-based application.
• Multiple users. The Sun-based application supports multiple, concurrent users. However, the software was not designed with features to allow, for example, update of a single table by multiple users.
• Execution Speed. The Sun-based software may take longer to execute a given
command than the PC-based application.
• Time Out. The system will exit the user if it does not observe any activity for thirty minutes. During the extract loading operation, the time-out parameter is set to four hours. This allows very large data sets to be loaded without interruption. The user should perform “save” operations frequently if there is a danger of work being lost due to operator inactivity.
• Exit from Screens. The user can exit from a secondary window within the
application through use of the “X” in the upper right corner of the window. Be aware that the “X” at the extreme upper corner of the screen will exit the user from the entire application. This will require the user to sign on again and may result in lost data.
• Use of the Back option. The internet browser has a Back button which allows the
user to return to a previous screen. Users should be aware that use of this button may result in unexpected results. For example, when executing a query from the Benefits Selection Criteria screen for a given population, exiting from the resulting screen, and then submitting the same query for a different population, the software may display the prior screen rather than generating a new one. This problem can be avoided by use of the “X” exit option instead.
• Next link. Screens that are unable to display all selected records at once because
there are too many to fit on the screen have a link labeled Next at the bottom of the screen. This takes the user to the next screen display.
• <Control End> and <Control Home>. <Control End> will take you immediately
to the bottom of any screen and <Control Home> to the top.
• Start and End Dates. The start and end dates required on the initial screen are needed only for the import function. Once a population is loaded, the user may choose any other function without supplying these dates.
- - 6

• Navigation within a Function. The user may move around within each part of the software through the use of sequential screens. This is explained in the relevant parts of the document.
• Print Function. Certain screens have a print button at the bottom of the screen.
The print function is particularly important when investigators are verifying DEV cases since using a print of sampled cases may be more realistic than attempting to investigate records and perform data entry at the same time. If print requests result in truncated screens, try resetting the print utility using the “landscape” option. In certain cases it may be necessary to save the file in Word or some other utility and print from there. System administrators should be able to assist if problems are encountered.
• Save and Save As Functions. Use of the Save button results in a data set being
saved internally in the DV application. Saved files for a given population are overwritten when a new extract file for that population is loaded. The Save As button allows the user to save data sets at a location outside the DV software. Data sets saved outside the application are not affected by loading new extract files. The Save As button can also be used to save summary reports, extract files, and DEV worksheets to satisfy audit requirements.
• Help functions. The application has Help links on certain screens. Clicking on
this option displays information relevant to the data displayed or processes controlled by this screen to assist users in the validation process.
• Links on the Benefits Selection Criteria Screen. Labels on the four data-entry
variables on the Benefit Selection Criteria screen (Population, Period Start Date, Period End Date, and Choose a function) serve as links to additional information. Clicking on Population also retrieves record layout information for the extract files specific to each population.
The remainder of this document provides explanations, and sequential steps state staff should follow when using the web-based DV software.
- - 7

2. Logging on 1. Select Data Validation from the State Menu.
2. Select Main Login.
Figure 2.1 - Login Screen
3. Enter the User Name Example: Ruth
4. Enter the Password Example: XNB
NOTE: -- User Name and Password are assigned by the state-level system administrator. -- The State Menu link at the bottom of the screen returns the user to the menu on the state Sun system which identifies applications resident in the computer.
5. Select Benefits.
6. Click on the Login button.
7. Figure 2.2 - Benefits Selection Criteria screen will be displayed.
- - 8

Figure 2.2 – Benefits Selection Criteria screen
8. Select a Population from the drop–down box. 9. Select a Period Start Date and Period End Date. This defines the time period covered by information in the extract file you wish to load.
NOTE: You can obtain the start and end dates from the calendar on the menu, or
enter them using the MM/DD/YYYY format.
- - 9
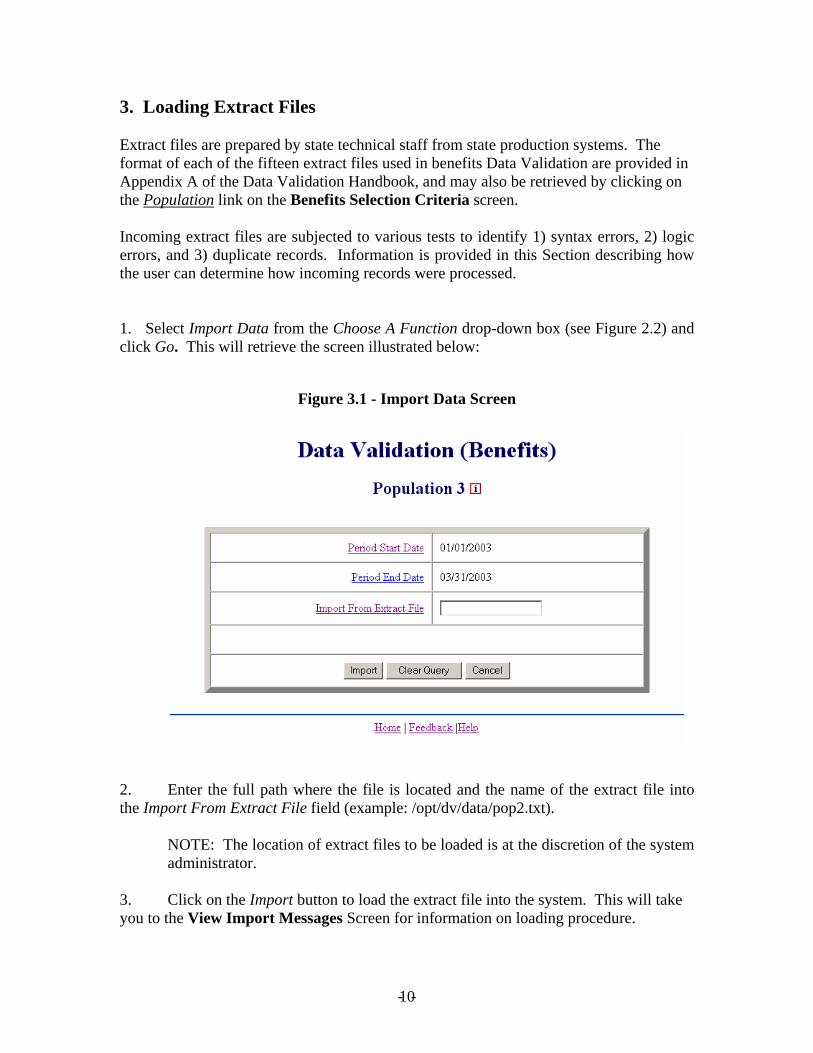
3. Loading Extract Files Extract files are prepared by state technical staff from state production systems. The format of each of the fifteen extract files used in benefits Data Validation are provided in Appendix A of the Data Validation Handbook, and may also be retrieved by clicking on the Population link on the Benefits Selection Criteria screen. Incoming extract files are subjected to various tests to identify 1) syntax errors, 2) logic errors, and 3) duplicate records. Information is provided in this Section describing how the user can determine how incoming records were processed.
1. Select Import Data from the Choose A Function drop-down box (see Figure 2.2) and click Go. This will retrieve the screen illustrated below:
Figure 3.1 - Import Data Screen
2. Enter the full path where the file is located and the name of the extract file into the Import From Extract File field (example: /opt/dv/data/pop2.txt).
NOTE: The location of extract files to be loaded is at the discretion of the system
administrator.
3. Click on the Import button to load the extract file into the system. This will take you to the View Import Messages Screen for information on loading procedure.
- - 10

NOTES:
• The software allows multiple populations to be resident in the application at the same time. Each population loading should be completed before loading an additional population. If the same population is loaded a second time, the new data set will over-write the former.
• Re-loading the same population will produce identical results with reference to
summary (RV) validation. However, each random sample drawn from an extract file generates a unique set of records.
• Load times vary depending on the number of records in the extract file. The time-
out parameter is set for four hours to allow ample time for loading large files. Most populations complete loading within a few minutes. Load times are affected by the size of the file, the population being loaded, and the number of error conditions encountered during loading.
• If you wish to cancel a load in progress, use the cancel button on the Import
Data screen. If you return to this function from elsewhere in the application, you must identify the population and provide start and end dates for the date range.
- - 11

3.1 Import Messages Information about the status of data sets which have been loaded to the system is available at various locations.
1. From the Benefits Selection Criteria screen select a population that has been
loaded or is in the process of loading. 2. Select View Import Messages from the Choose A Function drop-down box (See
Figure 2.2 Benefits Selection Criteria screen).
NOTE: During routine import processing, the View Import Messages screen is automatically displayed after initiating the import routine. This screen displays information including the time the load started, the time the load finished, the number of rows processed, and the number of records with errors detected during the loading routine.
Figure 3.3 – View Import Messages Screen
When the load is complete, you will get a count of the number of rows that loaded and also a count of the number of records with errors encountered in the load process. The number of rows processed provides a count of the number of records in the complete extract file.
3. When extract files are loaded, the software reads each record to ensure that all
fields are valid with reference to specifications provided in the Record Layout (Appendix A of the Benefits Data Validation Handbook, or click on the
- - 12

Population link on the Benefits Selection Criteria screen). Duplicate records and any records with invalid data or missing data in mandatory fields are loaded to an error table rather than to the Source Table. Records in the Source Table are used by the software for all subsequent functions.
NOTE: Messages displayed on the Import Messages Screen pertain to the import of
a specific population. These messages are available during the loading operation, but are not available after the file has been loaded and the operator has left this screen. Information about previous population loads is not available. Users have the option of printing this screen for future reference.
- - 13

3.2 Error Conditions in Incoming Files Three kinds of error conditions are detected during the import and loading process:
1. Syntax errors. This refers to records which are not formatted according to instructions in the population-specific Record Layouts. Alpha characters in the social security number field, or empty fields for a required variable, are examples of conditions which are identified as syntax errors.
2. Parsing errors. All records in an extract file must be assigned to a sub-
population. This parsing operation requires that information in fields within individual records be used to assign records to sub-populations. If sufficient information is missing, or if there are logic errors within the record, the record cannot be assigned to a sub-population and is loaded to the error table.
3. Duplicate records. Records which are found to be duplicate are not loaded to the
Source Table. The View Errors Screen allows the user to view the contents of records found to have syntax or logic errors (which prohibit parsing) during the loading operation. This screen is accessed by using the View Error option from the Benefits Selection Criteria Screen or the Show Errors link from the bottom of the View Source Table screen. Figure 3.4a - View Errors Screen
This figure illustrates the upper portion of the View Errors Screen. Individual data fields from each record classified as being in error are displayed.
- - 14

Figure 3.4b – View Errors Screen
The bottom portion of the View Errors screen is provided above. Note that the type of error which resulted in the record being rejected is provided in the right column, labeled “Error Message.” The count at the bottom of the screen provides the number of records in the error file for a given population.
- - 15

3.3 Duplicate Records The Duplicate Detection Report Screen provides an inventory of records found to be duplicates in the process of loading an extract file. This Screen is accessed by clicking on the Duplicate Detection Report field at the bottom of the View Errors Screen (see Figure 3.4, above). Figure 3.5 – Duplicate Detection Report
The right-most column of this report identifies the condition which resulted in individual records being identified as duplicate, e.g., “SSN and Issue ID.” There is a link at the bottom of this screen to All Errors. This displays a table containing all records identified as being erroneous in a given extract file (syntax, parsing and duplicate errors). 3.4 Source Table The Source Table displays all the records successfully loaded to the application for a given population, and the data elements in these records. It is accessed through the Benefits Selection Criteria screen utilizing the View Source Table option.
1. From the Benefits Selection Criteria screen select a population that has been loaded.
- - 16

2. Select View Source Table from the Choose A Function drop-down box (Figure 2.2 Benefits Selection Criteria screen).
3. Click on Go to view the data.
Figure 3.6a - View Source Table Screen
4. The software presents data in sets of 100, so you will have to scroll through
multiple screens to view populations of more than 100 records. Select the Next link at the bottom of the screen to view the subsequent set of records.
- - 17

Figure 3.6b - View Source Table Screen
The View Source Table screen indicates the number of errors detected when an extract file was loaded. In this example, the population has 27 errors with an error rate of 0.1%. For large extract files, the View Import Messages screen provides the quickest way to see the number of records that have been loaded.
The number of records loaded can also be seen quickly by clicking on the View Report Validation link at the bottom of screen. This report provides the number of records that were included in the validation count. The number of records included in the validation count plus the number of records found to be in error equals the number of records in the extract file. The Show Errors link on the screen allows the user to view the error records and associated error messages. If there were no errors the Show Errors link would be replaced with a No Errors message.
- - 18

4. Report Validation (RV) 4.1 Overview The report validation (RV) process consists of establishing the extent to which reported numbers match report counts reproduced through the data validation process. This comparison process is automated and does not require additional input from state staff once an extract file has been successfully loaded to the system. Comparisons are conducted at the report item level, but pass/fail scores are only calculated for groups of report elements. There is not a “total” score calculated for the complete population data set. The computer automatically retrieves reported numbers for conducting the comparison from report files resident in a database at the state level. The population being processed defines the report(s) used for comparison, and the Start Date and End Date provided by the user when the population is imported provide the time period needed to establish which reported numbers to retrieve for the comparison. Reports submitted to DOL for DEV and DV validation of a given population should be performed using the same extract file. Summary reports produced by the software provide the results of the RV comparison. These reports can be forwarded to DOL to document the results of the validation. 4.2 System Navigation
• The View Validation Counts screen is for informational purposes only and thus does not have a submit button at the bottom of the screen.
• The Sub Pop column on the View Validation Counts screen allows the user to
identify the number of records assigned by the software to various sub-populations within the population data set. The sub-population identifiers in the Sup Pop column are highlighted on the screen and serve as links to a second screen which displays the records which have been assigned to a given sup-population.
• The View Reported Counts and View Reported Dollars screens provide the
actual comparison of reported counts with validation counts. The reports provide the actual difference between the two numbers and the percent of error any observed differences represent. Groups of report items have cumulative scores computed and are assigned the value Pass or Fail based on these results. These screens serve as summary reports providing the results of RV validations. The state can forward these reports to DOL using the Submit button on the bottom of the screen at their discretion. Submissions are transferred to DOL through overnight batch processing.
- - 19

4.3 View Validation Counts 1. From the Benefits Selection Criteria screen select a population that has been
loaded.
2. Select View Validation Counts from the Choose A Function drop-down box. 3. Click on Go. It will bring up the Report Validation table:
Figure 4.1 – Report Validation Table Screen
4. This displays a summary data for each sub-population, and the total number of
records and dollar amounts, where applicable, for each subpopulation. There are four subpopulations in this population. To view the detailed records in each subpopulation, click on the Sub Pop number on the left. This will open another window displaying the detailed records for that particular sub-population (below).
(When you view sub-population information for Population 3a, note that the subpopulations have been revised with reference to the prior, PC-based version of the software.)
Prior Designation Current Designation 3a.49 3a.1 3a.50 3a.2 3a.51 3a.3 3a.52 3a.4 3a.53 3a.5 3a.54 3a.6
- - 20

4.4 View Sub-populations This screen is accessed by clicking on the numbers of the sub-populations displayed on the View Validation Counts Screen, above. The number of the sub-population being displayed is displayed at the top of the screen.
Figure 4.2 – Sub Populations Screen
Click on the “X” in the upper right hand corner of the screen to close the screen and return to the View Report Validation screen. Click on the Home link to return to the Benefits Selection Criteria screen.
- - 21

4.5 View Reported Counts This screen provides a summary report on the results of summary validation for a given population with reference to reported counts. Populations 1 – 3 and 3a and 5-11 include reported counts only. Populations 4 and 12 include reported dollars, as well as reported counts. Populations 13 and 14 include only reported dollars, and therefore this section does not apply to those populations.
1. From the Benefits Selection Criteria screen select a population that has been loaded.
2. Select Reported Counts from the Choose A Function options. 3. Click on Go to view the Report Counts table. 4. The Reported Counts screen will display the report cell, description, validation
counts, reported count, count difference, percent difference and whether groups of report items passed or failed.
Figure 4.3a - Reported Counts Screen
6. After completing the Report Validation for the reported counts, click on the
Submit to the National Office button. A warning message will appear “You are about to submit this report to the National Office, Continue?”
- - 22

Figure 4.3b - Reported Counts Screen: Submit
7. Click the OK button and the following screen will appear.
Figure 4.3c - Reported Counts Screen
The displayed message verifies that the report will be transferred to DOL through overnight batch processing.
- - 23

4.6 View Reported Dollars This screen provides summary results of Report Validation for populations that include reported dollar amounts. Populations 4 and 12 include reported dollars, as well as reported counts. Populations 13 and 14 include only reported dollars. Reported numbers which are compared with validation counts are retrieved from state databases in the manner described for the validation of counts (above).
1. From the Benefits Selection Criteria screen select a population that has been loaded.
2. Select Reported Dollars from the Choose A Function options. 3. Click on Go to view the Report Dollars screen. 4. The Reported Dollars screen will display the report cell, description, validation
dollars, reported dollars, difference, percent difference and whether groups of report items passed or failed. This screen is displayed as Figures 4.4 a & b below.
Figure 4.4a – View Reported Dollars Screen (Top)
- - 24

Figure 4.4b – View Reported Dollar Screen (Bottom)
5. After completing Report Validation of the reported dollars, click on the Submit to
the National Office button. A warning message will appear requiring the user to verify that submission is appropriate.
- - 25

4.7 Comments Comments may be attached to any data validation report being submitted to the National Office. The system provides for this by giving the users the capability to attach a separate “comments” record to reports being submitted by states. “Comments” should be forwarded by states to DOL in order to provide information state staff feels is important and relevant to the validation process. Comments records are associated with a given validation population. These records are attached to summary and quality validation reports for a specific population when being submitted to DOL, and are logically linked with the associated reports when the data is loaded to the national database. Comments records are created when the user selects the “View Comments” function from the main menu. Users should understand the following points when using the Comments function:
• The size of comments records is limited to 255 characters.
• Comments associated with a given population do not distinguish between summary validation reports and quality reports. If the comments are specific to either kind of report, this should be explained in the text.
• Prior comments for a given population are still resident in the system after they
have been submitted. The user should check the contents of the Comments record before submitting. If the information in the comments record is not appropriate for a given submission, the comments should be cleared or revised before submission.
• Comments should be prepared and saved prior to submission of reports. The
comments will accompany the report submission.
1. From the Benefits Selection Criteria screen select a population that has been loaded.
2. Select View comments from the Choose A Function options to view previous
comments or enter new comments for that population. 3. Click on Go to view the Comments table.
4. The first time you login, the comments window will be blank. You can enter your
comments for that particular population. 3. Select the Save button to save your comments in the database. Whenever you
return to this screen, the previously entered comments will be displayed. To enter a new comment, press the Clear Query button to remove the previous comments, and
- - 26

then type your new comments. Use the Save button at the bottom of the screen to save your new comments.
Figure 4.5 – Comments Screen
- - 27

5. Data Element Validation (DEV) 5.1 Overview Data element validation (DEV) consists of the investigation of samples drawn from extract files to verify that the information in the records is consistent with information elsewhere in the system, and that the correct information is included in the records. Although four types of samples are drawn, only random samples are used to assign pass/fail scores to the universe being sampled. Reports submitted to DOL for DEV and DV validation of a given population should be performed using the same extract file. Each population has a specific set of samples which are drawn by the software. Certain samples (e.g., missing) are drawn in response to the composition of random samples; the missing sample frame is sub-populations which are not included in the random sample. All samples use specific sub-populations as the sample frame. The four types of samples are:
1. Random Samples. Random samples are drawn from specific sub-populations within extract files. The size of random samples is either 30/110 or 60/200 (1st and 2nd tiers). The results of the investigation of random samples are used to assign pass/fail grades to samples as part of the DEV process. The second tier of the sample does not have to be investigated if the results of the investigation of the first tier are conclusive.
2. Minimum Samples. Minimum samples consist of selecting two cases from each
sub-population included in the sample frame. 3. Missing Samples. These samples consist of one case from sub-populations which
are not represented in a random sample data set.
4. Outlier Samples. Outlier samples select records with extreme values. Outlier samples select the largest and smallest values for the variable of interest in the data set.
DOL requests that all sample investigation results be forwarded to the National Office. All sample results provide the percent of error observed based on the results of the investigation. Random samples that indicate an error rate larger than 5% in the population from which they were drawn are said to have failed. The Pass/Fail status for completed samples is provided on the Data Element Validation Report screen (Figure 5.4). 5.2 System Navigation
- - 28

• The View Sample Validation screen provides access to both the sample worksheets (Sample Validation Screen) and the Data Element Validation Report.
• Data Element Validation Report screen is for informational purposes only. It
provides summary information on the results of sample investigations for a given population. It does not have a submit button, but does make allowances for the state to save and/or print the report.
• Users should be aware that loading the same population extract file twice should
not affect the results of RV validations. However, DEV validation is based on samples, and sampling procedures tend to produce different sets of records each time a sample is drawn. Thus it is important that the user “save” both the original sample and the results of sample investigations to prevent the loss of work if the user accidentally exits the system or loses sample data for any other reason (e.g., a system crash).
• Several buttons are provided on the Sample Validation screen. These are
explained below:
Save Button. This saves information displayed on the screen within the application. Samples and the complete or partial results of sample investigations should be saved in tables set up within the DV software. Save As Button. This allows the user to save data sets at any location accessible from the workstation. Summary results from the validation of populations and the extract file itself should be should be saved to satisfy audit requirements. Save and Submit button. This saves the data to tables, which are part of the application, and submits the report to DOL using conventions set up for transfer of reports through the Sun interface in overnight batch processing. Print Preview button. This allows the user to view an image of the document as it will be printed before submitting a print request. This is useful because the user may need to make adjustments before printing the sample investigation worksheets due to the format of the document. Print button. This sends an image of the displayed screen to a local printer. The print option allows the user to specify the number of records to be printed by providing start row and end row.
- - 29
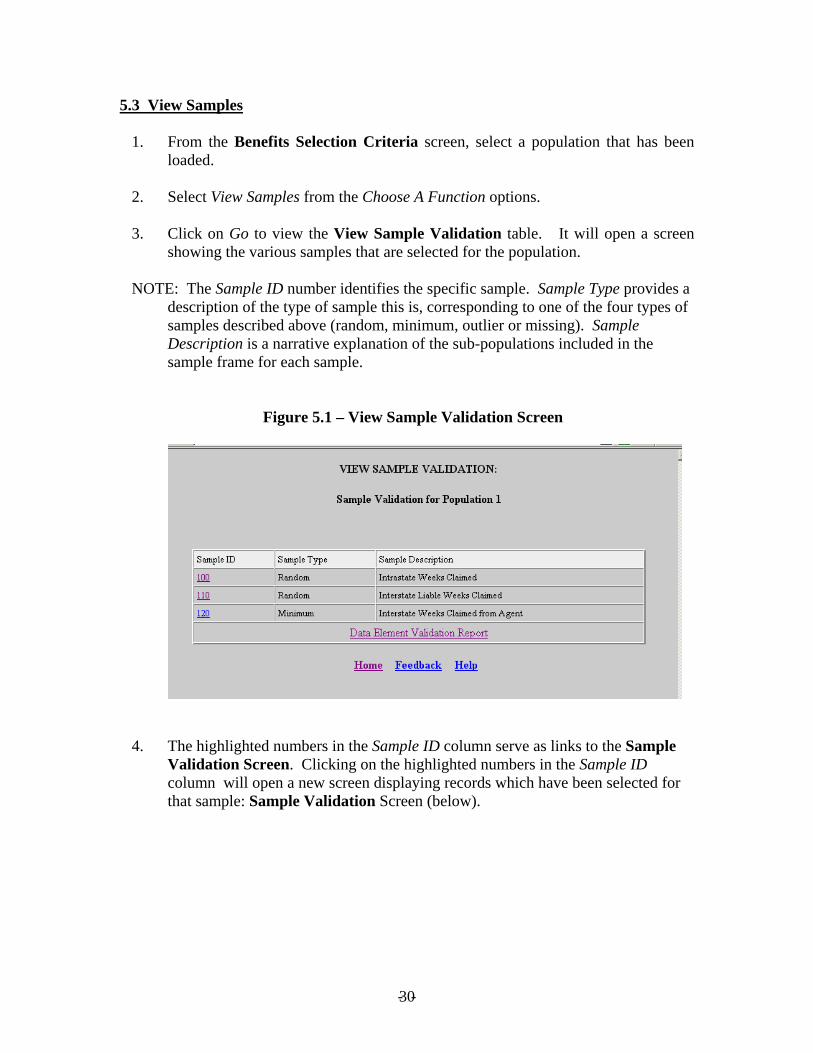
5.3 View Samples
1. From the Benefits Selection Criteria screen, select a population that has been loaded.
2. Select View Samples from the Choose A Function options. 3. Click on Go to view the View Sample Validation table. It will open a screen
showing the various samples that are selected for the population. NOTE: The Sample ID number identifies the specific sample. Sample Type provides a
description of the type of sample this is, corresponding to one of the four types of samples described above (random, minimum, outlier or missing). Sample Description is a narrative explanation of the sub-populations included in the sample frame for each sample.
Figure 5.1 – View Sample Validation Screen
4. The highlighted numbers in the Sample ID column serve as links to the Sample
Validation Screen. Clicking on the highlighted numbers in the Sample ID column will open a new screen displaying records which have been selected for that sample: Sample Validation Screen (below).
- - 30

Figure 5.2 – Sample Validation Screen
NOTE: The Sample Validation Screen displays records selected by the sample
routine which are to be investigated. The results of the investigation are data-entered into the system using this screen. Summary results of this investigation are displayed at the bottom of the screen. Summary results for the sample are transmitted to DOL when the user selects the Save and Submit to National Office option. Detail information from individual records is not transmitted to DOL. This means that sensitive information, such as SSNs, stays at the state level.
5. Click the Print Worksheets button to print the sample worksheets for the set of
individual records which constitute the sample. NOTE: Users are urged to print this screen as an aid in the investigation. Information gathered through the investigation and noted on the printed forms can be data-entered at one time, avoiding any time-out problems with the application 6. This screen facilitates sample investigations by providing a box next to each data
element in the sampled records for data entry, accompanied by a drop-down menu allowing the user to select “pass” or “fail” for each element. Each element is checked against the state database. The step numbers on the screen refer to the step in the validation handbook. Follow the rules for each step, as specified in Module 3 in the Data Validation Handbook, by checking all necessary screens and other documentation to determine whether each element is valid. Select “Pass” or “Fail” depending on whether the element in the record corresponds to the data in the database.
- - 31

NOTE: It is important to save both the sample and the results of investigations during the process to assure that data is not lost. Data can be saved in internal tables using the Save button.
7. The user has the option to select Pass Row or Check All, to set values for individual
records, or for the entire sample. Use of this option should be approached with caution since elements set to “fail” will default to “pass” if this option is used.
NOTE: For Random samples, the software initially displays only the first portion of
the sample (the first 30 cases of samples for 100, and the first 60 cases for samples of 200). This approach is used as a labor saving provision in instances when the results of the investigation are obvious after investigation of the first portion (tier) of the sample. When the initial investigation is conclusive (zero errors in either 30- or 60-case samples is a “pass;” 5 or more errors in a sample of 30, or 7 or more errors in a sample of 60, is a “fail”) the investigation does not have to proceed further. Be sure to “save” the results of the investigation of the first tier of the random sample before proceeding.
8. Sample investigations are complete when the records in the sample have results in
all the data entry boxes. Completed sample investigations can be transmitted to DOL through use of the Save and Submit button. Use of the Submit option for first-tier investigations of random samples will result in successful transmission only when the results of the first tier investigation are conclusive. In cases where the entire random sample must be investigated, the submission request will result in the user being instructed that the second tier of the sample must be investigated before submission.
NOTE: Sample validations cannot be submitted to DOL unless all the data-input boxes
for a given sample are completed. Attempts to submit a data set which is not complete will result in the display of a warning message indicating that the results are inconclusive.
- - 32

5.4 Data Element Validation Report Figure 5.3a – Data Element Validation Report Screen (Top)
Figure 5.3b – Data Element Validation Report (Bottom)
- - 33

The Data Element Validation Report Screen provides summary information about sample investigations which have been completed for a given population. NOTE: This report is for informational purposes only. It provides, for example, the number of cases in error and the derived percent of errors established through the sample investigation process. The report can be printed and/or saved outside the application, but there is no Submit button for export to DOL. 9. The Data Element Validation Report Screen is accessed through the link at the
bottom of the View Sample Validation Screen labeled Data Element Validation Report.
5.5 Comments Users may append comments to RV and DEV reports being submitted to DOL. Comments are population-specific. When the Submit option is used, the version of the comments file resident in the software for the population being submitted will be appended to the report and transmitted to DOL. Information provided about the Comments function in Section 4 applies here also.
- - 34