understanding adobe camera raw 3 · understanding adobe camera raw 3 whatever the reason, camera...
TRANSCRIPT
Technical paper
Understanding Adobe Camera Raw 3Adobe® Camera Raw 3 introduces important changes from Camera Raw 2. The primary focus of this document is to explain these changes, but it also discusses some nuances of features carried over from the Camera Raw 2 generation that are often misunderstood.
The role of Camera Raw 3Camera Raw 3 is more than just an Adobe Photoshop® plug-in. It’s shared by Adobe Bridge and Photoshop, and plays a vital role before you even start it. Camera Raw builds all the high-resolution thumbnails and previews you see in Bridge when you first point Bridge at a folder of images. Camera Raw can be hosted by Bridge, Photoshop, or both. Therefore, you can work on raw images in Camera Raw hosted by Bridge while Photoshop is doing batch processes, or work on raw images in Camera Raw hosted by Photoshop while Bridge is caching new folders. Before you use Camera Raw to edit raw images, make sure it’s set up as desired. Doing so will prevent unnecessary work down the line.
Camera Raw 3 installationCamera Raw is updated frequently, and you must install the updates manually. If you don’t install the updates in the correct location, Camera Raw may work in Bridge but not in Photoshop, or vice versa, or it may not work at all.
The correct location for Camera Raw in Microsoft® Windows® is /Program Files/Common Files/Adobe/Plug-ins/CS2/File Formats.
The correct location for Camera Raw in Mac OS® is /Library/Application Support/Adobe/Plug-ins/CS2/File Formats.
Camera Raw 3 defaults Camera Raw, as noted earlier, starts working every time Bridge encounters a new folder of raw images. It first builds thumbnails and then high-resolution previews. Camera Raw builds these previews using its default settings. This behavior gives rise to various common misunderstandings.
For example, users often want to see their raw images as shot—with no adjustments. In fact, there’s really no such thing as an as shot representation of a raw image—unless you want to see an almost-black grayscale file. For more information, read my articles at www.adobe.com/digitalimag/pdfs/linear_gamma.pdf and www.adobe.com/digitalimag/pdfs/understanding_digitalrawcapture.pdf.
A raw image is much more like a color negative than a transparency—it requires interpretation. Some shooters consider the very first thumbnail they see in Bridge as the as shot interpretation. In fact, it’s the JPEG thumbnail produced by the camera’s own raw conversion—the same image that’s displayed on the camera’s LCD—and it’s simply one of many possible interpretations of the raw image.
One characteristic of Camera Raw that some people find disturbing, at least initially, is that it shows you everything the camera has captured. Most proprietary raw converters apply a fairly steep contrast curve, and clip a good many shadow levels to hide noise. Camera Raw’s default settings have historically been seen as somewhat flat and unsatu-rated by comparison. The introduction of default auto settings may have been an attempt to adjust this perception.
TAble of ConTenTs
1 TheroleofCameraRaw3
1 CameraRaw3installation
1 CameraRaw3defaults
3 CameraRawpreferencesandsavingsettings
4 EditingimagesinCameraRaw
11 Theeditsequence
12 Filmstripmode
14 SavingfromCameraRaw
UnderstandingAdobeCameraRaw3 �
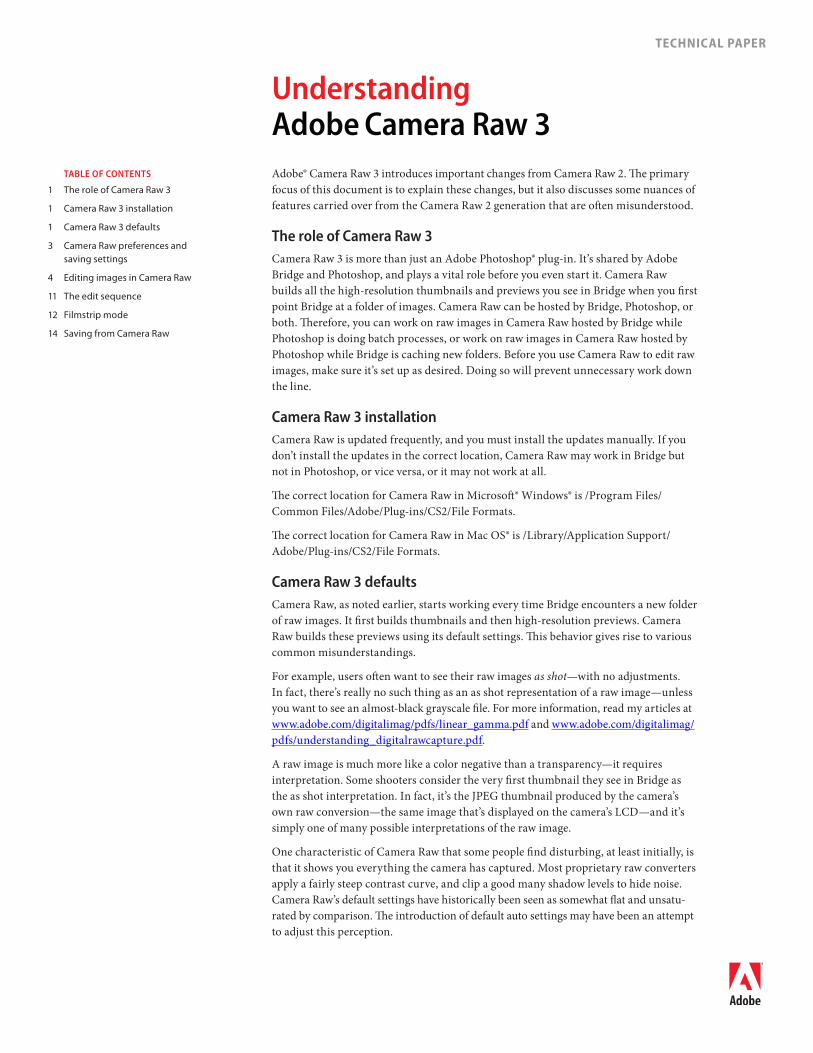
Whatever the reason, Camera Raw 3 performs an autocorrection on each image by default, a best-guess interpretation that may or may not be to your liking. If you’re happy with autocorrections applied as the default, you need do nothing. But if, like me, you need to see the effects of bracketing on your images, you can create a new Camera Raw default setting with Use Auto Adjustments turned off. Doing so is an easy two-step process.
Make sure that white balance is set to As Shot, then choose Use Auto Adjustments, or press Command+U (Mac OS) or Ctrl+U (Windows) to turn off auto adjustments (Figure 1).
Figure 1: Turn off Use Auto Adjustments if you want to create your own Camera Raw settings.
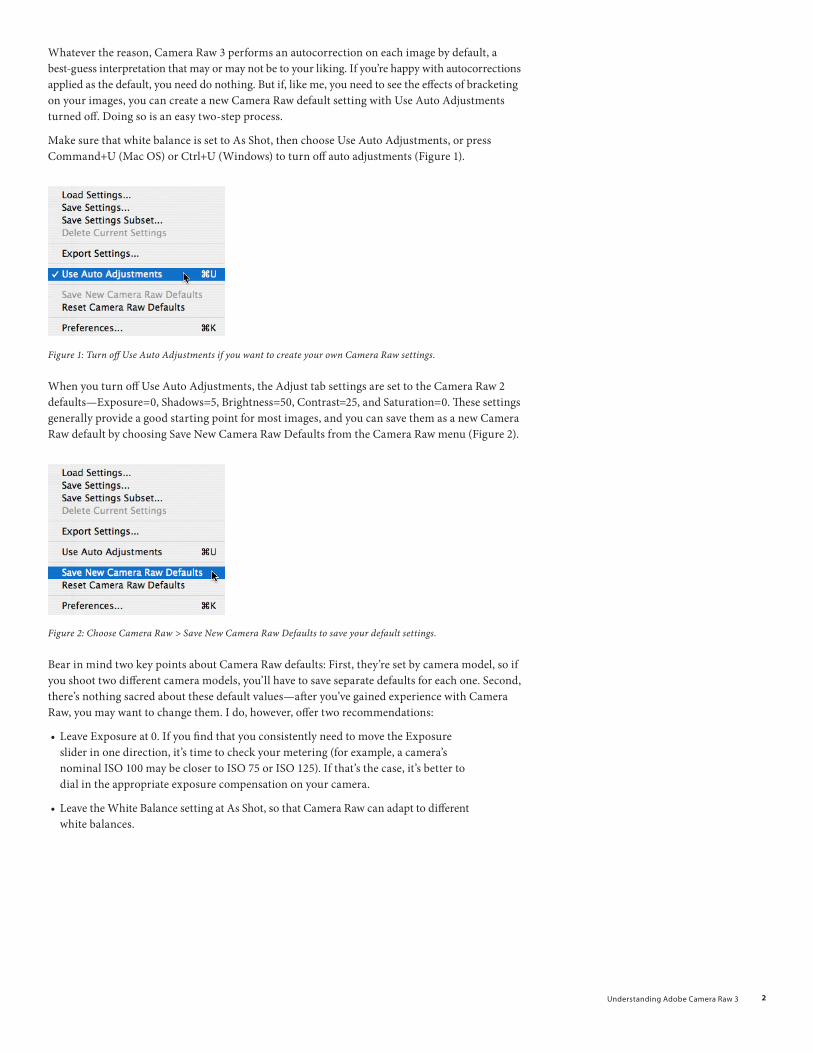
When you turn off Use Auto Adjustments, the Adjust tab settings are set to the Camera Raw 2 defaults—Exposure=0, Shadows=5, Brightness=50, Contrast=25, and Saturation=0. These settings generally provide a good starting point for most images, and you can save them as a new Camera Raw default by choosing Save New Camera Raw Defaults from the Camera Raw menu (Figure 2).
Figure 2: Choose Camera Raw > Save New Camera Raw Defaults to save your default settings.
Bear in mind two key points about Camera Raw defaults: First, they’re set by camera model, so if you shoot two different camera models, you’ll have to save separate defaults for each one. Second, there’s nothing sacred about these default values—after you’ve gained experience with Camera Raw, you may want to change them. I do, however, offer two recommendations:
Leave Exposure at 0. If you find that you consistently need to move the Exposure slider in one direction, it’s time to check your metering (for example, a camera’s nominal ISO 100 may be closer to ISO 75 or ISO 125). If that’s the case, it’s better to dial in the appropriate exposure compensation on your camera.
Leave the White Balance setting at As Shot, so that Camera Raw can adapt to different white balances.
•
•

UnderstandingAdobeCameraRaw3 �
Camera Raw preferences and saving settingsThe last important decision you need to make is where to save the edits you make to your raw images. Because the vast majority of proprietary raw formats (for example, Canon’s .CRW and CR2, Nikon’s NEF, and Olympus’ .ORF) are undocumented, Camera Raw treats them as read-only. That way, there’s no danger of Camera Raw overwriting something important in the raw file. Instead, it lets you save the edits you make in one of two places:
The Camera Raw database
Sidecar XMP files
Figure 3: Camera Raw Preferences dialog box
each approach has its pros and consWhen you save settings in the Camera Raw database, they’re indexed by image content rather than filename, so you can move and rename your raw files without losing the settings—but only on a single computer. If you burn the raw files to a CD or DVD, or move them to a different computer, the settings don’t travel with them. (You can export the settings to sidecar XMP files using Camera Raw’s Export Settings command on the Camera Raw menu, but it’s extra work that increases the likelihood of errors.)
When you save settings in a sidecar XMP file, a file with the same name as the image, but with an .xmp extension, is created in the same folder as the image. If you use Bridge to rename or move your files, the sidecar files automatically travel with the raw files, but if you use the Mac OS Finder or Windows Explorer, or a third-party application to move or rename your image files, you’ll have to manage the sidecar files manually.
There is a third alternative, which is to convert your raw files to Adobe DNG format. (A full discussion of the advantages and disadvantages of DNG is beyond the scope of this document.) A reasonable rule of thumb is that if you’re satisfied using Camera Raw for all your raw conversions, DNG offers the great convenience of storing the edits in the DNG file itself, and contains all the pixel data of the proprietary raw format. But if you want to bounce back and forth between Camera Raw and your proprietary raw converter, DNG probably isn’t useful, or at least, not yet. That said, the list of raw converters that support DNG is growing constantly, so check to see whether the converter you want to use supports DNG.
•
•
UnderstandingAdobeCameraRaw3 �
editing images in Camera RawAll the controls in Camera Raw are there for a reason. The basic philosophy is to let Camera Raw perform those operations that are best done on the raw image. If you just use Camera Raw at default settings to open images in Photoshop, then make all your adjustments there, you’re making extra work for yourself, and almost certainly not getting the best possible results. The fundamental difference between editing in Camera Raw and editing in Photoshop is that in the former, you’re editing the conversion from the raw to a rendered image, while in the latter you’re simply moving levels around in an already-rendered image. So learning your way around the controls in Camera Raw is key to exploiting the raw format.
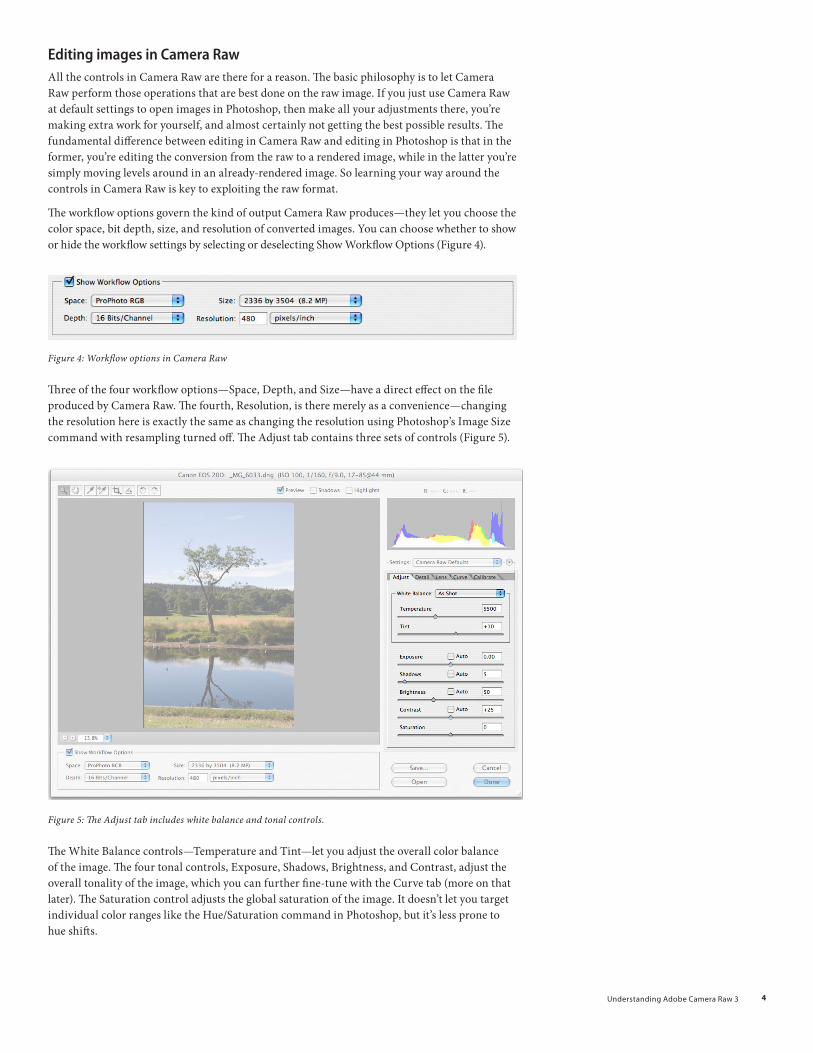
The workflow options govern the kind of output Camera Raw produces—they let you choose the color space, bit depth, size, and resolution of converted images. You can choose whether to show or hide the workflow settings by selecting or deselecting Show Workflow Options (Figure 4).
Figure 4: Workflow options in Camera Raw
Three of the four workflow options—Space, Depth, and Size—have a direct effect on the file produced by Camera Raw. The fourth, Resolution, is there merely as a convenience—changing the resolution here is exactly the same as changing the resolution using Photoshop’s Image Size command with resampling turned off. The Adjust tab contains three sets of controls (Figure 5).
Figure 5: The Adjust tab includes white balance and tonal controls.
The White Balance controls—Temperature and Tint—let you adjust the overall color balance of the image. The four tonal controls, Exposure, Shadows, Brightness, and Contrast, adjust the overall tonality of the image, which you can further fine-tune with the Curve tab (more on that later). The Saturation control adjusts the global saturation of the image. It doesn’t let you target individual color ranges like the Hue/Saturation command in Photoshop, but it’s less prone to hue shifts.
UnderstandingAdobeCameraRaw3 �
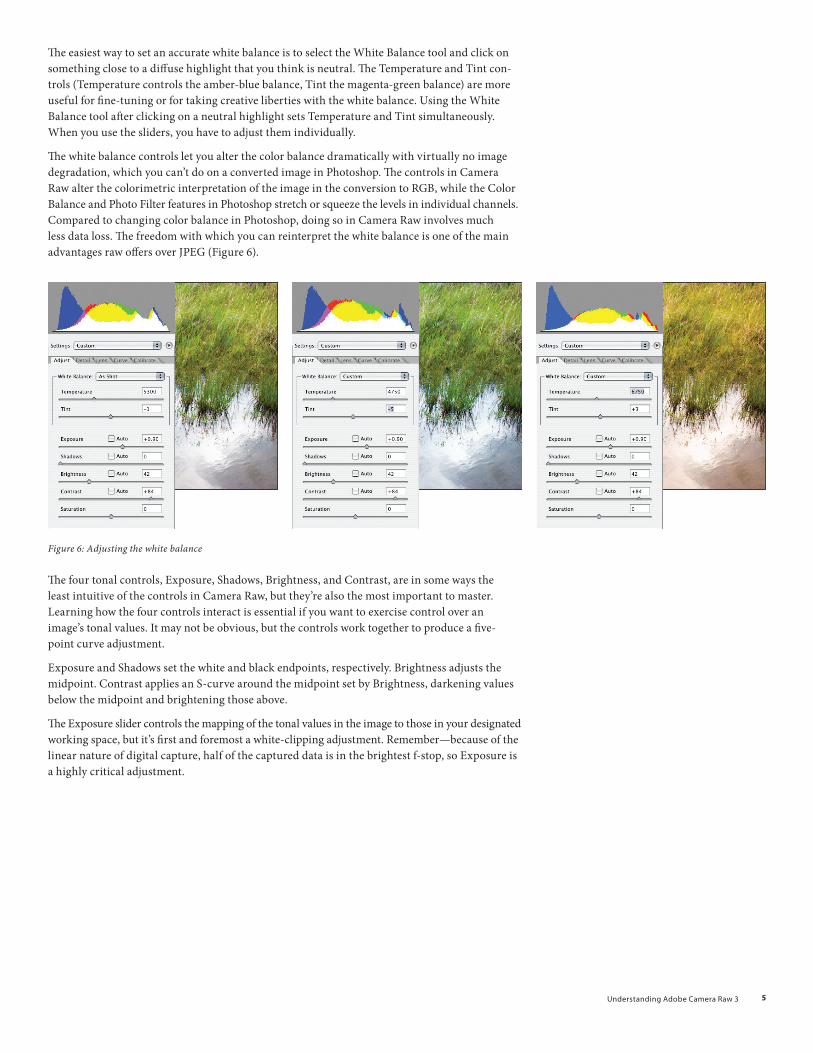
The easiest way to set an accurate white balance is to select the White Balance tool and click on something close to a diffuse highlight that you think is neutral. The Temperature and Tint con-trols (Temperature controls the amber-blue balance, Tint the magenta-green balance) are more useful for fine-tuning or for taking creative liberties with the white balance. Using the White Balance tool after clicking on a neutral highlight sets Temperature and Tint simultaneously. When you use the sliders, you have to adjust them individually.
The white balance controls let you alter the color balance dramatically with virtually no image degradation, which you can’t do on a converted image in Photoshop. The controls in Camera Raw alter the colorimetric interpretation of the image in the conversion to RGB, while the Color Balance and Photo Filter features in Photoshop stretch or squeeze the levels in individual channels. Compared to changing color balance in Photoshop, doing so in Camera Raw involves much less data loss. The freedom with which you can reinterpret the white balance is one of the main advantages raw offers over JPEG (Figure 6).
Figure 6: Adjusting the white balance
The four tonal controls, Exposure, Shadows, Brightness, and Contrast, are in some ways the least intuitive of the controls in Camera Raw, but they’re also the most important to master. Learning how the four controls interact is essential if you want to exercise control over an image’s tonal values. It may not be obvious, but the controls work together to produce a five-point curve adjustment.
Exposure and Shadows set the white and black endpoints, respectively. Brightness adjusts the midpoint. Contrast applies an S-curve around the midpoint set by Brightness, darkening values below the midpoint and brightening those above.
The Exposure slider controls the mapping of the tonal values in the image to those in your designated working space, but it’s first and foremost a white-clipping adjustment. Remember—because of the linear nature of digital capture, half of the captured data is in the brightest f-stop, so Exposure is a highly critical adjustment.
UnderstandingAdobeCameraRaw3 �
Large increases in exposure value (more than about 0.75 of a stop) increase shadow noise and may even make some posterization visible in the shadows, simply because large positive exposure values stretch the relatively few bits devoted to describing the shadows further up the tone scale. If you deliberately underexpose to hold highlight detail, your shadows won’t be as good as they could be. I certainly don’t advocate over-exposure—perfect exposure is always desirable—but slight overexposure is more often than not preferable to significant underexposure.
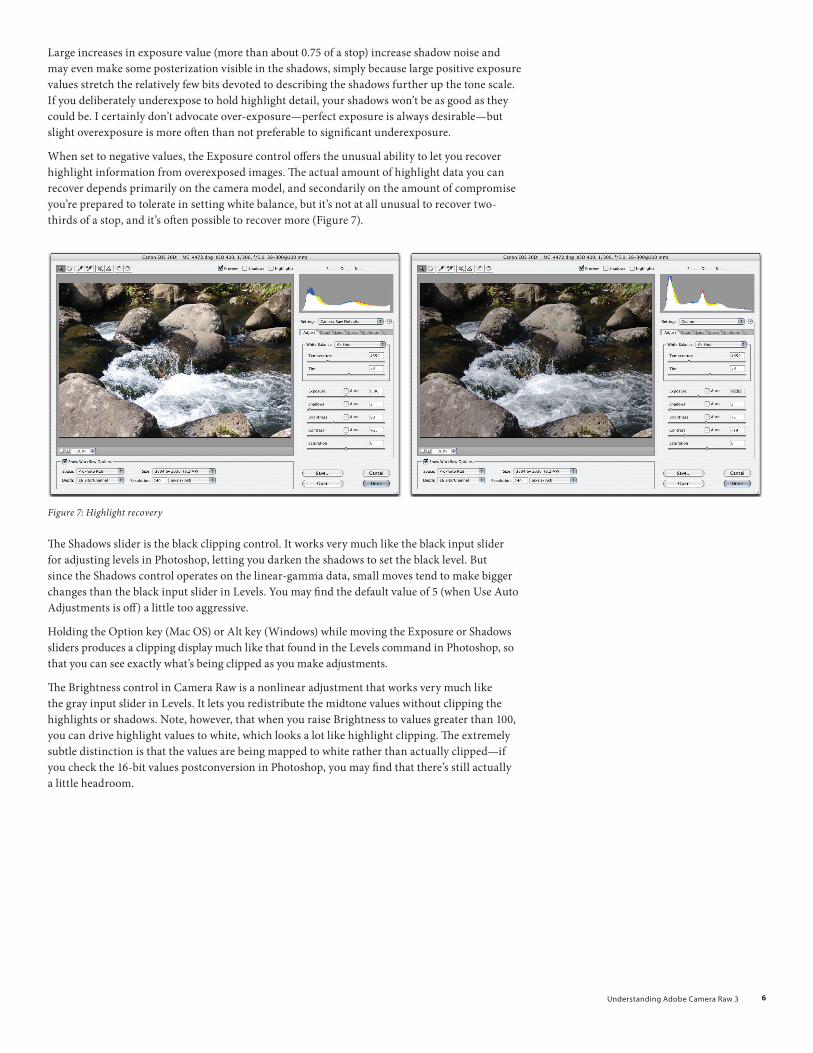
When set to negative values, the Exposure control offers the unusual ability to let you recover highlight information from overexposed images. The actual amount of highlight data you can recover depends primarily on the camera model, and secondarily on the amount of compromise you’re prepared to tolerate in setting white balance, but it’s not at all unusual to recover two-thirds of a stop, and it’s often possible to recover more (Figure 7).
Figure 7: Highlight recovery
The Shadows slider is the black clipping control. It works very much like the black input slider for adjusting levels in Photoshop, letting you darken the shadows to set the black level. But since the Shadows control operates on the linear-gamma data, small moves tend to make bigger changes than the black input slider in Levels. You may find the default value of 5 (when Use Auto Adjustments is off) a little too aggressive.
Holding the Option key (Mac OS) or Alt key (Windows) while moving the Exposure or Shadows sliders produces a clipping display much like that found in the Levels command in Photoshop, so that you can see exactly what’s being clipped as you make adjustments.
The Brightness control in Camera Raw is a nonlinear adjustment that works very much like the gray input slider in Levels. It lets you redistribute the midtone values without clipping the highlights or shadows. Note, however, that when you raise Brightness to values greater than 100, you can drive highlight values to white, which looks a lot like highlight clipping. The extremely subtle distinction is that the values are being mapped to white rather than actually clipped—if you check the 16-bit values postconversion in Photoshop, you may find that there’s still actually a little headroom.
UnderstandingAdobeCameraRaw3 �
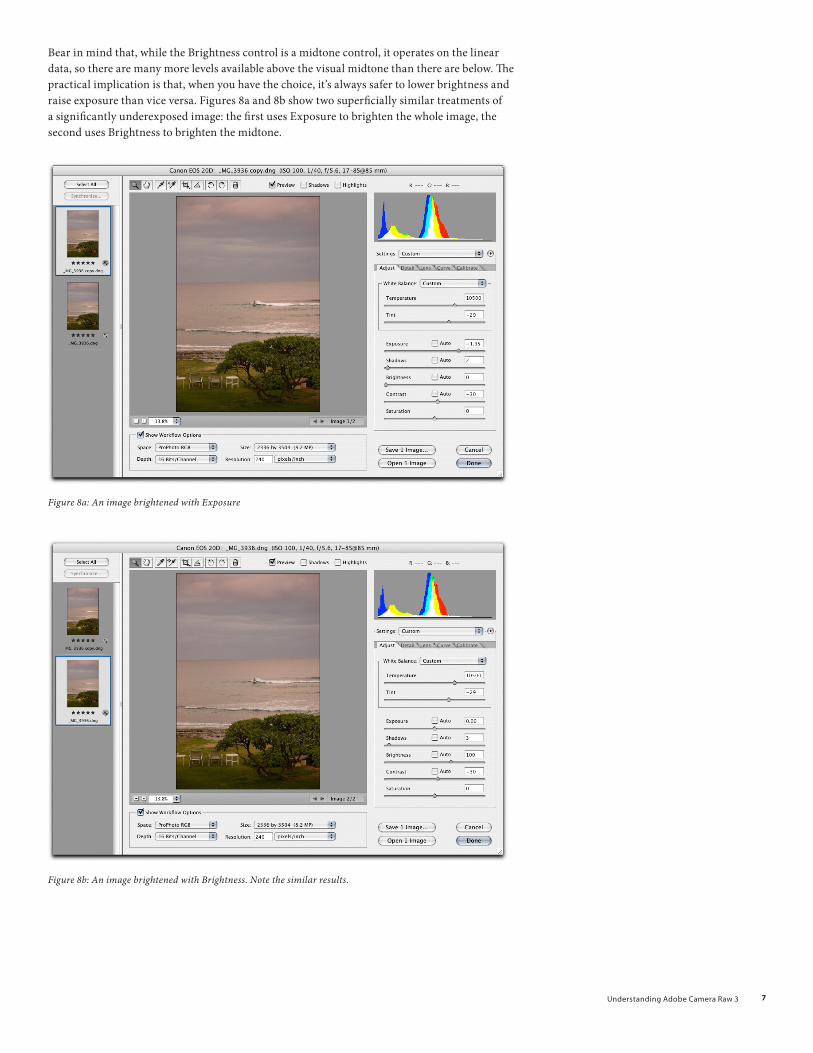
Bear in mind that, while the Brightness control is a midtone control, it operates on the linear data, so there are many more levels available above the visual midtone than there are below. The practical implication is that, when you have the choice, it’s always safer to lower brightness and raise exposure than vice versa. Figures 8a and 8b show two superficially similar treatments of a significantly underexposed image: the first uses Exposure to brighten the whole image, the second uses Brightness to brighten the midtone.
Figure 8a: An image brightened with Exposure
Figure 8b: An image brightened with Brightness. Note the similar results.
UnderstandingAdobeCameraRaw3 �
However, closer examination reveals that the version treated by increasing Brightness and leav-ing Exposure at 0 has much weaker highlight contrast than the version adjusted by increasing Exposure and reducing brightness. When we revisit this image in the Curve tab, the differences will become more obvious.
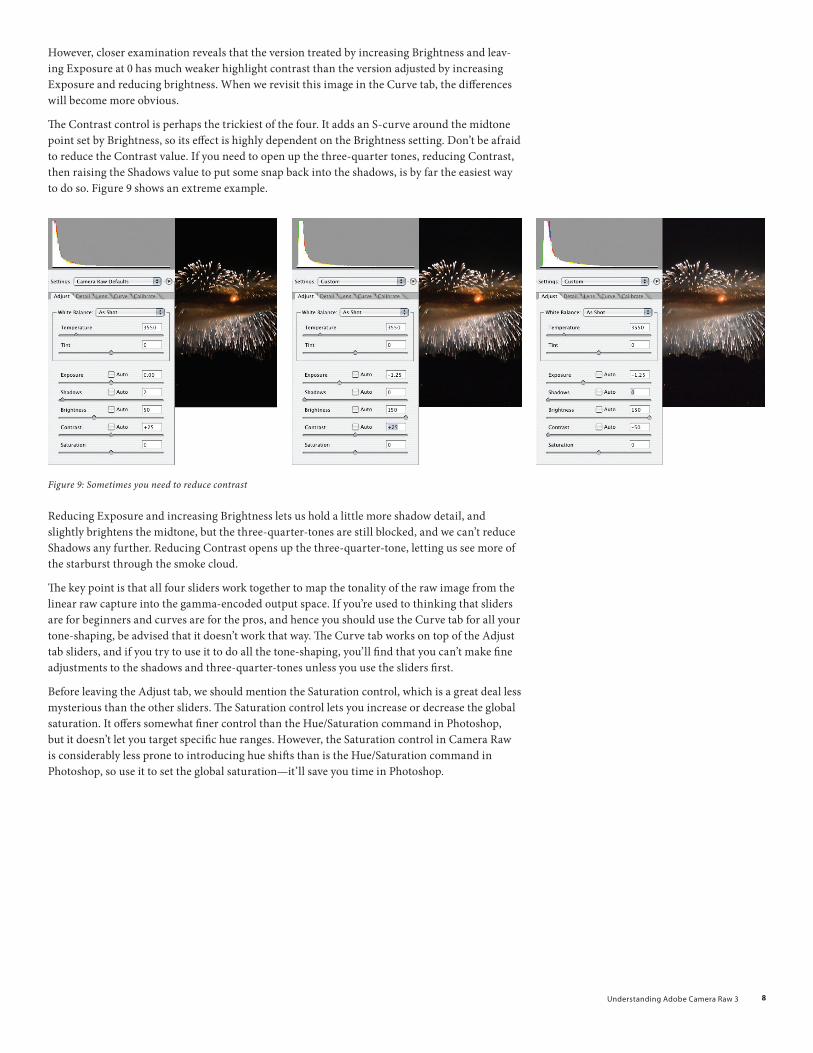
The Contrast control is perhaps the trickiest of the four. It adds an S-curve around the midtone point set by Brightness, so its effect is highly dependent on the Brightness setting. Don’t be afraid to reduce the Contrast value. If you need to open up the three-quarter tones, reducing Contrast, then raising the Shadows value to put some snap back into the shadows, is by far the easiest way to do so. Figure 9 shows an extreme example.
Figure 9: Sometimes you need to reduce contrast
Reducing Exposure and increasing Brightness lets us hold a little more shadow detail, and slightly brightens the midtone, but the three-quarter-tones are still blocked, and we can’t reduce Shadows any further. Reducing Contrast opens up the three-quarter-tone, letting us see more of the starburst through the smoke cloud.
The key point is that all four sliders work together to map the tonality of the raw image from the linear raw capture into the gamma-encoded output space. If you’re used to thinking that sliders are for beginners and curves are for the pros, and hence you should use the Curve tab for all your tone-shaping, be advised that it doesn’t work that way. The Curve tab works on top of the Adjust tab sliders, and if you try to use it to do all the tone-shaping, you’ll find that you can’t make fine adjustments to the shadows and three-quarter-tones unless you use the sliders first.
Before leaving the Adjust tab, we should mention the Saturation control, which is a great deal less mysterious than the other sliders. The Saturation control lets you increase or decrease the global saturation. It offers somewhat finer control than the Hue/Saturation command in Photoshop, but it doesn’t let you target specific hue ranges. However, the Saturation control in Camera Raw is considerably less prone to introducing hue shifts than is the Hue/Saturation command in Photoshop, so use it to set the global saturation—it’ll save you time in Photoshop.
UnderstandingAdobeCameraRaw3 �
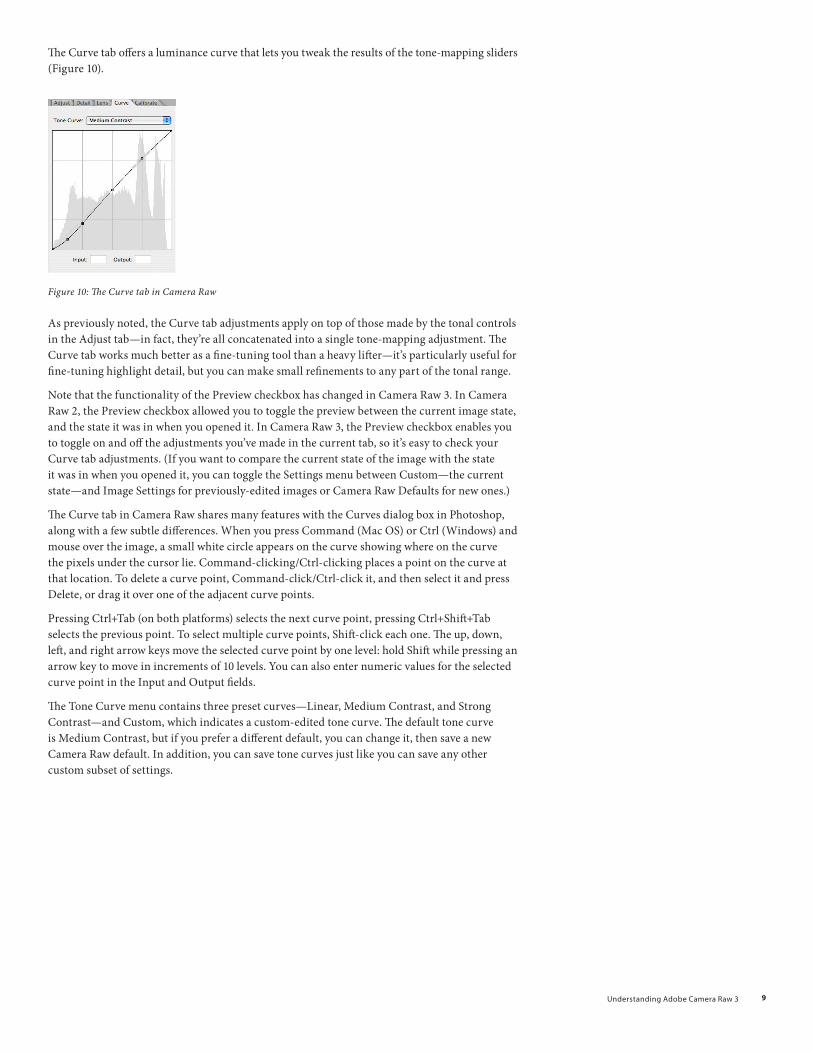
The Curve tab offers a luminance curve that lets you tweak the results of the tone-mapping sliders (Figure 10).
Figure 10: The Curve tab in Camera Raw
As previously noted, the Curve tab adjustments apply on top of those made by the tonal controls in the Adjust tab—in fact, they’re all concatenated into a single tone-mapping adjustment. The Curve tab works much better as a fine-tuning tool than a heavy lifter—it’s particularly useful for fine-tuning highlight detail, but you can make small refinements to any part of the tonal range.
Note that the functionality of the Preview checkbox has changed in Camera Raw 3. In Camera Raw 2, the Preview checkbox allowed you to toggle the preview between the current image state, and the state it was in when you opened it. In Camera Raw 3, the Preview checkbox enables you to toggle on and off the adjustments you’ve made in the current tab, so it’s easy to check your Curve tab adjustments. (If you want to compare the current state of the image with the state it was in when you opened it, you can toggle the Settings menu between Custom—the current state—and Image Settings for previously-edited images or Camera Raw Defaults for new ones.)
The Curve tab in Camera Raw shares many features with the Curves dialog box in Photoshop, along with a few subtle differences. When you press Command (Mac OS) or Ctrl (Windows) and mouse over the image, a small white circle appears on the curve showing where on the curve the pixels under the cursor lie. Command-clicking/Ctrl-clicking places a point on the curve at that location. To delete a curve point, Command-click/Ctrl-click it, and then select it and press Delete, or drag it over one of the adjacent curve points.
Pressing Ctrl+Tab (on both platforms) selects the next curve point, pressing Ctrl+Shift+Tab selects the previous point. To select multiple curve points, Shift-click each one. The up, down, left, and right arrow keys move the selected curve point by one level: hold Shift while pressing an arrow key to move in increments of 10 levels. You can also enter numeric values for the selected curve point in the Input and Output fields.
The Tone Curve menu contains three preset curves—Linear, Medium Contrast, and Strong Contrast—and Custom, which indicates a custom-edited tone curve. The default tone curve is Medium Contrast, but if you prefer a different default, you can change it, then save a new Camera Raw default. In addition, you can save tone curves just like you can save any other custom subset of settings.
UnderstandingAdobeCameraRaw3 10
To make saved tone curves appear automatically on the Tone Curve menu, save them in the User/Library/Application Support/Adobe/Camera Raw/Curves folder (Mac OS), or the Documents and Settings/User/Application Data/Adobe/Camera Raw/Curves folder (Windows)—this is a different folder from the one for all other Camera Raw settings and subsets, but if you save a subset containing only a tone curve, it is saved in this folder automatically. If you save tone curves anywhere else, you can load them using the Load Settings command in Camera Raw.
One key difference between Curves in Photoshop and the Curve tab in Camera Raw is that Curves in Photoshop work directly on gamma-corrected data, while the Curve tab controls in Camera Raw work on the linear data, but present a gamma 2.2-corrected user interface. (Otherwise, moving a curve point by the same increment would cause a much bigger visual change in the shadows than in the highlights.)
The Curves command in Photoshop adjusts pixel values directly, but the Curve tab controls in Camera Raw have to do a lot more work in mapping the edits you’ve specified in the gamma 2.2 interface of the tone curve onto the linear data (as modified by the sliders in the Adjust tab). Today’s computers simply don’t have enough horsepower to update the preview in real time, so the Curve tab in Camera Raw doesn’t preview in real time—there’s a noticeable lag. The most practical way to adjust the curve is to place points by Command-clicking /Ctrl-clicking, then use the arrow keys to make an adjustment, wait for the preview to update, and continue to fine-tune using the arrow keys.
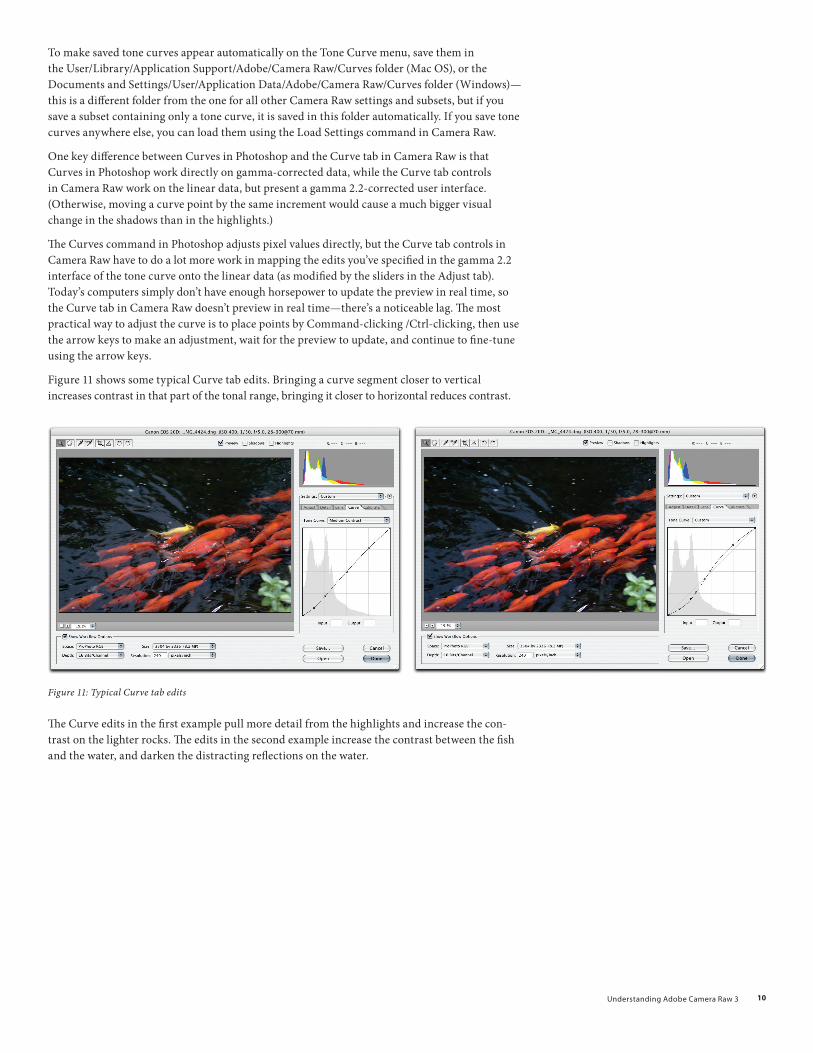
Figure 11 shows some typical Curve tab edits. Bringing a curve segment closer to vertical increases contrast in that part of the tonal range, bringing it closer to horizontal reduces contrast.
Figure 11: Typical Curve tab edits
The Curve edits in the first example pull more detail from the highlights and increase the con-trast on the lighter rocks. The edits in the second example increase the contrast between the fish and the water, and darken the distracting reflections on the water.
UnderstandingAdobeCameraRaw3 11
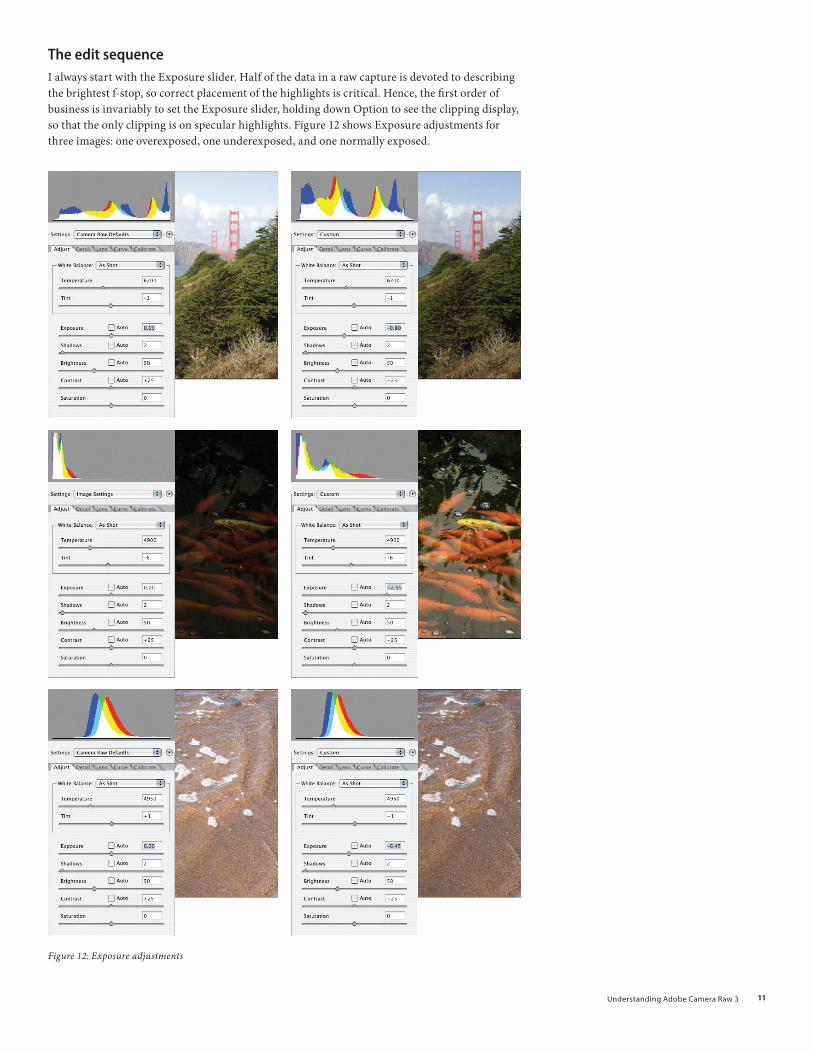
The edit sequenceI always start with the Exposure slider. Half of the data in a raw capture is devoted to describing the brightest f-stop, so correct placement of the highlights is critical. Hence, the first order of business is invariably to set the Exposure slider, holding down Option to see the clipping display, so that the only clipping is on specular highlights. Figure 12 shows Exposure adjustments for three images: one overexposed, one underexposed, and one normally exposed.
Figure 12: Exposure adjustments
UnderstandingAdobeCameraRaw3 1�
Note that the Exposure adjustment doesn’t necessarily make the image look better—the goal is to set the highlight point to make the best possible use of the captured bits.
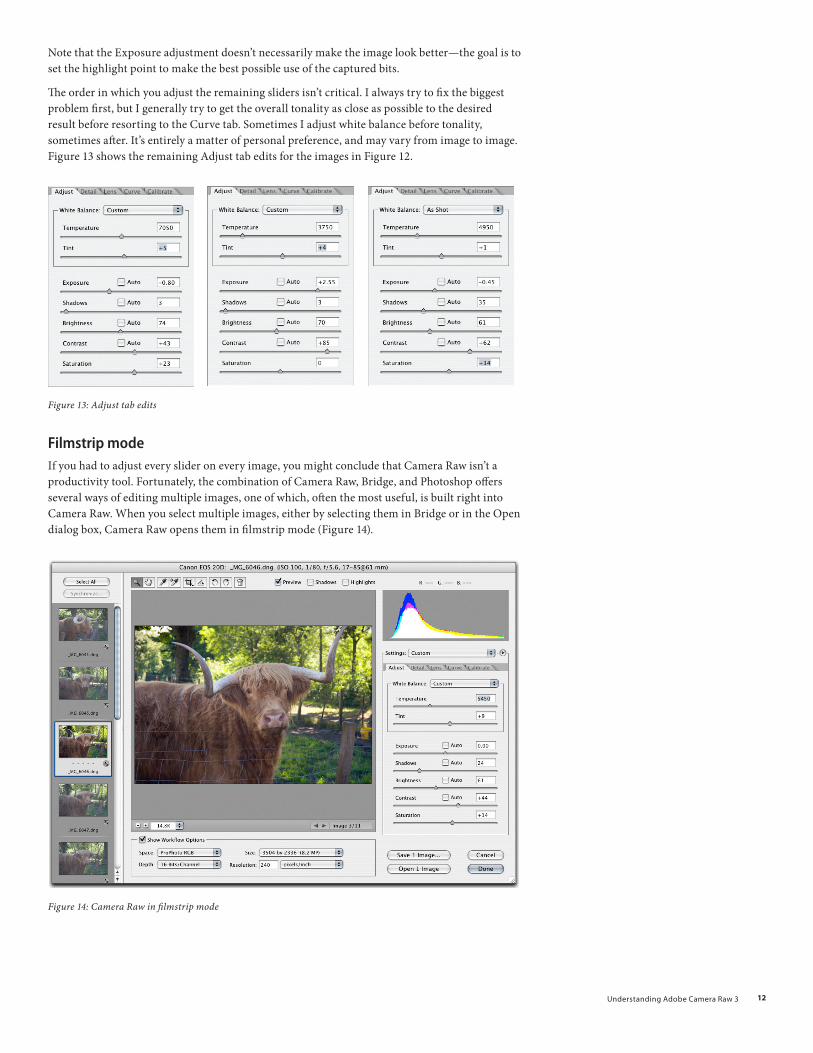
The order in which you adjust the remaining sliders isn’t critical. I always try to fix the biggest problem first, but I generally try to get the overall tonality as close as possible to the desired result before resorting to the Curve tab. Sometimes I adjust white balance before tonality, sometimes after. It’s entirely a matter of personal preference, and may vary from image to image. Figure 13 shows the remaining Adjust tab edits for the images in Figure 12.
Figure 13: Adjust tab edits
filmstrip modeIf you had to adjust every slider on every image, you might conclude that Camera Raw isn’t a productivity tool. Fortunately, the combination of Camera Raw, Bridge, and Photoshop offers several ways of editing multiple images, one of which, often the most useful, is built right into Camera Raw. When you select multiple images, either by selecting them in Bridge or in the Open dialog box, Camera Raw opens them in filmstrip mode (Figure 14).
Figure 14: Camera Raw in filmstrip mode
UnderstandingAdobeCameraRaw3 1�
In filmstrip mode, Camera Raw offers a great deal of flexibility in editing multiple images. You can select all the open images using the Select All button, and your edits will apply to all the selected images. You can also select contiguous ranges of images by Shift-clicking, or discontigu-ous ranges by Command-clicking/Ctrl-clicking. When the focus is on the filmstrip, you can navigate through the images using the up and down arrow keys, and select them all by pressing Command+A (Mac OS) or Ctrl+A (Windows).
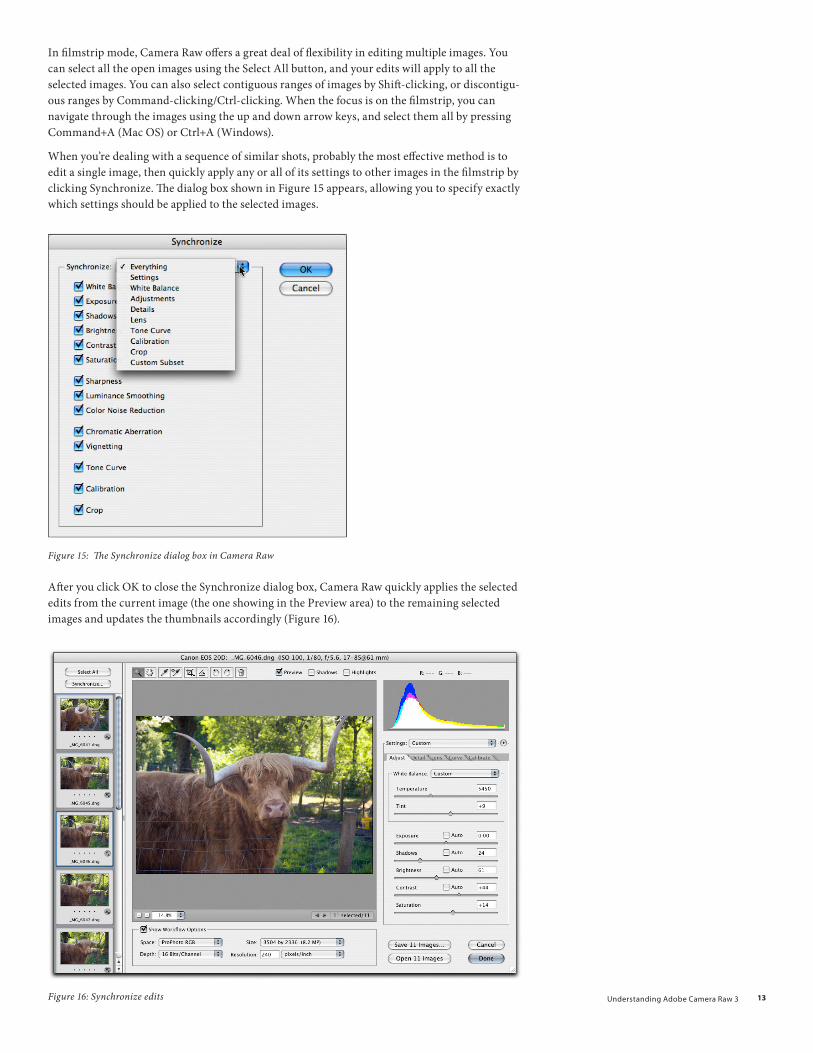
When you’re dealing with a sequence of similar shots, probably the most effective method is to edit a single image, then quickly apply any or all of its settings to other images in the filmstrip by clicking Synchronize. The dialog box shown in Figure 15 appears, allowing you to specify exactly which settings should be applied to the selected images.
Figure 15: The Synchronize dialog box in Camera Raw
After you click OK to close the Synchronize dialog box, Camera Raw quickly applies the selected edits from the current image (the one showing in the Preview area) to the remaining selected images and updates the thumbnails accordingly (Figure 16).
Figure 16: Synchronize edits
foR MoRe InfoRMATIon
ForacomprehensiveoverviewofCameraRaw,pleasevisitwww.adobe.com/products/photoshop/cameraraw.html.
ForacomprehensiveoverviewofPhotoshop,pleasevisitwww.adobe.com/products/photoshop/main.html.
Adobe Systems Incorporated345ParkAvenue,SanJose,CA95110-2704USAwww.adobe.com
Adobe,theAdobelogo,andPhotoshopareeitherregisteredtrademarksortrademarksofAdobeSystemsIncorporatedintheUnitedStatesand/orothercountries.MacandMacintosharetrademarksofAppleComputer,Inc.,registeredintheUnitedStatesandothercountries.MicrosoftandWindowsareeitherregisteredtrademarksortrademarksofMicrosoftCorporationintheUnitedStatesand/orothercountries.Allothertrademarksarethepropertyoftheirrespectiveowners.
©2006BruceFraser.Allrightsreserved.
AboUT The AUThoR
BruceFraseremigratedfromEdinburgh,ScotlandwhereheescapedthedrearyScottishclimesonlytodiscoverSanFrancisco’sequallychallengingweather.RumorhasitthiswastheinspirationofBruce’slifelongfascinationwithallthingsrelatingtocolor.Brucehasmadeastudyofhumanvisionandhowitrelatestoreproduciblecolorinpho-tographyandphotomechanicalreproduction.
In filmstrip mode, you can blitz your way through dozens or even hundreds of images, quickly applying general corrections and saving individualized treatment for those that need it.
saving from Camera RawCamera Raw 3 adds the useful ability to save images directly from the Camera Raw dialog box without first opening them in Photoshop. Note that to simply apply your edits to the raw image, you don’t need to click Save—the Done button writes your edits to the raw image metadata.
The function of the Save x Images button (where x is the number of selected images) is to create new image files. You can save images from Camera Raw as JPEG, TIFF, PSD, or as new DNG raw files with the original raw file’s metadata, including Camera Raw settings, embedded in the DNG file.
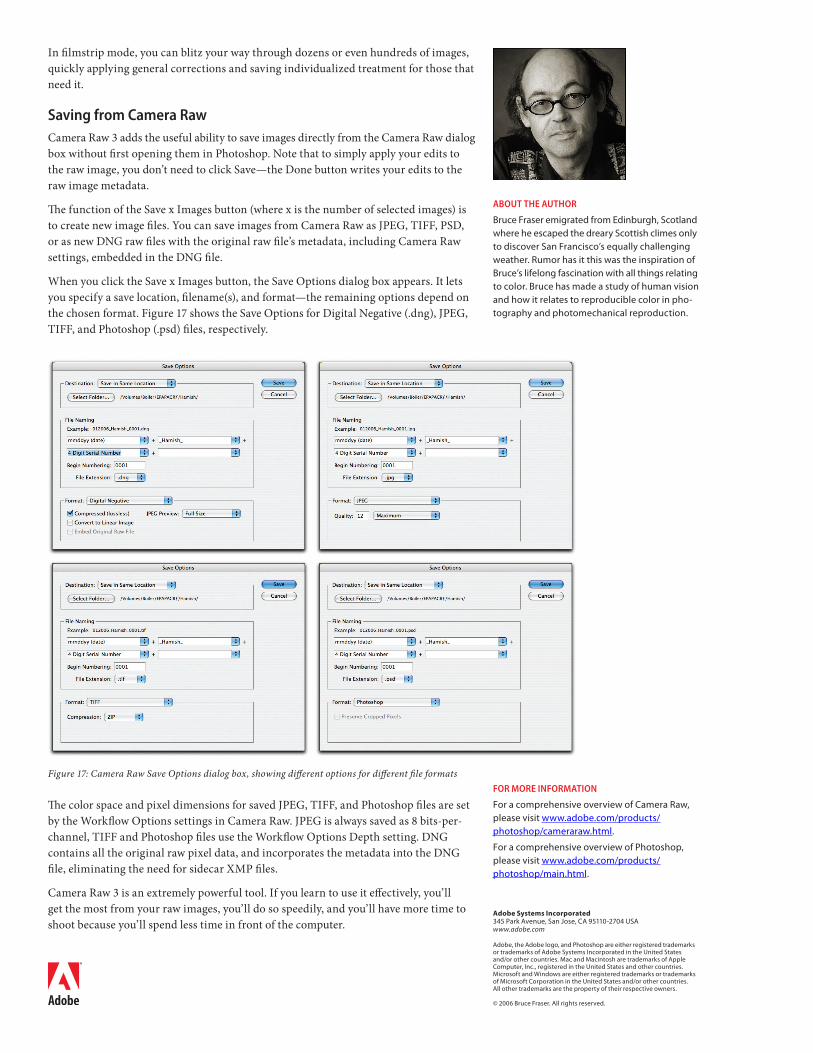
When you click the Save x Images button, the Save Options dialog box appears. It lets you specify a save location, filename(s), and format—the remaining options depend on the chosen format. Figure 17 shows the Save Options for Digital Negative (.dng), JPEG, TIFF, and Photoshop (.psd) files, respectively.
Figure 17: Camera Raw Save Options dialog box, showing different options for different file formats
The color space and pixel dimensions for saved JPEG, TIFF, and Photoshop files are set by the Workflow Options settings in Camera Raw. JPEG is always saved as 8 bits-per-channel, TIFF and Photoshop files use the Workflow Options Depth setting. DNG contains all the original raw pixel data, and incorporates the metadata into the DNG file, eliminating the need for sidecar XMP files.
Camera Raw 3 is an extremely powerful tool. If you learn to use it effectively, you’ll get the most from your raw images, you’ll do so speedily, and you’ll have more time to shoot because you’ll spend less time in front of the computer.