ultrasonic washer uw3000 - soniclean.com.au · so easy so fast so clean soniclean. contents table...
TRANSCRIPT

Ultrasonic Washer UW3000
Version 2.0
April 2009
SONICLEAN PTY LTDABN 89 057 730 917 ACN 057 730 91738 Anderson Street, Thebarton, South Australia, 5031Tel: 61 + 8 + 8234 8398 Fax: 61 + 8 + 8234 8391 www.soniclean.com.au – [email protected]
So Easy So Fast So Clean Soniclean

Contents
Table of Contents1. Overview............................................................................................6
2. Installation Procedure.......................................................................6
2.1. Set Up & Plumbing:..................................................................................6
2.2. Electrical:.................................................................................................6
2.3. Machine Reporting System: (MRS only)..................................................6
2.4 Printer (optional)......................................................................................7
2.5. Detergent Bottle:......................................................................................7
3. Installation Requirements.................................................................7
3.1. Environmental:.........................................................................................7
3.2. Plumbing:.................................................................................................7
3.3. Electrical:................................................................................................8
3.4. Machine Reporting System: (MRS models only):...................................8
3.5. Printer......................................................................................................8
3.6. Detergent Bottle:......................................................................................8
4. Operating Instructions......................................................................9
4.1. . How to Operate:.....................................................................................94.1.1. Start Process:............................................................................................................94.1.2. Confirm Parameters:.................................................................................................94.1.3. Load the Machine: ...................................................................................................94.1.4. Start Cleaning:........................................................................................................104.1.5 To Pause Cleaning:...................................................................................................104.1.6 To Stop Clean Cycle:...............................................................................................104.1.7 Completion of Single Clean Cycle:.........................................................................104.1.8 Automatic Drain and/or Shutdown:.......................................................................10
4.2 Rinse Function:......................................................................................11
4.3 De-gas Function:....................................................................................11
4.4 Drain the Tank:.......................................................................................11
4.5. Drain and Refill the Tank:......................................................................11
4.6. Manual Shut Down Procedure:..............................................................11
5. Foil Test...........................................................................................12
5.1 How to perform foil test:........................................................................12
5.2 Foil Test Problem Solving:.....................................................................12
ii

5.2.1 Machine may require further degassing...............................................................125.2.2 Detergent Type and Dilution..................................................................................125.2.3 Contact your service agent if you cannot achieve a satisfactory foil test.................12
6. Programmable Features..................................................................13
7. Keypad Description..........................................................................14
8. Program Mode.................................................................................15
8.1 Program Entry Points:.............................................................................158.1.1 Alternative 1 – Program at Start Up.......................................................................158.1.2 Alternative 2 - Program during Operation:............................................................15
8.2 Program Parameters:..............................................................................15
9. Display Messages.............................................................................17
10. Error Diagnosis..............................................................................18
10.1. Program Values Lost: (FAIL)................................................................18
10.2. Low Level in Tank: (LO)........................................................................18
10.3. Drain Blocked: (drnb)..........................................................................19
10.4. Overflow Detection: (OFLO).................................................................19
10.5. Ultrasonics Overheating: (HOT)..........................................................19
10.6. Real Time Clock: (rtc)..........................................................................19
10.7. Power up warning. (P-UP)....................................................................20
10.8. Water Leak. (H2OL)..............................................................................20
10.9. Setting default IP values. (IP-?)...........................................................20
APPENDICES........................................................................................21
SPECIFICATIONS..................................................................................21
Washer WARRANTY..............................................................................22
RECOMMENDED DISINFECTION PROTOCOL.....................................24
PS-3000 Ultrasonic Washer ACCESSORIES..........................................26
iii

1. Overview
The Ultrasonic Washer or “Washer” is designed to improve the quality and consistency of cleaning instruments using ultrasonics and clean water rinsing. It is intended that the instruments shall be gross cleaned prior to loading into the Washer, and be sterilised in the usual manner after ultrasonic cleaning.
2. Installation Procedure
2.1. Set Up & Plumbing:
Set up cabinetsi. Remove blanking panel (if fitted) from LHS bottom of rinse unit.ii. Position cabinets side by side with the wash tank (with control panel) on
the left hand side. Screw feet may be adjusted for level and hieght.iii. The gap between the cabinets should be sealed with a bead of silicon
sealant to prevent water running between the cabinets.iv. Remove the front panel from the rinse unit (RHS).v. Connect the silver braided hose to the bottom fitting on the wash unit. vi. Plug the small 2-way connector to the socket on the wash unit.
Inlet Mains Supplyi) Screw supplied braided hoses on to the machine and inlet mains water supply.ii) Hot connects to top inlet, cold to bottom inlet.iii)Hand tightened only.
Outlet Waste Supplyi) Screw and hand tighten supplied black sink hoses onto the machine and
insert into drain.ii) Ensure that the black sink hoses fall evenly away from the machine to
the drain
2.2. Electrical:i) Plug machine into mains supply.ii) Switch on when ready to operate.
2.3. Machine Reporting System: (MRS only)i) LAN connection; take the LAN provided cable and push the black plug
into the MRS socket provided on the Washer. Plug the other end (RJ45) into the LAN wall outlet.
ii) Contact your IT department and hand them the Machine Reporting Manual. The appropriate information for connecting the machine to the Local Area Network is found on page 10 “Network Hardware and Configuration” of the Machine Reporting System Manual.
UW-3000 Washer Operating Manual Page 4 of 24© Soniclean Pty Ltd Version 2.0 April 2009

iii) PC Connection: take the PC cable provided and push the black plug into the MRS socket provided on the Washer. Plug the other end (RJ45) into the appropriate outlet on the PC.
iv) Temperature Sensor: Push the ambient temperature sensor probe into the temperature sensor socket found on the right side of the machine.
2.4 Printer (optional)i)Plug the machine into mains supply and turn on at the switch.ii)Plug the printer cable into the machine and the printer.iii)Press the feed button to progress the paper.
2.5. Detergent Bottle:i) Open door on front of wash unit.ii) Place filtered end of detergent hose into container.iii) Place detergent bottle into compartmentiv) Ensure there is sufficient detergent in bottle at all times.v) Check level of detergent regularly.
Caution: (MRS units only)Only use designated cables for accessing data from the Washer. The cable marked ‘PC’ should be used with a laptop computer. The cable marked ‘LAN’ should be used for connection to a LAN wall outlet.
3. Installation Requirements
IMPORTANT NOTE:The customer shall ensure the following requirements are met prior to installation. This is essential for the machine to perform at optimum level and to fulfil Australian Standards.If the customer fails to provide this information, Soniclean will provide the information for a fee.
3.1. Environmental:i) Use hot and cold water .ii) A tap or inlet must be dedicated to the Washer.iii) Water Quality for cleaning as per AS/NZS 4187:2003 shall be used. Water
hardness will determine the type of detergent to be used. It will also determine the amount of detergent to be used in the cleaner.
3.2. Plumbing:i) Maximum water pressure 150 psi, minimum water pressure 30 psi.ii) Flow rate 10 litres/minute (minimum) to 20 litres/minute (maximum).iii) This is a High Hazard application and the inlet mains supply shall be fitted
with an approved Reduced Pressure Zone Device and a line filter. (Please check with your local Water Authority for the correct installation information for your area.)
UW-3000 Washer Operating Manual Page 5 of 24© Soniclean Pty Ltd Version 2.0 April 2009

iv) Mains inlet connection with ½” male BSP fitting within 600mm from the machine.
v) Do not use any aeration devices in the mains water supply.vi) Outlet pipe of 25mm diameter for waste water within 600mm from the machine.
3.3. Electrical:i) Wall power socket 240 VAC 50-60 Hz rated at 10 amps.ii) Wall power socket located within 600mm from the machine.iii) Power supply circuit shall not be shared with life threatening or life support
electrical systems.iv) Power supply circuit shall not be shared with computer electrical system or
other excessively large power devices, e.g. steriliser/washer disinfectors.v) Earth leakage protection shall be provided by user.
3.4. Machine Reporting System: (MRS models only):i) Local Area Network (LAN) outlet 1000mm from the machine.
3.5. Printer (MRS models only):i) Allow room on the right hand side of the machine for the printer unit.
3.6. Detergent Bottle:i) The detergent bottle is supplied with your machine.ii) The detergent bottle shall be positioned in the compartment in the front of the machine.iii) When bottle is empty replace with the same brand of detergent. It is important
the identical detergent is used, as this is critical to the total cleaning process. If other detergent is used the machine may require re-programming.
UW-3000 Washer Operating Manual Page 6 of 24© Soniclean Pty Ltd Version 2.0 April 2009

4. Operating Instructions
4.1. . How to Operate:
4.1.1. Start Process:i) Turn on at power point.ii) The machine will display 8.8.8.8, then SCx.xiii)The machine will automatically drain, flush, drain the flush, fill with water
and detergent and perform a de-gassing cycle.iv)When the degassing cycle is complete, the machine is ready for use.v)During the above cycle, the machine with display the following;
Display Function8.8.8.8 Internal programSCX.X Internal program processDrn Draining the water.Drnf Tank is flushing. (drain is open)Drn Tank is draining the flush
FILLTank is filling with water and
detergent is automatically added at the programmed quantity.
(0.5%)De-gas The solution is degassing. This
takes approximately 10 minutes.---- The machine is ready to be
loaded with instruments.
vii) It is recommended that you perform a foil test daily to check the performance of your Washer (Refer Section 5, Foil Test)
4.1.2. Confirm Parameters:To check or change the settings or parameters of your Washer:
i) Press the “SHIFT” key and “PROG” key together and hold for 3 seconds.ii) A beep will sound when command has been recognized.iii) The machine will display the “Clean Time” or “ct”iv) Scroll through the parameters using the “Enter” keysv) The parameters may be changed as required. (Refer Section 6, Program Mode Section)
4.1.3. Load the Machine:
i) Instruments may be loaded into tray with the tray located on a bench top.
ii) Gently lay the instruments on the bottom of the tray .iii) Lower the tray into the cleaning bath.
UW-3000 Washer Operating Manual Page 7 of 24© Soniclean Pty Ltd Version 2.0 April 2009

4.1.4. Start Cleaning:i) Close the lid and press “CLEAN”ii) The machine will perform a cleaning cycle according to its program.Iii) The following table explains the various parameters of the clean function, which are displayed during cleaning and are programmable to suit your requirements.
Cleaning Activity
Display Parameters set by manufacturer
(Settings)
Explanation
Clean No. C-01 10 Current Cleaning cycle number
Ultrasonics P-03 3 Displays power levelTime
Remaining03.48 5 minutes Time remaining to
complete current clean cycle shown in minutes
and seconds.
4.1.5 To Pause Cleaning:i) Lift the lid to pause the cleaning cycle.ii) This feature allows for any adjustments the instruments may require.
4.1.6 To Stop Clean Cycle:i) Press “CLEAN” again during cycle. This will stop cycle and clear current clean.ii) To start new cycle press “CLEAN” again.
4.1.7 Completion of Single Clean Cycle:i) The machine, will emit 5 beeps and display ‘- - - -‘.ii) Lift the lid.Iii) Raise the instrument tray and transfer to rinse tank.
4.1.8 Automatic Drain and/or Shutdown:The Washer can be programmed to automatically drain after a selected number of cleaning cycles.
i) Manufacturer’s programmed number of cleans between draining is ten.ii) When the tenth clean cycle is completed the machine will display
“END”.iii)The tank will automatically drain.iv) To refill the tank press 'shift' & 'refill' together for 3 seconds.v) Washer will be ready for reuse when '--.--' is displayed.
UW-3000 Washer Operating Manual Page 8 of 24© Soniclean Pty Ltd Version 2.0 April 2009

4.2 Rinse Function:i) To turn on, press the “RINSE” key. The red light indicator will light, indicating the irrigation function is “on”. The machine will rinse as programmed.
ii) To stop rinsing, press the RINSE key again, the red indicator light will extinguish, indicating the function is “off”.
iii)DO NOT open the lid when the rinse is operating.
4.3 De-gas Function:i) The machine will automatically de-gas as programmed when started.ii) If further de-gassing is required, press the “DEGAS” key.iii) The red indicator light will light, indicating the machine is de-gassing.iv) To stop de-gassing, press the “DEGAS” key again, the red indicator light
will extinguish, indicating the machine has stopped de-gassing.
4.4 Drain the Tank:i) Press the “SHIFT” key and “DRAIN” key together and hold for 3
seconds.ii) The machine will emit a beep.iii) Release the keys and the machine will drain. iv) When drain complete display will show “off”.
4.5. Drain and Refill the Tank:i) Press the “SHIFT” key and “REFILL” key together and hold for 3
seconds.ii) The machine will emit a beep.iii) Release the keys and the machine will drain and then refill with water and detergent and perform de-gas cycle.
4.6. Manual Shut Down Procedure:This enables the machine to be shut down at any time. It is recommended that this procedure be done at the end of each day.
Iii) Press “SHIFT” and “DRAIN” together, and hold for 3 seconds.ii) The machine will drain.iii) The machine will display “OFF”.iv) Turn off the power at the power point.v) Wipe down surfaces of machine with detergent or disinfectant.
UW-3000 Washer Operating Manual Page 9 of 24© Soniclean Pty Ltd Version 2.0 April 2009

5. Foil TestTip: Remove tray to ensure foil test is accurate
5.1 How to perform foil test:i) Complete the usual start process ii) Use a strip of ‘home’ brand aluminium foil about 150mm long x width of
roll.iii) Make sure Lid is closediv) Press TEST Key to switch on ultrasonic and unit will run for 30 sec as
programmedv) Open the Lid and insert the foil vertically into the bath.vi) Keep foil in the bath until LID is displayedvii) Remove the foil and compare the number and distribution of perforations with the sample foil test provided with your machine.
Refer Australian Standard AS/NZ 2773.1-1998, page 16 for more details.
NOTE: It is important to always use the same type of foil. It is suggested that a test is performed, on reciept of the machine, of such duration as to give a result similar to the sample provided. This will then become the foil test time for that type of foil.
5.2 Foil Test Problem Solving:If you are having difficulty getting a foil test to perform to standard, work through the following items, then try foil test again.
5.2.1 Machine may require further degassing.
5.2.2 Detergent Type and Dilution.i) Always use a pH neutral or slightly alkaline detergent (pH 8 to 10.8)
that is made specifically for ultrasonic machines.
ii) Extra detergent may be added to overcome water quality issues.
Tip: Check detergent bottle is full, check that same brand is being used, and check bottle and hose are connected and that there are no kinks in the line.
5.2.3 Contact your service agent if you cannot achieve a satisfactory foil test.
N.B. As per AS/NZ 2773.1-1998, it is acceptable to use alternative methods of testing the performance of your ultrasonic machine. Examples such as aluminium disc and pencil test, UPM probe must be used as per manufacturer’s instructions.
UW-3000 Washer Operating Manual Page 10 of 24© Soniclean Pty Ltd Version 2.0 April 2009

6. Programmable Features
When you receive your Soniclean Washer it will be set to function automatically. The parameters are set in the factory. The features described below may be altered as you require. The list includes the display you will see on the machine when you are programming.
Ct - length of cleaning times
PO - ultrasonic power levels
rt - length of rinse time
Cn - clean time. This determines the number of cleaning cycles your machine will perform before automatically draining. To refill, press SHIFT and hold down REFILL for three seconds.
FO - wash fill temperature
rO - rinse fill temperature
SP - detergent concentration
G1 - start up degassing time
tt - test time. Set time for foil test
To alter these parameters see 8, Program Mode.
UW-3000 Washer Operating Manual Page 11 of 24© Soniclean Pty Ltd Version 2.0 April 2009

7. Keypad Description
Name of key
Function
∆ Increases values in program mode.
Enter Confirms the parameters in program mode, and,Initialises the machine in operate mode.Decreases values in program mode.
Shift Second function key.Hold down, then press required key, i.e. drain, refill, reset, program.
Drain Drains the machine (takes approximately 4 mins).Hold down SHIFT key then press DRAIN key and hold for 3 seconds.Can be activated at any time.
Refill Drains the machine, then refills with fresh water.Hold down SHIFT key then press REFILL key and hold for 3 seconds.Can be activated at any time except during clean or de-gas cycles.
Reset Immediately aborts any current process that is operating.Hold down SHIFT and RESET keys together.
Rinse Activates rinse tankRed light indicates irrigation feature is operating.Press RINSE during rinse cycle to cancel.
Clean Ultrasonic cleaning and irrigation as programmed.Red light indicates clean cycle is operating.Press CLEAN during the clean cycle to cancel the current operation.
UW-3000 Washer Operating Manual Page 12 of 24© Soniclean Pty Ltd Version 2.0 April 2009

De-gas De-gassing removes air bubbles from the water prior to ultrasonic cleaning.Red light indicates de-gas is operating.Press DE-GAS during the degas cycle to cancel the current operation.
Prog Places the machine in program mode to allow alterations to the programmed settings.Hold down SHIFT key then press PROG key and hold for 3 seconds.
Test Operates the ultrasonic cleaning mode for 30 seconds for the foil test.
Clean Values
Cleaning times and power levels may be changed without performing the complete programming procedure.
8. Program Mode
The parameters can be altered by entering the program mode. There are 3 ways of entry to this mode.
8.1 Program Entry Points:
8.1.1 Alternative 1 – Program at Start Upi) Press the “PROG” key then turn on the machine.ii) Hold the “PROG” down until the machine displays “Ct.nn”.iii) Release the “PROG” key.
8.1.2 Alternative 2 - Program during Operation:i) When the machine will display “- - . - -“ii) Hold down the “SHIFT” key and then press the “PROG” key and hold for
3 seconds.
8. Alternative 2 - Program during Operation:i) When the machine will display “- - . - -“ii) Hold the “Program” key for 3 secondsiii)Ct, PO & rt parameters may be reset.iv) Values will be held until changed or until machine is restarted.
8.2 Program Parameters:To program the parameters, enter program mode as desired in 8.1, then:i) The machine will display a variety of parameters that may reconfigure.ii) Press the arrow “UP” key to increase the parameter and the arrow
“DOWN” key to decrease the parameter.i)To accept a value press “ENTER”. The display will scroll through to the next
parameter.ii)Refer the tables below for parameters and values.
UW-3000 Washer Operating Manual Page 13 of 24© Soniclean Pty Ltd Version 2.0 April 2009

KEY TO PROGRAMMING DISPLAYPARAMETER DISPLAY UNIT MIN MAX FACTORY
SETTINGSClean time Ct mins 1 99 5
Ultrasonics power level PO 1 6 3Rinse time rt mins 0.1 9.9 0.4
Clean number Cn 0 99 10Fill temperature FO 0 2 0
Rinse temperature rO 0 3 3Detergent concentration SP percentage 0.0 5.0 0.5Start up de-gassing time G1 mins 0 99 5
Test time tt sec 0 99 30
Ultrasonic Power LevelPARAMETER Power
1 low2 medium3 full4 full power 25% duty cycle5 full power 50% duty cycle6 full power 75% duty cycle
FILL TEMPERATUREThis parameter determines the temperature of the wash water; the table below
shows the temperature for each setting-PARAMETER TEMPERATURE
0 cold1 warm2 very warm
RINSE TEMPERATUREThis parameter determines the temperature of the wash water; the table below
shows the temperature for each setting-PARAMETER TEMPERATURE
0 cold1 warm2 very warm3 hot
UW-3000 Washer Operating Manual Page 14 of 24© Soniclean Pty Ltd Version 2.0 April 2009

9. Display Messages
These messages are displayed on the keyboard at various times. This table explains their meanings.
Display Explanation
- - - -Together with 5 beeps indicates that a process has been completed. (The operator does not need to wait for the beeps to complete before starting another process.)
04.58* Shows the time remaining of the function that is currently operating, i.e. clean or de-gas.
C-01* Indicates the current cleaning cycle number.P-03* Indicates power level selected, e.g. P-02, P-03, etc.dGAS Indicates the machine is de-gassing.drn Machine is draining.drnf Bottom of the wash tank is flushed with clean water,
and then drained.FILL The machine is filling the wash tank.OFF The machine has completed a drain or other operation
and needs to be turned off at power point.END End of final clean.Lid When the lid is in the open position, a flashing “Lid”
message is displayed, and all operations are paused. When the lid is lowered again the paused operations will recommence from the point of the pause.
tESt When the lid is open to maintain ultrasonic (foil/UPM) performance test
Error messagesDrnb This indicates sensors detect liquid when wash tank
supposed to be empty.FAIL Indicates that the operator programmed values have
been lost and will need to be re-programmed.HOT Indicates an excessive heat condition.LO Indicates a low level in the wash tank.
OFLO Indicates that liquid has been detected in an area of the machine that should always be dry.
rtc Indicates the Real Time Clock (RTC) date/time in the system is considered invalid. MRS function only
P-UP Indicates a clean process was interrupted and did not complete the full cycle. Press ENTER to continue.
H2OL Indicates a water leak in the system or circuit/wiring failure
IP-? Indicates the configuration of the machine is not known. MRS function only
N.B. * Displayed when cleaning
UW-3000 Washer Operating Manual Page 15 of 24© Soniclean Pty Ltd Version 2.0 April 2009

10. Error Diagnosis
10.1. Program Values Lost: (FAIL)This message indicates the operator programmed values have been lost and will need to be re-entered. This error occurs when the machine loads the programmed values stored in memory and an error is detected in the data. This error may be caused by:i) The memory device has not been programmed or programming has been erased.ii) An error in the memory device.iii) Electrical “noise” causing corruption of data.
Corrective Actioni)Press the “PROG” key to re-program the machine.ii)If the “FAIL” message is displayed again it may a faulty memory device.iii)Contact service agent.
When the following messages are detected, they are flashed on the display together with rapid intermittent beeps.Power to the machine must be removed when this occurs.
10.2. Low Level in Tank: (LO)i) This message may occur after a Fill Wash Tank Operation has completed
and a low level is detected in the wash tank (below minimum level).ii) This fault may be caused by a leaky drain valve or faulty minimum level
sensor.iii) This error will not be detected while the wash lid is up as the operator
may cause wave action in the wash tank causing a false indication.
Corrective Actioni)Turn off at power point.ii)Contact service agent.
UW-3000 Washer Operating Manual Page 16 of 24© Soniclean Pty Ltd Version 2.0 April 2009

10.3. Drain Blocked: (drnb)i) This message occurs if the top, minimum, or empty level sensors detect
liquid.ii) This may be caused by a blocked drain, or a faulty level sensor.iii) This may be caused by an incorrectly installed drain hose
Corrective Actioni) Turn off at power point.ii) Check for blocked drain.iii) Remove blockage if found.iv) Re-start machine.v) Check drain hose installationvi) If no blockage present contact service agent.
10.4. Overflow Detection: (OFLO)i) This message occurs when liquid is in danger of overflowing tank.ii) When this condition occur all power to the machine shall be shut
down.
Corrective Actioni) Drain valve not workingii) Contact a service agent.
10.5. Ultrasonics Overheating: (HOT)i) This message occurs when the ultrasonics board indicates an excessive
heat condition.
Corrective Actioni)Turn off the machine at power point.ii)Allow to cool for at least one hour.iii)Re-start machine.iv)If “HOT” display persists, contact a service agent.
10.6. Real Time Clock: (rtc)This message occurs if the Real Time Clock (rtc) date/time in the system is considered invalid. 1) This may be caused by the machine not being used for a long period of time.
Corrective Actioni) Replace the backup battery for the clock if dischargedii) Reset the date/time through the Web interface. (Read the Machine Reporting Manual, Page 7)ii) Contact a service agent.
UW-3000 Washer Operating Manual Page 17 of 24© Soniclean Pty Ltd Version 2.0 April 2009

10.7. Power up warning. (P-UP)This message occurs at boot up time if a clean process was interrupted and did not complete its cycle. This alerts the operator that instruments being cleaned in the machine may not be completely clean.i)Power Failure
Corrective Actioni)Press enter and continue with the clean cycle
10.8. Water Leak. (H2OL)Water may have entered the red control box or blue ultrasonic box or there may be a circuit/wiring failure
Corrective Actioni) Contact a service agent.
10.9. Setting default IP values. (IP-?)Only for MRS models and IT staff use.
Corrective Actionι)Contact the facilities IT department
ιι)Refer to the Machine Reporting Manual, Page 11iii) Contact a service agent
UW-3000 Washer Operating Manual Page 18 of 24© Soniclean Pty Ltd Version 2.0 April 2009

APPENDICES
SPECIFICATIONS
Soniclean UW-3000 Ultrasonic Washer
Model UW3000
Tank Size 600mm x 500mm x 200mm
Tank Capacity 60 litres
Ultrasonic Power 600W (typical)
Overall Size 760mm x 760mm x 1000mm
Weight 35kg (approx)
Benchtop Footprint 700mm deep x 760mm wide Overhead Clearance 1500mm
UW-3000 Washer Operating Manual Page 19 of 24© Soniclean Pty Ltd Version 2.0 April 2009

Washer WARRANTY
The warranty applies to Soniclean Irrigated Ultrasonic Cleaner (Washer) model UW-3000.
Your Washer is guaranteed for 12 months from date of purchase. We undertake to repair free of charge or exchange (at our discretion) any part found to be defective due to a manufacturing fault.
This warranty is not transferable and does not cover damage caused by the following:
-misuse, neglect, failure to observe operating instructions, failure to
keep the machine clean, accident, use of incorrect power supply, use of incorrect water supply and use of incorrect or non-approved cleaning chemicals.
This warranty does not cover the ultrasonic tank against:
-chemical and/or cavitations/ultrasonic erosion, damage to transducers caused by excess thermal or mechanical shock.
The purchaser agrees to undertake the cost and responsibility of transportation of the machine to and from the premises of the distributor, authorised service agent or manufacturer.
For the warranty conditions to apply, the Washer must be installed and commissioned by personnel approved by the manufacturer. Any faults or possible doubts arising concerning the effective operation of the machine must be reported to your supplier or manufacturer in writing within 3 working days.
This form, photocopy or facsimile must be returned within 1 month from date of commissioning the machine.
Purchased from
Model: Serial No:
Date of Purchase Date of Commissioning
Commissioned by (Signature)
Details: (plumbing licence, etc.)
Hospital staff in attendance (Signature)
UW-3000 Washer Operating Manual Page 20 of 24© Soniclean Pty Ltd Version 2.0 April 2009
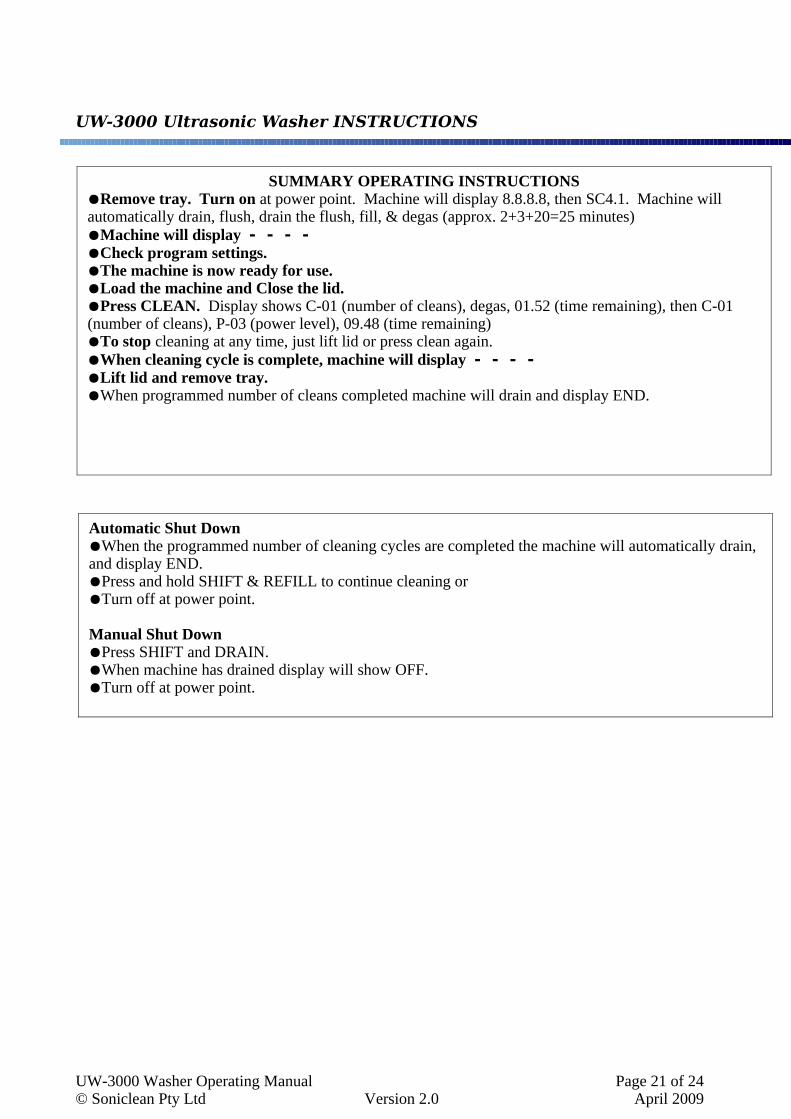
UW-3000 Ultrasonic Washer INSTRUCTIONS
UW-3000 Washer Operating Manual Page 21 of 24© Soniclean Pty Ltd Version 2.0 April 2009
SUMMARY OPERATING INSTRUCTIONS●Remove tray. Turn on at power point. Machine will display 8.8.8.8, then SC4.1. Machine will automatically drain, flush, drain the flush, fill, & degas (approx. 2+3+20=25 minutes)●Machine will display - - - -●Check program settings.●The machine is now ready for use.●Load the machine and Close the lid.●Press CLEAN. Display shows C-01 (number of cleans), degas, 01.52 (time remaining), then C-01 (number of cleans), P-03 (power level), 09.48 (time remaining)●To stop cleaning at any time, just lift lid or press clean again.●When cleaning cycle is complete, machine will display - - - -●Lift lid and remove tray.●When programmed number of cleans completed machine will drain and display END.
Automatic Shut Down●When the programmed number of cleaning cycles are completed the machine will automatically drain, and display END.●Press and hold SHIFT & REFILL to continue cleaning or●Turn off at power point.
Manual Shut Down●Press SHIFT and DRAIN.●When machine has drained display will show OFF.●Turn off at power point.

RECOMMENDED DISINFECTION PROTOCOLSONICLEAN UW-3000 IRRIGATED ULTRASONIC
CLEANER
It is Soniclean’s protocol to disinfect every Washer supplied for trial at the end of every trial and immediately prior to commencing the next trial. Soniclean or their distributors/agents will ensure this is undertaken unless the trial organisation prefers to conduct the disinfection themselves.
The protocol to be followed:
1.Drain Washer and turn off at power point.
2. Apply protective gloves (disposable non sterile latex gloves are suitable).
3.Remove tray; thoroughly wipe down all visible surfaces of the Washer including the lid, tank, all outside surfaces, hoses and attachments with disinfectant solution1.
4.Remove detergent bottle and replace with bottle containig slightly more than required amount of disinfectant1.2
5.Turn Washer on at power point whilst holding down the program key (this will allow you to re-program the parameters).
6.Change soap % parameter to required amount of disinfectant. Ensure irrigate function on.
7.Press “clean”. The Washer will now add appropriate amount of disinfectant to tank and in doing so will disinfect the internal plumbing fittings as well as Washer tank.
UW-3000 Washer Operating Manual Page 22 of 24© Soniclean Pty Ltd Version 2.0 April 2009
KEY TO PROGRAMMING DISPLAY
PARAMETER DISPLAY MACHINE MIN MAX FACTORYSETTINGS
Clean time Ct mins 1 99 10Ultrasonic power level PO 1 3 3Rinse time rt mins 0.1 9.9 0.4No. of cleans between drains Cn 0 99 10Fill temperature FO 0 2 0Rinse temperature rO 0 3 3Detergent concentration SP percentage 0.0 5.0 0.5Start up degassing time G1 mins 0=Off 99 5Test time tt sec 0=Off 99 30

8. Once clean is complete, disconnect disinfectant bottle and replace with bottle filled with clean water.
9.Press “shift” and “refill” keys, hold for three seconds. This will cause Washer to empty of water and disinfectant and then to fill with water. This will rinse disinfectant out of the unit.
10.Repeat steps 5 and reprogram soap parameter to factory setting (i.e. 1.2)
11.Dry all external surfaces and pack unit ready for transport.
___________________________________________________________________Notes:
1.Disinfectant solutions : The recommendation is to use a medical grade disinfectant, TGA approved, that is recommended for use in hospital settings for disinfecting horizontal and vertical working surfaces.
Soniclean currently uses a product called LCC, CSSD (supplied by Dominant Chemicals). For disinfecting the Washer it is recommended that you dilute LCC, 1:35. That is:
1.1To disinfect surfaces you will need to add 6mls of disinfectant to 200mls of water and then use this solution to wipe the surfaces with.
1.2To disinfect internal plumbing fittings, set the soap % parameter to 5. (This will ensure 1200mls of LCC is added to the 45itre tank).
________________________________________________________________________________
SONICLEAN PTY LTDABN 89 057 730 917 ACN 057 730 917
38 Anderson Street, Thebarton, South Australia 5031 AUSTRALIATel: 61 + 8 + 8234 8398 Fax: 61 + 8 + 8234 8391
UW-3000 Washer Operating Manual Page 23 of 24© Soniclean Pty Ltd Version 2.0 April 2009

UW-3000 Ultrasonic Washer ACCESSORIES
1. MANUAL
●1 x Operator’s Manual.
●1 x Sample Foil Test and Instructions in Clear Plastic Wallet.
2. FITTINGS
●Drain strainer (fitted in tank tank drain hole)
●2 x Inlet (Fill) Hoses.
●2 x Outlet (Drain) Hoses.
●1 x Detergent Connector Hose including ceramic weight and filter.
3. STANDARD ACCESSORIES
●1 x Tray .
●1 x Aluminum Foil.
4. DETERGENT
●1 x 5 liters Sonic 1.
●1 x MSDS for Detergent.
●1 x Detergent Information Sheet.
SONICLEAN PTY LTDABN 89 057 730 917 ACN 057 730 917
38 Anderson Street, Thebarton, South Australia 5031 AUSTRALIATel: 61 + 8 + 8234 8398 Fax: 61 + 8 + 8234 8391
UW-3000 Washer Operating Manual Page 24 of 24© Soniclean Pty Ltd Version 2.0 April 2009