ultranet how to guides
DESCRIPTION
Ultranet How to GuidesTRANSCRIPT

ULTRANET HOW TO GUIDES These “How to” guides show step by step processes to deploy Ultranet applications and common functionality. GETTING STARTED
Hide and Show Edit Controls Change the Theme Change Portlet Look and Feel Change Page Layout Change your Profile Start a new Space you own
The group of processes on the right apply to all spaces, pages and portlets.
Add Pages to a Space COLLABORATION
BLOGS Adding a Blog and Blog Post Posting images in a Blog Rating and Commenting on a Blog Scoping a Blog Set Permissions on a Blog MESSAGE BOARDS Add a Message Board Add A Thread Reply to/Comment on a Thread WIKIS Adding and Editing a Wiki Rename Page/Add Sub Pages Sub Pages used as a Wiki Display
Scoping a Wiki CONTENT MANAGEMENT
Adding to My Content IMAGES Add an Image Gallery Upload an External Image Add Uploaded Image to Folder Add a Slideshow PUBLICATIONS Add Publication Applications Creating a Publication Reference Library Asset Publisher
1
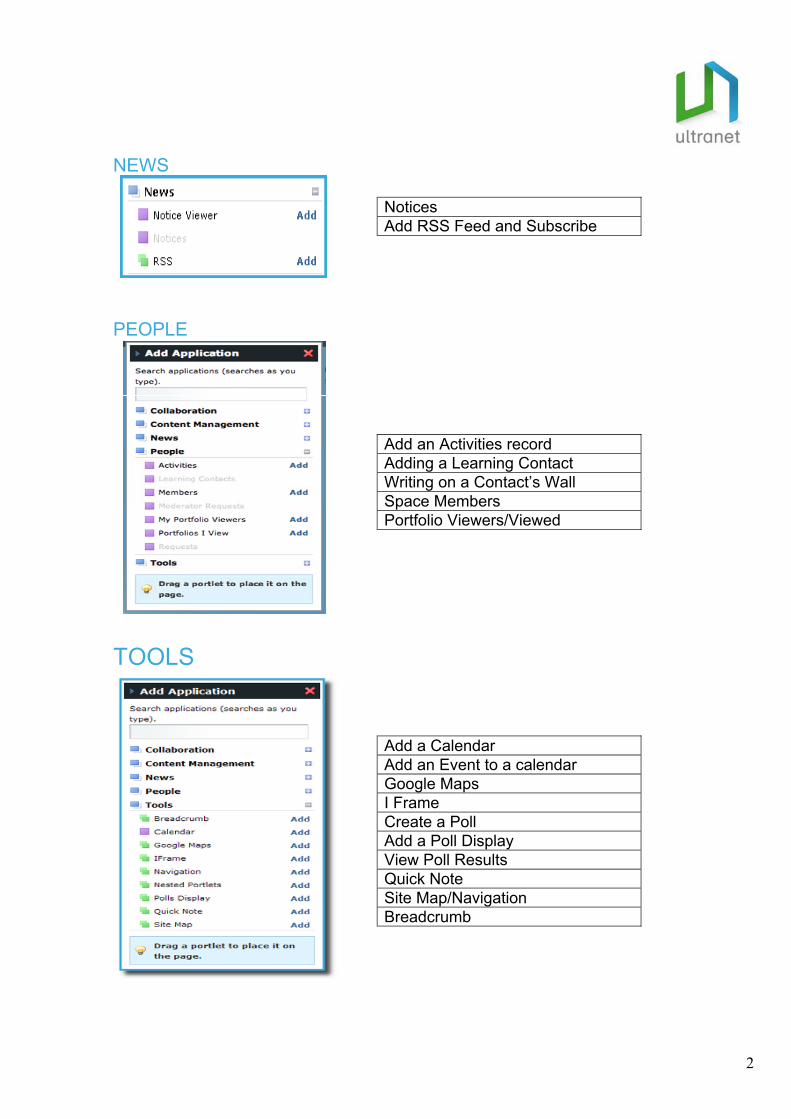
NEWS
Notices Add RSS Feed and Subscribe
PEOPLE
Add an Activities record Adding a Learning Contact Writing on a Contact’s Wall Space Members Portfolio Viewers/Viewed
TOOLS
Add a Calendar Add an Event to a calendar Google Maps I Frame Create a Poll Add a Poll Display View Poll Results Quick Note Site Map/Navigation Breadcrumb
2

On the Global Navigation hover over the Actions icon.
Then click the Edit Controls option.
You may want to hide or show the editing controls of a portlet. Here’s how you can do it.
You will notice that the Edit Controls have been removed
from the portlet.
Follow the process again to show the Edit Controls.
HIDE/SHOW EDIT CONTROLS
3

The following screen appears.
Select the theme you want by clicking on it.
To see the change click on Return to Full Page.
CHANGE THE THEME
From Global Navigation select Actions and click on
Manage Pages.
4

5

Select the layout you want by clicking on it.
To see the change click on Save.
CHANGE PAGE LAYOUT
The Layout selection screen appears.
From Global Navigation select Actions. Click
Change Layout.
6

Go to the eXpress Space and click on the tab called
Profile.
Click Edit.
Type in the text box provided, click Save.
Click Return to Full Page.
Your Profile is updated.
CHANGE YOUR PROFILE
7

STARTING A NEW SPACE YOU OWN
From the Global Navigation click on the Community, Design or Collaborative
Learning icons.
Click on Add the relevant space.
Give the space a clear Title and Description.
Determine whether it is Open, Restricted or Private.
Add tags, separated by a comma, choose a template
and Save.
The space will now appear in the list of My Spaces. To open the space click on the name.
TYPES OF ACCESSOpen spaces are listed for everyone to know about across the state (only teachers see design spaces) and join freely.Restricted spaces are listed for everyone to know about but people must make a request to the owner for co-ownership or membership.Private spaces are visible only to members who are assigned by the space owner.
NAMING SPACESIf you are making a space Open or Restricted it is important to use a title that indicates; who are the targeted participants and what is the purpose of the space. You may also include the name of the original owner. Likewise the description should be informative.
8
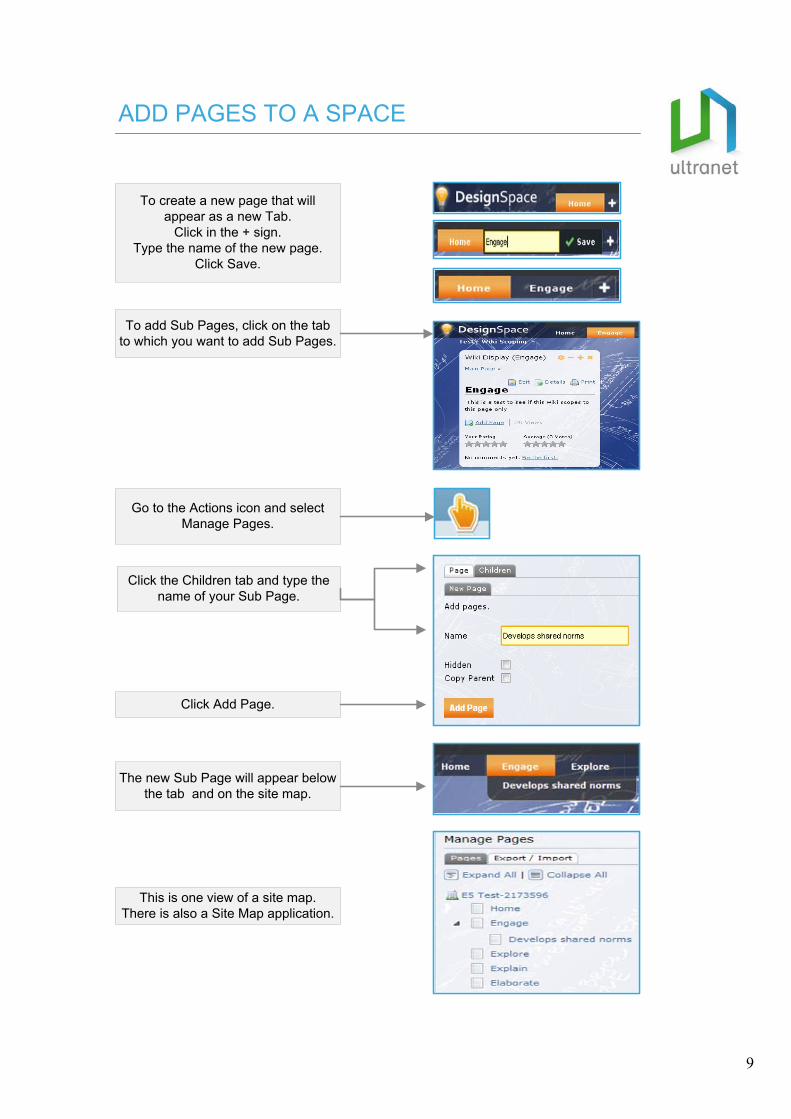
To add Sub Pages, click on the tab to which you want to add Sub Pages.
Go to the Actions icon and select Manage Pages.
Click the Children tab and type the name of your Sub Page.
Click Add Page.
The new Sub Page will appear below the tab and on the site map.
ADD PAGES TO A SPACE
This is one view of a site map.There is also a Site Map application.
To create a new page that will appear as a new Tab.
Click in the + sign. Type the name of the new page.
Click Save.
9

10

11

Click the Learning Contact who owns a Blog on which you wish to
comment. (Only teachers have Learning Contacts)
When you click on a Learning Contact you go to their eXpress space. Here you can view their
Blog.
Read the Blog, scroll down and you can give the Blog a rating out
of five by clicking on the stars.
Click comments to make a comment.
You may be the first to make a comment, so click the ‘Be the first’
to make a comment button.
Type your comment.
To post your comment, click reply.
Your comment has been posted.
You cannot leave a comment if you have not been given
permission.
RATING AND COMMENTING ON A BLOG
12

13

Click the Permissions tab.
Scroll down the list and check the boxes to
determine who has what permission.
Click the configure icon.
Click the word Configuration.
SET PERMISSIONS ON A BLOG
14

ADD A MESSAGE BOARD
From Global Navigation select Actions and click
Add Applications.
Search for Message then drag or click Add to place a
message board on your space.
Click the Add Category button.
Put a category name in the Name field.
Type in the Description field.
Click Save.
The category is added to the Message Board.
15

ADD A THREAD TO A MESSAGE BOARD
NOTE: A Thread cannot be added unless a Category
exists.
Click the relevant Category.
Click Post New Thread.
Type the Thread Subject.
Put the message in the body.
Click Save.
The Thread is now added in the Category.
16
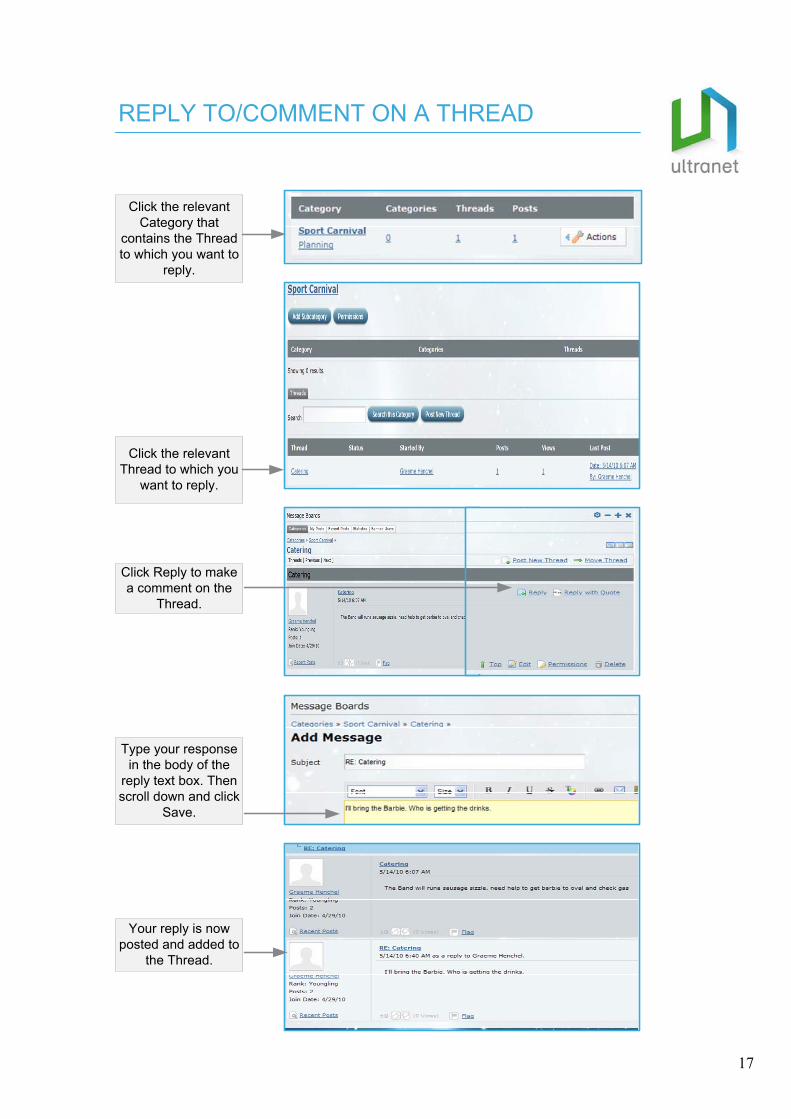
REPLY TO/COMMENT ON A THREAD
Click the relevant Category that
contains the Thread to which you want to
reply.
Click the relevant Thread to which you
want to reply.
Click Reply to make a comment on the
Thread.
Type your response in the body of the
reply text box. Then scroll down and click
Save.
Your reply is now posted and added to
the Thread.
17
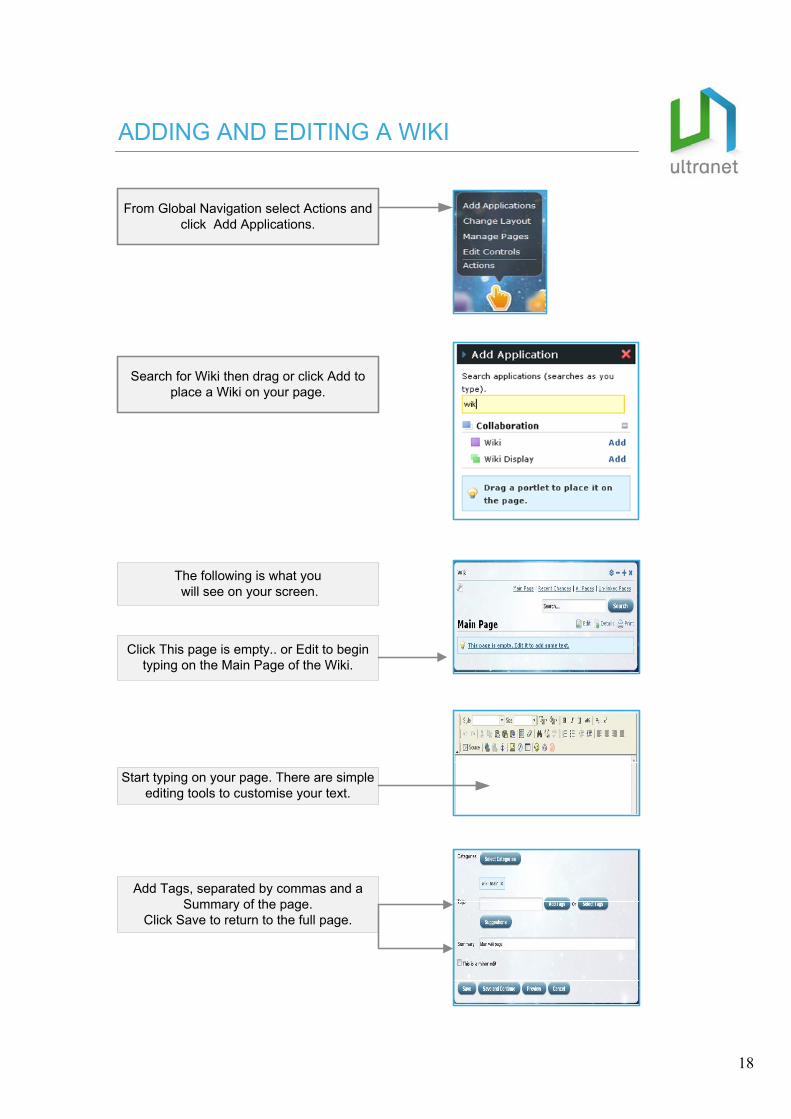
The following is what youwill see on your screen.
Click This page is empty.. or Edit to begin typing on the Main Page of the Wiki.
Start typing on your page. There are simple editing tools to customise your text.
Add Tags, separated by commas and aSummary of the page.
Click Save to return to the full page.
ADDING AND EDITING A WIKI
From Global Navigation select Actions and click Add Applications.
Search for Wiki then drag or click Add to place a Wiki on your page.
18

RENAME PAGES/ADD SUB PAGES TO A WIKI
To rename the Main Page click on Details.
In Advanced Actions click on Move.
Give your page a New Title.
Your page is now renamed.
To make a Sub Page click Add Page.
Give the Sub Page a Title.
Your Sub Page is now listed.
You can make many Sub Pages.
You can make Sub Pages from your Sub Pages.
19
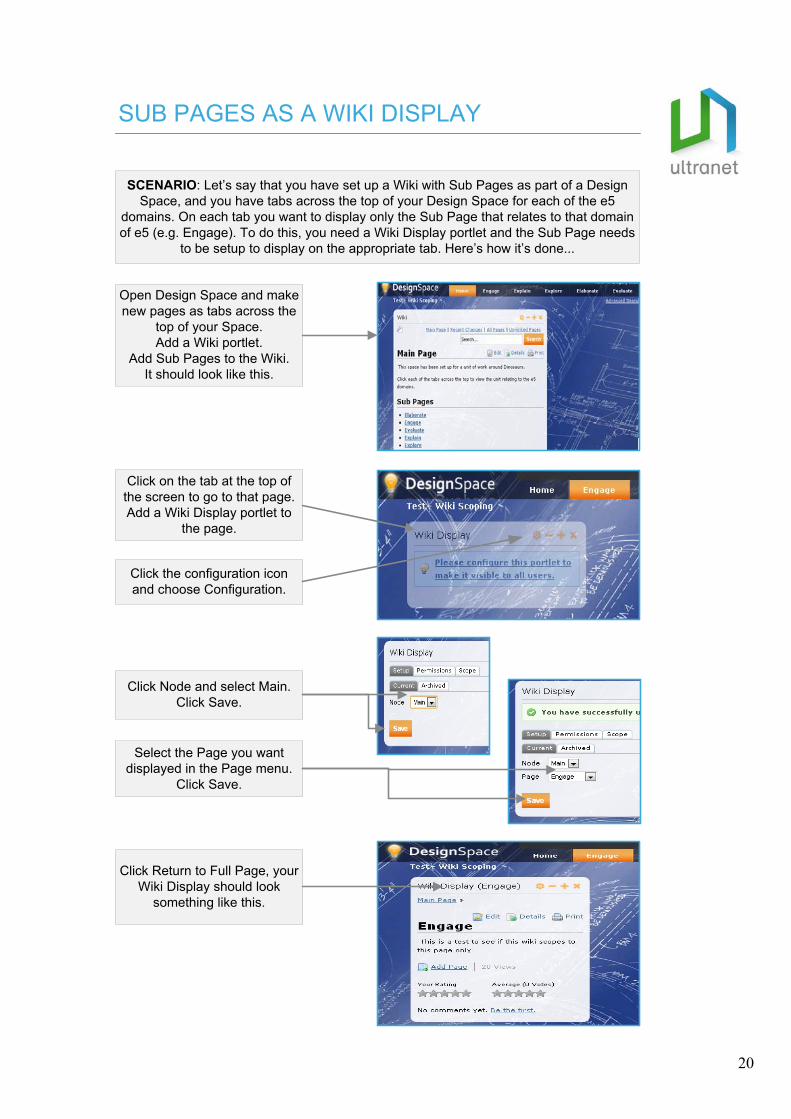
Open Design Space and make new pages as tabs across the
top of your Space. Add a Wiki portlet.
Add Sub Pages to the Wiki.It should look like this.
SCENARIO: Let’s say that you have set up a Wiki with Sub Pages as part of a Design Space, and you have tabs across the top of your Design Space for each of the e5
domains. On each tab you want to display only the Sub Page that relates to that domain of e5 (e.g. Engage). To do this, you need a Wiki Display portlet and the Sub Page needs
to be setup to display on the appropriate tab. Here’s how it’s done...
Click on the tab at the top of the screen to go to that page. Add a Wiki Display portlet to
the page.
Click the configuration icon and choose Configuration.
Click Node and select Main. Click Save.
Select the Page you want displayed in the Page menu.
Click Save.
Click Return to Full Page, your Wiki Display should look
something like this.
SUB PAGES AS A WIKI DISPLAY
20
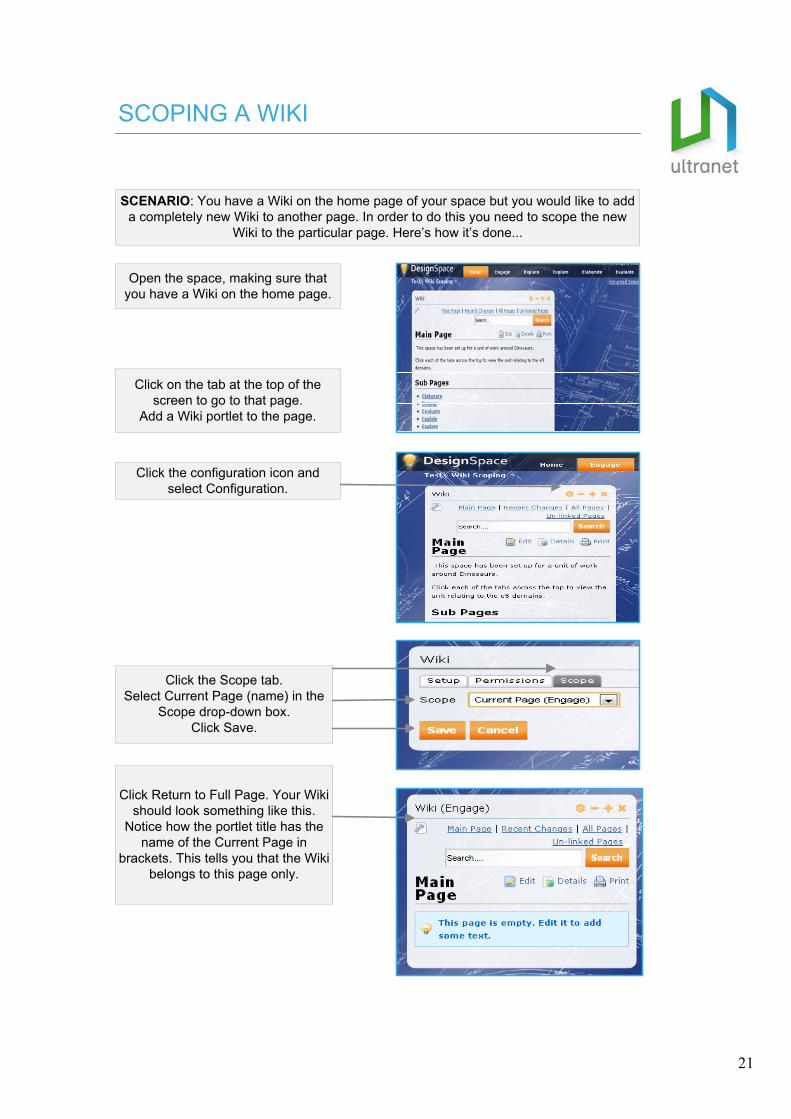
Open the space, making sure that you have a Wiki on the home page.
SCENARIO: You have a Wiki on the home page of your space but you would like to add a completely new Wiki to another page. In order to do this you need to scope the new
Wiki to the particular page. Here’s how it’s done...
Click on the tab at the top of the screen to go to that page.
Add a Wiki portlet to the page.
Click the configuration icon and select Configuration.
Click the Scope tab. Select Current Page (name) in the
Scope drop-down box. Click Save.
Click Return to Full Page. Your Wiki should look something like this.
Notice how the portlet title has the name of the Current Page in
brackets. This tells you that the Wiki belongs to this page only.
SCOPING A WIKI
21

On the Global Navigationclick on the My Content icon.
Notice that there is a quota for the amount of Personal content you can add.
To add content, click the Check In option and click Check In To Personal.
You can upload a link to a resource you have created online by clicking the
Upload Resource Link check box. You will then need to enter the URL of the link.
Enter a Title for your content and select the Content type.
You can also upload a file by selecting Browse. Locate the file on your computer
and select Open.
Add Tags, separated by commas, so that your content can be searched easily.
Ensure that the This material is all my own work... check box is selected before clicking
the Check In button.
ADDING TO MY CONTENT
22
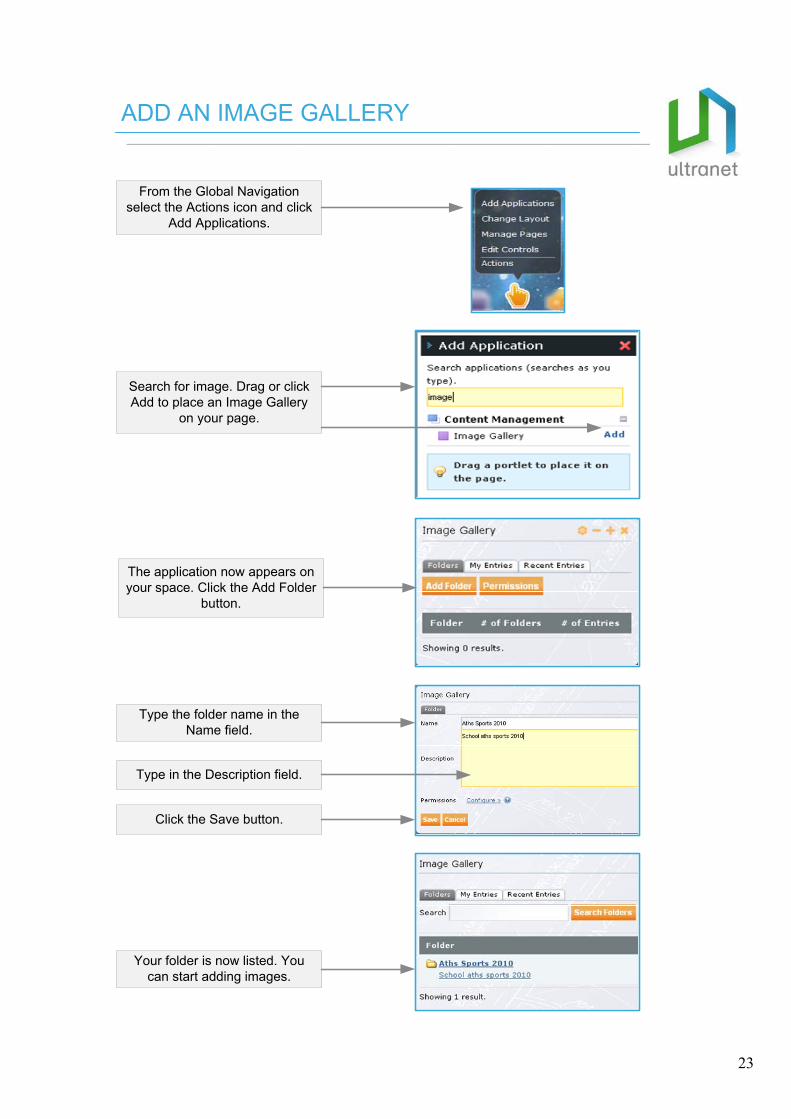
From the Global Navigation select the Actions icon and click
Add Applications.
Search for image. Drag or click Add to place an Image Gallery
on your page.
The application now appears on your space. Click the Add Folder
button.
Type the folder name in the Name field.
Type in the Description field.
Click the Save button.
ADD AN IMAGE GALLERY
Your folder is now listed. You can start adding images.
23

Click the folder to which you wish to upload the
images.
Click Select button.
Click Upload Image tab.
Click Browse and find the image you want to upload.
Name the Image.The Content Type is
selected image by default
Check the copyright box. Click Check In.
Click Check In Similar if you wish to add other
pictures from the same source.
These images have been added to
My Content.
Click Add Entry.
UPLOAD EXTERNAL IMAGES TO A FOLDER
24

Click Add Entry.
Click Select.
Select an image from those displayed, click on the image
and click Select.
Name the image.Specify the content type.Add Tags to assist with
searching.Check the copyright box. Click the Check In button.
ADD UPLOADED IMAGE TO A FOLDER
Select the folder in which you want to place the image.
25

Search for Slideshow. Drag or click Add to put the Slideshow portlet on
your page.
Click Please configure to make visible to all users.
Click the configure icon and then click the word Configuration.
Select and click the folder you wish to use.
Click Save.
This is what you see after Save has been clicked. Multiple images can be displayed using a Slideshow portlet.
ADDING A SLIDE SHOW
From Global Navigation select Actions and click Add Applications.
26

From the Global Navigation select the Actions icon and click Add
Applications.
Search for Publication to see the three Publication applications.
Select and Add each of the Publication applications to your
space.
The applications will look something like this.
ADDING PUBLICATION APPLICATIONS
The Display and the List need to be configured before they can be
seen.
27

On the Publication Display portlet, click the Add Publication icon.
Type a name for your Publication.
Add some content to your Publication. You can edit the content using the functions included in the text editor.
You may like to add an image to your Publication. Browse for your
image in the following window.
Change the size of your image. Click OK.
If you are ready to display it.Click Save and Approve at the
bottom of the Publications editor.
Your Publication will now be displayed inside the Publication
Display portlet.
CREATING A PUBLICATION
NOTE: If you initially click only Save, your Publication will be kept as a draft that you can access through the Control Panel. It will not show in your Publication Display until you
click Save and Approve.
28
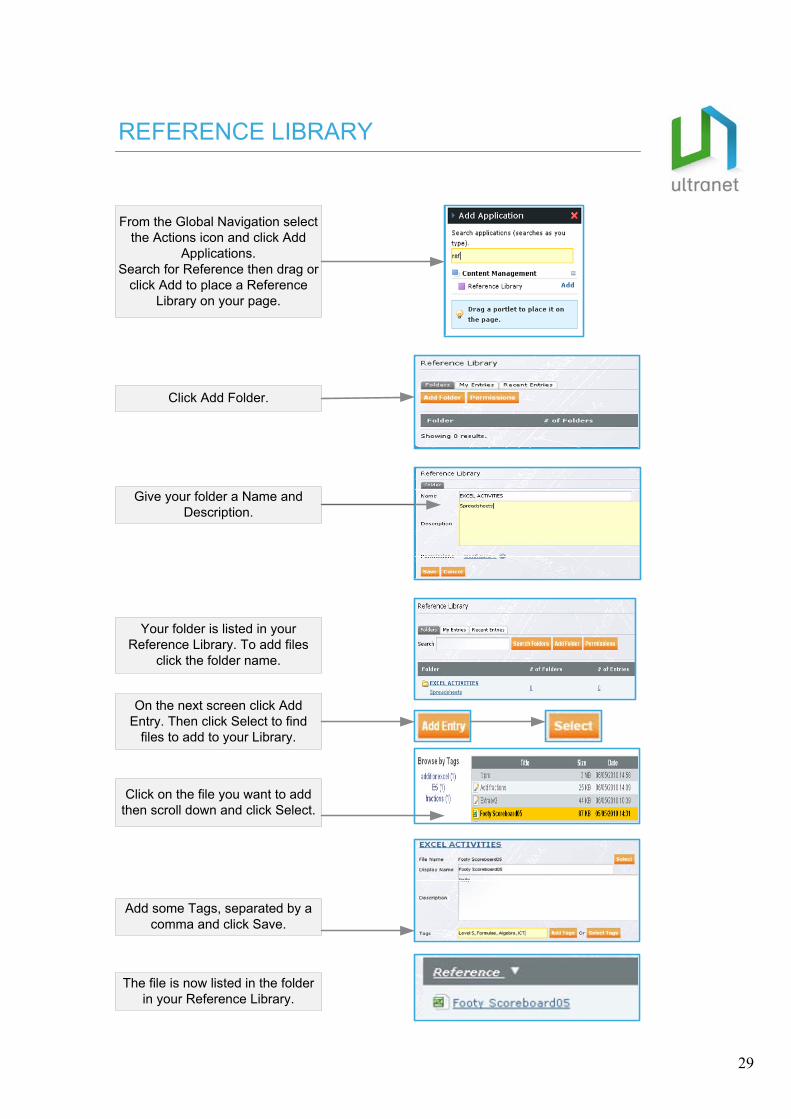
REFERENCE LIBRARY
From the Global Navigation select the Actions icon and click Add
Applications.Search for Reference then drag or
click Add to place a Reference Library on your page.
Click Add Folder.
Give your folder a Name and Description.
Your folder is listed in your Reference Library. To add files
click the folder name.
On the next screen click Add Entry. Then click Select to find
files to add to your Library.
Click on the file you want to add then scroll down and click Select.
Add some Tags, separated by a comma and click Save.
The file is now listed in the folder in your Reference Library.
29
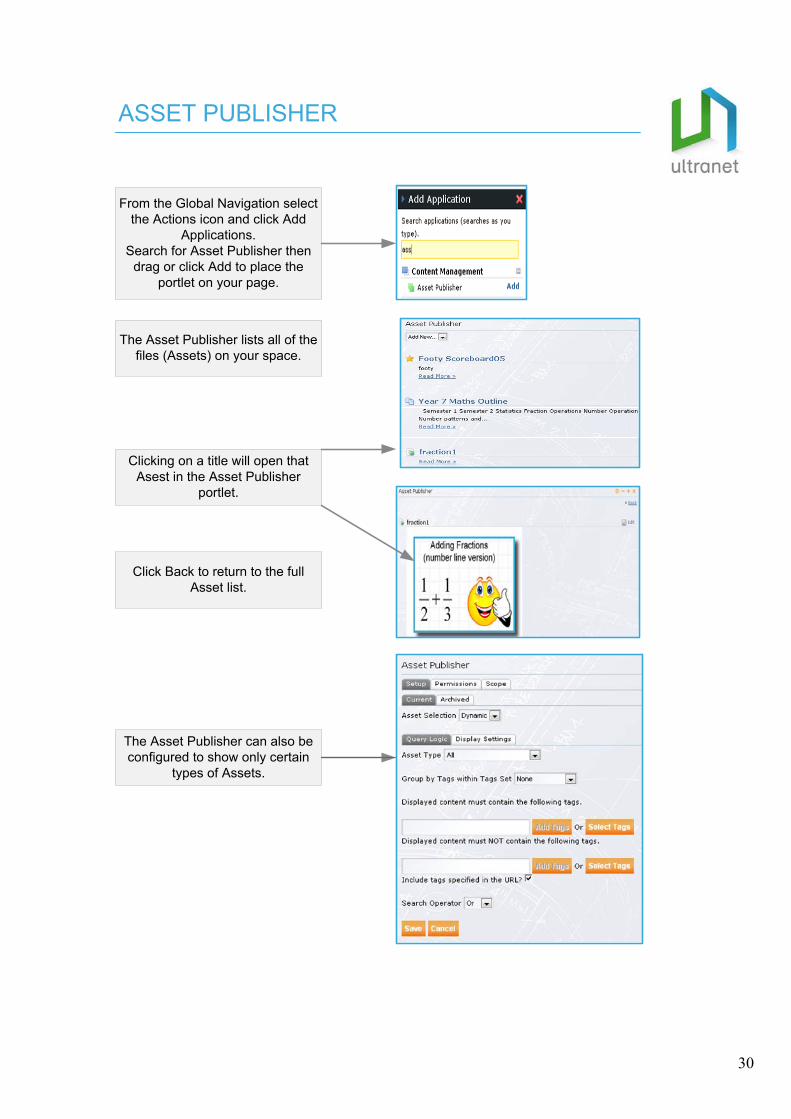
ASSET PUBLISHER
From the Global Navigation select the Actions icon and click Add
Applications.Search for Asset Publisher then
drag or click Add to place the portlet on your page.
The Asset Publisher lists all of the files (Assets) on your space.
Clicking on a title will open that Asest in the Asset Publisher
portlet.
Click Back to return to the full Asset list.
The Asset Publisher can also be configured to show only certain
types of Assets.
30

Search for Notice. Drag or click Add to put a Notice Viewer on
your page.
The viewer appears on your screen. You can minimise this
when not viewing notices.
Notices view after Mark as Readis clicked, to view the notice again
click on Show.
NOTICES AND MODERATOR REQUESTS
Notices and Moderator Requests appear by default on Teacher
Home Pages.Clicking Mark as Read will
minimise the notice leaving just the title.
Minimised View.
From the Global Navigation select the Actions icon and click Add
Applications.
31
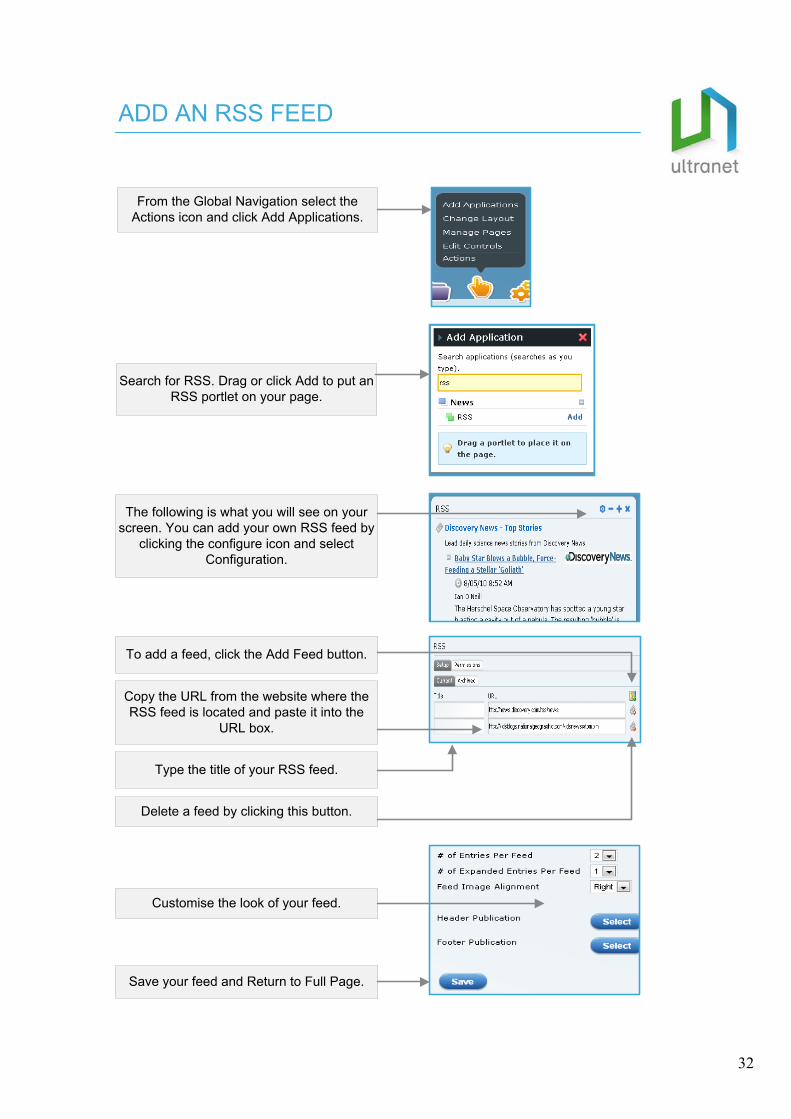
The following is what you will see on your screen. You can add your own RSS feed by
clicking the configure icon and select Configuration.
To add a feed, click the Add Feed button.
Copy the URL from the website where the RSS feed is located and paste it into the
URL box.
Type the title of your RSS feed.
Delete a feed by clicking this button.
Save your feed and Return to Full Page.
Customise the look of your feed.
ADD AN RSS FEED
From the Global Navigation select the Actions icon and click Add Applications.
Search for RSS. Drag or click Add to put an RSS portlet on your page.
32

Search for Activities.Drag or click Add to
place the portlet on your page.
Your recent Activities will be listed on the Space where you added the
Application.
ADD AN ACTIVITIES RECORD
From the Global Navigation select the
Actions icon and click Add
Applications.
33
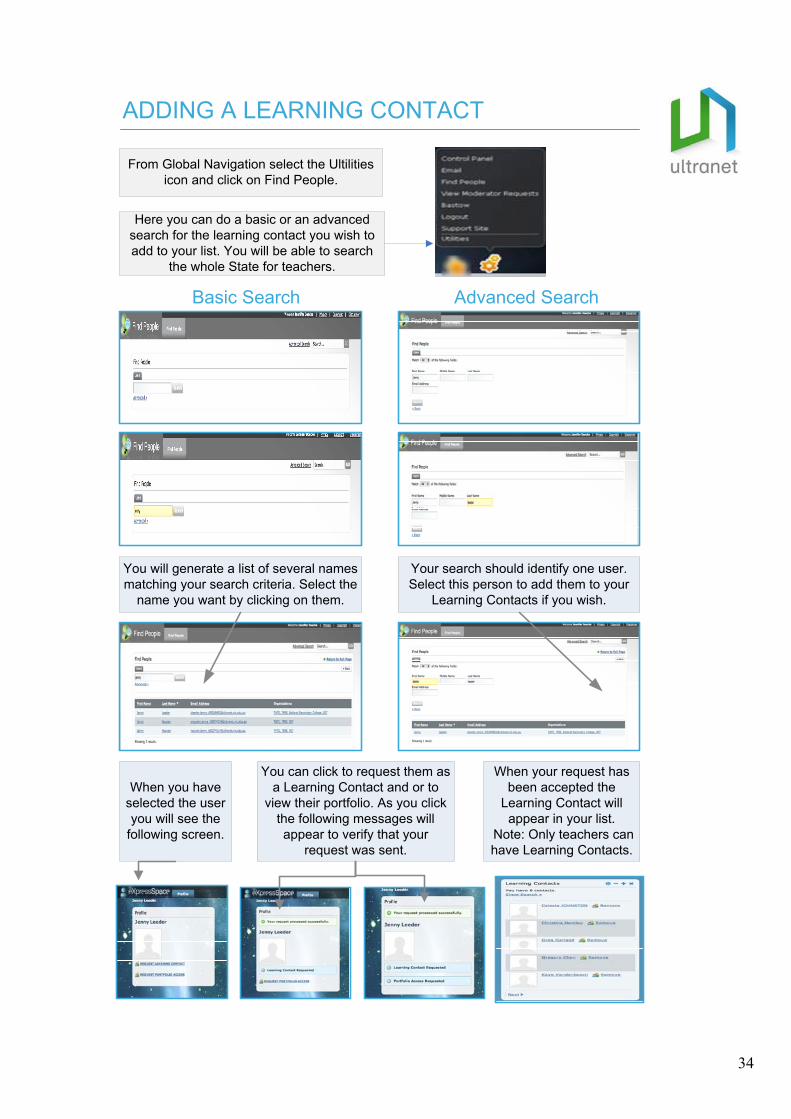
From Global Navigation select the Ultilities icon and click on Find People.
Here you can do a basic or an advancedsearch for the learning contact you wish to add to your list. You will be able to search
the whole State for teachers.
You will generate a list of several names matching your search criteria. Select the
name you want by clicking on them.
Your search should identify one user. Select this person to add them to your
Learning Contacts if you wish.
When you have selected the user you will see the
following screen.
You can click to request them as a Learning Contact and or to
view their portfolio. As you click the following messages will appear to verify that your
request was sent.
When your request has been accepted the
Learning Contact will appear in your list.
Note: Only teachers can have Learning Contacts.
Basic Search Advanced Search
ADDING A LEARNING CONTACT
34

Go to your Learning Contact list.
Click on the name of the contact for whom you wish to leave a
message. This will take you to the eXpress Space of that person.
Hover your cursor over the word eXpress. The word, Wall will
appear under this. Note that the name under the main
eXpressSpace title has changed to the name of the person you
wish to message.
Click on the word Wall. You will see a screen like this.
Write your message in the space provided. When you have finished your message click on the word
Post.
After you click Post the message will appear on the Learning
Contact’s Wall.
To return to your own screen click the Home Icon. This is in the
bottom left hand corner of your screen.
You can post on your own Wall and you can post Wall to Wall
with a Learning Contact.
WRITING ON A LEARNING CONTACT’S WALL
Teachers are the only users who have a Wall on their eXpress
Space.
35

SPACE MEMBERS
From the Global Navigation select the Actions icon and click
Add Applications.
Search for Members. Drag or click Add to put the portlet on
your page.
The Members Application lists all members of the space.
Find more members by clicking Next.
36

PORTFOLIOS VIEWERS/VIEWED
From the Global Navigation select the Actions icon and
click Add Applications.
Search for Portfolio. Drag or click Add to place the portlet
on your page.
Portfolios I View enables you to search for people who
have allowed you to view their Portfolio.
My Portfolio Viewers enables you to search for people who you have allowed to view your
Portfolio.
37

38
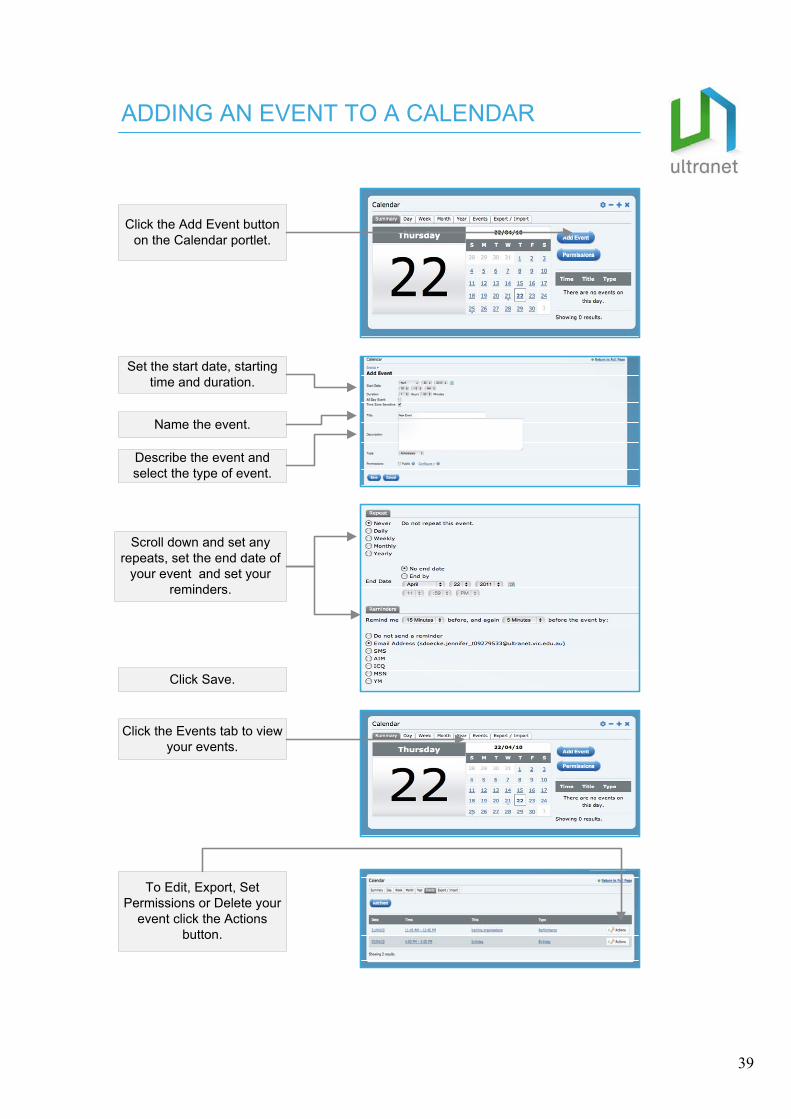
Click the Add Event button on the Calendar portlet.
Set the start date, starting time and duration.
Name the event.
Describe the event and select the type of event.
Scroll down and set any repeats, set the end date of
your event and set your reminders.
Click Save.
Click the Events tab to view your events.
To Edit, Export, Set Permissions or Delete your
event click the Actionsbutton.
ADDING AN EVENT TO A CALENDAR
39

Search for Google Maps. Drag or click Add to place the portlet on your page.
This will appear on your Space.
Click the configure icon and select Configuration.
Fill in the Map Address.
Click Save and click Return to Full Page.
This is what you will see on your Space.
GOOGLE MAPS
From the Global Navigation select the
Actions icon and click Add Applications.
40

You will see a transparent portlet on your page.
Click the Please configure this portlet...message.
Type the website address into the Source URL box, click Save, then
Return to Full Page.
I FRAME
From the Global Navigation select the Actions icon and click
Add Applications.
Search for I Frame.Drag or click Add to put the
portlet on your page.
41
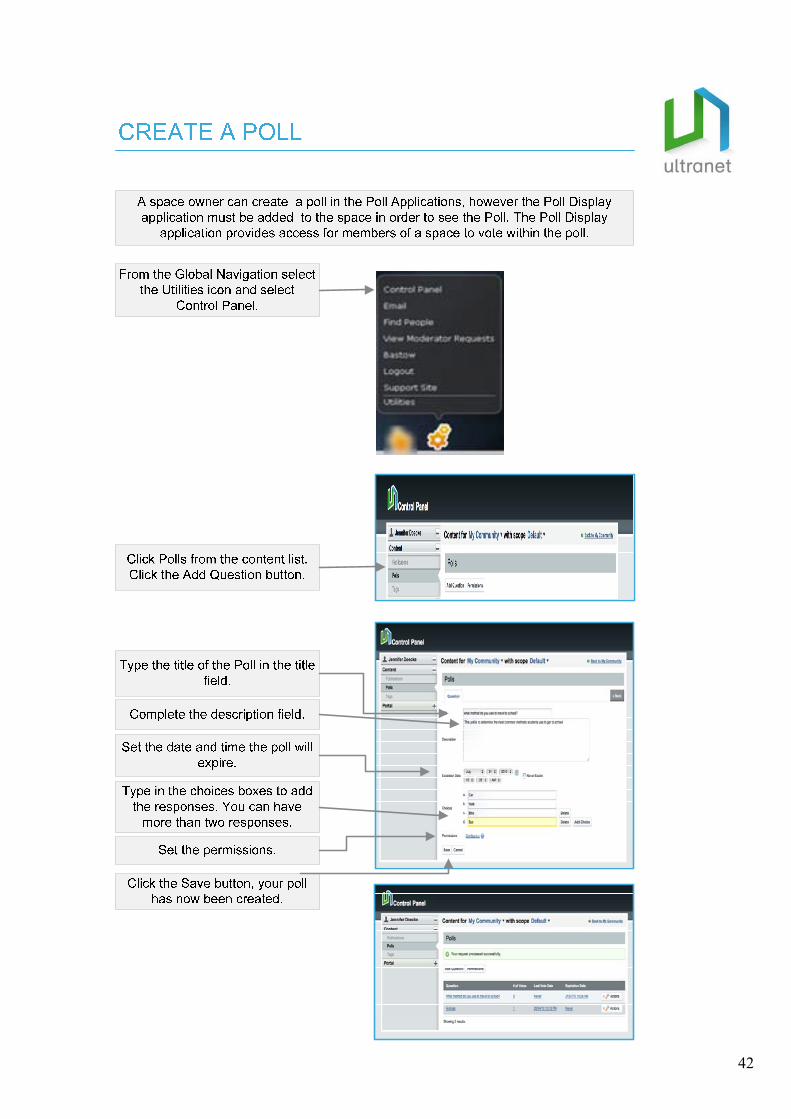
42

The application now appears in your space however it needs to
be configured.
Click Please Configure this portlet to make it visible to all.
Click the down arrow in the question field to choose your poll.
Select the question that you want from the list.
Click the Save button.
Click return to full page.
Members of your Space can now view your poll and vote only once.
ADD A POLL DISPLAY
From the Global Navigation select the Actions icon and click Add
Applications.
Search for Poll. Drag or click Add to put the portlet on your page.
43

Click the question for which you wish to view the results.
Scroll down and select how you wish to view the results. You can also see how each member of the
space voted.
If you copy the URL of the Poll Display and paste it into an I
Frame configuration.You can view a dynamic graph of the results beside your poll on the
page.
VIEW POLL RESULTS
Click Polls from the content list.
From the Global Navigation select the Utilities icon and select
Control Panel.
44

45

SITE MAP/NAVIGATION
Search for Site Map.Drag or click Add to put the portlet
on your page.
The Site Map lists all Pages and Sub Pages on the space with functioning
hyperlinks to these pages.
Search for Navigation.Drag or Click Add to put the portlet
on your page.
The Navigation portlet lists Sub Pages under the page on which you
place the Navigation portlet on.
From the Global Navigation select the Actions icon and click Add
Applications.
46