ucsb kronos 6.3 timekeeper manual manual . table of contents i. ... if you are unclear as to which...
TRANSCRIPT

UCSB
Kronos 6.3
Timekeeper Manual

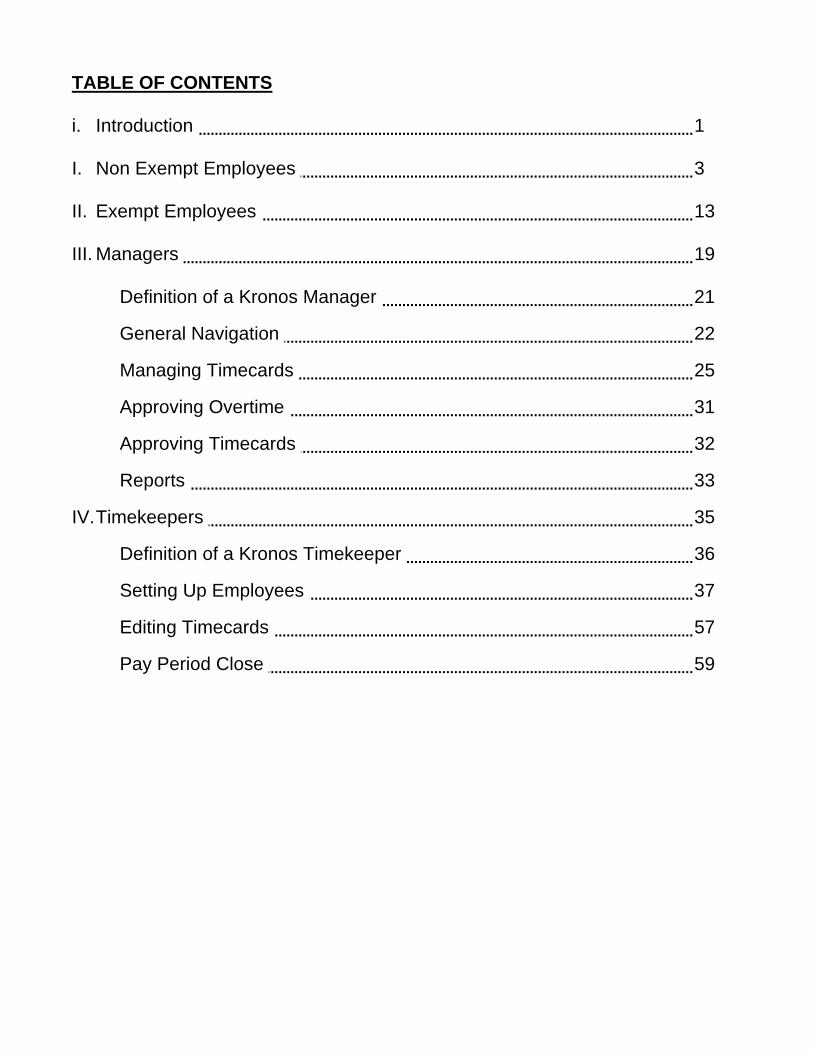
TABLE OF CONTENTS i. Introduction 1
I. Non Exempt Employees 3
II. Exempt Employees 13
III. Managers 19
Definition of a Kronos Manager 21 General Navigation 22 Managing Timecards 25 Approving Overtime 31 Approving Timecards 32 Reports 33
IV. Timekeepers 35
Definition of a Kronos Timekeeper 36 Setting Up Employees 37 Editing Timecards 57 Pay Period Close 59

Page 1
Introduction Welcome to Kronos Workforce Central, the official time and attendance system for UC Santa Barbara. Kronos is an integrated system which uses networked time clocks and computer terminals, replacing paper timecards and manual time calculation and reporting. This manual aims to help employees, managers and timekeepers accomplish daily, weekly, bi-weekly and monthly timekeeping tasks through detailed explanations and step-by-step examples. What type of Employee am I? There are two major types of employees within Kronos:
1) Non Exempt Employees - Required to track all hours worked and leave taken
2) Exempt Employees
- Required only to track leave taken If you are unclear as to which type of employee you are, please contact your Office/Payroll Manager.

Page 2

Non Exempt Employees Page 3
SECTION I
NON EXEMPT
EMPLOYEES

Non Exempt Employees Page 4
Non Exempt Employees Page 5
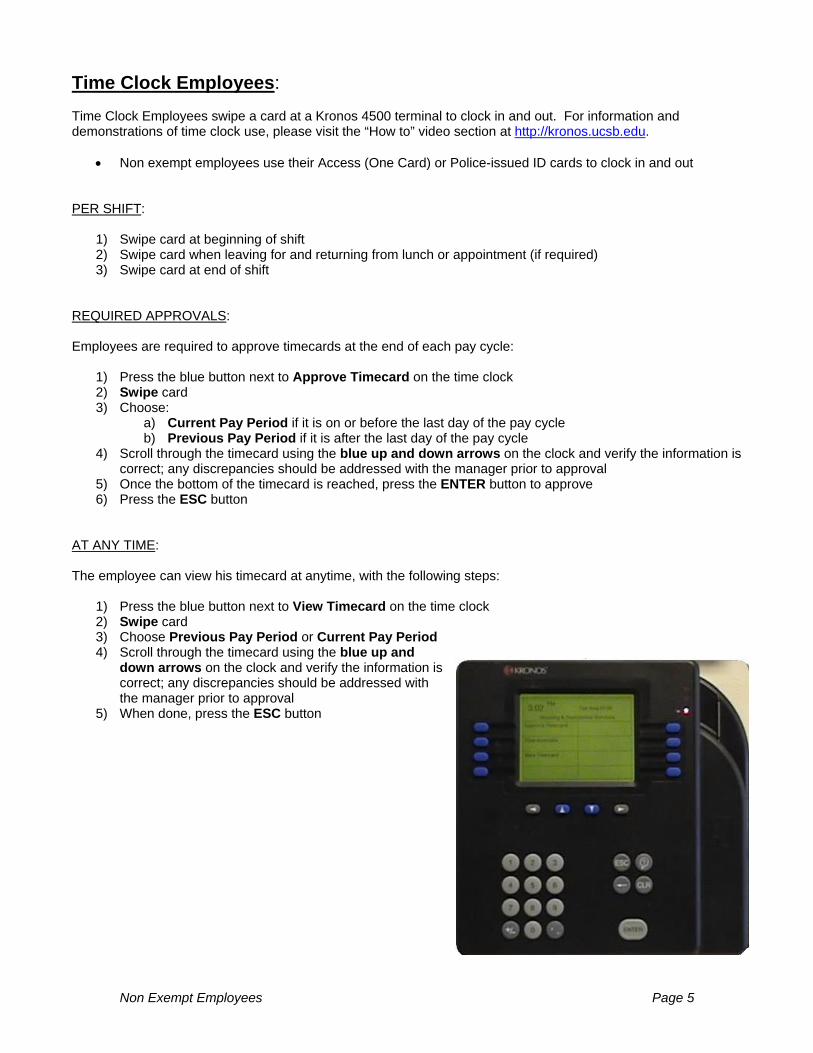
Time Clock Employees: Time Clock Employees swipe a card at a Kronos 4500 terminal to clock in and out. For information and demonstrations of time clock use, please visit the “How to” video section at http://kronos.ucsb.edu.
• Non exempt employees use their Access (One Card) or Police-issued ID cards to clock in and out PER SHIFT:
1) Swipe card at beginning of shift 2) Swipe card when leaving for and returning from lunch or appointment (if required) 3) Swipe card at end of shift
REQUIRED APPROVALS: Employees are required to approve timecards at the end of each pay cycle:
1) Press the blue button next to Approve Timecard on the time clock 2) Swipe card 3) Choose:
a) Current Pay Period if it is on or before the last day of the pay cycle b) Previous Pay Period if it is after the last day of the pay cycle
4) Scroll through the timecard using the blue up and down arrows on the clock and verify the information is correct; any discrepancies should be addressed with the manager prior to approval
5) Once the bottom of the timecard is reached, press the ENTER button to approve 6) Press the ESC button
AT ANY TIME: The employee can view his timecard at anytime, with the following steps:
1) Press the blue button next to View Timecard on the time clock 2) Swipe card 3) Choose Previous Pay Period or Current Pay Period 4) Scroll through the timecard using the blue up and
down arrows on the clock and verify the information is correct; any discrepancies should be addressed with the manager prior to approval
5) When done, press the ESC button
Non Exempt Employees Page 6
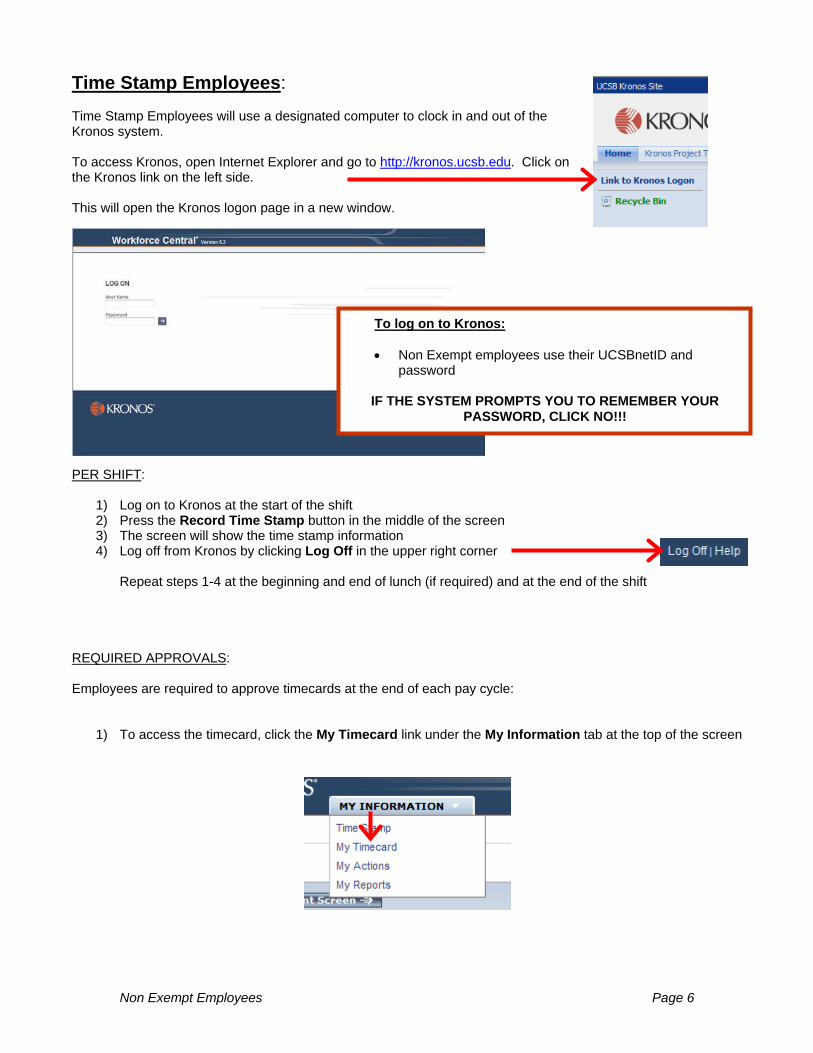
Time Stamp Employees: Time Stamp Employees will use a designated computer to clock in and out of the Kronos system. To access Kronos, open Internet Explorer and go to http://kronos.ucsb.edu. Click on the Kronos link on the left side. This will open the Kronos logon page in a new window.
PER SHIFT:
1) Log on to Kronos at the start of the shift 2) Press the Record Time Stamp button in the middle of the screen 3) The screen will show the time stamp information 4) Log off from Kronos by clicking Log Off in the upper right corner
Repeat steps 1-4 at the beginning and end of lunch (if required) and at the end of the shift
REQUIRED APPROVALS: Employees are required to approve timecards at the end of each pay cycle:
1) To access the timecard, click the My Timecard link under the My Information tab at the top of the screen
To log on to Kronos:
• Non Exempt employees use their UCSBnetID and password
IF THE SYSTEM PROMPTS YOU TO REMEMBER YOUR
PASSWORD, CLICK NO!!!

Non Exempt Employees Page 7
Time Stamp Employees (continued): 2) Verify the correct pay period is in view by checking the Time Period above the timecard
a) If it is on or before the end of the pay cycle, leave it as Current Pay Period b) If it is after the end of the pay cycle, change it to Previous Pay Period by clicking the drop down
arrow 3) Scroll through the timecard to verify the information is correct; any discrepancies should be addressed
with the manager prior to approval 4) Click the Approvals menu above the timecard 5) Choose Approve 6) The Sign-offs, Requests & Approvals tab will now show in the bottom
of the timecard confirming the approval was made 7) Log off from Kronos by clicking Log Off in the upper right corner
Log On Time Limit If you are logged on for a period of time with no activity, a flashing window will open with a message stating that your session is about to time out. You must click Yes to continue the session where you left off. NOTE: If you have entered data but have not saved it when this occurs, you will lose any data entered since you last saved. Always remember to save your data and log off if you are going to be away from the computer for any amount of time.

Non Exempt Employees Page 8
Electronic Timecard Employees: Electronic Timecard Employees will use a desingated computer to clock in and out of the Kronos system. To access Kronos, open Internet Explorer and go to http://kronos.ucsb.edu. Click on the Kronos link on the left side. This will open the Kronos logon page in a new window.
PER SHIFT: At the end of each shift:
1) Log on to Kronos 2) Find the day’s date and click in the Pay Code column 3) Choose the correct pay code from the drop down menu 4) Hit tab or click in the Amount column 5) Enter the number of hours worked 6) Click Save in the upper left corner of the timecard 7) Log off from Kronos by clicking Log Off in the upper right corner
To log on to Kronos:
• Non Exempt employees use their UCSBnetID and password
IF THE SYSTEM PROMPTS YOU TO REMEMBER YOUR
PASSWORD, CLICK NO!!!
Non Exempt Employees Page 9
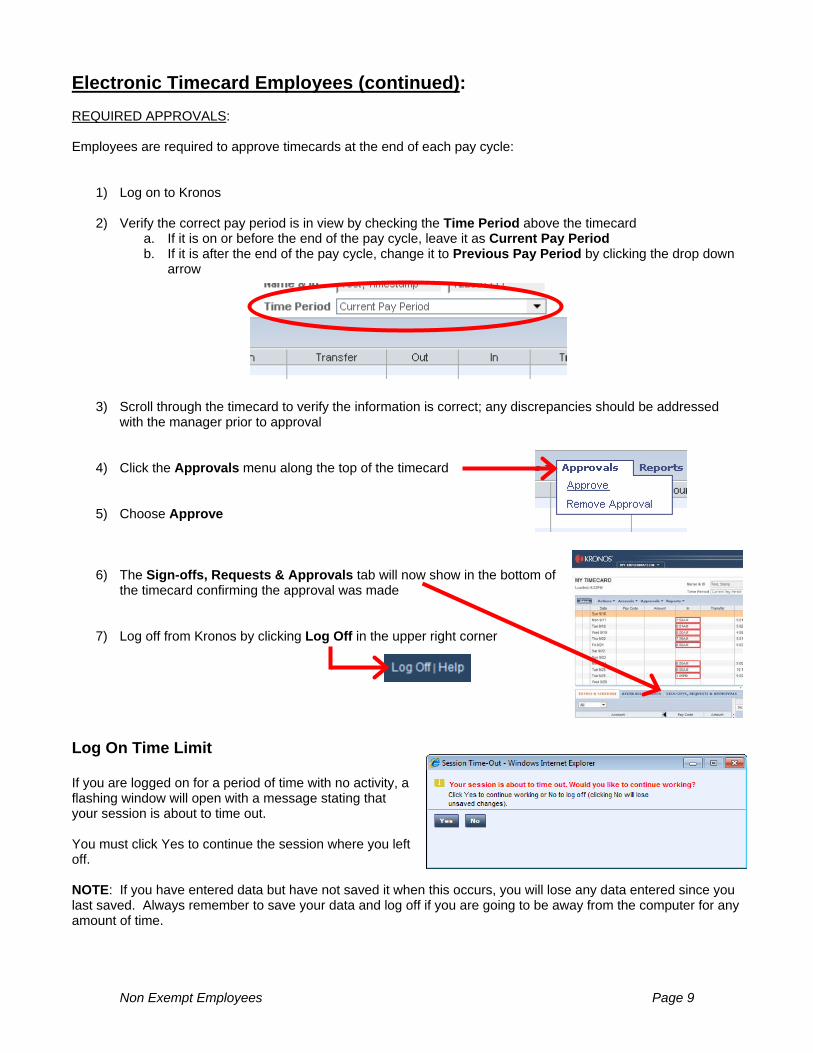
Electronic Timecard Employees (continued): REQUIRED APPROVALS: Employees are required to approve timecards at the end of each pay cycle:
1) Log on to Kronos 2) Verify the correct pay period is in view by checking the Time Period above the timecard
a. If it is on or before the end of the pay cycle, leave it as Current Pay Period b. If it is after the end of the pay cycle, change it to Previous Pay Period by clicking the drop down
arrow 3) Scroll through the timecard to verify the information is correct; any discrepancies should be addressed
with the manager prior to approval 4) Click the Approvals menu along the top of the timecard 5) Choose Approve 6) The Sign-offs, Requests & Approvals tab will now show in the bottom of
the timecard confirming the approval was made 7) Log off from Kronos by clicking Log Off in the upper right corner
Log On Time Limit If you are logged on for a period of time with no activity, a flashing window will open with a message stating that your session is about to time out. You must click Yes to continue the session where you left off. NOTE: If you have entered data but have not saved it when this occurs, you will lose any data entered since you last saved. Always remember to save your data and log off if you are going to be away from the computer for any amount of time.
Non Exempt Employees Page 10
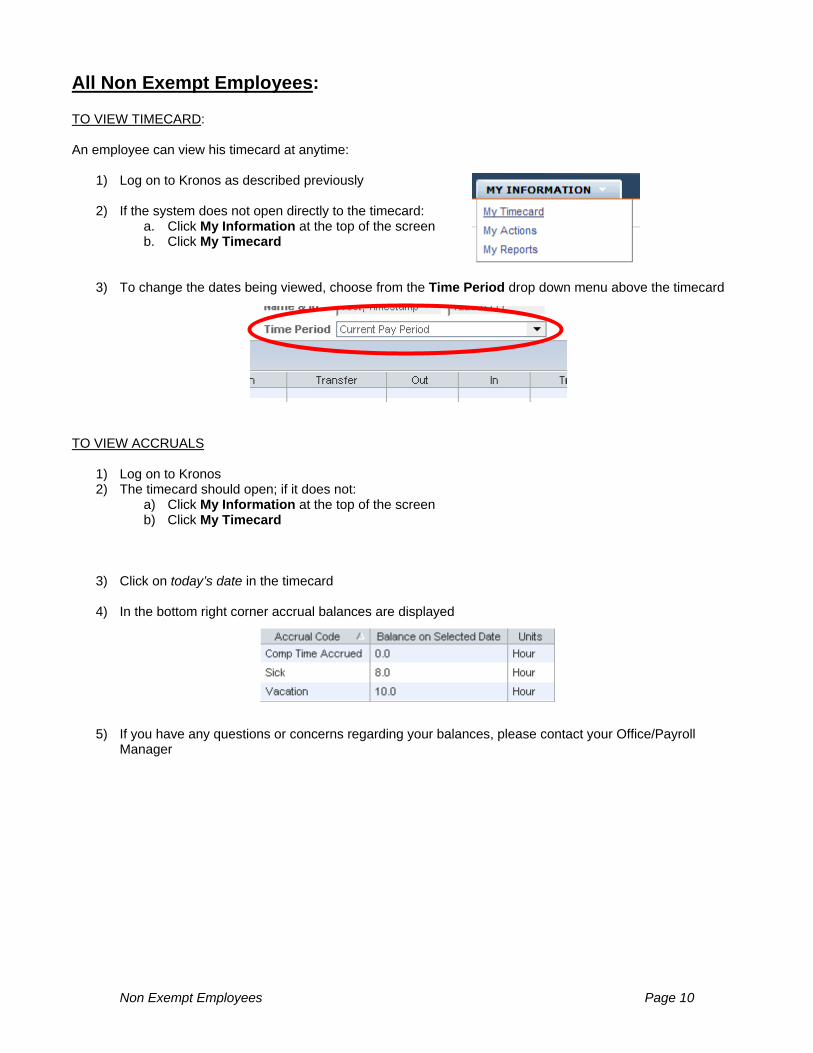
All Non Exempt Employees: TO VIEW TIMECARD: An employee can view his timecard at anytime:
1) Log on to Kronos as described previously
2) If the system does not open directly to the timecard: a. Click My Information at the top of the screen b. Click My Timecard
3) To change the dates being viewed, choose from the Time Period drop down menu above the timecard
TO VIEW ACCRUALS
1) Log on to Kronos 2) The timecard should open; if it does not:
a) Click My Information at the top of the screen b) Click My Timecard
3) Click on today’s date in the timecard
4) In the bottom right corner accrual balances are displayed
5) If you have any questions or concerns regarding your balances, please contact your Office/Payroll
Manager
Non Exempt Employees Page 11
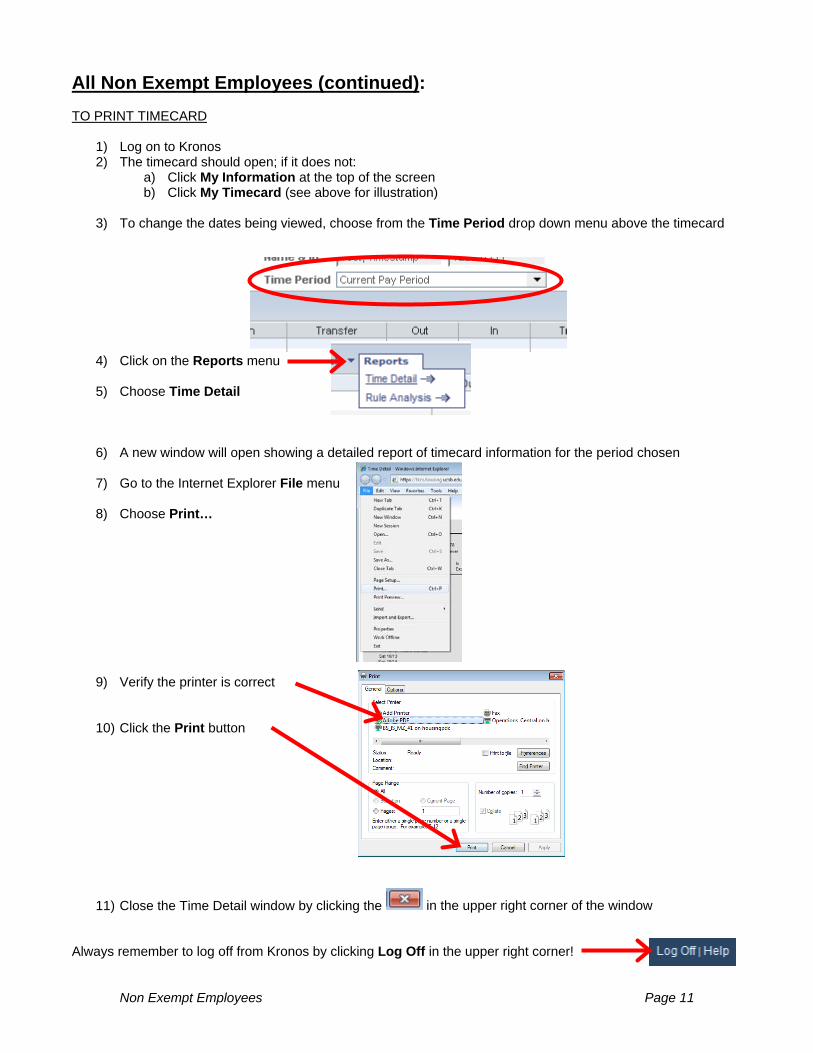
All Non Exempt Employees (continued): TO PRINT TIMECARD
1) Log on to Kronos 2) The timecard should open; if it does not:
a) Click My Information at the top of the screen b) Click My Timecard (see above for illustration)
3) To change the dates being viewed, choose from the Time Period drop down menu above the timecard 4) Click on the Reports menu 5) Choose Time Detail
6) A new window will open showing a detailed report of timecard information for the period chosen 7) Go to the Internet Explorer File menu
8) Choose Print… 9) Verify the printer is correct
10) Click the Print button
11) Close the Time Detail window by clicking the in the upper right corner of the window
Always remember to log off from Kronos by clicking Log Off in the upper right corner!

Non Exempt Employees Page 12
Exempt Employees Page 13
SECTION II
EXEMPT
EMPLOYEES

Exempt Employees Page 14
Exempt Employees Page 15
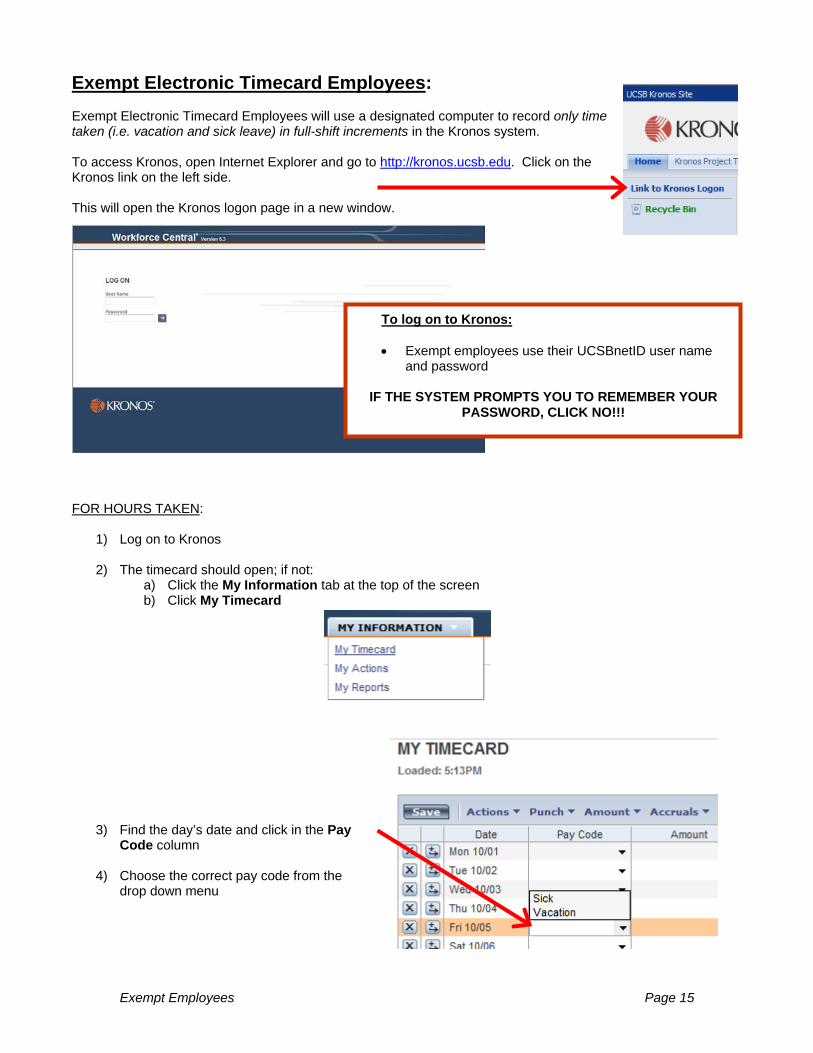
Exempt Electronic Timecard Employees: Exempt Electronic Timecard Employees will use a designated computer to record only time taken (i.e. vacation and sick leave) in full-shift increments in the Kronos system. To access Kronos, open Internet Explorer and go to http://kronos.ucsb.edu. Click on the Kronos link on the left side. This will open the Kronos logon page in a new window.
FOR HOURS TAKEN:
1) Log on to Kronos
2) The timecard should open; if not: a) Click the My Information tab at the top of the screen b) Click My Timecard
3) Find the day’s date and click in the Pay
Code column 4) Choose the correct pay code from the
drop down menu
To log on to Kronos: • Exempt employees use their UCSBnetID user name
and password
IF THE SYSTEM PROMPTS YOU TO REMEMBER YOUR PASSWORD, CLICK NO!!!
Exempt Employees Page 16
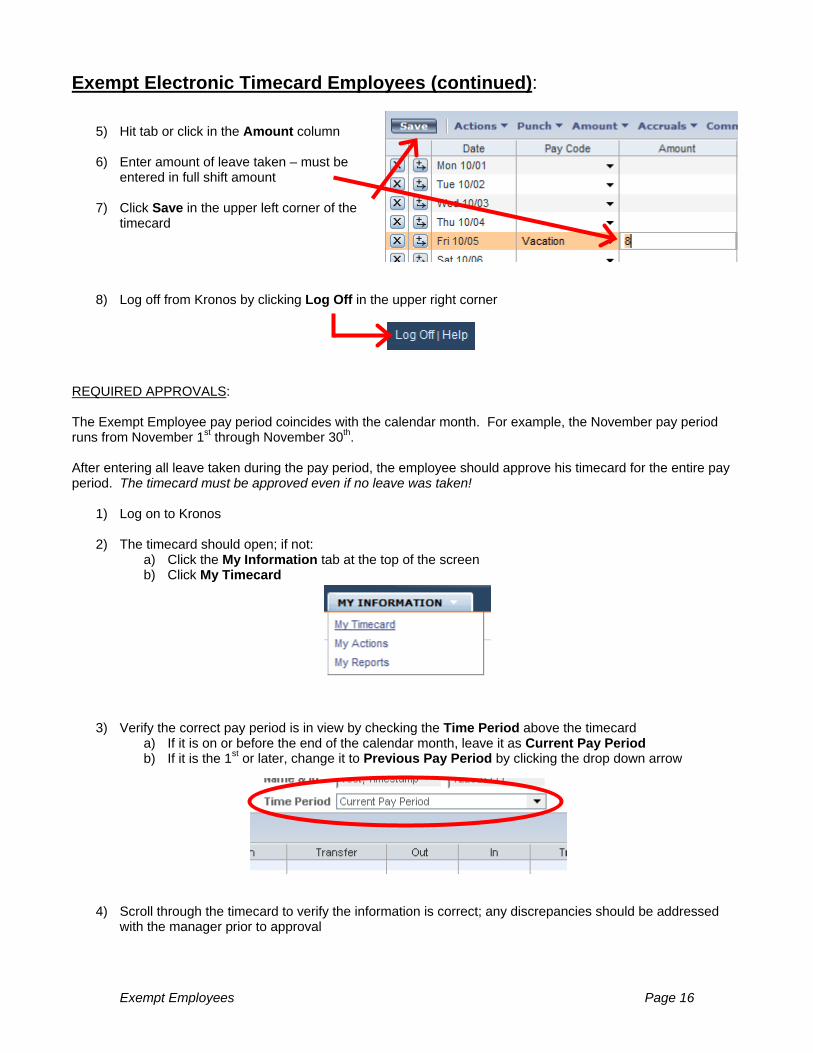
Exempt Electronic Timecard Employees (continued): 5) Hit tab or click in the Amount column 6) Enter amount of leave taken – must be
entered in full shift amount 7) Click Save in the upper left corner of the
timecard 8) Log off from Kronos by clicking Log Off in the upper right corner
REQUIRED APPROVALS: The Exempt Employee pay period coincides with the calendar month. For example, the November pay period runs from November 1st through November 30th. After entering all leave taken during the pay period, the employee should approve his timecard for the entire pay period. The timecard must be approved even if no leave was taken!
1) Log on to Kronos
2) The timecard should open; if not: a) Click the My Information tab at the top of the screen b) Click My Timecard
3) Verify the correct pay period is in view by checking the Time Period above the timecard
a) If it is on or before the end of the calendar month, leave it as Current Pay Period b) If it is the 1st or later, change it to Previous Pay Period by clicking the drop down arrow
4) Scroll through the timecard to verify the information is correct; any discrepancies should be addressed
with the manager prior to approval
Exempt Employees Page 17
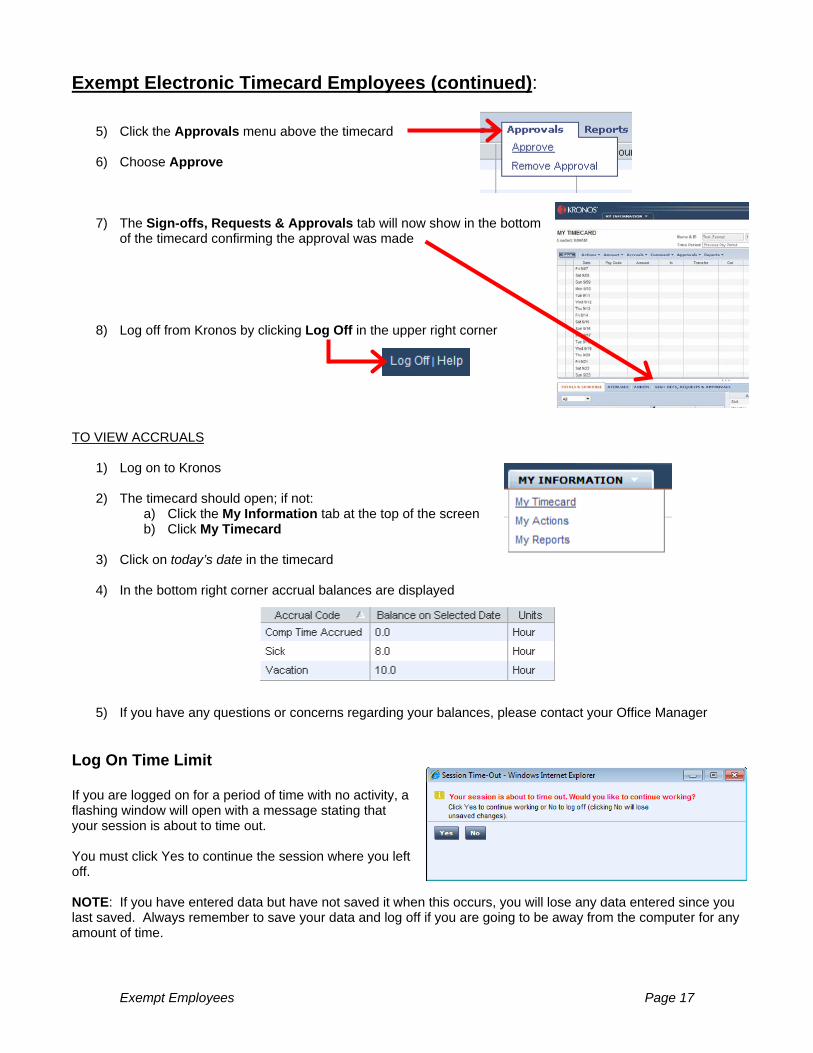
Exempt Electronic Timecard Employees (continued): 5) Click the Approvals menu above the timecard 6) Choose Approve 7) The Sign-offs, Requests & Approvals tab will now show in the bottom
of the timecard confirming the approval was made 8) Log off from Kronos by clicking Log Off in the upper right corner
TO VIEW ACCRUALS
1) Log on to Kronos
2) The timecard should open; if not:
a) Click the My Information tab at the top of the screen b) Click My Timecard
3) Click on today’s date in the timecard
4) In the bottom right corner accrual balances are displayed
5) If you have any questions or concerns regarding your balances, please contact your Office Manager
Log On Time Limit If you are logged on for a period of time with no activity, a flashing window will open with a message stating that your session is about to time out. You must click Yes to continue the session where you left off. NOTE: If you have entered data but have not saved it when this occurs, you will lose any data entered since you last saved. Always remember to save your data and log off if you are going to be away from the computer for any amount of time.
Exempt Employees Page 18
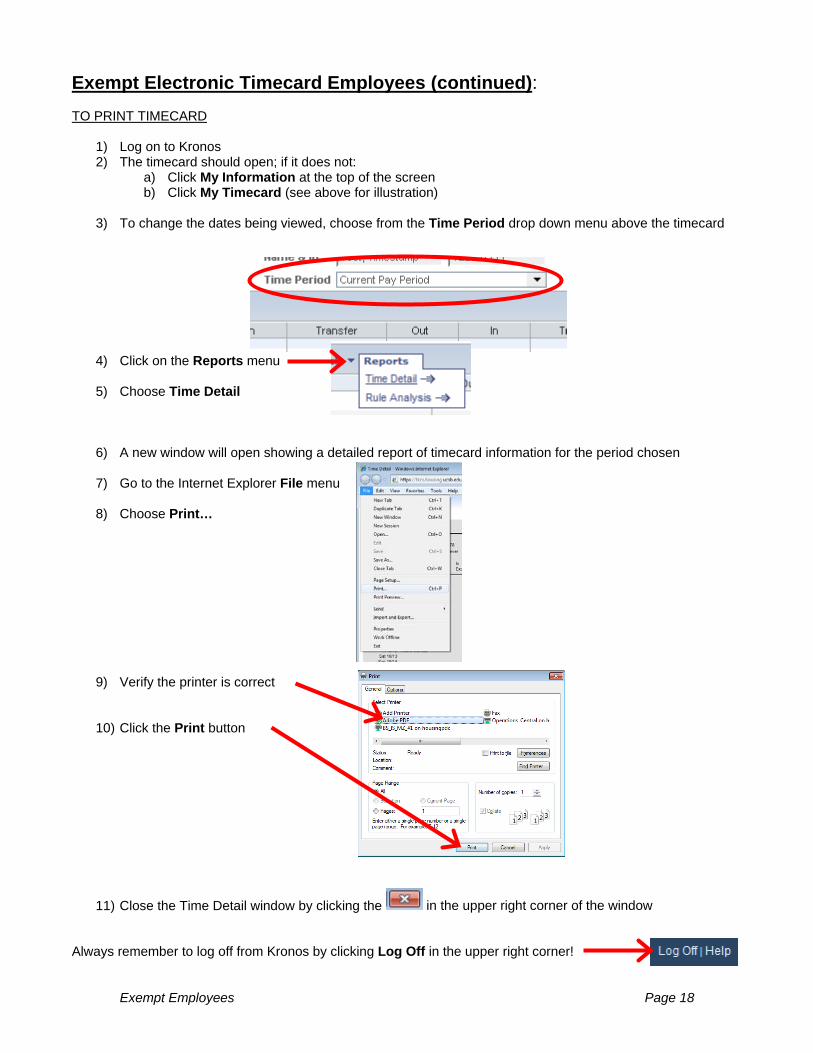
Exempt Electronic Timecard Employees (continued): TO PRINT TIMECARD
1) Log on to Kronos 2) The timecard should open; if it does not:
a) Click My Information at the top of the screen b) Click My Timecard (see above for illustration)
3) To change the dates being viewed, choose from the Time Period drop down menu above the timecard 4) Click on the Reports menu 5) Choose Time Detail
6) A new window will open showing a detailed report of timecard information for the period chosen 7) Go to the Internet Explorer File menu
8) Choose Print… 9) Verify the printer is correct
10) Click the Print button
11) Close the Time Detail window by clicking the in the upper right corner of the window
Always remember to log off from Kronos by clicking Log Off in the upper right corner!

Managers Page 19
SECTION III
MANAGERS

Managers Page 20
Definition of a Kronos Manager Managers are responsible for reconciling and approving time for all employees they directly supervise. As a manager you review, edit, and approve the timecard of the employees who are assigned to you.
Responsibilities include: Reviewing hours entered – DAILY
Missed punches Unexcused absences Late or Early punches (in or out) Missing hours Unscheduled work Approving overtime
Reviewing hours entered – WEEKLY
Ensuring each employee totals the correct number of hours (i.e. 100% time has 40 hours) Ensuring all overtime has been reviewed
Ensuring employee approvals are done per pay cycle Approving timecards at the end of each pay cycle
Managers should familiarize themselves with the different types of employees and time entry methods as documented in the Employee section of this manual. In addition, managers should remember they are an employee as well as a manager and need to adhere to employee responsibilities for their own time.

Managers Page 21
General Navigation Once you log on to the system, the following screen will appear:
Navigation Tabs The General tab has the following options on its drop-down menu:
Group Edit Results – allows you to see results when making changes to more than one employee from a Timekeeping genie.
Inbox – not currently in use Reports – allows you to view reports for groups of employees
through the use of HyperFind queries Actions – not currently in use
The My Genies® tab only has the QuickFind option on its drop-down menu. QuickFind is the default screen when Kronos opens since it allows you to quickly access your employees.
To generate a list of all employees, leave the Name or ID field with only the * in it and click the blue Find button
You can limit your results by typing all or part of an employee’s last name before the * (i.e. smi* for Smith)
and clicking the Find button.
Menu Bar These menu
choices pertain to whichever editor or
genie you are currently in.
Navigation Tabs Notice the five blue tabs across the top of the screen:
1. General 2. My Genies® 3. Timekeeping 4. Scheduling 5. My Information
Editor Links These links will open
the editor specific to the employee(s) selected.
Managers Page 22
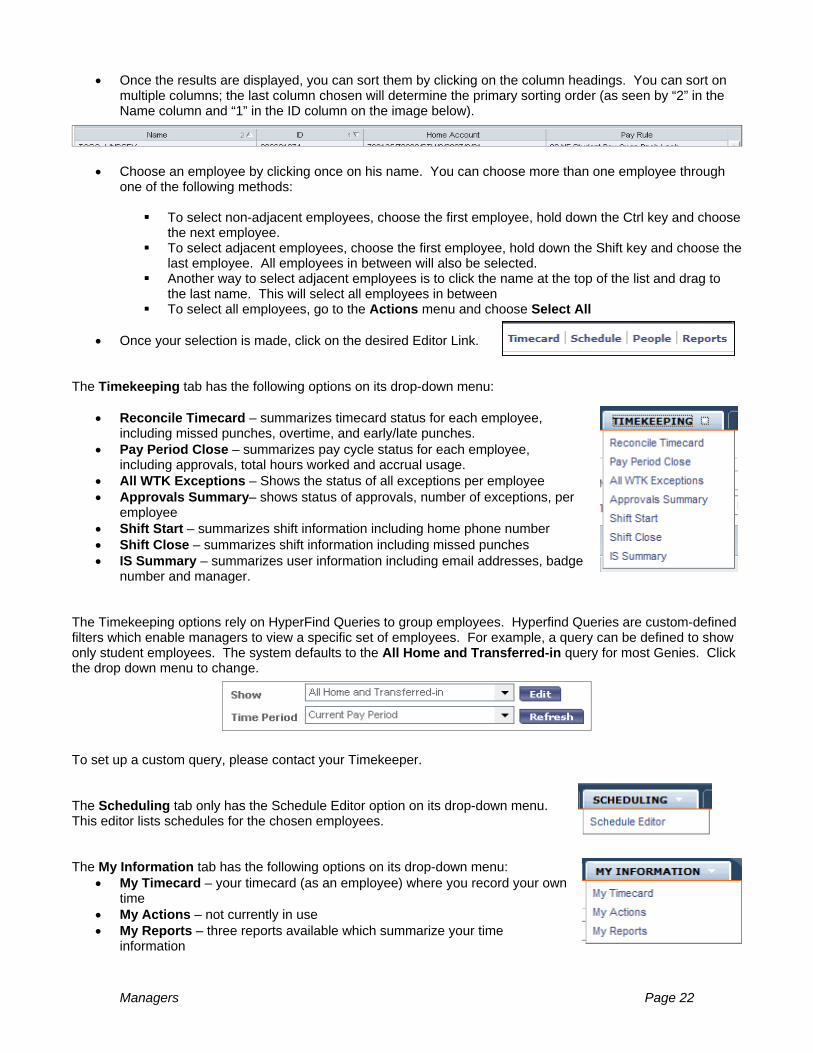
Once the results are displayed, you can sort them by clicking on the column headings. You can sort on multiple columns; the last column chosen will determine the primary sorting order (as seen by “2” in the Name column and “1” in the ID column on the image below).
Choose an employee by clicking once on his name. You can choose more than one employee through
one of the following methods:
To select non-adjacent employees, choose the first employee, hold down the Ctrl key and choose the next employee.
To select adjacent employees, choose the first employee, hold down the Shift key and choose the last employee. All employees in between will also be selected.
Another way to select adjacent employees is to click the name at the top of the list and drag to the last name. This will select all employees in between
To select all employees, go to the Actions menu and choose Select All Once your selection is made, click on the desired Editor Link.
The Timekeeping tab has the following options on its drop-down menu:
Reconcile Timecard – summarizes timecard status for each employee, including missed punches, overtime, and early/late punches.
Pay Period Close – summarizes pay cycle status for each employee, including approvals, total hours worked and accrual usage.
All WTK Exceptions – Shows the status of all exceptions per employee Approvals Summary– shows status of approvals, number of exceptions, per
employee Shift Start – summarizes shift information including home phone number Shift Close – summarizes shift information including missed punches IS Summary – summarizes user information including email addresses, badge
number and manager. The Timekeeping options rely on HyperFind Queries to group employees. Hyperfind Queries are custom-defined filters which enable managers to view a specific set of employees. For example, a query can be defined to show only student employees. The system defaults to the All Home and Transferred-in query for most Genies. Click the drop down menu to change. To set up a custom query, please contact your Timekeeper. The Scheduling tab only has the Schedule Editor option on its drop-down menu. This editor lists schedules for the chosen employees. The My Information tab has the following options on its drop-down menu:
My Timecard – your timecard (as an employee) where you record your own time
My Actions – not currently in use My Reports – three reports available which summarize your time
information

Managers Page 23
Editor Links Four Editor Links are available:
Timecard – takes you to the chosen employee’s Timecard Editor to make changes Schedule – takes you the chosen employee’s Schedule Editor to make changes People – takes you to the chosen employee’s People Editor to make changes Reports – allows you to view reports for the chosen employee(s)
If you choose more than one employee, you can move between their records by clicking the left and right arrows to the right of the ID box. Double-clicking the employee(s) will take you straight to the Timecard Editor. Menu Bar The choices available on the Menu Bar will vary depending on the Genie or Editor in use.
Managers Page 24
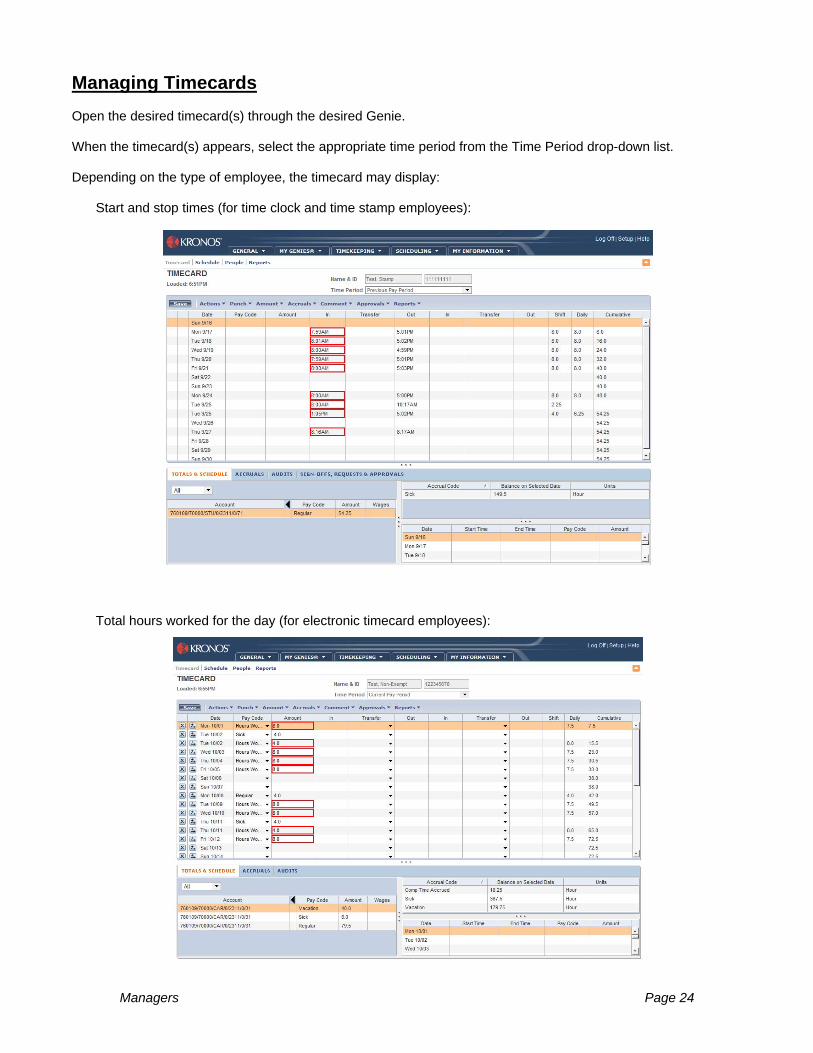
Managing Timecards Open the desired timecard(s) through the desired Genie. When the timecard(s) appears, select the appropriate time period from the Time Period drop-down list. Depending on the type of employee, the timecard may display:
Start and stop times (for time clock and time stamp employees):
Total hours worked for the day (for electronic timecard employees):

Managers Page 25
Timecard Indicators and Colors The appearance of the timecard cells changes to indicate a number of different conditions – called Exceptions. The causes of and corrections for these Exceptions will be explained under Editing Timecards. Description Indicator
This button allows you to clear the row’s contents. This button allows you to add an additional row for the day. If neither button shows to the left of the date, the employee is either not active on that day or the timecard has been Signed Off. No edits can be made; see you Timekeeper.
A solid red cell indicates a missed in-punch or a missed out-punch. If you move your mouse over a red cell (called a mouse-over) the system will define the problem.
A red outline around a cell indicates an exception. If you mouse over the cell, a message provides more information. Examples of exceptions include:
• A late or early punch as compared to a schedule • Unscheduled hours
A green outline around a cell indicates the exception has been reviewed.
A small yellow icon (resembles a Post-It note) in the upper right corner of a cell indicates a comment has been added. To view, see the Comments tab.
A red outline around the date indicates an unexcused absence. A blue outline around the date indicates an excused absence.
A transaction shown in purple indicates it was added by the system. Except for Holidays, changes must be made in the Schedule Editor.
An (x) before a labor account in between punches or in the Totals section of the timecard indicates that the account is not the home labor account for the employee (indicates a transfer to a department other than the home department).
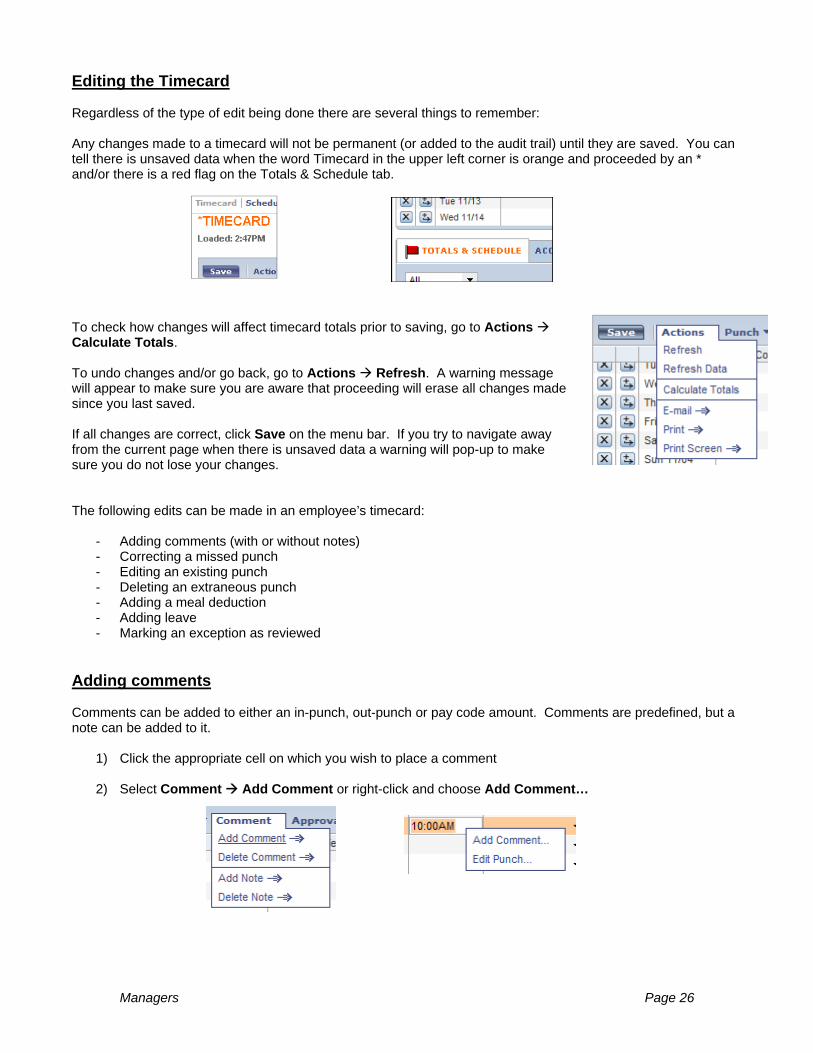
Managers Page 26
Editing the Timecard Regardless of the type of edit being done there are several things to remember: Any changes made to a timecard will not be permanent (or added to the audit trail) until they are saved. You can tell there is unsaved data when the word Timecard in the upper left corner is orange and proceeded by an * and/or there is a red flag on the Totals & Schedule tab. To check how changes will affect timecard totals prior to saving, go to Actions Calculate Totals. To undo changes and/or go back, go to Actions Refresh. A warning message will appear to make sure you are aware that proceeding will erase all changes made since you last saved. If all changes are correct, click Save on the menu bar. If you try to navigate away from the current page when there is unsaved data a warning will pop-up to make sure you do not lose your changes. The following edits can be made in an employee’s timecard:
- Adding comments (with or without notes) - Correcting a missed punch - Editing an existing punch - Deleting an extraneous punch - Adding a meal deduction - Adding leave - Marking an exception as reviewed
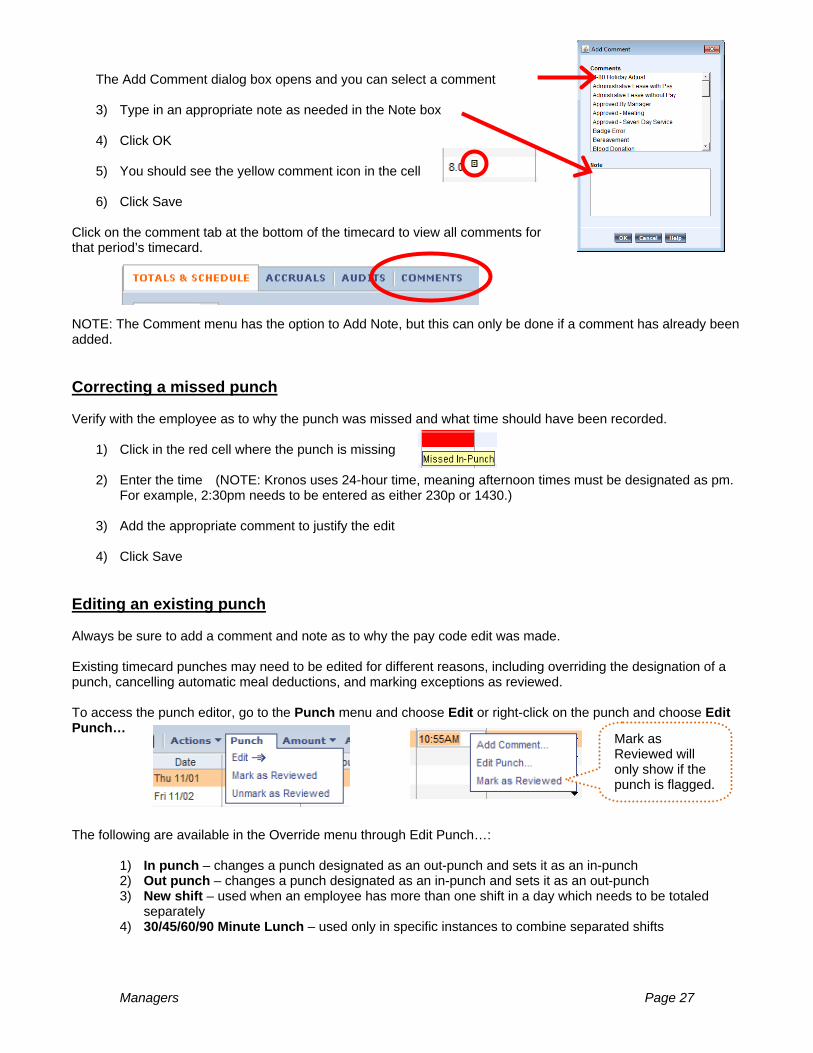
Adding comments Comments can be added to either an in-punch, out-punch or pay code amount. Comments are predefined, but a note can be added to it.
1) Click the appropriate cell on which you wish to place a comment
2) Select Comment Add Comment or right-click and choose Add Comment…
Managers Page 27
The Add Comment dialog box opens and you can select a comment 3) Type in an appropriate note as needed in the Note box 4) Click OK 5) You should see the yellow comment icon in the cell 6) Click Save
Click on the comment tab at the bottom of the timecard to view all comments for that period’s timecard. NOTE: The Comment menu has the option to Add Note, but this can only be done if a comment has already been added. Correcting a missed punch Verify with the employee as to why the punch was missed and what time should have been recorded.
1) Click in the red cell where the punch is missing 2) Enter the time (NOTE: Kronos uses 24-hour time, meaning afternoon times must be designated as pm.
For example, 2:30pm needs to be entered as either 230p or 1430.)
3) Add the appropriate comment to justify the edit
4) Click Save Editing an existing punch Always be sure to add a comment and note as to why the pay code edit was made. Existing timecard punches may need to be edited for different reasons, including overriding the designation of a punch, cancelling automatic meal deductions, and marking exceptions as reviewed. To access the punch editor, go to the Punch menu and choose Edit or right-click on the punch and choose Edit Punch… The following are available in the Override menu through Edit Punch…:
1) In punch – changes a punch designated as an out-punch and sets it as an in-punch 2) Out punch – changes a punch designated as an in-punch and sets it as an out-punch 3) New shift – used when an employee has more than one shift in a day which needs to be totaled
separately 4) 30/45/60/90 Minute Lunch – used only in specific instances to combine separated shifts
Mark as Reviewed will only show if the punch is flagged.

Managers Page 28
If a punch is outlined in red (flagged as Early/Late In, Early/Late Out, Unscheduled, etc) and has been reviewed, choose the Mark as Reviewed option from the punch menu. The outline will change from red to green. After making any edits, be sure to Save! Deleting an inappropriate punch Deleting a punch from a timecard is strongly discouraged because these punches reflect actual times an employee worked. However, some exceptions to this rule occur. For example, an employee might accidentally punch when logging on to approve the timecard. If this occurs, you can delete the extraneous punch. Remember all edits to a timecard – including deleted punches – are tracked in the Audits tab of the employee’s timecard. BEST PRACTICE: Before you delete a punch, add a comment and note to it, providing documentation as to why the punch was deleted. You cannot add a comment to a punch once it has been deleted. To delete a punch:
1) Click in the cell that contains the punch you want to delete 2) Select Comment Add from the menu bar or Right-click and select Add Comment… 3) Select one or more comments from the list. 4) Type in a note to explain why the punch is being deleted 5) Click OK 6) Select Save 7) Verify that the cursor is in the cell that contains the punch you want to delete 8) Press Delete 9) Select Save
Adding a meal deduction Automatic meal deductions usually take place after an employee has worked more than 6 continuous hours without clocking out; deductions will not happen until the employee reaches 6.25 hours. If a deduction needs to be made on a shift that is 6 hours or less, it must be entered manually. This employee came in after a doctor’s appointment but still took a one-hour lunch break at noon. To enter the break:
1) Click in the 2nd in cell and enter the time the meal period ended – LUNCH RETURN TIME 2) Click in the 2nd out cell and enter the time the meal period started – LUNCH START TIME
3) Click Save.
LUNCH RETURN
TIME
LUNCH START TIME
Managers Page 29
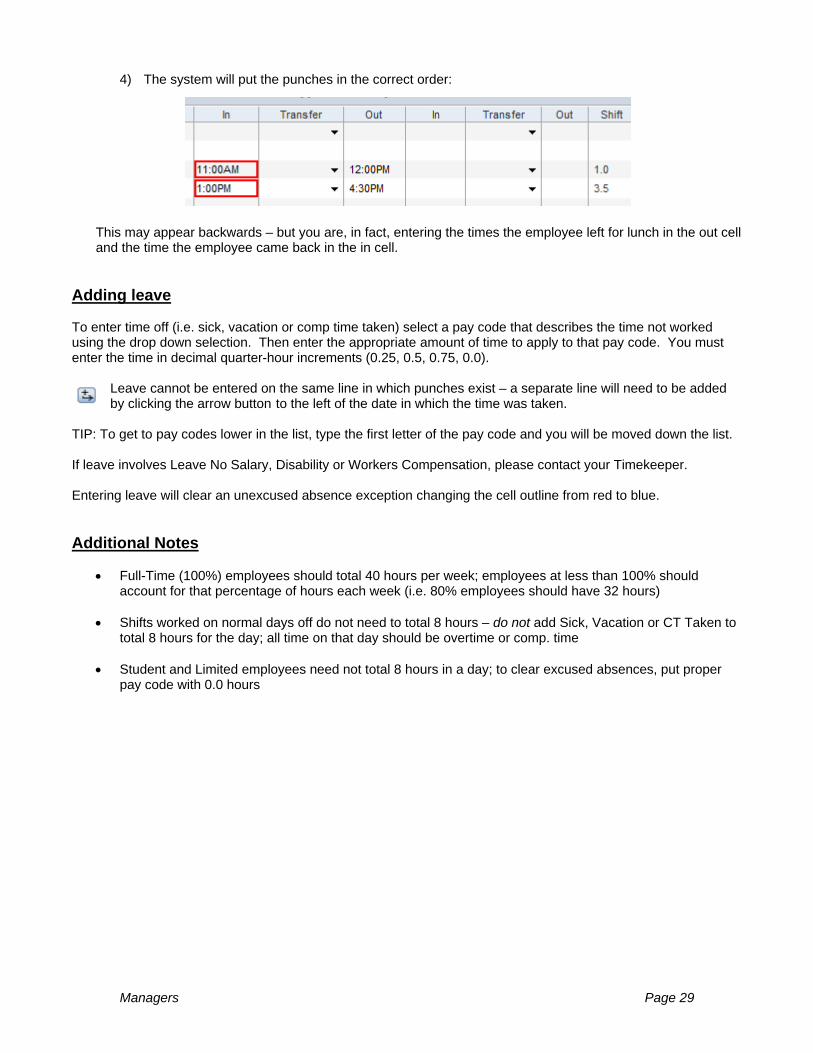
4) The system will put the punches in the correct order:
This may appear backwards – but you are, in fact, entering the times the employee left for lunch in the out cell and the time the employee came back in the in cell.
Adding leave To enter time off (i.e. sick, vacation or comp time taken) select a pay code that describes the time not worked using the drop down selection. Then enter the appropriate amount of time to apply to that pay code. You must enter the time in decimal quarter-hour increments (0.25, 0.5, 0.75, 0.0).
Leave cannot be entered on the same line in which punches exist – a separate line will need to be added by clicking the arrow button to the left of the date in which the time was taken.
TIP: To get to pay codes lower in the list, type the first letter of the pay code and you will be moved down the list. If leave involves Leave No Salary, Disability or Workers Compensation, please contact your Timekeeper. Entering leave will clear an unexcused absence exception changing the cell outline from red to blue. Additional Notes
Full-Time (100%) employees should total 40 hours per week; employees at less than 100% should account for that percentage of hours each week (i.e. 80% employees should have 32 hours)
Shifts worked on normal days off do not need to total 8 hours – do not add Sick, Vacation or CT Taken to
total 8 hours for the day; all time on that day should be overtime or comp. time
Student and Limited employees need not total 8 hours in a day; to clear excused absences, put proper pay code with 0.0 hours

Managers Page 30
Approving Overtime In addition to these procedures, be sure to adhere to your department’s internal policies and procedures. Overtime must be approved per day in Kronos. It will appear as Unapproved Time until you approve it. To approve overtime
1) Click on the day in which the overtime occurred 2) Go to the Approvals menu and choose Approve Overtime.
3) The following window will open:
You have the choice to approve All, None, or Some of the overtime. If you choose to approve Some, enter the approved Amount in the lower box. Do not then choose None for the remaining time (that will override the “Some” amount already approved).
NOTE: If you add a Comment through the Approve Overtime window the comment icon will not show on the timecard. If you want the icon to show you must add the Comment on the punch instead of through the Approve Overtime function.
Managers Page 31
Approving Timecards Employees must approve their own timecard for each pay cycle. Employees should be careful to approve the correct pay cycle (e.g. Previous Pay Period if it is after the pay cycle end date). An employee approves his own timecard to indicate agreement with the reported time. It is the manager’s responsibility to make sure his or her employees have approved their timecards. Managers should not approve the timecard without the employee’s approval. Certain exceptions are allowed. In extenuating circumstances the manager may approve the timecard without the employee’s approval, but the timecard should be printed out for the employee to physically sign. The signed timecard should be filed in the employee’s personnel file. Managers must also approve their employee’s timecards by the specified deadline (which varies per pay cycle), but only after the employee has approved. NOTE: No manager may remove an employee’s or another manager’s approval. Employees fall into two different pay cycles:
The pay cycle for Exempt employees corresponds with the calendar month; for example, November runs from November 1st through November 30th. Employees should approve their own timecards on the first few days of the month and the manager should approve after that.
Non Exempt employees have a bi-weekly pay cycle. Due to the frequency, there may only be one or two days for employees and then supervisors to approve timecards before payroll upload.
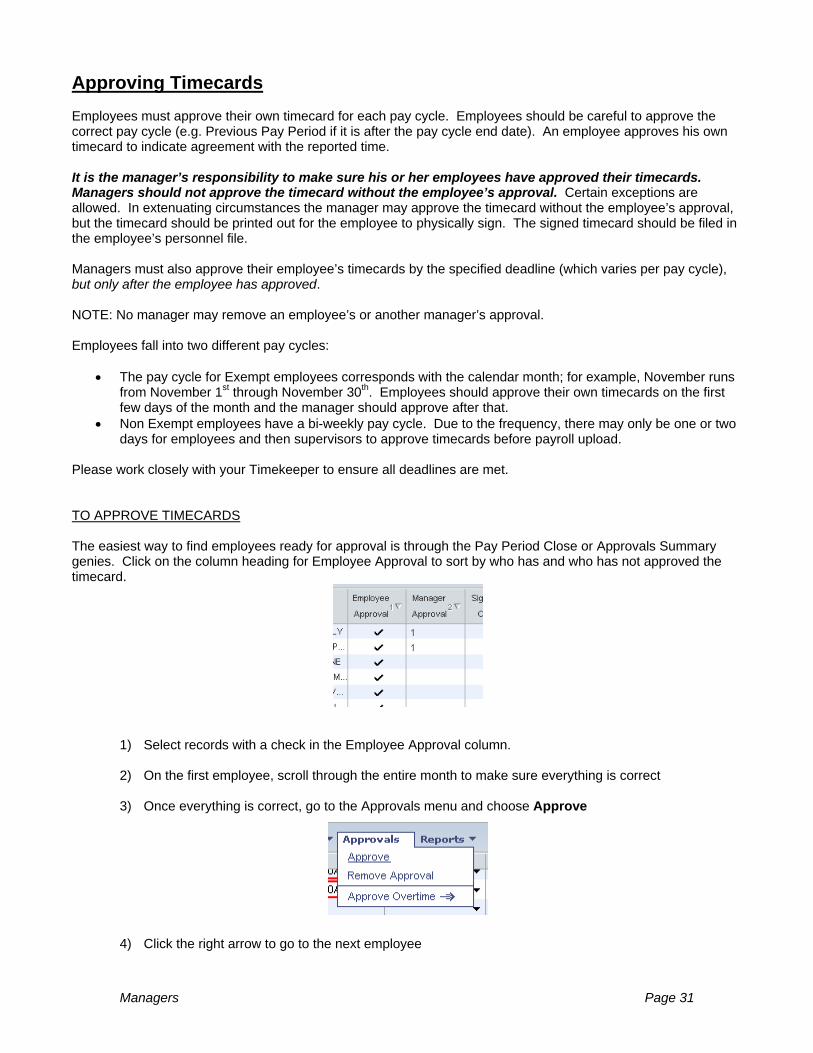
Please work closely with your Timekeeper to ensure all deadlines are met. TO APPROVE TIMECARDS The easiest way to find employees ready for approval is through the Pay Period Close or Approvals Summary genies. Click on the column heading for Employee Approval to sort by who has and who has not approved the timecard.
1) Select records with a check in the Employee Approval column.
2) On the first employee, scroll through the entire month to make sure everything is correct
3) Once everything is correct, go to the Approvals menu and choose Approve
4) Click the right arrow to go to the next employee
Managers Page 32
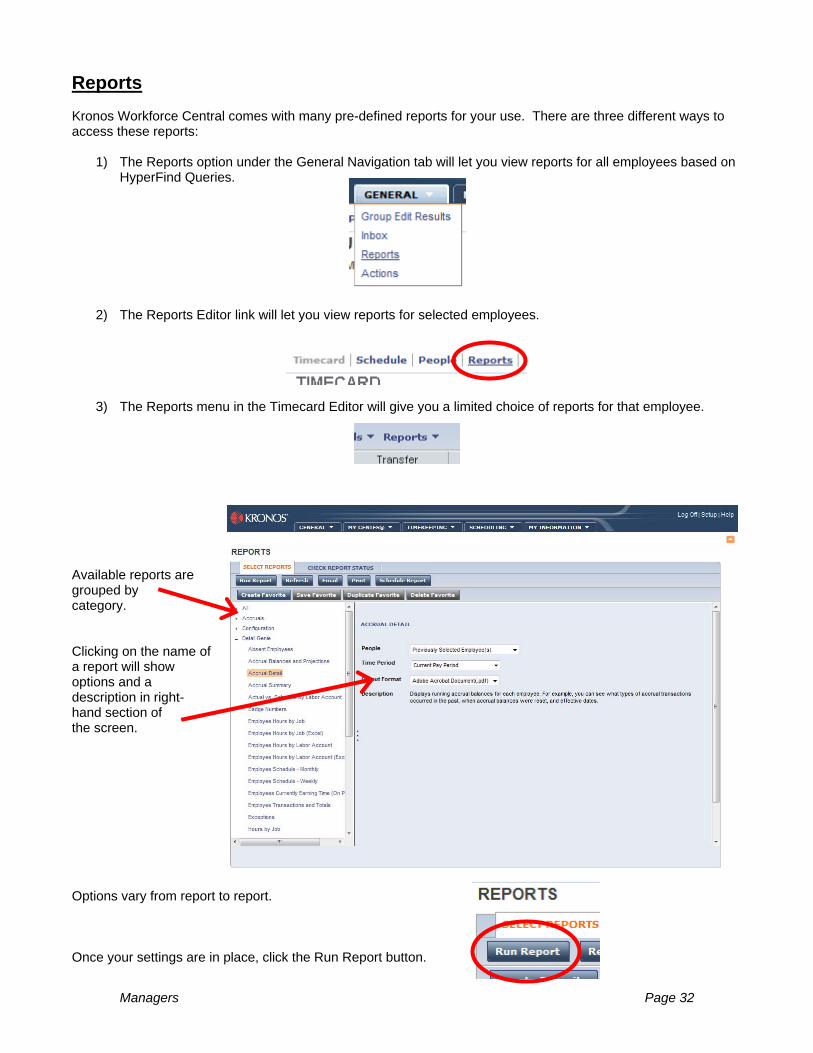
Reports Kronos Workforce Central comes with many pre-defined reports for your use. There are three different ways to access these reports:
1) The Reports option under the General Navigation tab will let you view reports for all employees based on HyperFind Queries.
2) The Reports Editor link will let you view reports for selected employees. 3) The Reports menu in the Timecard Editor will give you a limited choice of reports for that employee.
Available reports are grouped by category. Clicking on the name of a report will show options and a description in right-hand section of the screen. Options vary from report to report. Once your settings are in place, click the Run Report button.
Managers Page 33
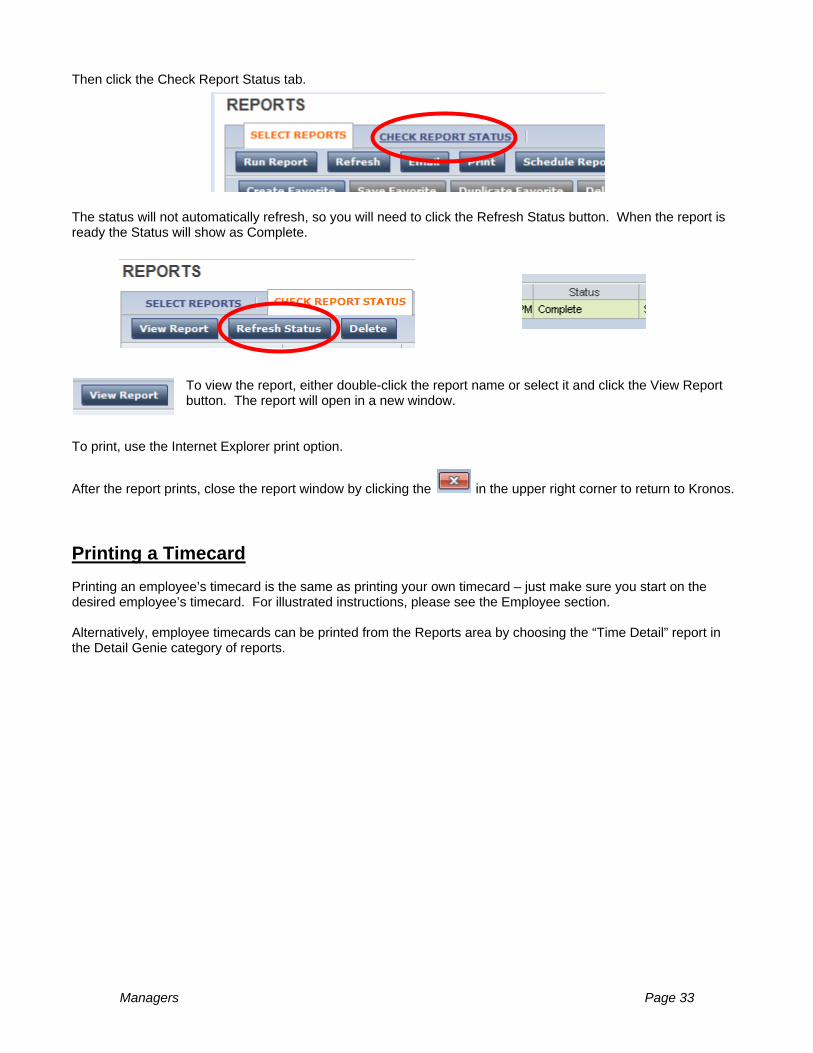
Then click the Check Report Status tab. The status will not automatically refresh, so you will need to click the Refresh Status button. When the report is ready the Status will show as Complete.
To view the report, either double-click the report name or select it and click the View Report button. The report will open in a new window.
To print, use the Internet Explorer print option.
After the report prints, close the report window by clicking the in the upper right corner to return to Kronos. Printing a Timecard Printing an employee’s timecard is the same as printing your own timecard – just make sure you start on the desired employee’s timecard. For illustrated instructions, please see the Employee section. Alternatively, employee timecards can be printed from the Reports area by choosing the “Time Detail” report in the Detail Genie category of reports.

Managers Page 34
Timekeepers Page 35
SECTION IV
TIMEKEEPERS
Timekeepers Page 36
Definition of a Kronos Timekeeper Timekeepers, also known as Payroll and Office Managers, are responsible for ensuring proper setup and payment of employees. They assist managers with reconciling timecards and serve as the Kronos contact person for their department. Responsibilities include:
Hiring paperwork Entering to PPS Setting up employees in Kronos (People Record) Entering schedules Reviewing hours entered (working with manager) – every week
Missed punches Unexcused absences Late or Early punches (in or out) Unscheduled work Unapproved overtime Ensuring 40 hours for Career FTE
Transferring time for students working more than one job/department Ensuring overtime procedures are followed Making sure employee approvals are completed at the end of each pay cycle Reviewing Kronos upload reports after each payroll and accrual upload
Timekeepers should familiarize themselves with the different types of employees and time entry methods as documented in the Employee section of this manual. They should also be aware of the Manager duties as outlined in the Manager section. Timekeepers should only perform the Manager duties for employees they directly supervise. ** For information regarding navigation throughout the Kronos application, please refer to the Manager section.
Timekeepers Page 37
Setting Up Employees
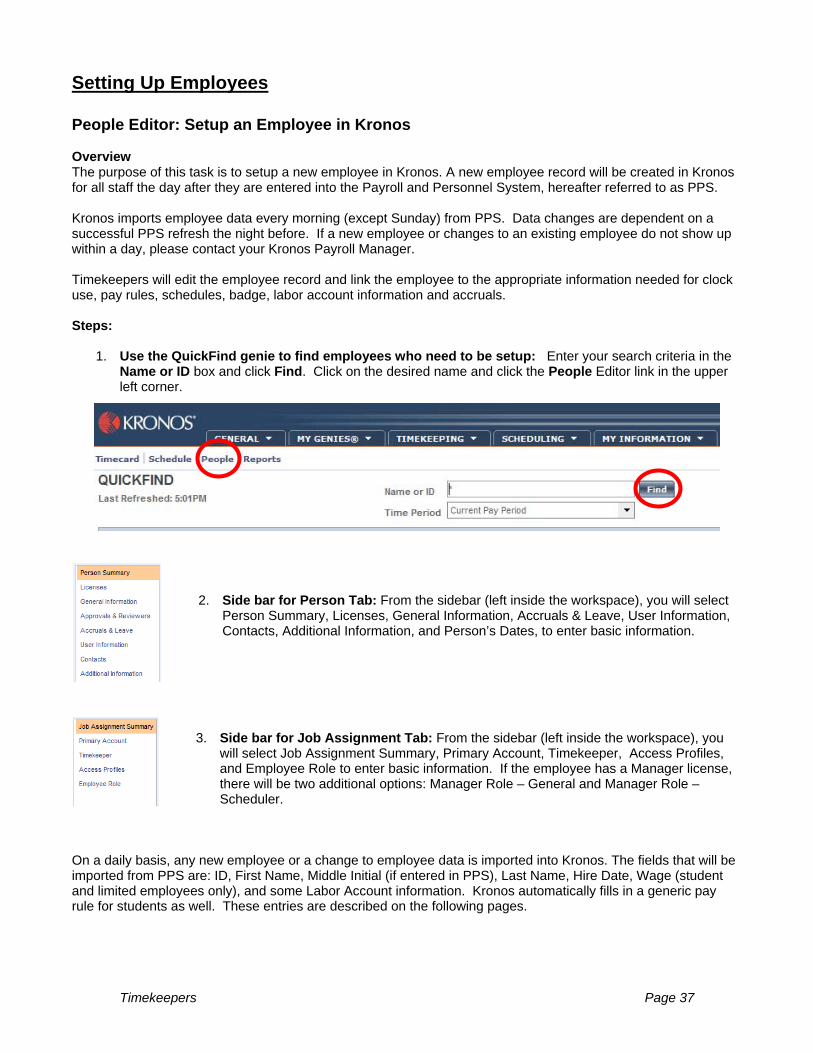
People Editor: Setup an Employee in Kronos Overview The purpose of this task is to setup a new employee in Kronos. A new employee record will be created in Kronos for all staff the day after they are entered into the Payroll and Personnel System, hereafter referred to as PPS.
Kronos imports employee data every morning (except Sunday) from PPS. Data changes are dependent on a successful PPS refresh the night before. If a new employee or changes to an existing employee do not show up within a day, please contact your Kronos Payroll Manager.
Timekeepers will edit the employee record and link the employee to the appropriate information needed for clock use, pay rules, schedules, badge, labor account information and accruals.
Steps:
1. Use the QuickFind genie to find employees who need to be setup: Enter your search criteria in the Name or ID box and click Find. Click on the desired name and click the People Editor link in the upper left corner.
2. Side bar for Person Tab: From the sidebar (left inside the workspace), you will select Person Summary, Licenses, General Information, Accruals & Leave, User Information, Contacts, Additional Information, and Person’s Dates, to enter basic information.
3. Side bar for Job Assignment Tab: From the sidebar (left inside the workspace), you
will select Job Assignment Summary, Primary Account, Timekeeper, Access Profiles, and Employee Role to enter basic information. If the employee has a Manager license, there will be two additional options: Manager Role – General and Manager Role – Scheduler.
On a daily basis, any new employee or a change to employee data is imported into Kronos. The fields that will be imported from PPS are: ID, First Name, Middle Initial (if entered in PPS), Last Name, Hire Date, Wage (student and limited employees only), and some Labor Account information. Kronos automatically fills in a generic pay rule for students as well. These entries are described on the following pages.
Timekeepers Page 38
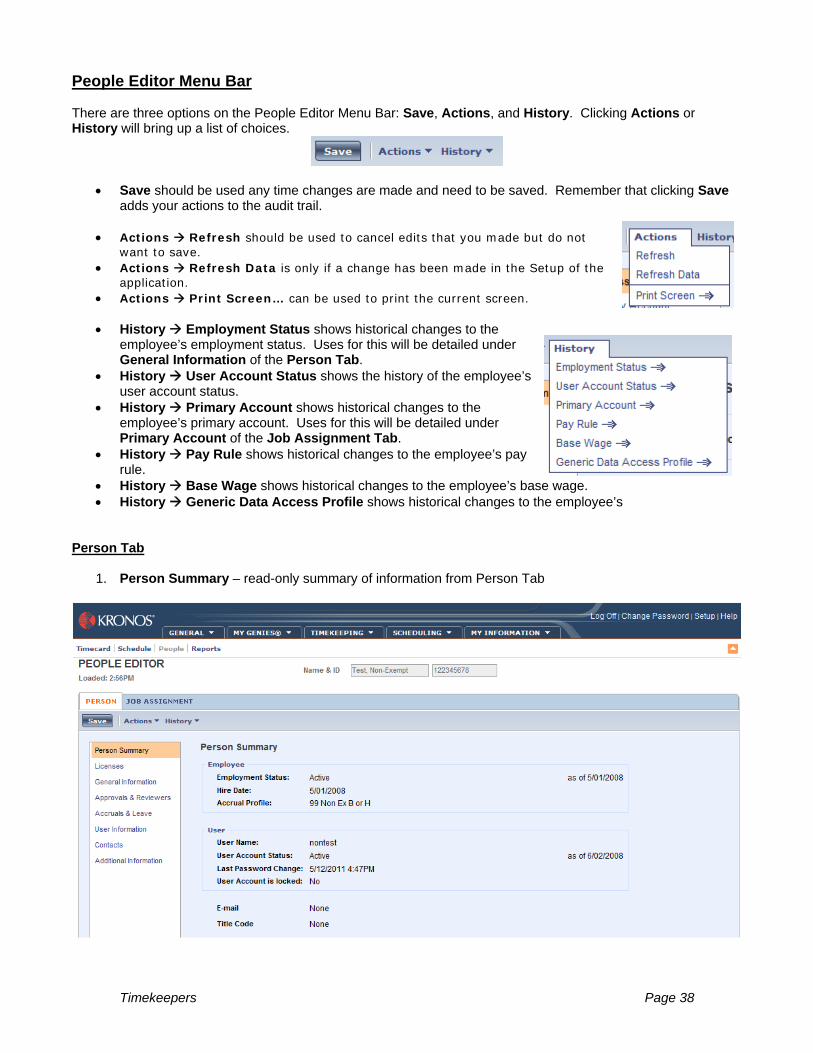
People Editor Menu Bar There are three options on the People Editor Menu Bar: Save, Actions, and History. Clicking Actions or History will bring up a list of choices.
Save should be used any time changes are made and need to be saved. Remember that clicking Save adds your actions to the audit trail.
Actions Refresh should be used to cancel edits that you made but do not
want to save. Actions Refresh Data is only if a change has been made in the Setup of the
application. Actions Print Screen… can be used to print the current screen. History Employment Status shows historical changes to the
employee’s employment status. Uses for this will be detailed under General Information of the Person Tab.
History User Account Status shows the history of the employee’s user account status.
History Primary Account shows historical changes to the employee’s primary account. Uses for this will be detailed under Primary Account of the Job Assignment Tab.
History Pay Rule shows historical changes to the employee’s pay rule.
History Base Wage shows historical changes to the employee’s base wage. History Generic Data Access Profile shows historical changes to the employee’s
Person Tab
1. Person Summary – read-only summary of information from Person Tab
Timekeepers Page 39
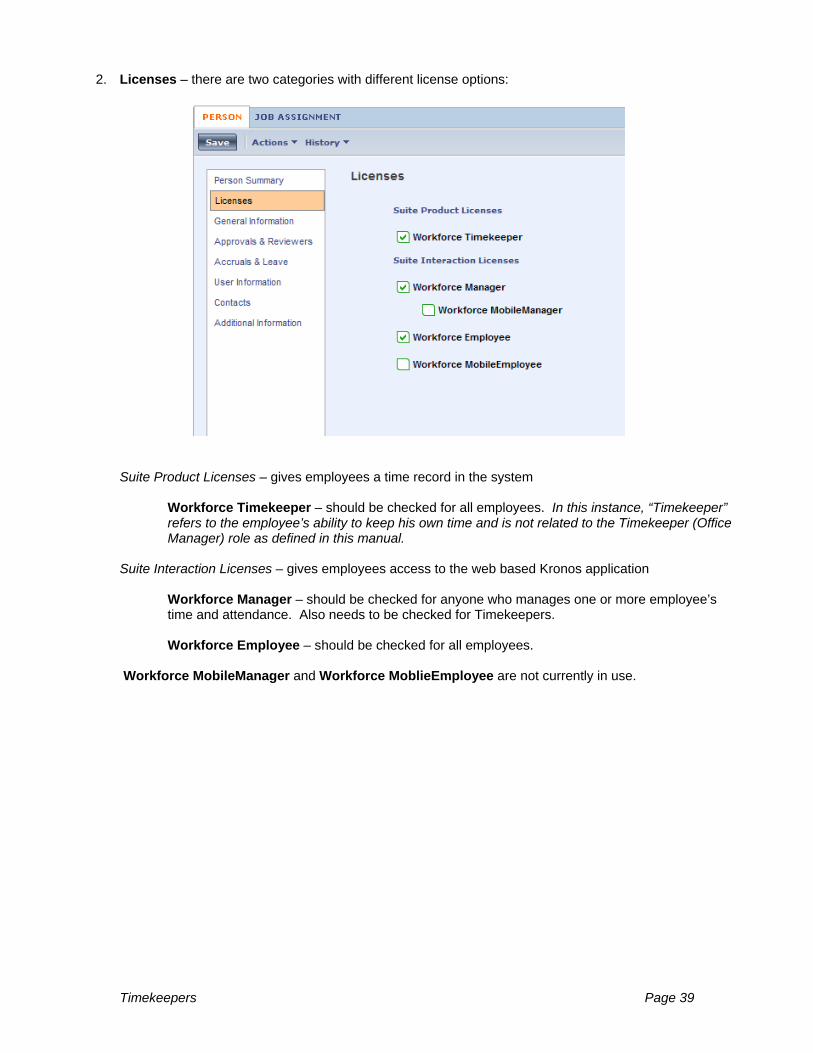
2. Licenses – there are two categories with different license options:
Suite Product Licenses – gives employees a time record in the system Workforce Timekeeper – should be checked for all employees. In this instance, “Timekeeper” refers to the employee’s ability to keep his own time and is not related to the Timekeeper (Office Manager) role as defined in this manual.
Suite Interaction Licenses – gives employees access to the web based Kronos application
Workforce Manager – should be checked for anyone who manages one or more employee’s time and attendance. Also needs to be checked for Timekeepers.
Workforce Employee – should be checked for all employees.
Workforce MobileManager and Workforce MoblieEmployee are not currently in use.
Timekeepers Page 40
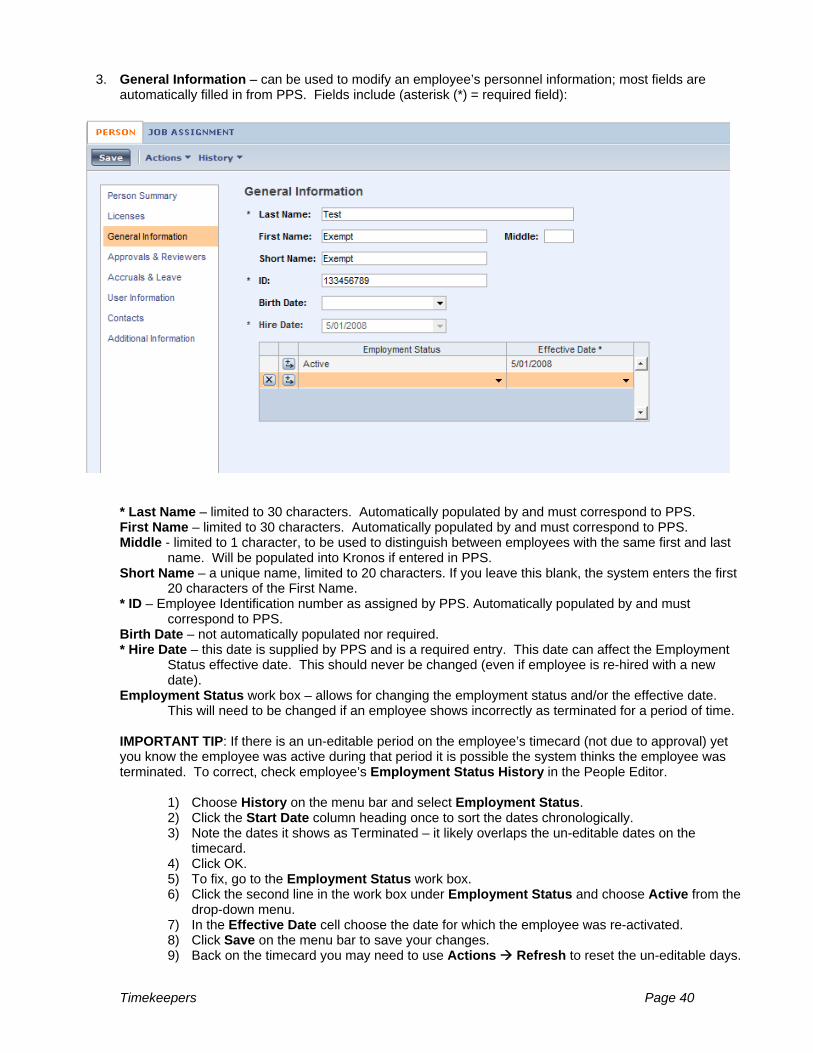
3. General Information – can be used to modify an employee’s personnel information; most fields are automatically filled in from PPS. Fields include (asterisk (*) = required field):
* Last Name – limited to 30 characters. Automatically populated by and must correspond to PPS. First Name – limited to 30 characters. Automatically populated by and must correspond to PPS. Middle - limited to 1 character, to be used to distinguish between employees with the same first and last
name. Will be populated into Kronos if entered in PPS. Short Name – a unique name, limited to 20 characters. If you leave this blank, the system enters the first
20 characters of the First Name. * ID – Employee Identification number as assigned by PPS. Automatically populated by and must
correspond to PPS. Birth Date – not automatically populated nor required. * Hire Date – this date is supplied by PPS and is a required entry. This date can affect the Employment
Status effective date. This should never be changed (even if employee is re-hired with a new date).
Employment Status work box – allows for changing the employment status and/or the effective date. This will need to be changed if an employee shows incorrectly as terminated for a period of time.
IMPORTANT TIP: If there is an un-editable period on the employee’s timecard (not due to approval) yet you know the employee was active during that period it is possible the system thinks the employee was terminated. To correct, check employee’s Employment Status History in the People Editor.
1) Choose History on the menu bar and select Employment Status. 2) Click the Start Date column heading once to sort the dates chronologically. 3) Note the dates it shows as Terminated – it likely overlaps the un-editable dates on the
timecard. 4) Click OK. 5) To fix, go to the Employment Status work box. 6) Click the second line in the work box under Employment Status and choose Active from the
drop-down menu. 7) In the Effective Date cell choose the date for which the employee was re-activated. 8) Click Save on the menu bar to save your changes. 9) Back on the timecard you may need to use Actions Refresh to reset the un-editable days.
Timekeepers Page 41
4. Approvals & Reviewers – not currently in use
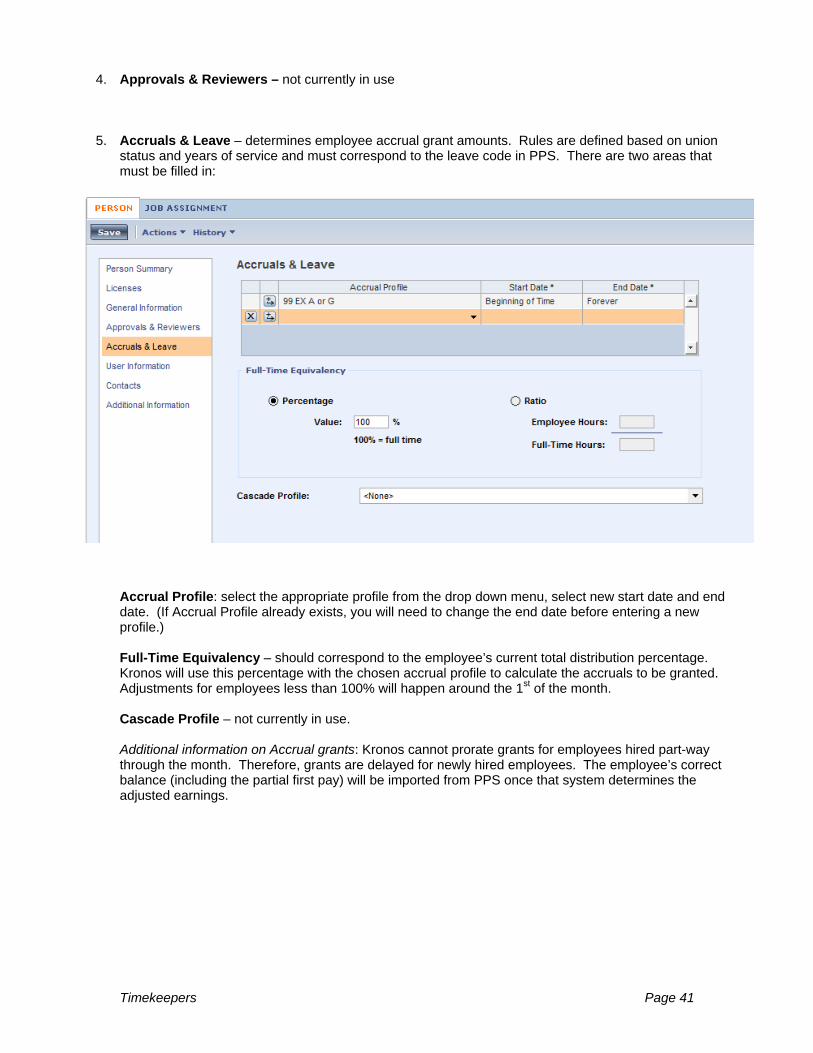
5. Accruals & Leave – determines employee accrual grant amounts. Rules are defined based on union status and years of service and must correspond to the leave code in PPS. There are two areas that must be filled in:
Accrual Profile: select the appropriate profile from the drop down menu, select new start date and end date. (If Accrual Profile already exists, you will need to change the end date before entering a new profile.)
Full-Time Equivalency – should correspond to the employee’s current total distribution percentage. Kronos will use this percentage with the chosen accrual profile to calculate the accruals to be granted. Adjustments for employees less than 100% will happen around the 1st of the month. Cascade Profile – not currently in use. Additional information on Accrual grants: Kronos cannot prorate grants for employees hired part-way through the month. Therefore, grants are delayed for newly hired employees. The employee’s correct balance (including the partial first pay) will be imported from PPS once that system determines the adjusted earnings.
Timekeepers Page 42
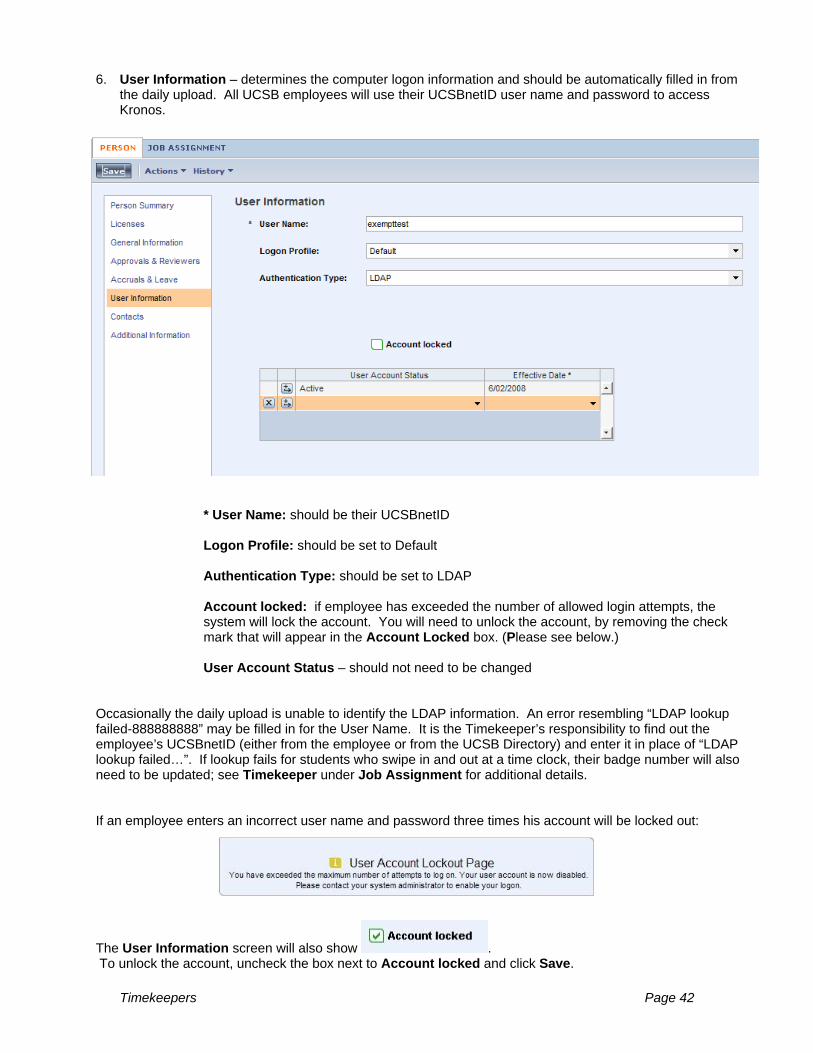
6. User Information – determines the computer logon information and should be automatically filled in from the daily upload. All UCSB employees will use their UCSBnetID user name and password to access Kronos.
* User Name: should be their UCSBnetID Logon Profile: should be set to Default Authentication Type: should be set to LDAP Account locked: if employee has exceeded the number of allowed login attempts, the system will lock the account. You will need to unlock the account, by removing the check mark that will appear in the Account Locked box. (Please see below.) User Account Status – should not need to be changed
Occasionally the daily upload is unable to identify the LDAP information. An error resembling “LDAP lookup failed-888888888” may be filled in for the User Name. It is the Timekeeper’s responsibility to find out the employee’s UCSBnetID (either from the employee or from the UCSB Directory) and enter it in place of “LDAP lookup failed…”. If lookup fails for students who swipe in and out at a time clock, their badge number will also need to be updated; see Timekeeper under Job Assignment for additional details.
If an employee enters an incorrect user name and password three times his account will be locked out:
The User Information screen will also show . To unlock the account, uncheck the box next to Account locked and click Save.
Timekeepers Page 43
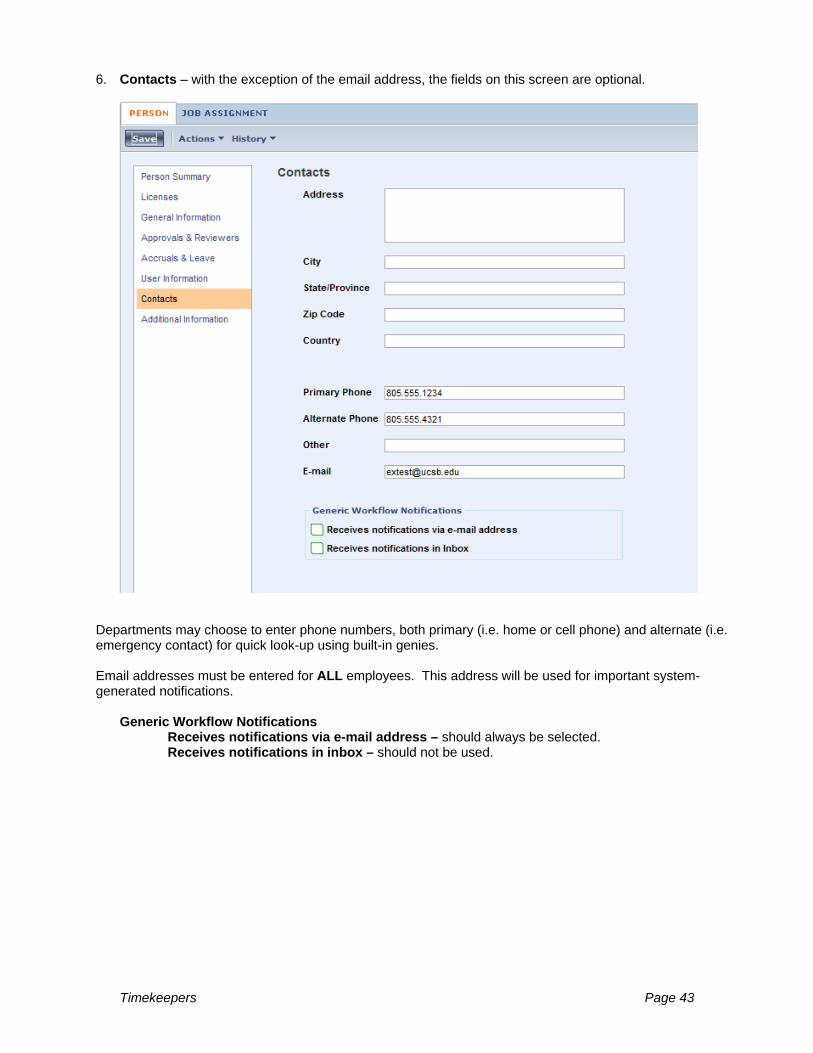
6. Contacts – with the exception of the email address, the fields on this screen are optional.
Departments may choose to enter phone numbers, both primary (i.e. home or cell phone) and alternate (i.e. emergency contact) for quick look-up using built-in genies. Email addresses must be entered for ALL employees. This address will be used for important system-generated notifications.
Generic Workflow Notifications Receives notifications via e-mail address – should always be selected. Receives notifications in inbox – should not be used.
Timekeepers Page 44
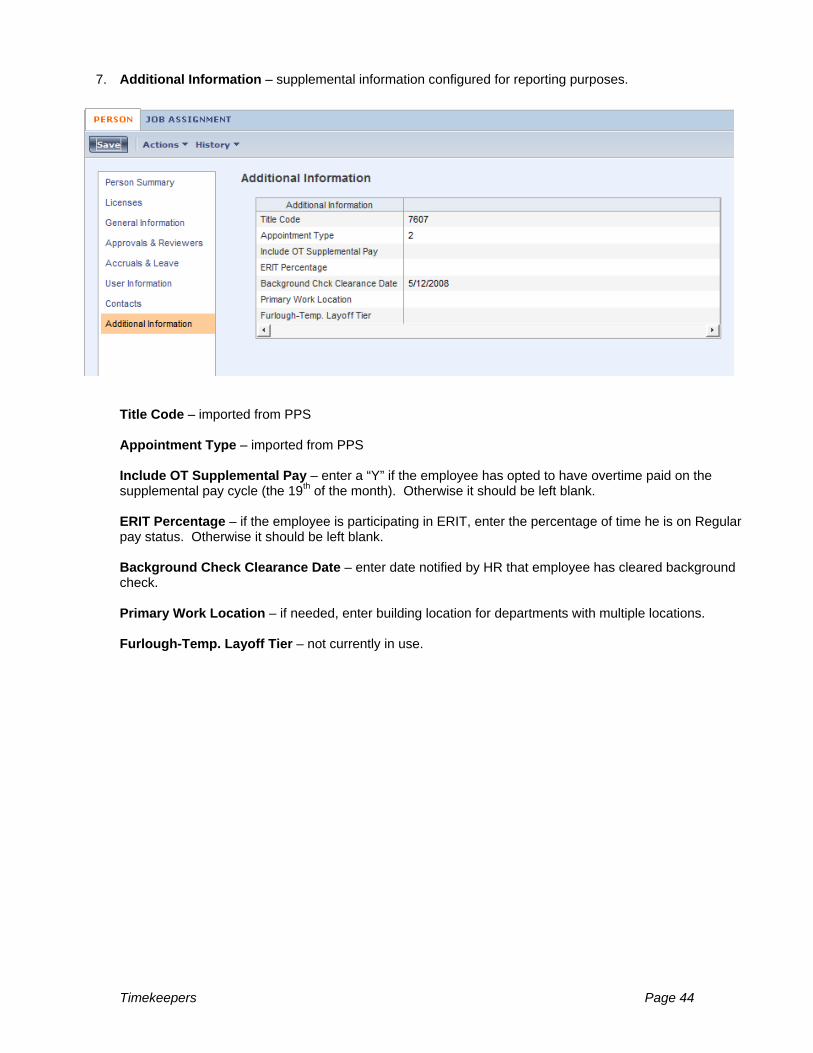
7. Additional Information – supplemental information configured for reporting purposes.
Title Code – imported from PPS Appointment Type – imported from PPS Include OT Supplemental Pay – enter a “Y” if the employee has opted to have overtime paid on the supplemental pay cycle (the 19th of the month). Otherwise it should be left blank. ERIT Percentage – if the employee is participating in ERIT, enter the percentage of time he is on Regular pay status. Otherwise it should be left blank. Background Check Clearance Date – enter date notified by HR that employee has cleared background check. Primary Work Location – if needed, enter building location for departments with multiple locations. Furlough-Temp. Layoff Tier – not currently in use.

Timekeepers Page 45
Job Assignment Tab 1. Job Assignment Summary – read-only summary of information from Job Assignment Tab.

Timekeepers Page 46
2. Primary Account – Displays the current home labor account assigned in PPS.
Primary Account work box Most of the primary account is imported from PPS initially, but the Access Control number for newly
hired employees must be set by the Timekeeper. Special Function codes have been set up for certain departments and, if applicable, need to be
entered. To make changes to the primary labor account, place your cursor in the second box under *Primary
Labor Account, click the down arrow and choose Search…. The Select Primary Labor Account window will open. Select the radio button of each labor level, scroll through the corresponding list and double click to select a new entry for it.
There are Seven Labor Levels: Account – 6-digit assigned department/unit payroll
account Fund – 5-digit assigned fund Project Code – department defined code; optional Cost Center – department defined code; optional Access Control – Kronos defined manager codes; will
determine which manager(s) can see the employee’s record
Special Function – 4-digit department defined codes for tracking purposes; optional
DistNum – 2-digit distribution number; corresponds to active PPS distribution
Click OK once labor levels have been selected
Choose an Effective Date for the account by placing your cursor in the second box under *Effective
Date, click the down arrow and choose the correct date from the pop-up calendar. The date can also be typed in the box.
NOTE: Pay special attention to the effective date – Kronos sets it to the day it updates from PPS, but that is not necessarily the accurate date. Make sure the effective date matches the change to the primary account – distribution changes, manager changes, etc. Effective dates can be changed retroactively (up to the last Sign-off date).
Timekeepers Page 47
Some employees have more than one labor level to which their hours need to be charged. Kronos can only handle one primary labor account. Any hours to be paid on a different labor level will have to be transferred in the timecard (explained in the Editing Timecard section) or through the employee’s schedule. If the different labor levels include different department accounts, the Timekeepers in each department need to work together to determine who will have the primary account. Kronos will set the primary labor account based on the highest distribution percentage (among other factors). For more on this, please refer to “Sharing Employees” later in this section.
Reports To: select the name of the employee’s manager who approves the timecard.
* NOTE – if the manager does not show in the list it is because he/she has not been assigned a manager license.
Timekeepers Page 48
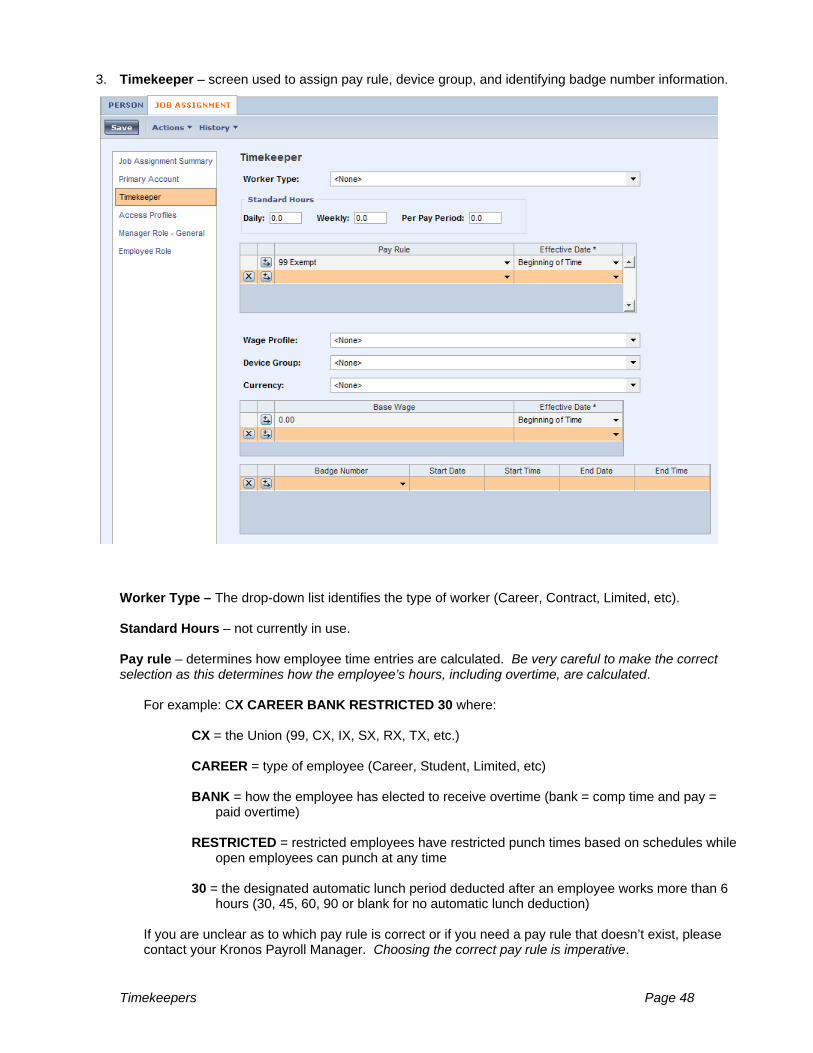
3. Timekeeper – screen used to assign pay rule, device group, and identifying badge number information.
Worker Type – The drop-down list identifies the type of worker (Career, Contract, Limited, etc). Standard Hours – not currently in use. Pay rule – determines how employee time entries are calculated. Be very careful to make the correct selection as this determines how the employee’s hours, including overtime, are calculated.
For example: CX CAREER BANK RESTRICTED 30 where:
CX = the Union (99, CX, IX, SX, RX, TX, etc.) CAREER = type of employee (Career, Student, Limited, etc) BANK = how the employee has elected to receive overtime (bank = comp time and pay =
paid overtime) RESTRICTED = restricted employees have restricted punch times based on schedules while
open employees can punch at any time 30 = the designated automatic lunch period deducted after an employee works more than 6
hours (30, 45, 60, 90 or blank for no automatic lunch deduction)
If you are unclear as to which pay rule is correct or if you need a pay rule that doesn’t exist, please contact your Kronos Payroll Manager. Choosing the correct pay rule is imperative.
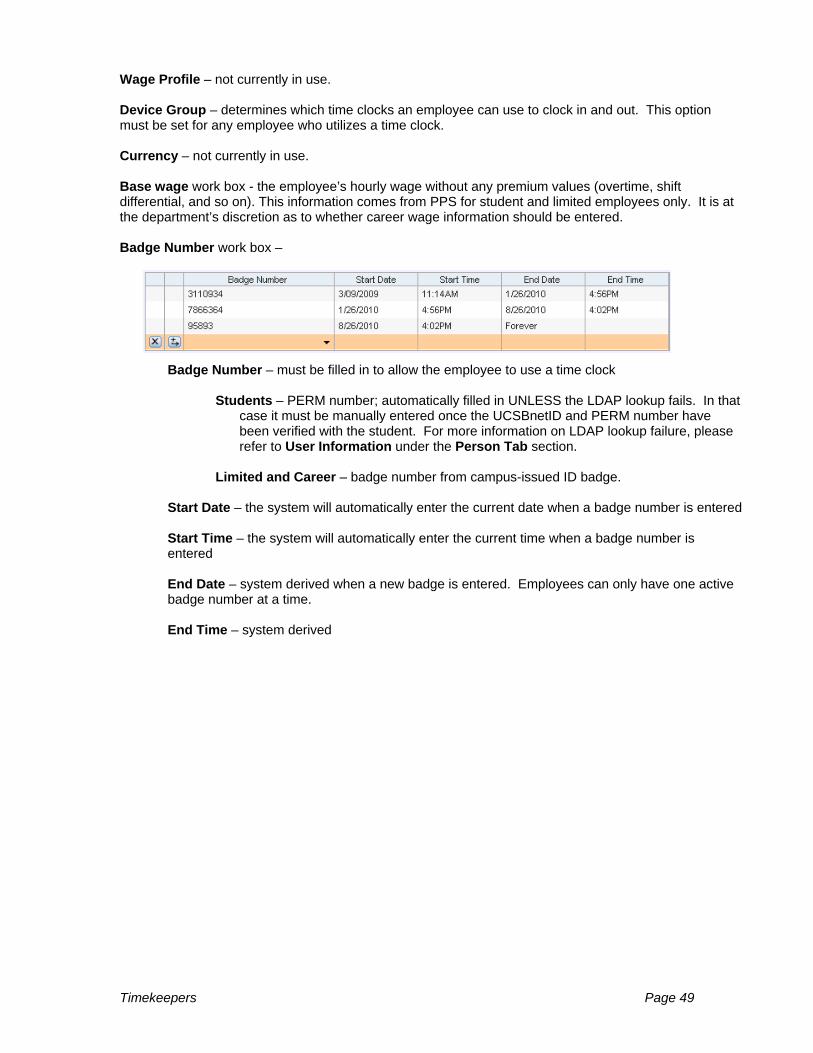
Timekeepers Page 49
Wage Profile – not currently in use.
Device Group – determines which time clocks an employee can use to clock in and out. This option must be set for any employee who utilizes a time clock. Currency – not currently in use. Base wage work box - the employee’s hourly wage without any premium values (overtime, shift differential, and so on). This information comes from PPS for student and limited employees only. It is at the department’s discretion as to whether career wage information should be entered. Badge Number work box –
Badge Number – must be filled in to allow the employee to use a time clock
Students – PERM number; automatically filled in UNLESS the LDAP lookup fails. In that case it must be manually entered once the UCSBnetID and PERM number have been verified with the student. For more information on LDAP lookup failure, please refer to User Information under the Person Tab section.
Limited and Career – badge number from campus-issued ID badge.
Start Date – the system will automatically enter the current date when a badge number is entered Start Time – the system will automatically enter the current time when a badge number is entered End Date – system derived when a new badge is entered. Employees can only have one active badge number at a time. End Time – system derived
Timekeepers Page 50
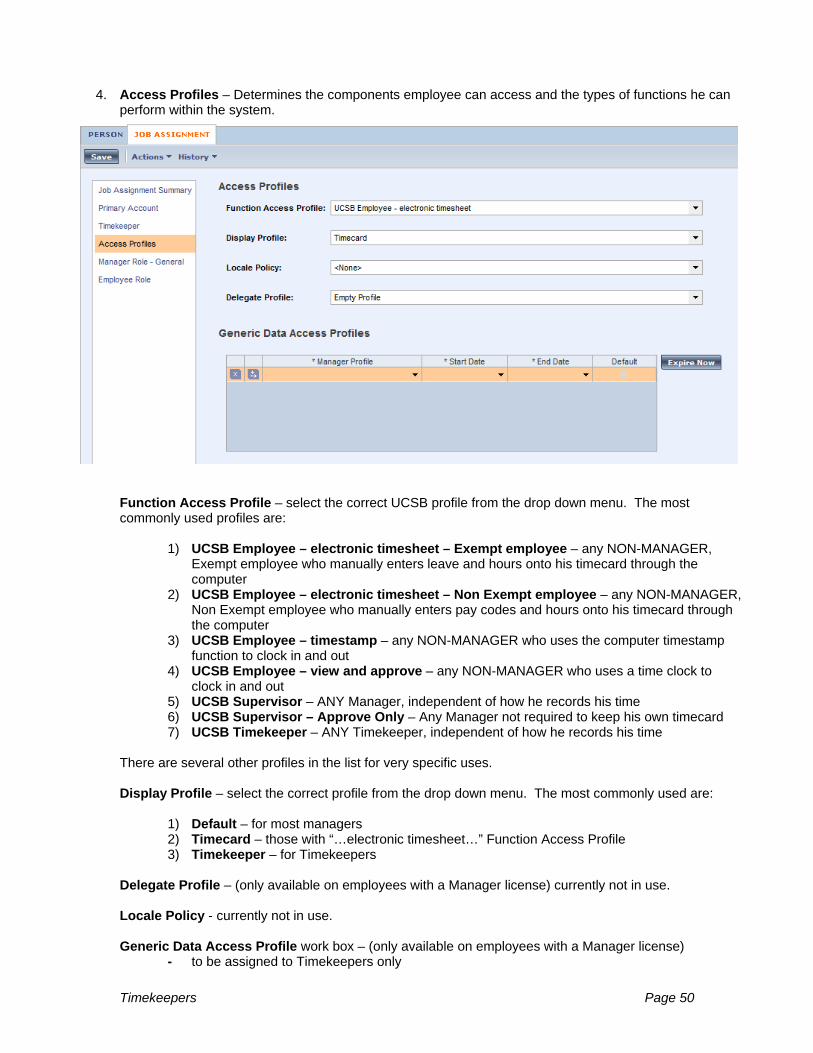
4. Access Profiles – Determines the components employee can access and the types of functions he can
perform within the system.
Function Access Profile – select the correct UCSB profile from the drop down menu. The most commonly used profiles are:
1) UCSB Employee – electronic timesheet – Exempt employee – any NON-MANAGER, Exempt employee who manually enters leave and hours onto his timecard through the computer
2) UCSB Employee – electronic timesheet – Non Exempt employee – any NON-MANAGER, Non Exempt employee who manually enters pay codes and hours onto his timecard through the computer
3) UCSB Employee – timestamp – any NON-MANAGER who uses the computer timestamp function to clock in and out
4) UCSB Employee – view and approve – any NON-MANAGER who uses a time clock to clock in and out
5) UCSB Supervisor – ANY Manager, independent of how he records his time 6) UCSB Supervisor – Approve Only – Any Manager not required to keep his own timecard 7) UCSB Timekeeper – ANY Timekeeper, independent of how he records his time
There are several other profiles in the list for very specific uses. Display Profile – select the correct profile from the drop down menu. The most commonly used are:
1) Default – for most managers 2) Timecard – those with “…electronic timesheet…” Function Access Profile 3) Timekeeper – for Timekeepers
Delegate Profile – (only available on employees with a Manager license) currently not in use. Locale Policy - currently not in use. Generic Data Access Profile work box – (only available on employees with a Manager license)
- to be assigned to Timekeepers only

Timekeepers Page 51
5. Manager Role – General (only available on employees with a Manager license) – determines the access the employee has AS A MANAGER.
Employee Group – determines the group of employees to which the manager has access; groups are created by the System Administrators
Can See Transferred Employees should be checked so the manager can see any employee transferred to his account. Labor Level Transfer Set – determines the labor account levels the manager can use for transfers.
- Managers – should be left as Empty Profile - Timekeepers – should be set to All Labor Accounts
Pay Codes “Edits” Profile – determines the pay codes to which the manager has access when editing another employee’s timecard
- Managers – should be set to Supervisor - Timekeepers – should be set to Timekeepers
Pay Codes “View” Profile – determines the pay codes to which the manager has access when running reports. Should be set to All Pay Codes for both Managers and Timekeepers.
Work Rule Profile – determines the work rules the manager can use for transfers.
- Managers – should be left as Empty Profile - Timekeepers – should be set to All Labor Accounts
Reports Profile – determines the reports the manager has access to run in the Reports area. Should be set to Supervisor for both Managers and Timekeepers
Can Approve Overtime Request – should be checked if the manager is allowed to approve overtime.
Currency Display Preference – currently not in use
Timekeepers Page 52
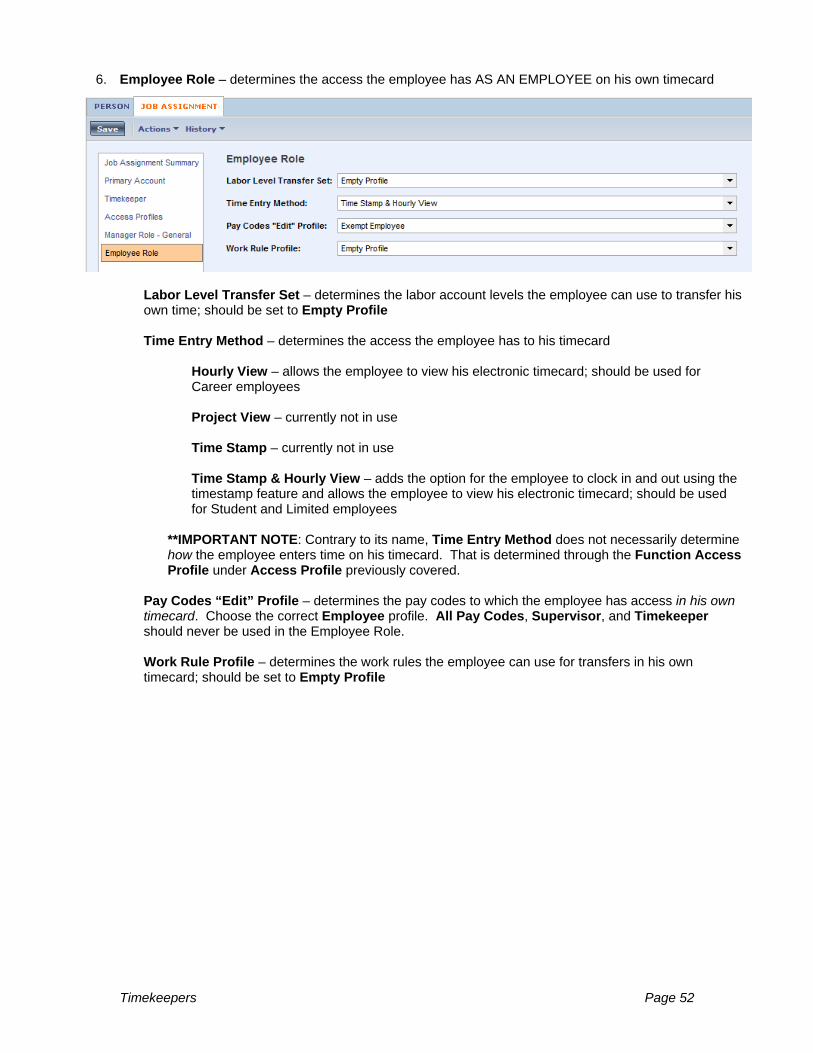
6. Employee Role – determines the access the employee has AS AN EMPLOYEE on his own timecard
Labor Level Transfer Set – determines the labor account levels the employee can use to transfer his own time; should be set to Empty Profile Time Entry Method – determines the access the employee has to his timecard
Hourly View – allows the employee to view his electronic timecard; should be used for Career employees Project View – currently not in use Time Stamp – currently not in use Time Stamp & Hourly View – adds the option for the employee to clock in and out using the timestamp feature and allows the employee to view his electronic timecard; should be used for Student and Limited employees
**IMPORTANT NOTE: Contrary to its name, Time Entry Method does not necessarily determine how the employee enters time on his timecard. That is determined through the Function Access Profile under Access Profile previously covered.
Pay Codes “Edit” Profile – determines the pay codes to which the employee has access in his own timecard. Choose the correct Employee profile. All Pay Codes, Supervisor, and Timekeeper should never be used in the Employee Role. Work Rule Profile – determines the work rules the employee can use for transfers in his own timecard; should be set to Empty Profile
Timekeepers Page 53
Sharing Employees Kronos does not effortlessly handle employees who work in multiple areas, so Timekeepers in the different areas need to communicate ahead of time and throughout the dual employment. Hours will need to be closely monitored as well. The following practices are strongly recommended:
1) When hiring an employee who already works for another department, contact the Timekeeper of that department. The two of you will need to answer (with assistance from the Managers):
a. In which department will the employee work more hours? b. Do any of the jobs require a set schedule?
The answers to a and b determine the PPS percentages and therefore the primary account. Kronos will pick up the distribution with the higher percentage for the primary account. If one department uses a set schedule, that schedule can be set to automatically transfer those hours to the right account. Therefore, that department should set its distribution to a lower percentage. If neither department uses a schedule, the department where the employee works the greater number of hours should have the higher distribution percentage.
c. How does the employee enter his time?
The answer to c will determine the device group to which the employee should be assigned and/or his access to the system for entering time. If he works in multiple time clock zones he will need to have his device group set to UCSB All Clock. Otherwise, leave it set to the appropriate area. If the employee uses timestamp to record his time, make sure the Function Access Profile is set to UCSB Employee – timestamp and Time Entry Method is set to Time Stamp & Hourly View.
d. What are the pay rule needs? The answer to d will determine the pay rule to which the employee should be assigned. Employees can only be assigned to one pay rule, so certain pay rule requirements may outweigh others. Examples include: an employee who works in both restricted and open areas; an employee with an automatic lunch deduction versus punch lunch; an employee with a different work week. Timekeepers and Managers from both departments should work together to determine the pay rule. If shifts need to be calculated differently than the Pay Rule, a Work Rule transfer can be done through the timecard or schedule.
2) Once the employee’s People Record is set, both Timekeepers and Managers will need to continuously
check the timecard for correct assignment of hours to proper accounts. Tips for distinguishing hours include:
Compare worked hours against the schedule and/or known shifts Check timecard audit trail for clock-in location (under User and Data Source) Verify the hours with the employee’s manager in both areas
3) At the end of each pay cycle, review all hours to ensure they are set to the correct account. 4) After the upload, review the payroll report to make sure hours were charged correctly.
Note on Work Study In order for Kronos to pick up the work study distribution for the primary account one of the following needs to be done:
1) Set the work study distribution as the higher-numbered distribution or 2) Set the work study distribution to a higher percentage than the regular distribution or 3) Set the work study distribution to end one day after the regular distribution
Timekeepers Page 54
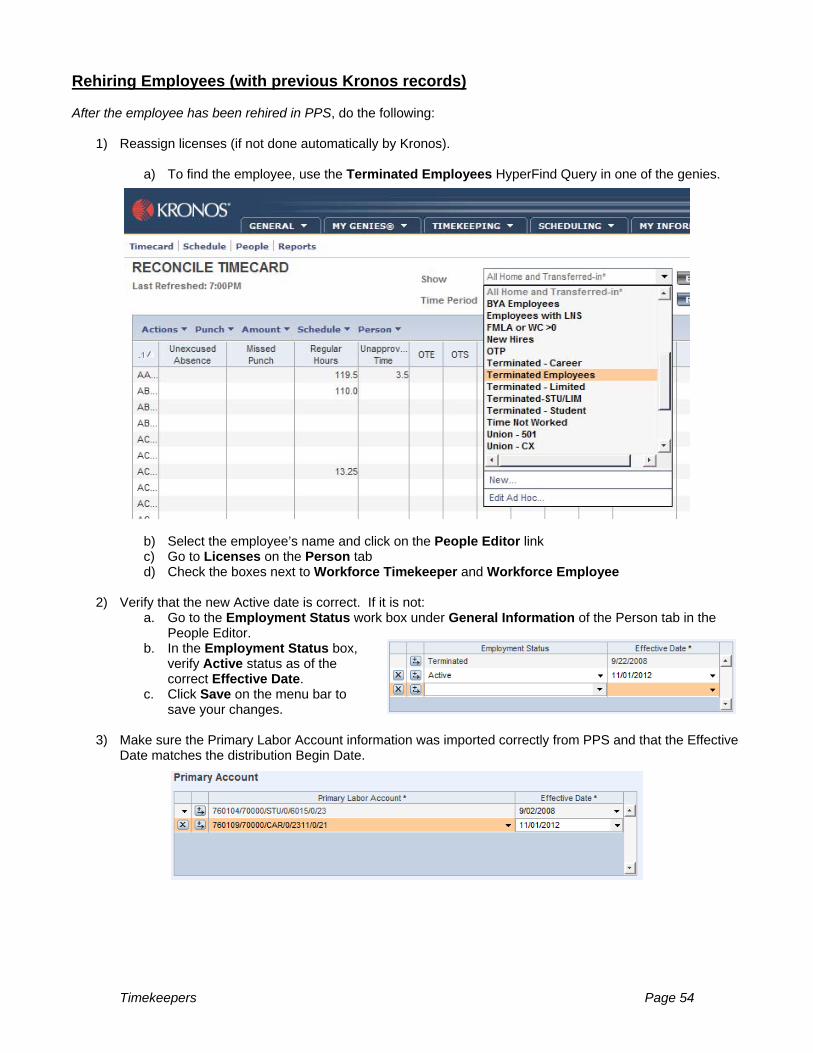
Rehiring Employees (with previous Kronos records) After the employee has been rehired in PPS, do the following:
1) Reassign licenses (if not done automatically by Kronos).
a) To find the employee, use the Terminated Employees HyperFind Query in one of the genies.
b) Select the employee’s name and click on the People Editor link c) Go to Licenses on the Person tab d) Check the boxes next to Workforce Timekeeper and Workforce Employee
2) Verify that the new Active date is correct. If it is not:
a. Go to the Employment Status work box under General Information of the Person tab in the People Editor.
b. In the Employment Status box, verify Active status as of the correct Effective Date.
c. Click Save on the menu bar to save your changes.
3) Make sure the Primary Labor Account information was imported correctly from PPS and that the Effective
Date matches the distribution Begin Date.
Timekeepers Page 55
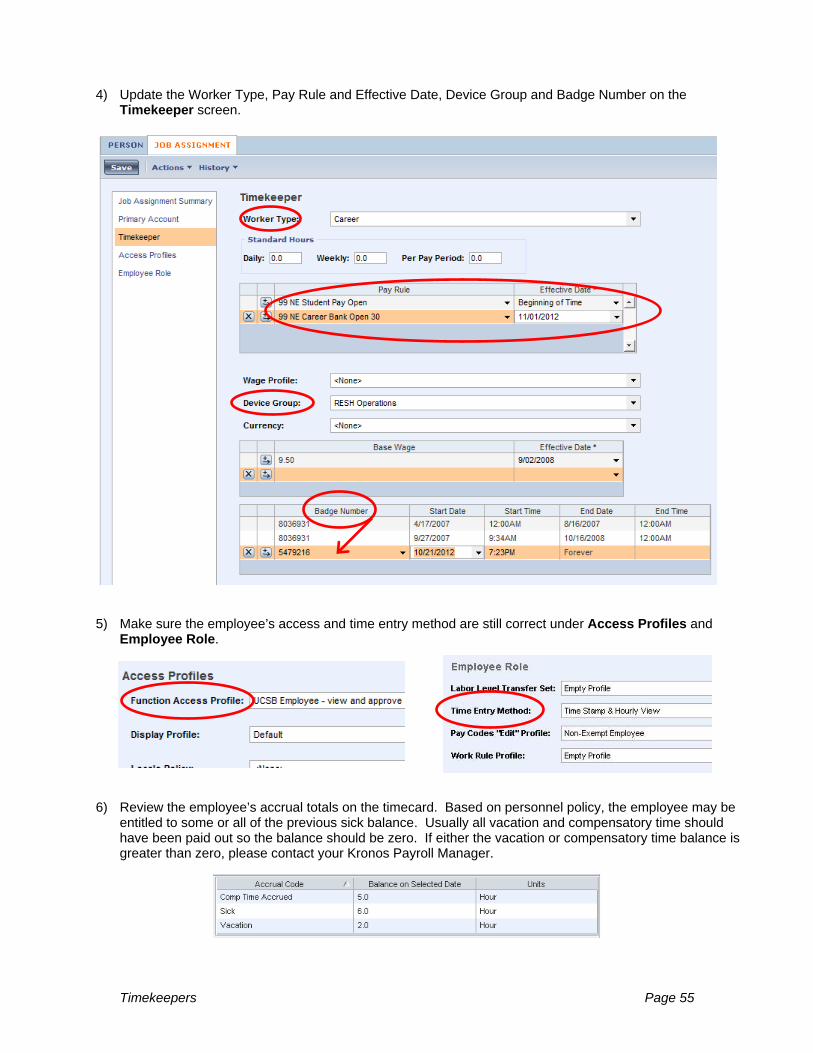
4) Update the Worker Type, Pay Rule and Effective Date, Device Group and Badge Number on the
Timekeeper screen.
5) Make sure the employee’s access and time entry method are still correct under Access Profiles and Employee Role.
6) Review the employee’s accrual totals on the timecard. Based on personnel policy, the employee may be entitled to some or all of the previous sick balance. Usually all vacation and compensatory time should have been paid out so the balance should be zero. If either the vacation or compensatory time balance is greater than zero, please contact your Kronos Payroll Manager.
Timekeepers Page 56
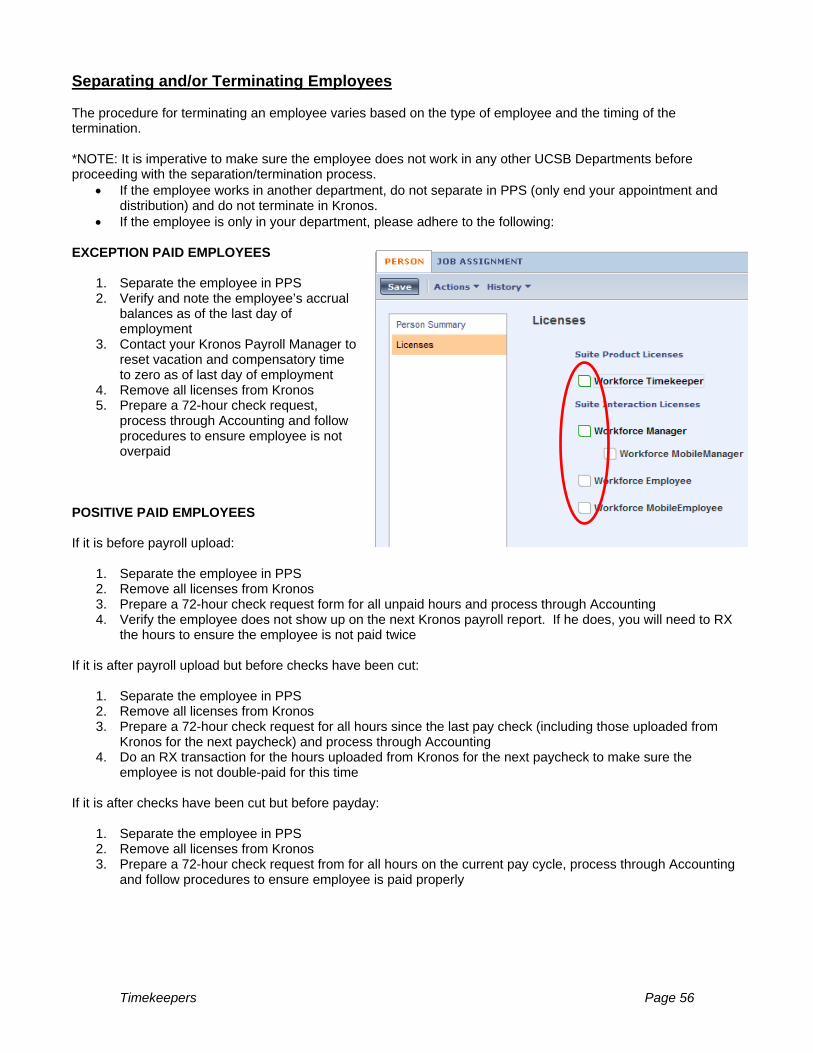
Separating and/or Terminating Employees The procedure for terminating an employee varies based on the type of employee and the timing of the termination. *NOTE: It is imperative to make sure the employee does not work in any other UCSB Departments before proceeding with the separation/termination process.
If the employee works in another department, do not separate in PPS (only end your appointment and distribution) and do not terminate in Kronos.
If the employee is only in your department, please adhere to the following: EXCEPTION PAID EMPLOYEES
1. Separate the employee in PPS 2. Verify and note the employee’s accrual
balances as of the last day of employment
3. Contact your Kronos Payroll Manager to reset vacation and compensatory time to zero as of last day of employment
4. Remove all licenses from Kronos 5. Prepare a 72-hour check request,
process through Accounting and follow procedures to ensure employee is not overpaid
POSITIVE PAID EMPLOYEES If it is before payroll upload:
1. Separate the employee in PPS 2. Remove all licenses from Kronos 3. Prepare a 72-hour check request form for all unpaid hours and process through Accounting 4. Verify the employee does not show up on the next Kronos payroll report. If he does, you will need to RX
the hours to ensure the employee is not paid twice If it is after payroll upload but before checks have been cut:
1. Separate the employee in PPS 2. Remove all licenses from Kronos 3. Prepare a 72-hour check request for all hours since the last pay check (including those uploaded from
Kronos for the next paycheck) and process through Accounting 4. Do an RX transaction for the hours uploaded from Kronos for the next paycheck to make sure the
employee is not double-paid for this time If it is after checks have been cut but before payday:
1. Separate the employee in PPS 2. Remove all licenses from Kronos 3. Prepare a 72-hour check request from for all hours on the current pay cycle, process through Accounting
and follow procedures to ensure employee is paid properly

Timekeepers Page 57
Editing Timecards The manager is responsible for most edits to employee timecards. However, there are a few situations where the Timekeeper is responsible for changes. Entering Leave It is the Timekeeper’s responsibility to enter Leave No Salary, FMLA, Worker’s Compensation and Extended Leave pay codes. Managers do not have access to these pay codes. Please work closely with Human Resources or Academic Personnel to ensure accuracy. Holiday and Holiday Reduction
Career employees are granted a full eight hours for each holiday Student and Limited employees are granted zero hours and adjusted by Kronos Payroll Managers at the
end of the pay cycle Holidays need to be reduced for career employees with a permanent reduction in time through the
following steps:
1) Check the employee’s union contract to determine if their holiday time should be reduced
2) On the employee’s timecard add a line and select the Holiday Reduction pay code
3) Enter the hours to be reduced (i.e. -2.0) 4) Click Save to finalize your changes
The hours will then be moved from Holiday Reduction to Holiday by Kronos Payroll Managers. The result will be that the reduced hours will be in the body of the timecard and the net Holiday hours
will be displayed below in the Totals and Schedules and on the Pay Period Close genie. Transferring Hours and/or Work Rules If an employee works in more than one position (including multiple jobs within one department, multiple departments or varying pay rules) hours will need to be transferred to the non-primary account or rule. Hours can be transferred in one of two ways:
1) After the shift has been worked the hours can be transferred in the body of the timecard.
o Click on the transfer box between the In punch and the Out punch.

Timekeepers Page 58
o Select Search from the drop down menu. This will give you a box in which you will need to select each labor account and/or work rule for the transfer.
o Click OK to return to the timecard o Click Save on the timecard to finalize your changes
OR
2) Set up the hours to be transferred in the schedule through the Add Shift feature in either the Schedule or Pattern Editors.
A work rule transfer can be done for a different Union, lunch period, type of overtime and more.
Timekeepers Page 59
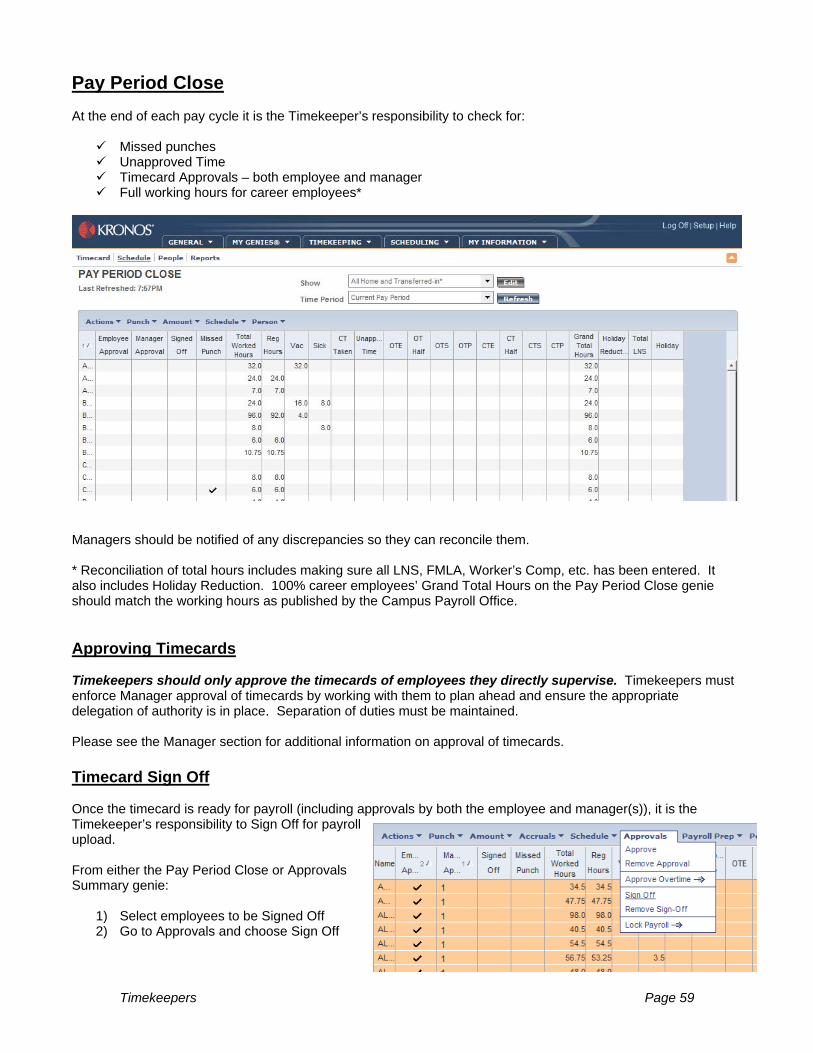
Pay Period Close At the end of each pay cycle it is the Timekeeper’s responsibility to check for:
Missed punches Unapproved Time Timecard Approvals – both employee and manager Full working hours for career employees*
Managers should be notified of any discrepancies so they can reconcile them. * Reconciliation of total hours includes making sure all LNS, FMLA, Worker’s Comp, etc. has been entered. It also includes Holiday Reduction. 100% career employees’ Grand Total Hours on the Pay Period Close genie should match the working hours as published by the Campus Payroll Office. Approving Timecards Timekeepers should only approve the timecards of employees they directly supervise. Timekeepers must enforce Manager approval of timecards by working with them to plan ahead and ensure the appropriate delegation of authority is in place. Separation of duties must be maintained. Please see the Manager section for additional information on approval of timecards. Timecard Sign Off Once the timecard is ready for payroll (including approvals by both the employee and manager(s)), it is the Timekeeper’s responsibility to Sign Off for payroll upload. From either the Pay Period Close or Approvals Summary genie:
1) Select employees to be Signed Off 2) Go to Approvals and choose Sign Off
Timekeepers Page 60
Paying By Agreement (BYA) Employees Employees with a BYA Flat Monthly Rate pay rule will not be included in the payroll upload and must be paid manually in PPS. Review of Kronos Payroll Report Once Sign-off of employees has occurred and the hours uploaded to Campus Payroll, reports will be distributed showing the hours uploaded for each department. The Timekeeper should:
Compare the report, line by line, against the Previous Pay Period and/or timecards in Kronos for each
employee If hours show in Kronos but are not on the report:
o Determine why by comparing account information against PPS and correct, as needed, in Kronos for the future
o Manually pay any hours missing from the report in PPS through IDTC or an LX transaction o Print a copy of the manual PPS payment for file o Contact your Kronos Payroll Manager if assistance is needed
Verify terminated employees have not been included; follow procedures as detailed under Terminating
Employees Save report for reconciling the Payroll Ledger as per department policy.
Accruals and Leave Reporting It is imperative to meet campus Leave Reporting deadlines and ensure accuracy of leave balances in both PPS and Kronos. If balances are off in the Kronos system, please contact your Kronos Payroll Manager.
Once timecards have been reviewed and approved, the hours of vacation, sick, compensatory time taken and compensatory time earned will be uploaded from Kronos to PPS.
Adjustments for LNS, etc., will be done once timecards have been reviewed and approved. Balance Exception reports will be prepared showing balances that do not match between Kronos and
PPS. Timekeepers should determine which is correct and update PPS or have the Kronos Payroll Manager update Kronos.
The Accrual Balances and Accrual Balance Details genies are quick summaries of accrual information. *NOTE: When viewing a Specific Date in the genies or on the timecard, the balance shown will include any hours taken that day. To figure out the starting balances, simply add the hours taken to the total shown.