uarm metal developer guide - ufactorydownload.ufactory.cc/docs/en/uarm-metal-developer-guide.pdf ·...
TRANSCRIPT
UFACTORY TECHNOLOGY CO.,LTD | NANSHAN DISTRICT, SHENZHEN, P.R.CHINA
WWW.UFACTORY.CC
uArm Metal Developer Guide
2017-03

Addr:NANSHAN DISTRICT, SHENZHEN, P.R.CHINA Tel:0755-23301959
Contents
Introduction ..............................................................................................................................................................2
Software .........................................................................................................................................................3
Software Installation .................................................................................................... 3
Communication Protocol .............................................................................................. 5
Calibration ................................................................................................................... 5
Hardware .......................................................................................................................................................6
uArm Metal Body .....................................................................................................................................................6
Basic Information of uArm Metal Body .......................................................................... 6
uArm metal Specifications .......................................................................................... 10
Board-Arduino ..............................................................................................................................................11
Board Reference ......................................................................................................... 11
Pinout ........................................................................................................................ 12
Control Board Diagram ............................................................................................... 12
Board Specification .................................................................................................... 12
Servo ............................................................................................................................................................14
Basic Information of Servo .......................................................................................... 14
Servo Specification ..................................................................................................... 16
The definition of port for uArm Metal servo ................................................................ 17
Control ...................................................................................................................... 18
Vacuum Pump ..............................................................................................................................................19
Reference .................................................................................................................. 20
Protection ......................................................................................................................................................20

Addr:NANSHAN DISTRICT, SHENZHEN, P.R.CHINA Tel:0755-23301959
Introduction
Maybe now you are a
Software Engineer
Mechanism Engineer
Electronic Engineer;
Maybe now you are studying the
Artificial Intelligence
the Computer Science the
Machine Learning;
Maybe now you are A
Scientist
An Artist;
Anyway, if you are reading this Guide-
You are a developer who has interest in ROBOTICS!
We are here to help you build your creative, fun, smart robot ideas come true with uArm! MAKERS COME
FROM ALL JACKS OF LIFE, SO DO UARM MASTERS!

Addr:NANSHAN DISTRICT, SHENZHEN, P.R.CHINA Tel:0755-23301959
Software
Software Installation
UFACTORY provide a link for you that you can download all documents about uArm Metal:
https://drive.google.com/open?id=0B-L-tCvknXU9bUpPbEp5Ry1SYXM
1. Basic Software Installation
Please refer to Getting Started Guide.
2. Developer Software Installation
Windows
As Python is not defaulted inside of Windows, if you want to use these developing tools, please DOWNLOAD and
INSTALL Python first.
Next, please install pip. We recommend pip-for-windows.
Now you can install uArm' tool kit by sending the command - pip install pyuarm.
Mac
What you need:
Pip -avrdude
Strongly recommend to use this, because it is a really very convenient tool that you type only one install
command:
This command will help you with the installation and very efficient:)
bash -c "$(curl -fsSL http://download.ufactory.cc/tools/macosx/install.sh)"
If you would like to install by yourself, you can do so:
First, install pip - sudo easy_install pip
Next, install pyuram - pip install pyuarm
If you need to upgrade the firmware, you need to install avrdude
-refer to Homebrew, a quick and easy way to make it.
Completing homebrew, you can start brew install avrdude.
Linux
What you need:
pip -avrdude
You can use the installation tool in the released version of Linux, for example, in the debain, you can just use:
sudo apt-get install python-pip python-dev build-essential avrdude
After installation, you can use: - pip install pyuarm installation tools.

Addr:NANSHAN DISTRICT, SHENZHEN, P.R.CHINA Tel:0755-23301959
Source Code and API Documentation
arduino IDE:https://www.arduino.cc/en/Main/Software
PLEASE DO NOT download your Arduino IDE from https://www.arduino.org , because you may not be able to use that. We recommend Arduino IDE V1.6.12 or later.
arduino API:http://uarm-developer.github.io/UArmForArduino/index.html
Python API:http://pyuarm.readthedocs.io/en/latest/
Pyuarm API:https://pypi.python.org/pypi/pyuarm
uArm protocol:https://github.com/uArm-Developer/UArmForArduino/blob/master/PROTOCOL.md
Arduino UNO board intro:https://www.arduino.cc/en/Main/ArduinoBoardUno?setlang=cn
uArm Metal 3D document:https://grabcad.com/library/uarm-metal-1
Communication Protocol
uArm Metal’s Communication Protocol
We write uArm’s Communication Protocol in order to help you program with your preferred languages at PC.
Once you send the command (via uArm Protocol), it will automatically analyze it and act as related. If you would
like to write your own uArm protocol for communication, please refer to our communication Protocol on guithub.
Calibration
Why calibration?
The analog data ADC adopted is not accurate, what's more, the inaccuracy of analog data is different from each
other, so we need to conduct the liner calibration once.
How to calibrate by yourself?
It was calibrated before sale.
1. Please DON'T calibrate it if not necessary. All uArms were calibrated by us before sale. Frequent calibration
will cause damage to the uArm.
2. If you have to calibrate, Please use uarmAssistant,function Re-calibration.
3. uarmAssistant is limited to the purchase of uArm users before April 2016, after April 2016, the user
does not have calibration problems, DO NOT DO THIS STEP.

Addr:NANSHAN DISTRICT, SHENZHEN, P.R.CHINA Tel:0755-23301959
Hardware
uArm Metal Body
Basic Information of uArm Metal Body
Work Range
You might have guessed the work range with the Limits of XYZ, and the work range for uArm is not a regular area.
However, you might not know there are somewhere which is out of the work range, so we have set restrains for
those places which uArm cannot reach, and return an Error. Work Range Diagram of uArm
Work Range PIC 1

Addr:NANSHAN DISTRICT, SHENZHEN, P.R.CHINA Tel:0755-23301959
Work Range PIC2
Accuracy and Offset
Theoretically, the offset is around ±0.5CM. In fact, the range is related with the payload for uArm. Servo has less
offset when working in the range between 40° and 140°; but when it is less than 40° or greater than 140°, the
offset will become wider.
So, please control the payload, don’t make uArm work out of its range, and pay attention not to push servo
working a wide range beyond its limit.
Three Dimension coordination
We use mathematical model- Three Dimension Coordination to describe uArm’s work range. Please refer to
the pic below Dimension Diagram

Addr:NANSHAN DISTRICT, SHENZHEN, P.R.CHINA Tel:0755-23301959
PIC Three Dimension Diagram
1) Point of Junction
O Original Point (0,0,0)
A The middle point of Left/ Right Axis
B The middle point between two screws--each screw is correspondently on one side of Link 2 as the linkage of
Point B.
C The middle point between two screws-- each screw is correspondently on one side of Link 2 as the linkage of
Point C.
D The Center Point on the bottom of Suction Cup.
E It is an interaction of DE and CE, which are perpendicular to each other. Like in the picture, DE is paralleled
with coordinate axis Z and CE is paralleled with coordinate axis Y.
F It is an interaction of OF and AF, which are perpendicular to each other. Like in the picture, OF

Addr:NANSHAN DISTRICT, SHENZHEN, P.R.CHINA Tel:0755-23301959
is paralleled with coordinate axis Z and AF is paralleled with coordinate axis Y.
2) Line
OA Distance of Original Point O to the center of L/R axis A
OF = 10CM Shadow of OA on coordinate axis +Z AF = 2CM
Shadow of OA on coordinate axis +Y AB = 14.8 CM Length
of Link2
BC = 16CM Length of Link1
CE = 3.5 CM Length of Front Part
DE = 6CM Length of Suction Cup
Extreme/Limits = [-36.5cm ~ 36.5cm]
Max X = AB + BC + CD + AF [Y] =
[11.5 cm ~ 36.5cm] MIN Y = Min Y
Max Y = Max X
[Z] = [-12cm ~ 19cm] Max
Z = OA + AB -DE Min Z = BC
- DE – OA

Addr:NANSHAN DISTRICT, SHENZHEN, P.R.CHINA Tel:0755-23301959
uArm metal Specifications
1. Apply Environmental Condition
No.
Item
Specification
1.1 Storage Temperature Range -20°C~70°C
1.2 Operate Temperature Range 0°C~30°C
2. Standard Test Environment
No.
Item
Specification
2.1 Temperature Range -1 0°C~ 60°C
2.2 Humidity Range 65%±1 0%
3. Mechanical Specification
No.
Item
Specification
3.1 Size
300*270*110mm
3.2 Weight
1.9kg
3.3 Material
Aluminum
3.4 Water Resistance
NO
3.5 Repeatability
10mm(Maximum)
3.6 Action Radius
12CM~32CM
3.7 Max Lifting Weight
500g (with 15kg
3.8 Accuracy
6~10MM (typical)
3.9 Lifetime
>100000 times
4. Electrical Specification
No.
Item
Specification
4.1 Operat voltage
DC5V
4.2 Idle current
200MA
4.3 working current
3.5A

Addr:NANSHAN DISTRICT, SHENZHEN, P.R.CHINA Tel:0755-23301959
Board-Arduino
Board Reference
We use Arduino UNO to modify but have not change the basic working theory. You can learn
from the Arduino Official Webcite, if you are interested.
Board Pinout
Pic link of pinout (You can refer to “Developer Pack”/Arduino/ PIC of “pinout”.)
Control Board Diagram
As for Control Board, please Check the Link here. (You can refer to “Developer Pack”/Arduino/
PIC of “uArm-Control Board.)
Board Specification
No. Item Description
1 buzzer Sound reminder- to remind you the position of uArm, port D3-PD3(INT1).
2 ISP download port
Starting in the upper left corner in clockwise order: RESET-PC6(RESET)->D13-PB5(SCK)->D12-PB4(MISO)-> VCC(+5V)-> D11-PB3(MOSI)->GND; PB/PC Port is in the ATmega328p.
3 USB converts to Serial port Online debug; communication-FT232RL
4 ATmega328p - Master chip

Addr:NANSHAN DISTRICT, SHENZHEN, P.R.CHINA Tel:0755-23301959
5 Servo 3 Connector (Control the arm end of the servo)
From Left to Right: GND->VCC(+5V)->D10- PB2(SS)->A3-PC3(ADC3); D10 is PWM output and A3 is analog input.
6 Servo 1 Connector (Control the left servo)
From Left to Right: GND->VCC(+5V)->D13-PB5(SCK)->A0-PC0(ADC0); D10 is PWM output and A3 is analog input.
7 Switch D4-PD4(T0) uArm condition exchange.
8 MINIUSB-A Download software and in-out communication.
9 Bluetooth port From Left to Right: D1-PD1(TXD)->D0-PD0(RXD)->VCC(+5V)->GND; uArm condition and specification setting and operation.
10 Servo 0 Connector (Control the base servo)
From Left to Right: GND->VCC(+5V)->D12-PB4(MISO)->A1PC1(ADC1); D12 is PWM output and A1 is analog input.
11 Servo Connector (Control the electric griper)
From Left to Right:
GND->VCC(+5V)->D9-PB1(OC1)->A6-(ADC6);
D9 is PWM output and A6 is analog input.
12 Power 5V power adapter and input currency >5A
13 Switch D7-PD7(AIN1) Change uArm condition.
14 Servo 2 Connector
(Control the right servo)
From Left to Right: GND->VCC(+5V)->D11- PB3(MOSI)->A2-PC2(ADC2); D11 is PWM output and A2 is analog input.
15 Servo connector(preserved)
From Left to Right: GND->VCC(+5V)->D8- PB0(ICP)->A7-(ADC7); D8 is PWM output and A7 is analog input.
16 Pump connector
From Left to Right: GND->VCC(+5V)->D8- PB0(ICP)->A7-(ADC7). D8 is PWM output and A7 is analog input.
17 End suction tip limit switch interface From Left to Right: GND->D2
18 LDO 5V transfer 3.3V
19 EEPROM External power-down memory
64KB
20 Reset

Addr:NANSHAN DISTRICT, SHENZHEN, P.R.CHINA Tel:0755-23301959
Servo
Basic Information of Servo
Servo Schematics
When we talk about the servo control, we have to mention Arduino. Thanks to Arduino, we can have
thousand open sourced libraries. For uArm, our servo motor supports
Arduino's servo.h library.
Servo Attach/Detach
Before using servo, it is a must to attach servos. At this time, servos will be locked.
Rotation Ranges of Servo
We use default functions for servo servoWrite(). The unit of its rotation is degree, ranging from 0 to 180.
When assembling, we install the servo to uArm with a fixed angle.
The servo on the left can range from 0° to 150° and the one on the right is 20° to 150°.
Addr:NANSHAN DISTRICT, SHENZHEN, P.R.CHINA Tel:0755-23301959
Now you can control the movement of uArm by read the servo's angle, but this is not visible, and somehow
dangerous. Because the linkage of servos may lock each other, it is a factor lead to burn the servo. We would
like to suggest you to construct a three dimension coordination to control uArm’ move.
Read the servo angle
There is a build-in ADC (analog and digital convertor), which can change the current analog signal into digital
one. And then, with the function analogRead which is defaulted in Arduino, the digital data can be read out
and get the current angle with this
formula intercept + analog * slope.
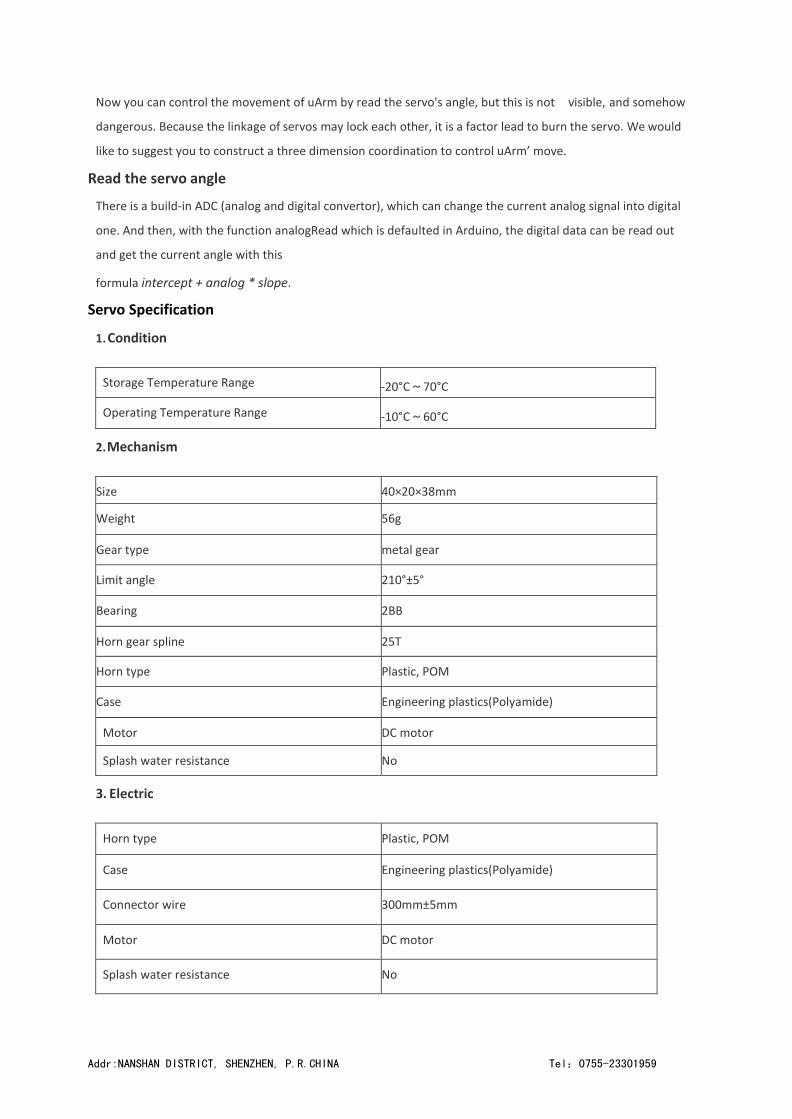
Servo Specification
1. Condition
Storage Temperature Range -20°C~70°C
Operating Temperature Range -10°C~60°C
2. Mechanism
Size 40×20×38mm
Weight 56g
Gear type metal gear
Limit angle 210°±5°
Bearing 2BB
Horn gear spline 25T
Horn type Plastic, POM
Case Engineering plastics(Polyamide)
Motor DC motor
Splash water resistance No
3. Electric
Horn type Plastic, POM
Case Engineering plastics(Polyamide)
Connector wire 300mm±5mm
Motor DC motor
Splash water resistance No

Addr:NANSHAN DISTRICT, SHENZHEN, P.R.CHINA Tel:0755-23301959
The definition of port for uArm Metal servo
DM1500A is fully compactable with normal 3 pin port and the forth is used for the output of potentiometer as
positon feedback of uArm.
Voltage and angle
An Value (TYP)
0° 0.364V
90 1.723V
18 3.076V
Ps:1, because of the correspondence-difference of potentiometer inside servo, different
servo might have ±10% difference.
2, Different ADC will leads different sample number when output.

Control
PWM and specification as following:
Command signal Pulse width modification
Pulse frequency 50Hz
Pulse width range 500~2500usec
Neutral position 1500usec
Running degree 180°±3° (when 500~2500usec)
Dead band width 2 usec
Rotating direction Clock wise(when 500~2500usec)
When control port is 0°, the oscillo-gram is the pic below (the pic on the right is enlarged
drawing of a single wave).
When control port is 90°, the oscillo-gram is the pic below (the pic on the right is enlarged drawing
of a single wave)
Addr:NANSHAN DISTRICT, SHENZHEN, P.R.CHINA Tel:0755-23301959
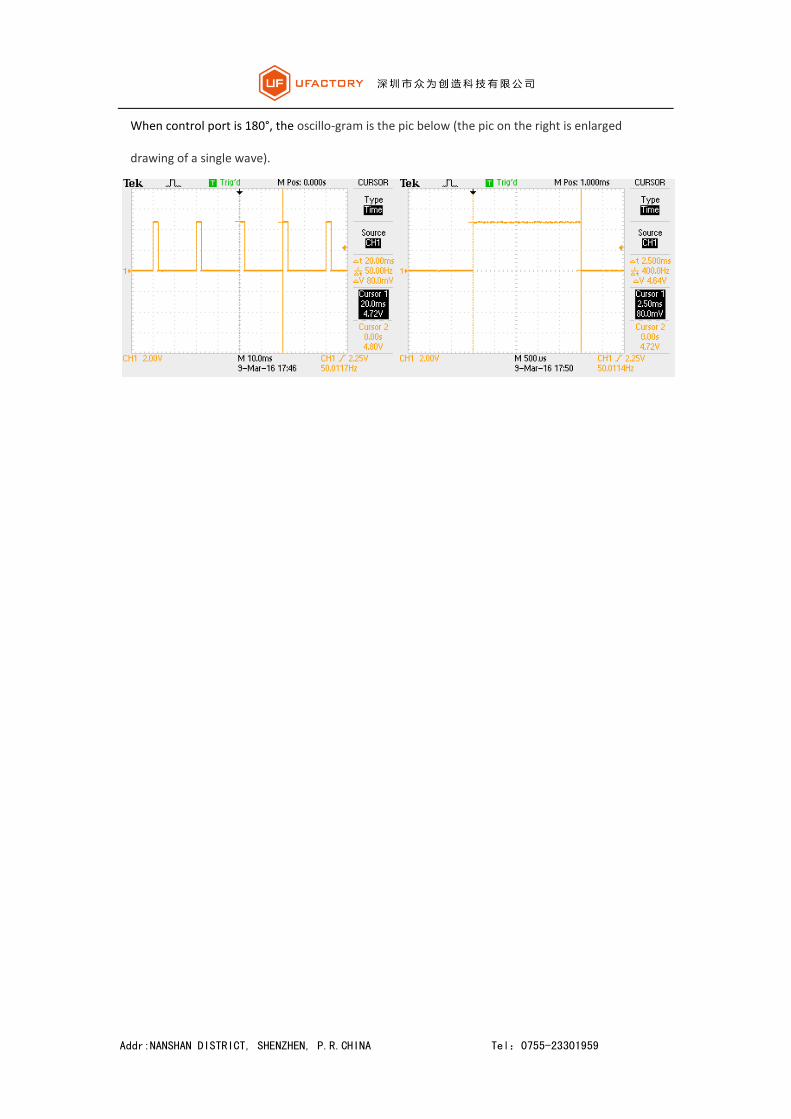
When control port is 180°, the oscillo-gram is the pic below (the pic on the right is enlarged
drawing of a single wave).

Addr:NANSHAN DISTRICT, SHENZHEN, P.R.CHINA Tel:0755-23301959
Vacuum Pump/mechanical Gripper/ Universal Holder
Pump
Voltage:DC 4-5V
Current: <400mA
Reference
1. Pump Specification (You can refer to “Developer Pack”/Pump/ “Pump Specification”.)
2. Pump User Guide(You can refer to “Developer Pack”/Pump/ “uArm Vacuum System
User Guide”.)
Gripper (You can refer to “Developer Pack”/Gripper/ “gripper user guide”.)
Universal Holder (You can refer to “Developer Pack”/Gripper/ “holder user guide”.)

Addr:NANSHAN DISTRICT, SHENZHEN, P.R.CHINA Tel:0755-23301959
Protection
How to prevent damaging uArm?
Make sure you use our firmware and it is updated, the payload and work range is not go beyond of its
limits.
Under what circumstances will the servo be burned or damaged?
1, The payload is out of its limit or work with the load almost its limit for a long time; 2,
The servo is hit hard;
3, Use the wrong power supply, which often burn the servo.
Under what circumstances should I unplug uArm ASAP?
When you see the red light is flashing, which means something wrong already happen, please
unplug ASAP.

Addr:NANSHAN DISTRICT, SHENZHEN, P.R.CHINA Tel:0755-23301959
5.uArm Community
Welcome to the uArm Community! Now,you can explore uArm with the world of robot
enthusiasts,Makers, sartists and scientists!
Official Website:
https://www.ufactory.cc/
Official Forum:
https://forum.ufactory.cc/
Official WeChat Account:
Official Media:
More Help?
【Contact Us】.