u6 coach v2 · • explain your coaching philosophy. o you can begin by explaining short-sided...
TRANSCRIPT

U-6 Coach –2011-2012 1
U-6 Coach
2 U-6 Coach –2011-2012
The AYSO National Office TEL: (800) 872-2976 FAX: (310) 525-1155 www.ayso.org
All rights reserved. © 2012 American Youth Soccer Organization
Reproduction in whole or in part is encouraged provided no changes are made to content and the “2011-2012 U-6 Coach” is referenced.

U-6 Coach –2011-2012 3
Contents
Welcome! 5
AYSO Philosophy 6
The Psychology of Coaching 7
Working with young athletes 7 What to Expect from Under-6 Players 7 Remember, they don’t think like adults! 8
Team Management 9
Organizing the Team 9 Equipment 10 Activity Day 10
Activity Day Outline 10 After The Activity 11
Warm Up 11
Training Overview for U-6 Players 12
Objectives & Principles of the Game for U-6 Players 13
Objectives of the Game 13 Principles of Play 13
Teaching Methods 14
P. I. E. Positive Instruction & Encouragement 14 Say, Show, Do and Review 14 See, Show and Say Method 14
Techniques for U-6 Players 16
Dribbling 16 Instep Kick 17 Throw-In 19
Training Games for U-6 Players 21
One, Two, Three, Red Light 22 Big Bad Coach 23 Coach Says 24
4 U-6 Coach –2011-2012
LA Freeway 25 Sharks/Minnows 26 Tag 27 The Big Race 28 The Big Snake 29 Lion King 30 Treasure Hunt 31 Golf 32 The Mosquito 33 Into The Well 34
Appendix A: Under-6 Program Guidelines 35
Activity Day 35 The U-6 Jamboree 36
Appendix B: Knowledge of the U-6 game 38
Appendix C: Pledges 40
AYSO Coach Pledge: 40 AYSO Player Pledge: 40 AYSO Parent Pledge: 41
Appendix D: VIP 42
Integrating the “VIP” Player into Your Region 42
Glossary of Terms 43
Notes 44
Welcome!
U-6 Coach –2011-2012 5
Welcome!
The American Youth Soccer Organization (AYSO) welcomes you to the world of coaching youth soccer. The Coaching Department of the AYSO National Office and the AYSO National Coaching Advisory Commission are pleased to present this manual to help you get started.
AYSO is a place where every child plays in an atmosphere of good sportsmanship and positive coaching. The emphasis in AYSO is on youth. AYSO is unique because we recognize the social and psychological needs of children and do our best to work toward the fulfillment of those needs in all our programs. This emphasis makes AYSO a model for other youth sports groups and is a key to our astounding growth and popularity.
Developing soccer skills, physical attributes, tactical awareness and knowledge of the game are critical to promoting self-efficacy and increasing self-esteem in players. Thus, they perform at a higher level, avoid injury, see the results of their hard work and achievement and most importantly, have fun. As a volunteer coach, your participation in the program should be fun, as well.
The content of this manual is drawn from the knowledge and experience of AYSO’s National Coaching Staff and National Coaching Advisory Commission—people with vast soccer knowledge, yet volunteers of AYSO—just like you. The soccer skills and coaching techniques included in this manual have been carefully selected as appropriate for the level of your players. We encourage you to use the techniques in this manual to train young players in the skills most needed at their level of development and play. With these guidelines and recommendations, your coaching experience will be satisfying for both you and your players.
We encourage you to attend the Annual Coach Orientation Course, held in your local region, as well as other AYSO coaching courses available in your area. Your regional commissioner or coach administrator can provide you with information about what’s available and how to register.
We are glad that you have joined the AYSO. On behalf of the players, we thank you!
National Coaching Advisory Commission

AYSO Philosophy
6 U-6 Coach –2011-2012
AYSO Philosophy
AYSO Vision To provide world class youth soccer programs that enrich children’s lives.
AYSO Mission To develop and deliver quality youth soccer programs in a fun, family environment based on the AYSO philosophies:
Everyone Plays Our goal is for kids to play soccer⎯so we mandate that every player on every team must play at least half of every game.
Balanced Teams Each year we form new teams as evenly balanced as possible⎯because it is fair and more fun when teams of equal ability play.
Open Registration Our program is open to all children between 4 and 19 years of age who want to register and play soccer. Interest and enthusiasm are the only criteria for playing.
Positive Coaching Encouragement of player effort provides for greater enjoyment by the players and ultimately leads to better-skilled and better-motivated players.
Good Sportsmanship We strive to create a safe, fair, fun and positive environment based on mutual respect, rather than a win-at-all-costs attitude, and our program is designed to instill good sportsmanship in every facet of AYSO.
Player Development We believe that all players should be able to develop their soccer skills and knowledge to the best of their abilities, both individually and as members of a team, in order to maximize their enjoyment of the game.
The Psychology of Coaching Working with young athletes
U-6 Coach –2011-2012 7
The Psychology of Coaching
Working with young athletes
It is important as a coach that you subscribe to a philosophy that acknowledges the role of athletics in developing children as complete individuals. Remember that AYSO’s vision is to provide soccer programs that enrich children’s lives.
As coaches we need to recognize that each athlete is an individual with unique needs and that we treat them accordingly:
• Understand that players want to enjoy attending practices and games. If they are not having fun and learning, they will lose interest and not want to return.
• Organize your activities and games so that every athlete on your team has an opportunity to develop and maintain positive feelings of self-worth.
• Provide positive encouragement to all players for both accomplishments and mistakes.
Play in this very young age group is meant to give a “taste” of the game, some experience in working together as a team, and, most of all; a positive introduction to the sports experience.
One of the appealing things about soccer as a youth sport is that practically no skills at all are required to play the game at its simplest level. If a youngster can run and can kick a ball, he or she can play soccer and enjoy it.
If we understand and support player development as both athletes and individuals, the players will enjoy themselves more and want to continue playing. We must help them understand that the objective of any game is to win, but that the overall goal is to enjoy the game and strive to do their best!
What to Expect from Under-6 Players
Remember that kids will develop differently, both physically and socially. You must take the needs of ALL of your players into consideration.
Physical/Gross Motor Development: • are in the early stages of development • can run, jump, and skip well; motor skills are continuing to develop • have lots of energy, although in bursts; they tend to tire quickly • can perform runs, starts and stops • can’t sit still for long
The Psychology of Coaching Remember, they don’t think like adults!
8 U-6 Coach –2011-2012
Social/Emotional Development: • may have fears of the unknown • experience rapid and unpredictable mood changes • tell tall tales • need encouragement • may have difficulty sharing • crave praise and attention
Cognitive/Thought Development: • do not like to repeat • lack judgment regarding their own safety and abilities • don’t think logically • ask lots of questions • are fond of stories
Remember, they don’t think like adults!
You will find kids this age extremely curious and highly impatient. They just won’t stand or sit still. Their short attention span causes them to be easily distracted by anything that catches their interest—even right in the middle of a game!
You may find communicating with them difficult. Their verbal and communication skills are somewhat limited.
Their ability to deal with abstract concepts is still developing, so, whenever possible, demonstrate what you want them to do. Also, remember that they will take what you show or tell literally, so be sure to say exactly what you mean.
Lastly, make everything positive and they will respond positively to you and your directions.
Traditionally, youth soccer is viewed from an adult perspective, using the 11-a-side game as a reference. We need to remember that children:
• must be treated as children, not as mini-adults.
• are essentially self-oriented and naturally relate only to a friend or two, not to groups of six or more.
• cannot sustain prolonged activity, and can function best with frequent rest periods.
• have a limited span of attention, so frequent activity changes are necessary.
• focus best when learning activities are fun.
Team Management
U-6 Coach –2011-2012 9
Team Management
There are off-the-field responsibilities that affect the team and the players before they ever step on the field. These activities are referred to as team management.
Organizing the Team
This should be your first priority!
1. Develop a Team Goal “Players having FUN while learning about soccer” is a good base for a team goal. You, the parents and players can build on that foundation.
2. Develop a Coaching Philosophy You can base your personal coaching philosophy on the AYSO Coach Pledge (see Appendix C).
3. Conduct a Parents’ Meeting • Discuss AYSO’s Six Philosophies. • Discuss the team’s goal(s). • Explain your coaching philosophy.
o You can begin by explaining short-sided soccer and why we play it. o Do not hesitate to share your experience or lack thereof as a coach.
• Educate parents briefly on the Laws of the Game specific to this age group. Distributing the ABC’s of AYSO (contact your Regional Commissioner for copies) is a great way to introduce new parents to soccer and AYSO.
• GET HELP – You will need: o Assistant Coaches o Team Manager: administrative duties such as phone calls,
coordinating carpools, etc… o Team Parent: develop snack schedule, plan social activities, etc…
• Set team policies regarding: o Equipment brought by each player: water, ball (properly inflated),
shinguards, appropriate clothing o Attendance at activity day. o Player and parent behavior. You can discuss expectations of players
and parents based on the Player and Parent Pledges (see Appendix C).
Team Management Equipment
10 U-6 Coach –2011-2012
Equipment
A coach must always come to the field prepared. Below is a basic list of the minimum equipment you should have with you on activity day:
• player medical release forms • a basic first-aid kit • water container (filled with water) and cups • soccer balls • an extra pair of shinguards • a marking pen for labeling • whistle Your players should bring a soccer ball to every activity and must be wearing shinguards.
Activity Day
This section will provide information on preparing for and conducting activity day. Ensuring that your team players are prepared and ready to play will ease your mind and keep everything running smoothly.
In Advance of Activity Day • Remind parents of where and what time your team will meet.
• Ask parents to have players arrive 15 minutes in advance, in order to account for late arrivals and preparation time.
• Check your equipment before you leave home to make sure you have everything you need, such as all the materials listed on the previous page in this manual.
Before The Activity Starts • Arrive early: at least 10 minutes before the time you expect your players.
• Gather team: preferably by the playing field and in the shade, if it is hot.
Activity Day Outline
• Warm Up & Stretch 5 Minutes. Keep it short, but do it. Young players must get used to warming up.
• Introduce a Technique 10 Minutes. Remember to utilize the methods of instruction discussed later in the manual.
• Skill-Based Training Game 15 Minutes. Activities and games that utilize the skill being taught are the most effective ways for players to improve their skills.

Team Management Warm Up
U-6 Coach –2011-2012 11
Attempt to utilize at least two different activities or games. This will ensure different types of experiences with the ball and keep the players from getting bored. (Age-appropriate games can be found later in this manual.)
• Water Break 5 Minutes.
• Game 25 Minutes.
The game will be divided into four equal five-minute periods with a five-minute halftime. Coaches are observers and will act as referees looking to ensure safety and will be the only adults allowed on the field of play.
After The Activity
• Congratulate players on working hard and having fun. • Kudos should be given to all! • Give a reminder of next activity day (to the parents, not the players)
Warm Up
Keep it short, but do it. Young players must get used to warming up.
At this young age, player’s muscles are not developed to a point where injuries will occur often, especially due to a lack of warming up and stretching. It is critical, however, that players be introduced to the concepts in order to prepare them for future competition in the years to come.
Warm Up the Muscles Before stretching muscles and other parts, they must be sufficiently warmed up. This requires aerobic activities that get the heart pumping and breathing above a resting rate.
Ideally, these activities should include a ball and be related to the technique you will be working on during the activity.
Activities should not be speed oriented, but they should cause players to move.
Stretch the Muscles After an aerobic warm up, players must stretch their muscles in order to avoid injury.
Stretch by slowly and evenly extending each muscle just to the point that the body naturally resists. Movements should be steady and gentle—static.
Training Overview for U-6 Players
12 U-6 Coach –2011-2012
Training Overview for U-6 Players
Objectives of the Game for the U-6 Player • Score • Prevent Scoring
Principles of Play for the U-6 Player • Penetration • Delay
Techniques • Instep Kick • Dribbling • Throw-in
Knowledge • What is in and out of play • Don’t kick or trip others • No handling of the ball

Objectives & Principles of the Game for U-6 Players Objectives of the Game
U-6 Coach –2011-2012 13
Objectives & Principles of the Game for U-6 Players
Objectives of the Game
Objective is defined in the dictionary as “a goal or a purpose.”
The Objectives of the Game at this age are simple:
• If your team has possession of the ball, your team is attacking, and your objective is to SCORE!
• If the opposing team has possession of the ball, your team is defending, and your objective is to STOP them from SCORING!
Principles of Play
The Principles of Play are used to achieve the Objectives of the Game.
There are five attacking and five defending Principles of Play utilized in soccer, however for this very young age, we will focus on only one attacking principle and one defending principle. There are two principles we focus on that are age appropriate for U-6:
Attacking Principle – Penetration
Defending Principle - Delay
Attacking Principle Penetration: Advancing the ball past opposing players by dribbling, passing and shooting.
The attacking principle of penetration ultimately leads us to achieving our attacking objective – SCORE!
Defending Principle Delay: To slow down the attack by closing gaps and denying space for the other team to work in. Once the attack is slowed, your team can attempt to take the ball back.
The defending principle of delay ultimately leads us to achieving our defending objective – STOP SCORING!
(As you progress through the coaching ages, more principles will be added. All five will be learned by the U-12 level.)
Teaching Methods
14 U-6 Coach –2011-2012
Teaching Methods
This section covers the most comprehensive and difficult aspect of coaching to master—how to develop player skills. Covered first are methods for instructing your players, followed by an explanation and discussion of the techniques necessary to perform the skills.
P. I. E. Positive Instruction & Encouragement
This concept is so important to AYSO’s coaching philosophy, it was written into the National Rules and Regulations. Positive Instruction and Encouragement should always be used to instruct and motivate your players. They will respond better to you and it will help keep AYSO a fun, positive place for all.
Say, Show, Do and Review
This method is effective for teaching any age group. Simply follow these four steps for the technique you are working on with your team:
• Say: Explain the skill or technique. • Show: Demonstrate the skill or technique. • Do: Have players perform the skill or technique. • Review: Review, correct and confirm proper technique. Remember to keep explanations and demonstrations brief and that young children will only want to work on the same thing for a short period of time.
See, Show and Say Method
This process can be used in conjunction with the Say, Show, Do and Review method described above. Once you have taught the technique, you can observe and correct your players as described below.
See Coaches must learn to be observers of their players’ performances, looking to see if the skills, tactics and strategies they have learned are being properly utilized and executed on the field.
Observation is a silent activity. Instead of trying to coach or correct immediately, let them play uninterrupted for a time while taking notes:
Teaching Methods See, Show and Say Method
U-6 Coach –2011-2012 15
• Make notes (preferably written) on what your players do. • Make notes on the positive outcomes. • Make a note (ONE note) on how they can improve.
Through the act of seeing (without speaking or directing), you can focus on analyzing the players and their performance. This analysis is the basis for the next step.
Show Showing consists of two complementary parts: description and demonstration.
Description involves briefly telling the players what you saw in terms of their execution; then provide them with attainable modifications to correct one or two deficits. This is called analysis and application. Don’t try to describe every error or apply every remedy.
Demonstration comes after the description of what you saw, and involves showing the players what modifications they can employ to improve their technique most effectively. If you are unable to demonstrate the technique yourself, utilize a player who can.
Say Once all of these steps have been followed, if the players perform the skill, tactic, or strategy effectively, it’s time to let them know! Say it out loud, so everyone can hear.
That’s the whole thing: See, Show, Say using Positive Instruction and Encouragement.

Techniques for U-6 Players
16 U-6 Coach –2011-2012
Techniques for U-6 Players
This section covers the various techniques you can teach to your players. The better grasp you have of the techniques, the better you will be able to teach them to your players. Note: all techniques should be practiced with both feet to ensure players do not develop a “strong foot” and a “weak foot.”
Dribbling
Dribbling is the art of using the feet to advance the ball, on the ground, under control, while moving. The two primary reasons to use dribbling skills are:
• to move the ball into a better position on the field.
• to retain possession of the ball.
Dribbling is one of the ways to achieve penetration, the Attacking Principle of Play for this age group.
The most important element of dribbling is developing a “feel” or “touch” for the ball with the feet…BOTH OF THEM. The key is then to keep the ball close by touching it softly.
Dribbling Basics • Use all major surfaces of the foot. • Knees should be slightly bent and body leaning slightly over the ball for balance. • Players should play with their head up, enabling them to see the field as well as
the ball by utilizing peripheral vision as their ability progresses. • Ball should be kept close.
o Encourage players to touch the ball softly. o Close control of the ball should be emphasized. o Players should attempt to touch the ball every other step (or so). o Ball should never be more than a step or two away.

Techniques for U-6 Players Instep Kick
U-6 Coach –2011-2012 17
Common Errors and Corrections E Ball is played too far ahead. C Have players move slower and remind them to the touch
ball softer.
E Player does not look up from ball. C Remind players to look up, then run activity requiring
players to look up while dribbling.
E Player re-positions entire body behind ball before touching. C Encourage player to use motion of foot to direct ball, instead of re-positioning their body.
Dribbling Build Up Stop the Ball Players at this age should be able to stop the ball by putting their foot on top of it.
• Balance on plant foot (foot on the ground), while keeping play foot (foot on the ball) firmly on top of the ball.
• Step past the ball with plant foot before stepping on it, keeping in mind the speed at which the ball is rolling.
Turn the Ball Learning to change direction while dribbling is critical in soccer and should be introduced at this age level.
• Use motion of foot to direct the ball. • Accelerate after changing direction.
Instep Kick
The instep kick is used to kick the ball and, as players get older, for long passes and shots on goal.
Instep Kick – Basics Prepare Plant Leg (supporting, non-kicking foot)
• Place support foot next to the ball pointed in general direction of target (distance from ball will depend on height of the player).
• Bend knee slightly. • All weight should be on plant foot. • Use arms out to sides for balance.
Prepare Striking (kicking) Leg • Bend knee (cock lower leg). • Withdraw leg straight back at hip. • Lock ankle back and down with toes pointed down.

Techniques for U-6 Players Instep Kick
18 U-6 Coach –2011-2012
Striking Movement • Body should be over the ball, moving forward. • Keep eyes on ball. • Set plant knee over ball (eye-knee-ball in line). • Move thigh of striking leg forward (whip action). • Strike the center of the ball on the instep (“laces” of the shoes). • Follow through—move leg straight through toward target: • Pull leg straight through while maintaining balance.
o Lower body as leg rises. o Follow through and lift knee. o Step out of the kick.
Instep Kick – Coaching Points Before having players strike the ball:
• Have them practice planting their foot in the proper place.
• Have them practice swinging their leg and foot straight back and forth, ensuring proper body and leg movement.
Next, have a parent sit down with legs out in front and secure ball with feet. Have each player stand with plant foot in proper position and strike lightly until they begin to hit the ball solidly (properly).
Techniques for U-6 Players Throw-In
U-6 Coach –2011-2012 19
Instep Kick –Common Errors And Corrections E Plant foot is too far in front, behind or away from ball
and/or not pointed in general direction of target. C Review proper technique with player(s).
E Knee(s) are locked, not bent. C Review proper technique with player(s).
E Ankle is not locked and toes are not pointed. C Lock ankle, point toes.
E Ball is stabbed or jabbed. C Encourage player to follow through.
E Leg is swung across the body instead of toward the target. C Encourage player to withdraw leg straight back and follow through straight toward target.
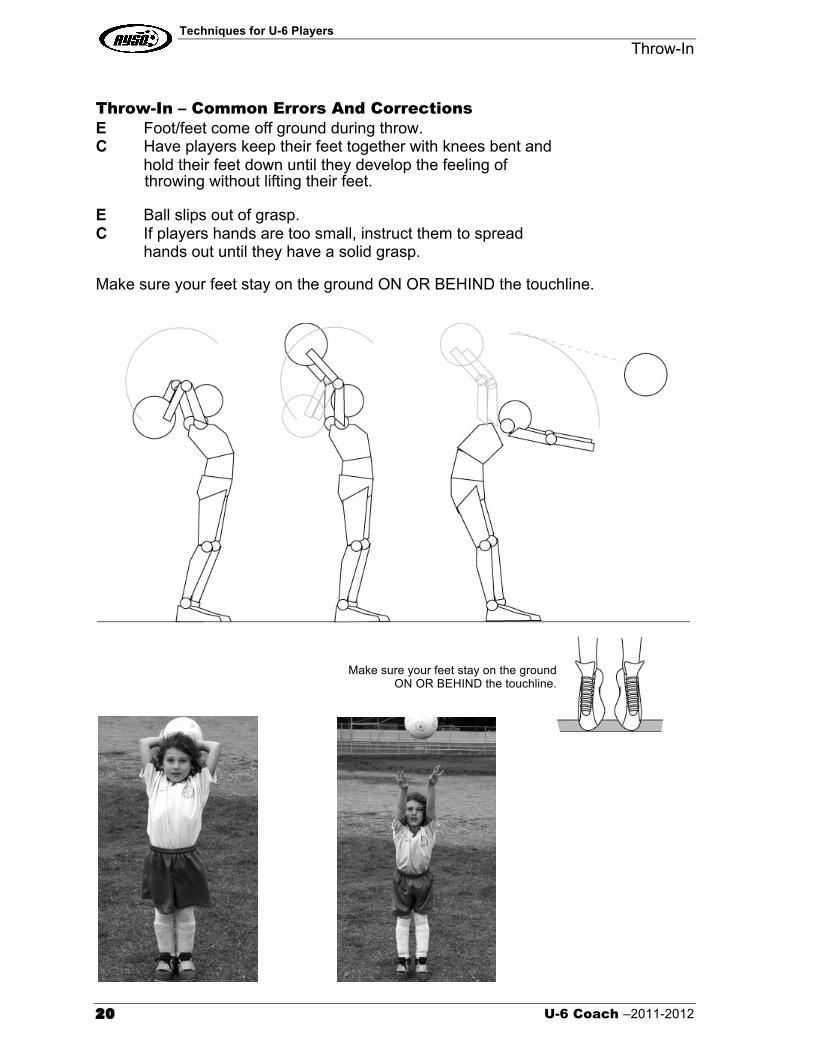
Throw-In
A throw-in is used to restart the game after the entire ball has crossed the touch line, whether on the ground or in the air.
Throw-In – Basics To execute a proper throw-in, the player must:
• Face the field of play.
• Have part of each foot on the ground, either on or behind the touchline when the ball is released.
• Use both hands and deliver the ball from behind and over the head in one continuous motion.
• Hold the ball evenly in both hands (hands should be slightly apart).
• Feet must be kept on the ground until ball is released.
Throw-In – Coaching Points • The thrower may not play the ball a second time until it is touched by another
player.
• Your team should try to maintain possession when executing a throw-in.
• Get the parents involved! Have each one of your players execute a throw-in by making a throw-in to a parent.
• Have each player continue to make throw-ins while you circulate and correct.
Techniques for U-6 Players Throw-In
20 U-6 Coach –2011-2012
Throw-In – Common Errors And Corrections E Foot/feet come off ground during throw. C Have players keep their feet together with knees bent and
hold their feet down until they develop the feeling of throwing without lifting their feet. E Ball slips out of grasp. C If players hands are too small, instruct them to spread
hands out until they have a solid grasp.
Make sure your feet stay on the ground ON OR BEHIND the touchline.
Make sure your feet stay on the ground ON OR BEHIND the touchline.
Training Games for U-6 Players
U-6 Coach –2011-2012 21
Training Games for U-6 Players
This section will provide you with training games recommended by the AYSO National Coaching Advisory Commission to help the players practice their skills. The games are grouped according to the skill that they will most effectively help to teach.
“The game itself is the teacher!” Despite all of the coaching techniques that can be utilized, nothing will ever teach young players more effectively than just letting them play.
You can be creative with the names of the games and modify them. Change the speed, space, and opposition as you and your players begin to feel comfortable with them.

Training Games for U-6 Players One, Two, Three, Red Light
22 U-6 Coach –2011-2012
One, Two, Three, Red Light
Skill: Dribbling
Number Of Players Required: Full U-6 team
Equipment: Four cones to mark grid and one cone and one ball for each player
Grid Requirement: 20 X 20 yard grid
Organization: Create a 20 X 20 yard grid marked with cones. All players are required to play within the grid and each player must have a soccer ball.
How the Game Is Played: The coach stands on one endline with his back to the players who are spread along the opposite endline and place five cones behind the coach. The players must dribble toward the opposite endline. Before the coach turns around he yells “One, Two, Three, Red Light” and then turns around. At that point each player must have stopped the ball with the sole of their foot. Any one seen moving is sent back to the endline. The coach turns his back again. Repeat. The first player to pick up a cone wins.
Variations: Allow players to only use left foot, right foot, outside of right or left, or use inside of both feet. Use the endline in place of cones (first player to the endline wins)

Training Games for U-6 Players Big Bad Coach
U-6 Coach –2011-2012 23
Big Bad Coach
Skill: Dribbling
Number Of Players Required: Full U-6 team
Equipment: Four or more cones to mark grid, one ball for each player
Grid Requirement: 20 X 20 yard grid
Organization: Create a 20 X 20 yard grid marked with cones. All players are required to play within the grid and each player must have a soccer ball.
How the Game Is Played: The players dribble around the area. The coach must attempt to kick the player’s ball out of the grid. Once a player has had her ball kicked out of the grid or has dribbled outside of the grid, she must bring it back into the area and stand with the ball above her head with her legs apart in a stationary position. Players can get back into the game only when a teammate passes their ball through teammates legs.
Variations: Allow players to only use left foot, right foot, outside of right or left foot, or use inside of both feet. Coach should play at 20 percent speed. Increase the speed of play as the players become more comfortable with the game.
Training Games for U-6 Players Coach Says
24 U-6 Coach –2011-2012
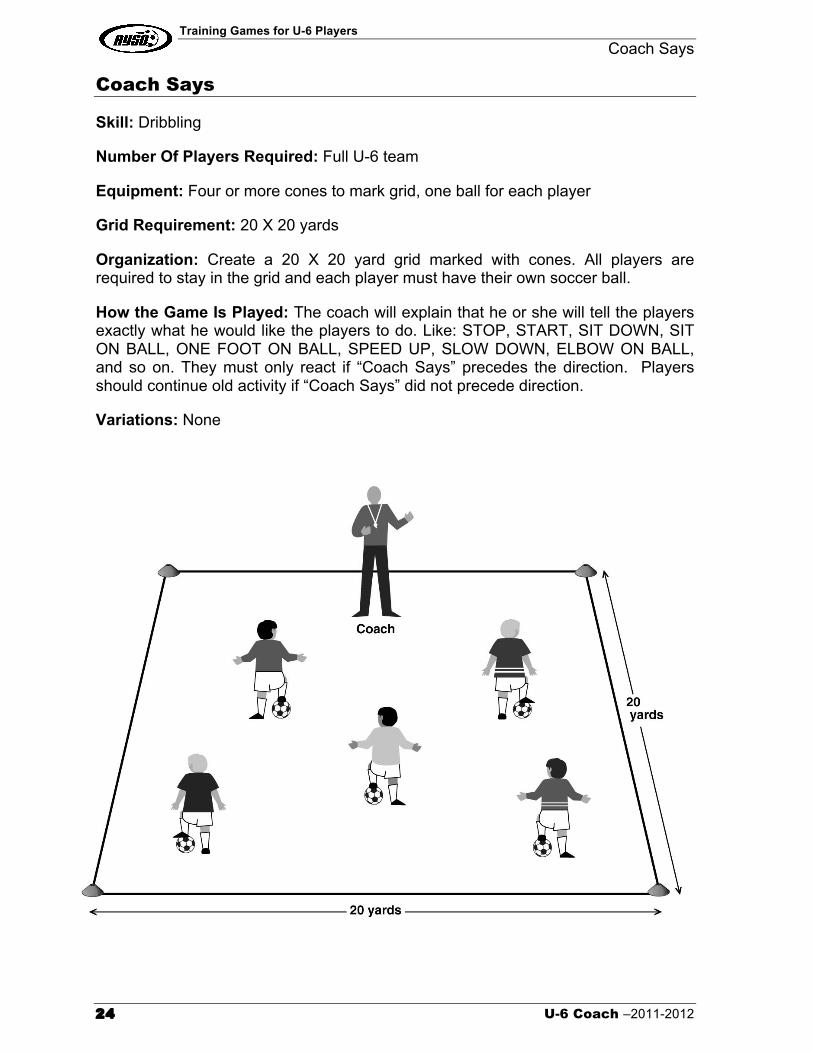
Coach Says
Skill: Dribbling
Number Of Players Required: Full U-6 team
Equipment: Four or more cones to mark grid, one ball for each player
Grid Requirement: 20 X 20 yards
Organization: Create a 20 X 20 yard grid marked with cones. All players are required to stay in the grid and each player must have their own soccer ball.
How the Game Is Played: The coach will explain that he or she will tell the players exactly what he would like the players to do. Like: STOP, START, SIT DOWN, SIT ON BALL, ONE FOOT ON BALL, SPEED UP, SLOW DOWN, ELBOW ON BALL, and so on. They must only react if “Coach Says” precedes the direction. Players should continue old activity if “Coach Says” did not precede direction.
Variations: None
Training Games for U-6 Players LA Freeway
U-6 Coach –2011-2012 25
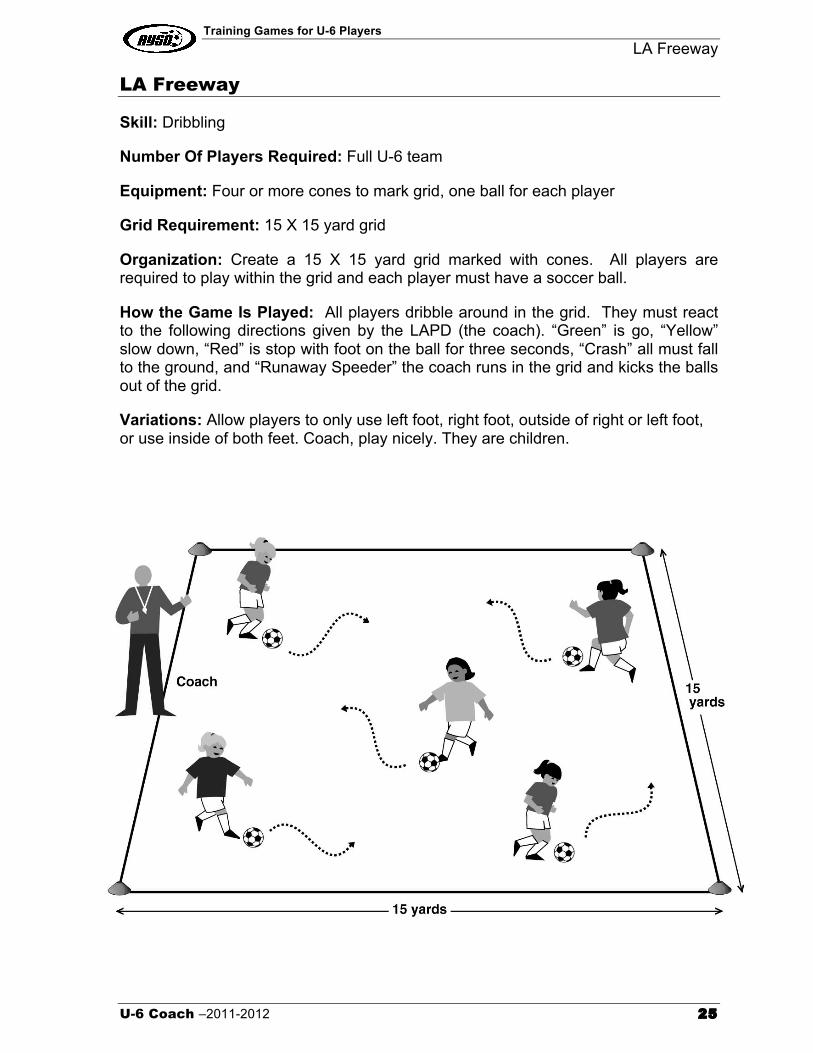
LA Freeway
Skill: Dribbling
Number Of Players Required: Full U-6 team
Equipment: Four or more cones to mark grid, one ball for each player
Grid Requirement: 15 X 15 yard grid
Organization: Create a 15 X 15 yard grid marked with cones. All players are required to play within the grid and each player must have a soccer ball.
How the Game Is Played: All players dribble around in the grid. They must react to the following directions given by the LAPD (the coach). “Green” is go, “Yellow” slow down, “Red” is stop with foot on the ball for three seconds, “Crash” all must fall to the ground, and “Runaway Speeder” the coach runs in the grid and kicks the balls out of the grid.
Variations: Allow players to only use left foot, right foot, outside of right or left foot, or use inside of both feet. Coach, play nicely. They are children.
Training Games for U-6 Players Sharks/Minnows
26 U-6 Coach –2011-2012
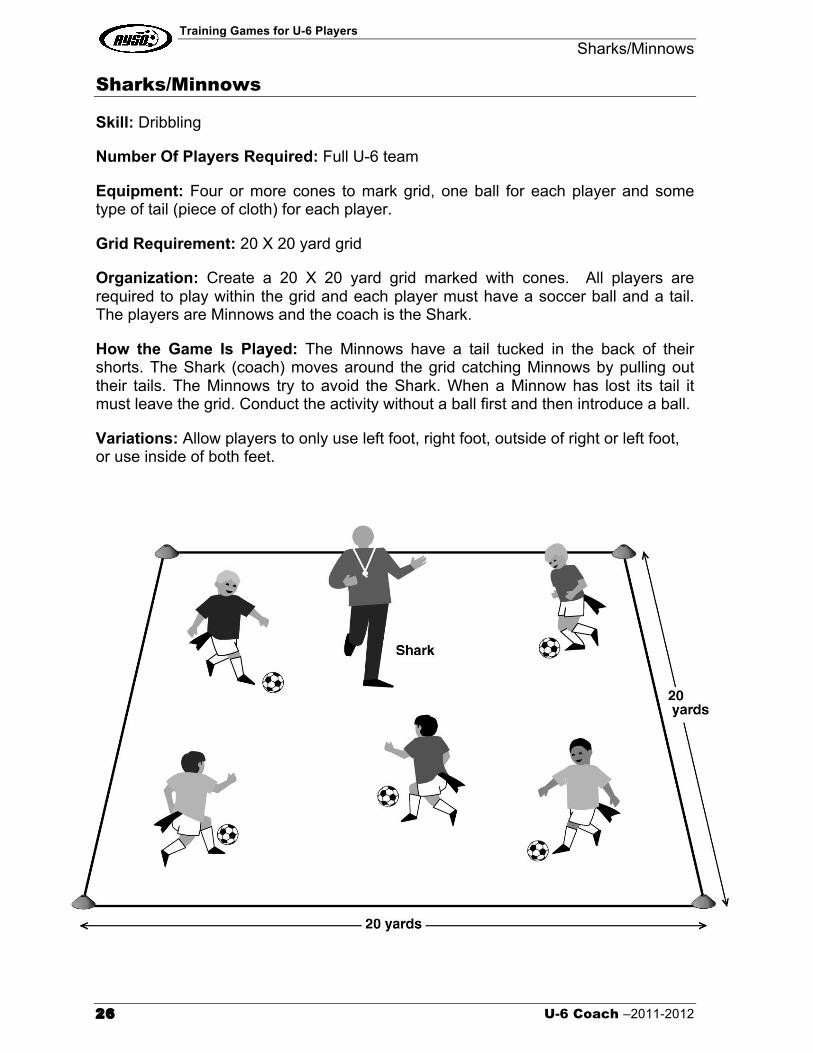
Sharks/Minnows
Skill: Dribbling
Number Of Players Required: Full U-6 team
Equipment: Four or more cones to mark grid, one ball for each player and some type of tail (piece of cloth) for each player.
Grid Requirement: 20 X 20 yard grid
Organization: Create a 20 X 20 yard grid marked with cones. All players are required to play within the grid and each player must have a soccer ball and a tail. The players are Minnows and the coach is the Shark.
How the Game Is Played: The Minnows have a tail tucked in the back of their shorts. The Shark (coach) moves around the grid catching Minnows by pulling out their tails. The Minnows try to avoid the Shark. When a Minnow has lost its tail it must leave the grid. Conduct the activity without a ball first and then introduce a ball.
Variations: Allow players to only use left foot, right foot, outside of right or left foot, or use inside of both feet.
Training Games for U-6 Players Tag
U-6 Coach –2011-2012 27
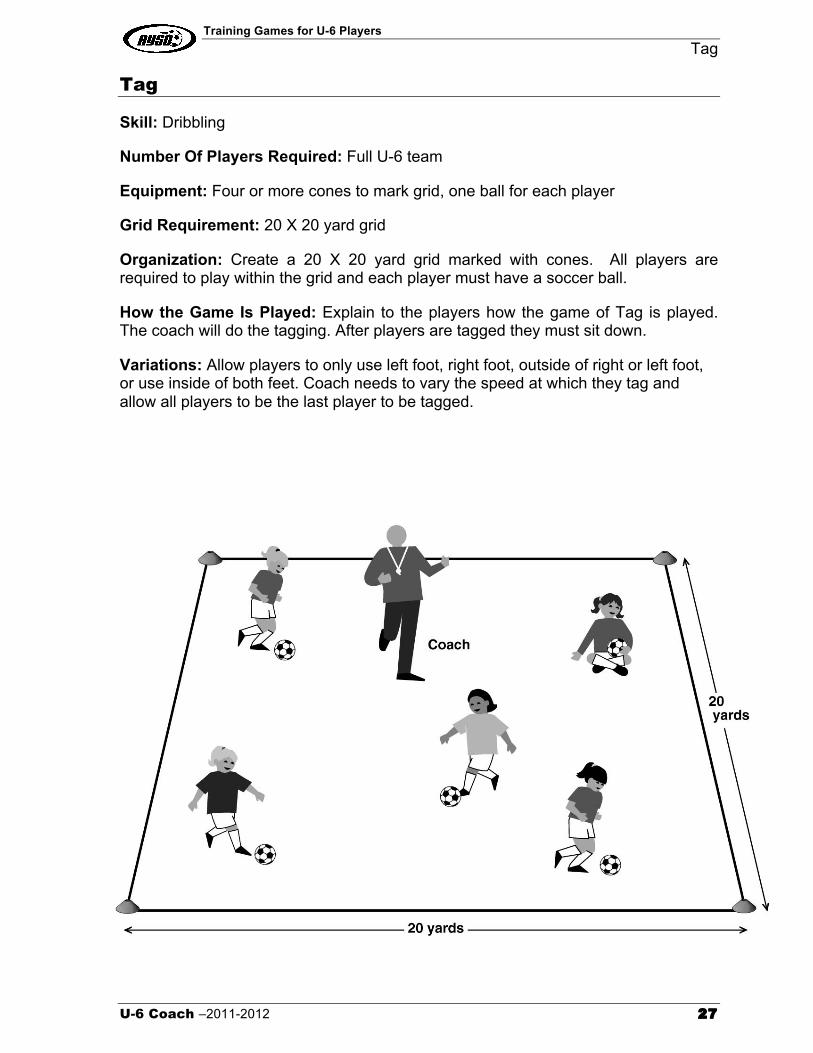
Tag
Skill: Dribbling
Number Of Players Required: Full U-6 team
Equipment: Four or more cones to mark grid, one ball for each player
Grid Requirement: 20 X 20 yard grid
Organization: Create a 20 X 20 yard grid marked with cones. All players are required to play within the grid and each player must have a soccer ball.
How the Game Is Played: Explain to the players how the game of Tag is played. The coach will do the tagging. After players are tagged they must sit down.
Variations: Allow players to only use left foot, right foot, outside of right or left foot, or use inside of both feet. Coach needs to vary the speed at which they tag and allow all players to be the last player to be tagged.
Training Games for U-6 Players The Big Race
28 U-6 Coach –2011-2012
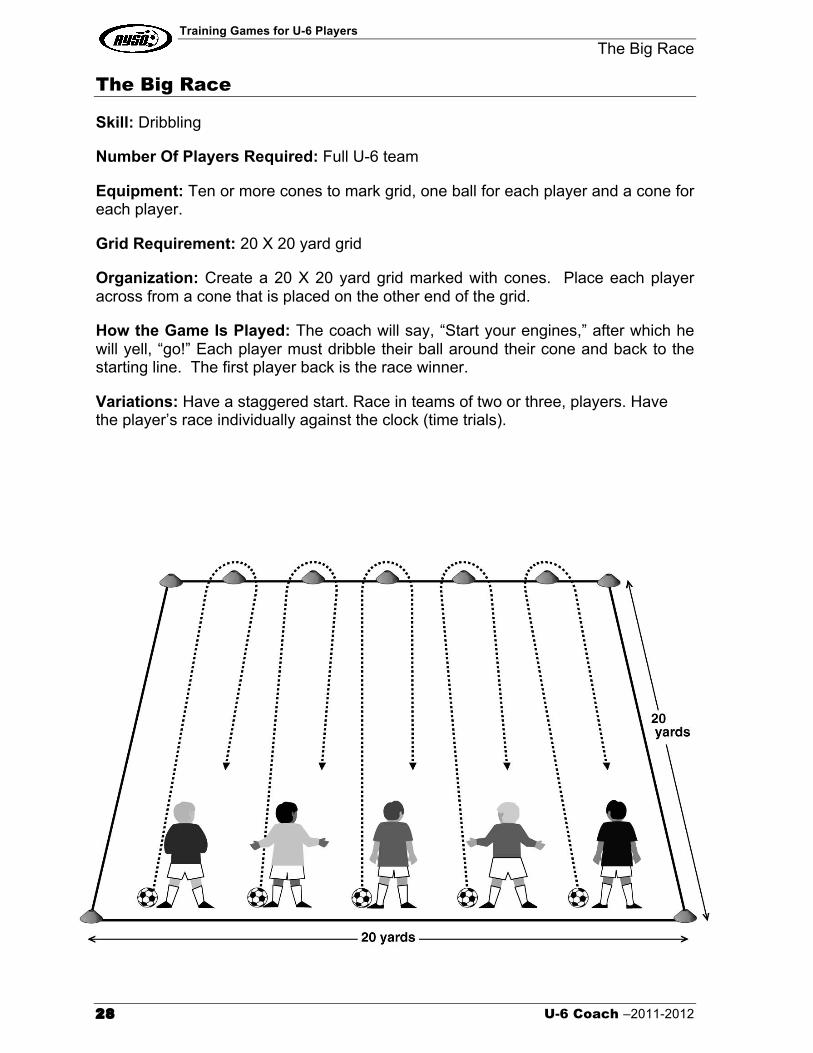
The Big Race
Skill: Dribbling
Number Of Players Required: Full U-6 team
Equipment: Ten or more cones to mark grid, one ball for each player and a cone for each player.
Grid Requirement: 20 X 20 yard grid
Organization: Create a 20 X 20 yard grid marked with cones. Place each player across from a cone that is placed on the other end of the grid.
How the Game Is Played: The coach will say, “Start your engines,” after which he will yell, “go!” Each player must dribble their ball around their cone and back to the starting line. The first player back is the race winner.
Variations: Have a staggered start. Race in teams of two or three, players. Have the player’s race individually against the clock (time trials).
Training Games for U-6 Players The Big Snake
U-6 Coach –2011-2012 29
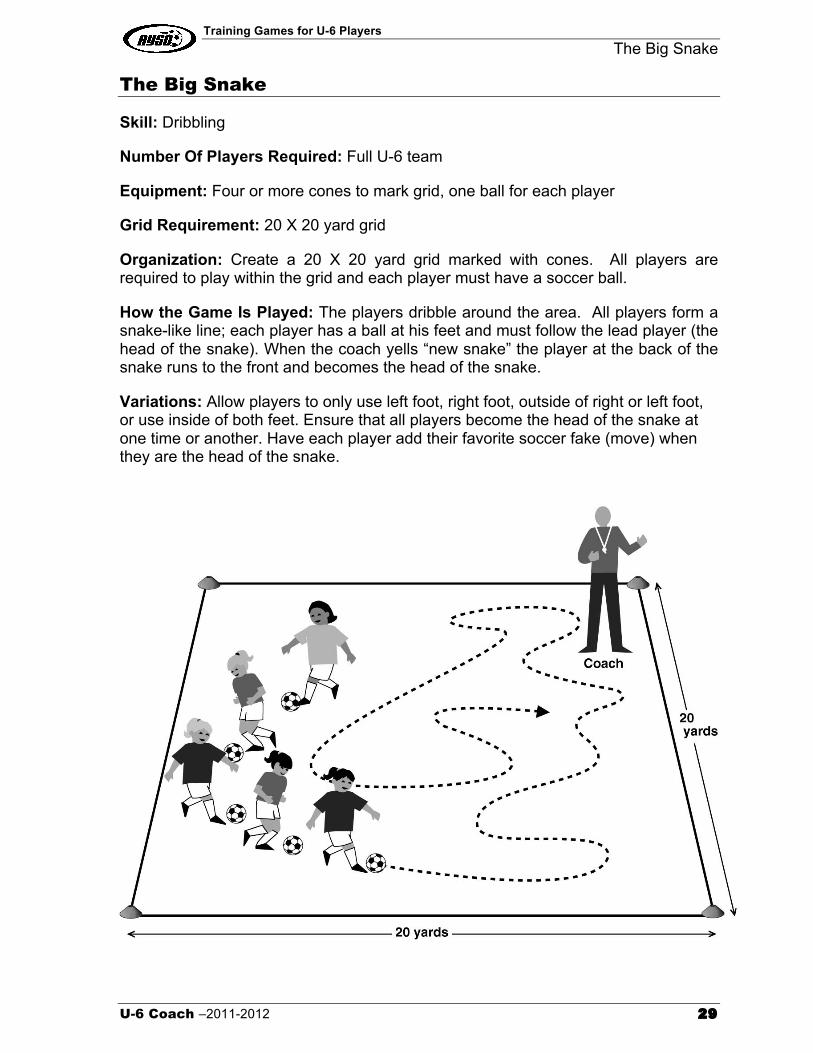
The Big Snake
Skill: Dribbling
Number Of Players Required: Full U-6 team
Equipment: Four or more cones to mark grid, one ball for each player
Grid Requirement: 20 X 20 yard grid
Organization: Create a 20 X 20 yard grid marked with cones. All players are required to play within the grid and each player must have a soccer ball.
How the Game Is Played: The players dribble around the area. All players form a snake-like line; each player has a ball at his feet and must follow the lead player (the head of the snake). When the coach yells “new snake” the player at the back of the snake runs to the front and becomes the head of the snake.
Variations: Allow players to only use left foot, right foot, outside of right or left foot, or use inside of both feet. Ensure that all players become the head of the snake at one time or another. Have each player add their favorite soccer fake (move) when they are the head of the snake.
Training Games for U-6 Players Lion King
30 U-6 Coach –2011-2012
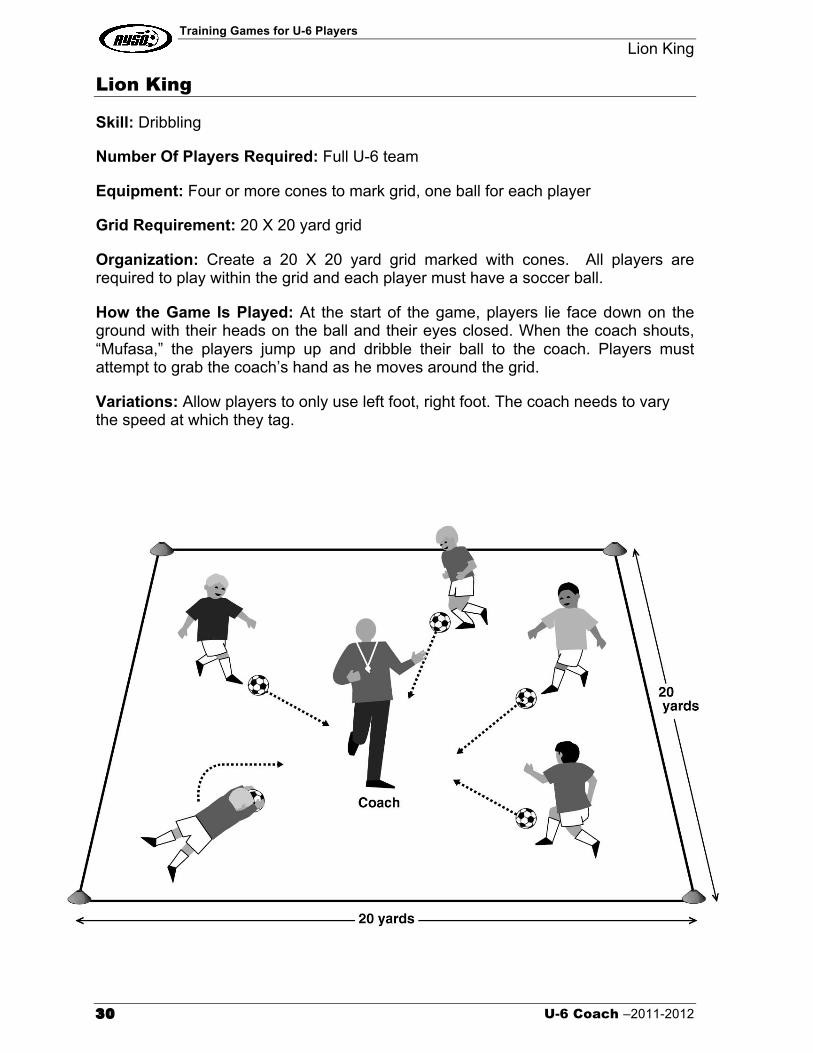
Lion King
Skill: Dribbling
Number Of Players Required: Full U-6 team
Equipment: Four or more cones to mark grid, one ball for each player
Grid Requirement: 20 X 20 yard grid
Organization: Create a 20 X 20 yard grid marked with cones. All players are required to play within the grid and each player must have a soccer ball.
How the Game Is Played: At the start of the game, players lie face down on the ground with their heads on the ball and their eyes closed. When the coach shouts, “Mufasa,” the players jump up and dribble their ball to the coach. Players must attempt to grab the coach’s hand as he moves around the grid.
Variations: Allow players to only use left foot, right foot. The coach needs to vary the speed at which they tag.
Training Games for U-6 Players Treasure Hunt
U-6 Coach –2011-2012 31
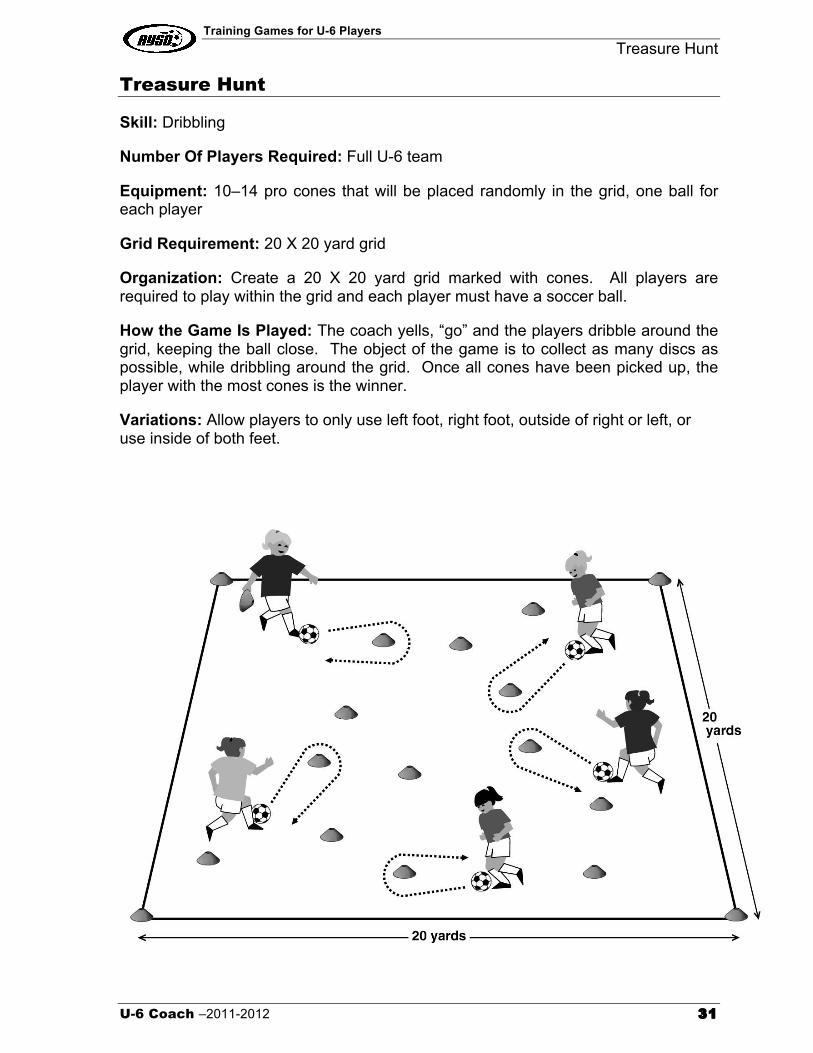
Treasure Hunt
Skill: Dribbling
Number Of Players Required: Full U-6 team
Equipment: 10–14 pro cones that will be placed randomly in the grid, one ball for each player
Grid Requirement: 20 X 20 yard grid
Organization: Create a 20 X 20 yard grid marked with cones. All players are required to play within the grid and each player must have a soccer ball.
How the Game Is Played: The coach yells, “go” and the players dribble around the grid, keeping the ball close. The object of the game is to collect as many discs as possible, while dribbling around the grid. Once all cones have been picked up, the player with the most cones is the winner.
Variations: Allow players to only use left foot, right foot, outside of right or left, or use inside of both feet.
Training Games for U-6 Players Golf
32 U-6 Coach –2011-2012
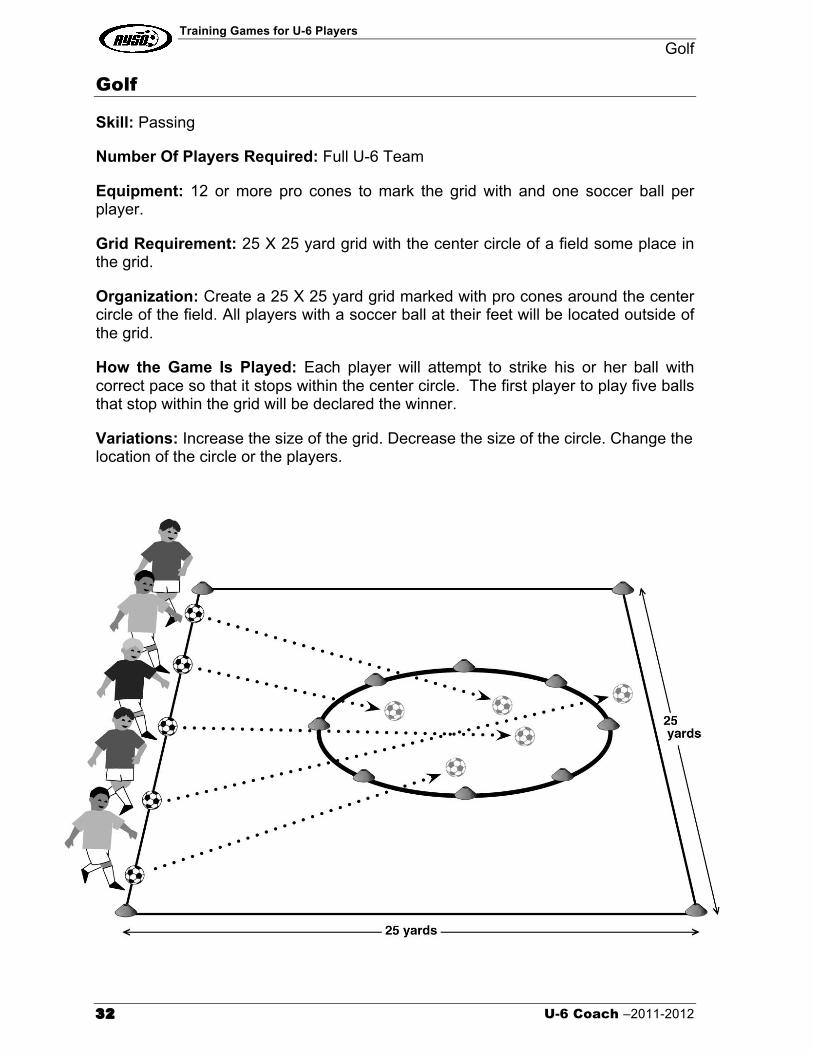
Golf
Skill: Passing
Number Of Players Required: Full U-6 Team
Equipment: 12 or more pro cones to mark the grid with and one soccer ball per player.
Grid Requirement: 25 X 25 yard grid with the center circle of a field some place in the grid.
Organization: Create a 25 X 25 yard grid marked with pro cones around the center circle of the field. All players with a soccer ball at their feet will be located outside of the grid.
How the Game Is Played: Each player will attempt to strike his or her ball with correct pace so that it stops within the center circle. The first player to play five balls that stop within the grid will be declared the winner.
Variations: Increase the size of the grid. Decrease the size of the circle. Change the location of the circle or the players.
Training Games for U-6 Players The Mosquito
U-6 Coach –2011-2012 33
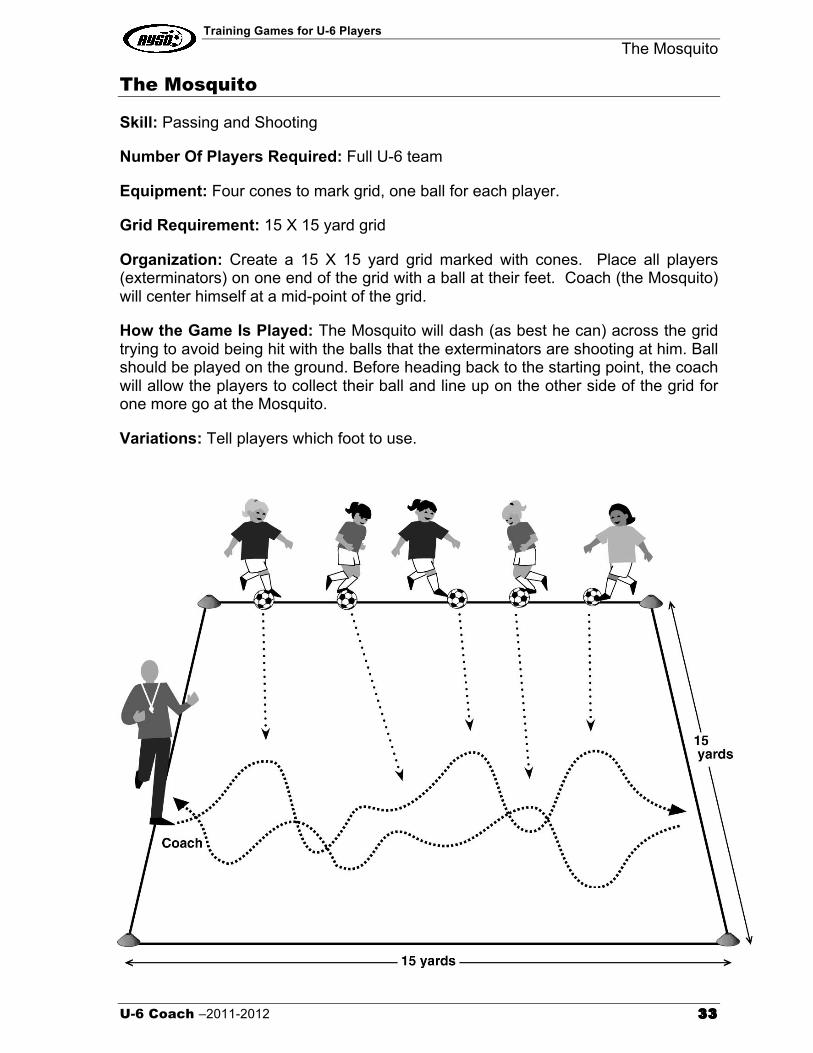
The Mosquito
Skill: Passing and Shooting
Number Of Players Required: Full U-6 team
Equipment: Four cones to mark grid, one ball for each player.
Grid Requirement: 15 X 15 yard grid
Organization: Create a 15 X 15 yard grid marked with cones. Place all players (exterminators) on one end of the grid with a ball at their feet. Coach (the Mosquito) will center himself at a mid-point of the grid.
How the Game Is Played: The Mosquito will dash (as best he can) across the grid trying to avoid being hit with the balls that the exterminators are shooting at him. Ball should be played on the ground. Before heading back to the starting point, the coach will allow the players to collect their ball and line up on the other side of the grid for one more go at the Mosquito.
Variations: Tell players which foot to use.

Training Games for U-6 Players Into The Well
34 U-6 Coach –2011-2012
Into The Well
Skill: Throw-In
Number Of Players Required: Full U-6 team
Equipment: Ten or more cones to mark grid, one ball for each player, and a trashcan.
Grid Requirement: Five-yard diameter circle.
Organization: Circle the players (5-yard diameter circle) around a target (trash can) with soccer ball in hand.
How the Game Is Played: The players attempt to throw the balls into the trashcan all at once. The object is to improve the number of balls that go into the trashcan, not to have a winner. Have the team work on improving the number of balls in the target.
Variations: Increase the diameter of the circle. Allow a parent to move around the circle carrying the target.

Appendix A: Under-6 Program Guidelines Activity Day
U-6 Coach –2011-2012 35
Appendix A: Under-6 Program Guidelines
Activity Day
At the U-6 level, activity day consists of a 60-minute session: 35 minutes of technical development and one game of four five-minute periods and a five-minute break.
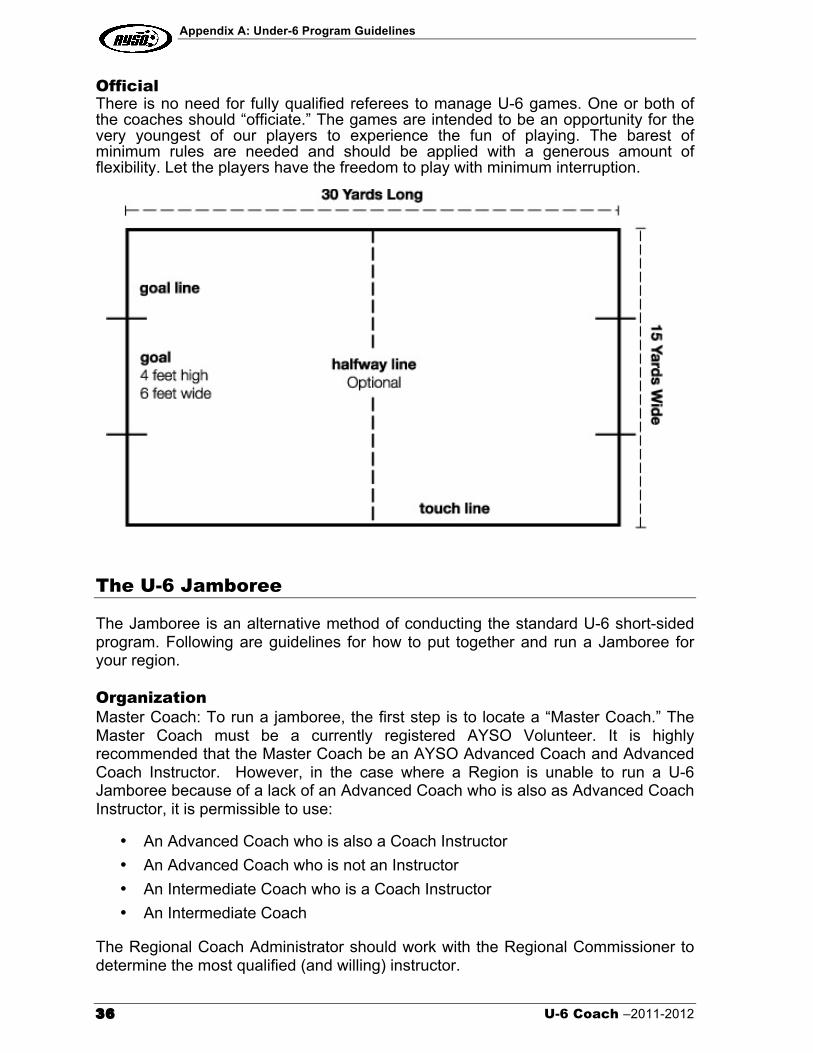
Field Dimensions: 30 yards long, 15 yards wide.
Markings: Distinctive lines can be used but are not required. Field can be marked using 20 flat pro-cones to mark all four sides.
Goals: Maximum four feet high and six feet wide OR four tall cones, two each set six feet apart.
Ball Size 3
Players Number: Three per team on field; no goalkeepers. Five maximum on roster.
Substitutions: Between periods, at halftime and for injuries.
Playing time: Minimum of two periods per game and no player should play four periods until everyone has played three.
Teams: Separate girls and boys teams at all levels of play. Only players should be allowed on the field; with the exception of a coach from each team who will manage the game.
Players’ Equipment Footwear: Soccer shoes, tennis shoes or similar type athletic shoes are recommended. The type and condition of cleated shoes must be inspected for safety before use.
Shinguards: MANDATORY, must be covered entirely by socks.
Duration of Game • Four five-minute periods
• Halftime break of five minutes
Appendix A: Under-6 Program Guidelines
36 U-6 Coach –2011-2012
Official There is no need for fully qualified referees to manage U-6 games. One or both of the coaches should “officiate.” The games are intended to be an opportunity for the very youngest of our players to experience the fun of playing. The barest of minimum rules are needed and should be applied with a generous amount of flexibility. Let the players have the freedom to play with minimum interruption.
The U-6 Jamboree
The Jamboree is an alternative method of conducting the standard U-6 short-sided program. Following are guidelines for how to put together and run a Jamboree for your region.
Organization Master Coach: To run a jamboree, the first step is to locate a “Master Coach.” The Master Coach must be a currently registered AYSO Volunteer. It is highly recommended that the Master Coach be an AYSO Advanced Coach and Advanced Coach Instructor. However, in the case where a Region is unable to run a U-6 Jamboree because of a lack of an Advanced Coach who is also as Advanced Coach Instructor, it is permissible to use:
• An Advanced Coach who is also a Coach Instructor • An Advanced Coach who is not an Instructor • An Intermediate Coach who is a Coach Instructor • An Intermediate Coach
The Regional Coach Administrator should work with the Regional Commissioner to determine the most qualified (and willing) instructor.

Appendix A: Under-6 Program Guidelines The U-6 Jamboree
U-6 Coach –2011-2012 37
The master coach is in charge of the field! The purpose of the master coach is to guide new players through skills, activities and training games with the help of the parents, which will, in turn, ease the parents into learning how to coach.
Throughout this process, parents of each team will guide their team through the activities and games with the help and supervision of the master coach. The Master Coach should introduce and demonstrate each section first, then circulate to help the parents as they help the kids, giving all a positive learning experience.
Teams Teams of five players on a roster should be formed before the season and have at least two parents per team who are willing to help on the weekend. Each player should receive a uniform, since it is part of the fun to get dressed up for “the big game” —and having fun will make the kids want to come back.
(Alternatively, teams may be formed each week at the beginning of the session based on how many players arrive, dividing them equally and using pinnies instead of uniforms.)
Session Schedule Sessions should last one hour. Run as many sessions with as many players as is necessary throughout the day to have all players attend one session. (Example: 100 players = five sessions with 20 players [four teams] per session)
5 minutes Group Warm-Up and Stretches
25 minutes Skills and Training Games
Each week a new technique and/or piece of game knowledge should be introduced, demonstrated, practiced and then reinforced with training games that focus on the particular technique or piece of game knowledge.
5 minutes Water Break
25 minutes 3 vs. 3 Game (four five-minute periods)
During the game, one parent from each team should be selected to keep the game going. All other parents should be encouraged to cheer positively but refrain from “coaching” (giving directions) from the sideline. This is the time for the kids to PLAY.
Appendix B: Knowledge of the U-6 game
38 U-6 Coach –2011-2012
Appendix B: Knowledge of the U-6 game
The Start of Play To start the first and second halves and following each goal in all age-group games, play is started or restarted with a kick-off in the middle of the field. A coin toss is used to determine which team kicks off to start the game and the other team kicks off to start the second half. Following a goal the team scored upon kicks off.
The Kick-off The kick-off is taken from the center of the field with each team in their own half and the team not kicking off at least five yards from the ball. Do not insist the opponent always be five yards from the ball, as this is just a guide to give the kicker room to kick the ball without it immediately hitting an opponent. Remember, let them play and do not interfere for technicalities.
Ball In and Out of Play The ball is out of play in all age group games when it completely crosses the touch line (side line) or goal line (end line), either on the ground or in the air. The team that didn’t touch it last gets either a throw-in (from the touch line) or, in U-6 games, a kick-in (from the goal line). The coach in U-6 games will determine when one of these restarts is necessary and should then interfere as little as possible in the restart. It’s their game, let them play. The coach can work on technique later.
Method of Scoring A goal, in all age group games, is awarded when the ball completely crosses the goal line into the goal. Goals should be enthusiastically celebrated by everyone but, in U-6 games, they are not recorded to determine who wins. Everyone wins in U-6 games.
Fouls and Other Stoppages Deliberate fouling should be rare in U-6 games. Kicking, tripping, handling the ball and dangerous play may occur. There should be few, if any, additional reasons to stop play in U-6 games. If a player is “not playing well with others” or if play must be stopped for any other reason (injury, substitution, confusion, or to watch a passing train, butterfly or frog), refocus the players and begin again with a free kick or throw-in as appropriate. Award the restart to whichever team deserves it or flip a coin to decide, but do not make it a lengthy ceremony. Exercise common sense, stand back and let them play.
Appendix B: Knowledge of the U-6 game
U-6 Coach –2011-2012 39
Free Kicks Play may have to be stopped occasionally to “sort things out” in U-6 games. A player may pick the ball up and start running with it or want to keep it away from the other players, or perhaps there is a pile of kids on the ground kicking at both the ball and each other. Stop play and correct the situation then restart with a free kick for a deserving player. All free kicks in U-6 games are direct free kicks which means, if you’re lucky, a goal can be scored directly from the kick.
Throw-in When the ball goes out of play across one of the touch lines (side lines) in all age group games, a throw-in is awarded from where it crossed the line to the team that didn’t touch it last. The coach should let the player take the throw-in and whether the throw-in is properly taken or not, let it go! Proper technique can be taught later. Again, let them play with minimum interruption.
Hand Ball A hand ball infraction occurs when a player handles the ball deliberately. The “handing the ball” includes the entire arm up to the top of the shoulder. Instinctive, self-protective reactions are not penalized at this young age. Accidental contact (ball striking hand or arm with no intent by the player) is not an offense and should not be penalized.

Appendix C: Pledges AYSO Coach Pledge:
40 U-6 Coach –2011-2012
Appendix C: Pledges AYSO Coach Pledge:
In my words and action, I pledge to:
1. Enthusiastically support and practice the AYSO Philosophies of: Everyone Plays, Open Registration, Balanced Teams, Positive Coaching, Good Sportsmanship and Player Development.
2. Stay informed about sound principles of coaching and child development.
3. Respect the game and know the Laws.
4. Emphasize to my players that they must abide by the Laws of the Game at all times.
5. Develop a true respect for the judgment of all referees.
6. Develop a team respect for the ability of our opponents.
7. Ensure a safe environment for my players.
8. Never yell at or ridicule a player.
9. Always set a good example.
10. Remember that soccer is a game and all games should be fun.
AYSO Player Pledge:
In my words and action, I pledge to:
1. Play for the sake of playing a game, not just to please a parent or coach.
2. Always give my best effort and work as hard for my teammates as I do for myself.
3. Treat all players as I would like to be treated.
4. Be a team player and not show off or hog the ball.
5. Be a good sport and acknowledge good plays whether they are made by my team or my opponents.
6. Abide by the Laws of the Game.
7. Cooperate with my coaches, teammates, opponents and the referee.
8. Never argue with or complain about referee calls or decisions.
9. Control my temper when I feel I have been wronged.
10. Remember that the object of the game is to win, but the goal is to enjoy myself.

Appendix C: Pledges AYSO Parent Pledge:
U-6 Coach –2011-2012 41
AYSO Parent Pledge:
In my words and action, I pledge to:
1. Attend and participate in team parent meetings.
2. Be on time or early when dropping off or picking up my child for a practice or game.
3. Ensure my child is supported and encouraged by family or loved ones at games.
4. Encourage my child to have fun and keep sport in its proper perspective.
5. Define winning for my child as doing his/her very best.
6. Endeavor to learn the Laws (rules) of soccer and support the efforts of referees.
7. Honor the game and show respect for all involved including coaches, players, opponents, spectators and referees.
8. Applaud and encourage players from both teams and not yell out instructions.
9. Not make negative comments about the game, coaches, referees or players in my child’s presence.
10. Encourage others to refrain from negative or abusive sideline behavior.
Appendix D: VIP Integrating the “VIP” Player into Your Region
42 U-6 Coach –2011-2012
Appendix D: VIP
Integrating the “VIP” Player into Your Region
A VIP (Very Important Player) is a player who’s physical and/or mental challenges make it difficult to successfully participate on a mainstream soccer team.
What is successful participation? It should be defined by the player’s enjoyment and the safety of all team members.
The player who has only a physical disability is likely to have many of the expectations and capabilities of a non-disabled player and should be coached accordingly. Every effort should be made to integrate these players into mainstream teams, as much as safety allows.
VIP is an AYSO program designed to provide a quality soccer experience for VIP players. VIP teams offer many players with disabilities the least-restrictive and safest environment in which to learn and enjoy the game of soccer. Contact your Regional Commissioner, Regional Coach Administrator, Regional VIP Administrator or the AYSO National Office to obtain AYSO’s special VIP training materials and information on how to begin a VIP program.

Glossary of Terms
U-6 Coach –2011-2012 43
Glossary of Terms
Delay: Slowing down the attack by closing the gap and denying space to allow the defense to get organized.
Dribbling: The skill of using the feet to advance the ball on the ground when opponents are near.
In and out of play: The ball is out of play when the entire ball has completely crossed the goal line or touch line whether on the ground or in the air.
Instep kick: This skill is used for long passes and strong shots on goal using the instep of the foot.
Penetration: Advancement moving the ball and/or players past an opponent in order to get into position to shoot and/or score, and is achieved by shooting, dribbling, and passing.
Principles of Play: There are five attacking and five defending Principles of Play utilized in soccer. At the U-6 level, however, we will focus on only one attacking principle (penetration) and one defending principle (delay).
Throw-in: The throw-in is used to restart the game after the entire ball has crossed the sideline, whether on the ground or in the air.
Warm-up: Keep it short, but do it. Young players must get used to warming up and stretching their muscles.
Notes
44 U-6 Coach –2011-2012
Notes