two dimensional design - wordpress.com · 2 greensheet: working syllabus class goal: learn basic...
TRANSCRIPT
1
Two Dimensional Design
Workbook
ART 104A
Fall 2010

2
Greensheet: Working Syllabus
Class Goal: Learn Basic Design Principles and Color Theory. Learn basic art techniques and craft.
Develop written and oral Art presentation skills.
Class Overview: This class will be composed of lecture and lab. There will be weekly demonstrations, slide
presentations, and critiques. In addition, we will have a mandatory field trip. All students are expected to be
present and participate.
Course outline: (See attached pages)
1: Awareness of Design
2: Principles of Design
3: Line
4: Shape and Form
5: Space
6: Texture
7: Value
8: Color
9: Hand-bound BOOK
Structure of Course:
1: Lectures (Announcements, Demonstrations, Critiques, and
Handouts)
2: Labs
Assignments:
1: Lab Projects
2: Outside Readings
3: Extracurricular Events
Grade Determinants: (see grading policy)
Required Texts:
1: Design Principles and Problems, 2nd Edition, Zelanski/ Fisher
Supplies: (see supply list)

3
“Unwritten Rules” for Succeeding in College
Make certain that you understand and follow the instructor‟s plagiarism policy. Be aware that you can
plagiarize without even intending to do so.
Don’t ask your instructor if “it is OK” to be absent, leave class early, or turn in an assignment
late. Understand that these choices have consequences, which are usually explained in the course
syllabus. If you must turn in an assignment late, don‟t try to talk the instructor out of counting it as late.
If you must miss class, don‟t waste the instructor‟s time by giving excuses about why you were absent.
Also, never tell your instructor that you had to miss class because
you had to work.
you were in Tahoe, L.A., Las Vegas, Minnesota, or (fill in the blank).
you had to study for a midterm in another class.
If you are absent for a class, don‟t ask the instructor to tell you what you missed. Instead, call or e-mail
another student in the class. It is your responsibility to keep up with the material covered in class and the
assignments.
Never ask the instructor, “Did I miss anything important?” upon returning to class after an absence.
If you must miss class for an extended period of time (one week or more) due to a serious illness or a
death in the family, let the instructor know by phone or e-mail. Otherwise, the instructor may assume
you‟ve dropped and remove you from the roster, or give you an F grade. If you have in fact dropped the
class, do not expect the instructor to do the paperwork to drop you. That is your responsibility!!!!!
Avoid coming to class late. If you must come late to class, don‟t make a lot of noise entering or walk in
front of the class while the instructor is talking. Instead, come in quietly and take a seat by the door.
Avoid talking to another student while the instructor is giving a lecture or addressing the class.
On days that an assignment is due, arrive to class on time, having proofread and stapled your paper.
Never ask your instructor, “Do you have a stapler?” Don‟t ask the instructor if you can leave early
after turning in an assignment; this makes a very poor impression. And do not work on that assignment
during the class and try to turn it in at the end of class.
Never answer your cell phone in class. Put phones on vibrate. If your phone rings during class, quickly
shut it off; don‟t go outside to answer it. Don‟t play with your phone during class. Don‟t look to see who it
is and announce you must talk to your mother, grandmother, sister, etc. Points will be deducted.
After an instructor has finished explaining something, don‟t ask, “Do we need to know this?” When an
instructor gives an assignment, don‟t ask, “Does this count for our grade?” Remember that your attitude
counts towards your grade.

4
Grading Policy
Attendance and participation are critical!
All projects will be graded. You will receive a project evaluation from me with the project graded for craft,
effort and execution (effectiveness). See below.
A = 11-12 points, B = 9-10 points, C = 7-8 points, D = 5-6 points, F = 0-4 points,
At the end of the semester all the points will be added together.
In addition to your project grades, you will be graded for your physical attendance.
Absence No. 2-3 will each count as 5 Points each, off your final grade.
You will receive an "F" at absence No. 4.*
Attendance is taken promptly. Three lates and/or three leaving earlies will equal one absence.
You will also be graded for your mental attendance and enthusiasm.
This class is very hands-on. It is very important for you to be in class on time with the materials that are
needed for that class period. If you miss class it is your responsibility to check with a classmate in regard to
what you missed.
You may not e-mail me and ask me what you missed.
You may not take up class time asking me what you missed.
You may not use class time allotted for one assignment by playing catch up with another assignment.
All students must attend first 2 days of class or they will be dropped & petitioners given their space.
Drop Policy: It is administration policy that students are responsible for dropping courses. If you decide to
drop this class, please fill out the appropriate paperwork.
Cheating or Plagiarism: At Ohlone, plagiarism is the act of representing the work of another as one's own
(without giving appropriate credit) regardless of how that work was obtained and submitting it to fulfill
academic requirements. Plagiarism at Ohlone includes but is not limited to:
1. The act of incorporating the ideas, words, sentences, paragraphs, or parts thereof, or the specific
substance of another's work, without giving appropriate credit, and representing the product as one's own
work; and
2. Representing another's artistic/scholarly works such as musical compositions, computer programs,
photographs, paintings, drawings, sculptures, or similar works as one's own.
If you plagiarize in this class you will not be allowed to stay in the class or complete the course. You
will receive an F for the course.
Changes to Syllabi:
This will most likely occur. Class time is very important for sharing ideas and working on assignments and
critiquing work. Do not jump ahead on the syllabus and try to interpret assignments before they are presented
to you. There is a point for each assignment and a time for them to be assigned. Each project leads to
success and better understanding for the next project. Some of the calculations or materials will change for a
project, so wait until the project is introduced in the classroom.
I understand that absences 2-3 each take 5 points off my final grade, & I will fail the class at absence
No. 4.
Sign here
Name of two classmates email Phone

5
___________________________________ ______________________
____________________
___________________________________ ______________________
____________________
2-D DESIGN SUPPLIES
Strathmore Bristol Smooth, white 11” X 14”, 20 sheets, 100lb., 300 series
Strathmore, Artagain, black, 12” X 18”, 24 sheets, 60 lb., 400 series
8 1/2 “ x 11” copier paper
“Yes” stickflat glue, 1 pint and plastic palette knife
or 2 ea. Premium Best-Test Rubber Cement, 8 ounce and rubber cement pick up
Pritt or Tombow Glue Stick, (Archival)
Drafting Tape #230, 1/2” or 3/4”
Self-healing cutting board, 12” X 18” or cardboard
Bevelled Triangle (transparent), P450, or 30-60-90 at least 10", Alvin or C-thru
Ruler with inches and centimeters
X-acto Knife, #2, with cover and refill blades
Good pair of scissors
Drawing pencils graphite HB, 4B
Erasures: Staedtler Mars Plastic or Pentel Clic Eraser ZE 21
Acrylic paint: Titanium White and Ivory Black
Acrylic paint: Cobalt Blue, Cadmium Red Medium, Cadmium Yellow Light
or Winsor & Newton Cobalt Blue, Perylene Red, Cadmium Yellow Medium
no transparent, no translucent, yes opaque
Brushes 1/4” , 1/2” and 2 round brushes
White-out, Bic White-Out Exact Liner
Black Sumi Ink Yasutomo and Pens, 2 sizes of tips
1 Fine Point Black Marker "PEN STIX" or Ultra-Fine Nib Sharpie
Sharpie fine point permanent marker (black felt tip)
Paper Palette or waxed paper
Rubber Brayer, soft
Barren or Scratch-Art rubbing stick
Small stiff plastic board, approximately 6”x6” 1/4” to 1/2” thick (check Tap Plastic)
Rag and small container for water
Itoya Portfolio 11”x 14” or Cardboard folder approximately 11” x 14”
Textbook: Design Principles and Problems, 2nd Edition, Zelanski/ Fisher
Need Week 14 (for book binding):
Heavy duty tracing paper, vellum, 11”x14”
2 pieces board for book cover - Binder‟s Board or Davey Board 11 1/4 x 14 1/4 #18 0.082 thick
2 big colorful pieces of Canson paper or fabric for book cover
Set of oil pastels,
Bone Tool Waxed paper weights post-its Itoya portfolio
Optional:

6
18" Flexible Curve

7
UTRECHT OHLONE OFFICE MAX
1909 University BOOKSTORE The Hub
Berkeley Fremont Fremont
510-649-0808 510-659-6062 510-745-6125
UNIVERSITY ARTS UNIVERSITY ARTS AMSTERDAM ARTS SAN JOSE ART
267 Hamilton Ave. 456 Meridian 1013 University Ave. 481 S. Bascom
Palo Alto San Jose Berkeley San Jose
415-328-3500 408-297-4707 510-548-9663 408-298-8422
AARON BROS DICK BLICK DANIEL SMITH CHEAP JOE‟S Art Stuff
39165 Farwell Drive
Fremont
510-791-5751 1-800-447-8192 1-800-426-6740 1-800-227-2788
ASW PETTINGELL Bookbindery Jerry‟Artarama
Art Supply Warehouse 2181 Bancroft Way 1800-827-8478
1-800-995-6778 Berkeley, CA www.jerrysartarama.com
www.aswexpress.com 510-845-3653
M-F 10-4pm
Binder board
#18 .082 thick 9 1/4”x 12 1/4”
ASK ABOUT STUDENT DISCOUNTS!

8
OHLONE COLLGE
ART 104A
2-D DESIGN
INFORMATION SHEET
NAME: DATE
Why are you taking this class?
What is your major?
What is your career goal?
What art classes are you currently taking?
What art classes have you completed since 8th grade? Where?
What art experiences do you have? (drawing, painting, etc.)
Do you have any art work experience? Where and when?
Describe your present job.
What degrees do you have?
Do you plan to transfer to a 4-year University? Where? Major?
What artist or style of art do you like? Why?
9
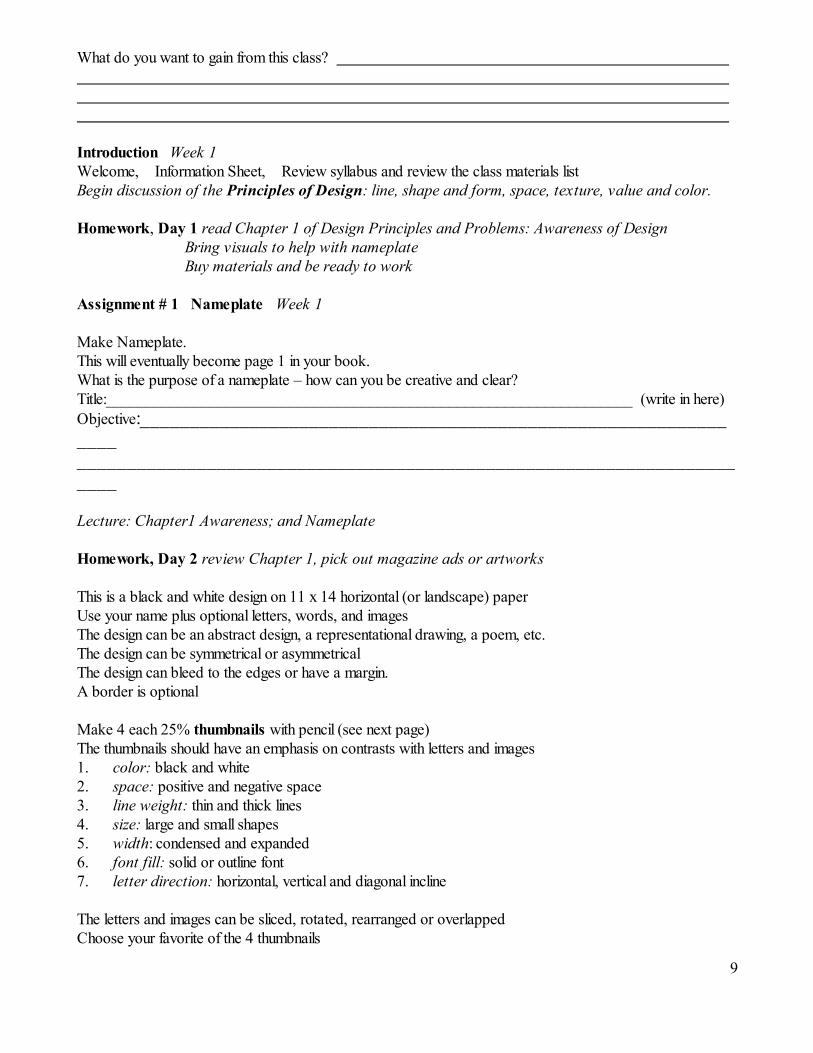
What do you want to gain from this class?
Introduction Week 1
Welcome, Information Sheet, Review syllabus and review the class materials list
Begin discussion of the Principles of Design: line, shape and form, space, texture, value and color.
Homework, Day 1 read Chapter 1 of Design Principles and Problems: Awareness of Design
Bring visuals to help with nameplate
Buy materials and be ready to work
Assignment # 1 Nameplate Week 1
Make Nameplate.
This will eventually become page 1 in your book.
What is the purpose of a nameplate – how can you be creative and clear?
Title:__________________________________________________________________ (write in here)
Objective:_______________________________________________________________ ______________________________________________________________________
Lecture: Chapter1 Awareness; and Nameplate
Homework, Day 2 review Chapter 1, pick out magazine ads or artworks
This is a black and white design on 11 x 14 horizontal (or landscape) paper
Use your name plus optional letters, words, and images
The design can be an abstract design, a representational drawing, a poem, etc.
The design can be symmetrical or asymmetrical
The design can bleed to the edges or have a margin.
A border is optional
Make 4 each 25% thumbnails with pencil (see next page)
The thumbnails should have an emphasis on contrasts with letters and images
1. color: black and white
2. space: positive and negative space
3. line weight: thin and thick lines
4. size: large and small shapes
5. width: condensed and expanded
6. font fill: solid or outline font
7. letter direction: horizontal, vertical and diagonal incline
The letters and images can be sliced, rotated, rearranged or overlapped
Choose your favorite of the 4 thumbnails

10
Enlarge and draw a 100% rough on 11 x 14 paper
Cut the design out of black paper.
„Yes‟ glue design to 11 x 14 horizontal white Bristol paper
Title:___________________________________ (write in here)
On the back of the project, put: your name; date; assignment. # and name; & title__________________
Type a short description of the assignment.
Discuss what you felt worked or did not work within the assignment.
Explain your choices.
Discuss the Seven Elements of Design: Line, Shape, Form, Space, Texture, Value and Color.
BOLD each Element Name that you use.
Read text p. 28, 29, 30.
When assembling the book, the back sides of the projects will be covered up.
However, you will need to know the order of the assignments.
The assignment descriptions will also be included in the book.

11
Nameplate thumbnails
12
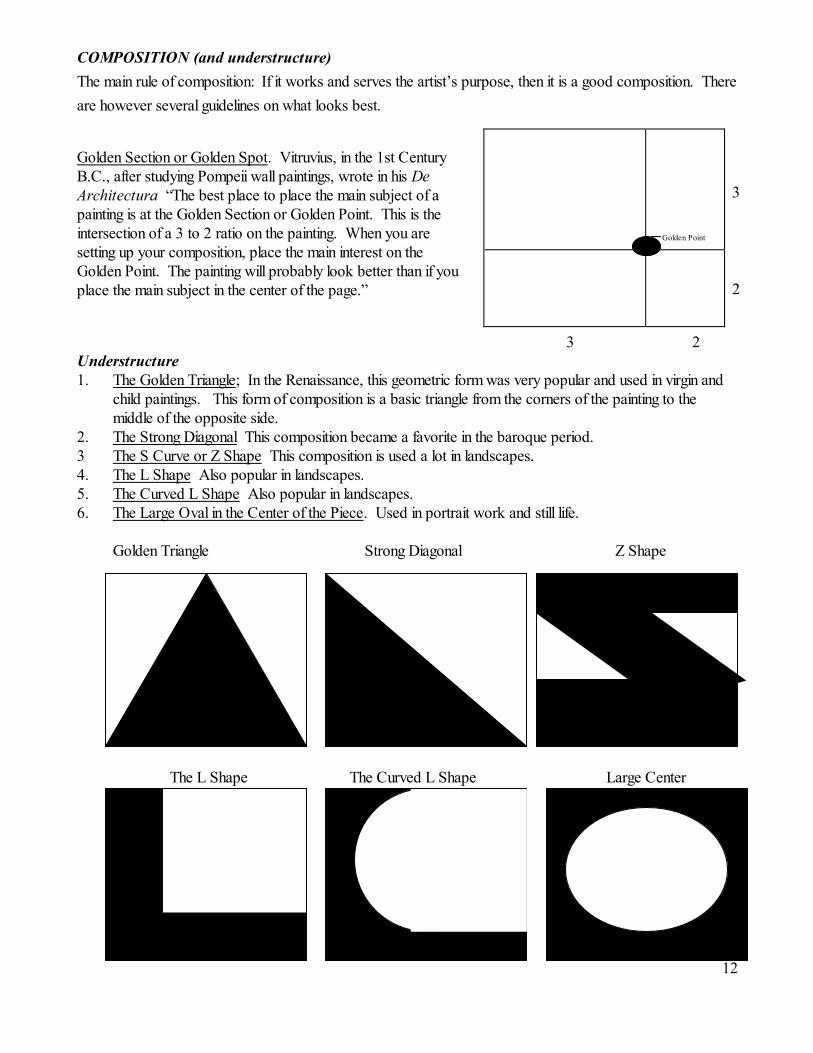
COMPOSITION (and understructure)
The main rule of composition: If it works and serves the artist‟s purpose, then it is a good composition. There
are however several guidelines on what looks best.
Golden Section or Golden Spot. Vitruvius, in the 1st Century
B.C., after studying Pompeii wall paintings, wrote in his De
Architectura “The best place to place the main subject of a
painting is at the Golden Section or Golden Point. This is the
intersection of a 3 to 2 ratio on the painting. When you are
setting up your composition, place the main interest on the
Golden Point. The painting will probably look better than if you
place the main subject in the center of the page.”
3
2
3 2
Understructure
1. The Golden Triangle; In the Renaissance, this geometric form was very popular and used in virgin and
child paintings. This form of composition is a basic triangle from the corners of the painting to the
middle of the opposite side.
2. The Strong Diagonal This composition became a favorite in the baroque period.
3 The S Curve or Z Shape This composition is used a lot in landscapes.
4. The L Shape Also popular in landscapes.
5. The Curved L Shape Also popular in landscapes.
6. The Large Oval in the Center of the Piece. Used in portrait work and still life.
Golden Triangle Strong Diagonal Z Shape
The L Shape The Curved L Shape Large Center
Golden Point

13
These compositions are poor and should be avoided: Dividing the piece in half, either vertical or horizontal) or
placing too many objects with too much space between them.
LINE
Assignment # 2 Simplify Lines and Understand Units Week 2
Read 3.1 on p. 71
View the 11 x14 Bristol as horizontal, and lightly mark 3.5 cm pencil borders on R & L side.
(Black lines will bleed at top and bottom.)
Divide the page into 4 equal sections, and lightly mark with pencil.
Draw 9 each 25% thumbnails with pencil (see next page). Choose favorite thumbnails for project.
Cut out straight lines from black construction paper. The line‟s width may vary.
Use your exacto-knife. Cut 4 lines for each section.
Yes glue. 4 straight black lines in each section. The lines should touch both the x and y axis.
Section 1 Horizontal lines Section 2 Vertical lines
Section 3 Diagonal lines Section 4 All 3 line directions, plus 4th line in any direction
Try to make negative areas work as hard as positive areas. Read p. 71 & 72.
On the back of the project, put: your name; date; assignment. # and name; & title__________________
Type the kind of movement you created or the type of image your lines allude to; (for example: stairs, building
interior, organic shapes, etc.) And express why. Discuss the ways you created:
Unity: Repetition, Variety, Rhythm, Balance, Emphasis, and Economy.
Also note which composition you like best and why you feel it is successful.
Homework Week 2 read Chapter 2: Unifying Principles of Design
Assignment # 3 Balance Week 3
View the 11 x 14 Bristol Vellum as horizontal, and lightly mark 3.5 cm pencil borders on R & L side.
(Black lines will bleed at top and bottom.)
Divide the page into 4 equal sections, and lightly mark with pencil.

14
Draw 9 each 25% thumbnails with pencil (see next page). Choose favorite thumbnails for project.
In the top 2 sections, use curved lines
Maintain only one curve within each line.
Each line must be the same width. Use 2 to 20 lines
Each line must go from edge to edge, to the x or y axis. Do not end lines in the middle of the page.
Create an asymmetrical composition.
Maintain balance using horizontal, vertical and diagonal curved lines.
Read p 72-73.
Cut lines from black construction paper. Use your exacto-knife.
„Yes‟ glue the black lines.
On the back of the project, put: your name; date; assignment. # and name; & title__________________
Homework Week 3 read Chapter 3: Line
Lecture: Chapter 3 Line

15
9 thumbnails

16
9 thumbnails
17
9 thumbnails

18
Assignment # 4 Asymmetrical Balance Week 3
Draw 9 each 25% thumbnails with pencil. Choose favorite thumbnails for project.
In the bottom 2 sections, vary the width and direction of the straight lines.
Use 2 to 20 lines, that are: horizontal, vertical, or 45 degrees.
Your lines do not have to go all the way across the page. They can end in the middle.
Lines can be positive or negative.
Achieve side to side balance and top to bottom balance, symmetrical or asymmetrical.
Cut lines from black construction paper. Use your exacto-knife.
„Yes‟ glue the black lines.
You can also cut out white shapes and glue them over black lines.
On the back of the project, put: your name; date; assignment. # and name; & title__________________
Also write the type of movement you created or the type of image your lines allude to; (for example: stairs,
building interior, organic shapes, etc.) And describe why.
Describe your lines. Discuss the type of lines used. What do your lines express?
Discuss positive and negative areas.
Also note which composition (top or bottom) you like best and why you feel it is successful.
Also explain why it is balanced. How did you achieve interest and balance?
Homework Week 4: finish project
Assignment # 5 Ebb and Flow of Positive and Negative Elements Week 4
Read 3.2 on p.74
View page as landscape. Create 3.5 cm R & L pencil borders.
Divide the page into 2 equal top and bottom sections and lightly mark with pencil.
(Black lines will bleed at top and bottom.)
Cut strips of black paper 5.5 inches long, with widths from the thinnest, you can make up to 1.5 inches thick.
In the top section – place the lines from thinnest to thickest.
On the bottom section - have the movement go from thick to thin to thick.
Lines can be vertical or slightly diagonal.
„Yes‟ glue the black lines.
On the back of the project, put: your name; date; assignment. # and name; & title__________________
Discuss Ebb and Flow. Describe your lines. What do your lines express? What illusions did you create?
Have you created an optical illusion? What color is figure and which color is ground? Why? Did your lines
create any shapes? How did you hold your lines and shapes together?
Homework Week 4: read Chapter 4: Shape and Form, Bring 2 1/2” circle or can for #6
SHAPE and FORM
Assignment # 6 Shapes Week 4
View the 11 x 14 Bristol Vellum as horizontal, and lightly mark 3.5 cm pencil borders on R & L side.

19
(Black shapes will bleed at top and bottom.)
Divide the page into 4 equal sections, and lightly mark with pencil.
From black paper, cut out 4 squares, 4 circles and 4 triangles, –they should all be the same size.
Each section contains 1 square, 1 circle. and 1 equilateral triangle, (3 equal angles, 3 equal sides)
In the 1st section (top left) all three shapes equal in relationship to one another (this will depend on how you
place them in relation to one another).
In the 2nd section (top right) the triangle be most domineering.
In the 3rd section (bottom left) alienate the triangle.
In the 4th section, (bottom right) the white space and the black shapes interact with one another, becoming a
figure-ground relationship. You want to see positive shapes and negative shapes.
You can crop the shapes as long as the viewer can identify the shapes.
Yes‟ glue the black shapes.
On the back of the project, put: your name; date; assignment. # and name; & title__________________
Discuss the SIX Principles of Design regarding your project: repetition, variety, rhythm, balance,
emphasis, economy. Also, how did you hold the shapes together?
Homework bring in Pen, Black Ink, Brush, White Out, scratch paper, drawing pencil, exacto, scissors
Assignment # 7 Abstract Organic Composition (with pen and ink) Week 5
1. In class, draw blind contour lines of organic shadows or shapes .
Use a pencil to draw 20 contours (any size).
What look are you attempting: symmetrical or asymmetrical, gravitational or floating, rigid or loose, etc.?
Look at Matisse cut outs.
2. Look at the different shapes you drew and then circle 4 to consider as use for a composition.
Then choose 1-2 of the shapes. Cut that shape from Black Artagain to use as template. 3” to 6” in size.
3. Quickly draw 4 sample compositions from the Bristol template by drawing pencil outlines on
11 x 14 paper, and then quickly color in shapes. No borders.
4. Choose 1 composition from the 4 samples.
Draw that composition with brush and ink (pen is optional) on 11 x 14 Bristol.
On the back of the project, put: your name; date; assignment. # and name; & title__________________
How did you hold shapes together. Read text p 80-81 & 96-105. How did you suggest Unity?
Homework finish project Save all contour drawings for later assignment
Assignment # 8 Create a Unit (of Design) Week 6
When line becomes shape and form
Use a pencil and make 30 asymmetrical thumbnails that are 1 1/2 x 1 1/2 (see next page)
Use any line type: straight or curved; diagonal, vertical or horizontal, arcs, etc.
You might want to suggest an outer edge by having a bleed on each side.

20
You may not want to use 50% black and 50% white,. Change the ratio to get a more interesting
positive/negative “checkerboard”.
View 11 x 14 Bristol Vellum as horizontal, and lightly mark a 5.75 cm pencil border on R & L side. Mark a 2
cm pencil border on top and bottom.
Divide the page into 9 equal sections, (8 cm square) and lightly mark with pencil.
Select 9 of the 30 thumbnails.
Use ink or markers and create forms to make a different unit in each of the 9 sections.
Distinguish positive/ negative space with black and white color.
Choose your favorite unit from the 9 completed.
You will make several repeat systems from this favorite unit.
On the back of the project, put: your name; date; assignment. # and name; & title__________________
Tell why you choose your favorite unit. And why you feel it is successful.
Discuss Design Terms: 7 Elements of Design and 6 Principles of Design.
Homework Week 5: Continue to work on units

21
30 thumbnails

22
Assignment # 9 Repeat and Mirror the Unit Week 6
Make a line drawing of your favorite Unit in a 9 cm square. Center the drawing on paper. This can be cut
and used as a template.
View 11 x 14 Bristol Vellum as horizontal, and lightly mark a 5.75 cm pencil border on each R & L side.
Mark a 2 cm pencil border on top and bottom.
Divide the pages into 9 equal units, (8 cm square) and lightly mark with pencil
Repeat your favorite unit in the horizontal top and bottom rows. Use ink.
On the back of the project, put: your name; date; assignment. # and name; & title__________________
Also write how you accomplished each task. And why you feel it is successful.
Homework Week 6: Continue to work on units
Lecture: Repeat Patterns
Assignment # 10 Counterchange (Reverse) the unit Week 6
View 11 x 14 Bristol as horizontal, and lightly mark a 5.75 cm pencil borders on each R & L side. Mark a 2
cm pencil border on top and bottom.
Divide the pages into 9 equal units, (8 cm square) and lightly mark with pencil.
Reverse the positive and negative of your favorite unit (assignment 9) and copy with ink.
(This is a reversed version of #9.) OR go to Kinkos or UPS Store & make a 100% negative (or
reversed) copy of #9 on heavy glossy cardstock.
On the back of the project, put: your name; date; assignment. # and name; & title__________________
Homework Week 6: Take assignments 9 & 10 to Kinkos or UPS Store. Make 12 each 50% copies on
heavy paper. You will have 216 of the 4 cm squares. (Cut a 4 cm square to use as a pattern.)
Patterns and Textures Block Repeats of the Unit First lightly draw grid on paper
Take 50% copies on heavy paper. (The units should measure 4 cm x 4 cm)
Cut, combine and glue the copies onto 11 x 14 Bristol to make the following assignments:
Assignment # 11 A or B Week 6
11A Five Vertical Pillars
Eight units high, with 1 cm white spacing between pillars
Rotate alternate units 90 degrees; then alternate positive and negative pillars
2 cm white border on R & L side, 1.75 cm top and bottom border
Title__________________________
11B Five Horizontal Stripes
Eight units wide, with 1 cm white spacing between rows
In horizontal stripe 1 and 3, Alternate unit between positive and negative
In horizontal stripe 2 and 4, Rotate unit 90degrees and switch from positive to negative

23
1.75 cm white border on R & L side, 2 cm top and bottom border
Title__________________________
Assignment # 12 A or B Week 6
12A Horizontal Mirrors
Six Horizontal rows of eight units each
Six units high, flush with no spacing
Horizontal Mirror each two units
Alternate rows between positive and negative
1.75 cm white border on R & L side, 2 cm top and bottom border
Title__________________________
12B Vertical Mirrors
Positive units with a positive mirrored row
Eight Horizontal rows of six positive units each
Eight units high, flush with no spacing
Vertical Mirror each two units
All rows stay positive
2 cm white border on R & L side, 1.75 cm top and bottom border
Title__________________________
Assignment # 13 Week 6
13 Quadrant Rotations or Composite Repeats or Mirror Repeats of negative unit
Eight Horizontal rows of six negative units each
Eight units high, flush with no spacing
Quadrant Rotate each four units
All rows stay negative (optional)
2 cm white border on R & L side, 1.75 cm top and bottom border
Title__________________________
Assignment # 14 A or B Week 7
14A Brick Repeats, Horizontal
A sideways drop becomes a half brick, there should be a horizontal emphasis
You choose positive or negative units. You can also use white blank blocks
Six horizontal rows of eight units each
Six units high, flush with no spacing
1.75 cm white border on R & L side, 2 cm top and bottom border Title_________________
14B Brick Repeats, Vertical
Half-Drop repeats with a vertical emphasis
You choose positive or negative units. You can also use white blank blocks
Eight horizontal rows of six units each
Eight units high, flush with no spacing
2 cm white border on R & L side, 1.75 cm top and bottom border Title_________________

24
Assignment # 15 Dissected Composite Repeats or Mirror Repeats Week 7
Dissect unit, then combine dissections to make new composite unit
Eight Horizontal rows of six units each
Eight units high, flush with no spacing
1 cm vertical column white spacing - Optional
2 cm white border on R & L side, 1.75 cm top and bottom border
Assignment # 16 Random Free-form Unit Repeats Week 7
With pencil, lightly draw a 4 cm square grid as a base to “anchor” your units.
Dissect unit, then combine dissections to make new random composite units.
Add very neat ink lines. – Optional
Work outside the box.
On the back of the project, put: your name; date; assignment # and name; & title__________________
Identify each repeat. Tell how each unit changed
Homework Week 6 & 7: finish Repeats
Choose Surrealist artist & painting for Assignment 18 ______________________________________,
Have artist and art piece approved.
Make an 11 x 14 color copy and a B/W copy (horizontal).
Bring in pencils for Value Scale Assignment #17.
Assignment # 17 B/W Value Scale (with pencils) Week 7
Draw 10 each 2” squares, that do not touch. Use pencils.
Color from whitest white to blackest black.
Cut squares & lightly tape in 2 rows. with no spacing All horizontal squares touch. And all vertical squares
touch. Center squares with a 1 inch horizontal margin between the 2 rows
There should be an even flow of color. Adjust color on squares, if necessary.
(We will Yes glue squares in class) Cover squares with tracing paper
On the back of the project, put: your name; date; assignment. # and name; & title__________________
Discuss technique and materials.
Homework Week 7: Bring in Surrealist paintings. Choose Surrealist artist for Assignment 19
__________________________
Assignment # 18 Surrealism Week 8
Pick out a Surrealist artwork (get approval). Get color copy on heavy paper, and save for bound book.
Make a B/W Xerox. Center the drawing. Cover with tracing paper.
On the back of the project, put: your name; date; assignment. # and name; & title__________________
Write why you choose artist. How you accomplished the drawing. Why you feel it is successful. Write down:
the artist's name, date of birth &death, title, date work was made, and size in inches.

25
Homework Week 7: Bring in fruit & vegetables
www.the-artist.org Some Surrealist artists:
Eileen Agar
Louis Aragon
Jean Arp
Antonin Artaud
Hugo Ball
Victor Brauner
Andre Breton
Luis Bunuel
David Burliuk
Leonora Carrington
Marc Chagall
Giorgio-de Chirico
Jean Cocteau
Joseph Cornell
Rene Crevel
Salvador Dali
Paul Delvaux
Robert Desnos
Oscar Dominguez
Marcel Duchamp
Paul Eluard
Max Ernst
Dulah Marie Evans
Gerhard Gepp
Alberto Giacometti
Gerome Kamrowski
Frida Kahlo
Paul Klee
Michel Leiris
Mina Loy
Dora Maar
Renee Magritte
Andre Masson
Roberto Matta
Joan Miro
Richard Oelze
Meret Oppenheim
Pablo Picasso
Benjamin Peret
Francis Picabia
Man Ray
Henri Rousseau
Yves Tanguy
Dorothea Tanning
Marie Toyen

26
Homework Week 9: read Chapter 5: Space (Perspective)
Bring to class: fruit, vegetable
Xerox #7 contour drawings
Take photos of your bedroom, for perspective drawing. Bring in printed photos
Lecture: Surrealism
dada - An early twentieth century art movement which ridiculed contemporary culture and traditional art
forms. It was born as a consequence of the collapse during World War I (1914-1919) of social and moral
values. Dada artists produced works which reflected a cynical attitude toward social values, and, at the same
time, were irrational, absurd, and playful. Less a style than a spirit of the times, Dadaists typically produced
art objects in unconventional forms produced by unconventional methods. Several artists employed the
chance results of accident as a means of producing art. Literally, the word dada means several things in
several languages: it's French for "hobbyhorse" and Slavic for "yes yes".
At the end of the First War World, Tristan Tzara, leader of the Dada movement, wanted to attack society
through scandal. He believed that a society that creates the monstrosity of war does not deserve art. (It is
estimated that up to 75% of some armies were killed or wounded, during World War I.) Tzara decided to
give society anti-art – not beauty but ugliness. With phrases like Dada destroys everything! Tzara wanted
to offend the new industrial commercial world – the bourgeoisie. However, his intended victims were not
insulted at all. Instead they thought that this rebellious new expression opposed, not them but the "old art" and
the "old patrons" of feudalism and the church. In fact, the bourgeoisie embraced this "rebellious" new art so
thoroughly that anti-art became Art, anti-convention became the Convention, and rebellion through chaotic
images became the status quo. Other Dadaist included Meret Oppenheim, Jean Arp, Man Ray and Marcel
Duchamp.
Guillaume Apollinaire was the Founding Father of Surrealism. Apollinaire influenced the Surrealists with
his creation of poetry before and during the First World War. He founded the Societe des Amis de Fantômas
in 1912. He believed and told stories of the phantoms of Paris and developed an organization for people who
believed in phantoms. They walked the streets of Paris late at night looking for a monster that eventually
became a myth of the city of Paris. Apollinaire coined the word "surrealist" to describe his play "Les
Mamelles de Tiresias" (The Breast of Tiresias) in 1917. We have an example of a poem he created in
response to the World War I. His use of word imagery in the format of the poem was a very powerful
method for getting his point across.

27
Many artists associated with Dada, later became associated with Surrealism. The Surrealist artists did not
embrace this new Dada art that threw away all which centuries of artists had learned and passed on about the
craft of art. The Surrealism emphasis was not on negation but on positive expression. The surrealists stressed
the subconscious or non-rational significance of images arrived at by chance effects and unexpected
combinations. Some of the artists in the group expressed themselves in the abstract tradition, while others,
expressed themselves in the representational tradition.
28
Surrealism - Sur meaning on, above; surrealism was a layer of reality on top of our recognized reality.
Surrealism represented a reaction against what its members saw as the destruction wrought by the
"rationalism" that had guided European culture and politics in the past and had culminated in the horrors of
World War I. The major spokesman of the movement was poet and critic André Breton (French, 1896-
1966) a French doctor who had fought in the trenches during the First World War. At first a Dadaist, he
wrote three manifestos about Surrealism -- in 1924, 1930, and 1934, and opened a studio for "surrealist
research." Breton saw the unconscious as the wellspring of the imagination. He defined genius in terms of
accessibility to this normally untapped realm, which, he believed, could be attained by poets and painters alike.
Surrealism reunited the conscious and unconscious realms so completely, that the world of dream and fantasy
was joined to the everyday rational world in "an absolute reality, a surreality."
The surrealists were greatly influenced by the theories of the pioneer of psychoanalysis, Sigmund Freud
(German, 1856-1939).
The images found in surrealist works are as confusing and startling as those of dreams. Surrealist works can
have a representational, though irrational style, precisely describing dreamlike fantasies, as in the works of
René Magritte (Belgian, 1898-1967), Salvador Dalí (Spanish, 1904-1988), and Yves Tanguy (French,
1900-1955), The surrealists were also influenced by the painting of Giorgio de Chirico (Italian, 1888-
1978), and Max Ernst (German, 1891-1976). Surrealism can also have a more abstract style, as in the
works of Joan Miró (Spanish, 1893-1983), and André Masson (French, 1896-1987), who invented
spontaneous techniques, modeled upon the psycho-therapeutic procedure of "free association" as a means to
eliminate conscious control in order to express the workings of the unconscious mind. This is the basis for
“Exquisite Corpse” drawings and word games including “Automatic Writing”, where the authors would sit with
pen and paper and put themselves in a „receptive‟ frame of mind and start writing. Other surrealist artists
include Kay Sage, Paul Klee, Paul Delvaux, Andre Masson, Marc Chagall, Frido Kahlo, Dorothea
Tanning, and M.C. Escher.
www.artlex.com/ArtLex/s/surrealism.html
www.artchive.com/artchive/D/de_chiricobio.html www.huntfor.com/arthistory/earlyC20th/surrealism.html
www.the-artist.org
www.surrealism.com
www.google.com>images
www.famsf.org
www.vggallery.com
www.ibiblio.org/wm/paint/

29
SPACE
Assignment # 19 Linear Perspective Drawing, in Hallway Week 9
Find a corner with ceiling and floor (or counter)
Draw a horizontal horizon line, with all vertical lines at 90 degrees. Find the vanishing point. All parallel lines
will meet at the vanishing point.
Use pencil on Bristol (or you can draw on paper then paste on Bristol)
This should be a simple line drawing without shading, or add shading for variety.
On the back of the project, put: your name; date; assignment # and name; & title__________________
Also write how you accomplished the drawing. And why you feel it is successful. Tell what you learned
about perspective. Discuss the vanishing point.
Homework Week 9: re-read text p. 122-131.
Assignment # 20 Perspective Drawing in Bedroom Week 9
Draw your bedroom. Use van Gogh‟s Bedroom at Arles for inspiration. www.vggallery.com
Use pencil on Bristol (or you can draw on paper then paste on Bristol)
Utilize perspective, shadows, shading and strong values of black, white, and grays.
On the back of the project, put: your name; date; assignment. # and name; & title__________________
Also write how you accomplished the drawing. And why you feel it is successful.
Homework Week 9: finish drawing
Assignment # 21 Drawing: Skeleton Bone /Landscape Week 9
Sketch parts of the skeleton.
Draw the shapes and shadows.
Use pencil on Bristol (or you can draw on paper then paste on Bristol)
Combine the skeleton parts into a bone landscape.
Utilize perspective, shadows, shading, and strong values of black, white, and grays.
First draw a quick sketch on 11 x 14 paper (to plan your composition)
On the back of the project, put: your name; date; assignment # and name; & title__________________
Also write how you accomplished the drawing. And why you feel it is successful.
Homework Week 9: Read Chapter 6: Texture. Bring in materials for Texture assignment #23-26
Lecture: Bone Landscape, Surreal Landscape

30
TEXTURE
Complete # 22 to Explore Texture Week 10
On the back of the project, put: your name; date; assignment. # and name; & title__________________
Discuss 7 Elements of Design: Line, Shape, Form, Space, Texture, Value, and Color.
Discuss Unity, Gestalt and Harmony.
Discuss 6 Principles of Design: Repetition, Variety, Rhythm, Balance, Emphasis and Economy.
Discuss your vision for the project.
Assignment # 22 Collage of Actual Textures – something you can FEEL
Experiment with paper, ink, acrylics, spray paint, found objects, transparency, etc.
Use different shapes and grids to spray paint into to create textures
You can collage different parts together to form composition. Experiment with transparencies
OR collage real textured items on 11 x 14 Bristol. Color copy on heavy paper Recommended
Assignment # 23 Type as: Texture & Shape Drawing Optional
Pick an item to draw. Repeat name of item (for ex. a lamp, draw the shape by repeating lamp to create the
form) Cut out magazine article text (optional) Create composition with shapes, texture and balance.
Assignment # 24 Print as: Texture Composition Optional
Experiment with: finger prints, woodcuts, rubber stamps, etc. Create a composition
Assignment # 25 Collage of Rubbings: to create Texture Optional
Use found objects to create rubbings with pencils, and also use eraser
You can collage different parts together to form final composition
Homework Week 10: Read Chapter 7: Value.
Bring in black and white acrylics, brushes, exacto, water jar, and palette or wax paper
Lecture: Chapter 6 Texture
VALUE
Assignment # 26 B/W Value Scale (with acrylics) Week 10
With a pencil, lightly draw 10 squares, 2” x 2” squares should not touch)
Paint squares with acrylics from whitest white to the darkest black
Cut out squares and lightly tape next to one another in two horizontal rows (touching)
Center squares with NO spacing between the 2 rows
Adjust colors if necessary, there should be no visual stop between the different shades

31
On the back of the project, put: your name; date; assignment. # and name; & title__________________
Also write how you accomplished the project. And why you feel it is successful.
Homework Week 10: read Chapter 8: Color, Finish project and Yes glue to Bristol.
Lecture: Chapter 7 Value
Assignment # 27 B/W Value Scale, Stripes Week 10
With a pencil, lightly draw 3 strips each 4” wide x 11” tall
Paint strips utilizing different tones of black (10) white (1) and a gray (3 or 4)
Cut strips to different widths
Arrange vertically from thick, thin, thick or more and dark, light,dark, etc
Lightly tape to 11 x 14 horizontal Bristol. Optional 3cm R & L border. Flush top & bottom.
On the back of the project, put: your name; date; assignment. # and name; & title__________________
Also write how you accomplished the project. And why you feel it is successful.
Homework Week 10: finish project and Yes glue to Bristol, Bring in Acrylics: red, blue and yellow
Lecture: Chapter 8 Color
COLOR
Assignment # 28 Color Wheel Week 11
How do colors work together, what makes color more vibrant or more subdued?
See Josef Albers
With a pencil, lightly draw 1 3/4” circles, to make your own color wheel (put a circle in the center for gray)
Use the following acrylic paints: red, yellow, blue, black, and white to paint color circles.
Mix red, blue and yellow to get neutral gray (you may slightly lighten with white)
(a mix of complimentary colors should make neutral brown, or neutral gray)
color names; primary, secondary; and tertiary. Use pencil or glue computer labels.
Other terms:
Value Scale – (shows lightness or darkness of color):
Tint – color & white Full Saturated color Shade – color & black
Hue (another word for color)
Analogous Colors (colors that are side by side)
Complimentary Colors (colors opposite each other)
Cool Colors (blue and purple range)
Warm Colors (red and orange range)
32
On the back of the project, put: your name; date; assignment. # and name; & title__________________
Discuss the colors you had trouble mixing.
Homework Week 11: Read Chapter 8 Color, especially page 226 to 250
Assignment # 29 Neutral Gray Squares Week 11
With a pencil, lightly draw 12 squares, 3” x 3”. Cut. Arrange in rows, 3 across and 4 down.
Center: 1” R & L border; 1” top & bottom border
12 each 3” x 3” squares, can be painted, cut & glued onto 11 x 14 Bristol.
Make 12 each 1” squares. Color with neutral gray.
Glue a 1” gray square onto each larger colored square.
Vertical columns are: red, yellow, blue.
4 Horizontal rows are: primary, secondary, tertiary, and tertiary.
On the back of the project, put: your name; date; assignment. # and name; & title__________________
Describe how the neutral gray changes.
Homework Week 11: finish project. Bring in 7, 8, & 9 template. Choose one design for 31.
Assignment # 30 Color Block Repeats Week 12
With a pencil, lightly draw 3 squares, 3”x 3”, center on 11 x 14 with ½” vertical margin between squares
Look at # 9 (your favorite unit) or another unit. (Unit will be drawn in each square.)
Designate each square with complimentary colors. Red/green, yellow/purple (in middle) & blue/orange
Paint an entire square with a primary color. Cut and glue to Bristol
Paint a second square with secondary colors. Cut out unit design from this square & glue shape to square
Glue to 11 x 14 Bristol. Center the brightest, lightest square.
On the back of the project, put: your name; date; assignment. # and name; & title__________________
What did you learn about color? What difficulties did you have?
Homework Week 12: choose artist, bring 8 1/2’ x 11’ color copies to class
Color copy on heavy paper. Bring in your 2D design book.
Master Artist (for #34 color copy) must first have a book of paintings by this artist.
Final Project (for #35) do not choose Monet or van Gogh or your surrealist for #34
Assignment # 31 Color Value Scale, Stripes Week 12
Use Value Scale and Color to create rhythm
Pick one primary color Mix color with white to make tints and mix with black to make shades
Draw wide 11 inches high strips for each of the values
Pick one secondary color

33
Mix secondary color with black to make shade, and mix with white to make tints
Draw wide 11 inches high strips for each of the values
Paint strips and cut to different widths
Arrange in a color balanced composition
Yes” glue to 11 x 14 horizontal Bristol. Optional 3.5 cm R & L border. Flush top & bottom.
On the back of the project, put: your name; date; assignment. # and name; & title__________________
What difficulties did you have? Discuss tints and shades.
Homework Week 12:
Assignment # 32 Monet (with oil pastels) Week 13
Bring 2D design book
Learn about oil pastels
On the back of the project, put: your name; date; assignment. # and name; & title__________________
Also write how you accomplished the project. And why you feel it is successful.
What did you learn about Monet, Impressionism and oil pastels?
Homework Week 13: Start #33 in class, finish for homework. Start #34 (fill out design issues)
Assignment # 33 Master Artist color reproduction Week 13
Choose a famous master artist. (get approval) Bring a book of their work to class
Make a 8 1/2‟ x 11‟ color Xerox
Some 20th Century Painters:
Francis Bacon
Thomas Hart Benton
Georges Braque
Mary Cassatt
Paul Cezanne
Marc Chagall
Chuck Close
Salvador Dali
Giorgio de Chirico
Edgar Degas
Willem de Kooning
Marcel Duchamp
Paul Gauguin
Frida Kahlo
Vassily Kandinsky
Paul Klee
Rene Magritte
Franz Marc
Henri Matisse
Joan Miro
Edvard Munch
Georgia O‟Keffe
Pablo Picasso
Robert Rauschenberg
Pierre-Auguste Renior
Diego Rivera
Henri Rousseau
Georges Seurat
On the back of the project, put: your name; date; assignment. # and name; & title__________________
List artist, title, date and size of painting: ____________________________________________________
What did you learn about the artist?

34
Homework Week 13 finish project
Homework Week 13: Bring bookmaking supplies to class, especially paper and materials for covers
Lecture: Practice folds. Show cover material.
Assignment # 34 Cover for Book re-work or adapt one assignment from #1-#28 as a simple cover.
(Thanksgiving week 13)
Assignment # 35 The Book Week 14-15
By the end of the semester you will have made a book. This book will contain all your class assignments with a table
of contents and an index. The index will be a description of each of the assignments and what you have learned from
each assignment. This class is rigorous but by the end of the semester you will be able to see in 16 weeks what an
amazing amount you have learned and you will be able to apply that information to all future art classes.
Helpful Hints:
Each page of your book will be viewed as a landscape.
Each page of your book will be 11” x 14” white Bristol.
Each page of your book will have 3.5 cm x 3.5 cm borders on each side (unless otherwise noted by me)
Make an Index (table of contents) for the beginning (List your name, 2-Dimensional Design, date)
Make an appendix for the end. (Put all your written descriptions here, maybe in a pocket at end of book)
Number all pages 1, 2, 3, etc. Number Index and Appendix with A-1 or Roman Numerals, or letters.
Numbers should be printed and cut out and glued to pages.
Erase your pencil lines. Craftsmanship is very important. Erase the border lines and clean up all glue.
By the end of the semester your project‟s sharpness will be very important to you. Also, your assignment grades will
be higher in marks for craft (craftsmanship).
Keep your pages sharp and flat. Do not stuff them into your backpack.
Decide on one safe place to keep your assignments throughout the semester.
Homework Week 14: Bring to class: all projects, printed pages (table of contents & appendix),
fabric or paper for cover, paper for accordion folds – 80 to 100 lb drawing paper, page numbers, tracing
paper or vellum, end papers, glue, tools, wax paper, post-its, clips, brayer, exacto, metal ruler, bone tool.
Lecture: Bookmaking
Preparations for Book Binding
Plan your book Assemble tools and supplies.
Have water, damp cloth and dry cloth for glue clean up
Print 1 page table of contents (at front) and appendix (at back). The appendix will contain your descriptions, printed
horizontally. Print page numbers.
Assemble papers with wax paper in between (this will be removed after book dries)
Grain
Check grain of the paper, paper will flex in direction of the grain (paper has more torque on long end)
Grain should be vertical (from head to tail) but our papers have a horizontal grain

35
Grain of paper should follow grain of board
Gluing both sides of board will equalize tension
Spine & Folds
Press with bone folder starting at center & move outward; re-press at center and move to other edge (you can put a
protective sheet down to keep paper from getting shiny)
Cover
Cut Binders Board (Davey board) the same grain direction as content pages, with 1/8” extra on each side
Place cover material with the grain (right side down)
Place board on top, leave 1” margin & draw around edge with pencil. Trim excess cover material.
Place wax paper down, put cover on top, apply glue in center and spread to pencil margin.
Place board on cover, press down. Flip cover and board over, and smooth cover with bone tool.
Glue
Work from front to back
Place pages on top of wax paper
Apply glue to last page
Apply glue to last accordion fold, be careful to keep glue from other folds
Line up accordion with page 1 and attach to accordion
Apply glue to page 2 and to accordion and attach 2 two pages to accordion fold
Put a „spacing paper‟ 1/8 inch from fold.
Apply glue over accordion, attach page, remove „spacing paper‟
Keep wax paper between pages until glue sets 24 hours
Repeat till book is fully bound
Glue
Glue accordion half-fold to back cover
Note: last page should be the heavy Bristle
End Papers
Cut two 11 x 14 end papers and glue as a liner onto back cover.
Weight
Separate papers with wax paper
Weigh down for 24 hours
Options
Glue folded vellum or tracing paper between pages with pencil drawing or oil pastel
Envelopes or pockets
Band enclosure
String or ribbon enclosure or ties
Slipcase
Embellished cover (only use objects that you hand-craft)
Cut windows
Fabric

36
Fabric should not easily fray or distort
Should not be too thin (glue will ooze)
Should not be loosely woven (board corners will poke through)
Homework Week 14-15: Practice accordion folds
Design book
Bring book pages and supplies to class to start binding
Finish book
STUDENT SAMPLE 1 2D Design 104A
Index (Table of Contents)
#1 “It’s easy to know my name” p.1 #18 “I love cat” p.16, 17 #2 “Lines’ simple life ” p.2 #20 “Classroom” p.18 #3 & 4 “Miss my best friend”… p.3 #21 “My place” p.19 #5 “Big or small” … … p.4 #22 “Sexy high heel” p.20 #6 “Different face different meaning” p.5 #23 “Fashion art” p.21 #7 “Fire extinguishers are king”… p.6 #27 “I did 12 squares” p.22 #8 “Cool nines”… p.7 #28 “Hella randomly together” p.23 #9 & 10 “Bless you”… p.8, 9 #29 “Colorful Ferris wheel” p.24 #11 “He wants to sneeze, ” p.10 #30 “?” p.25 #12 “Double-face”… p.11 #31 “Fire extinguishers come again” p.26 #13 “Kaleidoscope”… p.12 #32 “Ohlone’s color” p.27 #15 “Half positive and half negative”… p.13 #33 “Copy Monet’s artwork quickly” p. 28, 29 #16 “Play for fun”… p.14 #34 & 35 “I like Paul Klee’s style” p.30, 31 #17 “Light light light, dark dark dark” … p.15 Appendix (Descriptions) p.32
This should be printed LANDSCAPE
? You decide on page numbers….. Roman numerals, letters, etc
June Heaton
Appendix (Descriptions p. i)
# 1 - June in Black and White - This nameplate represents a person that desires to be creative but cannot commit
to being a fulltime art major. The form of the blocked shaped letters represents a confined creativity. I chose a
lower case “e” at the end of the name to show a delighted change in the ordinary. The piece is uniform and
balanced, which expresses comfort with the familiar. The line of the nameplate is slanting which hints at movement,
or change. The space and shape also define the form of the name, “JUNE.” The limited colors of black and white
are clean and direct. The texture of the piece is smooth on smooth paper. The value of the black in the papers
gives the nameplate a richness and sophistication. The assignment challenged me. I‟m just a beginner in the world of
37
art and am finding it fascinating so far. I have been taking business classes for so many years that it I feel like I am
experiencing a whole new side of myself.
# 2 - Thin to Thick Relationship - To unite this project, I used two thin lines and two thick lines in all the
horizontal, vertical and diagonal spaces. The lines were placed opposite each other to bring emphasis to their
different sizes. Repetition is shown by keeping the thinner lines to the outside of the space and the thicker lines
towards the inside of the space. I added variety by using a random placement of the lines in the 4th space. While
the lines are all relatively the same size in this space, they are pulled away from the edges instead of touching them as
in the other 3 spaces. I maintain rhythm in the pieces by using the smaller sizes to pull the eye to the edges of the
spaces. I keep balance by placing the larger lines towards the center of the space. I could have used exact sized
lines, to shows more economy in the spaces. I‟ve completed the objective of the assignment without putting too
much attention at one particular space. I like space #4 the best because it‟s connects the whole design, touching the
other spaces through the diagonals and flowing into one another.
# 3&4 - Ribbons and Gates - The top two section of the project are like ribbons that are flowing freely on the
page. They have a kite tail feel to them. They join together with the center curve that unifies the whole piece. The
curves take the eye from the bow look of the curves and join into the lower lines of the project with a large arch that
extends down through the fourth space. The ribbons are tied into the bottom two spaces. These bottom two spaces
are like gates to a yard. They are waiting to be opened and the beyond enjoyed. The four spaces work together to
create a mystery of what might be inside. The piece is balanced by the large curve that joins the two top spaces and
by the two curves that are anchored by the gate spaces. The diagonal line that butts into the horizontal of the fourth
space helps to balance the bottom with the large diagonal line in the upper left of the third space. The first and
second spaces are balanced with the curve in the second space flowing off the space. I like the top the best because
of its energy, with the flowing whimsical ribbons curling and blowing about.
This should be printed LANDSCAPE
? You decide on page numbers….. Roman numerals, letters, etc
Additional Thoughts
This class is demanding, but I am fair. Keep up with assignments, try your best and you will be very happy to see
your skills improve. There is much class time spent on these assignments and you will also need to spend be a lot of
time at home. If you finish an assignment early make sure you are happy with it.
Please talk to me if an assignment is not clear, after I have given a demonstration. Let me know what needs to be
explained further.
Please talk to me if you feel overwhelmed (with classes, life, etc.) and you are thinking about dropping the class.
This might be the right idea for you at the time, or it might be a too drastic move after spending several weeks
working so diligently. I am happy to spend time with you figuring out what is best for you.
My goal is for you to succeed. This class is setup for you to succeed. You will need to come to class and do the
assignments and if you do that with effort, you will do great!
Final is ____Monday, December 13, 9:30-11:30 _ ___________

38
Bring food for potluck _________________________________