tutorial - streamingstore.com€¦ · or, you can contact [email protected]. tutorials tutorial...
TRANSCRIPT

Tu
s
Windowtorial
5.0
111049 October 2013


3
Tutorials
IntroductionThe best way to get started using Wirecast is to quickly work through all its main features. This tour presents a series of three tutorials, each designed to help you understand how to create and broadcast presentations using Wirecast.
As you work through these tutorials, you will also become familiar with important Wirecast concepts and how you can use them to deliver high quality broadcasts. The more you know about Wirecast, the better it will serve your broadcasting objectives.
Because each tutorial builds on the skills and knowledge you learn in the previous tutorials, it is recommended that you take the tours in succession. Working through all the tutorials takes about thirty minutes.
As you gain hands-on experience creating video and audio presentations - which leads to a working knowledge of Wirecast and its components and architecture - you will gain proficiency in using Wirecast.
Tutorials Tutorial 1: Basic Concepts
Tutorial 2: Editing Shots
Tutorial 3: Broadcasting
Note: You can run all of the tutorials without a license. However, a watermark on the video and an occasional voice-over on the audio are present until a valid license is activated.
Note: For licensing information, select Preferences from the File menu, select License, then click Purchase License. Or, you can contact [email protected].

TutorialsTutorial 1: Basic Concepts
4
Tutorial 1: Basic ConceptsThe goal of this tutorial is to provide you with a quick but successful experience creating and broadcasting a presentation using Wirecast. This tutorial requires that you open the tutorial document in Wirecast. To do this, select Create Document for Tutorial from the Help menu in Wirecast.
Note: If you are running the tutorial with Wirecast in demonstration mode, the Wirecast logo appears from time to time and audio output has a periodic voice-over.
Tutorial PrepTo prepare for this tutorial you need to make two changes.
First, select Switch >Auto Live to turn on the Auto Live option. But also select Layout > Preview to turn off the Preview option. Both of these options will be changed back later in the tutorial.
Wirecast Tutorial | 111049

TutorialsTutorial 1: Basic Concepts
5
The Wirecast Main Window should now look like this:
+
Wirecast Tutorial | 111049
TutorialsTutorial 1: Basic Concepts
6
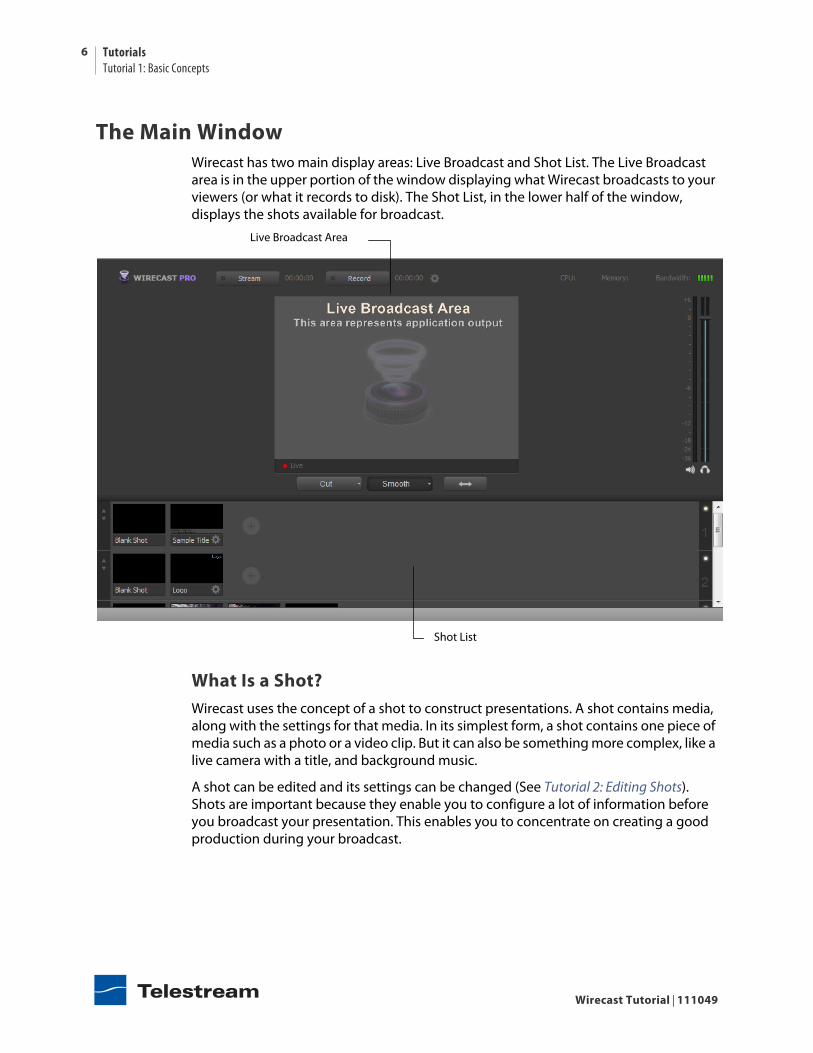
The Main WindowWirecast has two main display areas: Live Broadcast and Shot List. The Live Broadcast area is in the upper portion of the window displaying what Wirecast broadcasts to your viewers (or what it records to disk). The Shot List, in the lower half of the window, displays the shots available for broadcast.
What Is a Shot?Wirecast uses the concept of a shot to construct presentations. A shot contains media, along with the settings for that media. In its simplest form, a shot contains one piece of media such as a photo or a video clip. But it can also be something more complex, like a live camera with a title, and background music.
A shot can be edited and its settings can be changed (See Tutorial 2: Editing Shots). Shots are important because they enable you to configure a lot of information before you broadcast your presentation. This enables you to concentrate on creating a good production during your broadcast.
Live Broadcast Area
Shot List
Wirecast Tutorial | 111049

TutorialsTutorial 1: Basic Concepts
7
Switching Between ShotsIndividual shots are displayed in the Shot List. Click the Ripples shot in the Shot List area and the image fades into the Live Broadcast Area display. This is called taking a shot live.
Shot in Live Broadcast Area
Click Ripples
Wirecast Tutorial | 111049
TutorialsTutorial 1: Basic Concepts
8
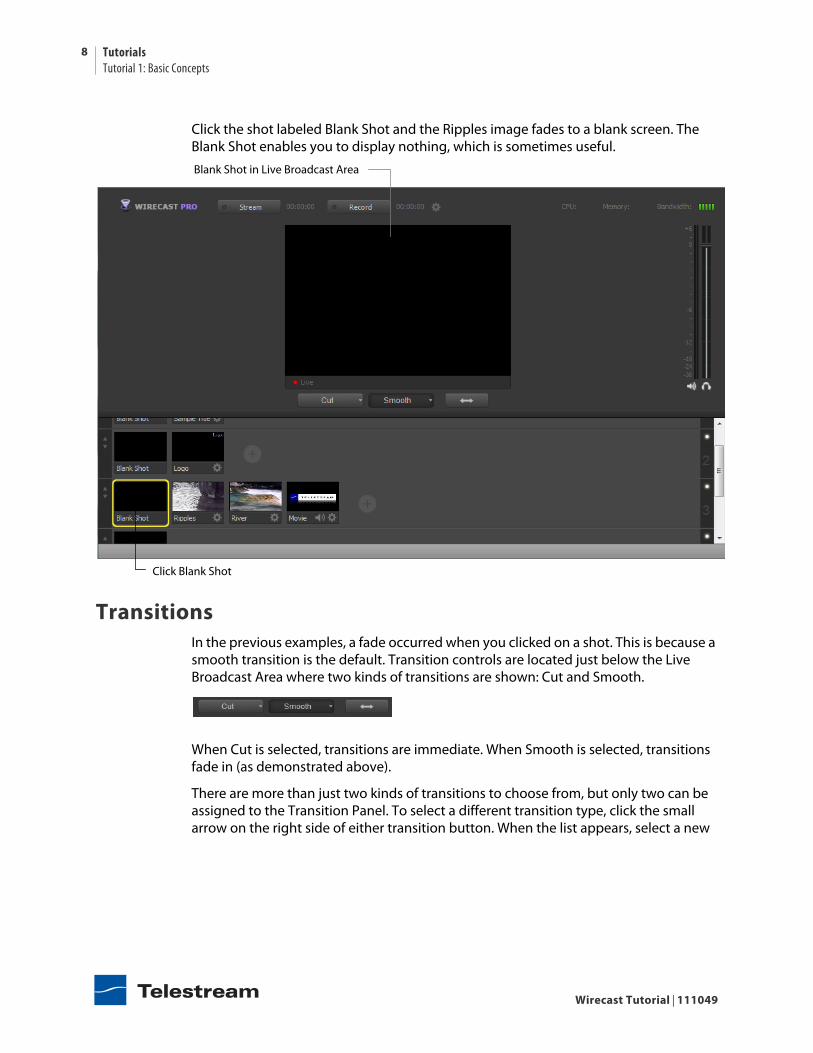
Click the shot labeled Blank Shot and the Ripples image fades to a blank screen. The Blank Shot enables you to display nothing, which is sometimes useful.
TransitionsIn the previous examples, a fade occurred when you clicked on a shot. This is because a smooth transition is the default. Transition controls are located just below the Live Broadcast Area where two kinds of transitions are shown: Cut and Smooth.
When Cut is selected, transitions are immediate. When Smooth is selected, transitions fade in (as demonstrated above).
There are more than just two kinds of transitions to choose from, but only two can be assigned to the Transition Panel. To select a different transition type, click the small arrow on the right side of either transition button. When the list appears, select a new
Blank Shot in Live Broadcast Area
Click Blank Shot
Wirecast Tutorial | 111049

TutorialsTutorial 1: Basic Concepts
9
transition to assign to the button. You can also click the transition button and drag the mouse downward until the menu of selections is displayed.
For example, to change the first transition button from Cut to Swoop, click the Cut button and dragging downward until the menu appears. select Swoop from the menu. Swoop should now be selected for the first button.
Now click back and forth between River and Ripples using Swoop.
These two transition buttons can also be selected by using the following key combinations: Ctrl+1 and Ctrl+2.
Transition Speed You can also control how fast a transition occurs, by selecting the Switch >Transition Speed. Your choices range from Slowest to Fastest.
Go Button The Go Button (or Ctrl+G) enables you to make a transition.
Clicking the Go button does nothing when Wirecast is in its default mode of AutoLive. The only exception is that it will update a live shot if you have made changes to it using the Shot Editor. Later in this tutorial you will discover how to use the Go button to transition between different shots when the AutoLive mode is off.
Click arrow to open menu
Select a transition type
Go button
Wirecast Tutorial | 111049

TutorialsTutorial 1: Basic Concepts
10
Layers
Note: Before you start this section, please select Smooth as your transition.
Wirecast enables you to use several layers. Layers are different kinds of displays (shots, logos, titles, etc.) placed on top of each other so that all are seen at the same time. It is an excellent way to add and remove objects in your broadcast.
Wirecast displays five layers in the Main Shot List window. They are numbered 1 through 5 along the right side of the window. Each layer contains shots that can be selected by clicking it. A red LED light indicates that a shot is selected. When a shot is selected it is displayed in the Live Broadcast window. If you select multiple shots (by selecting a shot on more than one layer) they will all be displayed in the Live Broadcast window. The shots are displayed in a layering manner, where layer 1 is on top and layer 5 is at the bottom (and layers 2 through 4 are layered in between).
Select the Logo shot in layer 2 and the River shot in layer 3. The result is a layered shot containing both images.
Layer numbersSelect River shot
Layered shot
Select Logo shot
Wirecast Tutorial | 111049

TutorialsTutorial 1: Basic Concepts
11
Layers are displayed in a particular order: Layer 1 is on top, Layer 2 below it, Layer 3 below Layer 2, etc. This tutorial, so far, has been operating on Layer 3. Blank, Ripples, River shots and Movie shot are on Layer 3 (as seen previously in this tutorial), but Layer 2 has only a logo and a blank shot.
Each layer can be turned on or off by clicking the white LED light on the far right side of the layer window. Click the Layer 2 LED to remove the Logo shot.
Click the LED again to turn Layer 2 back on.
Master Layer 3
Click to turn Layer 2 off
Logo removed
Wirecast Tutorial | 111049
TutorialsTutorial 1: Basic Concepts
12
Auto Live So far in this Tutorial, Wirecast has been running in AutoLive mode. What this means is that any change you make in the Shot List is automatically made live in your Broadcast. This mode is very useful for those users who want to set up all of their shots at once and then single-click them as they run their presentation. But the disadvantage of this single-click method is that you can only see one shot change at a time. Once you click a shot, your viewers also see it (with no preview of how it looks on your part).
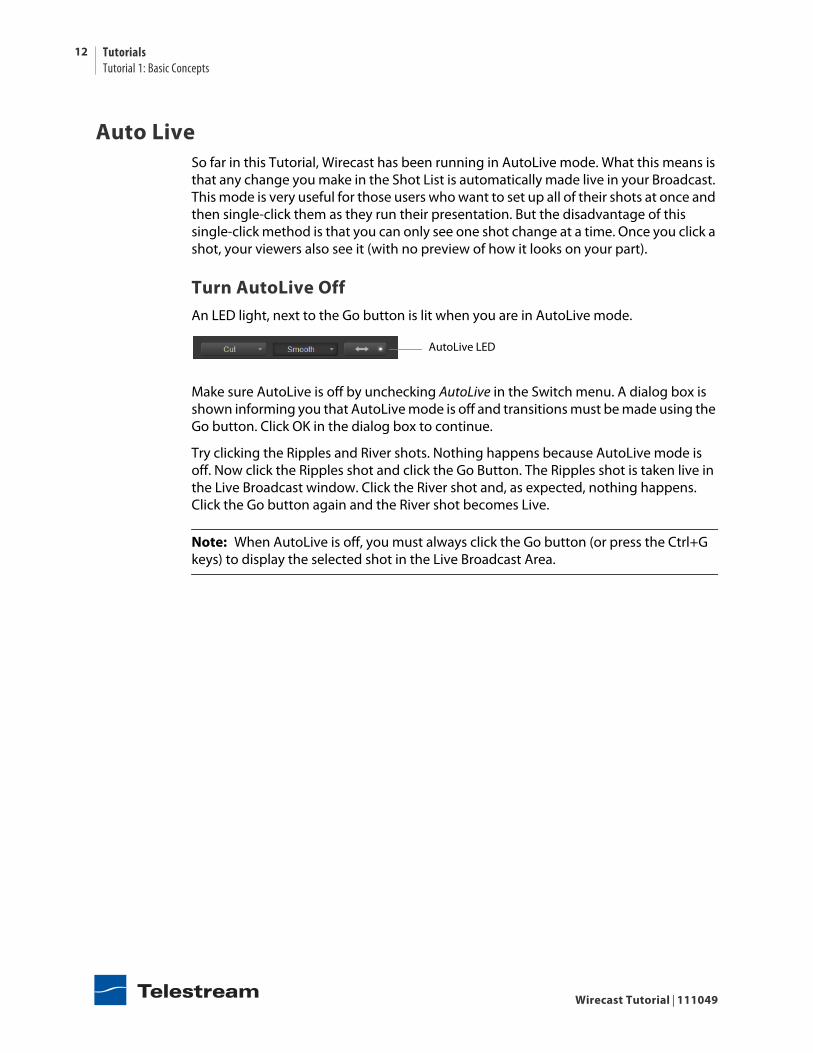
Turn AutoLive Off An LED light, next to the Go button is lit when you are in AutoLive mode.
Make sure AutoLive is off by unchecking AutoLive in the Switch menu. A dialog box is shown informing you that AutoLive mode is off and transitions must be made using the Go button. Click OK in the dialog box to continue.
Try clicking the Ripples and River shots. Nothing happens because AutoLive mode is off. Now click the Ripples shot and click the Go Button. The Ripples shot is taken live in the Live Broadcast window. Click the River shot and, as expected, nothing happens. Click the Go button again and the River shot becomes Live.
Note: When AutoLive is off, you must always click the Go button (or press the Ctrl+G keys) to display the selected shot in the Live Broadcast Area.
AutoLive LED
Wirecast Tutorial | 111049

TutorialsTutorial 1: Basic Concepts
13
Multiple ChangesThe benefit of having AutoLive off is that you can make several changes first and then have them occur all at the same time. To do this, first verify that AutoLive is off. Click Sample Title in layer 1, click Blank Shot in Layer 2, and click the Ripples Shot in Layer 3. Click the Go button (or Ctrl+G) to make the Ripples and Sample Title shots live at the same time.
Preview One problem you may have noticed while running this tutorial is that you cannot see the changes you are making before broadcasting them. To solve this problem, Wirecast enables you to see a preview of what you broadcast.
Select Sample Title
Select Ripples Layered shotsClick Go buttonSelect Blank Shot
Wirecast Tutorial | 111049

TutorialsTutorial 1: Basic Concepts
14
Select Preview from the Layout menu. A preview window is displayed to the left of the Live Broadcast window.
Click the River shot on Layer 3. The River shot is displayed in the Preview window. The Preview windows uses a green LED light to identify it. The Live Broadcast window uses a red LED. When shots are selected they display a green or red LED to indicate selection for preview or live broadcast.
Preview window
Sample Title and Ripples selected for Live window
River selected for Preview window
Wirecast Tutorial | 111049

TutorialsTutorial 1: Basic Concepts
15
Click the Go button to make the River shot live. Click Blank Shot in Layer 1 to remove the title from the ripples shot.
Click Blank Shot
Click Go button
Wirecast Tutorial | 111049

TutorialsTutorial 2: Editing Shots
16
Click the Go button again to make the Ripples Shot live. Notice that the Ripples and River shots LED’s have change color because the Preview and Live windows exchanged images. This lets you know what your last live window looked like as you prepare your next shot in the Preview window.
Tutorial 2: Editing ShotsThe first tutorial used only the Main window, and explained various ways in which you can use an existing shot. But shots can also be created and edited. This tutorial demonstrates how to edit your shots.
Shot LED’s changed color
Click Go button again
Wirecast Tutorial | 111049

TutorialsTutorial 2: Editing Shots
17
You create shots for use in broadcast presentations. Shot editing enables you to make shots you need for your broadcast. Shots can be configured in different ways. Some shots have only titles and some just a logo, others may have only a picture. When you broadcast you are choosing -- in real time -- the shot you want to display.
Note: Before you start this tutorial, create a new tutorial document by selecting Create Document Tutorial from the Help menu. You should see a new Main window as shown below:
Shot Editor OverviewDouble click the Ripples Shot. This opens the Shot Editor window.
Note: If you save a document with the Shot Editor window open, Wirecast remembers this and re-opens the edit window when the document is re-opened.
Wirecast Tutorial | 111049

TutorialsTutorial 2: Editing Shots
18
The Shot Editor window has three main areas: Shot Preview, Configuration Area, and Source Layers.
Shot Preview This area shows exactly what this shot looks like to your viewers when you take this shot live.
Configuration Area This is where you make changes to the content of the shot, and set its parameters. The configuration area changes appearance depending on the selected Source Layer. Click the source icon in the configuration area and it becomes invisible in the Preview.
Source Layers This area enables you to add, remove, and reorder the sources in your shot. Sources are ordered visually from top to bottom. For example, the first source in the Source Layer List appears on top of all other sources in the preview. This list also controls visibility of each of the elements in the shot.
Shot Preview
Configuration Area
Source Layers
Wirecast Tutorial | 111049
TutorialsTutorial 2: Editing Shots
19
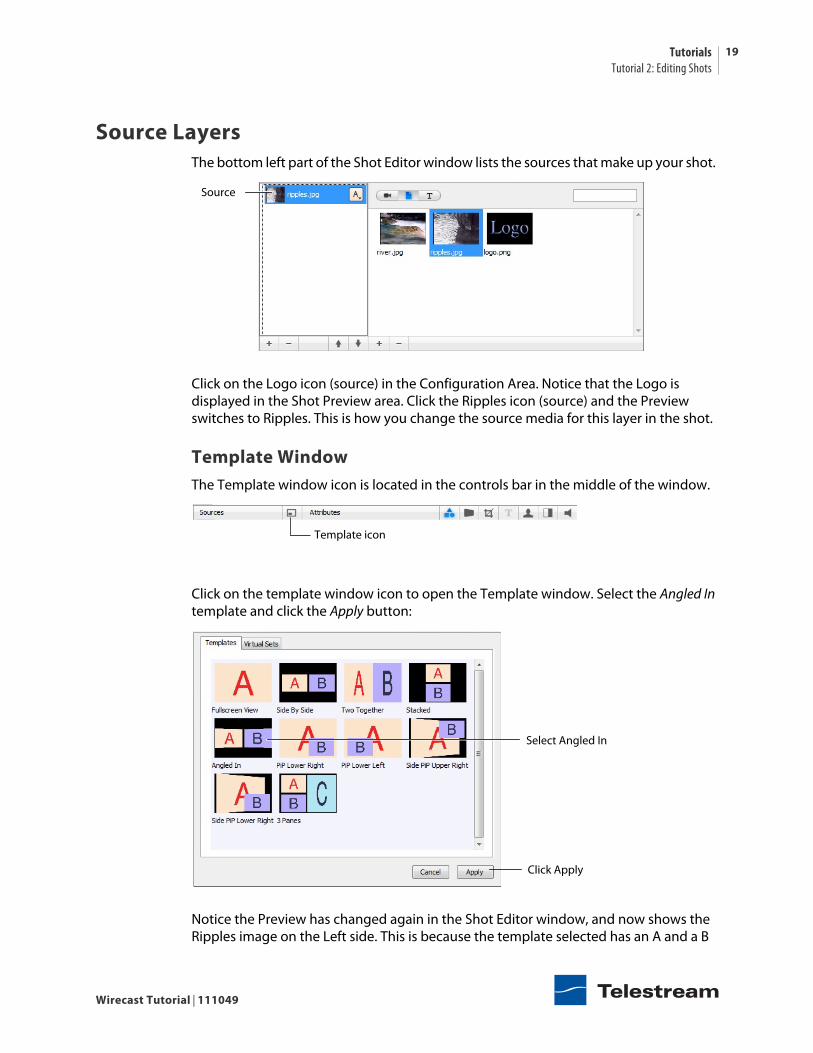
Source Layers The bottom left part of the Shot Editor window lists the sources that make up your shot.
Click on the Logo icon (source) in the Configuration Area. Notice that the Logo is displayed in the Shot Preview area. Click the Ripples icon (source) and the Preview switches to Ripples. This is how you change the source media for this layer in the shot.
Template WindowThe Template window icon is located in the controls bar in the middle of the window.
Click on the template window icon to open the Template window. Select the Angled In template and click the Apply button:
Notice the Preview has changed again in the Shot Editor window, and now shows the Ripples image on the Left side. This is because the template selected has an A and a B
Source
Template icon
Select Angled In
Click Apply
Wirecast Tutorial | 111049

TutorialsTutorial 2: Editing Shots
20
portion to it. Two different sources can be assigned to A and B, but for now only A is assigned (with the Ripples source):
Sources in Wirecast can be assigned either A, B or C in the Source Layers list. To change the assignment, click the A (or B or C) icon and make a selection. This makes choosing a new template much simpler because Wirecast automatically positions the correct sources on screen.
Wirecast Tutorial | 111049
TutorialsTutorial 2: Editing Shots
21
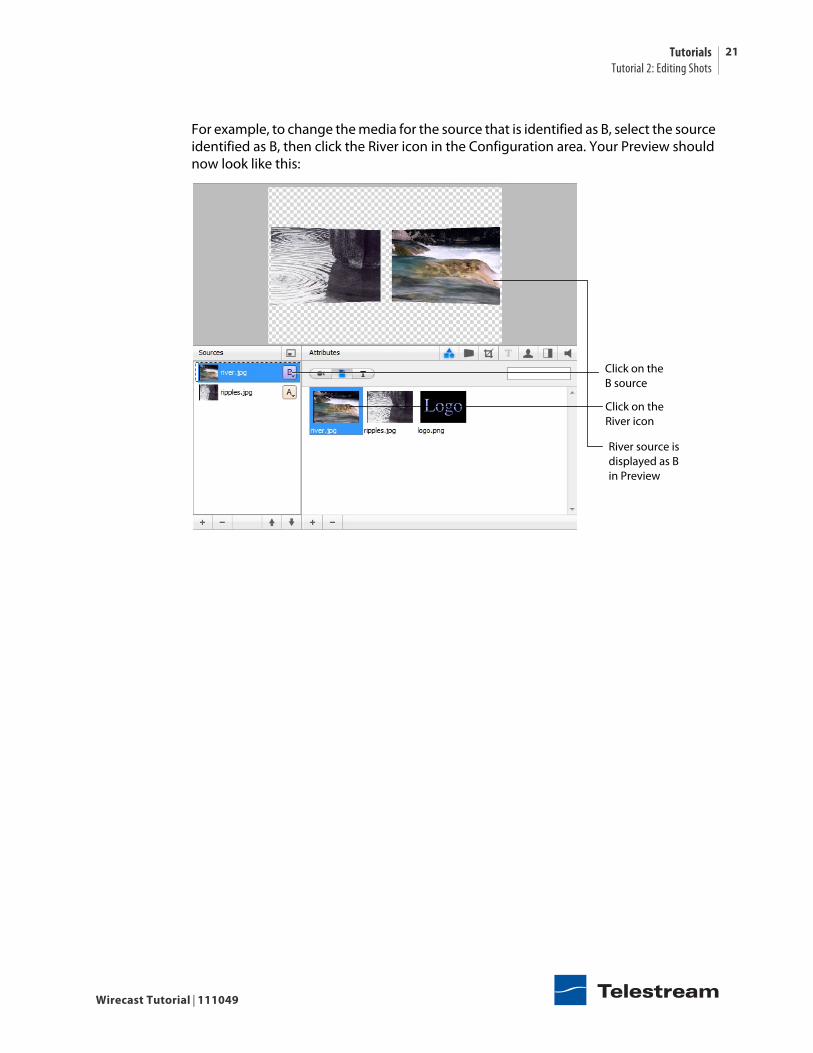
For example, to change the media for the source that is identified as B, select the source identified as B, then click the River icon in the Configuration area. Your Preview should now look like this:
Click on the B source
Click on the River icon
River source is displayed as Bin Preview
Wirecast Tutorial | 111049

TutorialsTutorial 2: Editing Shots
22
Titles You can also add a title to a shot. First click the plus (+) button on the bottom of the Source list to add a new layer:
To add a title template, click the T button on the control panel:
Click the plus button
New source layer added
Click T button
Wirecast Tutorial | 111049
TutorialsTutorial 2: Editing Shots
23
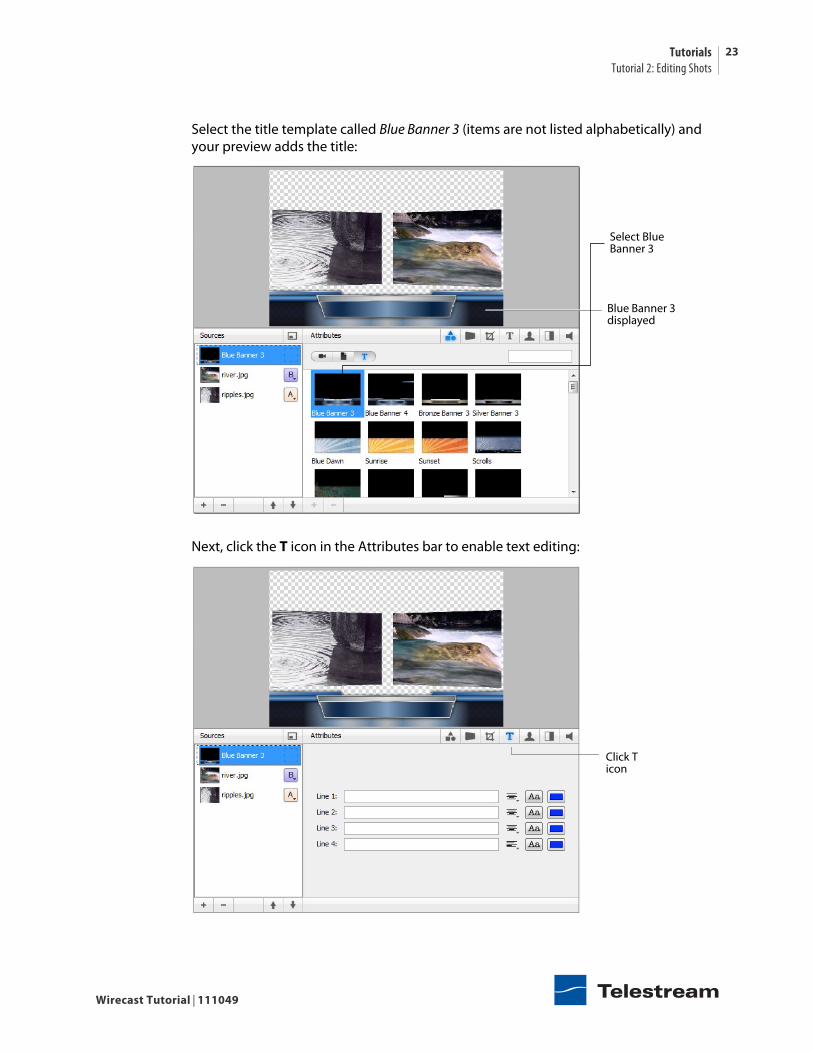
Select the title template called Blue Banner 3 (items are not listed alphabetically) and your preview adds the title:
Next, click the T icon in the Attributes bar to enable text editing:
Blue Banner 3 displayed
Select Blue Banner 3
Click T icon
Wirecast Tutorial | 111049
TutorialsTutorial 2: Editing Shots
24
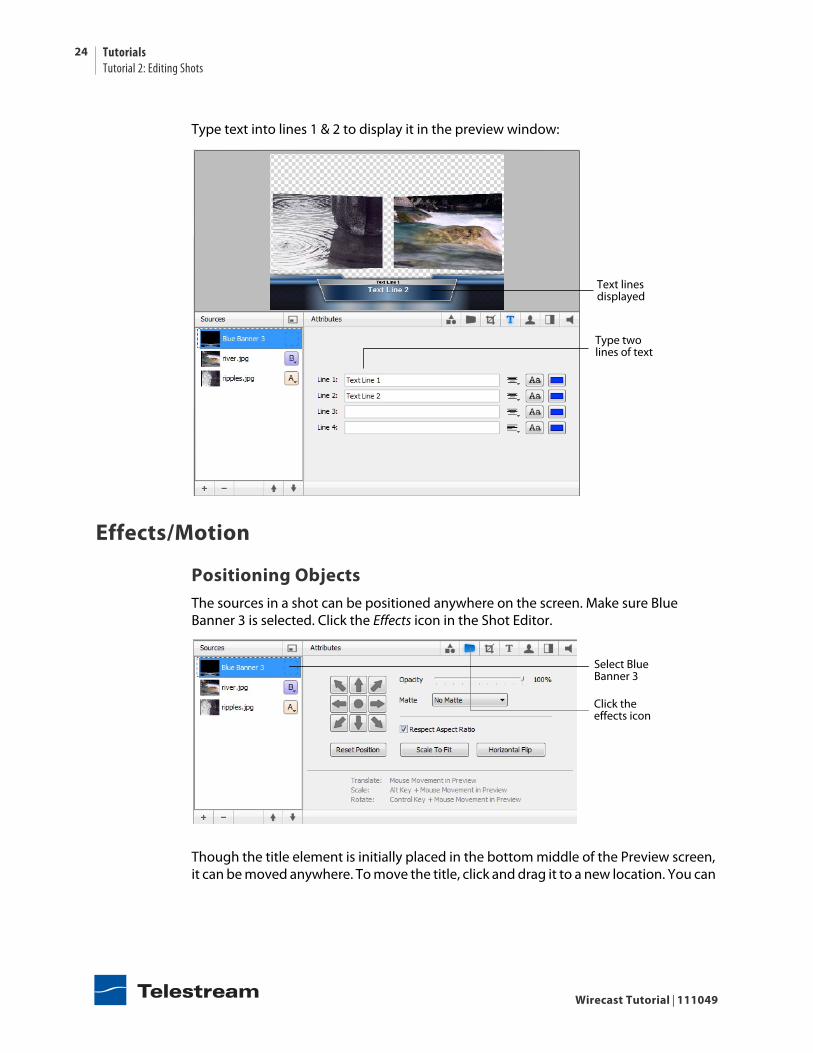
Type text into lines 1 & 2 to display it in the preview window:
Effects/Motion
Positioning Objects The sources in a shot can be positioned anywhere on the screen. Make sure Blue Banner 3 is selected. Click the Effects icon in the Shot Editor.
Though the title element is initially placed in the bottom middle of the Preview screen, it can be moved anywhere. To move the title, click and drag it to a new location. You can
Type two lines of text
Text lines displayed
Click the effects icon
Select Blue Banner 3
Wirecast Tutorial | 111049
TutorialsTutorial 2: Editing Shots
25
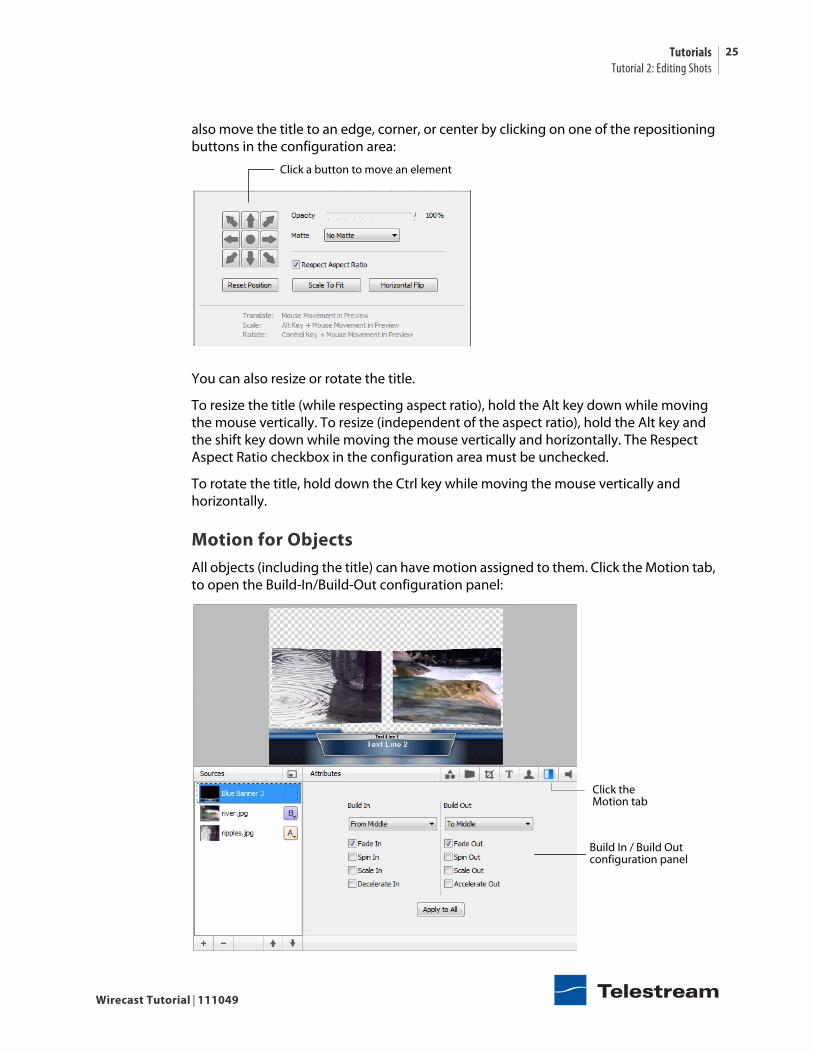
also move the title to an edge, corner, or center by clicking on one of the repositioning buttons in the configuration area:
You can also resize or rotate the title.
To resize the title (while respecting aspect ratio), hold the Alt key down while moving the mouse vertically. To resize (independent of the aspect ratio), hold the Alt key and the shift key down while moving the mouse vertically and horizontally. The Respect Aspect Ratio checkbox in the configuration area must be unchecked.
To rotate the title, hold down the Ctrl key while moving the mouse vertically and horizontally.
Motion for Objects All objects (including the title) can have motion assigned to them. Click the Motion tab, to open the Build-In/Build-Out configuration panel:
Click a button to move an element
Click the Motion tab
Build In / Build Out configuration panel
Wirecast Tutorial | 111049

TutorialsTutorial 3: Broadcasting
26
Motion only occurs during a transition (when you click Go, or click a shot in AutoLive mode). Motion defines how to add (Build-In) or remove (Build-Out) a shot element.
There are two forms of Motion:
1. Build In (add) Build In motion occurs when the shot is added to the Live Broadcast display.
2. Build Out (remove) Build Out motion occurs when the shot is removed from the Live Broadcast display.
Changing Motion Options Click the menu under Build-In in the configuration area and select From Left. Also check the Decelerate In checkbox:
To see this behavior in action, you must go back to the Main window and trigger the Build-In action. To do this, follow these steps:
1. Close the Shot Editor window (optionally) by clicking the X in the corner of the window.
2. In the Main window, make sure Smooth transition is selected.
3. Click on the Blank Shot, then click the Ripples shot (recently edited). Notice that when the Title appears it comes in from the left.
Tutorial 3: BroadcastingThis tutorial demonstrates how to setup and broadcast your Wirecast presentations. You can broadcast to a specific computer (Unicast), multiple viewers (Multicast), or even record your broadcast to disk.
There are two main components for broadcasting your presentation (or saving it to disk): Encoding and Destination.
Encoding You need to decide how you are going to encode the broadcast. Encoding is the type of compression used (JPEG, MPEG4, etc.). Wirecast comes configured with many common encoding options.
Select “From Left”
Check Decelerate In
Wirecast Tutorial | 111049

TutorialsTutorial 3: Broadcasting
27
Destination A destination for the broadcast must be selected. You can send it to a server for broadcast or save it to disk.
To stream your presentation, click the Stream button at the top of the Main window.
When the dialog box displays, select a destination and click OK to open the Output Settings window.
The Output Settings window can also be opened by selecting Output > Output Settings.
StreamingYou can stream your broadcast to any streaming service provider you choose. The Broadcast section of this user guide provides details on how to do this for many popular providers. This tutorial will show how to stream to Bambuser.
To stream to Bambuser, follow these steps:
1. Select Bambuser from the Destination menu.
2. Select an encoder.
3. Enter your Bambuser username.
4. After you have entered your username, click Authenticate to enter your password and generate the RTMP URL. You only need to do this one time because Wirecast stores the channel information for future streams. The default RTMP port is 1935. You may need to configure your firewall to enable connections on this port.
Click Stream
Select Destination
Click OK
Wirecast Tutorial | 111049

TutorialsTutorial 3: Broadcasting
28
Note: If you do not have a username and password, you can sign up with Bambuser by clicking the Bambuser icon or by clicking Sign Up.
5. Select your Bambuser channel.
6. Optionally, enter a Stream Delay value. This provides a time buffer between your live stream from Wirecast and the actual broadcast itself. You can set the delay from 0 to 999 seconds. However, greater delays require greater memory use. The amount of memory used is displayed when you enter the amount of delay.
7. Click OK.
Select an encoder
Select Bambuser
Click Authenticate and enter password
Select Channel
Enter user name
Wirecast Tutorial | 111049