tutorial 1; multi-section class list · pdf filetutorial 1; multi-section class list data...
TRANSCRIPT

Tutorial 1; Multi-Section Class List
Data Warehouse Services
Feb 2008 Tutorial 1; Multi-Section Class List Page1 1 Data Warehouse Services

Introduction
This manual was created as a “Tutorial” to help guide you through the basics of SADM using BRIO a reporting tool. The manual will show you how to create a query as well as simple reports, pivot reports and exporting to a Excel spreadsheet.
The intent is to use this manual as a hands on class as well as a “self taught” online tutorial.
Please follow each step in the order presented for a good result. (assumes you have authorized BRIO access.)
If you have any questions, please feel free to contact the “helpdesk.” (860) 486-4357.
2

After you log into STUDENT DATAMART (SADM) web site you will use BRIO http://www.datawarehouse.uconn.edu/SADM/Sadm.html , you will see the following screen.
To start the tutorial, from the left side --click on “Student Datamart” – then to log in, click on the blue box in the center that says “Go to Student Administration Datamart reports” -- this starts BRIO.
Then login (assume you have been setup and are authorized)
3

4

You will then see the following menu -- BRIO menu – select your report -- click on
Click on “Student Admin Data Mart
Click on “Sample SADM Reports”
5

Almost there ---- Finally click on “Report Template (ODS_CURRENT)” You are now in BRIO the UCONN standard Reporting tool that you will use in this tutorial.
The report will open up, and you should see the documentation, this is our standard. The purpose is to provide the user( you) a description
of the report and any changes made (by who and when).
Because this is a tutorial we will ignore this page for now.
6

7

We are going to do a little house cleaning (also good stuff to know later). We want you to focus on what we are teaching you, so we are going to hide a couple of sections before we start.
So these are the sections we will hide and how it’s done.
Click on the bottom section (to the right) it says “R LOAD DATE”, when you do, you should see this screen.
8

Then at the top click “VIEW” and a pop down menu will appear, click on “Hide Section – now the “R LOAD DATE” is gone.
Click here
Now --- Use the same process and hide the “Q LOAD DATE Que”
section also.
Now you are ready to follow this tutorial, and the correct screens will be presented.
9

Query: A set of statements which specify the criteria, based on which the data is
retrieved from the database. Sample Query in SQL
SELECT * FROM CC_PERSONAL_DIM WHERE PERS_NAME =’SMITH,JOHN”
The same query in BRIO
Required Data
Criteria
Table
10

Create a report of Students enrolled in a multi-section class. Include their section number in the report.
Step 1 Obtain personal information using EMPLID
Step 1.1: Review the query page.
Query Page
Request Line
Query Section
Limit Line
Results Section
Tables
Tip! – Click on the Request, Limits and Sort hyperlinks to turn the related lines on and off.
11

Step 1.2: Rename the Q SADM Query Section to Q Class Roster.
Click – Right click- select Rename section
Select Query section and
click on rename section
12

Step 1.3: Similarly rename the R Results Section to R Class Roster.
Step 1.4: Set Query Options.
Select Query – Query Options
Click ‘Query’ and
then ‘Query Options’
13

Select Return Unique Rows and Return First 100 Rows.
Select the options
14

Step 1.5: Selecting the required Table. Scroll down the list of tables and double click on the desired table. The table will
then be added to the query section. Here select CC PERSONAL DIM
Table is added
Sections have been
renamed
15

Step 1.6: Specify the required fields. Select the Pers Emplid, Pers Primary Last Name and Pers Primary First Name
fields, right click and select ‘Add Selected Items’
Adds the fields
you require
Step 1.7: Specify the selection criteria.
Right click on the field, on which the criteria will be defined. Select Limit . Here it
is Pers Emplid.
16

Fields are added to
the request line
17

Enter the criteria in the pop up box as shown. Here use 0479621
Column Name
Condition
Criteria
18

Step 1.8: Next step is to process the Query you have built. On the toolbar click ‘Process Current’
Click ‘Process
Current’
Tip! – Move your cursor over the process button and the default process type will be displayed.
19

The query results are displayed, as shown below
The query results are
displayed
20

Step 2: Obtain NetID information
Step 2.1: Add the table UC CC PERSONAL DIM to the query palette.
You should be able to see the auto join
The join
Auto-Join is a term we use to join (connect or link) two or more tables together
automatically. BRIO’s default is to automatically join tables when they have a field with the same name in each table. In this example we have two tables with “Pers
Empid” field in each hence BRIO links them automatically. You can always delete the join or change the default so no table links are automatically joined, hence you
would add them yourself if needed.
21

Tip! – Right-click on the join line and select properties to view the types of joins
that are available. In most cases the default join (simple) will suffice.
22

Step 2.2: Add UC Pers NetID to the request line.
Step 2.3: On the request line, right click on UC Pers NetId and select Properties – Functions – String Functions – Lower – Reference – Uc Cc Personal Dim – Uc Pers Netid.
Click properties
23
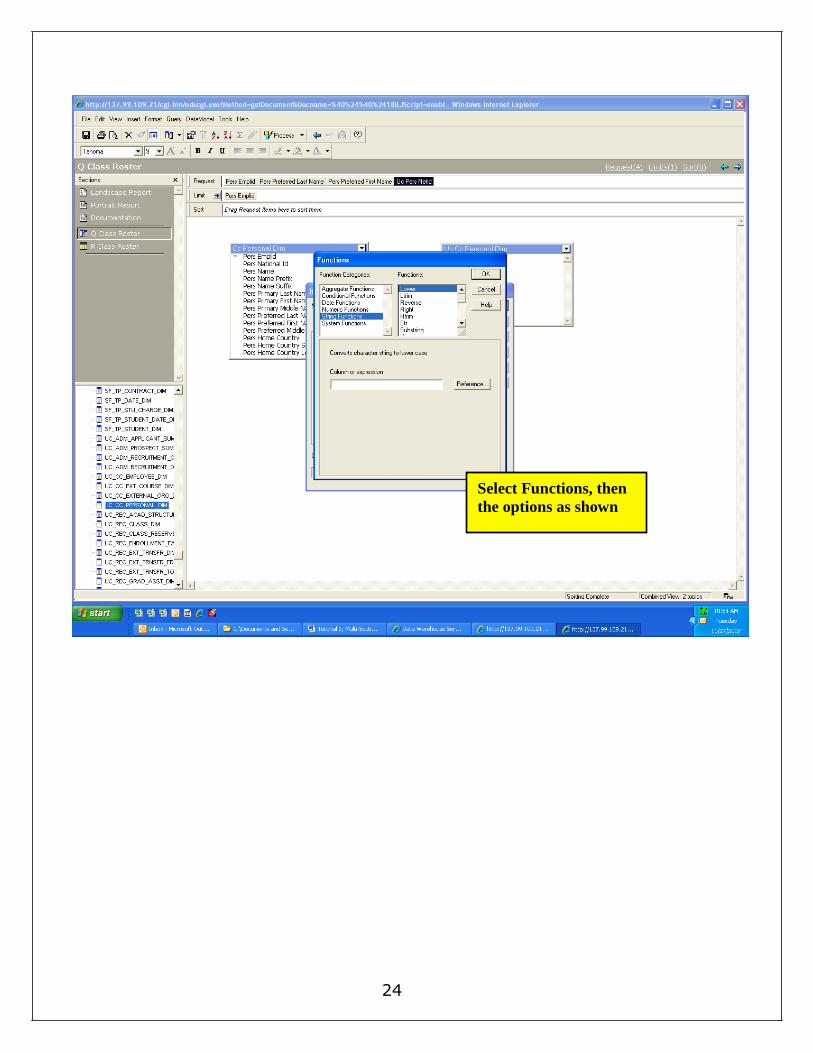
Select Functions, then
the options as shown
24

Select Reference, then
the options shown
25

It will display your
selections
26

Step 2.4: Process the query.
The results will be as shown
Results are shown in
lower case
Tip! – Save your document after completing a unit of work to guard against failures such as power outages…etc.
Tip! – You can set the default location of your saved files by clicking on Tools | Options | Program Options | File Locations.
27

Step 3 Obtain enrollment information limited to enrolled students
Step 3.1: Remove the limit from Pers Emplid.
Right click on the Pers Emplid on the Limit line and click remove
28

Step 3.2: Add the table REC ENROLLMENT FACT to the query palette.
Step 3.3: Add Enrl Status Reason Ldesc field to the Limit line.
The condition is Enrl Status Ldesc=Enrolled.
Step 3.4: Join Pers Emplid and Enrl Emplid . To do this, select
Pers Emplid in the CC Personal Dim table and drag it over Enrl
Emplid, in the Rec Enrollment Fact Table. The query palette should look as shown below.
The join on Pers
Emplid and Enrl
Emplid
Auto join on Pers
Emplid
Tip! – Sdesc fields values may not be unique. If in doubt, use Ldesc fields.
29

Tip! – Limit boxes give you the option of entering a custom value or showing you
current values. Use a custom value if your limit value is not current or when showing current values is time consuming.
Tip! – You can always join fields with the same name and in most cases fields with like names.
30

Step 3.5: Process the query.
The results will be displayed as shown
31
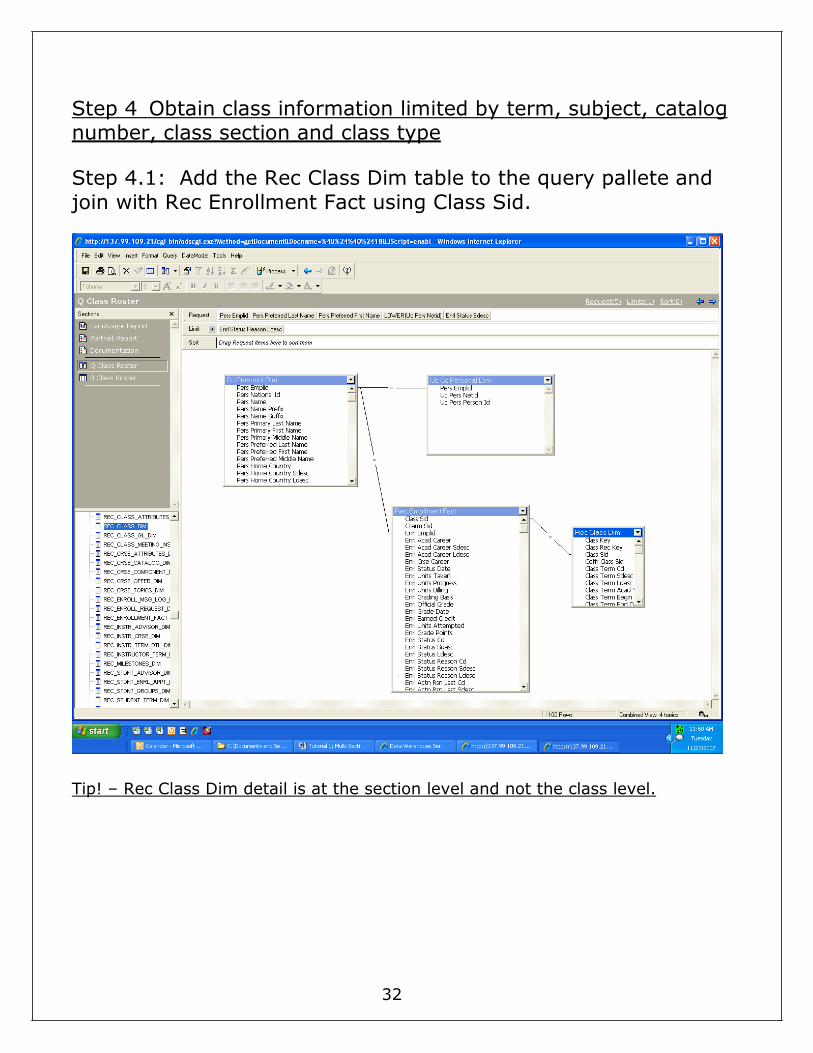
Step 4 Obtain class information limited by term, subject, catalog number, class section and class type
Step 4.1: Add the Rec Class Dim table to the query pallete and
join with Rec Enrollment Fact using Class Sid.
Tip! – Rec Class Dim detail is at the section level and not the class level.
32
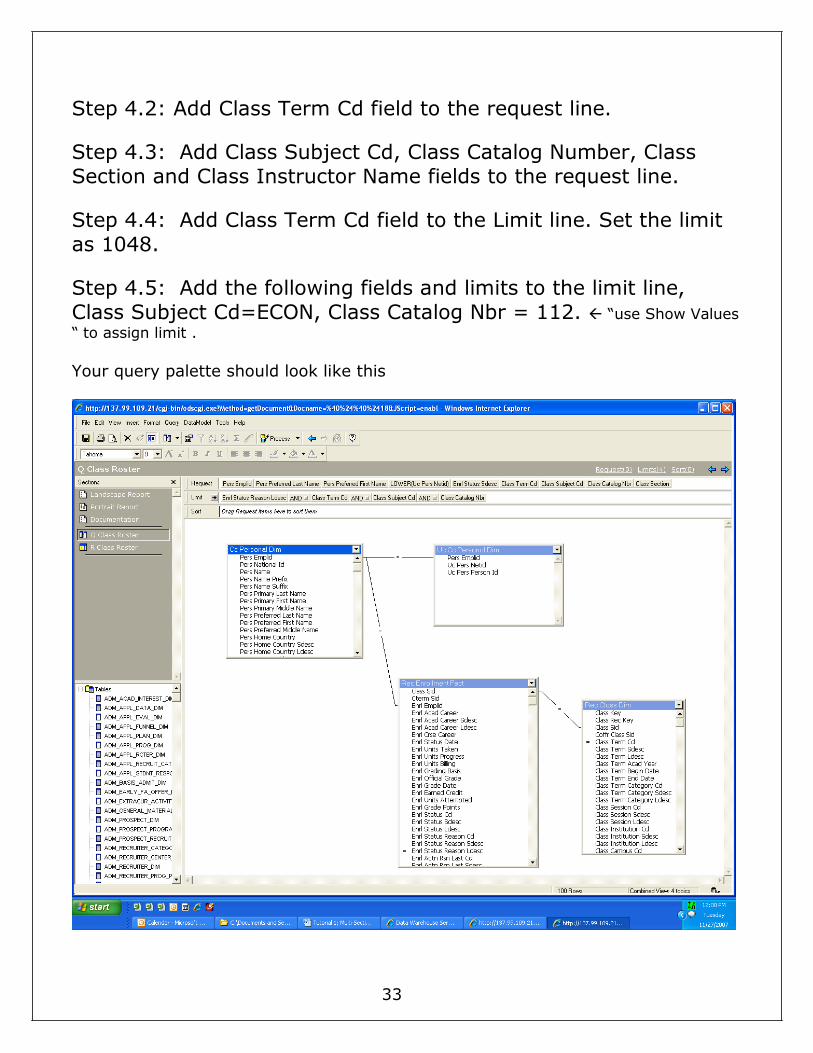
Step 4.2: Add Class Term Cd field to the request line.
Step 4.3: Add Class Subject Cd, Class Catalog Number, Class
Section and Class Instructor Name fields to the request line.
Step 4.4: Add Class Term Cd field to the Limit line. Set the limit
as 1048.
Step 4.5: Add the following fields and limits to the limit line,
Class Subject Cd=ECON, Class Catalog Nbr = 112. “use Show Values
“ to assign limit .
Your query palette should look like this
33

Tip! – Always show values when setting a limit on Catalog Number. The field has
an unusual format.
34

Step 4.6: Process the query. Your results section will look like this
35

Step 5 Build query with variable limits
Step 5.1: Right click Class Term Cd on the limit line and select variable limit.
36

Step 5.2: Add Class Section to the Limit line.
Step 5.3: Set variable limits for Class Subject Cd, Class Catalog Nbr and Class Section.
Your query palette will look like this
Tip! – Set a default value for the variable limit .
37
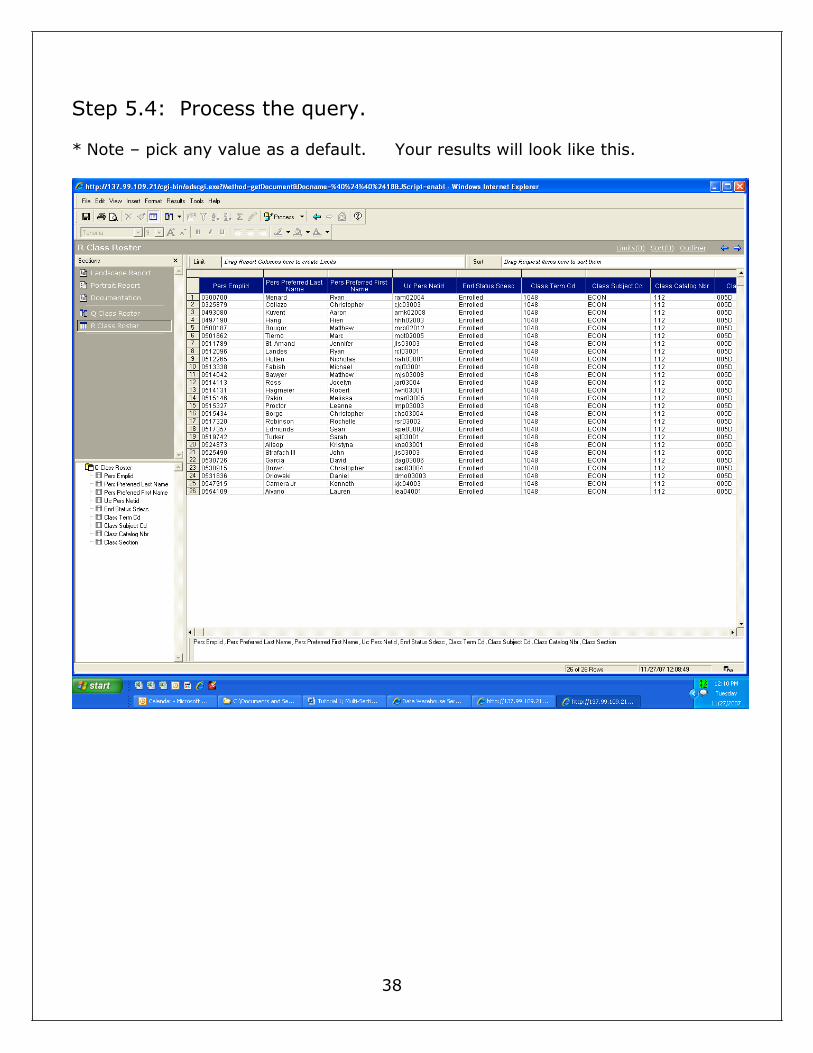
Step 5.4: Process the query. * Note – pick any value as a default. Your results will look like this.
38

Next we will export to Excel.
Step 5.5: Export to Excel.
Click File – Export – Section – save as excel
39

Excel 2.1 or higher is supported by BRIO for importing data (in) and exporting
data(out). This is handy if you need information for other applications.
40

Next we will create a report out of our results
Step 5.6: Click on Portrait Report to view Report section.
Table Dimensions
Report Group 1 Table Facts
41

Step 5.7: Rename section to Class Roster.
Step 5.8: Expand the Q class roster and R class roster fields.
Step 5.9: Drag the following fields to the Report Group1 Class term Cd, Class Subject Cd and Class Catalog Nbr.
Step 5.10: Drag the following fields to Table Dimensions Pers Emplid, Pers Primary Last Name, Pers Primary First Name, Uc Pers Netid, Class Section and Class Instructor Name.
Your report should look like this
42

Step 5.11: Rename “Scheduling Office” text to “Registrar’s Office”.
Step 5.12: Rename “Type Header Row 2 Here” text to “Multi-
Section Class Roster”. Tip! – Click View | Zoom to see more or less of the report.
Tip! – Double-Click the Pers Emplid row divider to ree up room for Class Instructor
Name
43

Next we will create a Pivot table by Class Catalog Number and Class Section
Step 5.13: Select the Q Class Roster section, click Insert and
select New Pivot.
Picture Update!: Click on the related Query section before inserting new
pivot.
44

Step 5.14: Rename the Pivot Section to P Class Roster.
Side Labels
Top Labels
Facts
45

Step 5.15: Expand R Class Roster.
Step 5.16: Drag Class Subject Cd to Side Labels.
Step 5.17: Drag Class Term Cd, Class Catalog Nbr and Class
Section to side labels.
Step 5.18: Drag Pers Emplid to Facts.
Step 5.19: Right click on Pers Emplid and select Data Functions –
Count, to view a count for each column.
46

Picture Update!: Do not drag UC_Pers_Netid to Facts.
47

48

(this page left intentionally blank)
49