tufflex ™ roofing system oem installation guide
TRANSCRIPT
TUFFLEX ™ ROOFING SYSTEM OEM INSTALLATION GUIDE
The instructions contained herein are guidelines for installing Tufflex roofing on New Construction
RV’s. When applied using the proper techniques, materials and tools, the roof should provide years
of dependable, trouble free performance.
To ensure proper warranty coverage, you should adhere to the installation techniques and materials
described in this installation guide. Use of other procedures and products may jeopardize your
warranty coverage.
NOTE: Read fully and understand the procedures before beginning installation.
TOOLS AND MATERIALS1. Waterbased adhesive (935BA-5 or 935BA-55) is applied to a wood substrate with a roller. Tufflex
is applied while the adhesive is still wet.
2. Butyl tape (BT-1834) must be under all vents and accessories on the roof and termination
moldings that contact the membrane. Butyl tape should also be used under the membrane where
it comes in contact with the unit body at the front, rear and side terminations.
3. Lap Sealant (502LS) is a self-leveling caulk used to seal screw-type fasteners and termination
moldings, formulated especially for Tufflex roofing.
4. Paint roller (not supplied) should be a 9” wide short nap type. Used to apply waterbased adhesive
(935BA-5 or 935BA-55).
5. Push broom or squeegee (not supplied) used to remove air pockets and ensure that the membrane
is completely in contact with the adhesive.
6. Caulking gun or pumping equipment (not supplied) used to apply lap sealant (502LS).
7. Roof decking (substrate, not supplied), depending on the roof load requirements, should be at
least 1/8” lauan plywood. If the load requirements are heavy (storage pods or consistent traffic)
a minimum of ½” is recommended. In most new unit applications, ¼” luan or plywood is the
minimum material used, while 3/8” material is more prevalent.
NOTE: Dicor does not warrant selection of substrate material. Feel free to contact Dicor with any
questions.
CLEANING INFORMATION Tufflex roofing can be cleaned with Dicor Rubber Roof Cleaner. For stubborn stains, products contain-
ing mineral spirits are recommended. Do not use Acetone or Citrus Cleaners.
Do not let any cleaning solvent come in contact with the membrane for extended periods of time. 2965 LaVanture Place • Elkhart IN 46514
574.264.2699 • dicorproducts.com
GENERAL INFORMATION
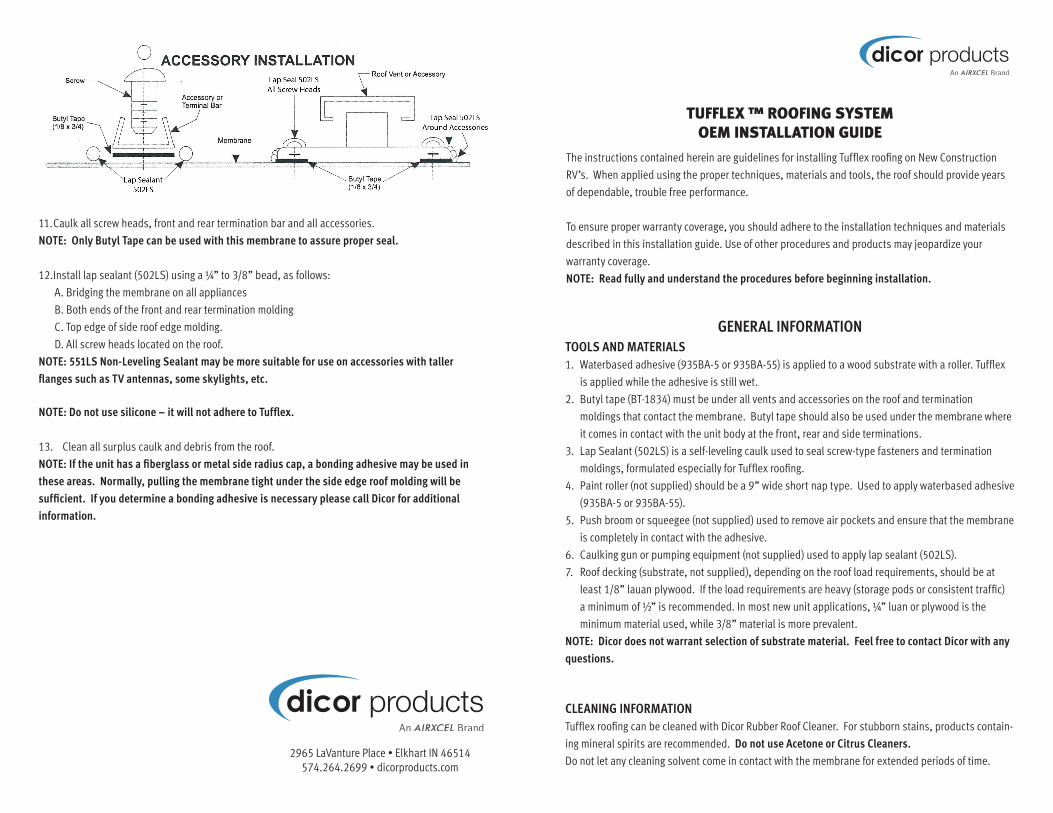
11. Caulk all screw heads, front and rear termination bar and all accessories.
NOTE: Only Butyl Tape can be used with this membrane to assure proper seal.
12. Install lap sealant (502LS) using a ¼” to 3/8” bead, as follows:
A. Bridging the membrane on all appliances
B. Both ends of the front and rear termination molding
C. Top edge of side roof edge molding.
D. All screw heads located on the roof.
NOTE: 551LS Non-Leveling Sealant may be more suitable for use on accessories with taller
flanges such as TV antennas, some skylights, etc.
NOTE: Do not use silicone – it will not adhere to Tufflex.
13. Clean all surplus caulk and debris from the roof.
NOTE: If the unit has a fiberglass or metal side radius cap, a bonding adhesive may be used in
these areas. Normally, pulling the membrane tight under the side edge roof molding will be
sufficient. If you determine a bonding adhesive is necessary please call Dicor for additional
information.

Because dust and dirt may collect on the roof, regular cleaning with Dicor’s RP-RC-160C or RP-RC320S
Rubber Roof Cleaner is recommended. Do not park vehicle for extended periods where roof will be
exposed to tree sap or fruit as staining may result. A soft bristle brush may be used during cleaning. PREPARATION1. When applying the substrate, make sure it extends to the edges of the roof. Also, make sure
all seams are tight and as level as possible. The substrate should be applied using screw-type
fasteners with screw heads level or slightly below the surface of the substrate. All substrate
seams should be on a rafter for necessary support and to reduce the possibility of “seam
separation”. ALL SUBSTRATE SEAMS MUST BE COVERED WITH DICOR FLEECE TAPE (511FT)
WHEN USING TUFFLEX ROOFING MEMBRANE. Additionally, if on the roof edge, the membrane
will be going over a sharp edge, you should either bevel the edge of the substrate with a sander or
place the Dicor Fleece Tape 511FT over the edge to protect the membrane from the edge.
2. Route-out or cut all vent and appliance openings.
3. Broom or blow-off of substrate all foreign materials and check entire roof for exposed screw heads
or sharp objects that may prematurely wear the membrane.
INSTALLATION1. Locate the ends (front and rear) where the membrane will be terminated. Use a chalk-line to mark
these areas. Make sure there is sufficient roof structure to fasten to.
2. Cover the roof with the membrane making sure there is sufficient length at both the front and rear
termination points. Fold membrane in-half, exposing the roof areas.
3. Open the waterbased adhesive (935BA-5 or 935BA-55) and stir thoroughly. Using a 9” wide short
nap paint roller, apply adhesive to the substrate at a rate of 160 sq. ft. per gallon. The membrane
is to be mated with the adhesive as quickly as possible.
4. Fold the membrane the opposite direction and repeat step #3.
5. With the membrane in place, adjust to make sure there is sufficient length at both termination
points and on both sides of the vehicle. Remove wrinkles by lifting and pulling the membrane. Do
not stretch the membrane.
6. Lightly squeegee or broom to eliminate air pockets, making sure the membrane is completely in
contact with the adhesive.
7. Apply butyl tape (BT-1834) to the side of the roof edge molding. While holding the molding, draw
surplus membrane tight with a downward pull. (You may staple the membrane in-place spacing
½” staples 3-5” apart to keep proper tension.) For best results, install this molding from the
center of the vehicle toward the ends. When complete, use a utility knife to cut surplus material
from below the molding. Repeat on opposite side.
NOTE: It may help to strike a chalk line to assist in keeping the side-body molding straight and in
proper position.
8. Apply butyl tape (BT-1834) to the termination molding. On the front of the vehicle, the front cap
should lay on top of the membrane. Using a screw-type fastener, install the termination moldings
–making sure there is sufficient roof structure. On the rear of the vehicle, the membrane should
lay on top of the rear cap.
NOTE: Butyl tape should also be used under the membrane where it comes in contact with the
unit body at the front, rear, and side terminations. See all termination drawings for correct butyl
placement.
9. Using a utility knife “X” cut all roof openings. Make sure all openings are cut the same size as
previous openings. Round all 90 degree cuts to eliminate “running cuts”. Surplus membrane
should be stapled inside vent openings. Do not stretch the membrane. Trim all excess material.
10. Apply butyl tape (BT-1834) to all appliances, vents, etc. Install appliances, vents, etc. using
screw-type fasteners. When installing the vents, appliances, etc., you may notice that the
membrane near the screws begins to “creep” and small air pockets form. Simply “Walk” the
bubble toward the opening and hold-in-place while installing screw-type fasteners.