tubbutec modypoly / modysix user manual · 2019-04-08 · the korg polysix korg mono/poly and...
TRANSCRIPT

Tubbutec Modypoly / Modysix
Midi retrofit and feature extension for Polysix and Poly-61
User Manual for firmware version v2.0
http://tubbutec.de
1

Contents
Contents 2
1 ModyPoly / Modysix 5
2 Play Modes 52.1 Play Modes Overview . . . . . . . . . . . . . . . . . . . . . . 52.2 Extended Unison . . . . . . . . . . . . . . . . . . . . . . . . 5
2.2.1 Retrigger . . . . . . . . . . . . . . . . . . . . . . . . 62.2.2 Priority . . . . . . . . . . . . . . . . . . . . . . . . . 6
2.3 3 Voice mode . . . . . . . . . . . . . . . . . . . . . . . . . . 72.4 2 Voice mode . . . . . . . . . . . . . . . . . . . . . . . . . . 72.5 Polychord . . . . . . . . . . . . . . . . . . . . . . . . . . . . 7
2.5.1 Switching into Polychord . . . . . . . . . . . . . . . . 72.5.2 Recording a new Chord . . . . . . . . . . . . . . . . 72.5.3 Retrigger . . . . . . . . . . . . . . . . . . . . . . . . 8
2.6 Chord . . . . . . . . . . . . . . . . . . . . . . . . . . . . . . 82.6.1 Retrigger . . . . . . . . . . . . . . . . . . . . . . . . 8
3 Powerarp 83.1 Powerarp overview . . . . . . . . . . . . . . . . . . . . . . . 83.2 Creating a new sequence . . . . . . . . . . . . . . . . . . . . 83.3 playing and transposing . . . . . . . . . . . . . . . . . . . . 93.4 Latch, Mode and Range . . . . . . . . . . . . . . . . . . . . 9
3.4.1 Latch . . . . . . . . . . . . . . . . . . . . . . . . . . 93.4.2 Mode . . . . . . . . . . . . . . . . . . . . . . . . . . . 93.4.3 Range . . . . . . . . . . . . . . . . . . . . . . . . . . 9
3.5 Playing a previously saved sequence . . . . . . . . . . . . . . 10
4 Sustain pedal input 104.1 Sustain in play modes . . . . . . . . . . . . . . . . . . . . . 104.2 Sustain in Arp and Powerarp . . . . . . . . . . . . . . . . . 10
2

CONTENTS 3
5 Midi 115.1 Midi in . . . . . . . . . . . . . . . . . . . . . . . . . . . . . . 115.2 Midi out . . . . . . . . . . . . . . . . . . . . . . . . . . . . . 11
5.2.1 Midi out as played . . . . . . . . . . . . . . . . . . . 115.2.2 Midi out as sounds . . . . . . . . . . . . . . . . . . . 11
5.3 Arpeggiator and Sample and Hold Trigger . . . . . . . . . . 125.4 Filter over midi . . . . . . . . . . . . . . . . . . . . . . . . . 125.5 Program change . . . . . . . . . . . . . . . . . . . . . . . . . 125.6 Pitch Bend . . . . . . . . . . . . . . . . . . . . . . . . . . . 13
6 Triangular filter LFO 13
7 S/H filter LFO 13
8 HiRes upgrade 148.1 Portamento . . . . . . . . . . . . . . . . . . . . . . . . . . . 14
8.1.1 Selecting portamento modes . . . . . . . . . . . . . . 148.1.2 Turning portmanto OFF . . . . . . . . . . . . . . . . 158.1.3 Adjusting portamento time . . . . . . . . . . . . . . 15
8.2 Custom tuning . . . . . . . . . . . . . . . . . . . . . . . . . 158.2.1 Upload tunings using Scala . . . . . . . . . . . . . . 158.2.2 Load tunings . . . . . . . . . . . . . . . . . . . . . . 16
8.3 Voice spread . . . . . . . . . . . . . . . . . . . . . . . . . . . 168.4 Precision pitch bend . . . . . . . . . . . . . . . . . . . . . . 17
9 Config menu 179.1 Enter and exit the config menu . . . . . . . . . . . . . . . . 179.2 Configure Midi Channels . . . . . . . . . . . . . . . . . . . . 179.3 Configure arp trigger . . . . . . . . . . . . . . . . . . . . . . 179.4 Configure S/H trigger . . . . . . . . . . . . . . . . . . . . . . 189.5 S/H LFO amount . . . . . . . . . . . . . . . . . . . . . . . . 189.6 Pitch bend calibration . . . . . . . . . . . . . . . . . . . . . 189.7 Portmento time . . . . . . . . . . . . . . . . . . . . . . . . . 189.8 Tuning . . . . . . . . . . . . . . . . . . . . . . . . . . . . . . 189.9 Pitch bend mode . . . . . . . . . . . . . . . . . . . . . . . . 199.10 Factory reset . . . . . . . . . . . . . . . . . . . . . . . . . . 19
10 Tips and tricks 2010.1 Transferring a melody to Powerarp . . . . . . . . . . . . . . 2010.2 Use of Powerap transpose and Polychord . . . . . . . . . . . 2010.3 Copy a Polychord . . . . . . . . . . . . . . . . . . . . . . . . 20

4 CONTENTS
11 Appendix 2111.1 Midi controller chart . . . . . . . . . . . . . . . . . . . . . . 2111.2 Troubleshooting . . . . . . . . . . . . . . . . . . . . . . . . . 21
11.2.1 Midi in not working . . . . . . . . . . . . . . . . . . . 2111.2.2 Midi loop back problems . . . . . . . . . . . . . . . . 2211.2.3 Midi filter control and S/H LFO not working . . . . . 22
11.3 Thanks . . . . . . . . . . . . . . . . . . . . . . . . . . . . . . 2211.4 Config menu keyboard overview . . . . . . . . . . . . . . . . 22*

5
1 ModyPoly / Modysix
The ModyPoly, aka Modysix is a midi retrofit and feature extension forthe Korg Polysix Korg Mono/Poly and Poly-61 synthesizers. It featuresvarious additional play modes, a free definable arpeggiator, midi in andmidi out, and a sustain pedal input, two additional filter LFOs and plentyother features.
This manual only describes the features different from the original Polysixand Poly-61. Great care has been taken to not alter the original behaviour,except of course for the additional features.
2 Play Modes
2.1 Play Modes Overview
In addition to the three play modes (Unison, Poly and Chord Memory)featured in the original Polysix the Modysix offers various other play modes.The new play modes are: An extended unison mode, 2-Voice Mode, 3-Voicemode and Polychord.
2.2 Extended Unison
The Extended Unison features adjustable key priority and re-trigger set-tings. This way the Polysix / Poly-61 can behave just like the monophonicsynthesizer of your choice.The features can be set using the arpeggiator’s switches for direction andlatch.

6 2. PLAY MODES
Figure 1: Play mode selection overview
Note for Poly-61 users: You can access unison mode by using midi or byinstalling a unison button.
2.2.1 Retrigger
Retrigger defines whether the gate re-triggers when playing legato. Whenturned off the gate stays on as long as there are one or more keys pressed,which also means that the envelope does not retrigger until you release allkeys. In the original Polysix Retrigger is always turned on. Use the LATCHswitch to set the re-trigger mode. Latch on -> Retrigger on. Latch off ->Retrigger off.
2.2.2 Priority
Priority defines how the currently played monophonic note is selected fromthe keyboard input. This can be used to emulate the behavior of classicmonophonic synths.Priority can be set to Upper/Lower/Last using the UP/DOWN/UPDOWNswitch of the arpeggiator. In the original Polysix Priority is set to last.UPPER means the uppermost key is selected for playing, LOWER meansthe lower most key is selected.When LAST is selected the 8 last played keys are used to determine thenote played when a key is released.

2.3. 3 VOICE MODE 7
2.3 3 Voice mode
The 3 voice mode is just like the normal polyphonic mode, only you havethree voices instead of six. In this mode two oscillators are layered to createa denser, thicker sound. To activate 3 Voice mode press POLY, UNI andCHORD simultaneously.
2.4 2 Voice mode
In the 2 Voice Mode there is only two voice polyphony, but
is just like the normal polyphonic mode, only you have two voices insteadof six. Three oscillators are layered to create an even denser, thicker sound.To activate 3 Voice mode press POLY and UNI simultaneously.
2.5 Polychord
The Polychord functionality allows you to assign an individual chord toeach key of the keyboard and play these chords with a single key press.Like any other play mode Polychord can be used in conjunction with thePowerarp. Combining the two gives you a versatile chord sequencer!
2.5.1 Switching into Polychord
To switch into Polychord mode release all keys, and press POLY andCHORD simultaneously.
2.5.2 Recording a new Chord
Two record a new chord, play it on the keyboard and press POLY andCHORD simultaneously. The POLY led will now blink to indicate that thedevice is waiting for you to select the key you want the chord assigned to.Press a key and the chord will be assigned to this key. The synthesizerthen returns to the play mode it was in before to speed up entry of multiplechords. This is a similar procedure to recording a chord in chord memoryon the original Polysix / Poly-61. Just press POLY+CHORD instead ofjust CHORD.

8 3. POWERARP
2.5.3 Retrigger
Use the LATCH switch to set the re-trigger mode for Chord. Latch on ->Retrigger on. Latch off -> Retrigger off.
2.6 Chord
2.6.1 Retrigger
Use the LATCH switch to set the re-trigger mode for Chord. Latch on ->Retrigger on. Latch off -> Retrigger off.
3 Powerarp
3.1 Powerarp overview
The Powerarp mode lets you define a custom arpeggiator sequence which -just like the normal arp - works in all play modes. You can define a sequenceof up to 128 notes, transpose in pitch or shift it in time. The next note istriggered by the arp clock, or midi.
3.2 Creating a new sequence
Hold the ARP key until it starts blinking. Now you can enter your sequencenote by note. Pressing the HOLD key while holding down a key will insterta tie and make the note longer by one step. Pressing HOLD without holdingdown a key will insert a break with the duration of one note. The HOLDled will light up for a short while to indicate a break has been inserted.
New in version 2.0: When playing legato when recording the notes, theywill also be plyaed legato on playback. This works in all play modes. Ifthe HiRes upgrade is installed and auto-portmento turned on, this will alsoinstert glides into the sequence.
You can use this to program more complex rhythms, then a usual arpeg-giator can provide. When finished press the arp key again to save the se-
3.3. PLAYING AND TRANSPOSING 9
quence and get into Powerarp mode. The sequence will be saved, even ifyou switch off the Polysix / Poly-61.
3.3 playing and transposing
To play the sequence press the middle C (C3). To transpose the sequencepress key above or below the middle C. When playing staccato the sequenceis reset each time you press a key, when playing legato it will transposewithout resetting. Activating HOLD will make sure the sequence is notretrigged, just like playing legato. The two uppermost keys of the keyboardhave a special function. The C will advance the sequence by one step, theB will move it back by one step.
3.4 Latch, Mode and Range
3.4.1 Latch
When the latch switch is set to on, any notes played are memorized andwill continue to be arpeggiated even after you lift your fingers completelyfrom the keyboard. To change the arpeggio pattern, simply play one ormore new keys.
Hold
Turn on HOLD during sequence playback to disable automatic triggeringwhen a new key is pressed. This is especially useful if the ModyPoly istriggered from an external clock or via midi.
3.4.2 Mode
The mode switch defines weather the arpeggio is played upwards, down-wards or both alternating. There is a fourth arpeggio mode that can beselected by the Range switch (see below)
3.4.3 Range
Set the range switch to 1OCT or 2OCT to play the sequence over a rangeof one or two octaves. In two octave mode notes that would extend therange of the keyboard are being folded back into the keyboards range.Set the range switch to FULL to enter random mode. In this mode you can

10 4. SUSTAIN PEDAL INPUT
use the mode switch to select different random modes as follows:UP: Normal random modeDOWN: Non repeating random mode (two consecutive notes will never bethe same)UPDOWN: Forward/Backward random (the sequence will randomly ad-vance or go back one step)
3.5 Playing a previously saved sequence
To switch directly into Powerarp mode press the ARP key until it startsblinking, then press it again without entering a sequence. The previouslystored sequence can now be played.
4 Sustain pedal input
4.1 Sustain in play modes
Pressing the sustain pedal will sustain the playing notes until it is released.
4.2 Sustain in Arp and Powerarp
The sustain pedal can also be used in combination with the arpeggiators.When pressing the sustain pedal the notes are sustained.When using the unison mode with arp or Powerarp the sustain pedal has aspecial function. While it is pressed the re-trigger is switched off, allowing

11
a smoother arp sound.
5 Midi
5.1 Midi in
Depending on the setting in the see config menu the Modsix receives midion channel 1-16 or an all channels (omni).It reacts to midi notes 36 - 97
5.2 Midi out
The Modysix has two separate midi out modes and sends both on two differ-ent midi channels simultaneously. You can configure the channel numbersin the config menu or turn the channels off.Midi notes 36 - 97 are beeing sent.
5.2.1 Midi out as played
On the as-played channel only the key presses on the Polysix / Poly-61keyboard are sent. If you record this channel and send it back to theModysix, the synth will sound exactly the same as when you played it.This is useful for using the Polysix / Poly-61 as a midi keyboard. In thismode sustain pedal events will be sent as ”sustain” midi messages.
5.2.2 Midi out as sounds
On the as-sounds channel instead of the key presses and releases, midi issent the way it actually sounds. In this mode the Modysix will output thearpeggiator, Powerarp, chord memory, Polychord, unison mode includingretrigger, poly-, two,- and three voice modes. Sustain events will not besent as midi massages but rather simulated with note on and off events.When retrigger is turned off in unison mode the next note on event will

12 5. MIDI
be sent before the note off event. By most monophonic synths this can beinterpreted as a ’glide’s command.
5.3 Arpeggiator and Sample and Hold Trigger
The Arp and Sample and Hold clocks can be selected to trigger by theinternal arp or midi. (see config menu). There are two midi trigger modes.when ’midi note’ is selected as the trigger input, the trigger is midi note 0(for the Arp) and midi note 1 (for the Sample and Hold)
When ’midi clock’ is selected, the Arp and Sample and Hold will triggerin sync to the received midi clock. You can choose between a number ofdividers for the midi clock to achieve various clock frequencies by sendingmidi controller messages (see midi controller chart). The table below showsthe controller values and the resulting frequency in bars. You can also setthe dividers in the config menu.
Ctrl val 0-7 8-15 16-23 24-31 32-39 40-47 48-55 56-63Bars 2.5 2 1.5 1 3
41T 1
238
Ctrl val 64-71 72-79 80-87 88-95 96-103 104-111 112-119 120-127Bars 1
2T 1
4316
14T 1
818T 1
16132
Table 1: Midi controller settings for arp and S/H LFO clock divider
5.4 Filter over midi
The Modysix features midi filter control. Controller massages received oncontroller number 17 will modulate the filter. The default value is 0.The filter S/H LFO and the triangular LFO can also be controlled usingmidi.
5.5 Program change
The modysix responds to program change commands and changes the playmode. It also sends program change commands when changing the playmode. The following table shows which program number corresponds withwhich play mode:

5.6. PITCH BEND 13
Program number Play Mode0 6 Voice Polyphonic1 Unison2 2 Voice Polyphonic3 3 Voice Polyphonic4 Chord Memory5 Polychord6 Unison / Share7 4 Voice Polyphonic8 3 Voice Polyphonic (Mono/poly)9 Random 4 Voice Polyphonic
Table 2: Midi program numbers and play modes
5.6 Pitch Bend
If the hardware is installed, the pitch bend can be controlled using midi bysending pitch bend commands.
6 Triangular filter LFO
The Modysix features an additional lfo for the filter which outputs a trian-gular waveform.Its frequency can be adjusted from 0,12Hz - 8kHz usinga fine and coarse control. The amount can also be adjusted. See the midicontroller chart for corresponding controller numbers.
7 S/H filter LFO
This is a build in sample and hold style LFO that controls the filter. Arandom value is created on every s/h clock event and sent to the filter.

14 8. HIRES UPGRADE
This simulates the effect of the sample and hold LFOs common in analogsynthesizers, where a noise source is periodically sampled to get a newrandom value each time.
You can choose between three different clock sources by using the configmenu. The internal arp clock, midi clock and midi trigger. The midi clocksdivider can be adjusted in the config menu or via midi. When midi triggeris selected, the S/H will trigger when note C#-2 is played (second lowestmidi note).
You can control the amount of this LFO by using the controller numbershown in the midi controller chart or by using the config menu.
8 HiRes upgrade
Hires is an optional upgrade for ModyPoly. It adds high pitch resolution,microtuning and portamento. It works for Polysix and Mono/Poly (and issomewhat usable on the Poly-61).
8.1 Portamento
With the HiRes upgrade, ModyPoly features a constant time linear porta-mento which works in all play modes (unison, poly, chord, ..)
Without the HiRes upgrade installed, portamento is replaced with glisando(only semitone steps). If a short glide time is used, this sounds very similarto actual portamento.
8.1.1 Selecting portamento modes
When the arp or sequencer are turned off, the MODE switch can be usedto select between several portamento modes:
• UP: auto portamento (will glide when playing legato)
• DOWN: Portamento is turned on
• UP/DOWN: Portamento is OFF. Setting the portamento time to 0is identical to turning it off.

8.2. CUSTOM TUNING 15
When the arpeggiator or sequencer are turned on, the MODE switch re-gains its original functuinallity, but keeps the previosly selected portamentomode.
8.1.2 Turning portmanto OFF
If you do not intend to use portamento, it is best to tuurn it off completely.This can be done by setting the portamento time to 0 in the config menu(see config menu)
8.1.3 Adjusting portamento time
There are three ways to adjust the portamento time: Midi, config menuand the portamento knob.
• Midi controller number 26 can be used to adjust the portmento timedirectly.
• You can also use the config menu to set the portamento time (seeconfig menu)
• If the portamento knob is installed, it will set the portamento time aswell. Midi and knob times will be added internally.
8.2 Custom tuning
The HiRes upgrade features full microtonal support for Polysix and Mono/Poly.HiRes uses a high quality 16 bit DAC which results in a effective resolutionof 0.2 cent. Up to 4 tunings can be saved in the ModyPoly and recalledusing the config menu. Real time sysex tuning messages are also supportedand allow instant retuning of any note.
8.2.1 Upload tunings using Scala
ModyPoly supports ’midi tuning standart bulk tuning dump 3 byte’ sysexmessages to upload custom tunings. One software that supoorts this is theTuning and Scale management and editor Scala by Manuel Op de Coul.After loading a tuning into Scala, you need to configure it to work withModyPoly. Go to the options menu (EDIT -> Preferences) and switch tothe Synth tab. Select ’107: MIDI tuning Standard bulk tuning dump, 3byte’ as tuning model. Set the device ID to 0. MTS preset selects which

16 8. HIRES UPGRADE
Figure 2: Synth and Midi tabs in Scala
tuning slot you would like to save this tuning into. Tuning slot 1-4 can beused to store a tuning indefinately. Tuning slot 0 is special and can be usedfor testing. Uploading into slot 0 will change the tuning imediately, but itwill not be saved after powerdown.
You might have to adjust paraemters in the MIDI tab as well. Here youcan define how the tuning is mapped to the synthesizer keys. If you feelyour scale is too low or to high, change these paraemters to adjust that.Increasing the Reference key will move the scale down on the keyboard,decreasing it will move it up.
Finally press OK to save your settings.
To upload the tuning press Send in Scala. You might have to select thecorrect midi output device as well.
8.2.2 Load tunings
To load tunings on the ModyPoly, switch into the config menu and pressthe TUNING key (see config menu). You can now select one of five tuningslots using the lowest 5 keyboard keys. The lowest key will always load12TET, the default tuning. Keys 1-4 load the tunings uploaded into tuningslots 1 - 4. After loading the tuning, exit the config menu.
8.3 Voice spread
HiRes can detune the individual voices of the Polysix in a controlled wayto produce thicker sounds when layering voices, or out-of tune sounds. Thesame principle is used i the Polysix in UNISON mode, only that here thedetuning is fixed.
Detuning amount can be set using midi controller number 27

8.4. PRECISION PITCH BEND 17
8.4 Precision pitch bend
With the HiRes upgrade you can activate an alternative, precision pitchbend mode. It will precisely bend ±1 octave, but has one disadvantagecompared to the ’normal’ pitch bend mode: You can not bend below thelowest note. So when using notes in the lowest octave + pitch bend, youmust keep that in mind.
The mode can be activated by selecting ’HiRes bend’ in the config menu.Press the lowest key (OFF) for normal pitch bend mode, and press the 1key (C#) to turn it on.
9 Config menu
In the config menu various parameters can be adjusted. For some param-eters a value can be selected by using the lower 17 key of the keyboard,others can be selected with a single key press. Figure 1 below shows theparameters and how they are assigned to the keys.
9.1 Enter and exit the config menu
To enter the config menu press the HOLD button until it starts blinking.To exit the config menu press it again.
9.2 Configure Midi Channels
Midi send an receive channels can be configured by pressing ’Midi In’, ’Midiout as-sounds’ and ’Midi out as-played’ key and then selecting the channelwith the lower keys. Midi in channel can be switched to ’omni’, midi outchannels can be turned off.
9.3 Configure arp trigger
The arp trigger source can be selected by pressing the ARP ’Internal’, ’Midinote’,’and midi clock’ keys.

18 9. CONFIG MENU
The midi clock divider for the arp can be adjusted by pressing the ARP’Divider’ key and then selecting the divider with the lower 17 keys. Thetable below shows which key belongs to which divider.
9.4 Configure S/H trigger
The S/H trigger source can be selected by pressing the S/H ’Internal’, ’Midinote’,’and midi clock’ keys.The midi clock divider for the S/H can be adjusted by pressing the S/H’Divider’ key and then selecting the divider with the lower 17 keys. Thetable below shows which key belongs to which divider.
9.5 S/H LFO amount
The S/H LFO amount can be set by pressing the S/H amount key and thenusing the lower 17 keys to set the amount. The OFF key will switch theS/H lfo off.
9.6 Pitch bend calibration
To perform pitch bend calibration set the tune knob to the center position,make sure the pitch bend wheel is at center and then use midi to send midipitch bend messages until the synth is in tune. In the config menu press’pitch bend cal’ to save the current setting as the new pitch bend centerposition.
9.7 Portmento time
Press the ’Porta time’ key, then use the lowest 17 keys to set the portamentotime. The lowest key will turn portamento off, key 1 is minimum, key 16 ismaximum portamento time. Better control can be acheived using midi orthe optional portamento knob.
9.8 Tuning
Press the TUNING key. You can now select one of five tuning slots usingthe lowest 5 keyboard keys. The lowest key will always load 12TET, the
9.9. PITCH BEND MODE 19
default tuning. Keys 1-4 load the tunings uploaded into tuning slots 1 - 4.After loading the tuning, exit the config menu.
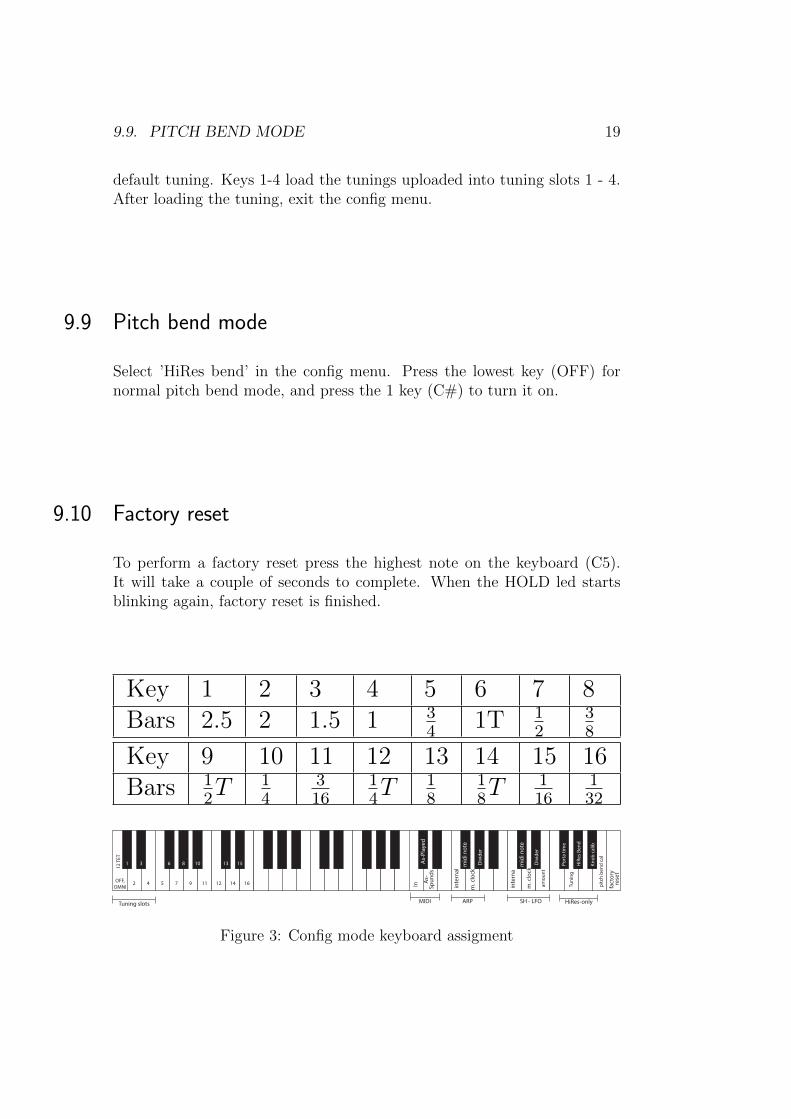
9.9 Pitch bend mode
Select ’HiRes bend’ in the config menu. Press the lowest key (OFF) fornormal pitch bend mode, and press the 1 key (C#) to turn it on.
9.10 Factory reset
To perform a factory reset press the highest note on the keyboard (C5).It will take a couple of seconds to complete. When the HOLD led startsblinking again, factory reset is finished.
Key 1 2 3 4 5 6 7 8Bars 2.5 2 1.5 1 3
41T 1
238
Key 9 10 11 12 13 14 15 16Bars 1
2T 1
4316
14T 1
818T 1
16132
inte
rnal
mid
i not
em
. clo
ck
fact
ory
rese
t
inte
rnal
mid
i not
em
. clo
ck
OFF,OMNI
1
2
3
4 5
6
7
8
9
10
11 12
13
14
15
16 InA
s-Pl
ayed
ARP SH - LFO
As-
Spun
ds
amou
nt
MIDI
Div
ider
Div
ider
pitc
h be
nd c
al
Knob
cal
ib
Tuni
ngPo
rta
time
HiR
es B
end
12 T
ET
HiRes-onlyTuning slots
Figure 3: Config mode keyboard assigment

20 10. TIPS AND TRICKS
10 Tips and tricks
10.1 Transferring a melody to Powerarp
You can transfer a melody from an external sequencer to the Modysix Pow-erap sequencer by going into Powerarp record mode and than sending themelody to the Modysix midi in channel.
10.2 Use of Powerap transpose and Polychord
You can use the combination of Powerarp transpose and Polychord in mul-tiple creative ways. You could for example save the notes C to B in the firstoctave, some minor and major chords in the second and some sept chordsin the third. After recording a Powerarp sequence in the first octave youcan transpose to play either single notes, or chords. You can use the sametrick to ’transpose’ between different melodies.
10.3 Copy a Polychord
If you want to move or copy a chord to a different key in Polychord mode,play it, then press POLY+CHORD to record it again.

21
11 Appendix
11.1 Midi controller chart
note: controller numbers in the chart are in the range of 0-127. If yourmidi controller displays controller numbers as 1-128 you have to add 1 tothe numbers below.
Controller number Usage Range16 Arp clock divider * see table 117 Filter cutoff 0-12718 S/H LFO amount 0-12719 S/H LFO divider 0-127 *see table 121 CV2 (if installed) 0-12722 CV3 (if installed) 0-12723 Triangular lfo frequency coarse 0-12724 Triangular lfo frequency fine 0-12725 Triangular lfo amount 0-12726 Portamento time 0-12727 Detuning / Voice spread amount 0-12764 Sustain off:0-63,on:64-127120 All Sound Off -123 All Notes Off -
Table 3: Midi receive controller numbers chart
11.2 Troubleshooting
11.2.1 Midi in not working
Are you sending on the correct channel? Try all 16 channels or configurethe midi in channel using the config menu.

22 11. APPENDIX
The Modysix excepts midi input in a range of 6 octaves from C0 to C5.Check if you are sending in this range.
11.2.2 Midi loop back problems
If you experience, weired phasing effects, chord memory and arpeggiatornot working as expected or similar problems you are most likely victim ofmidi loop back. A possible cause could be your DAW sending the receivedmidi back to the output or your midi interface having a loop back function.To check if midi loop back is the cause disconnect the midi in (or out)connection and see if the problem disappears.
11.2.3 Midi filter control and S/H LFO not working
This is caused by either not sending the midi controller information on themidi in channel or the filter cable not soldered to the correct location onthe Polysix / Poly-61 board.
Arp stopped working
Check the arp clock source and set it to ’internal’.
11.3 Thanks
go to
Norman HechtStephan Glowatzky
for feature suggestions and beta testingNick Crofts
for proof readingTobias Munzer
who wrote this manualAlexandra Cielas
for everything else
11.4 Config menu keyboard overview

11.4. CONFIG MENU KEYBOARD OVERVIEW 23
internal midi note
m. clock
factory reset
internal midi note
m. clock
OFF,
OM
NI 1
2
3
45
6
7
8
9
10
1112
13
14
15
16
InAs-Played
ARP
SH - LFO
As-Spunds
amount
MID
I
Divider
Divider
pitch bend cal
Knob calib
TuningPorta time
HiRes Bend
12 TET
HiRes-only
Tuning slots
Figure 4: Config menu options on keyboard