tst7600 touch screen with tmr tracker - digi-star … rev b 4 may 2015 tst7600 touch screen with tmr...
TRANSCRIPT

D3989-EN Rev B 4 May 2015
TST7600 Touch Screen with TMR Tracker
OPERATORS MANUAL
Ft. Atkinson, Wisconsin USA
Panningen, The Netherlands
www.Digi-Star.com

2 TST7600 Operators Manual D3989-EN
Table of Contents
1.0 INTRODUCTION ...................................................................................................... 4 2.0 SAFETY DURING USE ............................................................................................ 5 3.0 SPECIFICATION & HARDWARE ............................................................................. 6
3.1 Digi-Star Indicator Setup ........................................................................................ 6 4.0 OVERVIEW OF TOUCH SCREEN ........................................................................... 7 5.0 ICONS BRIEF DESCRIPTION.................................................................................. 9 6.0 HOME SCREEN ICONS ......................................................................................... 13 7.0 USING TST7600 WITH TMR TRACKER ................................................................ 14
7.1 Home Screen ....................................................................................................... 14 7.2 USB Menu ........................................................................................................... 14 7.3 General Weighing ................................................................................................ 15 7.4 General Weighing Screen .................................................................................... 15 7.5 Select Ration (Loads Mode) ................................................................................ 15 7.6 Loading Screen ................................................................................................... 15 7.7 Loading Ingredients ............................................................................................. 16 7.8 Deliver Ration ...................................................................................................... 16 7.9 Select Ration (List Mode)..................................................................................... 17 7.10 Download Data .................................................................................................. 18
8.0 Advanced commands ........................................................................................... 19 8.1 Edit Ration ........................................................................................................... 19 8.2 Resume Ration .................................................................................................... 20 8.3 Weigh-Back Substitution ...................................................................................... 21 8.4 Weigh-Back Entry ................................................................................................ 22 8.5 Dry Matter% Adjustment ...................................................................................... 23
9.0 TST7600 WITH FRONT SCREEN PROGRAMMING ............................................. 24 9.1 Home Screen ....................................................................................................... 24 9.2 Select Front Panel Screen ................................................................................... 24 9.3 Enter Ration......................................................................................................... 26 9.4 Loading Ingredients ............................................................................................. 29 9.5 Deliver Ration ...................................................................................................... 30
10.0 USER SCREEN .................................................................................................... 31 10.1 Add User ID, Name, Password .......................................................................... 31
11.0 Customize User Access ..................................................................................... 33 11.1 User Access Rights ........................................................................................... 33
12.0 Mixer ID SCREEN ................................................................................................ 34 12.1 Add New Mixer ID .............................................................................................. 34 12.2 Delete Mixer ID .................................................................................................. 35 12.3 Edit Mixer ID ...................................................................................................... 36
13.0 Settings ............................................................................................................... 36 13.1 Tab 1 ................................................................................................................. 37 13.2 Tab 2 ................................................................................................................. 38 13.3 Tab 3 ................................................................................................................. 39 13.4 Tab 4 ................................................................................................................. 40 13.5 Tab 5 ................................................................................................................. 41
14.0 USB Menu ............................................................................................................ 42 15.0 Cab Control Key Mapping .................................................................................. 43
15.1 Cab Control Key Mapping .................................................................................. 43 15.2 Genweight ......................................................................................................... 44 15.3 Loading .............................................................................................................. 44 15.4 Selration ............................................................................................................ 44
Table of Contents

D3989-EN TST7600 Operators Manual 3
16.0 UPDATING SYSTEM SOFTWARE ...................................................................... 45 17.0 DEFAULT SETTINGS FOR TOUCH SCREEN ..................................................... 47 18.0 CABLE CONNECTIONS ...................................................................................... 48 19.0 TST RAM MOUNT ................................................................................................ 50 20.0 DECLARATION OF CONFORMITY ..................................................................... 51 21.0 NOTES ................................................................................................................. 52
D3989-EN TST7600 Rev B LAC
All rights reserved. Reproduction of any part of this manual in any form whatsoever without Digi-Star’s express written permission is forbidden. The contents of this manual are subject to change without notice. All efforts have been made to assure the accuracy of the contents of this manual. However, should any errors be detected, Digi-Star would greatly appreciate being informed of them. The above notwithstanding, Digi-Star can assume no responsibility for any errors in this manual or their consequence.
© Copyright! 2015 Digi-Star, Fort Atkinson (U.S.A.).
Table of Contents

4 TST7600 Operators Manual D3989-EN
1.0 INTRODUCTION Thank you for your purchase of a Digi-Star TST7600 scale indicator. Your TST7600 is the culmination of more than 30 years of agricultural weighing engineering and expertise. With proper operation and preventative maintenance the TST7600 will last for many years.
The Digi-Star TST7600 is primarily designed for weighing agricultural animal feed products during the loading and unloading of mobile and stationary feed mixers and feed delivery boxes.
The TST7600 is not for use with applications for which the TST7600 is not intended, or as outlined in this manual.
Use of the TST7600 outside of its intended purposes may result in inaccurate weight measurement or damage to instrument.
Introduction

D3989-EN TST7600 Operators Manual 5
2.0 SAFETY DURING USE
Danger: Indicates an imminently hazardous situation that, if not avoided, could result in death
or very serious injury.
Warning: Indicates a potential hazardous situation that, if not avoided, may result in death or
very serious injury.
Caution: Indicates a potential hazardous situation that, if not avoided, may result in a minor
injury.
NOTE!
Cleaning: Do not use running water, pressure washer or hoses to clean the indicator or touch screen.
Charging Battery: Disconnect all cables from the indicator and touch screen before charging the battery or welding on the machine. If cables are left connected, the indicator, touch screen and connected load cells could be damaged
Safety During Use

6 TST7600 Operators Manual D3989-EN
3.0 SPECIFICATION & HARDWARE Temperature range: -20 to +70 C operating Operating voltage: 10 – 30 Volts DC EMC protection: Complies with 2004/108/EC ISO 14982 ENV protection: Display sealed to IP54 TST7600 ISOCAN 2 Touch Screen—P/N: 409633 Power Cable—P/N: 408479 Serial Extension Cable—P/N: 406834 Cable-TST to ERM---P/N: 409632
3.1 Digi-Star Indicator Setup With the TST7600 touch screen connected to the serial port of the indicator the indicator’s functions are to indicate weight and ingredient names. The indicator will also give the audible and visual alarms when reaching presets. The indicator can be programmed to allow the zeroing of the scale, perform the tare, net/gross, and hold functions. All other functions normally done using the indicator are now done using the TST7600.
The TST7600 touch screen has two modes of operation: 1. The first mode uses TMR Tracker software data that is transferred to the TST7600 by using a
USB drive. 2. The second method uses front panel programming via the TST7600 touch screen to enter data.
See section 7 or 8. The TST7600 touch screen must be connected to the serial /com1-2 port of a Digi-Star late model Scale Indicator or ScaleLink running software version 8.B or newer.
One user and one mixer ID is pre-loaded into the TST7600 so the device is ready for use after adding ration and pen data.
In addition the following settings in the EZ3 or before indicator must be setup as noted:
FEATURE Direct Access Number (DAN)
SETTING
OPSTAT 253 2
Computer in Mode 215 EZ2CMD
Specifications & Hardware

D3989-EN TST7600 Operators Manual 7
4.0 OVERVIEW OF TOUCH SCREEN
1. ON/OFF button located on left side of unit under a round rubber cover. To shut down unit, hold button down for 3-5 seconds.
2. The SD card is located under a rubber flap on the left side of the front of the housing. DO NOT
remove the SD card included with the device. Contact Dig-Star Technical Support before removing card.
3. USB slot under cover
4. Soft Keys- press to select operations displayed on screen.
5. Home Key- press to bring up home screen.
6. Password Key- press to enter system password.
7. Escape Key- press to go back one screen.
8. Soft Key Enter- press for alternate ENTER when button icon is present on the display screen.
1 2 3
Overview of Touch Screen
4
5 6 7
4
8

8 TST7600 Operators Manual D3989-EN
9. Speaker
10. ERM (external radio module) serial cable connection
11. Serial power cable connection
12. RJ45 cable connection
13. Video connections
14. Unit serial number
Overview of Touch Screen
9 10 11
12
13
13
14

D3989-EN TST7600 Operators Manual 9
5.0 ICONS BRIEF DESCRIPTION
User Access – Used to setup access to icons. Four levels available and a custom setting.
Weighback (Refusal) Ingredients - Name that will be loaded in place of ingredients.
Timer – Set Mix time
Pens - List Mode Select
User ID – Create new users from this screen
Weighback (refusal) substitutions – Load weighback as the first ingredient and the selected ingredients will be resized proportionately.
Weighback (Refusal) – Record weighback amounts manually or by loading them into the mixer.
Partial Drop – Unload partial amount of recipe to a pen. (Example; starting weight
5000 lbs. Fed 2500 lbs. to pen 13 in the morning, then select . Then feed the other 2500 lbs. to pen 13 in the afternoon. Dates and time will be recorded on the Touch Screen.)
Icons Description

10 TST7600 Operators Manual D3989-EN
Tare – Gives a temporary zero set point
Net/Gross – Toggles between net mode and gross mode
Mixer ID number – Set Mixer ID to match TMR Tracker or Beef Tracker mixer ID
Change Weight- amount of ingredient to be loaded
USB Transfer
Dry Matter % - Changes ingredient dry matter % for individual ingredients
Rations – Go to select ration screen
Hold – Freezes weight while moving mixer from one location to another
Home Screen
Icons Description

D3989-EN TST7600 Operators Manual 11
Substitute current ingredient with new ingredient
Settings: Load new software, Customize button locations Cab control key mapping, Feeding settings Set-up, Calibration
Zero-press an HOLD for 3 seconds
3 Day History – Access feeding data from previous 3 days
Feeding Number – select feeding number 1 thru 9. Example: 1 would equal morning feeding, 2 would equal afternoon feeding
Enter – Accepts changes and moves to next screen
Cancel – Moves back a screen and cancels selection
Expand to Ration Details – Shows all pens associated with current recipe selected
Skip Up- User can manually move up through ingredients.
Icons Description

12 TST7600 Operators Manual D3989-EN
Skip Down- User can manually move down through ingredients.
Add User- Add new user
Delete User- Delete highlighted user. All users cannot be deleted from Touch Screen. One user must remain on Touch Screen unit by default.
Edit User- Edit users name using key pad.
Edit User’s password- Edit user’s password using number key pad.
Save- Saves data after user makes changes
Update Software- press to update software when USB drive is installed
Record- record weighbacks (refusal).
Icons Description

D3989-EN TST7600 Operators Manual 13
6.0 HOME SCREEN ICONS
1. Users- Setup and manage multiple users
2. User Access- Set security levels for all users
3. Mixer ID- Used to manage multiple mixers
4. Settings- Access setup & calibration settings, software update page, personalize screens and advance batching options.
5. General Weighing- Main page to select
ration, change dry matters, record weigh-backs, feed pens and use general scale options.
6. USB Transfer- Used to transfer data to and from TST and TMR Tracker and transfer information to other TST’s devices.
1 2 3
4 5 6
Home Screen Icons

14 TST7600 Operators Manual D3989-EN
7.0 USING TST7600 WITH TMR TRACKER
7.1 Home Screen Transfer data from TMR Tracker to TST7600
7.2 USB Menu
1. Press key on front of TST7600. See page 7
2. Press 3. Insert USB drive into port under left cover.
See page 7 4. Press Import USB Files
All data from TMR Tracker software is transferred to TST7600.
2
4
TST7600 with TMR Tracker

D3989-EN TST7600 Operators Manual 15
7.3 General Weighing
7.4 General Weighing Screen
7.5 Select Ration (Loads Mode)
7.6 Loading Screen
5. Press NOTE: TMR Tracker software will transfer ration and pen data in one of two types of formats:
Loads Mode- Each load is built by PC software. It assigns pens to rations and builds exact load for pen.
List Mode- PC software sends ration and pen data in two different fields. Operators selects ration to build and pen deliveries.
1. Press. to display rations
See pages 9-12 for description of icons shown on screen.
NOTE: The 6 icons on the left of the display and the two bottom icons on the right of the display are customizable If more icons have been programmed you can access them using the or down arrows.
2. Press on desired ration
3. Press .
A-Pens to be fed B-Weight fed to each pen C-Delivery date/time
1. Opens side tab, selectable from personalize screen.
2. Active Ingredient to load 3. Ration Name
4. Total amount of time when loading and
deliver are complete
5. Current amount loaded in mixer
6. Next ingredient to be loaded
7. 2nd ingredient to be loaded
1
2
3
6 7
45
1
2
3
A B C
TST7600 with TMR Tracker
5

16 TST7600 Operators Manual D3989-EN
7.7 Loading Ingredients
7.8 Deliver Ration
1. Start loading ingredient into mixer. 2. When ingredient is loaded the next
ingredient to load is shown. Continue loading ingredients until all are loaded.
1. When all ingredients are loaded, the indicator will automatically show which pen to deliver to and how much to unload at this pen.
TST7600 with TMR Tracker

D3989-EN TST7600 Operators Manual 17
7.9 Select Ration (List Mode)
1. Press key on front of TST7600. See page 7
2. Press .
3. Press .
1. Press desired ration from list.
2. Press . 3. Follow 7.6 -7.8
1. Alternatively, you can exit the ration and
then press the key to see the list of pens available to be fed for that ration.
1
2
2
3
TST7600 with TMR Tracker

18 TST7600 Operators Manual D3989-EN
7.10 Download Data To copy feeding data from indicator to USB Drive this can then transfer to TMR Tracker
1. Press key on front of TST7600. See page 7
2. Press
3. Press Export USB Files Feeding files are copied to USB drive for use with TMR Tracker software
2
3
Download Data

D3989-EN TST7600 Operators Manual 19
8.0 ADVANCED COMMANDS
8.1 Edit Ration
1. Press key on front of TST7600. See page 7
2. Press
3. Press
4. Press ration to edit
5. Press
6. Press pen to edit 7. Press on “100”, in this example, to edit
number of head in pen 1 8. Press on “3650”, in this example, to edit
weight for pen 1
2
5
6 7 8
Advanced Commands
3
4

20 TST7600 Operators Manual D3989-EN
8.2 Resume Ration
9. Use keypad to change quantity
10. Press
After user has started loading ingredients for ration, the user may cancel out of the ration. When user chooses to return to the ration, user will be prompted to choose to resume or restart ration.
9
10
Advanced Commands

D3989-EN TST7600 Operators Manual 21
8.3 Weigh-Back Substitution
Batch Ingredients- Ingredients substituted for weigh-back
Weighback Ingredients-What you want to call the ingredients for use with TMR Tracker.
1. Press the ration desired on the select ration
screen
2. Press .
3. Select the arrow to move one ingredient. 4. Press 5. Select the arrow to move all ingredients 6. Press 7. Press if you’ve already
loaded & recorded WB for this pen that you are now feeding.
7
Advanced Commands
1 2
3
45
6

22 TST7600 Operators Manual D3989-EN
8.4 Weigh-Back Entry
1. Press on the general weighing screen
2. Individual weights can be entered by
selecting the weight column 3. Press to move through the list. 4. To select multiple pens press on the
pen/group. 5. Press to manually enter weight 6. To record the amount of weigh-back loaded
in the mixer select .
4
5 6
Advanced Commands
1
2
3

D3989-EN TST7600 Operators Manual 23
8.5 Dry Matter% Adjustment
1. Press on the general weighing screen
2. Filters ingredients in alphabetical and
numerical order when selected.
3. Select the ingredient to change and then select the “New Dry Matter %”.
When Dry Matter % is changed, the ingredient will be automatically resized in all the recipes that the ingredient is used. Also TMR Tracker will detect changes to the DM% and the user has an option to save or reject the changes.
3
1
2
Advanced Commands

24 TST7600 Operators Manual D3989-EN
9.0 TST7600 WITH FRONT SCREEN PROGRAMMING
9.1 Home Screen
9.2 Select Front Panel Screen
1. Press key on front of TST7600. See page 7
2. Press
3. Press 5
2
3
TST7600 with Front Programming
D3989-EN TST7600 Operators Manual 25
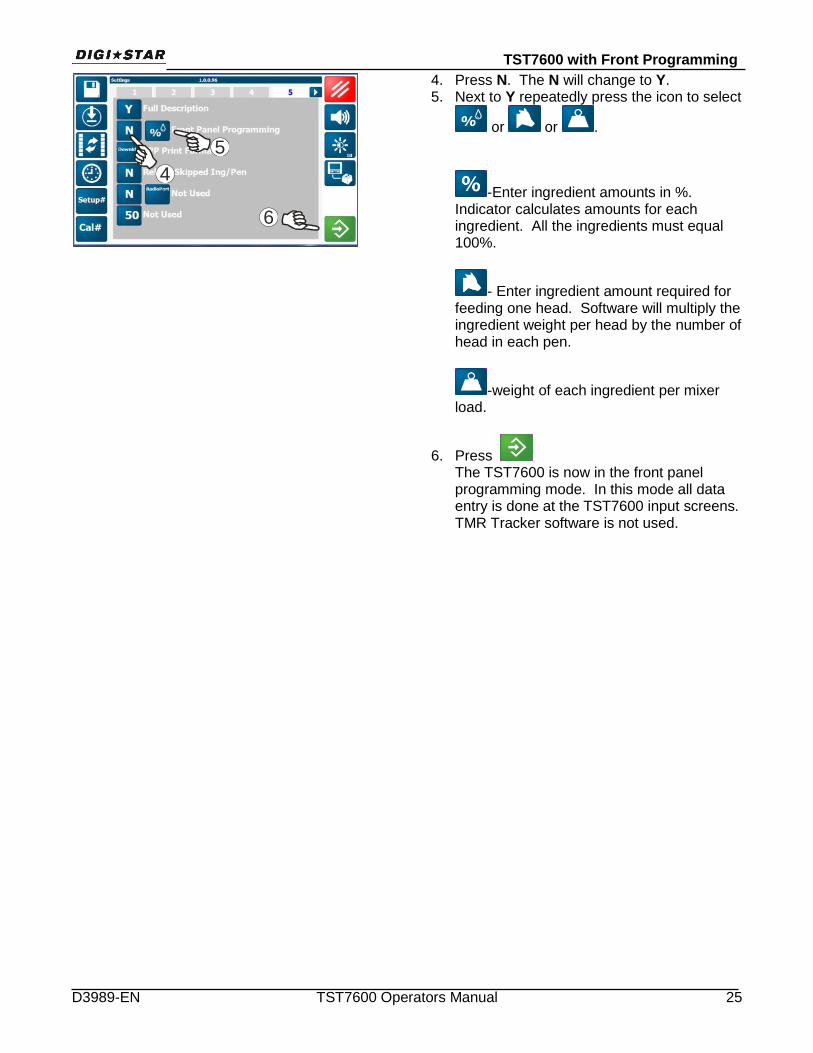
4. Press N. The N will change to Y. 5. Next to Y repeatedly press the icon to select
or or .
-Enter ingredient amounts in %. Indicator calculates amounts for each ingredient. All the ingredients must equal 100%.
- Enter ingredient amount required for feeding one head. Software will multiply the ingredient weight per head by the number of head in each pen.
-weight of each ingredient per mixer load.
6. Press The TST7600 is now in the front panel programming mode. In this mode all data entry is done at the TST7600 input screens. TMR Tracker software is not used.
4
5
6
TST7600 with Front Programming

26 TST7600 Operators Manual D3989-EN
9.3 Enter Ration
1. Press key on front of TST7600. See page 7
2. Press
3. Press
4. Press and HOLD for 3 seconds.
5. Press to start entering ration
2
3
4 Hold in
5
TST7600 with Front Programming

D3989-EN TST7600 Operators Manual 27
6. Using keypad enter ration description
7. Press
8. Press desired ingredient
9. Press to add ingredient to list.
10. Using keypad enter amount for ingredient. The amount entered depends on what basis was selected on page 19
11. Press
Continue to add ingredients until finished with ration.
12. Press
6
7
89
10
11
12
TST7600 with Front Programming

28 TST7600 Operators Manual D3989-EN
13. Press on desired pen for this ration.
14. Press
15. Using keypad enter amount to feed this pen.
16. Press
17. Press
13
14
15
16
17
TST7600 with Front Programming

D3989-EN TST7600 Operators Manual 29
9.4 Loading Ingredients
1. Press key on front of TST7600. See page 7
2. Press
3. Press
4. Press recipe desired
5. Start loading ingredient into mixer. 6. When ingredient is loaded the next
ingredient to load is shown. Continue loading ingredients until all are loaded.
2
3
4
TST7600 with Front Programming

30 TST7600 Operators Manual D3989-EN
9.5 Deliver Ration
1. When all ingredients are loaded, the
indicator will automatically show which pen to deliver to and how much to unload at this pen.
TST7600 with Front Panel Programming
D3989-EN TST7600 Operators Manual 31
10.0 USER SCREEN
10.1 Add User ID, Name, Password
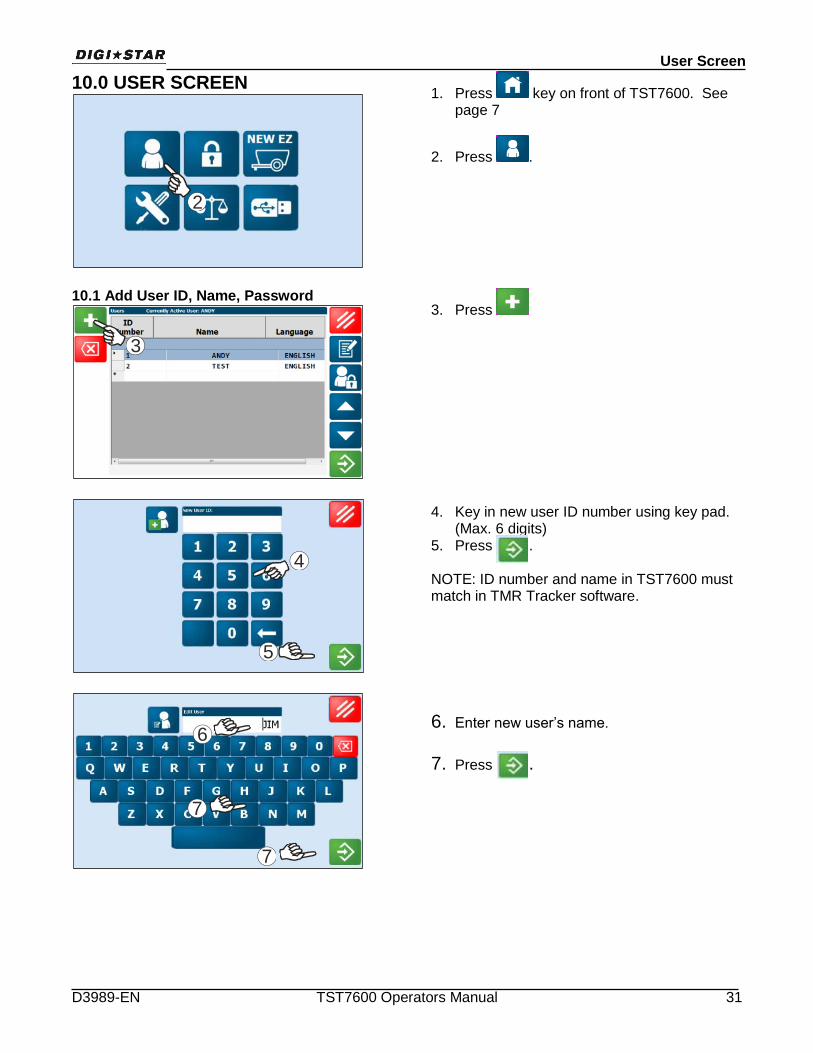
1. Press key on front of TST7600. See page 7
2. Press .
3. Press 4. Key in new user ID number using key pad.
(Max. 6 digits) 5. Press . NOTE: ID number and name in TST7600 must match in TMR Tracker software.
6. Enter new user’s name. 7. Press .
User Screen
2
3
4
5
6
7
7

32 TST7600 Operators Manual D3989-EN
8. Enter user password using number key pad. (Max 15 digits).
9. Press .
10. Select a language from list. 11. Press .
8
9
10
11
User Screen

D3989-EN TST7600 Operators Manual 33
11.0 CUSTOMIZE USER ACCESS
11.1 User Access Rights This screen allows or disallows users to have access to certain features.
1. Press key on front of TST7600. See page 7
2. Press .
NOTE! - Tabs 1-4 are predefined levels of access. Changes cannot be made.
3. Select user’s name 4. Press “CUSTOM” tab. 5. Press on ICONS for features that the user
will not have access too. A red “X” shows. To unselect features press ICON again.
6. Press
7. Press
3
4
5
2
6
7
User Access

34 TST7600 Operators Manual D3989-EN
12.0 MIXER ID SCREEN
12.1 Add New Mixer ID
1. Press key on front of TST7600. See page 7
2. Press .
3. Press to add new mixer ID
4. Use key pad to add new mixer ID. 5. Press
2
3
4
5
Mixer ID
D3989-EN TST7600 Operators Manual 35
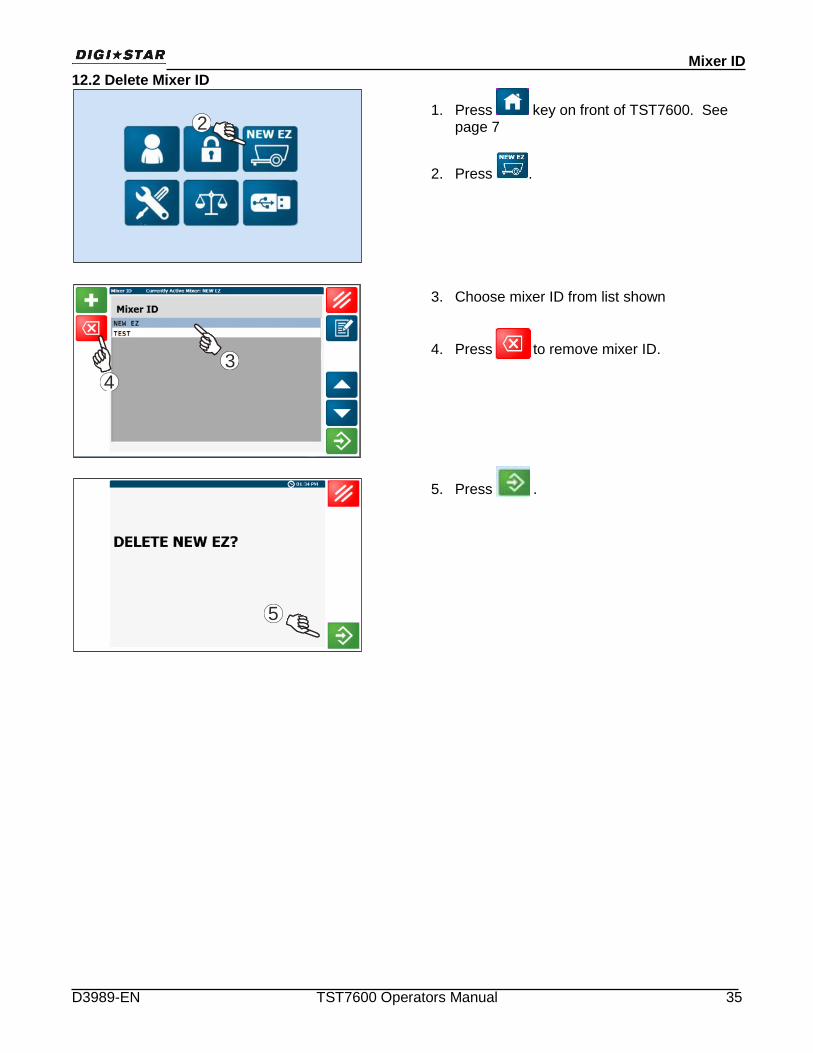
12.2 Delete Mixer ID
1. Press key on front of TST7600. See page 7
2. Press .
3. Choose mixer ID from list shown
4. Press to remove mixer ID.
5. Press .
2
34
5
Mixer ID

36 TST7600 Operators Manual D3989-EN
12.3 Edit Mixer ID
13.0 SETTINGS
1. Press key on front of TST7600. See page 7
2. Press .
3. Choose mixer ID from list shown
4. Press to edit mixer ID.
5. Use keypad to edit ID
6. Press
1. Press key on front of TST7600. See page 7
2. Press .
2
43
5
6
2
Mixer ID

D3989-EN TST7600 Operators Manual 37
13.1 Tab 1
1. Require User Login- When enabled,
requires password to log on to device at start.
2. Advance Delay Seconds- Number of seconds prior to automatically advancing ingredient/pen.
3. Tolerance % to Auto Accept ingredient /Pen- % of Ingredient/Pen that must be met before auto advance (0 is the same as disabled).
4. Tolerance over Lock (for negative weight)- Prevents the scale from auto-advancing if the amount being loaded or unloaded has exceeded the preset tolerance amount and has caused the scale to display “OVER”.
5. Pre-Alarm- Enter a value to activate an early warning that scale is reaching the preset weight. Pre-Alarm can be set by weight or percentage.
6. Re-Use: (Only works with loads mode) When set to enable, "Loads Mode" recipes will remain active in the Touch Screen so they can be “re-used” for additional loads. The information for each load is also stored with a new, individual batch number that is different from the original batch number sent to the indicator. This allows each “re-used” load to be identified by TMR Tracker.
12
3
4
56
Settings

38 TST7600 Operators Manual D3989-EN
13.2 Tab 2
1. Allow Resize- Select Y or N. When enabled, the resize batch/recipe option is available.
2. Auto Start Pens- Select Y or N. When
enabled, will start 1st pen after last ingredient is loaded.
3. Manual Advance Pen to Pen- Force user to
select Enter between pens 4. Mark Ingredient/Pen Started after Weight-
Won’t allow a skip if weight reached 5. Auto put Pen back on list Weight- If not fed
within Weight, puts Pen back on list. 6. Display Ct- Displays the count size
(1,5,10,20,50)
12
3
4
5
6
Settings

D3989-EN TST7600 Operators Manual 39
13.3 Tab 3
1. 1st Ingredient Resize/1+2 Ingredient Resize-
Select N, 1 or +. Will resize the batch based on amount loaded of the first or first and second ingredient. This will keep the ratio of ingredients the same. 1 = 1st Ingredient, + = 1+2 Ingredient resized.
2. Distribute Load- After the Delivery of each
Pen, will distribute the remaining loaded Weight to remaining Pens equally.
3. Small Ingredient Identification- If call Weight
is less than amount; the screen will display the call Weight (and not count down). Ingredients will need to be hand loaded. Enter or advance will need to be pressed after loading ingredients.
4. Zone Filter- Filter by zones – As set up in
TMR Tracker
5. Motion- Select Y or N. When enabled, if weight moves 2 display counts ingredient/Pen won’t advance
6. Batch Numbering- Select either PC or TST
to control the batch number. When P, batch number info set by PC (TMR Tracker) When S, batch number info set by TST7600.
12
3
4
5
6
Settings

40 TST7600 Operators Manual D3989-EN
13.4 Tab 4
1. Ingredient /Pen Display Time- Number of
seconds Ing/Pen name will display before switching to a weight value.
2. Return Original Call Weight- Select Y or N.
The TST will return the original ingredient/pen call weight when using the split load function.
3. Units- Select LB or KG (Setup number
determines how scale reads) 4. Beep for key- Select Y or N. Turn sound off
or on for key pressing. 5. Scale#- Select scale head number, have up
to 24 scale heads connected to system. 6. Radio Test- Select Y or N. If Y, Feedlines
sent from Datalink are marked “done”. (Only for DataLink)
1
2
3
4
5
6
Settings

D3989-EN TST7600 Operators Manual 41
13.5 Tab 5
1. Full Description- Select Y or N. When set to
N the ingredients are shown as the “display name” per TMR Tracker software. When set to Y the ingredients are shown as a “description” per TMR Tracker software.
2. Front Panel Programming- Select Y or N. When set to Y all programming is done using screens of the TST7600. When set to N all data is entered and retrieved by USB drive using TMR Tracker software.
3. FPP Print Format- Select which print format to use.
4. Reload Skipped Ing/Pen- If ingredient or pen is skipped by use of arrow key, the ingredient or pen will be reloaded before completion of the load.
Settings
1
23
4

42 TST7600 Operators Manual D3989-EN
14.0 USB MENU
1. Press key on front of TST7600. See page 7
2. Press . 1. Press to select:
Import USB Files- Imports files from USB stick to Touch Screen
Export USB Files- Exports files to USB stick, and then transfer to TMR Tracker software.
Import from other TS- Overwrites all data and settings in the current Touch Screen device. Upload from USB stick to Touch Screen.
Export from other TS- Download data and settings from Touch Screen to USB stick.
2. Delete Completed- Deletes only completed Rations
3. Delete All- Deletes all Rations and History files.
1
1
1
2 3
1
USB Menu

D3989-EN TST7600 Operators Manual 43
15.0 CAB CONTROL KEY MAPPING
15.1 Cab Control Key Mapping
Screen Column-Screen on TST7600
Function Column- What function on the TST7600
CCKey->Function- Cab Control function
1. Press key on front of TST7600. See page 7
2. Press .
3. Press .
Cab Control Key Mapping- The user has the ability to perform functions from the Digi-Star Cab Control unit when used in conjunction with the TST7600 touch screen.
Example, when pressing the “print” key on the cab control, the “tare” function will be done on the TST7600 touch screen unit.
1. To select the CC Key ->Function, double
touch the red , it will change to a green mark.
2. Press
2
1
2
Cab Control Key Mapping
3

44 TST7600 Operators Manual D3989-EN
15.2 Genweight
15.3 Loading
15.4 Selration
GENWEIGH- Functions for general weighing.
LOADING- Functions for loading.
SELRATION- Functions for selecting rations.
Cab Control Key Mapping

D3989-EN TST7600 Operators Manual 45
16.0 UPDATING SYSTEM SOFTWARE
1. Install USB drive. This screen comes up. 2. Press this will take the user back to the
“HOME” screen.
3. Press .
4. Press .
Updating System Software
2
3
4

46 TST7600 Operators Manual D3989-EN
5. Select “Software Rev” 6. Press
When software update is complete, remove the USB drive.
(Software Updates will not change the user’s settings)
Updating System Software
5
6

D3989-EN TST7600 Operators Manual 47
17.0 DEFAULT SETTINGS FOR TOUCH SCREEN Features Default Setting Options
Required User Login N Yes/No
Advance Delay Seconds 2 0, 1,2,3,4,5,10,15,20,25, 30,35,40,45,50,55,60
Tolerance % to Auto Accept Ingredient/Pen
0.5 0, 0.5,1,2,3,4,5,7,10
Tolerance Over-lock (for Negative Weight)
N Yes/No
Pre-Alarm 100 lbs. lbs. / Off / Percent
Re-Use N Yes/No
Allow Resize Recipe Y No/Yes
Auto Start Pens (after loading)
Y No/Yes
Manual Advance Pen to Pen N No/Yes
Mark Ingredient/Pen Started After Weight
40 0, 10, 20,30,40,50,100,200
Auto put Pen back on list Weight 0 0, 50,100,150,200,250,500
Display Count 10 1, 5,10,20,50
1st Ingredient Resize/1+2 Ingredient Resize
N Yes/No
Distribute Load N Yes/No
Small Ingredient Identification 5 Enter weight using numerical key pad
Zone Filter ALL 1, 2, 3, 4,5, 6,7,8,9,ALL
Motion N Yes/No
Batch Numbering P P / S
Ingredient/Pen Display Time 1 1,2,3,4,5
Return Original Call Weight N Yes/No
Units LB LB/KG
Default Settings

48 TST7600 Operators Manual D3989-EN
18.0 CABLE CONNECTIONS
Pin To 12VDC Power Supply
1 Red +Terminal
2 Black -Terminal
3 Orange Alarm Out
4 Blue Remote Input
Connections

D3989-EN TST7600 Operators Manual 49
Connect to Serial/Com 1-2 connection
Black – Red + Battery power connection (Must be fused)
TST7600
Scale Indicator
J-Box
ERM

50 TST7600 Operators Manual D3989-EN
19.0 TST RAM MOUNT
KEY PART NUMBER DESCRIPTION
409399 RAM Mount kit
1 406981 MOUNT-1.5 RAM W/U-BOLT
2 406947 MOUNT-1.5” RAM X 5.2”(101U-B)
3 403775 SCR-#8x3/4 PHSTS 48-2 SS
Use these screw holes for ram mount
12
3
Fits .5 to 1.5 OD tubing
Ram Mount

D3989-EN TST7600 Operators Manual 51
20.0 DECLARATION OF CONFORMITY
Declaration of Conformity

52 TST7600 Operators Manual D3989-EN
21.0 NOTES
Notes