ts training eng_modeling_170_enu
TRANSCRIPT

Tekla StructuresEngineering
Modeling
Training ManualProduct version 17.0January 2011
© 2011 Tekla Corporation

© 2011 Tekla Corporation and its licensors. All rights reserved.
This Software Manual has been developed for use with the referenced Software. Use of the Software, and use of this Software Manual are governed by a License Agreement. Among other provisions, the License Agreement sets certain warranties for the Software and this Manual, disclaims other warranties, limits recoverable damages, defines permitted uses of the Software, and determines whether you are an authorized user of the Software. All information set forth in this manual is provided with the warranty set forth in the License Agreement. Please refer to the License Agreement for important obligations and applicable limitations and restrictions on your rights. Tekla does not guarantee that the text is free of technical inaccuracies or typographical errors. Tekla reserves the right to make changes and additions to this manual due to changes in the software or otherwise.
In addition, this Software Manual is protected by copyright law and by international treaties. Unauthorized reproduction, display, modification, or distribution of this Manual, or any portion of it, may result in severe civil and criminal penalties, and will be prosecuted to the full extent permitted by law.
Tekla, Tekla Structures, Xcity, Xengineer, Xpipe, Xroad, Xpower, Xsteel, and Xstreet are either registered trademarks or trademarks of Tekla Corporation in the European Union, the United States, and/or other countries. Other product and company names mentioned in this Manual are or may be trademarks of their respective owners. By referring to a third-party product or brand, Tekla does not intend to suggest an affiliation with or endorsement by such third party and disclaims any such affiliation or endorsement, except where otherwise expressly stated.
Portions of this software:
D-Cubed 2D DCM © 2008 Siemens Industry Software Limited. All rights reserved.
EPM toolkit © 1995-2004 EPM Technology a.s., Oslo, Norway. All rights reserved.
XML parser © 1999 The Apache Software Foundation. All rights reserved.
Project Data Control Library © 2006 - 2007 DlhSoft. All rights reserved.
DWGdirect, DGNdirect and OpenDWG Toolkit/Viewkit libraries © 1998-2005 Open Design Alliance. All rights reserved.
FlexNet Copyright © 2010 Flexera Software, Inc. and/or InstallShield Co. Inc. All Rights Reserved. This product contains proprietary and confidential technology, information and creative works owned by Flexera Software, Inc. and/or InstallShield Co. Inc. and their respective licensors, if any. Any use, copying, publication, distribution, display, modification, or transmission of such technology in whole or in part in any form or by any means without the prior express written permission of Flexera Software, Inc. and/or InstallShield Co. Inc. is strictly prohibited. Except where expressly provided by Flexera Software, Inc. and/or InstallShield Co. Inc. in writing, possession of this technology shall not be construed to confer any license or rights under any Flexera Software, Inc. and/or InstallShield Co. Inc. intellectual property rights, whether by estoppel, implication, or otherwise.
The software is protected by U.S. Patent Nos. 7,302,368 and 7,617,076. Also elements of the software described in this Manual may be the subject of pending patent applications in the European Union and/or other countries including U.S. patent applications 2004267695, 2005285881, 20060004841, 20060136398, 20080189084, and 20090189887.

Contents
TEKLA STRUCTURES 17 1
Introduction 1
LESSON 1 3
1 Starting Tekla Structures . . . . . . . . . . . . . . . . . . . . . . . . . . . . . . . . 42 Reference models . . . . . . . . . . . . . . . . . . . . . . . . . . . . . . . . . . . . 4
2.1 Inserting a reference model .................................................................................................................... 4
2.2 Hiding a reference model........................................................................................................................ 5
2.3 Updating a reference model ................................................................................................................... 5
2.4 Detecting changes in reference models ................................................................................................. 6
Example ............................................................................................................................................. 7
2.5 Handling large reference models............................................................................................................ 9
3 Creating a new model . . . . . . . . . . . . . . . . . . . . . . . . . . . . . . . . . 94 Saving a model. . . . . . . . . . . . . . . . . . . . . . . . . . . . . . . . . . . . . . 11
4.1 Saving a model with a different name................................................................................................... 11
5 Opening a model . . . . . . . . . . . . . . . . . . . . . . . . . . . . . . . . . . . . 12
5.1 Model created in a previous version ..................................................................................................... 13
6 Moving around in the view . . . . . . . . . . . . . . . . . . . . . . . . . . . . . 13
6.1 Zooming................................................................................................................................................ 13
6.2 Panning................................................................................................................................................. 14
6.3 Rotating ................................................................................................................................................ 14
7 Views . . . . . . . . . . . . . . . . . . . . . . . . . . . . . . . . . . . . . . . . . . . . . 14
7.1 View properties ..................................................................................................................................... 14
7.2 Display .................................................................................................................................................. 16
7.3 Creating a basic view............................................................................................................................ 17
7.4 Creating a top view ............................................................................................................................... 17
Moving a plane in a top view............................................................................................................ 18
7.5 Creating a grid view using two points ................................................................................................... 18
7.6 Creating a view using three points........................................................................................................ 19
7.7 Opening, closing, and deleting named views ....................................................................................... 21
7.8 Changing part representation in model views....................................................................................... 21

TEKLA STRUCTURES 17 2
Rollover highlight .............................................................................................................................. 22
8 Common buttons . . . . . . . . . . . . . . . . . . . . . . . . . . . . . . . . . . . . 23
LESSON 2 25
9 Grids . . . . . . . . . . . . . . . . . . . . . . . . . . . . . . . . . . . . . . . . . . . . . . .26
9.1 Creating a grid ....................................................................................................................................... 26
9.2 Creating a second grid .......................................................................................................................... 27
9.3 Creating a grid on a shifted work plane ................................................................................................. 28
9.4 Adding a grid line to an existing grid...................................................................................................... 28
9.5 Modifying a grid line............................................................................................................................... 29
10 Work area . . . . . . . . . . . . . . . . . . . . . . . . . . . . . . . . . . . . . . . . . . 2911 Creating plane views along grid lines . . . . . . . . . . . . . . . . . . . . . 30
LESSON 3 33
12 Steel parts. . . . . . . . . . . . . . . . . . . . . . . . . . . . . . . . . . . . . . . . . . .34
12.1 Creating a steel column......................................................................................................................... 34
12.2 Creating a steel beam ........................................................................................................................... 34
12.3 Creating a curved steel beam................................................................................................................ 35
12.4 Creating a steel polybeam..................................................................................................................... 35
12.5 Creating an orthogonal steel beam ....................................................................................................... 36
12.6 Creating a steel twin profile ................................................................................................................... 36
12.7 Creating a steel contour plate................................................................................................................ 36
Setting the contour plate orientation ................................................................................................. 37
Adding a corner to a contour plate.................................................................................................... 38
Removing a corner from a contour plate........................................................................................... 39
13 Snapping. . . . . . . . . . . . . . . . . . . . . . . . . . . . . . . . . . . . . . . . . . . 40
13.1 Snap switches ....................................................................................................................................... 40
13.2 Dimensions in snapping ........................................................................................................................ 42
13.3 Orthogonal snapping ............................................................................................................................. 43
13.4 Measuring distances, angles, and bolt spaces...................................................................................... 43
14 Mini Toolbar . . . . . . . . . . . . . . . . . . . . . . . . . . . . . . . . . . . . . . . . 43
14.1 Mini Toolbar examples .......................................................................................................................... 44
14.2 Customizing Mini Toolbar ...................................................................................................................... 46
15 Part properties . . . . . . . . . . . . . . . . . . . . . . . . . . . . . . . . . . . . . . 47
15.1 Attributes tab ......................................................................................................................................... 47
15.2 Position tab............................................................................................................................................ 48

3 TEKLA STRUCTURES 17
15.3 Modifying part properties....................................................................................................................... 49
16 Selecting multiple objects . . . . . . . . . . . . . . . . . . . . . . . . . . . . . . 50
16.1 Hiding selected parts............................................................................................................................. 51
16.2 Hiding unselected parts......................................................................................................................... 51
17 Part modifications . . . . . . . . . . . . . . . . . . . . . . . . . . . . . . . . . . . . 52
17.1 Moving start and end points .................................................................................................................. 53
Extending and shortening parts........................................................................................................ 54
17.2 Creating curved parts............................................................................................................................ 55
18 Corner chamfers . . . . . . . . . . . . . . . . . . . . . . . . . . . . . . . . . . . . . 56
18.1 Chamfering example ............................................................................................................................. 57
19 Selection switches . . . . . . . . . . . . . . . . . . . . . . . . . . . . . . . . . . . . 58
19.1 Selection filters...................................................................................................................................... 60
Selection filter example .................................................................................................................... 60
19.2 Selection examples ............................................................................................................................... 61
20 Concrete parts . . . . . . . . . . . . . . . . . . . . . . . . . . . . . . . . . . . . . . . 63
20.1 Creating a concrete column .................................................................................................................. 63
20.2 Creating a concrete beam..................................................................................................................... 64
20.3 Creating a concrete pad footing ............................................................................................................ 64
20.4 Creating a concrete strip footing ........................................................................................................... 64
20.5 Creating a concrete panel ..................................................................................................................... 65
20.6 Creating a concrete slab ....................................................................................................................... 65
20.7 Creating a concrete polybeam .............................................................................................................. 65
LESSON 4 67
21 Copying and moving . . . . . . . . . . . . . . . . . . . . . . . . . . . . . . . . . . 68
21.1 Copying................................................................................................................................................. 69
21.2 Copying linearly..................................................................................................................................... 69
21.3 Copying and rotating ............................................................................................................................. 70
21.4 Copying and mirroring........................................................................................................................... 71
Mirroring an asymmetrical column ................................................................................................... 72
21.5 Copying to another plane...................................................................................................................... 72
21.6 Copying to another object ..................................................................................................................... 73
21.7 Copying from another model................................................................................................................. 74
21.8 Moving................................................................................................................................................... 74
21.9 Moving linearly ...................................................................................................................................... 75

TEKLA STRUCTURES 17 4
21.10 Moving and rotating ............................................................................................................................... 75
21.11 Moving and mirroring............................................................................................................................. 76
21.12 Moving to another plane ........................................................................................................................ 76
21.13 Moving to another object ....................................................................................................................... 77
22 Fine-tuning part shape . . . . . . . . . . . . . . . . . . . . . . . . . . . . . . . . 77
22.1 Fittings ................................................................................................................................................... 77
Creating a fitting................................................................................................................................ 77
22.2 Cutting parts with a line ......................................................................................................................... 78
22.3 Cutting parts with another part .............................................................................................................. 79
Errors in part cuts.............................................................................................................................. 79
22.4 Cutting parts with a polygon .................................................................................................................. 80
22.5 Surface treatment .................................................................................................................................. 81
Adding surface treatment to a selected area .................................................................................... 81
23 Bolts . . . . . . . . . . . . . . . . . . . . . . . . . . . . . . . . . . . . . . . . . . . . . . 81
23.1 Bolt properties ....................................................................................................................................... 82
Holes................................................................................................................................................. 84
23.2 Creating a bolt group ............................................................................................................................. 85
23.3 Creating a divided bolt group................................................................................................................. 86
23.4 Modifying bolt groups ............................................................................................................................ 87
23.5 Creating slotted holes............................................................................................................................ 87
24 Splitting and combining parts . . . . . . . . . . . . . . . . . . . . . . . . . . . 88
24.1 Splitting parts......................................................................................................................................... 88
24.2 Combining parts .................................................................................................................................... 89
25 Points . . . . . . . . . . . . . . . . . . . . . . . . . . . . . . . . . . . . . . . . . . . . . 90
25.1 Creating points along a line ................................................................................................................... 90
LESSON 5 91
26 Modifying the work area . . . . . . . . . . . . . . . . . . . . . . . . . . . . . . . .92
26.1 Fit work area to selected parts .............................................................................................................. 92
26.2 Fit work area using two points ............................................................................................................... 92
26.3 Fit work area to entire model in selected views..................................................................................... 93
26.4 Finding distant objects........................................................................................................................... 93
26.5 Finding distant points............................................................................................................................. 94
26.6 Finding distant reference models .......................................................................................................... 94
26.7 Hiding the work area.............................................................................................................................. 95
27 Clip planes . . . . . . . . . . . . . . . . . . . . . . . . . . . . . . . . . . . . . . . . . 95

5 TEKLA STRUCTURES 17
27.1 Creating a clip plane ............................................................................................................................. 95
27.2 Moving a clip plane ............................................................................................................................... 96
27.3 Deleting a clip plane.............................................................................................................................. 97
28 Work plane . . . . . . . . . . . . . . . . . . . . . . . . . . . . . . . . . . . . . . . . . 98
28.1 Set work plane parallel to a plane......................................................................................................... 98
28.2 Set work plane using three points ......................................................................................................... 99
28.3 Set work plane parallel to view plane.................................................................................................... 99
28.4 Set work plane to top plane of a part .................................................................................................... 99
28.5 Shifting the work plane........................................................................................................................ 100
29 Advanced snapping . . . . . . . . . . . . . . . . . . . . . . . . . . . . . . . . . . 100
29.1 Numeric snapping ............................................................................................................................... 100
29.2 Numeric location coordinates.............................................................................................................. 101
29.3 Creating a temporary reference point ................................................................................................. 101
29.4 Locking a coordinate ........................................................................................................................... 102
29.5 Snapping examples............................................................................................................................. 103
Creating a beam with a certain length............................................................................................ 103
Creating a shifted beam with a certain length ................................................................................ 104
Creating two parallel and equally long beams................................................................................ 105
Creating a beam using a temporary reference point ...................................................................... 107
Creating a beam using snap override ............................................................................................ 108
LESSON 6 111
30 Component catalog . . . . . . . . . . . . . . . . . . . . . . . . . . . . . . . . . . 11231 Components . . . . . . . . . . . . . . . . . . . . . . . . . . . . . . . . . . . . . . . 113
31.1 Creating a component......................................................................................................................... 114
31.2 Component status ............................................................................................................................... 114
31.3 Modifying component properties ......................................................................................................... 114
31.4 Saving component properties ............................................................................................................. 115
31.5 Conceptual components ..................................................................................................................... 115
Converting a conceptual component to a detailed component ...................................................... 115
31.6 Example .............................................................................................................................................. 116
Creating a base plate detail............................................................................................................ 116
Modifying the base plate detail ....................................................................................................... 116
32 Creating component default views . . . . . . . . . . . . . . . . . . . . . . 11733 Material catalog . . . . . . . . . . . . . . . . . . . . . . . . . . . . . . . . . . . . . 118
33.1 Adding a material grade...................................................................................................................... 119
33.2 Deleting a material grade.................................................................................................................... 120

TEKLA STRUCTURES 17 6
34 Profile catalog . . . . . . . . . . . . . . . . . . . . . . . . . . . . . . . . . . . . . . 120
34.1 Adding a profile.................................................................................................................................... 122
34.2 Modifying a profile ............................................................................................................................... 122
34.3 Deleting a profile.................................................................................................................................. 122
35 Parametric profiles . . . . . . . . . . . . . . . . . . . . . . . . . . . . . . . . . . 123
LESSON 7 125
36 Entering project information . . . . . . . . . . . . . . . . . . . . . . . . . . . .12637 Switching between single-user and multi-user modes . . . . . . . 12738 Checking the model . . . . . . . . . . . . . . . . . . . . . . . . . . . . . . . . . 127
38.1 Finding clashes in a model .................................................................................................................. 128
38.2 Flying through the model ..................................................................................................................... 129
38.3 Checking using reports........................................................................................................................ 129
39 Inquiring the model . . . . . . . . . . . . . . . . . . . . . . . . . . . . . . . . . . 130
39.1 Inquiring object properties ................................................................................................................... 130
Inquiring bolts.................................................................................................................................. 131
39.2 Inquiring the center of gravity .............................................................................................................. 131
40 Representing objects in model views . . . . . . . . . . . . . . . . . . . . 131
40.1 Creating object representation settings ............................................................................................... 132
40.2 Defining your own colors to model object groups................................................................................ 133
41 Phase Manager . . . . . . . . . . . . . . . . . . . . . . . . . . . . . . . . . . . . 135
41.1 Dividing the model into phases............................................................................................................ 136
LESSON 8 139
42 Custom components. . . . . . . . . . . . . . . . . . . . . . . . . . . . . . . . . .140
42.1 Custom component types.................................................................................................................... 140
42.2 Exploding a component ....................................................................................................................... 141
42.3 Defining a custom component ............................................................................................................. 141
42.4 Exporting and importing....................................................................................................................... 142
43 Recording a macro . . . . . . . . . . . . . . . . . . . . . . . . . . . . . . . . . . 142
43.1 Running a macro ................................................................................................................................. 143
43.2 Editing a macro.................................................................................................................................... 143
44 WebViewer . . . . . . . . . . . . . . . . . . . . . . . . . . . . . . . . . . . . . . . . 143
44.1 Publishing a model as a web page...................................................................................................... 144
45 Tekla Structures Model Reviewer. . . . . . . . . . . . . . . . . . . . . . . 145

7 TEKLA STRUCTURES 17
45.1 Opening a model in Model Reviewer .................................................................................................. 145
LESSON 9 147
46 Reinforcements . . . . . . . . . . . . . . . . . . . . . . . . . . . . . . . . . . . . . 148
46.1 Reinforcing bar group.......................................................................................................................... 148
Reinforcing bar group types ........................................................................................................... 148
Creating a reinforcing bar group..................................................................................................... 149
Distribution area ............................................................................................................................. 149
Distribution of bars ......................................................................................................................... 150
Omitting reinforcing bars ................................................................................................................ 152
46.2 Reinforcing bar.................................................................................................................................... 152
Creating a reinforcing bar ............................................................................................................... 152
Defining a hook for a reinforcing bar .............................................................................................. 154
Defining the reinforcing bar cover thickness .................................................................................. 155
Modifying reinforcing bars .............................................................................................................. 156
46.3 Curved reinforcing bar group .............................................................................................................. 157
46.4 Creating a circular reinforcing bar group............................................................................................. 158
46.5 Creating a reinforcement mesh........................................................................................................... 159
46.6 Creating a reinforcement strand pattern ............................................................................................. 160
46.7 Reinforcement strand example ........................................................................................................... 162
Creating a point array..................................................................................................................... 162
Creating a reinforcement strand for a beam................................................................................... 163
46.8 Creating a reinforcement splice .......................................................................................................... 165
46.9 Attaching reinforcing bars to another part ........................................................................................... 166
47 Custom reinforcement component example . . . . . . . . . . . . . . . 167
47.1 Creating a reinforcement for a column................................................................................................ 167
47.2 Defining a custom reinforcement component...................................................................................... 171
48 Reinforcement tips. . . . . . . . . . . . . . . . . . . . . . . . . . . . . . . . . . . 17249 Reinforcement components. . . . . . . . . . . . . . . . . . . . . . . . . . . . 173
49.1 Adding a reinforcement component .................................................................................................... 173
49.2 Reinforcement component examples.................................................................................................. 173
50 Windbracing. . . . . . . . . . . . . . . . . . . . . . . . . . . . . . . . . . . . . . . . 178
50.1 Windbracing in a front plane ............................................................................................................... 178
50.2 Windbracing in a straight roof plane.................................................................................................... 179
50.3 Windbracing in a sloping roof plane.................................................................................................... 180
Moving the work plane parallel to the roof plane ........................................................................... 181
Creating a view parallel to the sloping roof plane........................................................................... 181

TEKLA STRUCTURES 17 8
Creating a windbracing using the roof plane view .......................................................................... 181
Creating a windbracing without using the roof plane view .............................................................. 182
50.4 Shortening a windbracing .................................................................................................................... 182
Checking a windbracing.................................................................................................................. 184
50.5 Shortening examples........................................................................................................................... 184
50.6 Windbracing examples ........................................................................................................................ 185
LESSON 10 187
51 Component examples. . . . . . . . . . . . . . . . . . . . . . . . . . . . . . . . .188
51.1 Steel components................................................................................................................................ 188
End plate (144) ............................................................................................................................... 188
Two-sided end plate (142) .............................................................................................................. 189
Stiffened end plate (27)................................................................................................................... 189
Partial stiff end plate (65) ................................................................................................................ 190
Bolted gusset (11)........................................................................................................................... 190
Central gusset (169) ....................................................................................................................... 191
Seating (39) .................................................................................................................................... 192
Cranked beam (41) ......................................................................................................................... 192
Haunch (40) .................................................................................................................................... 193
Joining plates (14)........................................................................................................................... 193
Stub (28) ......................................................................................................................................... 193
Base plate (1004)............................................................................................................................ 194
Stiffened base plate (1014)............................................................................................................. 194
Stiffeners (1003) ............................................................................................................................. 195
Stub (1011) ..................................................................................................................................... 195
End plate detail (1002).................................................................................................................... 196
Stanchion weld (85) ........................................................................................................................ 196
Round tube (23) .............................................................................................................................. 196
Manlock column (1032)................................................................................................................... 197
Manlock beam (1033) ..................................................................................................................... 197
Array of objects (29)........................................................................................................................ 197
LESSON 11 201
52 Using Tekla Structures Help . . . . . . . . . . . . . . . . . . . . . . . . . . . .202
52.1 Opening Tekla Structures Help ........................................................................................................... 202
52.2 Browsing Help topics by subject.......................................................................................................... 202
52.3 Finding Help topics using the index..................................................................................................... 203
52.4 Searching for Help topics .................................................................................................................... 203
Viewing the search results .............................................................................................................. 203
Using search filters ......................................................................................................................... 204

9 TEKLA STRUCTURES 17
52.5 Saving favorite Help topics.................................................................................................................. 204

10 TEKLA STRUCTURES 17

TEKLA STRUCTURES 17 1
IntroductionTekla Structures is Building Information Modeling (BIM) software that enables the creation and management of accurately detailed and highly constructable 3D structural models regardless of material or structural complexity. Tekla models can be used to cover the entire building process from conceptual design to fabrication, erection, and construction management.
The 3D structural model includes the geometry and design of the structure, and all the information about profiles and cross sections, connection types, materials, structural analysis, etc. Tekla Structures drawings and reports are integrated with the models. Consequently, dimensions and marks are always correct. Drawings and reports can be created at any stage of the project and updated according to the changes in the model.
Tekla helps all new Tekla Structures users to get started and to maintain their development. Our well-defined training course is a jump start to Tekla Structures software and helps to maximize using Tekla Structures to its full potential. During the basic training course, you will be taught the basic principles of Tekla Structures. Each training day contains several exercises so you will learn to apply what you have learned in theory. The instructor will show the correct solution to each exercise. You can freely ask the the instructor questions to make sure you have understood each point correctly.
This training manual is intended to be used during a basic Tekla Structures training course, but you can also use it on your own after the training course. In addition, Tekla provides online learning material so the users can learn how to benefit from version improvements and adapt to using the new features.
The following learning and support material is available on the Tekla Extranet (https://extranet.tekla.com) for all our customers with a valid maintenance agreement. When the material is available also in the Tekla Structures software via the help menu, it is separately indicated.
Type Material Language Location
Training manuals Steel Detailing, Modeling
English, French, German, Dutch, Italian, Spanish, Russian, Japanese, Chinese
Extranet:
Self-learning > Manuals & instructionsSteel Detailing,
Drawings
Precast Concrete Detailing, Modeling
Precast Concrete Detailing, Drawings
Engineering, Modeling
Engineering, Drawings
Construction Management
Cast-in-place Concrete Detailing, Modeling
Cast-in-place Concrete Detailing, Drawings

2 TEKLA STRUCTURES 17
Product documentation
Help file English, French, German, Dutch, Italian, Spanish, Russian, Japanese, Chinese
Help > Tekla Structures Help
Manuals in PDF format
Extranet:
Self-learning > Manuals & instructions
Release Notes Help > Release Notes
Quick reference guide to Tekla Structures
Extranet:
Self-learning > Manuals & instructions
Keyboard shortcuts Extranet:
Self-learning > Manuals & instructions
Videos and tutorials
First Steps with Tekla Structures - Interactive Tutorial
English, Finnish, Swedish, German, Dutch, French, Spanish, Italian, Russian, Japanese, Chinese
Help > Learning Center > First Steps with Tekla Structures
Extranet:
Self-learning > Interactive tutorials & videos
http://www.tekla.com/firststeps
Top New Features Videos
English, German, Dutch, French, Spanish, Italian, Russian, Japanese, Chinese
Help > Learning Center > Top New Features
Extranet:
Self-learning > Interactive tutorials & videos
http://www.tekla.com/topnewfeatures
First steps with BIM - interactive tutorials
English http://www.tekla.com/bimlessons
More videos and tutorials
English Extranet:
Self-learning > Interactive tutorials & videos
Other support material
Frequently Asked Questions
English Extranet:
Self-learning > Questions & answers
Tekla Structures Glossary
Extranet:
Self-learning > Tekla Structures Glossary
Start-up checklist Extranet:
Self-learning > Start-up checklist
Discussion Forum Extranet:
Discussion Forum
Product Information English, French, German, Japanese, Chinese
Extranet:
Product
Type Material Language Location

>
TEKLA STRUCTURES 17 3
LE
SS
ON
1
LESSON 1In this lesson, you will learn the following things:
• how to start Tekla Structures
• how to use reference models
• how to create, open, and save a model
• how to move around in the model
• what views are and how they are created
• how to use the common buttons in the dialog boxes

4 TEKLA STRUCTURES 17
LE
SS
ON
1 R
efer
ence
mod
els
1 Starting Tekla Structures
To start Tekla Structures:
1. Click the Windows Start button.2. Click All Programs.3. Go to the Tekla Structures 17.0 menu item and click Tekla Structures 17.0.
The Tekla Structures - Login dialog box opens.
4. In the dialog box, select the license, role and environment you want to use.5. Click OK to start Tekla Structures.
2 Reference models
A reference model is a file which helps you to build a Tekla Structures model. A reference model is created in Tekla Structures or another software or modeling tool and imported to Tekla Structures.
For example, an architectural model, a plant design model, or a heating, ventilating and air-conditioning (HVAC) model can be used as a reference model. Reference models can also be simple 2D drawings that are imported and then used as a layout to directly build the model on.
The following file types are supported:
• AutoCAD (*.dxf)
• AutoCAD (*.dwg)
• MicroStation (*.dgn, *.prp)
• Cadmatic models (*.3dd)
• IFC files (*.IFC)
• IGES files (*.igs, *.iges)
• STEP files (*.stp, *.STEP)
• Tekla WebViewer XML files (*.xml)
You can snap to reference model geometry. Tekla Structures loads the reference model from the file each time you open your model. It does not save the reference model when you save the current model. The filename extension of a saved reference model properties file is *.rop.
2.1 Inserting a reference modelTo insert a reference model in a Tekla Structures model:
1. Click File > Insert Reference Model..., or click .The Reference Model Properties dialog box opens.

LE
SS
ON
1 R
efer
ence
mod
els
TEKLA STRUCTURES 17 5
2. Click Browse... next to the File name box to browse for the reference model file.3. Set the scale of the reference model, if it is different from the one in the Tekla Structures
(for example, if it uses different measurement units).
4. Click OK.5. Pick the position for the reference model origin.
Tekla Structures inserts the reference model.
2.2 Hiding a reference modelTo hide a reference model:
1. Click File > Reference Model List... to open the Reference Models dialog box.2. Select a reference model from the list.3. Select Hidden from the Visibility list box.
2.3 Updating a reference modelYou can update the reference models in your Tekla Structures model if there have been changes in the original reference models after you have imported them to Tekla Structures.
To update a reference model:
Set the scale for a DWG or a DXF file already in AutoCAD. When you define the measurement unit for a DWG or a DXF file and save the file in AutoCAD, the unit is recognized in Tekla Structures and the reference model is scaled correctly.

6 TEKLA STRUCTURES 17
LE
SS
ON
1 R
efer
ence
mod
els
1. Double-click a reference model.2. In the Reference Model Properties dialog box, browse for the modified file by clicking
the Browse... button next to the File name field.
3. In the Import dialog box, select the updated file and click OK.4. Click Modify.
2.4 Detecting changes in reference modelsReference models are often updated, but the changes are rarely documented. You can see the changes between an old and new reference model by using commands in the Reference Object Properties dialog box. You can detect changes in reference models that are of the following file formats:
• IFC (.ifc)
• Cadmatic (.3dd)
• WebViewer (.xml)
You can also update all the reference models in one go.
To update all reference models:
1. Click File > Reference Model List... to open the Reference Models dialog box.
2. Click Reload All.
Tekla Structures goes through all the reference models and regenerates the reference models that have a newer modified date than the one already in the cache.
However, this is not the recommended way to update reference models since it is time-consuming and affects the system performance.

LE
SS
ON
1 R
efer
ence
mod
els
TEKLA STRUCTURES 17 7
• DWG (.dwg)
To detect changes in a reference model:
1. Select the reference model and double-click it to display the Reference Object Properties dialog box.
2. Browse for the name of the old file by clicking the Browse... button next to the Old file name box.
3. Select an option in the Show list in the Change detection section. For example, select Changed to see the changed objects in a reference model.
4. Click Display....Tekla Structures highlights the changed reference model objects.
Example
The following example shows how the changes are displayed in the reference model:
The old file:

8 TEKLA STRUCTURES 17
LE
SS
ON
1 R
efer
ence
mod
els
The new file:
The Show option has been set to Changed in the Reference Object Properties dialog box:

LE
SS
ON
1 C
reat
ing
a n
ew m
ode
l
TEKLA STRUCTURES 17 9
2.5 Handling large reference modelsThese are some tips for speeding up large reference models:
• Large, highly-detailed reference models contain lots of snap points. To speed up snapping, activate only the snap switches you need.
• Split large reference models into smaller ones and display only the parts you need in the model.
3 Creating a new model
When Tekla Structures starts, the Learn Tekla Structures dialog box opens. The dialog box contains useful links to, for example, tutorials and quick guides.
To create a new model:
1. Click Create a new model in the Learn Tekla Structures dialog box, or click File > New....The New dialog box opens.

10 TEKLA STRUCTURES 17
LE
SS
ON
1 C
reat
ing
a n
ew m
ode
l
2. Enter the name of the model in the Model name box.
3. Define the folder where you want to save your model.By default, Tekla Structures saves the models in the ..\TeklaStructuresModels folder. If you want to save the model in another folder, click Browse... to browse for the model folder.
4. In the Model type list, select either Single-user or Multi-user.If you select Multi-user, enter the server name.
5. Click OK.Tekla Structures creates a 3D view using standard view properties.
Do not use special characters ( / \ . ; : | ) in model names.

LE
SS
ON
1 S
avin
g a
mod
el
TEKLA STRUCTURES 17 11
4 Saving a model
Tekla Structures prompts you to save the open model when you close Tekla Structures. You should also save your model regularly to avoid losing any work. Autosave also automatically saves your work at regular intervals.
To save the model, click File > Save, or click . Tekla Structures saves the model and the message database stored appears on the status bar.
4.1 Saving a model with a different nameTo save a copy of a model with a different name:
1. Click File > Save as... to open the Save as dialog box.2. Enter the new model name in the Model name box.
Autosave automatically saves your model and drawings at set intervals. To set the autosave interval, click Tools > Options > Options... > General.

12 TEKLA STRUCTURES 17
LE
SS
ON
1 O
peni
ng a
mod
el
3. If you want to save the model in a different folder, click Browse... to browse for the folder.
4. In the Save as dialog box, click OK to save the model.
5 Opening a model
To open a model:
1. Click File > Open..., or click .The Open dialog box opens.
2. Select the model.By default, Tekla Structures searches for models in the ..\TeklaStructuresModels folder. If your model is in another folder, click Browse... to browse for the model folder, or use the Look in list with the recently used folders.
3. Click OK to open the model.
The information in the Designer and Description columns comes from the Project Properties dialog box.
The Model name list contains the recently used models.

LE
SS
ON
1 M
ovin
g ar
ound
in th
e vi
ew
TEKLA STRUCTURES 17 13
5.1 Model created in a previous versionTekla Structures displays a warning when you open a model that was created in a previous Tekla Structures version.
You can open the model by clicking OK.
If you edit the model and want to save it, the following warning appears:
You have two options:
• If you click Yes, the model is saved and it cannot be opened with the previous Tekla Structures version anymore.
• If you click No, the model is not saved. You can open and edit the model with the Tekla Structures version in which the model was initially created.
6 Moving around in the view
There are several tools you can use to change what you see in a view. This topic introduces some of them.
6.1 ZoomingThe zoom tools allow you to focus in on a particular area, or pull out for a wider view.
We recommend that you complete any models you have started using your current Tekla Structures version. Custom components and drawings created in an older version may not work properly in the new Tekla Structures version.

14 TEKLA STRUCTURES 17
LE
SS
ON
1 V
iew
s
Use the mouse wheel to zoom in and out in the model: scroll forward to zoom in, scroll backward to zoom out.
You can also zoom by clicking View > Zoom and selecting an option.
6.2 PanningTo pan, hold down the middle mouse button. When the pointer changes to a hand symbol, click and drag the model to move it anywhere in the view window.
To activate or disable the middle button pan, click Tools > Options > Middle Button Pan, or Shift + M. There is a checkmark next to the menu option when the middle button pan is active.
6.3 RotatingTo rotate the model:
1. To set the center of rotation, press the V key.2. Pick the center of rotation.3. Hold down the Ctrl key and drag with the middle mouse button to rotate the model.
7 Views
A view is a representation of a model from a specific location. Each view is displayed in its own window in the Tekla Structures. There are several types of views. For example, you can create views
• of the entire model
• of selected parts and components
• of selected assemblies and cast units
• along grid lines.
7.1 View propertiesTo define the view properties, click View > View Properties.... The View Properties dialog box opens.

LE
SS
ON
1 V
iew
s
TEKLA STRUCTURES 17 15
The View Properties dialog box contains the following options:
Option Description
Name Name of the view. You should give a view a unique name if you need to open it in later sessions. When you exit the model, Tekla Structures only saves named views.
Angle Switch between the 3D and Plane angle.
Projection Switch between the Orthogonal and Perspective projection. The options are available only in the rendered view type.
Rotation around Z Rotation angle around the z axis.
Rotation around X Rotation angle around the x axis.
View type View type defines the appearance of the view. The view type options are Rendered and Wire frame.
Color and transparency in all views
Color and transparency settings that are applied to object groups in all views.
View depth: Up View depth upwards from the view plane. The objects within the displayed depth and the work area are visible in the model
View depth: Down View depth downwards from the view plane. The objects within the displayed depth and the work area are visible in the model
Visibility of object types Define the visibility and representation of object types.
Visible object group Define the visibility of object groups.

16 TEKLA STRUCTURES 17
LE
SS
ON
1 V
iew
s
7.2 DisplayYou can define visibility and representation settings of object types in the Display dialog box. To open the Display dialog box, click View > View Properties..., and then click Display... in the View Properties dialog box.
The Display dialog box contains the Settings and Advanced tabs.
Settings tab You can define the visibility of object types on the Settings tab. You can also define the representation settings of model parts and components.

LE
SS
ON
1 V
iew
s
TEKLA STRUCTURES 17 17
The default representation mode for bolts is Exact. It shows bolts, washers, and nuts as solids. The Fast option displays the axis and a cross to represent the bolt head. Fast is the recommended representation mode for bolts, because it increases display speed significantly and consumes less system memory.
Advanced tab You can define the visibility of a part center line, part reference line, part labels and connection texts on the Advanced tab.
You can also define the size of points in views. In model increases the point size on the screen when you zoom in. In view does not.
7.3 Creating a basic viewBasic views are views parallel to the global basic planes, i.e. xy, xz, and zy. In basic views two axes always define the view plane and they appear in the plane name. The third axis is perpendicular to the view plane. It does not appear in the plane name. In the basic plane view, the model is shown from the direction of that third axis.
To create a basic view:
1. Click View > Create View of Model > Basic View... or .The Create Basic View dialog box opens.
2. Select the plane parallel to the view plane.3. Enter the level coordinate of the view plane.4. Click Create.
Tekla Structures creates the basic view. The active properties of the View Properties dialog box are used in the view.
7.4 Creating a top viewTo create a top view:
1. Click View > View Properties... to open the View Properties dialog box.2. Select plane from the list next to the Load button. Click Load.
The properties are changed.
Sometimes the work area in the model can be huge because points are positioned far away from the origin of the model. To easily locate these points for deletion, change the Point size to 1000 or 1500.

18 TEKLA STRUCTURES 17
LE
SS
ON
1 V
iew
s
3. Click OK.
4. Click View > Create View of Model > Basic View... or to open the Create Basic View dialog box.
5. Enter the level distance in the Coordinate box. For example, if you want that the plane view is at level +4500, enter 4500 in the box.
6. Click Create to create the top view.
Moving a plane in a top view
To move a plane in a top view:
1. Click the view.A red frame appears in the edge of the view. The view is now selected.
2. Right-click and select Move Special > Linear....The Move - Linear dialog box opens.
3. Enter the moving distance in the dZ box and click Move.The Confirm View Move dialog box opens.
4. Click Yes.The plane moves.
If you want to change the name of the view, double-click the view and enter the name in the View Properties dialog box.
7.5 Creating a grid view using two pointsTo create a grid view using two points:
1. Hold down the Shift key and click View > Create View of Model > Using Two Points
or click .The View Properties dialog box opens.
2. Select plane from the list next to the Load button and click Load.The view properties are changed.

LE
SS
ON
1 V
iew
s
TEKLA STRUCTURES 17 19
3. Click OK.4. Pick the first point on a grid line.
Two arrows appear. The arrows indicate the direction of the view.
5. When the direction is correct, pick the second point on the grid line.A new view is created.
7.6 Creating a view using three pointsYou can use the Create View of Model > Using Three Points command to create, for example, views perpendicular to a plane of a part.
To create a view:
1. Hold down the Shift key and click View > Create View of Model > Using Three Points to open the View Properties dialog box.
2. Define the properties and click OK.3. Pick the first point to indicate the origin of the view plane.4. Pick the second point to indicate the direction of the view x axis.5. Pick the third point to indicate the direction of the view y axis.

20 TEKLA STRUCTURES 17
LE
SS
ON
1 V
iew
s
The view is created.

LE
SS
ON
1 V
iew
s
TEKLA STRUCTURES 17 21
7.7 Opening, closing, and deleting named viewsYou can open, close, and delete named views in the Views dialog box. To open the dialog box,
click View > View List... or .
The Named views list contains the named views that are closed.
Opening views To open views, select them and click the arrow to move the views to the Visible views list.
Closing views To close a view, move the view to the Named views list.
Deleting views To delete a view, select the view and click Delete.
7.8 Changing part representation in model viewsIn rendered views, you can define separately how Tekla Structures displays parts and component objects.
Use the shortcuts Ctrl + 1...5 and Shift + 1...5 to set the desired representation for parts in the model and components.
The number of the named views is unlimited, but the maximum number of open views is nine.
To select multiple views on lists, use the Shift and Ctrl keys when you select views. To deselect views, hold down the Ctrl key.

22 TEKLA STRUCTURES 17
LE
SS
ON
1 V
iew
s
Example
Rollover highlight
When you move the mouse pointer over objects in rendered model views, Tekla Structures highlights the objects in yellow, so that you can easily see which objects you can select.
Shaded wireframe (Ctrl + 2)
Rendered (Ctrl + 4)

LE
SS
ON
1 C
omm
on b
utto
ns
TEKLA STRUCTURES 17 23
To switch rollover highlight on or off, do one of the following:
• Press H.
• Click Tools > Options > Rollover Highlight.
8 Common buttons
Most of the Tekla Structures dialog boxes contain common buttons. These buttons mean the same thing in all dialog boxes. The common buttons are:
Button Description
Retains the properties in the dialog box without closing the dialog box. Tekla Structures uses these properties the next time you create an object of this type.
Closes the dialog box without retaining the properties in the dialog box or modifying objects.
Creates a new object using the properties in the dialog box.
Fills the dialog box with the properties of the selected object. When you select several objects, Tekla Structures takes the properties at random from one of the selected objects.

24 TEKLA STRUCTURES 17
LE
SS
ON
1 C
omm
on b
utto
ns
Displays the help topics for the dialog box.
Modifies the selected objects using the properties in the dialog box, but does not retain the properties in the dialog box.
Retains the properties in the dialog box and closes the dialog box. Tekla Structures uses these properties the next time you create an object of this type.
Switches all the check boxes in the dialog box on and off.
Button Description

>
TEKLA STRUCTURES 17 25
LE
SS
ON
2
LESSON 2In this lesson, you will learn the following things:
• how to create and modify grids
• what the work area is
• how to create plane views along grid lines

26 TEKLA STRUCTURES 17
LE
SS
ON
2
9 Grids
The Tekla Structures grids are rectangular and they are shown on the view plane by dash-and-dot lines. Using grids makes it easy to create a model and to locate objects in the model.
When you create a new model, Tekla Structures creates a default grid which can be modified. You can have one or more grids for one model. You can create one large grid for the entire model and one or more smaller grids for detailed sections. You can also create single grid lines and attach them to an existing grid.
9.1 Creating a gridTo create a grid:
1. Click Modeling > Create Grid..., or click .The Grid dialog box opens.
2. Adjust the grid properties by entering the x, y, and z coordinates and the labels for the grid lines.

LE
SS
ON
2
TEKLA STRUCTURES 17 27
The coordinates in the x and y directions are relative distances. The coordinates in the z direction are absolute distances.
3. Adjust other grid properties if necessary.
• Select Magnetic grid plane to bind objects to grid lines.
• You can lock the grid parameters to prevent accidental changes. To lock the grid parameters, click the User-defined attributes... button and choose Yes from the Locked list.
4. Click Create.5. Click Close.
9.2 Creating a second gridYou can create a second grid with a different origin.
You must have already created a grid before you begin creating a second grid.
To create a second grid:
1. Click Modeling > Create Grid....The Grid dialog box opens.
2. Enter the origin coordinate values in the X0, Y0, and Z0 boxes in the Origin area. You can also pick a point in the view and set it as the origin.
3. Enter the grid coordinates and labels.4. Click OK.
You now have two grids with different origins.
Use spaces to separate the coordinate values. Enter zero as the first coordinate value to show the first grid line on the 0,0 coordinate.
The origin of the second grid must be different from the origin of the first grid.

28 TEKLA STRUCTURES 17
LE
SS
ON
2
9.3 Creating a grid on a shifted work planeThe current work plane defines the local coordinate system of a Tekla Structures model. You can shift the work plane to any position by picking points, parallel to one of the global basic planes, or on a part or view plane. The current work plane is model specific so it is related to all views.
9.4 Adding a grid line to an existing gridTo add a single grid line to an existing grid:
1. Click Modeling > Add Grid Line.2. Select an existing grid and attach the grid line to it.
You can create a new grid and rotate the grid according to a shifted work plane. This makes it easier to model in the shifted work plane.

LE
SS
ON
2 W
ork
area
TEKLA STRUCTURES 17 29
3. Pick the start point of the grid line.4. Pick the end point of the grid line.
9.5 Modifying a grid lineTo modify a single grid line:
1. Ensure that the Select grid line selection switch is selected.2. Double-click a grid line. The Grid Line Properties dialog box appears.3. Modify the grid line properties.4. Click Modify to save the changes.
10 Work area
The work area is the main area where you can edit the model. Tekla Structures indicates the work area of a view using green dashed lines.
You can define the work area to suit particular situations, for example, to concentrate on a particular area of the model. Defining the work area makes it faster and easier to work with the model. Objects outside the work area still exist, but they are not visible.
For more information, see Modifying the work area (p. 92).
Work area
The arrow symbol indicates the work plane.
The green cube in a model view represents the global coordinate system. It is located at the global point of origin.

30 TEKLA STRUCTURES 17
LE
SS
ON
2 C
reat
ing
pla
ne
view
s al
ong
grid
line
s
11 Creating plane views along grid lines
To create plane views along grid lines:
1. Click View > Create View of Model > Along Grid Lines....The Creation of Views Along Grids Lines dialog box opens.
2. Define the settings you need.For instance, you can define the number of views and the view name prefixes.
3. Click Create.The Views dialog box opens.
4. Move views from the Named views list to the Visible views list.The direction of all views is -x, +y, and -z.

LE
SS
ON
2 C
reat
ing
pla
ne
view
s al
ong
grid
line
s
TEKLA STRUCTURES 17 31

32 TEKLA STRUCTURES 17
LE
SS
ON
2 C
reat
ing
pla
ne
view
s al
ong
grid
line
s

>
TEKLA STRUCTURES 17 33
LE
SS
ON
3
LESSON 3In this lesson, you will learn the following things:
• how to create parts such as columns and beams
• how to snap on points
• how to check distances and angles
• how to use and customize Mini Toolbar
• how to modify parts
• how to create chamfers in part corners
• how to control the selection of objects.

34 TEKLA STRUCTURES 17
LE
SS
ON
3
12 Steel parts
You can create steel parts by using the buttons in the Steel toolbar, or select a command from the Modeling menu.
12.1 Creating a steel columnTo create a steel column:
1. Click the Create column button.2. Pick the position of the column.
12.2 Creating a steel beamYou can create steel beams, compression bars, wind bracings, plates and tubes with the Create beam command.
To create a steel beam:
1. Click the Create beam button.
Button Command Description
Column Creates a steel column at a picked position.
Beam Creates a steel beam between two picked points.
Polybeam Creates a steel beam consisting of straight and curved segments.
Curved Beam Creates a steel beam with its radius defined by three picked points.
Contour Plate Creates a contour plate based on picked positions forming a contour.
Orthogonal Beam
Creates a steel beam orthogonal to the work plane in a picked position.
Twin Profile Creates a twin profile between two picked points. A twin profile consists of two beams.
LE
SS
ON
3
TEKLA STRUCTURES 17 35
2. Pick the start point.3. Pick the end point.
The beam is created.
12.3 Creating a curved steel beamA curved beam is a beam which runs through three points. The radius of the curved beam is automatically calculated on the basis of the picked points.
To create a curved steel beam:
1. Click the Create curved beam button.2. Pick the start point.3. Pick a point on the arc.4. Pick the end point.
The curved steel beam is created.
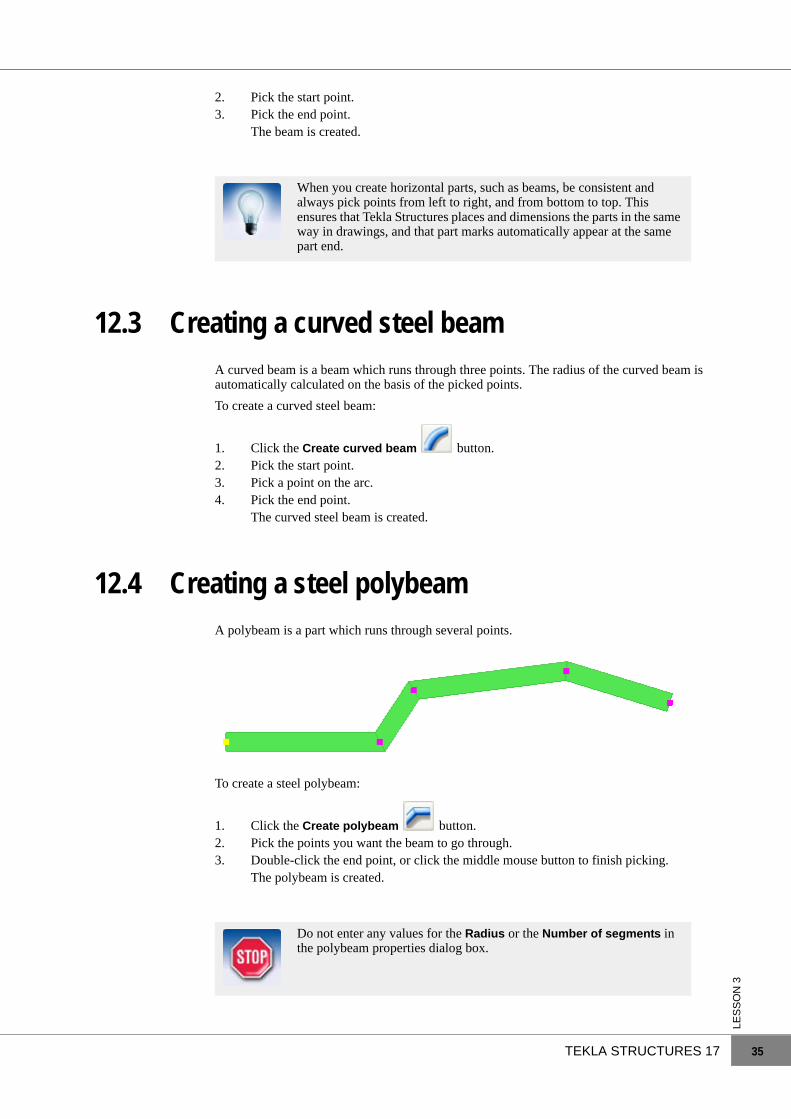
12.4 Creating a steel polybeamA polybeam is a part which runs through several points.
To create a steel polybeam:
1. Click the Create polybeam button.2. Pick the points you want the beam to go through.3. Double-click the end point, or click the middle mouse button to finish picking.
The polybeam is created.
When you create horizontal parts, such as beams, be consistent and always pick points from left to right, and from bottom to top. This ensures that Tekla Structures places and dimensions the parts in the same way in drawings, and that part marks automatically appear at the same part end.
Do not enter any values for the Radius or the Number of segments in the polybeam properties dialog box.

36 TEKLA STRUCTURES 17
LE
SS
ON
3
Curved sections You can create curved segments for polybeams. Use chamfering to create the curved segments. For more information, see Corner chamfers (p. 56).
Folded plates Folded plates need to be modeled as polybeams. You can modify the shape of a folded plate by selecting an appropriate chamfer symbol in the Chamfer Properties dialog box.
12.5 Creating an orthogonal steel beamOrthogonal beams are positioned orthogonally to the work plane.
To create an orthogonal steel beam:
1. Click Modeling > Create Steel Part > Orthogonal Beam.2. Pick the position of the beam.
12.6 Creating a steel twin profileA twin profile consists of two identical beams. You define the positions of both beams by selecting the twin profile type and setting the clearance between the beams in two directions.
To create a steel twin profile:
1. Click Modeling > Create Steel Part > Twin Profile.2. Pick the start point.3. Pick the end point.
The twin profile is created.
12.7 Creating a steel contour plateContour plates are free-form shaped plates.
To create a steel contour plate:
1. Click the Create contour plate button.2. Pick the start point.
To ensure that you will have correct information in NC files, create polybeams a little shorter than needed (1). Fit them afterwards or connect them by using a component (2).

LE
SS
ON
3
TEKLA STRUCTURES 17 37
3. Pick the corner points of the contour plate.4. Pick the start point again, or click the middle mouse button to finish picking.
Setting the contour plate orientation
You can set the contour plate main axis to follow the line created by the first and second points you have picked. This enables you to manually define the plate orientation in drawings and reports.
To set the contour plate orientation:
1. Create the contour plate. The first and second points you pick define the main axis of the plate.
2. Double-click the plate to open the Contour Plate Properties dialog box.3. Click the User-defined attributes... button and go to the Orientation tab.4. Select From 1st to 2nd creation point from the Main axis direction list.
First picked point
Second picked point

38 TEKLA STRUCTURES 17
LE
SS
ON
3
5. Click Modify and OK to close the dialog box.6. Click OK to close the Contour Plate Properties dialog box.7. Click Drawings & Reports > Numbering > Number Modified Objects to update
numbering.8. Create a single-part drawing of the contour plate to view the orientation.
Adding a corner to a contour plate
To add a corner to a contour plate:
1. Select the contour plate to which you want to add a corner.2. Click Detailing > Modify Polygon Shape.3. Pick an existing corner (1).4. Pick a new corner (2).5. Pick another existing corner (3).
Main axis direction is Automatic.
Main axis direction is From 1st to 2nd creation point.

LE
SS
ON
3
TEKLA STRUCTURES 17 39
Removing a corner from a contour plate
To remove a corner from a contour plate:
1. Select the contour plate from which you want to remove a corner.2. Click Detailing > Modify Polygon Shape.3. Pick an existing corner (1).4. Pick another existing corner (2).5. Pick the corner to be removed (3).
Alternatively, move the handles using drag-and-drop or the Move command.
40 TEKLA STRUCTURES 17
LE
SS
ON
3 S
napp
ing
13 Snapping
Most Tekla Structures commands ask you to pick points to position objects.
Snap switches specify exact locations on objects, for example, end points, midpoints, and intersections. Snap switches help you to pick points to position objects precisely without having to know the coordinates or create additional lines or points. You can use snap switches any time Tekla Structures prompts you to specify a point, for example, if you are creating a beam.
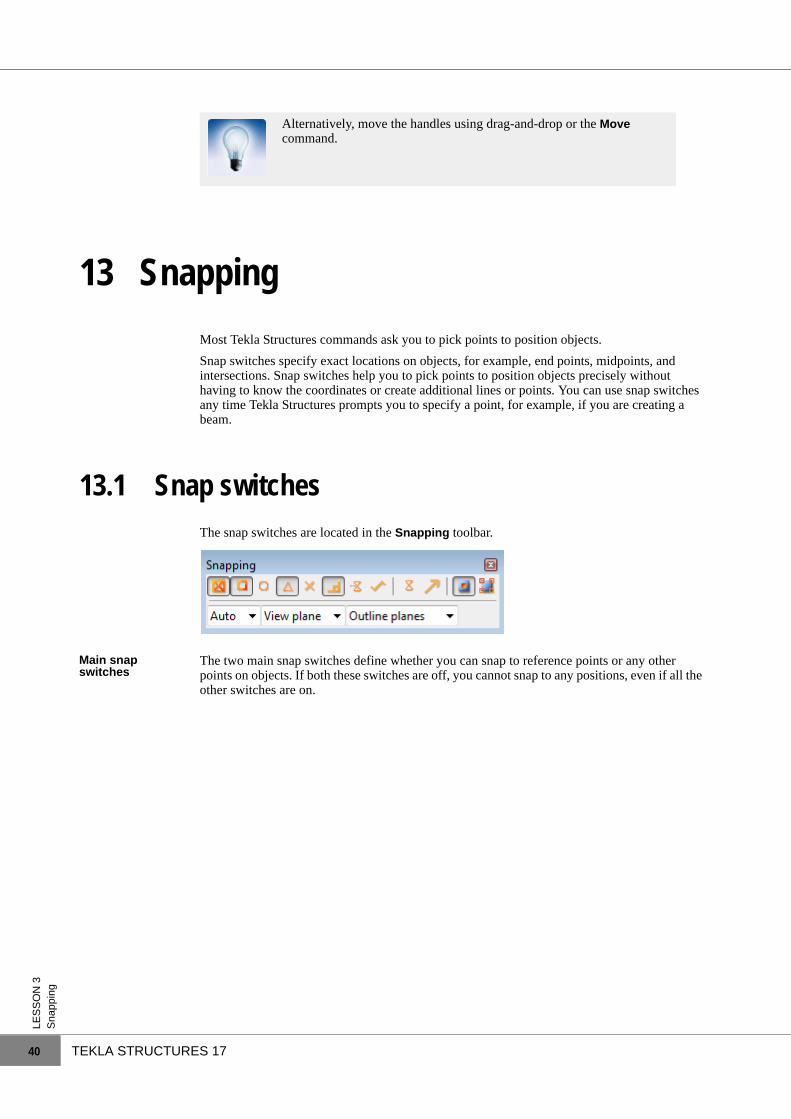
13.1 Snap switchesThe snap switches are located in the Snapping toolbar.
Main snap switches
The two main snap switches define whether you can snap to reference points or any other points on objects. If both these switches are off, you cannot snap to any positions, even if all the other switches are on.
Alternatively, move the handles using drag-and-drop or the Move command.

LE
SS
ON
3 S
napp
ing
TEKLA STRUCTURES 17 41
Other snap switches
You can have Tekla Structures display the snap symbols when you move the mouse pointer over objects. The snap symbol is yellow for model objects and green for objects inside components.
ButtonSnap positions Description Symbol
Reference lines and points
You can snap to object reference points (points that have handles).
Large
Geometry lines and points
You can snap to any points on objects.
Small
ButtonSnap positions Description Symbol
Points Snaps to points and grid line intersections.
End points Snaps to end points of lines, polyline segments, and arcs.
Centers Snaps to centers of circles and arcs.
Midpoints Snaps to midpoints of lines, polyline segments, and arcs.
Intersections Snaps to intersections of lines, polyline segments, arcs, and circles.
Perpendicular Snaps to points on objects that form a perpendicular alignment with another object.
Line extensions Snaps to the line extensions of nearby objects, and reference and geometry lines of drawing objects.

42 TEKLA STRUCTURES 17
LE
SS
ON
3 S
napp
ing
13.2 Dimensions in snappingWhen you create objects, you can see the dimensions when you snap to points. This is useful for creating beams of certain length, for example.
Free Snaps to any position.
Nearest point Snaps to the nearest points on objects, e.g. any point on part edges or lines.
Lines Snaps to grid lines, reference lines, and the edges of existing objects.
ButtonSnap positions Description Symbol
Zoom level affects the precision of snapping. To snap on smaller distances, zoom in.

LE
SS
ON
3 M
ini T
oolb
ar
TEKLA STRUCTURES 17 43
13.3 Orthogonal snappingUse the shortcut O or click Tools > Ortho to activate orthogonal snapping. The mouse pointer locks to the closest orthogonal point on the plane (0, 45, 90, 135, 180 degrees, and so on). The mouse pointer automatically snaps to positions at even distances in the given direction.
13.4 Measuring distances, angles, and bolt spacesYou can measure distances, angles, radius and length of an arc, and bolt spaces. All measurements are temporary. The measurements appear in the rendered view window until you update or redraw the window. Before you start measuring, make sure that you are using appropriate snap settings.
The following measurement options are available:
• Horizontal distance
• Vertical distance
• Distance
• Angle
• Arc
• Bolt spaces
To measure distances, angles, arcs, and bolt spaces:
1. Click Tools > Measure, or click one of the measurement buttons.2. Follow the instructions that vary according to the measurement option you selected.
14 Mini Toolbar
You can modify the most common properties of modeling objects with the Mini Toolbar.
The Mini Toolbar appears next to the mouse pointer when you select an object and fades out when you move the mouse further away or change the selection. You can change the position of the toolbar by dragging it and locking it to a new position with the lock button in the top right corner.
When you measure horizontal and vertical distances, use a plane view. To switch to a plane view, press Ctrl + P.

44 TEKLA STRUCTURES 17
LE
SS
ON
3 M
ini T
oolb
ar
14.1 Mini Toolbar examplesModifying the profile
In this example we modify the profile of a column using the Mini Toolbar:
1. Select the column.The Mini Toolbar appears next to the mouse pointer.
2. Move the pointer over the Mini Toolbar.3. Modify the profile in the Mini Toolbar and press enter.
The profile of the column is changed.

LE
SS
ON
3 M
ini T
oolb
ar
TEKLA STRUCTURES 17 45
Changing the part position
In this example we modify the position of a beam using the Mini Toolbar:
1. Click in the Mini Toolbar.A window with additional options appears.
2. To change the overall position of the beam, use the round selection dial. Click and drag to select a position.
Part orientation
Position selection dial
Rotation angle knob
Angle
Plane offset
Depth offset

46 TEKLA STRUCTURES 17
LE
SS
ON
3 M
ini T
oolb
ar
3. To change the rotation angle, click and drag the green rotation angle knob.4. To change the Angle, Plane offset, or Depth offset, enter a value in the corresponding
box.
14.2 Customizing Mini ToolbarYou can customize the Mini Toolbar by selecting which commands are visible, and by adding macros and user-defined attributes to the toolbar.
To customize the Mini Toolbar:
1. Move the mouse pointer on the Mini Toolbar to display it.
2. Click to open the Customize Mini Toolbar dialog box.3. Select the elements you wish to show or hide.
The Preview field shows what the toolbar will look like.
4. Include macros and user-defined attributes in the Mini Toolbar.a Select a macro or user-defined attribute in the list of macros and user-defined
attributes.b Click Add to Mini Toolbar after each selected macro and user-defined attribute.
The added macros and user-defined attributes are shown in the list of visible elements.
c To remove macros and user-defined attributes from the Mini Toolbar, unselect them in the list of visible elements.
5. Click OK.

LE
SS
ON
3 P
art p
rope
rtie
s
TEKLA STRUCTURES 17 47
15 Part properties
In addition to the Mini Toolbar, you can use the part properties dialog box to view or modify the properties of a part.
The basic options of the Attributes and Position tabs are described in this section. In addition, instructions on how to modify part properties are provided.
To open a part properties dialog box, double-click the button of the part, or click Modeling > Properties and select an option.
15.1 Attributes tabThe Attributes tab includes options for entering the name and defining the material of the part, for example.
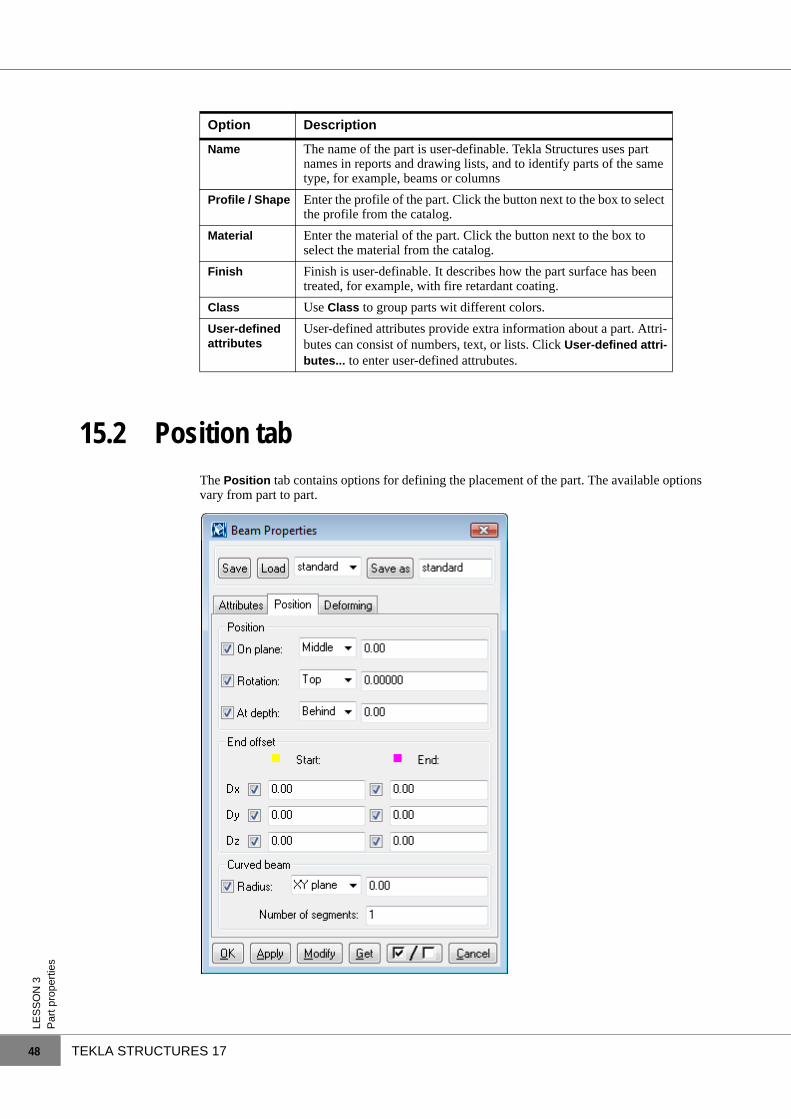
48 TEKLA STRUCTURES 17
LE
SS
ON
3 P
art p
rope
rtie
s
15.2 Position tabThe Position tab contains options for defining the placement of the part. The available options vary from part to part.
Option Description
Name The name of the part is user-definable. Tekla Structures uses part names in reports and drawing lists, and to identify parts of the same type, for example, beams or columns
Profile / Shape Enter the profile of the part. Click the button next to the box to select the profile from the catalog.
Material Enter the material of the part. Click the button next to the box to select the material from the catalog.
Finish Finish is user-definable. It describes how the part surface has been treated, for example, with fire retardant coating.
Class Use Class to group parts wit different colors.
User-defined attributes
User-defined attributes provide extra information about a part. Attri-butes can consist of numbers, text, or lists. Click User-defined attri-butes... to enter user-defined attrubutes.

LE
SS
ON
3 P
art p
rope
rtie
s
TEKLA STRUCTURES 17 49
15.3 Modifying part propertiesYou can modify part properties before you create parts. You can also modify properties of created parts.
Modifying properties before creating parts
1. Open the part properties dialog box either by
• double-clicking the button of the part,
• holding down the Shift key and clicking the button of the part, or
• clicking Modeling > Properties and selecting an option.
2. Modify the properties as required.3. Click Apply or OK.
The modified properties are used when you create parts of the same type.
Modifying properties of a created part
1. Double-click a part.The part properties dialog box opens.
2. Modify the properties as required.3. Click Modify to apply the modified properties to the part.4. Click Cancel to close the dialog box.
Option Description
Position The Position area contains options for defining the location of the part relative to its reference point or the work plane.
Levels For parts that you create by picking only one point (for example, columns), you can enter the positions of the part ends, relative to the picked point, in the global z direction. Use Bottom to define the position of the first end. Use Top to define the position of the second end. For example, the height of a column is defined with the entered values.
End offset Use end offsets to move the ends of a part, relative to its reference line. You can enter positive and negative values.
Curved beam Define the curvature of the part by entering the radius and the plane of curvature.
Mutual position of members
The Position tab in the Twin Profile Properties dialog box contains the Mutual postion of members area. Select an option from the Twin profile type list to define how the profiles are combined. To define the clearances between the profiles, enter values in the Horizontal and Vertical boxes.
If you click OK to close the dialog box, the modified properties are retained and will be used the next time you create parts of the same type.

50 TEKLA STRUCTURES 17
LE
SS
ON
3 S
elec
ting
mul
tiple
obj
ects
16 Selecting multiple objects
You can select multiple objects simultaneously. To select multiple objects (area selection), do one of the following:
• Hold down the mouse button and drag the mouse from left to right to select the objects that are completely within that rectangular area.
• Hold down the mouse button and drag the mouse from right to left to select the objects that are completely or partly within that rectangular area.
A quick way to modify the properties of a part is using the mini toolbar. For more information, see Mini Toolbar.
To define how area selection works, click Tools > Options > Crossing Selection.
When the option is off, the dragging direction affects the selection of objects, as described above. By default, the option is off.
When the option is on, all objects that fall at least partially inside the rectangular area are selected, regardless of the dragging direction.

LE
SS
ON
3 S
elec
ting
mul
tiple
obj
ects
TEKLA STRUCTURES 17 51
16.1 Hiding selected partsYou can quickly hide selected parts in a view. This can be useful, for example, when you want to temporarily hide parts in order to see the parts behind them.
To hide selected parts:
1. Click View > Hide Part.2. Select the parts you want to hide.
The selected parts become invisible
3. To make the parts visible again, do one of the following:
• Click View > Redraw All.
• Right-click and select Redraw view.
16.2 Hiding unselected partsTo hide all unselected parts in a view:
1. Select the parts that you want to keep visible.

52 TEKLA STRUCTURES 17
LE
SS
ON
3 P
art m
odi
fica
tions
2. Right-click and select Show Only Selected.
3. To make the parts visible again, do one of the following:
• Click View > Redraw All.
• Right-click and select Redraw View.
17 Part modifications
This section provides information on part modifications. The following topics are explained:
• Moving start and end points
• Bending parts
To completely hide the unselected parts, hold down the Shift key when selecting the command.
To show the unselected parts as sticks, hold down the Ctrl key when selecting the command.

LE
SS
ON
3 P
art m
odi
fica
tions
TEKLA STRUCTURES 17 53
17.1 Moving start and end pointsTekla Structures indicates the direction of a part with handles. When you select a part, Tekla Structures highlights the handles. The handle of the start point is yellow, the rest are magenta.
You can move the start and end points by using the End offset options in the part properties dialog box.
Start point
End point

54 TEKLA STRUCTURES 17
LE
SS
ON
3 P
art m
odi
fica
tions
Extending and shortening parts
To extend and shorten parts:
1. Ensure that the Snap to part extension lines switch is active.2. Select the part which you want to extend or shorten.
You can see the part handles when the part is selected.
3. Drag a handle to extend or shorten the part.
Do not use the Dx, Dy and Dz options on the Position tab for extending or shortening a part.

LE
SS
ON
3 P
art m
odi
fica
tions
TEKLA STRUCTURES 17 55
You can see the dimension of extension or shortening when you drag the handle.
17.2 Creating curved partsYou can create curved parts by defining a radius and the number of segments for a part. The number of segments determines how realistic the curved part looks: the more segments, the less angular the part appears.
To create a curved part:
1. Create a part that can be bent: a beam, panel, or strip footing.2. Double-click the part to open the part properties dialog box.3. Go to the Curved beam settings area.
These settings can be found either on the Position tab or on the Bending tab, depending on the part type.
4. In the Radius box, enter the radius.5. In the Number of segments box, enter the number of segments you want to use.6. Click Modify to bend the part.
Drag the handle along the blue dashed line (the line extension of the part). This way you do not change the orientation of the part.
To extend or shorten parts by dragging, the Drag and Drop feature must be enabled. When Drag and Drop is enabled, the D letter is displayed in the status bar.
To activate Drag and Drop, click Tools > Options > Drag and Drop, or press the D key.

56 TEKLA STRUCTURES 17
LE
SS
ON
3 C
orne
r ch
amfe
rs
18 Corner chamfers
Some part corners can be chamfered. You can use the Chamfer command to shape the following parts: concrete and steel polybeams, contour plates, strip footings, concrete slabs, and concrete panels.
When Tekla Structures creates a part, by default it has a rectangular chamfer at each corner, which does not change the geometry of the part.
The end points of a part do not have corner chamfers. The handles that you select must be at corner points or between two segments of a part.

LE
SS
ON
3 C
orne
r ch
amfe
rs
TEKLA STRUCTURES 17 57
Tekla Structures creates chamfers using the active properties in the Chamfer Properties dialog box. Click Detailing > Properties > Chamfer > Part Corner Chamfer... to open the dialog box, or double-click an existing chamfer.
The Chamfer Properties dialog box contains the following options:
18.1 Chamfering exampleTo modify the thickness of a slab corner:
1. Double-click the handle on the slab corner to open the Chamfer Properties dialog box.2. Enter the values in the dz1 and dz2 boxes.3. Click Modify.
The thickness of the corner is modified.
Default chamfer
Modified chamfers
Option Description
Type Defines the shape of the chamfer.
x The dimension of the chamfer.
y The second dimension of straight chamfers.
dz1 Moves the top surface of the part corner in the local z direction of the part.
dz2 Moves the bottom surface of the part corner in the local z direction of the part.

58 TEKLA STRUCTURES 17
LE
SS
ON
3 S
elec
tion
switc
hes
19 Selection switches
You can control object selection by using the selection switches. The selection switches are located in the Selecting toolbar.
The selection switches are described below:
Button Description
Turns all switches on. Select all object types, except for single bolts.
Select component symbols.
Select parts, such as columns, beams, and plates.
Select surface treatments.
Select points.

LE
SS
ON
3 S
elec
tion
switc
hes
TEKLA STRUCTURES 17 59
Select entire grids by selecting one line in the grid.
Select single grid lines.
Select welds.
Select line, part, and polygon cuts, and fittings.
Select model views.
Select entire bolt groups by selecting one bolt in the group.
Select single bolts.
Select reinforcing bars and bar groups.
Select planes.
Select distances.
When you click any object belonging to a component, Tekla Structures selects the component symbol and highlights (does not select) all component objects.
Objects created automatically by a component can be selected.
When you click any object in an assembly or a cast unit, Tekla Structures selects the assembly or cast unit and highlights all objects in the same assembly or cast unit.
Select single objects in assemblies and cast units.
Select selection filters. The list lists both standard and user-defined selection filters.
Create your own selection filters.
Button Description

60 TEKLA STRUCTURES 17
LE
SS
ON
3 S
elec
tion
switc
hes
19.1 Selection filtersBy using selection filters you can select particular objects. Tekla Structures contains several selection filters by default. If you use, for example, the columns filter, you can only select columns in the model. The Selection Filter list lists the standard and user-defined filters.
Defining your own filters
To define your own filters:
1. Click the Selection Filter button, or click Edit > Selection Filter... to open the Object Group - Selection Filter dialog box.
2. Find a filter which has close to the same settings as you need.3. Modify the settings, then enter a new name in the Save as box.4. Click Save as, then OK to exit.
You can now choose the new filter from the list.
Selection filter example
In this example we create a selection filter that selects parts whose class is two:
1. Click the Selection Filter button, or click Edit > Selection Filter... to open the Object Group - Selection Filter dialog box.
2. Select a row and click Delete row to remove the row.Repeat this to every row.
Selection filters
Click to open the Object Group - Selection Filter dialog box

LE
SS
ON
3 S
elec
tion
switc
hes
TEKLA STRUCTURES 17 61
3. Click Add row.Now the Object Group - Selection Filter dialog box contains one row where you can define the filter.
4. In the Property list, select Class. 5. In the Value list, enter 2. 6. Enter a unique name in the box next to the Save as button.7. Click Save as to save the selection filter.
Use the selection filter to select the parts whose class is two.
19.2 Selection examplesScrolling assembly levels
Ensure that the Select assemblies selection switch is active.
To define the level on which to select objects in nested components or assemblies, hold down the Shift key and scroll with the mouse wheel. Level 0 is the highest assembly level.
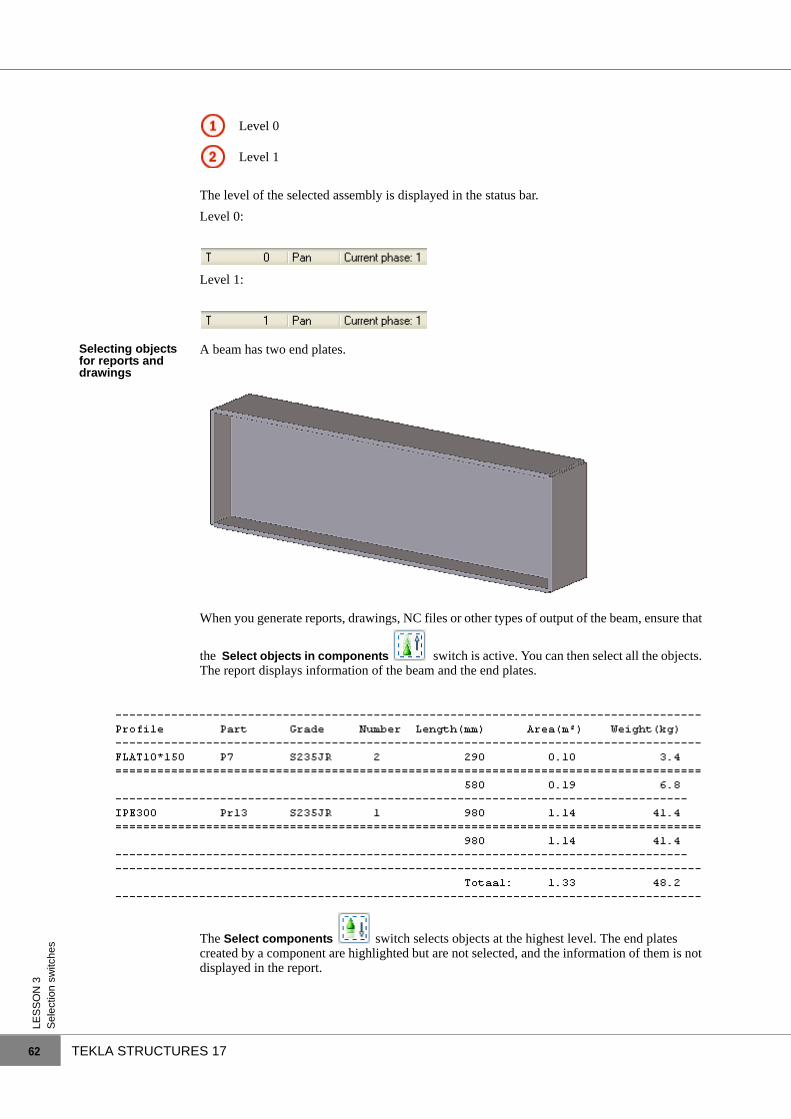
62 TEKLA STRUCTURES 17
LE
SS
ON
3 S
elec
tion
switc
hes
The level of the selected assembly is displayed in the status bar.
Level 0:
Level 1:
Selecting objects for reports and drawings
A beam has two end plates.
When you generate reports, drawings, NC files or other types of output of the beam, ensure that
the Select objects in components switch is active. You can then select all the objects. The report displays information of the beam and the end plates.
The Select components switch selects objects at the highest level. The end plates created by a component are highlighted but are not selected, and the information of them is not displayed in the report.
Level 0
Level 1

LE
SS
ON
3 C
oncr
ete
part
s
TEKLA STRUCTURES 17 63
20 Concrete parts
You can create concrete parts by using the buttons in the Concrete toolbar, or selecting a command from the Modeling menu.
20.1 Creating a concrete columnTo create a concrete column:
Button Command Description
Pad Footing Creates a pad footing at a picked position.
Strip Footing Creates a strip footing that traverses the picked points.
Column Creates a concrete column at a picked position.
Beam Creates a concrete beam between two picked points.
Polybeam Creates a concrete beam consisting of straight and curved segments.
Slab Creates a concrete slab based on picked positions forming a contour.
Panel Creates a concrete panel that traverses the picked points.

64 TEKLA STRUCTURES 17
LE
SS
ON
3 C
oncr
ete
part
s
1. Click the Create concrete column button.2. Pick the position of the column.
The column is created.
20.2 Creating a concrete beamTo create a concrete beam:
1. Click the Create concrete beam button.2. Pick the start point.3. Pick the end point.
The beam is created.
20.3 Creating a concrete pad footingTo create a concrete pad footing:
1. Click the Create pad footing button.2. Pick the pad footing position.
20.4 Creating a concrete strip footingTo create a concrete strip footing:
1. Click the Create strip footing button.2. Pick the points you want the strip footing to go through.3. Double-click the end point, or click the middle mouse button to finish picking.
The strip footing is created.
Curved sections You can create curved sections for strip footings. Use the chamfer feature to create the curved sections. For more information, see Corner chamfers (p. 56).
When you create horizontal parts such as beams be consistent and always pick points from left to right and from bottom to top. This ensures that Tekla Structures places and dimensions the parts in the same way in drawings, and that part marks automatically appear at the same part end.

LE
SS
ON
3 C
oncr
ete
part
s
TEKLA STRUCTURES 17 65
20.5 Creating a concrete panelTo create a concrete panel:
1. Click the Create concrete panel button.2. Pick the points you want the panel to go through.3. Double-click the end point, or click the middle mouse button to finish picking.
The concrete panel is created.
Curved sections You can create curved sections for concrete panels. Use the chamfer feature to create the curved sections. For more information, see Corner chamfers (p. 56).
20.6 Creating a concrete slabTo create a concrete slab:
1. Click the Create concrete slab button.2. Pick the start point.3. Pick the corner points of the slab.4. Pick the start point again.
The concrete slab is created.
20.7 Creating a concrete polybeamTo create a concrete polybeam:
1. Click the Create concrete polybeam button.2. Pick the points you want the polybeam to go through.3. Double-click the end point, or click the middle mouse button to finish picking.
The polybeam is created.
Curved sections You can create curved sections for polybeams. Use the chamfer feature to create the curved sections. For more information, see Corner chamfers (p. 56).
You can also model floors, walls and panels with the concrete slabs.

66 TEKLA STRUCTURES 17
LE
SS
ON
3 C
oncr
ete
part
s

>
TEKLA STRUCTURES 17 67
LE
SS
ON
4
LESSON 4In this lesson, you will learn the following things:
• how to copy and move objects
• how to fine-tune the part shape
• how to use bolts
• how to split and combine parts
• how to create points

68 TEKLA STRUCTURES 17
LE
SS
ON
4
21 Copying and moving
You can copy and move objects linearly, with rotation, and with mirroring. Copying creates a new object, leaving the existing object in its original position. Moving relocates the existing object.
Tekla Structures has the following options for copying and moving objects:
Copy
Move
Command Description
Edit > Copy or Ctrl + C Copies selected objects.
Edit > Copy Special > Linear... Creates copies of selected objects at a specified distance from the original.
Edit > Copy Special > Rotate... Creates a copy and rotates it around any line or around the work plane z axis.
Edit > Copy Special > Mirror... Creates a mirrored copy of an object through a specified plane.
Edit > Copy Special > To Another Plane
Creates a copy on another plane using three specified points.
Edit > Copy Special > To Another Object
Copies selected objects from one object to another.
Edit > Copy Special > From Another Model...
Copies selected objects from another model.
Command Description
Edit > Move or Ctrl + M Moves selected objects.
Edit > Move Special > Linear... Moves selected objects a specified distance.
Edit > Move Special > Rotate... Moves the object and rotates it around any line or around the work plane z axis.
Edit > Move Special > Mirror... Mirrors the object and moves it through a specified plane.
Edit > Move Special > To Another Plane
Moves the object using three specified points.
Edit > Move Special > To Another Object
Moves selected objects from one object to another.

LE
SS
ON
4
TEKLA STRUCTURES 17 69
21.1 CopyingTo copy an object:
1. Select the objects you want to copy.
2. Click Edit > Copy, or click .3. Pick the origin for the copying.
4. Pick one or more destination points.
The objects are copied immediately.
5. To stop copying, click Edit > Interrupt or right-click and select Interrupt.
21.2 Copying linearlyLinear copying creates one or several copies of a selected object at a specified distance from the original. Use linear copying when you want to make many copies of objects at equal distances. For example, use linear copying to create floors of a building.
To copy an object linearly to a new position:
1. Select the objects you want to copy.

70 TEKLA STRUCTURES 17
LE
SS
ON
4
2. Click Edit > Copy Special > Linear....The Copy - Linear dialog box opens.
3. Use one of the two options for entering the desired distance:
• Enter the distance directly in the Copy - Linear dialog box, or
• Pick an origin point and a destination point to set the distance.
4. Enter the number of copies.5. Click Copy.
The selected objects are copied in the selected destination.
21.3 Copying and rotatingYou can copy objects in a model by rotating them around any line you choose, or around the work plane z axis.
To rotate an object:
1. Select the objects you want to copy.2. Click Edit > Copy Special > Rotate....
The Copy-Rotate dialog box opens.
3. Select Z or line in the Around list box to define whether you want to rotate around the z axis or around a line.
4. Pick a point to define the rotation axis, or enter its coordinates in the Origin area.5. Enter the number of copies.6. If required, enter the dZ value, which is the difference in position between the original
and copied object in the z direction.7. Enter the rotation angle.8. Click Copy to copy and rotate the objects.
If the dialog box is open but the command is not active anymore, click the Pick button to re-activate the command.

LE
SS
ON
4
TEKLA STRUCTURES 17 71
Example
21.4 Copying and mirroringWhen you copy an object, you can mirror it through a plane that is perpendicular to the work plane and passes through a line you specify.
To copy and mirror an object:
1. Select the objects you want to copy and mirror.2. Click Edit > Copy Special > Mirror....
The Copy - Mirror dialog box opens.
Rotation point
The Rotate command is always more preferable than the Mirror command.
Tekla Structures cannot create mirrored copies of component properties. The Edit > Copy Special > Mirror... command does not fully mirror objects if they include components with, for example, asymmetrically positioned parts.

72 TEKLA STRUCTURES 17
LE
SS
ON
4
3. Pick the start point of the mirroring plane, or enter its coordinates.4. Pick the end point of the mirroring plane, or enter its coordinates.5. Enter the angle.6. Click Copy.
The objects are copied and mirrored.
Example
Mirroring an asymmetrical column
When you mirror an asymmetrical column, the properties of the mirrored column are not automatically correct.
To set the properties of a mirrored asymmetrical column:
1. Select the mirrored column.2. Click Modeling > Properties > Steel Parts > Orthogonal Beam....3. Click Get. 4. Click Modify.5. Click OK.
The properties of the mirrored column are correct.
21.5 Copying to another planeYou can copy objects from the first plane you specify to the second (and third, etc.) plane using three specified points.
To copy an object to another plane:
1. Select the objects you want to copy.2. Click Edit > Copy Special > To Another Plane.3. Pick the point of origin of the first plane.4. Pick a point on the first plane in the positive x direction.
Start point
End point
Mirror axis

LE
SS
ON
4
TEKLA STRUCTURES 17 73
5. Pick a point on the first plane in the positive y direction.6. Repeat steps 3–5 for all destination planes.
21.6 Copying to another objectYou can copy objects from an object to other similar objects. This is useful, for example, when you detail previously modeled parts. The objects that you can copy between can have different dimensions, length, and rotation.
To copy an object to another object:
1. Select the objects you want to copy.2. Right-click and select Copy Special > To Another Object from the pop-up menu.3. Select the object to copy from (source object).4. Select the objects to copy to (target object).
Select the objects.
Define the origin and the position of the source object.
Define the origin and position of the target object.
Copied objects.

74 TEKLA STRUCTURES 17
LE
SS
ON
4
21.7 Copying from another modelYou can copy whole phases from an existing model to another one. You can copy from another model even when more than one person is working on the model. Tekla Structures only copies secondary parts from the model if they belong to the same phase as their main part. This applies to both model and component parts.
To copy objects from another model:
1. Click Edit > Copy Special > From Another Model....2. Select the model to copy from in the Model directories list.3. Enter the numbers of the phases from which to copy objects, separated by spaces.
For example, 2 7.
4. Click Copy.5. Close the dialog box.
21.8 MovingTo move an objects:
1. Select the objects you want to move.
2. Click Edit > Move, or click .3. Pick the origin for moving.
4. Pick a destination point.
Drawings cannot be imported with the model.
When you enter several phases, separate the different phase numbers with a space. If additional phases are not created, all the objects in the model are in phase one.

LE
SS
ON
4
TEKLA STRUCTURES 17 75
5. The objects are moved immediatelly.
21.9 Moving linearlyLinear moving moves the selected object a specified distance.
To move an object linearly to a new position:
1. Select the objects you want to move.2. Click Edit > Move Special > Linear....
The Move - Linear dialog box opens.
3. Use one of the two options for entering the desired distance:
• Enter the distance directly in the Move - Linear dialog box, or
• Pick an origin point and a destination point to set the distance.
4. Click Move.The selected objects are moved in the selected destination.
21.10 Moving and rotatingYou can move objects in a model by rotating them around any line you choose, or around the work plane z axis.
To rotate an object:
1. Select the objects you want to move.2. Click Edit > Move Special > Rotate....3. The Move - Rotate dialog box opens.
If the dialog box is open but the command is not active anymore, click the Pick button to re-activate the command.

76 TEKLA STRUCTURES 17
LE
SS
ON
4
4. Select Z or line in the Around list box to define whether you want to rotate around the z axis or around a line.
5. Pick a point to define the rotation axis, or enter its coordinates in the Origin area.6. Enter the rotation angle.7. Click Move to rotate the objects around the defined line or axis to a new location.
21.11 Moving and mirroringWhen you move an object, you can mirror it through a plane that is perpendicular to the work plane and passes through a line you specify.
To move and mirror an object:
1. Select the objects you want to move and mirror.2. Click Edit > Move Special > Mirror....
The Move - Mirror dialog box opens.
3. Pick the start point of the mirroring plane, or enter its coordinates and angle.4. Click Move.
The objects are moved and mirrored.
21.12 Moving to another planeYou can move objects from the first plane you specify to another plane, which you specify by picking three points. The moved objects remain in the same position on the second plane as the original objects on the first plane
To move an object to another plane:
1. Select the objects you want to move.2. Click Edit > Move Special > To Another Plane.
The Rotate command is always more preferable than the Mirror command.

LE
SS
ON
4 F
ine-
tuni
ng p
art s
hape
TEKLA STRUCTURES 17 77
3. Pick the point of origin of the first plane.4. Pick a point on the first plane in the positive x direction.5. Pick a point on the first plane in the positive y direction.6. Repeat steps 3–5 for the destination plane.
21.13 Moving to another objectYou can move objects from an object to other, similar objects. This is useful, for example, when you detail previously modeled parts. The objects that you move between can have different dimensions, length, and rotation.
To move an object to another object:
1. Select the objects you want to move.2. Right-click and select Move Special > To Another Object from the pop-up menu.3. Select the object to move from (source object).4. Select the objects to move to (target object).
22 Fine-tuning part shape
You can use Tekla Structures to fine-tune the part shape in the following ways:
• fit part end to fit a part to the selected fitting line
• cut part with line to reshape the end of a part
• cut part with another part to create part-shaped cuts
• cut part with a polygon to cut a polygon shape into a part
22.1 FittingsYou can fit the end of a part by creating a straight cutting line between two points you pick. The shortest part of the part is deleted automatically.
When you fit parts, ensure that the cutting plane is perpendicular to the model view. Use a plane view when fitting.
Creating a fitting
To fit a part end:
1. Click Detailing > Fit Part End.
Use the Snap to neareast points (point on line) snap switch when fitting.

78 TEKLA STRUCTURES 17
LE
SS
ON
4 F
ine-
tuni
ng p
art s
hape
2. Select the part you want to cut with a fitting.3. Pick the first point of the cutting line.4. Pick the second point of the cutting line.
22.2 Cutting parts with a lineYou can shape the end of a part by using the Cut part with line command. A line cut cuts the end of a beam on a plane that passes through a line you pick. Several line cuts can be applied to one part end. In addition, a combination of one fitting and one or more line cuts can be applied. When you use the line cut for shortening, you have to select the side of the part which has to be removed.
To cut a part with a line:
1. Click Detailing > Cut Part > With Line or click .2. Select the part you want to cut.3. Pick the first point of the cutting line.4. Pick the second point of the cutting line.5. Select the side to be removed.
Do not apply a second fitting on the same part end, because then Tekla Structures will ignore the first fitting. This happens if you use the Fit Part End command for cutting and try to make two cuts on the same part end. In situations like this, use the Cut Part commands instead.
Fitting symbol
When you shorten parts in the longitudinal direction using a fitting or a line cut, the size of the profile is not changed in reports.

LE
SS
ON
4 F
ine-
tuni
ng p
art s
hape
TEKLA STRUCTURES 17 79
22.3 Cutting parts with another partYou can create a part-shaped cut by cutting a part with another part.
To cut a part with another part:
1. Click Detailing > Cut Part > With Another Part.2. Select the part you want to cut.3. Select the cutting part.
Tekla Structures cuts the selected main part. The part cut does not affect other parts.
4. Delete the cutting part.a Ensure that the Select cuts and fittings selection switch is off.b Select the cutting part and press Delete.
Cuts are displayed using dash-and-dot lines. It is possible to double-click the cutting line and change its shape and size.
Errors in part cuts
Occasionally erros may occur when the part is cut. In such cases, the cut part is highlighted in a transparent color.
Fitting
Line cut
Do not use cuts or fittings to change the length of a part, for the following reasons:
• Cuts may cause shop errors, because cuts do not always affect part length when you export information to NC files.
• Fittings may cause problems with connections and details.
You can create circular holes with the Cut part with another part command. Circular holes are also dimensioned in drawings. However, when creating circular holes, it is better to use the Create bolts command. For larger holes, increase the tolerance of the holes.

80 TEKLA STRUCTURES 17
LE
SS
ON
4 F
ine-
tuni
ng p
art s
hape
To have a cut created correctly, rotate the cut part.
An error can also occur when you use the Round tube (23) component. To avoid any errors, set a slight rotation for the component. Unsolved errors may result in wrong part lengths and problems in drawing creation.
22.4 Cutting parts with a polygonYou can cut a polygon shape into a part with a polygon cut. You must create the cuts in a plane view.
To cut a part with a polygonal shape:
1. Click Detailing > Cut Part > With Polygon or click .2. Select the part you wan to cut.3. Pick positions to outline the polygon to be used for cutting.
incorrect
correct

LE
SS
ON
4 B
olts
TEKLA STRUCTURES 17 81
4. To close the polygon, click the middle mouse button.
The dash-and-dot lines are cutting lines. They can be used for copying the cutting shape.
22.5 Surface treatmentYou can add surface treatment to parts. Surface treatment for steel parts include, for example, fire-proofing and unpainted areas. Surface treatments are visible only in rendered views.
When you redefine the properties of a part (for example, you change the size of a part), the surface treatment is automatically modified to fit the part.
To define the properties of the surface treatment, click Detailing > Properties > Surface Treatment....
For more information on surface treatment, see Tekla Structures Help.
Adding surface treatment to a selected area
To add surface treatment to a selected area:
1. Click Detailing > Create Surface Treatment > To Selected Area on Part Face.2. Pick the origin of the surface treatment.3. Pick a point to indicate the direction of the surface treatment.4. Select an area of the part face to apply the surface treatment to.
a Move the mouse cursor over a part. The faces that you can select appear in blue.b Select the part face.c Pick three or more points on the part face to define a polygonal area.
23 Bolts
To create bolts, you can either create a single bolt group or apply a component that automatically creates bolt groups.

82 TEKLA STRUCTURES 17
LE
SS
ON
4 B
olts
You can create different part marks for holes and bolts in drawings.
You cannot use bolt elements (such as screws, washers, and nuts) while creating holes, as Tekla Structures uses the same command for creating bolts and holes.
23.1 Bolt properties
Double-click the Create bolts button to open the Bolt Properties dialog box.

LE
SS
ON
4 B
olts
TEKLA STRUCTURES 17 83
Option Description
Bolt size Bolt diameter. Available diameters depend on the bolt standard chosen.
Bolt standard Bolt assembly standard that is defined in the bolt catalog.
Bolt type Defines whether the bolts are assembled on-site or in the shop. Default setting is Site.
Connect part/assembly Indicates whether you are bolting a secondary part or a sub-assembly.
Thread in material Indicates if the thread of the bolt can be inside the bolted parts.

84 TEKLA STRUCTURES 17
LE
SS
ON
4 B
olts
Holes
Tekla Structures uses the same command for creating bolts and holes. Before creating holes, you need to change some of the properties in the Bolt Properties dialog box.
If you want to create only holes without any bolts, clear all the Include in bolt assembly check boxes:
You can create the following types of holes:
• Round
• Oversized
Cut length Indicates which parts the bolt connects. Tekla Structures searches for parts using half the cut length value, in both directions from the bolt group plane. If you want to force a bolt to a certain length, enter a negative value for cut length.
Extra length Additional bolt length.
Shape The shape of the bolt group. The options are Array, Circle, and xy list.
Bolt dist X Bolt spacing, number, or coordinate, depending on the bolt group shape.
Bolt dist Y Bolt spacing, group diameter, or coordinate, depending on the bolt group shape.
Tolerance Tolerance = Hole diameter - Bolt diameter
Hole type Oversized or slotted. This list activates after you select Parts with slotted holes check boxes.
Slotted hole X X allowance of a slotted hole. Zero for a round hole.
Slotted hole Y Y allowance of a slotted hole. Zero for a round hole.
Rotate slots If the bolt connects several parts, you may want to rotate alternate holes by 90 degrees.
Options are Odd, Even, and Parallel.
On plane Bolt group location relative to the bolt group x axis on the work plane.
Rotation Defines how far the bolt group is rotated around the x axis, relative to the current work plane.
At depth Bolt group location relative to work plane.
Dx, Dy, Dz Offsets that move the bolt group by moving the bolt group x axis.
Option Description

LE
SS
ON
4 B
olts
TEKLA STRUCTURES 17 85
• Slotted
• Tapped
23.2 Creating a bolt groupBolt groups are used to connect parts. Bolts can penetrate one part or multiple parts. By default, bolt groups are rectangular, but it is also possible to make circular bolt groups. When you insert a bolt group, you need to pick two points. These two points determine the local x direction of the bolt group. It is important that the points you pick to create the bolt group are close enough to the parts you want to connect. The cut length property of a bolt group defines how far along the bolt axis the parts must be in order to hit the bolt group.
To create a bolt group:
1. Click Detailing > Bolts > Create Bolts or click .2. Select the shape of the bolt group in the Shape list.
Bolt groups are rectangular by default, but you can also select Circle to create a circular bolt group.
3. Select the main part to which the secondary parts will be bolted.4. Select the secondary parts.5. Click the middle mouse button to finish selecting parts.6. Pick a point, which is the bolt group origin. 7. Pick a second point to indicate the bolt group x direction.
An example of a rectangular bolt group:
An example of a circular bolt group:
A bolt group can contain a maximum of 100 bolts or holes.

86 TEKLA STRUCTURES 17
LE
SS
ON
4 B
olts
23.3 Creating a divided bolt groupYou can connect multiple parts together with a bolt group. For example, you can connect two beams with a plate that is bolted to the beams.
To connect beams with a plate and a bolt group:
1. Double-click the Create bolts button to open the Bolt Properties dialog box.2. Modify the values in the Bolt Dist X box.
You can define the number of bolt rows that are created and the spacing between them.
3. Click OK.4. Select the parts that you want to connect together.
Select first the beams and then the plate.
5. Pick the start and end points.The divided bolt group is created.

LE
SS
ON
4 B
olts
TEKLA STRUCTURES 17 87
23.4 Modifying bolt groupsIf the bolts in a bolt group are too short, you can modify them.
To modify a bolt group:
1. Select a bolt group.2. Right-click the bolt group and select Bolt parts.
The parts are highlighted.
3. Follow the instructions on the status bar to select the connected parts.The bolt length is adjusted to the new material thickness.
23.5 Creating slotted holesIn addition to circular holes, you can also create slotted holes. Slotted holes can be set either in x or in y direction.
To create a slotted hole:
1. Double-click the Create Bolts button.The Bolt Properties dialog box opens.
2. To indicate which parts should be slotted, select the desired Parts with slotted holes check boxes.When a bolt penetrates more than one part, you can define whether slotted holes are created for each part individually.
3. Set the length of the slotted holes in the Slotted hole X and Slotted hole Y boxes in the Bolt Properties dialog box.
4. If the bolt connects several parts, you can rotate alternate holes by 90 degrees by selecting one of the rotating options in the Rotate Slots list.Options to rotate the slots:

88 TEKLA STRUCTURES 17
LE
SS
ON
4 S
plit
ting
and
com
bin
ing
part
s
• even
• odd
• parallel
24 Splitting and combining parts
You can split and combine parts in Tekla Structures. Tekla Structures retains the properties, attached objects, and connections even when parts are split.
24.1 Splitting partsYou can use splitting with straight parts, curved beams without offsets, or normal and tapered reinforcing bar groups. You can also split plates and slabs by using a polygon. You cannot split polybeams.
To split a part:
1. Click Edit > Split.2. Select the part you want to split.3. Pick a point for the dividing line.
If necessary, you can create the points before selecting the parts. New start and end points are placed on the splitting points.
If you have already carried out the numbering, the part and assembly number is allocated to the part that was closest to the initial start point of the part. The other part gets a new number.

LE
SS
ON
4 S
plit
ting
and
com
bin
ing
part
s
TEKLA STRUCTURES 17 89
24.2 Combining partsYou can combine existing parts in Tekla Structures. This can be useful when you want to model complex parts (such as folded plates) that are otherwise difficult to model, or when you want to model prefabricated parts that are delivered to the workshop already attached to profiles.
When you select the parts you want to combine, the part properties of the part that is selected first are used for the combined part.
To combine parts:
1. Click Edit > Combine.2. Select the first part.3. Select the second part.
If the centerlines of the part are not in line with each other, the centerlines are combined by taking the largest distance between the start and end points from both parts.
You cannot split bolt groups.
The space is filled when parts are combined.
The furthest distance between the start and the end point.
Combining does not work for contour plates or polybeams.

90 TEKLA STRUCTURES 17
LE
SS
ON
4 P
oint
s
25 Points
To place an object in a model you may need to pick points. To place an object where no lines or objects intersect, you have the following options:
• Use snapping commands. See Snapping (p. 40).
• Use construction planes, lines and circles.
• Create points.
To create points, use the buttons in the Points toolbar, or select a command from Modeling > Add Points.
For more information on creating points and using construction planes, lines and circles, see Tekla Structures Help.
25.1 Creating points along a lineThe Add points on line command creates points at equal intervals along a line. You define the number of points and pick the line.
To create points along a line:
1. Double-click the Add points on line button.The Divided Line Points dialog box opens.
2. Enter the number of dividing points.3. Click OK.4. Pick the start point of the line.5. Pick the end point of the line.
When you combine parts, Tekla Structures retains the attached objects and connections. Tekla Structures does not recreate connections in the part that was selected first.

>
TEKLA STRUCTURES 17 91
LE
SS
ON
5
LESSON 5In this lesson, you will learn the following things:
• how to modify the work area
• how to create, move, and delete clip planes
• how to use work planes
• how to use more advanced snapping features

92 TEKLA STRUCTURES 17
LE
SS
ON
5
26 Modifying the work area
You can modify the work area to suit particular situations. You can fit the work area and locate, for example, distant objects from an oversized work area. It is also possible to hide the work area lines.
26.1 Fit work area to selected partsTo fit work area to selected parts:
1. Select the model objects you want to see in the work area.2. Click View > Fit Work Area > To Selected Parts in Selected Views.
The work area includes the selected objects. The objects outside the work area still exist, but they are not visible.
26.2 Fit work area using two pointsYou have to be working with a plane view in order to fit work area using two points. If you are currently working in 3D view, press Ctrl + P to switch to plane view.
To fit work area using two points:
1. Click View > Fit Work Area > Using Two Points or click .2. Pick the two points you want as corner points for the work area.

LE
SS
ON
5
TEKLA STRUCTURES 17 93
The work area is changed according to the points you picked.
26.3 Fit work area to entire model in selected viewsTo fit the work area to the entire model, click View > Fit Work Area > To Entire Model in Selected Views. The work area includes all model objects in selected views.
26.4 Finding distant objectsThe work area in a model view can be oversized if, for example, one or more objects have been positioned too far from the origin. You can use the Find Distant Objects command to correct the situation.
To find distant objects:
1. Click Tools > Diagnose & Repair Model > Find Distant Objects.Tekla Structures displays a list of object IDs. At the end of the list, Tekla Structures displays additional six objects that have the biggest and smallest x, y, or z coordinates.

94 TEKLA STRUCTURES 17
LE
SS
ON
5
2. Select an object in the list.3. Right-click and select a command from the pop-up menu.
You can, for example, inquire or delete the object.
26.5 Finding distant pointsThe work area in a model view can be oversized if, for example, one or more points have been positioned too far from the origin.
To find distant points:
1. Ensure that the Select points and Select objects in components selection switches are active.
2. Click Edit > Select All Objects or press Ctrl + A to select all points.3. Check the number of selected points in the status bar and press Delete.4. Click View > Fit Work Area > To Entire Model in Selected Views to fit the model in the
work area.
26.6 Finding distant reference modelsThe work area in a model view can be oversized if, for example, one or more reference models have been positioned too far from the origin.
To find distant reference models:
1. Click File > Reference Model List... and select the reference model in the list.2. Click View > Fit Work Area > To Selected Parts in Selected Views.
The work area is resized to the reference model.
3. Move the reference model.
The other switches in the Selecting toolbar must not be active.

LE
SS
ON
5 C
lip p
lane
s
TEKLA STRUCTURES 17 95
26.7 Hiding the work areaIf you want, you can hide the green work area box. This can be useful, for example, when creating screenshots.
To hide the work area:
1. Click Tools > Options > Advanced Options... > Model View.2. Set the XS_HIDE_WORKAREA advanced option to TRUE.3. Click OK or Apply.4. Click View > Redraw All. Tekla Structures hides the work area.5. To make the work area visible again, set the advanced option to FALSE.
27 Clip planes
Clip planes enable you to focus in on the required detail in the model. For example, you can use clip planes to see what is inside the model.
You can create up to six clip planes in any rendered model view.
27.1 Creating a clip planeTo create a clip plane:
1. Click View > Create Clip Plane, or click .
2. Select a plane.
The clip plane symbol appears in the model.
Alternatively, hold down the Ctrl and Shift keys when clicking View > Redraw All to hide the green work area box. To make the box visible again, click View > Redraw All again.

96 TEKLA STRUCTURES 17
LE
SS
ON
5 C
lip p
lane
s
3. Repeat step 2 to create as many clip planes as needed. 4. To finish creating clip planes, press Esc, or right-click and select Interrupt.
27.2 Moving a clip planeTo move a clip plane:
1. Select the clip plane you want to move.2. Click the clip plane symbol and drag it to a new location.

LE
SS
ON
5 C
lip p
lane
s
TEKLA STRUCTURES 17 97
27.3 Deleting a clip planeTo delete a clip plane:
1. Select the clip plane you want to delete.2. Click the clip plane symbol and press Delete.
You can change the location of the clip plane symbol by holding down the Shift key and dragging the symbol.

98 TEKLA STRUCTURES 17
LE
SS
ON
5 W
ork
plan
e
28 Work plane
The red coordinate arrow symbol indicates the work plane, which is the local coordinate system of the model. The work plane also has its own grid, which can be used for positioning parts. Tekla Structures displays the work plane grid in dark red color.
To display the work plane grid, select Work plane from the second list box on the Snapping toolbar.
The red arrow symbol shows the xy plane. The z direction follows the right-hand rule.
You can shift the work plane to any position by picking points, parallel to one of the global basic planes, or on a part or view plane. When modeling sloped parts, shifting the work plane helps you to place parts accurately.
28.1 Set work plane parallel to a planeYou can set the work plane parallel to the xy, xz, or zy directions.
To set the work plane parallel to a plane:
1. Click View > Set Work Plane > Parallel to XY(Z) Plane..., or click .The Work plane dialog box opens.
If you cannot see the arrow symbol because the parts block the view, press Ctrl + 2 to make the parts transparent.

LE
SS
ON
5 W
ork
plan
e
TEKLA STRUCTURES 17 99
2. Select the Plane and enter the Depth coordinate.The depth coordinate defines the distance of the work plane from the global origin along a line that is perpendicular to the plane parallel to the third axis. The default depth coordinate value is 0.
3. Click Change.
28.2 Set work plane using three pointsYou can set the work plane by picking three points. The first point you pick is the origin, the second point defines the x direction, and the third point point defines the y direction of the work plane. Tekla Structures fixes the z direction according to the right-hand rule.
To set a work plane using three points:
1. Click View > Set Work Plane > Using Three Points, or click .2. Pick the origin for the work plane.3. Pick a point in the positive x direction.4. Pick a point in the positive y direction.
28.3 Set work plane parallel to view planeYou can use this command to set the work plane to be the same as the view plane of a selected view.
To set a plane parallel to a view plane:
1. Click View > Set Work Plane > Parallel to View Plane, or click .2. Select the view you want to modify.
28.4 Set work plane to top plane of a partWhen a view is created, you initially work in the plane that belongs to that view. If you want to work in, for example, the roof plane that is sloping, you need to change the work plane. For example, you can set the work plane to top plane of a selected part.
To set a work plane to top plane of a part:
1. Click View > Set Work Plane > To Part Top Plane, or click .2. Select the part.

100 TEKLA STRUCTURES 17
LE
SS
ON
5 A
dvan
ced
snap
ping
28.5 Shifting the work planeYou can shift the work plane to any position by picking points, parallel to one of the global basic planes, or on a part or view plane. When modeling sloped parts, shifting the work plane helps you to place parts accurately. For example, to model horizontal bracing and purlins in a sloped roof, you need to shift the work plane to the slope of the roof.
To shift the work plane:
1. Click View > Set Work Plane and select one of the commands.For more information on each command, see the corresponding menu tooltip.
2. Shift the work plane by following the instructions on the status bar.3. Optional: In the second list box on the Snapping toolbar, select Work plane to display
the work plane grid.
29 Advanced snapping
You can use advanced snapping features to control snapping accurately.
29.1 Numeric snappingUse the Enter a numeric location toolbar to enter position coordinates you want to snap to.
To display the toolbar, initiate a command that requires you to pick positions, and then do one of the following:
• Start entering the coordinates using the keyboard

LE
SS
ON
5 A
dvan
ced
snap
ping
TEKLA STRUCTURES 17 101
• Click Tools > Enter a Numeric Location and select an option.
See Numeric location coordinates (p. 101) for information on location coordinates.
29.2 Numeric location coordinatesThe following table explains the types of information you can enter in the Enter a Numeric Location toolbar.
29.3 Creating a temporary reference pointYou can create a temporary reference point to use as a local origin when snapping in models.
You can enter Description Example
Cartesian coordinates
The x, y, and z coordinates of a position separated by commas.
Polar coordinates
A distance, an angle on the xy plane, and an angle from the xy plane separated by angle brackets.
Angles increase in the counterclockwise direction.
Absolute coordinates
The coordinates based on the origin of the work plane.
Relative coordinates
The coordinates relative to the last position picked.
One value A distance to an indicated direction.
Two coordinates
If you omit the last coordinate (z) or angle, Tekla Structures assumes that the value is 0.
Three coordinates
In drawings, Tekla Structures ignores the third coordinate.

102 TEKLA STRUCTURES 17
LE
SS
ON
5 A
dvan
ced
snap
ping
To create a temporary reference point:
1. Initiate a command that requires you to pick positions. For example, create a beam.2. Pick the start point.3. Hold down the Ctrl key and pick a position.
A green cross indicates that this position is now a temporary reference point.
4. Repeat step 3 to create as many reference points as needed.5. Release the Ctrl key and pick the end point.
Tekla Structures creates the object between the starting point and the end point.
29.4 Locking a coordinateYou can lock the x, y, and z coordinates on a line. This is useful when you need to determine a point to pick and the needed point does not exist on the line. When a coordinate is locked, you can snap to points only in that direction.
To lock the x coordinate, for example, press X on the keyboard. To unlock the coordinate, press X again.
Creating a beam at a certain level
1. Click Modeling > Create Steel Part > Beam and pick the start point.2. Snap to the start point and press Z to lock the z direction.

LE
SS
ON
5 A
dvan
ced
snap
ping
TEKLA STRUCTURES 17 103
3. Pick the end point to create the beam at a locked level.
29.5 Snapping examplesFollowing examples show how snapping can be used.
Creating a beam with a certain length
To create a beam with a certain length:
1. Click Modeling > Create Steel Part > Beam.2. Pick a start point for the beam.3. Move the pointer.
The dimension changes as you move the pointer. The zooming level affects the precision of snapping.

104 TEKLA STRUCTURES 17
LE
SS
ON
5 A
dvan
ced
snap
ping
4. When the dimension is correct, click to create the beam.
Creating a shifted beam with a certain length
To create a shifted beam with a certain length:
1. Click Modeling > Create Steel Part > Beam.2. Pick the first point.3. Enter the length and the angle of the shifted beam relative to the workplane. Use the
shortcut R and the symbol < as a separating character.
The direction of the x axis of the workplane is always 0°.

LE
SS
ON
5 A
dvan
ced
snap
ping
TEKLA STRUCTURES 17 105
4. Press Enter or click OK to create the beam.
Creating two parallel and equally long beams
To create two equally long beams:
1. Ensure that the Snap to line extensions switch is active.2. Click Modeling > Create Steel Part > Beam.3. Pick the start point for the beam.4. Pick the end point for the beam.
The first beam is created.
5. Snap to the start point of the first beam.You can now snap to the extension line of the first beam’s start point.

106 TEKLA STRUCTURES 17
LE
SS
ON
5 A
dvan
ced
snap
ping
6. Pick the start point for the second beam on the extension line.7. Snap to the end point of the first beam.
You can now snap on the extension line of the first beam end point. The snap point is parallel to the first beam, when a blue line runs through the beam.
8. Pick the end point for the second beam on the extension line.You have created two parallel and equally long beams.

LE
SS
ON
5 A
dvan
ced
snap
ping
TEKLA STRUCTURES 17 107
Creating a beam using a temporary reference point
To create a beam using a temporary reference point:
1. Click Modeling > Create Steel Part > Beam.2. Hold down the Ctrl key to pick a temporary reference point as an origin.3. Move the pointer in the direction of the start point of the beam.
4. Enter a distance from the temporary reference point and press Enter or click OK. The start point of the beam is picked.
5. Move the pointer in the direction of the end point of the beam.

108 TEKLA STRUCTURES 17
LE
SS
ON
5 A
dvan
ced
snap
ping
6. Pick the end point to create the beam.
Creating a beam using snap override
To create a beam using snap override:
1. Click Modeling > Create Steel Part > Beam.2. Use a temporary reference point to pick the start point of the beam at the center of the
grid line.

LE
SS
ON
5 A
dvan
ced
snap
ping
TEKLA STRUCTURES 17 109
3. Right-click to select an option from the pop-up menu or use the Snap Override toolbar to temporarily override the snap settings.
4. Move the pointer in the direction of the end point of the beam.

110 TEKLA STRUCTURES 17
LE
SS
ON
5 A
dvan
ced
snap
ping
5. Enter the length of the beam and press Enter or click OK.The beam is created.

>
TEKLA STRUCTURES 17 111
LE
SS
ON
6
LESSON 6In this lesson, you will learn the following things:
• how to use the component catalog
• how to create and modify components
• how to create component default views
• how to use the material catalog
• how to use the profile catalog

112 TEKLA STRUCTURES 17
LE
SS
ON
6
30 Component catalog
The component catalog contains all the components. To open the component catalog, click Detailing > Component > Component Catalog... (Create Component) or press Ctrl + F.
You can browse for the components or search by using terms and keywords.
Search
View folders
View details
View thumbnails
Show / hide descriptions
Create a component using the component tool you used last with its active properties.
Enter the search term here.
Use the list to view component groups, such as bracing connections and reinforcements.

LE
SS
ON
6 C
ompo
nen
ts
TEKLA STRUCTURES 17 113
31 Components
Components are tools that you can use to automatically create the parts, welds, and bolts required to connect parts. They are linked to main parts, so, when you modify a main part, the associated component also changes.
Components are divided into three sub-types:
Using the components has the following advantages:
• The settings of a component can be saved to a file. The settings can be used in other projects.
• When you modify a part, all details and connections attached to that part are updated automatically.
• When you copy or move objects, all associated details and components are also copied or moved.
Component description
Double-click the name to set the properties and create the component.
It is useful to view the thumbnail images in the component catalog. Most system components have a default thumbnail image, which shows you a typical situation where the component can be used.
Component type Description Examples Symbol
Connection Connects two or more parts, and creates all the required objects such as cuts, fittings, parts, bolts, and welds.
Two-sided clip angle, bolted gusset.
Corbel connection (14)
Detail Adds a detail or a reinforcement to a main part. A detail is only connected to one part. When you create a detail, Tekla Structures prompts you to select a part, followed by a point to locate the detail.
Stiffeners, base plates, lifting hooks
Beam reinforcement, pad footing reinforcement
Modeling tool
Automatically creates and assembles the parts to build a structure, but does not connect the structure to existing parts. Modeling tools can include connections and details.
Stairs, frames, towers

114 TEKLA STRUCTURES 17
LE
SS
ON
6 C
ompo
nen
ts
31.1 Creating a componentUse components to create a detail, a connection or a structural element in a model.
To create a component:
1. Click Detailing > Component > Component Catalog... (Create Component), or click
to open the component catalog.2. Click the component name in the component catalog.3. Follow the instructions on the status bar to select the parts or points required to create
the component.4. If required, click the middle mouse button to end the command.5. Check that the component symbol is green, which indicates that the component was
created successfully.6. Examine the component in the model to check if you need to make any changes.
31.2 Component statusTekla Structures uses different-colored component symbols to show the status of connections and details:
31.3 Modifying component propertiesTo modify a component, double-click the component symbol in the model. The component dialog box appears. This is where you modify the component properties.
When you create a component you are unfamiliar with, you should use the default properties. Create the component and check it to see what needs to be modified.
For more information on component properties, see Tekla Structures Help.
Color Status Tip
Green
Component created successfully
Yellow
Component created, but has problems
Often occurs when bolts or holes have an edge distance less than the default value for that component.
Red
Component creation failed
A common reason is that the up direction is not appropriate.
For more information, see Tekla Structures Help.

LE
SS
ON
6 C
ompo
nen
ts
TEKLA STRUCTURES 17 115
31.4 Saving component propertiesYou can save the modified component properties.
To save the component properties:
1. In the component dialog box, enter the name of the properties in the Save as box.2. Click Save as.
The properties file is saved in the model folder.
You can recognize the properties file by checking the file extension. For example, if you save the properties of the End plate detail (1002) component, the file extension is j1002.
31.5 Conceptual componentsConceptual components are meant to be used as reference information for further fabrication detailing. Conceptual components look similar to detailed components but do not include the option to change part numbering or assembly numbering settings.
Modifying part properties, such as the size of the component main part, does not automatically convert a detailed component to a conceptual one, or vice versa. For example, if you use the Engineering configuration and modify the model, detailed components do not convert back to conceptual components.
The Tekla Structures configuration you have determines which components you can create:
Converting a conceptual component to a detailed component
An individual conceptual component that has been created with Engineering or Reinforced Concrete Detailing configuration can be converted to a detailed component in Full, Steel Detailing, and Precast Concrete Detailing configurations.
To convert a conceptual component to a detailed component:
1. Select the component symbol.2. Click Detailing > Component > Convert to Detailing Component.
TypeSymbol Configuration Description
Conceptual Engineering
Reinforced Concrete Detailing
Conceptual component does not create assemblies or cast units.
The dialog box is the same as in detailed component, but does not contain options for part and assembly positions.
Detailed Full
Steel Detailing
Precast Concrete Detailing
Detailed component contains part and assembly numbering fields and creates needed assemblies and cast units.

116 TEKLA STRUCTURES 17
LE
SS
ON
6 C
ompo
nen
ts
31.6 ExampleTwo examples of using a component are presented here. In the first example, a base plate detail is created. In the second example, the geometry of the base plate detail is modified.
Creating a base plate detail
The component catalog contains several base plate details. In this example, you use one of them.
Create a steel column before creating the base plate detail. For information on creating a steel column, see Creating a steel column (p. 34).
To create a base plate detail:
1. Press Ctrl + F to open the component catalog.2. Enter "base plate" in the Search box and click Search.
The search results appear in the list.
3. Select Base plate (1004). The status bar displays instructions.
4. Select the column.5. Pick a point at the base of the column to indicate where to create the base plate.
The base plate is created.
6. Check that the connection symbol is green, which indicates that the connection was created successfully.
Modifying the base plate detail
In this example, you modify the geometry of the base plate detail.
To modify a base plate detail:
1. Ensure that the Select components switch is active.2. Double-click the base plate detail to open the component properties dialog box.3. On the Picture tab, enter values in boxes to modify the base plate geometry.

LE
SS
ON
6 C
reat
ing
com
pone
nt d
efau
lt vi
ews
TEKLA STRUCTURES 17 117
4. Click Modify.The geometry of the base plate detail changes.
32 Creating component default views
You can create several views of a component to view it from different viewpoints.
To create views of a component:
1. Click the component symbol to select the component.2. To create views, right-click and select Create View > Default Views of Component
from the pop-up menu. Tekla Structures creates four views: front, end, top, and perspective.
To check dimensions, such as bolt locations and edge distances, work in the Component front view and use the Measure tool.

118 TEKLA STRUCTURES 17
LE
SS
ON
6 M
ater
ial c
atal
og
33 Material catalog
The material catalog contains information on material grades. You can open the Modify Material Catalog dialog box by clicking Modeling > Material Catalog.... Materials are displayed in a hierarchical tree grouped according to, for example, steel and concrete. Material grades are located under the materials in the tree. You can view material grade properties by clicking them in the tree.

LE
SS
ON
6 M
ater
ial c
atal
og
TEKLA STRUCTURES 17 119
The Modify Material Catalog dialog box contains information on the materials on four tabs:
• The General tab
• The Analysis tab
• The Design tab
• The User attributes tab
33.1 Adding a material gradeYou can add a new material grade in two alternate ways.
Option 1 1. Click Modeling > Material Catalog....
Tab Description
The General tab The General tab has boxes for three alternative names for the material. These are usually the material names used in different countries or standards. It also contains the profile and plate density values.
The Analysis tab The Analysis tab has information on the properties used in structural analysis. The structure is analyzed using the Finite Element Method.
The Design tab The Design tab has information on the design-specific properties such as strengths and partial safety factors.
The User attributes tab The User attributes tab can be used to create your own attributes for material grades.

120 TEKLA STRUCTURES 17
LE
SS
ON
6 P
rofil
e ca
talo
g
The Modify Material Catalog dialog box opens.
2. Select a material grade that is similar to the one that you want to create.3. Right-click the material grade and select Copy Grade from the pop-up menu.4. Change the material name.5. Modify the material grade properties.6. Click OK to save the material grade and exit the dialog box.7. Click OK in the save confirmation dialog box to save the changes in the Material
Catalog.
Option 2 1. Click Modeling > Material Catalog....The Modify Material Catalog dialog box opens.
2. Change the material grade name in the Selected grade box.3. Enter the material grade properties.4. Click OK to save the material grade and exit the dialog box.5. Click OK in the save confirmation dialog box to save the changes in the Material
Catalog.
33.2 Deleting a material gradeYou can delete material grades from the Material Catalog dialog box.
To delete a material grade:
1. Click Modeling > Material Catalog.The Modify Material Catalog dialog box opens.
2. Right-click a material grade of your choice and select Delete.3. Click OK.4. Click OK again in the save confirmation dialog box.
The material grade is deleted.
34 Profile catalog
The profiles in the Modify Profile Catalog dialog box are displayed in a tree structure. They are grouped according to rules such as profile type (for example, I profiles) and profile sub-type (for example, HEA).

LE
SS
ON
6 P
rofil
e ca
talo
g
TEKLA STRUCTURES 17 121
Different icons denote profile types, rules and profiles within the tree:
Icon Description
Profile type rule. Different icons show different types.
Rule
Individual standard profile
Individual parametric profile

122 TEKLA STRUCTURES 17
LE
SS
ON
6 P
rofil
e ca
talo
g
34.1 Adding a profileYou can add profiles to the profile catalog. The simplest way to create a new profile is by modifying a copy of an existing profile.
To add a profile:
1. Click Modeling > Profiles > Profile Catalog....The Modify Profile Catalog opens.
2. Select an existing profile that matches best with the new profile.3. Right-click the profile.4. Select Copy Profile from the menu.
The copied profile name is added with COPY after its name.
5. Edit the profile name in the Profile name box. 6. Enter the correct values in the Value column.7. Click Update and OK.8. Click OK in the Save confirmation dialog box.
34.2 Modifying a profileYou must have the Profile Catalog open before you can start modifying profiles.
To modify a profile:
1. Click Modeling > Profiles > Profile Catalog....2. Select the profile you want to modify.3. Modify dimensions in the Value column.4. Click Update and OK.5. Click OK in the Save confirmation dialog box.
34.3 Deleting a profileTo delete a profile:
1. Click Modeling > Profiles > Profile Catalog....2. Select the profile you want to delete.3. Right-click and select Delete Profile.4. Click OK
The profile is deleted.

LE
SS
ON
6 P
aram
etr
ic p
rofil
es
TEKLA STRUCTURES 17 123
5. Click OK in the Save confirmation dialog box.
35 Parametric profiles
You can use parametric profiles to model profiles that are standard in a specific environment, but do not exist in the Tekla Structures profile catalog. Parametric profiles are partly user-definable and they have a predefined shape, but you determine their size by giving one or more parameters.
Tekla Structures includes several parametric profiles, such as gutter profiles or spheres.
User-defined profiles
Tekla Structures includes a cross section sketch editor that you can use to create and modify your own profile cross sections. The cross sections you create using the cross section sketch editor can be parametric or fixed. You can change the dimensions of parametric cross sections each time you use them in a model.
Parametric profiles are not polybeams. They cannot be unfolded and a flat pattern cannot be created.

124 TEKLA STRUCTURES 17
LE
SS
ON
6 P
aram
etr
ic p
rofil
es

>
TEKLA STRUCTURES 17 125
LE
SS
ON
7
LESSON 7In this lesson, you will learn the following things:
• how to enter project information
• how to switch between single and multi-user modes
• how to check the model
• how to make inquiries about objects
• how to represent objects in model views
• how to use the phase manager

126 TEKLA STRUCTURES 17
LE
SS
ON
7
36 Entering project information
When you start a project, enter project information to display the information automatically in reports and drawings.
To enter the project information:
1. Click File > Project Properties... to open the Project Properties dialog box.2. Enter the project information you want to use. All the boxes are optional.3. Click User-defined attributes to open the Tekla Structures Project (1) dialog box,
where you can enter additional information.

LE
SS
ON
7 S
witc
hing
bet
wee
n si
ngle
-use
r an
d m
ulti-
user
mod
es
TEKLA STRUCTURES 17 127
4. Click OK to save your changes and close the Tekla Structures Project (1) dialog box.5. Click OK to save your changes and close the Project Properties dialog box.
37 Switching between single-user and multi-user modes
You can switch between single-user and multi-user modes by using the different options in the Open dialog box.
Opening multi-user model in single-user mode
To open a multi-user model in single-user mode:
1. Click File > Open... to open the Open dialog box.2. Select the multi-user model.
3. Right-click and select Open as single-user model from the pop-up menu.
Opening single-user model in multi-user mode
To open a single-user model in multi-user mode:
1. Click File > Open... to open the Open dialog box.2. Select the single-user model.3. Right-click and select Open as multi-user model from the pop-up menu.4. Tekla Structures prompts for the name of the server. In the Open as multi-user model
dialog box, enter the server name or select it from the list, and then click OK.
38 Checking the model
When the model is complete, you need to check it. There are several methods available for checking the model:
• Clash checking
• Flying through the model
• Checking using reports
The contents of the Tekla Structures Project (1) dialog box depend on the Tekla Structures environment. The default tabs and options of the dialog box are different in different Tekla Structures environments.
The Model type column indicates whether the model is a single-user or a multi-user model. The button with three men indicates a multi-user model.

128 TEKLA STRUCTURES 17
LE
SS
ON
7 C
heck
ing
the
mod
el
• Checking the views
38.1 Finding clashes in a modelYou can run a clash check to find parts, reinforcements, bolts, or reference model objects that collide.
The following reference model file types are supported in clash checking:
• IFC
• DWG
• DGN
To find clashes in a model:
1. Click Tools > Clash Check Manager.2. In the model, select the objects you want to include in the clash check.
Alternatively, if you are using Model Organizer, select the sections and storys for which you want to run the clash check. Right-click and select Select in the Model.
3. Click to check the objects.You can continue working during the clash check. When the clash check is complete, the status bar message changes from Clash checking in progress to Ready.
4. To highlight a clash in the model, select a row in the list of clashes.The related model objects are selected.
5. To zoom the active view so that the selected objects are shown in the center of the view, double-click a row.
6. If you want to include more objects in the clash check, select the desired model objects and re-run clash check.New clashes are appended to the end of the list.
Do not run the clash check for the entire model. For best results, run the clash check only for appropriate sections and storys.
If you cannot find the clashes in the model, change the representation of objects to Show Only Selected (Ctrl+5) for better visibility.
After removing or modifying objects, you can re-run clash check to see if the clash still exists. To do this, select the desired rows in the list of clashes and re-run clash check.

LE
SS
ON
7 C
heck
ing
the
mod
el
TEKLA STRUCTURES 17 129
38.2 Flying through the modelUse the Fly command to travel through the model. You can change the direction and vary the speed as you go.
To fly through a model:
1. Set view projection to Perspective.a Double-click the view to open the View Properties dialog box.b In the Projection list box, select Perspective.c Click Modify.
2. Click View > Fly.3. Select a view. The mouse pointer changes into an arrow and a cross. The arrow indicates
the current flying direction.
4. Drag the mouse to move around in the model.
• To fly forward, move the mouse forward.
• To change the flying direction, drag the mouse in the desired direction.The flying speed grows exponentially when you are approaching the model from a distance.
• To move up or down, hold down Ctrl and drag the mouse forward or backward.
• To change the camera angle, scroll with the mouse wheel.
• To fly in the in the direction of the camera angle, hold down Shift and scroll forward or backward.
5. To stop flying, press Esc.
38.3 Checking using reportsYou can check models using reports. Reports can be lists of drawings, bolts, or parts. Reports can contain information from selected parts or the entire model.
You can generate the following types of reports:
• Bolt, nut, washer, and material lists
• ID listsThe main feature of the ID lists is that the lines that contain profiles can be selected. As a result, the accompanying profile will be highlighted in the model. This is useful if a profile is hard to locate.
• User-defined attributes list
A user-defined attribute list can be used to check that the correct profiles are shortened.
The Fly command only works rendered views with Projection set to Perspective.

130 TEKLA STRUCTURES 17
LE
SS
ON
7 I
nqui
ring
the
mod
el
To check using reports:
1. Click Drawings & Reports > Numbering > Number Series of Selected Objects.
2. Click Drawings & Reports > Create Report..., or click .The Report dialog box opens.
3. Select a report from the report templates4. Click Create from all or Create from selected button.
39 Inquiring the model
The inquire tool displays the properties of a particular object, or a group of objects, within the model.
The Inquire Object dialog box displays information relevant to the objects you select.
39.1 Inquiring object propertiesUse the Inquire object command to display the properties of a particular object, or group of objects, within the model.
To inquire object properties:

LE
SS
ON
7 R
epre
sent
ing
obj
ects
in m
odel
vie
ws
TEKLA STRUCTURES 17 131
1. Click Tools > Inquire > Object, or click .2. Select an object.
The object can be, for example, a part, a bolt, a component, or a weld.
The Inquire object dialog box opens. It displays the relevant information regarding the object. The information displayed depends on the selected object.
The selected object and all parts of the object are highlighted.
Inquiring bolts
You can use the Bolt Parts command to display parts that belong to a bolt group. With this command you can also change the parts that belong to a bolt group.
To inquire parts in bolt groups:
1. Select the bolts.2. Right-click and select Bolt Parts from the pop-up menu.
Main parts are highlighted with red and secondary parts with yellow.
39.2 Inquiring the center of gravityYou can inquire an object’s center of gravity. The object can be a part or an assembly.
To inquire the center of gravity:
1. Select an object.2. Click Tools > Inquire > Center of Gravity.
40 Representing objects in model views
Use object representation settings to modify the color and transparency of objects in the model view. Objects are grouped by a set of rules and conditions which can be used to control how the objects are displayed. Changing the object representation settings in the Object Representation dialog box affect all model views.
To set object representation settings in a model view:
1. Click View > Representation > Object Representation....The Object Representation dialog box opens.
2. Load the setting you want to use.The objects are displayed according to the settings. By default, several standard settings are included, but you can also create object representation settings yourself.
When calculating the center of gravity of an object, bolts and welds are not taken into account whereas polygon cuttings, part cuttings, fittings, and line cuts are taken into account in the calculation.

132 TEKLA STRUCTURES 17
LE
SS
ON
7 R
epre
sent
ing
obj
ects
in m
odel
vie
ws
3. Click Modify and OK.
40.1 Creating object representation settingsBy default, several standard settings are included in the object representation, but you can also create object representation settings by yourself.
This example shows how to create a new object group where all columns will be represented in blue with 70% transparency.
To create object representation settings:
1. Click View > Representation > Object Representation....The Object Representation dialog box opens.
2. Click the Add row button.A second object group is added. Initially, the new object group has the same properties as the first object group.
3. In the Object group list box, select All to activate the arrow button.4. Click the arrow button to open a drop down menu.
The drop down menu contains all the default options for object groups.
5. Select Create new group... from the list.The Object Group - Representation dialog box opens.
6. In the Category list box, select Part.7. In the Property list box, select Name.
The part name is used for selecting columns.
8. In the Condition list box, select Equals.9. In the Value list box, enter COLUMN.
Note that all the letters must be capitalized.
10. In the box next to the Save as button, enter a name for the group. For example, column. You will be able to reuse the new object condition in other models.
Changing the settings in the Object Representation dialog box affects all model views.

LE
SS
ON
7 R
epre
sent
ing
obj
ects
in m
odel
vie
ws
TEKLA STRUCTURES 17 133
11. Click Close.The Object Group - Representation dialog blox closes. Note that the Object Representation dialog box is still open.
12. In the Object Representation dialog box, in the Color list box, click Color by class to activate the arrow button.
13. Click the arrow button and select blue color from the drop down menu.14. In the Transparency list box, click Visible list box to activate the arrow button.15. Click the arrow button and select 70% transparent from the drop down menu.16. Click Modify.
40.2 Defining your own colors to model object groups
You can customize the color of model objects by selecting a specific color for each object group. You can use an unlimited number of colors.
To define colors for object groups:
1. Click View > Representation > Object Representation.The Object Representation dialog box is displayed.
2. Load the object representation settings that you want to change.3. Click Add row to add a new object group or select an existing object group from the
Object Group list.4. Click the Color list arrow and then click Choose color....5. Do one of the following:
• Click a color in the Basic colors palette or in the color window.

134 TEKLA STRUCTURES 17
LE
SS
ON
7 R
epre
sent
ing
obj
ects
in m
odel
vie
ws
• Click Define Custom Colors and create a color of your own:
a Click a color in the color window and then click the desired color depth on the color bar on the right, or enter RGB values.
b Click Add to Custom Colors.c Click the color in the Custom colors palette to select it.
6. Click OK.7. Select the desired Transparency option.8. Click Save to save the changes.9. Click Modify to change the representation of the objects.When you open the Object Representation dialog box the next time, the Color list shows a maximum10 colors that you last defined above the dashed line.

LE
SS
ON
7 P
hase
Man
ager
TEKLA STRUCTURES 17 135
41 Phase Manager
Use phases to break up a model into sections. Only parts can be split into phases.
Phases are often used to indicate erection sequences. You can create reports and views, hide objects, and copy objects from other models, according to their phase number.
Used the Phase Manager dialog box to create phases. You can open the Phase Manager dialog box from Tools > Phase Manager... or by using the shortcut Ctrl + H.

136 TEKLA STRUCTURES 17
LE
SS
ON
7 P
hase
Man
ager
41.1 Dividing the model into phasesTo divide a model into phases:
1. Click Tools > Phase Manager.... The Phase Manager dialog box appears.
2. Click Add to create new phases.3. Click Set current to make the selected phase the current phase.
From now on, Tekla Structures assigns all objects you create to the current phase. The @ character in front of the phase number indicates the current phase.
4. Divide the model into phases.a To identify the phase of an object, select an object and click Phases by objects.
Tekla Structures selects the phase of the object.
b To see which objects belong to a certain phase, select a phase from the list and then click Objects by phases.Tekla Structures highlights the corresponding objects in the model.
c To change the phase of one or more objects, select the objects, select a phase from the list, and then click Modify phase.
Option Description
The Number box You can enter the number of the phase in the Number box.
The Name box You can enter the name of the phase in the Name box.
The Filter button You can use the Filter button to filter the listed phases by the number and/or criteria that has been entered in the Number and Name boxes.
The Set Current button The Set Current button determines to which phase the object belongs. The current phase is indicated by @ character.
The Add button The Add button can be used to create new phases.
The Delete button The Delete button can be used to delete phases.
The Phases by objects button The Phases by objects button can be used to determine in which phase(s) the selected object(s) belong to. If you select objects that belong to several phases, they are highlighted in the Phase Manager.
The Objects by phases button The Objects by phases button can be used to determine which objects belong to the selected phase. The object will be highlighted in the model.
The Modify phase button The Modify phase button can be used to change the phase for one or more objects.

LE
SS
ON
7 P
hase
Man
ager
TEKLA STRUCTURES 17 137
5. Click OK to save your changes.

138 TEKLA STRUCTURES 17
LE
SS
ON
7 P
hase
Man
ager

>
TEKLA STRUCTURES 17 139
LE
SS
ON
8
LESSON 8In this lesson, you will learn the following things:
• how to define custom components
• how to use reference models
• how to publish models as web pages
• how to open models in Model Reviewer

140 TEKLA STRUCTURES 17
LE
SS
ON
8
42 Custom components
Tekla Structures contains lots of predefined components that can be used for creating details and connections. However, you can create your own custom components, if Tekla Structures does not contain required components. When you have created a custom component, you can use it the same way as any Tekla Structures system component.
42.1 Custom component typesYou can create four types of custom components:
Type Description Example
Connection
Creates connection objects and connects secondary part(s) to a main part.
Component symbol is green.
Detail Creates detail objects and connects them to a main part at a picked location.
Component symbol is green.

LE
SS
ON
8
TEKLA STRUCTURES 17 141
42.2 Exploding a componentExploding components is very useful when defining custom components. Exploding ungroups the objects in an existing component. You can then remove and modify parts and other objects in the component.
When you create a custom component, it is recommended to create a similar existing component and then explode it. Then you can modify the objects to suit your needs and use them in your custom component.
To explode a component:
1. Click Detailing > Component > Explode Component.2. Select the component you want to explode.
Tekla Structures ungroups the objects in the component.
42.3 Defining a custom componentYou can define and save custom components in the component library.
Before you can define a custom component, you need to create a sample component in the model containing all the necessary component objects, such as parts, fittings, and bolts.
Seam Creates seam objects and connects parts along a line picked with two points.
Component symbol is green.
Part Creates a group of objects which may contain connections and details.
Gets no symbol, has same position properties as beams.
Main part
Secondary part
Type Description Example

142 TEKLA STRUCTURES 17
LE
SS
ON
8 R
ecor
ding
a m
acr
o
To define a custom component:
1. Click Detailing > Component > Define Custom Component... to open the Custom Component Wizard.
2. Select the Type and enter other properties as required. Click Next.3. Select the objects that the custom component will create.4. Click Next.5. The next step depends on the Type you selected. Follow the instructions in the Custom
Component Wizard. 6. Click Finish to create the custom component.
The custom component appears in the component catalog.
42.4 Exporting and importingYou can export custom components to a file, and then import the file into another model.
Exporting To export a custom component to a file:
1. Click Detailing > Component > Component Catalog... (Create Component) or press Ctrl + F to open the component catalog.
2. Select Custom from the list to display all the custom components.3. Right-click the custom component and select Export... from the pop-up menu.
The Export components dialog box opens.
4. Enter the name for the file and select the folder where the file is saved in.By default, the file extension is .uel.
5. Click OK to export the file.
Importing To import a custom component:
1. Click Detailing > Component > Component Catalog... (Create Component) or press Ctrl + F to open the component catalog.
2. Right-click the component list and select Import... from the pop-up menu.The Import Components dialog box opens.
3. Browse for the file you want to import, select the file and click OK.The custom component is available in the component catalog.
43 Recording a macro
Tekla Structures enables you to record a series of actions from menu, dialog boxes, and shortcuts.
To record a macro:
1. Click Tools > Macros... to open the Macros dialog box.2. Enter a Macro name.3. Click Record.4. Perform the actions you want to record.5. Click Stop to stop recording.

LE
SS
ON
8 W
ebV
iew
er
TEKLA STRUCTURES 17 143
Macros are saved as *.cs files, in the folder defined with the advanced option XS_MACRO_DIRECTORY in the environment-specific initialization files.
43.1 Running a macroTo run a macro:
1. Click Tools > Macros... to open the Macros dialog box.2. Select the macro and click Run.
43.2 Editing a macroTo view or edit a macro:
1. First check that the file type .cs is associated with suitable text editor. 2. Click Tools > Macros... to open the Macros dialog box.3. Select the macro and click Edit.4. The macro opens in the associated text editor.
44 WebViewer
You can publish your Tekla Structures models as web pages that can be viewed via the Internet using a web browser. The WebViewer files can also be used as reference models.
The recorded macro is saved in the drawings or modeling folders, depending on in which mode the macro was recorded in.
Macros are based on C# commands and in case you want to edit macros, knowledge of C# programming is needed.

144 TEKLA STRUCTURES 17
LE
SS
ON
8 W
ebV
iew
er
44.1 Publishing a model as a web pageTo publish a model as a web page:
1. Click File > Publish as Web Page... to open the Publish as Web Page dialog box.
2. If you want to publish a web page of selected parts, select Selected parts.3. Change the page title if required.4. In the File name box, enter the destination path and file name for the published model.
By default, Tekla Structures creates a PublicWeb folder with sub-folders in the current model folder, and places the published model there.
5. Click Publish. If you select the Open in browser check box, the model opens in your web browser.

LE
SS
ON
8 T
ekla
Str
uctu
res
Mod
el R
evie
wer
TEKLA STRUCTURES 17 145
45 Tekla Structures Model Reviewer
Tekla Structures Model Reviewer is a free and improved tool based on the Tekla Structures Web Viewer. Model Reviewer includes excellent model navigation and mark up functionality. With it you can:
• Easily pan, rotate, zoom, and fly through the model
• See important part information
• Fly through a set of saved locations in the model to present it to the project team
• Use clip planes to slice through walls and crowded areas of the model
• Email models easily to other parties
• Create and manage markups (redlines) of specific areas in the model
• Visually track project statuses with different colors in the model
You can use the Model Reviewer tool to improve project communication.
In Tekla Structures, you can publish a model in .wrm, .xml or .zsol format. You can then send the published model to other project participants. After installing the tool, those involved in the project can open the model and add comments to it.
You can download and install Model Reviewer from Tekla’s website. Go to http://www.tekla.com/international/solutions/building-construction/Pages/web-models-model-reviewer.aspx and click the Free Download link.
To learn more, watch the introductory video on the download page.
45.1 Opening a model in Model ReviewerTo open a model in Model Reviewer:
1. Click Windows Start > All Programs > Tekla Structures > Tekla Structures Model Reviewer.
2. Browse for a published model file.Supported file formats are: .wmr, .xml, and .zsol.
When you save the model and the markups in Model Reviewer, the file is saved in .wmr format.

146 TEKLA STRUCTURES 17
LE
SS
ON
8 T
ekla
Str
uctu
res
Mod
el R
evie
wer

>
TEKLA STRUCTURES 17 147
LE
SS
ON
9
LESSON 9In this lesson, you will learn the following things:
• how to use reinforcements
• how to use windbracing

148 TEKLA STRUCTURES 17
LE
SS
ON
9
46 Reinforcements
You can add reinforcements to concrete parts to strengthen the parts. The Concrete toolbar contains three commands used for reinforcement:
46.1 Reinforcing bar groupA reinforcing bar group includes several identical, or very similar, reinforcing bars. Tekla Structures creates reinforcing bar groups using the properties in the Reinforcing Bar Properties dialog box. The file name extension of a saved reinforcing bar group file is .rbg.
Reinforcing bar group types
Tekla Structures has several reinforcing bar group types:
You can use the Group tab in the Reinforcing Bar Properties dialog box for selecting and modifying the reinforcing group types.
Reinforcing bar
Reinforcing bar group
Reinforcement mesh
Type Description
Normal Not tapered
Tapered One bar dimension changes linearly in the group.
Tapered ridge One bar dimension changes linearly. The dimension is longest in the middle of the group.
Tapered curved One bar dimension changes along a curve. The dimension is longest in the middle of the group.
Tapered N One bar dimension changes linearly between N ridges. Enter the number of ridges in the Number of cross sections box in the Group tab of the Reinforcing Bar Properties dialog box.
Spiral The reinforcing bars rise in a polygonal or circular shape along the longitudinal axis of the part.

LE
SS
ON
9
TEKLA STRUCTURES 17 149
Creating a reinforcing bar group
To create a reinforcing bar group:
1. Click Detailing > Properties > Reinforcement > Reinforcing Bar Group..., or double-
click the Create reinforcing bar group button.The Reinforcing Bar Properties dialog box opens.
2. Enter or modify the bar group properties.3. Click OK to save the properties.4. Select the part to reinforce.
Tekla Structures attaches the reinforcing bar group to the part.
5. Pick the reinforcing bar start point.6. Pick the other reinforcing bar reference point.7. Click the middle mouse button to finish picking.8. Pick the start point of the bar group.9. Pick the end point of the bar group.
Distribution area
In addition to the shape of the reinforcing bars, you need to define the distribution area of the reinforcing bars. The distribution area points can be positioned on the outer contour of the concrete part. Usually, the distribution area is perpendicular to the plane so the cover thickness on the sides can be defined in the From plane box in the Reinforcing Bar Properties dialog box.
The selection order of the handles, which determines the cover area, is important when the bars are placed. The bars are placed on the right side of a line that is defined by the two selected handles.

150 TEKLA STRUCTURES 17
LE
SS
ON
9
The example shows the placing of the handles for the top and bottom reinforcements in a beam:
The example on right shows the reinforcing bars outside the concrete. You can prevent this by entering a negative value in the On plane box in the Reinforcing Bar Properties dialog box.
The General tab in the Reinforcing Bar Properties dialog box contains the same options for both a single reinforcing bar and a reinforcing bar group. However, the Group tab contains additional options for defining the properties of a reinforcing bar group. If you open the Reinforcing Bar Properties dialog box for a single reinforcing bar, the Group tab is disabled.
Distribution of bars
You can define the way the bars are distributed over the cover area by selecting the Creation method list.
The creation method options are:
• Equal distribution by number of reinforcing bars: This option is used for main reinforcement bars in beams. The spacing of the bars is based on the number of the bars. The spacing is the available distance divided by the number of the bars. The available distance is cover area minus two times the value in the On plane box.
First handle
Plane

LE
SS
ON
9
TEKLA STRUCTURES 17 151
• Equal distribution by target spacing value: You can enter a spacing value. Tekla Structures aims the spacing value as closely as possible at the user-defined spacing value.The spacing value is set to 150. The available distance for the bars is 1150 mm. This makes 1150/150 = 7,6 bars. The value will be rounded to 8. 1150/8 = 143.75. The calculated spacing value of the bars is 143.75 mm.
• By exact spacing value with flexible first/last/middle space: Creates fixed, regular spaces between the bars. One space adjusts to even out the bar distribution. You can choose whether the adjusted space is the first, last, or the middle space.
• By exact spacing value with flexible first and last space:Tekla Structures calculates the number of bars and places with the defined spacing. The remaining spacing value is divided equally to the first and last bar spacing.
• By exact spacing: You can enter every spacing value manually. Use the multiplication character to repeat spacings, for example, 5*200 to create five spaces of 200.
Available distance
Value in the On plane box
Equally distributed reinforcing bars
Exact spacing with flexible first space
Exact spacing with flexible first and last space
Exact spacing

152 TEKLA STRUCTURES 17
LE
SS
ON
9
Omitting reinforcing bars
You have the following options for omitting reinforcing bars:
• None
• First
• Last
• First and last
The following example displays two reinforcing bar groups that have been added to a concrete beam.
46.2 Reinforcing barYou can create a single reinforcing bar with the Create Reinforcing Bar command. A reinforcing bar can be a straight bar, but also a hair pin, a former, or a bracket. Any shape with random dimensions can be modeled.
Creating a reinforcing bar
To create a reinforcing bar:
1. Click Detailing > Properties > Reinforcement > Reinforcing Bar... or double-click the
Create Reinforcing Bar button.The Reinforcing Bar Properties dialog box opens.
Two reinforcing bar groups with flexible end and/or start value.
The last and first bar omitted

LE
SS
ON
9
TEKLA STRUCTURES 17 153
2. Make the necessary modifications in the Reinforcing Bar Properties dialog box.You can set the series and start numbers for the reinforcing bars. In addition, you can enter values for Size (diameter), Grade, and Bending radius.
3. Select the reinforcing bar color by entering the color number in the Class box.We recommend you use this feature, because the 3D view will be clearer if all reinforcing bars are the same color.
4. Define a hook or a splice for the reinforcing bar. 5. Modify the values displayed in the Select Reinforcing Bar dialog box. 6. Define the reinforcing bar cover thickness.7. Click OK.8. Select the part to reinforce.
Tekla Structures attaches the reinforcing bar to the part.

154 TEKLA STRUCTURES 17
LE
SS
ON
9
9. Pick the start point for the reinforcing bar.10. Pick the other reinforcing bar reference points.11. Click the middle mouse button to finish picking.
Defining a hook for a reinforcing bar
You can define a hook or a splice for the reinforcing bar under the Hooks area in the Reinforcing Bar Properties dialog box.
To define a hook or a splice:
1. Double-click the Create Reinforcing Bar button.The Reinforcing Bar Properties dialog box opens. The Hooks area of the dialog box can be used for defining hooks and splices.
2. Select a hook type from the Shape lists.A hook does not have to be modeled. It is added to the reinforcing bar automatically. If a standard hook is selected, the Angle, Radius, and Length boxes are not active. These values are read from the rebar_database.inp file. If a Custom hook selected, you can define the values.
3. Define the values for the custom hooka Enter a value between -180 and +180 degrees in the Angle box.b Enter the internal bending radius of the hook in the Radius box.c Enter the length of the straight part in the hook to the Length box.

LE
SS
ON
9
TEKLA STRUCTURES 17 155
Defining the reinforcing bar cover thickness
Reinforcing bars need a concrete cover to protect them against harmful elements, such as the weather and fire.
To define the concrete cover thickness for a reinforcing bar or reinforcing bar group:
1. Click Detailing > Properties > Reinforcement, and select either Reinforcing Bar... or Reinforcing Bar Group....
Alternatively, you can double-click the Create Reinforcing Bar or the
Reinforcing Bar Group button.
The Reinforcing Bar Properties dialog box opens.
2. Define the reinforcing bar cover thickness in the Cover thickness area of the Reinforcing Bar Properties dialog box.The cover thickness can be defined in three directions:
• On plane, that is, the distance from beam’s bottom, top, and side surfaces to the bar.
• From plane, that is, the distance from the end surface of the beam to the bar.
• In the longitudinal direction of the bar, that is, start and end.
To define different cover thicknesses on the different legs of a reinforcing bar, enter a thickness value for each leg in the On plane field, in the order you pick points to create the bar.
3. Click OK.

156 TEKLA STRUCTURES 17
LE
SS
ON
9
Modifying reinforcing bars
To modify reinforcing bars:
1. Click Detailing > Properties > Reinforcement > Reinforcing Bar..., or double-click the
Create Reinforcing Bar button.The Reinforcing Bar Properties dialog box opens.
2. Click the Select button in the Reinforcing Bar Properties dialog box.The Select Reinforcing Bar dialog box opens.
First and last handle
From plane

LE
SS
ON
9
TEKLA STRUCTURES 17 157
3. Select the bar size for the chosen grade. You can also define whether the bar is a main bar or a stirrup or tie.You can modify the values displayed in the Select Reinforcing Bar dialog box in rebar_database.inp file. The file is located in ..\Tekla Structures\<version>\environments\<environment>\profil folder. You can edit the file with any standard text editor.
For steel grades, every diameter is listed twice in the file: once as main and once as tie/stirrup. The column Min bend radius contains the bending mandrel that is used if the bar is bended in the model. If a bar is bended with an angle of 90, 135, or 180 degrees, the column r contains the accompanying mandrels.
If you change the values in the Size column, you can change the diameter of the reinforcing bar. The mandrel will keep its original diameter.
4. Click OK to close the Select Reinforcing Bar dialog box.5. Click OK to close the Reinforcing Bar Properties dialog box.
46.3 Curved reinforcing bar groupCurved reinforcing bar groups are created using the same reinforcing properties as the straight bar groups. The only difference is that you need to pick three points instead of two to define the reinforcing bar shape. After defining the shape, do not click the middle-mouse button but continue to define the distribution area.
Next time you open Reinforcing Bar Properties, the active settings are used. If you have stored several sets of properties, you need to select an option from the list next to the Load button and load the appropriate set of properties.

158 TEKLA STRUCTURES 17
LE
SS
ON
9
If the concrete part is created using multiple points and with the intention to create a curved part by changing the chamfer properties, then it is recommended to create snap points to create the curved reinforcing bars. Always place the curved reinforcing bars using the working points of the concrete part and set the On plane option to the correct position.
46.4 Creating a circular reinforcing bar groupTo create a circular reinforcing bar group:
1. Click Detailing > Create Reinforcement > Circular Reinforcing Bar Group.2. Select the part to reinforce.3. Pick three points on the outer countour of the concrete part.
The radius is automatically calculated from these three points.
4. Pick two points to indicate the distribution direction of the bars. The circular reinforcing bar group is created.
5. Click Detailing > Properties > Reinforcement > Reinforcing Bar....The Reinforcing Bar Properties dialog box opens.
To define the splice length of the round stirrups, enter negative values in the Start and End boxes.

LE
SS
ON
9
TEKLA STRUCTURES 17 159
6. Click OK.
46.5 Creating a reinforcement meshYou can create a reinforcement mesh that consists of two perpendicular bar groups.
To create a reinforcement mesh:
1. Click Detailing > Properties > Reinforcement > Reinforcement Mesh..., or double-
click the Create reinforcement mesh button.The Reinforcement Mesh Properties dialog box opens. It can be used to set the length, width, diameter, mesh size, and cover area of the reinforcement mesh.
2. Click the Select button.The Select Mesh dialog box opens.

160 TEKLA STRUCTURES 17
LE
SS
ON
9
You can select various meshes in the Reinforcement Mesh Properties dialog box.
The standard mesh properties are in defined in the mesh_database_inp file located in the ..\Tekla Structures\<version>\environments\<environment>\profil folder.
46.6 Creating a reinforcement strand patternTo create a reinforcement strand pattern:
1. Click Detailing > Properties > Reinforcement > Reinforcement Strand Pattern....The Strand Pattern Properties dialog box opens.

LE
SS
ON
9
TEKLA STRUCTURES 17 161
2. Enter or modify the strand properties.3. Define the pre-stress load in the Pull per strand box.4. In the Number of cross sections box, enter a number based on the strand profile.
There are four strand profile options:
Strand profile Number of patterns
pattern 1
pattern 2

162 TEKLA STRUCTURES 17
LE
SS
ON
9
5. Define the lengths of the debonding zones.6. Click OK.7. Click Detailing > Create Reinforcement > Reinforcement Strand Pattern.8. Select the part to which you are creating strands.9. Pick points to position the strands, for example, at the end of a part.
46.7 Reinforcement strand exampleYou can create a reinforcement strand in a beam. First create an array of points to aid in the positioning of the reinforcement strand.
Creating a point array
Create a concrete beam before creating a point array. For more information, see Creating a concrete beam (p. 64).
To create a point array:
1. Click Modeling > Add Points > On Plane... to open the Point Array dialog box.2. Pick a corner of the beam.
pattern 3
pattern 4
Strand profile Number of patterns

LE
SS
ON
9
TEKLA STRUCTURES 17 163
The corner is used as an origin for defining the location of the points.
3. Enter the coordinates for points under the Coordinates area in the Point Array dialog box.
4. Click Create to create the point array.
Creating a reinforcement strand for a beam
You must have added a point array to the beam before creating a reinforcement strand. For more information, see Creating a point array (p. 162).
To create a reinforcement strand:
1. Hold down the Shift key and click Detailing > Create Reinforcement > Reinforcement Strand Pattern.The Strand Pattern Properties dialog box opens.
2. Modify the properties if required and click OK.3. Select the beam to reinforce.

164 TEKLA STRUCTURES 17
LE
SS
ON
9
4. Pick all the points which are positioned on the beam end.
5. Click the middle mouse button to finish picking.6. Pick two points to define the length of the strands.
7. Click the middle mouse button to finish picking.The reinforcement strand is created.

LE
SS
ON
9
TEKLA STRUCTURES 17 165
46.8 Creating a reinforcement spliceYou can join reinforcing bars or reinforcing bar groups together with reinforcement splices. The blue splice symbols indicate reinforcement splices in the models:
To create a reinforcement splice:
1. Click Detailing > Create Reinforcement > Reinforcement Splice.2. Select the first reinforcing bar or bar group.3. Select the second reinforcing bar or bar group.4. Optional: Modify the splice properties.
a Click Detailing > Properties > Reinforcement > Reinforcement Splice....The Reinforcement Splice Properties dialog box opens.

166 TEKLA STRUCTURES 17
LE
SS
ON
9
b Modify the splice properties.c Click Modify.
Moving a splice If needed, you can move the splice along reinforcing bars.
To move the splice:
1. Select the splice symbol.2. Right-click and select Move.3. Pick an origin and a destination point for the splice.
46.9 Attaching reinforcing bars to another partWhen you model reinforcing bars, you need to select a part to which the bars are attached. However, a modeled reinforcing bar may need to be attached to another part at a later stage.
To attach a reinforcing bar to another part:
1. Select the reinforcing bar you want to attach.2. Right-click and select Attach to part from the pop-up menu.3. Select the part to which you want to attach the reinforcement.

LE
SS
ON
9 C
usto
m r
einf
orce
men
t co
mpo
nent
exa
mpl
e
TEKLA STRUCTURES 17 167
47 Custom reinforcement component example
You can create two reinforcing bar groups to place staggered stirrups with hooks at opposite edges in a concrete column. Then define a custom component of the reinforcement.
47.1 Creating a reinforcement for a columnTo create a reinforcement for a column:
1. Create a concrete column that is 3000 millimeters high.For more information, see Creating a concrete column (p. 63).
2. Hold down the Shift key and click Detailing > Create Reinforcement > Reinforcing Bar Group.The Reinforcing Bar Properties dialog box opens.
3. Modify the properties on the General tab as shown below.

168 TEKLA STRUCTURES 17
LE
SS
ON
9 C
usto
m r
einf
orce
men
t co
mpo
nent
exa
mpl
e
4. Go to the Group tab.5. Modify the properties on the Group tab as shown below.

LE
SS
ON
9 C
usto
m r
einf
orce
men
t co
mpo
nent
exa
mpl
e
TEKLA STRUCTURES 17 169
6. Click Apply.7. Select the column.8. Pick the corners of the column to define the shape of the reinforcement. Follow the
sequence shown below. Click the middle mouse button to finish.
9. Pick the top and bottom levels to define the range of the reinforcement. Click the middle mouse button to create the first reinforcing bar group.

170 TEKLA STRUCTURES 17
LE
SS
ON
9 C
usto
m r
einf
orce
men
t co
mpo
nent
exa
mpl
e
10. Modify the properties under the Cover thickness area in the Reinforcing Bar Properties dialog box as shown below.
11. Click Apply.12. Select the column.13. Pick the corners of the column to define the shape of the reinforcement. Follow the
sequence shown below. Click the middle mouse button to finish.
14. Pick the top and bottom levels to define the range of the reinforcement. Click the middle mouse button to create the second reinforcing bar group.

LE
SS
ON
9 C
usto
m r
einf
orce
men
t co
mpo
nent
exa
mpl
e
TEKLA STRUCTURES 17 171
47.2 Defining a custom reinforcement componentTo define a custom reinforcement component:
1. Click Detailing > Component > Define Custom Component.The Custom Component Wizard dialog box opens.
2. Select Detail from the Type list.3. Enter a name and a short description for the component. Click Next. 4. Hold down the Ctrl key and select the two reinforcing bar groups as the component
objects. Click Next.5. Select the column as the main part. Click Next.6. Pick the end point at the top level of the column as the reference point.7. Click Finish to create the custom component.
The custom component only works correctly for columns with the same profile and height.

172 TEKLA STRUCTURES 17
LE
SS
ON
9 R
einf
orce
men
t tip
s
For more information on custom components, see Custom components (p. 140).
48 Reinforcement tips
Adding reinforcements to identical cast units is not always necessary. For example, if there are 20 cast units in a model, you can add reinforcements to all twenty cast units. In some cases, it is possible to reinforce just one cast unit.
Advantages of reinforcing just one cast unit:
• The model is better organized because it contains less reinforcements.
• The database is smaller because the model contains less reinforcements.
• Less chance on numbering differences because there are less reinforcements.
• Numbering of the model is faster.
• Copying reinforcements and using custom components is not needed.
• Applying model changes is quick. There is no need to modify multiple reinforcements.
Disadvantages of reinforcing just one cast unit:
• Incorrect reinforcement weight.
• Elements that have identical shapes but different reinforcements receive identical cast unit numbers.
You can create cast unit drawings of the reinforced cast units. If the drawing has already been created and the reinforcements need to be added in at a later stage, you can find the ID number of the cast unit by using the Inqure Object command and add the reinforcing bars in the particular cast unit.

LE
SS
ON
9 R
einf
orce
men
t co
mpo
nen
ts
TEKLA STRUCTURES 17 173
49 Reinforcement components
Tekla Structures contains various reinforcing components that you can use to create reinforcing bars and bar groups.
49.1 Adding a reinforcement componentTo add a reinforcement component:
1. Click Detailing > Component > Component Catalog...
2. Click the arrow button and select Reinforcements from the list.The reinforcement components are displayed in the Component Catalog.
3. Double-click a component.The properties dialog box opens.
4. Define the properties and click OK.5. Select the part that you want to reinforce.
49.2 Reinforcement component examplesBeam reinforcement (63)
The Beam reinforcement (63) component creates the stirrups and the top, bottom, and side reinforcements in one go. If the size of the beam changes, the reinforcement adapts to the new dimensions.
For the main reinforcement (top and bottom), the number and diameter of bars can be set individually. For T profiles or beams with a ridge, multiple stirrup groups can be generated.
The cover thickness for the stirrups needs to be defined in the properties dialog box. The positioning of the bars in longitudinal direction is automatically determined by the component.

174 TEKLA STRUCTURES 17
LE
SS
ON
9 R
einf
orce
men
t co
mpo
nen
ts
The stirrup distances can be defined on the Stirrup spacing tab. You can add more stirrups on places where bigger shear forces occur. You can set the number of stirrups and stirrup distances for the different zones.
It is possible to create different stirrups in two ledges. To do so, select Different Each Ledge from the Ledge stirrups list to activate the Upper ledge stirrups boxes.
The Ledge Stirrup Spacing Type list contains two options to define the spacing of ledge stirrups:
• Target: Tekla Structures creates equal spaces between the bars aiming the spacing value as closely as possible to the value you specify. This is the default option.
• Exact: The first and last space of a zone adjust themselves to even out bar distribution. The spaces in the middle of each zone are exactly the size you specify.

LE
SS
ON
9 R
einf
orce
men
t co
mpo
nen
ts
TEKLA STRUCTURES 17 175
Rebar in beam (90)
The Rebar in beam (90) component is a versatile component that is used to add reinforcement bars to a beam. Besides all the options that are available with the Beam reinforcement (63) component, the Rebar in beam (90) can also bend the bars at the start or end part of the beam.

176 TEKLA STRUCTURES 17
LE
SS
ON
9 R
einf
orce
men
t co
mpo
nen
ts

LE
SS
ON
9 R
einf
orce
men
t co
mpo
nen
ts
TEKLA STRUCTURES 17 177
Starter bars for pillar (86) and Slab bars (18)
Hole reinforcement for slabs and walls (84), Beam end reinforcement (79), and Rectangular column reinforcement (83)
Starter bars for pillar (86)
Slab bars (18)
Hole reinforcement for slabs and walls (84)
Beam end reinforcement (79)
Rectangular column reinforcement (83)

178 TEKLA STRUCTURES 17
LE
SS
ON
9 W
ind
brac
ing
50 Windbracing
All buildings must be designed to resist wind load. Wind load is different than, for example, snow and other vertical loads. Wind load acts horizontally and in any direction. Using windbracing, you can create buildings that can resist loads acting parallel and perpendicular to any wall of a building.
50.1 Windbracing in a front planeTo create a windbracing to a front plate:
1. Double-click the Create Beam button.The Beam Properties dialog box opens.
2. Load bracing in the Beam Properties dialog box.
By default, an angle steel profile is loaded. In case of windbracings in front planes, flat bracings are often used. Therefore, change the Profile to, for example, FL10*60.
3. Go to the Position tab.4. Select Middle in the On plane list and enter 5 in the box.
The windbracing will be positioned on the right side with an extra distance of 5 mm.

LE
SS
ON
9 W
ind
brac
ing
TEKLA STRUCTURES 17 179
5. Click OK.6. Click the Create Beam button and place a windbracing profile from the left bottom side
towards the right upper side.7. Position the windbracings in the center of the columns. 8. Select a component, for example Bolted gusset (11), and connect the braces to the
columns.
50.2 Windbracing in a straight roof planeTo create a windbracing in a straight roof plane:
1. Double-click the Create Beam button.The Beam Properties dialog box opens.
2. Load bracing in the Beam Properties dialog box.By default, an angle steel profile is loaded. This is the best option for modeling windbracings in a straight roof plane, because of their better resistance against deflection.
3. Go to the Position tab.4. Select Middle in the On plane list.5. To let the bracings cross each other correctly, increase the values for the On plane list.
For example, for a profile L60/6, the offset has to be set to 30, or the At depth has to bet set to Front or Behind.
Usually, in case of crossing angle steel windbracings, the bracings are positioned with the closed sides towards each other. That means that one bracing has to be rotated 180 degrees by changing the Rotation from Below to Top.

180 TEKLA STRUCTURES 17
LE
SS
ON
9 W
ind
brac
ing
6. Click OK.7. Click the Create Beam button and place a windbracing profile from the left bottom side
towards the right upper side.8. Position the windbracings in the center of the columns.9. Select the components and connect the braces to the columns.
50.3 Windbracing in a sloping roof planeYou can model windbracings for a sloping roof using Tekla Structures. The following steps lead to longer tasks explaining each phase needed to complete windbracings for a sloping roof.
To create a windbracing in a sloping roof plane:
1. Move the work plane parallel to the roof plane. 2. Create a view parallel to the sloping roof plane. 3. Create the windbracings.
• Create the windbracing with the roof plane view.
• Create the windbracing without the roof plane view.

LE
SS
ON
9 W
ind
brac
ing
TEKLA STRUCTURES 17 181
Moving the work plane parallel to the roof plane
Before you insert windbracings in a sloping roof plane, we recommend you move the work plane parallel to the roof plane.
To move the work plane:
1. Click View > Set Work Plane > To Part Top Plane.2. Select a roof beam.
The view is moved accordingly.
Creating a view parallel to the sloping roof plane
When the work plane is parallel to the roof beams, a view which is parallel to the sloping roof plane can be created. There are two ways of doing this:
Option 1 1. Set the work plane parallel to the roof beam.2. Click View > Creat View of Model > On Work Plane.
A new view looking perpendicularly to the roof plane is created.
3. Change the name of the view if you want to store it for later use.
Option 2 1. Set the work plane parallel to the roof beam.2. Click View > View Properties....
The View Properties dialog box opens.
3. Load the plane settings and change the name of the view.4. Click View > Create View of Model > Using Three Points.5. Pick points to create the view.
a Pick origin.b Pick a point in the positive x direction.c Pick a point in the y direction.
Creating a windbracing using the roof plane view
To create a windbracing using the roof plane view:
1. Insert reference points on the roof beam for positioning the windbracing.2. Double-click the Create Beam button to open the Beam Properties dialog box.3. Load the bracing setting and position the windbracing.

182 TEKLA STRUCTURES 17
LE
SS
ON
9 W
ind
brac
ing
4. Change the position of the bracings so that they do not intersect with each other.5. Connect the bracing to the roof beams, for example, with the component Bolted gusset
(11).
Creating a windbracing without using the roof plane view
To create a windbracing without using the roof plane view:
1. In a plane view, create reference points on the roof beam.For more information on creating points, see Creating points along a line (p. 90).
2. Copy the reference points to the next grid line.3. In a 3D view, set the work plane parallel to the roof plane.4. Model the windbracings in the 3D view by snapping to the reference points.
50.4 Shortening a windbracingTo shorten a windbracing:

LE
SS
ON
9 W
ind
brac
ing
TEKLA STRUCTURES 17 183
1. Double-click a windbracing to open the Beam Properties dialog box.2. Click User-defined attributes button in the Attributes tab.
The Tekla Structures Beam dialog box opens.
3. Enter the shortening value in the Shorten box.4. Click Modify and Cancel, or click Modify and close the dialog box.
When entering values to the Tekla Structures Beam dialog box, there is a difference between entering the value 0 (zero) and leaving the box empty.
Do not click Apply and OK, because the value you defined for the shortening will be saved as the default value for the Shorten box and it may affect other beams.

184 TEKLA STRUCTURES 17
LE
SS
ON
9 W
ind
brac
ing
Checking a windbracing
• ReportsYou can use the reports User Defined Attributes (UDA) and id_part_list. In these reports, the Shorten column displays which profiles are shortened.
• Object representation
You can create object representation settings to display shortened components.
50.5 Shortening examplesExamples 1 and 2 are both examples on how to shorten windbracing using Tekla Structures. Example 1 is a case where the windbracing is long and the shortening is therefore directed only to the distance between the bolts. Example 2 is a shorter windbracing so the shortening is divided equally to the whole windbracing.
Example 1 In this example, we have a windbracing that is 6000 mm in length. The windbracing has holes at a bolt distance of 60 mm and an edge distance of 40 mm. Without shortening, the distances would be: 40-60-5800-60-40.
If we shorten the windbracing by 4 mm, the total length should be 5996 mm. However, also the holes have to be taken into consideration. Tekla Structures divides the total length after shortening by the initial length of the bracing, that is, 5996 / 6000 = 0.9993. Each individual distance is multiplied with this factor:
• 0.9993*40 = 39.973 mm
• 0.9993*60 = 59.960 mm
• 0.9993*5800 = 5796.133 mm
By default, the dimensions are rounded off in millimeters. The dimensioning in this example will be: 40-60-5796-60-40. The shortening value of 4 mm will be applied to the largest distance, that is the distance between the two bolt groups.
Example 2 In this example, we have a windbracing that is 2000 mm in length. It is shortened by 20 mm.
Tekla Structures divides the total length after shortening by the initial length of the bracing, that is, 1980 / 2000 = 0.99. Each individual distance is multiplied with this factor:
• 0.99*40 = 39.6 mm
• 0.99*60 = 59.4 mm
• 0.99*1800 = 1782 mm
By default, the dimensions are rounded off in millimeters. The dimensioning in this example will be: 40-59-1782-59-40. The shortening of 20 mm is not only applied to the biggest distance, but also to the bolt distances.

LE
SS
ON
9 W
ind
brac
ing
TEKLA STRUCTURES 17 185
50.6 Windbracing examples
Welded connections
Cross bolted
Cross welded
Cross welded and bolted

186 TEKLA STRUCTURES 17
LE
SS
ON
9 W
ind
brac
ing
Flat bar

>
TEKLA STRUCTURES 17 187
LE
SS
ON
10
LESSON 10This lesson contains reference material that you can use when needed.

188 TEKLA STRUCTURES 17
LE
SS
ON
10
51 Component examples
You can browse the component examples in this lesson to see the various component options Tekla Structures offers. This material is presented as reference only.
51.1 Steel components
End plate (144)

LE
SS
ON
10
TEKLA STRUCTURES 17 189
Two-sided end plate (142)
Stiffened end plate (27)

190 TEKLA STRUCTURES 17
LE
SS
ON
10
Partial stiff end plate (65)
Bolted gusset (11)

LE
SS
ON
10
TEKLA STRUCTURES 17 191
Central gusset (169)

192 TEKLA STRUCTURES 17
LE
SS
ON
10
Seating (39)
Cranked beam (41)

LE
SS
ON
10
TEKLA STRUCTURES 17 193
Haunch (40)
Joining plates (14)
Stub (28)

194 TEKLA STRUCTURES 17
LE
SS
ON
10
Base plate (1004)
This component includes an option to create one or more filler plates.
Stiffened base plate (1014)
With the standard setting, a base plate is created with a leveling plate including grout holes. A plain base plate is also an option (leveling plate t=0) with or with-out grout holes. Additional stiffeners can also be added.

LE
SS
ON
10
TEKLA STRUCTURES 17 195
Stiffeners (1003)
Stub (1011)
Use the bolt delete option to determine which holes are deleted from the stub.

196 TEKLA STRUCTURES 17
LE
SS
ON
10
End plate detail (1002)
Stanchion weld (85)
Round tube (23)

LE
SS
ON
10
TEKLA STRUCTURES 17 197
Manlock column (1032)
Manlock beam (1033)
Array of objects (29)
This component can be used to copy model objects.

198 TEKLA STRUCTURES 17
LE
SS
ON
10
one truss
copied
If you modify the original objects, for example, a column, Tekla Structures changes the copied objects as well.
LE
SS
ON
10
TEKLA STRUCTURES 17 199

200 TEKLA STRUCTURES 17
LE
SS
ON
10

>
TEKLA STRUCTURES 17 201
LE
SS
ON
11
LESSON 11In this lesson, you will learn the following things:
• how to use Tekla Structures Help
• how to save your favorite Help topics

202 TEKLA STRUCTURES 17
LE
SS
ON
11
52 Using Tekla Structures Help
Tekla Structures Help is a detailed guide to Tekla Structures concepts, tools, commands, and features, with plenty of examples.
52.1 Opening Tekla Structures HelpTo open Help, do one of the following:
• Click Help > Tekla Structures Help.
• Press F1.
If you have a dialog box open, pressing F1 takes you straight to the related topic.
If you want to quickly learn how to use Help and its seach functionalities efficiently, watch the Using Help video tutorial on the Help homepage.
52.2 Browsing Help topics by subjectUse the Contents tab to browse through Help topics using a hierarchical list of topics.
To browse Help topics by subject:
LE
SS
ON
11
TEKLA STRUCTURES 17 203
1. Go to the Contents tab.2. Click a Help topic to open it, or double-click a closed book icon to display the subtopics.
3. Use the red arrow buttons to move to the next or previous topic.
52.3 Finding Help topics using the indexUse the Index tab to search for Help topics using an alphabetical list of keywords.
To find a Help topic using the index:
1. Go to the Index tab.2. Enter a keyword, or scroll through the list of keywords.3. Double-click a title to display that topic, or click a topic title and then click Display.
If a keyword is associated with more than one topic, a list of topics appears and you are prompted to select one of them.
52.4 Searching for Help topicsUse the Search tab to find Help topics based on search terms. You can refine your search using wildcard characters, search operators, nested search terms, and search filters.
To search for a Help topic:
1. Go to the Search tab.2. Enter the words to search for.3. Click List Topics to start the search.
A list of results appears.
4. Double-click a title to display that topic, or click a topic title and then click Display.
Viewing the search results
To view and sort the search results, do any of the following:
To open or close all books on the Contents tab, right-click one of the topics and select Open all or Close all from the pop-up menu.
If you want to find an exact phrase, or if the search term contains special characters, enclose the phrase in double quotation marks. For example, "bolt catalog" or "objects.inp".

204 TEKLA STRUCTURES 17
LE
SS
ON
11
Using search filters
Use any of the following search filters to narrow or broaden your search results:
To enable or disable a search filter, select or clear the corresponding check box on the Search tab.
52.5 Saving favorite Help topicsUse the Favorites tab to save Help topics that you might want to visit again.
To add a topic to your list of favorites:
1. Display the topic you want to save.2. Go to the Favorites tab.3. Optional: If you want to save the topic under a different name, enter a new name in the
Current topic box, and then press Enter.4. Click Add.
To Do this
Display the search results in alphabetical order
Click the Title column heading.
Display the location of a topic in the hierarchical list of topics
Click Locate on the Help toolbar.
Find a specific word or phrase in the open topic
Click the topic and press Ctrl + F.
Move forward and backward through previously viewed topics
Click Forward or Back on the Help toolbar.
Show or hide the navigation pane Click Show or Hide on the Help toolbar.
Disable the highlighting of search terms in the search results
Click Options > Search Highlight Off.
Return to the Help cover page Click Home on the Help toolbar.
Search filter Description
Search previous results Narrows down the search results. The next search will be performed within the topics that were found in the previous search.
Match similar words Includes topics that contain words similar to your search term. For example, also the plural form of the word is included in the search.
Search titles only Searches for words only in topic titles. If the search term appears only in the body of a topic, it is not included in the search results.