try entry-level repoussé - facetjewelry.com€¦ · your image should be: • easy to trace •...
TRANSCRIPT

Repoussé is an ancient metalworking process that traditionally requires an
artisan to use punches, mallets, and hammers. Using these tools, the artist
works on the back of a piece of metal, pressing it to create a raised image
on the front of the metal. A bowl filled with a gooey substance called “pitch”
holds the metal in place during all the hammering. The counter technique to
repoussé is “chasing,” in which you work the metal from the front, pressing and
indenting it to create a pattern or image.
My version of repoussé and chasing substitutes a terry cloth towel for the
bowl of pitch. I use various sizes of ball styluses and wooden clay-shaping tools
instead of punches, hammers, and mallets. This technique works equally well on
fired silver metal clay paper or on thin-gauge fine-silver or copper metal sheet.
Try Entry-Level Repoussé Use household items to make a low-relief image emerge from
metal clay paper or fine-gauge metal sheet. by Marian Ward
Preparing the metalChoose either metal clay paper sheet or fine-gauge metal sheet to make this project, and follow the appropriate instructions, below, to prepare your metal.
Prepare metal clay paper sheet. Fire a 2-in. (51 mm) square of metal clay paper sheet in a kiln according to the manufac-turer’s instructions.
NOTE: Do not burnish or tumble the fired sheet; this work-hardens the metal, making it likely to crack as you raise it with the shaping tools.
Prepare fine-gauge metal sheet. Use a jeweler’s saw and a 4/0 blade to cut a 2-in. (51 mm) square of 24-gauge (0.5 mm) copper or fine-silver metal sheet. If you choose copper sheet, be sure to anneal it periodically as you work.
materials ■ Metal piece (choose from):
■ Metal clay paper: 2-in. (51 mm) square ■ Fine-silver sheet: 24-gauge (0.5 mm), 2-in. (51 mm) square
■ Fine-silver sheet: 16-gauge (1.3 mm), 6 x 2 in. (15.2 x 5.1 cm) (cuff)
■ Metal clay slip ■ Metal clay paste ■ Metal clay syringe
toolbox ■ Metal clay
additional tools & supplies ■ Jeweler’s saw, blades ■ Annealing station (optional): torch, fire-resistant surface (soldering pad, firebrick, or charcoal block), copper tongs
■ Carbon or transfer paper ■ Terry cloth ■ Ball styluses: various tips ■ Wooden clay-shaping tools ■ Binder clips ■ Bracelet mandrel ■ Liver of sulfur
This 6 x 2-in. (15.2 x 5.1 cm) fine-silver cuff features a metal clay paper repoussé image of a bishop’s cap cactus.
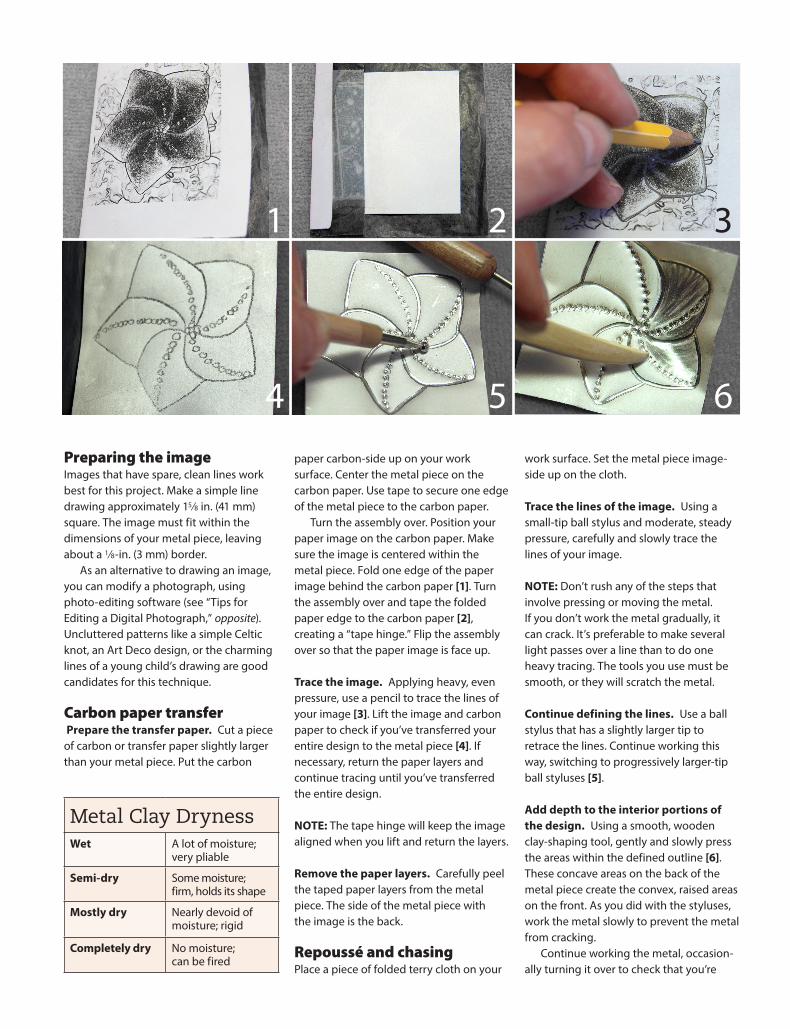
Preparing the imageImages that have spare, clean lines work best for this project. Make a simple line drawing approximately 15 ⁄8 in. (41 mm) square. The image must fit within the dimensions of your metal piece, leaving about a 1⁄8-in. (3 mm) border.
As an alternative to drawing an image, you can modify a photograph, using photo-editing software (see “Tips for Editing a Digital Photograph,” opposite). Uncluttered patterns like a simple Celtic knot, an Art Deco design, or the charming lines of a young child’s drawing are good candidates for this technique.
Carbon paper transfer Prepare the transfer paper. Cut a piece of carbon or transfer paper slightly larger than your metal piece. Put the carbon
paper carbon-side up on your work surface. Center the metal piece on the carbon paper. Use tape to secure one edge of the metal piece to the carbon paper.
Turn the assembly over. Position your paper image on the carbon paper. Make sure the image is centered within the metal piece. Fold one edge of the paper image behind the carbon paper [1]. Turn the assembly over and tape the folded paper edge to the carbon paper [2], creating a “tape hinge.” Flip the assembly over so that the paper image is face up.
Trace the image. Applying heavy, even pressure, use a pencil to trace the lines of your image [3]. Lift the image and carbon paper to check if you’ve transferred your entire design to the metal piece [4]. If necessary, return the paper layers and continue tracing until you’ve transferred the entire design.
NOTE: The tape hinge will keep the image aligned when you lift and return the layers.
Remove the paper layers. Carefully peel the taped paper layers from the metal piece. The side of the metal piece with the image is the back.
Repoussé and chasingPlace a piece of folded terry cloth on your
work surface. Set the metal piece image-side up on the cloth.
Trace the lines of the image. Using a small-tip ball stylus and moderate, steady pressure, carefully and slowly trace the lines of your image.
NOTE: Don’t rush any of the steps that involve pressing or moving the metal. If you don’t work the metal gradually, it can crack. It’s preferable to make several light passes over a line than to do one heavy tracing. The tools you use must be smooth, or they will scratch the metal.
Continue defining the lines. Use a ball stylus that has a slightly larger tip to retrace the lines. Continue working this way, switching to progressively larger-tip ball styluses [5].
Add depth to the interior portions of the design. Using a smooth, wooden clay-shaping tool, gently and slowly press the areas within the defined outline [6]. These concave areas on the back of the metal piece create the convex, raised areas on the front. As you did with the styluses, work the metal slowly to prevent the metal from cracking.
Continue working the metal, occasion-ally turning it over to check that you’re
Metal Clay DrynessWet A lot of moisture;
very pliable
Semi-dry Some moisture; firm, holds its shape
Mostly dry Nearly devoid of moisture; rigid
Completely dry No moisture; can be fired
1 2 3
4 5 6

For those of us who aren’t confident draftspersons, modifying a photograph is a great way to create an image for a repoussé design.
There are plenty of digital photo-editing programs on the market. Higher-end digital cameras are now sold with editing software included. And many photo-sharing websites provide basic editing features. Whatever software you’re using, the goal is to modify your photograph so that the final image looks like a line drawing from a coloring book. Your image should be:• Easy to trace • Simple (think flower,
not bouquet)• Cropped, or framed, in a
pleasing way
NOTE: For the project, I used Photoshop Elements 5.0 (PC format) to manipulate a photo of a bishop’s cap cactus. The steps I outline below are based on that software version.
If you’re using a newer version of Photoshop Elements or different software, familiarize yourself with the program’s toolbars and drop-down menus. For the most part, the steps to manipulating an image are fairly standard.
1. Open the image in the photo-editing software program.2. Click on the image. In the menu bar, select Image, and use the Crop tool to draw a border around a portion of the
photo that looks pleasing. (I cropped a square portion of my photo to match the shape of my metal square.)3. Select Image, Resize, and Image Size, and change the width and height to your desired finished size. (I resized
my image so that it would fit within my metal square.)4. Select Enhance in the menu bar and Convert to Black and White to remove the color from your photo. (Some software will allow you to do this under the Adjust Levels and Remove Color options.)5. Select Filter in the menu bar, and use the Stylize, Find Edges options to highlight the essential lines of your image.6. Select Image, Rotate, Flip Horizontally to create a mirror version of your original image.
NOTE: If you want your finished repoussé image to match the orientation of your original image, you must transfer a mirror-image version of your original image, because you’ll be working the metal from the back of your piece.
7. Print the image.
Experiment and undoTake advantage of your editing program’s tools. Don’t be afraid to experiment with all the drop-down options under the Image, Enhance, and Filter tabs. Remember, you can sequentially erase previous edits by selecting Edit, Undo. You can also select Edit, Revert to return your image to its original state.
tips for editing a
digital photograph
Crop Grayscale Contrast Stylize/Find Edges
Ornamental iron gate at La Posada Hotel & Gardens, Winslow, Ariz. Photo by Jill L. Erickson.

raising the metal uniformly and that the image is clearly defined.
Chase the front of the metal piece. Turn the piece over so that the raised face is up. Use a burnisher or wooden clay-shaping tool to smooth and flatten the border around the raised image. Work from the edge of the raised image outward to the edge of the sheet.
Then use a wooden tool or ball stylus to gently trace and define the outline of your image [7]. Take care not to press so hard that you deform the convex areas of your image.
Refine the image. Alternately working on the back and front of the metal piece, use your styluses and wooden tools to refine the image.
NOTE: If you used metal clay paper sheet or thin-gauge fine-silver metal sheet and you detect cracks in it, fill the cracks with metal clay slip. Allow the slip to dry completely (see the “Metal Clay Dryness” chart). Use extra-fine sandpaper to smooth the surface of the repair. Fire the piece according to the clay manufacturer’s instructions. Allow the piece to cool completely. Do not burnish or tumble-polish the piece.
Cuff blank and assembly I chose fine-silver metal sheet for my cuff. This allowed me to use syringe clay to attach my repoussé panel to the metal sheet and then fire the assembly in the kiln. For other options, see “What Else Can I Do With My Repoussé Panel?” left.
Cut a metal strip. Use a jeweler’s saw and a 1/0 blade to cut a 6 x 2-in. (15.2 x 5.1 cm) strip of 16-gauge (1.3 mm) fine-silver sheet. I tapered my strip to make the cuff more comfortable to wear [8].
File and sand the strip’s edges. Use a flat hand file to smooth the strip’s edges. Refine the edges and surfaces with progressively finer grits of sandpaper.
Clean the strip and the repoussé panel. Use a soft brush and soapy water to remove oils from the strip and the repoussé panel. Then rinse the compo-nents with water and allow them to dry completely.
Draw guidelines on the strip. Handling the components by their edges only, position the repoussé panel in the center of the strip. Use a pencil to trace around the panel. Remove the panel.
what else can I do with my repoussé panel?Because the repoussé panel is very thin, you need to attach it to a sturdy backing to make it a functional piece of jewelry. Here are some of the backing materials you could use: • Fired metal clay paper sheet
(join using metal clay syringe, then fire according to the manu-facturer’s instructions)
• Traditional metal sheet: sterling silver, copper, brass (join with solder, rivets, or tabs)
• Fired metal clay panels: bronze clay, copper clay (join with rivets or tabs)
SAFETY NOTE: Repoussé panels that are attached to their backing with metal clay paste or silver solder become hollow forms. If you reheat a hollow form (for example, maybe you want to add metal components), the form’s seams are prone to blowing out. Prior to reheating a sealed hollow form, drill a vent hole in the back of your assembly behind the repoussé panel to accommodate escaping air.
7 8
9 10 11

ASK THE ARTIST: MARIAN WARD
Apply metal clay paste to the compo-nents. Using a paintbrush, apply a coat of metal clay paste to the flat areas on the back of the repoussé panel [9]. Apply a coat of metal clay paste inside the square you marked on the metal strip [10].
Join the components. Position the panel paste-side down within the paste-coated area on the metal strip. Use binder clips to apply pressure and hold the components in place until the paste dries completely [11]. Remove the binder clips.
Apply a syringe-clay border. Extrude a line of syringe clay that straddles the edge of the repoussé panel and the metal strip [12]. Allow the syringe clay to dry completely.
Fire the assembly. Lay the assembly repoussé-side up on a kiln shelf. Place the kiln shelf in your kiln, and fire the assembly according to the clay manu-facturer’s instructions. (I fired mine at 1650°F/899°C for 2 hours.) Allow the assembly to cool completely.
Shape the strip into a cuff. Position the strip on a bracelet mandrel or tin can, and use your fingers to bend the strip around the mandrel [13].
NOTE: Repoussé panels that have been raised to a high relief may be stretched or distorted when you shape the cuff.
Examine the cuff. Check the cuff for any gaps between the repoussé panel and the cuff. Fill any gaps with syringe clay, and fire the cuff according to the
How does (or doesn’t) sketching factor into your process of constructing a piece of jewelry?
“I visualize and work out my design in my mind before I pick up my tools. In addition, I work well spontaneously, creating as I go. As a result, I rarely need to sketch designs in advance. The only time I need to sketch is when I’m away from my workbench and don’t want to lose a really great design inspiration.”Contact: www.desertskyjewelry.etsy.com
12 13 14manufacturer’s instructions. Allow the cuff to cool completely.
SAFETY NOTE: The sealed repoussé panel is now a hollow form attached to your cuff. If you reheat the cuff, the hollow form’s joins could blow out. Prior to any additional reheating of the cuff, drill a vent hole at the back of the cuff behind the repoussé panel to accommodate escaping air. Tumble-polish the cuff. Put the cuff in a tumbler with stainless steel shot and burnishing compound . Tumble for 2 hours to work-harden the fine silver and
Process photos by Marian W
ard.
Marian Ward‘s repoussé technique lends depth to a 11 ⁄4 x 3 ⁄4-in. (32 x 19 mm) bead.
Marian Ward shows a variation on how to use a stylized motif to dress up a fine-silver metal sheet and metal clay repoussé bracelet. 6 x 11 ⁄2 in. (15.2 x 3.8 cm).
give the cuff a shiny finish. Rinse the cuff in water and allow it to dry.
Patinate the cuff. Apply a liver of sulfur patina to the repoussé panel [14].