transmission & converter - ati performance … & converter before any installation begins 1....
TRANSCRIPT

TRANSMISSION & CONVERTER
BEFORE ANY INSTALLATION BEGINS
1. If the transmission is not fresh, drain all old oil, clean the pan and replace the filter and pan gasket.
2. The transmission cooler and lines must be clean and in good condition. If you had a previous transmission or converter failure which deposited metal particles in the lines and cooler, just replace it! It will be the cheapest preventative maintenance you can do! If you are not going to replace it, thoroughly flush the oil cooler lines and cooler with a radiator cleaner / flush system you can purchase at the parts store. Repeat this process in both lines until clean and then blow air through the system. Do this in both directions. If any restrictions are noticed in the lines or cooler, they must be replaced.
Note! ATI only recommends Teflon lined or the proper hose for Automatic Transmission Fluid and high temperatures.
3. If an external oil cooler is not used, a jumper line must be connected to the “in" and "out” lines of the transmission. Plugs can be used only if your unit has been internally bypassed.
4. Check the size of the bolt which is supplied with your converter that is used to secure the converter to the flexplate for proper fit. If necessary, drill the flexplate to the proper size. Drill holes in the flexplate .010" bigger than the bolts being used. Regardless of what you have to do, the flexplate holes cannot be overly sloppy or egged out!
This is not an option for high HP or Superplate use!
5. Be certain that the mating surface of the engine block and the transmission case are clean and free from nicks, paint, dirt, etc. Use a file to clean and smooth the surface. If your transmission doesn’t sit flush, it will constantly hurt seals and bushings, and possibly snap an ear off.
6. Check the dowel pins. You must use two dowel pins and they must fully engage the bell housing. These dowel pins must be firmly in the block and in good condition.
6747 Whitestone Road • Gwynn Oak, Maryland 21207 • (410) 298-4343800-284-3433 • FAX: (410) 298-3579 • www.atiracing.com
INSTALLATION INSTRUCTIONS
16 1/2” 12”
21 11/16” 6”*
*Tailhousings also available in 9” and 12”.
25 1/4” 4”
16 3/4” 7 9/16”
20” 13 1/2”
21 11/16" 7 1/4"
16” 18 3/8”
POWERGLIDE
T-350
T-400
700R44L60E / 4L80E
FORD C-4
FORD C-6
TF 727/904
If you made it this far and took this info out of the packet, stop and spend ten minutes to read it. There are 55 years of different bits and pieces of information compiled here! It can help your install go smoothly and give you some information you may not have known. Thanks for trusting ATI to build your driveline components!
Need a cooler? ATI stocks several Transmission Coolers to extend the life of your transmission plus improve it's performance and consistency in later rounds of racing.
Standard Transmission Cooler ...............................................................#925130Derale® "Electra Cool" Trans Cooler with Integral Fan (10" 650 CFM)...#925139Derale® "Atomic Cool" Trans Cooler with Integral Fan ( 8" 400 CFM) ...#925140ATI Transmission Cooler Installation Kit .................................................#925132
Extreme care must be exercised before and during installation for maximum benefits and longevity of all ATI precision units. If you are unsure of what you are doing or don't know something - ask us!

2
When using a midplate between the engine and the transmission, dowel pins must be lengthened at least the thickness of the midplate to insure proper engine - transmission alignment.Extended dowel pins are available from ATI - Part #958001 (GM, 2" long)
FLEXPLATE
1/8" TO 3/16" CLEARANCE WHEN CONVERTER IS FULLY SEATEDIN THE TRANSMISSION PUMP
MOUNTING PAD
PILOTENGAGEMENT
NO LESS THAN .100"
7. Before final installation, put the converter up to the flexplate and make sure the mounting pads fit flush to the flexplate and are in the correct position to the bolt pattern. With the pads flush to the flexplate, the converter pilot should be a good fit into the crankshaft with approximately 1/8" minimum extending into the crank below the chamfer. No less than .100 is recommended.
8. Inspect the condition of the old converter hub (where it goes into transmission) for wear, scoring or other damage. Abnormal wear may indicate that the bushing which supports the hub is defective and should be replaced before installation of the new converter. The front pump seal and bushing in the transmission should be replaced by a competent transmission shop.
9. On all Ford and Chrysler transmissions, the factory bronze front pump bushing must be replaced with a babbitt-type bushing. Bushings are available from most transmission shops or directly from ATI. All ATI transmissions come standard with this bushing installed and we even package one with new ATI converters.
1. Install one quart of a quality brand fluid, which is red in color, in the converter. (Refer to the chart on the right for your specific application.) Use some on the converter hub as well.
*Use of any fluid or oil that is not red in color will void all warranties!*
Install the converter on the transmission and be absolutely sure that the converter is engaging all of the splines and the pump, and that it is seated all the way back into the transmission. To be certain, take measurements as shown in Figure 1 (below). Sometimes it is helpful to spin the converter while holding it with one hand and use your fist to tap on the pilot.
2. For converters with an “offset” mounting pad (Chrysler and Ford), be sure to note the pad's location. Spray paint it if needed, and line up with the correct hole on the flexplate first.
3. Install the transmission to the dowel pins making certain the converter is free to move during and after the unit is bolted to
the block. Under no circumstances should the transmission be “drawn up” to the block, but should go flush to the back with relative ease!
Start all bolts by hand and make sure a few threads engage. Do not take the trans jack pressure off until at least 4 bolts are secure in the transmission!
4. Check the converter as soon as the transmission is bolted to the block. The converter must be free to move at least 1/8" to no more than 3/16" to contact the flexplate. If the converter is locked or very close to the flexplate, remove the transmission and check for proper installation of the converter. If there is more than 3/16", be sure to use the proper shims between the mounting pad and the flexplate!
5. After installation is complete, adjust the shifter in ALL gear positions! Be sure to do this going forward and going back! The rod and pin should slide with ease through the arm on the transmission when it is in gear and adjusted correctly. Adjust as required. DO NOT slack off on this step unless you want to be taking your transmission out when you get home after its first time out. Take the time needed to make it correct now! Incorrect adjustment WILL lead to premature failure.
BEFORE AND DURING THE INSTALLATION OF THE CONVERTER ONTO THE TRANSMISSION
CHOOSING THE CORRECT TRANSMISSION FLUID
All fluids must be red. Do NOT use blue, hydraulic or compressor oils!
ATI Super F 100% synthetic Type F produces for firmer shifts, faster clutch engagement and high
temperature protection.
ATI Super F
Std Type F
Dexron 3 / 4
Dexron 5 / 6
PGT-350T-400700 R44L60E / 65E4L80E / 85EC-4C-6TF- 727 / 904

6. Filling the transmission - Position the rear wheels about 3" above the ground with jack stands under the rear so the driveshaft is at the correct angle. Add 4 quarts of fluid to the transmission. Start the engine at the lowest possible RPM and complete filling the trans as quickly as possible with the engine running at idle and in Neutral. Incorrect adjustment will lead to premature failure!
Perform a final fluid check with the vehicle on level ground, in Neutral, warm at idle. You should be no more than at the middle of "Low" and "Full" on the dipstick.
7. After completion, raise the vehicle with the engine running to carefully check for leaks, especially at the cooler lines and radiator fittings. Better to find it now rather than after you are at the track!
8. ATI recommends warming up the transmission and rear end with jack stands under the rear end, and running the car for 2-4 minutes with your transmission in High gear using light varying brake pressure.
NOTE! There is no warranty for a broken transmission case!If you have any difficulties or problems when installing any ATI units, please feel free to call us for information
and advice. You have an investment to protect, so don't take any chances if you are in doubt.
Drive your car in second gear! There is a band holding the drum or clutch applied. In low gear, the sprag must release each time you lift and you will have lots of engine braking.
• Do not downshift to Low unless completely stopped. • Do not downshift to 2nd unless completely stopped.
IMPORTANT: Torqueflites! Always drive your car forward slightly before applying the throttle in Low Gear. If you shift to Neutral, then back to Low, the car must move forward again to engage drive components. Failure to follow this procedure could result in personal injury and damage to the unit!
3
*Do not overfill! Run the transmission through all the forward gears and reverse gears at light throttle.*
ATI RECOMMENDS THE FOLLOWING PROCEDURE FOR DOING A BURNOUT:1. Pull through the water, to the front edge. If you must spin the tires in the water, do so at low speed so water is not sent all
over your wheel well where it can drip on your tire after the burnout.
2. If you can do a burnout in high gear, or 2nd to 3rd for a 3 speed, that is best. Why waste a shift in the burnout? Some 3-speeds have a low gear sprag that is taxed when tires spin and change speeds. This causes un-needed wear.
3. When the tires are hot enough, release the line lock and power the car out of the water 10 to 20 feet and lift gradually. Lifting immediately is hard on the converter. Avoid the “squeak” of tire hook after the burnout if you can.
4. Do not attempt a "dry hop". Address the tree directly after the burn-out.
BAND ADJUSTMENT INFORMATION POWERGLIDE, TORQUEFLITE AND FORD: • Unlock and hold the lock nut. Turn in tight with a torque wrench (80 in/lbs). Adjust out to specified turns: PG Steel Drum = 3.5 turns Ford C-4, course thread = 1 turn PG Aluminum Drum = 4.5 turns Ford C-4, fine thread = 3 turns Ford C-6 = 1 turn Torqueflite 727 / 904 = 1 1/2 turns Hold adjuster in position while locking the lock nut.
• On Torqueflites without manual shift valve bodies, the stock throttle pressure rod from the carburetor to the transmission must be retained and adjusted properly. Be sure all linkage moves freely and is lubricated. Hold the transmission lever firmly forward against its internal stop and tighten the swivel lock screw to 100 in/lbs.
MANUAL SHIFT TORQUEFLITE & T-400 TRANSMISSIONS WITH LOW GEAR BAND APPLY:
.
Stall tests break parts, and not just converter and transmission parts! Remember you are at wide open throttle (full power) and maximum load. The pistons, pins, rods, and crank will really take a beating. Many racers ask why it’s OK to leave the line at wide open throttle but not OK to do stall tests. The difference is this. When at the starting line at wide open throttle, you release the brake and the RPMs accelerate from that point. In the converter, the stator is locked via the sprag assembly and goes from maximum load, in a controlled constant reduction in force, to zero load (free wheel) as the car accelerates. The hydraulic forces in the converter are directed in a smooth and efficient manner for maximum torque multiplication and flow for adequate cooling. When performing a stall test at wide open throttle (or even with a rev limiter such as a Two-Step), you lift off the throttle and the RPMs, now at 5000 or 6000, get jerked down to idle. The stator and sprag assembly goes from maximum load and torque multiplication to zero load in an instant. The sprag is unloaded rapidly and the hydraulic forces are instantly disrupted into unknown flow paths due to the rapid reduction in torque. We have seen many converters damaged by this rapid unloading when a ring and pinion, planetary gear set, or input shaft fails. The rampant hydraulic
pressure actually breaks the pump blades (fins) completely off the converter pump. For this reason, converter manufacturers have for years warned against “snagging” the slicks coming out of the water as RPMs can go from 5000 or 6000 to idle as the tires catch. Once again, damage can be done to the sprag assembly.Also remember that the converter builds up a tremendous amount of heat in a short period of time. By not running an engine after a stall test, all that heated fluid lays in the converter without having a chance to go through the cooler or back to the pan. Excessive heat eventually “fatigues” the metals in the converter. So just say no to stall tests. They hurt parts. Use the transbrake on the STARTING LINE ONLY...NOT in the pits, NOT in the driveway, NOT for your burnouts...STARTING LINE ONLY! Your cost per run will diminish significantly.The only way to safely test the flash or stall speed of your converter is as follows. After everything is warm and ready for full throttle, drive your car where you can safely be in high gear at roughly 15 mph, and put the throttle to the floor for 1-2 seconds, then look at the tach. It will be within 100-200 rpm of what you get on the track.
DO NOT DO STALL TESTS!
4
3000
4000
5000
6000
7000
8000
9000
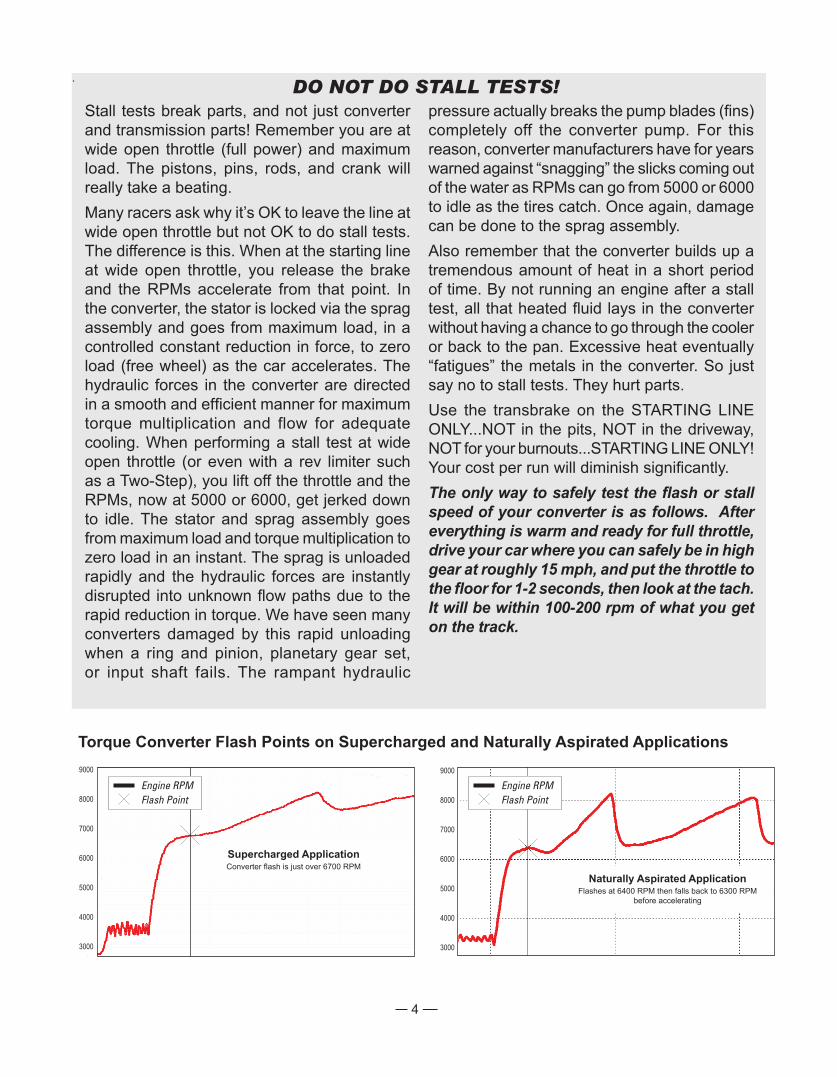
Supercharged ApplicationConverter flash is just over 6700 RPM
3000
4000
5000
6000
7000
8000
9000
Naturally Aspirated ApplicationFlashes at 6400 RPM then falls back to 6300 RPM
before accelerating
Torque Converter Flash Points on Supercharged and Naturally Aspirated Applications
Engine RPMFlash Point
Engine RPMFlash Point
PART # MANUAL OR AUTOMATIC
FWD OR REV
PATTERNBANDAPPLY BRAKE SAFETY NOTES
POWERGLIDE203050 Manual FWD YES YES External203051 Manual FWD YES YES Billet203200 Manual FWD203250 Manual FWD YES External
T-350353080 Manual REV NO YES YES External353100 Automatic FWD YES353200 Manual REV NO353300 Manual FWD 2ND ONLY353400 Manual REV 2ND ONLY
T-400 (RACE) LOW BAND
403085 Manual REV YES Brake in 1 & 2Billet
403085CN Manual REV YESClean Neutral Brake in 1 & 2
Billet
403086 Manual FWD YES2-Speed
Brake in 2 & 3Billet
403087 Manual YES (Man Low Only) YES
403091 Manual REV YES Billet
403091CN Manual REV YES YESClean Neutral
Brake in all gears Billet
403060 Manual REV YES YES Electronic shift
403070 Manual REV YES Electronic shift
T-400 (Street / Strip) LOW BAND
403080 Manual REV YES YES Internal (soft hit)
403100 Automatic FWD YES (Man Low Only)
403200 Manual REV YES403300 Manual FWD YES
700R4703200 Manual REV
TORQUEFLITE 727 - 904723080 Manual REV YES YES YES A & A
723100 Automatic FWD YES (Man Low Only)
723110 Automatic FWD YES (Man Low Only)
723200 Manual REV723200B Manual REV YES A & A
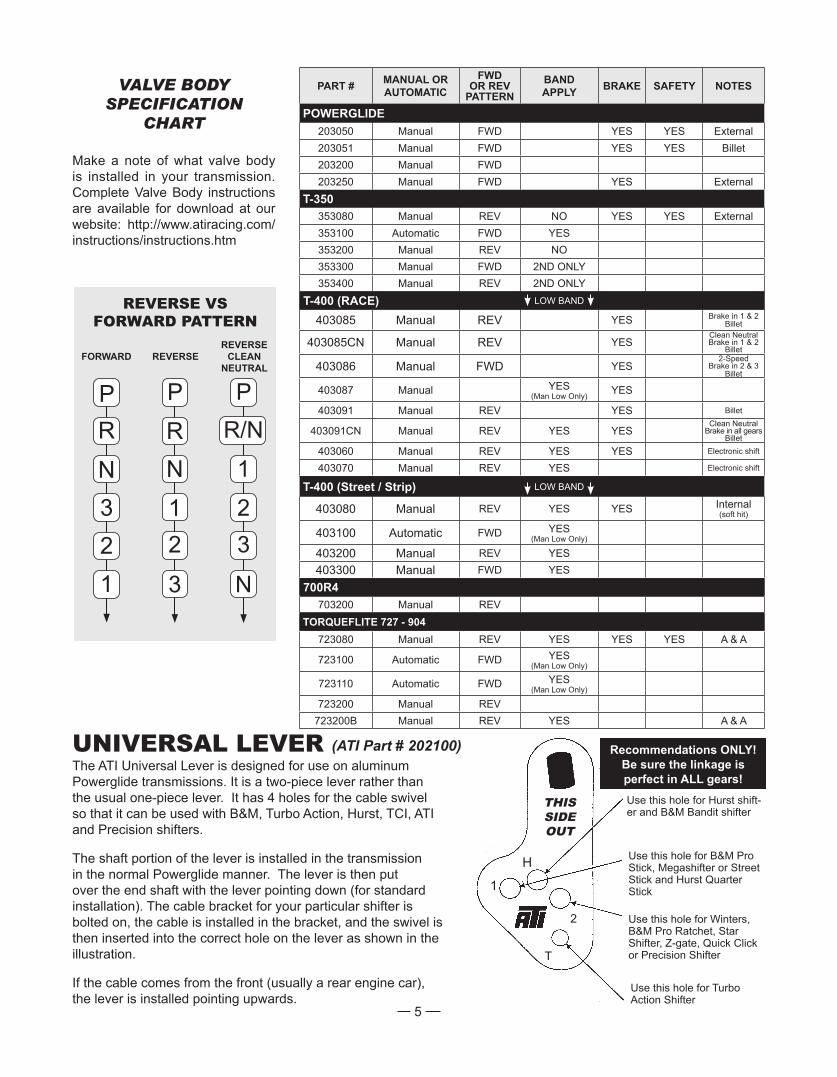
REVERSE VS FORWARD PATTERN
VALVE BODY SPECIFICATION
CHART
Make a note of what valve body is installed in your transmission. Complete Valve Body instructions are available for download at our website: http://www.atiracing.com/instructions/instructions.htm
5
P
RN
12
3
REVERSEFORWARD
PR
N
123
PR/N
1
23
N
REVERSECLEAN
NEUTRAL
UNIVERSAL LEVERThe ATI Universal Lever is designed for use on aluminum Powerglide transmissions. It is a two-piece lever rather than the usual one-piece lever. It has 4 holes for the cable swivel so that it can be used with B&M, Turbo Action, Hurst, TCI, ATI and Precision shifters.
The shaft portion of the lever is installed in the transmission in the normal Powerglide manner. The lever is then put over the end shaft with the lever pointing down (for standard installation). The cable bracket for your particular shifter is bolted on, the cable is installed in the bracket, and the swivel is then inserted into the correct hole on the lever as shown in the illustration.
If the cable comes from the front (usually a rear engine car), the lever is installed pointing upwards.
(ATI Part # 202100)
Use this hole for Hurst shift-er and B&M Bandit shifter
Use this hole for B&M Pro Stick, Megashifter or Street Stick and Hurst Quarter Stick
Use this hole for Winters, B&M Pro Ratchet, Star Shifter, Z-gate, Quick Click or Precision Shifter
Use this hole for Turbo Action Shifter
THISSIDE OUT
H
2
T
1
Recommendations ONLY!Be sure the linkage is perfect in ALL gears!

ADJUSTABLE PRESSURE REGULATOR - PowerglideFor use with Compu-Flow Valve Bodies (ATI Part #s #203050, 203051, 203200, & 203250)Your new ATI Valve Body features an exclusive (U.S. Patent #7,780,564) Adjustable Pressure Regulator. The regulator has been factory pre-set at 165 psi. 180 psi is the highest pressure ATI recommends for an OEM GM Powerglide case. Pressures exceeding 180 psi in a GM case have been known to break the case at the reverse piston bore. ATI recommends that when using a GM cased transmission in cool weather (sub 60° F), that the unit be thoroughly warmed up before engaging Reverse or Brake to prevent case breakage as the fluid will be thicker.
Adjustment procedure for AFTERMARKET cases only:The pressure can be increased by loosening the lock nut with a 9/16” box wrench and turning the adjuster screw in (clockwise) with a 3/16” Allen Key. The rate of change is 16 psi per turn. Tighten the lock nut after adjusting.
Note! For Billet Aluminum Valve Body #203051, the rate of change is 20 psi per turn.
PRESSURE PSI 175 185 200 220 250 280 - 300HORSEPOWER < 500 500-750 750-900 900-1500 1500-2500+ For Superglide 2 - 4
and Outlaw T-400s Note! 1.) Generally, heavier cars and higher horsepower require more line pressure. 2.) Remember more pressure feels better but it also robs horsepower.
Testing With A Pressure Gauge Use the test port at the Servo Cover. A reading may be obtained with the transmission in first or with the brake applied (if equipped). Bring the RPMs up until the pressure stops climbing and reads steady. This is the regulated pressure.
ATI Pressure Recommendations
U.S. PATENT # 7,780,564
6
ADJUSTABLE PRESSURE REGULATOR - T400For use with T-400 Super Pump
This kit is a perfect companion to ATI’s Adjustable Regulator Valve Bodies. Kit includes a 2 1/2” gauge with a 0-300 psi range, a 6’ neoprene hose, brass adapters for most popular fittings and a storage pouch.
ATI Valve Body Pressure Test KitPart #151001
The ATI Powerglide and T-400 Adjustable Pressure Regulator is patented. Patent infringements will not be tolerated and are
subject to legal action.
To set up the adjusterHold the adjuster and the spring seat together and turn the stud into the adjuster until you feel the seat move. Back it up until it is flush again. At this point, it is at zero. You can increase the pressure by turning the stud farther in to the seat and hence, compressing the spring.
4 1/2 turns should give you approximately 275 psi depending on the condition of the pump used. Results will vary. ATI highly recommends checking the line pressure both before and after the install to ensure desired pressure is achieved.
OEM cases should not be set over 185 psi unless an additional intermediate lug clutch snap ring support is used. Case damage will certainly occur if this is not done.

The Transbrake
Why can't I get above 2500 RPM on the footbrake?
This is called "free speed" and is a direct function of your brakes to hold the torque being transmitted.
Remember! Converters multiply torque 2 to 1. The 400 lbs of torque which the engine is producing is 800 ft / lbs at the transmission input shaft multiplied by the low gear of the transmission. It's a huge amount of torque to hold.
Drum brake shoes must be warmed up in the burnout.
ATI PERFORMANCE PRODUCTS, INC.6747 WHITESTONE RD • GWYNN OAK, MD 21207
TOLL FREE ORDERING! 800-284-3433(410) 298-4343 • FAX: (410) 298-3579
www.atiracing.com
INST. # 199990-I 9/2016
The Transbrake’s main function is to unload the chassis while staging to make the car shock the suspension and hook consistently. The brake will accomplish this at a mere 1000 RPM. Going higher on the brake only serves to super heat the oil in the converter and make for inconsistent launches.You should find an RPM that your engine is comfortable with (no stumble or hesitation), hopefully below 4000 RPM. Going higher on the brake will reduce the reaction time of the car, automatically putting you closer to the light. Then, the only reason for you to go higher on the brake is if you are late on the light. If you run a delay box, be sure to remove the time delay before testing. Many people have over a second in the delay box and stage the car at 5500+ RPM.
The lower the RPM at which you launch the car (relative to the stall speed of the converter), the more free energy the converter gives you. That’s a plus; your converter and transmission will live longer without the excessive heat. Many large, long stroke engines will run faster from a very low stage RPM.Many of our 350 cubic inch Super Stocker racers run the
quickest from 1800 RPM. The converter will flash to its stall speed no matter at what RPM you stage, provided the engine responds properly to that RPM. Engines with two carbs and big plenums on the intake system will require higher RPMs to respond consistently. Again, going higher on the torque converter only serves to reduce the reaction time of the race car.
True stall speed occurs when two things are present at the same time. They are:1) The maximum amount of torque (power) is input to the converter.2) The maximum amount of load (work) is present for the converter to accomplish.Perfect example: The car is in a wheel stand climbing the ring gear and has not moved an inch forward while stall speed is occurring.When checking stall speed using the transbrake, it must be checked on the starting line. Stage the car, deck the throttle, look at the stall speed, then release the brake and let the car leave. Most converter damage is caused by lifting the throttle from stall speed. Wide open throttle on the brake is extremely detrimental to the health of your converter.
ATI Performance Products, Inc. • 6747 Whitestone Road • Baltimore, Maryland 21207
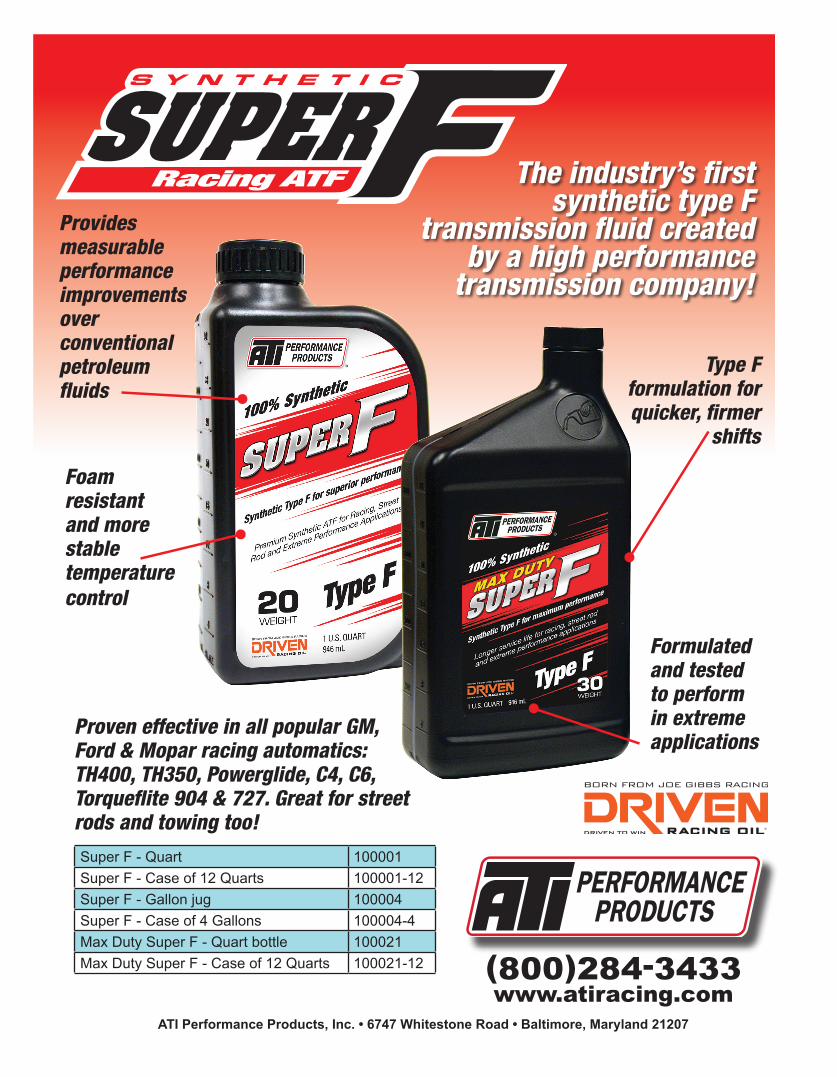
Foam resistant and more stable temperature control
Formulated and tested to perform in extreme applications
Provides measurable performance improvements over conventional petroleum fluids
Proven effective in all popular GM, Ford & Mopar racing automatics: TH400, TH350, Powerglide, C4, C6, Torqueflite 904 & 727. Great for street rods and towing too!
(800)284-3433 www.atiracing.com
Type F formulation for quicker, firmer
shifts
Super F - Quart 100001Super F - Case of 12 Quarts 100001-12Super F - Gallon jug 100004Super F - Case of 4 Gallons 100004-4Max Duty Super F - Quart bottle 100021Max Duty Super F - Case of 12 Quarts 100021-12
The industry’s first synthetic type F
transmission fluid created by a high performance
transmission company!