transfer cft ibm i - docs.axway.com...installation and operation guide transfer cft ibm i version...
TRANSCRIPT

I N S T A L L A T I O N A N D O P E R A T I O N G U I D E
Transfer CFT IBM iVersion 3.1.3
1 June 2017

Copyright © 2015 Axway Software S.A.
All rights reserved.
This documentation describes the following Axway software: Transfer CFT
No part of this publication may be reproduced, transmitted, stored in a retrieval system, or translated into any human or computer language, in any form or by any means, electronic, mechanical, magnetic, optical, chemical, manual, or otherwise, without the prior written permission of the copyright owner, Axway Software S.A.
This document, provided for informational purposes only, may be subject to significant modification. The descriptions and information in this document may not necessarily accurately represent or reflect the current or planned functions of this product. Axway Software S.A. may change this publication, the product described herein, or both. These changes will be incorporated in new versions of this document. Axway Software S.A. does not warrant that this document is error free.
Axway Software S.A. recognizes the rights of the holders of all trademarks used in its publications.
The documentation may provide hyperlinks to thirdparty web sites or access to thirdparty content. Links and access to these sites are provided for your convenience only. Axway Software S.A. does not control, endorse or guarantee content found in such sites. Axway Software S.A. is not responsible for any content, associated links, resources or services associated with a thirdparty site.
Axway Software S.A. shall not be liable for any loss or damage of any sort associated with your use of thirdparty content.

Contents
Preface 1
About Transfer CFT 1
Installation guide outline 1
Who should read this guide 2
Transfer CFT documentation set 2
Support services 2
What's new 2
Accessibility 4
Accessibility features of the documentation 4
Screen reader support 4
Support for high contrast and accessible use of colors 4
1 Prerequisites 6
Hardware prerequisites 6
Disk space 6
Software environment 6
Java 7
End User License Agreement 7
Default ports 7
Applying a license key 8
Restoring a Transfer CFT 9
Certificates 10
Creating a class 11
Creating a subsystem 13
TCP/IP requirements 14
Interface level used 14
Execution environment 14
Network environment 14
Precautions 15
2 Install 16
Get started 16
Installation files 16
Using FTP and the RSTLIB command 16
Creating a save file on the IBM i system 16
Manually send the installation files 17
Sending from a PC workstation 17
Set up the system and network 17
Transfer CFT IBM i3.1.3 Installation Guide i

Create a user profile 17
Assign user rights 19
Managing user rights 19
Setting up the operating environment 20
Create a profile and libraries 21
About the installation 21
Transfer CFT IBM i libraries 21
Installation and upload options 21
Restoring the save file on an IBM i System 21
Using the INSTALL command 22
Start the installation 22
Enable governance options 25
Enable Sentinel option 26
About multinode architecture 29
Procedure overview 32
Multinode unified configuration parameters 32
Managing multinode 35
Transfer CFT IBM i utilities 48
Using the Menu bar 48
Purging residual Transfer CFT objects 49
Using CFTUTIL Transfer CFT IBM i specific commands 49
3 Post-installation 52
Overview of Transfer CFT in production 52
Manage commands 52
Standard commands 52
Deprecated commands 53
Starting and stopping the Copilot server 53
Starting the Copilot client 56
Central Governance registration concepts 56
Step overview 57
Override the default policy 58
Operating Transfer CFT 59
Using the common Transfer CFT commands 59
Common Transfer CFT commands menu 61
Submitting CFTUTIL commands 62
About transport security 62
Certificates 62
Configuration changes 62
Using the PKIUTIL utility 62
Submitting PKIUTIL commands 63
Create a database 63
Interpreting source members 64
Running Transfer CFT 65
Transfer CFT IBM i3.1.3 Installation Guide ii

Starting Transfer CFT 65
Submitting a transfer command 69
Shutting down Transfer CFT 72
Configuring Transfer CFT parameters 73
Interpreting a parameter source 73
Identity and access management 76
About internal access management 76
Updating the secini and secenvg files 76
Generating security base dictionaries 77
Using the secparm file 77
Running Transfer CFT with a security base 78
Application programming interfaces 78
Call from a COBOL/ILE or RPG/ILE program 79
Call from a C Program 79
Start the Transfer CFT IBM i Manager 80
Starting Transfer CFT in batch mode 80
4 Migrate and upgrade 82
Prerequisites 82
Important information before performing a migration procedure 82
About license keys 82
Update Transfer CFT IBM i 82
Display patch information 82
Update with a service pack 83
Uninstall a service pack 84
Apply a patch 84
Uninstall a patch 85
Activate Central Governance connectivity 85
Overview 85
Automatically activate connectivity 85
Manually activate connectivity 86
Connect to a different Central Governance system 89
Use former configuration objects 89
View managed features 90
Migrating Transfer CFT IBM i 91
Overview 91
About catalog and com migration programs 91
Procedure overview 92
Before you start 92
Inserting transfers from the intermediate file to the 3.1.3 catalog and com 93
About the part and parm migration 94
Transfer CFT IBM i3.1.3 Installation Guide iii

5 Uninstall 96
6 Troubleshooting 98
Using the support tool 98
Using the CFTSUPPORT command 99
Tracking Transfer CFT IBM i activities 99
IFS access error codes: DIAGP 101
7 Appendix A: Use APIs 104
About APIs 104
About Transfer CFT services 104
Catalog querying services 104
Transfer services 106
Synchronous communication services 107
Using Web Services 108
Use the Transfer CFT JPI 109
Use the Transfer CFT JPI 110
Use Transfer CFT services in C 110
Call syntax 110
Use Transfer CFT services in C 111
About cftapi2 112
Transfer CFT catalog query services 118
Synchronous communication services 121
Transfer services 123
Use Transfer CFT services in COBOL 126
Call syntax 126
Return codes 126
Use Transfer CFT services in COBOL 127
Transfer CFT catalog query services 128
Synchronous communication services 131
Transfer services 133
8 Appendix B: Menu mapping 135
Transfer CFT 2.7.1 135
Transfer CFT 3.0.1 136
Transfer CFT 3.1.3 SP4 137
Transfer CFT IBM i3.1.3 Installation Guide iv
Preface
This documentation provides information to aide you in installing, upgrading, or migrating Transfer CFT.
About Transfer CFTTransfer CFT is the file transfer component in the Axway 5 Suite platform, and provides a multiplatform, highvolume, file and message transfer service. This documentation explains how to install, configure, and manage Transfer CFT.
As of version 3.1, you can configure Transfer CFT and manage flows using Axway Central Governance. Central Governance simplifies Transfer CFT usage, and provides services such as identity and access management, certificate management, monitoring, alerting, and a web dashboard.
For more information on Axway products, visit www.axway.com.
Installation guide outlineThis guide explains how to perform a full installation of Transfer CFT. It also describes how to:
Prepare and plan your installation – Describes what you should plan for deploying and configuring your system architecture, installing any prerequisite software, and configuring other components.
Install – Describes how to perform a complete install as well as apply a service pack.
Post installation – Provides instructions on how to check if the installation was successful and set up Transfer CFT. Additionally it describes any tasks to perform before the administrator can log on to the product for initial configuration.
Upgrade – Involves a change in product version and the replacement of binary artifacts; may also require configuration change.
Migrate – Involves a change in product versions, such as from 2.7.1 to 3.1.3. As part of this process, the existing configuration may need to be modified or updated to be compatible with the new version. For example, you may need to modify configuration files or the internal datafile schema. Because migration can be a complex process, organizations typically set up a migration project to study the new features and determine the impact on the existing configuration, and to plan for the changes across the various environments.
Uninstall – Describes how you can uninstall Transfer CFT.
Transfer CFT IBM i3.1.3 Installation Guide 1

Preface
ExpressPackage Describes how to create a product package that you can deploy to multiple remote sites.
Troubleshoot the installation or registration process – Describes the different types of troubleshooting errors you can encounter during installation, upgrade and postinstallation.
Who should read this guideThis guide is intended for enterprise personnel involved in installing software and Axway Professional Services personnel. Familiarity with Axway products is recommended.
This guide presumes you have knowledge of:
l Your company’s business processes and practices
l Your company’s hardware, software, and IT policies
l The Internet, including use of a browser
Others who may find parts of this guide useful include network or systems administrators and other technical or business users.
Transfer CFT documentation setTransfer CFT provides a complete set of documentation, covering all aspects of using the product. These documents include the following:
l Transfer CFT 3.1.3 Release Notes
l Transfer CFT 3.1.3 User Guide (HTML)
l Axway 5 Suite Supported Platforms Guide
Support servicesThe Axway Global Support team provides worldwide 24 x 7 support, subject to validation of your license agreement. Email [email protected] or, for your local support telephone number, visit Axway Sphere at support.axway.com and click Contact Axway Support.
You can post comments and question to the Axway user forum at: forums.axway.com/index.php
What's newTransfer CFT3.1.3 offers Central Governance management for UNIX, Windows, z/OS, and IBM i platforms. Additional new product features are listed in the Changelog found in the Transfer CFT User Guide.
Documentation updates include:
Transfer CFT IBM i3.1.3 Installation Guide 2

Preface
l General restructuring
l Getting started chapter
l Activating Central Governance chapter
l Updated installation guides for UNIX, Windows, z/OS, and IBM i
Transfer CFT IBM i3.1.3 Installation Guide 3

Accessibility
At Axway, we strive to create accessible products and documentation for all our users.
This section describes the accessibility features of the documentation.
Accessibility features of the documentationThe product documentation provides the following accessibility features:
l Screen reader support
l Support for high contrast and accessible use of colors
Screen reader support l Alternative text is provided for images whenever necessary.
l The PDF documents are tagged to provide a logical reading order.
Support for high contrast and accessible use of colors l The documentation can be used in highcontrast mode.
l There is sufficient contrast between the text and the background color.
Transfer CFT IBM i3.1.3 Installation Guide 4

Accessibility
5 Installation Guide Transfer CFT IBM i3.1.3

1 Prerequisites
This section describes the prerequisites for Transfer CFT 3.1.3 IBM i and covers:
l Hardware environment
l Software environment
Hardware prerequisitesTransfer CFT 3.1.3 IBM i can only be installed on an system based on the RISC architecture.
Disk spaceFor performance reasons, you are advised to configure a storage pool size of at least 250,000 Kbytes (245 MB). See Creating a subsystem.
You must ensure that the:
l Disk space used to restore the Transfer CFT objects is approximately 250 MB, excluding files to be transferred.
l Total disk space used on the system still allows acceptable performance levels to be maintained (< 80%).
Software environmentThis section describes the Transfer CFT 3.1.3 IBM i software environment:
l Transfer CFT IBM i 3.1.3supports version 6.1 and higher
l The file management mechanism uses the standard OS database management system and IFS (Integrated File System). The Transfer CFT IBM i Manager uses the PDM (Program Development manager) and SEU (Source Entry Utility).
l The Transfer CFT IBM i Manager uses the UIM (User Interface Manager).
l The Transfer CFT APIs only support an ILE environment.
Transfer CFT IBM i3.1.3 Installation Guide 6

1 Prerequisites
JavaWhen using Secure Relay, you require Java to be installed in the same environment as the Transfer CFT installation. The Master Agent is managed, but the Router Agent can be in another environment.
Check your Java version, Secure Relay requires Java 6.0.1.
End User License AgreementYou should read and accept the End User License Agreement (EULA) prior to installing Transfer CFT. The EULA file is located in the directory where you decompressed the Transfer CFT package.
Default portsThe following list contains the default Transfer CFT port numbers used for installation. You can check in advance that these ports do not conflict with ports used by other applications on the same machine.
You may need to modify the default port numbers, depending on your configuration.
Table 1. Default ports by platform
The Internet Assigned Numbers Authority (IANA) reserves the TCP ports 17611768 for Transfer CFT. For more information, refer to: www.iana.org/assignments/servicenamesportnumbers/servicenamesportnumbers.
Component Port
PeSIT 1761
SSL 1762
COMS 1765
Copilot 1766
Copilot for Central Governance 1767
Central Governance 12553
Central Governance SSL 12554
Secure Relay MA
ma.comm_port
6801
7 Installation Guide Transfer CFT IBM i3.1.3

Applying a license key
Component Port
Secure Relay RA
ra.comm_port
ra.admin_port
6811
6810
Legend:
l PeSIT (PESITANY protocol): PeSIT in plain text
l SSL: PeSIT protocol over SSL/TLS
l COMS: Synchronous transfers
l Copilot: Provides access to Transfer CFT Copilot server from a user Internet browser
l Copilot for Central Governance: Provides secure access forCentral Governance (mutual authentication)
l Central Governance: Used to connect to Central Governance
Applying a license keyYou need to apply a valid license key to Transfer CFT in the following situations:
l You perform an initial Transfer CFT installation.
l A hardware upgrade changes the CPU ID (CPU serial number).
l After a year passes, to replace an expired license key.
l To ramp up a Transfer CFT Disaster Recovery instance (for example, on a DR LPAR for z/OS systems).
l If you are migrating from a version 2.x Transfer CFT to a version 3.x.
Note You require as many keys as instances of Transfer CFT IBM i running at same time. For example, two Transfer CFT instances cannot run at the same time, on the same server, using the same license key.
Obtaining a license key 1. For a new installation, install Transfer CFT.
2. After completing the installation, or for an existing installation, use the command cftutil about to retrieve your system information. For details see the examples below.
3. Contact the Axway Fulfillment team at the appropriate email address to obtain a valid key.
l For a US key, contact: [email protected]
l For an EMEA or APAC key, contact: [email protected]
4. Provide the hostname where Transfer CFT is to be installed or updated.
5. Provide the list of characters in the CPU ID.
Transfer CFT IBM i3.1.3 Installation Guide 8

1 Prerequisites
Applying a license keyApply the license key(s) that you received from the Axway Fulfillment team as follows:
l Navigate to the <target>.SAMPLE library, and edit the 'PRODKEY' member.
l Replace the X's with the product key. The key may exceed the number of X's displayed.
Examples
Use the CFTUTIL utility to execute the ABOUT command to find the CPU ID.
CFTUTIL PARAM(ABOUT)
Host information :
* model = 525 *
cpuid = 10A16B2
In this example, you would provide the CPU ID 10A16B2.
Use the display system value command to get the serial number, known as QSRLNBR:
DSPSYSVAL SYSVAL(QSRLNBR)
System value . . . . . : QSRLNBR
Description . . . . . : System serial number
Serial number . . . . : 06890AP
In this example, you would provide the CPU ID 06890AP.
Note Your values will differ from those shown in the examples.
Restoring a Transfer CFT
OverviewYou can restore the Transfer CFT product on IBM i from a DVD or from the Axway Support web site at support.axway.com.
For a remote IBM I, use FTP from a PC workstation where the DVD contains a Transfer CFT save file (*SAVF).
To avoid being blocked by the execution rights for commands used in Transfer CFT programs, you must assign user rights to the Transfer CFT profile. Enter the following command to assign user rights:
GRTOBJAUT OBJ(QSYS/*ALL) OBJTYPE(*CMD) USER(CFT) AUT(*USE)
9 Installation Guide Transfer CFT IBM i3.1.3

Certificates
CertificatesUsing the default certificates that are supplied with Transfer CFT is strongly discouraged in a production environment. You should use your own certificates to enhance security.
Type Location Certificate Expires
Transfer CFT
<Transfer_CFT>/home/extras/pki Axway_MFT_Demonstration_Root_Certificate.der
August 2020
MFT_Demonstration_User_Certificate.der
August 2015
MFT_Demonstration_User_Certificate.p12 (user)
MFT_Demonstration_User_Certificatek.der
Copilot <Transfer_CFT>home/distrib/template/conf/pki
MFT_Demonstration_User_Certificate.p12
August
2015
copilot.ssl.sslcertpassword = ********
Secure Relay
<Transfer_CFT>/home/distrib/xsr SecureRelayCA.pem January
2015
SecureRelayMasterAgent.p12
Central Governance
<Transfer_CFT>/runtime/conf/pki passportCA.pem November 2019
When using a DER certificate, you must first create a file that has a record length equal to the size of the certificate (in bytes). You can then upload the certificate to this newly created file.
Example
If the 2k_l1_user1_key.der certificate size is 1,191 bytes:
1. Create a file with a record length of 1,191.
CRTPF FILE(YOURLIB/DER_CERT) RCDLEN(1191)
2. Upload 2k_l1_user1_key.der to YOURLIB/DER_CERT on the IBMi server.
Transfer CFT IBM i3.1.3 Installation Guide 10

1 Prerequisites
Creating a class 1. In the system Objects menu (option 4 in the Transfer CFT menu), type 5 and press Enter to
validate.
2. Specify class information.
Create Class (CRTCLS)
Type choices, press Enter.
Class . . . . . . . . . . . . > CLS1 Name
Library . . . . . . . . .. > CFTPROD Name, *CURLIB
Run priority . . . . . . . . . > 40 1-99
Time slice . . . . . . . . . . > 5000 Milliseconds
Eligible for purge . . . . . . *YES *YES, *NO
Default wait time . . . . . . 30 Seconds, *NOMAX
Maximum CPU time . . . . . . . *NOMAX Milliseconds, *NOMAX
Maximum temporary storage . . *NOMAX Kilobytes, *NOMAX
Maximum threads . . . . . . *NOMAX 1-32767, *NOMAX
Text 'description' . . . . .. . > 'CFT/400 class description'
If product performance levels are unacceptable, for example due to batch processing monopolizing the CPU, you may need to modify these default values. In particular you can increase the execution priority by reducing the value set by default.
Adding a routing entry1. In the system Objects menu, type 6 and press Enter to validate.
2. Define the standard routing entry if you have created a Transfer CFT specific subsystem.
3. Enter the name of the job description that you created for the Transfer CFT working environment.
Add Routing Entry (ADDRTGE)
Type choices, press Enter.
Subsystem description . .. > SBS1 Name
Library . . . . . . . . > CFTPROD Name, *LIBL, *CURLIB
Routing entry sequence number . > 9999 1-9999
Comparison data:
Compare value . . . . . . > *ANY
Starting position . . . . 1-80
11 Installation Guide Transfer CFT IBM i3.1.3

Creating a class
Program to call . . . . . . > QCMD Name, *RTGDTA
Library . . . . . . . . . *LIBL Name, *LIBL, *CURLIB
Class . . . . . . . . . . . > CLS1 Name, *SBSD
Library . . . . . . . . . > CFTPROD Name, *LIBL, *CURLIB
Maximum active routing steps . . *NOMAX 0-1000, *NOMAX
Storage pool identifier . . . . 1 1-10
Thread resources affinity:
Group . . . . . . . . *SYSVAL *SYSVAL, *NOGROUP, *GROUP
Level . . . . . . . . . . . . *NORMAL, *HIGH
Resources affinity group . . . *NO *NO, *YES
Changing the user profile 1. In the system Objects menu, type 8 and press Enter to validate.
2. Modify the user profile to take into account the selections that you made in previous customization steps.
3. Indicate the name of the job description that you created for the Transfer CFT working environment.
Change Profile (CHGPRF)
Type choices, press Enter.
Assistance level . . . *SYSVAL *SAME, *SYSVAL, *BASIC...
Current library . . . *CRTDFT Name, *SAME, *CRTDFT
Initial program to call . . CFGINLPGM Name, *SAME, *NONE
Library . . . . . . DOICONFIG Name, *LIBL, *CURLIB
Initial menu . . . . . MAIN Name, *SAME, *SIGNOFF
Library . . . . . . . QSYS Name, *LIBL, *CURLIB
Text 'description' . .. > ' CFT OS/400 user profile description'
Additional Parameters
Job description . . . > JOBD1 Name, *SAME
Library . . . . . . > CFTPROD Name, *LIBL, *CURLIB
Transfer CFT IBM i3.1.3 Installation Guide 12

1 Prerequisites
Creating a subsystem1. In the system Objects menu, type 3 and press Enter to validate.
2. Specify subsystem information.
Create Subsystem Description (CRTSBSD)
Type choices, press Enter.
Subsystem description . > SBS1 Name
Library . . . . . . > CFTPROD Name, *CURLIB
Storage pools:
Pool identifier . . > 1 1-10
Storage size . . . .. > 250000 Number, *BASE,
*NOSTG...
Activity level . . .. > 10 Number
+ for more values
Maximum jobs . . . .. > *NOMAX 0-1000, *NOMAX
Text 'description' ..> 'Transfer CFT IBM I (OS400) subsystem description'
It is recommended that you set the following parameters to the indicated values:
l Main private memory pool and size: a minimum of 245MB (250,000 Kbytes)
l Activity level: 10
l Maximum number of jobs: *NOMAX (default value)
Adding a job queue1. In the system Objects menu, type 4 and press Enter to validate.
2. Specify job queue information.
Add Job Queue Entry (ADDJOBQE)
Type choices, press Enter.
Subsystem description . . .> SBS1 Name
Library . . . . . . . . > CFTPROD Name, *LIBL,
*CURLIB
Job queue . . . . . . . . > JOBQ1 Name
Library . . . . . . . .> CFTPROD Name, *LIBL, *CURLIB
13 Installation Guide Transfer CFT IBM i3.1.3

TCP/IP requirements
Maximum active jobs . . . . . . > *NOMAX 0-1000, *NOMAX
Sequence number . . . . . . . . 10 1-9999
Max active priority 1 . . . . . *NOMAX 0-99, *NOMAX
Max active priority 2 . . . . . *NOMAX 0-99, *NOMAX
Max active priority 3 . . . . . *NOMAX 0-99, *NOMAX
Max active priority 4 . . . . . *NOMAX 0-99, *NOMAX
Max active priority 5 . . . . . *NOMAX 0-99, *NOMAX
Max active priority 6 . . . . . *NOMAX 0-99, *NOMAX
Max active priority 7 . . . . . *NOMAX 0-99, *NOMAX
Max active priority 8 . . . . . *NOMAX 0-99, *NOMAX
Max active priority 9 . . . . *NOMAX 0-99, *NOMAX
TCP/IP requirementsThis section describes the specific requirements for TCP/IP in a Transfer CFT Transfer CFT IBM i environment.
Interface level usedThe interface is a SOCKET type.
Execution environmentA TCP/IP network must be installed and configured before the Transfer CFT Transfer CFT IBM i product is installed. Use the STRTCP command to start the TCP/IP environment. The configured servers are then started.
Network environment
Local domain and host name 1. To configure the domain and host names, enter GO CFGTCP.
2. In the CFGTCP menu, select the Changes local domain and host names option and modify the local domain and host names for your IBM i. The host name is used in the CFTNET command HOST parameter when the Transfer CFT/400 monitor is configured.
Host tableEach host with which you wish to transfer files must be declared in this table.
Transfer CFT IBM i3.1.3 Installation Guide 14

1 Prerequisites
To do so, select the WORK WITH TCP/IP HOST TABLE ENTRIES option in the CFGTCP menu.
TCP/IP interfaceEach domain with which you wish to transfer files must be declared in an interface.
To do so, select the WORK WITH TCP/IP INTERFACE option in the CFGTCP menu and add an interface.
A partner address of 192.1.1.1 and the 255.255.255.0 mask are used to separate the network identifier part (192.1.1) from the host identifier part (1). For a site with the same network identifier, you do not need to configure another network interface.
TCP/IP port restrictionsThe SAPs used in the Transfer CFT configuration commands must be declared as ports for the TCP/IP protocol. They must also be associated with the Transfer CFT user profile.
Note Ports 1 to 1023 are reserved and must not be used by Transfer CFT.
Checking the network configurationThe PING command is used to test the connection with your partner.
To do so, enter the PING command on an Transfer CFT IBM i command line, followed by the name of the host to be tested. The test results are displayed on the message line.
PrecautionsAny incidents detected impact the following:
l SecurityTo start TCP, you do not need to have a user profile set to *IOSYSCFG, but it may be required for some Transfer CFT configuration commands in the TCP/IP environment: the Transfer CFT IBM i messages are explanatory.
l Network interface is not started after the ENDTCPIFC commandThe network interface can be started up via the WORK WITH TCP/IP INTERFACE option in the CFGTCP menu, or the STRTCPIFC or NESTAT command if the STRTCP command has already been called.
15 Installation Guide Transfer CFT IBM i3.1.3

2 Install
This section describes the upload and restore options available for Transfer CFT 3.1.3 for the IBM i platform prior to performing an installation.
There are two methods for installing Transfer CFT, as described in this section:
l Using FTP and the RSTLIB command.
l Using the Axway Installer
Before starting a Transfer CFT session, you must add the value *none in the initial program call to call a screen menu directly. Otherwise the session cannot start.
Note CFTPGM is the standard name for the programs library.
Get started Before you start, you should:
l Download the ESD file from Axway Sphere at support.axway.com
l Check for an FTP client that permits the transfer of files to the IBM i host
Note ISO files were deprecated in version 3.0.1.
To install the Transfer CFT IBM i product you need adequate space, as the file to upload is approximately 280 MB.
Installation files After downloading the ESD files locally, unzip and execute the setup32.exe.
Using FTP and the RSTLIB command
Creating a save file on the IBM i systemFor security management reasons, you must use the Transfer CFT profile (USRPRF=CFT) to restore the Transfer CFT IBM i library.
1. On IBM i, open an IBM I system session under the Transfer CFT account.
2. Create a temporary library, for example: CFTINSTEMP
Transfer CFT IBM i3.1.3 Installation Guide 16

2 Install
3. Create a save file (*SAVF) in CFTINSTEMP library, for example:
CRTSAVF FILE(CFTINSTEMP/CFT31XL) TEXT('Transfer CFT
Distribution save file')
Where: CFTINSTEMP is the standard name for temporary library used to launch the Transfer CFT install command.
Manually send the installation files
Sending from a PC workstationYou can use FTP to send the save file to an IBM i system. Open an FTP session, and enter:
> bin
> unit:\Transfer_CFT_3.1.X_os400.bin CFTINSTEMP/CFT31XL
> quit
Where: X is the version number
Set up the system and networkBefore you begin your Transfer CFT IBM i installation you should read this section, which describes the procedures that you need to perform before installing Transfer CFT IBM i.
Prior to installation you should:
l Create a user profile
l Manage user rights
l Set up the operating environment
Start by checking verifying that your operating system and environment requirements are met as described in Transfer environment.
Create a user profile It is up to the system administrator to make the decision to create a Transfer CFTspecific user profile. We recommend that you do, if possible, use this type of profile to simplify security management, execution environment generation, and Transfer CFT operations.
Unless you wish to differentiate between several Transfer CFT IBM i instances running concurrently on the same system, you should use the Transfer CFT profile name (USRPRF = CFT). If you decide to use Transfer CFT as a profile, you must create this Transfer CFT profile prior to installing the product.
17 Installation Guide Transfer CFT IBM i3.1.3

Set up the system and network
The profile used to install the product must be in the *SECOFR class.
You can create a Transfer CFT profile using the system administration profile (*SECOFR class) and executing the command:
CRTUSRPRF USRPRF(CFT) USRCLS(*PGMR) CCSID(65535) SPCAUT
(*JOBCTL,…)
The program owner profile must always be in the *PGMR class. The special rights assigned by default to the Transfer CFT profile (profile SPCAUT parameter), and belonging to the *PGMR user class (*USRCLS), may not be sufficient.
Description of rights:
l *JOBCTL: job control rights
l *SAVSYS: backup or restore rights
l *ALLOBJ if QSECURITY = 20 or 30: rights for all objects
l *IOSYSCFG: this right is mandatory if network objects are created automatically during the Transfer CFT startup, or manually via the Transfer CFT profile
l *SERVICE: this right is useful when running the SST tool network trace commands
It is recommended that you have a profile with the following rights:
l *JOBCTL
l *SAVSYS
l *IOSYSCFG
l *SERVICE
l *SPLCTL
Additionally, Transfer CFT requires as a minimum the following IBM i rights:
l GRTOBJAUT OBJ(CFTPROD/*ALL) OBJTYPE(*ALL) USER(AXMSING) AUT(*ALL)
l GRTOBJAUT OBJ(CFTPGM/*ALL) OBJTYPE(*ALL) USER(AXMSING) AUT(*USE)
l GRTOBJAUT OBJ(CFTPGM/DM3LCK) OBJTYPE(*ALL) USER(AXMSING) AUT(*ALL)
l GRTOBJAUT OBJ(CFTPGM/LOCKTABLE) OBJTYPE(*FILE) USER(AXMSING) AUT(*ALL)
l GRTOBJAUT OBJ(CFTPGM/DX25) OBJTYPE(*DTAARA) USER(AXMSING) AUT(*ALL)
l GRTOBJAUT OBJ(SI_TEMPLIB/*ALL) OBJTYPE(*ALL) USER(AXMSING) AUT(*ALL)
You must give rights *RX for all object created in the /home/cft/cft313/install directory (default directory)and /home/cft/cft313/runtime (default directory).
The system environment of the user performing the installation procedure is applied by default if there is no Transfer CFTspecific profile applied during installation. The user profile owns the objects created during installation, but not the restored objects such as programs, commands, and so on.
To provide assistance for users, the CHGOWNCFT and GRTOBJCFT commands are supplied with the library and profile name as call parameters.
Transfer CFT IBM i3.1.3 Installation Guide 18

2 Install
Assign user rights To avoid being blocked by the execution rights for commands used in Transfer CFT programs, you must assign user rights to the Transfer CFT profile. Enter the following command to assign user rights:
GRTOBJAUT OBJ(QSYS/*ALL) OBJTYPE(*CMD) USER(CFT) AUT(*USE)
Managing user rights System managers can use one of several methods to block Transfer CFT usage, as in some settings a system administrator may need to prohibit the general use of Transfer CFT IBM i.
One way for system administrators to manage users is to assign the right to execute Transfer CFT to any user with a group profile (*GRPPRF). Another is to give the Transfer CFT profile password only to certain users.
If Transfer CFT is used by several profiles, issues over object rights can occur, possibly affecting product operations. To grant specific authority for an object to a user or group, you may need to use the GRTOBJAUT command.
Additionally, when these programs create a file dynamically they grant all users [USER(*PUBLIC)] the default authorization(AUT(*LIBCRTAUT)
In a live environment, the security manager can modify:
l Program usage rights
l User profile usage rights
l Update rights for Transfer CFT service files (PARM, PART, CAT, COM, and optionally LOG and ACCNT files)
l Update rights for source members, such as:
o Source files that can be interpreted (particularly the configuration source file)
o Source files to be submitted by Transfer CFT at the end of the transfer
The method used to address security issues for specific rights depends on the:
l Number and diversity of the user profiles concerned by file transfers
l Required level of data protection, since most constraints when using the product are associated with data confidentiality issues
There are no preset security rules, as Transfer CFT security issues are closely associated with the administration of the system on which Transfer CFT is installed.
19 Installation Guide Transfer CFT IBM i3.1.3

Set up the system and network
Setting up the operating environment
Using a specific subsystemYou are advised to run Transfer CFT IBM i on a specific subsystem. Therefore, it is recommended that you use the Transfer CFT IBM i screen manager to create the following items:
l Job description (*JOBD)
l Subsystem with a private memory pool of 245 MB
l Standard batch class
For practical reasons, other configurations can be considered:
l If you foresee activity peaks for Transfer CFT and other applications at the same time, consider working in a shared pool
l If Transfer CFT is being used in time slots corresponding to normal activity levels and when no other applications are running, the basic memory pool is sufficient
Using librariesWhen installed, Transfer CFT uses the program and the CFTPGM example library, which contains:
l Programs
l Examples of source files (CFTSRC file)
l Additional files restored in the library that are specified during installation
You should create a Transfer CFT program library, and name it CFTPGM to conform to default standards. This library is generally reserved for Transfer CFT. It is recommended that you group together the following elements in the production library:
l Transfer CFT service files
l Source files customized by the client
l In general any files defining the Transfer CFT IBM i CFT operating environment
l Additionally, you can use this library to store temporary transferred data
The SI_TEMPLIB library and QTEMP libraries are used to manage temporary or working objects, such as:
l Data queues
l Data areas
l ICF files
l User spaces
Transfer CFT IBM i3.1.3 Installation Guide 20

2 Install
Create a profile and librariesPerform these operations on your IBM i system:
1. Create the Transfer CFT profile as described in Setting up the system and network on page Set up the system and network on page 17.
2. Create the Transfer CFT libraries. We recommended that you name these libraries CFTPGM and CFTPROD (the default names).
About the installation
Transfer CFT IBM i libraries Transfer CFT uses three libraries that are named by default:
l CFTPGM: Transfer CFT program library
l CFTPROD: Transfer CFT production library files
l SI_TEMPLIB: labeled Work, is a single library even if there are several Transfer CFTs on the same machine
While it is not recommended, you can rename the CFTPGM and CFTPROD libraries. If you do rename these libraries, throughout the rest of this document use those names in place of CFTPGM and CFTPROD.
When naming libraries, remember that the number 1 is a suffix managed by Transfer CFT and a named environment number. You can use any number up to the number 9, which in turn enables you to manage several Transfer CFTs on the same machine.
Installation and upload optionsTo install Transfer CFT IBM i, you should:
l Manually upload the installation files.
l Use the manual restore procedure.
l Install Transfer CFT using either the automatic procedure or a customization procedure.
Restoring the save file on an IBM i SystemTo restore the CFT31XL(*savf) save file, enter:
RSTLIB SAVLIB(CFTPG) DEV(*SAVF)SAVF(CFTINSTEMP/CFT31XL)RSTLIB
21 Installation Guide Transfer CFT IBM i3.1.3

About the installation
(CFTINSTEMP)
A confirmation message is displayed:
23 objects restored from CFTPG to CFTINSTEMP
After restoring, go to Using the INSTALL command.
Using the INSTALL commandThe INSTALL command enables you to install:
l Transfer CFT binary objects, such as programs, to the Transfer CFT program library
l Transfer CFT files to production library
l Transfer CFT IFS files to IFS directory
After uploading the Transfer CFT IBM i CFT31XL file to the target location, in the Transfer CFT profile you must add the CFTINSTEMP library to the library list. In command line execute:
ADDLIBLE LIB(CFTINSTEMP) POSITION(*FIRST)
Note The Transfer CFT program library and Transfer CFT production library are created if they do not exist prior to performing this procedure.
Executing the INSTALL command Enter the INSTALL command and press ENTER to display the Transfer CFT IBM i installation screen.
CFT OS/400 INSTALLATION (INSTALL_EN)
Install on an IASP . . . . . . . '2' 1:Yes / 2:No
Start the installation 1. If you have not done so already, enter the installation command and select the installation
language. Press ENTER to continue.
2. To install on IASP, select 1 for Yes when prompted and press ENTER to continue.
Install on an IASP . . . . . . . '2' 1:Yes / 2:No
If you select 1:Yes the following screen displays:
Install on an IASP . . . . . . . '1' 1:Yes / 2:No
Transfer CFT IBM i3.1.3 Installation Guide 22

2 Install
IASP . . . . . . . . . . . . . .
Subsystem library . . . . . . . CFTSBSLIB
Temporary library for install . CFTINSTEMP Character value
CFT program library .......... CFTPGM Name
CFT production library ....... CFTPROD Name
JOBD of production library . . . CFTJOBD Name
Using CFT standard environment '2' 1:Yes / 2:No
Installation directory ....... '/home/cft/cft31x/install'
Runtime directory ............ '/home/cft/cft31x/runtime'
IDPARM(max length < 9) . . . . . IDPARM0 Character value
Copilot server hostname . . . .
If you select 2:No the following screen displays:
Install on an IASP . . . . . . . '2' 1:Yes / 2:No
Temporary library for install . CFTINSTEMP Character value
CFT program library .......... CFTPGM Name
CFT production library ....... CFTPROD Name
JOBD of production library . . . CFTJOBD Name
Using CFT standard environment '2' 1:Yes / 2:No
Installation directory ....... '/home/cft/cft31x/install'
Runtime directory ............ '/home/cft/cft31x/runtime'
IDPARM(max length < 9) . . . . . IDPARM0 Character value
Copilot server hostname . . . .
Copilot server port . . . . . . 1766 Character value
3. To enable Central Governance connectivity, select 1 for Yes and press ENTER.
If you enable Central Governance 1:Yes, you are prompted for the following information:
Enable CG connectivity . . . . . > '1' 1:Yes / 2:No
CG Host Address . . . . . . . .
CG Port . . . . . . . . . . . . 12553
Specify Custom Certificate . . .
Shared Secret . . . . . . . . .
Confirm Shared Secret . . . . .
Local Host Address . . . . .
If you do not enable Central Governance 2:No, you can optionally configure connectors:
Enable CG connectivity . . . . . > '2' 1:Yes / 2:No
23 Installation Guide Transfer CFT IBM i3.1.3

About the installation
Enable Sentinel . . . . . . . . '2' 1:Yes / 2:No
AM type . . . . . . . . . . . . '2' 1:passport/2:none
After either option, you can customize the following installation information, and press ENTER to continue.
PKI type . . . . . . . . . . . . '2' 1:passport/2:cft
cft instance id . . . . . . . . CFT400
synchronous transfer port . . . . 1765
pesitany port . . . . . . . . . 1761
pesitssl port . . . . . . . . . 1762
enabled protocols . . . . . . . > 'PESIT,PESITSSL'
License key-enter up to 5 keys . . . .
A series of installation messages, similar to the example below, are displayed. This process may take several minutes.
From . . . : CFT 06/07/13 13:36:07
CFT installation is starting now ...Press Enter
From . . . : CFT 06/07/13 13:36:24
Press ENTER to create program library CFTPGM
From . . . : CFT 06/07/13 13:36:35
Press ENTER to create production library CFTPROD
From . . . : CFT 06/07/13 13:36:41
Restoring CFT31X(*savf) in progress ...(duration time around 3
minutes)
Update CFTUCONF(CFTUCONF) file is terminated
Press ENTER to end terminal session.
Press ENTER to end terminal session.
………
If necessary, change the default names for the temporary library for the Transfer CFT installation, the Transfer CFT program library, and the production library.
The following screen is displayed. Select an option and press ENTER to continue.
Select one of the following:
1. Create job queue
2. Create job description
3. Create subsystem
4. Add job-queue entry
5. Create class
6. Add routing entry
Transfer CFT IBM i3.1.3 Installation Guide 24

2 Install
7. Add communication entry
8. Change profile
After executing the installation, the following objects are created in the CFTPROD library:
l Files: CAT, COM, LOG, ALOG, ACCNT, AACCNT
l System objects: CFTJOBQ, CFTJOBD, CFTSBS, CFTCLS
Enable governance options
Manually activate connectivityAll OS
This section describes how to manually modify the Transfer CFT configuration to enable Central Governance connectivity in command line.
Prerequisites
1. Stop Transfer CFT and Copilot if running.
2. Ensure that all UCONF values used to identify a Transfer CFT instance are defined. These parameters include:
l cft.full_hostname
l cft.instance_id
l cft.instance_group
Enter CFTUTIL to begin a CFTUTIL command session, and then use the format:
uconfset id=cft.instance_id, value=<cft_id>
ProcedureThe manual procedure consists of the following steps, which are detailed below:
1. Set the UCONF parameter values for Central Governance.
2. Enable Central Governance.
3. Start Copilot to register.
Set UCONF values
Use the Central Governance installation values for the following UCONF settings. Transfer CFT uses these values to identify Central Governance.
25 Installation Guide Transfer CFT IBM i3.1.3

About the installation
l cg.host
l cg.port
l cg.mutual_auth_port
l cg.shared_secret
Enter CFTUTIL to begin a CFTUTIL command session, and then use the format:
uconfset id=cg.host, value=<host_value>
Enable Central Governance
uconfset id=cg.enable, value=yes
Register
Start the Transfer CFT Copilot to trigger an automatic registration with Central Governance.
You can check in the Central Governance Product List to confirm that the registration was successful.
Enable Sentinel optionWhen using Central Governance the visibility features are managed by Central Governance. Do not modify these parameters when running with Central Governance.
Sentinel configuration parametersThe following table lists the Sentinel parameters in the unified configuration and the corresponding former Sentinel parameter name (trkapi.cfg).
Unified configuration parameter Default Former Sentinel
trkapi.cfg
sentinel.xfb.enable NO XFB.Sentinel (trkapi.cfg)
sentinel.xfb.transfer ALLXFB.Transfer (trkapi.cfg)
sentinel.xfb.shut 0 XFB.Shut (trkapi.cfg)
Transfer CFT IBM i3.1.3 Installation Guide 26

2 Install
Unified configuration parameter Default Former Sentinel
trkapi.cfg
sentinel.xfb.log IEWFXFB.Log (trkapi.cfg)
sentinel.trktname$(cft.runtime_dir)/data/trkapi.buf
TRKTNAME (trkapi.cfg)
sentinel.trksharedfile No TRKSHAREDFILE
sentinel.trklenmsg TRKLENMSG
sentinel.trklocmaxtime 300 TRKLOCMAXTIME
sentinel.trktmode DIFFER TRKTMODE
sentinel.trktconnretry 60 TRKTCONNRETRY
sentinel.trkretrydelay 10 TRKRETRYDELAY
sentinel.trkretrynb 6 TRKRETRYNB
sentinel.trkdelay 10 TRKDELAY
sentinel.trktimeout 60 TRKTIMEOUT
sentinel.trkproductname CFT TRKPRODUCTNAME
sentinel.trkipaddr sentinelserverhostname
TRKIPADDR
sentinel.trkipport 1761 TRKIPPORT
sentinel.trk_min_port 5000 TRK_MIN_PORT
sentinel.trk_max_port 32000 TRK_MAX_PORT
sentinel.trkipaddr_bkup TRKIPADDR_BKUP
sentinel.trkipport_bkup 1761 TRKIPPORT_BKUP
sentinel.trk_min_port_bkup 5000 TRK_MIN_PORT_BKUP
sentinel.trk_max_port_bkup 32000 TRK_MAX_PORT_BKUP
27 Installation Guide Transfer CFT IBM i3.1.3

About the installation
Unified configuration parameter Default Former Sentinel
trkapi.cfg
sentinel.trktype TCP TRKTYPE
sentinel.trkgmtdiff 60 TRKGMTDIFF
sentinel.trktrcfile $(cft.runtime_dir)/run/sentinel.trc
TRKTRCFILE
sentinel.trktrace 0 TRKTRACE
sentinel.xfb.transfer_progress_period
The frequency in seconds in which Transfer CFT notifies Sentinel (for both SENDING and RECEIVING states) that a transfer is running.
0 = no notification
60
sentinel.xfb.transfer.send_relay_site_nidf
Enables an NIDF on the relay site. This uses an NIDF instead of COMMUT when sending an event to Sentinel using the XFBTransfer object.
No
For more information on event messages, refer to the Axway Sentinel documentation.
About Transfer CFT heartbeat functionalityWhen the Transfer CFT heartbeat function is activated, it sends the attributes to the Axway Sentinel server via TRKUTIL. The Transfer CFT heartbeat combined with a Status Dashboard allows you to monitor Transfer CFT, providing information on the Transfer CFT status from indicators such as the Transfer CFT state, process activity, CFT product version, Transfer CFT free catalog records, Transfer CFT used catalog records, Transfer CFT catalog maximum records and so on.
For more information on Dashboards and tracked objects, refer to the Transfer CFT 3.1.3 Dashboards User's Guide, and the Axway Sentinel User's Guide.
Sentinel Heartbeat implementation parametersThe following table lists the Heartbeat parameters that you can set in the unified configuration.
Each Transfer CFT environment number n (from 1 to 5) has its own corresponding Heartbeat script. You should check the default names (such as in the production library, jobd, and Transfer CFT file) that are used in the script.
Transfer CFT IBM i3.1.3 Installation Guide 28

2 Install
Unified configuration parameter
Default value Description
sentinel.heartbeat.enable NO Enables sending Heartbeats to the Sentinel Server.
sentinel.heartbeat.periodicity 300 The delay in seconds between sending Heartbeats.
sentinel.heartbeat.script CFTPROD/HEARTBEAT Script for executing Heartbeats.
Table 2. Example
uconfset id=sentinel.heartbeat.enable,value=yes
uconfset id=sentinel.heartbeat.periodicity,value=300
uconfset id=sentinel.heartbeat.script,value=CFTPROD/HEARTBEAT
uconfset id=sentinel.trkipaddr,value=serveur.sentinel.address
uconfset id=sentinel.trkipport,value=11277
uconfset id=sentinel.trklocaladdr,value=as400.local.address
About multi-node architectureThis topic describes the Transfer CFT multinode feature, which provides Horizontal scalability for increased transfer flow capacity.
A node is a Transfer CFT runtime running on a host. Multiple nodes are called a Transfer CFT cluster, which can run on one host in an IBM i environment.
PrerequisitesTransfer CFT in multinode architecture requires:
l That one key per node is licensed for the cluster option.
29 Installation Guide Transfer CFT IBM i3.1.3

About the installation
Concepts l Transfer CFT provides one node manager that monitors every node and checks that its nodes are active. If a node goes down, the node manager detects the inactivity and takes over that node's activity.
l For multiple nodes to be able to access the same files, using the same set configuration, the system requires the use of a shared file system. The shared disk provides communication, configuration, partners, data flows, internal datafiles and nodes. The shared data includes parameter files and configuration settings.
Service descriptions
CopilotCopilot operates two services, the node manager and the UI server.
Node manager
The node manager monitors all nodes that are part of the Transfer CFT multinode environment. The monitoring mechanism is based on locks provided by the resource enqueuing system.
Typically, when a node is not running correctly, the node manager tries to start it locally.
CFTCOM dispatcherFor outgoing calls, you can set the CFTCOM dispatcher to use either a round robin load balancing, or define a onetoone relationship between a partner and a node. A onetoone relationship ensures that for any given partner the transfers are kept in the correct chronological order. In the unified configuration, set the variable:
cft.multi_node.cftcom.dispatcher_policy
l Round robin: round_robin (default)
l Onetoone: node_affinity
Runtime filesAll runtime data are stored on a shared file system.
The following internal datafiles are shared between nodes:
l Parameter internal datafile (CFTPARM)
l Partners internal datafile (CFTPART)
l PKI base (CFTPKI)
Transfer CFT IBM i3.1.3 Installation Guide 30

2 Install
l Main communication media file (CFTCOM)
l Unified Configuration (UCONF)
The following internal datafiles are node specific, and the filename is flagged by the node identifier:
l Catalog (..CATALOG.N00,..CATALOG.N01,...)
l Communication media file (..COM.N00, ..COM.N01,...)
l Log files (..LOG1.N00, ..LOG2.N00, ..LOG1.N01, ..LOG2.N01, ,...)
l Account file (..ACCNT1.N00, ..ACCNT2.N00, ..ACCNT1.N01, ..ACCNT2.N01 ,...)
Note When using multinode architecture, the allocated space in the catalog file is 10% greater than when working in a standalone Transfer CFT.
Recovery
Node recovery If the node manager detects a failure the node is restarted, and it completes all transfer requests that were active when the failure occurred.
Transfer recovery When a node receives an incoming request, be that a transfer receive, restart, acknowledgement or negative acknowledgement, if the corresponding transfer record cannot be found in the node's own catalog, the node requests the transfer record from other nodes through the CFTPRX task.
Possible scenarios include:
l If another node has the catalog record, the node retrieves it and performs the transfer.
l If no nodes have the record, an error is returned.
l If any one of the nodes does not respond, the requesting node continues to retry all nodes until the session's timeout. Once the timeout is reached, the node ends the connection. After this, the remote partner retries the request according to its retry parameters.
In the case of node failure during the transfer recovery process, the catalog record is locked in both catalogs until both nodes are available for recovery.
Limitations Additionally note the following restrictions:
l There is only one communication media and must be a media FILE.
l Transfer CFT mailbox services are not supported.
l The only network is TCP/IP.
l The use of the console interface commands can apply only to one specific node.
l Bandwidth control is calculated by node.
31 Installation Guide Transfer CFT IBM i3.1.3

About the installation
l Accounting statistics are generated by node.
l Duplicate file detection is not supported.
Procedure overviewInstalling Transfer CFT
If you have not done so already, begin by performing a standard Transfer CFT installation.
After installing
After installing Transfer CFT, you must customize this Transfer CFT from a standard standalone installation to a multinode enabled Transfer CFT.
mm
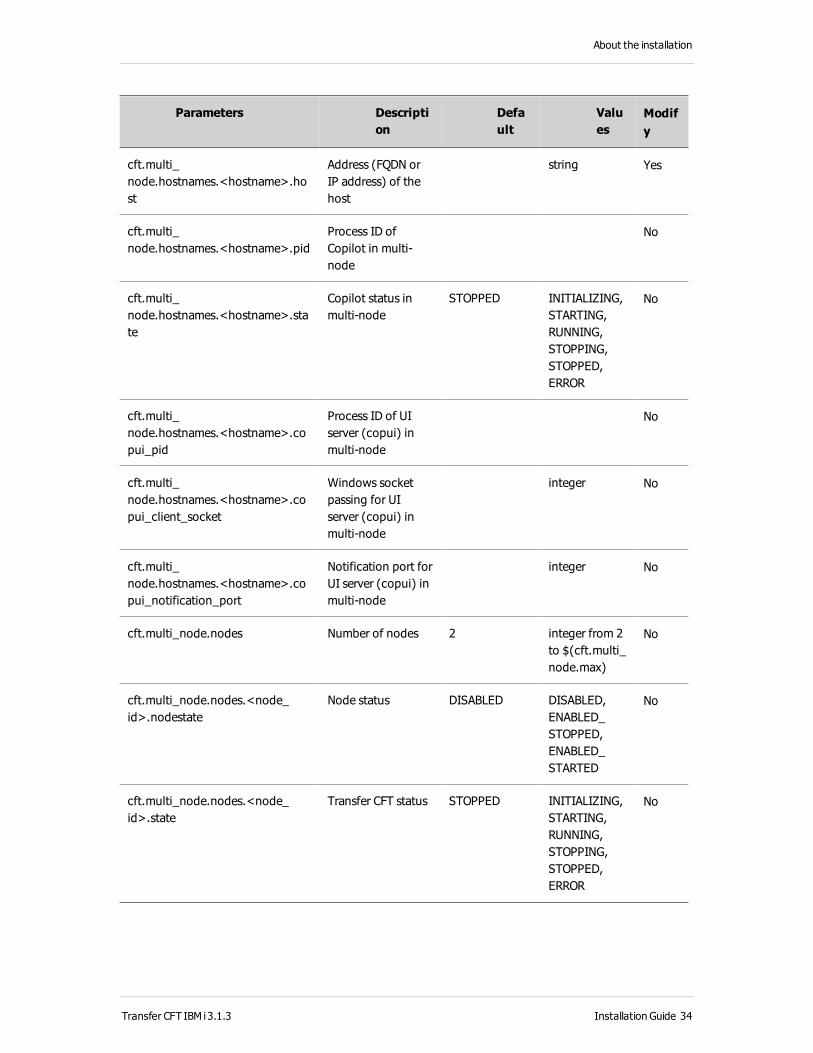
Multi-node unified configuration parametersThis topic presents the multinode uconf parameters and their default values. The column Modify indicates a strong recommendation that you should not modify this value if No is indicated.
Parameters Description
Default
Values
Modify
cft.multi_node.enable Enable/disable the multinode feature
No Yes, No Yes
cft.multi_node.max Maximum number of nodes
16 integer from 0 to 16
No
Transfer CFT IBM i3.1.3 Installation Guide 32

2 Install
Parameters Description
Default
Values
Modify
cft.multi_node.cftcom.dispatcher_policy
Specify the dispatching policy
l round_robin: Random dispatching across all nodes occurs.
l node_affinity: Creates a one to one link between a partner and a node. Transfer requests for a given partner will always be performed by the same node.
round_robin round_robin, node_affinity
Yes
cft.multi_node.sharedidt.fname Shared file for global IDT calculation in multinode
$(cft.runtime_dir)/data/cftsidt
fname Yes
cft.multi_node.sharedidt.enable Use global IDT calculation method
No Yes, No Yes
cft.multi_node.transfer_recovery_timeout
Timeout in seconds for transfer recovery process (seconds)
30 integer Yes
cft.multi_node.transfer_recovery_retry_delay
Delay in seconds for transfer recovery retry (seconds)
20 integer Yes
cft.multi_node.connection_retry_delay
Delay in seconds for connection retry between nodes (seconds)
10 integer Yes
cft.multi_node.hostnames List of hosts which handle the multinode architecture
list No
33 Installation Guide Transfer CFT IBM i3.1.3
About the installation
Parameters Description
Default
Values
Modify
cft.multi_node.hostnames.<hostname>.host
Address (FQDN or IP address) of the host
string Yes
cft.multi_node.hostnames.<hostname>.pid
Process ID of Copilot in multinode
No
cft.multi_node.hostnames.<hostname>.state
Copilot status in multinode
STOPPED INITIALIZING, STARTING, RUNNING, STOPPING, STOPPED, ERROR
No
cft.multi_node.hostnames.<hostname>.copui_pid
Process ID of UI server (copui) in multinode
No
cft.multi_node.hostnames.<hostname>.copui_client_socket
Windows socket passing for UI server (copui) in multinode
integer No
cft.multi_node.hostnames.<hostname>.copui_notification_port
Notification port for UI server (copui) in multinode
integer No
cft.multi_node.nodes Number of nodes 2 integer from 2 to $(cft.multi_node.max)
No
cft.multi_node.nodes.<node_id>.nodestate
Node status DISABLED DISABLED, ENABLED_STOPPED, ENABLED_STARTED
No
cft.multi_node.nodes.<node_id>.state
Transfer CFT status STOPPED INITIALIZING, STARTING, RUNNING, STOPPING, STOPPED, ERROR
No
Transfer CFT IBM i3.1.3 Installation Guide 34

2 Install
Parameters Description
Default
Values
Modify
cft.multi_node.nodes.<node_id>.pid
CFTMAIN process ID integer No
cft.multi_node.nodes.<node_id>.hostname
Hostname of the server where the node is running on
string No
cft.multi_node.nodes.<node_id>.host
Host address of the server where the node is running on.
string No
cft.multi_node.nodes.<node_id>.prx_port
Internal node listening port
integer No
cft.multi_node.nodes.<node_id>.disabling
Flag set when Transfer CFT is disabling
No Yes, No No
Managing multi-nodeThis section describes how to set up and manage your multinode environment.
Starting the Transfer CFT cluster
Start the node managercopstart
Start all nodesSubmit the command:
cftmn start
Stopping the Transfer CFT cluster
Stop all nodesSubmit the command on IBM i: cftmn stop
35 Installation Guide Transfer CFT IBM i3.1.3

About the installation
Stop the node managerSubmit the command on IBM i: copstop
Add a node to the Transfer CFT clusterIn this example the Transfer CFT cluster accounts at the beginning two nodes, node 0 and node 1.
Add a nodeExecute the following command to add a new node: cftmn add_node
The node 2 is created. The cluster is composed of three nodes: node 0, node 1 and node 2. All associated files associated with node 2 are initialized and its node state is set to DISABLED.
Note When adding a node, you must add the corresponding new license for that node in a licensekey file.
Enable a nodeOnce the new node has been added, you can now enable it using the command: cftmn action (enable_node) node(2)
Start a nodeThe node 2 can be started using the command: cftmn action(start) node(2)
Removing a node from the Transfer CFT clusterNote Only the last node can be removed.
Disable the last nodeYou must fence the last node before removing it, as follows:
cftmn action(disable_node) node(2)
The node runs as long as its catalog is not empty. Once the catalog is empty, the node state is set to DISABLED and the node stops automatically.
Remove the last nodeAfter fencing and stopping the last node, you can remove it:
cftmn action(remove_node) node(2)
Transfer CFT IBM i3.1.3 Installation Guide 36
2 Install
Conversion tables This section describes how to use a conversion table in Transfer CFT Transfer CFT IBM i in the following sections:
l Using a conversion table
l Configuration sample
Using a conversion table
Using conversion tablesDuring Transfer CFT operations conversion problems may occur when:
l A file to be transferred contains various special characters: |, !, \, ̀ , #, ~, [, ], ̂ , {, }, /, $ and £
l The transfer is performed between two heterogeneous systems with different character sets (CCSID) and the default conversion fails.
l The transfer is performed between international sites.
Default values
The default EBCDIC character set used by Transfer CFT has code 297 (EBCDIC France).
The default ASCII character set used by Transfer CFT is not fully compatible with code 850 (IBM multilingual personal computer). For more information refer to the Transfer CFT documentation.
Consequently, two files supplied in the production library are used to enter and create a conversion table in Transfer CFT:
l TABEBAS: file to be used to convert EBCDIC into ASCII (generally for send operations)
l TABASEB: file to be used to convert ASCII into EBCDIC (generally for receive operations)
These two files can be modified by DFU (Option 18 in PDM Member Management).
Creating the conversion table
To create the actual conversion table, you must run the make_tcd.c utility program after modifying the characters at fault: call make_tcd.c parm('CFTPROD/tabaseb')
The CFTPROD/tabaseb.x binary file is created: it constitutes the conversion table to be specified in the Transfer CFT configuration. The same applies to tabebas.x.
Configuration sampleThe following is a full Transfer CFT Transfer CFT IBM i configuration sample for a Windows system, which is a typical and frequent scenario.
37 Installation Guide Transfer CFT IBM i3.1.3

About the installation
Transfer CFT IBM i configuration
CFTXLATE MODE=REPLACE,
ID=TABASEB,
DIRECT=RECV,
FNAME=CFTPROD/TABASEB.X
CFTXLATE MODE=REPLACE,
ID=TABEBAS,
DIRECT=SEND,
FNAME=CFTPROD/TABEBAS.X
CFTSEND MODE=REPLACE, ID=……..,
XLATE=TABEBAS,
…………………….
CFTRECV MODE=REPLACE, ID=………,
XLATE=TABASEB,
…………………….
Transfer CFT configuration
============
cftrecv id = …………,
fcode = binary, /* to avoid needing conversion */
…………………
cftsend id = …………,
fcode = binary, /* to avoid needing conversion */
………………….
Extended character set mappingCharacter transcoding defines how data are encoded during the transfer process. This is important when transferring files that do not have the same coding requirements on the sending and receiving systems. See the section Character set transcoding in the Transfer CFT User Guide for more information.
NCHARSET and FCHARSET parameter mappingThe following table shows the mapping for the IBM i (OS/400) platform when using the NCHARSET and FCHARSET parameters.
Transfer CFT IBM i3.1.3 Installation Guide 38

2 Install
CFT_ charset IBM i
CFT_UTF8 01208
CFT_UTF16 01204
CFT_UTF16LE 01202
CFT_UTF16BE 01200
CFT_UTF32 01236
CFT_UTF32BE 01232
CFT_UCS2 N/A
CFT_CP850 00850
CFT_BIG5 00947
CFT_ISO88591 00819
CFT_ISO885915 00923
CFT_EBCDICFR 00297
About Transfer CFT file typesThis section describes the types of files that can be used:
l In a CFTRECV command, according to the types of files to be received on an IBM i system
l In a CFTSEND command according to the type of data to be sent
l As backup files
Receive mode configuration for all protocols
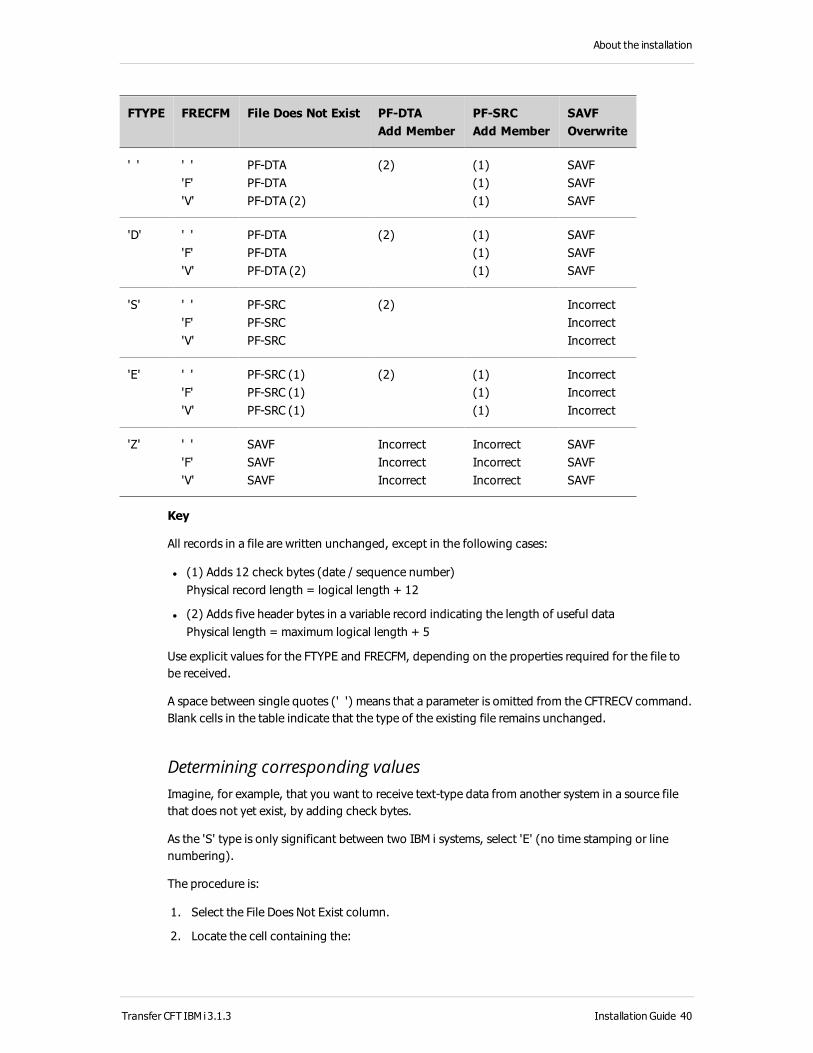
Configuring the receive modeThe following table lists the different types of files that can be received on an IBM i system.
39 Installation Guide Transfer CFT IBM i3.1.3
About the installation
FTYPE FRECFM File Does Not Exist PF-DTAAdd Member
PF-SRCAdd Member
SAVFOverwrite
' ' ' ''F''V'
PFDTAPFDTAPFDTA (2)
(2) (1)(1)(1)
SAVFSAVFSAVF
'D' ' ''F''V'
PFDTAPFDTAPFDTA (2)
(2) (1)(1)(1)
SAVFSAVFSAVF
'S' ' ''F''V'
PFSRCPFSRCPFSRC
(2) IncorrectIncorrectIncorrect
'E' ' ''F''V'
PFSRC (1)PFSRC (1)PFSRC (1)
(2) (1)(1)(1)
IncorrectIncorrectIncorrect
'Z' ' ''F''V'
SAVFSAVFSAVF
IncorrectIncorrectIncorrect
IncorrectIncorrectIncorrect
SAVFSAVFSAVF
Key
All records in a file are written unchanged, except in the following cases:
l (1) Adds 12 check bytes (date / sequence number)Physical record length = logical length + 12
l (2) Adds five header bytes in a variable record indicating the length of useful dataPhysical length = maximum logical length + 5
Use explicit values for the FTYPE and FRECFM, depending on the properties required for the file to be received.
A space between single quotes (' ') means that a parameter is omitted from the CFTRECV command. Blank cells in the table indicate that the type of the existing file remains unchanged.
Determining corresponding valuesImagine, for example, that you want to receive texttype data from another system in a source file that does not yet exist, by adding check bytes.
As the 'S' type is only significant between two IBM i systems, select 'E' (no time stamping or line numbering).
The procedure is:
1. Select the File Does Not Exist column.
2. Locate the cell containing the:
Transfer CFT IBM i3.1.3 Installation Guide 40

2 Install
l PFSRC (source file)
l "(1) (addition of check bytes)
The FTYPE and FRECFM values opposite the selected cell are the values to be used (in this example, 'E' and ' ' or 'E' and 'F').
The 'E' and 'V' options are used for:
l The IBM i system is used as an intermediate site.
l The user of the file on the IBM i system needs to know the exact record size.
Send mode with the PeSIT CFT profileThe following table lists the different types of files that can be used according to the type of data to be sent.
FTYPE FRECFM PF-DTAFixed
PF-DTAVariable
PF-SRC SAVF
' ' ' ''F''V'
(2)
(2)
..........(1) (1) (1)
'D' ' ''F''V'
2)
(2)
.........(1) (1) (1)
SAVFSAVFSAVF
'S' ' ''F''V'
(2) STDb IncorrectIncorrectIncorrect
'E' ' ''F''V'
2)
(2)
(1)(1)(1)
IncorrectIncorrectIncorrect
'Z' ' ''F''V'
IncorrectIncorrectIncorrect
IncorrectIncorrectIncorrect
IncorrectIncorrectIncorrect
KeyAll records in the file are sent unchanged, except in the following cases:
l (1): truncating of the 12 check bytes (date / sequence number), only data that can be edited is sentLogical record length = physical length 12
41 Installation Guide Transfer CFT IBM i3.1.3

About the installation
l (2): truncating of the five header bytes in the variable record, only the useful data, the length of which is indicated in the record header (five bytes), is sentLogical record length = physical length 5
The recommended values for the FTYPE / NTYPE and FRECFM / NRECFM parameters are:
l STDa: case of a PFSRC file with check byte filtering
l STDb: case of a PFSRC file without check byte filtering
Empty cells indicate that the data in the file is sent unchanged.A space between single quotes (' ') means that the parameter is omitted.
Backup files The records in this type of file (SAVF) have a specific format. They contain backed up, sequencing and parity data controlled by Transfer CFT IBM i. SAVF files can generally only be used on Transfer CFT IBM i systems. Consequently, backup files are predominantly transferred between two Transfer CFT IBM i partners.
Another system can be used as an intermediate partner, in which it must process the SAVF file as a sequential file with a fixed format and a length of 528 (bytes).
Implementing SAVF file supportThe value Z for the CFTSEND / CFTRECV command FTYPE parameter designates SAVF files. It is mandatory in receive mode (CFTRECV) and optional in send mode (CFTSEND).
The only variable property of an SAVF file is its allocation size in Kilobytes (FSPACE parameter). FSPACE must be between 1 and 65535.
The configuration of the other properties (FORG, FRECFM, FLRECL and so on) is ignored. Consequently, they do not need to be specified in the CFTSEND / CFTRECV commands. However, if FLRECL is specified, it must be set to 528 (bytes).
The SAVF file access method, implemented in Transfer CFT Transfer CFT IBM i, does not support synchronization points in write mode. This mechanism is however supported in read mode. Consequently, a SAVF file transfer with a receiver Transfer CFT IBM i system will fail during a restart (abort on the receiver side). If the file is sent to a nonTransfer CFT IBM i (intermediate) system, resynchronization (restart points) can be performed in read mode with the sender Transfer CFT Transfer CFT IBM i.
Using spool filesIn addition to the possibilities available in the SNDCFTSPLF interactive command (see OSIntegrated Commands), spool files can be used in batch mode or in the Transfer CFT configuration.
The syntax is as follows:
SEND FNAME = Spool file/File n°/Job/Job n°, PART ...
Example:
Transfer CFT IBM i3.1.3 Installation Guide 42

2 Install
SEND FNAME = QPRINT/2/CFTLOG/074556, IDF = SPLF, PART ...
You can transfer spool files from an IBM i system to any other system.The receive file is a fixed format sequential file. To use it as a spool file on a receiver IBM i system, you can add the commands in the following example to a receive procedure:
OVRPRTF FILE(QPRINT) CTLCHAR(*FCFC)CPYF FROM FILE(CFTPROD/R_SPLF) TO FILE (QPRINT)
The Qprint file is an exact copy of the initial spool file.
Integrated File System (IFS)This section describes how to use the IFS and includes:
l Using the IFS
l IFS and the Copilot (UI)
l IFS access error codes
Integrated File SystemThis topic describes the Integrated File System, IFS, functions available in Transfer CFT Transfer CFT IBM i.
IFS overviewThe IFS provides a common interface to another system on the IBM i. After installing Transfer CFTTransfer CFT IBM i you can:
l Transfer IFS files
l Receive and store IFS files
l Copy IFS files to a native Transfer CFT IBM i system and vice versa (using CFTUTIL COPYFILE)
Naming conventions
Respect the following naming conventions:
l The file name must be prefixed by the slash character /
o For example: /home/filename
l You cannot replace environmental variables in the file name
o For example: $HOME/filename is not a recognized filename
l You cannot precede filenames by a relative path
o For example: ../filename is not a recognized filename
43 Installation Guide Transfer CFT IBM i3.1.3

About the installation
Encoding IFS data
IFS file data can be in an ASCII, EBCDIC, or BINARY format. The CCSID, Code Character Set Identifier, associated with the file determines the encoding for the data.
l Transfer CFT can read and write IFS files in these three formats: ASCII, EBCDIC, or BINARY.When using the ASCII or EBCDIC formats, the data translation for a Transfer CFT transfer, if necessary, is managed by the Transfer CFT translation tables (CFTXLATE).
l When Transfer CFT receives an IFS file, the CCSID for the file is set by default. This identifier is set to the Transfer CFT Transfer CFT IBM i job CCSID value.
l The CFTRECV (or RECV) command FCODE=ASCII parameter creates an ASCII file with an associated CCSID code value of 819 (ISO 88591 common use default Internet code).
IFS file rights and authorizations
In an Transfer CFT IBM i environment, files are subject to two types of control, data authorities and object authorities.
By default the Transfer CFT users and other general users are given the following:
l The RWX options for data authority
l The OBJMGT, OBJEXIST, OBJALTER and OBJREF options for object authority
The minimum IFS data authorities required to perform transfers with any user are:
l RX: readable and executable permission for any object in the IFS directory
l RWX: readable, writable and executable permission for any object in the IFS directory
IFS file parametersThis section describes the CFTSEND (SEND) and CFTRECV (RECV) parameters for IFS files.
FRECFM
The FRECFM parameter can have one of the following format values:
l F: fixed
l V: variable
l U: undefined
If this parameter is not defined, the default value U is used.
Sending:
l In fixed format (FRECFM=F), the file data is read and saved line by line (the line delimiter is a ‘carriage return’)
l If the length of the save exceeds the length defined by the FLRECL parameter, the file data is not truncated. Instead, the transfer is interrupted by an error.
Transfer CFT IBM i3.1.3 Installation Guide 44
2 Install
l If the length of a save is less than the length defined by the FLRECL parameter, the file save is padded with blank characters.
l In variable format (FRECFM=V), the file data is read and saved line by line (the line delimiter is a ‘carriage return’)
l The saved or received data are neither truncated nor padded. The maximum save size, the FLRECL parameter, must be larger than or equal to the save maximum.
l In undefined format (FRECFM=U), the file data is read in blocks, and respects carriage return characters. The size of this block is defined by the FLRECL parameter.
FTYPE
This parameter does not impact the local IFS file management.
FLRECL
If this parameter is not defined, the default value of 1024 is used.
Sending:
l In fixed format (FRECFM=F), this parameter must be defined and cannot be less than the maximum save size.
l In variable format (FRECFM=V), this parameter must be defined if the save length exceeds the default value of 1024.
l In undefined format (FRECFM=U), this parameter increases the default value 1024 to enable you to transfer larger blocks of data.
FCODE
The FCODE parameter can have one of the three values: EBCDIC, ASCII, or BINARY.
The default value is EBCDIC.
Receiving:
FCODE = ASCII
This enables you to create a file with the code CCSID 819 (ISO 88591 Common use default Internet code).
Sending:
FCODE=ASCII and FRECFM=F
These two parameters pad records, when necessary, with “blank” ASCII characters (instead of blank EBCDIC characters).
45 Installation Guide Transfer CFT IBM i3.1.3

About the installation
FNAME and WFNAME
You can use a temporary file name, WFNAME, for an IFS type file, but the final file name, FNAME, must also be an IFS type file. This means that you cannot rename a temporary IFS file as a native IBM i type, and vice versa. Additionally, note the following parameter conventions:
l You can use Transfer CFT symbolic variables in IFS file names, but not system environmental variables.
l IFS file names must begin with a slash ‘/’.
l When sending, IFS file names are not case sensitive.
l When receiving, file names are created in upper case by default. If you want to keep the original file name case, you must protect the file name by placing it between quotation marks, for example “filename”.
Note You cannot use an IFS file name in SUBMIT procedure parameters. For example, CFTRECV MODE=REPLACE, ID=IDFDEFT,EXEC=/home/axkhuat/script/txt is not valid.
Sending a group of IFS files
Send using a generic name
This section describes how to send a group of files using a send command where there is one transfer per file.
When defining the filename, you must put a <filesymb> character (systemspecific) before the FNAME parameter value. Transfer CFT IBM i environments use the ‘#’ and ‘£’ symbols.
Use one of the following commands to send a group of files using a generic name:
SEND FNAME=#path_name/wildcards
Or:
CFTSEND FNAME=#path_name/wildcards
The FNAME parameter is set to a generic name that includes wildcard characters. In this type of send, only the selected files are sent.
A receiving Transfer CFT can specify the name of each file received via the symbolic variables:
l ?FPATH the file path of the sending file, and
l ?FROOT the file name of the sending file
Example
l CFTSEND
FNAME = “#/home/send/FIC*.*”, FRECVFM = V
l CFTRECV
FNAME = “/home/recv/?FROOT”,
FRECVFM = V
Transfer CFT IBM i3.1.3 Installation Guide 46
2 Install
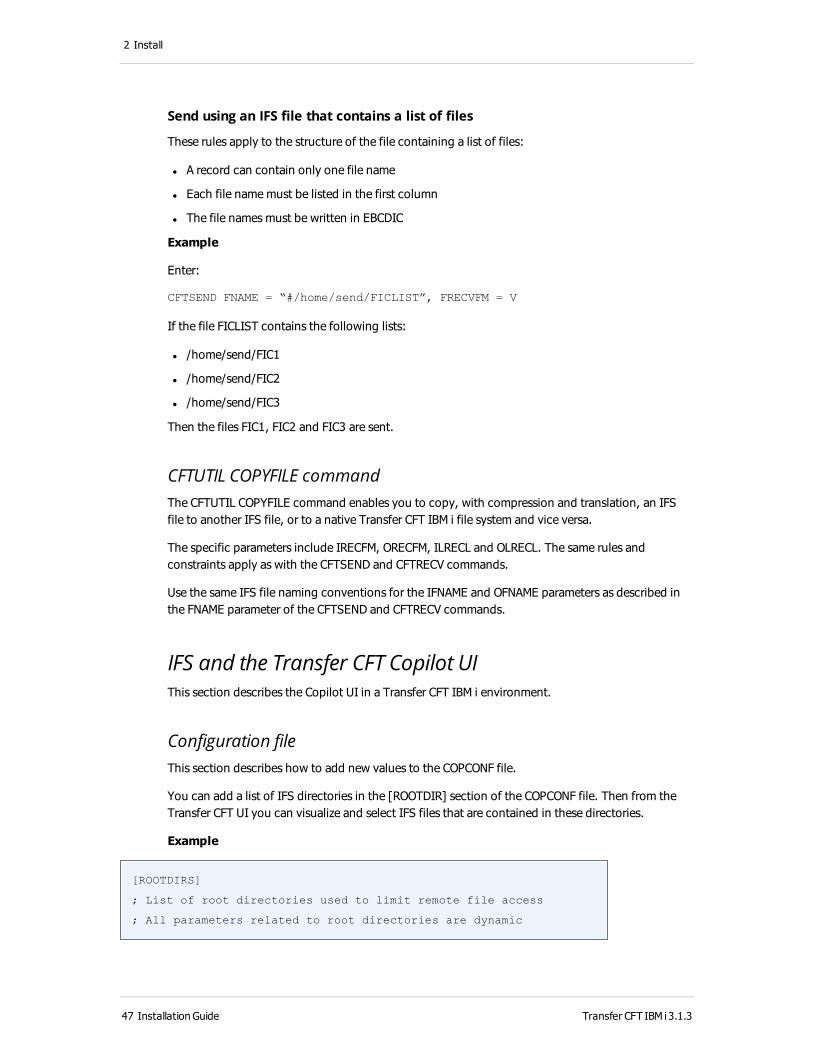
Send using an IFS file that contains a list of files
These rules apply to the structure of the file containing a list of files:
l A record can contain only one file name
l Each file name must be listed in the first column
l The file names must be written in EBCDIC
Example
Enter:
CFTSEND FNAME = “#/home/send/FICLIST”, FRECVFM = V
If the file FICLIST contains the following lists:
l /home/send/FIC1
l /home/send/FIC2
l /home/send/FIC3
Then the files FIC1, FIC2 and FIC3 are sent.
CFTUTIL COPYFILE commandThe CFTUTIL COPYFILE command enables you to copy, with compression and translation, an IFS file to another IFS file, or to a native Transfer CFT IBM i file system and vice versa.
The specific parameters include IRECFM, ORECFM, ILRECL and OLRECL. The same rules and constraints apply as with the CFTSEND and CFTRECV commands.
Use the same IFS file naming conventions for the IFNAME and OFNAME parameters as described in the FNAME parameter of the CFTSEND and CFTRECV commands.
IFS and the Transfer CFT Copilot UIThis section describes the Copilot UI in a Transfer CFT IBM i environment.
Configuration fileThis section describes how to add new values to the COPCONF file.
You can add a list of IFS directories in the [ROOTDIR] section of the COPCONF file. Then from the Transfer CFT UI you can visualize and select IFS files that are contained in these directories.
Example
[ROOTDIRS]
; List of root directories used to limit remote file access
; All parameters related to root directories are dynamic
47 Installation Guide Transfer CFT IBM i3.1.3
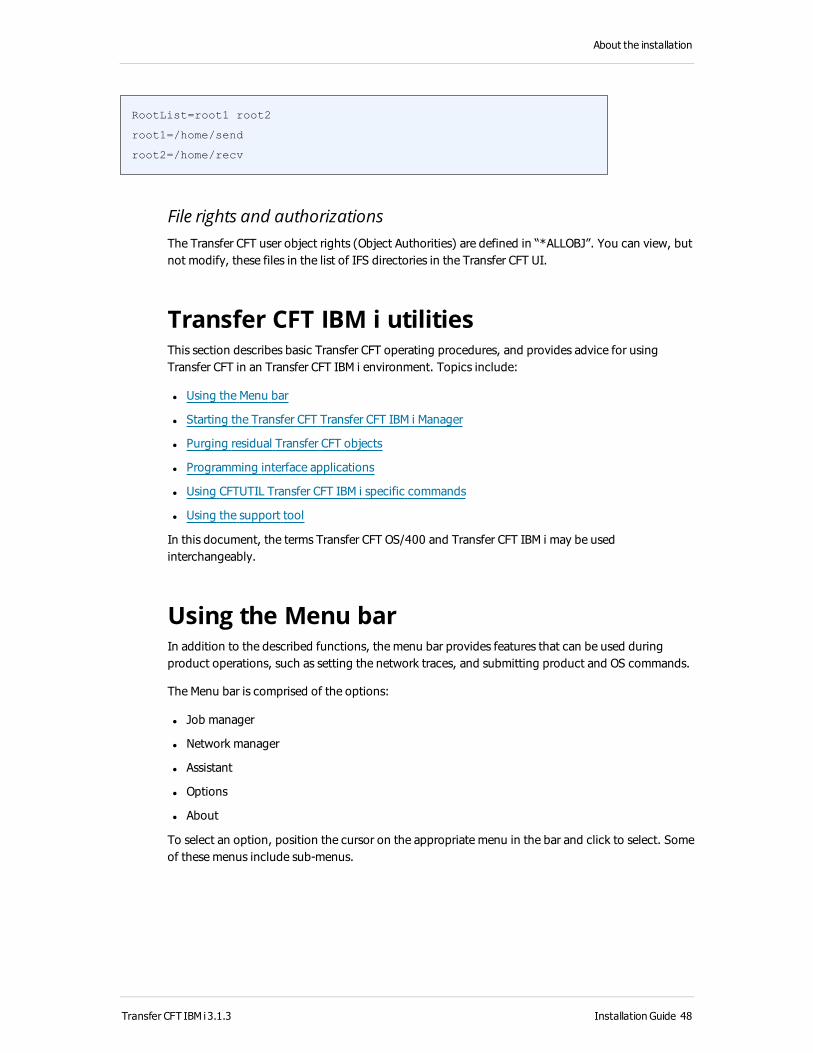
About the installation
RootList=root1 root2
root1=/home/send
root2=/home/recv
File rights and authorizationsThe Transfer CFT user object rights (Object Authorities) are defined in “*ALLOBJ”. You can view, but not modify, these files in the list of IFS directories in the Transfer CFT UI.
Transfer CFT IBM i utilitiesThis section describes basic Transfer CFT operating procedures, and provides advice for using Transfer CFT in an Transfer CFT IBM i environment. Topics include:
l Using the Menu bar
l Starting the Transfer CFT Transfer CFT IBM i Manager
l Purging residual Transfer CFT objects
l Programming interface applications
l Using CFTUTIL Transfer CFT IBM i specific commands
l Using the support tool
In this document, the terms Transfer CFT OS/400 and Transfer CFT IBM i may be used interchangeably.
Using the Menu barIn addition to the described functions, the menu bar provides features that can be used during product operations, such as setting the network traces, and submitting product and OS commands.
The Menu bar is comprised of the options:
l Job manager
l Network manager
l Assistant
l Options
l About
To select an option, position the cursor on the appropriate menu in the bar and click to select. Some of these menus include submenus.
Transfer CFT IBM i3.1.3 Installation Guide 48

2 Install
ExampleSelect 2 Network manager, and then select 10 Start communications trace. A Network manager screen similar to the following is displayed.
Purging residual Transfer CFT objectsThe BACKGROUND job that purges the Transfer CFT SI_TEMPLIB working library is submitted each time you execute the CFTSTART or CFTSTOP command (which starts and stops the Transfer CFT product). If you use the CFTUTIL command, the job that purges is not executed.
The BACKGROUND_C job ends after completing the purge. A spool file is used to obtain information on any objects that may not have been deleted, generally due to access right issues.
You must manually purge any objects generating an error so that the Transfer CFT working library is not overloaded with unwanted objects. Overloading the library has an indirect negative impact on product performance levels.
The SI_TEMPLIB library contains both resident objects and temporary objects that may be purged. You can recognize temporary objects because they have a creator job number suffix.
If a Transfer CFT instance is executing on an IBM i (OS/400) system, do not use the CLRLIB command to clean the SI_TEMPLIB library. Note that this will cause the product to stop!
The BACKGROUND job uses the following two parameters:
l PARAM1: O (execute only once) or F (execute loop)
l PARAM2: CFT (cleans all files related to Transfer CFT processes) or COPILOT (cleans all files related to Copilot processes)
Using CFTUTIL Transfer CFT IBM i specific commands
Line-mode commandsThe Transfer CFT utility CFTUTIL can accept linemode commands. Enter the command at the CFTUTIL > prompt and press ENTER to validate. To exit CFTUTIL, enter the /end command.
Examples
l In an Transfer CFT IBM i command line, enter the command CFTUTIL and press ENTER.
Enter the selection or command at the prompt.
> CFTUTIL
49 Installation Guide Transfer CFT IBM i3.1.3

About the installation
l Enter the command LISTCAT and press ENTER to confirm.
1:Input :
> LISTCAT
l Enter the command /end and press ENTER to exit CFTUTIL.
1:Input :
> /END
Files and individual parametersCFTUTIL can accept commands passed either as individual parameters or in a command file.
Command passed as a parameterThe command line is passed as a CFTUTIL parameter using the following syntax:
CFTUTIL PARAM(command ‘parameter=value, parameter=value,..’)
Examples
CFTUTIL PARAM('LISTCAT’ ‘TYPE=ALL')
CFTUTIL PARAM('LISTCAT’ ‘CONTENT=DEBUG,DIRECT=SEND')
CFTUTIL PARAM('SEND’ ‘PART=BOUCLE,IDF=TEST')
CFTUTIL PARAM('LISTPARM’ ‘TYPE=RECV')
File passed as a parameterThe following command runs the CFTUTIL utility, which reads the commands to be executed in the scen.cft file and displays the results.
Example
CFTUTIL PARAM('#CFTPROD/UTIN(SCRIPT)')
Transfer CFT IBM i3.1.3 Installation Guide 50

2 Install
51 Installation Guide Transfer CFT IBM i3.1.3

3 Post-installation
Overview of Transfer CFT in productionThis chapter describes how to operate Transfer CFT and includes information on the following topics:
l Common Transfer CFT commands
l CFTUTIL commands
l Source files interpretation
l Start the UI server
l Stop the UI server
l Run Transfer CFT jobs:
o Start Transfer CFT
o Submit a transfer command
o Transfer CFT shutdown
Manage commandsThis section describes all of the command available to manage your Transfer CFT product.
Standard commands
Command Comment
CFTSTART Start Transfer CFT
CFTSTOP Stop Transfer CFT
COPSTART Start the UI server
COPSTOP Stop the UI server
Transfer CFT IBM i3.1.3 Installation Guide 52

3 Postinstallation
Command Comment
CFTMN This is the procedure to manage Transfer CFT and to configure multinode. Add the following action(s) to manage your product:
l START
l STOP
l RESTART
l ADD_NODE
l REMOVE_NODE
l ADD_HOST
l REMOVE_HOST
l REMOVE_NODE
l ENABLE_NODE
l DISABLE_NODE
Note CFTMN is the equivalent of cft script for UNIX or Windows.
Deprecated commands
Replace this command... With the new command...
SHUT CFTSTOP + COPSTOPCFTMGSBM CFTSTARTSTARTCOPB COPSMNGCOPSTART COPSMNGCOPSTOPM COPSTOPSTOPCOPL COPSTOPBACKGROUND_C BACKGROUND
Starting and stopping the Copilot serverThis section explains how to:
l Start the Copilot server on page 54
l Stop the Copilot server on page 54
l Configure the Copilot server on page 54
l Starting the Copilot client on page 56
53 Installation Guide Transfer CFT IBM i3.1.3

Manage commands
Start the Copilot serverAccess the Common Transfer CFT commands menu on page 55 and navigate to the Start the Copilot server option.
Alternatively, use the COPSTART command or STARTCOPB procedure.
Example 1
Enter the command:
COPSTART
Example 2
Execute the procedure:
CALL PGM(STARTCOPB)
Stop the Copilot serverAccess the Common Transfer CFT commands menu on page 55 and navigate to the Stop Copilot option.
Only the server waiting for a connection is stopped. Other servers that users have logged on to are shut down when the user logs off, or after a network timeout.
Alternatively, use the COPSTOP command or STOPCOPL procedure.
Example 1
Execute the command:
COPSTOP
Example 2
Execute the procedure:
CALL PGM(STOPCOPL)
Configure the Copilot serverUse the UCONFSET commands to modify the configuration if you need to modify the Copilot server .
Transfer CFT IBM i3.1.3 Installation Guide 54

3 Postinstallation
Common Transfer CFT commands menu
1. Common CFT commands
1. Start Copilot
2. Stop Copilot
3. Start CFT
4. Stop CFT
5. CFTUTIL operation
6. Manage configuration File
1. Edit CFT configuration file
2. Update CFT configuration file
2. Security commands
1. Edit Security configuration file
2. Interpret Security configuration
3. PKIUTIL operation
3. Administration commands
1. Reinitialize CFT parameters
2. Submit CFT support request
4. Create CFT system objects
1. Create job queue
2. Create job description
3. Create subsystem
4. Add jobqueue entry
5. Create class
6. Add routing entry
7. Add communication entry
8. Change profile
5. Multinode commands
1. List nodes
2. Start node
3. Stop node
4. Enable node
5. Disable node
6. Add node
7. Remove node
8. Add host
9. Remove host
Note The option "5. Multinode commands" is only available if multinode is enabled.
Note A highlighted menu item indicates there is a sub menu.
See Appendix B for a mapping of the menu mapping from previous versions.
55 Installation Guide Transfer CFT IBM i3.1.3

CentralGovernance registration concepts
Starting the Copilot client 1. On the client workstation, open a browser window and enter the URL address for the Copilot
client. For example: http://as4j.ptx.fr.sopra:1766/index.html
Where:
l as4j.ptx.fr.sopra is the server host name
l 1766 is the Copilot server listening port
2. Enter your user profile and password in the login screen.
3. Click Confirm. When the connection is complete, the Copilot window is displayed.
To improve performance, several copsproc jobs are submitted within the same subsystem when you start the Copilot client:
l COPSMNG (main task)
l COPUI (child task)
l COPSPROC (child task)
l COPSPROC (child task)
l COPSPROC (child task)
l and so on…
This group of COPSPROC jobs is normal, and is temporarily active. Each of these jobs is shut down by the COPSMNG job after it completes the task. For more information on Copilot, refer to the Transfer CFT online documentation.
Central Governance registration conceptsThis topic describes the Transfer CFT to Central Governance registration process.
There are several types of exchanges that occur between Central Governance and Transfer CFT. The first exchange is registration, which begins when Copilot1 initiates a request to connect with Central Governance.
The registration is performed on a SSL connection using simple authentication. Further exchanges the heartbeat, and certificate renewal are performed on a SSL connection using mutual authentication, as described
Registration exchange overview
1Transfer CFT UI
Transfer CFT IBM i3.1.3 Installation Guide 56

3 Postinstallation
Step overviewStarting Copilot after installation begins the connection and registration process with Central Governance. This section describes the general steps that occurs during the registration process, and the impact on the configuration.
Note Transfer CFT requires the Central Governance shared secret to register. See the Central Governance documentation for details.
1. Copilot connects to Central Governance and submits its registration.
l Copilot sends a registration request through a simple authenticated SSL connection and submits its registration. Copilot authenticates the Central Governance server using the CA certificate pointing by the uconf:cg.ca_cert_id parameter. The registration request contains:
o Information about the Transfer CFT instance, including its instance name, host, port and version.
o Two Certificate Signing Requests (CSRs) for Central Governance to process.
Note If you use an intermediate certificate as a governance CA certificate, you must add the root CA certificate that signs this intermediate certificate in the Transfer CFT PKI database.
2. Central Governance sends the SSL certificates to Transfer CFT.
Central Governance processes the CSRs and returns two SSL certificates, one dedicated to governance exchanges and the other one dedicated to business exchanges (meaning: used for securing file transfers between the registering Transfer CFT and all other Managed File Transfers).
57 Installation Guide Transfer CFT IBM i3.1.3

CentralGovernance registration concepts
Both certificates are stored in the internal PKI base using the following identifiers:
l <uconf:cft.instance_id>_GOV for the governance certificate;
l <uconf:cft.instance_id> for the business certificate.
3. Copilot sends the first heartbeat over a mutual authenticated SSL connection.
4. The Transfer CFT configuration is updated and returned to Transfer CFT.
During the registration process Central Governance receives the current configuration of Transfer CFT and changes it accordingly to Central Governance rules.
Registration completes with Transfer CFT appearing in the Central Governance product list with the status of "Started" or "Stopped".
Configuration updatesDuring the registration process Central Governance receives the original Transfer CFT configuration and updates it so that Transfer CFT is configured to:
l Connect to Central Governance using the Central Governance mutual authentication port
l Use Central Governance for access management
l Use Central Governance for transfer monitoring
l Use its own internal PKI
These changes create two security profiles (CFTSSL) for Transfer CFT, one client and one server, named SSL_DEFAULT.
Re-registering with Central Governance
In the above registration scenario, when the Central Governance sends the SSL certificates to Transfer CFT (step 2), the uconf:cg.registration_id parameter is set to a positive integer. If an error occurred during steps 3 or 4, the registration process ends in error. To repeat the registration, perform the following steps:
1. Stop Transfer CFT.
2. Stop Copilot.
3. Set the uconf:cg.registration_id to its default value (1) using the command:
CFTUTIL uconfunset id=cg.registration_id
4. Start the Transfer CFT Copilot. Copilot starts the registration process.
Override the default policyYou must set the UCONF parameter cg.configuration_policy if you want to override the default policy applied by Central Governance when you register a Transfer CFT in Central Governance.
Transfer CFT IBM i3.1.3 Installation Guide 58

3 Postinstallation
Operating Transfer CFTAccess the Transfer CFT Main Menu screen. In the Main Menu enter the command cft and press Enter to open the Manager Menu.
Select from:
1. Common CFT commands
2. Security commands
3. Administration commands
4. Create CFT system objects
5. Multinode commands (only available if multinode is enabled)
To view all menu options, see Appendix B: Menu mapping v3.1.3.
Using the common Transfer CFT commandsSelect Option 1 to use the common Transfer CFT commands:
Option Command Details
1 Start Copilot Starts the Copilot server
2 Stop Copilot Stops the Copilot server
3 Start CFT Starts the Transfer CFT server, and in multinode configuration starts all enabled nodes
4 Stop CFT Stops the Transfer CFT server, and in multinode configuration stops all enabled nodes
5 CFTUTIL operations
Open a CFTUTIL command line session
6 Interpret source member
Interpret a source member
7 Manage configuration file
Opens the manage configuration file screen
59 Installation Guide Transfer CFT IBM i3.1.3

Using the common Transfer CFT commands
Expanded Transfer CFT main menu
The following menu shows the complete menu path to Common Transfer CFT commands used to run Transfer CFT, and additional commands needed to operate Transfer CFT.
Transfer CFT IBM i3.1.3 Installation Guide 60

3 Postinstallation
Common Transfer CFT commands menu
1. Common CFT commands
1. Start Copilot
2. Stop Copilot
3. Start CFT
4. Stop CFT
5. CFTUTIL operation
6. Manage configuration File
1. Edit CFT configuration file
2. Update CFT configuration file
2. Security commands
1. Edit Security configuration file
2. Interpret Security configuration
3. PKIUTIL operation
3. Administration commands
1. Reinitialize CFT parameters
2. Submit CFT support request
4. Create CFT system objects
1. Create job queue
2. Create job description
3. Create subsystem
4. Add jobqueue entry
5. Create class
6. Add routing entry
7. Add communication entry
8. Change profile
5. Multinode commands
1. List nodes
2. Start node
3. Stop node
4. Enable node
5. Disable node
6. Add node
7. Remove node
8. Add host
9. Remove host
Note The option "5. Multinode commands" is only available if multinode is enabled.
Note A highlighted menu item indicates there is a sub menu.
See Appendix B for a mapping of the menu mapping from previous versions.
61 Installation Guide Transfer CFT IBM i3.1.3
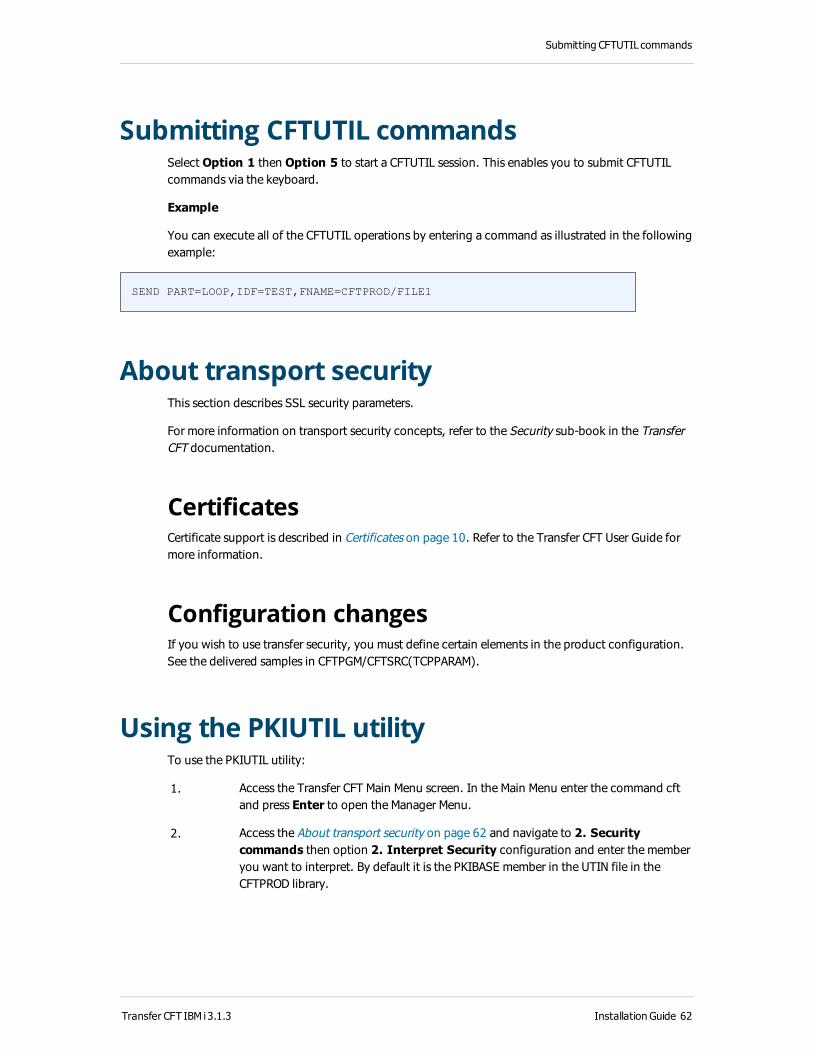
Submitting CFTUTIL commands
Submitting CFTUTIL commandsSelect Option 1 then Option 5 to start a CFTUTIL session. This enables you to submit CFTUTIL commands via the keyboard.
Example
You can execute all of the CFTUTIL operations by entering a command as illustrated in the following example:
SEND PART=LOOP,IDF=TEST,FNAME=CFTPROD/FILE1
About transport securityThis section describes SSL security parameters.
For more information on transport security concepts, refer to the Security subbook in the Transfer CFT documentation.
Certificates Certificate support is described in Certificates on page 10. Refer to the Transfer CFT User Guide for more information.
Configuration changesIf you wish to use transfer security, you must define certain elements in the product configuration. See the delivered samples in CFTPGM/CFTSRC(TCPPARAM).
Using the PKIUTIL utilityTo use the PKIUTIL utility:
1. Access the Transfer CFT Main Menu screen. In the Main Menu enter the command cft and press Enter to open the Manager Menu.
2. Access the About transport security on page 62 and navigate to 2. Security commands then option 2. Interpret Security configuration and enter the member you want to interpret. By default it is the PKIBASE member in the UTIN file in the CFTPROD library.
Transfer CFT IBM i3.1.3 Installation Guide 62

3 Postinstallation
3. To edit the security configuration file selection option 2. Security commands then option 1. Edit Security configuration file and enter the member you want to edit. By default it is the PKIBASE member in the UTIN file in CFTPROD library.
Submitting PKIUTIL commandsSelect option 2. Security commands then option 3. PKIUTIL operation in the Operations screen to start the PKUTIL session.
This option allows you to use the keyboard to enter and execute PKIUTIL commands.
PKIU20I
PKIU20I PKI
PKIU20I Version 3.1.3 2014/03/12 PKIU20I (C) Copyright AXWAY 1989-2014
PKIU20I ====> Starting Session on 29/03/2014 Time is 16:20:37
PKIU20I
===> LISTPKI
Create a databaseUse the following commands, in order, to create a database:
PKIFILE MODE=CREATE, FNAME= 'CFTPROD/PKIBASE'
PKICER ID=NEWCA, MODE=CREATE, PKIFNAME=CFTPROD/PKIBASE, ITYPE=ROOT,
INAME=CFTPROD/AXWRCA, IFORM=DER, STATE=ACT, PKIPASSW=CFT
PKICER ID=NEWUSER,MODE=CREATE, PKIFNAME=CFTPROD/PKIBASE,
INAME=CFTPROD/MFTUSRCA, IKNAME=CFTPROD/MFTUSRCAK, ITYPE=USER,
PKIPASSW=CFT, IKPASSW=user, STATE=ACT, ROOTCID=NEWCA, IKFORM=DER
List PKI database contents 1. To list the PKI database contents, enter the command: LISTPKI
2. Press ENTER to execute the command.
A correct execution displays the following messages:
63 Installation Guide Transfer CFT IBM i3.1.3

Interpreting source members
> LISTPKI
1:¬PKU|
Date = 29/03/2013 Time = 16:24:43PKI Fname =
Id. Root T S C K E Exp.Date Delivered to Delivered by------- ----- - - - - - ---------- ------------- ---------------
CAXMP CAXMP R A x 19/12/2010 CA SAMPLE FOR CA SAMPLE FOR CLIENT
CAXMP U A x x 18/12/2010 CLIENT SAMPLE CA SAMPLE FOR SERVER
CAXMP U A x x 18/12/2010 SERVER SAMPLE CA SAMPLE
PKIU00I LISTPKI _ Correct ()
Interpreting source membersOption 1. Common commands then option 6. Interpret source member in the Operation screen allows you to interpret source files dynamically.
These files contain change configuration commands and submit Transfer CFT commands routines. The send file command displays the following message if syntax parsing is successful:
CFTU20I CFT OS/400
CFTU20I Version 3.1.3 14/03/12
CFTU20I (C) Copyright AXWAY 1989-2014
CFTU20I ====> Starting Session on 29/03/2014 Time is 16:03:47 CFTU20I Parameters file :CFTPARM
CFTU20I Partners file :CFTPART CFTU20I Catalog file :CFTCAT
CFTU20I
CFTU00I SEND _ Correct
(PART=BOUCLE,IDF=TEST1,FNAME=CFTPROD/FILE1) CFTU20I Communication file row number used: 00000010 on 20130329
Time 1603470
1
CFTU00I SEND _ Correct
(PART=BOUCLE,IDF=TEST2,FNAME=CFTPROD/FILE2) CFTU20I Communication file row number used: 00000011 on 20130329
Time 1603470
2
CFTU00I SEND _ Correct
(PART=BOUCLE,IDF=TEST3,FNAME=CFTPROD/FILE3) CFTU20I Communication file row number used: 00000012 on 20130329
Time 1603470
Transfer CFT IBM i3.1.3 Installation Guide 64

3 Postinstallation
3
CFTU00I RETURN _ Correct (CODE=0)
CFTU20I Number of Command(s) 3 CFTU20I Number of error(s) 0
Running Transfer CFTSelect option 1. Common CFT commands then option 3. to start the Transfer CFT server. Note that this starts the Transfer CFT subsystem if it was not already running.
To view all menu options, see Appendix B: Menu mapping v3.1.3.
Operations that recreate files prior to starting up are only required in specific restart conditions, such as after changing the configuration.
Note If you recreate the COM file, any transfer requests deposited since Transfer CFT was last run are lost. If you recreate a CAT file, information required to restart any interrupted transfers may be lost.
Transfer CFT jobs are submitted in the following order:
l 1: CFTMAIN (main task and transfer scheduling task)
l 2: CFTLOG (log management task)
l 3: CFTTCOM (command management task)
l 4: CFTTPRO (protocol management task)
l 5: Network handler(s)
l 6: CFTTFIL (file tasks)
Transfer CFT cannot run if any of the jobs are missing, except for the file task. The file task is only submitted after a send or receive transfer request, or a receive request from a remote site.
Starting Transfer CFTSelect option 1. Common CFT commands then 3. Start Transfer CFT. Once Transfer CFT starts, the product is operational. You can perform transfer operations after the startup messages are displayed.
To view all menu options, see Appendix B: Menu mapping v3.1.3.
From . . . : CFT 04/02/13 17:04:56
Start CFT Monitor - Subsystem CFTSBS1 is started
From . . . : CFT 04/02/13 17:04:59
CFTS33I CFTLOG current file before switch :CFTPROD/LOG1
From . . . : CFT 04/02/13 17:04:59
65 Installation Guide Transfer CFT IBM i3.1.3

Starting Transfer CFT
CFTS34I+CFTLOG executed switch proc : *LIBL/CFTSRC(B_EXECLOG)
From . . . : CFT 04/02/13 17:04:59
CFTS35I+CFTLOG current file after switch :CFTPROD/ALOG1
From . . . : CFT 04/02/13 17:04:59
CFTI34I PID=2 CFTLOG Task started successfully
From . . . : CFT 04/02/13 17:04:59
CFTI18I CFT OS/400
From . . . : CFT 04/02/13 17:04:59
CFTI18I+Version 3.0.1 2013/03/12
From . . . : CFT 04/02/13 17:04:59
CFTI18I+Version 3.0.1
From . . . : CFT 04/02/13 17:04:59
CFTI18I+(C) Copyright AXWAY 1989-2012
From . . . : CFT 04/02/13 17:04:59
CFTI18I+
From . . . : CFT 04/02/13 17:04:59
CFTI18I+MODEL E4B
From . . . : CFT 04/02/13 17:04:59
CFTI18I+CPU 06890AP
From . . . : CFT 04/02/13 17:04:59
CFTI18I+ID IDPARM0
From . . . : CFT 04/02/13 17:04:59
CFTI18I+
From . . . : CFT 04/02/13 17:04:59
CFTI18I+Authentication Method: none
From . . . : CFT 04/02/13 17:05:00
CFTC08I Catalog: Loading...
From . . . : CFT 04/02/13 17:05:00
CFTC08I Catalog: Load Done
From . . . : CFT 04/02/13 17:05:00
CFTC08I Catalog: Size=5000, Used=3(0%)
From . . . : CFT 04/02/13 17:05:02
CFTC08I Purge Started.
From . . . : CFT 04/02/13 17:05:02
CFTC08I Purge catalog-size=5000 in-use=3 pre-filtered=0(0%)
From . . . : CFT 04/02/13 17:05:03
CFTI34I PID=4 CFTTCOM Task started successfully
From . . . : CFT 04/02/13 17:05:03
CFTI34I PID=5065 CFTPRX Task started successfully
From . . . : CFT 04/02/13 17:05:04
CFTI34I PID=8 CFTTCPS Task started successfully
Transfer CFT IBM i3.1.3 Installation Guide 66

3 Postinstallation
From . . . : CFT 04/02/13 17:05:04
CFTI34I PID=0 CFTTCPS Task started successfully
From . . . : CFT 04/02/13 17:05:04
CFTN01I NET=TCP0 started
From . . . : CFT 04/02/13 17:05:04
CFTN02I NET=TCP0 PROTOCOL=PESITANY SAP=65535 started
From . . . : CFT 04/02/13 17:05:04
CFTI34I PID=5 CFTTPRO Task started successfully
From . . . : CFT 04/02/13 17:05:05
CFTI34I PID=37328 CFTMAIN Task started successfully
From . . . : CFT 04/02/13 17:05:05
CFTI18I CFT started by user CFT
From . . . : CFT 04/02/13 17:05:05
CFTI18I+On 1000 authorized simultaneous transfer(s), 32 is
(are) active
From . . . : CFT 04/02/13 17:05:05
CFTI18I+
From . . . : CFT 04/02/13 17:05:05
CFTI18I+Be careful : the license of CFT will expire in 35
days.
From . . . : CFT 04/02/13 17:05:05
CFTI18I+
From . . . : CFT 04/02/13 17:05:05
CFTI18I+EBICS Protocol Option is authorized (0 partner(s))
From . . . : CFT 04/02/13 17:05:05
CFTI18I+Edition : Advanced
From . . . : CFT 04/02/13 17:05:05
CFTI18I+TCP/IP Network Access Method Option is authorized
From . . . : CFT 04/02/13 17:05:05
CFTI18I+File Transfer Acceleration Option is authorized
From . . . : CFT 04/02/13 17:05:05
CFTI18I+Bandwidth Priority Option is authorized
From . . . : CFT 04/02/13 17:05:05
CFTI18I+Multi-node Option is authorized
From . . . : CFT 04/02/13 17:05:05
CFTI18I+X25 Network Access Method Option is authorized
From . . . : CFT 04/02/13 17:05:05
CFTI18I+DNA Network Access Method Option is authorized
From . . . : CFT 04/02/13 17:05:05
CFTI18I+DSA Network Access Method Option is authorized
From . . . : CFT 04/02/13 17:05:05
CFTI18I+LU6.2 Network Access Method Option is authorized
67 Installation Guide Transfer CFT IBM i3.1.3

Starting Transfer CFT
From . . . : CFT 04/02/13 17:05:05
CFTI18I+VFM File Access Method Option is authorized
From . . . : CFT 04/02/13 17:05:05
CFTI18I+SNA Network Access Method Option is authorized
From . . . : CFT 04/02/13 17:05:05
CFTI18I+Web Services for Copilot Option is authorized
From . . . : CFT 04/02/13 17:05:05
CFTI18I+FIPS Compliance Option is authorized
From . . . : CFT 04/02/13 17:05:05
CFTI18I+SSL Protocol Option is authorized
From . . . : CFT 04/02/13 17:05:05
CFTI18I+
From . . . : CFT 04/02/13 17:05:05
CFTI26I+Init complete _ Security not active
From . . . : CFT 04/02/13 17:05:05
CFTI28I+Init complete _
From . . . : CFT 04/02/13 17:05:05
CFTI18I+ FNAME : CFTCAT
From . . . : CFT 04/02/13 17:05:05
CFTI11I+Init complete _ Logger process ¬ID=IDLOG0|
From . . . : CFT 04/02/13 17:05:05
CFTI18I+ FNAME : CFTPROD/LOG1
From . . . : CFT 04/02/13 17:05:05
CFTI18I+ AFNAME : CFTPROD/ALOG1
From . . . : CFT 04/02/13 17:05:05
CFTI13I+Init complete _ Communication process ¬ID=IDCOM0|
From . . . : CFT 04/02/13 17:05:05
CFTI18I+ TYPE : File FNAME : +CFTCOM
From . . . : CFT 04/02/13 17:05:05
CFTI12I+Init complete _ Protocol process
From . . . : CFT 04/02/13 17:05:05
CFTI14I+CFT init complete _ CFT400
From . . . : CFT 04/02/13 17:05:05
CFTC08I Purge Treated : no record found to delete.
From . . . : CFT 04/02/13 17:05:05
CFTR12I PURGE Treated
Transfer CFT IBM i3.1.3 Installation Guide 68

3 Postinstallation
Submitting a transfer commandAfter depositing a transfer command, such as the loopback test, the following messages are displayed.
Example
SEND PART=LOOP,IDF=TEST,FNAME=CFTPROD/TEST
From . . . : CFT 04/02/13 17:12:45
CFTR12I SEND PART=LOOP IDF=TEST Treated for USER CFT
From . . . : CFT 04/02/13 17:12:45
+
From . . . : CFT 04/02/13 17:12:45
CFTS20I Communication file row number deleted: 00000030
From . . . : CFT 04/02/13 17:12:45
+
From . . . : CFT 04/02/13 17:12:46
CFTW09I PART=LOOP IDF=TEST IDT=D0217124 CFTSEND IDFDEFT NIDF=TEST
From . . . : CFT 04/02/13 17:12:46
+
From . . . : CFT 04/02/13 17:12:46
CFTT13I PART=LOOP IDF=TEST IDT=D0217124 _ Session parameters
From . . . : CFT 04/02/13 17:12:46
+ PROT=PESITANY SAP=65535 HOST=127.0.0.1
From . . . : CFT 04/02/13 17:12:46
CFTI34I PID=9 CFTTFIL Task started successfully
From . . . : CFT 04/02/13 17:12:47
CFTT53I PART=LOOP IDF=TEST IDT=D0217124 Requester file selected
From . . . : CFT 04/02/13 17:12:47
CFTT55I PART=LOOP IDF=TEST IDT=D0217124 Requester file opened
From . . . : CFT 04/02/13 17:12:47
CFTH56I PART=LOOP IDS=00003 PESIT Server session opened
pi7=02:00512
From . . . : CFT 04/02/13 17:12:47
CFTH56I PART=LOOP IDS=00002 PESIT Requester session opened
pi7=02:00512
From . . . : CFT 04/02/13 17:12:47
CFTW09I PART=LOOP IDF=TEST IDT=D0217124 CFTRECV IDFDEFT NIDF=TEST
From . . . : CFT 04/02/13 17:12:47
+
69 Installation Guide Transfer CFT IBM i3.1.3

Submitting a transfer command
From . . . : CFT 04/02/13 17:12:47
CFTT53I PART=LOOP IDF=TEST IDT=D0217124 Server file created
From . . . : CFT 04/02/13 17:12:47
CFTT55I PART=LOOP IDF=TEST IDT=D0217124 Server file opened
From . . . : CFT 04/02/13 17:12:47
CFTT57I PART=LOOP IDF=TEST IDT=D0217124 Server transfer started
From . . . : CFT 04/02/13 17:12:47
CFTT57I PART=LOOP IDF=TEST IDT=D0217124 Requester transfer started
From . . . : CFT 04/02/13 17:12:47
CFTT58I PART=LOOP IDF=TEST IDT=D0217124 Server transfer ended
From . . . : CFT 04/02/13 17:12:47
CFTT58I PART=LOOP IDF=TEST IDT=D0217124 Requester transfer ended
From . . . : CFT 04/02/13 17:12:47
CFTT56I PART=LOOP IDF=TEST IDT=D0217124 Server file closed
From . . . : CFT 04/02/13 17:12:47
CFTH58I PART=LOOP IDS=00003 IDF=TEST NIDT=9317124 transfer
deselected
From . . . : CFT 04/02/13 17:12:47
+ T=400
From . . . : CFT 04/02/13 17:12:47
CFTT54I PART=LOOP IDF=TEST IDT=D0217124 Server file deselected
From . . . : CFT 04/02/13 17:12:47
CFTT88I+IDT=D0217124 FNAME=CFTPROD/R_A000000L NBC=160
From . . . : CFT 04/02/13 17:12:47
CFTH58I PART=LOOP IDS=00002 IDF=TEST NIDT=9317124 transfer
deselected
From . . . : CFT 04/02/13 17:12:47
+ T=200
From . . . : CFT 04/02/13 17:12:47
CFTT56I PART=LOOP IDF=TEST IDT=D0217124 Requester file closed
From . . . : CFT 04/02/13 17:12:47
CFTT54I PART=LOOP IDF=TEST IDT=D0217124 Requester file deselected
From . . . : CFT 04/02/13 17:12:48
CFTT88I+IDT=D0217124 FNAME=CFTPROD/TEST NBC=160
From . . . : CFT 04/02/13 17:12:48
CFTS03I PART=LOOP IDF=TEST IDT=D0217124 _ *LIBL/CFTSRC(B_EXECRF)
From . . . : CFT 04/02/13 17:12:48
+ executed
From . . . : CFT 04/02/13 17:12:50
CFTS03I PART=LOOP IDF=TEST IDT=D0217124 _ *LIBL/CFTSRC(B_EXECSF)
From . . . : CFT 04/02/13 17:12:50
Transfer CFT IBM i3.1.3 Installation Guide 70

3 Postinstallation
+ executed
From . . . : CFT 04/02/13 17:12:50
CFTR17I END PART=LOOP IDF=* IDTU=A000000L In progress for USER
From . . . : CFT 04/02/13 17:12:50
+ CFT
From . . . : CFT 04/02/13 17:12:50
CFTR12I END PART=LOOP IDF=* IDTU=A000000L Treated for USER
CFT
From . . . : CFT 04/02/13 17:12:50
+
From . . . : CFT 04/02/13 17:12:50
CFTS20I Communication file row number deleted: 00000031
From . . . : CFT 04/02/13 17:12:50
+
From . . . : CFT 04/02/13 17:12:50
CFTR12I SEND PART=LOOP IDM=REP Treated for USER CFT
From . . . : CFT 04/02/13 17:12:50
From . . . : CFT 04/02/13 17:12:50
CFTS20I Communication file row number deleted: 00000032
From . . . : CFT 04/02/13 17:12:50
+
From . . . : CFT 04/02/13 17:12:50
CFTT13I PART=LOOP IDM=REP IDT=D0217125 _ Session parameters
From . . . : CFT 04/02/13 17:12:50
+ PROT=PESITANY SAP=65535 HOST=127.0.0.1
From . . . : CFT 04/02/13 17:12:50
CFTT59I PART=LOOP IDM=TEST IDT=D0217124 Server reply
transfered
From . . . : CFT 04/02/13 17:12:50
CFTH60I PART=LOOP IDS=00002 IDM=TEST NIDT=9317124 reply
transfered
From . . . : CFT 04/02/13 17:12:50
CFTT59I PART=LOOP IDM=REP IDT=D0217125 Requester reply
transfered
From . . . : CFT 04/02/13 17:12:50
CFTH62I+ REF=9317124.LOOP.LOOP.0.TEST..
From . . . : CFT 04/02/13 17:12:51
CFTR17I END PART=LOOP IDF=* IDTU=A000000K In progress for USER
From . . . : CFT 04/02/13 17:12:51
+ CFT
From . . . : CFT 04/02/13 17:12:51
71 Installation Guide Transfer CFT IBM i3.1.3

Shutting down Transfer CFT
CFTR12I END PART=LOOP IDF=* IDTU=A000000K Treated for USER
CFT
From . . . : CFT 04/02/13 17:12:51
+
From . . . : CFT 04/02/13 17:12:51
CFTS20I Communication file row number deleted: 00000033
From . . . : CFT 04/02/13 17:12:51
Shutting down Transfer CFTTo stop the Transfer CFT server:
From the Operations screen, select option 1. Common CFT commands then 4. Stop Transfer CFT and press ENTER.
To view all menu options, see Appendix B: Menu mapping v3.1.3.
The following shutdown messages are displayed:
CFTU20I
CFTU00I SHUT _ Correct ( FAST=YES)
CFTU20I Communication file row number used: 00000022 on 20130329 Time
1612460
2
CFTU20I Number of Command(s) 1
CFTU20I Number of error(s) 0
CFTU20I Ending Session on 29/03/2013 Time is 16:12:46
CFTU20I Session active for 0:00:00
Press ENTER to end terminal session.
Job 729794/CFT/CFTCLEANUP ended abnormally.
From . . . : CFT 03/29/13 16:12:51
CFTR12I SHUT Treated for USER CFT
From . . . : CFT 03/29/13 16:12:51
From . . . : CFT 03/29/13 16:12:51
CFTI35I PID=9 CFTTFIL Task ended
From . . . : CFT 03/29/13 16:12:51
CFTI35I PID=8 CFTTCPS : Normal shut Task ended
Job 729786/CFT/CFTTCPS completed normally on 03/29/13 at 16:12:51.
From . . . : CFT 03/29/13 16:12:51
CFTI35I PID=0 CFTTCPS Task ended
From . . . : CFT 03/29/13 16:12:51
CFTI35I PID=37328 CFTMAIN Task ended
Transfer CFT IBM i3.1.3 Installation Guide 72

3 Postinstallation
From . . . : CFT 03/29/13 16:12:51
CFTI35I PID=34704 CFTTPRO Task ended
Job 729785/CFT/CFTTPRO1 completed normally on 03/29/13 at 16:12:51.
Configuring Transfer CFT parametersAccess the Transfer CFT Main Menu screen. In the Main Menu enter the command cft and press Enter to open the Manager Menu.
Navigate from option 1 Common CFT commands to the Interpret source member option.
To view all menu options, see Appendix B: Menu mapping v3.1.3.
Interpreting a parameter sourceThe parameter file that you selected in the previous step, option 1 Editing the parameter source member, is interpreted by CFTUTIL. The options are confirmed before being interpreted. To interpret or update a parameter source, select option 2 Interpret selected member in the Customization screen. The following screen is displayed.
The parameter and partner files can be created, recreated, or updated prior to interpretation. If this is the first time that you are interpreting a parameter source, you must first create it.
l Select 1= Create for each time you interpret a new parameter source.
l Select 2 = Update to change existing command parameters. You can modify many of the Transfer CFT parameters while CFT is running, but some configuration command changes cannot be applied dynamically. For more information, refer to the Transfer CFT online documentation.
If you select 1 Configuration interpretation, Transfer CFT displays following messages.
View messages
CFTU20I CFT OS/400
CFTU20I Version 3.0.1 2013/03/12
CFTU20I (C) Copyright AXWAY 1989-2012
CFTU20I ====> Starting Session on 02/04/2013 Time is 09:28:19
CFTU20I
CFTU00I CFTFILE _ Correct (type=param,mode=create,fname=CFTPROD/PARM1)
CFTU20I Number of Command(s) 1
CFTU20I Number of error(s) 0
CFTU20I Ending Session on 02/04/2013 Time is 09:28:20
CFTU20I Session active for 0:00:01
Press ENTER to end terminal session.
73 Installation Guide Transfer CFT IBM i3.1.3
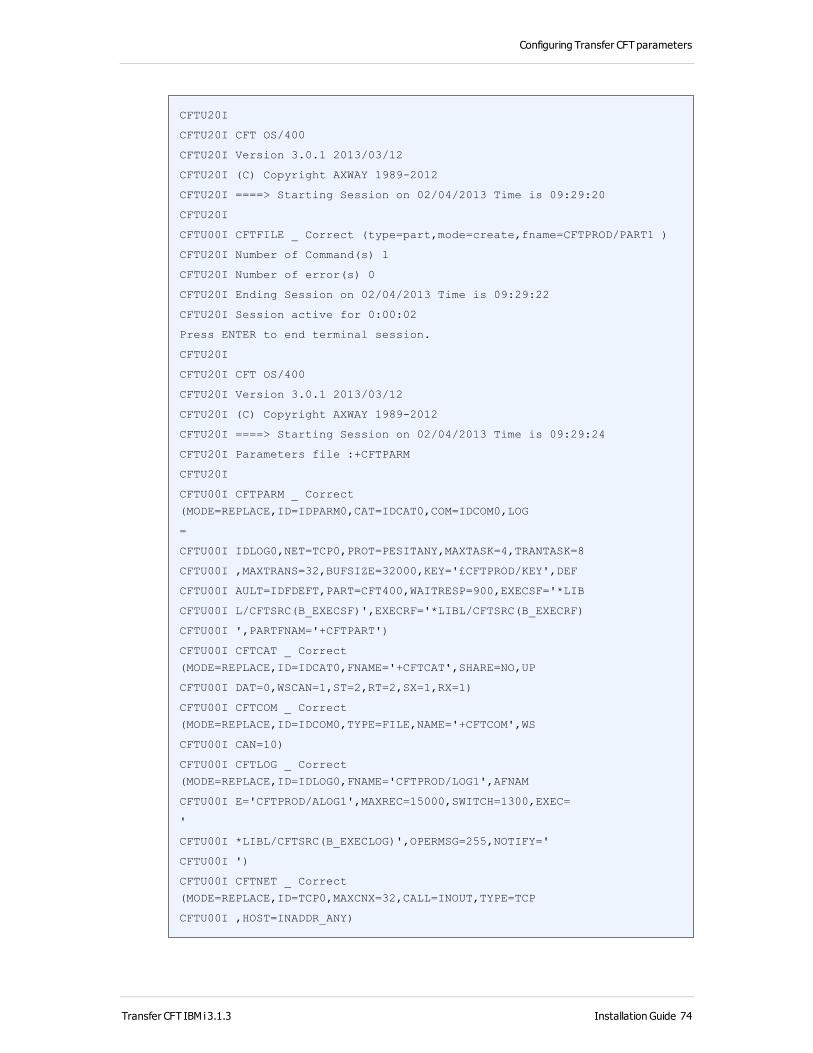
Configuring Transfer CFT parameters
CFTU20I
CFTU20I CFT OS/400
CFTU20I Version 3.0.1 2013/03/12
CFTU20I (C) Copyright AXWAY 1989-2012
CFTU20I ====> Starting Session on 02/04/2013 Time is 09:29:20
CFTU20I
CFTU00I CFTFILE _ Correct (type=part,mode=create,fname=CFTPROD/PART1 )
CFTU20I Number of Command(s) 1
CFTU20I Number of error(s) 0
CFTU20I Ending Session on 02/04/2013 Time is 09:29:22
CFTU20I Session active for 0:00:02
Press ENTER to end terminal session.
CFTU20I
CFTU20I CFT OS/400
CFTU20I Version 3.0.1 2013/03/12
CFTU20I (C) Copyright AXWAY 1989-2012
CFTU20I ====> Starting Session on 02/04/2013 Time is 09:29:24
CFTU20I Parameters file :+CFTPARM
CFTU20I
CFTU00I CFTPARM _ Correct
(MODE=REPLACE,ID=IDPARM0,CAT=IDCAT0,COM=IDCOM0,LOG
=
CFTU00I IDLOG0,NET=TCP0,PROT=PESITANY,MAXTASK=4,TRANTASK=8
CFTU00I ,MAXTRANS=32,BUFSIZE=32000,KEY='£CFTPROD/KEY',DEF
CFTU00I AULT=IDFDEFT,PART=CFT400,WAITRESP=900,EXECSF='*LIB
CFTU00I L/CFTSRC(B_EXECSF)',EXECRF='*LIBL/CFTSRC(B_EXECRF)
CFTU00I ',PARTFNAM='+CFTPART')
CFTU00I CFTCAT _ Correct
(MODE=REPLACE,ID=IDCAT0,FNAME='+CFTCAT',SHARE=NO,UP
CFTU00I DAT=0,WSCAN=1,ST=2,RT=2,SX=1,RX=1)
CFTU00I CFTCOM _ Correct
(MODE=REPLACE,ID=IDCOM0,TYPE=FILE,NAME='+CFTCOM',WS
CFTU00I CAN=10)
CFTU00I CFTLOG _ Correct
(MODE=REPLACE,ID=IDLOG0,FNAME='CFTPROD/LOG1',AFNAM
CFTU00I E='CFTPROD/ALOG1',MAXREC=15000,SWITCH=1300,EXEC=
'
CFTU00I *LIBL/CFTSRC(B_EXECLOG)',OPERMSG=255,NOTIFY='
CFTU00I ')
CFTU00I CFTNET _ Correct
(MODE=REPLACE,ID=TCP0,MAXCNX=32,CALL=INOUT,TYPE=TCP
CFTU00I ,HOST=INADDR_ANY)
Transfer CFT IBM i3.1.3 Installation Guide 74

3 Postinstallation
CFTU00I CFTPROT _ Correct
(MODE=REPLACE,ID=PESITANY,NET=TCP0,TYPE=PESIT,PROF=
CFTU00I ANY,CONCAT=YES,SEGMENT=YES,MULTART=YES,SCOMP=0,RCO
CFTU00I MP=0,SCHKW=2,RCHKW=2,SPACING=512,RPACING=512,SAP=6
CFTU00I 5535,RRUSIZE=32000,SRUSIZE=32000,RTO=250,DISCTC=40
CFTU00I 0,DISCTD=200,DISCTR=10,DISCTS=400)
CFTU00I CFTPART _ Correct
(MODE=REPLACE,ID=BOUCLE,NSPART=LOOP,NRPART=LOOP,PRO
CFTU00I T=PESITANY,SAP=65535,SYST='OS400')
CFTU00I CFTTCP _ Correct
(MODE=REPLACE,ID=BOUCLE,CNXOUT=16,CNXIN=16,CNXINOUT
CFTU00I =16,HOST=127.0.0.1)
CFTU00I CFTPART _ Correct
(MODE=REPLACE,ID=CIBLE,NSPART=AS400,NRPART=CIBLE,PR
CFTU00I OT=PESITANY,SAP=65531,SYST='OS400')
CFTU00I CFTTCP _ Correct
(MODE=REPLACE,ID=CIBLE,CNXOUT=16,CNXIN=16,CNXINOUT=
CFTU00I 16,HOST=CIBLE)
CFTU00I CFTSEND _ Correct
(MODE=REPLACE,ID=TSTIMPL,IMPL=YES,FNAME='QGPL/QAUOO
CFTU00I PT',EXEC='*LIBL/CFTSRC(B_EXECSIMP)',FCODE=EBCDIC)
CFTU00I CFTSEND _ Correct
(MODE=REPLACE,ID=TSTNCOMP,IMPL=NO,FCODE=EBCDIC,NCOM
CFTU00I P=0)
CFTU00I CFTSEND _ Correct (MODE=REPLACE,ID=IDFDEFT,IMPL=NO,FCODE=EBCDIC)
CFTU00I CFTRECV _ Correct
(MODE=REPLACE,ID=SRC400,FTYPE='S',FDISP=BOTH,FACTIO
CFTU00I N=ERASE,FCODE=EBCDIC,FRECFM='F',FNAME='CFTPROD/UT
CFTU00I IN(R_?PARM)')
CFTU00I CFTRECV _ Correct
(MODE=REPLACE,ID=SRCFILE,FDISP=BOTH,FACTION=ERASE,F
CFTU00I CODE=EBCDIC,FRECFM='F',FNAME='CFTPROD/UTIN(R_?PAR
CFTU00I M)')
CFTU00I CFTRECV _ Correct
(MODE=REPLACE,ID=COMMUT,FDISP=BOTH,FACTION=DELETE,F
CFTU00I CODE=BINARY,FRECFM='V',FSPACE=65535,FNAME='CFTPROD
CFTU00I P/R_?IDTU')
CFTU00I CFTRECV _ Correct
(MODE=REPLACE,ID=IDFDEFT,FDISP=BOTH,FACTION=DELETE
,
CFTU00I FCODE=EBCDIC,FRECFM='F',FSPACE=65535,FNAME='CFTPROD
CFTU00I /R_?IDTU')
CFTU00I CFTRECV _ Correct
75 Installation Guide Transfer CFT IBM i3.1.3

Identity and access management
(MODE=REPLACE,ID=SAVEFILE,FDISP=BOTH,FACTION=DELETE
CFTU00I ,FCODE=BINARY,FTYPE='Z',FNAME='CFTPROD/R_?IDTU')
CFTU00I RETURN _ Correct (CODE=0)
CFTU20I Number of Command(s) 18
CFTU20I Number of error(s) 0
CFTU20I Ending Session on 02/04/2013 Time is 09:29:25
CFTU20I Session active for 0:00:01
An interpretation is considered to be valid when all messages are displayed as Correct.
If an interpretation error is detected, modify the invalid parameter or parameters, and select 2 Repeat the interpretation. When you select 2 Repeat the interpretation, only messages concerning configuration commands are displayed.
Identity and access management
About internal access managementThis section describes access management for Transfer CFT on anTransfer CFT IBM isystem.
Updating the secini and secenvg files
Updating the secini file (pf-dta)In command line on the Transfer CFT IBM i, enter the command MAJSECINI and press F4.
Updating the secenvg file (pf-dta)In command line on the Transfer CFT IBM i, enter the command MAJSECENVG and press F4.
Transfer CFT IBM i3.1.3 Installation Guide 76

3 Postinstallation
Generating security base dictionaries 1. In command line on the Transfer CFT IBM i, enter the command GENEDICT and press F4.
Security dictionary generation (GENEDICT)
Type choices, press Enter.
Option (B/A/O) ...........: . . B B(ALL) A(Action) O
(Object)
2. Specify the dictionaries that you want to generate:
l B = generate both an objects and an actions dictionaries
l A = only generate an actions dictionary
l O = only generate an objects dictionary
Using the secparm file
Creating and interpreting an internal access management file (security base) 1. Enter the SECUTIL command to begin a session, and execute the following command:
SECFILE FNAME=CFTPROD1/SECPARM1,MODE=CREATE
SECU20I
SECU20I CFT Transfer CFT IBM i
SECU20I Version 3.1.3 2015/01/01
SECU20I (C) Copyright AXWAY 1989-2015
SECU20I ====> Starting Session on
02/02/2015 Time is 08:56:35
SECU20I
SECFILE
FNAME=CFTPROD1/SECPARM1,MODE=CREATE
1:¬SEU| SECU00I SECFILE _ Correct
(FNAME=CFTPROD1/SECPARM1,MODE=CREATE)
2. To interpret the source member execute:
SECUTIL PARAM(#CFTPROD1/SECPARM1)
Option descriptions
l 1: Delete and recreate the existing interpreted parameters file prior to interpreting the parameters source member. If you select option 1, the SECPARM1 file is deleted and regenerated before the
77 Installation Guide Transfer CFT IBM i3.1.3

Application programming interfaces
security parameter file is interpreted.
l 2: Only interpret the parameters source member in the existing interpreted parameters file.
Running Transfer CFT with a security base
Configuring Transfer CFT parameter with a security baseInitially you must create the CFT files with HABFNAME by including the CFTFILE command in your parameter source file. Refer to parameter sample:
CFTPROD/UTIN MBR(TCPPESITS)
Interpreting Transfer CFT parameters with a security base 1. From the CFT Main menu, select option 1 Customization. Press Enter to continue.
2. From the Main Customization screen, select 1 CFT Parameters. Press Enter.
3. Select option 2 Interpret selected member. Press Enter to validate.
4. Select 3 Create (security). Selecting option 3 deletes PART and PARM files and recreates them with a security base option before interpreting the Transfer CFT parameter file.
Starting Transfer CFT with a security base 1. From the CFT Main menu, select 2 Operation CFTUTIL. Press Enter.
2. From the Operation menu, select 9 Start CFT monitor. Press Enter.
3. Select option 3 YES (security). Selecting option 3 deletes the CAT and COM files and recreates them with a security base option before starting CFT.
For more information, refer to the security sections in the Transfer CFT 3.1.3 User Guide.
Application programming interfaces Note Only ILE (Integrated Language Environment) is supported.
You perform Transfer CFT service calls differently depending on the programming language that you use (C, COBOL or RPG). For more information, refer to the programming topics in the Transfer CFT User Guide.
The Transfer CFT service called (CFTI, CFTU or CFTC) executes the request, either with or without analyzing command syntax, and then initializes the response zone.
The client application receives from Transfer CFT:
l A return code
Transfer CFT IBM i3.1.3 Installation Guide 78
3 Postinstallation
l The requested data, if applicable
Call from a COBOL/ILE or RPG/ILE program
Querying the Catalog: CFTI functionAvailable commands include OPEN, SELECT, NEXT, MODIFY and CLOSE.
Requesting a transfer: CFTU and CFTC functionsAvailable parameters include: FSEND, FRECV, FSTART, FHALT, FKEEP, FDELETE, FEND and FCOM.
COBOL/ILE Programming examples
Refer to the programming examples, the COBOL COPY clauses, and the execution procedures, which are supplied in the Transfer CFT library CFTPGM/CFTSRC (APICPYCBL, INTCAT, TCFTU_CBL1(API asynchronous),TCFTU_CBL2(API synchronous), I_INTCAT, I_TCFTU_CB).
RPG/ILE Programming examples
Refer to the programming examples, RPG COPY clauses, and procedures, which are supplied in the Transfer CFT library:
l CFTPGM/CFTSRC (CPYRPGCILE, CPYRPGIILE, CPYRPGCIL4, CPYRPGIIL4)
o TCFTU_RPG(API structure V23)
o TCFTI2_RPG(API structure V24)
o TCFTU_RP1(API asynchronous)
o TCFTU_RP2(API synchronous)
o I_TCFTI_RP(executes CFTI or CFTIX functions)
o I_TCFTU_RP(executes CFTU function), etc.
Call from a C ProgramThe following are equivalent to the previous programs:
l cftai for CFTI
l cftau for CFTU
l cftac for CFTC
Using the CFTAPI1
79 Installation Guide Transfer CFT IBM i3.1.3

Start the Transfer CFT IBM iManager
Refer to the programming examples, INCLUDE clauses, and execution procedures, which are supplied in the Transfer CFT library CFTPGM/CFTSRC (APIXMP1, APIXMP2, APIXMP4, CFTAPI, I_APIXMP1, I_APIXMP2, I_APIXMP4…).
Using the CFTAPI2
Refer to the programming examples, INCLUDE clauses, and execution procedures, which are supplied in the Transfer CFT library CFTPGM/CFTSRC (API2XMP1, AP2IXMP2, CFTAPI2, I_API2XMP1, I_API2XMP2).
Start the Transfer CFT IBM i ManagerOther than during installation, which runs the Transfer CFT manager automatically, you can enter one of the following commands to start the manager:
l CFT
l CALL CFTMENU
Starting Transfer CFT in batch modeThe CFTMGSBM CLP program is used to start Transfer CFT IBM i without any required user action.
CFTMGSBM comprises:
ADDLIBLE LIB(CFTPGM) POSITION(*FIRST)
ADDLIBLE LIB(CFTPROD) POSITION(*FIRST)
CALL PGM(CFTMGSBM)
RMVLIBLE LIB(CFTPGM)
RMVLIBLE LIB(CFTPROD)
Transfer CFT IBM i3.1.3 Installation Guide 80

3 Postinstallation
81 Installation Guide Transfer CFT IBM i3.1.3

4 Migrate and upgrade
Prerequisites
Important information before performing a migration procedure l You must update your Transfer CFT to the most recent service pack version.
l Backup Transfer CFT before beginning an upgrade or migration procedure.
l Before beginning the upgrade or migration procedure stop the existing version of Transfer CFT and the GUI server.
About license keys l You require a new license key if you are migrating from a version 2.x Transfer CFT to a version 3.x.
l For details on how to apply or update a license key, and the new license key location, see the section Apply a license key.
Note You require as many keys as instances of Transfer CFT IBM i running at same time. For example, two Transfer CFT instances cannot run at the same time, on the same server, using the same license key.
Update Transfer CFT IBM iThis section describes how to apply a patch or Service Pack to Transfer CFT in an IBM i environment.
Display patch informationUse the CFTUTIL ABOUT command to display the product information, including the service pack number and patch number.
Results
CFT information :
Transfer CFT IBM i3.1.3 Installation Guide 82
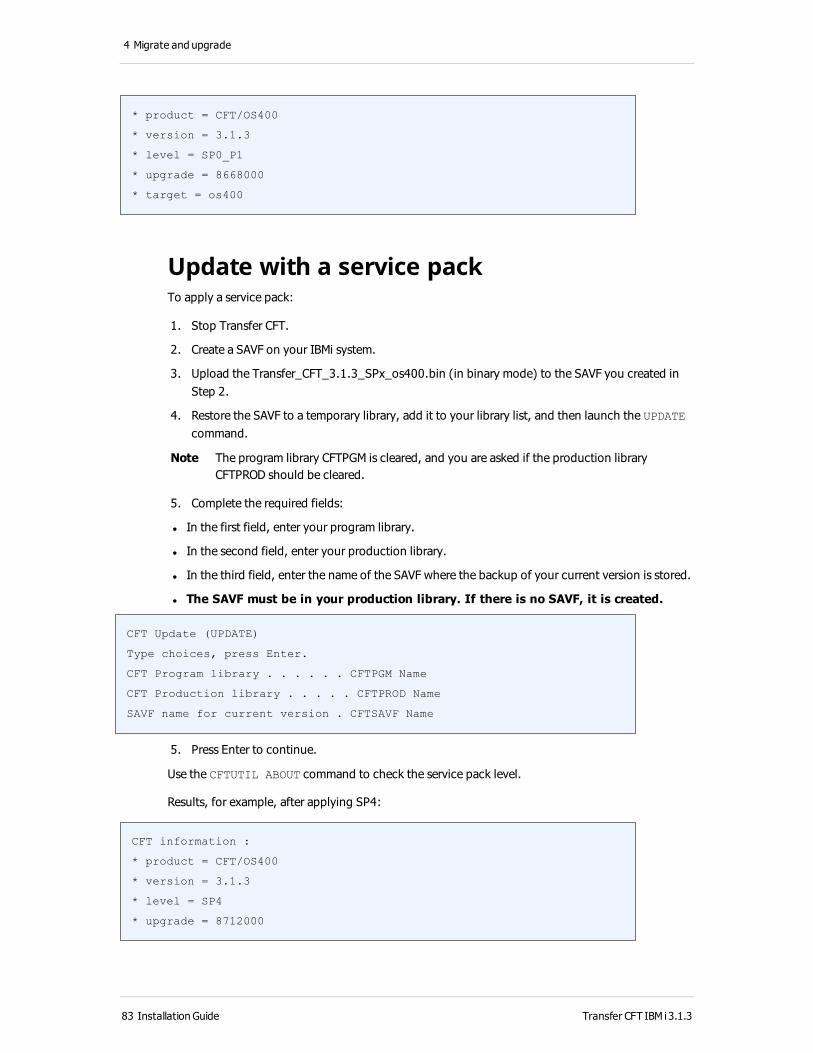
4 Migrate and upgrade
* product = CFT/OS400
* version = 3.1.3
* level = SP0_P1
* upgrade = 8668000
* target = os400
Update with a service packTo apply a service pack:
1. Stop Transfer CFT.
2. Create a SAVF on your IBMi system.
3. Upload the Transfer_CFT_3.1.3_SPx_os400.bin (in binary mode) to the SAVF you created in Step 2.
4. Restore the SAVF to a temporary library, add it to your library list, and then launch the UPDATE command.
Note The program library CFTPGM is cleared, and you are asked if the production library CFTPROD should be cleared.
5. Complete the required fields:
l In the first field, enter your program library.
l In the second field, enter your production library.
l In the third field, enter the name of the SAVF where the backup of your current version is stored.
l The SAVF must be in your production library. If there is no SAVF, it is created.
CFT Update (UPDATE)
Type choices, press Enter.
CFT Program library . . . . . . CFTPGM Name
CFT Production library . . . . . CFTPROD Name
SAVF name for current version . CFTSAVF Name
5. Press Enter to continue.
Use the CFTUTIL ABOUT command to check the service pack level.
Results, for example, after applying SP4:
CFT information :
* product = CFT/OS400
* version = 3.1.3
* level = SP4
* upgrade = 8712000
83 Installation Guide Transfer CFT IBM i3.1.3

Update Transfer CFT IBM i
* target = os400
Note You should keep the save file where the previous version was saved (for example, in CFTSAVF), in case you need to uninstall the service pack.
Uninstall a service packUninstall the SP by running the command UNINSTALL.
Apply a patch 1. Stop Transfer CFT.
2. Create a SAVF on your IBMi system.
3. Upload the Transfer_CFTSPx_Patchz_os400.bin (in binary mode) to the SAVF you created in Step 2.
4. Restore the SAVF to a temporary library, add it to the top of your library list, and then launch the PATCHER command.
5. Complete the required fields:
l In the first field, enter your CFT program library.
l In the second field, enter the name of the SAVF where the backup of current
Module versions impacted by the patch are stored. If the SAVF does not exist, it is created; if it exists, it is cleared.
Install Transfer CFT patch (PATCHER)
Type choices, press Enter.
Program library . . . . . . . . CFTPGM Character value
SAVF for backup . . . . . . . . PATCHSAV Character value
Use the CFTUTIL ABOUT command to check the patch level.
Results, for example, after applying SP7_Patch6:
CFT information :
* product = CFT/OS400
* version = 3.1.3
* level = SP7_Patch6
* upgrade = 8712000
* target = os400
Transfer CFT IBM i3.1.3 Installation Guide 84

4 Migrate and upgrade
Uninstall a patchTo uninstall this patch, please restore the previous SAVF to your CFT program library (in the example above, this would be PATCHSAV).
Example
RSTOBJ OBJ(*ALL) SAVLIB(CFTPGM1) DEV(*SAVF) OBJTYPE(*ALL) SAVF
(CFTPGM/PATCHSAV) OPTION(*ALL) RSTLIB(CFTPGM)
Activate Central Governance connectivityCentral Governance simplifies the management of Transfer CFT and provides identity and access management, certificate security services, monitoring, alerting, and web dashboard services. Central Governance replaces possible existing services from earlier Transfer CFT installations that required implementing and configuring multiple products, such as Transfer CFT Navigator, PassPort, Composer, and Sentinel.
You can perform this activation procedure only after completing an upgrade or migration to Transfer CFT 3.1.3.
OverviewThere are two ways to active Transfer CFT to Central Governance connectivity following an upgrade procedure:
l Automatically activate connectivity on page 85
l Manually activate connectivity on page 86
Additional information and tasks:
l Connect to a different Central Governance system on page 89
l Activate Central Governance connectivity on page 85
l Use former configuration objects on page 89
l View managed features on page 90
Automatically activate connectivityUNIX/Windows
The automatic activation is only available in UNIX/Windows. Please refer to the Manual activation procedure below for z/OS or IBM i instructions.
85 Installation Guide Transfer CFT IBM i3.1.3

Activate CentralGovernance connectivity
This section describes how to run the installer in configure mode to enable Central Governance connectivity.
Note If running in Windows, the same user who did the initial installation (or same type of user) must start the installer.
PrerequisiteYou must set the UCONF parameter cg.configuration_policy if you want to override the default policy applied by Central Governance when you register a Transfer CFT in Central Governance.
Procedure 1. Stop Transfer CFT and Copilot.
2. Start the Installer configure mode.
GUI
l UNIX: configure.sh –m gui
l Windows: In Windows Start menu, select Axway Software > Axway [installation name] > Configure
Console
3. In the installer screen, select Configure your existing installation.
4. Enter the license key if required.
5. Accept or modify the UI server and service mode screen values.
6. In the Governance Mode screen, select Central Governance.
7. In the CG connectivity screen, enter the Central Governance values.
8. Click Next and complete the configure procedure.
9. Once completed start Copilot, which automatically completes the registration process.
You can check in Central Governance to see that the Transfer CFT displays in the Product List.
Manually activate connectivityAll OS
This section describes how to manually modify the Transfer CFT configuration to enable Central Governance connectivity in command line.
Transfer CFT IBM i3.1.3 Installation Guide 86

4 Migrate and upgrade
Prerequisites 1. Stop Transfer CFT and Copilot if running.
2. Enabling Central Governance connectivity after an upgrade implies replacing any standalone connectors. Therefore, prior to connecting to Central Governance deactivate all previously activated connectors, for example PassPort AM, PassPort PS, and Sentinel.
3. Start a CFTUTIL command session, and then enter:
uconfunset id=am.type
uconfunset id=sentinel.xfb.enable
uconfset id=pki.type, value=cft
Note When running in a z/OS environment you must additionally set the am.passport.superuser with the user that will start the Copilot server.
4. Ensure that all UCONF values used to identify a Transfer CFT instance are defined. These parameters include:
l cft.full_hostname
l cft.instance_id
l cft.instance_group
From a CFTUTIL command session, use the format:
uconfset id=cft.instance_id, value=<cft_id>
You must set the UCONF parameter cg.configuration_policy if you want to override the default policy applied by Central Governance when you register a Transfer CFT in Central Governance.
ProcedureThe manual procedure consists of the following steps, which are detailed below:
1. Include certificates in the PKI database.
2. Set the UCONF parameter values for Central Governance.
3. Enable Central Governance.
4. Start Copilot.
Include certificatesYou must include the certificate authority that is used to validate communication with Central Governance in the PKI database. You can personalize this certificate on the Central Governance side, so be sure to use the correct iname in the pkicer command.
87 Installation Guide Transfer CFT IBM i3.1.3

Activate CentralGovernance connectivity
You can use any ID for this certificate. Transfer CFT uses the certificate ID defined in UCONF to communicate with Central Governance.
Note Modify the filename syntax to accommodate your specific platform.
PKIUTIL pkicer id = 'CG_CA',
iform = 'PEM',
iname = '$CFTPKIDIR/passportCA.pem',
itype = 'ROOT',
pkifname = '$CFTPKU',
pkipassw = 'CFT',
state = 'ACT',
mode = 'CREATE'
After inserting the correct certificate in the PKI database, define the UCONF variable cg.ca_cert_id. This value is required so that Transfer CFT knows which certificate to use when communicating with Central Governance.
From a CFTUTIL command session, enter:
uconfset id=cg.ca_cert_id, value='CG_CA'
Set UCONF valuesUse the Central Governance installation values for the following UCONF settings. Transfer CFT uses these values to identify Central Governance.
l cg.host
l cg.port
l cg.mutual_auth_port
l cg.shared_secret
From a CFTUTIL command session, enter:
uconfset id=cg.host, value=<host_value>
Enable Central GovernanceFrom a CFTUTIL command session, enter:
uconfset id=cg.enable, value=yes
Transfer CFT IBM i3.1.3 Installation Guide 88
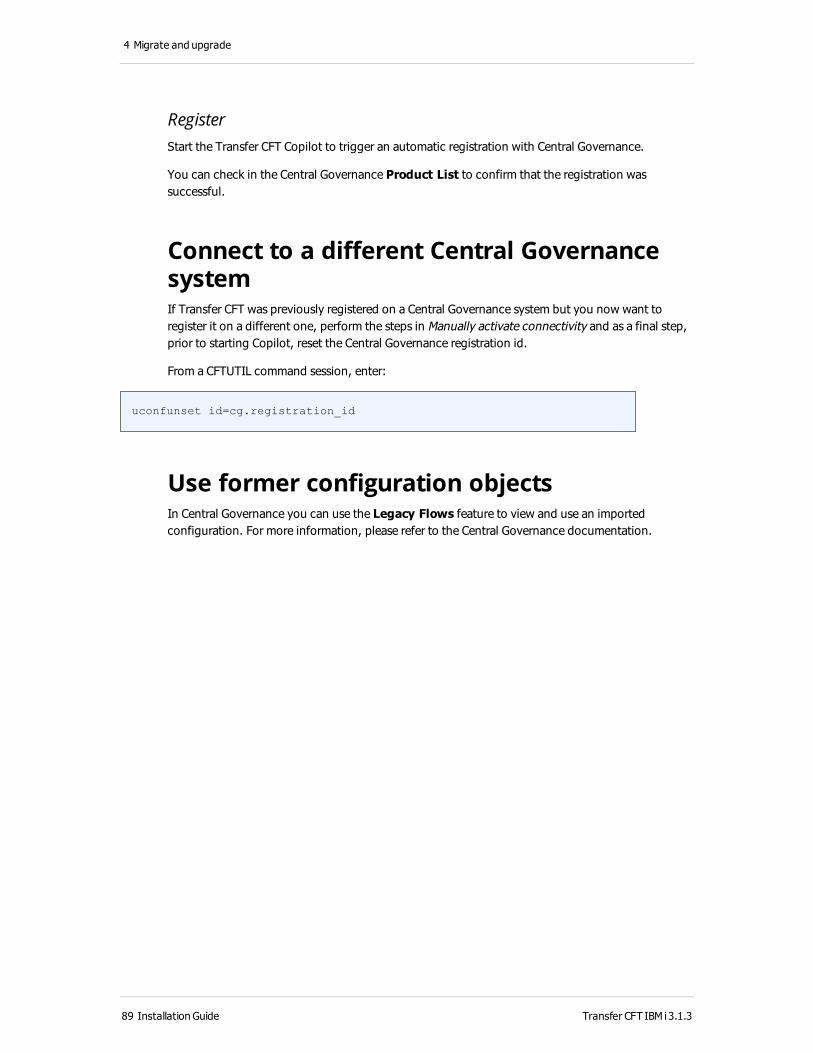
4 Migrate and upgrade
RegisterStart the Transfer CFT Copilot to trigger an automatic registration with Central Governance.
You can check in the Central Governance Product List to confirm that the registration was successful.
Connect to a different Central Governance systemIf Transfer CFT was previously registered on a Central Governance system but you now want to register it on a different one, perform the steps in Manually activate connectivity and as a final step, prior to starting Copilot, reset the Central Governance registration id.
From a CFTUTIL command session, enter:
uconfunset id=cg.registration_id
Use former configuration objectsIn Central Governance you can use the Legacy Flows feature to view and use an imported configuration. For more information, please refer to the Central Governance documentation.
89 Installation Guide Transfer CFT IBM i3.1.3

Activate CentralGovernance connectivity
View managed featuresAfter successfully upgrading and activating Central Governance connectivity, you can manage the following Transfer CFT features from Central Governance. The "Supported but not configurable" column lists features that you can retain, though you cannot manage them from the Central Governance interface.
Feature Manage using Central Governance
Supported but not configurable using Central Governance
Folder monitoring yes (1) yes
Multinode architecture no yes
CRONJOB no yes
Exits no yes
Network features
IPv6 yes yes
pTCP (UNIX/Windows only) yes yes
UDT (UNIX/Windows only) yes yes
SOCKS no yes
Heartbeat embedded yes
Interoperability
Secure Relay no yes
TrustedFile no yes (Not available on IBM i)
PassPort AM embedded no (2)
PassPort PS no yes
Sentinel embedded yes
Composer no no
Protocols
Transfer CFT IBM i3.1.3 Installation Guide 90

4 Migrate and upgrade
Feature Manage using Central Governance
Supported but not configurable using Central Governance
PeSIT yes yes
ODETTE no yes
EBICS no yes
1. IBM i and z/OS only support folder monitoring on UNIX file systems.
2. If you are performing a migration or upgrade from a previous version, you must migrate your PassPort AM.
Migrating Transfer CFT IBM iThis section describes the migration procedures for Transfer CFT 3.1.3 IBM i when migrating from:
l Version 2.4.x to 3.1.3
l Version 2.7.x to 3.1.3
l Version 3.0.1 to 3.1.3
OverviewTo perform a Transfer CFT IBM i migration from version 2.4.x to 3.1.3, you must migrate the following:
l Catalog
l Com file
l Part and parm
About catalog and com migration programsThe catalog and com migration requires the following:
l An intermediate file in XML format
l The version appropriate program:
o CFTMI240 utility for Transfer CFT 2.4.x (for 2.4.x catalogs and com file)
o CFTMI240 utility for Transfer CFT 2.7.x (for 2.7.x catalogs and com file)
o CFTMI utility for Transfer CFT 3.0.1 (for catalogs and com file)
l CFTMI utility Transfer CFT 3.1.3 (for catalogs and com file)
91 Installation Guide Transfer CFT IBM i3.1.3

Migrating Transfer CFT IBM i
Procedure overviewThe Transfer CFT migration is carried out in the following main steps:
l Generate an intermediate file from a 2.4.x, 2.7.x, 3.0.x catalog and com.
l Insert transfers from the intermediate file into the 3.1.3 catalog and com.
See Appendix B: Menu mapping on page 135 for the version by version menu mapping options.
Before you startIf you have not already done so, create catalog and com files:
1. Select option 2 CFTUTIL and press Enter.
2. Select option 4 All CFT commands and press Enter.
3. In the Transfer CFT command line, execute:
Input : cftfile type=cat,fname=cftprod/cat_new,recnb=5000
Input : cftfile type=com,fname=cftprod/com_new,recnb=1000
Generate an intermediate file from a 2.4.x, 2.7.x or 3.0.1 catalog and com 1. On the IBM i command line, execute the version appropriate program file. For example, for
version 2.4.x, enter:
call cftpgm/cftmi240
2. In the Transfer CFT command line execute:
Input :
migr
type=cat,direct=fromcat,ifname=CFTPROD/cat1,ofname=CFTPROD/inte_cat
Input :
migr
type=com,direct=fromcom,ifname=CFTPROD/com1,ofname=CFTPROD/inte_com
This generates two XML files called inte_cat and inte_com that contain the 2.4.x, 2.7.x, or 3.0.x catalog and com records.
Transfer CFT IBM i3.1.3 Installation Guide 92

4 Migrate and upgrade
Table 3. Example results for the catalog export
MI240>EXPORT 1 IDTU=A0000001 PART=BOUCLE IDF=TEST1 IDT=D0410013 STATE=T
EXPORT 2 IDTU=A0000002 PART=BOUCLE IDF=TEST2 IDT=D0410014 STATE=T
EXPORT 3 IDTU=A0000003 PART=BOUCLE IDF=TEST1 IDT=D0410013 STATE=T
EXPORT 4 IDTU=A0000004 PART=BOUCLE IDF=TEST2 IDT=D0410014 STATE=T
M24000I MIGR _ Correct
(type=CAT,direct=FROMCAT,ifname=CFTPROD/cat1,ofname=CFTPROD/inte_cat)
Table 4. Example results for the com export
MI240>EXPORT 1 NUMBLK 4 MTYPE=0 USERID=CFT
GROUPID= JOBNAME=QPADEV000758856 COMMAND=part=boucle,idf=test3,fname=
CFTPROD/test
EXPORT 2 NUMBLK 5 MTYPE=0 USERID=CFT
GROUPID= JOBNAME=QPADEV000758856 COMMAND=part=boucle,idf=test4,fname=
CFTPROD/test
M24000I MIGR _ Correct (type=COM,direct=FROMCOM,ifname=CFTPROD/COM1,
ofname=CFTPROD/inte_com)
Inserting transfers from the intermediate file to the 3.1.3 catalog and com 1. On the IBM i command line, execute (use the Transfer CFT 3.1.3 cftmi program):
call CFTPGM/cftmi
2. In the Transfer CFT command line, execute:
Input :
migr type=cat,direct=tocat,ifname=CFTPROD/inte_cat,ofname= CFTPROD/cat_new
MI240>CFTPROD/inte_cat:1: IMPORT 1 IDTU=A0000001 PART=BOUCLE IDF=TEST1
IDT=D0410013 STATE=X
CFTPROD/inte_cat:118: IMPORT 2 IDTU=A0000002 PART=BOUCLE IDF=TEST2
IDT=D0410014 STATE=X
CFTPROD/inte_cat:235: IMPORT 3 IDTU=A0000003 PART=BOUCLE IDF=TEST1
IDT=D0410013 STATE=X
CFTPROD/inte_cat:345: IMPORT 4 IDTU=A0000004 PART=BOUCLE IDF=TEST2
IDT=D0410014 STATE=X
M24000I MIGR _ Correct (type=CAT,direct=TOCAT,ifname=CFTPROD/inte_
93 Installation Guide Transfer CFT IBM i3.1.3

Migrating Transfer CFT IBM i
cat,ofname=CFTPROD/cat_new)
Input :
migr type=com,direct=tocom,ifname=CFTPROD/inte_com,ofname= CFTPROD/com_
new
MI240> CFTPROD/inte_com:1: IMPORT 1 MTYPE=0 USERID=CFT
GROUPID= JOBNAME=QPADEV000758856
COMMAND=part=boucle,idf=test3,fname=CFTPROD/test
CFTPROD/inte_com:7: IMPORT 2 MTYPE=0 USERID=CFT
GROUPID= JOBNAME=QPADEV000758856
COMMAND=part=boucle,idf=test4,fname=CFTPROD/test
M24000I MIGR _ Correct (type=COM,direct=TOCOM,ifname=CFTPROD/inte_
com,ofname=CFTPROD/COM_NEW)
About the part and parm migration
Extracting parameters 1. In Transfer CFT 2.4.x, 2.7.x, or 3.0.1 extract the current version parameters.
2. In IBM i command line execute:
l If 3.0.x is the current Transfer CFT version, execute: CRTPF FILE(CFTPROD/CONFIG30X) RCDLEN(132)
l If 2.7.x is the current Transfer CFT version, execute: CRTPF FILE(CFTPROD/CONFIG27X) RCDLEN(132)
l If 2.4.x is the current Transfer CFT version, execute: CRTPF FILE(CFTPROD/CONFIG24X) RCDLEN(132)
3. Select option 2 CFTUTIL in the CFT main menu and press Enter.
4. Select option 4 All CFT commands and press Enter.
5. In Transfer CFT command line, execute:
Input :
cftext fout=CFTPROD/config30x (if 3.0.x is CFT current version)
Or -
cftext fout=CFTPROD/config27x (if 2.7.x is CFT current version)
Or -
cftext fout=CFTPROD/config24x (if 2.4.x is CFT current version)
Transfer CFT IBM i3.1.3 Installation Guide 94

4 Migrate and upgrade
Updating the Transfer CFT 3.1.x the parm and part parametersOn the IBM i command line:
l If 3.0.x was the Transfer CFT version, execute: CFTUTIL PARAM('#CFTPROD/CONFIG30X(CONFIG30X)')
l If 2.7.x was the Transfer CFT version, execute: CFTUTIL PARAM('#CFTPROD/CONFIG27X(CONFIG27X)')
l If 2.4.x was the Transfer CFT version, execute: CFTUTIL PARAM('#CFTPROD/CONFIG24X(CONFIG24X)')
95 Installation Guide Transfer CFT IBM i3.1.3

5 Uninstall
To uninstall Transfer CFT in an IBM i environment, delete the following libraries:
l CFTPROD
l CFTPGM
In the HFS partition, remove:
l /home/cft/cft313/install
l /home/cft/cft313/runtime
Transfer CFT IBM i3.1.3 Installation Guide 96

5 Uninstall
97 Installation Guide Transfer CFT IBM i3.1.3

6 Troubleshooting
Using the support toolTo assist Axway Customer Support, the CFTSUPPORT command collects useful information from a Transfer CFT environment including the configuration, Unified Configuration parameters (UCONF), catalog information, log files, and so on. This information is then packaged and stored in a tar file in the specified IFS folder.
Collected information for the Transfer CFT Transfer CFT IBM i platform includes these different CFTPROD1/SUPOUT file members:
File Comment
ABOUT About information
CFTEXT CFT parameter extract
CFTOUT CFT jobs outputs
COPJLOG.CSV Primary Copilot QPJOBLOGs
COPJLOG2.CSV Secondary Copilot QPJOBLOGs
COPOUT Copilot jobs outputs
COPTRC Copilot traces
JLOG.CSV Primary CFT QPJOBLOGs
JLOG2.CSV Secondary CFT QPJOBLOGs
LISTCAT Brief listcat
LISTCATD Debug listcat
LISTCATF Full listcat
LISTCOM Listcom
LISTNODE Listnode
LISTPKI Listpki output
Transfer CFT IBM i3.1.3 Installation Guide 98

6 Troubleshooting
File Comment
LISTPKID Listpki debug output
LISTPKIF Listpki full output
LISTUCONF Listuconf output
Using the CFTSUPPORT commandThe CFTSUPPORT command executes the CFTSUPPORT program, which retrieves information about the Transfer CFT and stores it in a tar file.
You can use Transfer CFT IBM i command line to execute the command:
1. Enter the CFTSUPPORT command and press PF4.
2. Enter the IFS path where the CFTSUPPORT.tar file should be created. If the IFS path does not exist it will be created.
Note Alternatively, from the CFT menu select 3. Administration commands then 2. Submit CFT support request.
If the generated CFTSUPPORT.tar is too large, you can compress it prior to sending it to Axway support.
Example
In the following example the CFTSUPPORT.tar is created in /home/cft/cftsupport/.
CFTSUPPORT IFSPATH('/home/cft/cftsupport')
Tracking Transfer CFT IBM i activitiesTransfer CFT activities are tracked using the:
l Transfer CFT Catalog, which can be queried by CFTUTIL, Copilot, and CFTAPI
l Transfer CFT LOG, a file designated by the CFTLOG configuration command [A]FNAME parameter. This file contains, for example, INIT COMPLETE, SEND TREATED and SERVER SESSION OPENED
l Message queue echoing the Transfer CFT logging associated with the user designated by NOTIFY in the CFTLOG command:
l Specific values: NOTIFY='______' / NOTIFY='OP______'
l Echo level: OPERMSG= 0 to 255
When monitoring operating incidents, information may be logged in the:
99 Installation Guide Transfer CFT IBM i3.1.3

Tracking Transfer CFT IBM i activities
l Message queue that receives specific incident messages from the interface functions; by default, the function associated with the submitter user (same as NOTIFY='______')
l QSYSOPR message queue that receives messages generated by specific network or workmanagement commands, and any Transfer CFT file and data management error messages
l JOBLOG (history message queue and QPJOBLOG spool file), LOGCLPGM parameter in the *JOBD:
Logging level (0 to 4) (default = 4)
Severity level (00 to 99) (default = 50)
MSGQ > spool copy control (*MSG/*SECLVL/*NOLIST)(default = *NOLIST)
l Transfer CFT IBM i LOG (QHST) which records job start and end times, status changes for network objects and so on
l Interactive log file (DSPJOBLOG)
The output spool files (QPRINT) contain:
l CFTUTIL batch execution reports
l Messages corresponding to CFT logging, if Transfer CFT is run without a LOG file (without the CFTLOG command)
l Any internal CFT traces (MTRACE, PTRACE and FTRACE), a copy of the messages from the interface functions
l Any traces taken at function level
l Any network traces
l Reports from procedures submitted by Transfer CFT (see the transfer variables that can be retrieved as symbolic variables)
CFT ACCNT, accounting, the file designated by the CFTACCNT configuration command [A]FNAME parameter, is used to store information on all terminated transfers.
Note The file and data management systems display a system code (40000000 < SC < 5FFFFFFF) if an error is detected on transferred files. An associated error label, when it is not stored in any of the ways described above, can be retrieved from a file containing all CFT file management system error codes and labels:DSPPFM FILE (CFTPGM/FMDM3ERR).The hexadecimal value of the error code must be used in the search profile.
In the linesharing mode, unlike the exclusive mode, Transfer CFT checks the status of the line without implementing it. If the line is not operational, a message is displayed:
From.....: CFT 06/12/12 15:56:04CF1LX021 : This line is out of order.
After it has been implemented manually:
CF1LX021 line implemented.From.....: CFT 06/12/12 15:56:04CF1LX021 : Now this line is operational.
Transfer CFT IBM i3.1.3 Installation Guide 100

6 Troubleshooting
All messages stored in the log are described in the Transfer CFT 3.1.3 User's Guide subbook Messages and Codes. There are a few exceptions when messages are not stored in the log, for example messages that are selfexplanatory and OS related.
For more information, refer to the Transfer CFT documentation.
IFS access error codes: DIAGPError code Description
1 Kernel error
13 Invalid key
14 Invalid record address
15 File does not exist
16 Access not authorized
17 Inconsistent file structure
18 Record too big
19 Invalid record size
1A End of file reached
1B Record locked by another user
1C Record not locked
1D Record not found
1E Record already exists
1F Directory path error
20 File name error
21 File descriptor error
22 File not open
23 Invalid mode
101 Installation Guide Transfer CFT IBM i3.1.3

IFS access error codes: DIAGP
Error code Description
24 File access not authorized
25 Invalid file attribute(s)
26 Invalid access unit
27 System dependence error
28 Backspace not possible
29 File already open
2A File already exists
2B File read error
2C File write error
2D Secondary key duplicated
2E Empty file
2F Security attribute mismatch
30 File not empty
31 File access conflict
FF System error
Transfer CFT IBM i3.1.3 Installation Guide 102

6 Troubleshooting
103 Installation Guide Transfer CFT IBM i3.1.3

7 Appendix A: Use APIs
About APIsApplication Programming Interfaces, or APIs, are a set of functions that use a service. The service is followed by an application program.
Each of these services is described in one of the following sections, which provides an overview of the service. Applications can address requests to Transfer CFT via service call functions:
l Web services
l Using JPI
l Transfer services
l Synchronous communication services
l Catalog query services
The programming interfaces and programming language are related. The services can be called by programs in COBOL or in C language as described in this section.
About Transfer CFT servicesYou can query information related to correctly completed transfers. This information can be accessed in the communication structure.
A description of this structure subassembly is provided in the cftapi.h for the C language, and cftapi.cop for COBOL.
Restrictions l Visual Basic APIs are available on PCs only.
Catalog querying servicesThis service provides access to the Transfer CFT catalog entries, for querying and modification, and enables you to sort the selected catalog entries. Additionally, you can sort the current selection in memory.
Note The communication structure in Transfer CFT enables you to recuperate catalog fields, such as an identifier, that exceed 8 to 32 characters.
Transfer CFT IBM i3.1.3 Installation Guide 104

7 Appendix A: Use APIs
Function Use
OPEN Open catalog file
This function:
l Allocates the catalog file
l Opens the file
l Reserves an internal control block
l Initializes the internal block parameter
SELECT Specify the selection criteria
This function:
l Checks the syntax used
l Stores the selection criteria in the internal control block
SELECT240 Specify the selection criteria
This function:
l Is available in CFT v2.4 and higher
l Retrieves identifiers that are longer than 8 to 32 characters
l Checks the syntax used
l Stores the selection criteria in the internal control block
NEXT Read next entry in the catalog
This function:
l Reads the next entry
l Sets the "catalog entry data" area
The first call to this function must be preceded by a SELECT.
NEXT240 Read next entry in the catalog
This function:
l Is available in CFT v2.4 and higher
l Retrieves identifiers that are longer than 8 to 32 characters
l Reads the next entry
l Sets the "catalog entry data" area
Transfer CFT IBM i3.1.3 Installation Guide 105

7 Appendix A: Use APIs
Function Use
MODIFY Modify the state of the current catalog entry or delete this entry from the catalog
This function:
l Retrieves the last entry read from the internal control block
l Checks the state of this entry
l Sends the modification request to Transfer CFT
SORT Sort the selected catalog entries
This function:
l Close the catalog file
l Deallocates the file
l Frees the internal control block
l Resets the internal control block parameter
DO Execute the current selection and the requested sort in memory
CLOSE Close catalog file
Transfer servicesUse the transfer services to send transfer control commands to Transfer CFT, with or without a syntax analysis of these commands. The programming interface proposes a function integrating a syntax analysis of the command to detect any errors, at the source, and a function without syntax analysis, which provides a much smaller coding volume.
The transfer services functions:
l Check the validity of the command name
l Analyze the syntax of the command parameters, if the function using the syntax analyzer is used
l Place the command in the Transfer CFT communication medium
The processing performed by Transfer CFT is totally asynchronous.
The return code only provides an indication that the function has effectively been taken into account but does not necessarily mean that Transfer CFT has executed the command correctly. A return code indicating the success of the function only means that the command has been correctly placed in the communication medium.
Function Use
SEND Send transfer request: file, message or reply
Transfer CFT IBM i3.1.3 Installation Guide 106

7 Appendix A: Use APIs
Function Use
RECV Receive transfer request
HALT Interrupt one or more send or receive transfers with a given partner.
The interrupted transfers are set to the "H" state and can be restarted at the partner's request.
KEEP Suspend one or more send or receive transfers with a given partner.
The interrupted transfers are set to the "K" state and can only be restarted by a START command.
START Start one or more send or receive transfers
DELETE Delete a catalog entry and any transfer in process associated with it
END Set a transfer status to executed
The transfer is set to the "X" state. This indicates that endoftransfer procedure has been correctly executed.
SUBMIT Submit the endoftransfer procedure
SHUT Shut down Transfer CFT
SWITCH Switch monitoring files, LOG, STATS...
CLOSEAPI Free resources allocated at opening of communication medium: memory, network, file
COM Define communication medium
GETXINFO Retrieve information concerning the last transfer made from a synchronous request
Synchronous communication servicesThis topic describes Transfer CFT synchronous communication services.
Function Use
COM Set the communication medium
Transfer CFT IBM i3.1.3 Installation Guide 107

7 Appendix A: Use APIs
Function Use
GETXINFO Retrieve information concerning the last transfer made from a synchronous request after a request of the following types: SEND, RECV, HALT, KEEP, START, RESUME, DELETE, END, SUBMIT, SWITCH, PURGE.
The information is stored in a cftApiInftype structure:
l Transfer state
l Diagnostic
l Diagnostic protocol
l Value of the PART field of CFTPARM
l Transfer identifier (IDT)
l Local transfer identifier (IDTU)
l Transfer type (single, cyclical, diffusion list, collection, file group)
l Public reference of the transfer (only for a single transfer in Send)
The GETXINFO action returns an error if the communication medium is not synchronous.
Note The public reference of the transfer is a character string of variable length. In the PESIT protocol, it contains 'pi13.pi3.pi4.pi11.pi12.pi61.pi62'.
Using Web ServicesThis topic describes the Transfer CFT Web Services interface option. You can use Transfer CFT Web Services to access all of the main functions for managing a Transfer CFT, which include:
l Configuring Transfer CFT: create, modify, and view configuration objects
l Monitoring Transfer CFT: consult the log, the catalog, and transfer statistics
l Creating transfers: create a new file transfer, a message or transfer reply
The Web Services requests sent by the client are processed on the Transfer CFT Copilot server listening port.
To authorize the Web Services option on any version of Transfer CFT, you require a license key for the product. To request a key, contact your Axway sales representative.
Transfer CFT is delivered with a WSDL1 file. The WSDL file describes the operations, and operation attributes, as well as the request and response structure.
l For more information on WSDL, visit http://www.w3schools.com/wsdl/
l For more information on SOAP, visit http://www.w3schools.com/soap/
1Web Services Description Language
Transfer CFT IBM i3.1.3 Installation Guide 108

7 Appendix A: Use APIs
From the WSDL file, you can automatically generate a Web Services client. You can use an open source web service Java toolkit, for example Axis from the Apache Software Foundation, to create this Web Services client. For information on Axis, visit http://ws.apache.org/axis.
General restrictionsThe Web Services process can receive any SOAP request that conforms to the W3C specifications and WSI Recommendations.
The following restrictions apply to Transfer CFT Web services:
l The time zone offset is not supported for XSD types Time and DateTime.
l Element attributes are not supported, nor parsed. This means that if there are incorrect spaces in names for any operation attribute or message, they are skipped and no error is returned. Exceptions are made to support WSI recommendations.
WS-I recommendationsCheck that the correct option is set if your client requests have to be checked to conform to WSI recommendations. To do this, set the UCONF [copilot.webservices.wsicomplience] identifier to yes.
The following WSI constraints are checked by the GUI server for the XML representation of SOAP messages. These constraints include:
l SOAP Header constraints:
o R1009: A MESSAGE MUST NOT contain processing instructions
o R1012: A MESSAGE MUST be serialized as either UTF8 or UTF16
l SOAP Body constraints:
o R1006: A MESSAGE MUST NOT contain soap:encoding
l Style attributes on any element that is a child of soap:Body
o R1007: A MESSAGE described in an rpcliteral binding MUST NOT contain soap:encodingStyle attribute on any elements that are grandchildren of soap:Body
o R1014: The children of the soap:Body element in a MESSAGE MUST be namespace qualified
For more information on WSI recommendations, visit http://www.wsi.org
Use the Transfer CFT JPITransfer CFT delivers a java programming package in its installation folder. This package includes JPI requests, java configuration examples, and documentation necessary to perform local or remote monitoring via logs, transfer requests and control.
Note As of SP8, you can retrieve a transfer that is in the pre, post, or ack processing state. See the Transfer JPI documentation for details.
The JPI package is located at: <installation_directory>\home\distrib\jpi
Transfer CFT IBM i3.1.3 Installation Guide 109

7 Appendix A: Use APIs
Use the Transfer CFT JPITransfer CFT delivers a java programming package in its installation folder. This package includes JPI requests, java configuration examples, and documentation necessary to perform local or remote monitoring via logs, transfer requests and control.
Note As of SP8, you can retrieve a transfer that is in the pre, post, or ack processing state. See the Transfer JPI documentation for details.
The JPI package is located at: <installation_directory>\home\distrib\jpi
Use Transfer CFT services in CThis book begins with this topic which provides information about using the Transfer CFT services in C language. This book also contains topics that describe how to use the following services in C language.
This topic describes the Transfer CFT programming interface. The programming interface is implemented by the calling application module link, with the Transfer CFT interface function modules.
The library of object modules supplied provides everything the programmer can requires.
This library also contains the file cftapi.h to be included in the application using the Transfer CFT programming interfaces.
Call syntax
Syntax rc = cftxx (verb,&ptr,param)
Element Definition
cftxx cftai: simple Transfer CFT catalog querying services
cftaix: extended Transfer CFT catalog querying services
cftau: transfer services with syntax analysis
cftac: transfer services without syntax analysis
verb Service requested
ptr Address of the internal control block
param Parameters specific to the requested service
rc Return code
Transfer CFT IBM i3.1.3 Installation Guide 110

7 Appendix A: Use APIs
RestrictionsThe cftau function must not be called from an ASIT exit.
Return codesThe return codes are returned by the programming interfaces in the form of mnemonics.
Note It is strongly recommended that you test the return codes of services provided by the Transfer CFT programming interfaces through mnemonics. The corresponding values may change without notice.
The return codes are listed in the cftapi.h source file.
Use Transfer CFT services in CThis book begins with this topic which provides information about using the Transfer CFT services in C language. This book also contains topics that describe how to use the following services in C language.
This topic describes the Transfer CFT programming interface. The programming interface is implemented by the calling application module link, with the Transfer CFT interface function modules.
The library of object modules supplied provides everything the programmer can requires.
This library also contains the file cftapi.h to be included in the application using the Transfer CFT programming interfaces.
Call syntax
Syntax rc = cftxx (verb,&ptr,param)
Element Definition
cftxx cftai: simple Transfer CFT catalog querying services
cftaix: extended Transfer CFT catalog querying services
cftau: transfer services with syntax analysis
cftac: transfer services without syntax analysis
verb Service requested
ptr Address of the internal control block
param Parameters specific to the requested service
rc Return code
Transfer CFT IBM i3.1.3 Installation Guide 111

7 Appendix A: Use APIs
RestrictionsThe cftau function must not be called from an ASIT exit.
Return codesThe return codes are returned by the programming interfaces in the form of mnemonics.
Note It is strongly recommended that you test the return codes of services provided by the Transfer CFT programming interfaces through mnemonics. The corresponding values may change without notice.
The return codes are listed in the cftapi.h source file.
About cftapi2The catalog functions enable you to query and modify the catalog. These functions also include a method to recover information about the Transfer CFT that is using the catalog.
Additionally, the API catalog supports 32 character identifiers and 512 character file names.
Data structureThe data structures that are used by the API are as follows:
l Current session in progress: CftApi2Session
l Catalog: CftApi2Catalog
l Selection: CftApi2Selection
l Saved catalog record: CftApi2Record
The programmer can set pointers to these data structures. These are then allocated and initialized by the API.
API functions
Service CftApi2Session *ipcai2_initialize ()
Definition Initializes the API.
Parameter None.
Return value This function returns a pointer to the CFTApi2Session. If the returned value is NULL, the session cannot be initialized.
Transfer CFT IBM i3.1.3 Installation Guide 112

7 Appendix A: Use APIs
Service long ipcai2_get_errno(CftApi2Session * session)
Definition Recuperates the latest error code.
Parameter session: Pointer to the CftApi2Session is returned by the initialization function ipcai2_initialize()
Return value
The last error code for the API for this session.
Remarks This function can be used after all calls to the API except for ipcai2_initialize() and ipcai2_finalize().
Service long ipcai2_get_errno_str(CftApi2Session * session, char *buffer, int bufflen)
Definition Recuperates the error message.
Parameter session: Pointer to the CftApi2Session structure is returned by the initialization function ipcai2_initialize()buffer: The buffer that will be informed of the error message. bufflen: Length of the buffer sent to the API.
Return value If the return code is positive, it contains the last error code for the API for this session.
If the Return code is negative, the buffer is too short. If this happens, and the code is equal to –n where n is equal to the required length.
Remarks This function can be used after all calls to the API except for ipcai2_initialize() and ipcai2_finalize().
Service long ipcai2_finalize(CftApi2Session * session)
Definition Closes the API.
Parameter session: Pointer to the CftApi2Session structure returned by the initialization function ipcai2_initialize()
Return value
None.
Remarks None.
Transfer CFT IBM i3.1.3 Installation Guide 113

7 Appendix A: Use APIs
Service CftApi2Catalog *ipcai2_catalog_open(CftApi2Session * session, char *catalog_fname)
Definition Opens the Transfer CFT catalog file.
Parameter session: Pointer to the CftApi2Session structure returned by the initialization ipcai2_initialize()catalog_fname: Name of the catalog file. If the file name is "" the API opens the catalog file by default, for example _CFTCATA for Transfer CFTUNIX.
Return value This function returns a pointer to the CftApi2Catalog structure. If the returned value is NULL, the catalog cannot be opened and the error code is returned by calling ipcai2_get_errno().
Remarks None
Service long ipcai2_catalog_reload_cache(CftApi2Catalog *catalog)
Definition Reloads the catalog cache.
Parameter catalog: Pointer to the catalog returned by ipcai2_catalog_open()
Return value None.
Remarks None.
Service long ipcai2_catalog_close(CftApi2Catalog * catalog
Definition Closes the catalog.
Parameter catalog: Pointer to the catalog returned by ipcai2_catalog_open()
Return value Calling ipcai2_get_errno() ou ipcai2_get_errno_str() enables you to recuperate the return code for this function.
Remarks None.
Service CftApi2Selection *ipcai2_catalog_selection_new(CftApi2Catalog *catalog)
Definition New selection in the catalog.
Parameter catalog: The pointer to the catalog returned by ipcai2_catalog_open()
Transfer CFT IBM i3.1.3 Installation Guide 114

7 Appendix A: Use APIs
Return value
This function returns a pointer to a CftApi2Selection structure. If the returned value is NULL the selection cannot be initialized and an error code is returned by calling ipcai2_get_errno().
Remarks None.
Service long ipcai2_catalog_selection_ref(CftApi2Selection *selection)
Definition References a selection.
Parameter Selection: The pointer for the selected structure returned by calling ipcai2_catalog_selection_new()
Return value
Negative or null: Error, recuperated the error code from ipcai2_get_errno() or ipcai2_get_errno_str().Positive: Total number of sessions referenced after this call.
Remarks A selection can be referenced several times, and must be referenced at least one time before it is used.
Service long ipcai2_catalog_selection_set(CftApi2Selection * selection, char *param, char *value)
Definition Initializes a parameter selection.
Parameter selection: Pointer for the selected structure referenced by ipcai2_catalog_selection_ref()param: Modify selection parameter. Selection parameter available in cftapi2.h under “Selection parameters” section: CFTAPI2_SELECTION_*value: Parameter value in a character string
Return value
None.
Remarks None.
Service long ipcai2_catalog_selection_next(CftApi2Selection *selection)
Definition Executes a selection.
Parameter selection: Pointer for the selection is referenced by ipcai2_catalog_selection_ref()
Transfer CFT IBM i3.1.3 Installation Guide 115

7 Appendix A: Use APIs
Return value
A call to ipcai2_get_errno() ou ipcai2_get_errno_str() enables you to recover the return code for this function.
Remarks None.
Service long ipcai2_catalog_record_get(CftApi2Selection * selection, char *param, char *buffer, int bufflen)
Definition Recovers a saved field from the selected catalog.
Parameter selection: Pointer for the selection structure is referenced by ipcai2_catalog_selection_ref().param: Parameter to be recovered. The parameter to be recovered is available in cftapi2.h in the “Catalog record fields” section: CFTAPI2_RECORD_*buffer: Buffer that will be informed with the parameter valuebufflen: Length of the buffer sent by the API
Return value
If the Return code is positive it contains the last API error code for this session. If the return code is negative, the buffer is too short and the code is equal to –n where n is the required length for the buffer.
Remarks None.
Service long ipcai2_catalog_selection_unref(CftApi2Selection *selection)
Definition Delists a selection.
Parameter selection: Pointer to a selection structure that references ipcai2_catalog_selection_ref()
Return value
Negative: Error, recovered the error code by calling ipcai2_get_errno() or ipcai2_get_errno_str()Null: Okay, and no other referred sessions.Positive: Total number of referred sessions after this call.
Remarks None
Service long ipcai2_catalog_selection_delete(CftApi2Selection *selection)
Definition Deletes a selection.
Transfer CFT IBM i3.1.3 Installation Guide 116
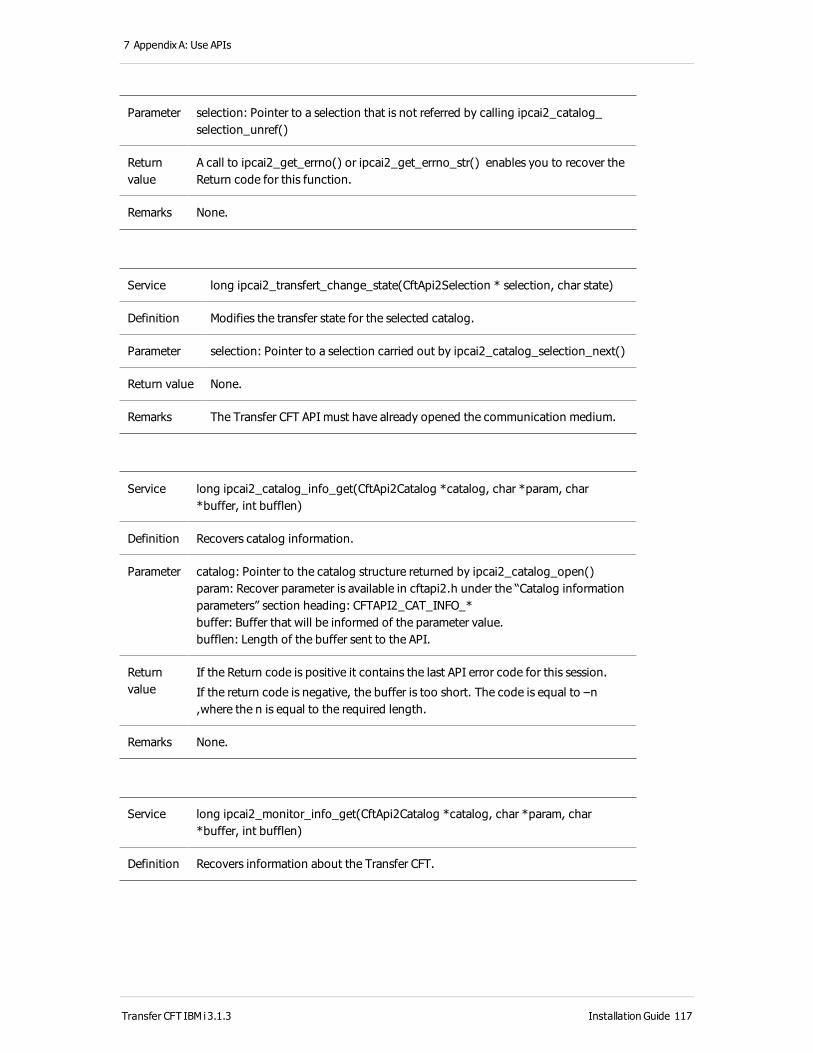
7 Appendix A: Use APIs
Parameter selection: Pointer to a selection that is not referred by calling ipcai2_catalog_selection_unref()
Return value
A call to ipcai2_get_errno() or ipcai2_get_errno_str() enables you to recover the Return code for this function.
Remarks None.
Service long ipcai2_transfert_change_state(CftApi2Selection * selection, char state)
Definition Modifies the transfer state for the selected catalog.
Parameter selection: Pointer to a selection carried out by ipcai2_catalog_selection_next()
Return value None.
Remarks The Transfer CFT API must have already opened the communication medium.
Service long ipcai2_catalog_info_get(CftApi2Catalog *catalog, char *param, char *buffer, int bufflen)
Definition Recovers catalog information.
Parameter catalog: Pointer to the catalog structure returned by ipcai2_catalog_open()param: Recover parameter is available in cftapi2.h under the “Catalog information parameters” section heading: CFTAPI2_CAT_INFO_*buffer: Buffer that will be informed of the parameter value. bufflen: Length of the buffer sent to the API.
Return value
If the Return code is positive it contains the last API error code for this session.
If the return code is negative, the buffer is too short. The code is equal to –n ,where the n is equal to the required length.
Remarks None.
Service long ipcai2_monitor_info_get(CftApi2Catalog *catalog, char *param, char *buffer, int bufflen)
Definition Recovers information about the Transfer CFT.
Transfer CFT IBM i3.1.3 Installation Guide 117
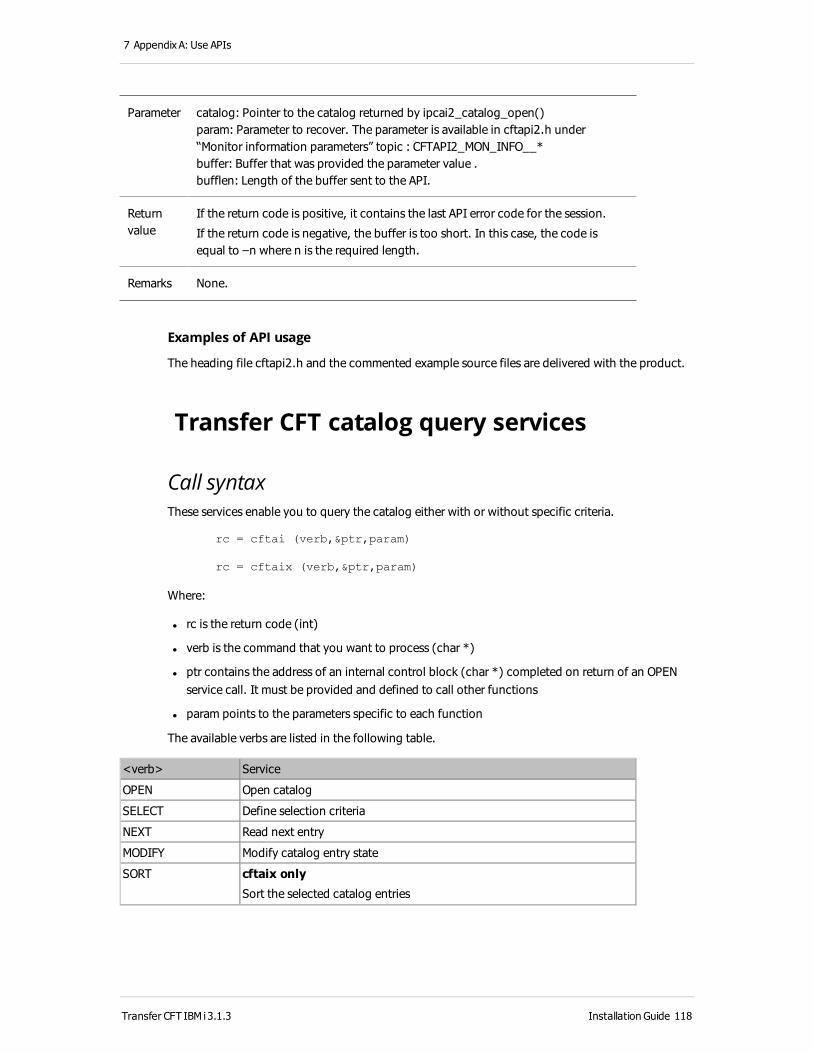
7 Appendix A: Use APIs
Parameter catalog: Pointer to the catalog returned by ipcai2_catalog_open()param: Parameter to recover. The parameter is available in cftapi2.h under “Monitor information parameters” topic : CFTAPI2_MON_INFO__*buffer: Buffer that was provided the parameter value .bufflen: Length of the buffer sent to the API.
Return value
If the return code is positive, it contains the last API error code for the session.
If the return code is negative, the buffer is too short. In this case, the code is equal to –n where n is the required length.
Remarks None.
Examples of API usage
The heading file cftapi2.h and the commented example source files are delivered with the product.
Transfer CFT catalog query services
Call syntaxThese services enable you to query the catalog either with or without specific criteria.
rc = cftai (verb,&ptr,param)
rc = cftaix (verb,&ptr,param)
Where:
l rc is the return code (int)
l verb is the command that you want to process (char *)
l ptr contains the address of an internal control block (char *) completed on return of an OPEN service call. It must be provided and defined to call other functions
l param points to the parameters specific to each function
The available verbs are listed in the following table.
<verb> Service
OPEN Open catalog
SELECT Define selection criteria
NEXT Read next entry
MODIFY Modify catalog entry state
SORT cftaix only
Sort the selected catalog entries
Transfer CFT IBM i3.1.3 Installation Guide 118

7 Appendix A: Use APIs
DO cftaix only
Do the current selection and the requested sort in memory
CLOSE Close catalog
The available <param> are listed in the following table.
<verb> <param> Explanation
OPEN cat Path name or logical name of the catalog file. If the name is blank, Transfer CFT uses a default name.
SELECT
and SELECT240
&cftsel Selection criteria according to the format described in the "Selection data description" in the cftapi.h file.
l cftsel230T for SELECT service
l cftsel240T for SELECT240 service
All the fields must be defined by leftaligned character strings. If a field is equal to binary zeros, it is considered not selective.
This structure can contain:
l The size of the selection criteria field (slength) and the size of the field supporting the catalog entry (clength) in order to avoid recompiling the application program if these two fields are extended.
l The transfer start and end date (BDATE and EDATE) to select transfers performed between these two dates.
l A field can be composed of a mask with the special characters "?" and *". The "?" character replaces any character. The "*" character replaces a character string of any length.
Examples: A*D replaces ABCD, ABCED or AID A??D replaces ABCD, AXYD or AQZD *CD replaces ABECD, YXZCDor TYUICD ?CD replaces ACD, XCD or ZCD ?B* replaces ABCDEF, XBZWEO or *KBWXCV ???? replaces ABCD, XYZW or HGFD
You should initialize the following:
l The param field to binary zero before defining it
l The slength and clength by "itoa()"
cftaix only
The selection is only taken into account at the time the DO service is called.
Transfer CFT IBM i3.1.3 Installation Guide 119

7 Appendix A: Use APIs
NEXT
and
NEXT240
&cftcat Next catalog entry according to the format described in the "Selection data description" in the cftapi.h file.
l cftcatT for NEXT service
l cftcat240T for NEXT240 service
MODIFY &nstate New state of a transfer to be placed in the catalog entry previously read:
l ‘D’ at Disposal: only valid if the former state is H or K
l ‘H’ Hold: only valid if the former state is D, C or K
l ‘K’ Keep: only valid if the former state is D, C or H
l ‘X’ eXecuted: only valid if the former state is T
l ‘P’ Purge: deletes the catalog entry*. It is only valid if the current state is D, H, K, T or X
SORT param cftaix only
Sort options as described in the "Sort structure of the selected catalog entries" in the cftapi.h file.
The function is only taken into account at the time the DO service is called.
DO " "
CLOSE " "
Return codesThe following return codes apply to all services.
Mnemonic Description
CAPI_NOERR No error
CAPI_FUNC_UNDEF Command not valid or service refused by the operating security system
CAPI_INT_PTR <ptr> parameter invalid
OPEN code only
CAPI_MEM_GET Memory allocation error
CAPI_CAT_ALLOC cftai only
Catalog file allocation error
CAPI_CAT_OPEN Catalog file opening problem
SELECT code only
CAPI_SEL_DIRECT DIRECTION criterion incorrect
CAPI_SEL_TYPE TYPE criterion incorrect
CAPI_SEL_STATE STATE criterion incorrect
CAPI_CAT_EMPTY Catalog empty
Transfer CFT IBM i3.1.3 Installation Guide 120

7 Appendix A: Use APIs
CAPI_CAT_SELECT cftaix only
Selection incorrect
CAPI_SEL_DATE EDATE value < BDATE value
CAPI_SEL_FDATE FDATE criterion incorrect
CAPI_SEL_CDATE CDATE criterion incorrect
CAPI_SEL_BDATE BDATE criterion incorrect
CAPI_SEL_DATE EDATE criterion incorrect
NEXT code only
CAPI_CAT_EOF End of catalog file
CAPI_CAT_READ Catalog file read error
MODIFY code only
CAPI_CAT_MODIFY cftaix only
Modification error
CAPI_MOD_OSTATE State invalid
CAPI_MOD_NSTATE Requested new state incorrect
CAPI_INT_ERR2 Internal error
CAPIO_COM_OPEN Communication medium opening error
CAPI_COM_WRITE Communication medium write error
CAPI_COM_CLOSE Communication medium closing problem
SORT code only (cftaix only)
CAPI_CATSORT sort incorrect
DO code only (cftaix only)
CAPI_CAT_CLOSE Error on closing the catalog
CAPI_CAT_OPEN Error on opening the catalog
CAPI_CAT_EMPTY Catalog empty or no record selected
CAPI_ERREXEC Execution error
CLOSE code only
CAPI_MEM_FREE Memory deallocation error
CAPI_CAT_FREE Catalog file deallocation error
CAPI_CAT_CLOSE Catalog file closing error
Synchronous communication services
Call syntaxrc = cftau (verb,param)
rc = cftac (verb,param)
Where:
Transfer CFT IBM i3.1.3 Installation Guide 121

7 Appendix A: Use APIs
l cftau indicates that syntax analysis is requested cftac indicates that syntax analysis is not requested
l <verb> is the command that you want to process
l <param> is a character string of variable length that contains the command parameters. The end of the field is defined by a character initially set to lowvalue
l <rc> is the return code
The available <verbs> are listed in the following table.
<verb> Service
COM Communication mode
GETXINFO Retrieving information about a transfer made from a synchronous request
The available <param> are listed in the following table.
<verb> <param> Description
com
param
The COM command parameter structure is as follows: <medium type> = <Medium name>
The medium type consists in an uppercase letter:
l 'F' for file
l 'M' for mailbox
l 'T' for the TCP/IP synchronous medium
l 'C' for the configuration file (ConfigFileName)
The medium name is the:
l Filename, if the medium type is 'F'
l Mailbox name, if the medium type is 'M'
l Name of the communication channel, if the medium type is 'T'
l Name of the configuration file containing the medium of communication characteristics, if the medium type is C.
getxinfo xinf Information about a transfer in the format described in the cftapi.h file.
Step procedureUse the COM command to define the synchronous medium.
Transfer CFT IBM i3.1.3 Installation Guide 122

7 Appendix A: Use APIs
1. Open the synchronous communication.
cftau ("COM",C=<configuration file>);
configuration file is a text file that contains the following lines :
# TCP/IP COMMUNICATION
TYPE = TCP
NAME = xhttp://localhost:<COM Synchron port value>
TIMEOUT = <timeout to reach>
2. Write the command. This is not specific to synchronous mediums.
cftau (verb,param)
3. Retrieve information using the GETXINFO service.
cftApiInfT cftinfo;
cftau("GETXINFO",(char*) &cftinfo);
To view the synchronous communication template containing details and an example, see tcftsyn.
Return codes
Mnemonic Description
CAPI_NOERR No error.
CAPI_FUNC_UNDEF Command not valid.
CAPI_COM_OPEN Communication medium opening error.
CAPI_COM_WRITE Communication medium write error.
CAPI_COM_CLOSE Communication medium closing problem.
CAPI_COM_ALLOC Communication medium allocation problem.
CAPI_COM_ERR Communication medium not available on this system.
Transfer servicesTransfer services allow actions to be taken on transfers with the security system performing an authorization check when the request is submitted, and not when the request is processed by the monitor, the behavior of unprotected IPC with an error message in the log file.
Transfer CFT IBM i3.1.3 Installation Guide 123

7 Appendix A: Use APIs
The application can detect commands that do not have permission for access. This lightens the workload, improving Transfer CFT performance, and reducing the cluttering of the communication medium by invalid requests.
Call syntax rc = cftau (verb,param)
rc = cftac (verb,param)
Where:
l cftau indicates that syntax analysis is requested
l cftac indicates that syntax analysis is not requested
l <verb> is the command that you want to process
l <param> is a character string of variable length that contains the command parameters. The end of the field is defined by a character initially set to lowvalue
l <rc> is the return code
The available <verbs> are listed in the following table.
<verb> Service
SEND Send
RECV Receive
HALT Interrupt
KEEP Suspend
START Retry
DELETE Delete
END Proceed to "X" state
SUBMIT Resubmit endoftransfer procedure
SHUT Stop monitor
SWITCH Switching monitoring files (log, statistics file)
COM
If <param> is not defined, CFTU will take a default name.
As these media are not available on all systems, the function performs an availability check.
Transfer CFT IBM i3.1.3 Installation Guide 124

7 Appendix A: Use APIs
The security check is performed on the user name, and the user group if applicable, depending on the command:
l IDF if present in parameter field: DELETE, END, HALT, KEEP, SEND, RECV, START
l Procedure name: SUBMIT
l Type: SWITCH LOG or ACCNT
Return codes
Mnemonic Description
CAPI_NOERR No error
CAPI_FUNC_UNDEF Command not valid
CAPI_CMD_LENGTH cftau only
Transfer CFT command string invalid, does not exist, or greater than 1024 characters long
CAPI_KEY_NAME cftau only
Command syntax incorrect: keyword name incorrect
CAPI_KEY_VALUE cftau only
Command syntax incorrect: keyword value incorrect
CAPI_MEM_GET Memory allocation error
CAPI_MEM_FREE Memory deallocation error
CAPI_INT_ERR1 Internal error 1
CAPI_INT_ERR2 Internal error 2
CAPI_INT_ERR3 Internal error 3
Error messagesThe FIELD and MSG fields of the CFTAPI COPY CLAUSE contain:
l FIELD: name of the incorrect parameter detected by the Transfer CFT syntax analyzer
l MSG:
o Either a message relative to the error recognized by the syntax analyzer
o Or an error message describing an incident when the command is taken into account
If no error is detected, the FIELD and MSG fields are blank.
Transfer CFT IBM i3.1.3 Installation Guide 125

7 Appendix A: Use APIs
Use Transfer CFT services in COBOLThis book begins with this topic which provides information about using the Transfer CFT services in COBOL.
The programming interface is implemented by the calling application module link, with the Transfer CFT interface function module or modules.
The library of modules supplied provides everything programmers can require.
This library also contains a programming example and the following COPY CLAUSE: CFTAPI to be included in the application which uses the Transfer CFT programming interfaces.
Call syntax
CALL CFTx USING <verb> <blk> <param> <rc>
Where:
l CFTx indicates:
l CFTI: Transfer CFT catalog querying services
l CFTU: transfer services with syntax analysis
l CFTC: transfer services without syntax analysis
l <verb> is the command you want to process
l <blk> is the internal control block
l < is a character string of variable length that contains the function parameters>param
l <rc> is the return code
The variables described in this documentation are defined in the cftapi.cop file supplied in the library of delivered modules. The programming example and the corresponding COPY files are shipped with the product.
Return codesThe return codes are returned by the programming interfaces in the form of mnemonics.
Note It is strongly recommended that you test the return codes of services provided by the Transfer CFT programming interfaces through mnemonics, the corresponding values being able to change without notice.
The return codes are listed in the cftapi.cop source file.
Transfer CFT IBM i3.1.3 Installation Guide 126

7 Appendix A: Use APIs
Use Transfer CFT services in COBOLThis book begins with this topic which provides information about using the Transfer CFT services in COBOL.
The programming interface is implemented by the calling application module link, with the Transfer CFT interface function module or modules.
The library of modules supplied provides everything programmers can require.
This library also contains a programming example and the following COPY CLAUSE: CFTAPI to be included in the application which uses the Transfer CFT programming interfaces.
Call syntax
CALL CFTx USING <verb> <blk> <param> <rc>
Where:
l CFTx indicates:
l CFTI: Transfer CFT catalog querying services
l CFTU: transfer services with syntax analysis
l CFTC: transfer services without syntax analysis
l <verb> is the command you want to process
l <blk> is the internal control block
l < is a character string of variable length that contains the function parameters>param
l <rc> is the return code
The variables described in this documentation are defined in the cftapi.cop file supplied in the library of delivered modules. The programming example and the corresponding COPY files are shipped with the product.
Return codesThe return codes are returned by the programming interfaces in the form of mnemonics.
Note It is strongly recommended that you test the return codes of services provided by the Transfer CFT programming interfaces through mnemonics, the corresponding values being able to change without notice.
The return codes are listed in the cftapi.cop source file.
Transfer CFT IBM i3.1.3 Installation Guide 127

7 Appendix A: Use APIs
Transfer CFT catalog query services
Call syntax
CALL "CFTI" USING <verb> <blk> <param> <rc>
Where:
l <verb> is the command that you want to process
l <blk> is a Transfer CFT specific field that must not be changed by the application
l <param> is a character string of variable length that contains the command parameters. The end of the field is defined by a character initially set to lowvalue
l <rc> is the return code
The available <verbs> are listed in the following table.
<verb> Value Service
FOPEN OPEN Open catalog
FSELECT SELECT Define selection criteria
FNEXT NEXT Read next entry
FMODIFY MODIFY Modify catalog entry state
FCLOSE CLOSE Close catalog
The available <param> are listed in the following table.
<verb> <param> Explanation
FOPEN DCAT Path name or logical name of the catalog file. If the name is blank, Transfer CFTI uses a default name.
Transfer CFT IBM i3.1.3 Installation Guide 128

7 Appendix A: Use APIs
<verb> <param> Explanation
FSELECT ZSEL Selection criteria according to the format described in the "Selection data description" in the cft.apicop file. If a field is blank or equal to binary zeros, it is considered not selective.
This field can contain:
l the size of the selection criteria field (SLENTGTH) and the size of the field supporting the catalog entry (CLENGTH) in order to avoid recompiling the application program if these two fields are extended.
l the transfer start and end date (BDATE and EDATE) to select transfers performed between these two dates.
l a mask with the special characters "?" and *". The "?" character replaces any character. The "*" character replaces a character string of any length.
Examples: A*D replaces ABCD, ABCED or AID A??D replaces ABCD, AXYD or AQZD *CD replaces ABECD, YXZCDor TYUICD ?CD replaces ACD, XCD or ZCD ?B* replaces ABCDEF, XBZWEO or *KBWXCV ???? replaces ABCD, XYZW or HGFD
FNEXT ZCAT Next catalog entry according to the format described in the "Selection data description" in the cft.apicop file.
The length of this field is defined by the SELECT service. See the CLENGTH field in the Selection data description.
FMODIFY MSTATE New state of a transfer to be placed in the catalog entry previously read:
l ‘D’ at Disposal: only valid if the former state is H or K
l ‘H’ Hold: only valid if the former state is D, C or K
l ‘K’ Keep: only valid if the former state is D, C or H
l ‘X’ eXecuted: only valid if the former state is T
l ‘P’ Purge: deletes the catalog entry
FCLOSE No <param> needed
Transfer CFT IBM i3.1.3 Installation Guide 129

7 Appendix A: Use APIs
Return codesThe return codes listed below apply to all services.
Mnemonic Description
CAPINOERR No error
CAPIFUNCUNDEF Command not valid
CAPIINTBLK <blk> parameter invalid
OPEN code only
CAPIMEMGET Memory allocation error
CAPICATALLOC Catalog file allocation error
CAPICATOPEN Catalog file opening problem
SELECT code only
CAPISELDIRECT DIRECTION criterion incorrect
CAPISELTYPE TYPE criterion incorrect
CAPISELSTATE STATE criterion incorrect
CAPICATEMPTY Catalog empty
CAPISELDATE EDATE value < BDATE value
CAPISELFDATE FDATE criterion incorrect
CAPISELCDATE CDATE criterion incorrect
CAPISELBDATE BDATE criterion incorrect
CAPISELDATE EDATE criterion incorrect
NEXT code only
CAPICATEOF End of catalog file
CAPICATREAD Catalog file read error
MODIFY code only
CAPIMODOSTATE State invalid
CAPIMODNSTATE Requested new state incorrect
CAPIINTERR2 Internal error
CAPIOCOMOPEN Communication medium opening error
CAPICOMWRITE Communication medium write error
CAPICOMCLOSE Communication medium closing problem
CLOSE code only
CAPIMEMFREE Memory deallocation error
CAPICATFREE Catalog file deallocation error
CAPICATCLOSE Catalog file closing error
Transfer CFT IBM i3.1.3 Installation Guide 130

7 Appendix A: Use APIs
Synchronous communication services
Call syntax
CALL "CFTU" USING <verb> <param> <rc>
CALL "CFTC" USING <verb> <param> <rc>
Where:
l CFTU indicates that syntax analysis is requested CFTC indicates that syntax analysis is not requested
l <verb> is the command that you want to process
l <param> is a character string of variable length that contains the command parameters. The end of the field is defined by a character initially set to lowvalue
l <rc> is the return code
The available <verbs> are listed in the following table.
<verb> Value Service
FCOM COM Communication mode
The available <param> are listed in the following table.
<verb> <param> Explanation
FCOM DCOM The COM command parameter structure is as follows: <medium type> = <Medium name>
The medium type consists in an uppercase letter:
l 'F' for file
l 'M' for mailbox
l 'T' for the TCP/IP synchronous medium
l 'C' for the configuration file (ConfigFileName)
The medium name is the:
l Filename, if the medium type is 'F'
l Mailbox name, if the medium type is 'M'
l Name of the communication channel, if the medium type is 'T'
l Name of the configuration file containing the medium of communication characteristics, if the medium type is C.
Transfer CFT IBM i3.1.3 Installation Guide 131

7 Appendix A: Use APIs
Return codes Mnemonic Description
CAPINOERR No error
CAPIFUNCUNDEF Command not valid
CAPICOMOPEN Communication medium opening error
CAPICOMWRITE Communication medium write error
CAPICOMCLOSE Communication medium closing problem
CAPICOMALLOC Communication medium allocation problem
CAPICOMERR Communication medium not available on this system
The available <verbs> are listed in the following table.
<verb> Value Service
FCOM COM Communication mode
FGETINXFO GETINXFO Recovering information about a transfer made from a synchronous request
The available <param> are listed in the following table.
<verb> <param> Explanation
FCOM DCOM The COM command parameter structure is as follows: <medium type> = <Medium name>
The medium type consists in an uppercase letter:
l 'F' for file
l 'M' for mailbox
l 'T' for the TCP/IP synchronous medium
l 'C' for the configuration file (ConfigFileName)
The medium name is the:
l Filename, if the medium type is 'F'
l Mailbox name, if the medium type is 'M'
l Name of the communication channel, if the medium type is 'T'
l Name of the configuration file containing the medium of communication characteristics, if the medium type is C.
FGETINXFO ZXINF Information about a transfer in the format described in the OAPIINF file.
Transfer CFT IBM i3.1.3 Installation Guide 132

7 Appendix A: Use APIs
Transfer services
Call syntax
CALL "CFTU" USING <verb> <param> <rc>
CALL "CFTC" USING <verb> <param> <rc>
Where:
l CFTU indicates that syntax analysis is requested CFTC indicates that syntax analysis is not requested
l <verb> is the command that you want to process
l <param> is a character string of variable length that contains the command parameters. The end of the field is defined by a character initially set to lowvalue
l <rc> is the return code
The available <verbs> are listed in the following table.
<verb> Value Service
FSEND SEND Send
FRECV RECV Receive
FHALT HALT Interrupt
FKEEP KEEP Suspend
FSTART START Retry
FDELETE DELETE Delete
FEND END Proceed to "X" state
FSUBMIT SUBMIT Resubmit endoftransfer procedure
FSHUT SHUT Stop monitor
FSWITCH SWITCH Switching monitoring files (log, statistics file)
FCLOSEAPI CLOSEAPI Freeing resources allocated at the opening of the communication medium
If <param> is not defined, CFTU takes the default name.
As these media are not available on all systems, an availability check is performed by the function.
Transfer CFT IBM i3.1.3 Installation Guide 133

7 Appendix A: Use APIs
Return codes
Mnemonic Description
CAPINOERR No error
CAPIFUNCUNDEF Command not valid
CAPICMDLENGTH Transfer CFT command string invalid, does not exist, or greater than 1024 characters long
CAPIKEYNAME Command syntax incorrect: keyword name incorrect
CAPIKEYVALUE Command syntax incorrect: keyword value incorrect
CAPIMEMGET Memory allocation error
CAPIMEMFREE Memory deallocation error
CAPIINTERR1 Internal error 1
CAPIINTERR2 Internal error 2
CAPIINTERR3 Internal error 3
Error messagesThe FIELD and MSG fields of the CFTAPI COPY CLAUSE contain:
l FIELD: name of the incorrect parameter detected by the Transfer CFT syntax analyzer
l MSG:
l Either a message relative to the error recognized by the syntax analyzer
l Or an error message describing an incident when the command is taken into account
If no error is detected, the FIELD and MSG fields are blank.
Transfer CFT IBM i3.1.3 Installation Guide 134
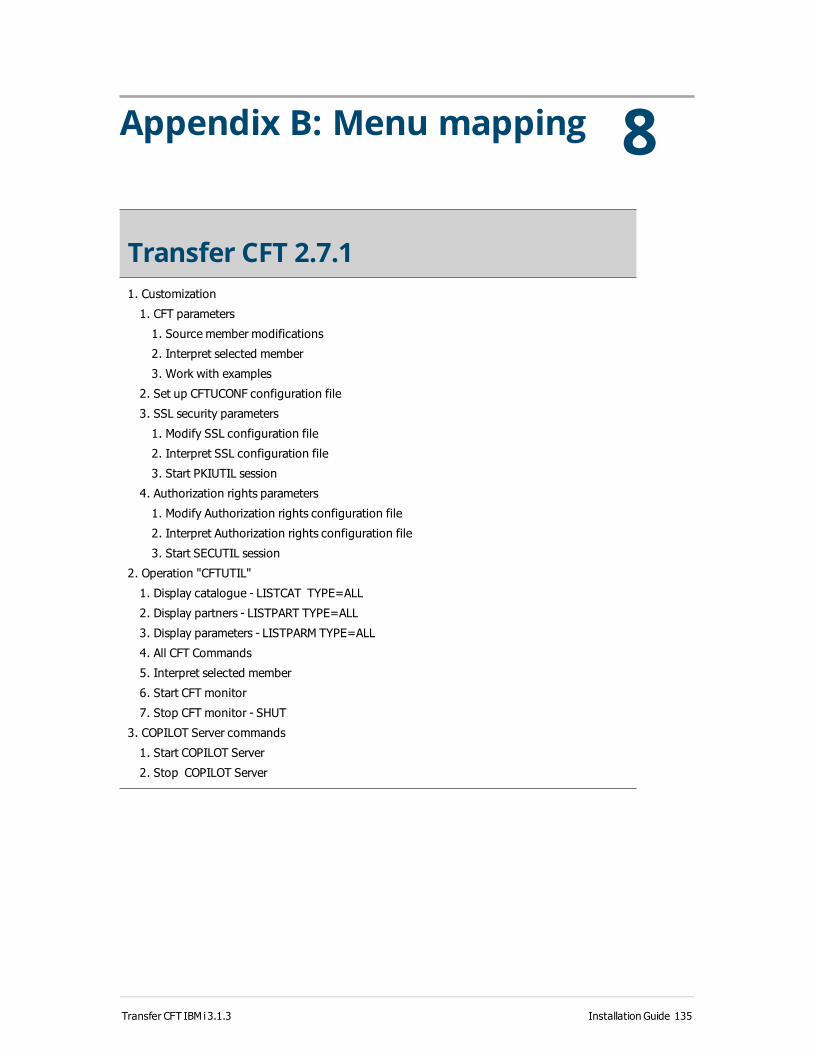
8 Appendix B: Menu mapping
Transfer CFT 2.7.11. Customization
1. CFT parameters
1. Source member modifications
2. Interpret selected member
3. Work with examples
2. Set up CFTUCONF configuration file
3. SSL security parameters
1. Modify SSL configuration file
2. Interpret SSL configuration file
3. Start PKIUTIL session
4. Authorization rights parameters
1. Modify Authorization rights configuration file
2. Interpret Authorization rights configuration file
3. Start SECUTIL session
2. Operation "CFTUTIL"
1. Display catalogue LISTCAT TYPE=ALL
2. Display partners LISTPART TYPE=ALL
3. Display parameters LISTPARM TYPE=ALL
4. All CFT Commands
5. Interpret selected member
6. Start CFT monitor
7. Stop CFT monitor SHUT
3. COPILOT Server commands
1. Start COPILOT Server
2. Stop COPILOT Server
Transfer CFT IBM i3.1.3 Installation Guide 135

8 Appendix B: Menumapping
Transfer CFT 3.0.1 1. Customization
1. CFT parameters
1. Source member modifications
2. Interpret selected member
2. Internal PKI database
1. Modify SSL configuration file
2. Interpret SSL configuration file
3. Internal Access Management
1. Modify Internal Access Management file
2. Interpret Internal Access Management file
3. Start SECUTIL session
2. CFT Operations
1. Display catalog LISTCAT TYPE=ALL
2. Display partners LISTPART TYPE=ALL
3. Display parameters LISTPARM TYPE=ALL
4. CFTUTIL
5. PKIUTIL
6. Interpret selected member
7. Start UI Server
8. Stop UI server
9. Start CFT monitor
10. Stop CFT monitor SHUT
Transfer CFT IBM i3.1.3 Installation Guide 136

8 Appendix B: Menumapping
Transfer CFT 3.1.3 SP41. Common CFT commands
1. Start Copilot
2. Stop Copilot
3. Start CFT
4. Stop CFT
5. CFTUTIL operation
6. Manage configuration File
1. Edit CFT configuration file
2. Update CFT configuration file
2. Security commands
1. Edit Security configuration file
2. Interpret Security configuration
3. PKIUTIL operation
3. Administration commands
1. Reinitialize CFT parameters
2. Submit CFT support request
4. Create CFT system objects
1. Create job queue
2. Create job description
3. Create subsystem
4. Add jobqueue entry
5. Create class
6. Add routing entry
7. Add communication entry
8. Change profile
5. Multinode commands
1. List nodes
2. Start node
3. Stop node
4. Enable node
5. Disable node
6. Add node
7. Remove node
8. Add host
9. Remove host
Note The option "5. Multinode commands" is only available if multinode is enabled.
Note A highlighted menu item indicates there is a sub menu.
Transfer CFT IBM i3.1.3 Installation Guide 137