training manual - madame madeline lashes€¦ · training manual professional brow design &...
TRANSCRIPT

T R A I N I N G M A N U A L
PROFESSIONAL BROW DESIGN & EXTENSION COURSE
T R A I N I N G M A N U A L
PROFESSIONAL BROW DESIGN & EXTENSION COURSE
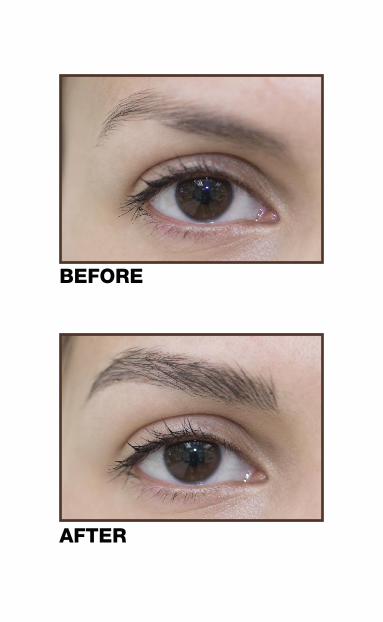
BEFORE
AFTER

Welcome Professionals,
Ardell Brow welcomes you to the latest trend and the biggest beauty service in the last decade! BROWS!!! The Ardell Brow Design & Extension course is now available to you.
Eyebrow design and extensions are a billion dollar industry with brow bars popping up everywhere! Eyebrow Feathering & Extensions are an excellent way to increase your knowledge, services in the salon and to fast-track your career. The techniques are easy (with practice), long-lasting and designed for immediate income! Ardell Brow was written by professionals for professionals and is taught by our Ardell Brow certified licensed professional instructors.
Brow Feathering and Extensions are a natural add-on to your existing service menu or a service all on its own. Brow artists will be applying brow feathering & brow extensions for many years to come. Once clients have a wonderful experience and see the lasting, luxurious results, they are hooked. Build your client base, maintain loyal customers and increase retail spending. A wonderful repeat business!
A professional Ardell Brow instructor will demonstrate the 3-Step procedure: Defining Brow Shape, Feathering and Extensions. In addition you will be shown the importance of the client consultation, sanitation, contraindications, set-up & preparation, care of extensions, as well as proper brow removal. We want you to succeed and we are here to help you achieve your goals and beyond!
Sincerely,
The Ardell Brow Professional Team

T A B L E O F C O N T E N T ST R A I N I N G M A N U A L
I. Course Description ........................................................... 1
II. Training Itinerary ............................................................... 2
III. Kit Contents...................................................................... 2
IV. Hair Growth Stages… ...................................................... 4
V. Safety & Sanitation… ....................................................... 5
VI. Set-up… ............................................................................ 6
A. Room Set-up................................................................6
B. Client Set-up / Consultation ....................................... 7
VII. Ardell Brow Design Procedures ..................................... 9
A. Step 1: Creating the Basic Brow Shape .................. 9
B. Step 2: Feather Design Technique........................... 11
C. Step 3: Brow Extension Technique ......................... 11
VIII. Proper After Care ...........................................................12
IX. Brow Design & Extension Removal ..............................13
X. Marketing Ideas & Suggestions ....................................13
XI. Frequently Asked Questions .........................................14
XII. How to Become Certified ..............................................18
XIII. Liability Release Form .....................................................19

1
I. Course Description
You will be shown the fundamentals of how to custom design and completely transform your client’s eyebrows. With practice, you can recreate brows that are tailor-made for each client’s personal needs. This program is suitable for all demographics, from natu-ral brows, clients desiring trendy designer brows, to those that need brow corrections such as filling in gaps or covering up scars. Beautiful brows are now available to both men and women of all ages and concerns.
The Ardell Brow 3-step process will have you creating realistic semi-permanent brows in no time at all. The 1st step, Creating the Basic Brow Shape, sets the foundation for the perfect brow. Step 2 is the Feather Design Technique which allows you to cre-ate shape, add length and/or fullness with a textured appearance by applying fine, feather-like strokes on the skin to mimic natu-ral brow hair. This also provides a base on which to apply brow extensions. The last step, Brow Extension Technique, allows you to artistically apply individual hairs one by one directly onto the feathering foundation or the existing natural brow hairs to create a natural, fuller brow or to create a dramatic effect.
Certification will be e-mailed to you after you have submitted 4 case studies to your instructor. (See certification requirements on page 18).
What You Will Learn: • The fundamentals of how to safely design a natural-looking brow, designer brow or special-effects brows using the Ardell Brow 3-step process.
• Understand how to properly set-up and hold your tools for safety as well as knowing the importance of the client consultation, sanitation, set-up & preparation, care of brows, and proper removal. • How the brow trend has grown in the last few years.
• Marketing ideas.

2
Who will benefit from this course?
• Estheticians
• Cosmetologists
• Make-up Artists
• Lash & Brow Spas
• Nail Techs (check your state board)
• Retailers
• Beauty supply distributors
II. Training Itinerary
Date: ________________________
Instructor: ________________________
Location ________________________
* Time subject to change
III. Kit Contents
Black Adhesive 0.34 oz
Clear Adhesive 0.34 oz
Flexible Bond 0.34 oz
Strawberry Blonde Textured Powder
TIME* TOPIC10:00 AM – 10:20 AM Introduction / Kit
10:20 AM – 10:30 AM Introduction to Ardell Brow Design Procedures
10:30 AM – 11:00 AM Sanitation, Safety & Client Consultation
11:00 AM – 12:30 AM Full Demo by Trainer on Model
12:30 PM – 1:30 PM Lunch
1:30 PM – 2:00 PM Feathering Practice on Hand
2:00 PM – 3:30 PM Student Practice on Each Other (One Brow)
3:30 PM – 4:30 PM Q & A and Marketing Ideas
4:30 PM – 5:00 PM Case Study Requirements for Certificate

3
Soft Taupe Textured Powder
Medium Brown Textured Powder
Dark Brown Textured Powder
Soft Black Textured Powder
Light Brown Brow Extensions 1 pk
Medium Brown Brow Extensions 1 pk
Dark Brown Brow Extensions 1 pk
Black Brow Extensions 1 pk
Design Tools 6 ct
Brow Cleanse 2 oz
Brow Exfoliate 2 oz
Brow Erase 0.5 oz
Brow Pencil
Dual Mixer/Spatula Tool
Plastic Rings 12 ct
Disposable Plastic Cups 60 ct
Metal Rings 3 ct
Pointed Tweezers
Curved Scissors
Glass Dish
Brow Grooming Wands 25 ct
Brow Remover Swabs 50 ct
Color Chart
Instruction Manual
Client Consultation Cards 25 pk
Window Cling
Black Cosmetic Bag

4
IV. Hair Growth Stages
Individual hairs are formed inside what is called the hair bulb found at the base of the hair follicle. The follicle is positioned, usually at a slant growing out of the skin. The bulb shape at the base of the follicle contains an egg-shaped cavity filled with loose tissue. This is the dermal papilla, and it contains the cells and blood vessels necessary for the growth and nourishment from the follicle. The sebaceous (oil) ducts attached to the follicle are responsible for lubrication of the skin and hair. Moderate amounts of secretion from the sebaceous glands are essential for healthy skin and hair.
Blood vessels also aid in healthy skin and hair. Vitamins, minerals, and other nutrients needed for strong, healthy hair is brought to the hair follicle by tiny blood vessels. In the same way, medications may have ingredients that will adversely affect hair health.
Hair grows differently for everyone. Hair growth is dependent on diet, health, weight, metabolism, medications, ethnicity, hor-mones, age, and other factors. However, all hair goes through three distinct growing phases. All three phases occur simulta-neously. While one strand of hair may be in the anagen phase another is in the telogen phase.
• Anagen Phase: Also known as the Active growth phase can last up to several years and can be genetically determined. Approximately 85% of our body hair is in this phase. This is also the phase where there is an abundance of melanin.
• Catagen Phase: Also known as the Regressive phase. It is not known what triggers the hair to move from the active growth phase to the catagen phase.
5
This is a short phase lasting approximately two weeks, during which the hair stops growing but is still attached at the root. About 3-4% of our body hair is in the catagen phase at any given time.
• Telogen Phase: Also known as the Resting Phase. This phase lasts approximately 5-6 weeks at which time the end of the hair falls out and a new hair begins to form. Approximately 10-13% of the body hair is in this phase. Main Reasons for Thinning Brows: • Hypothyroidism: causes thinning or loss of hair • Alopecia Areata: Total or partial hair loss • Chemotherapy • Prescription drugs • Autoimmune disease • Hormonal imbalances (including pregnancy) • Skin conditions: including skin growths, skin cancers, psoriasis, dermatitis, and fungal infections
V. Safety & Sanitation
The eye area is one of the most sensitive and easily irritated areas of the body. Safety and health is a vital aspect of any brow design & extension application. In order to maintain the utmost professionalism, to create a safe environment, and a comfort-able experience for your clients, you should follow these safety guidelines.
• Wash and disinfect your hands. • Clean and sterilize implements. To ensure that harmful bacteria and other agents do not come in contact with your client’s eyes, adequately clean all of your applicators, tweezers and other instruments that come into direct contact with client’s eyebrow. Clean and sanitize between clients according to your area's State Board regulations. • Always perform a Patch Test (predisposition test) before applying Ardell Brow adhesive/s for Feathering or Extensions. Follow your State Boards regulations for performing a patch test.

6
• Ask client to remove contacts or glasses. Have client place their contacts or glasses in a safe place. • Have client remain still during application. Due to the high risk of injury to the eye area, it is important that you inform your client to stay completely still while you are doing the brow application. If they need to move, ask them to give you a warning. Keeping movement to a minimum drastically eliminates the potential for a serious injury as well as assuring the proper application of brows. • Ask client to turn off cell phones to avoid disruption and distractions. • Maintain sufficient elbow room directly behind you to avoid being accidentally knocked, bumped or pushed into your client while working on their extensions. • Follow the directions carefully when using Ardell Brow adhesive/s.
Factors to consider before performing an Ardell Brow service:
• Is the client on chemotherapy? • Have they had any recent eyebrow tattoos? • Is their skin inflamed? • Do they have a sunburn, rash or hypersensitive skin? • Do they have severe acne or open lesions? • Have they had any resurfacing treatments; microderm abrasion or chemical peels in the last 72 hours? • Is there anything abnormal around the eyebrow area? • If in doubt, do not perform the application at that time and have client present you with a Dr.’s permission slip.
Contraindications in applying Ardell BrowA Contraindication is a condition or factor that increases the risks involved in determining a client’s suitability forArdell Brow. It is important to both the technician and the client to be aware of and able to identify certain contraindications. When in doubt always consult a physician and never provide the service if you have any uncertainty.
VI. Set-up
A. Room Set-Up 1. Massage bed or reclining beauty/treatment chair 2. If in a facial room, clean linens/paper roll

7
3. Roll stool or chair for technician if desired 4. Roll-about (set up ALL products in Ardell Brow Professional Kit. Place utensils in sterilizer) 5. Hand Sanitizer 6. Eye wash kit as a precaution 7. Tightly woven towels (not terry) 8. Hand mirror 9. Trash can 10. Hamper with lid 11. Acetone 12. Tissues 13. Extra tweezers 14. Disposable gloves (optional)
B. Client Set-up / Consultation 1. Have the client arrive early to discuss the Ardell Brow design procedure. Invite the client to ask questions and address each one as best as possible. This assists in comforting a new or anxious client by preventing any misconceptions. 2. Have your client fill out a client release form. 3. Have your client fill out a client consultation form. If waxing, they will also need to fill out a wax consultation card.
4. Perform a patch test (predisposition test) 24 hours before the procedure. Apply the products you will be using behind the ear or inside of elbow to determine if your client has allergies to the product. Follow your

8
State Board regulations regarding patch test requirements. Have your client return to confirm if the tests show any adverse reactions. If there is no reaction you may proceed with the brow design procedure. If there is a reaction, remove the product as soon as possible. 5. Review the Consultation Form (Assuming patch test is negative) to confirm the desired design (Natural, Thick & Full, Designer, Fill-in’s, etc.) 6. Discuss with client what to expect explaining if necessary what you might need to correct i.e. sparse or missing brows, lifting the arch, balance the brows etc. Be sure you & your client completely understand the direction and expectations before you begin your brow application. 7. It is a good idea if client arrives with their make-up on so you can see how they wear their brows. 8. Have your client rest comfortably on the treatment bed or chair. You may find it necessary to adjust the height of the bed or chair depending on the way you and the client are positioned. Keep your elbows close to your body. Be aware of your posture and hand positioning throughout the procedure to avoid causing your client any discomfort or uneasiness. 9. Reassure your client that the procedure will be relaxing. (Most clients will fall asleep!) 10. Ask client to remove their glasses or contacts. 11. Drape the client with a light draping cloth. 12. Use a headband if needed. 13. Remove the client’s brow make-up. It is ok to leave eye make-up on. 14. Ask if client is comfortable 15. Ask client to turn off cell phones to avoid disruption and distractions 16. Apply manicure mittens with lotion and warm towels (optional)
NOTE: It is important to have your client fill out Client Consul-tation & Legal Forms before each brow service. Add your own questions to fit the needs of your specific clients. Have your client sign and date the Consultation & Legal Forms in ink prior to the service. The Contraindications should all be observed before providing your brow service.

9
VII. Ardell Brow Design Procedures
A. Step 1: Creating the Basic Brow Shape
Prepping the brow
1. Wash and sanitize hands in front of client 2. Cleanse the brows with Brow Cleanse (Cleanse even if the client has removed their make-up prior to procedure). ALL OIL AND MAKE-UP MUST BE REMOVED FOR BROWS TO ADHERE. Eye make-up can remain. a. Only use lint free cotton pads. 3. Exfoliate the brow area with Brow Exfoliate. 4. Using brow brush, brush brows upwards and trim any long stray hairs using your precision scissors. After trimming, brush brows in a downward position and trim strays if necessary.
Shaping the Brow
Tip: : A string, brow brush or brow pencil can be used as your guide when creating a brow shape
Brow Starting Point:
1. Rest your brow pencil at the outside corner of client’s nose passing directly over the inside corner of the eye (tear duct) and place a dot. Do not get the pencil in the brow as this will affect the sculpting and extensions 2. If the brow extends past the dot, these are the hairs to be removed. In some cases, hair may not grow to the desired point. These areas will be filled in with your Ardell Brow Feathering technique
1 0
Arch (natural high point):
1. Ask your client to look straight ahead. 2. Hold the narrow part of the brow pencil to the outside edge of the nose, passing through to the outside edge of the pupil. 3. Where the pencil meets the brow is the highest part of the brow and where it should peak. 4. Place a dot being careful not get the pencil in the brow.
End Point or Tail:
1. Rest your brow pencil at the outside corner of client’s nose; slant it past the outside corner the eye. 2. This is the point where the brow should end. If the brow extends beyond the brow pencil, mark for hair removal. Thickness:
1. Based on the client consultation, determine the desired brow thickness
Height
1. If one brow is higher than the other, ask the client which brow she likes and match brows using the Ardell Brow Feathering and Extensions Techniques
Length:
1. The length is from the inside corner of the eye to outside end point of the eye. Rest your pencil horizontally from one eye to the other. Brow Shaping - Removing Unwanted Hair:
1. Tweeze, wax or thread brows to desired shape removing only the hair that is outside the desired brow shape. 2. Cleanse brows a second time to remove any oil residue caused from hair removal techniques.

1 1
B. Step 2 : Feathering Technique
1. Place a plastic ring on your finger (either the right or left hand, whichever is more comfortable) and insert a disposable plastic cup. 2. According to the mixing chart, mix the correct Adhesives & Flexible Bond for your client. 3. Add the appropriate amount of Textured Powder according to the mixing chart and desired color 4. Mix the Adhesive mixture and powder together with the Dual Mixer/Spatula Tool. 5. Begin making light feather-like strokes on the brow, increasing the number of feather strokes across the entire brow. The Feathering technique provides texture to the brow. REMEMBER: Brush brow after every few feathering strokes! 6. Check both brows to guide you towards balanced brows. 7. Once Feathering is complete, discard used plastic cup. 8. Provide a mirror for your client to admire their beautiful brows!
The Feathering may be enough brow design to complete your procedure. If more fullness or fill-in of sparse areas is needed, continue with Step 3.
**IMPORTANT NOTE: Humidity increases the drying time of adhesive. If necessary, mix a second batch. Use dehumidifier if necessary.
C. Step 3: Brow Extension Technique
1. Prepare metal adhesive ring by applying a drop of Adhesive on the plate of the ring. 2. Place desired brow strips on hand or finger of opposite hand you work with. 3. Using your tweezers pick up one brow extension hair and dip wider end of hair tip into the Adhesive. 4. Divide the brow into 3 sections. Starting at the end of the brow section, move to the center and end at the base (near the tear duct). Once you are more experienced it is not as necessary to divide into sections

1 2
5. Use a 1:1 ratio of individual Brow Extensions to natural brow hairs following the natural growth direction of the brow hairs. 6. Extensions can also be attached to the Feathering mixture. 7. Once the brow is complete, stand back, observe the shape and begin matching on the other brow. Your first completed brow will be your guide for your second brow so they match and balance. 8. Take your time and ensure the extensions are securely on one brow hair at a time to ensure long lasting results.
VIII. After Care Recommendations
After applying Ardell Brow design & extensions, it’s important to impart the following information to your client to ensure the longest lasting effect with their new brows. 1. Avoid swimming, dry or steam saunas, sweating or washing the face with hot water for the first 24 hours to allow the adhesive to set. 2. Carefully cleanse the eye area with a non-oily gentle cleanser. Oily products will soften the bond and the brows will not last as long. 3. When applying moisturizer to your face, keep it a good distance from the brow area as it will creep into the brows causing them to loosen and fall out. 4. Avoid rubbing or pulling on the brows. 5. If the brows begin to itch, gently pat & press on the area 2-3 times. 6. Do NOT tint Ardell Brow designs. 7. To cleanse the brows, allow warm water to gently run through the brows without any rubbing. Pat dry with a towel. 8. Protect your brows when pulling clothes over your head. 9. If a brow extension has moved out of place, gently pat & press it back into place. 10. Brow powder can be added as a fill-in as needed.

1 3
IX. Brow Design & Extension Removal
It is important to inform your client that the Feathering mixture and/or Brow Extensions cannot be removed by the client. Each time they must be professionally removed and a new set applied. Not removing brow design and extensions properly could result in loss of natural brows. Ardell Brow can be applied as often as the client wants as long as their skin is in good condition. 1. Wash & Sanitize your hands. 2. Arrange tools and materials needed. 3. Place small amount of Brow Erase in a clean glass dish and set aside several Brow Remover Swabs. 4. Using the Brow Remover Swabs, dip into Brow Erase and gently coat one area of the brow. Allow Brow Erase to sit on the skin a few minutes. Gently roll back and forth until the bond begins to release. DO NOT RUB THE SKIN. 5. Repeat this procedure for each section of the brow until the entire brow is free from residue and hairs. Move to the next brow and repeat the steps. 6. At this point if you are going to reapply Ardell Brow designs and/or extensions repeat Steps in Section VII.
It is very important to use caution when removing Ardell Brow design & extensions. Do not rub the client’s skin and do not pull on the brows as this can result in breakage and loss of brows. Be carefully not to get any Brow Erase in the eye. Should product get into the client’s eye, flush out with either warm water or over-the-counter eye wash.
X. Marketing Ideas & Suggestions
Marketing Ideas • Join social media: Instagram, Facebook, Twitter, Pinterest, Craig’s list under “services” • Attend Networking business functions & hand out business cards • Visit trade shows to keep up with new ideas and trends • Subscribe to trade & fashion magazines

1 4
• Have a Portfolio of Before/After shots • Make a YouTube video of applying Ardell Brow Design & Extensions • Know your competition • Know your target market • Set goals, a time to achieve them and then TAKE ACTION • For every 4 new referrals, give your client ½ off next application • Ask your clients how they found you • Flyers • Market yourself for Special Events, Weddings, Mother’s Day, Graduation, Birthday, Proms etc. • Attend local events • Hand out referrals.
Professional Suggestions • Dress professionally & maintain a professional attitude. • Be prepared, patch test, client consultation and legal forms, room set-up etc. • Pre-sanitize your work area before and after each procedure. • Sterilize all tools and implements and store in a safe and sanitized environment between procedures. • Display all of your certificates and licenses in a visible area. • Nails should be short to medium length • Do not wear jewelry with the exception of the rings provided in the kit. • Be precise, take your time, and visualize the desired result as you are designing.
XI. Frequently Asked Questions
1. What are Ardell Brow design & extensions? There is a simple 3-step process to create realistic, semi-permanent brows. Step 1, Creating the Basic Brow Shape, sets the foundation for the perfect brow. Step 2 is the Feather Design Technique which allows you to create shape, add length and/or fullness with a textured appearance by applying fine, feather-like strokes on the skin to mimic natural brow hair. This also provides a base on which to apply brow extensions. The last step,

1 5
Brow Extension Technique, allows you to artistically apply individual hairs one by one directly onto the feathering foundation or the existing natural brow hairs to create a natural, fuller brow or to create a dramatic effect.
2. Will my client require fill-in? No, Ardell Brow does not require fill-ins and each time your client comes in, the brow design & extensions must be removed by a professional to avoid brow loss and a new set applied. 3. Who would use brow extensions? Clients that want a fuller brow, more dramatic look, a brow lift, fill-in’s etc. We do not recommend you completely change the shape of the client’s original brow, but enhance it to be more shapely. If a client has no brows or sparse brows, you can completely re-construct their brows. If the client wants their natural brows thicker and fuller, you will be adding to the client’s natural shape. • If designing for cancer patients or patients with diabetes, they must provide you with a Doctor’s note.
4. What type of adhesive is used? Both the black and clear semi-permanent adhesives can be used for brow extensions and are safe to be applied directly to the skin.
5. What can my client expect during the procedure? Your client will be pampered and relaxed for 30 minutes to 2 hours depending on the desired brow look and the expertise of the technician. Your client’s natural brows will need to be completely free of all make-up and oil-based products. Their eyes will be closed and protected throughout the procedure. Most clients fall asleep. • You can play soft music during the duration of the procedure. • As an extra pampering treatment during the procedure you may wish to condition your client’s hands with moisturizer and place the hands in mitts. • Apply under eye conditioning pads (optional).
1 6
6. Is it safe for the client to use an exfoliant on her face before the Ardell Brow procedure? Exfoliants are safe to use up to 48 hours before the procedure.
7. How many individual brow extensions will I use per application? There are many factors to be taken into consideration when applying your extensions. Your client consultation will determine thickness and style of your desired outcome.
8. How long will Ardell Brow extensions last? When applied properly and with proper care, the extensions will adhere for the entire cycle of hair growth (2-4 weeks, depending on the individual & personal care). When the natural brow is shed the extension will fall with it. Natural eyebrows shed on a regular basis. This may result in multiple extension loss on any given day.
9. How much can a certified brow technician charge for an Ardell Brow service? This will vary from technician to technician depending on experience and location. Generally no less than $75 and you can charge or not charge for removal.
10. Can I apply Ardell Brow designs to clients if their natural eyebrows are tinted? Yes. Be sure your client’s Brows are clean, oil-free and dry before applying.
11. Can I tint over the brow extensions? No, and many states do not endorse tinting at all. Check with your local state board.
12. Once I have taken the Ardell Brow course can I begin to apply and charge for my new brow service? Yes, as a licensed professional you may begin to book and charge for your brow extension service. You will receive your certification after you have followed the Case Study steps. (see How to Become Certified, p. 18)
13. What if the client has a reaction to the adhesive? A Patch Test is required before the procedure is performed on the client’s brows. If the client feels she is allergic after the

1 7
brows have been applied, remove with Brow Erase. Then apply cool water and a soothing moisturizer. It is recommend to have your client call her physician.
14. Can cancer patients wear brow extensions? Because the cancer patients’ skin is so sensitive, and their immune system is compromised, the cancer patient would need to provide you with a Doctor’s note. You will have to provide an MSDS sheet to the client to take to her Doctor. Many cancer patients find this service a won- derful uplifting experience.
15. How long before the client can wash her face? Brows need to set at least 24 hours before they can get wet. Do not use oil or products containing oil on the brows as oil will begin to soften the bond. Avoid all moisturizers around the brow area as the cream will ‘seep’ down into the brow. Your brow design & extensions are completely waterproof and smudge-proof!
16. Can I swim or go into the sauna with my brows? After the initial 24 hour waiting period you can swim and go into the sauna. Do not rub your brows and when showering avoid shampoo and conditioners from running through the brows. Cool water only! Pat dry. Also, excessive sweating will cause the brows to lift.
17. What about ocean swimming? The brows will most likely not last as long, but they should last through an extended weekend vacation if swimming in salty waters.
18. Can my client remove their brows themselves? It is not recommend that your client remove their brows themselves. They need to return to their technician for proper brow removal as removing themselves could cause brow damage and brow loss.
19. Is the treatment invasive? No, it is completely non-invasive. There are no needles, blades or tattooing.

1 8
12-0
25
5
20. Will I always use both procedures, Feathering and Extensions? No, you are custom designing your client’s brows. For those clients that have natural and nicely shaped brows or have thinning eyebrows and just need their brows enhanced, you can apply the Feathering technique with a few extensions to their natural hairs. If they have no hair at all you can apply the Feather Technique which provides a base and adds dimension for a natural brow appearance, and add brow extensions as needed.
XII. How to Become Certified
How to receive your Ardell Brow Technician Certification?This is NOT included at the end of the class, but will be e-mailed to you for printing after you have submitted 4 case studies to your instructor for feedback.
1. Before photos to include: a. Photo of brows before any brow procedure b. Photo after shaping the brows (tweezing, waxing or threading) c. Photo after using the feathering technique on both brows d. Photo ½ way through applying extensions to one brow2. After Photo of both brows. Not full face; eyes and brows only.3. Time from start to finish4. Description of your procedure steps
We hope you have enjoyed your Ardell Brow class and will continue your education, knowledge and professionalism while building your income. Enjoy!!!
Your Ardell Brow team
1 9
XIII. Liability Release Form
Ardell Brow Eyebrow Design & ExtensionLiability Release Form
I, the Client at _________________________ Salon as herein signed, hereby authorize ________________________ (Certified Eyebrow Extension or Instructor), and whomever it may designate as its operators, assistants or otherwise to perform on myself the semi-permanent eyebrow design and extension procedure.
I have been informed of the methods and procedures concern-ing this cosmetic procedure. It has been represented to me that no guarantees, warranties, promises, commitments or other statements to the results of this treatment have been made. I acknowledge that I have no particular representations, nor guarantees, and I am consenting to this procedure at my own risk. I acknowledge also that the brow artist is not responsible for any allergic reaction to the semi-permanent brow extensions, adhesives or feathering mixture.
As the client, I understand I am solely responsible for the after-care of the eyebrow design & extensions. Individual results will vary due to the natural eyebrow hair cycle and how I care for my brows.
I agree to be bound by the laws of the State of California, and further agree that in the event any litigation endures, it shall be placed before the American Arbitration Association or some oth-er such arbitrator, for resolution. I agree in the event a decision is determined in favor of one party or the other, the prevailing party shall be entitled to reasonable attorney fees and costs as set by the arbitrator. I further agree to hold __________________________ nameless from any and all damages.
I, the client consent to “before” and “after” photographs for documentation, which may or may not be used for the purpose of advertising.
I, the client sign and certify that I have read, had explained to me and understand the above Release and Disclosure.
Dated: _______________ 20____
____________________________ Participant’s Name (Please Print)
___________________________ Participant’s Signature

2 0
American International Industries
Los Angeles, CA 90040
AII (UK) Ltd. Berkshire RG1 7SR
Ardell® is a registered trademark of American International Industries
Printed in USA
12-2094