training health workers in the management of sharps waste · training health workers in the...
TRANSCRIPT

1455 NW Leary Way Seattle, WA 98107-5136 USA Tel: 206.285.3500 Fax: 206.285.6619 www.path.org
Version 1 October 2005
Training Manual
Training Health Workers in the Management of Sharps Waste

Training Health Workers in the Management of Sharps Waste
Acknowledgements and Copyright
These materials were developed at PATH with support from the US Agency for International Development (USAID) HealthTech program under Cooperative Agreement #GPH-A-00-01-00005-00 and the Making Medical Injections Safer Project. The opinions expressed herein are those of the authors and do not necessarily reflect the views of USAID.
Copyright © 2005, Program for Appropriate Technology in Health (PATH). All rights reserved. The material in this document may be freely used and adapted for educational or noncommercial purposes, provided that the material is accompanied by an acknowledgement line.
Suggested citation: PATH. Training Health Workers in the Management of Sharps Waste. Version 1. Seattle: PATH; 2005.
For more information contact:
Program for Appropriate Technology in Health (PATH) 1455 NW Leary Way Seattle, WA 98107-5136 USAPhone: 206-285-3500 Fax: 206-285-6619 Email: [email protected]: http://www.path.org
Version 1 PATHOctober 2005 iii


Training Health Workers in the Management of Sharps Waste
Version 1 PATHOctober 2005
Table of Contents
Guide for Facilitation
1. Description of Training Materials...........................................................................................32. Adaptation...............................................................................................................................53. 50 Tips for Trainers ................................................................................................................6
Guide for Training Injection Providers
1. Training Overview................................................................................................................112. Sharps Waste Overview........................................................................................................133. Health Worker Safety ...........................................................................................................164. Segregation of Waste ............................................................................................................195. Sharps Waste––Why Prioritize? ...........................................................................................24 6. Containing Sharps––Safety Box...........................................................................................26 7. Containing Sharps––Needle Remover..................................................................................31 8. Roles and Responsibilities for Waste Management..............................................................37
Guide for Training Waste Handlers
1. Training Overview................................................................................................................43
2. Sharps Waste Overview........................................................................................................45
3. Health Worker Safety ...........................................................................................................48
4. Segregation of Waste ............................................................................................................51
5. Handling, Storage, and Transport of Safety Boxes...............................................................56
6. Overview of Sharps Treatment, Destruction, and Disposal..................................................58
7. Treatment of Sharps: Liquid Disinfection ............................................................................60
8. Treatment of Sharps: Autoclave/Shredding..........................................................................62
9. Treatment of Sharps: Encapsulation .....................................................................................66
10. Treatment and Destruction of Sharps: Incineration ..............................................................68 11. Disposal of Removed Needles: Protected Sharps Pit ...........................................................73 12. Disposal of Removed Needles: Protected Sharps Barrel......................................................78 13. Roles and Responsibilities for Waste Management..............................................................83
Resources
1. Annotated Bibliography..........................................................................................................89
2. Handouts .................................................................................................................................90
v


Guide for Facilitation Version 1 PATHOctober 2005
Training Health Workers in the Management of Sharps Waste
Guide for Facilitation
Contents:
1. Description of Training Materials...........................................................................................32. Adaptation...............................................................................................................................53. 50 Tips for Trainers ................................................................................................................6
1

2

Training Health Workers in the Management of Sharps Waste
1. Description of Training Materials
Purpose and Objectives The purpose of these materials is for use in training health workers in the management of sharps waste. Resources currently exist for policymakers and managers, but little has been developed for injection providers and waste handlers to help improve injection safety practices at the primary-care level.
The objectives of these materials are to: Raise awareness of public health and environmental hazards that may be associated with inappropriate segregation, storage, collection, transport, handling, and disposal of sharps waste.Provide information on proper practices for disposing of sharps waste.Identify roles and responsibilities of all staff involved with managing sharps waste.
AudienceThese materials are divided into two training guides, one for training injection providers and one for training waste handlers. It is important to distinguish between the two roles because in many settings the injection providers and waste handlers have two very different jobs. These materials take into account the possible difference in literacy levels between the two groups. In addition to the segmentation by responsibilities, there is likely to be a variety of waste management tools in place at varying levels of the health system.
How to Use these Materials Training Health Workers in the Management of Sharps Waste is a set of training modules that are designed to be adapted for use in various health care settings. This document and its accompanying materials are being distributed as electronic files on a CD ROM. The CD ROM includes the following:
1. A PDF file entitled Training Health Workers in the Management of Sharps Waste: This file comprises all the components of the training materials: the guide for facilitation, the guides for training injection providers and waste handlers and the accompanying slides, a list of references, and handouts.
2. Guide for Training Injection Providers Folder: This folder includes the text of the Guide for Training Injection Providers saved as a Word file, plus slides for all of the modulesin the guide saved as PowerPoint files, as well as the associated handouts for injection providers saved as PDF files.
3. Guide for Training Waste Handlers Folder: This folder includes the text of the Guide for Training Waste Handlers saved as a Word file, plus slides for all of the modules in the guide saved as PowerPoint files, as well as the associated handouts for waste handlers,saved as PDF files.
4. Graphics Folder: This folder contains a catalog of the images that were developed for these materials. They are organized by the respective handout each was created for and each is saved as an individual JPG file.
Guide for Facilitation Version 1 PATHOctober 2005 3

Training Health Workers in the Management of Sharps Waste
By providing the materials in electronic files that can be modified and used in a modular format, PATH is hoping to facilitate local adaptation.
Modular DesignThese materials were developed using a modular design. Each training guide includes eight or more modules on the management of sharps waste. These are detailed below. By using this format, the design allows for modules to be combined, modified, or omitted for different audiences. In order to make the training guides appropriate to a variety of cultures, the materials focus on technical content using simple language and graphics.
ContentsBelow is an outline of the content included in Training Health Workers in the Management of Sharps Waste as well as a description of the electronic format available for adaptation:
1. Guide for Facilitation
Description of Training Materials Acknowledgements and Copyright Adaptation Guidelines Tips for Trainers
2. Guide for Training Injection Providers
Module Guide, including notes for the trainer (MS Word) Handouts (Adobe PDF, graphics available as JPG files) PowerPoint Slides (MS PowerPoint)
Modules
1. Training Overview 2. Sharps Waste Overview 3. Health Worker Safety 4. Segregation of Waste5. Sharps Waste––Why Prioritize? 6. Containing Sharps––Safety Box 7. Containing Sharps––Needle Remover 8. Roles and Responsibilities for Waste Management
3. Guide for Training Waste Handlers
Module Guide, including Notes for the Trainer (MS Word) Handouts (Adobe PDF, graphics available as jpg files) PowerPoint Slides (MS PowerPoint)
Guide for Facilitation Version 1 PATHOctober 2005 4

Training Health Workers in the Management of Sharps Waste
Modules
1. Training Overview 2. Sharps Waste Overview 3. Health Worker Safety 4. Segregation of Waste 5. Handling, Storage, and Transport of Safety Boxes 6. Overview of Sharps Treatment, Destruction, and Disposal7. Treatment of Sharps: Liquid Disinfection 8. Treatment of Sharps: Autoclave/Shredding 9. Treatment of Sharps: Encapsulation 10. Treatment and Destruction of Sharps: Incineration 11. Disposal of Removed Needles: Protected Sharps Pit 12. Disposal of Removed Needles: Protected Sharps Barrel 13. Roles and Responsibilities for Waste Management
4. Resources
Annotated Bibliography Handouts
2. Adaptation
Adapting These Training Materials for Your Program These training materials were developed in a modular format in order to allow for local adaptation. Sections of this training guide should be adapted for the local context before use.
Recommended Steps for Adaptation
Obtain a copy of your country’s medical waste management policies. Adapt the information to reflect local policies (for example, waste management policies may be different in rural and urban settings). Thoroughly review the training modules and mark sections that require adaptation for your country or region.Remove any modules that are not applicable to your waste management system. Adjust the level of technical detail and language so that it is appropriate for the staff you are training.Add or change examples to reflect actual situations in your country.Add or change pictures to reflect the ethnic or cultural preferences of your audience.Translate the training modules into the appropriate language.
Guide for Facilitation Version 1 PATHOctober 2005 5

Training Health Workers in the Management of Sharps Waste
3. 50 Tips for Trainers
Set the Stage 1. Introduce yourself to the group in advance. 2. Learn participants’ names and use them. 3. Use eye contact to establish rapport. 4. Create an informal, comfortable physical setting that facilitates learning. 5. Establish your credibility early. 6. Give special emphasis to the first five minutes. First impressions are important. 7. Provide an overview and agenda for the training.8. Describe goals and objectives of training. 9. Establish ground rules for all participants and trainer (group norms). 10. Begin and end on time.
Content11. Know the material well. Be an expert.12. Provide accurate and complete information. 13. Exhibit your advance preparation (via handouts, etc.) 14. Ensure that content is free of value judgment. 15. Make handouts organized, useful, readable, relevant, and reproducible.
Delivery 16. Build rapport. 17. Use participatory techniques that involve the trainees. Let the participants do the work. 18. State instructions clearly. 19. Manage your appearance. Dress comfortably and appropriately. 20. Use your own style. 21. Use your own words. 22. Avoid distracting movements (hands to mouth, tugging on hair, pacing) and adopt a
natural (relaxed) posture. 23. Don’t lie. Say you don’t know if you don’t know. 24. Practice your presentation. Videotape yourself. 25. Convince yourself to relax. Try deep breathing, meditation, self-talk. 26. Add your own ideas. 27. Demonstrate flexibility.
Interaction with the Audience 28. Match content and style to participants’ needs. 29. Use active listening skills to assess the participants. 30. Involve the participants appropriately. 31. Use subgroups when appropriate. 32. Put yourself in the participants’ shoes. They’re asking, “What’s in it for me?” 33. Assume they are on your side. They will be 99.9% of the time. 34. Compliment trainees’ on their participation and the quality of their questions.
Guide for Facilitation Version 1 PATHOctober 2005 6
Training Health Workers in the Management of Sharps Waste
Guide for Facilitation Version 1 PATHOctober 2005
Preparation35. Anticipate potential problems and prepare probable responses. 36. Check in advance the facilities and audio-visual equipment. 37. Obtain information about the group in advance. 38. Rest up so that you are physically and psychologically alert. 39. Accept some fears as being good (energizing stress vs. destructive). 40. Identify your fears. Categorize them as controllable or uncontrollable and confront them. 41. Know your “hot buttons”––topics you are uncomfortable with. 42. Imagine yourself as a good trainer. 43. Practice responses to tough questions or situations. 44. Take a course in public speaking. 45. Conduct a self-assessment of your training capacity to identify areas to improve upon.
Co-facilitation 46. Styles and competencies of presenters should be complementary. 47. Presenters should demonstrate a shared rhythm, timing, pace. 48. Presenters should show evidence of having prepared together. 49. Presenters behave and interact respectfully toward one another.50. Presentation is balanced between the two presenters.
Adapted from Seattle-King County Department of Public Health. Speakers’ Training: Train the Trainer. Seattle: The AIDS Prevention Project. 1993.
7

8

Guide for Training Injection Providers Version 1 PATHSeptember 2005
Training Health Workers in the Management of Sharps Waste
Guide for TrainingInjection Providers
Contents
1. Training Overview................................................................................................................112. Sharps Waste Overview........................................................................................................133. Health Worker Safety ...........................................................................................................164. Segregation of Waste ............................................................................................................195. Sharps Waste––Why Prioritize? ...........................................................................................246. Containing Sharps––Safety Box...........................................................................................267. Containing Sharps––Needle Remover..................................................................................318. Roles and Responsibilities for Waste Management..............................................................37
9

10

Training Health Workers in the Management of Sharps Waste
Guide for Training Injection Providers Version 1 PATHOctober 2005
1. Training Overview
Objectives
To raise awareness of public health and environmental hazards that may be associated with inappropriate segregation, storage, collection, transport, handling, and disposal of sharps waste.To provide information on proper practices for disposing of sharps waste.To identify roles and responsibilities of all staff involved with managing sharps waste.
HandoutsNone
SlidesFour slides
Notes for the Trainer
Adapt objectives to match your needs. Review objectives with group.Ask if there are any objectives missing that the participants had hoped to achieve in the training.Add objectives to the list if feasible or determine alternate way to address participant objectives through additional training or information. Let participants know time expectations. Review modules listed below and determine which sessions will be included in your training: 1. Training Overview 2. Sharps Waste Overview 3. Health Worker Safety 4. Segregation of Waste 5. Sharps Waste––Why Prioritize? 6. Containing Sharps––Safety Box 7. Containing Sharps––Needle Remover 8. Roles and Responsibilities of Sharps Waste Management
11

Management of Sharps Waste:Guide for Training Injection Providers
Training Overview – IP.1
1. Training Overview
Objectives of Training
• Raise awareness of hazards that may be associated with inappropriate management of sharps waste.
• Provide information on proper practices for disposing of waste.
• Identify roles and responsibilities of all staff involved with managing waste.
Training Overview – IP.1
Topics to Be Covered
• Training Objectives
• Sharps Waste Overview
• Health Worker Safety
• Segregation of Waste
• Sharps Waste—Why Prioritize?
• Containing Sharps: Safety Box
• Containing Sharps: Needle Removal
• Roles and Responsibilities for Waste Management
Training Overview – IP.1
12

Training Health Workers in the Management of Sharps Waste
Guide for Training Injection Providers Version 1 PATHOctober 2005
2. Sharps Waste Overview
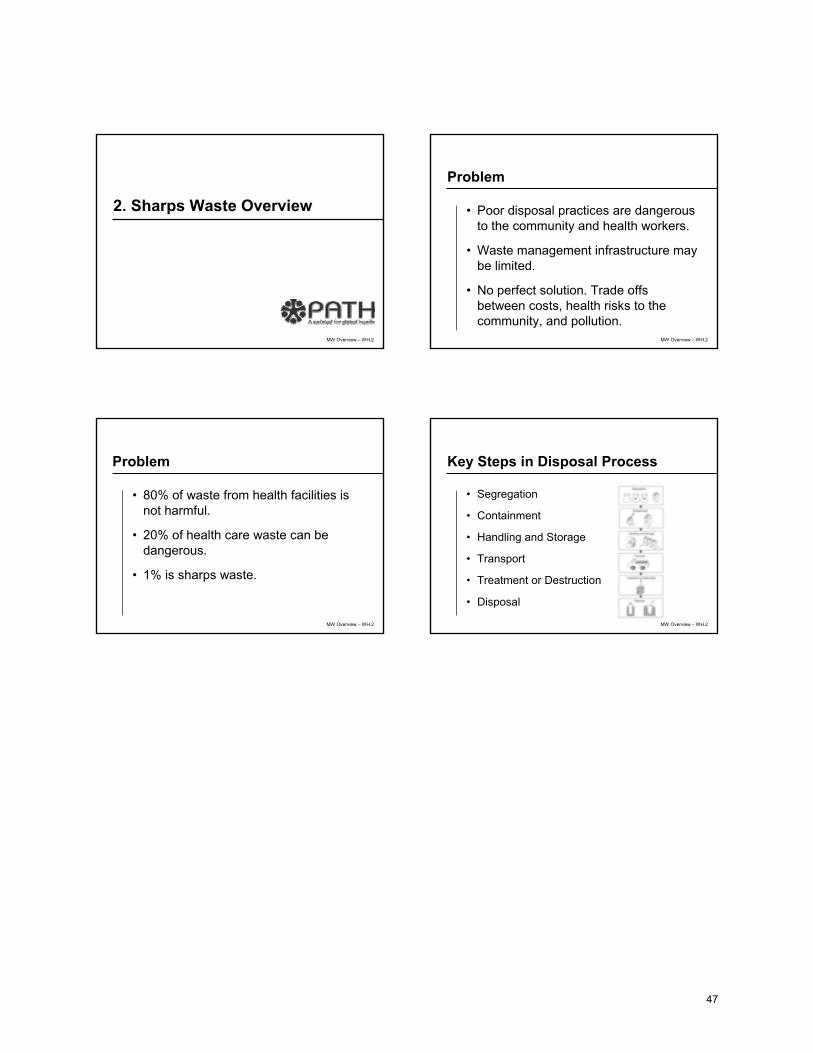
Problem
80% of waste from health facilities is “general” waste and not harmful. 20% of health care waste can be dangerous; only 1% is sharps waste. Poor waste disposal practices are dangerous to the community and health care workers. Waste management infrastructure may be limited in low-resource settings. There is no perfect solution. There are trade offs between costs, health risks to the community, and environmental pollution.
Approximate percentage of waste type per total waste in facility:
Noninfectious waste 80%Pathological waste and infectious waste 15%Sharps waste 1%Chemical or pharmaceutical waste 3%Aerosol cans, pressurized cylinders, broken thermometers
<1%
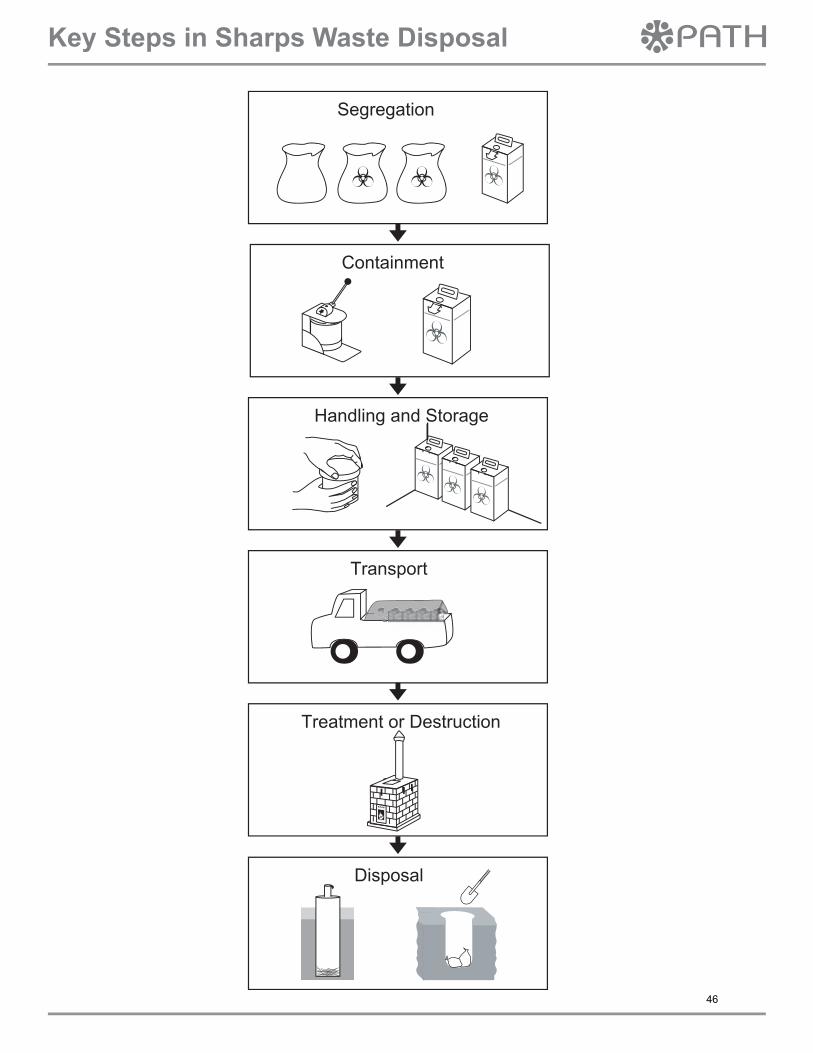
Key Steps in Sharps Waste Disposal
Segregation Containment Handling and Storage TransportTreatment or Destruction Disposal
HandoutsKey Steps in Sharps Waste Disposal
Slides4 slides
Notes for the Trainer
Review material and adapt based on your health system. Distribute handout depicting steps in disposal process.
13

14

MW Overview – IP.2
2. Sharps Waste Overview
Problem
• Poor disposal practices are dangerous to the community and health workers.
• Waste management infrastructure may be limited in low-resource settings.
• No perfect solution. There are trade offs between costs, health risks to the community, and environmental pollution.
MW Overview – IP.2
Problem
• 80% of waste from health facilities is not harmful.
• 20% of health care waste can be dangerous.
• 1% is sharps waste.
MW Overview – IP.2
Key Steps in Disposal Process
• Segregation
• Containment
• Handling and Storage
• Transport
• Treatment or Destruction
• Disposal
MW Overview – IP.2
15

Training Health Workers in the Management of Sharps Waste
Guide for Training Injection Providers Version 1 PATHOctober 2005
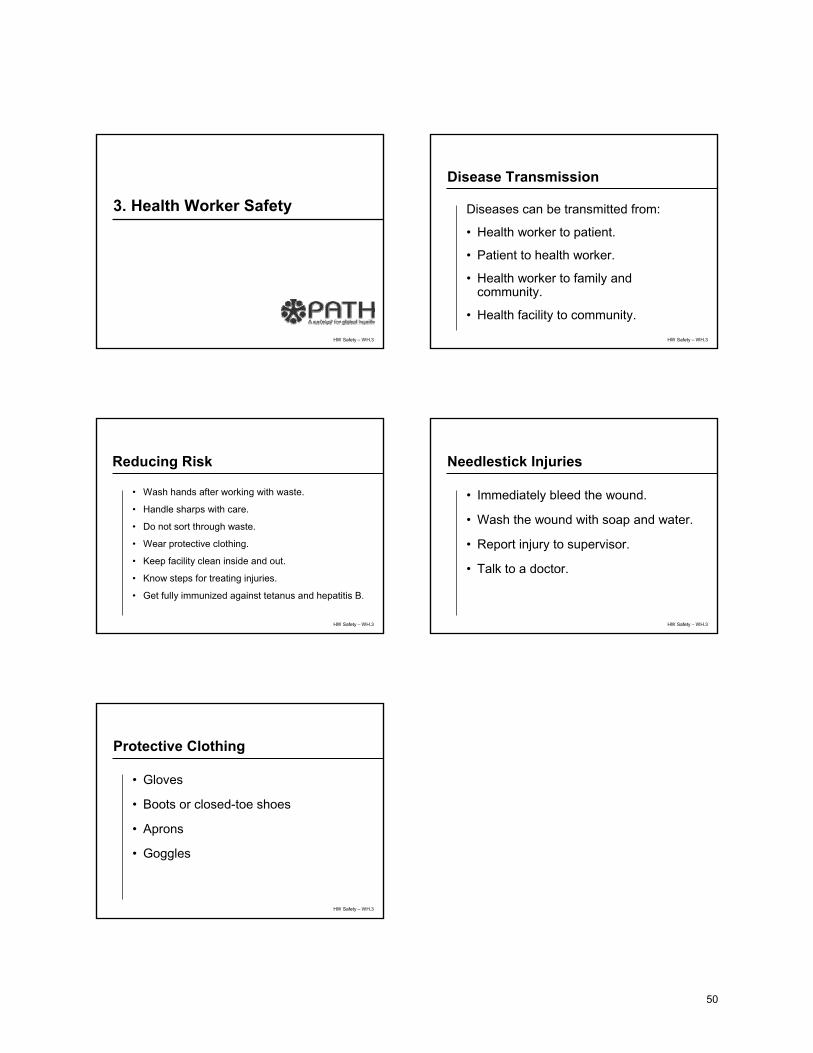
3. Health Worker Safety
Disease Transmission Diseases can be transmitted from:
Health worker to patient––due to unwashed hands, contaminated sharps, or improperly cleaned reusable equipment. Patient to health worker––due to being accidentally stuck by needles or sharps that have been used on patients. Also due to blood or body fluids accidentally splashing onto or coming in contact with broken skin. Health worker to family and community––health workers with unclean hands or contaminated clothing or shoes can carry infection home to family members. Health facility to community––improper disposal of medical waste and sharps can lead to transmission of disease to community members due to needlestick injury or needle reuse.
Reducing Risk
Wash hands after working with waste or infected material. Handle all sharps with care to minimize needlestick injury. If you handle waste, wear appropriate protective clothing, including a water-resistant apron, thick gloves, boots or closed-toe shoes, and eye protection.Do not sort waste or open waste containers to sort waste.Be aware of procedures for treatment of injuries, cleaning of contaminated areas, and reporting sharps injuries or accidents. Report sharps injuries to the appropriate personnel. Injuries should be followed up by post-exposure prevention treatment. Managers should maintain a log of all accidents. A full course of hepatitis B and tetanus vaccination will protect you from the hepatitis B virus and tetanus–anyone handling sharps should be vaccinated.
Health workers are at risk of accidental needlestick or other injuries from sharps. World health Organization (WHO) recommends following the steps below after a needlestick injury:
Immediately bleed the wound and wash the area with soap under clean running water. If blood or body fluids have gotten into eyes, splash eyes with clean water. Immediately report the incident to a designated person. Retain, if possible, the item involved in the incident; get details of its source for identification of possible infection. Seek additional medical attention in an emergency health department as soon as possible, including evaluating the exposure for its potential to transmit HIV infection (based on body substance and severity of exposure). Initiate post-exposure prophylaxis, if available and appropriate. Get blood tests or other tests and counseling, if indicated. Record the incident.
16

Training Health Workers in the Management of Sharps Waste
Guide for Training Injection Providers Version 1 PATHOctober 2005
Investigate the incident and identify and implement remedial action to prevent similar incidents in the future.
Protective Clothing Health workers protect themselves by establishing a barrier between themselves and the infective agent. The type of protection needed depends on the worker’s activities.
Protective clothing must be worn at all times when working with health care waste. It must be properly maintained and kept clean. The clothing should not be taken home; it must remain at the health facility to avoid possible contamination of the community. Protective clothing includes:
Gloves: always wear gloves when contaminated items are handled. Puncture-resistant gloves should be used when handling sharps containers or bags with unknown contents. Boots or closed-toe shoes: rubber boots or leather shoes provide extra protection to the feet from injury by sharps or heavy items that may accidentally fall. They must be kept clean. When possible, avoid wearing sandals, thongs, or shoes made of soft materials. Aprons: rubber or plastic aprons provide a protective, waterproof barrier to the body. Goggles: plastic goggles can protect the eyes from accidental splashes.
HandoutsNone
Slides5 slides
Notes for the Trainer
Review material and adapt based on your health system. Note the guidelines for reporting needlestick and protective clothing. It is important these be adapted to reflect the systems currently in place in your facilities.
17

HW Safety – IP.3
3. Health Worker Safety
Disease Transmission
Diseases can be transmitted from:
• Health worker to patient.
• Patient to health worker.
• Health worker to family and community.
• Health facility to community.
HW Safety – IP.3
Reducing Risk
• Wash hands.
• Handle all sharps with care.
• Wear appropriate protective clothing.
• Do not re-sort waste.
• Follow procedures.
• Report sharps injuries.
• Follow injuries with postexposure prevention treatment.
• Managers maintain a log of all accidents.
• Get vaccinated for hepatitis B and tetanus.
HW Safety – IP.3
Needlestick Injuries
In the case of a needlestick injury:
• Immediately bleed and wash wound.
• Splash eyes with clean water if appropriate.
• Immediately report and record the incident.
• Get details of its source for identification of possible infection.
• Seek additional medical attention.
• Initiate postexposure prophylaxis, if available and appropriate.
• Get blood tests or other tests and counseling, if indicated.
• Investigate the incident and implement steps to prevent future incidents.
HW Safety – IP.3
Protective Clothing
• Gloves
• Boots or closed-toe shoes
• Aprons
• Goggles
HW Safety – IP.3
18

Training Health Workers in the Management of Sharps Waste
Guide for Training Injection Providers Version 1 PATHOctober 2005
4. Segregation of Waste
Types of Waste
Injection providers should segregate health care waste immediately according to the type of waste. Types of waste include:– Noninfectious waste. This is general waste that presents no risk to persons who handle it.
Examples: paper, packaging materials, office supplies, drink containers, hand towels, boxes, glass, plastic bottles, and food.
– Infectious waste. This is waste that has been in contact with human blood or bodily fluid and has the ability to spread disease. Examples: gauze, cotton, dressings, laboratory cultures, IV fluid lines, blood bags, gloves, anatomical waste, and pharmaceutical waste.
– Sharps waste. This is waste that has the potential to puncture the skin and cause disease.Examples: needles, infusion sets, scalpels, knives, blades, lancets, and broken glass.
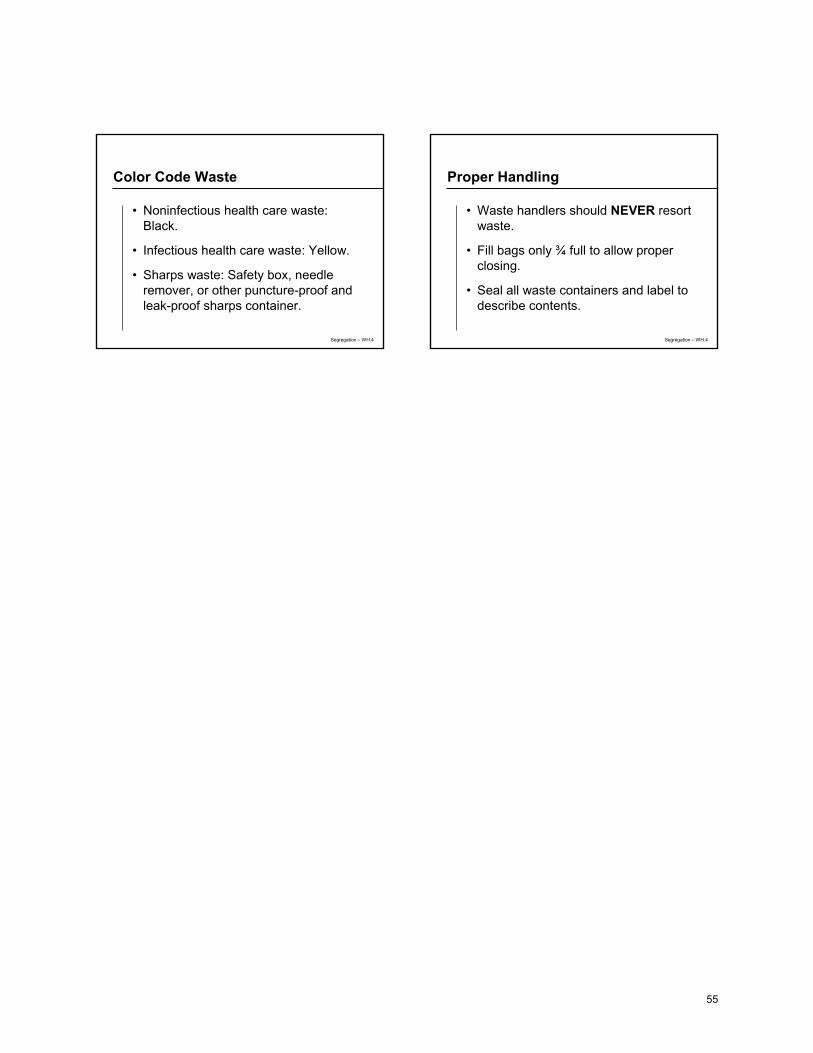
Segregating Waste
Follow a color-coded waste container system for each of these waste types and segregate the waste into the appropriate container. (WHO Color Recommendations) – Noninfectious health care waste: Black. – Infectious health care waste: Yellow. – Sharps waste: needle remover, safety box, or other puncture-proof and leak-proof sharps
containers.
Proper Handling
Injection providers segregate waste at point of use. Waste should NEVER be re-sorted. Seal all waste containers and label to describe contents. Reuse and/or recycle household waste whenever appropriate. Retractable syringes are to be placed into a safety box or infectious waste bag after the needle is retracted, according to facility guidelines.
HandoutsSegregation of Medical Waste
Slides8 slides
19
Training Health Workers in the Management of Sharps Waste
Guide for Training Injection Providers Version 1 PATHOctober 2005
Notes for the Trainer
Review material and adapt based on your health system. Note the color-coded system and ensure the colors reflect your system. Stress the importance of segregating the waste and the injection providers’ critical role.
Activity
Practice waste segregation using appropriate-colored bags and facility supplies if available. Alternatively, use paper cutouts of different types of waste and have participants separate them into the appropriate categories.
20

21

Segregation – IP.4
4. Segregation of Waste
Segregation of Waste
• Providers should segregate waste immediately according to type.
• Types of waste include: Noninfectious, infectious, and sharps waste.
Segregation – IP.4
Noninfectious Waste
• Presents no risk.
• Examples: paper, packaging materials, office supplies, drink containers, hand towels, boxes, glass, plastic bottles, and food.
Segregation – IP.4
Infectious Waste
• Has been in contact with human blood and has the ability to spread disease.
• Examples: gauze, cotton, dressings, laboratory cultures, IV fluid lines, blood bags, gloves, anatomical waste, and pharmaceutical waste.
Segregation – IP.4
Sharps Waste
• Has the potential to puncture the skin and cause disease.
• Examples: needles, infusion sets, scalpels, knives, blades, lancets, and broken glass.
Segregation – IP.4 Segregation – IP.4
22

Color Code Waste
• Noninfectious health care waste: Black.
• Infectious health care waste: Yellow.
• Sharps waste: Safety box, needle remover, or other puncture-resistant and leak-resistant sharps containers.
Segregation – IP.4
Proper Handling
• Injection providers segregate waste at point of use.
• Waste should NEVER be resorted.
• Seal and label all waste containers to describe contents.
Segregation – IP.4
23

Training Health Workers in the Management of Sharps Waste
Guide for Training Injection Providers Version 1 PATHOctober 2005
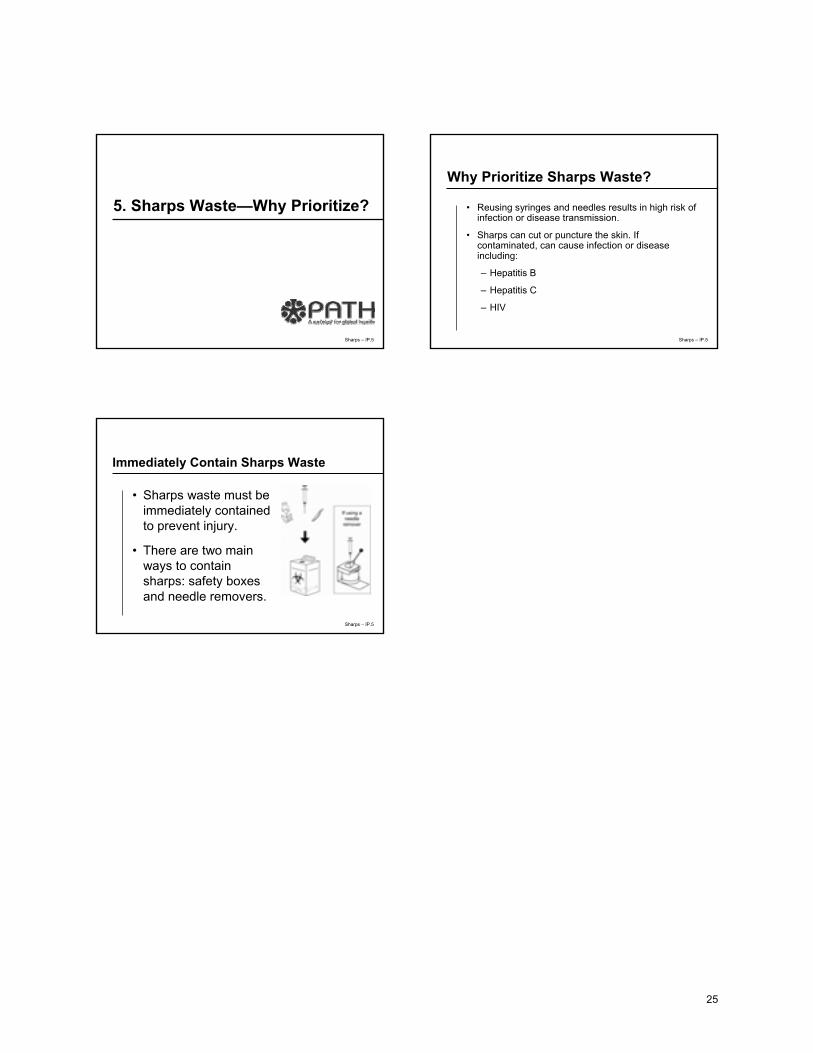
5. Sharps Waste––Why Prioritize?
If not properly disposed of, scavengers may collect and reuse sharps waste. Reusing syringes and needles results in high risk of infection or disease transmission. Sharps can cut or puncture the skin, and, if they are contaminated, they can cause an infection or disease including: – Hepatitis B – Hepatitis C – HIVIncreasing use of disposable and autodisable (AD) syringes to help prevent bloodborne diseases has resulted in more sharps waste.Sharps waste must be immediately contained to prevent injury. There are two main ways to contain sharps: safety boxes and needle removers.
HandoutsNone
Slides3 slides
Notes for the Trainer
Review material and adapt based on your health system.
24
Sharps – IP.5
5. Sharps Waste—Why Prioritize?
Why Prioritize Sharps Waste?
• Reusing syringes and needles results in high risk of infection or disease transmission.
• Sharps can cut or puncture the skin. If contaminated, can cause infection or disease including:
– Hepatitis B
– Hepatitis C
– HIV
Sharps – IP.5
Immediately Contain Sharps Waste
• Sharps waste must be immediately contained to prevent injury.
• There are two main ways to contain sharps: safety boxes and needle removers.
Sharps – IP.5
25

Training Health Workers in the Management of Sharps Waste
Guide for Training Injection Providers Version 1 PATHOctober 2005
6. Containing Sharps––Safety Box
Sharps waste must be immediately contained after use to prevent injury. There are two main ways to contain sharps: safety boxes and needle removers.
What is a safety box? Puncture- and leak-resistant container for disposal of sharps. Used only for sharps waste.
Why use a safety box? Immediately confines hazardous sharps waste and prevents reuse. Proper use may prevent needlestick injuries to health care workers and the community. WHO recommends use of a safety box.
How to use a safety box: Follow assembly instructions printed on the box. Keep safety box within arm’s reach at each place where injections are given. Dispose of the used syringe into the small opening in the safety box immediately after use. Do not recap and do not collect syringes for later disposal. Fingers should never be placed inside the box. Put retractable or safety syringes in safety box or infectious waste bag, according to facility guidelines.Close the flap on the small opening of the box when it is ¾ full. Do not overfill. Fill safety box only once and then destroy.
What goes in a safety box? Syringes with needles. Syringes with needles removed (if using a needle remover). Infusion sets. Scalpels.Blades.Broken glass.
HandoutsUsing a Safety Box
Slides7 slides
26

Training Health Workers in the Management of Sharps Waste
Guide for Training Injection Providers Version 1 PATHOctober 2005
Notes for the Trainer
Review material and adapt based on your health system. Distribute handout and go through instructions with the participants.
Activity
Distribute safety boxes to participants and have them practice putting one together. Clarify instructions if necessary.
27

28

Safety Box–IP. 6
6. Containing Sharps—Safety Box
Containing Sharps
• Sharps waste must be immediately contained to prevent injury.
• There are two main ways to contain sharps: safety box and needle remover.
Safety Box – IP.6
What is a safety box?
• Puncture- and leak-resistant container for disposal of sharps.
• Used only for sharps waste.
Safety Box – IP. 6
Why use a safety box?
• Immediately confines hazardous sharps waste and prevents reuse.
• Proper use may prevent needlestick injuries to health care workers and the community.
• WHO recommends use of a safety box.
Safety Box – IP.6
How to use a safety box:
• Follow assembly instructions printed on the box.
• Keep safety box within arm’s reach at each place injections are given.
• Dispose of the used syringe into the small opening in the safety box immediately after use.
• Do not recap and do not collect syringes for later disposal.
Safety Box – IP.6
How to use a safety box:
• Fingers should never be placed inside the box.
• Put syringes in safety box or infectious waste bag, according facility guidelines.
• Close the flap on the small opening of the box when it is ¾ full. Do not overfill.
• Fill safety box only once and then destroy.
Safety Box –IP. 6
29
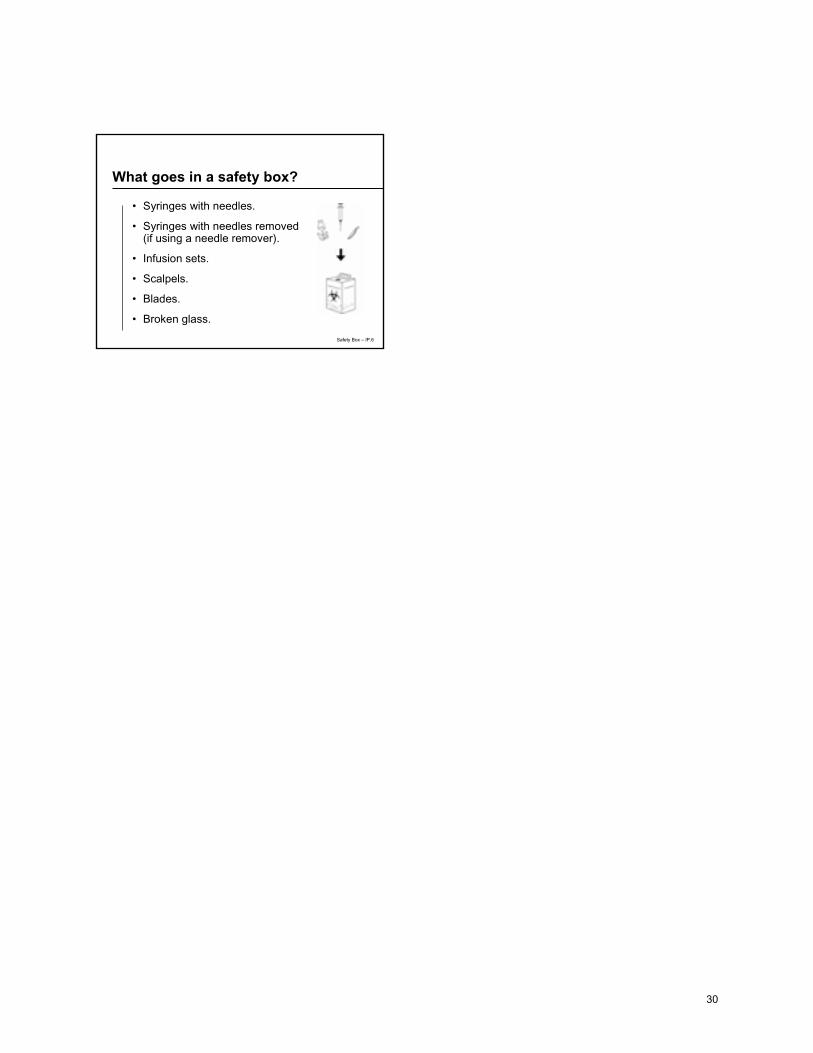
What goes in a safety box?
• Syringes with needles.
• Syringes with needles removed (if using a needle remover).
• Infusion sets.
• Scalpels.
• Blades.
• Broken glass.
Safety Box – IP.6
30

Training Health Workers in the Management of Sharps Waste
Guide for Training Injection Providers Version 1 PATHOctober 2005
7. Containing Sharps––Needle Remover
Sharps waste must be immediately contained to prevent injury. There are two main ways to contain sharps: safety box and needle remover.
What is a needle remover?
A device to remove and contain needles at point of use; disables syringe. Can be used only on plastic syringes (not glass).
Why use a needle remover?
Immediately confines hazardous sharp waste. Prevents reuse. Reduces waste volume. Allows for on-site disposal of needles in a sharps pit or barrel. Proper use may prevent needlestick injuries to health care workers and the community.
Using a needle remover:
Place needle remover within arm’s reach of where the injection is given. Use the needle remover immediately after the injection is given.Do not save or batch syringes for later removal of needles. Do not recap needle before using the needle remover.Insert needle as far into the opening of the needle remover as possible and, while holding the syringe steady, push the handle down.Cut the syringe, not just the needle. Fill container to fill line––do not overfill. Put plastic syringe in safety box or infectious waste bag, according to facility guidelines. When full, carefully remove container and immediately put the lid on the container. Special care must be taken when placing the lid on the container to prevent accidental spill or needlesticks. Replace needle container when 3/4 full. If transporting the needle remover to outreach sites, make sure the lid is properly on the container.It is important to clean and oil the device regularly and tighten screws when necessary. Empty container in sharps pit or sharps barrel.
Maintenance notes:
Designate an appropriate and trained person to maintain the needle removers. Vaseline or any light lubricant may be used to oil the device.Do not use bleach on the metal blades of the device.
31

Training Health Workers in the Management of Sharps Waste
Guide for Training Injection Providers Version 1 PATHOctober 2005
HandoutsUsing a Needle Remover
Slides8 slides
Notes for the Trainer
Review material and adapt based on your health system. Distribute hand out and go through instructions with the participants. Stress the importance of maintenance.
Activity
Distribute one needle remover device and five syringes to each participant. Have participants practice using the needle remover, including removing and reinserting the container.
32

33

34

Needle Remover– IP.7
7. Containing Sharps—Needle Remover
Containing sharps
• Sharps waste must be contained immediately to prevent injury.
• There are two main ways to contain sharps: safety boxes and needle removers.
Needle Remover – IP.7
What is a needle remover?
• A device to remove and contain needles at point of use.
• Can be used only on plastic syringes (not glass).
Needle Remover – IP.7
Why use a needle remover?
• Immediately confines hazardous sharps waste.
• Prevents reuse.
• Reduces waste volume.
• Allows for on-site disposal of needles in a sharps pit or barrel.
• Proper use may prevent needlestick injuries to health care workers and the community.
Needle Remover – IP.7
Using a needle remover
• Place needle remover within arm’s reach of where the injection is given.
• Use the needle remover immediately after the injection is given.
• Do not save or batch syringes for later removal of needles.
• Do not recap needle before using the needle remover.
Needle Remover – IP.7
Using a needle remover
• Insert needle as far into the opening as you can and push the handle down.
• Cut the syringe, not just the needle.
• Fill container to fill line—do not overfill.
• Put plastic syringe in safety box or infectious waste bag, according to facility guidelines.
• When full, carefully remove container and immediately put the lid on the container.
Needle Remover –IP.7
35

Using a needle remover
• Care must be taken when placing the lid on the container to prevent accidental needlesticks.
• Replace needle container when ¾ full.
• If transporting the needle remover, make sure the lid is on the container.
• It is important to clean and oil the device regularly and tighten screws when necessary.
• Empty container into sharps pit or barrel.
Needle Remover – IP.7
Maintenance
• Designate an appropriate and trained person to maintain the needle removers.
• Vaseline or any light lubricant may be used to oil the device.
• Do not use bleach on the blades of the device.
36

Training Health Workers in the Management of Sharps Waste
Guide for Training Injection Providers Version 1 PATHOctober 2005
8. Roles and Responsibilities for Waste Management
Be sure you know what your and other staff’s responsibilities are with regard to management and disposal of sharps waste. Here are some common responsibilities:
Managers
Obtain and be familiar with national waste management policies. Develop facility waste management plan (goal, budget, personnel, roles, supervision, training, reporting). Ensure supply of safety boxes, needle removers, or other sharps containers, designate appropriate and secure storage for used sharps. Identify and budget for final disposal method including transport and fees. Create climate of support for needlestick injury reporting. Develop protocol for management of needlestick injury.Advocate for health worker safety.
Injection Providers
Follow waste management policies. Follow color-coded waste segregation system. Place sharps containers properly. Immediately dispose of sharps in closed container. Record keeping––record number of filled sharps containers, identify supply needs, report stock outs. Store sharps waste in secure location.
Waste Handlers
Know color-coding system. Collect filled sharps containers. Ensure waste is securely stored until disposal. Use protective equipment when handling sharps. Provide waste to waste collection vehicle or service.
Waste Carriers
Maintain segregation. Remove waste from facility. Ensure a clean environment at the facility. Safely transport waste to final disposal site. Dispose of waste in safe and acceptable manner.
Incinerator or autoclave operators:
Follow incinerator/autoclave operations procedure. Use protective equipment when handling waste.
37
Training Health Workers in the Management of Sharps WasteEnsure supply of fuel. Record weight and type of waste received. Ensure payments received, as appropriate. Follow regular maintenance schedule for incinerator. Ensure regular transport of ash to landfill.
HandoutsNone
Slides3 slides
Notes for the Trainer
Review roles and responsibilities and adapt based on your health system. Make sure all of the injection provider’s responsibilities are included above.
Guide for Training Injection Providers Version 1 PATHOctober 2005 38

Roles and Responsibilities– IP.8
8. Roles and Responsibilities for Waste Management
Roles and Responsibilities
• Know what your and other staff’s responsibilities are with regard to management and disposal of sharps waste.
Roles and Responsibilities– IP.8
Roles and Responsibilities
• Managers
• Injection Providers
• Waste Handlers
• Waste Carriers
• Incinerator or Autoclave Operators
Roles and Responsibilities– IP.8
39

40

Guide for Training Waste Handlers Version 1 PATHOctober 2005
Training Health Workers in the
Management of Sharps Waste
Guide for Training of
Waste Handlers
Contents
1. Training Overview................................................................................................................43
2. Sharps Waste Overview........................................................................................................45
3. Health Worker Safety ...........................................................................................................48
4. Segregation of Waste ............................................................................................................51
5. Handling, Storage, and Transport of Safety Boxes...............................................................56
6. Overview of Sharps Treatment, Destruction, and Disposal..................................................58
7. Treatment of Sharps: Liquid Disinfection ............................................................................60
8. Treatment of Sharps: Autoclave/Shredding..........................................................................62
9. Treatment of Sharps: Encapsulation .....................................................................................66
10. Treatment and Destruction of Sharps: Incineration ..............................................................6811. Disposal of Removed Needles: Protected Sharps Pit ...........................................................7312. Disposal of Removed Needles: Protected Sharps Barrel......................................................7813. Roles and Responsibilities for Waste Management..............................................................83
41

42

Training Health Workers in the Management of Sharps Waste
Guide for Training Waste Handlers
1. Training Overview
Objectives
To raise awareness of public health and environmental hazards that may be associated with inappropriate segregation, storage, collection, transport, handling, and disposal of sharps waste.To provide information on proper practices for disposing of sharps waste.To identify roles and responsibilities of all staff involved with managing sharps waste.
HandoutsNone
Slides4 slides
Notes for the Trainer
Review objectives with group.Ask if there are any objectives missing that the participants had hoped to achieve in the training.Add objectives to the list if feasible or determine alternate way to address participant objectives through additional training or information. Let participants know time expectations. Review modules listed below and determine whish sessions will be included in your training: 1. Training Overview 2. Sharps Waste Overview 3. Health Worker Safety 4. Segregation of Waste 5. Handling, Storage, and Transport of Safety Boxes 6. Overview of Sharps Treatment, Destruction, and Disposal7. Treatment of Sharps: Liquid Disinfection 8. Treatment of Sharps: Autoclave/Shredding 9. Treatment of Sharps: Encapsulation 10. Treatment and Destruction of Sharps: Incineration 11. Disposal of Removed Needles: Protected Sharps Pit 12. Disposal of Removed Needles: Protected Sharps Barrel 13. Roles and Responsibilities for Waste Management
Version 1 PATHOctober 2005 43

Management of Sharps Waste:Guide for Training Waste Handlers
Training Overview – WH.1
1. Training Overview
Objectives of Training
• Raise awareness of hazards of improper management of waste.
• Provide information on proper practices.
• Identify roles and responsibilities of all staff.
Training Overview – WH.1
Topics to Be Covered
• Training Objectives
• Sharps Waste Overview
• Health Worker Safety
• Segregation of Waste
• Handling and Transport of Safety Boxes
• Overview of Sharps Treatment and Disposal
• Destruction Training Overview – WH.1
44

Training Health Workers in the Management of Sharps Waste
Guide for Training Waste Handlers
2. Sharps Waste Overview
Problem
80% of waste from health facilities is “general” waste and not harmful. 20% of health care waste can be dangerous; only 1% is sharps waste. Poor waste disposal practices are dangerous to the community and health care workers. Waste management infrastructure may be limited in low-resource settings. There is no perfect solution. There are trade offs between costs, health risks to the community, and environmental pollution.
Approximate percentage of waste type per total waste in facility:
Noninfectious waste 80%Pathological waste and infectious waste 15%Sharps waste 1%Chemical or pharmaceutical waste 3%Aerosol cans, pressurized cylinders, broken thermometers
<1%
Key Steps in Sharps Waste Disposal
Segregation Containment Handling and Storage TransportTreatment or Destruction Disposal
HandoutsKey Steps in Sharps Waste Disposal
Slides4 slides
Notes for the Trainer
Review material and adapt based on your health system. Adjust the level of technical detail and language so that it is appropriate for the staff you are training.Distribute handout depicting steps in disposal process.
Version 1 PATHOctober 2005 45
46
MW Overview – WH.2
2. Sharps Waste Overview
Problem
• Poor disposal practices are dangerous to the community and health workers.
• Waste management infrastructure may be limited.
• No perfect solution. Trade offs between costs, health risks to the community, and pollution.
MW Overview – WH.2
Problem
• 80% of waste from health facilities is not harmful.
• 20% of health care waste can be dangerous.
• 1% is sharps waste.
MW Overview – WH.2
Key Steps in Disposal Process
• Segregation
• Containment
• Handling and Storage
• Transport
• Treatment or Destruction
• Disposal
MW Overview – WH.2
47

Training Health Workers in the Management of Sharps Waste
3. Health Worker Safety
Disease Transmission Diseases can be transmitted from:
Health worker to patient via: – Unclean hands – Dirty needles, other sharps Patient to health worker via: – Dirty needles, other sharps – Blood or body fluids on broken skinHealth worker to family or community via: – Unclean hands – Dirty clothes – Dirty shoes Facility to community – Improper disposal of medical and sharps waste.
Practices to reduce disease transmission: Wash hands after working with waste. Handle sharps with care. Do not sort through waste. Wear protective clothing. Keep facility clean inside and out. Know steps for treating injuries. Get fully immunized against tetanus and hepatits B.
Reducing Risk
If you handle waste, wear appropriate protective clothing, including a water-resistant apron, thick gloves, boots or closed-toe shoes, and eye protection.Do not sort or open waste containers to sort waste.Be aware of procedures for treatment of injuries, cleaning of contaminated areas, and reporting accidents.Report sharps injuries to the appropriate personnel. Injuries should be followed up by post-exposure prevention treatment. Managers should maintain a log of all accidents A full course of hepatitis B and tetanus vaccination will protect you from the hepatitis B virus and tetanus. Anyone handling sharps should be vaccinated.
Critical steps to take following a needlestick injury: Immediately bleed the wound. Wash the wound with soap and water.
Guide for Training Waste Handlers Report injury to supervisor.
Version 1 PATHOctober 2005 48

Training Health Workers in the Management of Sharps Waste
Talk to a doctor.
Protective Clothing What to wear:
Gloves: protects any cuts on hands and helps protect against needlesticks. Boots or closed-toe shoes: protects feet from sharps and accidental spills. Aprons (rubber or plastic): keeps germs off of clothes. Goggles (plastic): protect the eyes from accidental splashes.
When to wear it: At all times when working with health care waste.
Keep it in good condition: Clean clothing after each use. Leave at facility; do not take home.
HandoutsNone
Slides5 slides
Notes for the Trainer
Review material and adapt based on your health system.Adjust the level of technical detail and language so that it is appropriate for the staff you are training.Note the guidelines for reporting needlesticks and wearing protective clothing. It is important these be adapted to reflect the systems currently in place in your facilities.
Guide for Training Waste Handlers Version 1 PATHOctober 2005 49
HW Safety – WH.3
3. Health Worker Safety
Disease Transmission
Diseases can be transmitted from:
• Health worker to patient.
• Patient to health worker.
• Health worker to family and community.
• Health facility to community.
HW Safety – WH.3
Reducing Risk
• Wash hands after working with waste.
• Handle sharps with care.
• Do not sort through waste.
• Wear protective clothing.
• Keep facility clean inside and out.
• Know steps for treating injuries.
• Get fully immunized against tetanus and hepatitis B.
HW Safety – WH.3
Needlestick Injuries
• Immediately bleed the wound.
• Wash the wound with soap and water.
• Report injury to supervisor.
• Talk to a doctor.
HW Safety – WH.3
Protective Clothing
• Gloves
• Boots or closed-toe shoes
• Aprons
• Goggles
HW Safety – WH.3
50

Training Health Workers in the Management of Sharps Waste
Guide for Training Waste Handlers
4. Segregation of Waste
Types of Waste
Injection providers should segregate health care waste immediately according to the type of waste. Types of waste include:– Noninfectious waste. This is waste that presents no risk to persons who handle it.
Examples: paper, packaging materials, office supplies, drink containers, hand towels, boxes, glass, plastic bottles, and food.
– Infectious waste. This is waste that has been in contact with human blood or bodily fluids and has the ability to cause disease.Examples: gauze, cotton, dressings, laboratory cultures, IV fluid lines, blood bags, gloves, anatomical waste, and pharmaceutical waste.
– Sharps waste. This is waste that has the potential to puncture the skin and cause disease.Examples: needles, infusion sets, scalpels, knives, blades, lancets, and broken glass.
Segregating Waste
Waste handlers should NEVER re-sort waste. Follow a color-coded waste container system for each of these waste types and segregate the waste into the appropriate container. (WHO Color Recommendations) – Noninfectious health care waste: Black. – Infectious health care waste: Yellow. – Sharps waste: needle remover, safety box, or other puncture-resistant and leak-resistant
sharps containers.Fill bags only ¾ full to allow proper closing. This will reduce risk of spilling or breaking. Seal all waste containers and label to describe contents.
HandoutsSegregation and Disposal of Medical Waste
Slides8 slides
Version 1 PATHOctober 2005 51

Training Health Workers in the Management of Sharps Waste
Notes for the Trainer
Review material and adapt based on your health system.Adjust the level of technical detail and language so that it is appropriate for the staff you are training.Distribute handout.Note the color-coded system and ensure the colors reflect your system. Stress the concept that waste handlers should NEVER re-sort waste.
Activity
Practice waste segregation using appropriate-colored bags and facility supplies if available. Alternatively, use paper cutouts of different types of waste and have participants separate them into the appropriate categories.
Guide for Training Waste Handlers Version 1 PATHOctober 2005 52

53

Segregation – WH.4
4. Segregation of Waste
Segregation of Waste
• Segregate waste immediately according to type.
• Types of waste include: Noninfectious, infectious, and sharps waste.
Segregation – WH.4
Noninfectious Waste
• Presents no risk.
• Examples: paper, packaging materials, office supplies, drink containers, hand towels, boxes, glass, plastic bottles, and food.
Segregation – WH.4
Infectious Waste
• Has been in contact with human blood and bodily fluids and has the ability to spread disease.
• Examples: gauze, cotton, dressings, laboratory cultures, IV fluid lines, blood bags, gloves, anatomical waste, and pharmaceutical waste.
Segregation – WH.4
Sharps Waste
• Has the potential to puncture the skin and cause disease.
• Examples: needles, infusion sets, scalpels, knives, blades, lancets, and broken glass.
Segregation – WH.4 Segregation – WH.4
54
Color Code Waste
• Noninfectious health care waste: Black.
• Infectious health care waste: Yellow.
• Sharps waste: Safety box, needle remover, or other puncture-proof and leak-proof sharps container.
Segregation – WH.4
Proper Handling
• Waste handlers should NEVER resort waste.
• Fill bags only ¾ full to allow proper closing.
• Seal all waste containers and label to describe contents.
Segregation – WH.4
55
Training Health Workers in the Management of Sharps Waste
Guide for Training Waste Handlers
5. Handling, Storage, and Transport of Safety Boxes
Handling/Storage
Sharps waste must be stored in a safe place.
Keep boxes in a secure location––away from medical supplies and out of reach (a locked room is best). Keep safety boxes dry. Keep written record of number of safety boxes received and disposed. Store safety boxes no more than one week (or according to facility guidelines).
Burial or Transport At facilities that do not have incinerators, safety boxes can be buried on site in a deep pit or transported to an incinerator. If transported to an incinerator:
Keep boxes upright. Avoid direct contact of safety boxes with drugs, vaccine, and medical supplies that might be in the same vehicle. Keep safety boxes dry and protected from rain. Be sure you are aware of the schedule for pick up and delivery of safety boxes. After transport, clean vehicle surfaces with bleach solution.
HandoutsNone
Slides4 slides
Notes for the Trainer
Review material and adapt based on your health system.
Version 1 PATHOctober 2005 56

Handling and Transport of Safety Boxes–WH.5
5. Handling, Storage, and Transport of Safety Boxes
Handling/Storage
• Sharps waste must be stored in a safe place.
• Keep boxes in a secure location.
• Keep safety boxes dry.
• Keep written record of number of safety boxes received and disposed.
• Store safety boxes no more than one week (or according to facility guidelines).
Handling and Transport of Safety Boxes–WH.5
Burial or Transport
• At facilities that do not have incinerators, safety boxes can be buried on site in a deep pit or transported to an incinerator.
Handling and Transport of Safety Boxes–WH.5
Transporting to an Incinerator
• Keep boxes upright.
• Avoid direct contact of safety boxes with other waste or medical supplies in the same vehicle.
• Keep safety boxes dry.
• Be sure you are aware of the transport schedule.
• After transport, clean vehicle surfaces.
Handling and Transport of Safety Boxes–WH.5
57

Training Health Workers in the Management of Sharps Waste
6. Overview of Sharps Treatment, Destruction, and Disposal
Today there are no systems without disadvantages and the final choice of the best available alternative is dependent on local conditions rather than global policy.
Treatment Options
IncinerationAutoclave/shreddingLiquid disinfection Melting
Disposal Options
Infectious waste pit Protected sharps pit Sharps barrel Ash pit Municipal waste/landfill Encapsulation Recycling
HandoutsNone
Slides3 slides
Notes for the Trainer
Review material and adapt based on your health system. Some treatment options may not be available at your facility; include only those that are.
Guide for Training Waste Handlers Version 1 PATHOctober 2005 58

Treatment and Disposal- WH.6
6. Overview of Sharps Treatment, Destruction,and Disposal
Treatment Options
• Incineration
• Autoclave/shredding
• Liquid disinfection
• Melting
Treatment and Disposal–WH.6
Disposal Options
• Infectious waste pit
• Protected sharps pit
• Sharps barrel
• Ash pit
• Municipal waste/landfill
• Encapsulation
• Recycling
Treatment and Disposal–WH.6
59

Training Health Workers in the Management of Sharps Waste
7. Treatment of Sharps: Liquid Disinfection
Warning: Disinfection does not render sharps safe for reuse and only serves to reduce the risk from accidental exposure to sharps prior to treatment or disposal.
What is disinfection? Chemical disinfection is generally achieved by adding bleach or other disinfectants to syringes.
Why disinfect? It reduces the pathogenic risk of infectious health care wastes.
Guidelines for disinfection:
Household bleach, at the appropriate concentrations (0.5% chlorine solution), can be used to disinfect sharps and other wastes.Disinfection procedures must be followed carefully to be effective.
HandoutsNone
Slides4 slides
Notes for the Trainer
Review material and adapt based on your health system.Adjust the level of technical detail and language so that it is appropriate for the staff you are training.Instructions for use will vary by method of disinfection.Specific details should be added based on method used in your health facilities.
Guide for Training Waste Handlers Version 1 PATHOctober 2005 60

Treatment: Disinfection–WH.7
7. Treatment of Sharps: Liquid Disinfection
Liquid Disinfection
What is disinfection?
• Chemical disinfection is generally achieved by adding bleach or other disinfectants to syringes.
Treatment: Disinfection–WH.7
Liquid Disinfection
Why disinfect?
• It reduces the pathogenic risk of infectious health care waste.
Treatment: Disinfection–WH.7
Liquid Disinfection
Guidelines for Disinfection
• Household bleach can be used to disinfect sharps and other wastes.
• Disinfection procedures must be followed carefully to be effective.
• Disinfection does not render sharps safe for reuse.
• Disinfection reduces the risk of accidental exposure to sharps. Treatment: Disinfection–WH.7
61

Training Health Workers in the Management of Sharps Waste
8. Treatment of Sharps: Autoclave/Shredding
What is autoclaving?
Autoclaving is a low-heat thermal process that is designed to bring steam into direct contact with waste for a sufficient duration to disinfect the waste.Autoclaving is environmentally safe. It requires electrical power in most cases and is not always suitable to treat waste at health centers.
How it works:
Hot pressurized steam kills microorganisms.
Guide for Training Waste Handlers
InfectiousWaste
Autoclave
Regular garbage (or recycling of syringe
plastic)
SharpsWaste
Requirements:
Proper pressure, heat, and time are required: 121° for 1 hour.
AutoclaveNeedle removal or shredding before autoclaving will make autoclaved waste safer.
Remove needles Inspection and Maintenance:
Required to ensure gaskets, boiler, filters, etc. are working properly.
Handling: Landfill
Autoclaved waste is as safe for handling as regular garbage if it contains no sharps.
Shredding:
Shredders cut sharps into small pieces. Requires a worker skilled in the operation and maintenance of sometimes heavy-duty, rotating equipment. Only disinfected needles and syringes should be shredded.
HandoutsNone
Slides9 slides
Version 1 PATHOctober 2005 62

Training Health Workers in the Management of Sharps Waste
Notes for the Trainer
Review material and adapt based on your health system.Adjust the level of technical detail and language so that it is appropriate for the staff you are training.Instructions for use will vary by type of autoclave in use. Specific details should be added based on the autoclave in place in your health facilities. Stress that only trained staff should operate an autoclave. Stress the importance of maintenance. This section covers small-scale autoclaves. Large-scale autoclaves may be available in some urban settings. These require a qualified operator and have specific operating procedures that are not covered here.
Guide for Training Waste Handlers Version 1 PATHOctober 2005 63

Autoclave–WH.8
8. Treatment of Sharps: Autoclave/Shredding
Autoclave
What is autoclaving?
• Low-heat thermal process that brings steam into direct contact with waste to disinfect the waste.
• It requires electrical power in most cases and is not always suitable to treat waste at health centers.
Autoclave–WH.8
Autoclave
Why autoclave?
• Autoclaving is environmentally safe.
Autoclave–WH.8
Autoclave
How it works:
• Hot pressurized steam kills microorganisms.
Autoclave–WH.8
Autoclave
Requirements:
• Proper pressure, heat, and time are required: 121° for 1 hour.
• Needle removal or shredding before autoclaving will make autoclaved waste safer.
Autoclave–WH.8
Autoclave
Infectious Waste
Autoclave
Regular garbage(or recycling of syringe
plastic)
Landfill
Sharps Waste
Autoclave
Remove needles
64

Autoclave
Inspection and Maintenance:
• Required to ensure gaskets, boiler, filters, etc. are working properly.
Autoclave–WH.8
Autoclave
Handling:
• Autoclaved waste is as safe for handling as regular garbage if it contains no sharps.
Autoclave–WH.7
Shredding
• Shredders cut sharps into small pieces.
• Requires a worker skilled in the operation and maintenance of equipment.
• Simple shredders can be made from a manually operated grain mill.
• Only disinfected needles and syringes should be shredded.
Autoclave–WH.8
65

Training Health Workers in the Management of Sharps Waste
Guide for Training Waste Handlers
9. Treatment of Sharps: Encapsulation
What is encapsulation? Encapsulation (or solidification) refers to the containment of a small number of hazardous or dangerous items or materials in a mass of inert material.
Why encapsulate?
Needles removed or cut from the syringes take up very little space. Large quantities of needles can therefore be collected in hard, puncture-proof containers.The purpose of the treatment is to isolate the dangerous items or materials from humans and the environment by encapsulating them in an impervious mass. The main advantage of the process is that it is very effective in reducing the risk of scavengers gaining access to the hazardous health care waste.
How to encapsulate:
Fill containers with waste ¾ full. Add an immobilizing material (wet concrete, sand, or clay). Seal the container. Once the needles have been encapsulated, the block containing the needles can be disposed of in a burial pit or introduced into the municipal waste system. Encapsulation of used sharps is generally not practiced as a long-term solution.
HandoutsNone
Slides4 slides
Notes for the Trainer
Review material and adapt based on your health system.Adjust the level of technical detail and language so that it is appropriate for the staff you are training.Instructions will vary by method of encapsulation.
Version 1 PATHOctober 2005 66

Treatment: Encapsulation–WH.9
9. Treatment of Sharps: Encapsulation
Encapsulation
What is encapsulation?
• Encapsulation refers to the containment of a small number of hazardous materials in a mass of solid material.
Treatment: Encapsulation–WH.9
Encapsulation
Why encapsulate?• Needles removed or cut from the syringes
take up little space. Large quantities of needles can be collected in puncture-proof containers.
• Isolates the dangerous items or materials from humans and the environment.
• Effective in reducing the risk of scavengers gaining access to the hazardous health care waste.
Treatment: Encapsulation–WH.9
Encapsulation
How to encapsulate:
• Fill containers with waste to ¾ full.
• Add immobilizing material.
• Seal the container.
• Once encapsulated, the block can be disposed of in a burial pit or municipal waste.
• Encapsulation is not a long-term solution.
Treatment: Encapsulation–WH.9
67

Training Health Workers in the Management of Sharps Waste
10.Treatment and Destruction of Sharps: Incineration
What is incineration? Incineration is high temperature burning.
Why incinerate sharps waste?
Incineration reduces volume and eliminates pathogens. Note that syringes do not contain PVC plastic and can be safely incinerated without releasing toxic emissions.
Using an Incinerator Operation:
Keep incinerator clean. Remove ash from ash chamber and grate, and do not store waste in incinerator. Some incinerators (i.e., De Montfort) need to be preheated by burning nonmedical waste (firewood, coconut shells, etc, and supplemented with kerosene or diesel fuel as may be necessary). The temperature of the stovepipe thermometer should be approximately 600ºC (it may take 20-30 minutes to reach this temperature) before medical waste is added. Safety boxes should be loaded at a rate that maintains a constant and good, but not fierce, fire in the grate (approximately 6 kg/hr of safety boxes). If the incinerator does not need to be preheated: – Load 4 to 6 safety boxes. – Sprinkle with ½ to 1 liter of kerosene. – Light fire through inspection door. – Close doors when fire burns hot. – Reload additional safety boxes when fire is finished and loading door is cool to touch.
Key components needed to properly incinerate Clear operation procedures––posted near the incinerator. Trained operator. Reliable segregation system so only infectious and nonpolluting materials are incinerated. Reliable transport system to get waste to the incinerator. Ash pit to safely dump the incinerator ash. Maintenance schedule. Adequate supply of fuel.
Things that MUST NOT be incinerated: PVC plastics (Important! Syringe bodies are not PVC plastics)Mercury thermometers. Batteries.
Guide for Training Waste Handlers Version 1 PATHOctober 2005 68

Training Health Workers in the Management of Sharps Waste
X-ray/photographic materials. Aerosol cans/gas containers. Glass vials (they can explode or if uncapped they melt and could block the incinerator grate). Reminder: broken glass goes in the safety box.
Critical Maintenance Steps A qualified official must inspect the incinerator every six months.
Masonry inspection and repair – Check for loose bricks and cracks in mortar––interior and exterior. – Repair or replace damaged bricks. Metal inspection and repair – Check doors, hinges, grate, chimney cap. – Replace if bent or damaged. Chimney – Clean soot from inside of chimney. Site maintenance – Clear brush from area around incinerator. Ash pit – If ash pit is full, cover and dig new pit.
HandoutsIncinerator Operation and Maintenance
Slides7 slides
Notes for the Trainer
Review material and adapt based on your health system.Adjust the level of technical detail and language so that it is appropriate for the staff you are training.Distribute handout. Instructions for use will vary by type of incinerator in use. Stress that only trained staff should operate an incinerator. Stress the importance of maintenance.
Guide for Training Waste Handlers Version 1 PATHOctober 2005 69

70

Incineration–WH.10
10. Treatment and Destruction of Sharps: Incineration
Incineration
What is incineration?
• Incineration is high-temperature burning.
• High temperature=cleaner burning.
Incineration–WH.10
Incineration
Why incinerate sharps waste?
• Incineration reduces volume and eliminates pathogens.
• Syringes do not contain PVC plastic and can be safely incinerated without releasing toxic emissions.
Incineration–WH.10
Operating an Incinerator
• Keep incinerator clean.
• Some incinerators need to be preheated by burning nonmedicalwaste.
• Safety boxes should be loaded at a rate that maintains a constant and good fire.
Incineration–WH.10
Components for Proper Incineration
• Clear operation procedures.
• Trained operator.
• Reliable segregation system.
• Reliable transport system.
• Ash pit.
• Maintenance schedule.
• Adequate supply of fuel. Incineration–WH.10
Do NOT Incinerate:
• PVC plastics
• Mercury thermometers
• Batteries
• X-ray/photographic materials
• Aerosol cans/gas containers
• Glass vials Incineration–WH.10
71

Critical Maintenance Steps
• Inspect the incinerator every 6 months
• Metal inspection and repair
• Chimney
• Site maintenance
• Ash pit
Incineration–WH.10
72
Training Health Workers in the Management of Sharps Waste
11.Disposal of Removed Needles: Protected Sharps Pit
What is a protected sharps pit?
A sharps pit is a deep, covered hole where needles or small sharps are placed after being cut with a needle remover. The needle pit should have a small opening so no one can reach into it.
Why use a protected sharps pit?
Confines hazardous sharps waste at facility without requiring transport. Proper use may prevent needlestick injuries to health care workers and the community. When the sharps pit is correctly used, a one cubic meter pit will safety contain over 1 million used needles.
Building a protected sharps pit
Identify the appropriate location. Locate the protected sharps pit away from ground water sources.Identify a builder and purchase the necessary materials. Follow the design drawings provided in the handout. Build the protected sharps pit above the water table. If the pit must be built below the water table, line the pit with concrete or consider installing a sharps barrel.Include drainage holes. Leave drainage holes in the sides of the pit to facilitate drainage. Build a fence around the sharps pit. The sharps pit must be fenced and protected to prevent unauthorized access. Lid should be kept on the needle chute when not in use. This will prevent water from entering the pit.
Using a protected sharps pit
Dispose of removed needles carefully in secure sharps pits. When transporting the filled container to the sharps pit, keep the lid on the container. Empty the needles into the opening in the top of the sharps pit. Wearing plastic gloves, clean the needle container with bleach and hot water before reuse.
HandoutBuilding a Protected Sharps Pit Using a Protected Sharps Pit
Slides5 slides
Guide for Training Waste Handlers Version 1 PATHOctober 2005 73

Training Health Workers in the Management of Sharps Waste
Notes for the Trainer
Review material and adapt based on your health system.Adjust the level of technical detail and language so that it is appropriate for the staff you are training.Distribute handouts.
Guide for Training Waste Handlers Version 1 PATHOctober 2005 74

Building a Protected Sharps Pit
1. Identify the appropriate location. Locate protected sharps pit away from
ground water sources.
2. Identify a builder and purchase the necessary materials. F
ollow the design draw
ings below.
3. Build the protected sharps pit above the w
ater table. Consider installing a sharps barrel if the w
ater table is an issue.
4. Include drainage holes. Leave drainage holes in the sides of the pit to facilitate drainage. 5. B
uild a fence around the sharps pit. The sharps pit m
ust be fenced and protected to prevent unauthorized access.
6. Lid should be kept on the needle chute when not in use. T
his will prevent w
ater from entering the pit.
Sharps pit (Indonesian style)
>1.5m
10cm C
oncrete slab
Sharps pit (MSF style)
NO
TE
:If the pit is above the w
ater table, leave drainage holes
in the wall. If the w
ater table is higher than the
base of the pit, coat the inside of the w
all with
cement to stop w
ater from
entering the pit.
1m
1.1mWater table
Brick or
concrete wall
10cm diam
. 1m
long plastic (pvc) or iron drainpipe
Ground
Cap
1m1m
Drainage
10cm C
oncrete slab
18cm
18 cm diam
. 1.5m
long concrete
drainpipe
1m 50cms
Concretefloor of
incineratorhousing
Ground
18cm
10cm
10cm diam
. 1m
long plastic (pvc)
or iron drainpipe
10cm C
oncrete slabW
ater table
75

76

Sharps Pit–WH.11
11. Disposal of Removed Needles:Protected Sharps Pit
Protected Sharps Pit
What is a sharps pit?
• A sharps pit is a deep, covered hole where needles or small sharps are placed after being cut with a needle remover.
Sharps Pit–WH.11
Protected Sharps Pit
Why use a protected sharps pit?
• Confines hazardous sharps waste at facility.
• Proper use may prevent needlestickinjuries.
• A one cubic meter pit will safety contain over 1 million used needles.
Sharps Pit–WH.11
Building a Protected Sharps Pit
• Identify the appropriate location.
• Identify a builder and purchase the necessary materials.
• Build the protected sharps pit above the water table.
• Include drainage holes.
• Build a fence around the sharps pit.
• Lid should be kept on the needle chute when not in use.
Sharps Pit–WH.11
Using a Protected Sharps Pit
• Dispose of removed needles carefully in secure sharps pit.
• When transporting the filled needle container to the sharps pit, keep the lid on the container.
• Empty the needles into the opening in the top.
• Wearing plastic gloves, clean the needle container with bleach and hot water before reuse.
Sharps Pit–WH.11
77

Training Health Workers in the Management of Sharps Waste
Guide for Training Waste Handlers
12.Disposal of Removed Needles: Protected Sharps Barrel
What is a protected sharps barrel?
A sharps barrel is a plastic, covered barrel where needles or small sharps are placed after being cut with a needle remover.
Why use a protected sharps barrel?
Confines hazardous sharps waste at facility without requiring transport. Proper use may prevent needlestick injuries to health care workers and the community. When the sharps barrel is correctly used, a barrel will safety contain over 150,000 used needles.
Building a protected sharps barrel: Manufacture a funnel: identify a manufacturer to make the funnel and provide the design drawings.Select a barrel and identify an appropriate location: barrels should be plastic, as metal barrels could rust over time. Health facility supervisors and waste handlers should decide together on a site for the barrel. It should be dry, secure, and convenient.Attach the funnel to the sharps barrel: screw the metal funnel into the hole on top of barrel. Rubber cement or other sealant may be used to help secure connection if needed. Occasionally the barrel may be gently rocked to settle the contents evenly inside: needles will tend to stack directly underneath the funnel opening, rocking helps to ensure that the entire barrel volume is being used. Funnel lid should be kept closed and locked when not in use.
Using a protected sharps barrel:
Dispose of removed needles carefully in secure sharps barrel. When transporting the filled needle container to the sharps barrel, keep the lid on the container.Empty the needles into the opening in the top of the sharps barrel.Wearing plastic gloves, clean the needle container with bleach and hot water before reuse.
HandoutsBuilding a Protected Sharps Barrel Using a Protected Sharps Barrel
Slides5 slides
Version 1 PATHOctober 2005 78

Training Health Workers in the Management of Sharps Waste
Notes for the Trainer
Review material and adapt based on your health system. If barrel is being newly implemented, ensure funnel design drawings are followed closely. Adjust the level of technical detail and language appropriately. Distribute handouts.
Guide for Training Waste Handlers Version 1 PATHOctober 2005 79

80
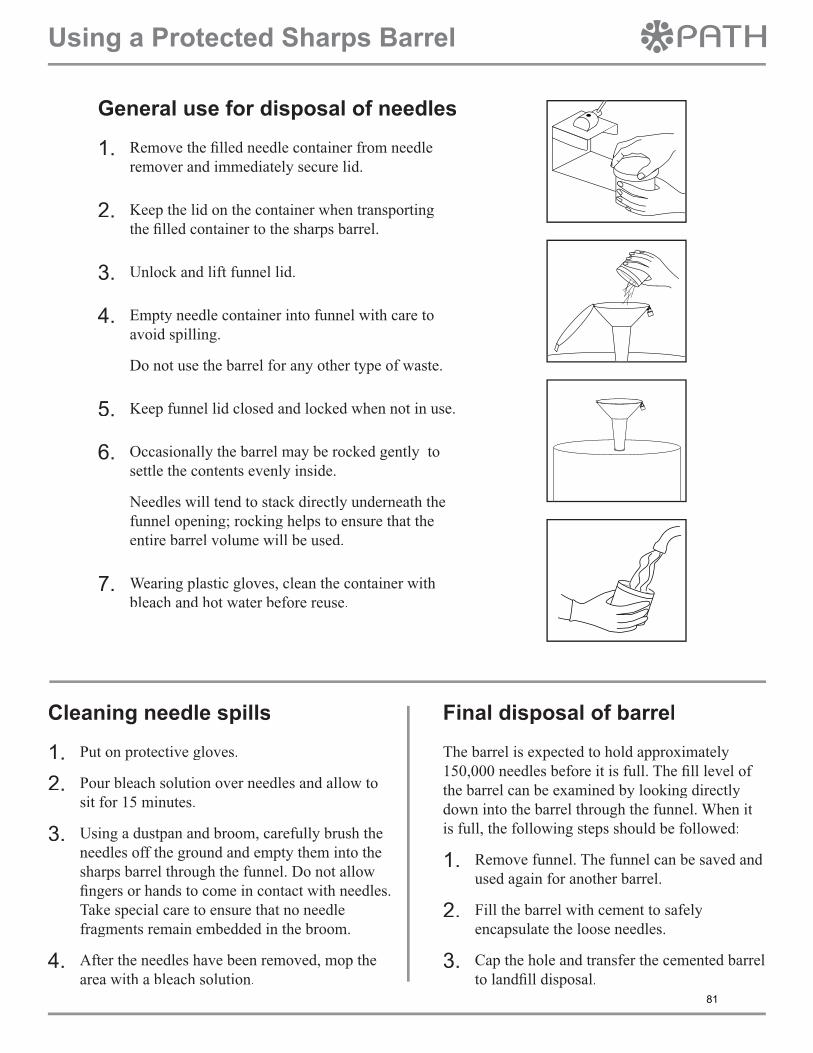
81

Sharps Barrel–WH.12
12. Disposal of Removed Needles:Protected Sharps Barrel
Protected Sharps Barrel
What is a sharps barrel?
• A sharps barrel is a plastic, covered barrel where needles or small sharps are placed after being cut with a needle remover.
Sharps Barrel–WH.12
Protected Sharps Barrel
Why use a protected sharps barrel?
• Confines hazardous sharps waste at facility.
• Proper use may prevent needlestickinjuries.
• A barrel will safely contain over 150,000 used needles.
Sharps Barrel–WH.12
Building a Sharps Barrel• Manufacture a funnel.
• Select a barrel and identify an appropriate location.
• Attach the funnel to the sharps barrel.
• Occasionally the barrel may be gently rocked to settle the contents evenly inside.
• Funnel lid should be kept closed and locked when not in use.
Sharps Barrel–WH.12
Using a Sharps Barrel• Dispose of removed needles
carefully in secure sharps barrel.
• When transporting the filled needle container to the sharps barrel, keep the lid on the container.
• Empty the needles into the opening in the top.
• Wearing gloves, clean the needle container with bleach and hot water before reuse.
Sharps Barrel–WH.12
82

Training Health Workers in the Management of Sharps Waste
Guide for Training Waste Handlers
13. Roles and Responsibilities for Waste Management
Be sure you know what your and other staff’s responsibilities are with regard to management and disposal of sharps waste. Here are some common responsibilities:
Managers
Obtain and be familiar with national waste management policies. Develop facility waste management plan (goal, budget, personnel, roles, supervision, training, reporting). Ensure supply of safety boxes, needle removers, or other sharps containers; designate appropriate and secure storage for used sharps. Identify and budget for final disposal method including transport and fees. Create climate of support for needlestick injury reporting. Develop protocol for management of needlestick injury.Advocate for health worker safety.
Injection Providers
Follow waste management policies. Follow color-coded waste segregation system. Place sharps containers properly. Immediately dispose of sharps in closed container. Record keeping––record number of filled sharps containers, identify supply needs, report stock outs. Store sharps waste in secure location.
Waste Handlers
Know color-coding system. Collect filled sharps containers. Ensure waste is securely stored until disposal. Use protective equipment when handling sharps. Provide waste to waste collection vehicle or service.
Waste Carriers
Maintain segregation. Remove waste from facility. Ensure a clean environment at the facility. Safely transport waste to final disposal site. Dispose of waste in safe and acceptable manner.
Version 1 PATHOctober 2005 83

Training Health Workers in the Management of Sharps Waste
Incinerator or autoclave operators:
Follow incinerator/autoclave operations procedure. Use protective equipment when handling waste. Ensure supply of fuel. Record weight and type of waste received. Ensure payments received, as appropriate. Follow regular maintenance schedule for incinerator. Ensure regular transport of ash to landfill.
HandoutsNone
Slides3 slides
Notes for the Trainer
Review roles and responsibilities and adapt based on your health system. For example, does the waste handler transport the waste? Is he/she also the incinerator operator?
Guide for Training Waste Handlers Version 1 PATHOctober 2005 84

Roles and Responsibilities– WH.13
13. Roles and Responsibilities of Sharps Waste Management
Roles and Responsibilities
• Know what your and other staff’s responsibilities are with regard to management and disposal of sharps waste.
Roles and Responsibilities– WH.13
Roles and Responsibilities
• Managers
• Injection Providers
• Waste Handlers
• Waste Carriers
• Incinerator or Autoclave Operators
Roles and Responsibilities– WH.13
85

86

Resources Version 1 PATHOctober 2005
Training Health Workers in the Management of Sharps Waste
Resources
Contents
1. Annotated Bibliography..........................................................................................................89
2. Handouts .................................................................................................................................90
87

88

Training Health Workers in the Management of Sharps Waste
1. Annotated Bibliography
PATH. Giving Safe Injections: Using Auto-Disable Syringes for Immunization
Seattle. 2001. English: http://www.path.org/files/SI_Giving_Safe_Injections_complete.pdfRussian: http://www.path.org/files/SI_Giving_Safe_Injections_Russian.pdfFrench: http://www.childrensvaccine.org/files/Giving_Safe_Inj_Fr.pdf
This manual is designed to give injection providers a foundation in providing injections that are safe for the recipient, heath worker, and the community. It discusses how health workers can unknowingly spread diseases through contaminated injections, it reviews the safe selection and reconstitution of vaccines, it covers how to arrange work stations and syringe disposal to prevent needlestick injuries, and it introduces the autodisable syringe.
PATH. A Planning Guide for Medical Waste Management. Seattle. 2004. Email [email protected] to obtain a copy.
This document is designed help health workers plan sharps waste disposal systems. The guide details critical planning steps including mapping the district, reviewing sharps collection options, reviewing options for disposal, assigning disposal systems, and creating a district planning guide to calculate needs and plan implementation.
PATH. Proper Handling and Disposal of Auto-Disable Syringes and Safety Boxes.
Seattle. 2002. http://www.childrensvaccine.org/files/AD_and_Safety_Box_Disposal.pdf
This module is a training resource to increase the safety of immunization injection equipment handling and disposal at health posts and hospitals in the developing world. It is specially designed to be easy to adapt for specific country programs. The primary audiences for this module are health workers who regularly give childhood vaccinations, their supervisors, and clinic and hospital managers.
PATH. Developing Health and Family Planning Materials for Low-Literate
Audiences: A Guide. Seattle. 1996. http://www.path.org/files/DC_Low_Literacy_Guide.pdf
This manual offers guidelines for developing health and family planning support materials for illiterate and low-literate groups worldwide, using materials development techniques that rely heavily on the involvement of the target audience, such as focus group discussions and in-depth interviews.
Resources Version 1 PATHOctober 2005 89

Training Health Workers in the Management of Sharps Waste
Prüss A, Townend WK. Teachers Guide: Management of wastes from health-care
activities. WHO. Geneva. 1998. http://whqlibdoc.who.int/hq/1998/WHO_EOS_98.6.pdf
The Teacher’s Guide complements the WHO publication Management of wastes from health-care activities (Geneva, 1999). The course outlined in the Teacher’s Guide is designed to raise awareness on public health and environmental hazards associated with improper health care waste management and to enable course participants to develop training programs that will incorporate sound waste management practices and technologies into individualized waste management plans for their health care establishments.
WHO. “First do no harm”, Introducing auto-disable syringes and ensuring
injection safety in immunization systems of developing countries.
WHO/V&B/02.26. Geneva. 2002.http://whqlibdoc.who.int/hq/2002/WHO_V&B_02.26.pdf
This document aims to assist policymakers and program managers in planning the introduction of AD syringes as part of a comprehensive national policy and plan of action to improve injection safety, both for routine immunization and for mass campaigns.
WHO. Management of Solid Health-Care Waste at Primary Health-Care Centres, A
Decision-Making Guide. WHO/PHE/IVB/04/ Geneva. 2005.http://whqlibdoc.who.int/publications/2005/9241592745.pdf
This document provides guidance for selecting the most appropriate method for safely managing solid waste generated at primary health care centers in developing countries. It includes six decision trees aimed at assisting the user in identifying appropriate waste management methods. This guide may also be used to evaluate existing practices related to healthcare waste management. It is intended for staff working in primary healthcare centers and technical staff working in the local, state, or central administration.
WHO. Managing health care waste disposal: Guidelines on how to construct, use,
and maintain a waste disposal unit. Funded by PATH. Harare. 2005. Email [email protected] to obtain a copy.
These guidelines focus on specifications, installation, and operation and maintenance procedures of a waste disposal unit, using the De Montfort incinerator. They include a plan for training waste disposal unit operators and an operator’s manual that outlines the best practices for disposing of health care waste.
2. Handouts
The following handouts were developed for these training materials. These handouts alsoappeared in each corresponding module. The CD ROM for this guide includes a catalog of the images that are included in these handouts to facilitate adaptation.
abvp24179.doc
Resources Version 1 PATHOctober 2005 90

91

92

93

94

95

96

97
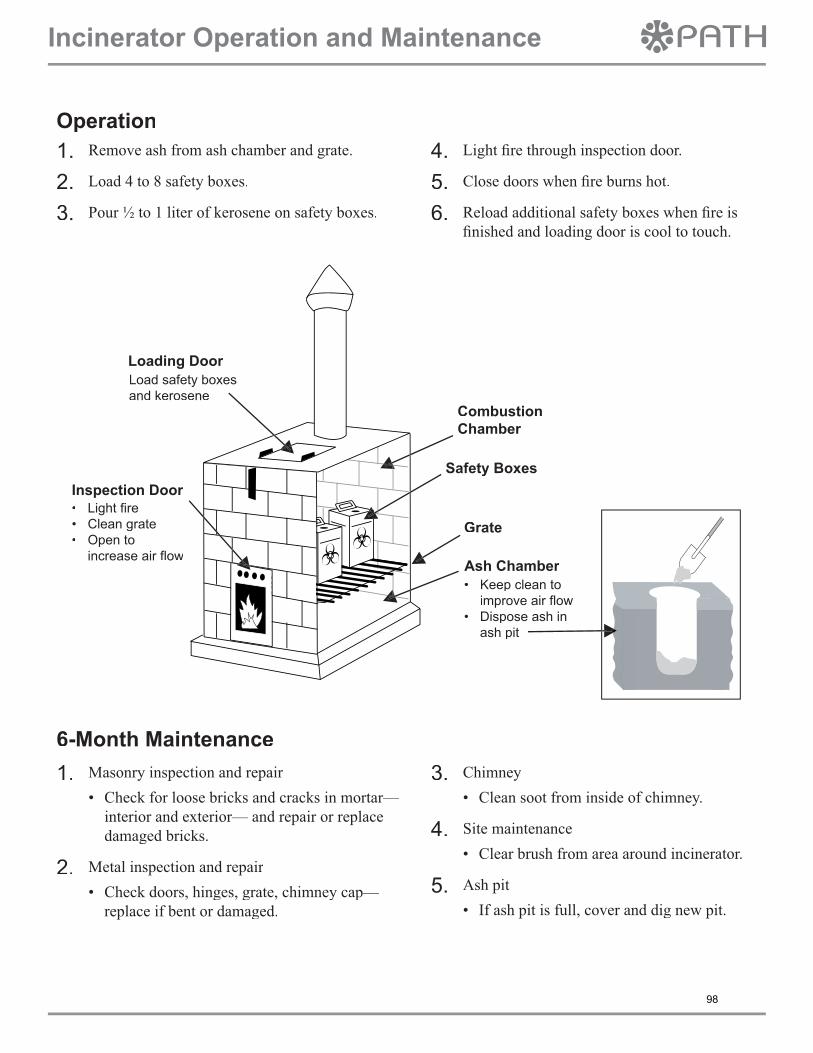
98

Building a Protected Sharps Pit
1. Identify the appropriate location. Locate protected sharps pit away from
ground water sources.
2. Identify a builder and purchase the necessary materials. F
ollow the design draw
ings below.
3. Build the protected sharps pit above the w
ater table. Consider installing a sharps barrel if the w
ater table is an issue.
4. Include drainage holes. Leave drainage holes in the sides of the pit to facilitate drainage. 5. B
uild a fence around the sharps pit. The sharps pit m
ust be fenced and protected to prevent unauthorized access.
6. Lid should be kept on the needle chute when not in use. T
his will prevent w
ater from entering the pit.
Sharps pit (Indonesian style)
>1.5m
10cm C
oncrete slab
Sharps pit (MSF style)
NO
TE
:If the pit is above the w
ater table, leave drainage holes
in the wall. If the w
ater table is higher than the
base of the pit, coat the inside of the w
all with
cement to stop w
ater from
entering the pit.
1m
1.1mWater table
Brick or
concrete wall
10cm diam
. 1m
long plastic (pvc) or iron drainpipe
Ground
Cap
1m1m
Drainage
10cm C
oncrete slab
18cm
18 cm diam
. 1.5m
long concrete
drainpipe
1m 50cms
Concretefloor of
incineratorhousing
Ground
18cm
10cm
10cm diam
. 1m
long plastic (pvc)
or iron drainpipe
10cm C
oncrete slabW
ater table
99

100

101

102