training for safe and effective logging techniques - oregon osha
TRANSCRIPT

Training for Safe and effecTive Logging TechniqueS
A series of plastic coated cards has been prepared to help you provide training to loggers. You can’t think of training as a one-shot deal. You need a total system of training for each job. Each firm has heavy responsibilities to provide sufficient training so each worker can perform safely. The bonus is that training also makes workers more productive.
Before you start, put yourself in the trainee’s place and think how you would like to be trained. How can you improve on trial-and-error learning? As a trainer you are the coach of a crew that must perform like athletes, work together like a team, and solve problems like geniuses! Besides your own technical skills, your greatest asset is patience.
People remember much more of what they see than what they hear. Draw pictures in the dirt. They remember much more if they do it as part of the training. Only telling someone what to do is often not enough.
Use positive feedback to get the correct performance. Shouting and negative feedback lose their effectiveness quickly. Repeat key ideas often. Use performance checks to track progress.
Key ideas at the top of the page are followed when possible throughout the card series. You can use these to expand on your training not covered by the ideas on the card.
Communications Organization Maintain Control Position Expectations
1 training.indd .indd 1 1/18/08 9:33:35 AM

Training guideLineSThese guidelines are offered to help you do a more effective training job on any logging technique.
Procedures1. Explain the technique calmly and slowly, step-by-step. Tell
them how, why, when, and where to use the technique. Use the pocket cards to explain ideas.
2. Demonstrate the technique at a normal pace, but make sure they understand the steps before speeding up the process.
3. Let the trainees try it.4. Provide coaching. Start by saying something positive. Give
only two or three points of correction on each trial. Don’t point out all the errors at once.
5. Let trainees try it again. Ask them to talk through what they are doing. Ask them what felt right or wrong.
6. Have trainees practice the technique. Tell them after a time a check will be made on their performance.
Performance ChecksEither the trainer or the supervisor should make a performance check on the trainee after some practice and operations. More instructions and practice may be needed. Individuals unable to make it past a couple of performance checks should be coun-seled into some other work.
Specific InformationThe plastic cards only have basic techniques. The trainer must explain in more detail and point out specific hazards and what to do about them.
Points to RememberStart slowly. Make sure trainees use proper techniques, then go for speed. It is easier to form good habits than to correct bad ones. You may have to “set up” a training situation, e.g. use a “bridle” with the end of the log in the air rather than covered with brush.
Give Them Short Rules to Remember“Put a roll on a big log to get it moving.”
1 training.indd .indd 2 1/18/08 9:33:36 AM

As a person in charge of other employees, you are the employer’s agent. You are the primary person responsible for the safety of those who work in your care. The employer has authorized you to be their representative for the safety and health program by:• showingthepurposeofthesafetyandhealthprogram.• identifyingthesafetyandhealthpersonnelimplementing
the program.• providing ongoing evaluation of employees’ safety
performance.• implementingadisciplinaryactiontoaddressunsafework
practices.• actingasthecompetentpersoninyourareawithauthorityto
supervise all personnel and enforce the safety and health program.
Youhavespecificresponsibilitiesto:(1) Supervise and enforce the company’s safety and health program.(2) Verify that all employees:
(a) can safely perform assigned tasks.(b) have received adequate job safety instruction and
training.(3) Periodically review the safety performance of each employee.(4) Provide job safety and health instruction, training, or
disciplinary action to an employee when the employee is working in an unsafe manner.
5) Closely supervise each employee who is receiving job safety and health instruction and training.
(6) Require all employees to demonstrate the ability to safely perform their work task before permitting them to work independently. (adapted from Rule 437-007-0110).
You will be the person employees come to in case of an accident, soyourfirstaidandCPR(cardio-pulmonaryresuscitation)skillsneed to be current and you should be prepared to use them. You willbeinvolvedinhazardidentificationandelimination,pre-serving an accident scene, accident investigation, employee involvement, training, evaluating employees, and keeping records.
Your obligations as a supervisor for safetY & HealtH
2 supervisor role.indd 1 1/18/08 9:34:55 AM

Some supervisors “seem” to know everything about all the jobs they supervise, but that probably is not true. Logging jobs are complex and supervisors cannot be expected to be experts at all logging jobs. Some skills need constant practice to be good at performing them. Supervisors need to demonstrate how to do the task safely and effectively. They need to identify the hazards around each job and how to eliminate them, or take actions to protect the workers.
When it comes to the safety of forest workers, it is all about US! There can be no barriers to working safely and workers, supervisors, and managers all have the same goal: to come home safely at the end of the day. Supervisors are the key com-municators so workers and managers can trust in each other and the supervisor to do what is best for safety and health.
Supervisors may be concerned that they will be grooming someone to do their job if they train another worker. They may get the message that production is above everything. Employ-ees need to trust supervisors; supervisors need to trust manag-ers; and managers need to trust the owners for the safety chain of supervision to be strong.
Supervisors need to know how to motivate people by rewarding them for the proper actions and by correcting their improper actions immediately and using disciplinary procedures to assure compliance. However, supervisors need to know what de-motivates people as well. Rewarding someone for improper actions (like ignoring safety violations for selected workers) or punishing a worker for doing the right action (not responding to workers who bring up safety issues) is de-motivating. De-motivating actions spread distrust throughout the organization likeawildfire.
The supervisor’s overall safety responsibility is to identify hazards and unsafe worker behaviors and correct them before an accident occurs. There is no more important job.
Your obligations as a supervisor for safetY & HealtH
2 supervisor role.indd 2 1/18/08 9:34:55 AM

ORIENTING NEW EMPLOYEES
The first few days on a new logging job are vital both for the employee and the employer. Get off to a good start on train-ing for production and safety.
Remember the circumstances of a new job. Everything is happening so fast; not much is remembered. You may have an employee completely new to logging or someone who claims to be experienced. The main supervisor needs to tell the new employee and the crew what is expected of them. Do it in a positive way.
Put your orientation and training program in position for future development of the employee over the next weeks and months. Fix responsibility for training and direct supervi-sion. Early mistakes can be fatal.
Explain the accident prevention program, the orientation, and the on-the-job training, and encourage questions. Tell new employees not to do anything beyond their skills — get help! Tell the crew not to ridicule new employees.
Make a visual competence check of new employees who claim to be experienced. Make sure personal protective equipment is used.
Tell them about safety meetings, how to report injuries, and about accident investigations, and give them copies of the safety and health rules. Make sure they know who has first- aid training and where the supplies are.
Instruct them on emergency radio procedures and evacua-tion plans. Give them the basics of firefighting, equipment, and tool use.
Communication patterns between the crew and the whistle and hand signals need detailed training. Don’t tolerate horseplay or inattention. Explain company disciplinary pro-cedures. Make new employees responsible for their learning and check on their progress periodically.
3 orientation.indd 1 1/18/08 9:36:06 AM

ORIENTING NEW EMPLOYEES
Artwork by Don Poole
ORGaNIzaTION & ExPEcTaTIONS
Stop any moving line and hold
Maintain control: Don’t do anything you don’t have skills for – get help!
POSITIONINGSafe lifting and pulling
Pull with your legs Lift with your legs
FIRST-aId SuPPLIES
PERSONaL PROTEcTIvE EquIPMENT
Hard hat
cOMMuNIcaTIONSWhistles and hand signals
Ear & eye protection
Gloves
Chaps
Stag pants
Calk boots
Back straight
3 orientation.indd 2 1/18/08 9:36:07 AM

THE MEANING OF “IN THE CLEAR”
There are no places on a logging operation that are absolutely safe. There are places “in the clear” where work takes place and where workers have the best chance of avoiding injury if the unexpected happens. For new workers “in the clear” means doing exactly what the experienced crew members tell you to do. Woodsworkers must make judgments about what being “in the clear” means for their jobs. This card will help you develop that judgment.
There are no absolute distances measured in feet or inches to put you “in the clear.” Experienced loggers know there’s an impact zone around any activity, such as where a tree can fall out of lead or a log up-end. Then there’s a secondary danger zone where trees hit others and knock them down or logs trigger other log movements. Sometimes, guidelines that are twice the height of trees or twice the length of logs are used to help make judgments.
You might use natural barriers, including being over the ridge, and behind trees, rocks or large stumps, to help get “in the clear.” Stay on your feet and pay attention to hazards in front of you, but keep alert in all directions, especially uphill where gravity can send hazards your way.
For equipment operations, being “in the clear” means putting enough distance between yourself and the machine so a sudden, unexpected movement will not put you in jeopardy. Get the log-ger’s attention before you move by any logging machine.
Stay out of the “bight” (Locations where, if rigging failed or lines broke or slackened, the slashing or falling lines would be deadly).
Being “in the clear” means having a clear path of escape avail-able and avoiding working in hazardous confined places (Watch pinch points).
The meaning of “in the clear” varies with every situation in log-ging. It is a matter of knowing which hazards to expect, how unexpected actions can trigger other hazards, and putting enough distance or barriers between you and the likely hazards.
You must make the final judgment!
4 in the clear.indd 1 1/18/08 9:36:40 AM

THE MEANING OF “IN THE CLEAR”
DISTANCES BARRIERS
BIGHT
ATTENTION
ESCAPE PATH
PINCH POINTS
Artwork by Don Poole
4 in the clear.indd 2 1/18/08 9:36:41 AM

StrapS and rigging
A competent person must inspect all rigging (blocks, shackles, etc.) for damage, cracks, or wear, including wire and synthetic rope, straps, guylines, and other lines, before they are used. Repairs or replacements must be made before they are used. Wire rope must be taken out of service or repaired when there is evidence of chafing, sawing, crushing, kinking, crystalliza-tion, bird-caging, corrosion, heat damage, and other damage that weakens the rope.
A shackle must have a rated breaking strength greater than the rated breaking strength of the line that they are used with and the manufacturer’s rated breaking strength of shackles must be used. The shackle pin diameter must be 1/8 inch larger than the indicated shackle size for shackles up to 1 3/4 inches and 1/4 inch larger than the indicated shackle size for shackles 1 3/4 inches up through 3 inches.
Safety pins must secure shackles used to hang blocks, jacks, or rigging on trees, anchor guylines, and join guyline or deadman strap eyes. When skylines are attached with a shackle using a knockout pin, the pin must be one size larger than the skyline and secured with a molly, latchpin, or cotterkey large enough to retain the shackle pin.
Sleeve shackle with “mollie” & knockout pin
Mollies must be rolled in with the lay of the line. Mollies must not be used to connect eyes of load-bearing lines.
Replacement shackle pins must meet the manufacturer’s origi-nal specifications. Shackle pins and nuts must be replaced when the threads are worn or stripped or when the original diameter is reduced by 15 percent. Sleeve shackles or choker bells must be used where choked lines are permitted. Sleeve shackles are required for guylines.
5 straps and rigging.indd 1 1/18/08 9:37:10 AM

StrapS and riggingStraps must be of the same or better material than the lines they support. After a strap is passed around an anchor and the two eyes are contained in the “U” part of the shackle, the angle created by the strap eyes must not be greater than 90 degrees. Another guide is that the shackle and eyes must not be closer than the same diameter of the anchor where the strap is attached. When a two-part strap or two chokers are used to hang a block, jack, tree shoe, or rigging, both eyes or ends must be under ap-proximately equal tension.
Straps or chokers are used at or near the ground or when rig-ging is hung in trees to hang or support blocks, jacks, tree shoes, etc., straps must be sized in accordance with Tables in Div. 7, Forest Activities Code. When rigging is suspended in one eye of a strap, the strap must be sized larger than when it is hung in both eyes.
For straps hung in trees where the interior angle (smaller angles between where lines enter and leave the block) creates excessive loading on the strap, additional precautions must be taken, such as using a larger strap, lightening loads, moving the carriage ahead on the line, and so forth to reduce the load on the strap.
Correct
0.52 x tension 1.25 x tension 1.54 x tension
150 degrees100 degrees
80 degrees
Incorrect
5 straps and rigging.indd 2 1/18/08 9:37:10 AM

RIGGING CREW HAZARDS
SOLUTIONS: to safety and efficiency problems for the rig-ging crew will depend on the logging system, the terrain and timber, and most of all, on the crew themselves.
COMMUNICATIONS: with the landing and between rig-ging crew members is vital. Keep the landing informed where crew members are located at all times. Show the landing team your trails to the work area. Use accepted hand signals when needed. Never move lines until everyone is in the clear. Hold pre-work meetings before beginning the unit to identify haz-ards and develop solutions.
ORGANIZATION: Arrange the work so no one is put “in the bight.” Select locations “in the clear” when turns break out and move toward the landing. Remove hazards before working in jeopardy, such as unstable rootwads, logs, etc.
MAINTAIN CONTROL: Keep control of the turn going to the landing. Don’t let hang ups break lines; use techniques rather than horsepower. Build turns up to a safe maximum, but don’t overload the system, lines, stumps, etc.
POSITIONING: Face the work and the hazards; watch the turn all the way to the landing. Use proper techniques for pulling line and carrying blocks. Keep your feet on solid footing and be ready to move quickly. Never get in a position where something can fall, roll or slide into you, such as set-ting chokers below logs that might roll.
EXPECTATIONS: Everyone on the rigging crew needs to be able to predict how the lines will move, how logs will move, and what to expect from others on the rigging crew. Yarder engineers and loader operators will not do anything to move lines unexpectedly when the crew is setting chokers.
6 rigging hazards.indd 1 1/18/08 9:38:30 AM
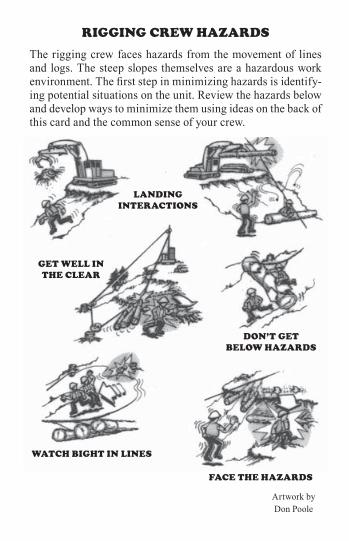
RIGGING CREW HAZARDS
The rigging crew faces hazards from the movement of lines and logs. The steep slopes themselves are a hazardous work environment. The first step in minimizing hazards is identify-ing potential situations on the unit. Review the hazards below and develop ways to minimize them using ideas on the back of this card and the common sense of your crew.
LANDING INtERACtIoNS
GEt WELL IN tHE CLEAR
DoN’t GEt bELoW HAZARDS
WAtCH bIGHt IN LINES
fACE tHE HAZARDS
Artwork by Don Poole
6 rigging hazards.indd 2 1/18/08 9:38:30 AM

Hazards at tHe LandingHand signals, whistles, and horns should be understood by everyone. Chasers hand signal to yarder operators to control the landing of logs; those doing saw work stay in visual communications with loader operators; trucks and loader operators establish horn signals to control movements. When signals are unclear, lines and machines won’t move until the signals are acknowledged. Visual signals will be given from positions in the clear. No excess communications! Problems will be resolved before work begins. When an unusual activity is called for, communicate before you begin. When a hazard is spotted, everyone takes responsibility to correct it.
Landing arrangement, traffic routes, and log handling will minimize hazards. Loading positions, deck locations, and limbing areas will be identified to make the work safe. There are truck turnarounds, crummy parking, fire truck parking, etc. Pinch points will be eliminated or bar-riers placed. Everyone will know the hazardous areas of moving lines or machines. As conditions change, the landing will be reorganized to be safe and effective. Keeping the landing cleaned up is everyone’s job. Someone must be responsible for maintaining tools and rigging in assigned locations. Machine operators need to take care of their own machines, oil spills, access ladders, etc. The hazards of logs, lines, saws, and other tools can be minimized by the operator maintaining control. Gravity is always acting on logs and lines to move them in unpredict-able ways. Before you release control, make sure the situation is stable. Where a condition of instability is seen, stabilize it before continuing to work. If something gets out of control, don’t take rash actions that may compound the problem. Think the situation through and regain control.
Don’t put yourself or your machine in a position to create a hazard. Position yourself where you can be seen. Wear a bright-colored vest and hard hat. Face the work and hazards and don’t be blindsided. Before you change positions, signal your intentions. Know your limits, your machine’s limits, and when to reposition the work situation.
When work settles into a comfortable routine, the landing team knows what to expect of other workers. Patterns are familiar to old hands, but new workers need full explanations. Problems arise when routine work masks the hazards and you make assumptions about what workers will do. You must be able to predict how the work will go, how the machinery will move, where the logs will go, and then allow yourself a margin of safety for the unexpected.
7 hazards at the landing.indd 1 1/18/08 9:39:14 AM

Hazards at tHe Landing
The landing is a concentration of logging activities in a confined place. There are several kinds of hazards commonly recognizable at landings. Solutions to the hazards vary depending on how your landing arranges its work, but there are some common characteristics of safe and efficient landings. Let’s look at hazards first:
sLiPs & FaLLs
Artwork by Don Poole
UneXPeCted HaPPenings
UnstaBLe deCKs
trees & LOng LOgs
PinCH POints
7 hazards at the landing.indd 2 1/18/08 9:39:14 AM

Stabilizing tail treeS and intermediate Support treeS
Trees used to support lines and loads will usually need guylines to keep them stable. The diameter of trees needed to support loads is given in Appendix 7-B of the Divi-sion 7 Forest Activities Code. There are conditions when trees do not need guylines for tail trees or single intermediate support trees. Guylines are not required when at the point of rigging attachment the tree does not move more than its diameter in the direction of the load as shown in the figure.
In addition, the tail tree cannot be within reach of workers and the resulting line movement must not pose a hazard to workers if the tail tree failed.
A minimum of two guylines must be used on tail trees and located within guying zones to oppose the forces as shown (azimuths 130-150 and 210-230 degrees).
When the angle of the lines between the tail tree and a tail hold produces an offset of more than 8 degrees between the lines as they enter and leave the tail tree, then at least three guylines are required. If a suitable anchor is not available within a specified guying zone, two guylines may be used in lieu of one guyline for that zone, provided a guyline is placed on both sides of, and as near as possible, to the affected guying zone.
INCREASE GUYING LOCATION FOR GUYLINE OPPOSITE THE DIRECTION OF OFFSET BY 10 DEGREES
SKYLINE OFFSET NO MORE THAN 8 DEGREES EITHER SIDE OF
LINE EXTENDED TO YARDER
TO YARDER
AZ 300
AZ 240AZ 230
AZ 210
AZ 60
AZ 130AZ 120
AZ 150
8 stabilizing.indd 1 1/18/08 9:40:05 AM

When guylines are required to stabilize the tree, they must be of the size and same material to support the line in the tree: 5/8-inch line requires 3/8-inch guylines or larger; for lines greater than 5/8 inch and less than one inch, guylines must be at least ½ inch; and for 1 inch and larger, guylines must be at least 5/8 inch. Guylines made of synthetic materials, including the end connectors, must have the equivalent strength capacities of wire rope.
Single tree intermediate supports need guylines opposing the force on the jack when it is loaded.
Double tree intermediate supports are designed to be stable without guylines unless a support tree moves more than two feet at the point of rigging attachment.
Artwork by Don Poole
D = .25xL = minimum distance D = .5xL = minimum distance
To yarder
8 stabilizing.indd 2 1/18/08 9:40:05 AM

Machine OperatiOns On slOpes
All machines have limits for the slopes on which they can safely operate. The limits are measured as “percent slope,” which is a ratio of the difference in elevation divided by the horizontal distance and then multiplied by 100 percent. For example, a ground slope with a difference in elevation of 21 feet over 50 feet of horizontal distance would yield a 42 percent slope.
The effective slope felt by the operator and machine is influenced by the surface conditions of the terrain. In soft soils, one side of the machine may sink into the ground and steepen the effective slope. Likewise, running the machine onto a log, stump, or rock on the upslope side may increase the effective slope of the machine.
Icy, frozen, or weak soils limit the traction of machines and could restrict how machines travel on the slopes, perhaps creating hazardous machine positions.
The stability of machines depends on how the machines are constructed: tracks are generally more stable than wheels. Stability is affected by the attachments on the machines, such as a boom with a circular sawhead, and the type and size of loads handled, such as tall, heavy trees.
Machine purchasers will need to determine how the overall machine, including the attachments, performs on slopes. Oregon’s Forest Activities Safety Codes call for guarding on forest machines and vehicles to protect operators (using seat belts) from the hazards they are exposed to in their work (437-007-subdivision H).
The hazards of operating on slopes include completely over-turning the machine or tipping the machine on its side. The speed of operations influence how likely accidents might happen and the seriousness of the accident. The way loads are handled, carried, or pulled also makes machines more or less stable.
9 machine oper on slopes.indd 1 1/18/08 9:40:48 AM

Guidelines for slope limits are below. When it’s necessary to operate on slopes steeper than recommended, safety precau-tions are outlined (from OAR 437-007-0935):
(1) Machines must not be operated on slopes in excess of the following limits unless specified by the manufacturer.(a) Rubber-tired skidders – 30 percent.(b) Crawler tractors, tracked feller bunchers, tracked
excavators and loaders – 40 percent.(c) Forestry equipment designed for steep slopes –
50 percent.
(2) Operation in excess of the limits may be permitted for specific limited application or in identified small areas provided the operator and the competent person plan how to safely operate on the steep slopes considering the:(a) Experience of the operator.(b) Limitations of the machine, the soil conditions.(c) Direction of travel (traveling straight up and down
the slope).(d) Requirements for turning the machine or vehicle on
the slope.(e) Weather.(f) Load sizes.(g) Any other adverse conditions.
Safe operation on slopes is the overall goal!
9 machine oper on slopes.indd 2 1/18/08 9:40:48 AM

POTENTIAL FAILURE ZONELoggers need to be able to estimate where a position “in the clear” would be by identifying the potential failure zone of the operation, especially trees and rigging. The Potential Failure Zone is defined in the Safety Code as: Potential failure zone – An area that could be impacted by the fail-ure of any part of a standing tree anchor, tail, or intermediate support tree as the result of forces or loads imposed on the tree by guylines, running lines, or skylines. The boundaries of the zone encompass the area into which the tree, or parts of the tree, could fall, slide, or roll and all trees, logs, lines, and material impacted by the tree failure. Working Near Standing Tree Anchors, and Tail/Intermediate Support Trees.(1) Affected personnel must be notified of the potential failure zone of
any tail tree, intermediate support tree, and standing tree anchor.(2) The boundaries of the potential failure zone must be determined
by a competent person.(3) The boundaries of the potential failure zone must encompass the
area into which the tree or parts of the tree could fall, slide, or roll and all trees, logs, lines, and material that could be impacted by the tree failure.
(4) Personnel must be in the clear of the turn and out of the potential failure zone of a standing tree skyline or running line anchor before lines are tensioned.
(5) Personnel working around tail and intermediate support trees must be in the clear of the turn and out of the potential failure zone before lines are tensioned.
(6) If the potential failure zone cannot be determined, personnel must move at least 1 1/2 tree lengths from the base of tail and intermedi-ate support trees, and in the clear before lines are tensioned.
(7) A competent person must instruct affected personnel in the safe work practices required for work activity in any potential failure zone. This instruction must identify the:(a) Boundaries of the potential failure zone.(b) Potential for the boundaries of the failure zone to change
when line pull and line angles change.(c) Limitations or restrictions for entering or working in the
potential failure zone.
10 potential failure zone.indd 1 1/18/08 9:41:26 AM
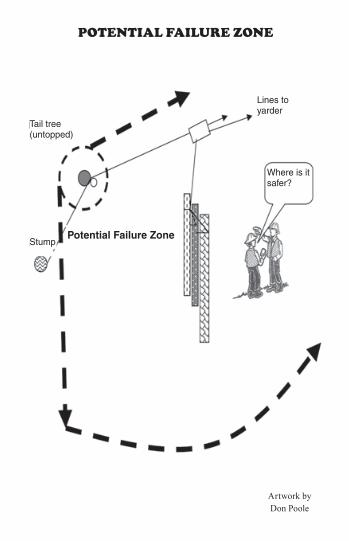
POTENTIAL FAILURE ZONE
Where is it safer?
Potential Failure Zone
Lines to yarder
Tail tree (untopped)
Stump
Artwork by Don Poole
10 potential failure zone.indd 2 1/18/08 9:41:27 AM