(tpm 4250 6250 8250mkiii topp pro_v1-1)
TRANSCRIPT

SE
IKA
KU
TE
CH
NIC
AL
GR
OU
PLIM
ITE
D
OC
T.27.2010
A3
A4
A5
TO
PP
PR
O
-RS
TP
M4
25
0/6
25
08
25
0M
KT
OP
PP
RO
_V
1.1
TP
M4
25
0/6
25
08
25
0
0.0
80
KG
/1
10
5g
/NH
00
14
9
10
PC
S
NP
D-T
O-2
01
00
40
02
20
NF
03
47
6
PH
FA
A1
02
-20
10
09
00
00
1
NO1
1.1
20
10
.10
.27
:QH
FB
E0
04
-20
10
10
00
00
8

USB PLAYER
(Push & Hold)POWERTAC-MP3-T
TPM 8250
MKII
12VLAMP
LAMP ON/OFF
USB PLAYER
(Push & Hold)POWERTAC-MP3-T
TPM 6250
MKII
12VLAMP
LAMP ON/OFF
NF03476-1.1


1. INTRODUCTION ............................................................................................................4
2. FEATURES .....................................................................................................................4
3. USEFUL DATA ..............................................................................................................4
4. CONTROL ELEMENTS................................................................................................... 5
5. INSTALLATION TIPS... ..................................................................................................12
6. CONNECTING DIAGRAM..............................................................................................13
7. AUDIO CONNECTIONS.................................................................................................14
8. PRESET LIST........................... ......................................................................................15
10. BLOCK DIAGRAM.......................................................................................................17
11. GUARANTEE...............................................................................................................18
12. NOTES .......................................................................................................................19
9. TECHNICAL SPECIFICATIONS........................................................................................16

300W/4Ohm amplifier mono
4/6/8 line inputs through 1/4'' jacks
4/6/8 line balanced MIC inputs through XLR jacks
3-band channel EQ
Monitor and effect sends on each input channel
7-band graphic equalizers/100DSPeffects
Signal/Peak indicator on channel 1 - 4/6/8
Tape input with level control for recording level matching
4-segment LED display for monitoring the output signals
Foot switch jack for control of DSP on/off
Main and monitor line out jacks
Mains power can be switchable between 110V-127V and 220V-240V
Built-in feedback LOCATOR
Tape in and tape out jacks for recording and play back
Thank you for purchasing the TOPP PRO TPM 4250/6250/8250 MKII.
Please read this manual carefully so you can take advantages of all the features of the
TPM Series.
1AUX input; 3.5 MP3 input;2 RCA inputs
The TPM series of powered mixers are designed to be rugged, powerful and filled withquality features that would usually be found in much larger systems.
The 300 series are all built with the same powerful 300 Watts power amplifier and areavailable with 4,6 or 8 channel configurations.
Thanks again for choosing .TOPP PRO
USB port for MP3 player(TPM6250/8250MKII)
8

5
LOW NOISE PREAMP
MIC IN (bal ).
LOW
DSP/FXAUX1POST
80Hz
LINE IN(bal ).
12KHz
HIGH
2 5KHz.
MID
SG/PEAK
15-15
0
15-15
0
-12 12
10-
LEVEL-
8
10
0
8
12
3
4.1 FRONT PANEL
1
LEVEL CONTROL
This control is used to adjust the overall level of the respective channel.
The adjustable range goes from - to +10dB.
5
MID
This is the mid range control. It can affect most fundamental frequencies
of all musical instruments and human voice. An attentive use of this control
will give you a very wide panorama of sound effects. The gain range goes
from -12dB to +12dB and the center frequency is 2.5kHz.
7
6
3-BAND EQUALIZER
3-band equailizer is provided for all input channels with a wide range of
frequency adjustment.
LOW 8
2MONO INPUT CHANNELS
This is the bass control. It is used to boost male voice, kickdrum or bass
guitar. Your system will sound much bigger than what it is. The gain
goes from -15dB to +15dB and the center frequency is 80Hz.
CH1 TO CH 4(TPM6250MKII CH1 to CH6,TPM8250MKII CH1to CH8)come
with balance MIC IN and LINE IN connectors.Use the XLR (MIC IN)socket
to connect low impedance microphone or low level signal,which also
features +15V phantom power allowing you to connect a condenser
microphone. Use the 1/4" TRS(LINE IN)jack to connect either a microphone
or a line instrument such as synthesizers, drum machines, effect processors
or any other line level signal.
+15V PHANTOM POWER SWITCH AND WORKING INDICATOR
This switch will apply +15V Phantom power only to the XLR sockets. When
these XLR sockets are connected with devices that not require phantom
power, please make sure the phantom power is turned off, failure to close
may damage the device.
When pressing phantom power switch, the indicator lights up; it means
that phantom power is working, When pressing phantom power switch
again, the indicator is extinguished.
DSP/FX AUX POST CONTROL
This control is configured as POST-FADER, so the audio signal will be
affected by channel level control. Via the FX SEND socket, the AUX1
signal can be an external effect device.
4
3
PEAK/SIGNAL LED
This LED will illuminate green when there is a signal present in the
LINE/MIC input. When signal nears clipping the LED will turn to red.
Note: you shall never connect an unbalanced microphone to the XLR socket if
you do not want to damage both the microphone and the mixer.
HIGH
This is the treble control. You can use it to get rid of high frequency noises
or to boost the sound of cymbals or high harmonics of the human voice.
The gain goes from -15dB to +15 dB with a center frequency of 12kHz.
TAPE IN
TAPE OUT
PHANTOM
LEVEL 7-8-
8
10

6
TAPE IN
A BNC-TYPE lamp socket is provided for use with a gooseneck lamp.
LAMP SWITCH
10
The automatic feedback locator function will be activated in main mix signal path. When a frequency band
fader lights up, it means the level of this frequency is too high ,i.e. there is a little feedback occurring in
this frequency band, which may result in unpleasant speaker "howling" or "whistling". In this case, in order
to eliminate feedback, you need to turn down the corresponding fader.
GRAPHIC EQ 16
17
OUTPUT LEVEL LED
This 4-segment LED meter is used to indicate the output level.
9This insert can be used to connect with computer, Mp3, Mp4
or CD players.
3.5 JACK
LEVEL
This control used to adjust the level of TAPE IN and 3.5 jack
signal simultaneously. The adjustable range goes from - to +10dB.
11
The unit features dual RCA jacks (left and right). If you wish to listen
to your monitor from a tape recorder, DAT or cassette, please use
these tape input jacks.
TAPE OUT 12
Via these jacks, you can route the main output signal into a tape recorder or DAT for recording
12V LAMP
14
By pressing this key, you can turn on/off the lamp.
MONITOR LEVEL CONTROL 15
This control is used to adjust the level of monitor output.
Your TPM 4250/ TPM 6250/TPM 8250 MKII is equipped with a graphic equalizer, and provides 7-band
fader controls and feedback locator function. Via these faders, you can boost or attenuate the selected
frequency by 15dB at a preset bandwidth. When all faders are at the center position, the output of the
equalizer is at flat response. They are used to modify the frequency "contour" of a sound. The EQ function
will be activated automatically as soon as you operate your unit.
18
POWER LED
This LED lights up when the unit is powered on.
19
LEVEL CONTROL
This control is used to adjust the output level. The adjustable range goes from - to +10dB.
DSP SECTION WITH 24BITS DIGITAL EFFECTS
The TPM 4250/TPM6250/TPM8250 MKII features a special 100-preset digital effect. For further details,please refer to the following content.
13
12VLAMP
MONITOR
8
10
LAMP ON/OFF

USB PLAYER
(Push & Hold)POWERTAC-MP3-T
TPM 6250
MKII
12VLAMP
LAMP ON/OFF

4.3 REAR PANEL
32
AC INLET
34
These connectors are used to output the signal to the speaker. The minimum speaker load is 2 ohms.
Standard IEC receptacle connect your TPM4250/6250/8250 MKII to mains with the supplied power cord.
OUTPUT
VOLTAGE SELECTOR
33
There are two kinds of voltage for your operation. From this switch you can select the voltage at 110V-127V
or 220V-240V.
VENTS 35
These vents are used for ventilation and heat dissipation.
8
FUSE OUTPUT POWER: 300WATTSMINIMUM SPEAKER LOAD: 2 OHMS
CAUTIONRISK OF ELECTRIC SHOCK
DO NOT OPEN
CAUTION:REPLACE WITH THE SAME TYPE FUSE AND RATINGDISCONNECT SUPPLY CORD BEFORE CHANGING FUSE
WARNING: SHOCK HAZARD - DO NOT OPEN
AVIS: RISQUE DE CHOC ELECTRIQUE - NE PAS OUVRIR TPM4250
SERIAL
MODEL
MADE IN P.R.C.RATED POWER CONSUMPTION: 500W
AC INPUT
115V 230V
OUTPUT
230V ~ 50Hz T3.15A 250V115V ~ 60Hz T6.3A 250V
115V
35 35
4.4 (Optional for TPM6250/8250MKII)
This section can be selected and installed according to user's requirement. Please see the installation procedure .
(USB Module Installation)
The file system of USB memory for USB players is FAT16 and FAT32, and these players can only decode Mp3.
It has 7 rank subordinate folders at most.
1- USB port: For connecting with USB memory equipment.
2- PRE: In pause state, press this key, it will go to the previous song and still keep in pause state;
In play state, press this key, it will go to the previous song and start playing; Furthermore, press this key and
hold for a few seconds to decrease the volume.
3- NEXT: In pause state, press this key it will go to the next song and still keep in pause state; In play state,
press this key it will go to the next song and start playing; Furthermore press this key and hold for a few
seconds to increase the volume.
4- PLAY/PAUSE:In play state, press this key to pause the player; In pause state, press it to start playing.
5- STOP: In play state, press this key to stop playing and all the songs in USB memory will appear on the
display ; In stop state, press STOP/ PRE/ NEXT keys again to go to first song and the player will
keep in pause state, then press PLAY/PAUSE key to play the song.
6- DISPLAY:
Option One - Song Module
All the USB player information are monitored through this sexy and magic display.
(1)(2) (3)(4) (5)(6)
TAC-MP3-S
USB PLAYER
USB PLAYER-RECORDER
TAC-MP3-R
VOL+ VOL-
RPTREC(Push & Hold)
POWER
USB PLAYER
(Push & Hold)POWERTAC-MP3-T
TAC-MP3-S
USB PLAYER
CN13CN20 CN19
CN13 CN19CN20
CN13CN20 CN19

9
Operation Instruction for Song Module
INSERT USB KEY
Fig 1
MENU:
PROGRAM
FOLDER LIST
PLAYING
Fig 2
1- When no USB key inserted, the display will show as Fig. 1.
2- Inserted the USB key, the USB player starts to search the songs in USB key,
and the display shows "Searching". At the end of the search, the display
will show as Fig. 2.Using keys, you can select one of
following three menu options ("Playing", "Program" and "Folder List").
Press Playing, the unit will enter into the corresponding operation mode.
3- "Playing" mode - single song play
In Fig 2, selecting the Playing mode to recall following interface. This
display shows the name of all the folders containing MP 3 files. Using the
PRE/ NEXT keys, you can scan the folders, then press
you will open corresponding folders. Press STOP to return to Fig 2 interface.
PRE/ NEXT
PLAY/PAUSE key,
PRE/ NEXT
PLAY/PAUSE
stop key. PLAY/PAUSE
a).
After opening the folder, the display will show as Fig 3. This display
shows MP 3 file list, and scrolling list using keys you can
choose the desired song. Press the key, the selected song
playback will start. In order to stop playback, you just need to press the
Then, if you press the key, the song playback will
start from the pause point, if you press again the stop key, the system will
return to Fig 3 interface.
b). FOLDER:
pop music
jazz music
classic music
Fig 3
Fig 4
03. Plena pop 03.mp
02. Pop 02.mp3
01. Plena pop 01.mp
[ 002 ] 00 : 05
4-"Program" mode
a) In Fig 2, select "Program" to enter into the following interface:"Play list Set":
Set the playing list."Playing List": Play list.
Press PRE / NEXT key to select, press STOP key to return the Fig 2
interface.
b) After entering into the "Play List Set", the display will show as Fig 3.
Selecting the desired folder, the display will show the following interface.
The display will show all the MP 3 files, the selected song will be inserted
into the playing list and a mark will appear. Press again you're going to
delete the song from the playing list, and the mark will disappear. Press the
STOP key, you will return to Fig 2 interface. The playing list can accept up to
20 songs, and it will display the list according to song insert order.
Fig 5
PLAYLIST SETPLAYLIST SET
PLAYING LISTPLAYING LIST
classic musicclassic music
Plena pop 03.mpPlena pop 03.mp
Plena pop 02.mpPlena pop 02.mp
Plena popPlena pop[ . ]p3
[ . ]
[ ]
Fig 6
Fig 7
03. Plena pop 04.mp
02. Plena pop 06.mp
01. lena pop 02.mp3
[ . ] 00 : 20
c) The display will show the following interface. Press the PRE / NEXT
key, you can select the starting song, then press the PLAY/PAUSE key, the
selected song playback will start. Press PLAY/PAUSE key again, or press
STOP key, the playback will stop. Press PLAY/PAUSE key again, or press
STOP key, the playback will start again from the same point. Twice press
STOP, the USB player will return to Fig 3 interface.
PLAY/PAUSE key
5-Folder List:
See the Fig 3, the display shows MP3 files folders names.
Use PRE/ NEXT key to scan, press , you'll enter into
corresponding folder. In order to return to Fig 5 interface, you just need to
press the STOP key.
(5)(6)(7)
(1)
(8)
(3)(4)(2)(9)
USB PLAYER-RECORDER
TAC-MP3-R
VOL+ VOL-
RPTREC(Push & Hold)
POWER

Option Two - Track Module
The file system of USB memory for USB players is FAT16 and FAT32, and these players can only decode Mp3.
It has 7 rank subordinate folders at most.
(5)(6) (7)
(1)(8) (3) (4)(2)
1
2
3
4
6
7
5
8- DISPLAY: All the USB player information are monitored through this sexy and magic display.
10
USB PLAYER
(Push & Hold)POWERTAC-MP3-T

1
Option Three - Recording Module
3
2
The file system of USB memory for USB players is FAT16 and FAT32, and these players can only decode MP3.
It has 7 rank subordinate folders at most.
(5)(6)(7)
(1)
(8)
(3)(4)(2)(9)
4
5
6
7
9- DISPLAY: All the USB player information are monitored through this sexy and magic display.
8
11
USB PLAYER-RECORDER
TAC-MP3-R
VOL+ VOL-
RPTREC(Push & Hold)
POWER
(5)(6) (7)
(1)(8) (3) (4)(2)
USB PLAYER
(Push & Hold)POWERTAC-MP3-T
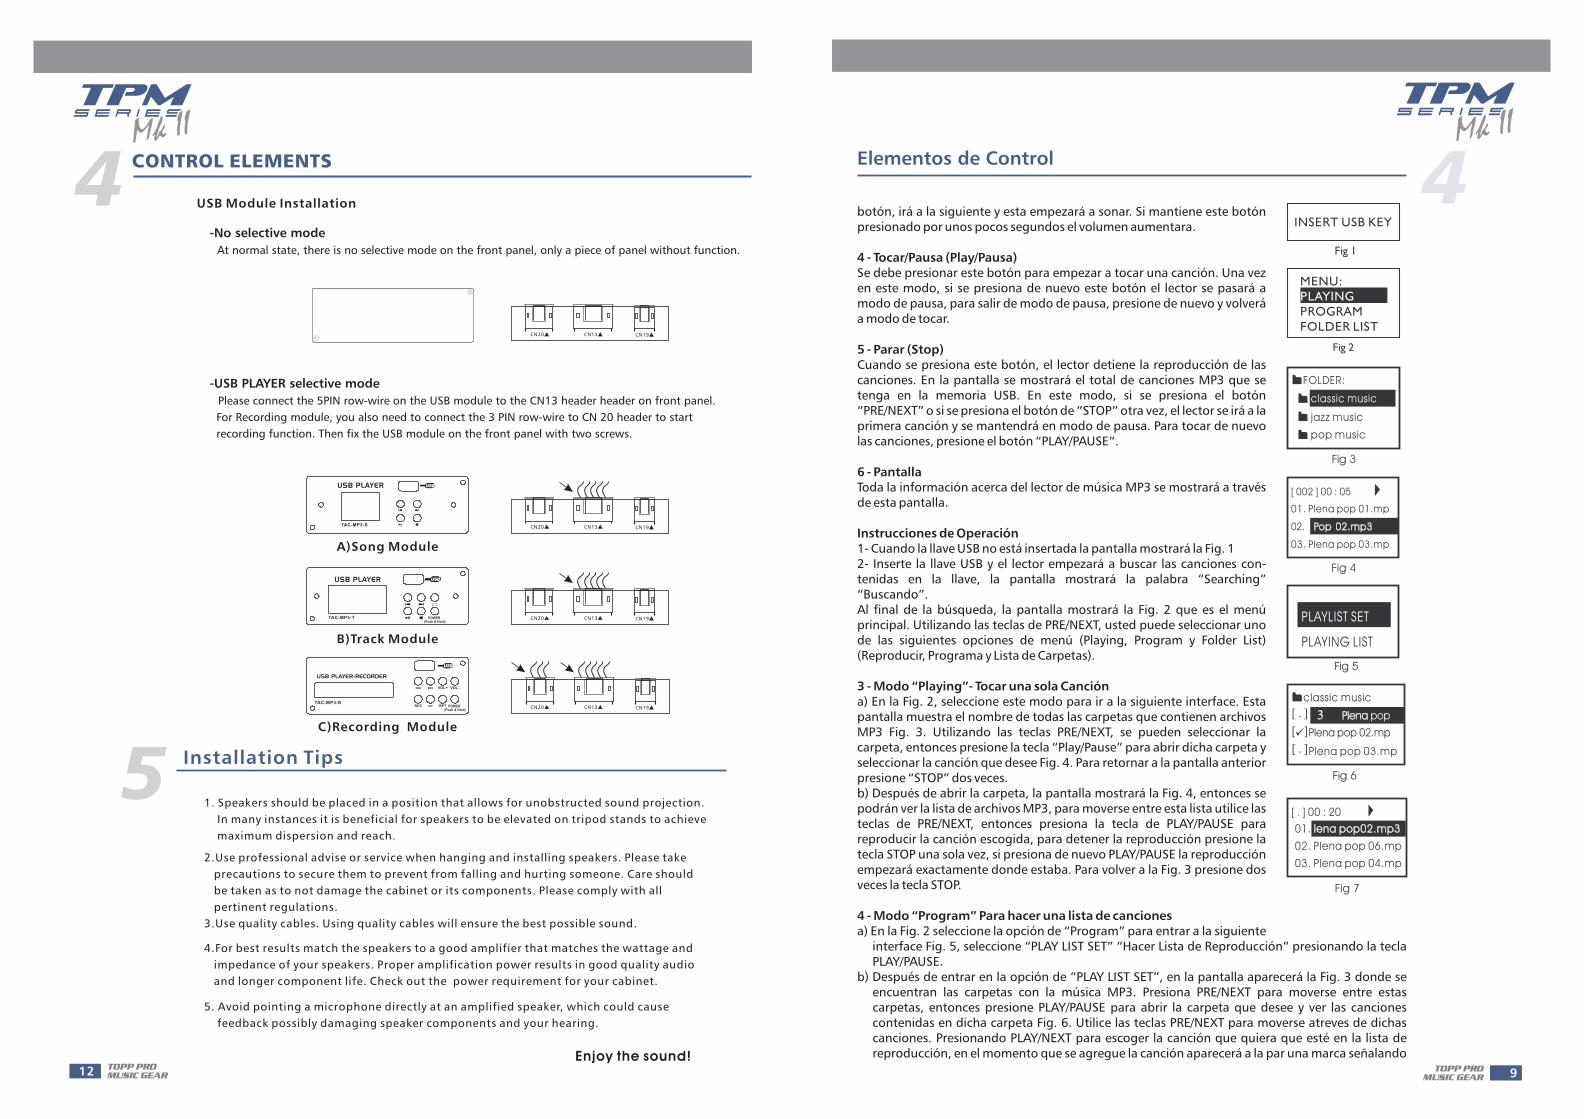
-No selective mode
-USB PLAYER selective mode
At normal state, there is no selective mode on the front panel, only a piece of panel without function.
Please connect the 5PIN row-wire on the USB module to the CN13 header header on front panel.
For Recording module, you also need to connect the 3 PIN row-wire to CN 20 header to start
recording function. Then fix the USB module on the front panel with two screws.
USB Module Installation
A)Song Module
B)Track Module
C)Recording Module
CN13CN20 CN19
1. Speakers should be placed in a position that allows for unobstructed sound projection.
In many instances it is beneficial for speakers to be elevated on tripod stands to achieve
maximum dispersion and reach.
Installation Tips
2.Use professional advise or service when hanging and installing speakers. Please take
precautions to secure them to prevent from falling and hurting someone. Care should
be taken as to not damage the cabinet or its components. Please comply with all
pertinent regulations.
3.Use quality cables. Using quality cables will ensure the best possible sound.
4.For best results match the speakers to a good amplifier that matches the wattage and
impedance of your speakers. Proper amplification power results in good quality audio
and longer component life. Check out the power requirement for your cabinet.
5. Avoid pointing a microphone directly at an amplified speaker, which could cause
feedback possibly damaging speaker components and your hearing.
Enjoy the sound!12
CN13 CN19CN20
CN13CN20 CN19
CN13CN20 CN19
USB PLAYER-RECORDER
TAC-MP3-R
VOL+ VOL-
RPTREC(Push & Hold)
POWER
USB PLAYER
(Push & Hold)POWERTAC-MP3-T
TAC-MP3-S
USB PLAYER

Connecting Diagram
Make sure all initial connections with all the equipment powered off, and make sure thatthe main volume controls are turned down completely.
(1) with a high quality signal line connect a CD player or other players to the powered mixer.
(2)using the speaker cable connect the INPUT of the two passive speakers to the OUTPUT
of the powered mixer.
(3)complete other connections as illustrated. And then turn the power on.
(4)turn up the volume controls of the powered mixer to about 70%
(5) se the mixer PFL function fo the powered mixer to get the proper input level, and adjust
the Main Mix level control to manipulate the output level.
u
USB PLAYER
(Push & Hold)POWERTAC-MP3-T
TPM 6250
MKII
12VLAMP
LAMP ON/OFF
13
(1)(2) (3)(4) (5)(6)
TAC-MP3-S
USB PLAYER

14
Audio ConnectionsAudio Connections

15
Preset ListPreset List

16
Technical SpecificationsTechnical Specifications
Input Channels
THD
S/N
Power Source
Physical
Electronically Balanced, Discrete Input
20Hz to 22kHz, +/-3dB
50dB
Electronically balanced
20Hz to 22kHz,+/-3dB
20dB
1.5kOhm
10kOhm or greater
1kOhm
120Ohm
+/-15dB@12kHz
+/-15dB@80Hz
24 bits
24 bits
Vocal, Small Room, Large Room, Echo, Echo + Verb, Flanger+Verb
Plate, Chorus +GTR, Rotary+GTR, Tremolo + GTR
100-position PRESET selector, CLIP LED,MUTE SWITCH with LED indicator
+22 dBu unbalanced,1/4''jack
+22 dBu unbalanced,1/4''jack
>65dB
<50W
300W RMS at 1kHz,THD=1%,Load=4Ohm
20Hz to 22kHz,+/-3dB
TPM 4250MKII 380*220*274mm(14.96''*8.66''*10.79'')
TPM 6250 410*220*274mm(16.34''*8.66''*10.79'')
TPM 8250 480*220*274mm(18.98''*8.66''*10.79'')
MKII
MKII
Microphone input
Frequency Response
Gain
Line Input
Frequency Response
All other output
Hi shelving
Mid shelving
Low shelving
Graphic EQ
A/D and D/A converters
DSP resolution
Type of effects
Controls
Monitor Max Out
FX sends max out
THD<0.5% at 1 watt output power; THD<1%watt output power
SNR(signal to noise ratio)
set output line to 1kHz
No Output power state at 230V
Output power
Frequency Response
Dimensions
Gain
Microphone InputImpedance
All other input
Tape Out
Equalization
7-band, 4/3 octave
DSP section
Presets 100
Main Mix Section Fader 0dB, channels muted:-85dBr(refL+4dBu)Fader 0dB,all input channels assigned and setto UNITY gain:-81dBr(ref:+4dBu)
Noise(Bus noise)
Static PowerConsumption
Power Amplifier
Section
220V-240V/110V-127V~50/60Hz
Net WeightTPM 4250 9.00Kg(19.84lbs)MKII
TPM 6250 9.70Kg(21.38lbs)MKII
TPM 8250 10.80Kg(23.81lbs)MKII
MP3 sectionUSB HOST Builds in the USB FULL speed(12Mbps)HOSTcontrol function
Supports the USB mass storage class
FATanalysis
Supports FAT16 and FAT32
Supports VFAT(long file name)
Supports multi-partition up to1
MP3DECODE
Supports sample rates 8KHz,16 ,32 ,11.025KHz KHz KHz,22.05KHz,44.1KHz,12KHz,24KHz and 48KHz.
Supports bit rate 8 to 320 kbps and VBR(Variable Bit Rate)except free format
Frequency response
S/N Ratio
Distortion(at 1 KHz)
20Hz~20KHZ
> 90 dB
< 0.04%
ElectricSpecification

17
Block DiagramBlock Diagram
18
19

8