tools for effective training in the child care field for effective training in the child care field...
TRANSCRIPT

A Handbook for Trainers ofChild Care Providers
Second Edition
Tools For Effective Trainingin the Child Care Field


Tools For Effective Trainingin the Child Care Field
A Handbook for Trainersof Child Care Providers
Developed byBetty Z. Bassoff, D.S.W. for
The California Childcare Health Program1322 Webster Street, Suite 402
Oakland, CA 94612-3218510-839-1195
Second EditionMay 2001


Acknowledgements
We wish to credit the original compiler of this guidebook, Cynthia Pena, who was a
student in the Graduate School of Public Health at San Diego State University. She was
assisted by Pearl Carpenter, Department Head for Resource and Referral, San Diego
County YMCA Childcare Resource Service. The year 2001 revision was carried out by
Betty Z. Bassoff, DSW, Consultant to the California Childcare Health Program (CCHP)
and former Director.
Thanks also to: Lyn Dailey, BSN, Child Care Health Consultant, for her role as editor; the
staff of CCHP for their comments; Karen Soleau for her graphics; Eva Guralnick for her
updated design; and Annette Weatherford for the original formatting and word processing.


CONTENTS
Page
Introduction 1
I. Types of Child Care 2
II. Pre-Session Preparation 5
III. Presenting Your Material Effectively 11
IV. Attachments
Icebreakers i
Flip Charts vii
Overhead Projectors viii
Videos xi
Computer Presentations xii
Questions and Participation xiii
Asking Questions of Participants xiv
Using Groups xvi
Pocket Card or Action Plan xviii
Workshop Evaluation xx
Resources and References xxi


California Childcare Health Program 1
Introduction
Established in 1987, the California Childcare Health Program (CCHP) is a community-
oriented, multidisciplinary team dedicated to enhancing the quality of child care for
California’s children by initiating and strengthening linkages among the health, safety
and child care communities and the families they serve.
It is in our interest to assist trainers who practice in the child care field to be effective in
presenting health and safety information. Over one million children in California attend
child care/early education programs and services throughout the state, spending part or
most of their waking (and sometimes sleeping) hours out of their homes. Ensuring their
health and safety during those hours is the first priority of teachers and caregivers. As a
trainer, you will act as an important transmitter of the information to achieve those ends.
You may also act as a resource person, helping child care providers find services which
already exist in your community through which they can obtain information and refer
families for help. Your ability to create a memorable learning environment for your
participants will ensure that our goals are met.
This resource guide is organized to parallel the steps and activities you will undertake in
offering your training—the events before, during, and after your session which influence
the participants. In planning for the “before,” it is important to consider the history that
your participants bring with them and how it may affect their ideas and participation.
During the workshop, your planning needs to focus on productive learning experiences.
Finally, in what way will you help influence how participants will use the learning once
they leave your session?
Because your goal is to provide effective learning for adults who are, or will be, working
in a child care setting, we will begin by offering you a brief overview of the child care
field in California, prepared by the Community Care Licensing Division of the California
Department of Social Services in June 1999.
A last note: you are free to reproduce all of our material.

2 Tools for Effective Training
License Exempt
Unless specifically exempted by statute or regulations, facilities for providing child care
are required to be licensed by the California Department of Social Services. The following
settings are exempted from needing a license:
Types of Child Care
Licensed
There are two types of licenses for child care facilities in California:
Child Care Centers - typically operated outside the licensee’s home. Child care centers provide
child care and supervision to infants, toddlers, preschoolers or school-age children. Centers are
usually in public buildings. They are located in schools, church facilities and a variety of other
settings. Depending on its usable indoor space, the number of restrooms and the size of the
outdoor play space, a center can care for virtually any number of children. Separate licenses
are required to care for infants, preschool, and school-age children, although care for all three
age groups can be provided at a single site. Qualified teachers for centers that care for infants
or preschoolers must have completed at least 12 units of Early Childhood Education. For
centers with a license for school-age children, the course work may be in other subjects more
appropriate for the care of older children.
Family Child Care Homes - always operated in the licensee’s own home. Family child care homes
are usually in residential settings and provide a home-like environment. Homes may be rented,
owned or leased. Family child care can include care provided in mobile home parks and apart-
ment buildings as well. Small family child care homes can care for up to eight children. Large
homes can care for up to 14 children when the care provider has the help of an assistant. The
number of children counted in small and large family child care homes includes the licensee’s
children who are under the age of 10. Family child care homes may care for infants, toddlers,
preschoolers or school-age children, and often serve a mixture of these groups.

California Childcare Health Program 3
Relative Care - care provided by a parent, stepparent, grandparent, aunt, sister, etc. Care can
be in the relative’s or the child’s home. Any number of children can be in care as long as
they are all related. For example, if a grandparent may have two adult children, each of
whom has three minor children, the grandparent may care for all six grandchildren. Such
an arrangement does not require a license.
Cooperative Care - care provided by the parents of the children. This type of care arrange-
ment is for no more than 12 children, and each parent or set of parents rotates as the
caregiver for all the children. No money is exchanged for the care, which can be provided
in a home or a commercial building.
Care for One Family - care provided in the home of the care provider for the children of one
family not related to the care provider. The care provider may be taking care of their own
children as well. As with relative care, there is no limit on the number of children receiv-
ing care, as long as they are from only one other family.
Public Recreation Programs - recreational programs operated by any public entity, often a
city, county or school district. The program must be operated only during the hours that
school is not in session and must be for children of kindergarten age and above. The
program must operate for 16 hours or less per week, or for a total of 12 weeks or less in
any one year. Recreation programs can also accept children not yet in kindergarten who
are at least 4 years and nine months of age, as long as the program operates for less than
16 hours per week or no more than 12 weeks during any given year. Children under 4
years and nine months may also attend recreation programs as long as no child attends
any program for more than 12 hours per week and more than 12 weeks in a given year.
Extended Day Care - care provided to school-age children by a public or private school. Usually,
this exemption is for the children who attend a public or private school and receive care
after school at the school site. The after-school program is exempt if the school is respon-
sible for the entire program, including the employment of the staff who operate the
program.
4 Tools for Effective Training
Parents-On-Site Child Care - care offered for parents on a short-term basis, usually no more
than a few hours, while the parents are participating in an activity such as physical fitness.
Parents must be readily available on the premises of the activity at all times. Care for
children in shopping centers, malls or ski resorts is required to be licensed because par-
ents are not readily available and could leave the area for extended periods of time.
Nanny Care - care arranged for children in their own home. A nanny hired by the child’s
parents to provide care in the child’s own home is not required to be licensed. If the nanny
were to care for other neighborhood children, the care arrangement would no longer be
exempt and would require licensing as a child care center (care outside of the care
provider’s own home).
Parents in School or Adult Education Child Care - care for children on a school’s premises
while the parent is attending school. Child care provided at a school site when the parent is
attending classes on the same premises, and the school is operated by (or contracted to
operate by) a public school district, is exempt. As with temporary, short-term care, the
parent must be readily available.
Instructional Child Care - care which offers instruction to school-age children for not more than
30 consecutive days during school vacations or breaks. Such programs include bible schools
and summer craft schools. Children younger than school-age can also attend for up to 15
consecutive days.
Activities-Based Child Care - recreational programs, similar to those found at public parks or
schools during the summer. Activity-based child care is exempt if children can come and go
at will and there is no monitoring of their attendance or length of stay. In these programs,
children are supervised only to the extent that they do not injure or harm themselves
while participating in the activities offered. Such activities may include soccer, baseball,
softball, or arts and crafts. Centers that provide drop-in care for younger children while
parents are shopping or involved in other activities must be licensed.
California Childcare Health Program 5
Pre-Session Preparation
There are a number of steps that you will want to take before the day of your
training or workshop. These are critical to the successful outcome of your session.
Publicity
� Allow plenty of time for the information to get out in your targeted commu-nity; at least one month notice is essential.
� Use the information channels that reach the audience you want to train, forexample, child care association and resource and referral agency newsletters(many resource and referral agencies publish a monthly training calendar).
� Circulate flyers announcing your session and include a map.� If you offer core child care health and safety training to meet AB 243 (section
1596.866 of the Health & Safety code) requirements, contact your local orregional Community Care Licensing office to ask if you can include a flyerin their orientation packet for new providers.
� Clearly indicate how many people you can accommodate, and set a cut-offdate for registration.
The Environment
� Arrange and confirm your meeting place on-site, especially if it is a newsetting (don’t allow yourself to be unpleasantly surprised).
� Provide written instructions on the set-up you need.� Note the limitations of the physical environment before you prepare your
materials—for example, if desks are bolted down, limiting group activity, orif chairs are uncomfortable, necessitating frequent breaks and movement.
� Check where the facilities such as washrooms and telephones are located.� Listen and look for distractions in the environment such as noise in adjacent
rooms, poor acoustics, too much heat or poor air conditioning.� Make sure you know how to raise and lower the lights and blinds.� Check that the space is accessible for those with disabilities (wheel chair
access, step, etc.).

6 Tools for Effective Training
Room Arrangements
Consider the following room arrangements and how your goals might best be met.
� Round tables support group interaction and take the emphasis off
the trainer.
� Tables forming a square (or chairs in a circle) help establish equality
between participants and the trainer and promote group discussion.
� U shapes promote interaction, but they also promote the trainer’s
authority.
� Classroom style (tables and chairs in rows) supports note-taking and
trainer dominance but restricts participation.
� Theater style (chairs in rows, no tables) send a strong message to sit
back, be quiet, listen and you’ll be told what to do and how to do it.
This definitely does not support interaction but can support questions
and answers.
You want the room arrangement you choose to maximize the goals of your training. Select
accordingly, and make sure you arrive in plenty of time to see that the room is arranged
the way you want it.
The Equipment
The downfall of many good training plans is caused by equipment—its absence when
ordered, its failure to perform, or user incompetence. If you are going to use equipment:
� Arrive early to test the equipment ordered, especially if it is not yours.
� Locate an on-site person whom you can call if problems arise.
� Check that all units are there, such as the overhead projector, screen (walls
aren’t great), movable table/stand, extension cords and flip-chart stand.
� Check that the machine you are using carries an extra light bulb.
� Make sure you know how to dim the lights.
California Childcare Health Program 7
The Materials
What materials will you need to bring with you? Here’s a checklist to help you organize the
session. Use it as a guide for yourself. There is nothing as frustrating as driving 30 miles only
to find that you left the workshop outline or the evaluation sheets behind.
Pre-Session ChecklistItem Preparation
Made
Map and directions (in publicity? mailed?) ❏
Name tags and markers ❏
Audio-visual equipment (did you test it?) ❏
Speakers’ phone numbers (if any) (arranged and confirmed?) ❏
Handouts (are they color coded?) ❏
Participant list (did you make one?) ❏
Sign-in and sign-out forms ❏
Workshop packets and handouts (includes session outline and evaluation) ❏
Certificates of completion (if are you offering them?) ❏
Easel and flip-chart (will it stand up?) ❏
Markers for dry-writer board or flip chart ❏
Workshop packets should contain learning
goals and objectives for the session, as well
as supportive reading materials for later
reading which deepen the information
being taught. Include a resource list of
local contacts wherever possible. Child
care providers like to receive recognition
certificates which they can post in their
facility for parents to see and to document
their hours of training for the child care
stipends available in some counties.

8 Tools for Effective Training
The Participants
There are several steps that you can take to prepare the participants for the workshop.
For example, you can:
� Personally invite the people you think will benefit the most.
� Send a short suggestion list—for example, write down the five most puz-
zling questions you have about controlling the spread of infection in child
care.
� Ask participants to do some “advance work” (thinking, reading, writing).
� Encourage participants to talk to their co-workers before coming to the
workshop. Topics for discussion should include possible applications for
new learning, hoped-for support upon return, and special questions or
concerns.
� Let your participants know ahead of time what your goals are and what
their role in the training will be.
Once the participants arrive at the workshop site,
it is important that you put them at ease. This can
be influenced by how they are greeted, so be
friendly and open to questions. If you have asked
them to prepare anything prior to your presenta-
tion, be sure to incorporate that into your training.
Listen to people and show recognition as much as
possible. Do not put them in a situation where
they will fail or be embarrassed, and NEVER insist
that a participant share personal information.

California Childcare Health Program 9
The Schedule
Your outline for the training or workshop is determined by how the content is to be
presented (participation, lecture, audiovisual) and the limits of adult concentrated atten-
tion. The following outline is offered as an example:
SAMPLE SCHEDULE FOR THE DAY
Injury Prevention
8:30 - 9:00 Arrival and Registration
9:00 - 9:15 Introductions (introduce presenters and participants; give an overview
of the agenda; also a good time to use an icebreaker—see Attachment 1)
9:15 - 10:00 Injury Prevention: car crashes, falls, choking and suffocation, poisoning
Note: content presented by lecture or audiovisual from 9:15 to 9:30;
break into small groups from 9:30 to 10:00 for problem-solving on
prevention
10:00 - 10:15 Break
10:15 - 11:00 Injury Prevention: drowning, burns, house fires, heat exhaustion and
stroke
11:00 - 11:20 Emergency action principles and community resources: guest speaker
11:20 - 11:45 Questions and answers; discussion
11:45 - 12:00 Wrap-up and session evaluation
Resource Reference: Ages and Stages of Normal Growth and Development (chart)
Note: the session starts on time and all units begin and end on time.

10 Tools for Effective Training
The Handouts
Handouts can be used to further emphasize certain points and ideas. Use handouts only
when you want to reinforce a point you are making and make sure the participant will
take the information home with him/her. Some information is imparted better visually,
such as measuring bleach and water for cleaning surfaces. Gather and duplicate hand-
outs ahead of time. Make sure you have enough handouts for all of the participants. If
you run out, mail the missing pieces to participants who did not receive them. Make sure
all of the handouts you will be distributing are legible and clear. Spend a couple of
minutes on each as they are distributed or they will be filed and forgotten.

California Childcare Health Program 11
Presenting Your Material Effectively
Begin by introducing yourself and establishing your credentials as a trainer in the child
care field. Set the stage for a good learning environment by making your expectations
clear at the outset. For example, you can say “I want you to stop me and ask questions
when I’m not clear,” or “ I have a special experience to share about…” or “We’ll hold
questions for the end.” Use humor to put your participants at ease, avoid professional
jargon, and demonstrate your real interest in your audience.
Before we go further, let’s review key conditions of learning for adult learners.
Seven Conditions of Learning for Adult Learners
Adult learners learn more when:
� they feel a need to learn;
� the learning environment is characterized by physical comfort, mutual trust
and respect, mutual helpfulness, freedom of expression, and acceptance of
differences; learners feel supported, never judged or threatened;
� they perceive the goals of a learning experience to be their goals;
� they accept a share of the responsibility for the planning and implementa-
tion of a learning experience, and therefore have a feeling of commitment
toward it;
� they participate actively in the learning process;
� the learning process is related to, and makes use of, their experiences’s and;
� they have a sense of progress toward their goal.
There will always be variations in learning styles within the group. Some adults learn
best by reading or listening to lectures, some learn best by doing, and still others learn
best by interacting and sharing their thoughts and ideas with others. In group training or
workshop situations, recognize the variety of learning styles and employ a variety of
techniques and formats.
12 Tools for Effective Training
Strengths and Limitations of Training Techniques
Format/Technique: Lecture (or Mini Lecture)
Strengths: An efficient means of transmitting facts. Mini-lectures of
a few minutes work better in an adult learning setting.
Limitations: Participants may lose interest; no immediate feedback; difficult to
verify if facts were understood; minimizes participation.
Note: a newer approach is to combine a lecture with a Power Point presentation, thereby integrat-ing visual and auditory effectively
Format/Technique: Large GroupStrengths: Establishes group identity, therefore it is well suited for groups
that will meet for training more than once. Allows question-and-answer participation.
Limitations: Consumes time; difficult to manage; has the potential to compro-mise leadership; excludes shy participants.
Format/Technique: Small GroupStrengths: Allows in-depth discussion; skills practice; exploration; active
participation; good for shy people.
Limitation: A leaderless group may become lost; valuable feedback may notreach the whole group.

California Childcare Health Program 13
Format/Technique: Role Plays and Real PlaysStrengths: Simulates real-world situations; generates discussion; allows skills
practice; can be entertaining and stimulate interest.
Limitations: Requires a degree of trust among group members; needs process-ing to tie role plays back to the learning objectives of the training;needs monitoring and sometimes assistance staying on track.
Format/Technique: Group Games and ExercisesStrengths: Stimulates a relaxed atmosphere for learning; can make dry facts
fun and build camaraderie.
Limitations: May drift off-point; must be processed effectively to relate to thelearning objectives of the training.
Format/Technique: Audiovisuals: overheads, slides, film/videoStrengths: A good way to demonstrate and reinforce facts visually; a good
stand-in when real-life observation is not possible.
Limitations: Context; not always relevant.
Format/Technique: Demonstration/Modeling BehaviorStrengths: Provides motivation and standards for participant performance;
enhances the assimilation of skills and the correction of mistakes.
Limitations: May cut off creativity; in some instances, it may be appropriatefollowing, rather than preceding, role playing by participants.

14 Tools for Effective Training
Facilitating Skills
Adults learn best when they participate actively in the training process. Effective facilita-
tion skills encourage involvement by showing interest in the participants and making
them feel free to comment and ask questions. There are four basic interpersonal commu-
nication skills that are used in conducting an effective training in both one-on-one and
group situations. These are:
1. Attending (non-verbal) • face the trainees
• maintain appropriate eye contact (remember thatthis varies culturally)
• move toward the trainees
• avoid distracting behaviors
2. Observing (non-verbal) • look at the person’s face, body position and bodymovements
• formulate an inference of the person’s feelingbased on what you have observed
3. Listening (verbal) • listen to the words being expressed
• listen to the tone of the voice as well as thewords; are participants bored, enthusiastic,uncomfortable, angry
• paraphrase what was said to ensureunderstanding.
4. Questioning (verbal) • ask open-ended questions
• respond positively to trainees’ answersto questions
• respond to trainees’ questions byenlisting input of others
Always use participatory techniques. The more you involve the learners, the more they learn.

California Childcare Health Program 15
Using Icebreakers
You may want to use icebreakers at the beginning of your session, especially if you plan to
have your participants work in small groups during the workshop. You will find several
time-tested icebreakers described in Attachment 1. Be sure to come prepared with all
materials you need, and do a trial run at home to check your timing and the feedback you
may want to give.
Presentation Options and Techniques
During your presentation, the main message or theme will be enhanced by expanding the
major points with definitions, ideas, information, examples, illustrations, demonstrations,
activities and discussions.
When addressing the major points of your workshop, keep the following in mind:
� Keep it clear and simple; use precise language, avoid long words and
excessive jargon.
� Show originality; avoid cliches, slang and profanity.
� Use imagery—descriptive words and metaphors—to illustrate concepts.
� Personalize the training by using personal experiences the audience can
identify with and by soliciting their experiences.
� Elicit emotional responses by appealing to a range of audience emotions
to enhance the impact of your presentation.
� Use variety, meaning not only use the above techniques throughout the
presentation, but also varied formats which reinforce the points and
generate participant involvement; also, be sure to let the audience rest
periodically by changing the pace, pausing, and balancing information.
16 Tools for Effective Training
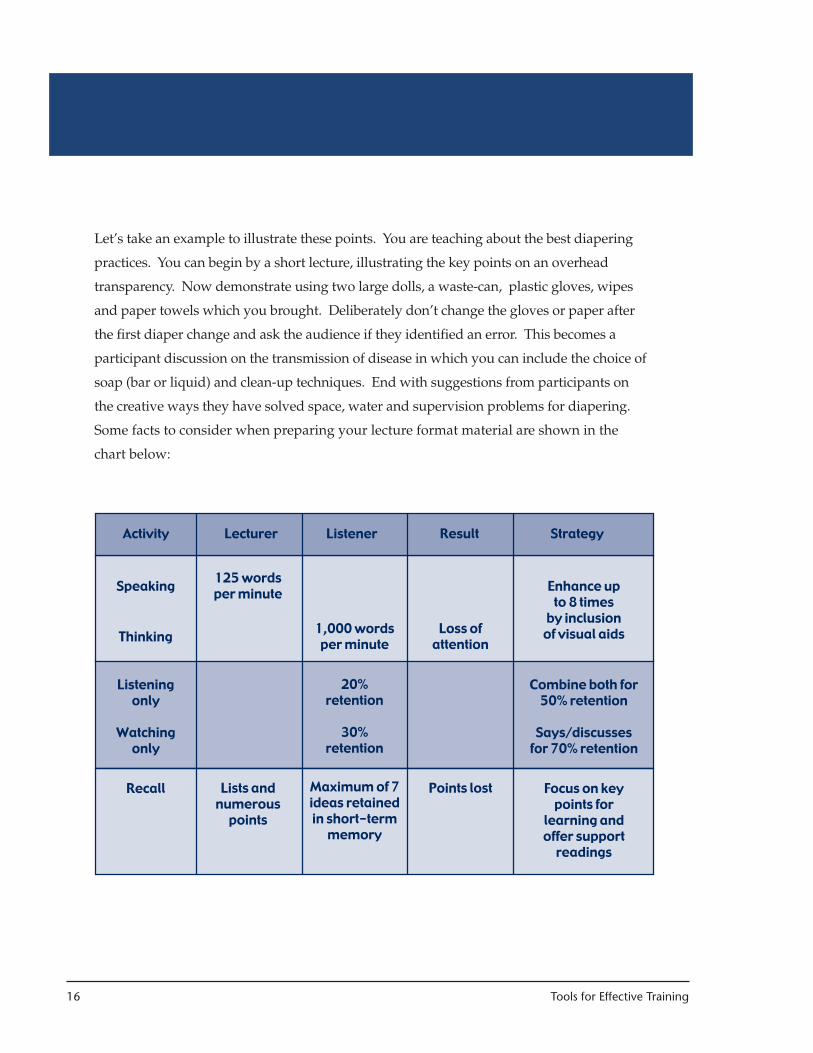
Let’s take an example to illustrate these points. You are teaching about the best diapering
practices. You can begin by a short lecture, illustrating the key points on an overhead
transparency. Now demonstrate using two large dolls, a waste-can, plastic gloves, wipes
and paper towels which you brought. Deliberately don’t change the gloves or paper after
the first diaper change and ask the audience if they identified an error. This becomes a
participant discussion on the transmission of disease in which you can include the choice of
soap (bar or liquid) and clean-up techniques. End with suggestions from participants on
the creative ways they have solved space, water and supervision problems for diapering.
Some facts to consider when preparing your lecture format material are shown in the
chart below:
Activity Lecturer Listener Result Strategy
Speaking
Thinking
Listeningonly
Watchingonly
Recall
125 wordsper minute
Lists andnumerous
points
1,000 wordsper minute
20%retention
30%retention
Maximum of 7ideas retainedin short-term
memory
Loss ofattention
Points lost
Enhance upto 8 times
by inclusionof visual aids
Combine both for50% retention
Says/discussesfor 70% retention
Focus on keypoints for
learning andoffer support
readings

California Childcare Health Program 17
When presenting your material to the workshop participants, there are several things you
can do to enhance attention, learning, and retention. For example, ask the audience for
ideas or solutions regarding the subject you are addressing; ask questions and wait for
participants to answer; ask for examples of points or ideas you are trying to get across.
Not only will this keep the audience’s attention, it will help both of you focus on what is
useful to them.
You do not need to have all the answers to questions that may arise. If you do not know
an answer, direct the participant to an appropriate resource or offer to get the correct
answer for them. You can also direct questions back to the participants. This acknowl-
edges their expertise and makes them part of the solution. However, make sure you
discuss their ideas and answers with them, and help them correct their understanding.
Refer back to the key point to clarify off-track discussion answers. Do not forget to thank
and compliment those who have given you ideas and help, and if you promised to get
back to someone be sure to do so. Use your flip-chart or board, and just before breaking,
briefly review the main points that have been covered and preview the next part of the
session.
As you present your material, keep “sight and sound” in mind. Listeners are significantly
aware of and impacted by the quality of the presenter’s speech and nonverbal behavior.
Body language makes up 55 percent of what the listener picks up on, and includes groom-
ing and clothing. Posture is very important. Sit
or stand straight, but not stiffly. Gestures and
mannerisms should be natural but not exagger-
ated. Movements above the waist are positive
(below the waist negative). When using your
hands, keep them open, not clenched, and do
not let them flap around or appear limp, as this
indicates lack of power and authority. Try as
much as possible to avoid nervous mannerisms
such as pacing, toe tapping, leg bouncing or

18 Tools for Effective Training
other erratic gestures. Your facial expressions are very important. You should visually
scan the audience throughout your session to assess boredom, fatigue and declining
attention. Be flexible enough to change gears in response to what you see and feel. Eye
contact is considered the most powerful influence of audience attention/comprehension
and speaker credibility in the western world. However, it has other more negative mean-
ings in non-western cultures; be aware of this. Use vocal quality and speaking rate to
control emphasis and accent key points. Modulate and vary volume and rate of speech
rather than speaking in a monotone voice. Remember to breathe! Take deep breaths to
relax and send oxygen to your brain and to enhance vocal pitch.
Try to rid your speech of unconscious “uhhs,” “you knows,” etc. These are very irritating
and distracting to an audience. Brief pauses for thought or emphasis are not only accept-
able, but helpful.
If you will be using a microphone, try to ignore it. Do not continually adjust or fidget
with it.
The most important thing you can do to enhance your speaking skills is practice them.
Using a tape recorder or a colleague who can give you feedback will help you hear your-
self as others hear you, will desensitize you, and will make you more comfortable and
confident. Practice will give you a chance to review how you will make your presenta-
tion, and what parts may need further work. Regardless of how prepared you are, always
remember that your greatest skill is flexibility and knowledge to meet the needs of learn-
ers. Be prepared to give up a well-practiced part of your discussion if other needs prevail.
There are many forms of visual aids you can use to support and reinforce learning: videos,
slides, posters, flip charts, chalkboards, overhead projectors, Power Point presentations,
flannel boards, and more. Two of the most convenient are flip charts and overhead
projectors, while increasing use is being made of Power Point presentations. Flip charts
and overhead projectors are cheap, flexible, portable, widely available, and they can be
prepared in advance or as you go. See Attachments 2 and 3 for tips on how to prepare
and use flip charts and overheads, and Attachment 5 for Power Point presentations.

California Childcare Health Program 19
Involving the Audience
It is important that you design the training event for maximum participation and for the
maximum practice of learning. Encourage note taking, questions and group discussions.
Increased participation by the audience gets them to relax, open up, and feel more comfort-
able. This, in turn, makes them more open to new ideas. Heightened levels of participation
increase feelings of “ownership,” and double the audience’s willingness to use what they
have learned.
You can facilitate audience participation by asking questions of participants, by encouraging
them to ask questions, and by asking them to share the problems that they have encountered
and solutions that they have devised. Attachment 6 offers tips on increasing questions from
the audience; Attachment 7 offers tips on how to engage participants through the asking of
questions.
Using Small Groups
Group discussion and group participation are very important strategies for retention and
learning. We’ll begin with a brief refresher of related findings from group theory research
and practice.
� The group is the natural learning environment for humans, beginning with the
family and moving in stages to the workplace and beyond.
� We all bring to the learning experience the strategies we have learned to use in
surviving within groups.
� People replicate the roles they have learned to play—leader, mediator, chal-
lenger, listener—in every group setting.
� What takes place in group discussion is a complex network of interpersonal
communication with a lot of “noise” (misinterpretation, errors in understand-
ing caused by language, attitude, prejudice, culture, experience, etc.).
� Effective communication occurs when all “senders” and “receivers” hear the
same message and can arrive at a consensus.
� Group size is a determinant of participation—for example, five is an ideal small
group (large enough for diversity and small enough for full involvement)
� The larger the group, the more anonymous the group members can be.

20 Tools for Effective Training
A word about large groups. You are not always in control of group size or the setting where
your training takes place. Large groups are most frequently accommodated in theater-style
arrangements, sometimes in fixed seats. You will want to use a lecture format which is
broken up by audiovisual units and by soliciting questions and answers from the audience.
You can set up brief exercises by asking groups of three people (usually sitting adjacently) to
share their experience with an issue. You can contact three or four participants in advance
to request that they share an example of the issue with the whole group—for example, how
they handled an outbreak of head lice. If the members of the group are required to attend
the training, you should begin by eliciting what (in your topic) would be most helpful to
them and adjust your material accordingly.
There are several ways to achieve a productive group discussion. For example, towards the
end of your session you may want to divide the large group into smaller groups (no more
than five participants per group). Ask everyone to think about what they have learned and
to jot down which new ideas they want to apply and/or use. After five minutes ask the
group to discuss these new ideas and any factors which might prevent them from imple-
menting them. Interrupt periodically and ask for a quick report from a group. This will
allow the other groups to see that they are not alone in their struggle to implement change.
Then ask them to discuss what steps and strategies they can use to minimize these barriers.
Allow for more time on this part of the discussion because the focus here is problem solving,
and this will generate solutions. Ask for a
brief report from each group, focusing on
solutions. Wrap up the discussion with a
few summary points which pick up the
common threads in the reports. This is the
last chance you have to reinforce your
theme. The process described above can be
used with any topic. In Attachment 8, we
have offered more tips on using groups.
California Childcare Health Program 21
Know Your Audience
It is important that you know who your audience is and that you tailor your presentation
to them. If this group is new to you, contact the child care associations in the area, your
county’s child care council, resource and referral agency, or your licensing agency to find
out more about the working conditions and concerns of your audience. Check the child
care Web sites online. Know what the audience expects from you by asking them. If this
is not possible, put yourself in their position and ask yourself what you would want to
know if you were in the audience.
More importantly, consider the context of your presentation with respect to the partici-
pants’ immediate learning experience needs. Make your presentation relevant to the
work your audience must perform. Move at a pace appropriate for their existing knowl-
edge base.

22 Tools for Effective Training
Handling Problems That May Arise
It is only natural that problems will arise through the course of the class. These will not
necessarily have an adverse effect on the class or its effectiveness if they are handled
effectively. Here are some of the difficulties you may encounter.
� Someone says something you do not agree with or you feel is incorrect. Do not
say that it is incorrect; that only stifles participation. Instead, help the participant
see the potential consequences of their idea. Ask the audience to come up with
potential benefits or problems. Then add, “From my experience with that solu-
tion, I have found that…”
� People may arrive late. If you wait for them, those who arrived on time will
suffer. Start the workshop on time and ask latecomers to introduce themselves
before the break. Supply them with workshop packets and tell them what they
missed during the break.
� A more serious problem is resistance to new ideas. First, you need to recognize
when resistance is occurring (i.e. excessive questioning by one person, questions
that challenge or attempt to trap the trainer, numerous side conversations, per-
functory participation in group tasks, or obviously disruptive behavior). Follow
these steps:
1) State your ground rules up front, such as “only one person speaks at a
time” and “everyone’s ideas will be respected.”
2) Look inward. Is there anything you are doing or saying which could be
seen as shutting out discussion?
3) Consult; find out why participants think they are here and what would
make the training useful (sometimes they are required to be there).
4) Offer opportunities for reactions. Find out what is not meaningful to
them, and provide an opportunity for venting fears, frustrations,
concerns and anger.
5) Confront people directly. Speak to the disruptive person at a break and
solicit their support. If all else fails, quietly ask them to leave.
California Childcare Health Program 23
� Another concern you may have is about a person who does not participate.
First, try to understand the reasons for their silence and non-participation. It
might be from boredom, indifference, confusion, not feeling part of the group,
timidity or preferring to listen. After all, we all have our preferred learning
styles and group role preferences.
Then try one of the following techniques:
� Check to make sure you are not moving too rapidly for a majority of
the people; make sure that a point you make is understood by all.
� Ask the person for feedback on the topic, such as “what is your under-
standing of how to clean surfaces?”
� Ask a non-threatening question, and accept a brief or yes/no answer.
� As you move around the room, occasionally stand next to the person
to provide support.
� When the person does talk, offer a sincere compliment or thanks.
� Accept that the person may want to listen only
� The opposite of the person who will not say anything is the person who says
too much. This person is a monopolizer. As with the person who does not
participate, you need to try to understand the reasons behind their behavior.
Perhaps they possess knowledge the others do not, are anxious to be helpful,
are enthusiastic about the subject, are a know-it-all, desire recognition, or are
challenging the trainer ’s leadership. Then try the following techniques:
� At the beginning, emphasize that everyone will have sufficient time
to participate.
� Interrupt and ask the monopolizer to summarize.
� Interrupt and say “That is an interesting point…now let’s see what
other members of the group think of it.”
� Slow them down with some difficult questions.
Note: Do not allow yourself to be side-tracked from the learning points you are offering.

24 Tools for Effective Training
� If you run across a highly argumentative person, there are several things you can
do. First, keep your temper in check. Then find merit in one of their points, agree
with it and move on. Another technique is to say the time is short and you’ll
discuss it during the break or after the workshop. If these tactics do not work,
talk to the participant during the break and find out what is bothering him/her.
� When the group or a speaker gets off track, summarize and redirect the discus-
sion. Nothing helps re-focus the group more than a quick review followed by a
re-emphasis of the session’s objectives.
Summarizing What Has Been Learned
Summarizing what has been learned is a very important part of learning and retention.
Review the major points and suggest implications and applications. Use your original
overhead with the learning points you planned to cover. This is a good time for you to
ask for brief reports from the small groups. Focus on application and ways to implement
new practices. Allow enough time for feedback and questions which may serve to
spontaneously reinforce, clarify, or expand information that was given in the body of the
presentation. Check that the class objectives have been met. Attachment 9 offers a simple
exercise that encourages behavioral change by saying “now that you have some new
knowledge, apply it!”
Closing Thoughts
While providing a basic sense of closure and com-
pleteness with your closing thoughts, keep them
“hungry” for more. End with a provocative statement
which projects a vision, extends an invitation or makes
an appeal. Make sure it’s one which stimulates imagi-
nation, has emotional appeal, and is inspirational and
memorable. Remember that your last impression
drives the message home and seals the feelings and
tone which will subsequently be associated with you
and your presentation. Be sure to end on time.

California Childcare Health Program 25
Obtaining Feedback From the Audience
Obtaining feedback is very important. It will give you insight as to how you performed
and let you know if you need to revise your material or your style. You can receive two
types of feedback: written and verbal. You can ask the participants to tell you directly
what they thought of the presentation and your style. However, many people are not
comfortable doing this, especially if their opinion is negative. You can get feedback
throughout the presentation by observing the participants and paying attention to their
questions and comments. If they seem bored, you may be going to slow, or you may be
speaking with a monotone voice, or your style may be at fault. If they ask a lot of
questions about issues which you covered, you may not have been clear, or they may
not have understood your language.
You may also get written feedback. It is
standard practice to use evaluation forms for
workshops and trainings. If you want your
participants to do this before they leave for the
day, make sure you schedule the time for it
and alert them at the beginning. Assure them
that you rely on this feedback to improve the
quality of your presentations, and that the next
group will profit from their comments. In
Attachment 10 we have provided a sample
workshop evaluation form which you may
wish to adapt for your own use.
Using Feedback for Self-Development
Make sure that you honestly consider all of the feedback you receive. If necessary, make
appropriate changes to your curriculum and style to enhance yourself and your workshop.


Attachments


California Childcare Health Program i
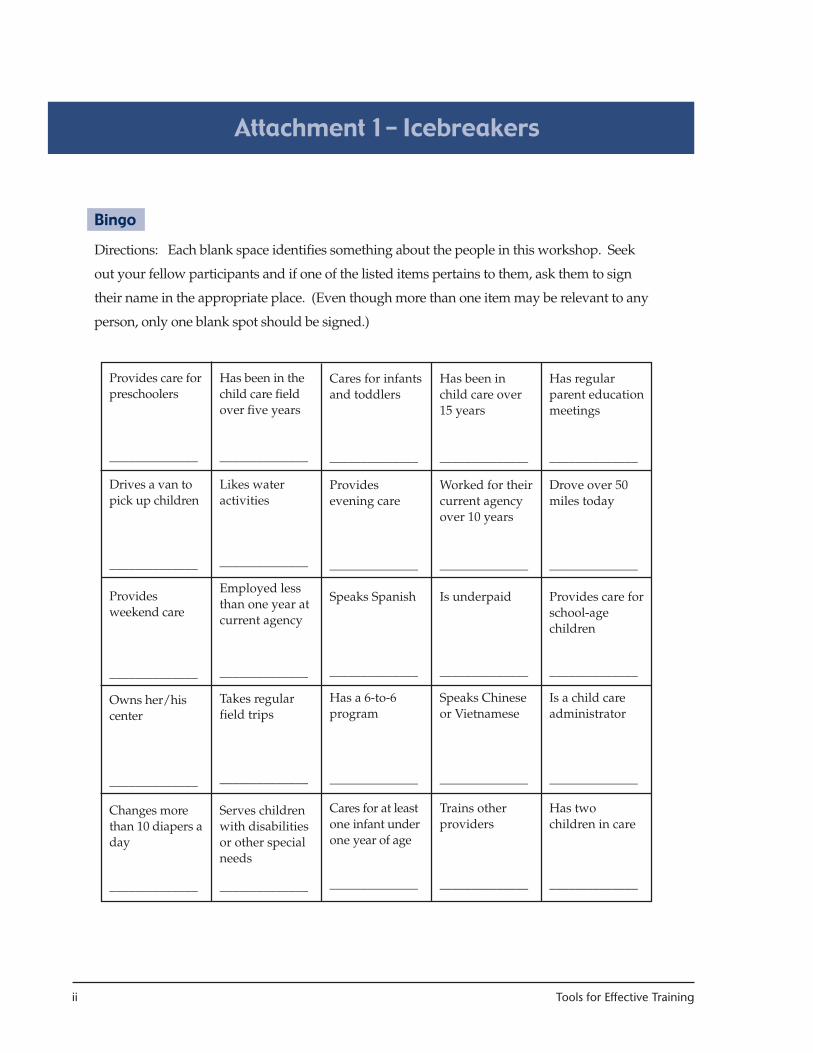
BINGO
Objective
To help the workshop participants become acquainted with each other at the beginning,
in a fun and non-threatening way.
Preparation
Prepare a bingo-type card for handouts to each participant. Use the attached example or,
better yet, adapt the categories to your workshop or participants
Process (15 minutes)
As participants arrive for the workshop, give them a copy of the bingo card and instruc-
tions. They are to move around the room until they find a person who fits one of the
descriptions. They have that person sign their name in the appropriate slot. Participants
may not sign their name more than once on each bingo card.
After participants have had sufficient time to mingle, poll the group for results. How
many got names in all 25 boxes? 24 boxes? And so forth.
Attachment 1- Icebreakers
ii Tools for Effective Training
Bingo
Directions: Each blank space identifies something about the people in this workshop. Seek
out your fellow participants and if one of the listed items pertains to them, ask them to sign
their name in the appropriate place. (Even though more than one item may be relevant to any
person, only one blank spot should be signed.)
Attachment 1- Icebreakers
Provides care forpreschoolers
______________
Drives a van topick up children
______________
Providesweekend care
______________
Owns her/hiscenter
______________
Changes morethan 10 diapers aday
______________
Has been in thechild care fieldover five years
______________
Likes wateractivities
______________
Employed lessthan one year atcurrent agency
______________
Takes regularfield trips
______________
Serves childrenwith disabilitiesor other specialneeds
______________
Cares for infantsand toddlers
______________
Providesevening care
______________
Speaks Spanish
______________
Has a 6-to-6program
______________
Cares for at leastone infant underone year of age
______________
Has been inchild care over15 years
______________
Worked for theircurrent agencyover 10 years
______________
Is underpaid
______________
Speaks Chineseor Vietnamese
______________
Trains otherproviders
______________
Has regularparent educationmeetings
______________
Drove over 50miles today
______________
Provides care forschool-agechildren
______________
Is a child careadministrator
______________
Has twochildren in care
______________
California Childcare Health Program iii
Brag
Objective
To become better acquainted with other group members and to help establish a positive-
focused mood.
Preparation
None.
Process (5 minutes)
Ask participants to turn to their immediate neighbor (not someone they already know)
and tell them two things they do well as a child care provider or are proud of.
Introductions
There are many ways to introduce workshop participants. Here are a few:
Old traditional - Stand and give us your name, agency and agency position.
Best friend - Participants pair up, interview one another, then introduce each other by
giving their names and what they like most to do with their spare time.
Expectations - Go around the room and ask each person to complete the sentence,“My expectation for today’s workshop is…” Allow anyone to pass without stating their
expectations.
Name Tag Mixer
ObjectiveTo get acquainted.
Preparation
Prepare name tags for all participants and a participant roster.
Process (10 minutes)
As participants arrive, check their name off the roster and give them a different person’s
name tag. Tell them to seek out that person, but also to introduce themselves to others.
Attachment 1- Icebreakers

iv Tools for Effective Training
Attachment 1- Icebreakers
Newsprint Census
ObjectivesProvides you with valuable information about the group, gives participants an activity as they
arrive and provides them with a picture of how they compare to others in the workshop.
Preparation
Identify four to six questions covering information that you would like to know about theparticipants. Print each question on a separate sheet of flip chart paper. Provide a choice of
answers (nothing open-ended). Tape the sheets on the walls around the meeting area.
Process (10 minutes)
As people arrive, hand them a marking pen (watercolor, not permanent or oil base, to avoidmarks on the wall) and ask them to respond to the questions.
When all participants have added their checks, walk around and review the information.Using a different colored marking pen, quickly figure averages (where appropriate), refer to
the workshop’s content (where appropriate) and react to what you’ve learned from the data.
Examples
“How many training events did you attend last year?”0 to 5 6 to 10 11 to 15 over 15
“How many training events will you attend next year?”0 to 5 6 to 10 11 to 15 over 15
“What child care skills would you like to improve?”Crafts Talking to parents Keeping calm Assessing an ill child
Hand - Showing Census
Process (5 minutes)
This is an adaptation of Newsprint Census (see above). Instead of using newsprint, ask thecensus questions of the total group with raised hands for answers. (Caution: Newsprintanswers can be confidential, but showing hands is public.)
California Childcare Health Program v
Attachment 1- Icebreakers
Off the Top
Objective
To start the group focusing on the workshop content and to demonstrate similarities and
differences.
Preparation
None.
Process (10 minutes)
Ask participants to list on a sheet of paper the first 10 words that come to their mind
Examples
For a workshop on infectious disease prevention, use the word “prevention.” After
small group discussion, emphasize how many different images people have when youmention planning. What does this mean about expectations when people come to a“prevention” retreat?
Your HeritageGo around the room and ask people to state their name (before marriage) and tell theorigin of that name.
Volunteering
Objective
To demonstrate how old habits and attitudes prevent reaching out and to assess theparticipants’ willingness toward risk-taking behavior.
Preparation
None.
Process (10 minutes)
Announce to the group, “We are going to perform an experiment, but I need five volun-teers to come up here to help me.” Wait for a show of hands. One or two will soon raise

vi Tools for Effective Training
their hands, but ask them to remain seated until five volunteers have been obtained.When five people have volunteered, say, “Okay, that is the end of the experiment.”Ask participants to share with a partner, small group or the total group “Why did you, ordid you not, volunteer?” Discuss the blocks we have toward risk-taking and how break-ing down reticence can lead to a richer life (meeting new people, sharing one’s ideas orfeelings, taking on new responsibilities, etc.).
Wallet and Purse
Objective
To become better acquainted and to help establish a positive-focused mood.
Preparation
None.
Process (5 minutes)
Ask participants to turn to their immediate neighbor and remove three things from theirwallet or purse that helps describe themselves. Allow the next five to eight minutes foreach to describe who they are through the selected items.
Attachment 1- Icebreakers

California Childcare Health Program vii
Attachment 2- Flip Charts
Tips on Preparing Flip Charts
• Use water base pens instead of permanent or oil base pens to prevent “bleed
through” to a wall or second sheet.
• Use several colors, but avoid red—it’s hard to read at a distance because most
people have some red-blindness.
• Print in large block letters.
• Use only key words or phrases.
• Use only the top two-thirds of each page because it’s hard for participants to see
the bottom portion.
• Border your newsprint with a different color. A simple straight line about one inch
from the four edges of the paper helps focus attention and makes it look a little
special.
• Correct errors by cutting them out with a razor and taping new paper behind.
• Carry sheets by rolling them up instead of folding them.
• Personalize the first page—a title sheet—with the workshop name, group name,
date, etc. This reinforces that the group is important and the session was prepared
just for them.
• Use Post-It poster paper if you can’t pin or tape to the walls.
Tips on Using Flip Charts
• Prepare two-inch strips of masking tape in advance for more rapid posting. Stick
them along the edge of the easel or use Post-it posters.
• Avoid “slants” (writing downhill) and use blank newsprint only.
• Recruit a participant to record group discussion so you can concentrate on ideas
coming from the group.
• Use two easels and two volunteer recorders to keep up with the many ideas
coming from the group.
• Post filled sheets on the wall during the entire workshop. This provides a good
history of key ideas and allows you to refer back to them to reinforce previous
points.
• When taping finished sheets to the wall before discussing them, fold them up from
the bottom to cover what’s written on them.
• Remove masking tape from the wall using a “painter’s pull” (pull the tape
straight up or down from the wall, instead of out from the wall.)

viii Tools for Effective Training
Tips on Preparing Transparencies
• Almost all photocopiers will make transparencies, and most copy centers carry
transparency sheets. Just match the transparency type to your copier.
• Select your colors carefully. Red can be glaring and blue and green can be hard to
read. The best colors are yellow and pink.
• Vary your colors. Why not match the transparency color with the color of handouts
you are using at the same time?
• Make sure the type is at least one-quarter inch tall.
• Use the same font style throughout—make it look professional. Limit the use of all
caps (they are harder to read than upper and lower case).
• If you must copy a page from a book or anything in small type, duplicate it as a
handout. Let them read along with you when it is projected.
• Use key words or phrases. Complete sentences are not necessary.
• Maximum wording: six words per line, six lines per page. It’s okay to break this rule
from time to time, but know you’re breaking it and why.
• Limit lists to six items. The mind can easily identify and recall up to seven items, but
beyond that, the points are lost.
• Use cardboard frames, because they focus attention, protect the transparency, look
more professional, and allow you to write notes on the borders.
• Number your transparencies on the frames. Write yourself reminders, such as “go to
small groups next” or “use the video tape next.”
• Use colors—color transparencies, color writing pens, color film.
• Use pie charts, graphs, but limit the use of tables because they’re harder to read.
• Use the same format—either all vertical or all horizontal. Don’t switch back and
forth.
• Use illustrations and graphics. You don’t have to be an artist—borrow from the
comics, clip art books, magazines.
• Use borders around wording. Use arrows, stars, pointing fingers, etc., for emphasis.
• Limit writing to the top two-thirds of the transparency. Participants have a hard
time seeing the bottom of the screen.
Attachment 3- Overhead Projectors
California Childcare Health Program ix
• Make “hinged” transparencies by taping a second and third transparency on top
of the framed original to add information, build on concepts, and fill in blanks.
• Make transparencies with blanks to be filled in. Ask the group for answers and
write them in as they are offered.
• Carry blank transparencies with you (for best results, buy the ones designed to be
written on) in frames, for last minute ideas, input from the group, etc.
• “Personalize” the first transparency—a title page—with the workshop name,
group name, date, etc. This reinforces that the group is important and the session
was prepared just for them.
Tips on Preparing Slides
In addition to the “Tips for Preparing Transparencies” consider the following:
• Count on each slide taking 15-20 seconds.
• Have a blank slide at the beginning and the end of your presentation so that your
viewers don’t experience excessive glare.
• If you can read your slide when you hold it at arm’s length, your participants will
be able to read it when it’s projected.
• To ensure a smooth presentation:
• Put “thumb spots” on each slide to indicate which way it should be placed into
a projector.
• Place the thumb spot on the bottom left-hand corner.
• When the slide is turned upside down and put in the projector, right-handed
people will use their thumb to hold the slide at the “thumb spot.”
• The thumb spot should be toward the outer edge of the carousel.
• Arrange the slides in order of presentation and number them.
• Hold each slide the way it is supposed to be viewed on the screen.
• The slides should be right-side up, with the lettering going left to right.
• Consider using a felt-tip pen to make a light diagonal line running across the
tops of the slides. This visual cue will help you see quickly if any slides are
missing. When one is missing, it is easier to put it back in place.
Attachment 3- Overhead Projectors

x Tools for Effective Training
Tips on Using Overhead Projectors
• Switch off the projector lamp when changing transparencies. This focuses attention, is
less distracting, and gives you more audience control.
• Use the “reveal” technique. Put a sheet of paper or card stock between the transparency
and the projector and pull it down a line or two at a time to “reveal” the writing.
• Use water-base colored pens for circling, underlining and adding comments. Perma-
nent pens won’t allow you to wipe off your writing.
• Don’t block the projection (keep your shoulder out of the light beam).
• Allow ample reading time. Don’t rush your audience.
• Don’t read the transparencies word-for-word. Some will speak for themselves, others
benefit from your expansion on key words.
• To match your audience with the right screen size, use the “2 x 6” rule: two times the
screen width to the first row, six times the screen width to the last row.
• Use as large a screen as possible. Remember, walls—even those with minor textures—
can work as screens in a pinch.
• Use the extension at the top of the screen (the hook that comes out of the top of larger
screens) to tilt the screen forward. This reduces “keystoning” (this means the image is
broader at the top, smaller at the bottom, and the top or bottom is always out of focus).
• Raise the screen as high as possible—touching the ceiling—so the people in the
back of the room can see comfortably.
• Put the screen in the front, but in the nearest corner. This takes up less space, is less
distracting when not used, but can still be easily seen.
• Walk around while explaining a transparency to keep you in touch with the partici-
pants and vary the setting.
• When pointing to something on the transparency, point at the transparency, not at
the screen. A pencil works great!
• Supplies to always have with you: a spare projector bulb, an extension cord, a
three-prong adapter, and blank transparencies.
Attachment 3- Overhead Projectors
California Childcare Health Program xi
Tips on Preparing and Using Videos
Videos are used as a visual learning tool to expand lecture points and to stimulate discus-
sion. Here are some tips for using videos.
• Always screen videos in advance of presentation.
• Make sure your equipment works well and you know how to use it.
• Use the most up-to-date versions.
• Avoid long videos. The maximum lengths should be 30 minutes, but 15-20 minutes
is preferable.
• Avoid highly technical content.
• Be sure seating allows for clear viewing.
• Stop the video after important content has been completed (the endings are often
summaries and recaps).
• Allow adequate time for questions and discussion that arise from viewing.
Attachment 4- Videos

xii Tools for Effective Training
Tips on Preparing and Using Computer Presentations
• Have a title for each slide/screen.
• Use large font sizes and different colors for titles.
• Be consistent from slide to slide. All slides/screens must be able to stand alone.
• Keep it simple. Don’t overuse effects or overcrowd slides.
• Use a lot of white space on screen.
• Create a high contrast between the background and the text.
• Don’t use too many colors or fonts.
• Stick to one font with different sizes and styles (bold and italics).
• Use no more than six bullet points per slide.
• Order points by importance, with the most important first.
• Use graphic symbols where possible to highlight ideas.
• For impact, combine sound, image and motion (multi-media).
• Test all your equipment in advance of the presentation.
• Prepare for the unexpected—have a backup plan.
Attachment 5- Computer Presentations
California Childcare Health Program xiii
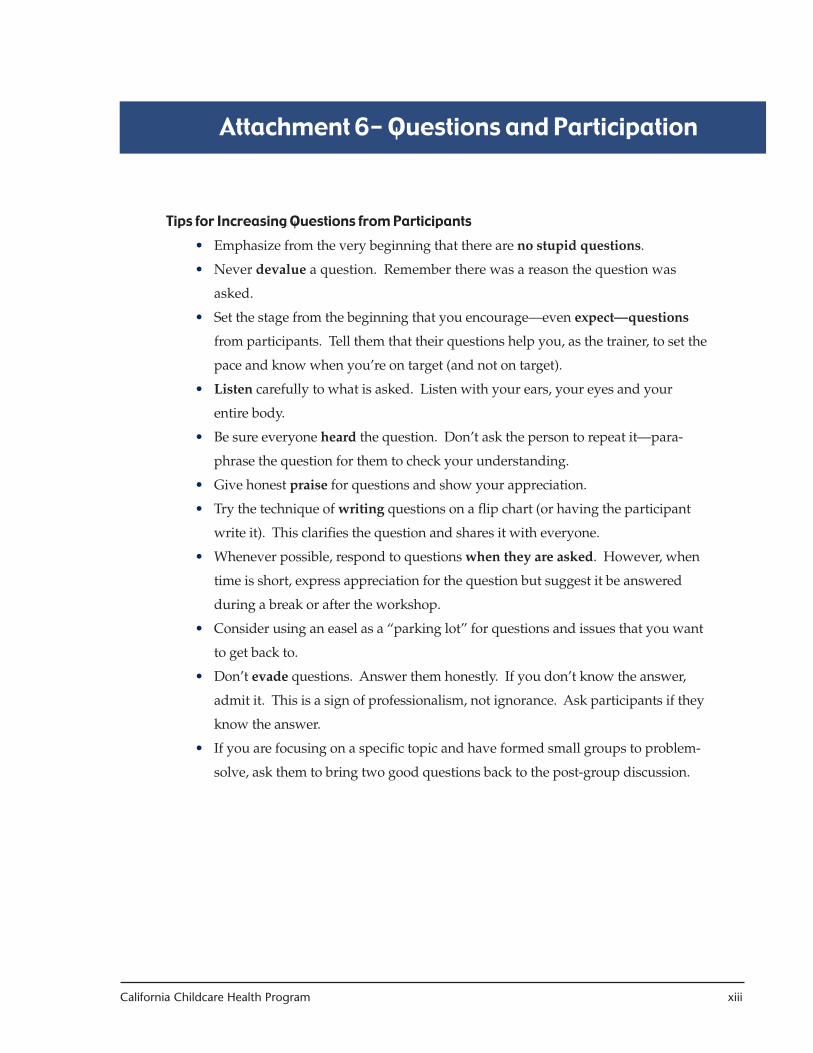
Tips for Increasing Questions from Participants
• Emphasize from the very beginning that there are no stupid questions.
• Never devalue a question. Remember there was a reason the question was
asked.
• Set the stage from the beginning that you encourage—even expect—questions
from participants. Tell them that their questions help you, as the trainer, to set the
pace and know when you’re on target (and not on target).
• Listen carefully to what is asked. Listen with your ears, your eyes and your
entire body.
• Be sure everyone heard the question. Don’t ask the person to repeat it—para-
phrase the question for them to check your understanding.
• Give honest praise for questions and show your appreciation.
• Try the technique of writing questions on a flip chart (or having the participant
write it). This clarifies the question and shares it with everyone.
• Whenever possible, respond to questions when they are asked. However, when
time is short, express appreciation for the question but suggest it be answered
during a break or after the workshop.
• Consider using an easel as a “parking lot” for questions and issues that you want
to get back to.
• Don’t evade questions. Answer them honestly. If you don’t know the answer,
admit it. This is a sign of professionalism, not ignorance. Ask participants if they
know the answer.
• If you are focusing on a specific topic and have formed small groups to problem-
solve, ask them to bring two good questions back to the post-group discussion.
Attachment 6- Questions and Participation

xiv Tools for Effective Training
Tips on Asking Questions of Participants
• Never embarrass anyone. Ask questions only of those you believe know the
answer.
• Ask open-ended questions. Avoid any question that can be answered “yes” or
“no.”
• Allow time for a response. Count to 10 silently (to force your waiting) before
saying more.
• Don’t ask questions just before a break or meal.
• Don’t say, “We’re running late” and then ask a question.
• Be alert to your body language. Don’t ask a question—or ask for a question—
and then look down or do something else.
• Ask the question before calling on someone for the answer to keep everyone
alert and thinking.
• When asking participants to raise their hands (such as those knowing the answer,
or those who want to share their answer), wait until a number of hands are
raised. Don’t move too quickly and take others off the hook.
• Get full group involvement by asking:
- For the answer out loud;
- Everyone to write their answer on a piece of paper;
- Participants to share their answer with their neighbor.
• Avoid asking leading questions. (Example: “You believe in the importance of the
first 10 minutes of a workshop . . . don’t you?”)
• Watch for confusion and try rephrasing your question.
• Write questions to be problem-solved on overhead transparencies or a flip-chart.
This is especially helpful for questions assigned to small groups.
• Don’t answer your own questions. Allow for silence. Probe. Give hints, but
insist the group think it through and come up with an answer. Answer a ques-
tion once and the group will expect you to answer a second one.
• Start off with questions everyone can answer. Don’t frighten participants away
with difficult ones at the beginning.
Attachment 7- Asking Questions of Participants

California Childcare Health Program xv
• Don’t ask questions that could change what you present unless you can be flexible
enough to follow through; for example, if you ask “what do you want out of this
workshop” you may find the answer is different than what you prepared.
• Try the “why string.” When you get an almost complete answer, follow up with,
“Yes, and why . . .” That question will usually get you a second, deeper answer.
Again, ask “Why?” Continue until all aspects of the answer are discovered. Be
sure to use this technique only with confident participants.
• Keep the questions simple and concise. Long, drawn-out questions result in poor,
incomplete answers. Keep each question to one main thought.
• Use questions for specific reasons at different times during the workshop:
At the beginning - to discover where the participants stand and to set the
stage for what will happen.
In the middle - to serve as a check on the group’s learning progress and to
provide a change of pace.
At the end - to summarize and reinforce what was learned and help you
find out if you have been successful.
• Think of questions in terms of levels:
Memory - Participants are required only to recall or recognize information.
Comprehension - Participants demonstrate an understanding of the
material or ideas, discover relationships, make generalizations, or explain
meanings.
Application - Participants solve practical problems through the use of
ideas, principles or theories.
Analysis - Participants solve problems by breaking them down to their
components and determining the relationships between them.
Synthesis - Participants solve problems by using original, creative think-
ing.
Evaluation - participants make judgments on specific criteria rather than
opinions.
Attachment 7- Asking Questions of Participants
xvi Tools for Effective Training
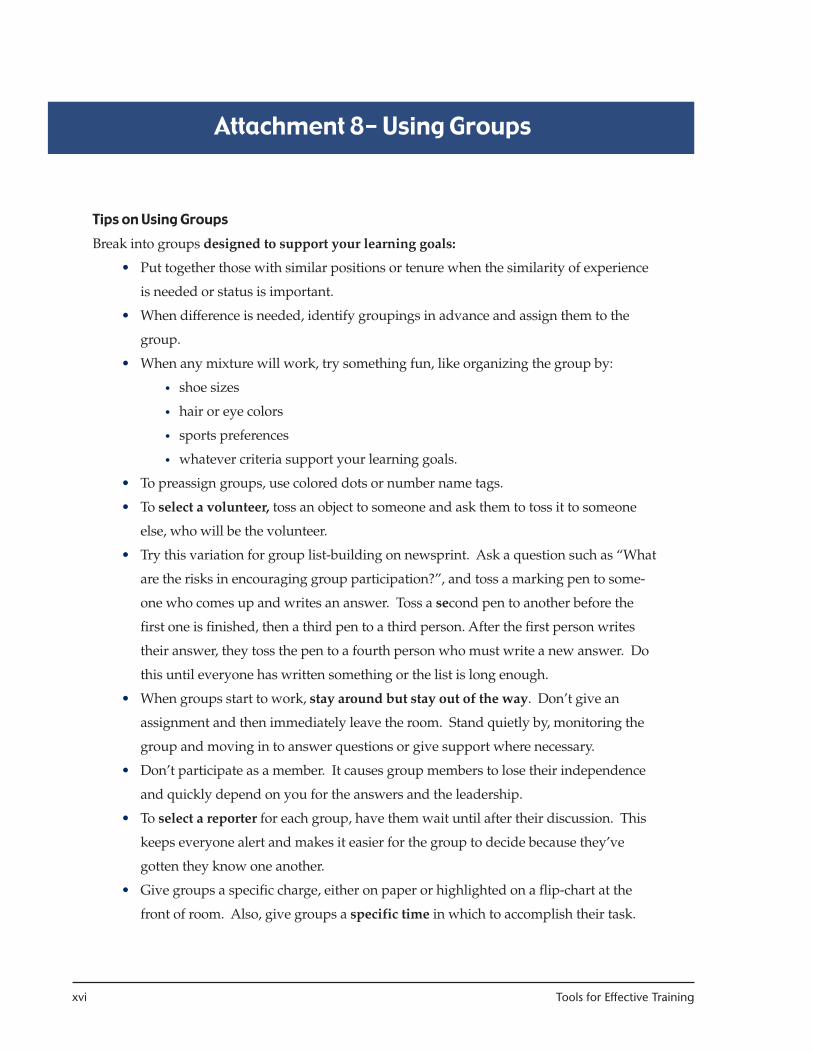
Tips on Using Groups
Break into groups designed to support your learning goals:
• Put together those with similar positions or tenure when the similarity of experience
is needed or status is important.
• When difference is needed, identify groupings in advance and assign them to the
group.
• When any mixture will work, try something fun, like organizing the group by:
• shoe sizes
• hair or eye colors
• sports preferences
• whatever criteria support your learning goals.
• To preassign groups, use colored dots or number name tags.
• To select a volunteer, toss an object to someone and ask them to toss it to someone
else, who will be the volunteer.
• Try this variation for group list-building on newsprint. Ask a question such as “What
are the risks in encouraging group participation?”, and toss a marking pen to some-
one who comes up and writes an answer. Toss a second pen to another before the
first one is finished, then a third pen to a third person. After the first person writes
their answer, they toss the pen to a fourth person who must write a new answer. Do
this until everyone has written something or the list is long enough.
• When groups start to work, stay around but stay out of the way. Don’t give an
assignment and then immediately leave the room. Stand quietly by, monitoring the
group and moving in to answer questions or give support where necessary.
• Don’t participate as a member. It causes group members to lose their independence
and quickly depend on you for the answers and the leadership.
• To select a reporter for each group, have them wait until after their discussion. This
keeps everyone alert and makes it easier for the group to decide because they’ve
gotten they know one another.
• Give groups a specific charge, either on paper or highlighted on a flip-chart at the
front of room. Also, give groups a specific time in which to accomplish their task.
Attachment 8- Using Groups
California Childcare Health Program xvii
Give them periodic time checks (“Five minutes left”). It’s also helpful to check in
with groups (“How much more time do you need? Is five minutes sufficient?”).
• Have each group prepare a newsprint sheet of their report. This helps them
clarify their ideas, increases others’ comprehension of the information, and pre-
serves their ideas. Post them and save them for the duration of the workshop.
• Always have small groups report back to the whole group. This reinforces the
importance of their work and provides new information to the other participants.
Some methods for reporting back include:
Cream-off-the-top: Get a little information from each group so it all adds to a
total. (Task instructions: “list the categories to use for breaking into groups.”
Report back instructions: “Let’s hear a couple from each group.”)
Add-ons: Each group has a different assignment. The learning takes place in
groups and again as the information is presented by the small groups to the
whole class. (Task instructions: “Group 1 will list categories to use for
breaking into groups by directors, Group 2 by teachers, etc.” Report back
instructions: “Group 1, please share your categories, then Group 2 will
follow, etc.”)
Formal presentations: A small group works on a presentation and then pre-
sents it to the total group.
Polling: Each group shares their solution to a problem and the trainer does not
comment until all are heard from.
• In forming groups always remember:
• A small group means five to seven people maximum.
• Each person brings his or her own style and prior experience to the
group.
• Encourage leaderless participation.
• First interpersonal encounters make openness difficult, so minimize
personal experiences.
• The risk in small groups is the dominant, need-meeting personality.
Attachment 8- Using Groups

xviii Tools for Effective Training
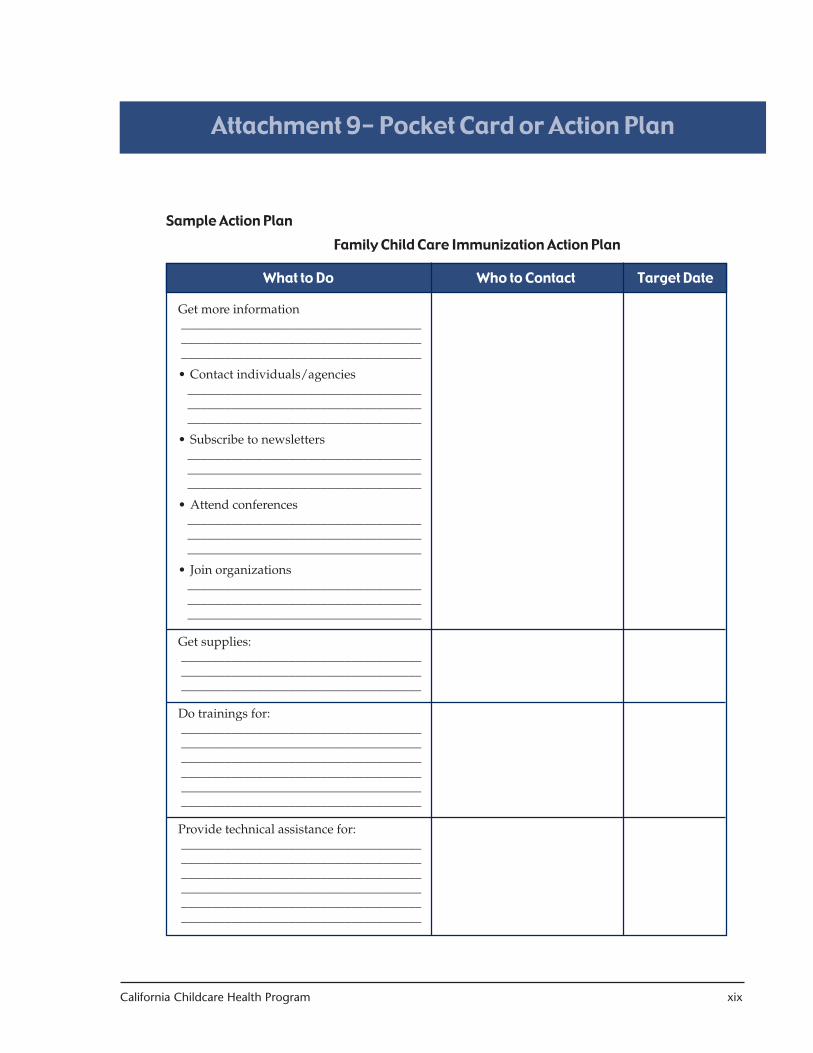
How to Use a Pocket Card or Action Plan
Pocket Card
• Bring to the workshop three 3" x 5" cards for each participant.
• Near the close of the workshop, distribute the cards to each person. Ask them to
identify the three most important things they learned in this workshop and will
take home and use. Ask that these items be as specific and measurable as possible.
• Ask them to write all three of these things on each card.
• As participants complete writing on their cards, ask them to share out loud some of
the specific items. As the trainer, to reinforce this, you could ask:
• How soon will you do that?
• Who do you think could help you accomplish that?
• What barriers might you face in accomplishing that?
• How many other participants have something similar?
• Have the participants put their three cards each in a different place . . . . somewhere
they will be seen during the next two weeks (in their calendar, wallet, mirror at
home, bookmark for the novel they’re reading, etc.) Ask participants for other
ideas for locations.
• Emphasize that repetition is extremely important in changing behavior, thus the
importance of three cards in three different locations.
Attachment 9- Pocket Card or Action Plan
California Childcare Health Program xix
Attachment 9- Pocket Card or Action Plan
Sample Action Plan
Family Child Care Immunization Action Plan
Get more information__________________________________________________________________________________________________________________
• Contact individuals/agencies_______________________________________________________________________________________________________________
• Subscribe to newsletters_______________________________________________________________________________________________________________
• Attend conferences_______________________________________________________________________________________________________________
• Join organizations_______________________________________________________________________________________________________________
Get supplies:__________________________________________________________________________________________________________________
Do trainings for:____________________________________________________________________________________________________________________________________________________________________________________________________________________________________
Provide technical assistance for:____________________________________________________________________________________________________________________________________________________________________________________________________________________________________
What to Do Who to Contact Target Date

xx Tools for Effective Training
Workshop evaluation
Sample
Always evaluate your workshop and make sure you integrate the feedback into your
subsequent presentations.
Workshop Evaluation
Workshop Title: __________________________ Date ________________________________
Presenter(s)_____________________________________________________________________
Check if: � Parent � Staff
� Community Representative � Other _______________________
Workshop was: (circle one)
Attachment 10- Workshop Evaluation
� ☺ � � �Stimulating Interesting O.K. Sort of boring It put me
& interesting to sleep
Put a check � in the boxes Excellent Good Fair Poor
Good ideas and information I can use � � � �
Communicated clearly � � � �
Responsive to questions � � � �
Prepared and organized � � � �
Enthusiastic � � � �
Knowledgeable about topic � � � �
Was consistent with workshop description � � � �
Would recommend presenter to others �
Comments or suggestions:
(Use back if needed)
California Childcare Health Program xxi
Resources & References
A. Health and SafetyThe California Child Care Health Program offers a number of resources for trainers which include mastersfor overheads and hand-outs. These can be ordered by calling the San Diego office at (619) 594-3728 or bye-mail at [email protected]. The following training materials are available:
• Prevention of Infectious Disease• Prevention of Injuries• Health and Safety Notes, Set I, Set II (available in English or Spanish)• Child Care Lead Poisoning Prevention Curriculum• Safely on the Move• Serving Children in Biracial/Bi-Ethnic Families• The California Child Care Provider Health Insurance Study• Survival Tips Posters (available in English or Spanish)• Child Care Health Connections Newsletter• Starting Point manual• Starting Point . . . . Children Are Children First video• Including All of Us, Module I• Including All of Us, Module II• Including All of Us, Module II• Training of Trainers Manual• Caring For Our Children: Guidelines for Out-of-Home Child Care Programs. American Public
Health Association, 1992.• Model Child Care Health Policies. ECELS, Pennsylvania Chapter of American Academy of Pediat-
rics, 1997.• Shapiro, A., et. al. Healthy Young Children. National Association for the Education of Young Children,
1995.• Robertson, C. Safety, Nutrition, and Health in Early Education, 1998.
B. Training• Kuenzli, Gary. How to Increase Participation in Your Workshops. YMCA of Metropolitan Los Angeles.• Kuenzli, Gary. Visual Exercises. Southern California Management Resources Center for the YMCA
of Southern California, 1992.• Pfeiffer, W. and Associates. The 1994 Annual (and subsequent annuals): Developing Human Resources.• Nadler, L. Designing Training Programs – The Critical Events Model, 1998.
C. Useful Web Sites• California Child Care Health Program: www.childcarehealth.org• Healthy Child Care America campaign: www.nccic.org/hcca/abthcca.html• National Association for the Education of Young Children: www.naeyc.org• American Academy of Pediatrics: www.aap.org• National Resource Center for Health and Safety in Child Care: www.nrc.uchsc.edu• National Child Care Information Center: www.nccic.org
Resources and References

xxii Tools for Effective Training