toad data point installation guidesupport-public.cfm.quest.com/43279_toaddatapoint_4... ·...
TRANSCRIPT

Toad® Data Point 4.3
Installation Guide

© 2017 Quest Software Inc.ALL RIGHTS RESERVED.
This guide contains proprietary information protected by copyright. The software described in this guide isfurnished under a software license or nondisclosure agreement. This software may be used or copied only inaccordance with the terms of the applicable agreement. No part of this guide may be reproduced or transmittedin any form or by any means, electronic or mechanical, including photocopying and recording for any purposeother than the purchaser’s personal use without the written permission of Quest Software Inc.
The information in this document is provided in connection with Quest Software products. No license, expressor implied, by estoppel or otherwise, to any intellectual property right is granted by this document or inconnection with the sale of Quest Software products. EXCEPT AS SET FORTH IN THE TERMS ANDCONDITIONS AS SPECIFIED IN THE LICENSE AGREEMENT FOR THIS PRODUCT, QUEST SOFTWAREASSUMES NO LIABILITY WHATSOEVER AND DISCLAIMS ANY EXPRESS, IMPLIED OR STATUTORYWARRANTY RELATING TO ITS PRODUCTS INCLUDING, BUT NOT LIMITED TO, THE IMPLIED WARRANTYOFMERCHANTABILITY, FITNESS FOR A PARTICULAR PURPOSE, OR NON-INFRINGEMENT. IN NO EVENTSHALL QUEST SOFTWARE BE LIABLE FOR ANY DIRECT, INDIRECT, CONSEQUENTIAL, PUNITIVE,SPECIAL OR INCIDENTAL DAMAGES (INCLUDING, WITHOUT LIMITATION, DAMAGES FOR LOSS OFPROFITS, BUSINESS INTERRUPTION OR LOSS OF INFORMATION) ARISING OUT OF THE USE ORINABILITY TO USE THIS DOCUMENT, EVEN IF QUEST SOFTWARE HAS BEEN ADVISED OF THEPOSSIBILITY OF SUCH DAMAGES. Quest Software makes no representations or warranties with respect to theaccuracy or completeness of the contents of this document and reserves the right to make changes tospecifications and product descriptions at any time without notice. Quest Software does not make anycommitment to update the information contained in this document.
If you have any questions regarding your potential use of this material, contact:
Quest Software Inc.Attn: LEGAL Dept4 Polaris WayAliso Viejo, CA 92656
Refer to our web site (www.quest.com) for regional and international office information.
Patents
This product includes patent pending technology. For the most current information about applicable patents forthis product, please visit our website at www.quest.com/legal.
Trademarks
Quest, Quest Software, LiteSpeed, SQL Navigator, vWorkspace, Toad, and the Quest logo are trademarks ofQuest Software Inc. in the U.S.A. and other countries. For a complete list of Quest Software trademarks, pleasevisit our website at www.quest.com/legal. Microsoft, Windows, Windows Server, Windows Vista, Visual Studio,SQL Server, SharePoint, Access and Excel are either registered trademarks or trademarks of MicrosoftCorporation in the United States and/or other countries. Oracle is a trademark or registered trademark of Oracleand/or its affiliates in the United States and other countries. Citrix® and XenApp™ are trademarks of CitrixSystems, Inc. and/or one or more of its subsidiaries, and may be registered in the United States Patent andTrademark Office and in other countries. SAP is the registered trademark of SAP AG in Germany and in severalother countries. IBM and DB2 are registered trademarks of International Business Machines Corporation.MySQL is a registered trademark of MySQL AB in the United States, the European Union and other countries.Google and Google Analytics are registered trademarks of Google Inc. PostgreSQL is a registered trademark ofthe PostgreSQL Community Association of Canada. Subversion is a trademark of the Apache SoftwareFoundation. All other trademarks, servicemarks, registered trademarks, and registered servicemarks areproperty of their respective owners.
Toad Data Point 4.3Installation GuideThursday, October 12, 2017
Contents
Contents 3
Installation 6System Requirements 6Client Requirements 6Server Requirements 8Virtualization Support 10User Requirements 10
Install Toad 12Troubleshoot Installation Errors 12
Specify Application Data Directory Location 13Read-Only Installation 14Additional Considerations and Limitations of Read-Only Install 15
Install Toad Silently 15DetermineWhich Installer to Use 15Silent Installation Prerequisites 16Silent Installation Using the Executable 16Silent Installation Using theMicrosoft Installer 18
Install Toad on Citrix® Systems 20Upgrade Toad 21Upgrade Automation Scripts and Scheduling Tasks 21Upgrade Automation Scripts to Newer Version of Toad 21Migrate Scheduling Tasks to Newer Version of Toad 22
Files Migrated During Upgrades 23Uninstall Toad 24Licensing 25Notes for Toad Data Point Users 25
Configure Toad Layout 26Customize Your ToadWorkspace 29
Create Connections 30Understand Toad Connections 30ToadOpen Connections 30Sharing a Connection AmongWindows 31
Create Access Connections 31Considerations and Limitations 32
Create SAP Business Objects Connections 32Configure DB2Client Connections 34If You Previously Used the Toad DB2Client 34Configure DB2Client Connections 34Maintain DB2Client Connections 38
Toad Data Point 4.3 Installation GuideContents
3
Configure DB2 LDAP Support 40Create Toad Connection Profiles for DB2 40Connection Using a Custom Connection String 41If You Previously Used the Toad DB2Client 41Create Connection Profiles 41Manage Connections 42
Create Excel Connections 43Considerations and Limitations 45Troubleshoot Excel 45
Create Google Analytics Connections 45About Google Analytics Connections 46Create Google Analytics Connections 46Reauthorizing a Connection 46
Create Hive Connections 47Create a Connection to Intelligence Central 50Limitations of UsingWindows Authentication 52
CreateMySQL orMariaDB Connections 52Create ODBC Connections 53Tips forWorking with ODBC Connections 55ODBC Features 55
Configure Oracle LDAP Support 55Create Oracle Connections 56Client Connection or Direct Connection 56Configure the Oracle Instant Client 56Create anOracle Connection 57
Create Oracle Business Intelligence Connections 58Create Salesforce Connections 59Important Notes about Salesforce Connections 61
Create SQL Server and SQL Azure Connections 61Create SQL Server Analysis Services Connections 63Configure HTTP Access 63Connect to SQL Server Analysis Services 63
Create SAP Connections 64Create SAP HANA Connection 65Create Teradata Connections 66
Troubleshoot Connections 69Troubleshoot Access Issues 69Missing Functionality andObject Information 69Other Issues 69
Troubleshoot Excel® Issues 69Excel Connections 70Working with Excel Files 71Opening Excel Files in Toad Document Window 71
Troubleshoot DB2 LUW Issues 72Installation Issues 72Connection Issues 72Other Issues 73
Toad Data Point 4.3 Installation GuideContents
4
Troubleshoot DB2 z/OS Issues 74Installation Issues 74Connection Issues 74Missing Functionality or Object Information 75Other Issues 75
Troubleshoot Informix Issues 76Troubleshoot MySQL Issues 76Connection Issues 76Missing Functionality or Object Information 77
Troubleshoot Oracle Issues 78Connection Issues 78Missing Functionality andObject Information 78
Troubleshoot SQL Server® Issues 78Connection Issues 78
Troubleshoot SAP Issues 80Connection Issues 80Missing Functionality or Object Information 80Other Issues 80
Configure Version Control 81Version Control for Toad Files 81
About Us 84Wearemore than just a name 84Our brand, our vision. Together. 84Contact Quest 84Technical Support Resources 84
Index 85
Toad Data Point 4.3 Installation GuideContents
5

Installation
System RequirementsReview the following client and database server requirements for Toad® Data Point.
Client RequirementsBefore installing Toad, ensure that your client system meets the following minimum hardware and softwarerequirements:
Requirement Details
Platform 2 GHz processor (recommended minimum)
Memory 8 GB of RAM minimum, 16 GB recommendedAdditional RAM Requirements: Using Local Storage, Cross-Connection Query,Business Intelligence connections, or NoSQL connections can require an additional500 MB of RAM. These features start processes (mysqld.exe, hubproxy.exe) whichpersist for the Toad session.Note: The memory required may vary based on the following:
l Applications that are running on your system when using Toad
l Size and complexity of the database
l Amount of database activity
l Number of concurrent users accessing the database
Hard Disk Space 800 MB to install Toad450 MB to run ToadAdditional Recommendations: For retrieving large queries, allow 10 GB free disk space(or more, depending on the size of the data being retrieved). After retrieving 2500 rows,Toad saves data in a TMP (.tmp) file in the user's Temp directory. These TMP files aredeleted when Toad closes.
Operating System Windows Server® 2008 Service Pack 2 (32-bit or 64-bit)Windows Server® 2008 R2 Service Pack 1 (64-bit)Windows Server® 2012Windows Server® 2012 R2Windows Server® 2016Windows® 7 (32-bit or 64-bit)Windows® 8 (32-bit or 64-bit)Windows® 8.1 (32-bit or 64-bit)Windows® 10
1
Toad Data Point 4.3 Installation GuideInstallation
6

Requirement Details
.NET Framework Microsoft® .NET Framework 4.5.1Teradata® .NET Data ProviderYou must install the Teradata .NET Data Provider (13.10 or later) to use a Teradatanative connection in Toad.Note: To use a Teradata connection in a cross-connection query, you must also installa Teradata (13.10 or later) ODBC driver.
AdditionalSoftware
Visual C++ Redistributable for Visual Studio 2015. This software is required. It isincluded in installation using the .exe installer. If using the .msi installer, ensure that thissoftware is installed prior to installation. See Visual C++ Redistributable for VS 2015.Prerequisites for the 2015 Redistributable—If you encounter a "Microsoft Visual C++2015 Redistributable is not installed correctly" error during Toad installation, do thefollowing:
1. Uninstall the Microsoft Visual C++ 2015 Redistributable using the ControlPanel.
2. Install the missing prerequisite software. See Universal C Runtime UpdatePrerequisites or use one of the following links:
l For Windows 7 or Windows Server 2008 R2, install Service Pack 1:https://support.microsoft.com/en-us/kb/976932.
l For Windows RT 8.1, Windows 8.1, or Windows Server 2012 R2, installthe April 2014 update: https://support.microsoft.com/en-us/kb/2919355.
l For Windows Vista or Windows Server 2008, install Service Pack 2:https://support.microsoft.com/en-us/kb/948465.
3. Run the ToadInstaller.exe again.
Database Client DB2® ClientToad no longer installs a DB2 Client along with the Toad application. When connectingto a DB2 database, ensure that you have a DB2 Client or IBM Data Server Driverinstalled. Toad supports DB2 Client versions 9.7.6 through 11.1.Oracle® ClientToad can connect to Oracle using Direct Connect (no Oracle Client required) or usingan Oracle Client or Oracle Instant Client. However, if you want to use LDAP, you mustinstall an Oracle Client. Toad supports 9i or later Oracle Clients and Oracle InstantClients.Notes:
l You cannot use Oracle Direct Connection in a cross-connection query.
l To use an Oracle connection in a cross-connection query, you must install anOracle Client (full install) or you must install the Oracle Instant Client plus theOracle ODBC driver.
AdditionalRequirements
Web BrowserMicrosoft® Internet Explorer® 7.0 or laterScreenToad supports screen resolutions up to 3200 x 1800 and display DPI settings up to150%
Toad Data Point 4.3 Installation GuideInstallation
7

Server RequirementsBefore installing Toad, ensure that your server meets the following minimum hardware and softwarerequirements:
Requirement Details
Native DatabaseServer
Toad supports the following databases:Oracle 9i, 10g, 11g, 11g R2, 12c, 12c R2Toad has been tested on Oracle Exadata 2.0 running Oracle database 11g R2.Limited support of SQL Server® 2000 (Service Pack 3 or later)SQL Server 2005 (Service Pack 2 or later) and SQL Server 2005 ExpressSQL Server 2008 and SQL Server 2008 ExpressSQL Server 2008 R2 and SQL Server 2008 R2 ExpressSQL Server 2012 and SQL Server 2012 ExpressSQL Server 2014 Enterprise and SQL Server 2014 ExpressSQL Server 2016Notes:
l SQL Server Compact Edition is not supported.
l Storage Management is not available on SQL Server Express.
IBM DB2 for LUW 9.5, 9.7, 10.1, 10.5, 10.5.0.5, 11.1IBM DB2 for z/OS 9, 10, 11, 12Note: Toad may support IBM DB2 Express and SWE in addition to listed above servers,but note that no testing was performed on it.Note:Windows 8, 10 and Windows Server 2012 require the following Fix Pack in orderto ensure registration of DLLs in Global Assembly Cache:
IBM DB2 LUW 10.5 Fix Pack 4IBM DB2 LUW 10.1 Fix Pack 4IBM DB2 LUW 9.7 Fix Pack 10MySQL 4.1, 5.0, 5.1, 5.5, 5.6, 5.7MariaDB 5.5.5, 10.2.8 (using MySQL provider)SAP ASE 12.5.4, 15.0.2, 15.0.3, 15.5, 15.7, 16SAP IQ 15, 16SAP SQL Anywhere 10, 11, 12, 16SAP HANA SPS 08, SPS 09, SPS 10, SPS 11, SPS 12, SAP HANA 2.0, SAP HANA 2.0SPS 02Teradata 12.0, 13.0, 13.10, 14, 15, 16Access® 2003, 2007, 2010, 2013, 2016Note: To use Access 2016 64-bit to connect to an Access database in Toad, theMicrosoft Access Database Engine is required and might not be included in the Accessinstallation. The engine must match the architecture (bitness) of Toad.Excel® 2003, 2007, 2010, 2013, 2016Note: To use Excel 2016 64-bit to connect to an Excel or .csv file in Toad, the MicrosoftAccess Database Engine is required and might not be included in the Excelinstallation. The engine must match the architecture (bitness) of Toad.
ODBC DatabaseServer
Toad Data Point allows you to create a connection to a database that supports anODBC 3.0 or later driver. ODBC connectivity provides basic querying capability, butmay not be as full-featured as a native connection in Toad. Toad has been tested onthe following databases, using an ODBC connection:
Toad Data Point 4.3 Installation GuideInstallation
8
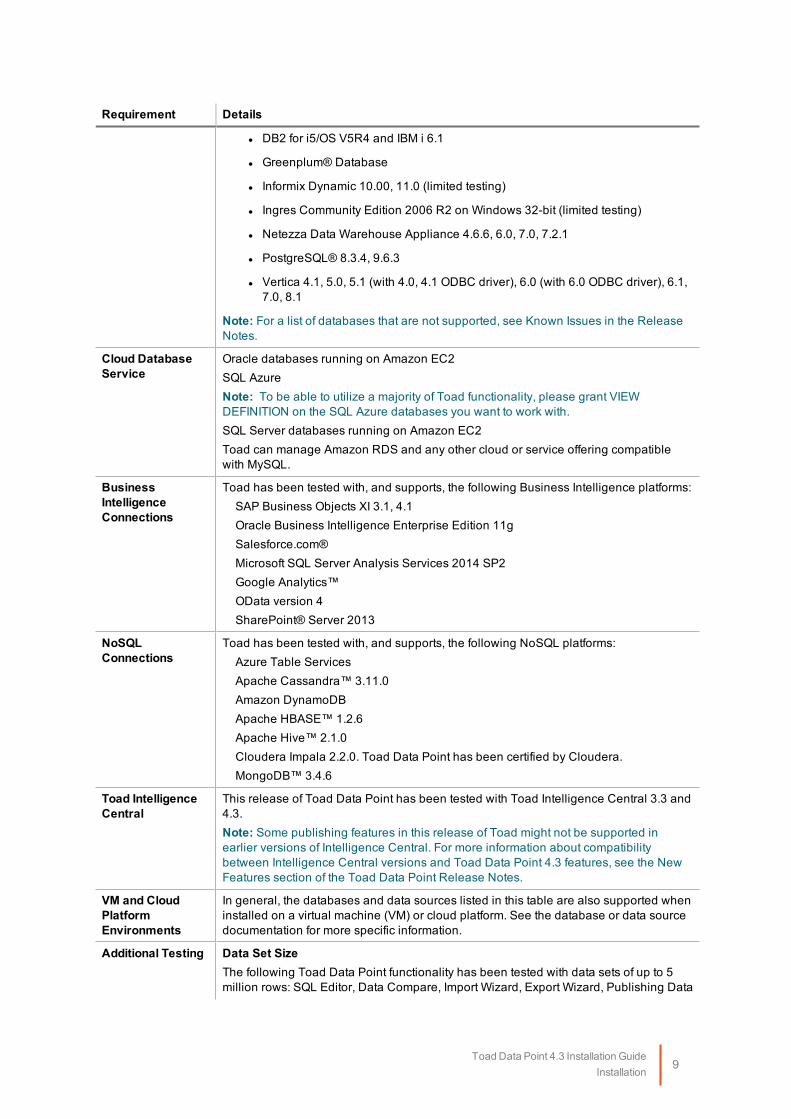
Requirement Details
l DB2 for i5/OS V5R4 and IBM i 6.1
l Greenplum® Database
l Informix Dynamic 10.00, 11.0 (limited testing)
l Ingres Community Edition 2006 R2 on Windows 32-bit (limited testing)
l Netezza Data Warehouse Appliance 4.6.6, 6.0, 7.0, 7.2.1
l PostgreSQL® 8.3.4, 9.6.3
l Vertica 4.1, 5.0, 5.1 (with 4.0, 4.1 ODBC driver), 6.0 (with 6.0 ODBC driver), 6.1,7.0, 8.1
Note: For a list of databases that are not supported, see Known Issues in the ReleaseNotes.
Cloud DatabaseService
Oracle databases running on Amazon EC2SQL AzureNote: To be able to utilize a majority of Toad functionality, please grant VIEWDEFINITION on the SQL Azure databases you want to work with.SQL Server databases running on Amazon EC2Toad can manage Amazon RDS and any other cloud or service offering compatiblewith MySQL.
BusinessIntelligenceConnections
Toad has been tested with, and supports, the following Business Intelligence platforms:SAP Business Objects XI 3.1, 4.1Oracle Business Intelligence Enterprise Edition 11gSalesforce.com®Microsoft SQL Server Analysis Services 2014 SP2Google Analytics™OData version 4SharePoint® Server 2013
NoSQLConnections
Toad has been tested with, and supports, the following NoSQL platforms:Azure Table ServicesApache Cassandra™ 3.11.0Amazon DynamoDBApache HBASE™ 1.2.6Apache Hive™ 2.1.0Cloudera Impala 2.2.0. Toad Data Point has been certified by Cloudera.MongoDB™ 3.4.6
Toad IntelligenceCentral
This release of Toad Data Point has been tested with Toad Intelligence Central 3.3 and4.3.Note: Some publishing features in this release of Toad might not be supported inearlier versions of Intelligence Central. For more information about compatibilitybetween Intelligence Central versions and Toad Data Point 4.3 features, see the NewFeatures section of the Toad Data Point Release Notes.
VM and CloudPlatformEnvironments
In general, the databases and data sources listed in this table are also supported wheninstalled on a virtual machine (VM) or cloud platform. See the database or data sourcedocumentation for more specific information.
Additional Testing Data Set SizeThe following Toad Data Point functionality has been tested with data sets of up to 5million rows: SQL Editor, Data Compare, Import Wizard, Export Wizard, Publishing Data
Toad Data Point 4.3 Installation GuideInstallation
9

Requirement Details
to Intelligence Central.For the following Toad Data Point modules, working with very large data sets canimpact performance. For best results in these areas, work with data sets of less than 1million rows: Dimensional Viewer, Pivot Grid, manually sorting a result grid, performingmore than one Data Compare at a time (such as running multiple Data CompareAutomation scripts simultaneously).Notes:
l Performance can vary based on available disk space and memory, CPU speed,and the bitness of Toad, as well as the type and number of columns.
l It is recommended to use Toad Data Point 64-bit when working with large datasets.
l Import and export functionality was tested with .csv files.
l Performance testing was conducted using Toad Data Point 64-bit.
Virtualization SupportRequirement Details
ApplicationVirtualization
When deploying Toad Data Point in a virtualization environment, for best results ensurethe system accurately reflects the applicable client hardware and softwarerequirements listed in this document.Toad Data Point has been developed using Microsoft guidelines (see Remote DesktopServices programming guidelines) and can be deployed and operated in virtualizationenvironments such as Citrix XenApp, Microsoft App-V, and VirtualBox.See "Install Toad on Citrix® Systems" on page 20 for more information.
ServerVirtualization
Toad has been tested with the following:
l Oracle VM 3.1 running on Red Hat Enterprise Linux 64-bit with Oracle 11gR2
l Oracle VM 2.2 running on Windows 2008 32-bit with Oracle 11gR2
User Requirements
User Requirements to Install ToadOnly Windows Administrators and Power Users can install Toad.
Note: The following exceptions exist for Power Users:
l A Power User cannot install Toad on a computer running Windows Vista Enterprise. This is a Windowslimitation because Vista does not support Power User mode.
l (DB2 only) A Power User can install Toad as long as this user belongs to the DB2ADMNS orDBUSERS group.
If an Administrator installs Toad, the Administrator can share the Toad shortcut icon on the desktop and menuitems with any user—a Power User, Restricted User, Vista standard user—on the computer.
If a Power User installs Toad, a Restricted User cannot do the following:
l Associate file extensions.
Toad Data Point 4.3 Installation GuideInstallation
10
l View the Toad shortcut icon on the desktop or the Toad menu options in the Windows Start menu. As aworkaround, Restricted Users can create a shortcut to Toad from the install directory and place theshortcut on their desktop.
User Requirements and Restrictions for Running ToadThe following describes the requirements and restrictions for users who launch and run Toad:
l (DB2 only) A Windows Power User or Restricted User must belong to the DB2ADMNS orDB2USERS group. To add the user to one of these groups, select Start | Control Panel |Administrative Tools | Computer Management | System Tools | Local Users and Groups |Groups | DB2ADMNS or DB2USERS.
l (DB2 only) A Windows Vista user must be either an administrator or a standard user that belongs to anVista Administrators group. Additionally, to enable full functionality in Toad when Vista’s User AccessControl security feature is turned on, the standard user must run Toad as an administrator. (Right-clickthe Toad icon on the Vista desktop and select Run as administrator.)
l (DB2 only) A Windows Power User or Restricted User does not have the authority to add or remove DB2catalog entries using the Toad Client Configuration wizard. However, these users can use the ImportProfile function in the Toad Client Configuration wizard to import catalog entries to Toad.
l (DB2 only) To take full advantage of Toad for DB2 LUW functionality, the user ID specified in the Toadconnection profile for each DB2 for LUW database connection requires the authorizations listed in thefollowing document:
ToadDB2LUWAuthorizations.xls
l (DB2 only) As a minimum requirement to manage a DB2 for z/OS subsystem in Toad, the user ID definedin the Toad connection profile for the subsystem must either have SYSADM privileges or SELECTprivileges on the DB2 catalog tables. For a complete list of authorizations (and corresponding GRANTstatements) a user requires to take full advantage of Toad for DB2 z/OS functionality, refer to thefollowing document:
ToadDB2zOSAuthorizations.doc
l To create or modify the QuestSoftware.ToadSecurity table to enable Toad Security, the user whomaintains this table must have privileges to create, insert, update, and delete it. All other users need onlythe ability to read the QuestSoftware.ToadSecurity table to use Toad Security features.
Toad Data Point 4.3 Installation GuideInstallation
11

Install ToadBeginning with release 3.2, Toad® Data Point is available in two editions: Base and Professional.
Beginning with release 4.1, Toad Data Point is available in a 64-bit version, as well as a 32-bit version.
To install Toad
1. Run the ToadInstaller.exe.
For individual installation, the .exe file is recommended. The Microsoft Visual C++ 2015 Redistributableis required by Toad. This software is included in the installation when using the .exe file, but not whenusing the .msi file. Please ensure Visual C++ Redistributable for VS 2015 is installed prior to installationusing the .msi file. See MSI Prerequisites for more information.
For help with installation errors, see Troubleshoot Installation Errors.
2. If you are running the combined installer in a 64-bit environment, on the Choose Installer page, selectthe version to install: 32-bit or 64-bit.
Note: Install 32-bit Toad if you intend to use a 32-bit ODBC driver.
3. Complete the wizard. Review the following for additional information.
Install WizardPage Description
DestinationFolder
Select a destination folder or use the default.
Install Type Typical Install—Select to install Toad normally.Read-only Install—Select to install Toad as a read-only application. See "Read-Only Installation" on page 14 for more information.
Side-by-side Installation
Toad Data Point 4.1 (or later) supports side-by-side installation of versions with different architecture (bitness)as long as they are also different releases (e.g., 4.0 and 4.1) or different editions (e.g., Commercial and Beta).
For example, you could install the following side-by-side:
l A 32-bit 4.1 Commercial edition and a 64-bit 4.1 Beta edition
l A 32-bit 4.0 Commercial edition and a 64-bit 4.1 Commercial edition
Troubleshoot Installation ErrorsError Message: The Microsoft Visual C++ 2015 Redistributable is not installed correctly
You might encounter this error if the prerequisites for the Microsoft Visual C++ 2015 Redistributable are notinstalled prior to installing Toad. If you encounter this error, do the following:
1. Uninstall the Microsoft Visual C++ 2015 Redistributable using the Control Panel.
2. Install the missing software. See Universal C Runtime Update Prerequisites or use one of the followinglinks:
l For Windows 7 or Windows Server 2008 R2, install Service Pack 1:https://support.microsoft.com/en-us/kb/976932.
l For Windows RT 8.1, Windows 8.1, or Windows Server 2012 R2, install the April 2014 update:
Toad Data Point 4.3 Installation GuideInstallation
12

https://support.microsoft.com/en-us/kb/2919355.
l For Windows Vista or Windows Server 2008, install Service Pack 2:https://support.microsoft.com/en-us/kb/948465.
3. Run the ToadInstaller.exe again.
Specify Application Data DirectoryLocationToad Data Point 4.3 stores settings files in the user's Application Data directory. The default location cannot bemodified from within the application. Toad provides two methods to change the default location: by using aRegistry setting or by using a command switch in a Toad shortcut.
Use the Registry setting method to change the application data directory from Roaming to Local. Use thecommand switch method to change the location to any new path.
To change Toad Application Data directory location from Roaming to Local
In the Registry under Toad Data Point (Computer\HKEY_CURRENT_USER\Software\Quest Software\ToadData Point\4.3), add LOCALSETTINGS with a value of 1.
See the following table for default (Roaming) and resulting (Local) directory path.
Caution: All current Toad settings will be lost after applying this Registry setting unless you manually copythe settings files from the default location (Roaming directory) to the new location (Local directory). Copy thesettings files BEFORE you add the Registry setting and BEFORE opening Toad.
Operating System Default LocationNew Location whenLOCALSETTINGS = 1
Windows VistaWindows Server 2008Windows 7Windows 8
C:\Users\username\AppData\Roaming\QuestSoftware\Toad Data Point 4.3
C:\Users\username\AppData\Local\Quest Software\ ToadData Point 4.3
To change Toad Application Data directory location using a command-line switch
You can override the default Application Data directory by running Toad with the command switch:
Toad.exe --datadir="YourNewDirPath"
To instruct Toad to always use the new directory path, add the command switch and the new directory path to aToad desktop shortcut. Then use the desktop shortcut when opening Toad.
Toad Data Point 4.3 Installation GuideInstallation
13

1. To add the command switch, right-click the Toad shortcut and select Properties.
2. Enter the command switch and add the directory path in quotes (replace "YourNewDirPath" with yourdirectory path).
Read-Only InstallationDuring installation, you can select an option to install Toad as a read-only application. This lets you query dataand view objects using Toad, but all actions that can impact the database (Create, Alter, Drop, Insert, Update,etc.) are disabled or hidden. This ensures that you can use Toad without worrying about committing a change toa sensitive production instance. The following image shows an example of the differences between a typicaland a read-only installation:
Toad Data Point 4.3 Installation GuideInstallation
14

To install a read-only version of Toad Data Point
1. During installation, select the Read-only option.
To change an existing installation to read-only
1. Reinstall Toad and select Read-only Install on the Install Type page.
Additional Considerations and Limitations of Read-Only InstallReview the following additional considerations/limitations before using a Toad read-only installation.
Consideration/Limitation
Additional limitations for IBM DB2 z/OSconnections
When using an IBM DB2 z/OS connection in a read-only install ofToad, please note the following additional limitations:
l The Dependencies, Grants, and Script tabs in theDatabase Explorer (Viewer) are not available.
l The Clone Tables node/tab in the Object Explorer is notavailable.
l The user does not have SQL access to SYS<xxx>AUTHtables.
Install Toad SilentlySilent installation provides a convenient method for deploying Toad to multiple machines. With somecustomization, you can also deploy the license key and settings at the same time.
Determine Which Installer to UseBefore performing a silent installation, review the following to determine which installer to use:
Installer Advantages Disadvantages
Executable file(.exe)
Silent installation using the .exe file hasthe following advantages:
l Verifies whether the prerequisitesoftware is installed, and if not,redirects you to the download
Silent installation using the .exe file hasthe following disadvantages:
l Cannot deploy custom Toadsettings files or license keys.
l Installer automatically exits if the
Toad Data Point 4.3 Installation GuideInstallation
15

Installer Advantages Disadvantages
location. prerequisite software is notinstalled.
Microsoft Installerfile (.msi)
Supports deployment of Toad settingsfiles and license keys.
Silent installation using the .msi file hasthe following disadvantages:
l Requires manual verification anddownload of any prerequisitesoftware.
l Requires a manual uninstall of theprevious version of Toad usingAdd/Remove Programs.
Silent Installation PrerequisitesBefore you can perform a silent installation, the following software must be installed on every computer whereyou are installing Toad:
l Microsoft .NET Framework 4.5.1
l (Installation using .msi Microsoft installer only) Visual C++ Redistributable for Visual Studio 2015. SeeVisual C++ Redistributable for VS 2015 for downloads. See KB2999226 - Update for Universal CRuntime in Windows for additional information.
Silent Installation Using the ExecutableUse the executable file to perform a silent install to the default directory (or to a different directory) and to specifyoptions such as logging installation messages.
To perform a silent install using the executable file
1. At a Windows command prompt, switch to the drive or directory where the executable for Toad islocated. (This file can be downloaded from the Quest Software Web site or can be found on the Toadinstallation CD-ROM.)
2. For a standard installation with all features enabled, enter the following command:
“ToadInstaller.exe” /S
For a read-only installation with create, alter, and drop functionality disabled, enter the followingcommand:
“ToadInstaller.exe” /S READONLY=TRUE
You can customize MSIEXEC command-line options and overrides for your installation similar to thefollowing command:
“ToadInstaller.exe” /S /Lx “C:\temp\installLog.txt” INSTALLDIR=”Drive:\your_install_path” USERNAME=”some_user” COMPANYNAME=”your_company” ALLUSERS=1
Use the following descriptions to customize the command-line options and overrides for your installation.
Toad Data Point 4.3 Installation GuideInstallation
16
Command-Line Options
The following MSIEXEC command-line options are used in this example:
Option Description
/L “C:\temp\installLog.txt”
(Optional) Write installation messages to the specified log. You can appendother options, such as x for debug (used in the previous example) or v for averbose log. See the log section at http://msdn2.microsoft.com/en-us/library/aa367988.aspx for more information about additional loggingoptions.Also, substitute “C:\temp\installLog.txt” in the example with the fully qualifiedname of the log file. Enclose this value in double quotations. The installationprocess creates this file if it does not exist. Otherwise, the existing file isoverwritten.
Toad Default Installation Option Overrides
You can specify the following values to override Toad’s default installation options. Enclose each valuein double quotations.
Option Description
INSTALLDIR (Optional) Specify the absolute path for the directory in which you want to installToad. If you do not include this path, the installation program defaults to:C:\Program Files (x86)\Quest Software\Toad Data Point4.3.
ALLUSERS (Optional) Specify one of the following:
l For a per-machine installation, specify 1. This value allows any user touse the Toad shortcut on the desktop after the installation completes.
l For a per-user installation, enter the empty string value (“”) This valueallows only the user specified for USERNAME (and the user that installedToad) to see the Toad shortcut on the target desktop. If USERNAME isomitted, only the user that installed Toad sees the shortcut.
Note: If you do not specify this property, the installation program defaults to a per-user installation.
USERNAME (Optional) Specify the user that intends to use Toad on the target computer.Notes:
l If ALLUSERS is omitted or defined with the empty string value (""), onlythe user specified here (and the user that installed Toad) can see theToad shortcut on the desktop after the installation completes.
l If ALLUSERS is omitted or defined with the empty string value ("") and youomit the USERNAME option, only the user that installed Toad sees theToad shortcut on the desktop.
l If ALLUSERS is 1, the USERNAME value is ignored during installation.
COMPANYNAME (Optional) Specify the name of the company that owns this installation.
Notes:l All default installation option overrides are case-sensitive.
l Enclose all values (except for the ALLUSERS value) in double quotations.
Toad Data Point 4.3 Installation GuideInstallation
17
Silent Installation Using the Microsoft InstallerNote: (MSI installs on Windows Vista and 7) If you are using MSI to install Toad on Windows Vista or 7 with UACenabled, you can install a file that adds a "Run as administrator" option when right-clicking the MSIfile: http://www.symantec.com/connect/downloads/msi-run-administrator-context-menu-vista.
Note: The installer does not verify that system requirements have been met before installing. If you do not wantto manually verify system requirements, you should use the .exe file for the silent install.
MSI PrerequisitesVisual C++ Redistributable for Visual Studio 2015 is required by Toad, however it is not installed when youuse the Microsoft (.msi) installer. Ensure that this software is installed prior to performing an install using the .msiinstaller. For downloads, see Visual C++ Redistributable for VS 2015. For related information, see KB2999226 -Update for Universal C Runtime in Windows.
If your operating system is 32-bit, install vc_redist.x86.exe. If your operating system is 64-bit, install both vc_redist.x86.exe and vc_redist.x64.exe.
This software is required to enable some features in Toad Data Point, such as Local Storage. This software isincluded in installation when using the executable (.exe) installer.
Perform Silent Installation Using MSIYou can deploy the license key, custom settings, and connections files when installing using the .msi installer.See "Create Transform (MST) Files" on page 19 for more information.
To perform a silent install using msi
1. At a Windows command prompt, switch to the drive or directory where the msi installer for Toadis located.
2. For a standard installation with all features enabled, enter the following command:
msiexec /i “ToadInstaller.msi” /q
For a read-only installation with create, alter, and drop functionality disabled, enter the followingcommand:
msiexec /i “ToadInstaller.msi” /q READONLY=TRUE
You can customize command-line options and overrides for your installation similar to the following:
msiexec /i “ToadInstaller.msi” INSTALLDIR= “Drive:\your_install_path” /qUSERNAME=”someone” COMPANYNAME=”your_company” ALLUSERS=1
Command-Line Options
The following MSIEXEC command-line options are used in this example:
Option Description
/i Run the installation.
/q Specify the user interface (UI) that displays during installation. You can appendother options, such as n to hide the UI or b to hide the Cancel button during theinstallation.
Note: All command-line options are case-insensitive. See http://msdn2.microsoft.com/en-us/library/aa367988.aspx for a complete list of command-line options.
Toad Data Point 4.3 Installation GuideInstallation
18

Toad Default Installation Option Overrides
You can specify the following values to override Toad’s default installation options. Enclose each valuein double quotations.
Option Description
INSTALLDIR (Optional) Specify the absolute path for the directory in which you want to installToad. If you do not include this path, the installation program defaults to:C:\Program Files (x86)\Quest Software\Toad Data Point4.3.
ALLUSERS (Optional) Specify one of the following:
l For a per-machine installation, specify 1. This value allows any user touse the Toad shortcut on the desktop after the installation completes.
l For a per-user installation, enter the empty string value (“”) This valueallows only the user specified for USERNAME (and the user that installedToad) to see the Toad shortcut on the target desktop. If USERNAME isomitted, only the user that installed Toad sees the shortcut.
Note: If you do not specify this property, the installation program defaults to a per-user installation.
USERNAME (Optional) Specify the user that intends to use Toad on the target computer.Notes:
l If ALLUSERS is omitted or defined with the empty string value (""), onlythe user specified here (and the user that installed Toad) can see theToad shortcut on the desktop after the installation completes.
l If ALLUSERS is omitted or defined with the empty string value ("") and youomit the USERNAME option, only the user that installed Toad sees theToad shortcut on the desktop.
l If ALLUSERS is 1, the USERNAME value is ignored during installation.
COMPANYNAME (Optional) Specify the name of the company that owns this installation.
Notes:l All default installation option overrides are case-sensitive.
l Enclose all values (except for the ALLUSERS value) in double quotations.
Additional Options
Option Description
TRANSFORMS (Optional) Specify the name and location of the .mst file.TRANSFORMS="filename.mst"See Create Transform (MST) Files for more information.
Create Transform (MST) FilesYou can create a Microsoft transform (.mst) file that deploys the license key, custom settings, and connectionsfor users when performing a silent install using the .msi file.
If you do not already have the license key, settings, and connections files that you want to deploy in a silentinstall, you can create them in Toad.
Toad Data Point 4.3 Installation GuideInstallation
19
To create license, settings, and connections files in Toad
1. License file. In Notepad, do the following:
a. Enter the license key in the first line.
b. Enter the site message in the second line.
c. Save the file with license.key as the file name in the Toad install directory. Make sure the fileextension is .key not .txt.
2. Start Toad. The application should open without prompting you to enter a license key.
3. Settings file. Select Tools | Configuration Wizard from the Toad menu and complete the Configurationwizard. This wizard creates an initial settings file (Settings.xml).
4. ModuleSettings files. Select Tools | Options from the menu in Toad to open the Options window.
l Select each page in the window and set any options you want to deploy. These options create amodule settings folder and files.
5. Connection file. Select View | Connection Manager from the menu in Toad to open theConnection Manager.
l Create any connections you want to deploy.
6. Exit Toad. Upon exiting, a Connections file is created.
7. Locate the files you created. See the following table for file locations.
FileLocation (Windows Vista, Windows Server 2008, Windows 7,Windows 8, Windows 10)
Settings.xml C:\Users\ username\AppData\Roaming\Quest Software\Toad DataPoint 4.3.
ModuleSettings folder andfiles
C:\Users\username\AppData\Roaming\Quest Software\Toad DataPoint 4.3\ModuleSettings.
Connections.xml C:\Users\username\AppData\Roaming\Quest Software\Toad DataPoint 4.3.
To create a Transform (.mst) file
1. Select the tool of your choice to create a Transform (.mst) file using the ToadInstaller.msi.
2. Package the files created in the previous procedure. When creating the Transform file, select the ToadInstallation directory as the Destination.
For example, C:\Program Files\Quest Software\<product> <version>
When the user starts Toad for the first time, if these files are located in the Installation directory then thefiles are copied to the appropriate location.
3. Generate and save the Transform file.
4. Perform a silent install. See "Perform Silent Installation Using MSI" on page 18 for more information.
Install Toad on Citrix® SystemsToad must be installed on the Citrix server by the Citrix administrator. Users then connect to this instancethrough their Citrix login.
Toad Data Point 4.3 Installation GuideInstallation
20
To install Toad on a Citrix system
1. Connect to the Citrix Environment as an administrator.
2. Copy Toad to the Citrix server, if needed.
3. Start the Toad installation process.
4. During installation, select the Anyone who uses this computer checkbox when prompted.
5. Repeat steps 2 through 4 for each server in the Citrix farm.
Note: Although you must install Toad on every server in the Citrix farm, you only need topublish Toad once.
6. Review the following considerations regarding licensing:
l A license supplied by an administrator always overrides a user-supplied license in a Citrixenvironment.
l If you need to provide the same Toad functionality to all users, you can enter the default licensekey for all users.
Upgrade ToadTo upgrade Toad
1. Run the ToadInstaller.exe installation program from the DVD or downloaded file.
2. Select Uninstall Toad and continue with install.
3. Complete the wizard.
If you are upgrading from a previous version of Toad, you are prompted to migrate your settings the first time youstart Toad. The settings files include database connections, layout customizations, shortcut keys, and optionscustomized in the Options pages.
To migrate the settings again, remove or rename the current version's Application Data folder and migrate thefiles from the previous version's Application Data folder.
Note: Local Storage databases and database objects persist between versions (releases) of Toad Data Point.
Upgrade Automation Scripts andScheduling TasksIf you upgrade to a newer version of Toad, Automation scripts created in a previous version must be upgradedbefore you can open them in the newer version. Toad prompts you to automatically upgrade a script when youattempt to open it in a newer version.
In addition, scheduled scripts are scheduled to run using the version of Toad in which they were created. Afterupgrading Toad, those previously-created, scheduled scripts will not execute in the newer version until youmigrate each script's scheduling task. Toad prompts you to migrate scheduling tasks when you initially launchthe application after installation.
Upgrade Automation Scripts to Newer Version of ToadAn automation script is compatible with the version of Toad in which the script was created. If you want to openand/or modify a script using a newer version of Toad, you must upgrade the script. Toad automatically prompts
Toad Data Point 4.3 Installation GuideInstallation
21

you to upgrade the script the first time you open it in the newer version.
To upgrade an Automation script
1. Open the script in Toad. Toad prompts you to upgrade the script.
2. To upgrade the script, select Yes.
Caution: If you upgrade an automation script, it will no longer be compatible with earlierversions of Toad.
3. Select No (and do not elect to save the script), to keep the script compatible with the previous version.
4. If you selected Yes, Toad upgrades your script and saves a backup copy of the original script in thefollowing location:
<application data directory>\Automation\bak\
5. If the script you upgraded is also scheduled, you must migrate the scheduling task, otherwise theupgraded script will fail to run.
Migrate Scheduling Tasks to Newer Version of ToadEach scheduled Automation script uses a Windows scheduling task. The scheduling task specifies whichversion of Toad to use by specifying the version's application path. Toad provides you with two easy ways tomigrate your scheduled scripts' scheduling tasks when you upgrade Toad. First, Toad prompts you to migratescheduling tasks upon initial launch of the application after installation. Next, you can migrate scheduling tasksat any time using the Job Manager.
Notes:
l If you upgrade a previously-created script by opening it in a newer version of Toad, you must alsomigrate the scheduling task to the newer version.
l If you install the newer version of Toad side-by-side with the older version, previously-created,scheduled scripts will continue to execute using the older version, until you migrate the scheduling tasks(provided that you do not open the scripts in the newer version).
To migrate scheduling tasks upon initial launch
1. After upgrading Toad, and upon initial launch of the application, the Migrate Scheduled Tasksdialog opens.
2. Select the scheduled tasks (scheduled Automation scripts) to migrate to the new version of Toad.
3. Click OK to close the dialog.
4. Toad immediately prompts you for your Windows password. Enter your password to migrate thescheduled tasks.
Toad Data Point 4.3 Installation GuideInstallation
22
To migrate scheduling tasks using the Job Manager
1. Select Tools | Administer | Job Manager.
2. Click on the Job Manager toolbar.
3. Select the scheduled tasks to migrate and click OK.
Note: Only currently-scheduled tasks (enabled or disabled) are listed in the Migrate ScheduledTasks dialog.
4. Toad immediately prompts you for your Windows password. Enter your password to migrate thescheduled tasks.
Manually Edit Scheduling TasksOn occasion you may need to modify the application path in a Windows scheduling task. You can do this bymanually editing the scheduling task using the following procedure.
To manually edit a scheduling task
1. In the Job Manager (Tools | Administer | Job Manager), right-click a task and select Edit Task.
2. To change the version of Toad used to run the script, in the Actions tab, change the folder name in thetoad.exe path.
Files Migrated During UpgradesWhen upgrading to a new version of Toad, the following files can be migrated from the previous version'sApplication Data Directory (click the Application Data Directory link in Help | About to open the directory).
Caution! Migrating settings from a previous version of Toad may overwrite new settings files, implementedfor the current release (for example, updated reports templates, layouts, etc).
File Description
Action.log Tracks your usage within Toad. If you agree to share this data, the file isautomatically sent to Quest Software on a periodic basis.
Connections.xml Contains all connections stored in the Navigation Manager or the NewConnection window.
ConnectionTrace.log Contains the SQL Output connection trace log file if you select Tools |Execution Trace from the menu.
ExceptionTrace.log Contains a log of all exceptions encountered while running Toad.
FTPConnection.log Contains a log of exceptions encountered when attempting to connect toFTP servers.
FTPConnections.xml Contains connections to FTP servers stored in the FTP Connections window.
Quest.PersistentCache.xml Contains the private object annotation cache options (object notes, Lookuptables, and hidden columns). You can share these options with other Toadusers in Tools | Options | Database | Cache.
Settings.xml Contains many of the global configuration settings.
SqlServerPlanPrefs.xml Used to generate SQL Server execution plans.
ToadSupportBundle.zip Contains the last support bundle you generated.
Toad Data Point 4.3 Installation GuideInstallation
23

Folder Description
Automation (temporaryfolder)
Used by automation when executing automation scripts.
Cache Used to spool cache database metadata to disk if enabled. The data is inbinary format and can always be recreated by fetching it from the database.
Context Contains settings that depend on the context within Toad including thefollowing:
l Adapter—Custom data editing statements.
l Filter—Unnamed filters defined in the Object Explorer or DatabaseExplorer.
l Named Filter—Named filters defined in the Object Explorer orDatabase Explorer.
l TYPE—Tabs that display on the right when you select an object in theObject Explorer or Database Explorer.
Document Recovery Contains backup copies of Editor, Query Builder, and Database Diagram filessaved if you have enabled Document Recovery in Tools | Options| Environment | General.
Keyboard Contains custom keyboard shortcut layouts.
Layouts Contains layouts for some areas in Toad, such as tool windows thatautomatically display in the Editor and column layouts for the Messages tab.
ModuleSettings Contains general settings for various components in Toad, such as whetherthe data grid defaults to read-only, displays not null indicators, etc.
Plugins Used by Toad plugin components.
Session Contains desktop configurations, including toolbar customizations and toolwindow locations.
SQLFormatter Contains pre-set and user created templates for formatting SQL, and theSQL statement used to preview formatting changes in the Formatting Optionspage.
SQLRecall Contains the SQL statements saved by SQL Recall.
Templates Contains the following templates:
l Code Templates—Templates used to define default values whencreating new objects in the Object Explorer or Database Browser.
l Scripts—Startup scripts to run when connecting.
l Snippets—Code Snippet entries.
l Reports—Report entries.
Uninstall ToadIf you uninstall Toad, it may not uninstall completely. When you use Toad, you create new files such as SQLscripts, data output, or temp files, etc. The following types of files are not removed when you uninstall:
l Any new files you create
l Any copies of files you make for backup purposes
l Settings files
Toad Data Point 4.3 Installation GuideInstallation
24
You can uninstall Toad Data Point by using the Installer or by using the Windows Add/Remove Programs (orUninstall a program) feature. Using the Installer is the preferred way to uninstall Toad Data Point.
To uninstall Toad
1. Run the ToadInstaller.exe.
2. Select Uninstall Toad Data Point only.
3. Complete the wizard.
LicensingTo enter your license key
1. Select Help | Licensing from the menu (ALT+H+L).
2. Review the following for additional information:
Authorization key Enter the license key for Toad.
Site message Enter the site message included with the license key.
Note: Your license key determines the edition of Toad (Base, Pro, etc.) and will enable the functionalityaccordingly. In many cases, if functionality is disabled within Toad, you may not have an appropriatelicense to use it. When Toad is running, you can see which components are licensed by selecting Help |About. For complete list of features shipped with your Toad edition see https://www.quest.com/.
Notes for Toad Data Point Users
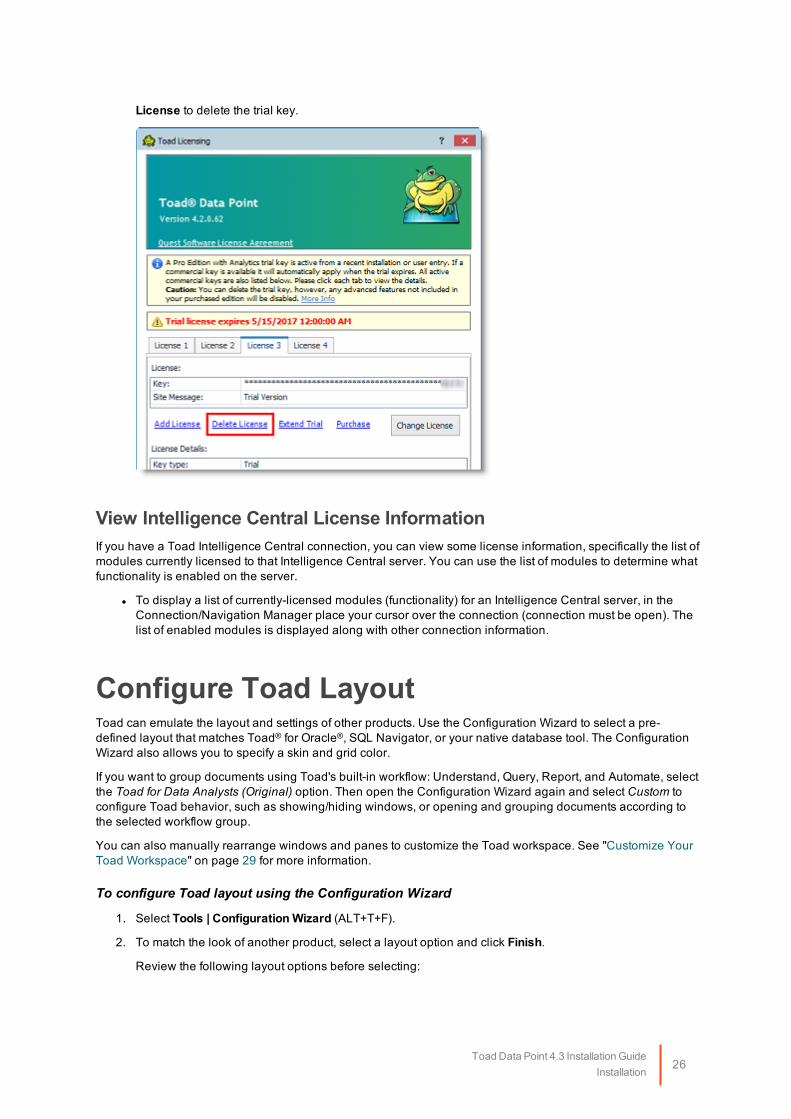
Trial KeysThe commercial version of Toad Data Point comes pre-installed with a trial license key for your convenience.This allows you to use the application while waiting for your commercial key to be delivered.
The trial license key remains active for the designated trial period, even after you enter your commercial licensekey (the splash screen may continue to indicate your application is a trial version). This is helpful if you arepreviewing an upgrade or an advanced module.
If you entered your commercial license key and do not require the trial version, you can delete the trial key.
Important: If you delete the Trial key, any advanced features not included in your purchased edition willbe disabled.
To delete a trial key
1. Select Help | Licensing.
2. In the Toad Licensing dialog, select the License tab for the trial license key and then click Delete
Toad Data Point 4.3 Installation GuideInstallation
25
License to delete the trial key.
View Intelligence Central License InformationIf you have a Toad Intelligence Central connection, you can view some license information, specifically the list ofmodules currently licensed to that Intelligence Central server. You can use the list of modules to determine whatfunctionality is enabled on the server.
l To display a list of currently-licensed modules (functionality) for an Intelligence Central server, in theConnection/Navigation Manager place your cursor over the connection (connection must be open). Thelist of enabled modules is displayed along with other connection information.
Configure Toad LayoutToad can emulate the layout and settings of other products. Use the Configuration Wizard to select a pre-defined layout that matches Toad® for Oracle®, SQL Navigator, or your native database tool. The ConfigurationWizard also allows you to specify a skin and grid color.
If you want to group documents using Toad's built-in workflow: Understand, Query, Report, and Automate, selectthe Toad for Data Analysts (Original) option. Then open the Configuration Wizard again and select Custom toconfigure Toad behavior, such as showing/hiding windows, or opening and grouping documents according tothe selected workflow group.
You can also manually rearrange windows and panes to customize the Toad workspace. See "Customize YourToad Workspace" on page 29 for more information.
To configure Toad layout using the Configuration Wizard
1. Select Tools | Configuration Wizard (ALT+T+F).
2. To match the look of another product, select a layout option and click Finish.
Review the following layout options before selecting:
Toad Data Point 4.3 Installation GuideInstallation
26
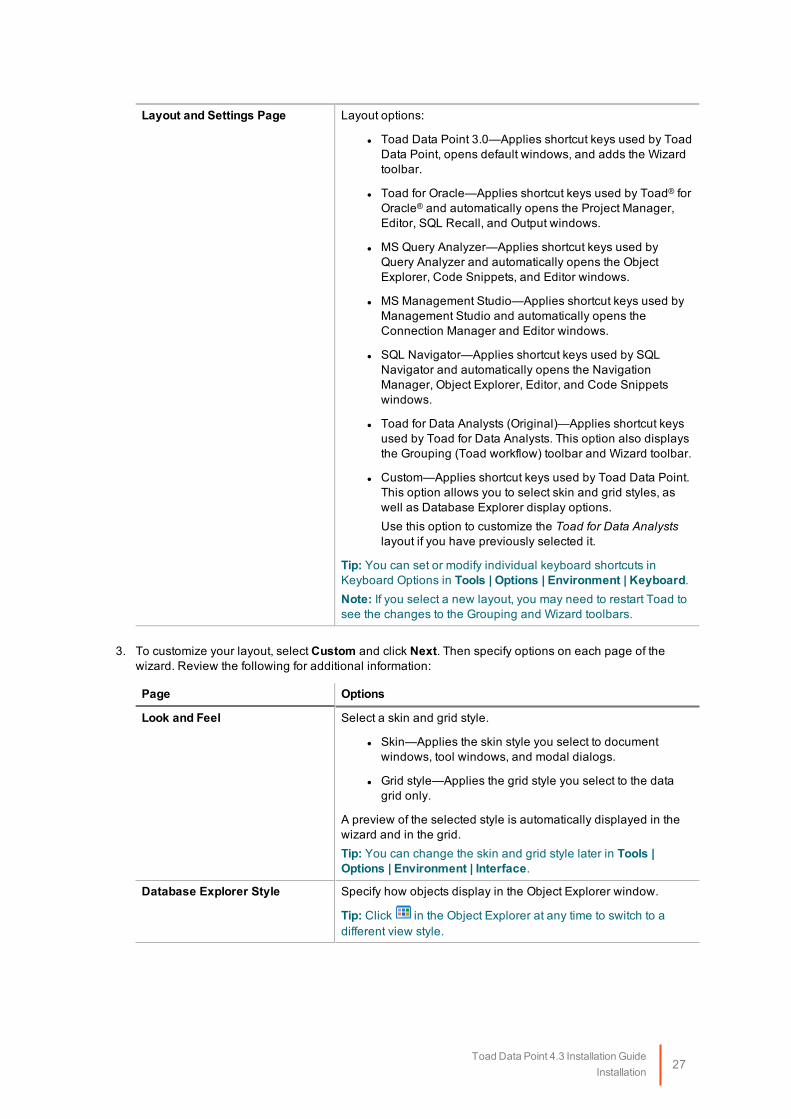
Layout and Settings Page Layout options:
l Toad Data Point 3.0—Applies shortcut keys used by ToadData Point, opens default windows, and adds the Wizardtoolbar.
l Toad for Oracle—Applies shortcut keys used by Toad® forOracle® and automatically opens the Project Manager,Editor, SQL Recall, and Output windows.
l MS Query Analyzer—Applies shortcut keys used byQuery Analyzer and automatically opens the ObjectExplorer, Code Snippets, and Editor windows.
l MS Management Studio—Applies shortcut keys used byManagement Studio and automatically opens theConnection Manager and Editor windows.
l SQL Navigator—Applies shortcut keys used by SQLNavigator and automatically opens the NavigationManager, Object Explorer, Editor, and Code Snippetswindows.
l Toad for Data Analysts (Original)—Applies shortcut keysused by Toad for Data Analysts. This option also displaysthe Grouping (Toad workflow) toolbar and Wizard toolbar.
l Custom—Applies shortcut keys used by Toad Data Point.This option allows you to select skin and grid styles, aswell as Database Explorer display options.Use this option to customize the Toad for Data Analystslayout if you have previously selected it.
Tip: You can set or modify individual keyboard shortcuts inKeyboard Options in Tools | Options | Environment | Keyboard.Note: If you select a new layout, you may need to restart Toad tosee the changes to the Grouping and Wizard toolbars.
3. To customize your layout, select Custom and click Next. Then specify options on each page of thewizard. Review the following for additional information:
Page Options
Look and Feel Select a skin and grid style.
l Skin—Applies the skin style you select to documentwindows, tool windows, and modal dialogs.
l Grid style—Applies the grid style you select to the datagrid only.
A preview of the selected style is automatically displayed in thewizard and in the grid.Tip: You can change the skin and grid style later in Tools |Options | Environment | Interface.
Database Explorer Style Specify how objects display in the Object Explorer window.
Tip: Click in the Object Explorer at any time to switch to adifferent view style.
Toad Data Point 4.3 Installation GuideInstallation
27

Page Options
Quick Guide Displays a Quick Start Guide that lets you quickly launchfrequently used features and tutorials until you are more familiarwith the application.Tips:
l To view this window at anytime, select View | QuickGuide from the menu.
l To hide this window when starting Toad, select the Do notshow on start up checkbox at the bottom of the QuickGuide window.
Group Documents Applies to the Toad for Data Analysts (Original) layout. Selectthis layout option prior to customizing.Specify one or more of the following options:
l Use document groups—Associates each open documentwith its respective group in the Groupings (Toadworkflow) toolbar.
l Hide windows per group—Displays only those windowsthat are associated with the selected group in theGroupings toolbar. For example, if the Query group isselected and a Query Builder window is open, it will behidden when you select the Report group.Note: Unless the Hide windows per connectioncheckbox is selected, any connections that have awindow open for this group display.
l Hide windows per connection—Displays only thosewindows for the current connection that are associatedwith the selected group.
Tip: To hide the Grouping toolbar, select Tools | Customize, andthen deselect the Grouping toolbar in the Toolbar tab.
Group Document Defaults Applies to the Toad for Data Analysts (Original) layout. Selectthis layout option prior to customizing.Select the default window to open when selecting a group fromthe Grouping toolbar.Understand
l Database Diagram—Easily identify relationships betweentables via foreign keys.
l Database Explorer—Drill-down to details for each object.
Query
l Query Builder—Quickly create complex queries andsubqueries using a graphical interface.
l SQL Editor—Powerful editor for writing SQL queries andscripts.
Report
l Excel—Automatically export query results and open themin Excel.
l Toad Report—Send query results to the Toad DataReport wizard.
Toad Data Point 4.3 Installation GuideInstallation
28

Page Options
Wizard Bar Select to display the Wizard bar, a toolbar containing frequently-used actions for the currently open window. It displays along thebottom of the Toad window.Tip: To modify this option later, use the Configuration Wizard.
Connection Documents Specify which type of new document to automatically open whena new database connection is created.Tip: You can modify this option later in Tools | Options |Database | General.
Additional Settings Specify whether to automatically add files to the Project Managerwhen saving, executing, or sending the files to a report. Thisoption can help you locate and manage your work.
4. Click Finish when you are done customizing.
Customize Your Toad WorkspaceYou can customize your Toad workspace by re-arranging windows and panes. For docked panes selected fromthe View menu, Toad remembers the configuration of your last open session and displays it when you re-launchthe application.
To rearrange windows and panes
1. Open a Toad pane by selecting it from the Viewmenu.
2. Drag the pane to a new location in the Toad workspace.
3. Drop the pane into the desired section of the workspace when it becomes highlighted.
4. To move an open window, drag it to the desired area of the workspace and drop it into ahighlighted section.
Toad Data Point 4.3 Installation GuideInstallation
29

Create Connections
Understand Toad ConnectionsReview this topic to learn about open database connections in Toad.
Toad Open ConnectionsIn Toad, an open connection in the Connection/Navigation Manager represents one or more actual connectionsto the database or data source. When you open a database connection in Toad:
l Toad creates an initial database connection for general use.
l Toad also creates a separate database connection for each Editor (the first time you execute astatement) and for each Data tab in the Database Explorer (the first time you select the tab andquery data).
The connection associated with the window (or tab) remains open until you close the window. If awindow has an associated connection, but a statement is not currently executing, the connection is in aninactive state.
To view information for an open connection
l To view the number of actual database connections that exist for a Toad connection, including thenumber of active connections, place the cursor over the connection in the Connection/NavigationManager pane or in the connection drop-down list.
To use the Background Processes pane
l When a statement is executing, a progress bar displays in the Status bar located at the bottom of theToad application window. Click the executing progress bar to open the Background Processes pane.
l To cancel statement execution, use the Background Processes pane.
Note: It is recommended that you cancel only your own processes, because terminating Toad activitiescould cause unexpected behavior.
2
Toad Data Point 4.3 Installation GuideCreate Connections
30

Sharing a Connection Among WindowsYou can instruct Toad to share an open connection among windows. In this way, the Editor windows and Datatabs can share the same connection when the connection is inactive.
To share a database connection among windows in Toad
1. Select Tools | Options | Editor | General.
2. Clear the checkbox for the Use individual connection for each open editor option.
3. When this option is not selected, Toad attempts to use a single connection for any new windows or queryexecution. For example, if you share a database connection, you can execute a query in the Editor,execute another query in a new Editor, and then select the Data tab from the same connection.
If the single connection is in use when Toad attempts to execute it, the following occurs:
l (DB2 and Oracle only) If your database supports executing multiple queries simultaneously on ashared connection, the query is placed in a queue and executes as soon as the current operationcompletes.
l If your database does not support executing multiple queries on a shared connection, a dialogprompts you to either permanently associate the window with a new database connection, cancelthe previous operation, or add the query to a queue until the current operation completes, andthe execute it. If you place multiple queries in the queue, each one executes in the order that itwas added to the queue.
Note: Although you can share a database connection, any commits apply to the selected window only.
Create Access ConnectionsAlthough this connection uses the ODBC driver, it is easier and faster to connect using this method. See"Troubleshoot Access Issues" on page 69 for more information about troubleshooting connection issues.
Notes:
l The Toad Sample Database and established connection that comes pre-loaded in Toad Data Point is anAccess database. The connection information for this database is:
Database file = C:\Program Files\Quest Software\ToadInstallDirectory\Plugins\Odbc\SampleDatabase\Quest_Stage.mdb
Additional sample files for this database are available in the Project Manager.
To create an Access connection
1. Click on the toolbar (ALT+F+N).
2. Select Access from the Group list box.
3. Review the following for additional information:
Database file Select the database to use when connecting.
MDW file Select the MDW file that is linked to the database.
Password Enter the password to use when connecting.Tip: After connecting, you can set a master password to further secure yourconnection in Tools | Options| Environment | Security.
Toad Data Point 4.3 Installation GuideCreate Connections
31

Category Select or create a category if you want to color code Editor tabs for a specificconnection. This can help differentiate between development and productiondatabases. You can also set an option to color code the Object Explorer paneand object editor windows (Create, Alter, Drop, etc.). Click here to view a video of this feature.
4. Click Connect to connect immediately while saving the connection information. Optionally, click Save tosave the connection without connecting.
Considerations and LimitationsConsideration/Limitation Description
Microsoft Access 2016 64-bitOffice 365 64-bit
To successfully create a connection to an Access database usingMicrosoft Access 2016 64-bit, the Microsoft Access Database Engineis required and might not have been included in the Accessinstallation. In addition, the architecture (bitness) of the engine mustmatch the bitness of Toad.If using 64-bit Toad, the 64-bit version of Microsoft Access DatabaseEngine is required.If using 32-bit Toad, the 32-bit version of Microsoft Access DatabaseEngine is required.
1. You can download the 64-bit or 32-bit Microsoft AccessDatabase Engine components at:https://www.microsoft.com/en-us/download/details.aspx?id=13255.
2. Be sure to select the appropriate version (64-bit or 32-bit) ofthe AccessDatabaseEngine.exe installer to match the bitnessof Toad.
Tip: Connections are stored in the connections.xml file and can be found by clicking the Application DataDirectory link in Help | About.
Click here to view a video about creating connections in Toad Data Point
Create SAP Business Objects ConnectionsToad allows you to connect to SAP® Business Objects through the Query as a Web Service (QaaWS)component to view and query data in QaaWS Queries.
Note: This feature is available in the Toad Data Point Professional Edition only.
To create a Business Objects connection
1. Click on the Connections toolbar (ALT+F+N).
2. Select SAP Business Objects from the Group list.
3. Enter the connection information in the Create New Connection dialog. Review the following foradditional information:
URL Enter the Business Objects URL to which you want to connect. This is the URL tothe Query as a Web Service component of the Business Objects installation.
Toad Data Point 4.3 Installation GuideCreate Connections
32

See "Important Information about Business Objects Connections" on page 33 formore information.Note: The URL should be in the following format:
http://<server>:<port>/dswsbobje/qaawsservices
Password Enter the password to use when connecting.Tip: After connecting, you can set a master password to further secure yourconnection in Tools | Options| Environment | Security.
Category (Optional) Select an existing category or create a new one.
Note: In NoSQL and Business Intelligence connections, Toad automatically saves the password in theconnections.xml file as obfuscated text, as well as in Toad. To add additional password security, useToad's Master Password feature.
4. Click Connect to connect immediately while saving the connection information. Optionally, click Save tosave the connection without connecting.
5. Upon creating an initial connection, Toad automatically maps the data source objects. This processruns in the background, and until it is finished, you may experience a delay when attempting to accessthese objects.
Important Information about Business Objects ConnectionsTo create a Business Objects connection in Toad, you must connect to the Query as a Web Service componentin Business Objects. The connection URL should have the format:
http://<server>:<port>/dswsbobje/qaawsservices
Where <server> corresponds to your web server address, and <port> corresponds to the port where youset up in your web server. (dswsbobje is the default name of the Query as a Web Service webapplication.)
An example URL is http://server01:8080/dswsbobje/qaawsservices.
For more information about the Business Objects component, Query as a Web Service, see the documentationat http://help.sap.com/businessobject/product_guides/xir2PP/en/qaaws.pdf.
Tips:
l To specify a default value for a column parameter, select a Query and click .
l Connections are stored in the connections.xml file and can be found by clicking the Application DataDirectory link in Help | About.
l You can specify a proxy server to use for Business Intelligence and NoSQL connections at Tools |Options | Database | Data Services.
Toad Data Point 4.3 Installation GuideCreate Connections
33

Configure DB2 Client ConnectionsSetting up connections to the DB2 for LUW databases and DB2 for z/OS subsystems that Toad will managerequires two main steps.
Step 1. Configure DB2 client connections - Before you can create a connection profile, each of thedatabases or subsystems must be cataloged on the DB2 client. This topic helps you with that process.
Step 2. Create connection profiles - Step 2 involves creating Toad connection profiles for the catalogedDB2 databases or subsystems. Each profile contains the information that Toad needs to connect to thesystem, such as the user ID and password, DB2 registry settings, and the default schema. See "CreateToad Connection Profiles for DB2" on page 40 for more information.
Note: You must have a DB2 client installed before you can configure client connections and create connectionprofiles. Beginning with Toad Data Point 3.6, a DB2 client is no longer included in the product installation. Referto IBM for information regarding a DB2 client download, http://www-01.ibm.com/software/data/db2/linux-unix-windows/downloads.html, or consult your organization's IT department. For a list of supported DB2 clientversions, see the Toad Data Point Release Notes.
If You Previously Used the Toad DB2 ClientIf you previously used the Toad DB2 client installed with earlier versions of Toad Data Point, you may need todo the following:
l Install a DB2 client from IBM and set it as the default. Because Toad no longer installs a client along withthe product, you must now have a DB2 client from IBM installed to use your DB2 connections.
l Transfer the catalog from the previous Toad DB2 client to your current default DB2 client. If you usedthe Toad DB2 client in a previous version of Toad, install a default DB2 client from IBM, and thentransfer the catalog from the Toad client to the new default DB2 client. See Transfer a Catalog AnyTime After Initial Setup.
To check default client
l You may want to check that the correct client is set as the default, before you import a catalog to it. Thedefault client is identified as such in the Start menu (Start | All Programs | IBM DB2). The default clienthas “(Default)” after the client name.
To specify default client
l You can specify the default client using the Database Client Interface Selection Wizard (Start | AllPrograms | IBM DB2 client name | Database Client Interface Selection Wizard).
Configure DB2 Client ConnectionsUse one of the following methods to catalog each of the databases or subsystems on the DB2 client.
Transfer a Catalog Any Time After Initial SetupUse this method to transfer a catalog from another DB2 client on your machine to your default DB2 client. If youpreviously used the Toad DB2 client installed with the product in prior versions, use this method to transfer thecatalog from the previous Toad DB2 client to your current default DB2 client.
Toad Data Point 4.3 Installation GuideCreate Connections
34

To transfer a catalog any time after initial setup
1. In the Connection Manager, click in the toolbar.
Note: If the Client Configuration Wizard opens, Toad found only one DB2 client installed.
2. From the DB2 Client list, select the name of the DB2 client whose catalog you want to transfer to yourdefault DB2 client.
This list contains all current previously installed DB2 clients on your computer, including the default DB2client instance and any Toad DB2 client installations.
3. Click OK.
4. To create a connection in Toad for any of the transferred catalog entries, see Create Toad ConnectionProfiles for DB2.
Import a DB2 catalog previously exported to a file
To import an exported catalog profile
1. In the Connections (or Create New Connection) window, click beside the Database alias drop-downlist to open the Client Configuration wizard.
2. On the Welcome page, select Import Profile.
3. Click Next.
4. Click in the Profile name field to browse for and select the exported profile you want to import. Whenyou select the profile, its contents display in the text pane.
5. Complete the wizard.
Once you close the wizard, the Database alias drop-down list in the Connections window includes allthe DB2 databases and subsystems whose catalog entries you imported.
Note: DB2 does not automatically export catalog entries for the local DB2 instance and its databases onthe computer from which the export is run (unless these entries already exist in the catalog). Therefore,the profile you are importing might not include these node entries. To add the missing entries to yourDB2 client catalog, you must manually catalog the databases. If these databases are local to yourcomputer, catalog them as remote databases. See "Manually catalog DB2 for LUW databases " on page35 for more information.
6. Proceed to catalog entries as needed. See "Create Toad Connection Profiles for DB2" on page 40 formore information.
Manually catalog DB2 for LUW databases
To manually catalog a DB2 for LUW database
1. In the Connections (or Create New Connection) window, click beside the Database alias drop-downlist to open the Client Configuration wizard. The Welcome page displays, showing the DB2 client'sexisting catalog configuration in a tree view.
2. If the host and node names for the database you want to configure are listed in the tree, select them.These selections pre-fill certain fields required later in the wizard process. If these names are not listed,you must provide the necessary host and node information later in the wizard.
3. Click Add Catalog Entry.
4. Review the following for additional information:
Toad Data Point 4.3 Installation GuideCreate Connections
35

Add a Host Description
Operatingsystem
Select the operating system for the server on which the DB2 for LUW instancecontaining the DB2 database you are cataloging resides. For a list of supportedserver platforms, see the release notes.
Host name Enter the TCP/IP address or the system name for the server on which the DB2database resides.
Port number Enter the port number for the server on which the DB2 database resides.
Security type Select a secure protocol to handle TCP traffic for this connection.
Specify anInstance
Description
Node name Enter a user-defined name for the DB2 instance containing the database you arecataloging.If you selected the node name from the tree on the Welcome page, thisinformation is pre-filled (but you can update it as needed).
Instance name Enter the real name of the DB2 instance.
Comment Enter a descriptive comment for the instance, if needed.
Add a Database Description
Database name Enter the real name of the DB2 database.
Database alias Enter a unique nickname to identify the database on your system.
Authentication Select the authentication method that is required to connect to the database.
Target principal Enter the service account name for server's service where the database resides.Note: This option is available only when Kerberos is selected as theauthentication method.
5. Complete the wizard.
The Database alias drop-down list in the Connections window shows the alias for the newly catalogeddatabase. To complete the Toad connection setup, you must create a Toad connection profile for thedatabase. See "Create Toad Connection Profiles for DB2" on page 40 for more information.
Manually catalog DB2 for z/OS subsystems
Note: If you connect directly to a DB2 for z/OS subsystem, you cannot take advantage of Sysplex. If you want touse Sysplex, catalog an entry to a DB2 Connect gateway instead. See "Manually catalog DB2 Connectgateways " on page 37 for more information.
To manually catalog a DB2 for z/OS subsystem
1. In the Connections (or Create New Connection) window, click beside the Database alias drop-downlist to open the Client Configuration wizard. The Welcome page displays, showing the DB2 client'sexisting catalog configuration in a tree view.
2. If the host name for the DB2 subsystem you want to configure is listed in the tree, select it. This selectionpre-fills certain fields required later in the wizard process. If the host name is not listed, you must providethe necessary host information later in the wizard.
3. Click Add Catalog Entry.
4. Review the following for additional information:
Toad Data Point 4.3 Installation GuideCreate Connections
36
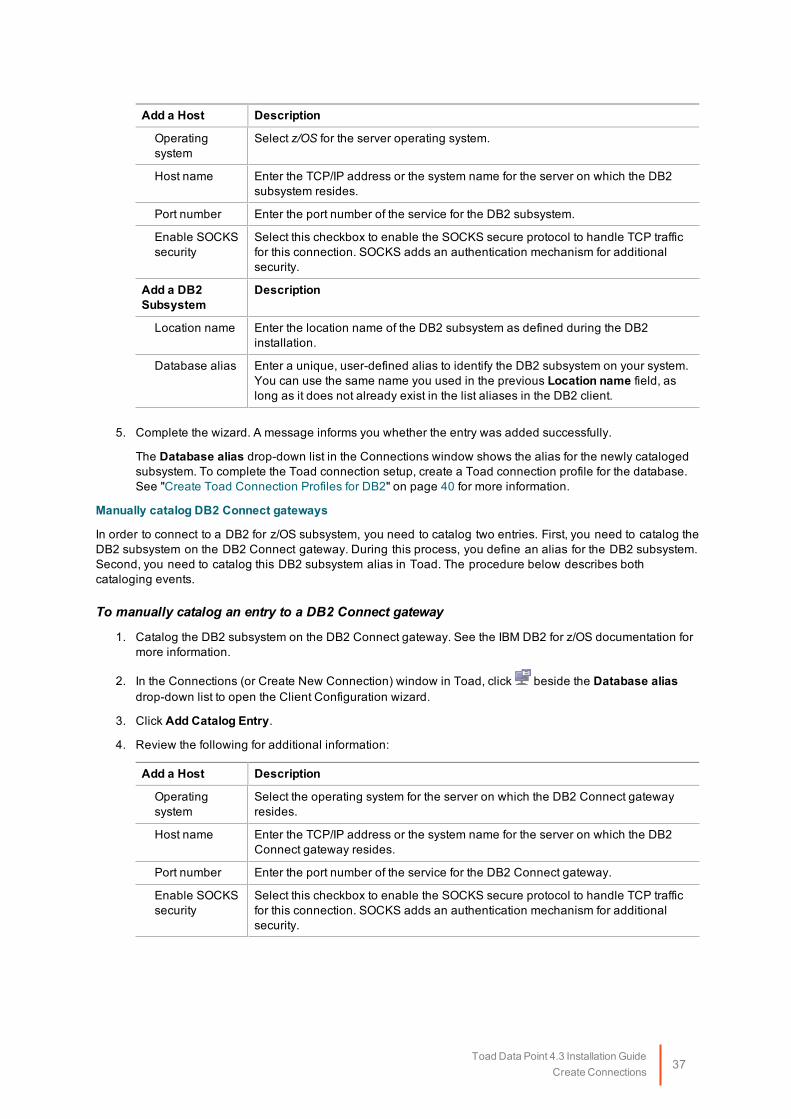
Add a Host Description
Operatingsystem
Select z/OS for the server operating system.
Host name Enter the TCP/IP address or the system name for the server on which the DB2subsystem resides.
Port number Enter the port number of the service for the DB2 subsystem.
Enable SOCKSsecurity
Select this checkbox to enable the SOCKS secure protocol to handle TCP trafficfor this connection. SOCKS adds an authentication mechanism for additionalsecurity.
Add a DB2Subsystem
Description
Location name Enter the location name of the DB2 subsystem as defined during the DB2installation.
Database alias Enter a unique, user-defined alias to identify the DB2 subsystem on your system.You can use the same name you used in the previous Location name field, aslong as it does not already exist in the list aliases in the DB2 client.
5. Complete the wizard. A message informs you whether the entry was added successfully.
The Database alias drop-down list in the Connections window shows the alias for the newly catalogedsubsystem. To complete the Toad connection setup, create a Toad connection profile for the database.See "Create Toad Connection Profiles for DB2" on page 40 for more information.
Manually catalog DB2 Connect gateways
In order to connect to a DB2 for z/OS subsystem, you need to catalog two entries. First, you need to catalog theDB2 subsystem on the DB2 Connect gateway. During this process, you define an alias for the DB2 subsystem.Second, you need to catalog this DB2 subsystem alias in Toad. The procedure below describes bothcataloging events.
To manually catalog an entry to a DB2 Connect gateway
1. Catalog the DB2 subsystem on the DB2 Connect gateway. See the IBM DB2 for z/OS documentation formore information.
2. In the Connections (or Create New Connection) window in Toad, click beside the Database aliasdrop-down list to open the Client Configuration wizard.
3. Click Add Catalog Entry.
4. Review the following for additional information:
Add a Host Description
Operatingsystem
Select the operating system for the server on which the DB2 Connect gatewayresides.
Host name Enter the TCP/IP address or the system name for the server on which the DB2Connect gateway resides.
Port number Enter the port number of the service for the DB2 Connect gateway.
Enable SOCKSsecurity
Select this checkbox to enable the SOCKS secure protocol to handle TCP trafficfor this connection. SOCKS adds an authentication mechanism for additionalsecurity.
Toad Data Point 4.3 Installation GuideCreate Connections
37

Specify anInstance
Description
Node name Enter an alias for the user-defined node name you specify in the Instance namefield.
Instance name Enter a user-defined name for the gateway node or use the same value enteredin the Node name.Note: This name does not point to an actual node on the gateway system, but isneeded to continue the cataloging process.
Add a Database Description
Database name Enter the database alias name for the DB2 subsystem.Note: This alias name must match the alias cataloged on the DB2 Connectgateway.
Database alias Enter a unique, user-defined alias for the DB2 Connect gateway. You can use thesame alias you used in the previous Database name field, as long as it does notexist in the list of Toad for DB2 aliases.
Authentication Select the authentication method that matches the method specified for the DB2subsystem on the DB2 Connect gateway.
5. Complete the wizard.
The Database alias drop-down list in the Connections window shows the name for the newly catalogedDB2 subsystem. To complete the Toad connection setup, you must create a Toad connection profile forthe subsystem. See "Create Toad Connection Profiles for DB2" on page 40 for more information.
Note: Toad for DB2 supports LDAP connections. See "Configure DB2 LDAP Support" on page 40 for moreinformation.
Maintain DB2 Client ConnectionsAdditionally, Toad provides functionality to perform the following maintenance on the catalog you set up for thecurrent DB2 client:
Edit DB2 catalog entries
To edit a DB2 catalog entry
1. In the Connections (or Create New Connection) window, click beside the Database alias drop-downlist to open the Client Configuration wizard.
2. In the catalog configuration tree for the DB2 client, select the catalog entry for the DB2 database orsubsystem that you want to edit.
3. Click Edit Catalog Entry.
4. On the Edit Catalog Entry page, update the catalog properties as needed. For a description of thecatalog properties, see the following links:
l Manually catalog DB2 for LUW databases
l Manually catalog DB2 for z/OS subsystems
l Manually catalog DB2 Connect gateways
5. Click Next to open the Catalog Script Review window.
6. Review and modify the script in the preview pane as needed.
Toad Data Point 4.3 Installation GuideCreate Connections
38

7. Click Finish. A message window displays, informing you whether the updates to the catalog entrycompleted successfully.
Remove DB2 catalog entries
To remove a DB2 catalog entry
1. In the Connections (or Create New Connection) window, click beside the Database alias drop-downlist to open the Client Configuration wizard.
2. In the catalog configuration tree for the DB2 client, expand one or more nodes, and select the catalogentries that you want to remove. (Press CTRL+click to select multiple entries.)
Note: You can remove a node by selecting all database entries for that node.
3. Click Remove Catalog Entry.
4. On the Catalog Script Review page, modify the script in the preview pane as needed.
5. Click Finish. A message window displays, informing you whether the removals completed successfully.
Export the catalog for the current DB2 client
Toad Data Point provides functionality to export your current DB2 client catalog to a file, called an export profile.You can then import this profile to set up the catalog for another DB2 client.
To create the export profile containing the current DB2 client catalog, Toad executes the DB2 ConnectivityConfiguration Export Tool command db2cfexp. If you want to export the catalog of a remote or local DB2 client(other than your current DB2 client), you must manually execute this command. For more information, see thefollowing IBM documentation: http://publib.boulder.ibm.com/infocenter/db2luw/v8/index.jsp?topic=/com.ibm.db2.udb.doc/core/r0002442.htm.
To export the DB2 client catalog
1. In the Connections (or Create New Connection) window, click beside the Database aliasdrop-down list.
2. Click Export Profile in the Welcome window of the Client Configuration wizard. (You might need to click
this button.)
3. Click Next.
4. Click in the Profile name field to browse for and select the path for the profile in which to export thecurrent DB2 client catalog.
5. Select the type of profile you want to create:
l Template to create a profile used as a template for other DB2 clients (default for exporting aDB2 catalog)
l Backup to create a profile used to back up a DB2 database instance
l Maintain to create a profile that contains only database or node information required for updatingother instances
For more information about these profile types, see the IBM documentation (as cited previously)describing the db2cfexp command.
6. Complete the wizard. A message window displays, informing you whether the export completedsuccessfully.
Note: DB2 does not automatically export catalog entries for the local DB2 instance and its databasesinstalled on your computer unless these entries already exist in the catalog you are exporting. If you laterimport the export catalog to a DB2 client, you must manually catalog the missing local-node databasesas remote databases. See "Manually catalog DB2 for LUW databases " on page 35 for more information.
Toad Data Point 4.3 Installation GuideCreate Connections
39
After you have set up the catalog on the current DB2 client, you can proceed to the second phase of the Toadconnection setup. This phase involves creating Toad connection profiles for the cataloged DB2 databases orsubsystems. See "Create Toad Connection Profiles for DB2" on page 40 for more information.
Configure DB2 LDAP SupportYou can create DB2 Lightweight Directory Access Protocol (LDAP) connections when the DB2 client installedwith Toad is configured for LDAP. Configuring the client consists of enabling LDAP support and specifying thehost name and port number of the LDAP server. Once the client is configured, Toad retrieves names from yourLDAP server and displays them in the Database Alias list in the Connections window.
Notes:
l You must configure LDAP support for the DB2 client installed with Toad regardless of whether anexisting DB2 client on the computer is already configured to support LDAP.
l Currently, Toad for DB2 supports only the access of DB2 LDAP catalog entries. Toad does not supportthe management of these entries.
To configure the DB2 client for LDAP
1. Open the Command Window for the DB2 client installed with Toad by selecting Start | All Programs |IBM DB2 | <ToadCom, ToadEval, or ToadFree> | Command Line Tools | CommandWindow.
2. Enter the following command to enable LDAP support:
db2set DB2_ENABLE_LDAP=YES
3. Enter the following command to specify the TCP/IP host name and port number of the LDAP server:
db2set DB2LDAPHOST=<hostname[:port]>
The port number defaults to 389 (default LDAP port) if you leave the port number blank.
4. Exit the Command window.
5. Launch Toad and open the Connections window.
Databases on the LDAP server should be available from the Database alias drop-down list in theConnections window. To complete the Toad connection setup, you must create a Toad connectionprofile for each database. See "Create Toad Connection Profiles for DB2" on page 40 for moreinformation.
Create Toad Connection Profiles for DB2Setting up connections to the DB2 for LUW databases and DB2 for z/OS subsystems that Toad will managerequires two steps.
Step 1. Configure DB2 client connections - If you use a DB2 client each of the databases orsubsystems must be cataloged on the client. See Configure DB2 Client Connections to learn how tocatalog databases/subsystems.
Step 2. Create connection profiles - Step 2 involves creating Toad connection profiles for DB2databases or subsystems that were either cataloged in the DB2 client or imported from your Data ServerDriver configuration file. Each profile contains the information that Toad needs to connect to the system,such as the user ID and password, DB2 registry settings, and the default schema. If you use IBM DSDenvironment you can import your connection profile from a Data Server Driver configuration file.
Note: You must have a DB2 client installed before you can configure client connections and create connectionprofiles. Beginning with Toad Data Point 3.6, a DB2 client is no longer included in the product installation. Referto IBM for information regarding a DB2 client download, http://www-01.ibm.com/software/data/db2/linux-unix-
Toad Data Point 4.3 Installation GuideCreate Connections
40

windows/downloads.html, or consult your organization's IT department. For a list of supported DB2 clientversions, see the Toad Data Point Release Notes.
Note: The default location of your Data Server Driver configuration file is in ...ProgramData\IBM\DB2\IBMDBCL1\cfg. The default config filename is db2dsdriver.cfg.
Note:When you connect using IBM Data Server Driver the Database button and the toolbar option in Tools |LUW Database Options will not be available.
Click here to view a video about creating connections in Toad Data Point
Connection Using a Custom Connection StringYou can also connect to your DB2 database/subsystem using a custom connection string.
l Select Connect Using | Connection String in Connection Properties
l Enter Database alias, Host name, Login, and Password and the connection string will be automaticallyupdated according to what you enter
l You can save a connection created using a custom connection string in your Connection Manager
If You Previously Used the Toad DB2 ClientIf you previously used the Toad DB2 client installed with earlier versions of Toad Data Point, you may need todo the following:
l Install a DB2 client from IBM and set it as the default client. Because Toad no longer installs a clientalong with the product, you must now have a DB2 client from IBM installed to use your DB2 connections.
l Transfer the catalog from the previous Toad DB2 client to your current default DB2 client. If you used theToad DB2 client in a previous version of Toad, install a default DB2 client from IBM, and then transfer thecatalog from the Toad client to the new default DB2 client. See "Configure DB2 Client Connections" onpage 34 for more information.
Create Connection ProfilesUse one of the following methods to create Toad connection profiles:
l Import Toad connection profiles previously exported to an XML file
(See "Export connection profiles to an XML file" on page 42 for more information about exporting aprofile that you can later import.)
Note: The connection profiles are not usable unless you have also created entries in the DB2 catalog forthe DB2 databases and subsystems to which these profiles correspond. See "Configure DB2 ClientConnections" on page 34 for more information.
To import connection profiles
1. In the Connections (or Create New Connection) window, click on the toolbar, and selectConnection file.
2. From the Import Connections window, browse for and select the XML file containing theconnection profiles you want to import.
3. Click Open.
4. Select DB2 and click OK to complete the import.
The connections whose profiles you imported are listed on the Connections window.
Toad Data Point 4.3 Installation GuideCreate Connections
41

l Manually define Toad connection profiles.
To create a Toad connection profile for a DB2 database or subsystem
1. In the Connections (or Create New Connection) window, click on the toolbar (ALT+F+N).
2. Select IBM DB2 LUW or IBM DB2 z/OS from the Group list box.
3. Review the following for additional information:
Database alias Select the alias for the DB2 database or subsystem. This alias was definedwhen you cataloged this DB2 database or subsystem on the DB2 client.See "Configure DB2 Client Connections" on page 34 for more information ifthe alias does not display in the list.
Tip: Click to refresh the alias list. Normally, Toad caches the DB2 catalogthe first time you open this window in your Toad session and continues toread from cache each time you subsequently open this window. This buttonforces Toad to reread the DB2 catalog to list any new systems that mighthave been cataloged externally during the caching period.
Defaultschema/auth ID
Enter the SET SCHEMA value (DB2 for LUW) or the SET SCHEMA or SETCURRENT SQLID value (DB2 for z/OS) for this connection.
Category Select or create a category if you want to color code Editor tabs for aspecific connection. This can help differentiate between development andproduction databases. You can also set an option to color code the ObjectExplorer pane and object editor windows (Create, Alter, Drop, etc.). Click here to view a video of this feature.
4. Select the Advanced tab to define special register values that are then in effect each time Toadconnects to the DB2 database or subsystem.
5. Click Connect to save the connection and immediately connect to the database.
or
Click Save to save the connection without connecting to the database.
Manage ConnectionsAfter you have completed both phases for configuring Toad connections to DB2 databases or subsystems, theConnections window lists all the configured connections, allowing you to perform the following:
l Connect to and manage a DB2 database or subsystem through Toad
l Export connection profiles to an XML file
Toad for DB2 provides functionality to export one or more of your current Toad connection profiles to anXML file. You can then import these exported connection profiles into another Toad installation. See"Import Toad connection profiles previously exported to an XML file " on page 41 for more information.
To export connection profiles
1. In the Connections (or Create New Connection) window, select the connections whose profilesyou want to export.
2. Click on the toolbar, and select Connection file.
3. On the Export Connections window, review the selected connections, and click OK.
4. Browse for and select the path for the file in which to export the selected profiles.
Toad Data Point 4.3 Installation GuideCreate Connections
42
l Import missing connections defined on the Toad client
You can import all connection entries currently defined in the DB2 client catalog or Data Server Driverconfiguration file but missing from your current list of Toad connections.
Note: Default location for Data Server Driver configuration files is in ...\IBM\DB2\IBMDBCL1\cfg.
Note: The imported connection entries might be associated with incorrect or missing DB2 catalog orToad connection profile information, making them currently invalid. To re-instate any of theseconnections, you might need to provide accurate DB2 catalog and Toad profile information.
To import missing connections
l In the Connections or Connections Manager window, click .
l Troubleshoot connection issues
Note: Click to open the Client Configuration Wizard. See "Configure DB2 Client Connections" on page 34for more information.
Tip: Connections are stored in the connections.xml file and can be found by clicking the Application DataDirectory link in Help | About.
Create Excel ConnectionsConnecting to an Excel file is easy. To create the connection, simply open the Excel file from the Create NewConnection dialog .
To create an Excel connection
1. Click on the Navigation or Connection Manager toolbar.
2. Select Excel from the Group list.
3. Browse to and select the Excel file.
4. Complete the Create New Connection dialog. Review the following for additional information:
General Tab Description
Category Select a category if you want to color code your connection.Tip: The color is applied in the Connection Manager and other connectiondialogs. You can also create a new category for your connection.
Advanced Tab Description
Enable importmode
Select this checkbox to set IMEX=1 in the connection string, which convertsintermixed data to text.
Show systemtables
Select to display worksheets as system tables. Toad uses the worksheet namesuffixed with a dollar sign ($).
Automaticallycreate ranges
Select this option if you want Toad to automatically create named ranges. Toadcreates one named range in each worksheet (unless the Toad name,AutoRange_<worksheet name>, already exists).Note: Toad does not overwrite the user defined named ranges. The Toad-created named ranges and the user defined named ranges are both visible in theObject Explorer after connecting.Deselect this option if the Excel file contains user defined named ranges and youdo not want Toad to create additional named ranges.
Toad Data Point 4.3 Installation GuideCreate Connections
43
Important: If you deselect this option, and your Excel file does not contain namedranges, Toad is unable to create tables from your data.The feature is selected by default.
Hide namedranges
Select the named ranges to hide.Note: Named ranges are not displayed until after a connection is created (in theConnections or Connection Properties dialog). In Excel 2007 files, named rangesare not displayed for active connections.
Open in Excel Click to open the selected file in Excel. This is useful if you want to modify yourfile or define named ranges before connecting.
4. Click Connect to connect immediately while saving the connection information. Optionally, click Save tosave the connection without connecting.
Understand how Toad creates data tables from an Excel file
Toad uses Excel named ranges (regions) to define the data to include in a table. Therefore, any data that youwant to display and easily query in Toad must be included in an Excel named range (region).
You can create named ranges using one of the following methods:
l Preferred method: You can ask Toad to automatically create named ranges when you create theconnection to the Excel file. Toad creates one table from each worksheet and includes the contents ofevery formatted cell.
l If you do not want to include a worksheet's entire contents in one named range, or if a worksheetcontains more than one table, then define the named ranges ahead of time in Excel.
To create a named range in Excel
1. In the Excel file, select the data that you want to include in the table (including column headings). Thendefine a named range.
» In Excel 2003, select Insert | Name | Define.
» In Excel 2007, right-click the data and select Name a Range.
2. Save your Excel file. In Toad, create a new connection to the file. In the New Connection dialog, deselectAutomatically create ranges.
To allow Toad to automatically create named ranges
» When creating a new connection to the Excel file, in the New Connection dialog, select Automaticallycreate ranges. Toad creates one named range for each worksheet and includes the contents of everyformatted cell.
Tip: For an Excel file with an existing connection, in the Navigation Manger, right-click the file and selectProperties. On the Advanced tab, select Automatically create ranges. Toad creates the named ranges thenext time you reconnect to this file.
To hide named ranges
You can hide an Excel file's named ranges so that they do not display as tables in the Object Explorer.
1. In the Navigation Manager, right-click an Excel file connection and select Properties.
Note: In Excel 2007 files, the connection must be inactive for the named ranges to display.
2. On the Advanced tab, select the named ranges to hide.
To view or modify connection properties
To view an Excel connection's properties, do one of the following:
Toad Data Point 4.3 Installation GuideCreate Connections
44

l Right-click an Excel file connection in the Navigation or Connection Manager and select Properties.
l Select on the Connections toolbar to open the Connections dialog. Select the Excel file connectionin the left pane to view the connection properties in the right pane.
Considerations and LimitationsConsideration/Limitation Description
Excel 2016 64-bit orOffice 365 64-bit
To successfully create a connection to an Excel file using Excel 201664-bit, the Microsoft Access Database Engine is required and mightnot have been included in the Excel installation. In addition, thearchitecture (bitness) of the engine must match the bitness of Toad.If using 64-bit Toad, the 64-bit version of Microsoft Access DatabaseEngine is required.If using 32-bit Toad, the 32-bit version of Microsoft Access DatabaseEngine is required.
1. You can download the 64-bit or 32-bit Microsoft AccessDatabase Engine components at:https://www.microsoft.com/en-us/download/details.aspx?id=13255.
2. Be sure to select the appropriate version (64-bit or 32-bit) ofthe AccessDatabaseEngine.exe installer to match the bitnessof Toad.
Note: This requirement applies only to connections to Excel, not to theToad functionality of importing/exporting to Excel.
Troubleshoot ExcelTo troubleshoot Excel issues, see the following:
l See "Troubleshoot Excel® Issues" on page 69 for more information about troubleshooting Excelconnection issues.
l For a list of Excel file limitations from Microsoft, see Microsoft Excel specifications and limits.
l For special considerations when using Excel macro-enabled files, especially in Automation scripts, seeUsing Macro-Enabled Excel Files.
Click here to view a video about creating connections in Toad Data Point
Tip: Connections are stored in the connections.xml file and can be found by clicking the Application DataDirectory link in Help | About.
Create Google Analytics ConnectionsToad allows you to create connections to your Google Analytics data. A connection in Toad allows you toaccess the Google Analytics accounts and data that are available to you from your Google user account.
If you have multiple Google user accounts, you can create a separate Google Analytics connection in Toad foreach account. For an explanation of Google accounts, see the following:https://developers.google.com/analytics/resources/concepts/gaConceptsAccounts
Note: This feature is available in the Toad Data Point Professional Edition only.
Toad Data Point 4.3 Installation GuideCreate Connections
45

About Google Analytics ConnectionsWhen you create a Google Analytics connection in Toad, you log in to Google using your Google account.During the connection creation process, you also grant Toad access to the Google Analytics data accessiblefrom that Google account.
Toad provides you with an interface to the Google log-in and authorization pages and displays these pageswithin the Create New Connection (and Connection Properties) dialog. The Google pages displayed areindependent of Toad. The log-in process is the same as you normally encounter with your other Web-basedGoogle log-in procedures. The only difference is that by creating a connection in Toad, you are giving Toadpermission to access your Google Analytics data. This is accomplished when you click Accept in the Googleauthorization page.
Create Google Analytics ConnectionsTo create a Google Analytics connection
1. Click on the Connections toolbar (ALT+F+N).
2. In the Group list, selectGoogle Analytics. The Google log-in page immediately displays within theCreate New Connection dialog.
3. Enter the credentials (email address and password) for your Google account and click Sign in.
Note: If you have multiple Google accounts and have previously logged in to Google (or connectedthrough Toad), the Google log-in page may display the last Google account used. To specify a differentGoogle account for the new connection, use the Google links/menu to select another account.
4. (optional) You can enter a name for your new account and select a category. You can also make thesemodifications later using the Connection Properties dialog.
5. In the Google authorization page that displays, click Accept to allow Toad access to your GoogleAnalytics data. Toad then attempts to establish a connection to Google Analytics. If the connection issuccessful, the Create New Connection dialog closes.
6. Upon creating an initial connection, Toad automatically maps the data source objects. This processruns in the background, and until it is finished, you may experience a delay when attempting to accessthese objects.
Reauthorizing a ConnectionIf you encounter an error message when attempting to connect using your Google Analytics connection, Toad'sauthorization (access) to the Google account for that connection may have been lost. Use the followingprocedure to re-establish authorization for the connection.
You can also use this procedure to specify a different Google log-in account for a connection.
To Reauthorize
1. In the Navigation Manager, disconnect from the connection. You must disconnect before you canre-authorize.
2. After disconnecting, right-click the connection and select Properties.
3. In the Connection Properties dialog, click Reauthorize.
l If you are no longer logged in to Google, the Google log-in page displays.
l To reauthorize using the same Google account, re-enter your Google account credentialsand click Sign-in. Then click Accept on the authorization page.
Toad Data Point 4.3 Installation GuideCreate Connections
46
l To specify a different Google account for this connection, use the Google links to switchthe account just as you normally would in the Google Web site. Once you specify adifferent account, this is the Google account associated with this connection in Toad. ClickSign-in. Then click Accept on the authorization page.
l If you are still logged in to Google, the Google page for granting Toad access to your GoogleAnalytics data displays.
l To reauthorize using the same Google account, click Accept.
l To specify a different Google account for this connection, use the Google menu or links toswitch the Google account just as you normally would in the Google Web site. Once youspecify a different account, this is the Google account associated with this connection inToad. Click Sign-in. Then click Accept on the authorization page.
Notes:
l You can specify a proxy server to use for Business Intelligence and NoSQL connections at Tools |Options | Database | Data Services.
Create Hive ConnectionsToad allows you to connect to a Hive data warehouse system. Apache Hive is one of the NoSQL data sourcessupported by Toad.
Note: This feature is available in the Toad Data Point Professional Edition only.
To create a Hive connection
1. Click on the Connections toolbar (ALT+F+N).
2. Select Apache Hive from the Group list.
3. Enter the connection information in the Create New Connection dialog. Review the following foradditional information:
Server tab
Host Enter the host name or IP address of the Hive data source.
Port Enter the port number.
Schema Enter a Hive schema to open upon connection.(HiveServer2 only) After connecting, you can select a different availableschema in the Object Explorer.
Server type Select the version of HiveServer the host uses, HiveServer1 orHiveServer2.
Use SSL (HiveServer2 only) Select to use SSL to connect to Hive.
HTTP mode (HiveServer2 only) Select to connect to HiveServer2 running in HTTPmode. Then enter the service endpoint. The default is cliservice.
Session Initialization (HiveServer1 only) Enter any Hive session initialization commands.These commands will be executed once, at the start of each connection.
Category (Optional) Select an existing category or create a new one.
Authentication tab(HiveServer1)
Toad Data Point 4.3 Installation GuideCreate Connections
47
Connect with SSH Select to use SSH to connect to Hive. Then enter a user name and selectan authentication method (key file or password).
SSH user Enter the user name to log in when using SSH.
SSH port Select the SSH port number. The default is 22.
Authenticate with a keyfile
Select if the host uses a key file to authenticate the SSH user field.Private key path—Enter the absolute path (including file name) to theprivate key file on the host (not the client).Pass phrase—Enter your passphrase.
Authenticate with apassword
Select if the host uses a password to authenticate the SSH user field.Password—Enter the password to log in using SSH.
Authentication tab(HiveServer2)
Authentication Select an authentication method.To enter only a user name, select the Username and passwordmethod.
Username Enter the user name to use for this connection.If using Kerberos authentication, enter your user name in the followingformat: user@REALM or domain\user.
Hive host realm (Kerberos only) Enter the Kerberos realm of the HiveServer2 host.Note: If necessary, contact your IT department to obtain this information.Before you can successfully connect to Hive using Kerberosauthentication, the Toad client computer must have a Kerberos KeyDistribution Center (KDC) address entry for the Hive host realm. To definethe KDC entry, use the following procedure.Open a Windows Command Prompt as Administrator and enter thefollowing command:ksetup /addkdc <REALM> <KDC name>
You only need to run this command once for the given realm. To confirmthe setting, enter the following command: ksetup. This command shouldreturn both the name of the Hive host realm and the KDC name youspecified.
Hive host FQDN (Kerberos only) Enter the fully-qualified domain name (FQDN) of theHiveServer2 host.Note: If necessary, contact your IT department to obtain this information.
Service name (Kerberos only) Enter the service name of the Hive server. The default ishive.
Note: In NoSQL and Business Intelligence connections, Toad automatically saves the password in theconnections.xml file as obfuscated text, as well as in Toad. To add additional password security, useToad's Master Password feature.
4. Click Connect to connect immediately while saving the connection information. Optionally, click Save tosave the connection without connecting.
5. Upon creating an initial connection, Toad automatically maps the data source objects. This processruns in the background, and until it is finished, you may experience a delay when attempting to accessthese objects.
Tips:
l Connections are stored in the connections.xml file and can be found by clicking the Application DataDirectory link in Help | About.
l You can specify a proxy server to use for Business Intelligence and NoSQL connections at Tools |Options | Database | Data Services.
Toad Data Point 4.3 Installation GuideCreate Connections
48

Toad Data Point 4.3 Installation GuideCreate Connections
49

Create a Connection to Intelligence CentralToad allows you to create a connection to a Toad Intelligence Central server.
The purpose of Toad Intelligence Central (TIC) is to give Toad Data Point users a place to store and share data.After creating a connection to an Intelligence Central instance, not only can you view data that is made availableto you, you can publish data from other sources in the form of snapshots, views, and datasets.
Note: This feature is available in the Toad Data Point Professional Edition only.
About Toad Intelligence Central ConnectionsTo create a new TIC connection, you must provide the TIC server name and then register with TIC by creating anew user account for yourself. The new user name and password will be used by TIC to identify you from amongthe group of TIC users and to manage the objects you create and are granted access to on the TIC server.
A TIC connection displays in the Navigation Manager in the format: username@server. The username is thename of the new user you create when you create a new TIC connection.
To create an Intelligence Central connection
1. Click on the Connections toolbar (ALT+F+N).
2. Select Intelligence Central from the Group list.
3. Select the Register New User tab.
4. Register New User. Use this tab to register with Intelligence Central by creating your own account (username and password). Review the following for additional information:
Note: If you are creating a connection to a Intelligence Central instance for which you already have auser account, do not fill in this tab again. Skip ahead to the next step (Login tab).
Register NewUser
Use WindowsAuthentication
Select to create a new user account using your Windows credentials. Toadautomatically populates the fields with your account information. See Limitationsof Using Windows Authentication.
Host Enter the name of the Intelligence Central host server. Click to display a listof Intelligence Central servers currently active on the network.
User Name Create a new user name for this connection.This is the name you will be logged in with. The objects you create will be linkedto this user name. All your TIC rights (like sharing) will be linked to this username. This user name will display in your connection in the Navigation Managerin the format:username@serverNote: User names must be lower case only. When you enter a user name, allupper-case characters are automatically converted to lower-case.
Password Create a password.
Verify Password Re-enter the password to confirm.
Full Name Enter your full name.This name, along with your user name, displays on the Sharing tab of thePublishing dialog and in the Alter Visibility dialog. Your full name will help users
Toad Data Point 4.3 Installation GuideCreate Connections
50
identify you when they select users with which to share an object.
Email Address Enter your email address.
Port Enter the port number for the App Server.
5. Login as Existing User tab. Use this tab to create a new connection to a TIC server for which youalready have a user account. (When you open an existing connection, this tab displays your useraccount information.)
Login as ExistingUser
Host Enter the name of the Intelligence Central host server. Click to display a listof Intelligence Central servers currently active on the network.
User Enter an existing server user name.
Password Enter the existing password for the user name.
Data Source (Optional) Enter the name of a default data source to open upon connection.
Port Enter the port number for the App Server.
Category (Optional) Select an existing category or create a new one.
6. Advanced tab. (Optional) Use the Advanced tab to specify ODBC drivers to use when publishing to thisTIC server.
Note: Specify an ODBC driver only if you are having difficulty publishing to this TIC instance from aparticular database type.
Advanced
ODBC Drivers Specify an ODBC driver for each database type that you are having difficultypublishing from. That ODBC driver will be used when publishing from thisdatabase type using this connection.
7. (Optional) Select Save Password to save your password with this connection.
8. Click Connect to connect immediately and save the connection information. Optionally, click Save tosave the connection without connecting.
To change your Intelligence Central user password
You can change your password for your Intelligence Central user account at any time.
Note: You cannot use this procedure to change the password for a Intelligence Central account that usesWindows Authentication.
1. In the Navigation Manager, right-click the Intelligence Central connection and select Change Password.
2. Enter the old password and then enter the new password. Enter the new password a secondtime to confirm.
To switch your TIC user account to a Windows Authentication account
You can switch your current Intelligence Central account to a Windows Authentication account if both accountshave the same user name.
1. In the Connection Manager, right-click your current TIC account connection and select Properties.
2. In the Register New User tab, select Use Windows Authentication. Toad prompts you to switchyour account.
Toad Data Point 4.3 Installation GuideCreate Connections
51
Limitations of Using Windows AuthenticationConsideration/Limitation Description
Windows Authenticationconnection and cross-connection query
Cross-connection query using a Windows Authentication IntelligenceCentral connection is not supported.Workaround: To use an Intelligence Central connection in a cross-connection query, log-in using a standard Intelligence Central useraccount, not a Windows Authentication account.
Publishing data objects from aWindows Authenticationconnection is not supported
You cannot publish a data object (view or snapshot) from one IntelligenceCentral instance, TIC1, to another, TIC2, if you are connected to TIC1using Windows Authentication.Workaround: To publish a data object from Intelligence Central, pleaseconnect to TIC using a standard Intelligence Central user account, not aWindows Authentication account.
Tip: Connections are stored in the connections.xml file and can be found by clicking the Application DataDirectory link in Help | About.
Create MySQL or MariaDB ConnectionsYou can create a new connection, or connect to an existing connection from the Create New Connectionwindow. See "Troubleshoot MySQL Issues" on page 76 for more information about troubleshooting MySQLconnection issues.
To create a MySQL or MariaDB connection
1. Click on the toolbar (ALT+F+N).
2. Select either MySQL or MariaDB from the Group list box.
3. Review the following for additional information:
Login Tab Description
Connectiontype
Select the protocol to use when connecting.
Host Enter the name of the host computer where the database is installed.
Password Enter the password to use when connecting.Tip: After connecting, you can set a master password to further secure yourconnection in Tools | Options| Environment | Security.
Connectiontimeout
Enter the number of seconds to wait when connecting before the applicationtimes out. The default is 15 seconds.
SSL If you selected SSL as the connection type, review the following for additionalinformation:
l Private key—browse to the location of the SSL key file to use whenconnecting.
l CA cert—browse to the location of the trusted certificate authority to usewhen connecting.
Toad Data Point 4.3 Installation GuideCreate Connections
52
l Cert—browse to the location of the SSL certificate file to use whenconnecting.
Compress Select this checkbox to compress the value of any strings and return binaryvalues.
Use MySQLlibraries
Select this checkbox to use an embedded MySQL library instead of the MySQL.NET provider.Note: If you select this option, you must specify libMySQL.dll in the path.
Category Select or create a category if you want to color code Editor tabs for a specificconnection. This can help differentiate between development and productiondatabases. You can also set an option to color code the Object Explorer paneand object editor windows (Create, Alter, Drop, etc.). Click here to view avideo of this feature.
Advanced Tab Description
ODBC driver Select an ODBC driver to use when executing cross-connection queries usingthis connection.Tip: You can specify the ODBC driver to use for all connections for this databaseprovider in Tools | Options | Database | MySQL.
4. Click Connect to save the connection and immediately connect to the database.
or
Click Save to save the connection without connecting to the database.
Tip: Connections are stored in the connections.xml file and can be found by clicking the Application DataDirectory link in Help | About.
Click here to view a video about creating connections in Toad Data Point
Create ODBC ConnectionsToad Data Point allows you to create a connection to a database that supports an ODBC 3.0 or later driver.ODBC connectivity provides basic querying capability, but may not be as full-featured as a native connection inToad. For a list of databases tested with the ODBC provider, see the Release Notes.
This form of connectivity allows connections to databases such as Netezza, IBM iSeries, Ingres, and Vertica.
Note: Distinct values are not available in Code Completion for ODBC connections.
DSN Architecture (Bitness) Must Match Toad
To create a successful ODBC connection, the architecture (bitness) of the driver in the specified DSN mustmatch the architecture (bitness) of Toad. For example, 64-bit Toad requires an applicable 64-bit driver and 32-bit Toad requires an applicable 32-bit driver.
To create an ODBC connection
1. Click on the toolbar (ALT+F+N+O).
2. SelectODBC Generic from the Group list box.
3. Click in the Data Source Name field.
4. Click Add.
Toad Data Point 4.3 Installation GuideCreate Connections
53
5. Select an ODBC driver from the list, and click Finish.
Note: If creating an Oracle ODBC connection, select the ODBC driver provided by Oracle. The MicrosoftODBC for Oracle driver has less functionality than the driver provided by Oracle.
6. Specify the configuration properties required for the database in the windows configuration dialog.
Notes:
l If you have an Oracle database with Unicode data, make sure to select Force SQL_WCHARSupport on the Workarounds tab of the windows Oracle ODBC Configuration dialog. If you donot, you will not be able to see the data.
l If creating a MySQL ODBC connection to use in a cross-connection query, you must specify adatabase in the Windows MySQL ODBC Configuration dialog.
7. Specify the connection properties in the Create New Connection dialog. Review the following foradditional information:
General
Use datasource name
Select to display the Data source names.Do not select this option if you want to display the driver names.
Data sourcename
Select the driver or data source name you added in the previous steps.
User Enter the user name to use when connecting.
Password Enter the password to use when connecting.Tip: After connecting, you can set a master password to further secure yourconnection in Tools | Options| Environment | Security.
Database Select a database or schema. Click to create a temporary connection anddisplay available databases/schemas in the drop-down list.
Information
Data SourceName
Displays the selected driver or data source name.
Driver Displays the ODBC driver associated with the data source.
Advanced
Default TableColumn
Specify default options to use when creating a new table.Column type—Select the default data type to use when creating a table.Column length—For the selected column type, enter a default column length touse.
Advanced Options Block Cursor Size—Specify the number of rows to return in a single fetch of datafrom the result set.Disable multi-threading—Multi-threading is disabled by default. Enable multi-threading only if supported by the driver. Multi-threading can improveperformance, but can also result in unpredictable behavior if not supported by thedriver.Default: Selected
Category (Optional) Select an existing category or create a new one.
8. Click Connect to connect immediately while saving the connection information. Optionally, click Save tosave the connection without connecting.
Tip: Connections are stored in the connections.xml file and can be found by clicking the Application DataDirectory link in Help | About.
Toad Data Point 4.3 Installation GuideCreate Connections
54

Tips for Working with ODBC ConnectionsTip Description
Filter DSN by bitness To filter Data Source Names displayed in the New Connection dialog by thebitness of Toad, go to Tools | Options | Database | ODBC.
Cache object metadata To cache object metadata for ODBC connections and retain it betweensessions, go to Tools | Options | Database | ODBC and select to enable diskcaching.Cached object metadata is retained until manually refreshed.
Refresh object metadata To refresh object metadata for all ODBC connections, in the Object Explorerright-click an object and select Refresh All.Right-click an object and select Refresh Schema to refresh only objects in thatschema.
ODBC FeaturesFeature Description
Bypass schema/instanceselection in SQL Editor
For ODBC connections, in the SQL Editor you can bypass selecting aschema/instance and specify this information through the script instead. Thisis useful if your script executes SQL against multiple schemas.To use this method, select I will set schema/instance in the script from theschema/instance drop-down list in the SQL Editor window. Then specify theschema/instance through your script.Note:When this option is selected, some code completion features, objectactions, and object information tool tips are unavailable for this SQL Editorwindow.
Click here to view a video about creating connections in Toad Data Point
Configure Oracle LDAP SupportYou can create Oracle Lightweight Directory Access Protocol (LDAP) connections when your Oracle client isconfigured for LDAP. Once the client is configured, Toad retrieves names from your LDAP server and displaysthem in the Database Name list in the Create New Connection window.
Notes:
l To connect using LDAP, you must install an Oracle client on the computer.
l Toad supports a 9i, 10g, and 11 client and the Oracle Instant client. If you want to use the instant client,you must configure it to work with Toad. See "Configure the Oracle Instant Client" on page 56 for moreinformation.
To configure the Oracle client for LDAP
1. Obtain the LDAP.ORA file from your database administrator.
2. Copy the LDAP.ORA file to the folder where the SQLNET.ORA file for your Oracle client is located. Thedefault folder is: ORACLE_HOME\network\admin
Toad Data Point 4.3 Installation GuideCreate Connections
55

3. Open the SQLNET.ORA file and enter "(LDAP)" as the value for the NAMES.DIRECTORY_PATH as follows:
NAMES.DIRECTORY_PATH= (LDAP)
Note: If you are using multiple naming methods, add the (LDAP) value to existing parameter values. Forexample, if you are using both the TNSNAMES and LDAP naming methods, add LDAP to TNSNAMESas follows:
NAMES.DIRECTORY_PATH= (TNSNAMES, LDAP)
4. Save the SQLNET.ORA file.
5. Launch Toad and select File | New | Connection.
6. Create an LDAP connection following the procedure in Create Oracle Connections. In step 3, select adatabase on the LDAP server from the Database Name list. Toad retrieves the list of LDAP names from
the LDAP server once per Toad session. To refresh the list, click .
Create Oracle ConnectionsYou can create a new connection, or connect to an existing connection from the Create NewConnection window.
Click here to view a video about creating connections in Toad Data Point
Tip: You can configure Toad Data Point to accept connection information from Toad for Oracle.
Client Connection or Direct ConnectionYou can connect to your database using a native Oracle database provider in Toad using one of thefollowing methods:
Connection Method Advantages Disadvantages
Client connectionClient tab—Uses an installedOracle Client or Oracle InstantClient to establish a connectionto the database from Toad.
Supports LDAP Requires an Oracle clientNote: Toad supports Oracle clients andOracle Instant clients using version 9i orlater.
Direct connectionDirect Connect tab—UsesTCP/IP to connect directly to thedatabase.
Does not require aninstalled Oracle ClientRecommended forconnecting to Oracle 8idatabases
This method only supports common datatypes. Some advanced Oracle object typescannot be retrieved when connecting usingthis method.This method does not support LDAP. (Toconnect using LDAP, use the ClientConnection method instead.)This method cannot be used in a cross-connection query.
Note: Quest recommends using one of the methods described in this table to connect to Oracle rather than anODBC driver. Because ODBC connectivity is generic, it is not full-featured and may not be as robust as thefully exploited native database provider.
Configure the Oracle Instant ClientThe Oracle Instant client installs only those files needed to connect to your database using OCI. Because thisclient does not write to the registry (no ORACLE_HOMES) or add to the environmental path, you must manually
Toad Data Point 4.3 Installation GuideCreate Connections
56
set environment variables so the client can be used with Toad.
To configure the Oracle Instant Client to work with Toad
1. Save the Oracle Instant Client files in any location on the computer where Toad is installed.
2. On your Windows desktop, right-click My Computer and select Properties.
3. Select the Advanced tab and click Environment Variables.
4. Click New under System Variables and complete the following:
Variable name Variable Value
PATH <Path where Instant Client is installed>;%PATH%For Example: C:\Program Files\OracleInstantClient;%PATH%
TNS_ADMIN <Path where tnsnames.ora file is installed>
5. To use the Oracle Instant Client connection in a cross-connection query, you must also install anOracle ODBC driver. (While the Oracle Client full install includes an ODBC driver, the Oracle InstantClient does not.)
Note: You cannot use an Oracle Direct Connection in a cross-connection query.
Create an Oracle ConnectionTo create an Oracle connection
1. Click on the toolbar (ALT+F+N).
2. SelectOracle from the Group list box.
3. Review the following for additional information:
Login Tab Description
Database name Select the alias to use when connecting. This list displays aliases from LDAP, aswell as any local tnsnames.ora file.When you initially open the connection dialog, Toad retrieves the list of LDAPnames from the LDAP server. Toad caches this list and displays it upon
subsequent requests, within one Toad session. To refresh the list, click .Note: If you do not select a database, Toad uses the ORACLE_SID for theselected home. If an ORACLE_SID value does not exist and you do not specify adatabase, you cannot connect.
Password Enter the password to use when connecting.Tip: After connecting, you can set a master password to further secure yourconnection in Tools | Options| Environment | Security.
Connect as Select whether to connect as either SYSDBA or SYSOPER if you have theappropriate permissions. Otherwise, use the default.
Schema Select a schema if you frequently work in a different schema than the oneassociated with your user name.
Explain plantable
(Optional) Specify the location of an existing explain plan table to use instead ofToad automatically creating one for you when you execute a statement. This isuseful if you do not have necessary permissions to create explain plan tables orwant to use an existing table.
Toad Data Point 4.3 Installation GuideCreate Connections
57
Category Select or create a category if you want to color code Editor tabs for a specificconnection. This can help differentiate between development and productiondatabases. You can also set an option to color code the Object Explorer paneand object editor windows (Create, Alter, Drop, etc.). Click here to view avideo of this feature.
Save password Select this checkbox if you plan to use Automation to generate reports.
Oracle Client Tab Description
Current home Modify the Oracle home to use, if needed.
TNSNamesEditor
Click this button to edit your local TNSNames file.Tip: You can press CTRL+F to open the Find/Replace window to locate entries inthe TNS Names Editor. Pressing F3 locates the next entry that matches yourcriteria.
SQLNET Editor Click this button to edit SQLNET.ORA parameters. Before editing this file, youshould create a backup copy. See SQLNET.ORA Profile Parameters in the Oracledocumentation for more information.
Direct Tab Description
SID Enter the ORACLE_SID value for the database. This value is specified in theregistry under each installed home.
Advanced Tab Description
ODBC driver If an Oracle Client is installed, the default is the Oracle ODBC driver.If an Oracle Client is not installed, the default is the Microsoft Access ODBCdriver.Tip: You can specify the ODBC driver to use for all connections for this databaseprovider in Tools | Options | Database | Oracle.
4. Click Connect to connect immediately while saving the connection information. Optionally, click Save tosave the connection without connecting.
Note: Go to Tools | Options | Database | Oracle to specify default options to use in Oracle connections.
Tip: Connections are stored in the connections.xml file and can be found by clicking the Application DataDirectory link in Help | About.
Create Oracle Business IntelligenceConnectionsToad allows you to connect to the presentation layer of an Oracle Business Intelligence Enterprise Edition(OBIEE) data source.
Note: This feature is available in the Toad Data Point Professional Edition only.
To create an Oracle Business Intelligence Enterprise connection
1. Click on the Connections toolbar (ALT+F+N).
2. SelectOracle BI Enterprise from the Group list.
3. Enter the connection information in the Create New Connection dialog. Review the following foradditional information:
Toad Data Point 4.3 Installation GuideCreate Connections
58
URL Enter the URL to the Oracle Business Intelligence Enterprise data source towhich you want to connect.Note: You must include the port number in the URL as in the following examples:
format—http://<server path>:<port>/analytics/saw.dllexample—http://server01.mycompany.com:80/analytics/saw.dll
Password Enter the password to use when connecting.Tip: After connecting, you can set a master password to further secure yourconnection in Tools | Options| Environment | Security.
Row Limit Select a row limit to enforce for query results.default = 500,000
Category (Optional) Select an existing category or create a new one.
Note: In NoSQL and Business Intelligence connections, Toad automatically saves the password in theconnections.xml file as obfuscated text, as well as in Toad. To add additional password security, useToad's Master Password feature.
4. Click Connect to connect immediately while saving the connection information. Optionally, click Save tosave the connection without connecting.
5. Upon creating an initial connection, Toad automatically maps the data source objects. This processruns in the background, and until it is finished, you may experience a delay when attempting to accessthese objects.
Important Information about Oracle BI ConnectionsYou must incorporate the port into the OBIEE database connection URL in the following format:
http://<server name>:<port>/analytics/saw.dll
An example URL is http://server01.mycompany.com:80/analytics/saw.dll
Tips:
l Connections are stored in the connections.xml file and can be found by clicking the Application DataDirectory link in Help | About.
l You can specify a proxy server to use for Business Intelligence and NoSQL connections at Tools |Options | Database | Data Services.
Create Salesforce ConnectionsToad allows you to connect directly to Salesforce.com, one of the business intelligence data sources supportedby Toad. Toad supports authentication using either a Salesforce security token or single sign-on with yourcorporate credentials.
Note: This feature is available in the Toad Data Point Professional Edition only.
To create a Salesforce connection
1. Click on the Connections toolbar (ALT+F+N).
2. Select Salesforce from the Group list. The Create New Connection dialog opens.
Toad Data Point 4.3 Installation GuideCreate Connections
59
3. To create a Salesforce connection using your Salesforce email login, select the Credentials tab.
a. Enter the connection information. Review the following for additional information:
URL Enter the Salesforce.com URL to which you want to connect.Note: An example is https://login.salesforce.com.
Username Enter your email login.Note: You must have a Salesforce email login to create this type ofconnection to Salesforce.com from Toad.
Password Enter the password to use when connecting.Tip: After connecting, you can set a master password to further secureyour connection in Tools | Options| Environment | Security.
Security token Enter your Security Token provided by Salesforce.Note: You must have a Salesforce security token to create this type ofSalesforce.com connection from Toad. See "Important Notes aboutSalesforce Connections" on page 61 for more information.
Category (Optional) Select an existing category or create a new one.
b. After entering the connection information, click Connect to connect immediately while saving theconnection information. Optionally, click Save to save the connection without connecting.
4. To create a Salesforce connection using your corporate credentials (single sign-on), select theCorporate Credentials tab.
a. Enter your company's custom Salesforce URL. An example is https://company.my.salesforce.comor http://salesforce.servername.
Note: If you authenticate and request login to Salesforce through your company's server (e.g.,http://salesforce.servername), you may need to contact your IT department to obtain the full URLto enter in this step.
b. If the Salesforce log-in page displays, enter your corporate credentials (user name andpassword) and click Log in to Salesforce.
Note: The Salesforce log-in page does not display when authenticating through yourcompany's server.
c. The Salesforce consent page displays. Click Allow to allow Toad access to your Salesforce data.
5. Upon creating an initial connection, Toad automatically maps the data source objects. This processruns in the background, and until it is finished, you may experience a delay when attempting to accessthese objects.
Note: In NoSQL and Business Intelligence connections, Toad automatically saves the password in theconnections.xml file as obfuscated text, as well as in Toad. To add additional password security, use Toad'sMaster Password feature.
Manual Single Sign-OnUse the manual single sign on method when you want to create a Salesforce connection using your corporatecredentials but you are having problems accessing Salesforce from Toad, for example, if Toad does not haveaccess to the Internet.
Create a Salesforce.com connection - manual single sign-on
1. In the Create New Connection dialog, select the Manual Single Sign On tab.
2. Log-in to your Salesforce.com account using your browser. After you log-in, copy the full URL from thebrowser's address bar and paste it into the text box under Step 1 in the Manual Single Sign On tab.
Toad Data Point 4.3 Installation GuideCreate Connections
60

3. A URL appears in the text box under Step 2. Copy this URL and then paste it into the address bar inyour browser.
4. The Salesforce consent page displays. Click Allow.
5. A page displays containing the authorization code. Copy the code and paste it into the text box underStep 3. Then click Connect.
Reauthorizing a Connection (If Using Corporate Credentials)If you encounter an error message when attempting to connect to Salesforce using your corporate credentialsconnection, Toad's authorization (access) to Salesforce may be lost. Use the following procedure to re-establishauthorization for the connection.
To Reauthorize
1. In the Navigation Manager, disconnect from the connection. You must disconnect before you canre-authorize.
2. After disconnecting, right-click the connection and select Properties.
3. In the Connection Properties dialog, click Reauthorize in the Corporate Credentials tab.
4. If the Salesforce log-in page displays, re-enter your corporate credentials.
Note: The Salesforce log-in page does not display when authenticating through your company's server.
Important Notes about Salesforce Connectionsl If you connect to Salesforce using a proxy, you must define the proxy server in Toad.
l A Security Token is required to log on to Salesforce.com from Toad, using your Salesforce email login.
l For information about how to generate a new security token, see the Salesforce documentation athttps://login.salesforce.com/help/doc/en/user_security_token.htm.
l You may need to have your IP address included in your organization's list of trusted IP addresses. Formore information, see the Salesforce documentation athttp://www.salesforce.com/us/developer/docs/api/Content/sforce_api_concepts_security.htm.
Tips:
l Connections are stored in the connections.xml file and can be found by clicking the Application DataDirectory link in Help | About.
l You can specify a proxy server to use for Business Intelligence and NoSQL connections at Tools |Options | Database | Data Services.
Create SQL Server and SQL AzureConnectionsYou can create a new connection, or connect to an existing connection from the Create New Connectionwindow. See "Troubleshoot SQL Server® Issues" on page 78 for more information about troubleshootingconnection issues.
Click here to view a video about creating connections in Toad Data Point
Note: For SQL Azure connections:
l To be able to utilize majority of Toad functionality please grant VIEW DEFINITION on the SQL Azuredatabases you want to work with.
Toad Data Point 4.3 Installation GuideCreate Connections
61

l You can login to Windows Azure Platform by selecting Tools | Cloud Computing | SQL Azure Portal andproviding your credentials.
l Make sure that no Azure firewall rule restricts your IP address from having access to Azure server. See"Create and Alter Azure Firewall Rules" in the online help for more information.
To create a new connection
1. Click on the toolbar (ALT+F+N).
2. SelectMicrosoft SQL Server or Microsoft SQL Azure from the Group list box.
3. Review the following for additional information:
Login Tab Description
Server name Enter the name of the server to use when connecting.
Click to display any servers running SQL Server that are currently active onthe network.Notes:
l For SQL Azure connections, enter InstanceName.database.windows.netin this field.
l For named instances, enter the MachineName\InstanceName in thisfield.
Authentication Select the type of authentication to use for this connection.Note: You cannot create a SQL Azure connection using WindowsAuthentication.
Password Enter the password to use when connecting.Tip: After connecting, you can set a master password to further secure yourconnection in Tools | Options| Environment | Security.
Category Select or create a category if you want to color code Editor tabs for a specificconnection. This can help differentiate between development and productiondatabases. You can also set an option to color code the Object Explorer paneand object editor windows (Create, Alter, Drop, etc.). Click here to view avideo of this feature.
Encryptconnection
Select this option to enable encryption for the current connection provided thatthe certificate has been already installed on the server.
Advanced Tab Description
Network protocol Select one of the following:
l Shared Memory
l TCP/IP
l Named PipesNote:When establishing Named Pipes connection "Poll service statusin connection list" option should be cleared.
ParameterName/Value
You can add parameters to the connection. Toad includes the ApplicationName parameter with value Toad Data Point by default.
OBDC driver Select an ODBC driver to use for this connection when creating cross-connection queries.Tip: You can specify the ODBC driver to use for all connections for thisdatabase provider in Tools | Options | Database | SQL Server.
Toad Data Point 4.3 Installation GuideCreate Connections
62
4. Click Connect to save the connection and immediately connect to the database.
or
Click Save to save the connection without connecting to the database.
Tip: Connections are stored in the connections.xml file and can be found by clicking the Application DataDirectory link in Help | About.
To import connections (including Central Management Server connections)
1. Click .
2. Specify the location where the connections currently reside.
Note: Review the following for additional information on CMS connections:
l To import CMS connections, select a server from the list where the CMS is registered. Theconnection to this SQL Server instance should be created beforehand.
l CMS is available beginning with Microsoft SQL Server 2008.
l User should have an appropriate login (Windows Authentication and grant to connect to selectedserver are required) created on the server to which he connects via CMS.
3. Select the connections to be imported.
Create SQL Server Analysis ServicesConnectionsThrough Toad you can create a connection to a Microsoft SQL Server Analysis Services (SSAS) data source. AnSSAS connection in Toad allows you to access the multi-dimensional cubes from the data source.
Note: This feature is available in the Toad Data Point Professional Edition only.
Configure HTTP AccessBefore connecting to SQL Server Analysis Services from Toad Data Point, you must configure the IIS Webserver (to be used for connecting) for HTTP access to SSAS. See the following instructions from Microsoft:http://msdn.microsoft.com/en-us/library/gg492140(v=sql.105).aspx.
Connect to SQL Server Analysis ServicesTo create a SQL Server Analysis Services connection
1. Click on the Connections toolbar (ALT+F+N).
2. SelectMicrosoft SQL Server Analysis Services (SSAS) from the Group list.
3. Enter the connection information in the Create New Connection dialog. Review the following foradditional information:
Toad Data Point 4.3 Installation GuideCreate Connections
63
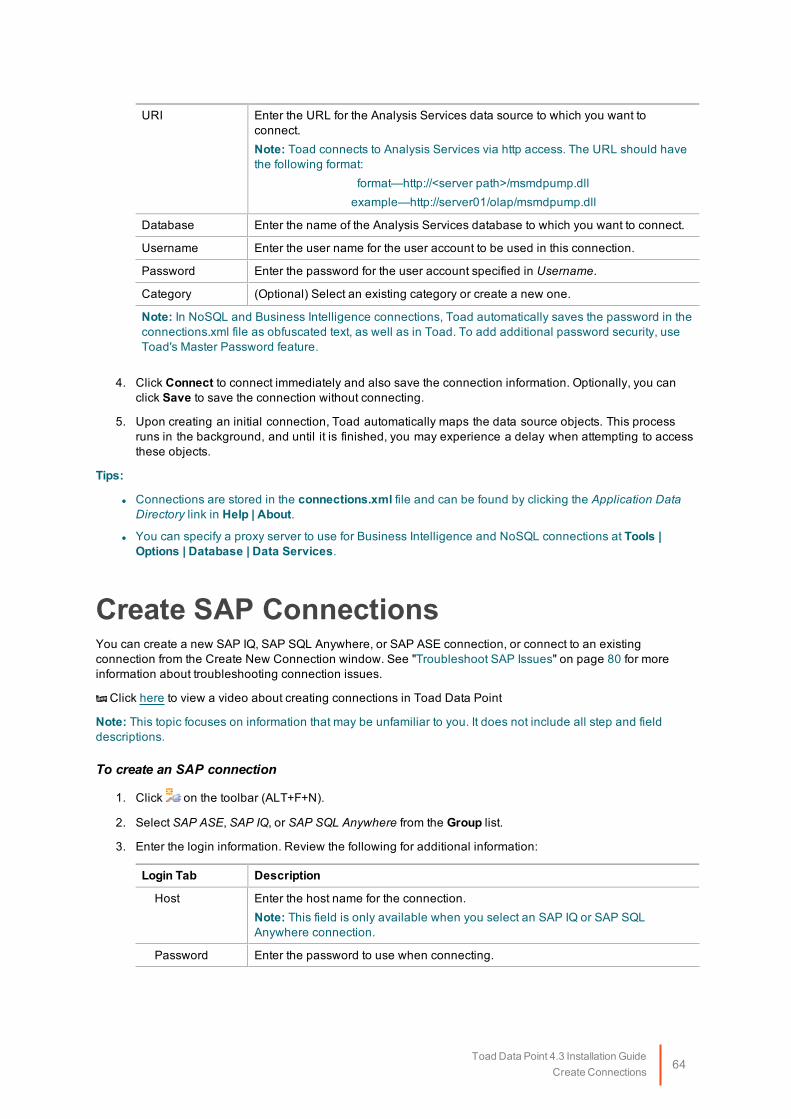
URI Enter the URL for the Analysis Services data source to which you want toconnect.Note: Toad connects to Analysis Services via http access. The URL should havethe following format:
format—http://<server path>/msmdpump.dllexample—http://server01/olap/msmdpump.dll
Database Enter the name of the Analysis Services database to which you want to connect.
Username Enter the user name for the user account to be used in this connection.
Password Enter the password for the user account specified in Username.
Category (Optional) Select an existing category or create a new one.
Note: In NoSQL and Business Intelligence connections, Toad automatically saves the password in theconnections.xml file as obfuscated text, as well as in Toad. To add additional password security, useToad's Master Password feature.
4. Click Connect to connect immediately and also save the connection information. Optionally, you canclick Save to save the connection without connecting.
5. Upon creating an initial connection, Toad automatically maps the data source objects. This processruns in the background, and until it is finished, you may experience a delay when attempting to accessthese objects.
Tips:
l Connections are stored in the connections.xml file and can be found by clicking the Application DataDirectory link in Help | About.
l You can specify a proxy server to use for Business Intelligence and NoSQL connections at Tools |Options | Database | Data Services.
Create SAP ConnectionsYou can create a new SAP IQ, SAP SQL Anywhere, or SAP ASE connection, or connect to an existingconnection from the Create New Connection window. See "Troubleshoot SAP Issues" on page 80 for moreinformation about troubleshooting connection issues.
Click here to view a video about creating connections in Toad Data Point
Note: This topic focuses on information that may be unfamiliar to you. It does not include all step and fielddescriptions.
To create an SAP connection
1. Click on the toolbar (ALT+F+N).
2. Select SAP ASE, SAP IQ, or SAP SQL Anywhere from the Group list.
3. Enter the login information. Review the following for additional information:
Login Tab Description
Host Enter the host name for the connection.Note: This field is only available when you select an SAP IQ or SAP SQLAnywhere connection.
Password Enter the password to use when connecting.
Toad Data Point 4.3 Installation GuideCreate Connections
64
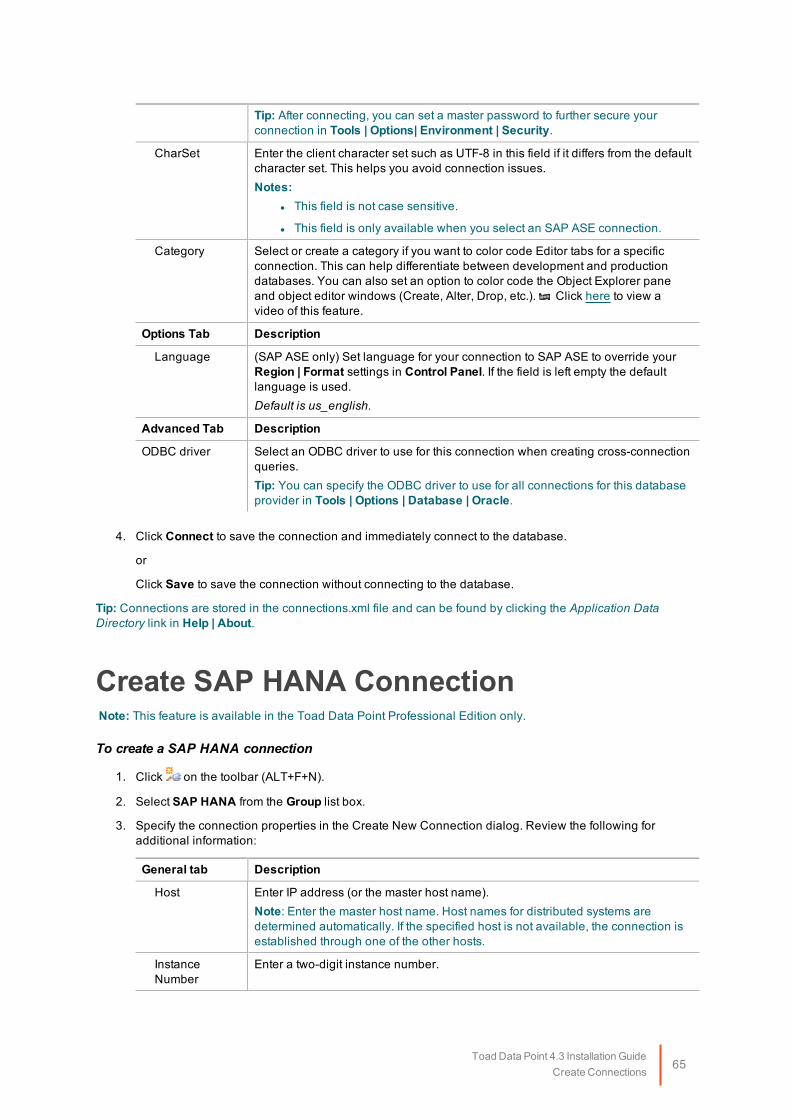
Tip: After connecting, you can set a master password to further secure yourconnection in Tools | Options| Environment | Security.
CharSet Enter the client character set such as UTF-8 in this field if it differs from the defaultcharacter set. This helps you avoid connection issues.Notes:
l This field is not case sensitive.
l This field is only available when you select an SAP ASE connection.
Category Select or create a category if you want to color code Editor tabs for a specificconnection. This can help differentiate between development and productiondatabases. You can also set an option to color code the Object Explorer paneand object editor windows (Create, Alter, Drop, etc.). Click here to view avideo of this feature.
Options Tab Description
Language (SAP ASE only) Set language for your connection to SAP ASE to override yourRegion | Format settings in Control Panel. If the field is left empty the defaultlanguage is used.Default is us_english.
Advanced Tab Description
ODBC driver Select an ODBC driver to use for this connection when creating cross-connectionqueries.Tip: You can specify the ODBC driver to use for all connections for this databaseprovider in Tools | Options | Database | Oracle.
4. Click Connect to save the connection and immediately connect to the database.
or
Click Save to save the connection without connecting to the database.
Tip: Connections are stored in the connections.xml file and can be found by clicking the Application DataDirectory link in Help | About.
Create SAP HANA ConnectionNote: This feature is available in the Toad Data Point Professional Edition only.
To create a SAP HANA connection
1. Click on the toolbar (ALT+F+N).
2. Select SAP HANA from the Group list box.
3. Specify the connection properties in the Create New Connection dialog. Review the following foradditional information:
General tab Description
Host Enter IP address (or the master host name).Note: Enter the master host name. Host names for distributed systems aredetermined automatically. If the specified host is not available, the connection isestablished through one of the other hosts.
InstanceNumber
Enter a two-digit instance number.
Toad Data Point 4.3 Installation GuideCreate Connections
65

Note: The communication port number is defined by: n <instance> xy, where n iseither 3 or 5, <instance> is a two-digit number representing the instance numberof the SAP HANA appliance, and xy represents a consecutive number. Toadusers only enter the instance number.
Type ofAuthentication
Select:Authentication by the current operating system user - connect using youroperating system authenticationAuthentication by the database user - connect using your database userauthentication
User Enter the user name to use when connecting.
Password Enter the password to use when connecting.Tip: After connecting, you can set a master password to further secure yourconnection in Tools | Options| Environment | Security.
Mode Select the database mode. SAP HANA supports numerous isolated databases ina single HANA system. Although each database in a multiple-container system isisolated, cross-queries can be performed and all databases share the sameinstallation, resources, and administration.Single-container— Select for single-container systems. These can be convertedto multiple-container systems.Multiple-container— Select for multiple-container systems. These systemsalways have one system database, which is used for administration, and anynumber of tenant databases.Select whether you want to connect to the System or Tenant database. Usersconnect to a specific tenant database within the system using its database name.
CurrentSchema
Select a database schema. Click to create a temporary connection anddisplay available schemas in the drop-down list.
Category Select or create a category if you want to color code Editor tabs for a specificconnection. This can help differentiate between development and productiondatabases. You can also set an option to color code the Object Explorer paneand object editor windows (Create, Alter, Drop, etc.). Click here to view a video of this feature.
Options tab Description
Isolation Level (Optional) Select the default isolation level for this connection.
Lifetime (Optional) Specify a maximum value for connection lifetime by entering the lengthof time in seconds. The default value is 0, which specifies no maximum.
4. Click Connect to connect immediately while saving the connection information. Optionally, click Save tosave the connection without connecting.
Note: An SAP HANA ODBC driver is installed along with Toad Data Point and is required if using a HANAconnection in a cross-connection query.
Tip: Connections are stored in the connections.xml file and can be found by clicking the Application DataDirectory link in Help | About.
Create Teradata ConnectionsToad allows you to create a full-featured, native Teradata connection. This type of connection provides completeQuery Builder, Query Editor, and Database Explorer functionality.
Toad Data Point 4.3 Installation GuideCreate Connections
66
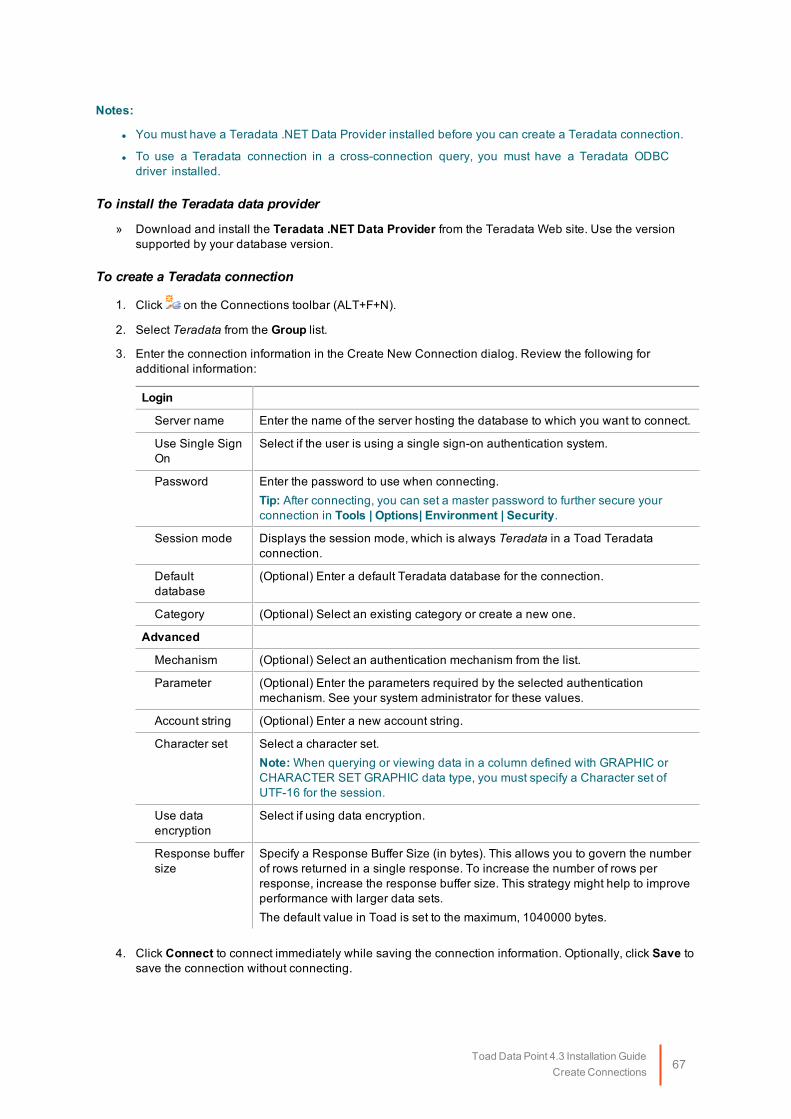
Notes:
l You must have a Teradata .NET Data Provider installed before you can create a Teradata connection.
l To use a Teradata connection in a cross-connection query, you must have a Teradata ODBCdriver installed.
To install the Teradata data provider
» Download and install the Teradata .NET Data Provider from the Teradata Web site. Use the versionsupported by your database version.
To create a Teradata connection
1. Click on the Connections toolbar (ALT+F+N).
2. Select Teradata from the Group list.
3. Enter the connection information in the Create New Connection dialog. Review the following foradditional information:
Login
Server name Enter the name of the server hosting the database to which you want to connect.
Use Single SignOn
Select if the user is using a single sign-on authentication system.
Password Enter the password to use when connecting.Tip: After connecting, you can set a master password to further secure yourconnection in Tools | Options| Environment | Security.
Session mode Displays the session mode, which is always Teradata in a Toad Teradataconnection.
Defaultdatabase
(Optional) Enter a default Teradata database for the connection.
Category (Optional) Select an existing category or create a new one.
Advanced
Mechanism (Optional) Select an authentication mechanism from the list.
Parameter (Optional) Enter the parameters required by the selected authenticationmechanism. See your system administrator for these values.
Account string (Optional) Enter a new account string.
Character set Select a character set.Note:When querying or viewing data in a column defined with GRAPHIC orCHARACTER SET GRAPHIC data type, you must specify a Character set ofUTF-16 for the session.
Use dataencryption
Select if using data encryption.
Response buffersize
Specify a Response Buffer Size (in bytes). This allows you to govern the numberof rows returned in a single response. To increase the number of rows perresponse, increase the response buffer size. This strategy might help to improveperformance with larger data sets.The default value in Toad is set to the maximum, 1040000 bytes.
4. Click Connect to connect immediately while saving the connection information. Optionally, click Save tosave the connection without connecting.
Toad Data Point 4.3 Installation GuideCreate Connections
67

Tip: Connections are stored in the connections.xml file and can be found by clicking the Application DataDirectory link in Help | About.
To install a Teradata ODBC driver
» Download and install a Teradata ODBC driver from the Teradata Web site. For a list of supportedTeradata ODBC drivers, please see the Release Notes for your version of Toad Data Point.
Notes:
l Toad does not support the Teradata multi-statement request.
l You can specify which Teradata Data Directory views to use, X views or Non-X views, in Tools | Options| Database | Teradata.
Toad Data Point 4.3 Installation GuideCreate Connections
68

Troubleshoot Connections
Troubleshoot Access IssuesReview the following solutions to help troubleshoot Access issues pertaining to missing functionality and objectinformation and other problems in Toad.
See "Create Access Connections" on page 31 for more information about Access connections.
Missing Functionality and Object InformationIssue Cause/Solution
Some queries display in the View tab ofthe Object Explorer, but do not display inthe Query tab.
The Access ODBC driver handles saved queries in the followingmanner:
l If the stored query does not contain parameters, it istreated as a view and displays in the View tab.
l If the stored query contains parameters, it is treated as astored procedure and displays in the Query tab.
Primary key information is unavailable. The Microsoft Access ODBC driver does not return primary keyinformation for databases. However, in some cases, Toad canobtain this information through additional methods.
Other IssuesIssue Cause/Solution
A delay occurs between writing a value toa database via one connection andseeing the updated value via anotherconnection.
This delay is the default when you are writing and reading databetween two different Jet connections. The delay occurs even ifthe two connections reside in the same client process.Solution:Use a single connection when updating data.
Troubleshoot Excel® IssuesReview the following to help troubleshoot and solve issues involving Excel files.
See "Create Excel Connections" on page 43 for more information about Excel connections.
3
Toad Data Point 4.3 Installation GuideTroubleshoot Connections
69

Excel ConnectionsIssue Cause/Solution
Tables are limited to 256columns and 65536 rows.
This is a known limitation with Excel worksheets.
Column names longer than 64characters are truncated andthe remaining charactersdisplay as null.
This is a known limitation with Excel worksheets.
Columns that include textvalues or special characters aspart of a numeric value, as wellas entries with straight numericvalues, result in one of thevalue sets displaying as null.
When you connect to Excel, the driver automatically scans the first eightrows in a column and applies the data type used in a majority of those rowsto all rows in the column. Any rows that do not meet the majority data typedisplay as null values.Solution 1: Reformat worksheet column and values as text.
1. Open the worksheet in Excel.
2. Format the column that contains mixed data types as Text.
3. You can now connect to this spreadsheet from Toad without any nullvalues displayed.
Solution 2: Create an ODBC connection.You can force the ODBC driver to read all rows as Text to avoid null values;however, this can result in issues if you attempt to insert data.
1. Open the Create New Connection window and selectODBC fromthe Group list.
2. Complete the fields as described in Create ODBC Connections.
3. Enter "IMEX=1", in quotations, in the ExtraParameters field.
4. Click Connect.
Column names that contain anexclamation point (!) are notsupported.
The exclamation point character has a special meaning in Excel. If a columnname contains an exclamation point, it is internally converted to a dollarsign ($) character.
Tables cannot be altered. Tables cannot be altered when the Excel connection is Read-Only.Solution: Deselect Read-Only Connection in the Connection Propertiesdialog.
The Primary Keys and ForeignKeys tabs are blank in theDatabase Explorer.
Excel is a spreadsheet, and does not support primary and foreign keys sothese tabs are always blank.
Indexes cannot be created ordropped.
The Excel ODBC driver does not support this functionality.
Unable to query Excel fileswithout named ranges(regions).
The worksheet you are querying does not have named ranges (regions)defined.Solution:You can query the worksheet from the Editor by entering a dollar sign ($)followed by a cell range to limit the results similar to the following statement: Select * from (MyWorksheet$A1:C10)
You can also query the entire worksheet by entering a dollar sign ($) afterthe worksheet name. However, this may also return the worksheet's emptyrows and columns.
Toad Data Point 4.3 Installation GuideTroubleshoot Connections
70

Issue Cause/Solution
Attempting to connect to orcreate a new Excel connectionresults in No user tables couldbe foundmessage.
The Excel file does not have named ranges (regions) defined. If you clickOK to close the message, the new connection is created, but no user tablesdisplay in Object Explorer. (System tables are displayed, if you selected toshow these.)Solution 1: In the Excel file, create named ranges.Solution 2: Ask Toad to automatically create named ranges.
1. Disconnect from the file.
2. In Navigation Manager, right-click the file and select Properties |Advanced.
3. Select Automatically create ranges.The next time you connect, Toad automatically creates namedranges, which are then displayed as tables.
See "Create Excel Connections" on page 43 for more information.
Unable to query data using anempty string or null value.
The underlying data format cannot differentiate between an empty stringand null data, so a query with a search condition that contains an emptystring does not match any empty strings in the table. This occurs becausethe empty string is treated as a null value, and a null value never matchesanything, not even another null value.
Unable to update or deleterows in a table.
The Excel ODBC driver does not support this functionality. While it ispossible to update values, DELETE statements do not remove a row from atable. Basically, you can only insert data in a table.
Attempting to insert dataresults in Cannot expandnamed range error.
This error occurs if you have more than one named range (region) in thesame worksheet, and the named ranges are not separated by blank rows.Solution 1: You must add blank rows between named ranges. Add as manyblank rows as you have new records to insert.Solution 2: Include only one named range in each worksheet.
Working with Excel FilesIssue Cause/Solution
Microsoft Excel worksheet rowand column limits
When exporting to Excel, be aware that Excel worksheets have limits formaximum number of rows and columns supported.See Microsoft Excel specifications and limits for more information.
Opening Excel Files in Toad Document WindowIssue Cause/Solution
Excel menus do not display when you openExcel files in a Toad document window.
The Toad document window cannot display all Excel menus.Solution:Right-click the Excel toolbar and add the equivalent toolbarfor the missing menu or functionality.
When two or more instances of Excel areopen in Toad document windows, toolbarsare active for only one instance.
Toad document windows support one Excel instance at atime. Opening more than one Excel file disables the Exceltoolbars for the additional files.Solution:Open only one Excel file at a time.
Toad Data Point 4.3 Installation GuideTroubleshoot Connections
71

Troubleshoot DB2 LUW IssuesReview the following solutions to help troubleshoot DB2 LUW issues pertaining to Toad installation anddatabase connections.
Installation IssuesThe following table describes issues related to installing Toad for DB2.
Issue Cause/Solution
System.IO.FileNotFoundException - Fileor assembly name DB2AdminWrapper, orone of its dependencies was not found
You are not a member of the DB2ADMIN or DB2USERS group.To install Toad, you must be a member of either group.Solution:Ensure that you have been added to one of these groups.
Error: "Could not load file or assembly'IBM.Data.DB2.9.1.0, Version=9.1.0.2,Culture=neutral,PublicKeyToken=7c307b91aa13d208' orone of its dependencies. The systemcannot find the file specified."
You installed a commercial version of Toad for DB2 afteruninstalling the freeware version.Solution:You must remove run time information for the freeware version ofToad from the .NET system.config file.
To remove run time information
1. Exit Toad.
2. Navigate to the following .NET framework directory:C:\WINDOWS\Microsoft.NET\Framework\v2.0.50727\CONFIG
3. Create a backup copy of the system.config file.
4. Open the system.config file in Notepad.
5. Locate the <runtime> tag delete everything between theruntime tags (including <runtime> and </runtime>).
6. Save the file.
7. Restart Toad.
Connection IssuesIssue Cause/Solution
ERROR [08001] [IBM] SQL1336N Theremote host was not found.SQLSTATE=08001
You are attempting to connect to a database version that is notsupported in Toad.Solution:Review the list of supported databases in the Release Notes orInstallation Guide.
ERROR [58031] [IBM] SQL1031N Thedatabase directory cannot be found on theindicated file system. SQLSTATE=58031
Catalog entries have not been imported or defined for theconnection.Solution:See "Configure DB2 Client Connections" on page 34 for more
Toad Data Point 4.3 Installation GuideTroubleshoot Connections
72

Issue Cause/Solution
information to determine the best method for cataloging adatabase.
"The type initializer for'IBM.Data.DB2.DB2Connection' threw anexception."or"SUCCESS - unable to allocate anenvironment handle."
A settings file might be corrupt.Solution:Rename your local settings directory so a new one can berecreated.
To rename your local setting directory
1. Exit Toad.
2. Navigate to the following settings directory:
l Windows Vista, Windows Server 2008, Windows7—C:\Users\username\AppData\ Roaming\QuestSoftware\
3. Rename the Toad for DB2 version# folder to "Toad forDB2 OLD".
4. Restart Toad and try to connect.
Notes:l Make sure you can view hidden folders in WindowsExplorer.
l To navigate to this directory quickly, click the ApplicationData Directory link in the About dialog (Help | About).
Other IssuesIssue Cause/Solution
Unable to capture Container Informationin DB2 for LUWMulti-Partition Databases
Certain Toad functions require that the DFT_MON_BUFPOOLdatabase manager configuration parameter be set to ON tocapture information on containers used in DB2 for LUWdatabases. Additionally, to capture container information acrossall partitions in a multi-partition database, the snapshot monitorrequires that all database partitions be active. To activate alldatabase partitions (and keep them active), execute the DB2command ACTIVATE DATABASE real_database_name on theserver before connecting Toad to the database. See your IBMDB2 for Linux, Unix, and Windows documentation for moreinformation about this command.
Toad Data Point 4.3 Installation GuideTroubleshoot Connections
73
Troubleshoot DB2 z/OS IssuesReview the following solutions to help troubleshoot DB2 z/OS issues in Toad.
Installation IssuesIssue Cause/Solution
Error: "Could not load file or assembly'IBM.Data.DB2.9.1.0, Version=9.1.0.2,Culture=neutral,PublicKeyToken=7c307b91aa13d208' orone of its dependencies. The systemcannot find the file specified."
You installed a commercial version of Toad for DB2 afteruninstalling the freeware version.Solution:You must remove run time information for the freeware version ofToad from the .NET system.config file.
To remove run time information
1. Exit Toad.
2. Navigate to the following .NET framework directory:C:\WINDOWS\Microsoft.NET\Framework\v2.0.50727\CONFIG
3. Create a backup copy of the system.config file.
4. Open the system.config file in Notepad.
5. Locate the <runtime> tag delete everything between theruntime tags (including <runtime> and </runtime>).
6. Save the file.
7. Restart Toad.
Connection IssuesIssue Cause/Solution
ERROR [08001] [IBM] SQL1336N Theremote host was not found.SQLSTATE=08001
You are attempting to connect to a database version that is notsupported in Toad.Solution:Review the list of supported databases in the Release Notes orInstallation Guide.
ERROR [58031] [IBM] SQL1031N Thedatabase directory cannot be found on theindicated file system. SQLSTATE=58031
You do not have any catalog entries defined for the connection.Solution:See "Configure DB2 Client Connections" on page 34 for moreinformation to determine the best method for cataloging adatabase.
ERROR [42501] [IBM][DB2] SQL0551N"UserName" does not have the privilegeto perform operation "SELECT" on object"SYSIBM.SYSSTMT". SQLSTATE=42501
You do not have SYSADM privileges for the DB2 for z/OSsubsystem.Solution:Ensure that you are granted SELECT permissions on the DB2catalog tables.
Toad Data Point 4.3 Installation GuideTroubleshoot Connections
74
Issue Cause/Solution
ERROR [] [IBM] SQL1460N Theenvironment variable "SOCKS_NS"required for SOCKS server nameresolution is not defined or not valid.
When using the Time-Sharing Option (TSO) to connect, the userID, port number, or IP address entered may be incorrect.Solution:Ensure that you use the following for TSO connections:
l DB2 user ID for the DB2 subsystem
l Port number that DB2 listens on, for remote connections,via the DB2 DDF address space
l IP address for the z/OS subsystem
ERROR [56038] [IBM][DB2] SQL0969NThere is no message text correspondingto SQL error "-4700" in the message fileon this workstation.' when connecting tocompatibility mode database.-or-After connecting, some objects do notdisplay properly or some functionalitydoes not work as designed.
In general, Toad does not support a z/OS subsystem running inCompatibility mode.Solution:If possible, switch the subsystem's operating mode to FullFunction mode.If this is not possible, Toad now provides a message when youconnect to subsystem, informing you of that the subsystem isrunning in compatibility mode and that some features might notbe available.
Missing Functionality or Object InformationIssue Cause/Solution
Unable to browse databases in DB2 forz/OS 8 or later.
The DB2 installation job DSNTISG defines a set of DB2procedures that the ODBC driver uses. The installation assignsthese procedures (namely, those beginning with SYSIBM.SQL*)to a specific Work Load Manager (WLM) environment, whichcurrently might not exist or be defined properly.Solution:Be sure that you have correctly set up and enabled the WLMenvironment to which the procedure definitions point.
Cannot edit data in compatibility mode. In compatibility mode, the ODBC driver does not return enoughinformation for the CommandBuilder to correctly generateupdate or insert statements.Solution:No solution exists. However, when you connect to a subsystemrunning in compatibility mode, Toad now provides a message,informing you of this condition and warning you that somefeatures might not be available.
Other IssuesIssue Cause/Solution
Poor performance when browsing DB2 forz/OS objects in Toad. Indexes arepopulated slowly.
User-defined indexes on specific system catalog tables canimprove performance when you are browsing DB2 for z/OSobjects in Toad. The following link contains the DDL for indexesthat can optimize Toad performance on your DB2 for z/OSsubsystem. Keep in mind that the creation of these indexes is arecommendation only. The indexes can have different results in
Toad Data Point 4.3 Installation GuideTroubleshoot Connections
75
Issue Cause/Solution
different environments, depending on the number of DB2 objectsand the amount of data involved. To create these indexes, editand run the DDL contained in the following file:ToadDB2zOSIndexes.txtAdditionally, if the schema drop-down lists in the ObjectMigration wizard populate slowly, consider creating an index onthe SCHEMA and CREATOR columns in the catalog table foreach object type. Here is a list of some of the object-type tables:
SYSIBM.SYSSYNONYMSSYSIBM.SYSSEQUENCESSYSIBM.SYSROUTINESSYSIBM.SYSTABLESSYSIBM.SYSDATATYPESSYSIBM.SYSINDEXESSYSIBM.SYSTRIGGERSSYSIBM.INDEXES
Encountering the S378 Abend whenrunning IBM DB2 z/10 subsystem inConversion mode with older versions ofToad.
This issue appears because the Toad z/OS Component tries toreference the QUEST.QC200ZPARM function.Solution:DROP the QUEST.QC200ZPARM function from your DB2 z/OS10 subsystem. This will eliminate the possibility of the functionbeing called into the WLM environment procedure and causingthe S378 abend.We do not recommend that you to just STOP theQUEST.QC200ZPARM function on the mainframe side, withoutactually dropping it, because that may case Toad or the batchprocess (QCEXEC – remote job execution) to hang. Droppingthe QUEST.QC200ZPARM function is recommended.
Troubleshoot Informix IssuesReview the following solutions to help troubleshoot Informix issues in Toad.
Issue Cause/Solution
Unable to view all available databases. The InformixODBC driver does not return information aboutevery available database.
Troubleshoot MySQL IssuesReview the following solutions to help troubleshoot MySQL connection issues pertaining to databaseconnections and missing functionality or object information in Toad.
Connection IssuesIssue Cause/Solution
"InvalidCastException" error whenconnecting to MYSQL 4.1.14-nt database
This is a known issue in MySQL.Solution:
Toad Data Point 4.3 Installation GuideTroubleshoot Connections
76

Issue Cause/Solution
Review the known issue and download a patch from:http://bugs.mysql.com/bug.php?id=12771
"System.IO.DirectoryNotFoundException"error occurs each timeyou attempt to connect after installingToad into a directory other than the defaultdirectory.
Solution:
1. Exit Toad.
2. Locate the MySQL.xml file in the C:\Documents andSettings\username\Local Settings\ ApplicationData\Quest Software\ Toad for MySQLversion\ModuleSettings
3. Rename or delete the MySQL.xml file.
4. Restart Toad.
Missing Functionality or Object InformationIssue Cause/Solution
Views tab in Object Explorer isunavailable when connecting to MySQLusing the ODBC driver
You are attempting to connect using the 3.51 ODBC driver. Thisdriver is hard-coded to reply that the database does not supportviews because it needs to connect to MySQL databases prior toversion 5.Solution:Use the native MySQL provider included in Toad.
Using a MySQL ODBC connection in across-connection query results in an error
Attempting to execute a cross-connection query using a MySQLODBC connection (not a native connection) results in thefollowing error: "The table <table name> can not be mapped."Solution:To use a MySQL ODBC connection in a cross-connection query,you must specify a database for the connection.
To specify a database for an existing MySQL ODBCconnection
1. In the Connection/Navigation Manager, right-click theexisting MySQL ODBC connection and select Properties.
2. Click beside the Data source name drop-down list.The ODBC Data Source Administrator dialog opens.
3. On the User DSN tab, select (highlight) the connection'sMySQL ODBC driver and then click Configure. TheMySQL ODBC Configuration dialog displays.
4. Select a database from the Database list.
Notes:l Specifying a database using the Connection PropertiesDatabase field does not result in a solution. You mustfollow the procedure above.
l You can repeat this procedure at any time to specify adifferent database.
Toad Data Point 4.3 Installation GuideTroubleshoot Connections
77

Troubleshoot Oracle IssuesReview the following solutions to help troubleshoot Oracle connection issues pertaining to databaseconnections and missing functionality and object information in Toad.
Connection IssuesReview the following to help troubleshoot Oracle:
Issue Cause/Solution
Attempting to connect when Oracle InstantClient is installed results in aSystem.NullReferenceException error
Solution:In order to connect using the Oracle Instant Client, the directoryfor the Instant Client must be included in the environmental path,or you must copy the client files for the instance to the root installdirectory of Toad Data Point.You can also connect to the database without using an Oracleclient or TNSNames file by selecting the Direct tab in the CreateNew Connection window.
An error occurs when attempting toconnect to Oracle Rdb using an ODBCdriver.
Toad does not support Oracle Rdb at this time.
Missing Functionality and Object InformationIssue Cause/Solution
Some schemas are not available from theSchema drop-down list in the ObjectExplorer.
The Oracle ODBC driver cannot display schemas that do nothave any tables.
Unable to view table data on the Data tab;SQLFetch generates an access violation.
The Oracle ODBC driver is accessing unallocated memory.Solution:Update the Oracle ODBC driver:
l For 9i drivers, update to 9.2.0.7.0 or later.
l For 10g drivers, update to 10.1.0.3.0 or later.
Troubleshoot SQL Server® Issues
Connection IssuesReview the following solutions to help troubleshoot SQL Server connection issues in Toad.
Issue Cause/Solution
Cannot specify a port number Currently, Toad does not have a separate field for specifying a port number.
Toad Data Point 4.3 Installation GuideTroubleshoot Connections
78

Issue Cause/Solution
when connecting Solution:You can connect if you know the port number for the instance by enteringthe following in the Server name field on the New Connection window:ServerName,PortorIPAddress,Port
For example:10.1.29.129,1234 (where 1234 is the port number of the instance)
Cannot connect to a remoteinstance in SQL Server 2005
Remote connections may not be enabled in SQL Server 2005. Also, namedinstances are configured to use dynamic ports and select an available portonce the SQL Server Service starts. If you are connecting to a namedinstance through a firewall, configure the Database Engine to listen on aspecific port, so that the appropriate port is opened in the firewall.Note: Remote connections are disabled by default in the Express andDeveloper editions of SQL Server 2005.Solution:To enable remote connections, see "How to configure SQL Server 2005 toallow remote connections" at: http://support.microsoft.com/kb/914277
"Path is not of a legal form"error message whenconnectingor"Could not find a part of thepathC:\Program Files\QuestSoftware\Toad DataPoint\Template\Scripts\InitialSqlServer.Sql" errormessage when connecting
You attempted to migrate settings from a previous install of Toad to thecurrent install, but the settings file (InitialSqlServer.Sql) for the previousinstall was either removed, moved, or corrupt.You may also receive this error if you installed Toad and migrated settingsfrom a previous version, and later uninstalled the previous version.Solution:You must specify a valid location for the InitialSqlServer.Sql file in Toad.
To specify a valid location
1. Open the SQL Server options page under Tools | Options |Database | SQL Server.
2. Specify the location for the new install's InitialSqlServer.Sql file in theRun Script on new connection field.
By default, this file is located in the following directory:C:\Program Files\Quest Software\Toad Data Point version\Templates\Scripts
Note: Clicking may result in a "Path not found error". If you receive thiserror, manually enter the location in the field.
Cannot establish Named Pipesconnection
If you are trying to connect to the server using Named Pipes, "Poll servicestatus in connection list" option should be cleared.Solution:
1. Open the options page under Tools | Options | Database | General.
2. Clear Poll service status in connection list checkbox.
Cannot establish Azureconnection
Failing to establish Azure connection may indicate that your IP address isrestricted from having access to the Azure server.Solutions:
1. Select Tools | Cloud Computing | SQL Azure Portal to login toAzure Portal.
Toad Data Point 4.3 Installation GuideTroubleshoot Connections
79

Issue Cause/Solution
2. Create a firewall rule on the master database, enabling access tocurrent IP address or range. See "Create and Alter Azure FirewallRules" in the online help for more information.
Cannot access somefunctionality when working withAzure connection.
To utilize majority of Toad functionality VIEW DEFINITION grant is requiredfor those databases you want to work with.
Troubleshoot SAP IssuesReview the following solutions to help troubleshoot SAP issues pertaining to the following in Toad:
Connection IssuesIssue Cause/Solution
Unable to connect to the database. Thefollowing message displays: "TheODBCMDA procedures have not beeninstalled on this database..."
Stored procedures that the ODBC driver requires currently do notexist on the server.Solution:Install the required procedures.
Missing Functionality or Object InformationIssue Cause/Solution
Unable to view or export data for objectswith non-standard names.
The ASE ODBC driver has issues handling non-standard namesfor objects.Solution:When setting up an ASE connection in Toad, select Use quotedidentifiers on the Connection tab in the Adaptive ServerEnterprise window to enable the use of quotations in identifiers.
Unable to view linked tables. Linked tables store DSN connection information.Solution:Set up the DSN connection information exactly the same on allmachines that access the database.
Other IssuesIssue Cause/Solution
DBMS name showing as SQL Server. Older versions of the ASE ODBC driver return SQL Server as theDBMS name.Solution:Upgrade to the latest version of the ODBC driver, which correctlyreturns Adaptive Server Enterprise as the DBMS name.
Toad Data Point 4.3 Installation GuideTroubleshoot Connections
80

Configure Version Control
Version Control for Toad FilesToad can integrate with your existing version control system allowing you to maintain multiple versions of Toadfiles. After you integrate Toad with your version control system, you can perform version control tasks directlyfrom within Toad, such as commit file changes and retrieve revisions.
Toad supports the following version control systems for managing Toad files:
l Apache Subversion™—Toad has been tested with Subversion 1.7.5 and 1.8.
The following types of files can be managed using version control from within Toad: Editor (.tef, .sql, .txt), QueryBuilder (.tsm), ER Diagram (.ter), and Automation (.tas).
To configure version control for Toad files
1. Ensure that an Apache Subversion client is installed on the same computer as Toad.
2. In Toad, open one of the supported file types. Then right-click the document window tab and select FileVersion Control | Version Control Wizard. This action opens the Version Control Wizard which allowsyou to configure Toad for your version control system.
3. Use the wizard to provide information about your version control system to Toad. Review the followingfor additional information:
Field/Button
Version Control System Page
Type Select Subversion.
Properties Click the Properties button and enter the path to the Subversionexecutable (svn.exe) on the client computer. For example, if usingTortoiseSVN, the path might be:C:\Program Files\TortoiseSVN\bin
Note: Do not include svn.exe in the path.
Server Enter the URL for the Subversion repository on the Subversionserver.
Login and Password Enter the user name and password for your Subversion account.
Default Version ControlSettings Page
Version Control Folder Select the folder on the Subversion server where you want tocheck in files.If you currently have files under version control, select the folder onthe server where these files are located.
Working Folder Select a folder on the client computer to use as the root working
4
Toad Data Point 4.3 Installation GuideConfigure Version Control
81
Field/Button
folder. This is the location into which you will check out files.If you currently have files under version control, select yourexisting working folder.
To add a file to version control
1. After configuring version control for files, you can start adding files to version control from within Toad.Right-click a document window tab and select File Version Control | Add file to working folder.
2. Select a location in your working folder in which to save the file. Click Save.
3. In the Commit dialog, enter a comment and click OK to add the file to version control.
To browse the repository
1. Right-click the document window tab (of one of the supported file types) and select File Version Control| Repository Browser.
2. In the Repository Browser you can right-click a file to perform one of the following actions. Availableactions depend on the file's status.
Action Description
Open Open the file in Toad.
Commit Commit your changes. Available for Modified or Untracked files.
Undo Changes Discards your changes and reverts to the previous revision of the file(previous commit). Available when the file status is Modified.
Get Latest Version Check out the latest revision from the remote repository. Available whenthe file status is OutOfDate.
To commit your changes
l After modifying a file, right-click the document window tab and select File Version Control | Commit.
To compare revisions (Editor files only)
l After modifying and saving an Editor file, you might want to compare your changes to the remote copy(last commit) before committing your changes. Right-click the document tab and select File VersionControl | Diff with latest revision.
l You can compare two revisions of an Editor file (.tef, .sql, or .txt) by using the History dialog.
1. To open a file's History dialog, right-click the document tab and select File Version Control |Show history.
2. Select two revisions to compare. Then right-click the revisions and select Compare revisions.
3. For an OutOfDate file, right-click the latest revision in the History dialog and select Compare withworking copy to compare the remote file to your working copy.
To check file status
l The status of a currently open file displays in the status bar of the document window. You can also placethe cursor over the document tab to display status.
l You can check the status of one or more files by using the Repository Browser. To update file status inthe Repository Browser, right-click a folder and select Update folder.
l Review the following file status definitions.
Toad Data Point 4.3 Installation GuideConfigure Version Control
82

File Status Definition
Untracked The file has not been added to version control. Right-click the file in the RepositoryBrowser and select Commit to add it to version control.
UpToDate The file in your working folder is synchronized with the file in the remoterepository. No changes are detected. No action is required.
Modified The working copy of this file was modified. The changes are stored in the workingfolder only. Commit this file to add the changes to the remote repository.
OutOfDate A more recent revision of this file exists in the remote repository. To update yourworking copy, check out the latest revision from the remote repository (right-clickthe file and selectGet Latest Version).
Unknown The file is under version control, but its status cannot be determined.
Deleted The file was under version control, but it was dropped or renamed in the workingfolder and exists only in the remote repository.
Additional Actions
l To open the folder where a file is located, open the file and then right-click the document tab and selectFile Version Control | Open in Windows Explorer.
Toad Data Point 4.3 Installation GuideConfigure Version Control
83
We are more than just a nameWe are on a quest to make your information technology work harder for you. That is why we build community-driven software solutions that help you spend less time on IT administration and more time on businessinnovation. We help you modernize your data center, get you to the cloud quicker and provide the expertise,security and accessibility you need to grow your data-driven business. Combined with Quest’s invitation to theglobal community to be a part of its innovation, and our firm commitment to ensuring customer satisfaction, wecontinue to deliver solutions that have a real impact on our customers today and leave a legacy we are proud of.We are challenging the status quo by transforming into a new software company. And as your partner, we worktirelessly to make sure your information technology is designed for you and by you. This is our mission, and weare in this together. Welcome to a new Quest. You are invited to Join the Innovation.
Our brand, our vision. Together.Our logo reflects our story: innovation, community and support. An important part of this story begins with theletter Q. It is a perfect circle, representing our commitment to technological precision and strength. The space inthe Q itself symbolizes our need to add the missing piece—you—to the community, to the new Quest.
Contact QuestFor sales or other inquiries, visit www.quest.com/contact.
Technical Support ResourcesTechnical support is available to Quest customers with a valid maintenance contract and customers who havetrial versions. You can access the Quest Support Portal at https://support.quest.com.
The Support Portal provides self-help tools you can use to solve problems quickly and independently, 24 hoursa day, 365 days a year. The Support Portal enables you to:
l Submit and manage a Service Request
l View Knowledge Base articles
l Sign up for product notifications
l Download software and technical documentation
l View how-to-videos
l Engage in community discussions
l Chat with support engineers online
l View services to assist you with your product
About Us
Toad Data Point 4.3 Installation GuideAbout Us
84
A
Access
create connections 31
troubleshoot 69
application virtualization 10
automation
migrate scheduled tasks 22
upgrade scripts 21
B
Business Objects (SAP)
create connections 32
C
Citrix
install 20
requirements 10
client requirements 6
configure Toad 26
connections
configure DB2 client 34
create Access 31
create Business Objects 32
create DB2 40
create Excel 43
create Google Analytics 45
create Hive 47
create MariaDB 52
create MySQL 52
create OBIEE 58
create ODBC 53
create Oracle 56
create Salesforce 59
create SAP ASE 64
create SAP HANA 65
create SAP IQ 64
create SAP SQL Anywhere 64
create SQL Azure 61
create SQL Server 61
create SQL Server Analysis Services 63
create Teradata 66
create Toad Intelligence Central 50
DB2 LDAP support 40
Oracle LDAP support 55
share for all session windows 31
troubleshoot 78
Access 69
Informix 76
Oracle 78
SAP ASE 80
troubleshoot DB2 LUW 72
troubleshoot DB2 z/OS 74
troubleshoot SQL Server 78
understand 30
corporate deployment 15
customize
Toad 26
D
DB2
create connections 40
troubleshoot LUW issues 72
troubleshoot z/OS issues 74
desktop virtualization 10
Index
Toad Data Point 4.3 Installation GuideIndex
85

E
Excel
create connections 43
ranges 43
troubleshoot 69
G
Google Analytics
create connections 45
H
Hive
create connections 47
I
Informix, troubleshoot 76
install 12
Citrix 20
Citrix support 10
client requirements 6
read-only 14
silent 15
Intelligence Central
create connections 50
L
LDAP
DB2 support 40
Oracle support 55
license keys 25
look and feel configuration 26
M
mst file 19
MySQL
create connections 52
troubleshoot 76
O
OBIEE
create connections 58
ODBC
create connections 53
Oracle
OBIEE, create connections 58
Oracle, create connections 56
troubleshoot 78
R
read-only installation 14
requirements
Citrix 10
client 6
virtualization 10
S
Salesforce.com
create connections 59
server virtualization 10
shortcut keys
configure to match other applications 26
silent install 15
create transform file 19
prerequisites 16
SQL Azure
create connections 61
SQL Server
create connections 61
troubleshoot 78
SQL Server Analysis Services
create connections 63
Sybase
create connections 64
system requirements 6
T
Teradata
create connections 66
Toad, customize 26
transform file 19
Toad Data Point 4.3 Installation GuideIndex
86

troubleshoot
DB2 LUW connections 72
DB2 z/OS connections 74
Excel 69
Informix issues 76
MySQL 76
Oracle connections 78
SQL Server connections 78
tutorials
create ODBC connections 53
U
uninstall 24
V
virtualization support 10
Toad Data Point 4.3 Installation GuideIndex
87