to a directory under ubuntu, tar –jxvf s3c-linux-2.6.28-real6410.tar ... · 1410 cannon mountain...
TRANSCRIPT

1410 Cannon Mountain Dr
Longmont, Co 80503
1
Chapter 7. Configuration, Compilation, and Use of Linux Kernel
Linux kernel can be found at android at linux\linux-source\s3c-linux-2.6.28.tar.bz2. Unzip it to
a directory under Ubuntu,
tar –jxvf s3c-linux-2.6.28-Real6410.tar.bz2
Now we get a directory named s3c-linux-2.6.28-Real6410.tar.bz2.
We provide two scripts to make the debug process easier:
build -> Not execute “make xconfig”, and directly call “make” to compile kernel, and after the
compilation is done, copy zImage to /tftpboot for uboot to download. User can modify the
content according to the needs.
xbuild -> Execute “make xconfig” to configure the kernel, and then use “make” to compile the
kernel. After the compilation is done, copy zImage to /tftpboot.
In the following, we are going to introduce how to configure the. Default is to use “make
xconfig” to enter into the configuration menu.
7.1 NAND Flash Driver
7.1.1 Configuration

1410 Cannon Mountain Dr
Longmont, Co 80503
2
You can find nandflash driver under Device Drivers->Memory Technology Device. Remember
to select Hardware ECC.
Another important thing is the partitions of nandflash. The partition table is in arch/arm/plat-
s3c/include/plat/partition.h:
struct mtd_partition s3c_partition_info[] = {
#if 0
{
.name = "Bootloader",
.offset = 0,
.size = (256*SZ_1K),
.mask_flags = MTD_CAP_NANDFLASH,
},
{
.name = "Kernel",
.offset = (256*SZ_1K),
.size = (4*SZ_1M) - (256*SZ_1K),
.mask_flags = MTD_CAP_NANDFLASH,
},
#endif
{
.name = "cramfs",
.offset = (4*SZ_1M),
.size = (4*SZ_1M),

1410 Cannon Mountain Dr
Longmont, Co 80503
3
},
{
.name = "ubifs",
.offset = MTDPART_OFS_APPEND,
.size = MTDPART_SIZ_FULL,
}
};
Here we assigned two file systems partitions, one for cramfs and the other one for ubifs.
7.1.2 Test
Save configuration, compile and download to board, during booting, the following message will
show up:
7.2 DM9000AE Driver
The Ethernet interface chip we use on the board is DM9000AE.
7.2.1 Configuration

1410 Cannon Mountain Dr
Longmont, Co 80503
4
7.2 Test
Save configuration, compile and download to board, boot and mount cramfs file system. After
mounting file system, do the following to test Ethernet:
ifconfig eth0 up #Enable Ethernet port
ifconfig eth0 192.168.1.20 #Config IP address of LS6410
ping 192.168.1.178 # ping other computer’s ip
The following message will tell that it is successful:

1410 Cannon Mountain Dr
Longmont, Co 80503
5
7.3 LCD Driver
We provide many different sizes, 4.3”, 5” and 7”.
7.1.3 Configuration

1410 Cannon Mountain Dr
Longmont, Co 80503
6
7.3.2 Test
The simplest way to test LCD is to display the logo during boot. Using the following way to
pick one logo:
The default linux kernel has a penguin on the upper left. We a custom logo with penguin and
Google to tell that it supports two Oss, ie., linux and Android. Save, Compile and write to the
boot to test.
7.4 Driver for USB OTG

1410 Cannon Mountain Dr
Longmont, Co 80503
7
The kernel for S3C640 contains a USB OTG of USB-2.0 standard. OTG interface can be used as
host and device. But till now, we are still not able to compile it as both host and device. This
issue can be resolved by changing the driver. We will try to solve it in a later release.
On LS6410, the mini-USB is OTG, the large connector is USB host.
7.4.1 Configuration of OTG Host
We will first introduce how to configure host function:
After enable host function, the slave function will be disabled.

1410 Cannon Mountain Dr
Longmont, Co 80503
8
7.4.2 Test host function of OTG
Save, compile and load the kernel image to the board, during boot, the following message will
be displayed:
After boot, connected USB drive to the OTG, it will output:

1410 Cannon Mountain Dr
Longmont, Co 80503
9
Mdev will automatically mount USB driver to /mnt/udisk, and we can check the content by
doing:
If the USB driver is not automatically mounted, we can mount it manually:
mount –t vfat /dev/uba1 /mnt/udisk

1410 Cannon Mountain Dr
Longmont, Co 80503
10
7.4.3 Configure salve (device) function of OTG
First it’s to cancel host function:
Next is to select slave function:

1410 Cannon Mountain Dr
Longmont, Co 80503
11
Please note that USB Gadget Driver is compiled as module, and directly compiled into the
kernel.
7.4.4 Test slave (device) function of OTG
Save, compile and download zImage to the board, and copy
drivers/usb/gadget/g_file_storage.ko
to /root under the root file system. Reboot, and do the following commands after file system is
mounted:
dd if=/dev/zero of=10m bs=1M count=10
insmod /root/g_file_storage.ko file=10m stall=1 removable=1
The first command is to create a virtual disk of size 10MB. The second is to mount
g_file_storage.ko module, and use the just created virtual driver as storage medium.
The result is as follows:
Connect the LS6410 to PC. You can find a USB driver of size 10MB on PC.
We can also use SD as the storage medium for g_file_storage.ko.
insmod /root/g_file_storage.ko file=/dev/mmcblk0p1 stall=0 removable=1
/dev/mmcblk0p1 is the device name for SD. Now LS6410 works as a USB SD card reader.
7.5 Driver of USB Host
The bigger USB connector is host interface with USB 1.1
7.5.1 Configuration

1410 Cannon Mountain Dr
Longmont, Co 80503
12
Select OHCI HCD support is select host function of S3C6410.
7.5.2 Test
Save, compile and download the kernel, after mounting the file system, plug USB driver to
USB host interface, it will show the following information:
Now USB driver has been mounted to /mnt/udisk.
7.6 Driver of MMC/SD
7.6.1 Configuration

1410 Cannon Mountain Dr
Longmont, Co 80503
13
Select MMC/SD channel under System Type->SMDK6410->SMDK6410 MMC/SD slot Setup:
Here we select channel 0 and channel 1, where channel 0 is connected to WIFI module, and
channel 1 is connected to SD. Continue to configure MMC/SD:

1410 Cannon Mountain Dr
Longmont, Co 80503
14
7.6.2 Test
Save, compile and download the kernel to LS6410 board, and plug in SD, and power on:
We can use the following command to check if SD has been recognized:
ls /dev/mmcblk0
If SD is not automatically mounted, we can run the following command to mount:
mount –t vfat /dev/mmcblk0 /mnt/sdcard
ls /mnt/sdcard
7.7 Driver of Touchscreen
7.7.1 Configuration
It should be note that we provide the touch screen driver for Android and Qtopia, respectively.
The main difference between these two is different calibration methods. We will describe the
calibration method for both cases. Here we will select S3C touchscreen driver for Qtopa.

1410 Cannon Mountain Dr
Longmont, Co 80503
15
7.7.2 Test
There is one calibrate program nasmed ts_calibrate on the board.
Run: /usr/local/bin/ts_calibrate. There will be calibration interface shown on LCD. Click the
calibration points.
7.7.3 Calibration of touchscreen
In Qtopia, if it is found that the touchscreen is not accurate, we can delete the old calibrate file,
and do:
rm /etc/pointercal
ts_ calibrate
reboot
Note that we must use reboot to reboot the board, otherwise the calibrate data will not be
saved.
7.8 Driver of keyboard
7.8.1 Configuration

1410 Cannon Mountain Dr
Longmont, Co 80503
16
Enter into keypad to do further configuration:
7.8.2Test
Please run the test program linux\Applications\keyboard to test.
7.9 Audio Driver
7.9.1 Configuration

1410 Cannon Mountain Dr
Longmont, Co 80503
17
Click ALSA for SoC audio support to do further configuration:
7.9.2 Test
Use the following command to test audio:
madplay /root/Documents/Innocent.mp3

1410 Cannon Mountain Dr
Longmont, Co 80503
18
7.10 GPRS Driver
7.10.1 Configuration
GPRS (SIM300) is connected to Uart1. So the driver for GPRS is actually a serial port driver
functionally. Please configure as:
7.10.2 Test
Run linux\Applications\gprs\gprs_s3c2410_linux, the result is as following:

1410 Cannon Mountain Dr
Longmont, Co 80503
19
The above figure to test the basic AT commands.
7.11 WIFI Driver
7.11.1 Configuration
To use WiFi, please configure 802.11 in network layer:

1410 Cannon Mountain Dr
Longmont, Co 80503
20
Next is to configure support of WiFi:
Here we compile Marvell Libertas 8385 and 8686 SDIO 802.11 b/g cards as module.
7.11.2 Test
Save, compile, and download kernel, and copy drivers/net/wireless/libertas/libertas_sdio.ko to
/root. Run the following command:
insmod /root/libertas_sdio.ko helper_name=/lib/firmware/helper_sd.bin
fw_name=/lib/firmware/sd8686.bin

1410 Cannon Mountain Dr
Longmont, Co 80503
21
Here two firmware files helper_sd.bin、sd8686.bin can be downloaded from Marvell website and put under lib.
Use the following command to find local WIFI network:
ifconfig eth1 up
iwlist eth1 scanning
Results:

1410 Cannon Mountain Dr
Longmont, Co 80503
22
Iwlist, iwconfig are simple command. Normally, please use wpa_supplicant to configure.
If WiFi becomes abnormal, please power cycle the board. Soft reset can not bring it back.
7.12 Camera Driver
7.12.1 Configuration
First it’s needed to configure i2c, as it will need API function in i2c to control the camera.
Next is to configure Camera, if the camera module is 3 million ov3640, the configuration is:

1410 Cannon Mountain Dr
Longmont, Co 80503
23
If the camera is 1.3 million ov9650, the configuration is as following:
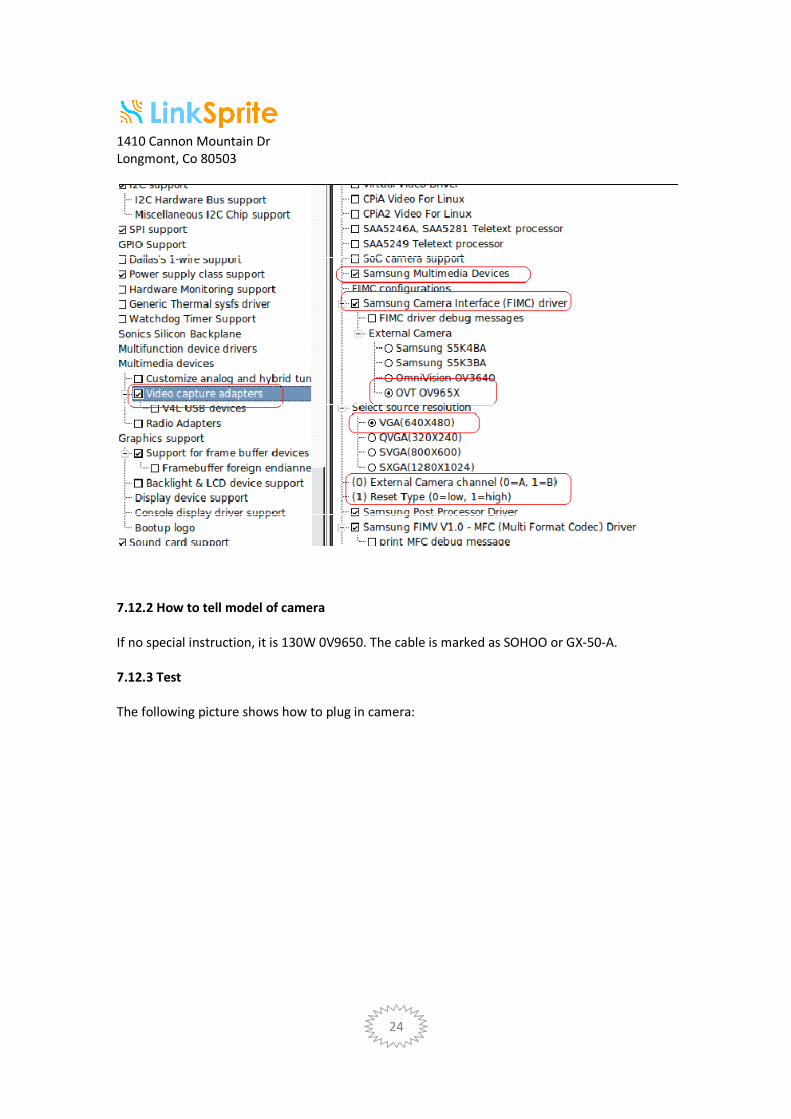
1410 Cannon Mountain Dr
Longmont, Co 80503
24
7.12.2 How to tell model of camera
If no special instruction, it is 130W 0V9650. The cable is marked as SOHOO or GX-50-A.
7.12.3 Test
The following picture shows how to plug in camera:

1410 Cannon Mountain Dr
Longmont, Co 80503
25
Next is to run linux\Applications\camera\cam2fb.c to test. Use the following command:
cam2fb /dev/video0
7.13 GPS driver
Like GPRS module, GPS module is also connected to UART. It’s connected to UART2. So
essentially, the driver of GPS is the driver for UART2.
7.13.1 Configuration

1410 Cannon Mountain Dr
Longmont, Co 80503
26
7.13.2 Test
Run linux\Applications\gps\gps_test2: