tnx software network installations - tower numerics · tnx software network installations...
TRANSCRIPT
TNX Software Network Installations Installation Guide (with Sentinel RMS license management software)
Last Revised August, 2011
Tower Numerics Inc. 1050 Waltham Street
Suite 430
Lexington, MA 02421
www.towernx.com
phone: 1-781-862-0966
fax: 1-781-538-6463

TNX Network Installation Instructions
8/19/2011 2 of 21

TNX Network Installation Instructions
8/19/2011 3 of 21
Network Installation
The installation and licensing infrastructure that Tower Numerics (TNX) uses for its software has been
originally implemented by RISA Technologies. Pursuant to the agreement between TNX and RISA,
RISA provides technical support for installation issues for TNX users. However, all support requests
should be initially directed to TNX ([email protected]).
These instructions are intended for the network versions of the TNX programs. If you are running a
Stand Alone version, refer to the Stand Alone Installation Instructions provided with your software.
The network version of the TNX software has been written specifically for 32 and 64 bit Windows
(XP/Vista and 7) operating systems. It uses a customized version of Sentinel RMS to manage and
administer the licensing. The details of your software license are contained within a license file.
Therefore, you must obtain a license file from TNX and register it with the Sentinel License
Management server. If you do not already have a license file, then you must request one by sending an
e-mail to [email protected]. When you e-mail your request make sure to include the Company
Name, Product(s), and the Key ID. For more information, refer to section B. sub-section 1. Obtaining
the Server License File.
The network version of TNX is designed such that the application itself is stored and run entirely on the
Client computer. The File Server is used only to store the files for setup / installation. In addition to the
file server, there must be a License Server computer that will host the license management software. In
many cases, the File Server and the License Server will be the same computer.
A new or upgrade installation is a normally three part process (A, B and C) as summarized below. Each
step is explained in greater detail in the appropriate section.
A. Perform the installation on the File Server: This involves copying data files onto the computer
that will act as the File Server. This must be done for new installations and for an upgrade
/update to an existing program. Note that NO drivers are installed on the file server during this
step.
B. Install (or Update) the License Manager: This involves installing the license manager
(Sentinel RMS) onto the License Server computer that will host the license management
software. For most cases where TNX’s customized version of the Sentinel License Management
service is already running, this will involve a simple update rather than a full install.
C. Perform the Client Installation: This involves installing the program on the end user’s
computer. If you want to, you may set up a silent installation and initiate the Client installation
through the registry or log-on scripts. For an update / upgrade to an existing program, this
installation may be performed automatically.
When adding a new product to, or removing a product from, an existing installation, there is an
additional step that will be needed. This is described in the following section. Note: Section D does NOT
normally apply when upgrading an existing product to a newer version.
D. Using an RUS password to Update the Hardware Key: When adding a new product to, or
removing a product from, an existing installation, you will use the TNX Key Manager utility
along with the RUS password provided from either a red Installation Information sheet or via
email to update your Sentinel Pro hardware key.
In addition, we have added sections regarding some of the other administrative functions. These
instructions are brief and are intended only to be a simplified introduction to the concepts. For a more

TNX Network Installation Instructions
8/19/2011 4 of 21
complete explanation, see the Sentinel Website (www.safenet-inc.com) or contact TNX technical
support ([email protected]).
E. Troubleshooting the Sentinel RMS Installation: Contains a brief explanation of the most
common installation problems and potential solutions.
F. Commuting Licenses: A brief overview on how to commute licenses and control the amount of
commuting that is allowed.
G. Usage Reports and License Monitoring: A brief overview on how to setup usage reports
regarding the use of the programs.
A. Server InstallationTo create the necessary data files on the File Server please follow these instructions:
1) Put the TNX CD in the File Server’s CD drive.
2) If the CD starts automatically go to step 4. If after 15 seconds the CD has not started click the
Windows Start button and select Run.
3) In the Run dialog box type “d:launch” (where “d” is the label of your CD drive) and then click
the OK button.
4) Follow the on-screen instructions.
NOTE : No drivers are installed onto the file server during this step.
Updating a previous version: When upgrading from a previous version that did NOT use the Sentinel
License Manager there will NOT be an automatic upgrade of the client computers.
When upgrading from a previous version that DID use the Sentinel License Manager, the client
upgrades will happen automatically. However, this will only occur if you maintain the appropriate sub-
directory structure on the File Server. This is because an upgrade is only detected when a client
computer looks at the subfolders under the ProgramServer directory. These folders will follow this
naming convention:
<C:\Program Files\TNX\tnxTower>\<ProgramServer>\<VersionNumber>\
Where <C:\Program Files\TNX> is the drive and base directory on the File Server for all application
installs, <ProgramServer> is the directory for a TNX product, and <VersionNumber> is the directory
referring to the version number for that program (e.g. 6_00_00). The Version Number directory contains
all the current installation information from that version (6.0). When the program detects another
subfolder (e.g. G:\Program Files\TNX\tnxTower\TowerServer\6_10_00) it will interpret this to mean
that an updated version of the tnxTower program is available.
For the remainder of the instructions, the folder in which you install a program will be referred to as
<ProgramServer> and the version of the program will be referred to as <VersionNumber>
Locating the License Manager Files
During a File Server installation of your TNX program, a \Sentinel RMS \ directory will be created
under the <C:\Program Files\TNX\tnxTower> directory. This folder will contain the following files
specific to the Sentinel License Manager:
loadls.exe – Installs Sentinel RMS as Windows service
lservnt.exe – Sentinel RMS (XP/Vista/7 version) executable

TNX Network Installation Instructions
8/19/2011 5 of 21
lsapiw32.dll – Required by WlmAdmin.exe
WlmAdmin.exe – Administers RMS server / licensing
Locating the SuperPro Device Drivers
During a File Server installation of your TNX program, a Sentinel Protection Installer\
directory will be created under the <C:\Program Files\TNX\tnxTower> directory. This folder will
contain the following files specific to the installation of the Sentinel Pro device drivers:
SetupSPI.exe – Installation routine for Sentinel SuperPro drivers
ReadMeSPI.pdf – Detailed Installation instructions from Sentinel
Locating the Key Manager Utility
During a File Server installation of your TNX program, a TNX Key Manager\ directory will be created
under the <C:\Program Files\TNX\tnxTower> directory. This folder contains a utility that may be used
for diagnosing problems related to the Sentinel SuperPro hardware key.
B. Installing the License Manager (Sentinel RMS) After the File Server installation has been completed, the following steps must be taken to ensure the
proper installation of Sentinel License Management software. Each step is explained in greater detail in
the following sections. (The TNX customized Sentinel RMS is fully compatible with RISA’s Sentinel
RMS. Consequently, licensing of TNX and RISA programs may be administered by either version.)
For cases where TNX’s customized version of the Sentinel RMS service is already running, this will
involve a simple update rather than a full install.
For most updates, only steps 1) and 4) will be required.
1) Obtain the TNX license file
2) Install the Sentinel Pro device driver
3) Install or Update TNX’s customized version of Sentinel RMS on the License Server
4) Configure Sentinel RMS License Server to work with the new license file
1. Obtaining the TNX License File
TNX will ship a Sentinel SuperPro hardware key which will be used to secure your network
installation. Each key will have a unique KeyID.
You will need to request a license file from TNX. You may do so by e-mailing
[email protected] with your company information, product information, and the program serial
number(s) or Key ID. TNX will then send you a license file in return.
The license will have a name similar to “TNX_LM_KeyID”, where KeyID corresponds to your USB
key. In some cases, the file may be called “TNX_LM_CompanyName”, where CompanyName is
the name of your company. This file is a unique identifier / license file for your TNX programs. The
generated license will be locked to your KeyID. Each time TNX is launched, Sentinel RMS will
validate the license to ensure that the key is present. This file needs to be updated for each new
release or whenever you add or reduce the license count of your network version of the TNX
program.
TNX Network Installation Instructions
8/19/2011 6 of 21
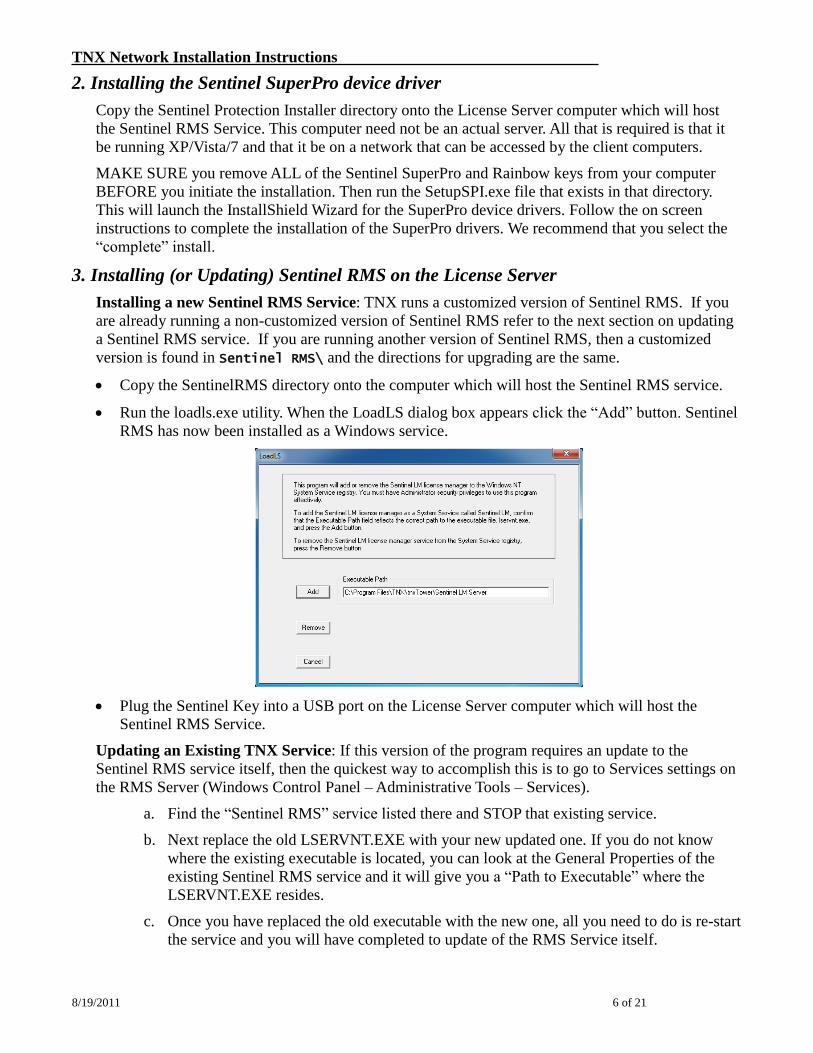
2. Installing the Sentinel SuperPro device driver
Copy the Sentinel Protection Installer directory onto the License Server computer which will host
the Sentinel RMS Service. This computer need not be an actual server. All that is required is that it
be running XP/Vista/7 and that it be on a network that can be accessed by the client computers.
MAKE SURE you remove ALL of the Sentinel SuperPro and Rainbow keys from your computer
BEFORE you initiate the installation. Then run the SetupSPI.exe file that exists in that directory.
This will launch the InstallShield Wizard for the SuperPro device drivers. Follow the on screen
instructions to complete the installation of the SuperPro drivers. We recommend that you select the
“complete” install.
3. Installing (or Updating) Sentinel RMS on the License Server
Installing a new Sentinel RMS Service: TNX runs a customized version of Sentinel RMS. If you
are already running a non-customized version of Sentinel RMS refer to the next section on updating
a Sentinel RMS service. If you are running another version of Sentinel RMS, then a customized
version is found in Sentinel RMS\ and the directions for upgrading are the same.
Copy the SentinelRMS directory onto the computer which will host the Sentinel RMS service.
Run the loadls.exe utility. When the LoadLS dialog box appears click the “Add” button. Sentinel
RMS has now been installed as a Windows service.
Plug the Sentinel Key into a USB port on the License Server computer which will host the
Sentinel RMS Service.
Updating an Existing TNX Service: If this version of the program requires an update to the
Sentinel RMS service itself, then the quickest way to accomplish this is to go to Services settings on
the RMS Server (Windows Control Panel – Administrative Tools – Services).
a. Find the “Sentinel RMS” service listed there and STOP that existing service.
b. Next replace the old LSERVNT.EXE with your new updated one. If you do not know
where the existing executable is located, you can look at the General Properties of the
existing Sentinel RMS service and it will give you a “Path to Executable” where the
LSERVNT.EXE resides.
c. Once you have replaced the old executable with the new one, all you need to do is re-start
the service and you will have completed to update of the RMS Service itself.

TNX Network Installation Instructions
8/19/2011 7 of 21
Note: TNX uses a CUSTOMIZED version of Sentinel RMS. Therefore, you cannot load the TNX
license file onto an existing copy of Sentinel RMS. This customized version is capable of loading the
license files for most other applications. However, any application that requires its own customized
version will not function from within TNX’s.
If you are running a version of Sentinel RMS, then a customized version is found in Sentinel
RMS\ and the directions for upgrading are the same except that Sentinel RMS is Sentinel RMS.
4. Configuring the Sentinel RMS license
Make sure on Sentinel RMS Host computer that UDP port 5093 is open on your firewall.
Locate the WlmAdmin.exe utility on the Sentinel RMS Host computer. It should exist in the
“..\Sentinel RMS \” directory.
Run WlmAdmin utility and open the Subnet Servers tree on the left hand side of the
WlmAdmin dialog. If the License Server is accessible by subnet broadcast that computer should
appear under Subnet Servers. If it is not listed then you will have to select Edit–>Defined Server List from the Main Menu Toolbar, and add your server to the list. Also refer to the
Trouble Shooting section for reasons why the server may not appear under the sub-net server list.
The license file obtained from Step 1 will now be needed. Make sure this license file is in an
accessible location. Right click on the License Server and select Add Feature->From a File-> To Server and its File. An Open dialog will come up, browse to the license file
(TNX_LM_KeyID) location and open it. Once the license has been accepted, Sentinel RMS can
issue network license tokens for your TNX program. If the licensing file is not accepted, see the
section on Troubleshooting.
The licenses will also be to the appended to the server’s license file, lservrc. If by mistake the right click menu item Add Feature->From a File->To Server is chosen, the license will be
added to the server but not its file, so when the server machine reboots, it will be missing that
license.

TNX Network Installation Instructions
8/19/2011 8 of 21
C. Client Installation & Licensing Configuration 1. Installing the software on the client
For first-time installations and manual upgrades: You may perform the client installation in one of
two ways as outlined below. Either method requires write privileges to the HKEY_CLASSES_ROOT
and HKEY_LOCAL_MACHINE registry keys.
For upgrading a previous version: When upgrading from a previous version that did NOT use the
Sentinel License Manager there will NOT be an automatic upgrade of the client computers.
When upgrading from a previous version that DID use the Sentinel License Manager, the client
upgrades will happen automatically. However, this will only occur if you maintained the appropriate
sub-directory structure on the File Server. This is because an upgrade is only detected when the program
looks at the subfolders under a program’s file server directory. These folders will typically follow this
naming convention:
<C:\Program Files\TNX\tnxTower>\<ProgramServer> \<VersionNumber>\
Where <C:\Program Files\TNX\tnxTower> is the drive and base directory on the File Server for all
application installs, <ProgramServer> is the file server directory for that TNX product (3DServer,
FloorServer, etc.) and <VersionNumber> is the directory matching the version number for that program
(e.g. a 7_02_00 directory is for version 7.0.2). The <VersionNumber> directory contains all the current
installation information for that version. When the program detects another subfolder (e.g. G:\Program
Files\TNX\tnxTower\TowerServer\6_10_00) it will interpret this to mean that an updated version of
the program is available.
Method 1 – Manual Installation
From the client, execute the setup.exe file that is located in the <C:\Program
Files\TNX\tnxTower>\<ProgramServer> \<VersionNumber> directory. This will prompt you with a series
of dialogs that will guide you through the client installation.
Method 2 – Silent Installation You may use a silent installation to avoid interacting with the client installation dialogs and you may
automatically run the silent setup in a log-on script or through the registry. Silent setup uses the
SETUP.ISS file in <C:\Program Files\TNX\tnxTower>\<ProgramServer> \<VersionNumber> to guide the
client installation. This file, as provided, will install the above files to the client’s C:\Program
Files\TNX\tnxTower directory and place a program shortcut in the TNX folder on the Start-Programs
menu.
To execute the silent installation from the client, execute the setup.exe file with the “/s” switch. The
entire command line would look something like this:
<C:\Program Files\TNX\tnxTower>\<ProgramServer> \<VersionNumber>\setup.exe /s
Where <C:\Program Files\TNX\tnxTower> is the mapped drive and directory on the file server containing
the <ProgramServer> \<VersionNumber>\ directories. This can be called through a DOS prompt on the
client, a log-on script or client registry entry.
To record a new or customized SETUP.ISS file, you can use the “/r” switch. This initiates a new client
setup and will record all the information that you enter during the setup. The SETUP.ISS file will need
to be copied from the C:\WINDOWS folder on the client computer to the <ProgramServer>
\<VersionNumber> directory before it can be used for a silent install.

TNX Network Installation Instructions
8/19/2011 9 of 21
<C:\Program Files\TNX\tnxTower>\<ProgramServer> \<VersionNumber>\setup.exe /r
If you wish to manually change the Path or Country options, you can do this by editing the SETUP.ISS
file in the <VersionNumber> subdirectory.
To change the PATH into which the client version gets installed, you would edit the “szDir” value in the
following block:
[{6D0ED027-9979-4FC8-A0D6-93380CC6C31E}-SdSetupType2-0] szDir=C:\Program Files\TNX\tnxTower
SILENT INSTALLATION ERROR MESSAGES
Be aware that no messages are displayed when running a silent installation. You may view the Setup.log
file to determine the result of the setup. To verify if a silent setup succeeded, look at the ResultCode
value in the [ResponseResult] keyname. InstallShield places one of the following return values after the
ResultCode keyname:
0 Success
-1 General Error
-2 Invalid Mode
-3 Required Data not found in the Setup.iss file
-4 Not enough memory available
-5 File does not exist
-6 Cannot write to the response file
-7 Unable to write to the log file (see below)
-8 Invalid path to the response file
-9 Not a valid list type
-10 Data type is invalid
-11 Unknown error during setup
-12 Dialog boxes are out of order
-51 Cannot create the specified folder
-52 Invalid option selected
If the log file cannot be written because of read only privileges you will have to redirect the log file to a
directory with write permission using the following switch:
/f2<path\LogFile> (don’t type the <> symbols)
To redirect the log file the example above would now look like this:
<C:\Program Files\TNX\tnxTower>\<ProgramServer> \<VersionNumber>\setup.exe /s /f2g:\okfolder\setup.log

TNX Network Installation Instructions
8/19/2011 10 of 21
2. Configuring software licensing on the client
Typically the network versions of TNX software are usually run over a Local Area Network where the
File Server, License Server and Client are located on the same Broadcast Domain, a Subnet where the
License Server is accessible from the Client by subnet broadcast. In this case no extra configuration is
needed. However, for those networks where the License Server is not accessible from the Client by
subnet broadcast (such as a VLAN or WAN) additional configuration is needed.
To access licenses over these types of networks, on the Client go to the registry key for the application.
This Application Registry Key will look something like:
HKEY_LOCAL_MACHINE\SOFTWARE\TNX\tnxTower Network\<Version Num>
Where <Version Num> is the version of the program (e.g. 6.0). In that registry key you find the registry
value named “LS Query List” and put in the IP address of the license server. If your company has two
License Servers, you can enter both of them separated by a colon. The order in which they appear
determines the order the application accesses them for authorization.
2.1 Using the Network.ini File to Automatically Set Advanced Registry Entries
There is a file, Network.ini, that gets installed in the Sentinel RMS subdirectory that can be used to
automate the setting of the “LS Query List” registry value. You may use this file to have the License
Server’s address automatically written to the end user’s registry by following these steps:
Network.ini should be placed in the <C:\Program Files\TNX\tnxTower> as the client install
looks two levels up from the location of setup.exe.
Client installation looks for Network.ini and if it finds that file it searches for the section LS Query
List and the parameter Initialize=<License Server Address>.
For update installations:
If the “LS Query List” registry entry under the Application Registry Key does not already contain
the address of a license sever, the installation will write <License Server Address> as the value in the
“LS Query List” registry entry
For a new install:
In the Application Registry Key, the “LS Query List” value is set to <License Server Address>.
So for the following Network.ini file:
[LS Query List] Initialize='192.168.100.52'
The “LS Query List” registry entry gets set to the value 192.168.100.52

TNX Network Installation Instructions
8/19/2011 11 of 21
D. Using an RUS password to Update the Hardware Key Typically, you will only need to update the hardware key on your license server when you adding new
products or removing products. To update the key, you will want to run the utility “TNX Key
Manager.exe” on the License Server, this utility can be found in the <C:\Program
Files\TNX\tnxTower>\<ProgramServer> \<VersionNumber>\TNX Key Manager folder.
You will then be presented with a Key Manager window similar to the one shown below.
Verify that the Key ID listed on your RUS Update / Installation Information sheet corresponds to the
Key ID listed on screen. Click the Upgrade button. You then enter in the RUS password given on your
installation sheet and click Update.
The Key Manager allows access to the hardware key over Terminal Services, so the Hardware Key can
be updated remotely. The Sentinel Protection Installer must be version 7.5.0 or higher to support this
new remote capability.

TNX Network Installation Instructions
8/19/2011 12 of 21
E. Trouble Shooting Sentinel RMS Networking There are a number of common issues that you may encounter while installing or using the network
version of the TNX programs. These can be grouped into the following main categories:
1) You receive Error Codes 19, 92, or 150 when adding your license file
2) Your client computers cannot access your RMS Host computer or the access is very slow
3) Network version stops working or your Client computers get an error message at start-up
1. You receive Error Code 19 or 92 when adding your license file
Loading the TNX License File onto a non-customized Sentinel RMS host: TNX uses a
CUSTOMIZED version of Sentinel RMS. Therefore, you must remove the existing copy of
Sentinel RMS and replace it with the customized one provided with your TNX installation.
It is not good enough to merely stop that old Sentinel RMS Service. It must be “removed” using
the LOADLS utility that was used to install it.
TNX’s customized version of Sentinel RMS is capable of loading the license files for most other
applications. However, any application that requires its own customized version will not function
from within TNX’s.
Two Instances of Sentinel LM/RMS are running on the same computer: If you look at the list
of services (Control Panel – Administrative Tools – Services), you may find that there are TWO
services running. One will be called “Sentinel LM” (with or without the space) and is the
standard non-customized version. The other will be called “Sentinel RMS License Manager”
(with a space between words) and is the customized version provided by TNX.
It is not good enough to merely stop that old SentinelLM (no space) service. It must be
“removed” using the LOADLS utility that was used to install it.
A non-customized copy of Sentinel RMS is running on that machine: If you look at the list of
services (Control Panel – Administrative Tools – Services), you may find that there is a service
running that is called “Sentinel RMS Server”. If this was not provided by TNX, then it is
probably the standard non-customized version of sentinel RMS. As such, it would not be
compatible with TNX’s customized version of Sentinel RMS or RMS. If this is the case, and you
require that the TNX license manager be loaded on the same server, then you will have to install
the customized version of RMS which may be found in the C:\Program
Files\TNX\tnxTower\Sentinel RMS folder of any new install. This version is capable of running
any features that require version 8.0.5 of Sentinel RMS.
The license file information doesn’t match with the USB key: If the information encrypted into
the license file (KeyID and program authorization) doesn’t match the information on your USB
key you will receive error code 19. Contact TNX technical support ([email protected]) for a
new license file or for an RUS password to update the information on your USB key.
2. You receive Error Code 19 or 92 when adding your license file
The USB key is not present or cannot be read properly: If the licensing file was not accepted
when you tried to use the Add Feature utility, first verify that the Sentinel Key is plugged into a
USB port on the computer which will host the Sentinel RMS service. When it has been plugged
in a green light will appear on the key indicating that it is receiving power.
Also run the TNX Key Manager utility and make sure that that the key has the proper KeyID, is
a network key and authorized for the appropriate programs.

TNX Network Installation Instructions
8/19/2011 13 of 21
3. Your client computers cannot access your RMS host computer
Client computer cannot access an RMS host that resides on the same Subnet: If you are
running Windows XP with Service Pack 2 and your client cannot access the Sentinel RMS
Service, then you may be dealing with a firewall issue. This could be an issue with the HOST,
CLIENT, or with your network in general. If your firewall is a Windows XP firewall, then the
settings can normally be manipulated by going to the Windows Security section of your Control
Panel. You would then go to the Exceptions tab and add in a Port exception with the following
settings:
If you have another Firewall protecting your network, then you may need to adjust its settings or
add an exception for the Sentinel RMS Service.
In addition, the instructions in the following section (when the client and RMS host are not on
the same Subnet) will solve a wide variety of communication issues between client and RMS
server.
Client computer and RMS host do NOT reside on the same Broadcast Domain (Subnet): The
network versions of TNX software are usually run over a Local Area Network where the File
Server, License Server and Client are located on the same Broadcast Domain, a Subnet where the
License Server is accessible from the Client by subnet broadcast. We do provide a method that
will allow the program to function properly on those networks where the License Server is not
accessible from the Client by subnet broadcast (such as a VLAN or WAN). However, this is not
automatically addressed during the installation process.
To get functionality over multiple Subnet’s all you have to do is set the following registry entry
on the HKEY_LOCAL_MACHINE entry on the client computer.
Software\TNX\<TNXProgram> Network\<Version Num>\
Or (for 64 bit machines):
Software\WOW6432node\TNX\<TNXProgram> Network\<Version Num>\
In the <Version Num> registry key (e.g. 6.0), there will be a registry value named “LS Query
List”. If the value for this entry is set to the DNS name or IP address for the Sentinel RMS host
computer, then the program will directly access that computer for licensing rather than searching
the Subnet. If you split your licenses between multiple license servers (for redundancy purposes),
then enter in each server separated by a colon.

TNX Network Installation Instructions
8/19/2011 14 of 21
Client computer cannot access RMS host and you are unsure if the client and host resides on
the same Subnet: If you are running Windows XP with Service Pack 2 and your client cannot
access the Sentinel RMS Service, verify that both your client machine and the computer which
serves as the host for Sentinel RMS reside on the same Sub-Net.
To find your computers’ IP settings (for XP only):
i. From your client computer, go to Start Run type in cmd and click OK.
ii. You should see a command line window. Type in ipconfig /all in the command
prompt and hit <Enter>.
iii. Make note of the IP Address and subnet mask listed for that client computer.
To determine the IP address of your RMS host:
iv. In the same command line window that you used for the client, type: ping [name of
License Server] <Enter>
v. This will show you the IP address of the server you typed in. Normally, you will have to
show this to your company’s networking guy to determine if the Client and Host are part
of the same sub-net.
One common configuration would be a client IP Address of XXX.YYY.ZZZ.10, with a
Subnet Mask of 255.255.255.0. In this common case, your RMS host would have to have
an IP Address in the range XXX.YYY.ZZZ.1 through XXX.YYY.ZZZ.254.
Program responds very slowly: If the users do not have the LS Query List entry described above
(in the section titled “Client Computer and RMS Host do NOT reside on the same Broadcast
Domain (Subnet)”), then the program will have to search the entire sub-net every time it tries to
verify the license. This will happen every 2 to 5 minutes and can cause sluggish behavior in the
program. Setting this registry entry to the IP address (or DNS name) of the license management
server should improve the response time.
The program is mainly designed to work over a Local Area Network. Attempting to load it over a
WAN or VPN can cause response time issues that affect the performance of the program. Other
than setting the LS Query List registry entry, there is little that can be done on the TNX side to
improve the network performance.
Finally, errors in the network card of the client machine or the host computer can result in a slow
response. Errors with the USB port on the HOST machine can also cause a similar slow
response.
4. Network version stops working or your Client computers get an error message at
start-up
The Sentinel RMS service has been stopped: Check to make sure that the Sentinel RMS service
has not been “stopped”. This can be done in the Control Panel – Administrative Tools – Services.
The Sentinel RMS service is loaded onto a mapped drive: Check to make sure that the Sentinel
RMS service is loaded onto a local drive of the host machine. This can be done by going to
Control Panel – Admin Tools – Services and double clicking on the Sentinel RMS service that is
listed. The path to executable should point to the local hard drive.
Multiple copies of the Sentinel RMS service on one machine: Check to make sure that there is
only one Sentinel RMS service on the host computer. Multiple services will cause a conflict.
This can be verified by going to the Control Panel – Administrative Tools – Services.

TNX Network Installation Instructions
8/19/2011 15 of 21
When launching the application from a Client computer, you receive the following error:
TNX runs a customized version of the Sentinel License Manager. This customized version was
updated in early 2006. This error message means that you are running an older version of the
License Manager and need to update the Sentinel RMS service as described in part B3 of these
Network Installation Instructions.
When launching the application from a Client computer, you receive the following error:
TNX runs a customized version of the Sentinel License Manager. This customized version was
updated in early 2006. In order to maintain compatibility between this version of the license
manager and the hardware key it is necessary to also update your network key. This is described
in part D of these Network Installation Instructions.
When launching the application from a Client computer, you receive the following error:
Licenses exist on the Sentinel License Manager but the Hardware Key that the licenses are
locked to cannot be found to authorize the license. Check that the Hardware key is still plugged
into the USB port on the license server and if so that the USB port still functions.

TNX Network Installation Instructions
8/19/2011 16 of 21
When launching the application from a Client computer, you receive the following error:
Licenses for the application could not be found on the Sentinel License Manager contacted by
the application. If you have more than one machine running the Sentinel Manager Service, verify
that the license server machine contacted is the one with the licenses loaded. To determine the
contacted server, examine the “LS Query List” registry entry. If that is blank, then the “LS Host”
registry entry will contain the address of the contacted server.
If the license server contacted is one that you know the licenses were loaded on, then perhaps the
Hardware key was disconnected. If that occurs and the License Manager service was restarted, it will not
have loaded the TNX licenses locked to the Hardware Key. Also if the license file was originally loaded
using Add Feature->From a File->To Server instead of Add Feature->From a File-> To Server and its File, the TNX licenses will not reload on restart and you will get this error message.
TNX Network Installation Instructions
8/19/2011 17 of 21
F. Commuting Licenses
One of the most significant advantages of the Sentinel RMS license management system is that it
provides commuter licensing. This allows you to temporarily use the protected TNX application on a
portable computer that is not connected to the network.
Note:
When a license gets commuted it will decrease the number of seats available through the license
manager.
You MUST have administrative privileges on the client machine in order to commute a license.
The TNX program first attempts to check out a license from the License Server. It will first look
for a hardware key, then a commuted license. If neither is found, this it will request a token from
the License Management software. If the program is slow to start up, then this could be the
cause.
If the client machine is Windows Vista or Windows 7, then the commute utilities must always be
run as Administrator.
Locating the WCommute Utilities:
During the client installation of tnxTower, a Sentinel LM\Commute\ directory will be created under
the main TNX directory. This folder will contain the following files used for the commuting of licenses:
WCommute.exe – Allows for local “commuting” of licenses
WRCommute.exe – Allows for remote “commuting” of licenses
Lsapiw32.dll – Required by WCommute and WRCommute
Commuting of Licenses (Local)
The most common use of commuter licensing is when a user needs to travel on business and wants to
use a copy of TNX software from his laptop / portable computer during the trip. The commuting features
will allow a network user to check out an authorization to use the application for a requested time
period. If the user returns before the time period has expired, then they can check the authorization back
in making that seat available to other users.
Step 1: Make sure the laptop / portable computer is attached to the network and has access to the
Sentinel RMS host computer. The TNX application must already be installed on the laptop /
portable computer.
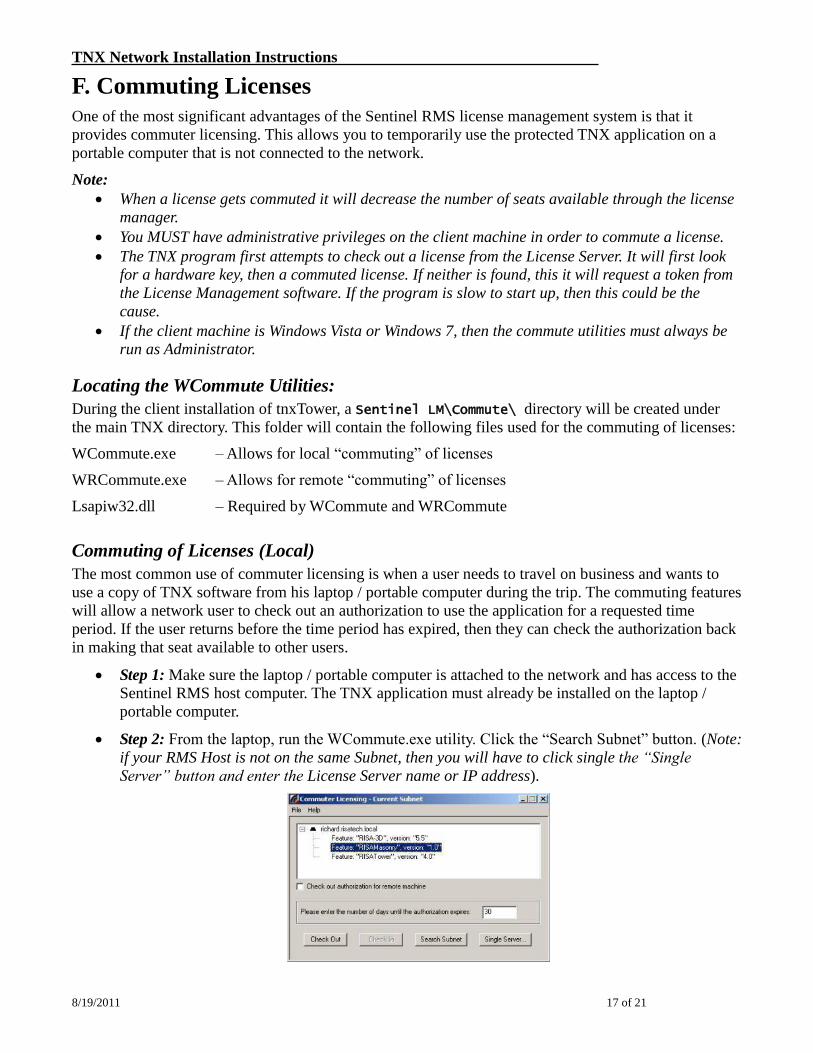
Step 2: From the laptop, run the WCommute.exe utility. Click the “Search Subnet” button. (Note:
if your RMS Host is not on the same Subnet, then you will have to click single the “Single
Server” button and enter the License Server name or IP address).

TNX Network Installation Instructions
8/19/2011 18 of 21
The license server(s) and corresponding protected application(s) will appear in upper portion of
the dialog. Select the protected application for which you wish to commute a license. Enter the
number of days until the authorization expires and then click the Check Out button. The
portable computer is now licensed to run the protected application until the commuter license
expires or is checked back in. Disconnect portable computer from local subnet.
Note: You should NOT check the box that says, “Check out authorization for remote machine”. This is intended only for the REMOTE commuting, not for local commuting.
Step 3: To check the commuter license back in: Connect the portable computer to the local
subnet. Follow steps as outlined in Step 2 to search the local subnet for commutable licenses.
The upper portion of the dialog should show the license server and application which the
portable computer has a commuter license for; This entry will have a red check mark next to it.
Select application associated with commuter license and click the Check In button.
Commuting of Licenses (Remote)
The commuting feature may also be used for users which are NOT connected to network. This is known
as Remote Commuting. An example would be a remote office that has need for the software, but which
CANNOT connect to the license management host. Note: that once a license has been commuted
remotely, it cannot be checked back in until the commuting period has ended.
Step 1: On the remote computer run the WRCommute utility. Click the Get Locking Code tab
and the Save button. Save the commuter locking code file. Send the locking code file to a local
user who has access to the Sentinel RMS host computer.
Step 2: Once the local user receives the locking code file from the remote user he will be able to
generate a remote authorization code. On a local computer run the WCommute utility. Click the
Search Subnet button. (Note: if your RMS Host is not on the same Subnet, then you will have
to click single the “Single Server” button and enter the License Server name or IP address).

TNX Network Installation Instructions
8/19/2011 19 of 21
The license server(s) and corresponding protected application(s) will appear in upper portion of
the dialog. Select the protected application for which you wish to commute a license. Enter the
number of days until the authorization expires and select the “Check out authorization for remote machine” option. Then click the Check Out button. The “Locking Code for Remote Machine” dialog appears. Select “Get locking code string for remote machine from file” and browse to the locking code file obtained from the remote user. Click the Ok
button. The Remote Commuter Licensing dialog appears. Save the remote commuter
authorization file. Send the remote authorization file to the remote user.
Step 3: From the remote portable computer again run the WRCommute utility. Select the “Install Remote Authorization Code” tab. Select the “Get remote authorization code from file” option and click the Browse button. Open the remote authorization file (obtained
from the local Sentinel RMS user). Click the Install button. A message indicating that the
remote authorization code has been installed successfully should appear. The “remote” portable
computer is now licensed to run the protected application until the commuter license expires.
There is no option to check a remote commuter license back in.
Limiting the Number of Commutable Licenses
To restrict then number of licenses that can be commuted, the network administrator would go to
Control Panel – System Properties and select the Advanced tab. You would then click the Environment
Variables button to open up and add (or edit) the environment variable called LSERVOPTS.
To tell the license server to limit commutable licenses to 2/3rds of available license tokens, the
LSERVEROPTS environment variable would be to COM66
To prohibit ANY licenses from being commuted, the environment variable would be set to:
LSERVOPTS=-com0

TNX Network Installation Instructions
8/19/2011 20 of 21
G. Usage Reports and License Monitoring The WLMADMIN.EXE utility will give you an instantaneous snapshot of which users have checked out
a license and how many licenses are available.
For a more advanced usage report, you can do the following.
Step 1: Creating the Log File Reports
Sentinel RMS gives you the ability to create usage reports to monitor how frequently the software is
being use. You can turn on logging by adding the string value CommandLineOpts under the registry key
HKEY_LOCAL_MACHINE\SOFTWARE\Rainbow Technologies\SentinelLM\CurrentVersion. You can
then set the value of CommandLineOpts to ‘-l lserv.log’.
When you restart the Sentinel RMS service, it will automatically create an lserv.log file in the
C:\Windows\system32 folder. Entries in this file will appear only when you will access the License
Server either for issue or release of a license.
Step 2: Creating a CSV file that can be read by MS Access
Sentinel RMS also provides reporting capability through a Microsoft Access database table,
ReportDB.mdb, that allows developers and their customers to view license server log file output in bar
chart form (for example, to see total use of a feature during a particular time period). To use the
reporting feature, the lsusage.exe utility must be used. This utility may be present on the License Server
in the “..\Sentinel RMS Server\” subdirectory. If not, the utility can be obtained by contacting the
technical support group at TNX ([email protected]).
A command line example of how to use the lsusage.exe utility:
lsusage -l "C:\WINDOWS\system32\lserv.log" -c xyz.csv
where lserv.log file is the license server log file and xyz.csv is a output file where decrypted output will
be written in a comma separated value format (CSV).
The lsusage utility displays a report of the information in the specified encrypted license server log file.
The license server log file contains a record of license transactions made by that license server.
Step 3: Importing the CSV file into Access
This falls outside the realm of technical support for the TNX Program and we can provide on a very
limited amount of support on this subject. That being said, we have received some documentation from
the Sentinel folks that we have summarized for our clients use as described below:
1. Within Microsoft Access, open the ReportDB.mdb file provided with Sentinel RMS. Note that the file is
MS Access 97 format – so a newer version of Access will want to convert it to the new format. Go ahead
and do that and use the converted MDB file.
2. Select the Table tab.
3. Click New.
4. Select Import Table.
5. Select the CSV file you created with lsusage and click Import.
6. The Import Text Wizard is displayed. Continue to click Next until it asks “Where would you like to
store your data?”
TNX Network Installation Instructions
8/19/2011 21 of 21
7. Select In an existing table and select the table Lservlog. (If instead of adding to an existing Lservlog table
you want to create a new one, delete any rows that are already in the Lservlog table before importing new
data.)
8. Click Finish. Don’t forget to keep the table name set to Lservlog.
Note: The ReportDB.mdb file mentioned above may be present on the License Server in the “..\Sentinel RMS
Server\” directory. If not, it can be obtained by contacting the technical support group at TNX
This Lservlog will contain the entire information of ALL the features in the License Server including the
non-TNX features. Once the log file use data is imported into the Lservlog table as discussed above, you
can now create reports for that data.
Within Microsoft Access, open the ReportDB.mdb file. You will immediately see the Sentinel RMS
report selection screen.
Within Access, open the ReportDB.mdb file. You will immediately see the Sentinel RMS report
selection screen.
You can now select the date range of the report by specifying Start Date and End Date.
Now select the type of report you want to create:
o Total number of tokens granted per feature
o Maximum number of tokens granted per feature
o Average number of tokens created per feature
o Total usage time per feature
o Total number of tokens denied per feature
o Percentage of licenses denied per feature