tischwaage 150 kg - s8079c850fc06b07e.jimcontent.com filetel.: +49 8086 933-100 • fax: +49 8086...
TRANSCRIPT
1
Albert Kerbl GmbH84428 Buchbach • Felizenzell 9, Germany
Tel.: +49 8086 933-100 • Fax: +49 8086 [email protected] • www.kerbl.com
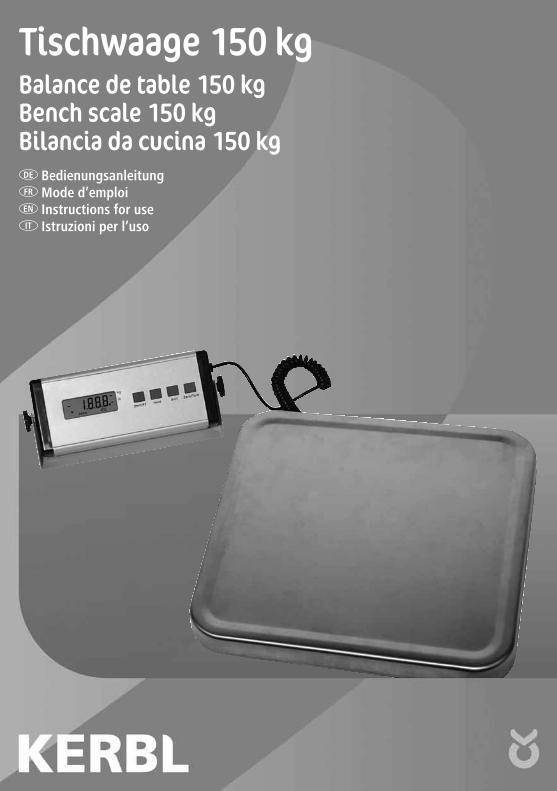
Tischwaage 150 kgBalance de table 150 kg Bench scale 150 kg Bilancia da cucina 150 kgDE BedienungsanleitungFR Mode d’emploiEN Instructions for useIT Istruzioni per l’uso
2
DE Sicherheitshinweise
! WARNUNG Bei Missachtung dieses Hinweises könnenIhnen starke Schäden am Produkt oderVerletzungen Ihrerseits entstehen. Daherbitte unbedingt diesen Hinweis beachten.
! ACHTUNG Dieser Hinweis gibt Ihnen eine Information zur Vermeidung von Schäden.
Wenn Sie die Waage verwenden, bitten wir Sie unbedingt die folgenden Punkte zu beachten:
! WARNUNGVerwenden Sie nur den im Lieferumfang befindlichen AC-Adapter. Andere Adapter können das interne Netzteil beschädigen.
! ACHTUNG• Setzen Sie die Waage nie direkter Sonnenstrahlung aus, dieses könnte sonst zu Fehlfunktionen führen.• Verwenden Sie immer nur Batterien eines gleichen Typs. Tauschen Sie immer alle Batterien gleichzeitig aus.• Wenn Sie die Waage längere Zeit nicht benutzen, entfernen Sie bitte alle Batterien aus dem Batteriefach,
um eine Waagen – Beschädigung durch auslaufende Batterien zu vermeiden.• Vermeiden Sie die Waage zu überladen => das kann zu Schäden an der Waage führen!• Vermeiden Sie, dass Wassertropfen in das Innere der Waage gelangen. Eine innere Korrosion führt zu Schäden.• Eine statische Aufladung beeinflusst die digitale Messtechnik. Entladen Sie also Bauteile, die Sie verwiegen
möchten vorher oder verwenden Sie antistatisches Spray (z.B. auch auf der Wägeplattform). Stellen Sie die Waage nie in der Nähe starker elektrischer Felder auf.

3
Beschreibung der Oberfläche
• seitlichAC AdaptorBuchse
ON/OFF TasteEin- undAusschalten der Waage
HOLD TasteWert bleibt für 120 Sek. am Display
UNIT TasteAuswahl der Einheit (kg oder Ib)
ZERO Taste (TARA)Setzt die Anzeige auf „Null“Zieht die Masse eines Behälters ab
• DisplayAnzeige des negativ Wertes Wägeeinheit
Stabilitätsindikator
Anzeige Batteriekapazität
Hold Indikator ZERO Indikator

4
Hold - Funktion Wenn Sie die HOLD-Taste drücken:1) Die CPU sendet den aktuellen Wägewert zur RS232-Schnittstelle.2) Der Wägewert wird für ca. 120 Sek. im Display gehalten
1) Legen Sie das Wägegut auf die Plattform.2) Warten Sie, bis die Anzeige sich stabilisiert hat.3) Drücken Sie die HOLD-Taste. Der “.” Hold-Indikator leuchtet auf.4) Nehmen Sie das Wägegut von der Plattform. Der Wägewert bleibt nun für 120 Sek. im Display erhalten.5) Hold-Funktion wieder löschen: Drücken Sie die HOLD-Taste erneut.
Der “.” Hold-Indikator erlischt und der aktuelle Wägewert erscheint.
Weitere Funktionen1. Wechseln Sie in den Funktionsmodus:
Drücken Sie die [ON/OFF] Taste, um die Waage auszuschalten. Drücken und halten Sie die [HOLD] Taste gedrückt, dann drücken Sie die [ON/OFF] Taste/das Display zeigt A_ON oder A_OFF.
2. An- oder Abwahl der automatischen Abschaltfunktion: Wenn Sie im Funktionsmodus sind, zeigt das Display A_ON oder A_OFF. Drücken Sie die [ZERO] Taste, die Auswahl A_ON bedeutet, die automatische Abschaltung (nach 2 min.) ist aktiv. Drücken Sie die [ZERO] Taste erneut. Das Display zeigt A_OFF, das bedeutet, die automatische Abschaltung ist deaktiviert.
3. An- oder Abwahl der Hintergrundbeleuchtung: Wenn Sie im Funktionsmodus sind, drücken Sie die [HOLD] Taste, das Display zeigt L_ON oder L_OFF. Drücken Sie die [ZERO] Taste, die Auswahl L_ON bedeutet, die automatische Hintergrundbeleuchtung ist aktiv. Drücken Sie die [ZERO] Taste erneut. Das Display zeigt L_OFF, das bedeutet, die automatische Hintergrundbeleuchtung ist deaktiviert.
WägevorgangVorbereitungGeben Sie der Waage nach Einschalten zunächst eine Aufwärmzeit bevor Sie mit dem Wiegen beginnen.MeldungenEEEE: Überlastung der Wägezelle (Overload)
: niedriger Batteriestatus
Wägevorgang
1. Drücken Sie die [ON/OFF] Taste, um die Waage einzuschalten.Bei Einschaltung leuchten zunächst alle Display Segmente für einige Sekunden auf; danach erscheint die Anzeige “0”.
2. Auswahl der Wägeeinheit [UNIT].Drücken Sie die [UNIT] Taste, um “kg” oder “Ib” auszuwählen.Wenn die Einheit ausgewählt ist, wird sie neben dem Wägewert angezeigt.
3. WägeartenWägung ohne BehälterAchten Sie darauf, dass das Display vor Belastung der Plattform eine “0” anzeigt.Wenn nicht, drücken Sie die [ZERO/TARE] Taste.Legen Sie das Wägegut auf die Plattform.Wenn der angezeigte Wert stabil ist, lesen Sie ihn ab.

5
Wägung mit BehälterSetzen Sie den leeren Behälter auf die Plattform. Warten Sie, bis die Anzeige stabil ist. Drücken Sie dann die [ZERO/TARE] Taste. Füllen Sie das Wägegut in den Behälter und setzen Sie ihn auf die Plattform. Wenn die Anzeige stabil ist, lesen Sie den Wägewert ab.
Kalibrierung Bei der Erstaufstellung ist die Waage natürlich noch werkskalibriert. Daher ist eine erneute Kalibrierung bei Erhalt der Waage nicht notwendig. Wenn die Waage am Aufstellungsort starken Umwelteinflüssen (Staub, Schmutz, hohe Luftfeuchte) unterliegt, kann die Waage aber rekalibriert werden.
Wie wird kalibriert? (Achtung: Information nur für Kalibrierdienste)**Eine Kalibrierung darf ausschliesslich nur durch akkreditierte Kalibrierlabors durchgeführt werden!!**
1. Die Waage muss ausgeschaltet sein [OFF]. Drücken und halten Sie die [ZERO] Taste, dann drücken Sie auf [ON/OFF], dabei halten Sie die [ZERO] Taste gedrückt, dann lassen Sie beide Tasten los. Im Display erscheint A/D (eine zufällige Ziffernfolge).
2. Warten Sie, bis sich die Anzeige stabilisiert Drücken Sie die [UNIT] Taste. Das Display zeigt „0SAVE“, danach A/D Zahlen (zufällige Ziffernfolge). Setzen Sie die Kalibriergewichte (entsprechend des maximalen Wägebereiches (z.B.: 60 oder 150 kg)) auf die Plattform auf. Warten Sie, bis sich die Anzeige stabilisiert, dann drücken Sie die [UNIT] Taste / das Display zeigt „0SAVE“. Die Kalibrierung ist abgeschlossen / nehmen Sie die Kalibriergewichte von der Plattform.
Schalten Sie die Waage aus [ON/OFF], dann wieder ein [ON/OFF] und führen Sie einige Probewägungen mit einer Kalbriermasse aus.Wenn Sie Abweichungen feststellen sollten, dann führen Sie die Kalibrierprozedur erneut durch. Achtung: Während der Kalibrierung sollte die Waage stabil und vibrationsfrei stehen.
Merkmale • Automatische Selbstabschaltung• Display inkl. Wandhalterung• Hold-Funktion• Wägeeinheit: kg / Ib

6
Spezifikationen
Modell Kapazität Ablesbarkeit (d)
29924 150 kg 50 g
Genauigkeitsklasse III
Eichwert e = d = 50 g
Plattform 330 x 320 mm
Netto-/Bruttogewicht 4,1 kg/4,5 kg
Display 6-stellig/15 mm LCD-Ziffernhöhe
Einsatztemperatur 15° C – 30° C
Stromversorgung 6x AA Batterien oder AC/DC-Adapter
Ladegerät 9 V/100 mA
**Warnung**Die Verwendung von Mobiltelefonen oder anderen elektronischen Artikeln mit hoher Sendeleistung kann zu einer Interferenz führen und die Waage zeitweise beeinflussen. Dies gilt ebenfalls für die Durchführung einer Kalibrierung.
Schnittstellenbeschreibung (Software + Datenkabel optional)
ASC II Code Parameter
Bits pro Sekunde (Baudrate) 9600Parität (Parity bit) keine (none)Datenbits (Data bit) 8Stoppbits (Stop bit) 1
Albert Kerbl GmbH Felizenzell 9 84428 Buchbach, Germanywww.kerbl.de E-Mail: [email protected]

7
FR Consignes de sécurité
! AVERTISSEMENT Le non-respect de cette consigne peut entraîner un grave endommagement du produit ou des blessures. Pour cette raison, veuillez respecter absolument cette consigne.
! CAUTION Cette consigne vous donne une information sur la manière d’éviter les dommages.
Veuillez absolument respecter les points suivants lorsque vous utilisez la balance :
! AVERTISSEMENTUtilisez exclusivement l’adaptateur AC fourni. D’autres adaptateurs pourraient endommager le bloc d’alimentation interne.
! CAUTION• N’exposez jamais la balance directement aux rayons du soleil car cela peut provoquer des défaillances. • N’utilisez que des piles identiques. Remplacez toujours toutes les piles en même temps. • Si vous n’utilisez pas la balance pendant une période prolongée, veuillez enlever toutes les piles du compartiment
afin d’éviter d’endommager la balance en cas de fuite des piles.• Evitez de surcharger la balance => ceci peut endommager la balance !• Eviter de laisser des gouttes d’eau pénétrer à l’intérieur de la balance. Une corrosion interne provoque des
dommages. • Un chargement statique a une influence sur la technique numérique de mesure. Déchargez les composants que
vous souhaitez peser au préalable ou utilisez un spray antistatique (par ex. sur la plate-forme de pesage égale-ment). N’installez jamais la balance à proximité d’un fort champ électrique.

8
Description de la surface
• LatéraleAdaptateur AC Douille
Touche ON/OFF Démarrage et arrêt de la balance
Touche HOLD La valeur reste affichée pendant 120 sec. sur l‘écran
Touche UNITSélection de l’unité (kg ou Ib)
Touche ZERO (TARA)Met l’affichage sur « zéro » Soustrait le poids d’un récipient
• ECRANAffichage de la valeur négative Unité de pesage :
Indicateur de stabilité
Affichage de la capacité de la batterie
Indicateur Hold Indicateur ZERO

9
Fonction HOLD Lorsque vous appuyez sur la touche HOLD : 1) Le CPU envoie la valeur actuelle à l’interface RS232 2) La valeur de pesage est affichée pendant env. 120 sec. sur l’écran.
1) Posez le bien à peser sur la plate-forme. 2) Attendez que l’affichage se stabilise. 3) Appuyez sur la touche hold. L’indicateur Hold « . » s’allume. 4) Retirez le bien à peser de la plate-forme. La valeur reste maintenant affichée sur l’écran pendant 120 sec. 5) Supprimer encore une fois la fonction Hold : Appuyez encore une fois sur la touche HOLD. L’indicateur Hold « . »
s’éteint et la valeur de pesage actuelle s’affiche.
Autres fonctions 1. Passez en mode fonctionnel :
Appuyez sur la touche [ON/OFF] pour éteindre la balance. Appuyez sur la touche [HOLD], maintenez-la enfoncée puis appuyez sur la touche [ON/OFF] / l’écran affiche A_ON ou A_OFF.
2. Sélection ou désélection de la fonction d’arrêt automatique : Si vous êtes dans le mode fonctionnel, l’écran affiche A_ON ou A_OFF. Appuyez sur la touche [ZERO], la sélection A_ON signifie que l’arrêt automatique (après 2 min.) est actif. Appuyez une nouvelle fois sur la touche [ZERO]. L’écran indique A_OFF. Cela signifie que l’arrêt automatique est désactivé.
3. Sélection ou désélection de la fonction de rétroéclairage automatique: Si vous êtes dans le mode fonctionnel, appuyez sur la touche [HOLD], l’écran affiche L_ON ou L_OFF. Appuyez sur la touche [ZERO], la selection L_ON signifie que le rétroéclairage automatique est actif. Appuyez une nouvelle fois sur la touche [ZERO]. L’écran indique L_OFF. Cla signifie que le rétroéclairage automatique est désactivé.
Procédure de pesagePréparation Après avoir allumé la balance, saisissez un temps de chauffe avant de commencer le pesage.Alertes EEEE: Surcharge de la cellule de pesage (Overload)
: Statut de batterie faible
Procédure de pesage
1. Appuyez sur la touche [ON/OFF] pour allumer la balance.Lors du démarrage, tous les segments s’allument sur l’écran pendant quelques secondes puis l’affichage « 0 » apparaît.
2. Sélection de l’unité de pesage [UNIT].Appuyez sur la touche [UNIT] pour sélectionner « kg » ou « Ib ».Une fois l’unité sélectionnée, elle s’affiche à côté de la valeur de pesage.
3. Types de pesagePesage sans récipient Veillez à ce que l’écran affiche « 0 » avant de charger la plate-forme. Si tel n’est pas le cas, appuyez sur la touche [ZERO/TARE]. Posez le bien à peser sur la plate-forme. Une fois que la valeur affichée est stable, lisezla.
Pesage avec récipientInstallez le récipient vide sur la plate-forme. Attendez que l’affichage se stabilise. Appuyez ensuite sur la touche [ZERO/TARE]. Remplissez le récipient avec le bien à peser puis posezle sur la plateforme. Une fois la valeur stabilisée, lisez la valeur.

10
Calibrage Lors de la première installation, la balance est encore calibrée comme à l’usine. C’est pourquoi un nouveau calib-rage est nécessaire à la réception de la balance. La balance peut être calibrée une nouvelle fois si elle est soumise à de fortes influences environnementales sur le lieu de montage (poussière, salissures, humidité élevée).
Comment effectuer le calibrage ? (Attention : information valable uniquement pour le calibrage)** Le calibrage ne doit être effectué que par un laboratoire de calibrage accrédité. **
1. La balance doit être éteinte [OFF]. Appuyez sur la touche [ZERO], maintenez-la enfoncée, appuyez ensuite sur [ON/OFF] puis relâchez les deux touches. A/D (une suite aléatoire de chiffres) s’affiche sur l’écran.
2. Attendez que l’affichage se stabilise puis appuyez sur [UNIT]. L’écran affiche « 0SAVE » puis les chiffres A/D (ordre aléatoire). Posez le poids de calibrage (correspondant à la plage de pesage maximale (par ex. 60 ou 150 kg)) sur la plate-forme. Attendez que l’affichage se stabilise puis appuyez sur [UNIT] / l‘écran indique « 0SAVE ». Le calibrage est terminé / enlevez les poids de calibrage de la plate-forme.
Eteignez la balance [ON/OFF]. Appuyez ensuite sur [ON/OFF] et exécutez quelques pesages tests avec une masse de calibrage. Si vous constatez des décalages, renouvelez la procédure de calibrage. Attention : la balance doit être stable et ne pas vibrer pendant le calibrage.
Caractéristiques • Arrêt automatique• Ecran avec support mural • Fonction Hold • Unité de pesage : kg / Ib
Spécifications
Modèle Capacité Lisibilité (d)
29924 150 kg 50 g
Classe de précision III
Echelon de vérification e = d = 50 g
Plateforme 330 x 320 mm
Poids net/brut 4.1 kg/4.5 kg
Ecran 6 caractères /hauteur des chiffres LCD 15 mm
Température d‘utilisation 15° C – 30° C
Alimentation électrique 6 x piles AA ou adaptateur AC/DC
Chargeur 9 V / 100 mA
**Avertissement** L’utilisation de téléphones mobiles ou autres articles électroniques à grande puissance émettrice peut provo-quer une interférence et influencer la balance par intermittence. Ceci est également valable pour l’exécution d’un calibrage.

11
Description de l’interface (logiciel + câble de données en option)
Paramètre de codage ASC II
Bits par seconde (débit en bauds) : 9600Parité (Parity bit) : aucune (none)Bits de données (Data bit) : 8Bits d’arrêt (Stop bit) : 1
Albert Kerbl GmbH Felizenzell 9 84428 Buchbach, Germanywww.kerbl.com E-Mail: [email protected]

12
EN SAFETY INSTRUCTIONS
! WARNING Important information to alert you to asituation that might cause serious injury and damage to your property if instructions arenot followed.
! CAUTION Important information that tells how to prevent damage to the equipment.
When using the scale, the following safety precautions should always be followed.
! WARNING:Use only the correct AC adaptor with the scale. Other adaptors may cause permanent electrical damage.
! CAUTION:• Avoid placing the scale in direct sunlight, this may cause discoloration or malfunction.• Replace all batteries at the same time – Do not replace only a portion of the 6 batteries as this may cause a
malfunction.• If the scale is not to be used for a long period of time, remove all batteries from the battery compartment to
avoid leakage, which may cause damage to this scale.• Avoid overloading the scale, as this may cause permanent damage and void your warranty –
do not EVER exceed the maximum capacity of the scale.• Keep the scale away from water – this scale is not water resistant. Shock, injury and electrical damage can occur
if used in a wet location!• Matter charged with static electricity could affect accuracy. Discharge all static electricity. For example,
one method is to use Static-Guard spray, and spray it on both sides of the weighing platform.

13
DESCRIPTION
• SIDEAC adaptorSocket
ON/OFF keyTurns the scaleon/off.
HOLD TasteRemain on the display for 120 seconds
UNIT keyYou can change the units (kg or Ib)
ZERO key (for TARE)Sets display to zero orsubtracts weight of a container
• DisplayNegative value indicator Weighing unit
Stable indicator
Low battery indicator
Hold indicator ZERO indicator

14
HOLD FUNCTION Once the hold key is pressed:1) The CPU will send weight data into RS232 socket2) The weight will remain on the display for 120 seconds
1) Place the item on the scale platform.2) Wait for the stable indicator.3) Press the hold key. The “.” hold indicator will turn-on.4) Remove the item from the scale platform. The weight will remain on the display for 120 seconds.5) Cancel the hold modus: Press the hold key again to cancel the “.” hold indicator and return the scale to weight value.
FUNCTION SETTINGS1. Enter function setting mode.
Press [ON/OFF] to turn the power off, Press [HOLD] first, then press [ON/OFF], while keeping [HOLD] pressed. The display will show A_ON or A_OFF.
2. Selection of auto shut off mode. When the balance enters function setting menu, the display will show A_ON or A_OFF. Press [ZERO] key, selec-tion display A_ON, this means auto shut off function (after 2 min.) active. Press [ZERO] again, the display will show A_OFF, this means auto shut off function inactive.
3. Selection of auto backlight mode: When the balance enters function setting menu press [HOLD] key, the display will show L_ON or L_OFF. Press [ZERO] key, selection display L_ON, this means auto backlight function is active. Press again, the display will show L_OFF, this means auto backlight function is inactive.
WEIGHINGBefore weighingWhenever possible, please allow the scale to warm up for several seconds after first turning the power on so that the scale will function properly and accurately.Error messagesEEEE: Overload
: Low battery
Weighing procedures
1. Press [ON/OFF] to turn on the scale.When the power is turned on, all display segments appear for a few seconds and „0“ will appear on the display.
2. Select the weighing unit [UNIT].Press [UNIT] to select a weighing unit „kg“or „lb“.Once the unit has been selected, the selected unit will be displayed next to the weight value.
3. Start weighingWeighing without container:Verify the reading is „0“. If not, press [ZERO/TARE] to display „0“.Place the items to be weighed on the platform.When the reading becomes stable, the stable weighing is displayed.
Weighing with container:Place an empty container on the platform. Wait for the stability indicator to be displayed and press [ZERO/TARE].Place the objects to be weighed in the container.When the reading becomes stable, the stable weighing displayed.

15
CALIBRATION If you use the scale for the first time it is calibrated. Because of this it’s not necessary to calibrate it once again. You can re-calibrate the scale if it goes under environmental influences like dust or dirt
How to calibrate? (Warning: Information only for calibration service)**Calibration may only arrange from accredited calibration laboratory**
1. The scale must be powered OFF. Press and hold [ZERO] first, then press [ON/OFF] while keeping the [ZERO] button depressed and then releases both keys. The display will show the A/D value (a series of random numbers).
2. Wait for the stable indicator to be displayed. Press [UNIT] the display will show „0SAVE“ and then the display will return to the random A/D value. Place the full load kilograms weight(s) on platform. Wait for the stable indicator to display then press [UNIT], the display will show „0SAVE“. Calibration is complete; remove the weight(s). Turn the scale OFF (Press the ON/OFF key), then turn it back ON and check some weight readings. If calibration is still incorrect, repeat calibration but try it more slowly.
If calibration is repeatedly incorrect then: 1) Replace the batteries, 2) Try a more stable surface or vibration and interference free location, 3) Be sure there is no static electricity on the scale (use an anti-static spray to remove static electricity)
FEATURES • Auto shut off• Display incl. wall holder• Hold-function• Weighing units: kg / Ib
SPECIFICATIONS
Model number Capacity Division
29924 150 kg 50 g
Accuracy class III
Calibration value e = d = 50 g
Platform 330 x 320 mm
Net/gross weight 4.1kg/4.5kg
Display 6-digits, 15 mm high (LCD)
Operation Temperature 15°C – 30°C
Power source 6×AA Batteries or AC/DC Adapter
Charger: 9~12V/100mA
**WARNING**Cell-Phones, Cordless-Phones and any radio-frequency device can cause temporary interference and cause the scale to temporarily not work properly. While there is NO risk of permanent damage to the scale, interfe-rence can cause an incorrect calibration or incorrect weight readings.

16
Interface description (optional: Software + data cable):
ASC II code parameter
Baud rate 9600Parity bit noneData bit 8Stop bit 1
Albert Kerbl GmbH Felizenzell 9 84428 Buchbach, Germanywww.kerbl.com E-Mail: [email protected]

17
IT Indicazioni di sicurezza
! AVVERTENZA Non rispettando questa indicazione si possono provocare gravi danni al prodotto o pesanti lesioni fisiche. Per questo motivo è necessario prestare la massima attenzione a questa indicazione.
! ATTENZIONE! Questa indicazione fornisce un‘informazione per evitare eventuali danni.
Se si utilizza la bilancia, è necessario prestare la massima attenzione ai punti elencati di seguito.
! AVVERTENZAUtilizzare solo l‘adattatore AC fornito in dotazione. Gli altri adattatori possono danneggiare il trasformatore interno.
! ATTENZIONE!• Non esporre mai la bilancia alla luce diretta del sole perché quest‘ultima può provocare eventuali
malfunzionamenti.• Impiegare sempre e solo batterie dello stesso tipo. Sostituire sempre tutte le batterie allo stesso tempo.• Se non si utilizza la bilancia per un periodo prolungato di tempo, rimuovere tutte le batterie dal vano per
evitare danni alla bilancia provocati dalla fuoriuscita di liquidi dalle batterie.• Evitare il sovraccarico della bilancia perché questa operazione può provocare danni alla bilancia.• Evitare l‘infiltrazione di gocce d‘acqua all‘interno della bilancia. L‘eventuale corrosione interna provoca danni.• Le cariche statiche influiscono sul sistema digitale di misurazione. Si consiglia di eliminare le cariche dai compo-
nenti che si desidera pesare prima o utilizzare uno spray antistatico (ad esempio anche sulla piattaforma della bilancia). Non disporre mai la bilancia vicino a forti campi elettrici.
Descrizione delle interfacce (software + cavo dati facoltativi)
Parametri codice ASCIIBit al secondo (baudrate): 9600Bit di parità: assenteBit dati: 8Bit di stop: 1
Albert Kerbl GmbH Felizenzell 9 84428 Buchbach, Germanywww.kerbl.com E-Mail: [email protected]

18
Descrizione dell‘interfaccia
• LateraleAdattatore ACPresa
Pulsante ON/OFFAttivazione e disattivazione della bilancia
Pulsante HOLDIl valore rimane visualizzato sul display per 120 sec.
Pulsante UNITSelezione dell‘unità (kg o Ib)
Pulsante ZERO (TARA)Imposta la visualizzazione su „zero“.Sottrae il peso di un recipiente.
• DISPLAYVisualizzazione del valore in negativo. Unità di misura
Indicatore di stabilità
Indicazione dell‘autonomia delle batterie
Indicazione HOLD Indicazione ZERO

19
Funzione HOLD Se si preme il pulsante HOLD:1) la CPU invia il valore corrente della pesatura all‘interfaccia RS232.2) il valore della pesatura viene mantenuto sul display per 120 sec. circa.
1) Disporre il materiale da pesare sulla piattaforma.2) Attendere fino a quando l‘indicazione non si è stabilizzata.3) Premere il pulsante HOLD. L‘indicazione HOLD „.“ si illumina.4) Rimuovere il materiale da pesare dalla piattaforma. A questo punto il valore della pesatura rimane visualizzato
sul display per 120 sec.5) Per annullare la funzione HOLD, premere nuovamente il pulsante HOLD. L‘indicazione HOLD „.“ scompare e viene
visualizzato il valore corrente della pesatura.
Altre funzioni1. Per passare alla modalità delle funzioni:
Premere il pulsante [ON/OFF] per disattivare la bilancia. Tenere premuto il pulsante [HOLD], quindi premere pulsante [ON/OFF]. Sul display viene visualizzato A_ON o A_OFF.
2. Selezione o deselezione della funzione di disattivazione automatica. Nella modalità delle funzioni A_ON o A_OFF sono visualizzati sul display. Premere il pulsante [ZERO]. La selezione A_ON indica che la disattivazione automa-tica (dopo 2 min.) è attiva. Premere nuovamente il pulsante [ZERO]. Sul display viene visualizzato A_OFF che indica che la disattivazione automatica non è attiva.
3. Selezione o deselezione della funzione di illuminazione automatica: Nella modalità delle funzioni, premere il pusante [HOLD]. La selezione L_ON o L_OFF. La selezione L_ON indica che la illumazione automatica è attiva. Premer nuovamente il pulsante [ZERO]. Sul display viene visualizzato L_OFF che indica che la illumazione automatica non è attiva.
Processo di pesaturaPreparazioneDopo l‘attivazione consentire alla bilancia di completare la fase di riscaldamento prima di iniziare il processo di pesatura.MessaggiEEEE: Sovraccarico della cella di pesatura (overload)
: Autonomia ridotta delle batterie
Processo di pesatura1. Premere il pulsante [ON/OFF] per attivare la bilancia.Durante l‘attivazione si accendono innanzitutto tutti i segmenti del display per alcuni secondi. Successivamente viene visualizzato „0“.
2. Selezione dell‘unità di misura [UNIT]Premere il pulsante [UNIT], per selezionare „kg“ o „Ib“.Una volta selezionata l‘unità desiderata, questa viene visualizzata a fianco del valore della pesatura.
3. Modalità di pesaturaPesatura senza recipienteÈ necessario prestare attenzione al fatto che sul display sia visualizzato uno „0“ prima del carico della piattaforma. In caso contrario, premere il pulsante [ZERO/TARE]. Disporre il materiale da pesare sulla piattaforma.Se il valore visualizzato è stabile, procedere alla sua lettura.
Pesatura con recipienteDisporre il recipiente vuoto sulla piattaforma. Attendere fino a quando l‘indicazione non si è stabilizzata. Quindi premere il pulsante [ZERO/TARE]. Riempire il recipiente con la merce da pesare e disporre il tutto sulla piattaforma. Se l‘indicazione si è stabilizzata, leggere il valore della pesatura.

20
Taratura Alla prima installazione la bilancia presenta ovviamente ancora la taratura di fabbrica. Per questo motivo non è necessaria un‘altra taratura alla ricezione della bilancia. Se la bilancia è particolarmente esposta agli agenti atmos-ferici (polvere, sporco, elevata umidità dell‘aria), è tuttavia necessario eseguire un‘altra taratura della bilancia.
Come tarare la bilancia? (Attenzione! Informazioni destinate solo al servizio di taratura.)**La taratura deve essere eseguita esclusivamente da specifici laboratori autorizzati!!**
1. La bilancia deve essere disattivata [OFF]. Mantenere premuto il pulsante [ZERO], quindi premere il pulsante [ON/OFF] tenendo premuto il pulsante [ZERO], quindi rilasciare entrambi i pulsanti. Sul display viene visualizzato A/D (un‘eventuale sequenza di cifre).
2. Attendere fino a quando la visualizzazione non si stabilizza. Premere il pulsante [UNIT]. Sul display viene visualiz-zato „0SAVE“ e successivamente i numeri A/D (eventuale sequenza di cifre). Disporre i pesi di taratura (a seconda dell‘intervallo massimo di carico della bilancia, come ad esempio 60 o 150 kg) sulla piattaforma.
Attendere fino a quando la visualizzazione non si stabilizza, quindi premere il pulsante [UNIT]. Sul display viene visualizzato „0SAVE“. La taratura è completata. Rimuovere i pesi di taratura dalla piattaforma. Disattivare la bilancia [ON/OFF], quindi riattivarla [ON/OFF] ed eseguire alcune pesature di prova con un peso di taratura. Se si rilevano eventuali differenze, eseguire nuovamente la procedura di taratura. Attenzione! Durante la taratura si consiglia di mantenere la bilancia in posizione stabile e priva di vibrazioni.
Caratteristiche • Disattivazione automatica• Display incl. supporto a parete• Funzione HOLD• Unità di misura: kg / lb
Specifiche
Modello Capacità Leggibilità (d)
29924 150 kg 50 g
Classe di precisione III
Valore di taratura e = d = 50 g
Piattaforma 330 x 320 mm
Peso netto/peso lordo 4,1 kg/4,5 kg
Display 6-stellig/15 mm LCD-Ziffernhöhe
Temperatura d‘impiego 15° C – 30° C
Alimentazione elettrica 6 batterie AA o adattatore AC/DC
Caricatore 9 V / 100 mA
**Avvertenza**L‘impiego di telefoni cellulari o altre apparecchiature elettroniche dotate di un‘elevata potenza di trasmissione può provocare interferenze ed influire temporaneamente sul funzionamento della bilancia. Questa indicazione è valida anche per l‘esecuzione della taratura.