time management system employee user guideresources.realtysouth.com/files/tms employee user guide -...
TRANSCRIPT

Time Management System Employee User Guide
March 2012

This document is being provided to MidAmerican Energy Holdings Company employees for use with the Time Management System. This document contains information proprietary to WorkForce Software. You are not permitted to disclose this information to any third party.
Time Management System Employee User Guide
Page 1
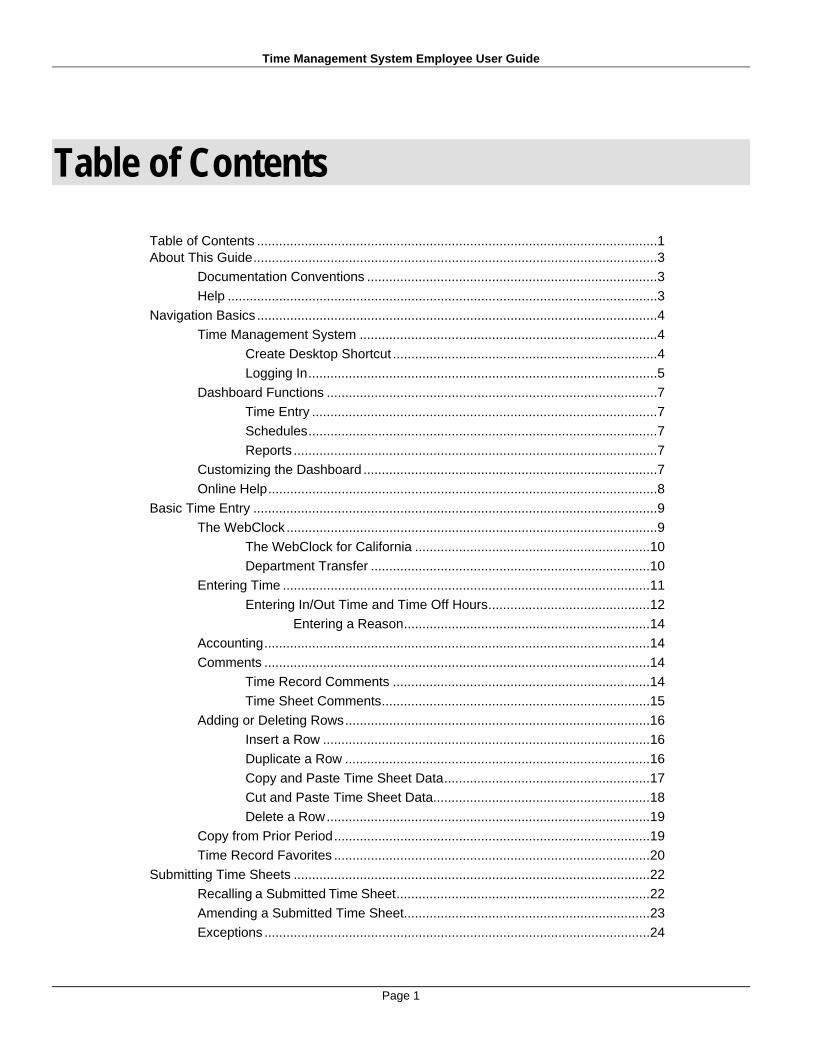
Table of Contents
Table of Contents ............................................................................................................. 1 About This Guide .............................................................................................................. 3
Documentation Conventions ............................................................................... 3
Help ..................................................................................................................... 3
Navigation Basics ............................................................................................................. 4
Time Management System ................................................................................. 4
Create Desktop Shortcut ........................................................................ 4
Logging In ............................................................................................... 5
Dashboard Functions .......................................................................................... 7
Time Entry .............................................................................................. 7
Schedules ............................................................................................... 7
Reports ................................................................................................... 7
Customizing the Dashboard ................................................................................ 7
Online Help .......................................................................................................... 8
Basic Time Entry .............................................................................................................. 9
The WebClock ..................................................................................................... 9
The WebClock for California ................................................................ 10
Department Transfer ............................................................................ 10
Entering Time .................................................................................................... 11
Entering In/Out Time and Time Off Hours ............................................ 12
Entering a Reason ................................................................... 14
Accounting ......................................................................................................... 14
Comments ......................................................................................................... 14
Time Record Comments ...................................................................... 14
Time Sheet Comments ......................................................................... 15
Adding or Deleting Rows ................................................................................... 16
Insert a Row ......................................................................................... 16
Duplicate a Row ................................................................................... 16
Copy and Paste Time Sheet Data ........................................................ 17
Cut and Paste Time Sheet Data........................................................... 18
Delete a Row ........................................................................................ 19
Copy from Prior Period ...................................................................................... 19
Time Record Favorites ...................................................................................... 20
Submitting Time Sheets ................................................................................................. 22
Recalling a Submitted Time Sheet ..................................................................... 22
Amending a Submitted Time Sheet................................................................... 23
Exceptions ......................................................................................................... 24

Time Management System Employee User Guide
Page 2
Resolving Exceptions ........................................................................... 25
Time Off Requests .......................................................................................................... 26
Submitting a Time Off Request ......................................................................... 26
Email Notification .................................................................................. 28
Canceling a Time Off Request .......................................................................... 29
Time Entry Window ........................................................................................................ 30
Function Buttons................................................................................................ 31
Changing the Work Period ................................................................... 32
Time Sheet Views.............................................................................................. 33
List View ............................................................................................... 33
Table View ............................................................................................ 33
Day View .............................................................................................. 34
Show all Weeks .................................................................................... 34
Exceptions Tab .................................................................................................. 35
Leave Balances Tab .......................................................................................... 36
Summary Tab .................................................................................................... 36
Schedule Tab .................................................................................................... 38
Printing the Time Sheet ..................................................................................... 38
Generating Reports ........................................................................................................ 40
Report Favorites ................................................................................................ 42
Creating a Report Favorite ................................................................... 42
Removing a Report Favorite ................................................................ 42

Time Management System Employee User Guide
Page 3
About This Guide
The Time Management System Employee User Guide helps you learn the most commonly used employee functions in the Time Management System.
The intended audience is employees who will use the Time Management System to report time, request time off and generate reports.
The Time Management System automates and standardizes the time collection and approval processes. The Time Management System delivers the functionality and flexibility to enforce the company’s time and attendance policies.
Documentation Conventions This guide uses the following notational conventions:
Bold text represents exact text that appears in the Time Management System. This includes items such as button text, menu selections and dialog box elements.
Example: Select OK to begin the operation.
A right arrow ( ) represents successive menu selections.
Example: Choose File Print to print the document.
Italicized text represents a reference to other published material.
Example: Managers should refer to the Time Management System Manager User Guide for reference.
Help If you have any questions regarding this guide or the Time Management System, contact your local Human Resources representative.
Time Management System Employee User Guide
Page 4
Navigation Basics
Time Management System The Time Management System is a web-based application that can be accessed in one of the following ways:
Select the Time Management System shortcut on your desktop. See “Create Desktop Shortcut” below.
Select the Time Management System link in HR Self Service. To access the link, select QUICK LINKS Time Management System.
Access the Time Management System directly by typing the URL (https://tms.midamerican.com/workforce/Logon.do) in your web browser or create a favorite in your browser to access this web address.
For nonexempt employees required to utilize the WebClock to record in and out times, select Go to WebClock from the Time Management System Dashboard, or access the WebClock directly in one of the following ways:
Select the WebClock shortcut on your desktop. See “Create Desktop Shortcut” below.
Access the WebClock directly by typing the URL (https://tms.midamerican.com/workforce/WebClockLogon.do) in your web browser or create a favorite in your browser to access this web address.
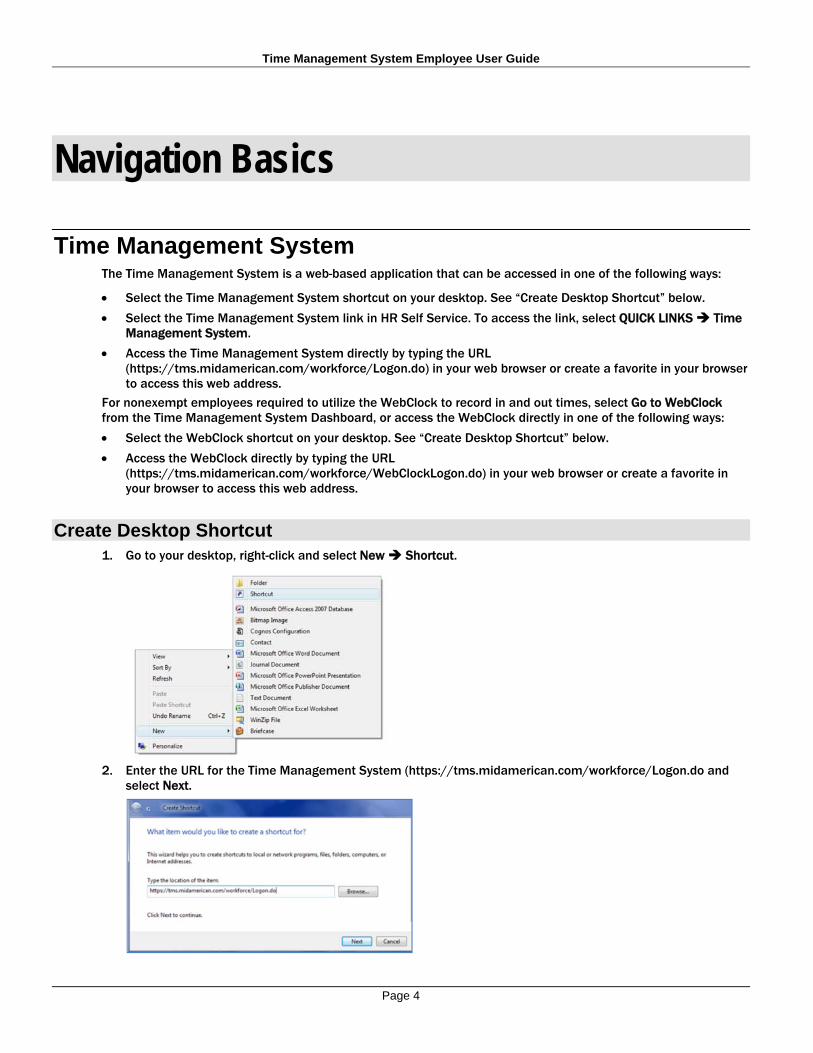
Create Desktop Shortcut 1. Go to your desktop, right-click and select New Shortcut.
2. Enter the URL for the Time Management System (https://tms.midamerican.com/workforce/Logon.do and
select Next.

Time Management System Employee User Guide
Page 5
3. Enter the shortcut name (e.g., TMS) that will appear with the icon and select Finish.
4. The new shortcut icon will appear on your desktop.
5. For nonexempt employees that are required to utilize the WebClock to record in and out times, repeat steps
1-4 using the URL for the WebClock (https://tms.midamerican.com/workforce/WebClockLogon.do).
Logging In 1. Log into the Time Management System or WebClock by entering your employee ID (with the T) and HR Self
Service password, and selecting Login or the login arrow button. If you have access to both the Time Management System and the WebClock, your user ID and password will be the same for both logins.
Time Management System login: WebClock login:
Note: If your password expires or you are locked out of the Time Management System due to entering the incorrect User ID and Password combination, go to HR Self Service at www.midamerican.com/ess/ and select the link for forgot password.

Time Management System Employee User Guide
Page 6
2. The first time you log in to the Time Management System Dashboard, the following dialog box appears. Select OK.
3. If logging into the Time Management System, the employee Dashboard appears. The Dashboard is
configured according to your company’s time and attendance requirements. The following is a sample Dashboard. To log off, select Log Off.
4. If logging directly into the WebClock, the WebClock appears. The WebClock is configured according to your
company’s time and attendance requirements. The following is a sample WebClock. To log out, select Logout.

Time Management System Employee User Guide
Page 7
Dashboard Functions The Time Management System presents windows for recording your time and attendance data, such as hours worked and the projects and tasks on which you worked. Depending on your configuration, you can perform tasks such as viewing reports or requesting time off. The employee Dashboard typically provides links to the following time and attendance related functions. Your Dashboard may have more or fewer functions. Access to certain features is determined by your assigned user role. To return to the Dashboard from other windows, select Home.
Time Entry Enter My Hours: View, enter or update time sheet data, and submit time sheets. View your schedule and
leave balances.
Go to Web Clock: The WebClock records in and out times for nonexempt employees. It functions like a traditional time clock.
Schedules My Time Off: Submit time off requests, track the status of your request and view the history of past requests.
Reports View General Reports: The Time Management System includes reports for both employees and managers.
Employees can access general reports to view time sheet information for a certain period, roles delegated to them or comments on time sheets.
Customizing the Dashboard The Time Management System supports the following time and attendance Dashboard customization features:
Rearranging function links: To rearrange the order in which functions appear within a category, select and drag the function link.
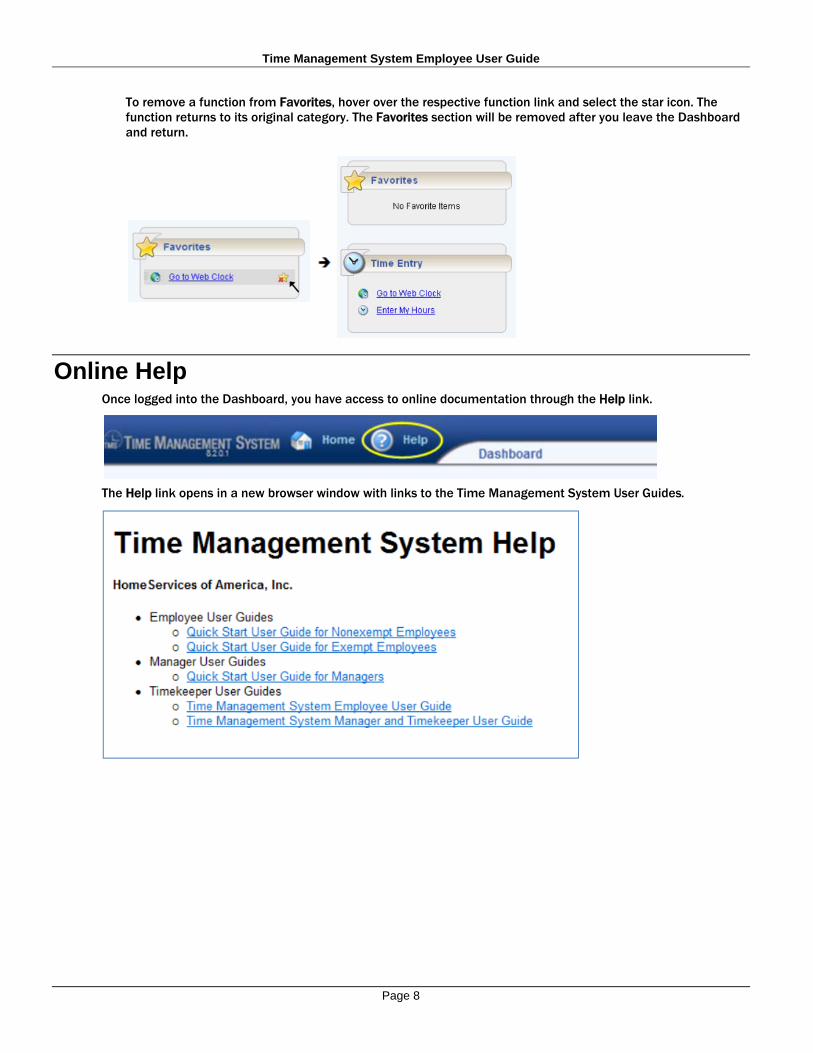
Creating a Favorites category for frequently-used functions:
Hover the pointer over the function’s star icon and select it to move the function to the Favorites section of the Dashboard.
Time Management System Employee User Guide
Page 8
To remove a function from Favorites, hover over the respective function link and select the star icon. The function returns to its original category. The Favorites section will be removed after you leave the Dashboard and return.
Online Help Once logged into the Dashboard, you have access to online documentation through the Help link.
The Help link opens in a new browser window with links to the Time Management System User Guides.
Time Management System Employee User Guide
Page 9
Basic Time Entry
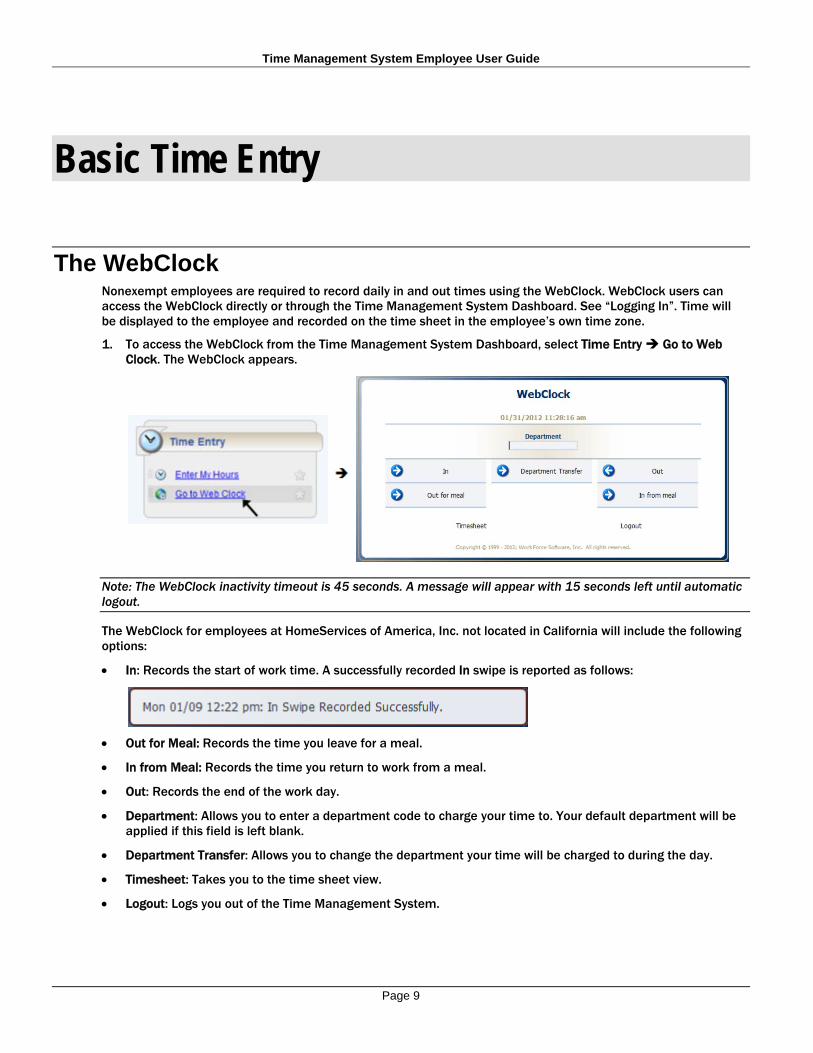
The WebClock Nonexempt employees are required to record daily in and out times using the WebClock. WebClock users can access the WebClock directly or through the Time Management System Dashboard. See “Logging In”. Time will be displayed to the employee and recorded on the time sheet in the employee’s own time zone.
1. To access the WebClock from the Time Management System Dashboard, select Time Entry Go to Web Clock. The WebClock appears.
Note: The WebClock inactivity timeout is 45 seconds. A message will appear with 15 seconds left until automatic logout.
The WebClock for employees at HomeServices of America, Inc. not located in California will include the following options:
In: Records the start of work time. A successfully recorded In swipe is reported as follows:
Out for Meal: Records the time you leave for a meal.
In from Meal: Records the time you return to work from a meal.
Out: Records the end of the work day.
Department: Allows you to enter a department code to charge your time to. Your default department will be applied if this field is left blank.
Department Transfer: Allows you to change the department your time will be charged to during the day.
Timesheet: Takes you to the time sheet view.
Logout: Logs you out of the Time Management System.

Time Management System Employee User Guide
Page 10
The WebClock for California The WebClock for employees at HomeServices of America, Inc. in California will also include the following option:
Waive 2nd Meal Break: Allows you to waive your second meal break of the day.
Department Transfer When an employee performs work for a department other than his or her default department, a department transfer must be performed on the WebClock. Select the Department field to see a list of available departments or enter the new department code directly into the Department field, and select Department Transfer.
Note: The department selection box contains a limited number of departments per company. If you do not see the department you need, enter the first few characters of the department and select Search for more. Select the department from the new list.

Time Management System Employee User Guide
Page 11
Entering Time For detailed explanation of the Employee Time Entry window and all its features, see “Time Entry Window”. If your Time Management System configuration enables you to enter time directly into time sheets, do the following:
1. From the Time Management System Dashboard, select Time Entry Enter My Hours to open your time sheet. Your time sheet will appear using the default view or the view you last chose.
2. To change the view, select the arrow on the View button to access its drop-down menu, then highlight and
select a menu item to select a different view.
3. Ensure that the correct work period displays. To change the work period:
(1) Select the respective arrow on the Work Period button to retreat or advance a work period.
(2) Select the Work Period button to access a pop-up calendar and then select a work period or select the Default Period button.
(3) If your work period is longer than a week and you want to enter time for the entire period, select the Show All Weeks checkbox.
4. Select anywhere in the row in which you want to enter or modify time.
5. Record your time (see “Entering In/Out Time and Time Off Hours”).
6. Select the Save button after every time sheet change.
7. Select the Submit button at the end of every work period to send your time and attendance information to your supervisor for approval.
Time Management System Employee User Guide
Page 12
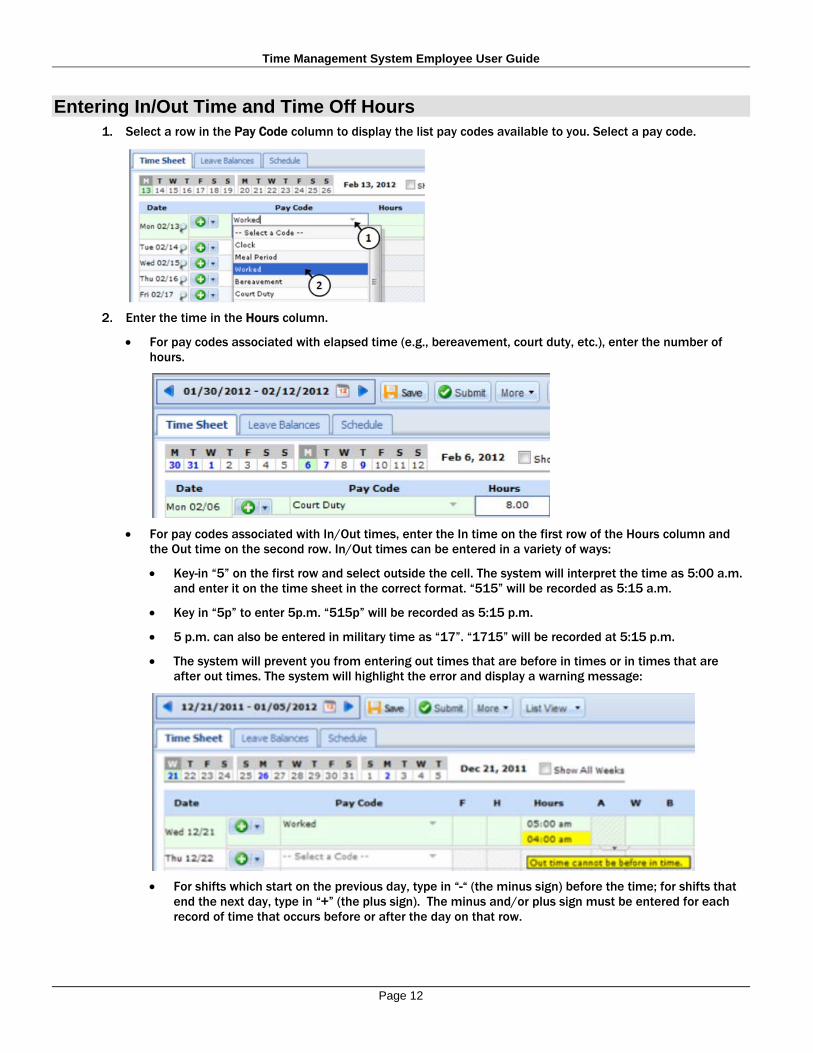
Entering In/Out Time and Time Off Hours 1. Select a row in the Pay Code column to display the list pay codes available to you. Select a pay code.
2. Enter the time in the Hours column.
For pay codes associated with elapsed time (e.g., bereavement, court duty, etc.), enter the number of hours.
For pay codes associated with In/Out times, enter the In time on the first row of the Hours column and the Out time on the second row. In/Out times can be entered in a variety of ways:
Key-in “5” on the first row and select outside the cell. The system will interpret the time as 5:00 a.m. and enter it on the time sheet in the correct format. “515” will be recorded as 5:15 a.m.
Key in “5p” to enter 5p.m. “515p” will be recorded as 5:15 p.m.
5 p.m. can also be entered in military time as “17”. “1715” will be recorded at 5:15 p.m.
The system will prevent you from entering out times that are before in times or in times that are after out times. The system will highlight the error and display a warning message:
For shifts which start on the previous day, type in “-“ (the minus sign) before the time; for shifts that end the next day, type in “+” (the plus sign). The minus and/or plus sign must be entered for each record of time that occurs before or after the day on that row.
Time Management System Employee User Guide
Page 13
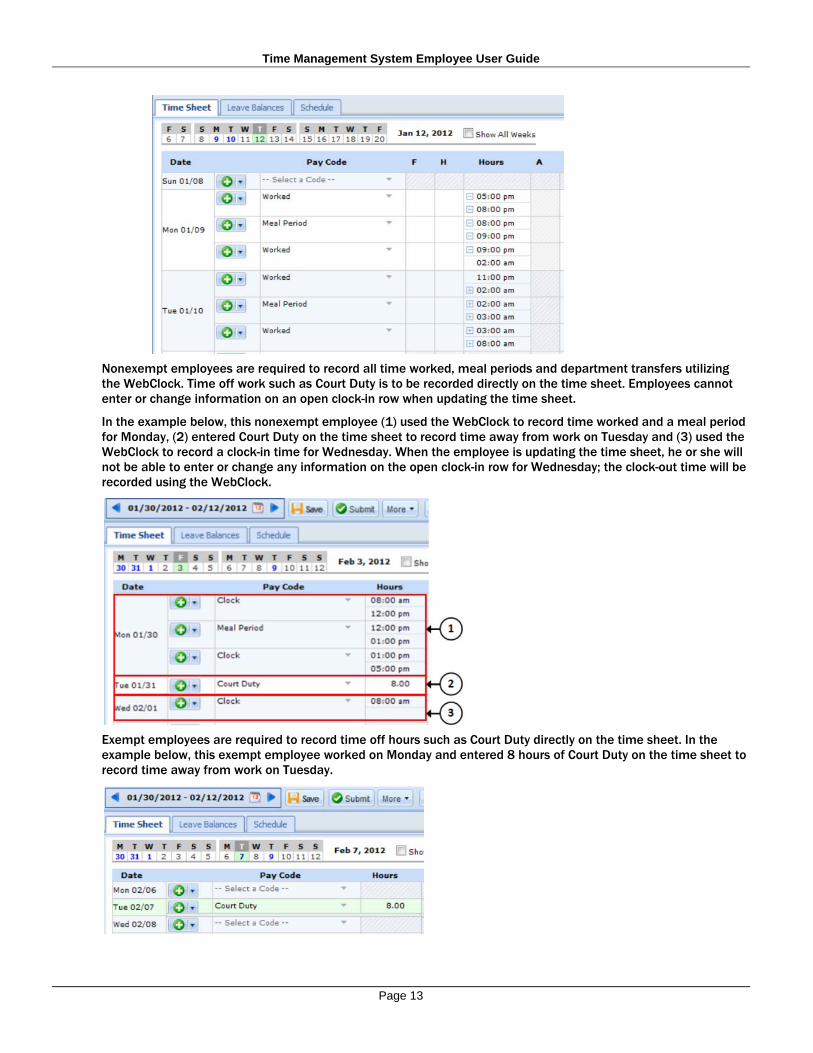
Nonexempt employees are required to record all time worked, meal periods and department transfers utilizing the WebClock. Time off work such as Court Duty is to be recorded directly on the time sheet. Employees cannot enter or change information on an open clock-in row when updating the time sheet.
In the example below, this nonexempt employee (1) used the WebClock to record time worked and a meal period for Monday, (2) entered Court Duty on the time sheet to record time away from work on Tuesday and (3) used the WebClock to record a clock-in time for Wednesday. When the employee is updating the time sheet, he or she will not be able to enter or change any information on the open clock-in row for Wednesday; the clock-out time will be recorded using the WebClock.
Exempt employees are required to record time off hours such as Court Duty directly on the time sheet. In the example below, this exempt employee worked on Monday and entered 8 hours of Court Duty on the time sheet to record time away from work on Tuesday.

Time Management System Employee User Guide
Page 14
Entering a Reason
A reason is required for nonexempt employees if you enter time directly in the time sheet instead of using the WebClock. Also, certain pay codes such as “Bereavement” require additional information to be entered in the Reason field on the time sheet. For example, relationship is required for bereavement entries.
Accounting Nonexempt employees are required to record all time worked, meal periods and department transfers utilizing the WebClock. When a department transfer is performed utilizing the WebClock, accounting fields are automatically entered on the time sheet. In the example below, this nonexempt employee used the WebClock to record a department transfer at 10:00 a.m. The only time that will be allocated to department 0055 is from 10:00 a.m. – 12:00 p.m., which is 2 hours. The remaining time worked during the day will be allocated to the employee’s default department, which is 6 hours.
Note: If hours worked after the meal period should be allocated to a department other than your default department, another department transfer must be completed after the in punch from the meal period.
Comments Comments can be entered for each individual time record or for the entire time sheet work period.
Time Record Comments Use the Comments field to enter additional information related to a particular time entry.
1. After entering a Pay Code, select the Comments tab to open the Comments field.
2. Insert comments in the Comments field.
3. Select the Comments tab to close the Comments field.

Time Management System Employee User Guide
Page 15
The Comments field in List View:
Time Sheet Comments Use Time Sheet Comments from the More drop-down menu to enter additional information related to the entire time sheet work period.
1. Select the work period.
2. Select the drop-down arrow next to the More button.
3. Select Time Sheet Comments.
4. Enter comments related to the selected time sheet work period.
5. Select Close.
Note: Comments are visible to anyone that has access to your time sheet, including your manager, timekeepers and payroll. It is recommended that comments entered on time sheets are brief and professional.

Time Management System Employee User Guide
Page 16
Adding or Deleting Rows Each row of your time sheet contains an Insert button with a drop-down menu from which you can select to cut or copy a row, day or week. Additionally you can duplicate or delete a row. Add rows by selecting the Insert button plus sign.
Insert a Row Select the Insert button plus sign. The new row appears below the row on which you selected Insert and appears in a different color.
Duplicate a Row 1. Select the drop-down arrow next to the Insert button and select Duplicate Row. The duplicated row appears
below the currently selected row.
2. To apply that row’s time sheet information to another work day, click the drop-down arrow next to the Insert button and select Change Work Date. From the popup calendar, select a date.
Time Management System Employee User Guide
Page 17
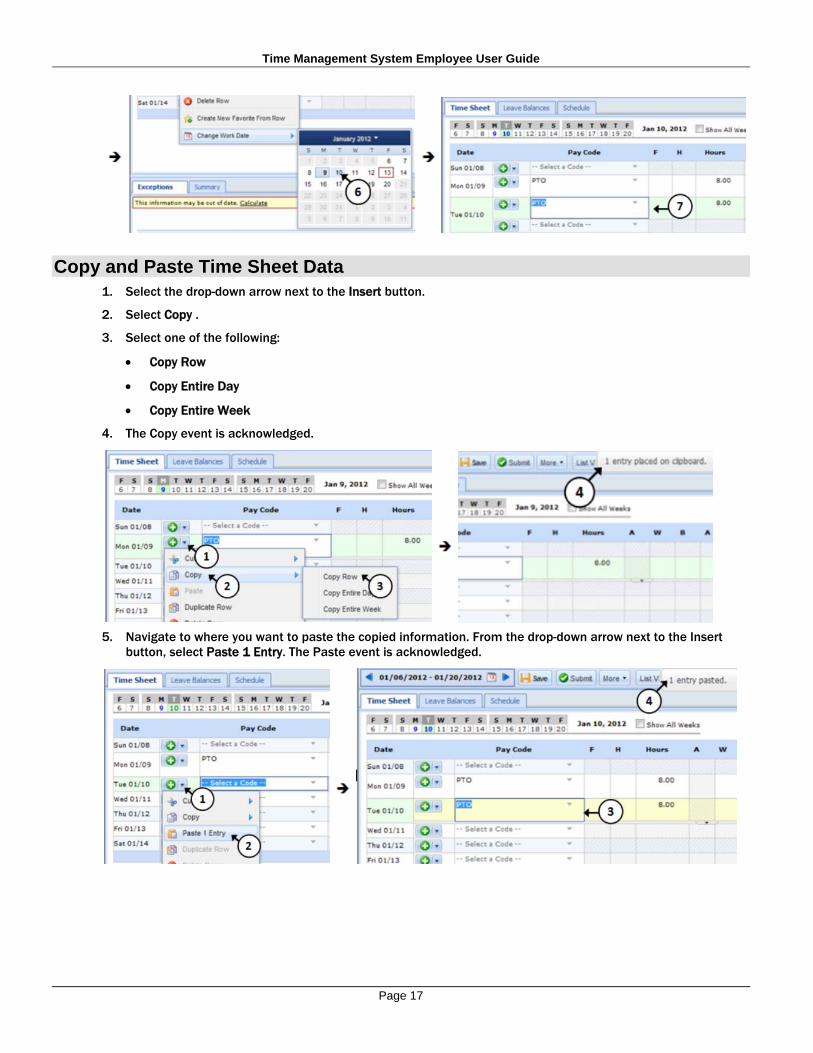
Copy and Paste Time Sheet Data 1. Select the drop-down arrow next to the Insert button.
2. Select Copy .
3. Select one of the following:
Copy Row
Copy Entire Day
Copy Entire Week
4. The Copy event is acknowledged.
5. Navigate to where you want to paste the copied information. From the drop-down arrow next to the Insert
button, select Paste 1 Entry. The Paste event is acknowledged.

Time Management System Employee User Guide
Page 18
Cut and Paste Time Sheet Data 1. Select the drop-down arrow next to the Insert button.
2. Select Cut.
3. Select one of the following:
Cut Row Cut Entire Day Cut Entire Week
4. The Cut event is acknowledged.
5. Navigate to where you want to paste the copied information. From the drop-down arrow next to the Insert
icon, select Paste 1 Entry. The Paste event is acknowledged. The cut row’s data is deleted.
Note: Cutting a row will remove the hours for that row. If you want to retain the hours for a row, use the copy option.

Time Management System Employee User Guide
Page 19
Delete a Row 1. Select the drop-down arrow next to the Insert icon.
2. Select Delete Row.
3. Select Yes.
4. The row will be deleted.
Note: You cannot delete the only row for a date or a pay code. Instead, the delete process clears the data and lets you save the blank row.
Copy from Prior Period To copy a prior time sheet into the current time sheet, select the More button and select Copy From Prior Period. Copy From Prior Period is enabled only if you have a prior work period. The prior work period’s rows will be copied and pasted into the current work period without overwriting the existing entries.
Note: This feature is only supported for periods that are exactly the same length and type (e.g., biweekly). System-generated time entries (e.g., Holidays) will not be copied from the prior period.

Time Management System Employee User Guide
Page 20
Time Record Favorites Time Record Favorites allow you to insert a pre-defined time record into your time sheet. Instead of entering each part of a time record every time you need to enter the information on a time sheet, you can create a favorite, which enters a combination of information all at once.
1. To create a favorite on a time sheet, fill in the fields of a time record which will become a favorite.
Note: The Time field cannot be pre-defined in a favorite. You must directly enter hours on the time sheet after applying a favorite.
2. Select the Insert button drop-down menu on the time record from which you want to create a favorite.
3. Select Create New Favorite from Row. The Create Favorite window appears, listing the values of the various fields on the time record.
4. Fill in the Create Favorite window:
a. In the Favorite Label field, enter a name for the favorite as follows:
“Pay Code Name – Favorite Label”, e.g., “Worked – NORMAL”
b. Select the check boxes of the parameters you need to appear each time you use the favorite. If you do not want the favorite to include a pre-defined value for a particular field, unselect that field by selecting the corresponding checkbox. These fields remain blank on the time record when you apply the favorite, requiring the user to enter a value each time.
Note: A pay code must always be part of a favorite, since this field is mandatory for any time record.
c. Select Create Favorite to create a favorite for the time record.

Time Management System Employee User Guide
Page 21
5. The favorite you created appears in the Pay Code field and is available for you to use in your time sheet. The favorite displays with the given label at the top of the Pay code drop down menu. A star icon appears beside the name of the favorite.
Note: Your favorites are not made available to other users; that is, only you have access to the favorites you create. It is recommended that favorite labels used on time sheets are brief and professional.
Time Management System Employee User Guide
Page 22
Submitting Time Sheets
At the end of each work period, you will receive a reminder email to submit your time sheet. Exempt employees will only have to submit their time sheet if they have time off hours recorded for the work period.
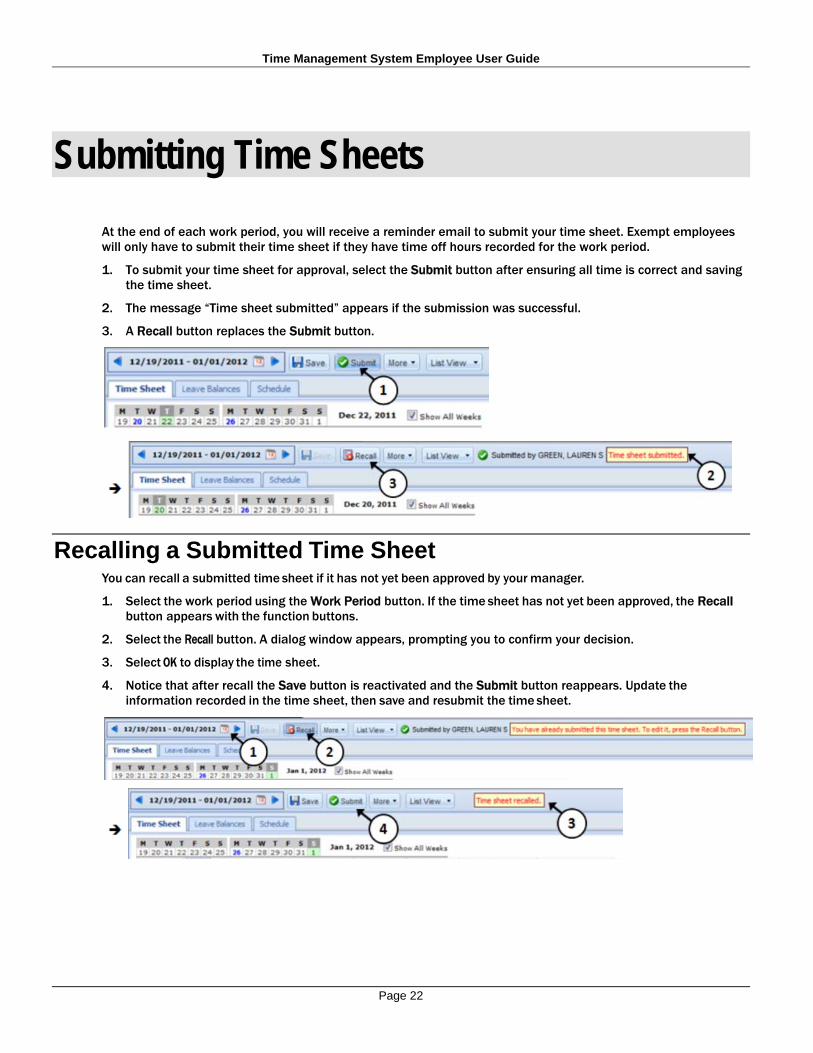
1. To submit your time sheet for approval, select the Submit button after ensuring all time is correct and saving the time sheet.
2. The message “Time sheet submitted” appears if the submission was successful.
3. A Recall button replaces the Submit button.
Recalling a Submitted Time Sheet You can recall a submitted time sheet if it has not yet been approved by your manager.
1. Select the work period using the Work Period button. If the time sheet has not yet been approved, the Recall button appears with the function buttons.
2. Select the Recall button. A dialog window appears, prompting you to confirm your decision.
3. Select OK to display the time sheet.
4. Notice that after recall the Save button is reactivated and the Submit button reappears. Update the information recorded in the time sheet, then save and resubmit the time sheet.

Time Management System Employee User Guide
Page 23
Amending a Submitted Time Sheet As an employee, you can amend time sheets that have already been processed by payroll. Amended time sheets must be approved by a manager (or payroll) in order for them to be included in end of period processing and therefore paid.
Employees can amend time sheets from the prior work period only. Managers and timekeepers can amend time sheets for work periods paid in the current year. Time sheets for work periods in prior years cannot be amended. Any changes you make must be approved by your manager to be considered for recalculation.
Any changes made to a time sheet for which you have already been paid will cascade through all time sheets up through the current work period. The difference will be applied to your current pay and paid time off bank balances.
If you amend a past time sheet to account for a PTO day that you entered as a workday, then that change – because it affects your PTO bank – is used to recalculate your bank balances for each successive time sheet up through the current work period.
1. To amend a closed time sheet, use the Work Period button to select a prior work period.
2. If the time sheet can be amended, an Amend button appears in the functions toolbar.
Select Amend to access your prior time sheet for editing. The time sheet opens for edits.
3. Edit and Save the time sheet. The Other Versions button appears.
4. Select the Other Versions button. The Time Sheet Versions window appears.
5. Select View This Version to display the original version of the time sheet.
6. Select Compare To Open version to list the differences between the two versions. A pop-up window displays the results of the comparison.
7. To submit your amended time sheet for approval, select the Submit button.

Time Management System Employee User Guide
Page 24
8. After viewing the comparison, you can print the results or close the window to return to the time sheet.
Exceptions An exception is a conflict noted between your time and attendance information and the rules under which your time sheet is processed.
1. Exceptions generate messages which appear in the Exceptions tab on the Time Entry screen.
2. If a specific time record has a related exception, an exception pin appears which you can select to display the Exception tab.
3. To view exceptions for a specific day, select the Filter exception by day checkbox.
4. Some messages are informational and require no action; others require a satisfactory resolution before the time sheet can be successfully submitted. Red-level exceptions must be corrected before the respective time is paid.

Time Management System Employee User Guide
Page 25
Resolving Exceptions Certain exceptions must be resolved before your time sheet can be submitted successfully. In the following example, an exception message indicates that Tuesday, Feb. 14 is missing a clock-out time. The severity of this red-level exception is Error, which means it will not be paid unless resolved. The exception can be cleared by recording an out-time using the WebClock. Once the exception clears, the time sheet can be submitted successfully.

Time Management System Employee User Guide
Page 26
Time Off Requests
Benefit-eligible employees can submit time off requests, track the status of requests and view the history of past requests using the My Time Off function. When employees request time off an email is sent to the appropriate person to review.
Submitting a Time Off Request 1. Select Schedules My Time Off in the Dashboard.
2. The My Time Off window appears. Select Create New Request. The Create Time Off Request window appears
in which you specify the type and dates of your request.
3. Choose the type of time off from the Paycode drop-down list.
4. Enter the day on which you want to begin your time off in the Start Date field, or select the Calendar button on the right of the date field to display a calendar from which you can choose the date. Ensure that the Start Date is today’s date or later.
5. Enter the day on which you want to end your time off in the End Date field, or use the Calendar button.
6. Select Enter details for this date range to display the details of your time off request.

Time Management System Employee User Guide
Page 27
7. The Edit Time Off Request Details window appears. The hours request default to the employee’s scheduled hours for that day. You can modify the hours requested and also select another pay code from the Paycode column.
Select the Insert button in the Action field of a row to add another row for that day, select the Pay code and enter the hours for that type. Remember to adjust the other hours for that day accordingly, if necessary.
Select the Delete button in the Action field of a row to remove the hours you have entered in that row. If more than one row for that day has been created, the row itself will be removed. If the row is a beginning or ending row, the hours will be removed and a subsequent select will remove the row.
Select View and confirm details for this Time Off Request.
8. The Review/Finish Time Off Request screen lists the hours you requested and your adjusted bank balances.
The Adjusted Bank Balances reflect time off requests, but does not include future accruals. The leave balance in the Time Entry window does not include future time off requests or future accruals.
9. If necessary, enter a note to accompany your request in the Comments to Manager field.

Time Management System Employee User Guide
Page 28
10. If exceptions prevent you from submitting the request, select Enter details for this date range to return to the previous screen and make a different selection or Cancel this Time Off Request to return to the Create New Request window.
11. If no exceptions prevent you from submitting the request, select Submit this Time Off Request to create and
submit your request. The My Time Off screen reappears, listing the status of all your time off requests.
Notes:
When your manager approves the Time Off Request, the requested time posts to your time sheet as the respective time off.
You will receive an email message when your manager approves or rejects your request.
All paid time off requests are contingent upon hours being available at the time of the scheduled absence. If hours are not available, your supervisor or manager must determine if the time away from work is allowed.
Email Notification The following table shows when time off request email is sent, the recipients and the content of the message.
Day and time to send email
Recipients Message subject Message
Submission of time off request
Manager and Delegates
Time Off Request – Pending
“Employee Name” has requested time off. Please review and approve.
Approval of time off request
Employee Time Off Request – Approved
Your time off request has been approved.
Rejection of time off request Employee
Time Off Request – Rejected
Your time off request has been rejected.
Cancellation of time off request
Manager and Delegates
Time Off Request – Cancelled
“Employee Name” has cancelled his or her request for time off.

Time Management System Employee User Guide
Page 29
Canceling a Time Off Request You can cancel a time off request before or after it has been approved.
1. Go to Schedules My Time Off.
2. Select the Current tab.
3. Select the respective time off request.
4. The View/Cancel Time Off Request window appears listing the details and history of the request. Select
Cancel this Time Off Request at the bottom of the screen to withdraw your request.
5. The Reason for Cancellation window appears. Enter your reason for cancellation, if necessary.
6. Select Cancel this Time Off Request.
7. The My Time Off window appears again, showing the status of the request as cancelled.

Time Management System Employee User Guide
Page 30
Time Entry Window
The Employee Time Entry Window comprises various fields and tabs which allow easy viewing and entry of your time. After you login to the system, open your time sheet by selecting Enter My Hours from the Time Entry area of the Dashboard. Nonexempt employees can also open the time sheet by selecting Timesheet from the WebClock.
Dashboard: WebClock:
The Employee Time Entry Window provides the options necessary for completing time entry. From this screen, depending on your role, you can perform one or more of the following tasks:
Enter time on your time sheet
View your schedule
View or acknowledge any exceptions (errors or warnings) about your time sheet
View details of available time off
See a preview summary of time entered on the time sheet
The following is an example of the Employee Time Entry Window. The exact appearance of the time sheet varies according to your Time Management System configuration.

Time Management System Employee User Guide
Page 31
Note the following user features:
1. Hover the pointer on the line separating the panels to activate the “adjust height” control. Select and drag the line up or down to adjust the relative height of the panels.
2. Select the arrow to hide the bottom panel. Select it again to display it.
3. Use the scrollbar to access parts of the time sheet which are not currently visible.
4. When a time sheet cell shows a green triangle in the upper right corner, you can select the cell to activate the
“details” tab.
Function Buttons Several buttons reside at the top of your time sheet. These buttons execute certain program functions.
Button Functions
Button Button Name Function
Work Period Selects the work period to view.
Select the calendar button to access a pop-up calendar from which to select a work period. (See “Changing the Work Period.”)
Save Saves your time sheet data. This should be done every time
you enter new data or make any changes.
Submit Sends your completed time sheet to your supervisor for
approval.
Recall This button appears after the time sheet has been submitted. If the time sheet has not yet been approved, it recalls the time sheet and allows you to make modifications.
Amend Enables a user to change a previously submitted and
processed time sheet. Button appears after an employee submits a time sheet and it has been processed by payroll.

Time Management System Employee User Guide
Page 32
Button Button Name Function
More The More menu reveals the Print, Print Preferences, Reload Data and Time Sheet Comments functions.
The Print Preferences function enables you to select or exclude the following fields to print:
Time sheet
Leave Balances
Schedule
Exceptions
Summary The Reload Data button performs time sheet calculations without saving the data. Time Sheet Comments: Add comments to your time sheet.
View Allows you to select the List View, Table View or Day View of
your time sheet. The view you select alters the presentation of the data on the Time Sheet tab. The system remembers the last view used.
Changing the Work Period The work period button allows the user to move forward or backward one period at a time, using the arrow buttons or to select a specific period to move to using the calendar button.
1. Select the respective arrow on the Work Period button to retreat or advance a work period.
2. Select the Work Period button to access a pop-up calendar and then select a work period or select the Default Period button.
3. If your work period is longer than a week and you want to enter time for the entire period, select the Show All Weeks checkbox.
4. Select anywhere in the row in which you want to enter or modify time.
5. Record your time and attendance information (see “Entering In/Out and Elapsed Time”).
6. Select the Save button after every time sheet change.

Time Management System Employee User Guide
Page 33
7. Select the Submit button at the end of every work period to send your time and attendance information to your manager for payroll processing.
Time Sheet Views The Time Management System provides three views (or formats) for displaying time sheet information: List View, Table View and Day View. Each view displays time sheet information for an entire work period. Your ability to view any or all depends on your Time Management System configuration.
Select the respective view through the View button.
List View The List View is the default view; it displays the days in the selected work period as a list. The sum total for the work period is displayed in the upper right corner.
Table View The Table View eliminates the need to enter repetitive information for each entry on your time sheet. For example, instead of selecting a pay code for each day, you can enter this information once in Table View and simply enter hours for each day of the work period. Totals per pay code appear on the right side of the window and totals for each day at the bottom of the window.

Time Management System Employee User Guide
Page 34
Day View The Day View displays only one day of time and attendance information. To view a specific day, select its respective date in the calendar bar.
Show all Weeks If your work period is longer than a week and you want to enter or view time for the entire period, select the Show All Weeks checkbox (in the List and Table views only).

Time Management System Employee User Guide
Page 35
Exceptions Tab An exception is a conflict noted between your time and attendance information and the rules under which your time sheet is processed. Exceptions generate messages which appear in the Exceptions tab on the Time Entry screen. Some messages are informational and require no action; others require a satisfactory resolution before the time sheet can be successfully submitted. Error level exceptions must be corrected before the respective time is paid.
The Exceptions tab presents exceptions. Each exception shows the:
Date of the exception
Exception message describing the problem
Severity of the exception (Informational, Warning or Error)
Any action that may be required (appears when applicable)
Exception messages are color-coded to identify the level of severity:
Red: Errors present
Yellow: Warnings present
White: No exceptions or only informational messages present
By default, exception messages are displayed in decreasing order of severity.
The rank of severity codes, from highest to lowest, is as follows:
SEVERITY LEVEL FIELD OPTIONS
Most Severe
Least Severe
Error
Warning
Informational message
No Exceptions
1. Select any column header (Date, Exception Message or Action Required) to reorder the list.
2. Select the arrow which appears next to the column name to select a different sort order.
3. Time entries associated with exceptions appear on the time sheet marked with a colored pin. Select the pin to display the exception message.

Time Management System Employee User Guide
Page 36
Leave Balances Tab The Leave Balances tab displays the number of hours available in time off banks, taking into account any hours used during the current period. It includes initial and ending balances for the period. Employees add and withdraw from those banks according to company guidelines.
For any given bank, notice the functions in the following example:
(1) Select the Show Details link in the lower right corner of a bank to see more details about the period’s bank transactions.
(2) The Floating Holiday bank is shown in the detail view. Select the Hide Details link to return to the summary
view.
Summary Tab The Summary tab reports the calculated results of the data input on the main time sheet, including overtime, shift premiums, etc. User-controlled grouping capabilities are provided on this tab. Any column is available for grouping; by default the data is grouped by Pay Code.

Time Management System Employee User Guide
Page 37
Note the following features:
(1) Select a column title to display the sorting arrow and sort in increasing order. Select it again to sort in
decreasing order. All columns can be sorted.
(2) Select and drag the line separating two columns to modify the width of the left-hand column.
(3) Select and drag a column title to change the display order of the column.
(4) Select the arrow on top of the right-hand scroll-bar to display the menu that allows you to show/hide columns by checking or un-checking the appropriate check boxes.
The figure below depicts a sample of a customized view of the Summary tab; the results are sorted in increasing hours order; the Amount and Reason columns have been hidden. Each Pay Code is summarized by Work Date. Select Split Slices to view each record of time.

Time Management System Employee User Guide
Page 38
Schedule Tab The Schedule tab displays schedules—your regularly-assigned work hours. Employees have read-only rights for their schedules.
Printing the Time Sheet You can print the information from all of the tabs in your Employee Time Entry Window.
1. In the Time Entry window, select the More button and select Print.
A Print Preview window and Print dialog box appear.

Time Management System Employee User Guide
Page 39
Note: If the Print dialog does not open, select the Print link in the upper right area of the Print Preview window.
2. Select your print options and select Print.
3. Select the Close link to close the Print Preview window.
Time Management System Employee User Guide
Page 40
Generating Reports
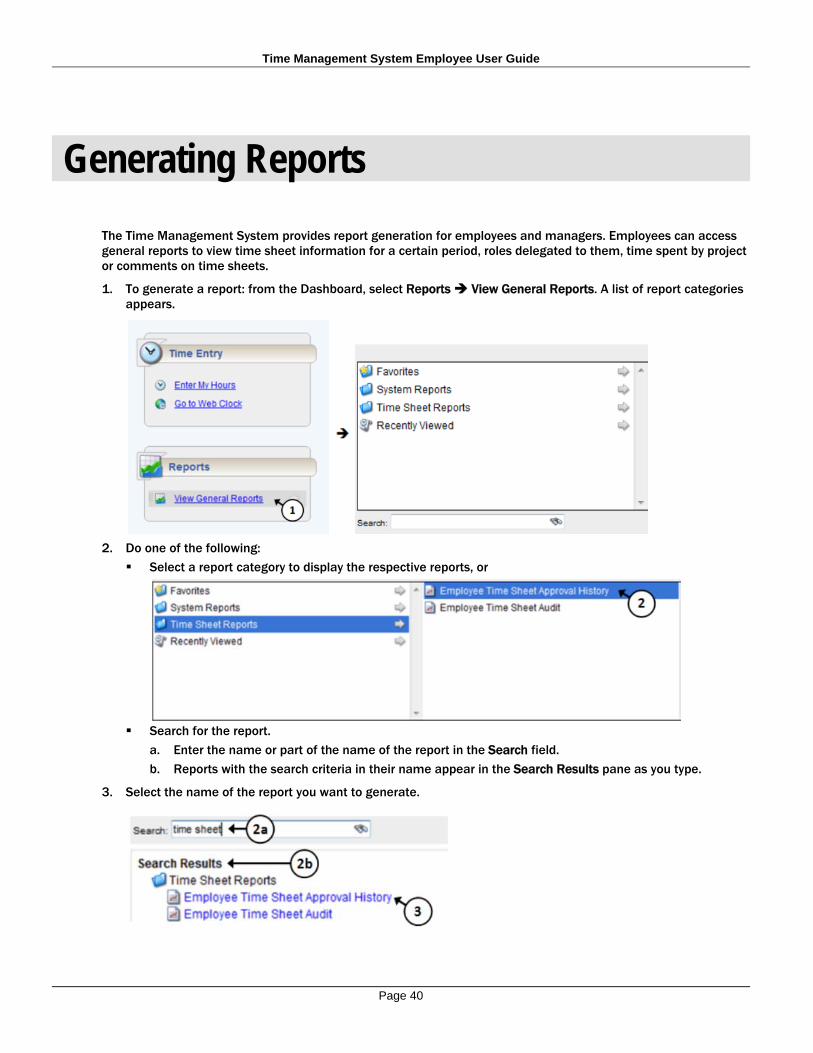
The Time Management System provides report generation for employees and managers. Employees can access general reports to view time sheet information for a certain period, roles delegated to them, time spent by project or comments on time sheets.
1. To generate a report: from the Dashboard, select Reports View General Reports. A list of report categories appears.
2. Do one of the following:
Select a report category to display the respective reports, or
Search for the report.
a. Enter the name or part of the name of the report in the Search field.
b. Reports with the search criteria in their name appear in the Search Results pane as you type.
3. Select the name of the report you want to generate.
Time Management System Employee User Guide
Page 41
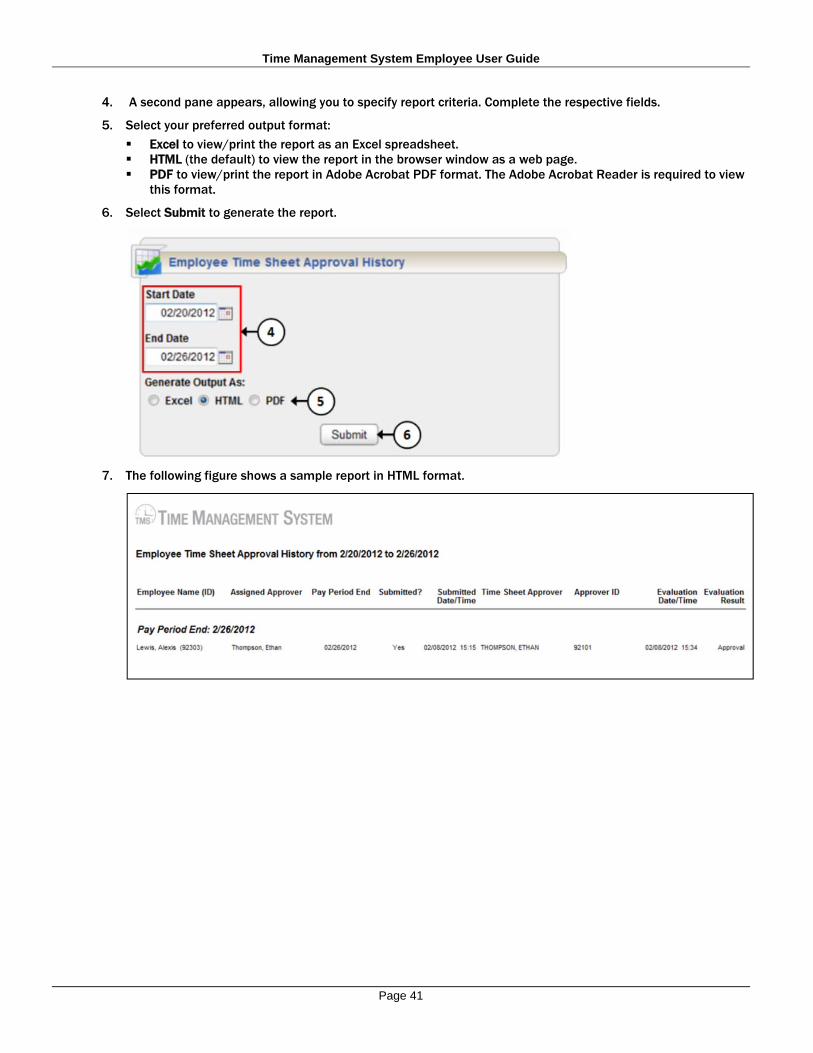
4. A second pane appears, allowing you to specify report criteria. Complete the respective fields.
5. Select your preferred output format:
Excel to view/print the report as an Excel spreadsheet. HTML (the default) to view the report in the browser window as a web page. PDF to view/print the report in Adobe Acrobat PDF format. The Adobe Acrobat Reader is required to view
this format.
6. Select Submit to generate the report.
7. The following figure shows a sample report in HTML format.

Time Management System Employee User Guide
Page 42
Report Favorites Report favorites give you quick access to frequently run reports by letting you store those reports in a top-level folder. You have the ability to specify and store your own report favorites.
Creating a Report Favorite 1. From the Dashboard, select View General Reports. On the Report window, navigate to and select the report
you want to designate as a favorite.
2. Select the Favorites button (the star). The star turns yellow.
3. The report now appears in the Favorites folder.
Removing a Report Favorite 1. To remove a report favorite, highlight the report name to be removed.
2. Select the Favorites button.
3. The report is removed from the Favorites folder and the star icon turns gray.