tiger store 2.5 administration guide · pdf fileadministration guide ... storage server system...
TRANSCRIPT

August 13, 2014
Tiger Store 2.5 Administration Guide

© Copyright 2008 - 2014 Tiger Technology. All rights reserved.
This publication, or parts thereof, may not be reproduced in any form, by any method, for any purpose.
TIGER TECHNOLOGY MAKES NO WARRANTY, EITHER EXPRESSED OR IMPLIED, INCLUDING BUT NOT LIMITED TO ANY IMPLIED WARRANTIES, OF MERCHANTABILITY OR FITNESS FOR A PARTICULAR PURPOSE, REGARDING THESE MATERIALS AND MAKES SUCH MATERIALS AVAILABLE SOLELY ON AN “AS-IS” BASIS.
IN NO EVENT SHALL TIGER TECHNOLOGY BE LIABLE TO ANYONE FOR SPECIAL, COLLATERAL, INCIDENTAL, OR CONSEQUENTIAL DAMAGES IN CONNECTION WITH OR ARISING OUT OF PURCHASE OR USE OF THESE MATERIALS. THE SOLE AND EXCLUSIVE LIABILITY TO TIGER TECHNOLOGY, REGARDLESS OF THE FORM OF ACTION, SHALL NOT EXCEED THE PURCHASE PRICE OF THE MATERIALS DESCRIBED HEREIN.
Tiger Technology reserves the right to revise and improve its products as it sees fit. This publication describes the state of this product at the time of its publication, and may not reflect the product at all times in the future.
THIRD-PARTY TRADEMARKS
All other brand names, product names, or trademarks belong to their respective holders.
Manual Revision and Control
Title: Tiger Store Administration GuideSoftware version: Tiger Store 1.0Date: August 13, 2014
Revision Record
Date Description Page Version
20 Jan 2014 Initial Draft

3
Table of Contents
1 Getting Started with Tiger Store 5Introducing Tiger Store. . . . . . . . . . . . . . . . . . . . . . . . . . . . . 6
The Tiger Store Workflow . . . . . . . . . . . . . . . . . . . . . . . . 6Concepts Used Throughout the Guide . . . . . . . . . . . . . . . 6Storage Server System Requirements . . . . . . . . . . . . . . . 7Tiger Client System Requirements . . . . . . . . . . . . . . . . . . 8Storage Requirements . . . . . . . . . . . . . . . . . . . . . . . . . . 11
Getting Started . . . . . . . . . . . . . . . . . . . . . . . . . . . . . . . . . . 11Installing and Uninstalling Tiger Store . . . . . . . . . . . . . . . . . . 12Accessing Tiger Store’s Web Interface . . . . . . . . . . . . . . . . . . 15
Changing the Password for the Web Interface . . . . . . . . . . 18Activating and Deactivating Tiger Store . . . . . . . . . . . . . . . . . 19
Activating Tiger Store . . . . . . . . . . . . . . . . . . . . . . . . . . 19Deactivating Tiger Store . . . . . . . . . . . . . . . . . . . . . . . . . 24
2 Setting Up Tiger Clients 31Installing and Uninstalling the Tiger Client Software. . . . . . . . . 33Managing Storage Server(s) on a Tiger Client . . . . . . . . . . . . . 35
Creating a List of Storage Servers . . . . . . . . . . . . . . . . . . 35Connecting and Disconnecting to a Storage Server . . . . . . 38
Overwriting The Volume Mount Location (Windows) . . . . . . . . . 39Controlling Clients from The Web Interface . . . . . . . . . . . . . . . 41View Connection Status . . . . . . . . . . . . . . . . . . . . . . . . . . . . 42View Traffic Information . . . . . . . . . . . . . . . . . . . . . . . . . . . . 43
3 Managing Tiger Store Storage 45Viewing Storage Information . . . . . . . . . . . . . . . . . . . . . . . . . 47
Viewing Shared Volumes Details . . . . . . . . . . . . . . . . . . . 47Viewing All Volumes Details . . . . . . . . . . . . . . . . . . . . . . 47
Sharing and Unsharing Volumes . . . . . . . . . . . . . . . . . . . . . . 48Making a Volume Offline . . . . . . . . . . . . . . . . . . . . . . . . . . . . 50

Table of Contents
4
Creating New Volumes . . . . . . . . . . . . . . . . . . . . . . . . . . . . . 51Renaming a Shared Volume . . . . . . . . . . . . . . . . . . . . . . . . . 53Selecting Volume Mount Location. . . . . . . . . . . . . . . . . . . . . . 54Controlling Defragmentation . . . . . . . . . . . . . . . . . . . . . . . . . 56
Manually Defragmenting a Shared Volume . . . . . . . . . . . . 57Performing Maintenance Operations of The Storage . . . . . . . . . 58
Checking and Repairing The File System . . . . . . . . . . . . . 58
4 System Maintenance 61Tiger Store Server Reboot Options. . . . . . . . . . . . . . . . . . . . . 62Viewing Event Reports . . . . . . . . . . . . . . . . . . . . . . . . . . . . . 63

Getting Started with Tiger Store
Introducing Tiger Store . . . . . . . . . . . . . . . . . . . . . . . 6
Getting Started . . . . . . . . . . . . . . . . . . . . . . . . . . . 11
Installing and Uninstalling Tiger Store . . . . . . . . . . . . 12
Accessing Tiger Store’s Web Interface . . . . . . . . . . . . 15
Activating and Deactivating Tiger Store . . . . . . . . . . . 19

Getting Started with Tiger Store
6
Congratulations on your purchase of Tiger Store, Tiger Technology’s complete software solution for shared storage workflows. This manual will guide you in the process of setting up and administering your Tiger Store network, and of accessing the shared volume(s) from client computers. This guide is intended for any user or administrator of Tiger Store.
You can find the most up-to-date version of this manual at the following address:http://www.tiger-technology.com/products/tstore/docs
Introducing Tiger Store
The Tiger Store WorkflowWith the help of Tiger Store you can achieve a true SAN workflow, providing multiple Windows, Mac OS X and Linux computers with concurrent high-speed access to NTFS shared volumes. For the purpose, the metadata controller computer must be connected directly or through a switch to the shared storage through 8/16G FC or 1/10GbE (for iSCSI storage). Tiger Clients can mount the shared volumes as SAN clients (8/16Gb FC or 10GbE), Fast LAN (10GbE) or LAN clients (1GbE). To prevent data corruption when multiple computers access the same file system, the computer with Tiger Store installed acts as a metadata controller that processes requests, coming from clients using the LAN connection. Each computer that has the Tiger Client software installed can mount the volumes shared by the metadata controller. Computers without the Tiger Client software cannot mount volumes shared to Tiger Clients even if they are connected to them. These computers can only mount the volumes that Tiger Store has specified that it doesn’t manage and protect.
If you have specified that your Tiger Store network is part of an Active Directory domain, requests for access to the shared volumes are authenticated against the domain controller. If Tiger Store is deployed in workgroup environment every user has full access to all data on the shared volumes.
Besides acting as a metadata controller on your SAN, Tiger Store greatly optimizes the shared storage workflow by providing you with automatic defragmentation of the shared storage volumes, storage usage and connectivity monitoring tools, etc. You can administer your Tiger Store network in the password-protected Tiger Store web interface, which is accessible to any device with a web browser that is on the same LAN as the metadata controller.
Concepts Used Throughout the Guide
Storage Server — the computer that acts as a metadata controller on the Tiger Store network and that controls Tiger Clients’ access to the shared storage. The metadata controller exchanges metadata with client computers over the Ethernet and thus provides or denies access to data on the shared volume(s). It protects the shared storage volumes from computers that see it, but don’t have the Tiger Client software installed. For the Tiger Store network to operate, the storage server

Introducing Tiger Store
7
computer must always be online. When this computer is turned off, Tiger Clients lose access to the shared storage, but the volumes it manages are still protected. The storage server holds the information about the number of client computers that can access the shared storage concurrently.
Tiger Client — each computer running the Tiger Client software, which can mount the shared volume(s) via FC, iSCSI or 1/10GbE. You can install the Tiger Client software on as many computers as you like. The storage server takes care to connect clients as long as their number doesn’t exceed the number, specified in the activation key. Each Tiger Client computer can share the volumes it has mounted or folders on them to LAN clients on the network as SMB/CIFS shares.
SAN Client — a Tiger Client computer that is connected to the shared storage directly or through a switch using 8/16Gb FC or 1/10GbE (for iSCSI storage).
Fast LAN Client — a Tiger Client computer that mounts the shared volumes using 10GbE connection to the metadata controller.
LAN client — a Tiger Client computer that mounts the shared volumes using 1GbE connection to the metadata controller. In contrast to computers on the LAN that don’t have the Tiger Client software installed and access only LAN shares of the shared storage, LAN clients mount the volumes.
Tiger Store Administrator — the user account with which any user can log on to Tiger Store’s web interface and administer the Tiger Store network. The web interface of Tiger Store is accessible to any device with a web browser that is on the same network as the storage server.
Shared volume — a volume managed by Tiger Store, which all connected Tiger Clients can mount and work with, in contrast to computers that have access to the volume but don’t have the Tiger Client software installed.
Private volume — a volume managed by Tiger Store, which is accessible only to the metadata controller, usually for performing maintenance operations. Tiger Clients and computers without the Tiger Client software installed cannot mount and work with private volumes.
Offline volume — a volume that is not managed and protected by Tiger Store and that can be mounted by any computer that has access to it. Tiger Store cannot prevent data corruption on offline volumes, when more than one computer accesses them.
Storage Server System RequirementsTo be able to play the role of a metadata controller, the computer on which you install the Tiger Store software must meet the following system requirements:

Getting Started with Tiger Store
8
• PC with 1.8GHz 64-bit (x64) processor.
• 64-bit Microsoft Windows® 7/Server 2008 R2.
• 2GB of physical RAM at least.
• 200MB of available hard-disk space for installation.
• Network LAN connection (1Gb at least).
• Fibre Channel or 1/10GbE card for connection to the storage.
Tiger Client System RequirementsEach system that you want to connect to Tiger Store as a Tiger Client must meet the following minimum system requirements:
Mac OS X:
• Intel-based Mac with 1.33GHz CPU.
• Mac OS X Snow Leopard/Snow Leopard Server (64-bit), Mac OS X Lion/Lion Server (32-bit and 64-bit), Mac OS X Mountain Lion/Mountain Lion Server (64-bit), Mac OS X Mavericks/Mavericks Server (64-bit).
Note: No support for Mac OS X versions below 10.6.
• 1GB of physical RAM at least.
• 25MB of available hard-disk space for Tiger Client software installation.
• 4Gb/8Gb/16Gb FC, 10GbE and/or 1GbE adapter for connection to the storage.
• Network LAN connection (1Gb at least) for public communication.
• The following TCP ports - 9120, 9121, 9122, 9123, 9124, 9125, 9126, 9127 - should not be blocked by a firewall if any.
Windows:
• PC with 1.33GHz processor.
• 32-bit or 64-bit Microsoft Windows® 7/Server 2008 R2, Windows® 8/Server 2012.
Note: No support for Microsoft Windows® 95, Windows® 98, Windows® NT, Millennium Edition, Windows® 2000, Windows® XP or Windows® Vista/Server 2008.
• 1GB of physical RAM at least.
• 25MB of available hard-disk space for Tiger Client software installation.
• 4Gb/8Gb/16Gb FC, 10GbE and/or 1GbE adapter for connection to the storage.

Introducing Tiger Store
9
• Network LAN connection (1Gb at least) for public communication.
• The following TCP ports - 9120, 9121, 9122, 9123, 9124, 9125, 9126, 9127 - should not be blocked by a firewall if any.
Linux:
• PC with 1.33GHz Intel processor
• Red Hat Enterprise Linux Workstation/CentOS Linux 5.x:
• 2.6.18-128.el5 (32-bit and 64-bit)
• 2.6.18-128.1.16.el5 (32-bit and 64-bit)
• 2.6.18-164.2.1.el5 (32-bit and 64-bit)
• 2.6.18-164.el5 (32-bit and 64-bit)
• 2.6.18-164.6.1.el5 (32-bit and 64-bit)
• 2.6.18-164.9.1.el5 (32-bit and 64-bit)
• 2.6.18-164.10.1.el5 (32-bit and 64-bit)
• 2.6.18-164.11.1.el5 (32-bit and 64-bit)
• 2.6.18-164.15.1.el5 (32-bit and 64-bit)
• 2.6.18-238.el5 (32-bit and 64-bit)
• Red Hat Enterprise Linux Workstation/CentOS Linux 6.x:
• 2.6.32-220.el6 (64-bit)
• 2.6.32-279.el6 (64-bit)
• 2.6.32-358.el6 (64-bit)
• Red Hat Enterprise Linux Workstation 5.x (Autodesk):
• 2.6.18-128.el5.ADSK (64-bit)
• Red Hat Enterprise Linux Workstation 6.2 (Autodesk):
• 2.6.32-220.27.1.el6.x86_64 (64-bit)
• FilmLightOS 2.x:
• kernel 2.6.18-92.1.22.el5.centos.plus (64-bit)
• kernel 2.6.18-194.11.4.el5.centos.plus (64-bit)
• SuSe Linux 10:

Getting Started with Tiger Store
10
• 2.6.16.21-0.8-default (64-bit)
• 2.6.16.21-0.8-smp (64-bit)
• 2.6.16.60-0.85.1-default (64-bit)
• 2.6.16.60-0.85.1-smp (64-bit)
• 2.6.16.60-0.103.1-default (64-bit)
• 2.6.16.60-0.103.1-smp (64-bit)
• SuSe Linux 11:
• 2.6.32.12-0.7-default (64-bit)
• 3.0.80-0.7-default (64-bit)
• 3.0.13-0.27-default (64-bit)
• DaVinci Resolve Linux:
• 2.6.18-164.el5 (64-bit)
• 2.6.18-238.el5 (64-bit)
• 2.6.32-358.el6 (64-bit)
• SGO Mistika Linux:
• 2.6.32.12-0.7-default (64-bit)
• 3.0.13-0.27-default (64-bit)
Important: Changing any of the default kernel setting may prevent Tiger Store from operating properly.
Tip: To check the exact version of the kernel used by your system, in command-line execute the following: uname -a
Note: Both uni and multiprocessor versions of the kernels are supported.
• SELinux should be disabled prior to installing the Tiger Client software.
• 1 GB of physical RAM at least.
• 25 MB of available hard-disk space for installation.
• 4Gb/8Gb/16Gb FC, 10GbE and/or 1GbE adapter for connection to the storage.
• Network LAN connection (1Gb at least) for public communication.
• The following TCP ports - 9120, 9121, 9122, 9123, 9124, 9125, 9126, 9127- should not be blocked by a firewall if any.

Getting Started
11
iSCSI Requirements Although Tiger Store is designed to work with any iSCSI initiator, it is currently certified to work with:
• Microsoft iSCSI Software Initiator
• UNH iSCSI Initiator
• Studio Network Solutions' globalSAN iSCSI initiator for OS X
• ATTO Xtend SAN iSCSI initiator
Note: If you use an iSCSI initiator not listed above, you can contact Tiger Technology support team with inquiry about possible support.
Storage RequirementsTiger Store can supports any NTFS-formatted volume to which the storage server has Read & Write access. You can connect the storage server to the storage directly or using a switch through Fibre Channel or 1/10Gb Ethernet (for iSCSI storage).
Getting StartedTo set up your Tiger Store network, you must perform the following:
1. Plan the topology of your network:
• Check the requirements for storage (see “Storage Requirements” on page 11)
• Check the requirements for the storage server (“Storage Server System Requirements” on page 7)
• Check the requirements for Tiger Clients (see “Tiger Client System Requirements” on page 8)
• Make sure the storage server and all Tiger Clients are on the same LAN (whether or not in an Active Directory domain).
• Make sure the storage server and each SAN Tiger Client can see and mount the shared storage volumes using FC or 1/10GbE, taking care not to corrupt the file system of the volumes, by preventing simultaneous access to the storage from more than one computer.
2. Install the Tiger Store software on the metadata controller (see “Installing and Uninstalling Tiger Store” on page 12) and activate Tiger Store and the Tiger Client licenses (see “Activating Tiger Store” on page 19).
3. Specify what volumes will be shared to Tiger Clients (see “Sharing and Unsharing Volumes” on page 48) and what will not be managed (see “Making a Volume Offline” on page 50)

Getting Started with Tiger Store
12
4. Download and install the Tiger Client software on each client computer (see “Installing and Uninstalling the Tiger Client Software” on page 33).
5. On each Tiger Client, connect to the metadata controller and mount the shared volumes (see “Managing Storage Server(s) on a Tiger Client” on page 35).
Installing and Uninstalling Tiger StoreYou should install the Tiger Store software on the computer that will play the role of metadata controller on your Tiger Store network. Once you install the software and activate Tiger Store on the computer, all supported storage devices that the computer sees and that meet the storage requirements can be shared to Tiger Clients, preventing computers that don’t run the Tiger Client software from mounting them.
Additionally, to allow client computers to download the Tiger Client software from the home page of Tiger Store’s web UI, you should also install the client bundle, containing the Tiger Client installation for all supported platforms.
Should you decide to change the metadata controller on your Tiger Store network, you should uninstall and deactivate the Tiger Store software from the current storage server and install and activate it on the new computer that will play the role of metadata controller. For steps about uninstalling and deactivating Tiger Store, refer to “Activating and Deactivating Tiger Store” on page 19.
Once the Tiger Store software is installed on a computer on your network, you can access and work in Tiger Store’s web interface (see “Accessing Tiger Store’s Web Interface” on page 15), in which you can activate the product on the metadata controller and the client licenses, and administer your Tiger Store network.
The Tiger Store installation creates the tbox_db user account to run maintenance tasks scheduled for it in the Tasks Scheduler of the metadata controller computer. It is important not to delete or disable neither the user account nor the tasks set to it.

Installing and Uninstalling Tiger Store
13
To install Tiger Store and the client bundle on the storage server:1. On the selected computer, log on using an account with administrative privileges.
2. Browse for and double-click the Tiger Store installation file.
The installation begins.
3. Click Next.
4. Accept the terms of the Software license agreement and click Next.

Getting Started with Tiger Store
14
5. Select the folder where to install Tiger Store and click Next.
6. Click Install and then Finish.
7. Select not to restart the computer, when prompted.
8. Browse for and double-click the Tiger Store clients bundle installation file.
The installation begins.
9. Click Next and then Install.
10.When the installation finishes, restart the computer.

Accessing Tiger Store’s Web Interface
15
Accessing Tiger Store’s Web InterfaceTiger Store can be administered through its web interface, which is accessible to every device with a web browser that is on the same network as the metadata controller, whether or not this computer has the Tiger Client software installed.
Tiger Clients can also access the web interface of a storage server they have connected to using the tray application (Windows), the menulet (Mac OS X) or command-line (Linux).
By default, the web interface uses a pre-set password:admin
It is advisable to set new password for the web interface during the initial setup of Tiger Store in order to prevent unauthorized access to the Tiger Store network administration. See “Changing the Password for the Web Interface” on page 18.
Note: Tiger Store’s web interface is accessible with most web browsers as long as JavaScript is enabled. If you experience any problems with Tiger Store's web interface, please, contact Tiger Technology support.
To access the web interface from a network computer:1. In a web browser, do one of the following:
• type the IP address of the storage server;
• type the domain name of the storage server;
Important: A DNS server on the network must resolve the IP address of the storage server to its domain name.

Getting Started with Tiger Store
16
2. Press Enter.
The web interface of Tiger Store loads.
3. Click Manage and type the password for the web interface.
Note: By default, the web interface uses a pre-set password - admin. It is advisable to change this password during the initial setup.
To access the web interface from a Tiger Client (Mac OS X and Windows):
Note: To connect to the web interface from the tray application/the menulet, you must first add the storage server to the list of accessible storage servers (see “Managing Storage Server(s) on a Tiger Client” on page 35).
1. Click the tray application/the menulet.
2. In the menu, click Open Configuration.

Accessing Tiger Store’s Web Interface
17
3. Click the name/IP address of the storage server to whose web interface you want to connect.
The web interface of Tiger Store loads in the default web browser of your computer.
4. Click Manage and type the password for the web interface.
Note: By default, the web interface uses a pre-set password - admin. It is advisable to change this password during the initial setup.
To access the web interface from a Tiger Client (Linux):
Note: To connect to the web interface from a Linux computer, you must first add the storage server to the list of accessible storage servers (see “Managing Storage Server(s) on a Tiger Client” on page 35).
1. In command-line, type this:tclient -config [number/host/IP address]
where [number/host/IP address] is the IP address of the storage server or its number in your list of storage servers.

Getting Started with Tiger Store
18
2. Press Enter.
The web interface of the selected metadata controller loads in the default web browser of your computer.
3. Click Manage and type the password for the web interface.
Note: By default, the web interface uses a pre-set password - admin. It is advisable to change this password during the initial setup.
Changing the Password for the Web InterfaceBy default, Tiger Store’s web interface is accessible after supplying a predefined password (admin). It is advisable to change this password during the initial setup as after that the web interface becomes accessible to every computer on the same network whether or not it runs the Tiger Client software.
You can change the password for the web interface at any time.

Activating and Deactivating Tiger Store
19
To change the web interface password:1. In the left pane of Tiger Store’s web interface, click System and then Settings.
The Settings page loads.
2. In the Management Password field, enter the current password and the new password in the respective fields, and then click Set Password.
Activating and Deactivating Tiger Store
Activating Tiger StoreTo benefit from Tiger Store you have to activate both the Tiger Store and Tiger Client licenses in the web interface.
Important: Until you activate Tiger Store on the metadata controller, the volumes it is connected to are not protected from data corruption and cannot be shared to Tiger Clients.
The Tiger Client license holds information about the type and number of clients that can connect concurrently to the shared volumes. Tiger Client licenses are activated on the metadata controller and there is no need for activation on client computers. This allows you to install the Tiger Client software on as many computers as you wish. Should a Tiger Client attempt to connect to the

Getting Started with Tiger Store
20
metadata controller and mount the volumes shared by it, the metadata controller checks if there are available connections and either provides access to its volumes, or denies it until another Tiger Client is disconnected and provides free connection to the shared storage.
The activation procedure of both Tiger Store and Tiger Client consists of two parts - obtaining an activation key on the licensing server and activating the license in the web interface of Tiger Store. To facilitate this process, Tiger Store offers two methods for activation - automatic and manual. Automatic activation connects you to the licensing server, generates an activation key, and activates it on the computer. In case the machine from which you want to activate Tiger Store is not connected to the Internet, or you want to store the activation key, you should use the manual activation method.
Important: To activate the Tiger Clients license, you must first activate Tiger Store on the metadata controller.
To activate the Tiger Store and Tiger Client licenses automatically:1. In the left menu of Tiger Store’s web interface, click System and then About.
The About page loads. It displays license information about the metadata controller.
2. Click Automatic Activation.
The Automatic Activation dialog appears.

Activating and Deactivating Tiger Store
21
3. Enter your order name and password, and click Activate.
Important: The order name and the password are case sensitive.
Both the Tiger Store and the Tiger Client licenses are activated on the metadata controller.
To activate Tiger Store manually:1. In the left menu of Tiger Store’s web interface, click System and then About.
The About page loads. It displays license information about the metadata controller.
2. Click Manual Activate Server.
The License Activation dialog appears.
3. Copy the serial number and in a web browser go tohttps://license.tiger-technology.com
Tip: You can click the address of the licensing server in the License Activation dialog to enter the licensing site.
4. In the home page of the licensing server, enter your order name and password in the corresponding fields, and click Log in.

Getting Started with Tiger Store
22
Note: If you enter the Tiger Technology licensing site for the first time, you should fill the registration form to continue.
Important: The order name and the password are case sensitive.
The server displays information about your account.
5. In the Licensing Server menu, click Activate Server.
The Activate a Server page appears.
6. Paste the serial number for your copy of Tiger Store and click Generate Activation Key.
The licensing server generates an activation key.
7. Copy the Activation key.
8. In the License Activation dialog in the Tiger Store web interface, paste the key generated for your copy of Tiger Store, and click OK.
The About page displays the activation status of the metadata controller and the type of license used.

Activating and Deactivating Tiger Store
23
To activate the Tiger Clients license manually:1. In the left menu of Tiger Store’s web interface, click System and then About.
The About page loads. It displays license information about the metadata controller.
2. Click Manual Activate Clients.
The License Activation dialog appears.
3. Copy the serial number and in a web browser go tohttps://license.tiger-technology.com
Tip: You can click the address of the licensing server in the License Activation dialog to enter the licensing site.
4. In the home page of the licensing server, enter your order name and password in the corresponding fields, and click Log in.
Note: If you enter the Tiger Technology licensing site for the first time, you should fill the registration form to continue.

Getting Started with Tiger Store
24
Important: The order name and the password are case sensitive.
The server displays information about your account.
5. In the Licensing Server menu, click Activate Clients.
The Activate Clients page appears.
6. Paste the serial number for your Tiger Client license and click Generate.
The licensing server generates an activation key.
7. Copy the Activation key.
8. In the License Activation dialog in the Tiger Store web interface, paste the key generated for your Tiger Client license, and click OK.
The About page displays the activation status of the Tiger Clients and the type of license used.
Deactivating Tiger StoreWhen you need to assign another computer as a metadata controller, you need to uninstall and deactivate the Tiger Store and Tiger Client licenses from the current metadata controller in order to be able to use them on another computer.
When you want to transfer your licenses to another machine, you have to obtain new activation keys (as the activation key is granted per machine) and return the old one by deactivating your licenses for this computer. After deactivating Tiger Store on the current storage server, you will not be able to activate it again with the same key even if you reinstall Tiger Store. There is no need to deactivate the Tiger Client licenses as they can be activated only after activating Tiger Store on the metadata controller.

Activating and Deactivating Tiger Store
25
Important: In case the current storage server has failed and you cannot start it in order to deactivate the licenses on it, contact Tiger Technology support for instructions.
The deactivation procedure of the licenses consists of two parts - obtaining a deactivation key and deactivating the licenses on Tiger Technology’s licensing server in order to obtain new activation keys. You can choose between two methods for deactivation - automatic and manual. The automatic method automatically deactivates the licenses on your computer and on the licensing server. In case your computer is not connected to the Internet, you can also use the manual deactivation and deactivate the licenses on the licensing server later or from another machine.
To uninstall and obtain deactivation key manually:1. Display the Control Panel.
2. Double-click Programs and Features.
3. Right-click Tiger Store and select Uninstall.
You are prompted to confirm that you want to remove Tiger Store.
4. Click Yes, to confirm.
5. Click Yes to continue with the uninstallation.
The deactivation wizard starts.
6. Select “Yes, return license to server,” and click Next.

Getting Started with Tiger Store
26
7. Select Manual Deactivation, and click Next.
The deactivation wizard lists the serial number and activation key of your Tiger Store/Tiger Client licenses and generates a deactivation key.
8. Click Next.
A text file (Tiger Store_Keys.txt) containing the serial number, activation and deactivation keys, is automatically saved on the Desktop of the currently logged user.
9. When prompted, restart the computer.
To deactivate Tiger Store on the licensing server:1. In a web browser, go to
https://license.tiger-technology.com
2. In the home page of the licensing server, enter your order name and password in the corresponding fields, and click Log in.

Activating and Deactivating Tiger Store
27
3. In the licensing server Menu, click Order Information.
The licensing server lists all activated Tiger Store/Tiger Client licenses with their serial numbers and activation keys.
4. In Server Licenses, click the Deactivate icon.
The Deactivate License page appears.
5. Paste the deactivation key in the corresponding field, and click Deactivate.
The Tiger Store/Tiger Client licenses in your order are deactivated and can be activated on another metadata controller.
To deactivate Tiger Store automatically:1. Display the Control Panel.
2. Double-click Programs and Features.

Getting Started with Tiger Store
28
3. Right-click Tiger Store and select uninstall.
You are prompted to confirm that you want to remove Tiger Store.
4. Click Yes, to confirm.
Tiger Store warns you that the volumes will become inaccessible to Tiger Clients.
5. Click Yes to continue with the uninstallation.
The deactivation wizard starts.
6. Select “Yes, return license to server,” and click Next.
7. Select Automatic Deactivation.
8. Enter your order name and password, then click Next.
Note: The order name and the password are case sensitive.

Activating and Deactivating Tiger Store
29
Important: If you are not connected to the Internet or the licensing site is currently unavailable, the Setup will transfer you to manual deactivation.
The deactivation wizard automatically generates a deactivation key and deactivates your Tiger Store and Tiger Client licenses on the licensing server.
9. When prompted, restart the computer.

Getting Started with Tiger Store
30

Setting Up Tiger Clients
Installing and Uninstalling the Tiger Client Software . . 33
Managing Storage Server(s) on a Tiger Client . . . . . . 35
Overwriting The Volume Mount Location (Windows) . . 39
Controlling Clients from The Web Interface . . . . . . . . 41
View Connection Status . . . . . . . . . . . . . . . . . . . . . . 42
View Traffic Information . . . . . . . . . . . . . . . . . . . . . 43

Setting Up Tiger Clients
32
Besides being connected to the storage server and the Tiger Store metadata controller, to be able to mount and work with the shared volumes, client computers need to run the Tiger Client software. You can install the Tiger Client software on each computer that meets the minimum system requirements (see “Tiger Client System Requirements” on page 8). All other computers that are on the same LAN, can mount a shared volume as a regular CIFS/SMB share. Once you install the Tiger Client software, you can use the Tiger Client tray application (Windows), the menulet (Mac OS X) or command-line (Linux) to:
• Create a list of the storage servers on your network (see “Creating a List of Storage Servers” on page 35).
• Connect to and disconnect from Tiger Store server on your list and mount/dismount the volumes they share (see “Connecting and Disconnecting to a Storage Server” on page 38).
• Overwrite the volume mount location on Windows Tiger Client (see “Overwriting The Volume Mount Location (Windows)” on page 39)
• View connection status (see “View Connection Status” on page 42).
• Easily access Tiger Store’s web interface (see “Accessing Tiger Store’s Web Interface” on page 15).
In the Tiger Store web interface, you can also view traffic information for Tiger Clients (see “View Traffic Information” on page 43).

Installing and Uninstalling the Tiger Client Software
33
Installing and Uninstalling the Tiger Client SoftwareTo download and install the Tiger Client software (Mac OS X and Windows):1. Open the web interface of Tiger Store (see “Accessing Tiger Store’s Web Interface” on page 15).
2. Find the Tiger Client installation file for your operating system and click Download.
3. When the installation file downloads to your computer, double-click it to start the installation.
4. Follow the on-screen instructions and when prompted, restart your computer.
The Tiger Client icon appears in the Menu Bar/System Tray of your computer.

Setting Up Tiger Clients
34
To download and install the Tiger Client software (Linux):1. Open the web interface of Tiger Store (see “Accessing Tiger Store’s Web Interface” on page 15).
2. Find the Tiger Client installation file for your operating system and click Download.
3. When the installation file downloads to your computer, log on to the Linux system as root.
4. In command-line, type:rpm -i <path to the Tiger Client .rpm file>
5. Press Enter.
6. Restart your computer.
To uninstall the Tiger Client software (Windows):1. Display the Control Panel.
2. Double-click Programs and Features.
3. Right-click Tiger Client and select Uninstall.
You are prompted to confirm that you want to remove the Tiger Client software.
4. Click Yes, to confirm.
Tiger Client uninstallation warns you that you will have to reboot the computer to complete the uninstallation.

Managing Storage Server(s) on a Tiger Client
35
5. Click OK.
6. When prompted, restart the computer.
To uninstall the Tiger Client software (Mac OS X):1. Go to Applications | Tiger Client.
2. Double-click Uninstall.
3. Provide administrator’s user name and password.
4. When prompted, confirm that you want to uninstall the Tiger Client software.
To uninstall the Tiger Client software (Linux):1. Log on to the Linux system as root.
2. In command-line, type:rpm -e Tbox
3. Press Enter.
Managing Storage Server(s) on a Tiger ClientManaging the storage servers means creating a list of all available storage servers and connecting/disconnecting to any of them in order to mount and work with the volumes they share.
You can manage the storage server(s) on your computer using the tray application (Windows), the menulet (Mac OS X) and the command-line interface (Linux).
Creating a List of Storage ServersOnce you install the Tiger Client software on your computer, you can create a list of all Tiger Store servers that you see. Then, you can connect and disconnect to any of the servers on your list in order to mount/dismount the volumes they share.
Important: On Fast LAN clients to avoid being redirected through the 1GbE port, it is advisable to add the Tiger Store appliance to the storage servers list with the IP address set for the 10GbE port.
Whenever you change the name or IP address of a storage server that is already added to a Tiger Client’s list of storage servers, you may have to re-add it to the storage servers’ list.
Specifying Avid FS Emulation
On Mac OS X and Windows, before mounting the shared storage volume(s), you can specify whether to emulate the file system of all volumes as AvidFS or not. By default, emulation for Avid is disabled. When emulation for Avid is enabled, multiple computers can access the same Avid project simultaneously, letting Avid restrict accesses to project bins that are currently in use.

Setting Up Tiger Clients
36
To change the Avid FS emulation setting for a Tiger Serve appliance you have already added to your list of storage servers, you should remove it from the list and then add it again, specifying the desired setting.
To add a storage server to the list (Mac OS X and Windows):1. Click the Tiger Client tray application/the menulet and then click Settings.
The Settings dialog appears. It lists all already added Tiger Store servers.
2. Do one of the following:
• (Windows) Click Add.
• (Mac OS X) Click the “+” button.
The Add Storage Server dialog appears.
3. Enter the name or IP address of the storage server.
4. Do one of the following:
• Select the “Mount as AvidFS” check box, to allow the selected storage server to emulate AvidFS when the volumes are mounted on your computer.

Managing Storage Server(s) on a Tiger Client
37
• Clear the “Mount as AvidFS” check box, to mount the volumes with their own file system on your computer.
5. Click OK.
The storage server appears in the list of storage servers in the Settings dialog. You can view its name and IP address, the preferred mount location of the volumes it shares for your computer and the server’s status for your computer:
• Online - the server is accessible and the volumes it shares are mounted in the preferred mount location.
• Online (AvidFS) - the server is accessible and the volumes it shares are mounted as AvidFS in the preferred mount location.
• Online (mounted as...) - the server is accessible, but at least one of the volumes it shares is not mounted in the preferred mount location.
• Online (AvidFS, mounted as...) - the server is accessible and the volumes it shares are mounted as AvidFS, but at least one of them is not mounted in the preferred mount location.
• Offline - the server is not accessible.
To add a storage server to the list (Linux):1. In command-line, type:
tclient -a [name or IP address]
where [name or IP address] is the name or IP address of the storage server.
2. Press Enter.
If you have successfully added the server to the list, the Tiger Client software automatically attempts to mount the volumes it shares on your computer.
Tip: To view all servers added to the list on your computer, type tclient -l and press Enter.
To remove a storage server from the list (Mac OS X and Windows):
Important: After you remove a storage server from the list of storage servers on your computer, volumes shared by this server are automatically dismounted from your computer.

Setting Up Tiger Clients
38
1. Click the Tiger Client tray application/the menulet and then click Settings.
The Settings dialog appears. It lists all already added Tiger Store servers.
2. Select the server you want to remove from the list and do one of the following:
• (Windows) Click Remove.
• (Mac OS X) Click the “-” button.
3. Confirm that you want to remove the server from the list.
The server is removed from the list and its volumes are dismounted from your computer.
To remove a Tiger Store server from the list (Linux):1. In command-line, type:
tclient -r [name or IP address]
where [name or IP address] is the name or IP address of the Tiger Store server.
Tip: To view all servers added to the list on your computer, type tclient -l and press Enter.
2. Press Enter.
Connecting and Disconnecting to a Storage Server
To connect to a Tiger Store server (Mac OS X and Windows):1. Click the Tiger Client tray application/the menulet and then click Connect/Disconnect.
Your list of all storage servers is displayed.
2. Click a disconnected server (a server without a check mark in front of its name/IP address) to connect to it.
The volumes this server shares are mounted on your computer.

Overwriting The Volume Mount Location (Windows)
39
To connect to a Tiger Store server (Linux):1. In command-prompt, type:
tclient -c [number/host/IP address]
where [number/host/IP address] is the IP address of the server or its number in your list of storage servers.
2. Press Enter.
Tip: To connect to all servers on your list, type tclient -c all and press Enter.
To disconnect from a Tiger Store server (Mac OS X and Windows):1. Click the Tiger Client tray application/the menulet and then click Connect/Disconnect.
Your list of all storage servers is displayed.
2. Click a connected server (a server with a check mark in front of its name/IP address) to disconnect from it and dismount the volumes it shares.
3. Confirm that you want to disconnect from the server.
Note: On Mac OS X, you are asked for confirmation only if a file operation on the shared volume is going on at the moment.
The volumes shared by this server are dismounted from your computer.
To disconnect from a Tiger Store server (Linux):1. In command-prompt, type:
tclient -d [number/host/IP address]
where [number/host/IP address] is the IP address of the server or its number in your list of storage servers.
2. Press Enter.
Tip: To disconnect from all servers on your list, type tclient -d all and press Enter.
Overwriting The Volume Mount Location (Windows)By default, each Tiger Store volume uses Automatic mount location on all Tiger Clients:
• Windows - the first available drive letter.
• Mac OS X - /Volumes.
• Linux - /mnt directory.
In the web interface of Tiger Store, you can specify a preferred drive letter as mount location of a Tiger Store volume on all Windows Tiger Clients. This way, you can make a volume to be mounted

Setting Up Tiger Clients
40
in one and the same location on all Windows Tiger Clients that see it. For more information, see “Selecting Volume Mount Location” on page 54.
Using the Tiger Client tray application, you can overwrite this setting for a particular Windows Tiger Client, by specifying different drive letter as default mount point on this computer.
To overwrite the default mount location setting for a specific Tiger Client:
Note: To overwrite the mount location of a volume, it must be disconnected from your computer.
1. Click the Tiger Store tray application and then click Settings.
The Settings dialog appears. It lists all already added Tiger Store servers.
2. Expand the node of a disconnected storage servers and select the volume whose mount location you want to overwrite.
3. Click Edit Volume.
The Edit Volume Properties dialog appears.
4. Do one of the following:

Controlling Clients from The Web Interface
41
• Select Automatic to let the volume mount on your computer using the first available drive letter.
• Select Drive Letter and in the drop-down box select a drive letter.
Note: Tiger Store doesn’t allow you to select a drive letter that is already in use on your computer.
5. Click OK.
The volume will be mounted in the new mount location on your computer the next time you mount it.
Controlling Clients from The Web InterfaceThe Clients page of the web interface lists all Tiger Clients that are currently connected to the Tiger Store server. Each Tiger Client is represented by a tile that gives you the following information about the computer:
• Name;
• IP address;
• Operating system;
• Version of the Tiger Client software;
• Connectivity type - LAN or Fibre Channel;
In the tile of a Tiger Client in the Clients page, you can force disconnect just a selected Tiger Client from the shared volumes it sees. This way you can free its connection for another Tiger Client.

Setting Up Tiger Clients
42
Important: By disconnecting a Tiger Client from a shared volume, you cancel any file operation going on at the moment on that volume that this computer may be performing.
Note: To connect again to the Tiger Store volume(s), each client computer should manually connect to the server following the steps in “Connecting and Disconnecting to a Storage Server” on page 38.
To force disconnect a selected client computer:1. In the left pane of Tiger Store’s web interface, click Clients.
The Client page loads. It lists all currently connected Tiger Clients.
2. Find the tile of the computer that you want to disconnect and click Disconnect.
Tiger Store disconnects the selected Tiger Client from all shared volumes.
View Connection StatusThe Tiger Client tray application/menulet icon on your computer shows the connectivity status of your computer:
• Windows
• - connected as SAN client to all servers in the list;
• - connected as LAN client to all servers in the list;
• - there’s problem with the connection between your computer and one or more servers in the servers list;
• Mac OS X

View Traffic Information
43
• - connected to all servers in the servers list;
• - there’s problem with the connection between your computer and one or more servers in the servers list;
Note: On Mac OS X, you can check the type of connection by the icon of each Tiger Store volume mounted on your computer:
- volume is mounted over Fibre Channel;
- volume is mounted over the Ethernet;
On Linux, to view the connectivity status of your computer for each server on the storage servers list, type this and press Enter:tclient -l
• Online - the server is online, but you are not connected to it;
• Mounted (LAN) - your computer is connected as a LAN client to all servers on the storage servers list;
• Mounted (Fibre) - your computer is connected as a SAN client to all servers on the storage servers list;
• Offline - there’s problem with the connection between your computer and one or more servers in the servers list;
In the web interface of Tiger Store you can view the connection type of each client computer that is currently connected to the server:
View Traffic InformationTo facilitate you in monitoring the workload of the server and the connectivity with currently connected Tiger Clients, Tiger Store’s web interface offers you the Traffic monitoring tool. You can view data and metadata traffic statistics between the storage and one or all currently connected Tiger Clients for a selected period.
You can also use the Traffic monitoring tool to determine the activity of a Tiger Client you want to disconnect from the shared storage.
Windows Mac OS X Linux
SAN Member
LAN Client

Setting Up Tiger Clients
44
To view traffic information:1. In the left pane of Tiger Store’s web interface, click Traffic.
The Traffic page appears.
2. In the drop-down box above the graph, select the type of metric (volume I/O in MB/s, volume I/O in requests/s, network I/O in MB/s, network packets/s, and number of open operations).
3. In the drop-down box below the graph, select the time interval for which you want statistics.
The Traffic page displays a graph showing you the statistics for the parameters you’ve chosen in the respective drop-down boxes.
Tip: Instead of refreshing the web page to update the results displayed, select the “Update automatically” check box to allow the web interface to automatically update the information displayed.

Managing Tiger Store Storage
Viewing Storage Information . . . . . . . . . . . . . . . . . . 47
Sharing and Unsharing Volumes . . . . . . . . . . . . . . . . 48
Making a Volume Offline . . . . . . . . . . . . . . . . . . . . . 50
Creating New Volumes . . . . . . . . . . . . . . . . . . . . . . . 51
Renaming a Shared Volume . . . . . . . . . . . . . . . . . . . 53
Selecting Volume Mount Location . . . . . . . . . . . . . . . 54
Controlling Defragmentation . . . . . . . . . . . . . . . . . . . 56
Performing Maintenance Operations of The Storage . . 58

Managing Tiger Store Storage
46
You can use Tiger Store with pre-formatted storage (see “Storage Requirements” on page 11) or you can create new volumes on the disks seen by the server after you install Tiger Store.
You can manage the Tiger Store storage in the following ways:
• Share/unshare a volume (see “Sharing and Unsharing Volumes” on page 48).
• Make a volume offline (see “Making a Volume Offline” on page 50).
• Create a new volume (see “Creating New Volumes” on page 51).
• Rename a volume (see “Renaming a Shared Volume” on page 53).
• Set volume mount location on Windows Tiger Clients (see “Selecting Volume Mount Location” on page 54).
• Perform maintenance operations on a volume:
• Enable/disable auto-defragmentation of the shared volume(s) (see “Controlling Defragmentation” on page 56).
• Manually defragment a shared volume, when auto-defragmentation is disabled (see “Manually Defragmenting a Shared Volume” on page 57).
• Check and repair the file system of a volume (see “Checking and Repairing The File System” on page 58).
Some of the above operations on the shared storage require higher protection. That is why before you perform them, you should either unshare the volume for Tiger Clients or enter Maintenance mode. Entering Maintenance mode automatically disconnects all client computers from the shared volumes, that is why it is advisable to make sure that no file operation is being interrupted by entering Maintenance mode. After exiting Maintenance mode client computers are not automatically reconnected to the shared volume and have to manually connect to the server in order to mount the volume.
Important: If the storage server is rebooted while in Maintenance mode, any maintenance operation going on at the moment is canceled and clients can re-connect to it.

Viewing Storage Information
47
Viewing Storage Information
Viewing Shared Volumes DetailsYou can view details about volumes shared to Tiger Clients in the Shared Volumes page of the web interface. It displays all shared volumes as separate volume tiles and you can view the following details:
• Volume name.
• Pie chart of the volume capacity with free and used space statistics.
• File system details - number of files and folders on the volume, and fragmentation statistics.
• Number of connected clients.
• Default mount location of the volume on all Windows computers.
Viewing All Volumes DetailsIn the Volumes page (Storage Management | Volumes) each supported volume seen by the storage server is presented with a separate tile. The volume tile in the Volumes page gives you information about the file system, size, partition and disk type, and the mode of the volume for Tiger Clients (shared, offline or private).

Managing Tiger Store Storage
48
Sharing and Unsharing VolumesVolumes in the Tiger Store network can have one of the following states:
Shared — the volume can be mounted only on Tiger Clients;
Private — the volume is accessible to the storage server only and neither Tiger Clients, nor computers without the Tiger Client software can mount it and work with it;
Offline — the volume is not managed by Tiger Store and can be mounted by any computer that sees it;
By default, when you install Tiger Store for the first time, all existing volumes manageable by the storage server are set to Private mode. You can chose which ones of them to share to Tiger Clients (by making them shared) and which ones to computers without the Tiger Client software installed (by making them offline).
Whenever you perform a maintenance operation like checking and repairing the file system of a volume, instead of disconnecting Tiger Clients from all shared volumes by entering Maintenance mode, you can unshare the volume on which you will perform the respective maintenance operation and after that share it again.
To share a volume to Tiger Clients:
Important: If you share an Offline volume, all non-Tiger Client computers that access it will dismount it and will lose any unsaved data on that volume.

Sharing and Unsharing Volumes
49
1. In the left pane of Tiger Store’s web interface, click Storage Management and then Volumes.
The Volumes page loads. It displays the tiles of all volumes seen by the storage server.
2. Find the tile of the volume, which you want to share and in the drop-down box select Shared.
3. Confirm that you want to share the volume to Tiger Clients.
The volume is shared to all Tiger Clients that have access to it.
To make a volume Private for the storage server:
Important: If you make Private an Offline volume, all non-Tiger Client computers that access it will dismount it and will lose any unsaved data on that volume.

Managing Tiger Store Storage
50
1. In the left pane of Tiger Store’s web interface, click Storage and then Volumes.
The Volumes page loads. It displays the tiles of all volumes seen by the storage server.
2. Find the tile of the volume, which you want to unshare and in the drop-down box select Private.
3. Confirm that you want to make the volume Private for the storage server.
The volume is made Private for the storage server and all computers that had access to it (Tiger Clients or non-Tiger Clients) can no longer mount it.
Making a Volume OfflineBy default, Tiger Store manages all volumes, meeting the storage requirements that the storage server is connected to. Whether or not the storage server shares them to Tiger Clients, these volumes are protected and cannot be mounted by computers that don’t run the Tiger Client software, even though they may have access to these volumes. To let non-Tiger Client computers work and mount volumes that the storage server sees, you should remove Tiger Store’s protection over them. You can do this by making them Offline. An Offline volume is accessible to any computer that sees that volume.

Creating New Volumes
51
Important: As offline volumes are not protected by Tiger Store, you should take care not to let more than one computer to mount them at a time in order to prevent data corruption on them.
To make a volume offline (remove Tiger Store protection):
Important: If you make a shared volume Offline, all Tiger Clients that access it will dismount it and will lose any unsaved data on that volume.
1. In the left pane of Tiger Store’s web interface, click Storage and then Volumes.
The Volumes page loads. It displays the tiles of all volumes seen by the storage server.
2. Find the tile of the volume, which you want to share and in the drop-down box select Offline.
3. Confirm that you want to make the volume Offline.
The volume is made Offline and all non-Tiger Client computers that see it can mount it.
Creating New VolumesYou can create a new volume on the computer that is storage server after you enter Maintenance Mode.

Managing Tiger Store Storage
52
You can also create a new volume on the disks of a volume seen by the storage server from any non-Tiger Client computer that sees these disks, as long as the volume is made Offline in the Tiger Store interface (see “Making a Volume Offline” on page 50).
Important: All volumes created on the storage server are automatically shared to Tiger Clients.
To create a new volume:
Important: Creating a new volume is an operation that requires entering Maintenance mode. Entering Maintenance mode automatically disconnects all Tiger Clients from the shared storage and stops any file operation going on at the moment.
1. In the left pane of Tiger Store’s web interface, click System and then Maintenance.
2. In the Maintenance page, click Enter Maintenance Mode.
3. Confirm that you want to enter Maintenance mode, when prompted.
The storage server automatically disconnects all Tiger Clients currently accessing the volumes and the button changes to Exit Maintenance mode.
Important: If you exit Maintenance mode or the storage server is rebooted while in Maintenance mode, any maintenance operation going on at the moment is canceled and clients can re-connect to Tiger Store.
4. On the storage server, create the new volume, following the steps described in your OS documentation.
5. In the left pane of Tiger Store’s web interface, click System and then Maintenance.
6. In the Maintenance page, click Exit Maintenance Mode.
7. In the left pane of Tiger Store’s web interface, click Storage Management and then Volumes.

Renaming a Shared Volume
53
8. Do one of the following:
• to share the volume to Tiger Clients, in the tile of the newly created volume, click Shared.
• to let non-Tiger Client computers access the volume, in the tile of the newly created volume, click Offline.
Renaming a Shared VolumeThe name of each shared volume is used as its label on Tiger Clients. You can change the name of a shared volume at any time. Computers that have mounted a shared volume with its old name can see it with its new name only after reconnecting to the storage server.
To rename a shared volume:1. In the left pane of Tiger Store’s web interface, click Shared Volumes.
The Shared Volumes page loads.

Managing Tiger Store Storage
54
2. Click the name of the volume in the tile.
The Rename Volume dialog appears.
3. Enter a new name of the volume and click OK.
The new volume name is displayed on client computers only after they remount the volume.
Selecting Volume Mount LocationBy default, each shared volume uses Automatic mount location on all client computers:
• Windows - the first available drive letter.
• Mac OS X - /Volumes.
• Linux - /mnt directory.
In the web interface of Tiger Store, you can specify a preferred drive letter as mount location of a shared volume on all Windows Tiger Clients. This way, you can make a volume to be mounted in one and the same location on all Windows machines that see it.
Note: If you specify a drive letter as default mount location, but this drive letter is taken on a Windows client computer, it uses Automatic as mount location setting.
You can also overwrite this setting for a particular Windows Tiger Client, by specifying different drive letter as default mount point on this computer. For more information, see “Overwriting The Volume Mount Location (Windows)” on page 39.
Selecting Volume Mount Location
55
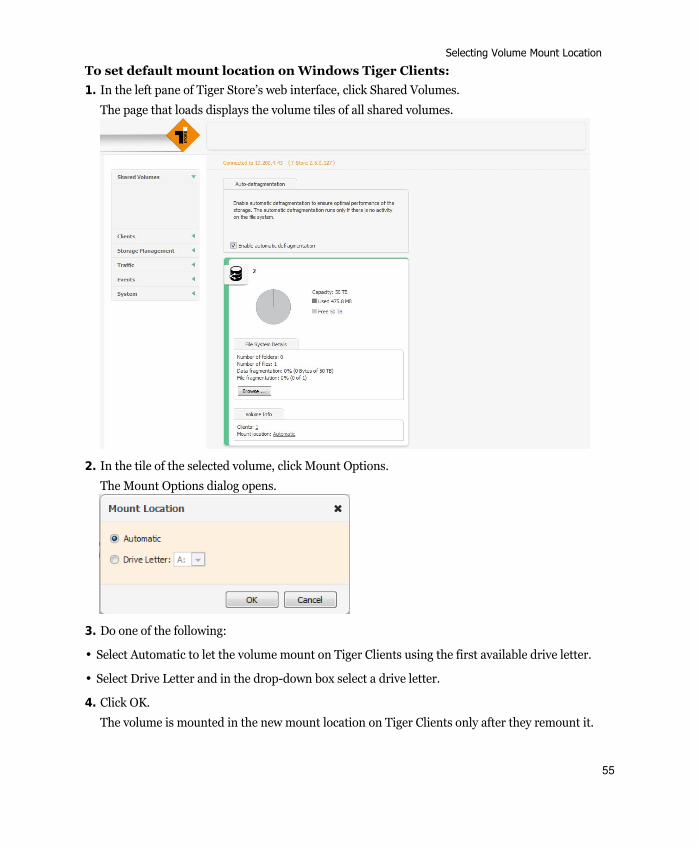
To set default mount location on Windows Tiger Clients:1. In the left pane of Tiger Store’s web interface, click Shared Volumes.
The page that loads displays the volume tiles of all shared volumes.
2. In the tile of the selected volume, click Mount Options.
The Mount Options dialog opens.
3. Do one of the following:
• Select Automatic to let the volume mount on Tiger Clients using the first available drive letter.
• Select Drive Letter and in the drop-down box select a drive letter.
4. Click OK.
The volume is mounted in the new mount location on Tiger Clients only after they remount it.

Managing Tiger Store Storage
56
Controlling DefragmentationTiger Store’s defragmentation engine is designed not only to reduce the fragmentation of the file system, but also to optimize the processing of file sequences on the shared volumes. By default, auto-defragmentation of volumes shared by Tiger Store is enabled. It defragments both data and free space on the shared volume(s) only when the system is in idle state (overall traffic to the shared storage doesn’t exceed 10MB/s for at least 30 minutes) and automatically pauses, when traffic above this threshold is detected. You can disable auto-defragmentation and run defragmentation manually from the web interface instead.
To enable/disable auto-defragmentation:1. In the left pane of Tiger Store’s web interface, click Shared Volumes.
The Shared Volumes page loads.
2. In the Auto-defragmentation field, do one of the following:

Controlling Defragmentation
57
• Select the “Enable automatic defragmentation” check box, to enable auto-defragmentation of the volume.
• Clear the “Enable automatic defragmentation” check box, to disable auto-defragmentation of the volume.
Manually Defragmenting a Shared VolumeIf you have disabled Tiger Store’s auto-defragmentation (see “Controlling Defragmentation” on page 56), it is advisable that you perform manual defragmentation of the volume(s) when needed. You can keep track of the fragmentation of each shared volume in the Volume tile - it displays information about both data fragmentation and file fragmentation. Manual defragmentation can be stopped at any time.
To manually defragment a shared volume:1. In the left pane of Tiger Store’s web interface, click Shared Volumes.
The page that loads displays the tiles of all available volumes.
2. In the tile of a selected volume, click Defragment.
While the process is running, the Volume tile displays the defragmentation progress percentage and allows you to stop the defragmentation by clicking Stop Defrag.

Managing Tiger Store Storage
58
Performing Maintenance Operations of The Storage
Checking and Repairing The File SystemYou can check and repair the file system on each volume managed by Tiger Store from the web interface. The operation goes through two stages - file system check and file system repair. While you perform the operation, Tiger Clients must not have access to the volume, that is why you should first make it private for the storage server and only after the operation finishes, share it to Tiger Clients again.
Requests for data on the volume whose file system you are checking and repairing will not be processed until the volume is again shared to Tiger Clients.
To check and repair the file system of a shared volume:1. In the left pane of Tiger Store’s web interface, click Storage Management and then Volumes.
The Volumes page loads. It displays the tiles of all volumes seen by the storage server.
2. Find the tile of the volume, which you want to unshare and in the drop-down box select Private.
3. Confirm that you want to make the volume Private for the storage server.

Performing Maintenance Operations of The Storage
59
4. Click Verify & Repair in the volume tile.
5. Click Continue to confirm that you want to check and repair the file system.
When the file system check finishes, an event is logged in the Events log and Tiger Store automatically attempts to repair the file system. Once the operation finishes, you can share the volume to Tiger Clients (see “Sharing and Unsharing Volumes” on page 48).

Managing Tiger Store Storage
60

System Maintenance
Tiger Store Server Reboot Options . . . . . . . . . . 62
Viewing Event Reports . . . . . . . . . . . . . . . . . . . 63

System Maintenance
62
System maintenance operations include Tiger Store reboot options and advanced operations like upgrading the software version, backing up and restoring backed up settings.
Tiger Store Server Reboot OptionsTo facilitate you in performing certain tasks and in order not to obstruct users work with the shared storage, Tiger Store offers you several reboot options:
• Restart add-on services - restarts all add-on services, installed on Tiger Store Server (like auto defragmentation, etc.).
• Restart all services - restarts all our services and starts them in the correct order, Tiger Clients are not disconnected from the shared volumes.
• System reboot - Tiger Store Server automatically disconnects any connected Tiger Client and shuts down, then starts again. Once the system is up again, the web interface is automatically refreshed.
• Shutdown - Tiger Store Server automatically disconnects any connected Tiger Clients and shuts down.
Note: After restarting the Tiger Store Server, Tiger Clients are not automatically reconnected to it.
To issue a reboot option command:1. In the left pane of Tiger Store’s web interface, click System and then Maintenance.
The Maintenance page loads.
2. Select the desired reboot option in the drop down box.
The button below the drop down box changes according to the selected command.
3. Click the button below the drop down box to issue the selected command.

Viewing Event Reports
63
Viewing Event ReportsIn the web interface allows you to view detailed reports about events regarding the shared volumes, a Tiger Client or all Tiger Clients within a selected time period. You can filter the events by three categories - informations, warning and errors.
Note: You can generate Event reports if you are currently connected to the Tiger Store server for which you generate the report.
To generate an event report:1. In the left pane of Tiger Store’s web interface, click Events.
Tip: To view events report for a specific server node only, open its node view in the web UI.
The Events page appears.
2. In the Type drop-down box, select whether to generate a report about all events or filter it to specific type only.
3. In the Period drop-down box, select the time period for which to generate the report.
4. In the Machines drop-down box, select whether to generate a report about all machines or filter it to a specific computer only.
The Events page displays graphs with the event types by date and below lists all events in descending order.

System Maintenance
64

65
indexIndex
Aaccess
Tiger Store web interface 15web interface from Linux Tiger Clients 17web interface from Mac OSX Tiger Clients 16web interface from network computers 15web interface from Windows Tiger Clients 16
activateTiger Clients automatically 20Tiger Clients manually 23Tiger Store 19Tiger Store automatically 20Tiger Store manually 21
addstorage server to the list 37storage server to Tiger Client’s list 36
auto-defragmentationdisabling 56enabling 56
Avid FSenable emulation 35
Ccheck
volume file system 58connect
Linux Tiger Client to storage server 39Mac OS X Tiger Client to storage server 38viewing status 42Windows Tiger Client to storage server 38
createnew volume 51
Ddeactivate
Tiger Store 24Tiger Store automatically 27Tiger Store manually 25
defragmentmanually volume 57
defragmentation 56disable
auto-defragmentation 56disconnect
Linux Tiger Client from storage server 39Mac OS X Tiger Client from storage server 39selected Tiger Client 42Windows Tiger Client from storage server 39
downloadTiger Client software 33, 34
Eenable
auto-defragmentation 56Avid FS emulation 35
eventsview report 63
FFast LAN Client 7
Iinstall
Tiger Client software 33, 34installing
Tiger Store Server software 13iSCSI

Index
66
requirements 11
LLAN client 7Linux
system requirements 9
MMac OS X
minimum system requirements 8manage
storage server from Tiger Clients 35mount location
overwrite 40
Ooffline
make volume offline 50offline volume 7overwrite
mount location 40
Ppassword
change 18private
make a volume private 49private volume 7
Rreboot commands 62remove
storage server from the list 37storage server from the list on Linux 38
renamevolume 53
repairvolume file system 58
requirementsstorage 11volume 11
SSAN Client 7set
default mount location 55
mount location to a volume 54share
volume to Tiger Clients 48shared volume 7
view details 47storage
requirements 11Storage Server 6storage server
manage from Tiger Clients 35system requirements
iSCSI requirements 11Linux Tiger Client 9Mac OS X Tiger Client 8Tiger Client 8Tiger Store Server 7Windows Tiger Client 8
TTiger Client 7
activate automatically 20activate manually 23disconnect selected 42system requirements 8system requirements Linux 9system requirements Mac OS X 8system requirements Windows 8view connection status 42
Tiger Client softwaredownload and install 33, 34uninstall from Linux 35uninstall from Mac OS X 35uninstall from Windows 34
Tiger Storeactivation 19add to list on Linux 37add to list on Mac OS X 36add to list on Windows 36automatic activation 20automatic deactivation 27change password 18connect to from Mac OS X 38connect to from Windows 38connect to on Linux 39deactivation 24disconnect from Linux 39disconnect from Mac OS X 39disconnect from Windows 39

Index
67
getting started 11manual activation 21manual deactivation 25reboot commands 62remove from list on Linux 38remove from list on Mac OS X 37remove from list on Windows 37
Tiger Store Administrator 7Tiger Store Server
system requirements 7Tiger Store Server software
installing 13Tiger Store volume
overwrite mount location 40traffic
viewing 43
Uuninstall
Tiger Client software from Linux 35Tiger Client software from Mac OS X 35Tiger Client software from Windows 34
unshare volume 49
Vview
connection status 42details about all volumes 47details about shared volume 47events report 63traffic information 43
volumecheck and repair 58create new 51defragmentation 56make offline 50make private 49manually defragment 57offline 7private 7rename 53requirements 11set default mount location 55set mount location 54share to Tiger Clients 48shared 7unshare 49
view details 47
Wweb interface
access from computers on the network 15access from Linux Tiger Clients 17access from Mac OS X Tiger Clients 16access from Windows Tiger Clients 16accessing 15set new password 18
Windowsminimum system requirements 8

Index
68