tibco activematrix businessworks smartmapper · pdf fileusing activematrix businessworks...
TRANSCRIPT

TIBCO ActiveMatrix BusinessWorks™ SmartMapper
User’s GuideSoftware Release 5.5June 2011

Important Information
SOME TIBCO SOFTWARE EMBEDS OR BUNDLES OTHER TIBCO SOFTWARE. USE OF SUCH EMBEDDED OR BUNDLED TIBCO SOFTWARE IS SOLELY TO ENABLE THE FUNCTIONALITY (OR PROVIDE LIMITED ADD-ON FUNCTIONALITY) OF THE LICENSED TIBCO SOFTWARE. THE EMBEDDED OR BUNDLED SOFTWARE IS NOT LICENSED TO BE USED OR ACCESSED BY ANY OTHER TIBCO SOFTWARE OR FOR ANY OTHER PURPOSE.
USE OF TIBCO SOFTWARE AND THIS DOCUMENT IS SUBJECT TO THE TERMS AND CONDITIONS OF A LICENSE AGREEMENT FOUND IN EITHER A SEPARATELY EXECUTED SOFTWARE LICENSE AGREEMENT, OR, IF THERE IS NO SUCH SEPARATE AGREEMENT, THE CLICKWRAP END USER LICENSE AGREEMENT WHICH IS DISPLAYED DURING DOWNLOAD OR INSTALLATION OF THE SOFTWARE (AND WHICH IS DUPLICATED IN THE LICENSE FILE) OR IF THERE IS NO SUCH SOFTWARE LICENSE AGREEMENT OR CLICKWRAP END USER LICENSE AGREEMENT, THE LICENSE(S) LOCATED IN THE “LICENSE” FILE(S) OF THE SOFTWARE. USE OF THIS DOCUMENT IS SUBJECT TO THOSE TERMS AND CONDITIONS, AND YOUR USE HEREOF SHALL CONSTITUTE ACCEPTANCE OF AND AN AGREEMENT TO BE BOUND BY THE SAME.This document contains confidential information that is subject to U.S. and international copyright laws and treaties. No part of this document may be reproduced in any form without the written authorization of TIBCO Software Inc.TIBCO, The Power of Now, TIBCO Adapter, TIBCO ActiveMatrix BusinessWorks, TIBCO Designer, TIBCO Administrator, TIBCO Rendezvous, TIBCO Runtime Agent, TIBCO Hawk, TIBCO Enterprise Message Service, are either registered trademarks or trademarks of TIBCO Software Inc. in the United States and/or other countries.All other product and company names and marks mentioned in this document are the property of their respective owners and are mentioned for identification purposes only.THIS SOFTWARE MAY BE AVAILABLE ON MULTIPLE OPERATING SYSTEMS. HOWEVER, NOT ALL OPERATING SYSTEM PLATFORMS FOR A SPECIFIC SOFTWARE VERSION ARE RELEASED AT THE SAME TIME. SEE THE README FILE FOR THE AVAILABILITY OF THIS SOFTWARE VERSION ON A SPECIFIC OPERATING SYSTEM PLATFORM.THIS DOCUMENT IS PROVIDED “AS IS” WITHOUT WARRANTY OF ANY KIND, EITHER EXPRESS OR IMPLIED, INCLUDING, BUT NOT LIMITED TO, THE IMPLIED WARRANTIES OF MERCHANTABILITY, FITNESS FOR A PARTICULAR PURPOSE, OR NON-INFRINGEMENT.THIS DOCUMENT COULD INCLUDE TECHNICAL INACCURACIES OR TYPOGRAPHICAL ERRORS. CHANGES ARE PERIODICALLY ADDED TO THE INFORMATION HEREIN; THESE CHANGES WILL BE INCORPORATED IN NEW EDITIONS OF THIS DOCUMENT. TIBCO SOFTWARE INC. MAY MAKE IMPROVEMENTS AND/OR CHANGES IN THE PRODUCT(S) AND/OR THE PROGRAM(S) DESCRIBED IN THIS DOCUMENT AT ANY TIME.THE CONTENTS OF THIS DOCUMENT MAY BE MODIFIED AND/OR QUALIFIED, DIRECTLY OR INDIRECTLY, BY OTHER DOCUMENTATION WHICH ACCOMPANIES THIS SOFTWARE, INCLUDING BUT NOT LIMITED TO ANY RELEASE NOTES AND "READ ME" FILES.Copyright © 1999-2011 TIBCO Software Inc. ALL RIGHTS RESERVED.TIBCO Software Inc. Confidential Information

| iii
Contents
Figures . . . . . . . . . . . . . . . . . . . . . . . . . . . . . . . . . . . . . . . . . . . . . . . . . . . . . . . . . . . . . . . . . . . . . . . . ix
Tables . . . . . . . . . . . . . . . . . . . . . . . . . . . . . . . . . . . . . . . . . . . . . . . . . . . . . . . . . . . . . . . . . . . . . . . . xiii
Preface . . . . . . . . . . . . . . . . . . . . . . . . . . . . . . . . . . . . . . . . . . . . . . . . . . . . . . . . . . . . . . . . . . . . . . .xvii
Related Documentation . . . . . . . . . . . . . . . . . . . . . . . . . . . . . . . . . . . . . . . . . . . . . . . . . . . . . . . . . . . . . . . . . . . . xviiiTIBCO ActiveMatrix BusinessWorks SmartMapper Documentation . . . . . . . . . . . . . . . . . . . . . . . . . . . . . . xviiiOther TIBCO Product Documentation . . . . . . . . . . . . . . . . . . . . . . . . . . . . . . . . . . . . . . . . . . . . . . . . . . . . . xviii
Typographical Conventions . . . . . . . . . . . . . . . . . . . . . . . . . . . . . . . . . . . . . . . . . . . . . . . . . . . . . . . . . . . . . . . . . .xix
Connecting with TIBCO Resources . . . . . . . . . . . . . . . . . . . . . . . . . . . . . . . . . . . . . . . . . . . . . . . . . . . . . . . . . . . xxiiHow to Join TIBCOmmunity . . . . . . . . . . . . . . . . . . . . . . . . . . . . . . . . . . . . . . . . . . . . . . . . . . . . . . . . . . . . . xxiiHow to Access All TIBCO Documentation . . . . . . . . . . . . . . . . . . . . . . . . . . . . . . . . . . . . . . . . . . . . . . . . . . xxiiHow to Contact TIBCO Support . . . . . . . . . . . . . . . . . . . . . . . . . . . . . . . . . . . . . . . . . . . . . . . . . . . . . . . . . . xxii
Chapter 1 Introduction. . . . . . . . . . . . . . . . . . . . . . . . . . . . . . . . . . . . . . . . . . . . . . . . . . . . . . . . . . . .1
Product Overview. . . . . . . . . . . . . . . . . . . . . . . . . . . . . . . . . . . . . . . . . . . . . . . . . . . . . . . . . . . . . . . . . . . . . . . . . . . 2How TIBCO ActiveMatrix BusinessWorks SmartMapper Addresses Business Problems . . . . . . . . . . . . . . . . 4
Features. . . . . . . . . . . . . . . . . . . . . . . . . . . . . . . . . . . . . . . . . . . . . . . . . . . . . . . . . . . . . . . . . . . . . . . . . . . . . . . . . . 5Compatibility . . . . . . . . . . . . . . . . . . . . . . . . . . . . . . . . . . . . . . . . . . . . . . . . . . . . . . . . . . . . . . . . . . . . . . . . . . . 6
Using a Common Data Model: Three Mapping Models . . . . . . . . . . . . . . . . . . . . . . . . . . . . . . . . . . . . . . . . . . . . . . 7
Architecture . . . . . . . . . . . . . . . . . . . . . . . . . . . . . . . . . . . . . . . . . . . . . . . . . . . . . . . . . . . . . . . . . . . . . . . . . . . . . . . 9Scaling TIBCO ActiveMatrix BusinessWorks SmartMapper. . . . . . . . . . . . . . . . . . . . . . . . . . . . . . . . . . . . . . . 9
Chapter 2 Lifecycle . . . . . . . . . . . . . . . . . . . . . . . . . . . . . . . . . . . . . . . . . . . . . . . . . . . . . . . . . . . . .13
Overview . . . . . . . . . . . . . . . . . . . . . . . . . . . . . . . . . . . . . . . . . . . . . . . . . . . . . . . . . . . . . . . . . . . . . . . . . . . . . . . . 14
Model Phase . . . . . . . . . . . . . . . . . . . . . . . . . . . . . . . . . . . . . . . . . . . . . . . . . . . . . . . . . . . . . . . . . . . . . . . . . . . . . 16Applications . . . . . . . . . . . . . . . . . . . . . . . . . . . . . . . . . . . . . . . . . . . . . . . . . . . . . . . . . . . . . . . . . . . . . . . . . . 17Relationships . . . . . . . . . . . . . . . . . . . . . . . . . . . . . . . . . . . . . . . . . . . . . . . . . . . . . . . . . . . . . . . . . . . . . . . . . 19Storage . . . . . . . . . . . . . . . . . . . . . . . . . . . . . . . . . . . . . . . . . . . . . . . . . . . . . . . . . . . . . . . . . . . . . . . . . . . . . . 20
Assemble Phase . . . . . . . . . . . . . . . . . . . . . . . . . . . . . . . . . . . . . . . . . . . . . . . . . . . . . . . . . . . . . . . . . . . . . . . . . . 21Using ActiveMatrix BusinessWorks SmartMapper Activities . . . . . . . . . . . . . . . . . . . . . . . . . . . . . . . . . . . . . 21Using the SmartMapper Wizard . . . . . . . . . . . . . . . . . . . . . . . . . . . . . . . . . . . . . . . . . . . . . . . . . . . . . . . . . . . 22Using the Bulk Load and Bulk Extract Activities . . . . . . . . . . . . . . . . . . . . . . . . . . . . . . . . . . . . . . . . . . . . . . . 23
Deployment Phase. . . . . . . . . . . . . . . . . . . . . . . . . . . . . . . . . . . . . . . . . . . . . . . . . . . . . . . . . . . . . . . . . . . . . . . . . 24
TIBCO ActiveMatrix BusinessWorks SmartMapper User’s Guide

iv | Contents
Management Phase . . . . . . . . . . . . . . . . . . . . . . . . . . . . . . . . . . . . . . . . . . . . . . . . . . . . . . . . . . . . . . . . . . . . . . . 25
Chapter 3 Simple Tutorial: Seed and Lookup . . . . . . . . . . . . . . . . . . . . . . . . . . . . . . . . . . . . . . . 27
Overview . . . . . . . . . . . . . . . . . . . . . . . . . . . . . . . . . . . . . . . . . . . . . . . . . . . . . . . . . . . . . . . . . . . . . . . . . . . . . . . . 28Business Scenario . . . . . . . . . . . . . . . . . . . . . . . . . . . . . . . . . . . . . . . . . . . . . . . . . . . . . . . . . . . . . . . . . . . . . 28TIBCO ActiveMatrix BusinessWorks SmartMapper Solution. . . . . . . . . . . . . . . . . . . . . . . . . . . . . . . . . . . . . 28Assumptions Made in this Tutorial . . . . . . . . . . . . . . . . . . . . . . . . . . . . . . . . . . . . . . . . . . . . . . . . . . . . . . . . . 29Working with Palettes in TIBCO Designer . . . . . . . . . . . . . . . . . . . . . . . . . . . . . . . . . . . . . . . . . . . . . . . . . . . 29
Creating the ER Model . . . . . . . . . . . . . . . . . . . . . . . . . . . . . . . . . . . . . . . . . . . . . . . . . . . . . . . . . . . . . . . . . . . . . 31
Seeding Data into the Model. . . . . . . . . . . . . . . . . . . . . . . . . . . . . . . . . . . . . . . . . . . . . . . . . . . . . . . . . . . . . . . . . 39Opening the Completed Tutorial . . . . . . . . . . . . . . . . . . . . . . . . . . . . . . . . . . . . . . . . . . . . . . . . . . . . . . . . . . 39Reviewing the Contents of the Seed_Data.xml . . . . . . . . . . . . . . . . . . . . . . . . . . . . . . . . . . . . . . . . . . . . . . . 41Reviewing the Seed All Data into the Model Process . . . . . . . . . . . . . . . . . . . . . . . . . . . . . . . . . . . . . . . . . . 41Running the Seed All Data into the Model Process. . . . . . . . . . . . . . . . . . . . . . . . . . . . . . . . . . . . . . . . . . . . 45
Reviewing and Running the Lookup Data Process. . . . . . . . . . . . . . . . . . . . . . . . . . . . . . . . . . . . . . . . . . . . . . . . 47Reviewing the Lookup Data Process . . . . . . . . . . . . . . . . . . . . . . . . . . . . . . . . . . . . . . . . . . . . . . . . . . . . . . . 47Scenario 1: The Lookup Fails . . . . . . . . . . . . . . . . . . . . . . . . . . . . . . . . . . . . . . . . . . . . . . . . . . . . . . . . . . . . 49Scenario 2: The Lookup Returns a Single Value . . . . . . . . . . . . . . . . . . . . . . . . . . . . . . . . . . . . . . . . . . . . . . 49
Chapter 4 Advanced Tutorial: SmartMapper Wizard . . . . . . . . . . . . . . . . . . . . . . . . . . . . . . . . . . 51
Overview . . . . . . . . . . . . . . . . . . . . . . . . . . . . . . . . . . . . . . . . . . . . . . . . . . . . . . . . . . . . . . . . . . . . . . . . . . . . . . . . 52Business Scenario . . . . . . . . . . . . . . . . . . . . . . . . . . . . . . . . . . . . . . . . . . . . . . . . . . . . . . . . . . . . . . . . . . . . . 52TIBCO ActiveMatrix BusinessWorks SmartMapper Solution. . . . . . . . . . . . . . . . . . . . . . . . . . . . . . . . . . . . . 52Advanced Tutorial Process . . . . . . . . . . . . . . . . . . . . . . . . . . . . . . . . . . . . . . . . . . . . . . . . . . . . . . . . . . . . . . 53
Updating Default File Locations in the Wizard Project . . . . . . . . . . . . . . . . . . . . . . . . . . . . . . . . . . . . . . . . . . . . . 54
Viewing the Create Sales Order Process . . . . . . . . . . . . . . . . . . . . . . . . . . . . . . . . . . . . . . . . . . . . . . . . . . . . . . . 55
Reviewing the SmartMapper Wizard Activity . . . . . . . . . . . . . . . . . . . . . . . . . . . . . . . . . . . . . . . . . . . . . . . . . . . . 57
Reviewing the Map All Data Activity . . . . . . . . . . . . . . . . . . . . . . . . . . . . . . . . . . . . . . . . . . . . . . . . . . . . . . . . . . . 62
Chapter 5 Loading and Extracting Data . . . . . . . . . . . . . . . . . . . . . . . . . . . . . . . . . . . . . . . . . . . . 63
Overview . . . . . . . . . . . . . . . . . . . . . . . . . . . . . . . . . . . . . . . . . . . . . . . . . . . . . . . . . . . . . . . . . . . . . . . . . . . . . . . . 64
ER Model and BusinessWorks Activities . . . . . . . . . . . . . . . . . . . . . . . . . . . . . . . . . . . . . . . . . . . . . . . . . . . . . . . 65Applications and Entities . . . . . . . . . . . . . . . . . . . . . . . . . . . . . . . . . . . . . . . . . . . . . . . . . . . . . . . . . . . . . . . . 66Relationships and Participants. . . . . . . . . . . . . . . . . . . . . . . . . . . . . . . . . . . . . . . . . . . . . . . . . . . . . . . . . . . . 67BusinessWorks Data Format Activity. . . . . . . . . . . . . . . . . . . . . . . . . . . . . . . . . . . . . . . . . . . . . . . . . . . . . . . 68
Using the Bulk Load Activity . . . . . . . . . . . . . . . . . . . . . . . . . . . . . . . . . . . . . . . . . . . . . . . . . . . . . . . . . . . . . . . . . 70
Using the SmartMapper Wizard . . . . . . . . . . . . . . . . . . . . . . . . . . . . . . . . . . . . . . . . . . . . . . . . . . . . . . . . . . . . . . 73
Using the Create Relationship Instance . . . . . . . . . . . . . . . . . . . . . . . . . . . . . . . . . . . . . . . . . . . . . . . . . . . . . . . . 75
Extracting Data to the File. . . . . . . . . . . . . . . . . . . . . . . . . . . . . . . . . . . . . . . . . . . . . . . . . . . . . . . . . . . . . . . . . . . 77
TIBCO ActiveMatrix BusinessWorks SmartMapper User’s Guide

Contents | v
Chapter 6 Managing Projects and Services . . . . . . . . . . . . . . . . . . . . . . . . . . . . . . . . . . . . . . . . .79
Overview . . . . . . . . . . . . . . . . . . . . . . . . . . . . . . . . . . . . . . . . . . . . . . . . . . . . . . . . . . . . . . . . . . . . . . . . . . . . . . . . 80
Building an Enterprise Archive (EAR) . . . . . . . . . . . . . . . . . . . . . . . . . . . . . . . . . . . . . . . . . . . . . . . . . . . . . . . . . . 81
Adding a SmartMapper Application . . . . . . . . . . . . . . . . . . . . . . . . . . . . . . . . . . . . . . . . . . . . . . . . . . . . . . . . . . . . 83
Opening a SmartMapper Project . . . . . . . . . . . . . . . . . . . . . . . . . . . . . . . . . . . . . . . . . . . . . . . . . . . . . . . . . . . . . . 86Opening a Non-Deployed SmartMapper Project . . . . . . . . . . . . . . . . . . . . . . . . . . . . . . . . . . . . . . . . . . . . . . 86Opening a Deployed SmartMapper Project . . . . . . . . . . . . . . . . . . . . . . . . . . . . . . . . . . . . . . . . . . . . . . . . . . 87
Managing Relationships. . . . . . . . . . . . . . . . . . . . . . . . . . . . . . . . . . . . . . . . . . . . . . . . . . . . . . . . . . . . . . . . . . . . . 88Create a Relationship Map . . . . . . . . . . . . . . . . . . . . . . . . . . . . . . . . . . . . . . . . . . . . . . . . . . . . . . . . . . . . . . . 89Search for a Relationship . . . . . . . . . . . . . . . . . . . . . . . . . . . . . . . . . . . . . . . . . . . . . . . . . . . . . . . . . . . . . . . . 90Remove or Edit Keys in a Relationship. . . . . . . . . . . . . . . . . . . . . . . . . . . . . . . . . . . . . . . . . . . . . . . . . . . . . . 92
Chapter 7 SmartMapper ER Model Resources . . . . . . . . . . . . . . . . . . . . . . . . . . . . . . . . . . . . . . .93
SmartMapper ER Model . . . . . . . . . . . . . . . . . . . . . . . . . . . . . . . . . . . . . . . . . . . . . . . . . . . . . . . . . . . . . . . . . . . 94Configuration Tab . . . . . . . . . . . . . . . . . . . . . . . . . . . . . . . . . . . . . . . . . . . . . . . . . . . . . . . . . . . . . . . . . . . . . . 95Advanced Tab . . . . . . . . . . . . . . . . . . . . . . . . . . . . . . . . . . . . . . . . . . . . . . . . . . . . . . . . . . . . . . . . . . . . . . . . . 95
Entity . . . . . . . . . . . . . . . . . . . . . . . . . . . . . . . . . . . . . . . . . . . . . . . . . . . . . . . . . . . . . . . . . . . . . . . . . . . . . . . . . . 96Configuration Tab . . . . . . . . . . . . . . . . . . . . . . . . . . . . . . . . . . . . . . . . . . . . . . . . . . . . . . . . . . . . . . . . . . . . . . 96Schema Tab . . . . . . . . . . . . . . . . . . . . . . . . . . . . . . . . . . . . . . . . . . . . . . . . . . . . . . . . . . . . . . . . . . . . . . . . . . 97
Relationship . . . . . . . . . . . . . . . . . . . . . . . . . . . . . . . . . . . . . . . . . . . . . . . . . . . . . . . . . . . . . . . . . . . . . . . . . . . . 98Configuration Tab . . . . . . . . . . . . . . . . . . . . . . . . . . . . . . . . . . . . . . . . . . . . . . . . . . . . . . . . . . . . . . . . . . . . . . 98
Participant . . . . . . . . . . . . . . . . . . . . . . . . . . . . . . . . . . . . . . . . . . . . . . . . . . . . . . . . . . . . . . . . . . . . . . . . . . . . . . 99Configuration Tab . . . . . . . . . . . . . . . . . . . . . . . . . . . . . . . . . . . . . . . . . . . . . . . . . . . . . . . . . . . . . . . . . . . . . . 99
JDBC-Based SmartMapper Service . . . . . . . . . . . . . . . . . . . . . . . . . . . . . . . . . . . . . . . . . . . . . . . . . . . . . . . . . 100Configuration Tab . . . . . . . . . . . . . . . . . . . . . . . . . . . . . . . . . . . . . . . . . . . . . . . . . . . . . . . . . . . . . . . . . . . . . 100JDBC Settings Tab . . . . . . . . . . . . . . . . . . . . . . . . . . . . . . . . . . . . . . . . . . . . . . . . . . . . . . . . . . . . . . . . . . . . 101Caching Tab . . . . . . . . . . . . . . . . . . . . . . . . . . . . . . . . . . . . . . . . . . . . . . . . . . . . . . . . . . . . . . . . . . . . . . . . . 106
File-Based SmartMapper Service . . . . . . . . . . . . . . . . . . . . . . . . . . . . . . . . . . . . . . . . . . . . . . . . . . . . . . . . . . . 107Configuration Tab . . . . . . . . . . . . . . . . . . . . . . . . . . . . . . . . . . . . . . . . . . . . . . . . . . . . . . . . . . . . . . . . . . . . . 107
Adapter-Based SmartMapper Service . . . . . . . . . . . . . . . . . . . . . . . . . . . . . . . . . . . . . . . . . . . . . . . . . . . . . . . 108Configuration Tab . . . . . . . . . . . . . . . . . . . . . . . . . . . . . . . . . . . . . . . . . . . . . . . . . . . . . . . . . . . . . . . . . . . . . 108Transport Tab . . . . . . . . . . . . . . . . . . . . . . . . . . . . . . . . . . . . . . . . . . . . . . . . . . . . . . . . . . . . . . . . . . . . . . . . 109Advanced Tab . . . . . . . . . . . . . . . . . . . . . . . . . . . . . . . . . . . . . . . . . . . . . . . . . . . . . . . . . . . . . . . . . . . . . . . . 109
SmartMapper Adapter Configuration . . . . . . . . . . . . . . . . . . . . . . . . . . . . . . . . . . . . . . . . . . . . . . . . . . . . . . . . 111Configuration Tab . . . . . . . . . . . . . . . . . . . . . . . . . . . . . . . . . . . . . . . . . . . . . . . . . . . . . . . . . . . . . . . . . . . . . 111JDBC Settings Tab . . . . . . . . . . . . . . . . . . . . . . . . . . . . . . . . . . . . . . . . . . . . . . . . . . . . . . . . . . . . . . . . . . . . 111Caching Tab . . . . . . . . . . . . . . . . . . . . . . . . . . . . . . . . . . . . . . . . . . . . . . . . . . . . . . . . . . . . . . . . . . . . . . . . . 111Thread Pooling Tab. . . . . . . . . . . . . . . . . . . . . . . . . . . . . . . . . . . . . . . . . . . . . . . . . . . . . . . . . . . . . . . . . . . . 112Advanced Tab . . . . . . . . . . . . . . . . . . . . . . . . . . . . . . . . . . . . . . . . . . . . . . . . . . . . . . . . . . . . . . . . . . . . . . . . 112Logging Tab . . . . . . . . . . . . . . . . . . . . . . . . . . . . . . . . . . . . . . . . . . . . . . . . . . . . . . . . . . . . . . . . . . . . . . . . . 113Startup Tab . . . . . . . . . . . . . . . . . . . . . . . . . . . . . . . . . . . . . . . . . . . . . . . . . . . . . . . . . . . . . . . . . . . . . . . . . . 114
TIBCO ActiveMatrix BusinessWorks SmartMapper User’s Guide

vi | Contents
Monitoring Tab . . . . . . . . . . . . . . . . . . . . . . . . . . . . . . . . . . . . . . . . . . . . . . . . . . . . . . . . . . . . . . . . . . . . . . . 114
Chapter 8 SmartMapper Activities . . . . . . . . . . . . . . . . . . . . . . . . . . . . . . . . . . . . . . . . . . . . . . . 117
Bulk Extract . . . . . . . . . . . . . . . . . . . . . . . . . . . . . . . . . . . . . . . . . . . . . . . . . . . . . . . . . . . . . . . . . . . . . . . . . . . . 118Configuration Tab. . . . . . . . . . . . . . . . . . . . . . . . . . . . . . . . . . . . . . . . . . . . . . . . . . . . . . . . . . . . . . . . . . . . . 118Input Tab . . . . . . . . . . . . . . . . . . . . . . . . . . . . . . . . . . . . . . . . . . . . . . . . . . . . . . . . . . . . . . . . . . . . . . . . . . . 119Output Tab . . . . . . . . . . . . . . . . . . . . . . . . . . . . . . . . . . . . . . . . . . . . . . . . . . . . . . . . . . . . . . . . . . . . . . . . . . 122Error Output Tab . . . . . . . . . . . . . . . . . . . . . . . . . . . . . . . . . . . . . . . . . . . . . . . . . . . . . . . . . . . . . . . . . . . . . 124
Bulk Load . . . . . . . . . . . . . . . . . . . . . . . . . . . . . . . . . . . . . . . . . . . . . . . . . . . . . . . . . . . . . . . . . . . . . . . . . . . . . . 125Configuration Tab. . . . . . . . . . . . . . . . . . . . . . . . . . . . . . . . . . . . . . . . . . . . . . . . . . . . . . . . . . . . . . . . . . . . . 125Input Tab . . . . . . . . . . . . . . . . . . . . . . . . . . . . . . . . . . . . . . . . . . . . . . . . . . . . . . . . . . . . . . . . . . . . . . . . . . . 130Output Tab . . . . . . . . . . . . . . . . . . . . . . . . . . . . . . . . . . . . . . . . . . . . . . . . . . . . . . . . . . . . . . . . . . . . . . . . . . 132Error Output Tab . . . . . . . . . . . . . . . . . . . . . . . . . . . . . . . . . . . . . . . . . . . . . . . . . . . . . . . . . . . . . . . . . . . . . 132
Create Entity Instance . . . . . . . . . . . . . . . . . . . . . . . . . . . . . . . . . . . . . . . . . . . . . . . . . . . . . . . . . . . . . . . . . . . . 133Configuration Tab. . . . . . . . . . . . . . . . . . . . . . . . . . . . . . . . . . . . . . . . . . . . . . . . . . . . . . . . . . . . . . . . . . . . . 133Input Tab . . . . . . . . . . . . . . . . . . . . . . . . . . . . . . . . . . . . . . . . . . . . . . . . . . . . . . . . . . . . . . . . . . . . . . . . . . . 133Output Tab . . . . . . . . . . . . . . . . . . . . . . . . . . . . . . . . . . . . . . . . . . . . . . . . . . . . . . . . . . . . . . . . . . . . . . . . . . 133Error Output Tab . . . . . . . . . . . . . . . . . . . . . . . . . . . . . . . . . . . . . . . . . . . . . . . . . . . . . . . . . . . . . . . . . . . . . 133
Update Entity Instance . . . . . . . . . . . . . . . . . . . . . . . . . . . . . . . . . . . . . . . . . . . . . . . . . . . . . . . . . . . . . . . . . . . 134Configuration Tab. . . . . . . . . . . . . . . . . . . . . . . . . . . . . . . . . . . . . . . . . . . . . . . . . . . . . . . . . . . . . . . . . . . . . 134Input Tab . . . . . . . . . . . . . . . . . . . . . . . . . . . . . . . . . . . . . . . . . . . . . . . . . . . . . . . . . . . . . . . . . . . . . . . . . . . 134Output Tab . . . . . . . . . . . . . . . . . . . . . . . . . . . . . . . . . . . . . . . . . . . . . . . . . . . . . . . . . . . . . . . . . . . . . . . . . . 134Error Output Tab . . . . . . . . . . . . . . . . . . . . . . . . . . . . . . . . . . . . . . . . . . . . . . . . . . . . . . . . . . . . . . . . . . . . . 134
Delete Entity Instance . . . . . . . . . . . . . . . . . . . . . . . . . . . . . . . . . . . . . . . . . . . . . . . . . . . . . . . . . . . . . . . . . . . . 135Configuration Tab. . . . . . . . . . . . . . . . . . . . . . . . . . . . . . . . . . . . . . . . . . . . . . . . . . . . . . . . . . . . . . . . . . . . . 135Input Tab . . . . . . . . . . . . . . . . . . . . . . . . . . . . . . . . . . . . . . . . . . . . . . . . . . . . . . . . . . . . . . . . . . . . . . . . . . . 135Output Tab . . . . . . . . . . . . . . . . . . . . . . . . . . . . . . . . . . . . . . . . . . . . . . . . . . . . . . . . . . . . . . . . . . . . . . . . . . 135Error Output Tab . . . . . . . . . . . . . . . . . . . . . . . . . . . . . . . . . . . . . . . . . . . . . . . . . . . . . . . . . . . . . . . . . . . . . 135
Create Relationship Instance . . . . . . . . . . . . . . . . . . . . . . . . . . . . . . . . . . . . . . . . . . . . . . . . . . . . . . . . . . . . . . . 136Configuration Tab. . . . . . . . . . . . . . . . . . . . . . . . . . . . . . . . . . . . . . . . . . . . . . . . . . . . . . . . . . . . . . . . . . . . . 136Input Tab . . . . . . . . . . . . . . . . . . . . . . . . . . . . . . . . . . . . . . . . . . . . . . . . . . . . . . . . . . . . . . . . . . . . . . . . . . . 136Output Tab . . . . . . . . . . . . . . . . . . . . . . . . . . . . . . . . . . . . . . . . . . . . . . . . . . . . . . . . . . . . . . . . . . . . . . . . . . 136Error Output Tab . . . . . . . . . . . . . . . . . . . . . . . . . . . . . . . . . . . . . . . . . . . . . . . . . . . . . . . . . . . . . . . . . . . . . 137
Add to Relationship Instance . . . . . . . . . . . . . . . . . . . . . . . . . . . . . . . . . . . . . . . . . . . . . . . . . . . . . . . . . . . . . . 138Configuration Tab. . . . . . . . . . . . . . . . . . . . . . . . . . . . . . . . . . . . . . . . . . . . . . . . . . . . . . . . . . . . . . . . . . . . . 138Input Tab . . . . . . . . . . . . . . . . . . . . . . . . . . . . . . . . . . . . . . . . . . . . . . . . . . . . . . . . . . . . . . . . . . . . . . . . . . . 138Output Tab . . . . . . . . . . . . . . . . . . . . . . . . . . . . . . . . . . . . . . . . . . . . . . . . . . . . . . . . . . . . . . . . . . . . . . . . . . 139Error Output Tab . . . . . . . . . . . . . . . . . . . . . . . . . . . . . . . . . . . . . . . . . . . . . . . . . . . . . . . . . . . . . . . . . . . . . 139
Delete Relationship Instance . . . . . . . . . . . . . . . . . . . . . . . . . . . . . . . . . . . . . . . . . . . . . . . . . . . . . . . . . . . . . . 140Configuration Tab. . . . . . . . . . . . . . . . . . . . . . . . . . . . . . . . . . . . . . . . . . . . . . . . . . . . . . . . . . . . . . . . . . . . . 140Input Tab . . . . . . . . . . . . . . . . . . . . . . . . . . . . . . . . . . . . . . . . . . . . . . . . . . . . . . . . . . . . . . . . . . . . . . . . . . . 140Output Tab . . . . . . . . . . . . . . . . . . . . . . . . . . . . . . . . . . . . . . . . . . . . . . . . . . . . . . . . . . . . . . . . . . . . . . . . . . 140
TIBCO ActiveMatrix BusinessWorks SmartMapper User’s Guide

Contents | vii
Error Output Tab . . . . . . . . . . . . . . . . . . . . . . . . . . . . . . . . . . . . . . . . . . . . . . . . . . . . . . . . . . . . . . . . . . . . . . 140
Lookup . . . . . . . . . . . . . . . . . . . . . . . . . . . . . . . . . . . . . . . . . . . . . . . . . . . . . . . . . . . . . . . . . . . . . . . . . . . . . . . 141Configuration Tab . . . . . . . . . . . . . . . . . . . . . . . . . . . . . . . . . . . . . . . . . . . . . . . . . . . . . . . . . . . . . . . . . . . . . 141Input Tab. . . . . . . . . . . . . . . . . . . . . . . . . . . . . . . . . . . . . . . . . . . . . . . . . . . . . . . . . . . . . . . . . . . . . . . . . . . . 141Output Tab . . . . . . . . . . . . . . . . . . . . . . . . . . . . . . . . . . . . . . . . . . . . . . . . . . . . . . . . . . . . . . . . . . . . . . . . . . 142Error Output Tab . . . . . . . . . . . . . . . . . . . . . . . . . . . . . . . . . . . . . . . . . . . . . . . . . . . . . . . . . . . . . . . . . . . . . . 142
Dynamic Lookup . . . . . . . . . . . . . . . . . . . . . . . . . . . . . . . . . . . . . . . . . . . . . . . . . . . . . . . . . . . . . . . . . . . . . . . 143Configuration Tab . . . . . . . . . . . . . . . . . . . . . . . . . . . . . . . . . . . . . . . . . . . . . . . . . . . . . . . . . . . . . . . . . . . . . 143Input Tab. . . . . . . . . . . . . . . . . . . . . . . . . . . . . . . . . . . . . . . . . . . . . . . . . . . . . . . . . . . . . . . . . . . . . . . . . . . . 144Output Tab . . . . . . . . . . . . . . . . . . . . . . . . . . . . . . . . . . . . . . . . . . . . . . . . . . . . . . . . . . . . . . . . . . . . . . . . . . 144Error Output Tab . . . . . . . . . . . . . . . . . . . . . . . . . . . . . . . . . . . . . . . . . . . . . . . . . . . . . . . . . . . . . . . . . . . . . . 144
Dynamic Delete . . . . . . . . . . . . . . . . . . . . . . . . . . . . . . . . . . . . . . . . . . . . . . . . . . . . . . . . . . . . . . . . . . . . . . . . 145Configuration Tab . . . . . . . . . . . . . . . . . . . . . . . . . . . . . . . . . . . . . . . . . . . . . . . . . . . . . . . . . . . . . . . . . . . . . 145Input Tab. . . . . . . . . . . . . . . . . . . . . . . . . . . . . . . . . . . . . . . . . . . . . . . . . . . . . . . . . . . . . . . . . . . . . . . . . . . . 146Output Tab . . . . . . . . . . . . . . . . . . . . . . . . . . . . . . . . . . . . . . . . . . . . . . . . . . . . . . . . . . . . . . . . . . . . . . . . . . 147Error Output Tab . . . . . . . . . . . . . . . . . . . . . . . . . . . . . . . . . . . . . . . . . . . . . . . . . . . . . . . . . . . . . . . . . . . . . . 147
Generate Key . . . . . . . . . . . . . . . . . . . . . . . . . . . . . . . . . . . . . . . . . . . . . . . . . . . . . . . . . . . . . . . . . . . . . . . . . . 148Configuration Tab . . . . . . . . . . . . . . . . . . . . . . . . . . . . . . . . . . . . . . . . . . . . . . . . . . . . . . . . . . . . . . . . . . . . . 148Input Tab. . . . . . . . . . . . . . . . . . . . . . . . . . . . . . . . . . . . . . . . . . . . . . . . . . . . . . . . . . . . . . . . . . . . . . . . . . . . 148Output Tab . . . . . . . . . . . . . . . . . . . . . . . . . . . . . . . . . . . . . . . . . . . . . . . . . . . . . . . . . . . . . . . . . . . . . . . . . . 148Error Output Tab . . . . . . . . . . . . . . . . . . . . . . . . . . . . . . . . . . . . . . . . . . . . . . . . . . . . . . . . . . . . . . . . . . . . . . 148
SmartMapper Wizard . . . . . . . . . . . . . . . . . . . . . . . . . . . . . . . . . . . . . . . . . . . . . . . . . . . . . . . . . . . . . . . . . . . . 149Configuration Tab . . . . . . . . . . . . . . . . . . . . . . . . . . . . . . . . . . . . . . . . . . . . . . . . . . . . . . . . . . . . . . . . . . . . . 150Input Editor Tab. . . . . . . . . . . . . . . . . . . . . . . . . . . . . . . . . . . . . . . . . . . . . . . . . . . . . . . . . . . . . . . . . . . . . . . 150SmartMapper Calls Tab . . . . . . . . . . . . . . . . . . . . . . . . . . . . . . . . . . . . . . . . . . . . . . . . . . . . . . . . . . . . . . . . 150Input Tab. . . . . . . . . . . . . . . . . . . . . . . . . . . . . . . . . . . . . . . . . . . . . . . . . . . . . . . . . . . . . . . . . . . . . . . . . . . . 154Output Tab . . . . . . . . . . . . . . . . . . . . . . . . . . . . . . . . . . . . . . . . . . . . . . . . . . . . . . . . . . . . . . . . . . . . . . . . . . 154Error Output Tab . . . . . . . . . . . . . . . . . . . . . . . . . . . . . . . . . . . . . . . . . . . . . . . . . . . . . . . . . . . . . . . . . . . . . . 155
Appendix A Adding your own GUID Generation Class . . . . . . . . . . . . . . . . . . . . . . . . . . . . . . .156
GUID Class Overview . . . . . . . . . . . . . . . . . . . . . . . . . . . . . . . . . . . . . . . . . . . . . . . . . . . . . . . . . . . . . . . . . . . . . 157
Class Overview . . . . . . . . . . . . . . . . . . . . . . . . . . . . . . . . . . . . . . . . . . . . . . . . . . . . . . . . . . . . . . . . . . . . . . . . . . 158
Sample Code For GUID Generation . . . . . . . . . . . . . . . . . . . . . . . . . . . . . . . . . . . . . . . . . . . . . . . . . . . . . . . . . . 159
Appendix B Adapter Service Configuration . . . . . . . . . . . . . . . . . . . . . . . . . . . . . . . . . . . . . . . .161
Modifying the Subscriber Service . . . . . . . . . . . . . . . . . . . . . . . . . . . . . . . . . . . . . . . . . . . . . . . . . . . . . . . . . . . . 162Configuration Tab . . . . . . . . . . . . . . . . . . . . . . . . . . . . . . . . . . . . . . . . . . . . . . . . . . . . . . . . . . . . . . . . . . . . . 162Transport Tab . . . . . . . . . . . . . . . . . . . . . . . . . . . . . . . . . . . . . . . . . . . . . . . . . . . . . . . . . . . . . . . . . . . . . . . . 162Modifying the Reliable Quality of Service . . . . . . . . . . . . . . . . . . . . . . . . . . . . . . . . . . . . . . . . . . . . . . . . . . . 163Modifying the Distributed Queue Quality of Service . . . . . . . . . . . . . . . . . . . . . . . . . . . . . . . . . . . . . . . . . . . 164
Setting Global Variables. . . . . . . . . . . . . . . . . . . . . . . . . . . . . . . . . . . . . . . . . . . . . . . . . . . . . . . . . . . . . . . . . . . . 166
TIBCO ActiveMatrix BusinessWorks SmartMapper User’s Guide

viii | Contents
Appendix C Error Codes . . . . . . . . . . . . . . . . . . . . . . . . . . . . . . . . . . . . . . . . . . . . . . . . . . . . . . . 167
Error Codes for SmartMapper Engine . . . . . . . . . . . . . . . . . . . . . . . . . . . . . . . . . . . . . . . . . . . . . . . . . . . . . . . . 168
Error Codes for SmartMapper Plug-In . . . . . . . . . . . . . . . . . . . . . . . . . . . . . . . . . . . . . . . . . . . . . . . . . . . . . . . . 170
Appendix D Specifying Data Schema . . . . . . . . . . . . . . . . . . . . . . . . . . . . . . . . . . . . . . . . . . . . 171
Editor . . . . . . . . . . . . . . . . . . . . . . . . . . . . . . . . . . . . . . . . . . . . . . . . . . . . . . . . . . . . . . . . . . . . . . . . . . . . . . . . . 172
Appendix E Relationships in TIBCO ActiveMatrix BusinessWorks SmartMapper . . . . . . . . 177
Identity Relationship . . . . . . . . . . . . . . . . . . . . . . . . . . . . . . . . . . . . . . . . . . . . . . . . . . . . . . . . . . . . . . . . . . . . . . 178Common Participant Added. . . . . . . . . . . . . . . . . . . . . . . . . . . . . . . . . . . . . . . . . . . . . . . . . . . . . . . . . . . . . 179
Association Relationship . . . . . . . . . . . . . . . . . . . . . . . . . . . . . . . . . . . . . . . . . . . . . . . . . . . . . . . . . . . . . . . . . . . 180Participant . . . . . . . . . . . . . . . . . . . . . . . . . . . . . . . . . . . . . . . . . . . . . . . . . . . . . . . . . . . . . . . . . . . . . . . . . . 180
Index . . . . . . . . . . . . . . . . . . . . . . . . . . . . . . . . . . . . . . . . . . . . . . . . . . . . . . . . . . . . . . . . . . . . . . . . 183
TIBCO ActiveMatrix BusinessWorks SmartMapper User’s Guide

Figures | ix
Figures
Figure 1 Three Mapping Models in Action . . . . . . . . . . . . . . . . . . . . . . . . . . . . . . . . . . . . . . . . . . . . . . . . . . . . 7
Figure 2 Small Project with One BusinessWorks Engine. . . . . . . . . . . . . . . . . . . . . . . . . . . . . . . . . . . . . . . . . 9
Figure 3 Maximized Throughput Scenario with Multiple BusinessWorks Engines . . . . . . . . . . . . . . . . . . . . . 10
Figure 4 Minimized Latency Scenario with Multiple SmartMapper Enterprise Servers . . . . . . . . . . . . . . . . . 11
Figure 5 ER Model as Presented in TIBCO Designer . . . . . . . . . . . . . . . . . . . . . . . . . . . . . . . . . . . . . . . . . . 16
Figure 6 Applications Set Up in TIBCO Designer. . . . . . . . . . . . . . . . . . . . . . . . . . . . . . . . . . . . . . . . . . . . . . 17
Figure 7 Entity Configured in the ER Model . . . . . . . . . . . . . . . . . . . . . . . . . . . . . . . . . . . . . . . . . . . . . . . . . . 18
Figure 8 Relationship Defined in the ER Model . . . . . . . . . . . . . . . . . . . . . . . . . . . . . . . . . . . . . . . . . . . . . . . 19
Figure 9 Choose one of the Three Storage Services . . . . . . . . . . . . . . . . . . . . . . . . . . . . . . . . . . . . . . . . . . . 20
Figure 10 Completed BusinessWorks Process . . . . . . . . . . . . . . . . . . . . . . . . . . . . . . . . . . . . . . . . . . . . . . . . 21
Figure 11 SmartMapper Used to Populate the Data Store. . . . . . . . . . . . . . . . . . . . . . . . . . . . . . . . . . . . . . . . 22
Figure 12 Completed BusinessWorks Process that Uses the SmartMapper Wizard . . . . . . . . . . . . . . . . . . . . 22
Figure 13 Bulk Load Process . . . . . . . . . . . . . . . . . . . . . . . . . . . . . . . . . . . . . . . . . . . . . . . . . . . . . . . . . . . . . . 23
Figure 14 Bulk Extract Process . . . . . . . . . . . . . . . . . . . . . . . . . . . . . . . . . . . . . . . . . . . . . . . . . . . . . . . . . . . . 23
Figure 15 GUI for Adding a New Map in TIBCO Administrator . . . . . . . . . . . . . . . . . . . . . . . . . . . . . . . . . . . . 25
Figure 16 Creating an Outbound Message for the OAG-based Common Data Model . . . . . . . . . . . . . . . . . . 29
Figure 17 BusinessWorks with the SmartMapper Palette . . . . . . . . . . . . . . . . . . . . . . . . . . . . . . . . . . . . . . . . 30
Figure 18 Name the New Project . . . . . . . . . . . . . . . . . . . . . . . . . . . . . . . . . . . . . . . . . . . . . . . . . . . . . . . . . . . 31
Figure 19 SmartMapper Resource added to the Design Panel . . . . . . . . . . . . . . . . . . . . . . . . . . . . . . . . . . . . 32
Figure 20 Name the New Application. . . . . . . . . . . . . . . . . . . . . . . . . . . . . . . . . . . . . . . . . . . . . . . . . . . . . . . . 33
Figure 21 Name the New Entity . . . . . . . . . . . . . . . . . . . . . . . . . . . . . . . . . . . . . . . . . . . . . . . . . . . . . . . . . . . . 34
Figure 22 Configure the Schema Tab . . . . . . . . . . . . . . . . . . . . . . . . . . . . . . . . . . . . . . . . . . . . . . . . . . . . . . . 34
Figure 23 Second Application Added . . . . . . . . . . . . . . . . . . . . . . . . . . . . . . . . . . . . . . . . . . . . . . . . . . . . . . . . 35
Figure 24 Select the TIBCO-Managed Entity Checkbox . . . . . . . . . . . . . . . . . . . . . . . . . . . . . . . . . . . . . . . . . 35
Figure 25 Name the Relationship. . . . . . . . . . . . . . . . . . . . . . . . . . . . . . . . . . . . . . . . . . . . . . . . . . . . . . . . . . . 36
Figure 26 Select a Resource . . . . . . . . . . . . . . . . . . . . . . . . . . . . . . . . . . . . . . . . . . . . . . . . . . . . . . . . . . . . . . 37
Figure 27 File-Based SmartMapper Service Added. . . . . . . . . . . . . . . . . . . . . . . . . . . . . . . . . . . . . . . . . . . . . 38
Figure 28 Global Variables Panel. . . . . . . . . . . . . . . . . . . . . . . . . . . . . . . . . . . . . . . . . . . . . . . . . . . . . . . . . . . 40
TIBCO ActiveMatrix BusinessWorks SmartMapper User’s Guide

x | Figures
Figure 29 Global Variables Dialog. . . . . . . . . . . . . . . . . . . . . . . . . . . . . . . . . . . . . . . . . . . . . . . . . . . . . . . . . . 40
Figure 30 Reviewing the Seed-Data. xml . . . . . . . . . . . . . . . . . . . . . . . . . . . . . . . . . . . . . . . . . . . . . . . . . . . . 41
Figure 31 Read XML Data: Input Tab . . . . . . . . . . . . . . . . . . . . . . . . . . . . . . . . . . . . . . . . . . . . . . . . . . . . . . . 42
Figure 32 Parse XML Data: Output Editor Tab . . . . . . . . . . . . . . . . . . . . . . . . . . . . . . . . . . . . . . . . . . . . . . . . 42
Figure 33 Parse XML Data: Output . . . . . . . . . . . . . . . . . . . . . . . . . . . . . . . . . . . . . . . . . . . . . . . . . . . . . . . . . 43
Figure 34 Create Relationship Configuration. . . . . . . . . . . . . . . . . . . . . . . . . . . . . . . . . . . . . . . . . . . . . . . . . . 43
Figure 35 Account_ID Mapping . . . . . . . . . . . . . . . . . . . . . . . . . . . . . . . . . . . . . . . . . . . . . . . . . . . . . . . . . . . . 44
Figure 36 Add to Relationship Input . . . . . . . . . . . . . . . . . . . . . . . . . . . . . . . . . . . . . . . . . . . . . . . . . . . . . . . . 44
Figure 37 Select Process to Load Dialog . . . . . . . . . . . . . . . . . . . . . . . . . . . . . . . . . . . . . . . . . . . . . . . . . . . . 45
Figure 38 Process Test Success. . . . . . . . . . . . . . . . . . . . . . . . . . . . . . . . . . . . . . . . . . . . . . . . . . . . . . . . . . . 45
Figure 39 Lookup Data Process . . . . . . . . . . . . . . . . . . . . . . . . . . . . . . . . . . . . . . . . . . . . . . . . . . . . . . . . . . . 47
Figure 40 No Key Found in Mapping Tables . . . . . . . . . . . . . . . . . . . . . . . . . . . . . . . . . . . . . . . . . . . . . . . . . . 49
Figure 41 Key Found in Mapping Tables. . . . . . . . . . . . . . . . . . . . . . . . . . . . . . . . . . . . . . . . . . . . . . . . . . . . . 50
Figure 42 Global Variables Dialog. . . . . . . . . . . . . . . . . . . . . . . . . . . . . . . . . . . . . . . . . . . . . . . . . . . . . . . . . . 54
Figure 43 Create Sales Order Process . . . . . . . . . . . . . . . . . . . . . . . . . . . . . . . . . . . . . . . . . . . . . . . . . . . . . . 55
Figure 44 SmartMapper Wizard Configuration Tabs . . . . . . . . . . . . . . . . . . . . . . . . . . . . . . . . . . . . . . . . . . . . 57
Figure 45 Input Editor Tab. . . . . . . . . . . . . . . . . . . . . . . . . . . . . . . . . . . . . . . . . . . . . . . . . . . . . . . . . . . . . . . . 57
Figure 46 Smart Mapper Calls Tab . . . . . . . . . . . . . . . . . . . . . . . . . . . . . . . . . . . . . . . . . . . . . . . . . . . . . . . . . 58
Figure 47 Input Tab Configuration. . . . . . . . . . . . . . . . . . . . . . . . . . . . . . . . . . . . . . . . . . . . . . . . . . . . . . . . . . 59
Figure 48 Output Tab . . . . . . . . . . . . . . . . . . . . . . . . . . . . . . . . . . . . . . . . . . . . . . . . . . . . . . . . . . . . . . . . . . . 60
Figure 49 Error Output Tab . . . . . . . . . . . . . . . . . . . . . . . . . . . . . . . . . . . . . . . . . . . . . . . . . . . . . . . . . . . . . . . 61
Figure 50 Map All Data: Input Tab. . . . . . . . . . . . . . . . . . . . . . . . . . . . . . . . . . . . . . . . . . . . . . . . . . . . . . . . . . 62
Figure 51 SmartMapper ER Model . . . . . . . . . . . . . . . . . . . . . . . . . . . . . . . . . . . . . . . . . . . . . . . . . . . . . . . . . 65
Figure 52 Entity: Configuration Tab. . . . . . . . . . . . . . . . . . . . . . . . . . . . . . . . . . . . . . . . . . . . . . . . . . . . . . . . . 66
Figure 53 Entity: Schema Tab . . . . . . . . . . . . . . . . . . . . . . . . . . . . . . . . . . . . . . . . . . . . . . . . . . . . . . . . . . . . . 66
Figure 54 Relationship. . . . . . . . . . . . . . . . . . . . . . . . . . . . . . . . . . . . . . . . . . . . . . . . . . . . . . . . . . . . . . . . . . . 67
Figure 55 Participant . . . . . . . . . . . . . . . . . . . . . . . . . . . . . . . . . . . . . . . . . . . . . . . . . . . . . . . . . . . . . . . . . . . . 67
Figure 56 Data Format Activity: Configuration Tab . . . . . . . . . . . . . . . . . . . . . . . . . . . . . . . . . . . . . . . . . . . . . 68
Figure 57 Data Format Activity: Data Format Tab. . . . . . . . . . . . . . . . . . . . . . . . . . . . . . . . . . . . . . . . . . . . . . 68
Figure 58 Data Format Activity: Field Offsets Tab. . . . . . . . . . . . . . . . . . . . . . . . . . . . . . . . . . . . . . . . . . . . . . 69
Figure 59 Bulk Load Activity Diagram . . . . . . . . . . . . . . . . . . . . . . . . . . . . . . . . . . . . . . . . . . . . . . . . . . . . . . . 70
Figure 60 Group Activity Configuration Diagram . . . . . . . . . . . . . . . . . . . . . . . . . . . . . . . . . . . . . . . . . . . . . . . 70
TIBCO ActiveMatrix BusinessWorks SmartMapper User’s Guide

Figures | xi
Figure 61 Parse Data Activity: In put Tab. . . . . . . . . . . . . . . . . . . . . . . . . . . . . . . . . . . . . . . . . . . . . . . . . . . . . 71
Figure 62 Bulk Load Activity: Configuration Tab . . . . . . . . . . . . . . . . . . . . . . . . . . . . . . . . . . . . . . . . . . . . . . . 71
Figure 63 Bulk Load Activity: Activity Input . . . . . . . . . . . . . . . . . . . . . . . . . . . . . . . . . . . . . . . . . . . . . . . . . . . 72
Figure 64 Parse Data Activity: Diagram . . . . . . . . . . . . . . . . . . . . . . . . . . . . . . . . . . . . . . . . . . . . . . . . . . . . . . 73
Figure 65 Input Editor . . . . . . . . . . . . . . . . . . . . . . . . . . . . . . . . . . . . . . . . . . . . . . . . . . . . . . . . . . . . . . . . . . . . 73
Figure 66 SmartMapper Calls Tab . . . . . . . . . . . . . . . . . . . . . . . . . . . . . . . . . . . . . . . . . . . . . . . . . . . . . . . . . . 74
Figure 67 Generating a GUID . . . . . . . . . . . . . . . . . . . . . . . . . . . . . . . . . . . . . . . . . . . . . . . . . . . . . . . . . . . . . 74
Figure 68 Create Relationship Instance Diagram. . . . . . . . . . . . . . . . . . . . . . . . . . . . . . . . . . . . . . . . . . . . . . . 75
Figure 69 Create Relationship Instance: Configuration . . . . . . . . . . . . . . . . . . . . . . . . . . . . . . . . . . . . . . . . . . 75
Figure 70 Create Relationship Instance: Activity Input. . . . . . . . . . . . . . . . . . . . . . . . . . . . . . . . . . . . . . . . . . . 76
Figure 71 Extracting Data to the File . . . . . . . . . . . . . . . . . . . . . . . . . . . . . . . . . . . . . . . . . . . . . . . . . . . . . . . . 77
Figure 72 Show Record Timestamp. . . . . . . . . . . . . . . . . . . . . . . . . . . . . . . . . . . . . . . . . . . . . . . . . . . . . . . . . 77
Figure 73 Bulk Extract: Input Tab. . . . . . . . . . . . . . . . . . . . . . . . . . . . . . . . . . . . . . . . . . . . . . . . . . . . . . . . . . . 78
Figure 74 Bulk Extract: Activity Input . . . . . . . . . . . . . . . . . . . . . . . . . . . . . . . . . . . . . . . . . . . . . . . . . . . . . . . . 78
Figure 75 Write File: Input Tab. . . . . . . . . . . . . . . . . . . . . . . . . . . . . . . . . . . . . . . . . . . . . . . . . . . . . . . . . . . . . 78
Figure 76 Adding a Project to the Archive . . . . . . . . . . . . . . . . . . . . . . . . . . . . . . . . . . . . . . . . . . . . . . . . . . . . 81
Figure 77 Adding a Process to the Archive . . . . . . . . . . . . . . . . . . . . . . . . . . . . . . . . . . . . . . . . . . . . . . . . . . . 82
Figure 78 Upload EAR File. . . . . . . . . . . . . . . . . . . . . . . . . . . . . . . . . . . . . . . . . . . . . . . . . . . . . . . . . . . . . . . . 83
Figure 79 New SmartMapper Application. . . . . . . . . . . . . . . . . . . . . . . . . . . . . . . . . . . . . . . . . . . . . . . . . . . . . 84
Figure 80 Add Non-Deployed Service . . . . . . . . . . . . . . . . . . . . . . . . . . . . . . . . . . . . . . . . . . . . . . . . . . . . . . . 86
Figure 81 Deployed SmartMapper Project . . . . . . . . . . . . . . . . . . . . . . . . . . . . . . . . . . . . . . . . . . . . . . . . . . . . 86
Figure 82 SmartMapper Project Deployed . . . . . . . . . . . . . . . . . . . . . . . . . . . . . . . . . . . . . . . . . . . . . . . . . . . . 87
Figure 83 Create a Relationship Map. . . . . . . . . . . . . . . . . . . . . . . . . . . . . . . . . . . . . . . . . . . . . . . . . . . . . . . . 89
Figure 84 Select a Participant . . . . . . . . . . . . . . . . . . . . . . . . . . . . . . . . . . . . . . . . . . . . . . . . . . . . . . . . . . . . . 90
Figure 85 Query Results for a Relationship Search . . . . . . . . . . . . . . . . . . . . . . . . . . . . . . . . . . . . . . . . . . . . . 91
Figure 86 Edit Keys . . . . . . . . . . . . . . . . . . . . . . . . . . . . . . . . . . . . . . . . . . . . . . . . . . . . . . . . . . . . . . . . . . . . . 92
Figure 87 Synchronize ER Model. . . . . . . . . . . . . . . . . . . . . . . . . . . . . . . . . . . . . . . . . . . . . . . . . . . . . . . . . . 104
Figure 88 Changed Objects that Cannot be Synched . . . . . . . . . . . . . . . . . . . . . . . . . . . . . . . . . . . . . . . . . . 105
Figure 89 Input Set for the Extraction Filter: Find a Relationship Created Yesterday . . . . . . . . . . . . . . . . . . 121
Figure 90 Input Set to One Participant Relationship; Mode Set to Create . . . . . . . . . . . . . . . . . . . . . . . . . . . 127
Figure 91 Input Set to One Participant Relationship; Mode Set to Add . . . . . . . . . . . . . . . . . . . . . . . . . . . . . 128
Figure 92 Input Set to One Participant Relationship; Mode Set to Update . . . . . . . . . . . . . . . . . . . . . . . . . . 129
TIBCO ActiveMatrix BusinessWorks SmartMapper User’s Guide

xii | Figures
Figure 93 Duplicate Participant . . . . . . . . . . . . . . . . . . . . . . . . . . . . . . . . . . . . . . . . . . . . . . . . . . . . . . . . . . . 131
Figure 94 DuplicateParticipant’s Field . . . . . . . . . . . . . . . . . . . . . . . . . . . . . . . . . . . . . . . . . . . . . . . . . . . . . . 132
Figure 95 SmartMapper Wizard: Lookup Operation . . . . . . . . . . . . . . . . . . . . . . . . . . . . . . . . . . . . . . . . . . . 151
Figure 96 SmartMapper Wizard: Maintain Mapping Operation . . . . . . . . . . . . . . . . . . . . . . . . . . . . . . . . . . . 152
Figure 97 SmartMapper Wizard: Maintain Mapping Operation One-to-Many . . . . . . . . . . . . . . . . . . . . . . . . 153
Figure 98 Editor Tab for Specifying Data Schema . . . . . . . . . . . . . . . . . . . . . . . . . . . . . . . . . . . . . . . . . . . . 172
Figure 99 Participant Defined in the ER Model . . . . . . . . . . . . . . . . . . . . . . . . . . . . . . . . . . . . . . . . . . . . . . . 181
TIBCO ActiveMatrix BusinessWorks SmartMapper User’s Guide

Tables | xiii
Tables
Table 1 General Typographical Conventions . . . . . . . . . . . . . . . . . . . . . . . . . . . . . . . . . . . . . . . . . . . . . . . xix
Table 2 Syntax Typographical Conventions . . . . . . . . . . . . . . . . . . . . . . . . . . . . . . . . . . . . . . . . . . . . . . . . xx
Table 3 Cross-Referencing Relationships Across Applications . . . . . . . . . . . . . . . . . . . . . . . . . . . . . . . . . 14
Table 4 SmartMapper Calls Tab Value . . . . . . . . . . . . . . . . . . . . . . . . . . . . . . . . . . . . . . . . . . . . . . . . . . . . 58
Table 5 SmartMapper ER Model: Configuration Tab . . . . . . . . . . . . . . . . . . . . . . . . . . . . . . . . . . . . . . . . . 95
Table 6 SmartMapper ER Model: Advanced Tab . . . . . . . . . . . . . . . . . . . . . . . . . . . . . . . . . . . . . . . . . . . . 95
Table 7 Entity: Configuration Tab . . . . . . . . . . . . . . . . . . . . . . . . . . . . . . . . . . . . . . . . . . . . . . . . . . . . . . . . 96
Table 8 Entity: Schema Tab . . . . . . . . . . . . . . . . . . . . . . . . . . . . . . . . . . . . . . . . . . . . . . . . . . . . . . . . . . . . 97
Table 9 Relationship: Configuration Tab. . . . . . . . . . . . . . . . . . . . . . . . . . . . . . . . . . . . . . . . . . . . . . . . . . . 98
Table 10 Participant: Configuration Tab . . . . . . . . . . . . . . . . . . . . . . . . . . . . . . . . . . . . . . . . . . . . . . . . . . . . 99
Table 11 JDBC-Based SmartMapper Service: Configuration Tab . . . . . . . . . . . . . . . . . . . . . . . . . . . . . . . 100
Table 12 JDBC-Based SmartMapper Service: JDBC Settings Tab . . . . . . . . . . . . . . . . . . . . . . . . . . . . . . 101
Table 13 Synchronize ER Model Dialog . . . . . . . . . . . . . . . . . . . . . . . . . . . . . . . . . . . . . . . . . . . . . . . . . . . 102
Table 14 Reload from Database Dialog . . . . . . . . . . . . . . . . . . . . . . . . . . . . . . . . . . . . . . . . . . . . . . . . . . . 104
Table 15 JDBC-Based SmartMapper Service: Caching Tab . . . . . . . . . . . . . . . . . . . . . . . . . . . . . . . . . . . 106
Table 16 File-Based SmartMapper Service: Configuration Tab . . . . . . . . . . . . . . . . . . . . . . . . . . . . . . . . . 107
Table 17 Adapter-Based SmartMapper Service: Configuration Tab. . . . . . . . . . . . . . . . . . . . . . . . . . . . . . 108
Table 18 Adapter-Based SmartMapper Service Transport Tab: Rendezvous Reliable Transport . . . . . . . 109
Table 19 Adapter-Based SmartMapper Service Advanced Tab . . . . . . . . . . . . . . . . . . . . . . . . . . . . . . . . . 110
Table 20 SmartMapper Adapter: Configuration Tab . . . . . . . . . . . . . . . . . . . . . . . . . . . . . . . . . . . . . . . . . . 111
Table 21 SmartMapper Adapter: Thread Pooling Tab: . . . . . . . . . . . . . . . . . . . . . . . . . . . . . . . . . . . . . . . . 112
Table 22 SmartMapper Adapter: Logging Tab . . . . . . . . . . . . . . . . . . . . . . . . . . . . . . . . . . . . . . . . . . . . . . 113
Table 23 SmartMapper Adapter: Startup Tab . . . . . . . . . . . . . . . . . . . . . . . . . . . . . . . . . . . . . . . . . . . . . . . 114
Table 24 SmartMapper Adapter: Monitoring Tab . . . . . . . . . . . . . . . . . . . . . . . . . . . . . . . . . . . . . . . . . . . . 114
Table 25 Bulk Extract: Configuration Tab . . . . . . . . . . . . . . . . . . . . . . . . . . . . . . . . . . . . . . . . . . . . . . . . . . 118
Table 26 Bulk Extract: Input Tab. . . . . . . . . . . . . . . . . . . . . . . . . . . . . . . . . . . . . . . . . . . . . . . . . . . . . . . . . 119
Table 27 Bulk Extract Output: Entity Format . . . . . . . . . . . . . . . . . . . . . . . . . . . . . . . . . . . . . . . . . . . . . . . . 122
Table 28 Bulk Extract Output: One Participant Relationship Format . . . . . . . . . . . . . . . . . . . . . . . . . . . . . 123
TIBCO ActiveMatrix BusinessWorks SmartMapper User’s Guide
xiv | Tables
Table 29 Bulk Extract Output: Two Participant Relationship Format . . . . . . . . . . . . . . . . . . . . . . . . . . . . . . 124
Table 30 Bulk Load: Configuration Tab. . . . . . . . . . . . . . . . . . . . . . . . . . . . . . . . . . . . . . . . . . . . . . . . . . . . . 125
Table 31 Bulk Load: Input Tab . . . . . . . . . . . . . . . . . . . . . . . . . . . . . . . . . . . . . . . . . . . . . . . . . . . . . . . . . . . 130
Table 32 Create Entity Instance: Configuration Tab. . . . . . . . . . . . . . . . . . . . . . . . . . . . . . . . . . . . . . . . . . . 133
Table 33 Create Entity Instance: Input Tab . . . . . . . . . . . . . . . . . . . . . . . . . . . . . . . . . . . . . . . . . . . . . . . . . 133
Table 34 Update Entity Instance: Configuration Tab . . . . . . . . . . . . . . . . . . . . . . . . . . . . . . . . . . . . . . . . . . 134
Table 35 Update Entity Instance: Input Tab . . . . . . . . . . . . . . . . . . . . . . . . . . . . . . . . . . . . . . . . . . . . . . . . . 134
Table 36 Delete Entity Instance: Configuration Tab. . . . . . . . . . . . . . . . . . . . . . . . . . . . . . . . . . . . . . . . . . . 135
Table 37 Delete Entity Instance: Input Tab . . . . . . . . . . . . . . . . . . . . . . . . . . . . . . . . . . . . . . . . . . . . . . . . . 135
Table 38 Create Relationship Instance: Configuration Tab . . . . . . . . . . . . . . . . . . . . . . . . . . . . . . . . . . . . . 136
Table 39 Error Output for Activities (Except Wizard) . . . . . . . . . . . . . . . . . . . . . . . . . . . . . . . . . . . . . . . . . . 137
Table 40 Add to Relationship Instance: Configuration Tab . . . . . . . . . . . . . . . . . . . . . . . . . . . . . . . . . . . . . 138
Table 41 Add to Relationship Instance: Input Tab . . . . . . . . . . . . . . . . . . . . . . . . . . . . . . . . . . . . . . . . . . . . 138
Table 42 Delete Relationship Instance: Configuration Tab . . . . . . . . . . . . . . . . . . . . . . . . . . . . . . . . . . . . . 140
Table 43 Delete Relationship Instance: Input Tab . . . . . . . . . . . . . . . . . . . . . . . . . . . . . . . . . . . . . . . . . . . . 140
Table 44 Lookup: Configuration Tab . . . . . . . . . . . . . . . . . . . . . . . . . . . . . . . . . . . . . . . . . . . . . . . . . . . . . . 141
Table 45 Lookup: Input Tab . . . . . . . . . . . . . . . . . . . . . . . . . . . . . . . . . . . . . . . . . . . . . . . . . . . . . . . . . . . . . 141
Table 46 Lookup: Output Tab. . . . . . . . . . . . . . . . . . . . . . . . . . . . . . . . . . . . . . . . . . . . . . . . . . . . . . . . . . . . 142
Table 47 Dynamic Lookup: Configuration Tab . . . . . . . . . . . . . . . . . . . . . . . . . . . . . . . . . . . . . . . . . . . . . . . 143
Table 48 Dynamic Lookup: Input Tab . . . . . . . . . . . . . . . . . . . . . . . . . . . . . . . . . . . . . . . . . . . . . . . . . . . . . 144
Table 49 Dynamic Delete: Configuration Tab. . . . . . . . . . . . . . . . . . . . . . . . . . . . . . . . . . . . . . . . . . . . . . . . 145
Table 50 Dynamic Delete: Input Tab . . . . . . . . . . . . . . . . . . . . . . . . . . . . . . . . . . . . . . . . . . . . . . . . . . . . . . 146
Table 51 Dynamic Delete: Output Tab . . . . . . . . . . . . . . . . . . . . . . . . . . . . . . . . . . . . . . . . . . . . . . . . . . . . . 147
Table 52 Generate Key: Configuration Tab . . . . . . . . . . . . . . . . . . . . . . . . . . . . . . . . . . . . . . . . . . . . . . . . . 148
Table 53 Generate Key: Output Tab . . . . . . . . . . . . . . . . . . . . . . . . . . . . . . . . . . . . . . . . . . . . . . . . . . . . . . 148
Table 54 SmartMapper Wizard: Configuration Tab . . . . . . . . . . . . . . . . . . . . . . . . . . . . . . . . . . . . . . . . . . . 150
Table 55 SmartMapper Wizard: Calls Tab . . . . . . . . . . . . . . . . . . . . . . . . . . . . . . . . . . . . . . . . . . . . . . . . . . 151
Table 56 SmartMapper Wizard: Lookup Operation Tab. . . . . . . . . . . . . . . . . . . . . . . . . . . . . . . . . . . . . . . . 152
Table 57 SmartMapper Wizard: Maintain Mapping Operation . . . . . . . . . . . . . . . . . . . . . . . . . . . . . . . . . . . 152
Table 58 SmartMapper Wizard: Maintain Mapping Operation One-to-Many . . . . . . . . . . . . . . . . . . . . . . . . 153
Table 59 SmartMapper Wizard: Error Output Tab . . . . . . . . . . . . . . . . . . . . . . . . . . . . . . . . . . . . . . . . . . . . 155
Table 60 GUID Class Overview: Constructor and Method Overview. . . . . . . . . . . . . . . . . . . . . . . . . . . . . . 158
TIBCO ActiveMatrix BusinessWorks SmartMapper User’s Guide

Tables | xv
Table 61 GUID Class Overview: Constructor Detail . . . . . . . . . . . . . . . . . . . . . . . . . . . . . . . . . . . . . . . . . . 158
Table 62 GUID Class Overview: Method Detail . . . . . . . . . . . . . . . . . . . . . . . . . . . . . . . . . . . . . . . . . . . . . 158
Table 63 Modifying the Subscriber Service: Transport Tab . . . . . . . . . . . . . . . . . . . . . . . . . . . . . . . . . . . . 162
Table 64 Modifying Reliable QOS: DefaultRVSession . . . . . . . . . . . . . . . . . . . . . . . . . . . . . . . . . . . . . . . . 163
Table 65 Modifying Distributed Queue QOS: DefaultRVCMQSession . . . . . . . . . . . . . . . . . . . . . . . . . . . . 164
Table 66 TIBCO SmartMapper Engine Codes . . . . . . . . . . . . . . . . . . . . . . . . . . . . . . . . . . . . . . . . . . . . . . 168
Table 67 TIBCO SmartMapper Plug-In Codes . . . . . . . . . . . . . . . . . . . . . . . . . . . . . . . . . . . . . . . . . . . . . . 170
Table 68 Editor Tab for Specifying Data Schema . . . . . . . . . . . . . . . . . . . . . . . . . . . . . . . . . . . . . . . . . . . . 173
Table 69 Content Types for Data Elements . . . . . . . . . . . . . . . . . . . . . . . . . . . . . . . . . . . . . . . . . . . . . . . . 173
Table 70 Datatypes Available for Data . . . . . . . . . . . . . . . . . . . . . . . . . . . . . . . . . . . . . . . . . . . . . . . . . . . . 175
Table 71 Identity Relationship: Customer Record Appears Once. . . . . . . . . . . . . . . . . . . . . . . . . . . . . . . . 178
Table 72 Identity Relationship: Customer Record Not in the Application . . . . . . . . . . . . . . . . . . . . . . . . . . 178
Table 73 Identity Relationship: Customer Record Appears Zero or More Times . . . . . . . . . . . . . . . . . . . . 179
Table 74 Identity Relationship: Common Participant Added. . . . . . . . . . . . . . . . . . . . . . . . . . . . . . . . . . . . 179
Table 75 Association Relationship . . . . . . . . . . . . . . . . . . . . . . . . . . . . . . . . . . . . . . . . . . . . . . . . . . . . . . . 180
TIBCO ActiveMatrix BusinessWorks SmartMapper User’s Guide

xvi | Tables
TIBCO ActiveMatrix BusinessWorks SmartMapper User’s Guide

| xvii
Preface
This user’s guide explains how to use TIBCO ActiveMatrix BusinessWorks SmartMapper with TIBCO BusinessWorks™.
Topics
• Related Documentation, page xviii
• Typographical Conventions, page xix
• Connecting with TIBCO Resources, page xxii
TIBCO ActiveMatrix BusinessWorks SmartMapper User’s Guide

xviii | Related Documentation
Related Documentation
This section lists documentation resources you may find useful.
TIBCO ActiveMatrix BusinessWorks SmartMapper DocumentationThe following documents form the TIBCO ActiveMatrix BusinessWorks SmartMapper documentation set:
• TIBCO ActiveMatrix BusinessWorks SmartMapper Installation Guide Read this manual for instructions on site preparation and installation.
• TIBCO ActiveMatrix BusinessWorks SmartMapper User’s Guide Read this manual for instruction on using the product.
• TIBCO ActiveMatrix BusinessWorks SmartMapper Release Notes Read the release notes for a list of new and changed features. This document also contains lists of known issues and closed issues for this release.
Other TIBCO Product DocumentationYou may find it useful to read the documentation for the following TIBCO products:
• TIBCO Designer™
• TIBCO Administrator™
• TIBCO ActiveMatrix BusinessWorks™
• TIBCO Rendezvous®
• TIBCO Enterprise Message Service™
• TIBCO Hawk®
• TIBCO Runtime Agent™
TIBCO ActiveMatrix BusinessWorks SmartMapper User’s Guide

Preface | xix
Typographical Conventions
The following typographical conventions are used in this manual.
Table 1 General Typographical Conventions
Convention Use
TIBCO_HOME
ENV_HOME
Many TIBCO products must be installed within the same home directory. This directory is referenced in documentation as TIBCO_HOME. The default value of TIBCO_HOME depends on the operating system. For example, on Windows systems, the default value is C:\tibco.
Other TIBCO products are installed into an installation environment. Incompatible products and multiple instances of the same product are installed into different installation environments. An environment home directory is referenced in documentation as ENV_HOME. The default value of ENV_HOME depends on the operating system. For example, on Windows systems the default value is C:\tibco.
code font Code font identifies commands, code examples, filenames, pathnames, and output displayed in a command window. For example:
Use MyCommand to start the foo process.
bold code
font Bold code font is used in the following ways:
• In procedures, to indicate what a user types. For example: Type the username admin.
• In large code samples, to indicate the parts of the sample that are of particular interest.
• In command syntax, to indicate the default parameter for a command. For example, if no parameter is specified, MyCommand is enabled: MyCommand [enable | disable]
italic font Italic font is used in the following ways:
• To indicate a document title. For example: See TIBCO BusinessWorks Concepts.
• To introduce new terms. For example: A portal page may contain several portlets. Portlets are mini-applications that run in a portal.
• To indicate a variable in a command or code syntax that you must replace. For example: MyCommand pathname
TIBCO ActiveMatrix BusinessWorks SmartMapper User’s Guide

xx | Typographical Conventions
Key combinations
Key name separated by a plus sign indicate keys pressed simultaneously. For example: Ctrl+C.
Key names separated by a comma and space indicate keys pressed one after the other. For example: Esc, Ctrl+Q.
The note icon indicates information that is of special interest or importance, for example, an additional action required only in certain circumstances.
The tip icon indicates an idea that could be useful, for example, a way to apply the information provided in the current section to achieve a specific result.
The warning icon indicates the potential for a damaging situation, for example, data loss or corruption if certain steps are taken or not taken.
Table 2 Syntax Typographical Conventions
Convention Use
[ ] An optional item in a command or code syntax.
For example:
MyCommand [optional_parameter] required_parameter
| A logical OR that separates multiple items of which only one may be chosen.
For example, you can select only one of the following parameters:
MyCommand para1 | param2 | param3
Table 1 General Typographical Conventions
Convention Use
TIBCO ActiveMatrix BusinessWorks SmartMapper User’s Guide

Preface | xxi
{ } A logical group of items in a command. Other syntax notations may appear within each logical group.
For example, the following command requires two parameters, which can be either param1 and param2 or param3 and param4:
MyCommand {param1 param2} | {param3 param4}
In the next example, the command requires two parameters. The first parameter can be either param1 or param2 and the second can be either param3 or param4:
MyCommand {param1 | param2} {param3 | param4}
In the next example, the command can accept either two or three parameters. The first parameter must be param1. You can optionally include param2 as the second parameter. And the last parameter is either param3 or param4.
MyCommand param1 [param2] {param3 | param4}
Table 2 Syntax Typographical Conventions
Convention Use
TIBCO ActiveMatrix BusinessWorks SmartMapper User’s Guide

xxii | Connecting with TIBCO Resources
Connecting with TIBCO Resources
How to Join TIBCOmmunityTIBCOmmunity is an online destination for TIBCO customers, partners, and resident experts, a place to share and access the collective experience of the TIBCO community. TIBCOmmunity offers forums, blogs, and access to a variety of resources. To register, go to http://www.tibcommunity.com.
How to Access All TIBCO DocumentationAfter you join TIBCOmmunity, you can access the documentation for all supported product versions here:
http://docs.tibco.com/TibcoDoc
How to Contact TIBCO SupportFor comments or problems with this manual or the software it addresses, please contact TIBCO Support as follows:
• For an overview of TIBCO Support, and information about getting started with TIBCO Support, visit this site:
http://www.tibco.com/services/support
• If you already have a valid maintenance or support contract, visit this site:
https://support.tibco.com
Entry to this site requires a user name and password. If you do not have a user name, you can request one.
TIBCO ActiveMatrix BusinessWorks SmartMapper User’s Guide

| 1
Chapter 1 Introduction
This chapter gives an overview of TIBCO ActiveMatrix BusinessWorks SmartMapper.
Topics
• Product Overview, page 2
• Features, page 5
• Using a Common Data Model: Three Mapping Models, page 7
TIBCO ActiveMatrix BusinessWorks SmartMapper User’s Guide

2 | Chapter 1 Introduction
Product Overview
TIBCO ActiveMatrix BusinessWorks SmartMapper is focused on addressing three problems common to solutions that are part of enterprise application integration (EAI):
• Lookups
• Cross-Referencing
• Configurable Business Rules
Lookups
Any two applications are likely to have different code sets for things like currency, countries, status codes, and so forth. These code sets generally represent pick lists in applications. As the number of applications increase or more packaged applications are thrown in the mix, it becomes prohibitively difficult to make these code sets all the same. As the list expands, it also becomes unwieldy to hardcode these lists into maps; therefore, the majority of these lookups are done in databases.
Database lookups introduce a number of problems:
• Lookups are difficult to write, as they require advanced programming skills.
• To save time, the data models become oversimplified, which makes their growth difficult over time.
• Database access can be very slow.
Cross-Referencing
The most common integration need in EAI is data synchronization. Data synchronization typically requires the development of three things for each object:
• A mapping, to transform data from one schema to another. Three mapping models are needed if there is a common object model.
See Using a Common Data Model: Three Mapping Models on page 7 for more information on this case.
• A process, to define the business rules that control how data is processed.
TIBCO ActiveMatrix BusinessWorks SmartMapper User’s Guide

Product Overview | 3
• Cross-referencing, which allows users to
— Match an entity in one application with its semantic equivalent in another application. For example, an account ID in Siebel might be labeled acme-123 and the same account in SAP might be labeled 00001890.
— Follow a previously created link to perform updates or to preserve references.
— Match static data such as codes or a pick-list of data among applications. For example, a pick list in one system may use USD and another system pick list may use Dollars.
Configurable Business Rules
Through the Data Models and Cross-Referencing Functions, users can do the following:
• Set thresholds in a process, and make these thresholds configurable from the administrative GUI rather than by redoing the entire process.
For example, a business may choose that all purchase orders over $10,000 must be manually approved. If the business now chooses to change that threshold to $5,000, they only need to change the value in the database through the SmartMapper GUI.
• Set closed loop integration. TIBCO BusinessWorks processes can set the values required by SmartMapper. For example, you can set stocking levels in BusinessWorks, and have SmartMapper incorporate these levels into its processes.
TIBCO ActiveMatrix BusinessWorks SmartMapper User’s Guide

4 | Chapter 1 Introduction
How TIBCO ActiveMatrix BusinessWorks SmartMapper Addresses Business Problems
TIBCO ActiveMatrix BusinessWorks SmartMapper offers a unique set of features that both simplify and enhance the process of setting up, deploying, using, and managing cross-referencing services for data synchronization. These features can dramatically reduce the time and cost of integration projects.
The following is an overview of what TIBCO ActiveMatrix BusinessWorks SmartMapper offers:
• Speed High-performance cache, parallel execution, and distributed server options ensure that lookups are not the bottleneck.
• Simplicity A graphical user interface models relationships, applies them to maps, and even generates the tables without the need for coding. This dramatically reduces both the development time and the total cost of ownership.
• Power Modeling the right relationships the first time rather than forcing them into a one-size-fits-all model saves endless extra steps and workarounds.
• Flexibility Neither the model nor the processes is tied to the deployment / data store options, which allows the system to grow as a company’s needs grow.
This additional set of features is built on the power of BusinessWorks and offers the same ease-of-use, standards, and lifecycle management capabilities that are available in BusinessWorks.
TIBCO ActiveMatrix BusinessWorks SmartMapper User’s Guide

Features | 5
Features
TIBCO ActiveMatrix BusinessWorks SmartMapper includes the following major features:
• Cross-reference activities, which are used within a BusinessWorks process. Cross-reference activities allow you to look up, create, update, and delete mappings, and to generate keys.
• SmartMapper Wizard, which allows data translation in the context of a hierarchical object.
• Batched approach, which allows lookups to be processed efficiently and writes to be all-or-nothing.
• Non-key attributes. Support for a non-key based Dynamic Lookup activity.
• The association relationship type where there are only two participants. The relationship type is set on the Relationship resource.
• Composite key lookups: multiple attributes can be used as search criteria at the same time to perform lookups, which might produce multiple results..
• Use of XML standards such as XSD for definitions and XPath for attributes
• Server, server-less, or cache only
• Simplified correlation of data from multiple sources
• Leverages and features all of the deployment, administration, security and management capabilities of BusinessWorks.
Bulk Load and Bulk Extract Activities
• Bulk extract of data. The Bulk Extract activity enables the bulk extraction of cross-referencing data for reporting purposes. You can query entity or relationship data by providing an entity name or relationship name. You can also filter the results of the Bulk Extract activity.
• Dynamic loading and dynamic query. The Bulk Load activity allows you to load SmartMapper data and the Dynamic Lookup activity allows you to query SmartMapper data.
• Creation and modification timestamps for records can be included in the Dynamic Lookup and Bulk Extract activities. A participant level timestamp for the relationship-based Bulk Extract activity is now available.
TIBCO ActiveMatrix BusinessWorks SmartMapper User’s Guide

6 | Chapter 1 Introduction
Available through TIBCO Designer GUI
• Zero-coding approach with SmartMapper Wizard-driven graphical entity relationship modeling and mapping. This approach enables lookups, new key generation, and maintenance of the mapping model.
• Entity relationship modeling. This allows you to model objects and keys, and to link modeled objects through relationships.
Available through TIBCO Administrator
• Use of TIBCO Administrator to maintain data related to rules and cross-reference services
Performance and Scalability
• High-performance caching mechanisms for optimal throughput and scalability.
• Queries are performed in parallel.
• Cross-referencing engine shared among multiple instances of BusinessWorks (ActiveMatrix BusinessWorks SmartMapper Enterprise Server only). Shared cross-referencing takes place in the Maximize Throughput scenario. For further information, refer to Maximize Throughput Scenario (Many Small Objects) on page 10.
• Shared multiple adapter instances among one instance of BusinessWorks. This is the Minimize Latency scenario. See Minimize Latency Scenario (One Large Batch) on page 11.
Complexity of Relationships
• Multiple keys
• The same object may participate in many relationships
• Ability to handle complex object relationships: one-to-many, many-to-one, many-to-many, non-key data
CompatibilityFor information on which platforms this product is compatible with, see the readme.txt file.
TIBCO ActiveMatrix BusinessWorks SmartMapper User’s Guide

Using a Common Data Model: Three Mapping Models | 7
Using a Common Data Model: Three Mapping Models
A common data model is used when data is mapped into a canonical data format such as OAG.
See http://www.openapplications.org.
When using a publish and subscribe /event-driven architecture, a source does not necessarily know what its destinations are. Further, if multiple applications are connected to the network as peers, it is helpful if each application does not have to know about the internal data formats of all of the others. In this case, you can set up one standard common data model and have all the sources map to and from that model.
Generally, when performing cross-referencing between two applications with a common data model, the following three mapping models are necessary:
• Publish mapping This mapping goes from a source application to a common data model. It can be used to generate primary keys if the objects have not yet been created in the cross-reference mapping tables.
The sample projects address the publish mapping only, but the software can be used to build any one of these mappings.
• Request mapping This mapping maps data from a common data model to a target application. In request mapping, if a primary key lookup fails, it usually does not matter because the adapter creates a key in the application. The target adapter generates these entities. For example, when you create a customer in SAP, request mapping will generate a customer ID, which is returned in the response from the SAP BAPI.
• Response mapping After a key is successfully created into the target application, the newly-generated keys must be matched to the common keys.
Figure 1 shows all three mapping models.
Figure 1 Three Mapping Models in Action
TIBCO ActiveMatrix BusinessWorks SmartMapper User’s Guide

8 | Chapter 1 Introduction
Publish mapping maps an entity (say Customer_Number) from the Siebel adapter to the common model in TIBCO ActiveMatrix BusinessWorks SmartMapper. A common ID can be generated in the common model. From there, the mapper takes the entity as defined in the common model and performs the synchronization logic.
Request mapping uses the synchronization logic results, and generates a request to the SAP adapter. If SAP uses external numbering, then, if necessary, during Request Mapping, a key can be generated that will correspond to a SAP identifier.
Response mapping establishes the link between the common ID and the one generated by the SAP application.
TIBCO ActiveMatrix BusinessWorks SmartMapper User’s Guide

Architecture | 9
Architecture
There are as many ways to set up TIBCO ActiveMatrix BusinessWorks SmartMapper as there are ways to set up BusinessWorks. However, the following are some of the more likely scenarios:
• Development In this case, all the TIBCO ActiveMatrix BusinessWorks SmartMapper components run on one machine. The project is undeployed. The data store is a local database or a file system.
• Small project In this case, TIBCO ActiveMatrix BusinessWorks SmartMapper is installed on the remote BusinessWorks machine. The database is installed on the remote BusinessWorks machine.
• Large project or enterprise In this case, there are multiple BusinessWorks engines that contain TIBCO ActiveMatrix BusinessWorks SmartMapper and a TIBCO Administrator server. The file system is used for static data on BusinessWorks engines. The SmartMapper Enterprise Server runs on the database machine.
Scaling TIBCO ActiveMatrix BusinessWorks SmartMapperYou can scale TIBCO ActiveMatrix BusinessWorks SmartMapper depending on the project requirements.
Figure 2, Figure 3, and Figure 4 show how to scale TIBCO ActiveMatrix BusinessWorks SmartMapper.
Using TIBCO ActiveMatrix BusinessWorks SmartMapper for a Small Project
In the simplest case, you might need only one BusinessWorks engine, as shown in Figure 2. This is a typical small project where a data source is sending messages to BusinessWorks. Mapping is done in process and TIBCO ActiveMatrix BusinessWorks SmartMapper accesses a JDBC data source as needed.
Figure 2 Small Project with One BusinessWorks Engine
DatabaseTIBCO BusinessWorks Engine
RV JDBC
Client
TIBCO ActiveMatrix BusinessWorks SmartMapper User’s Guide

10 | Chapter 1 Introduction
Using TIBCO ActiveMatrix BusinessWorks SmartMapper for More Complex Projects
In more complex situations, you need to consider the loads and scale TIBCO ActiveMatrix BusinessWorks SmartMapper depending on whether you are getting many messages or a smaller number of large messages.
For example, imagine 10,000 orders, each with many lines and at least one lookup per line.
• In one case, each order would be a separate inbound message. Refer to the Maximize Throughput Scenario (Many Small Objects) on page 10.
• In the second case, the whole batch of orders is a single message. Refer to the Minimize Latency Scenario (One Large Batch) on page 11.
Maximize Throughput Scenario (Many Small Objects)
If you are receiving many messages, tune your system for high message throughput by using multiple BusinessWorks engines. As throughput increases, more BusinessWorks engines are used to handle the load.
The SmartMapper Enterprise Server brokers the transactions to the data store. If you have many messages, you need to scale the number of BusinessWorks engines that you use, but the SmartMapper Enterprise Server can be shared among all the BusinessWorks engines.
Figure 3 Maximized Throughput Scenario with Multiple BusinessWorks Engines
Database
RVDQ JDBC
TIBCO BusinessWorks Engines
RV
SmartMapper Enterprise Server
Client
TIBCO ActiveMatrix BusinessWorks SmartMapper User’s Guide
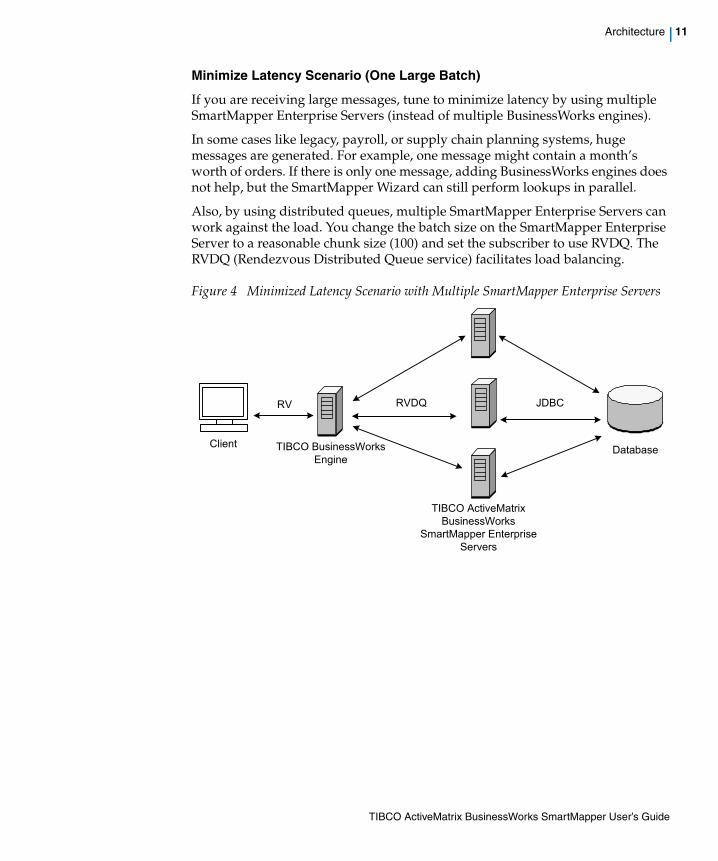
Architecture | 11
Minimize Latency Scenario (One Large Batch)
If you are receiving large messages, tune to minimize latency by using multiple SmartMapper Enterprise Servers (instead of multiple BusinessWorks engines).
In some cases like legacy, payroll, or supply chain planning systems, huge messages are generated. For example, one message might contain a month’s worth of orders. If there is only one message, adding BusinessWorks engines does not help, but the SmartMapper Wizard can still perform lookups in parallel.
Also, by using distributed queues, multiple SmartMapper Enterprise Servers can work against the load. You change the batch size on the SmartMapper Enterprise Server to a reasonable chunk size (100) and set the subscriber to use RVDQ. The RVDQ (Rendezvous Distributed Queue service) facilitates load balancing.
Figure 4 Minimized Latency Scenario with Multiple SmartMapper Enterprise Servers
Database
RVDQ
TIBCO ActiveMatrix BusinessWorks
SmartMapper Enterprise Servers
JDBC
TIBCO BusinessWorks Engine
Client
RV
TIBCO ActiveMatrix BusinessWorks SmartMapper User’s Guide

12 | Chapter 1 Introduction
TIBCO ActiveMatrix BusinessWorks SmartMapper User’s Guide

| 13
Chapter 2 Lifecycle
This chapter describes the lifecycle you can expect when working with TIBCO ActiveMatrix BusinessWorks SmartMapper. Read it to get an introduction to the tasks you will face when configuring an Entity Relationship (ER) Model, including activities in TIBCO ActiveMatrix BusinessWorks processes that reference the model.
Topics
• Overview, page 14
• Model Phase, page 16
• Assemble Phase, page 21
• Deployment Phase, page 24
• Management Phase, page 25
TIBCO ActiveMatrix BusinessWorks SmartMapper User’s Guide

14 | Chapter 2 Lifecycle
Overview
TIBCO ActiveMatrix BusinessWorks SmartMapper allows you to maintain cross-referencing relationships across applications. It provides an easy-to-use graphical user interface for modeling, assembling, deploying, and managing these relationships. Before proceeding, read through the descriptions of the terms in Table 3. Doing so will help you understand the concepts presented in this chapter.
Table 3 Cross-Referencing Relationships Across Applications
Creating Keys You should know the relevant fields in your application so you can choose your keys well. The choice of keys is an important decision and not one to be taken lightly. The key defines an entity's identity with respect to the entities in other systems. This is further complicated when an entity participates in many relationships or is referenced as a foreign key on other schema.
For example, when choosing keys for customers and addresses, consider how they relate to each other, how they relate to their peers in other systems, and how they are referenced on sales orders. You create a key for an entity by adding an attribute to the entity. You must define a key to set up the entity.
Attribute A field in an entity.
Non-key attributes are supported. Certain non-key attributes are also nullable. If an entity has multiple attributes marked as keys, they form a composite key. Non-key attributes, if they exist, are not part of the key.
Composite Key A composite key is used when an entity needs more than one attribute for unique identification, such as:
If a social security number attribute and an email address attribute are keys, and they are placed in one entity, then both are necessary to identify the entity.
If order lines are numbered 10, 20, 30, and so on in each non-unique order, then the OrderNumber plus the Line Number attribute form the unique composite key.
Data Synchronization
The processes of replicating data while performing the necessary semantic and syntactic transformations.
Example: The customer Cisco in Siebel might also be represented in SAP. Both systems generate a unique key according to their own algorithm. You could choose to match these directly, or you could choose their own common format and have all the sources map to and from that model.
Cross-referencing is used in data synchronization. For example, you can create a customer and then update that customer. You can create an object (such as a sales order) that depends on the customer. In this case, you use cross-referencing to associate the new object with the customer.
TIBCO ActiveMatrix BusinessWorks SmartMapper User’s Guide

Overview | 15
Key A value that represents some object. A value that is a link to data in another location. A key is what an adapter uses to retrieve and uniquely identify a set of information such as a customer or an order.
A key can be a single value or a set of values (composite). None of the values can be null or blank.
In this software, an entire entity is used as a key to access data.
For example, the Siebel_Account entity contains an attribute called AccountId. AccountId is the key which the Siebel adapter uses to retrieve an account.
In another example, in a order, the order lines are numbered 10, 20, 30, and so on. This is done in every order, so the line numbers are not unique. However, the OrderNumber attribute plus the Line Number attribute, as part of an entity like Siebel_SalesOrder, form a key that is unique. This is a composite key because it is comprised of more than one value.
Primary Key The unique key to an object. The most concise way to uniquely identify an object. The primary key to an object must be one (or more) of the attributes of the entity which represents the object.
Foreign Key A foreign key represents an object other than the object that contains the key. For example, an order entity might contain an order key and a customer key.
The order key is the primary key for the order. The order key refers to the order itself, which is a record in the table of orders.
The customer key (say customerid) is a foreign key in the order. It refers to the table of customer records, not the table of orders. The customerid foreign key in the order links the order to the customer record. The customerid is the primary key of the customer that placed the order.
Static Data Data that does not change, or data that is changed manually instead of through a process.
Examples of static data are:
• State codes
• Currency codes
• Units of measure
TIBCO ActiveMatrix BusinessWorks SmartMapper does not differentiate between static and dynamic data. Therefore, the same TIBCO ActiveMatrix BusinessWorks SmartMapper functionality applies to both.
Table 3 Cross-Referencing Relationships Across Applications
TIBCO ActiveMatrix BusinessWorks SmartMapper User’s Guide

16 | Chapter 2 Lifecycle
Model Phase
The first step is to set up the ER Model, which is a reusable logical data model that contains a set of applications, entities, and relationships that you configure in TIBCO Designer.
In this phase, you model entity relationships and create mappings between applications.
Each ER Model can be assigned to one TIBCO ActiveMatrix BusinessWorks SmartMapper service and to one persistent storage. If multiple ER Models are created, they must be seperated. That is, a relationship can only refer to entities in its own ER Model.
Figure 5 ER Model as Presented in TIBCO Designer
The ER Model consists of applications, relationships and storage. These are described in the following sections:
• Applications on page 17
• Relationships on page 19
• Storage on page 20
TIBCO ActiveMatrix BusinessWorks SmartMapper User’s Guide

Model Phase | 17
ApplicationsAn application is a system with a unique data set and numbering scheme. In TIBCO Designer, application folders are logical containers for entities. For example:
• An instance of an ERP system such as Oracle, Siebel, or SAP
• A code set such as ISO
You can have multiple instances of one application, for example, three SAP applications that all use different numbering schemes. In this case, the three applications must be set up as separate applications in TIBCO Designer.
Figure 6 Applications Set Up in TIBCO Designer
Entity
In TIBCO ActiveMatrix BusinessWorks SmartMapper, an entity represents something that is being referenced, such as a customer record.
In most cases, an entity is a proxy for an object. It contains the information necessary to retrieve or identify the object.
Entities are composed of one or more attributes. Entities are created and grouped logically in Application folders like SAP, Oracle, and Siebel. Once created, entities are placed in relationships to form participants.
An entity represents a complete key to the object. This is the case whether the entity contains one or many attributes, and whether those attributes are keys or values.
For example, in a list of name-value pairs, name and value are both entities:
• SAP_customer. This entity might have just one attribute, but the entity is a concept that represents the real customer in the SAP system, which has hundreds of attributes.
• Siebel_account
• ISO country code
• Name and value
The following rules apply to entities:
TIBCO ActiveMatrix BusinessWorks SmartMapper User’s Guide

18 | Chapter 2 Lifecycle
• Keys have limited data types
• All keys are strings or integers
• Non-key attributes are supported
• Certain non-key attributes are also nullable
Figure 7 Entity Configured in the ER Model
TIBCO-Managed Entity
A TIBCO-Managed Entity is identified using a checkbox that is available in the Configuration tab of each entity (as shown in Figure 7).
An entity is marked as a TIBCO-Managed Entity when TIBCO ActiveMatrix BusinessWorks SmartMapper is responsible for generating new keys.
For a TIBCO-Managed entity, keys are generated internally rather than assigned, because the entity does not correspond to an external system. These keys are used for a common data model.
TIBCO ActiveMatrix BusinessWorks SmartMapper User’s Guide

Model Phase | 19
RelationshipsA relationship is a collection of entities that a user wants to bind together in a particular way. It may also be a way to describe the binding.
The relationship can be one of the following two types:
• Identity relationship In this relationship all participants are peers. See Identity Relationship on page 178 for more details.
• Association relationship In this relationship there are only two participants in each relationship. See Association Relationship on page 180 for more details.
An entity may participate in many relationships within one ER Model, but must not play two roles in the same relationship.
For example, one customer relationship contains the entities Siebel_Account_ID and SAP_Customer. These entities play roles in the customer relationship, and the same entities can participate in other relationships. However, the entities cannot each play more than one role in each relationship.
Figure 8 Relationship Defined in the ER Model
For more information, see Appendix E, Relationships in TIBCO ActiveMatrix BusinessWorks SmartMapper, on page 177.
TIBCO ActiveMatrix BusinessWorks SmartMapper User’s Guide

20 | Chapter 2 Lifecycle
StorageA storage service defines the back-end implementation and storage characteristics of an ER Model. It specifies whether the data is stored in a file or a database, or is accessed through the Enterprise Server. You can choose one of three storage services: JDBC, File or Adapter-based (Enterprise Server).
Figure 9 Choose one of the Three Storage Services
The file-based service is very useful for prototyping and for production where the data is static. Think of the file service as a read-only cache. While it's possible to write to the file, such as for seeding purposes, it is very slow. In addition, there's some risk of data corruption when doing concurrent writes.
A SmartMapper storage service is associated with an ER Model. Assigning an ER Model to a service designates that service as the only data manager for that ER Model.
An ER Model can only be assigned to one storage service at a time. If an ER Model assigned to one service is assigned to another service, it is automatically un-assigned from the first service and assigned to the new service.
A storage option may be chosen after a process is created, but must be chosen before the process is run. Multiple storage options and ER Models may be created. There is a one-to-one correlation between storage options and ER Models.
TIBCO ActiveMatrix BusinessWorks SmartMapper User’s Guide

Assemble Phase | 21
Assemble Phase
Once you have set up the ER Model, you can bind and configure the components into a TIBCO ActiveMatrix BusinessWorks process. There are two ways to do this, using individual ActiveMatrix BusinessWorks SmartMapper activities, or using the SmartMapper Wizard.
You may need to use the SmartMapper Wizard activity when you are doing a large number of lookups. The SmartMapper Wizard enables many lookups to be processed in parallel, allowing the process to run quickly.
You can bulk extract data from ActiveMatrix BusinessWorks SmartMapper for reporting purposes and filter the results. You can also dynamically load bulk data into ActiveMatrix BusinessWorks SmartMapper using the Bulk Load activity.
Using ActiveMatrix BusinessWorks SmartMapper ActivitiesFigure 10 shows a completed BusinessWorks process that uses SmartMapper activities. The process reads and parses incoming data, then determines if the key already exists. If it does not exist, a key is generated. The key is used the next time the process is run.
Figure 10 Completed BusinessWorks Process
You must also seed the data for the keys in the standard tables. This means importing key data from the clients that will be synchronized using TIBCO ActiveMatrix BusinessWorks SmartMapper.
As shown in Figure 11, the SmartMapper activities can be used to read from the source and populate the data store. The data may also be entered manually in TIBCO Administrator.
See Chapter 6, Managing Projects and Services, on page 79 for details.
TIBCO ActiveMatrix BusinessWorks SmartMapper User’s Guide

22 | Chapter 2 Lifecycle
Figure 11 SmartMapper Used to Populate the Data Store
Using the SmartMapper WizardThe SmartMapper Wizard allows you to select primary keys, foreign keys and other lookup data, and then assign relationships to them using a single activity.
Once this has been accomplished, the SmartMapper Server automatically performs lookups, generates new IDs, and maintains mappings as needed.
Figure 12 Completed BusinessWorks Process that Uses the SmartMapper Wizard
TIBCO ActiveMatrix BusinessWorks SmartMapper User’s Guide

Assemble Phase | 23
Using the Bulk Load and Bulk Extract ActivitiesBulk data loading and extraction are supported using the Bulk Load and Bulk Extract activities.
Figure 13 shows a bulk load process. You must provide the input format as an entity, one participant relationship, or two participant relationship, the ER Model to use, the criteria to load, and the Name or Index. You can also enable verbose reporting.
Figure 13 Bulk Load Process
Figure 14 shows a bulk extract process. When defining a Bulk Extract activity, you must provide the output format as an entity, one participant relationship, or two participant relationship, and the ER Model to use.
It is also possible to filter the results of the Bulk Extract activity.
You can specify that the operation be processed in subsets, which allows you to process smaller batches of rows instead of retrieving one large result set. You can also include record timestamps, such as create and update timestamps, as well as participant-level timestamps for the relationship-based Bulk Extract activity.
Figure 14 Bulk Extract Process
TIBCO ActiveMatrix BusinessWorks SmartMapper User’s Guide

24 | Chapter 2 Lifecycle
Deployment Phase
When you deploy, you attach the ActiveMatrix BusinessWorks process to a physical architecture. You can deploy by using:
• an ActiveMatrix BusinessWorks engine that is configured with ActiveMatrix BusinessWorks SmartMapper activities.
• the SmartMapper Enterprise Server. This allows you to share the cross-referencing server across multiple integration projects.
Generally the SmartMapper Enterprise Server would run on the same machine as the database server itself. Multiple SmartMapper Enterprise Servers could communicate to the same database if throughput demands are high enough. Multiple data stores may be used in an enterprise as long as the data is disjoint.
See Architecture on page 9 for more information about deployment.
TIBCO ActiveMatrix BusinessWorks SmartMapper User’s Guide

Management Phase | 25
Management Phase
After you deploy an ActiveMatrix BusinessWorks SmartMapper service, it is managed using TIBCO Administrator. For information about deploying an application in TIBCO Administrator, see the TIBCO Administrator User’s Guide.
You can also use the ActiveMatrix BusinessWorks SmartMapper plug-in into TIBCO Administrator to view participants and manage relationships. Figure 15 shows the GUI for adding a new map.
See Chapter 6, Managing Projects and Services, on page 79 for details.
Figure 15 GUI for Adding a New Map in TIBCO Administrator
TIBCO ActiveMatrix BusinessWorks SmartMapper User’s Guide

26 | Chapter 2 Lifecycle
TIBCO ActiveMatrix BusinessWorks SmartMapper User’s Guide

| 27
Chapter 3 Simple Tutorial: Seed and Lookup
This chapter describes a simple tutorial that illustrates setting up the entities and relationships in an ER Model, performing data seeding, and doing a look-up in TIBCO ActiveMatrix BusinessWorks.
Topics
• Overview, page 28
• Creating the ER Model, page 31
• Seeding Data into the Model, page 39
• Reviewing and Running the Lookup Data Process, page 47
TIBCO ActiveMatrix BusinessWorks SmartMapper User’s Guide

28 | Chapter 3 Simple Tutorial: Seed and Lookup
Overview
This tutorial addresses a common cross-referencing requirement in which an inbound message contains a reference to an object in one application that needs to be synchronized with objects in one or more other applications. The tutorial is included in the installation package in the directory install-path\tibco\smartmapper\version\examples\Getting_Started .
Here is what the tutorial covers:
• First, the mapping relationships are created by defining the entities or keys involved in each relationship, and then defining the relationships themselves.
• Second, the service used for this mapping model is configured. The service defines where this mapping will be stored. Our options include file, database or adapter-based.
• Next, the data has to be seeded. A BusinessWorks process is included, which reads an XML file and uses the data in that file to populate the mapping.
• Finally, we will review and run the process to lookup a Siebel Account ID value in the cross-reference table.
Business ScenarioHere, the inbound message from a Siebel application references a Siebel customer through a Siebel_Account_ID field. Some of the data in this inbound message must be used to generate an outbound message to an OAG-based common data model. This OAG-based common data model uses an OAG_Party_ID field to refer to customers.
The inbound Siebel_Account_ID must be cross-referenced with the corresponding OAG_Party_ID on the OAG-based common data model at runtime. Also, if such a cross-reference does not exist, a new OAG_Party_ID must be created and cross-referenced with the inbound Siebel_Account_ID for possible future use.
TIBCO ActiveMatrix BusinessWorks SmartMapper Solution TIBCO ActiveMatrix BusinessWorks SmartMapper can perform the necessary cross-referencing required by the business scenario. The Siebel_Account_ID field is cross-referenced with the OAG_Party_ID field. When an inbound Siebel account is received by the TIBCO ActiveMatrix BusinessWorks SmartMapper cross-referencing engine at runtime, it is cross-referenced with the corresponding OAG_Party_ID, which is returned as output.
TIBCO ActiveMatrix BusinessWorks SmartMapper User’s Guide

Overview | 29
For entity values that do not exist in an underlying data store, TIBCO ActiveMatrix BusinessWorks SmartMapper dynamically generates an OAG_Party_ID, and then creates a cross-reference in the model at runtime.
Figure 16 shows how TIBCO ActiveMatrix BusinessWorks SmartMapper takes the inbound message from a Siebel application, cross-references the inbound Siebel_Account_ID with the corresponding OAG_Party_ID, and creates an outbound message for the OAG-based common data model that the other applications can understand.
Figure 16 Creating an Outbound Message for the OAG-based Common Data Model
Assumptions Made in this TutorialUser schemas have been defined and this step is not described in this tutorial. The Schema Definition activity is used to set up schemas and link them to the .xsd schemas for the business documents to be used in this tutorial. These schemas are then used in the parse and render XML activities in the processes.
Working with Palettes in TIBCO DesignerWhen you install TIBCO ActiveMatrix BusinessWorks SmartMapper Plug-in or ActiveMatrix BusinessWorks SmartMapper Enterprise Server, the installer adds a palette into TIBCO BusinessWorks. This palette enables you to set up the entity-relationship mapping for your systems, as well as to create, update, and use relationship instances.
<Name>COLTAS Inc</Name>
<AccountId>abc-123</AccountId><Address>
<Street>3450,Baker Street</Street><City>Lexington</City><State>NJ</State><ZIP>08648</ZIP>
</Address>
Siebel_Account[1] abc-123[2] xyz-987[3] tib-111
OAG_Party[1] z6ir7Zm8ZJhH7-jeStzzw4IUzzw[2] kljd986YIjds6-nbfhujkUb52s1[3] 98sdj7s6hs8en-dnmcIyudysbw1
TIBCO ActiveMatrix BusinessWorks SmartMapper
<Id>z6ir7Zm8ZJhH7-jeStzzw4IUzzw</Id><Name>COLTAS Inc</Name><Address> <Street>3450,Baker Street</Street> <City>Lexington</City> <State>NJ</State> <ZIP>08648</ZIP></Address>
Inbound Outbound
TIBCO ActiveMatrix BusinessWorks SmartMapper User’s Guide

30 | Chapter 3 Simple Tutorial: Seed and Lookup
BusinessWorks with the SmartMapper Palette should resemble Figure 17.
Figure 17 BusinessWorks with the SmartMapper Palette
You can drag icons from the palette panel to the design panel. All the panels change in an interactive way as you use TIBCO ActiveMatrix BusinessWorks SmartMapper.
TIBCO ActiveMatrix BusinessWorks SmartMapper User’s Guide

Creating the ER Model | 31
Creating the ER Model
This section explains the steps necessary to create the ER Model and the storage service used in the tutorial.
In this tutorial, you will do the following:
• Create the Project, page 31
• Create the Applications and Entities, page 33
• Define a Relationship Among Entities, page 36
• Create a Service, page 38
Task A Create the Project
To create the ER Model, you must first create a project and add the top level ER Model resource.
1. Select Start > All Programs > TIBCO > TIBCO Designer version_number > TIBCO Designer.
2. Click New Empty Project.
3. Next to the Project Directory window, browse to the directory where you wish to save the new project and provide a unique name; for example, Getting_Started_2.
Figure 18 Name the New Project
4. Click OK.
TIBCO ActiveMatrix BusinessWorks SmartMapper User’s Guide

32 | Chapter 3 Simple Tutorial: Seed and Lookup
5. Click the Palettes tab on the left, and select the SmartMapper Resources palette.
6. Drag and drop the SmartMapper ER Model activity to the design panel.
Figure 19 SmartMapper Resource added to the Design Panel
TIBCO ActiveMatrix BusinessWorks SmartMapper User’s Guide

Creating the ER Model | 33
Task B Create the Applications and Entities
After creating the ER Model, you can define its applications by completing the following steps:
1. Double-click the SmartMapper ER Model in the design panel.
The Applications, Relationships, and Storage folders appear.
2. Double-click the Applications folder in the design panel.
3. Drag and drop the Application activity icon in the palette panel to the design panel.
4. Enter the name Siebel in the Name field in the configuration panel, and then click the Apply button.
Figure 20 Name the New Application
5. Double-click the new Siebel application in the design panel.
The Entity icon appears in the Palettes panel.
6. Drag and drop the Entity activity to the design panel.
TIBCO ActiveMatrix BusinessWorks SmartMapper User’s Guide

34 | Chapter 3 Simple Tutorial: Seed and Lookup
Figure 21 Name the New Entity.
7. Enter the Siebel_Account_ID entity name in the Name field in the configuration panel, and then click the Apply button.
8. Click the Schema tab in the configuration panel, as shown in Figure 22.
Figure 22 Configure the Schema Tab
9. Click the button, and then enter Account_id in the Name field.
Select the String type in the Type drop-down list.
10. Click the Apply button.
TIBCO ActiveMatrix BusinessWorks SmartMapper User’s Guide

Creating the ER Model | 35
11. Click the Applications folder and drag another Application activity from the pallette panel to the design panel.
Figure 23 Second Application Added
12. Enter the application name OAG, and click the Apply button.
13. Double-click the new OAG application in the design panel.
The Entity icon appears in the palette panel.
14. Drag and drop the Entity activity to the design panel.
15. Enter OAG_Party_ID in the Name field, and click the Apply button.
16. Check the TIBCO-Managed Entity checkbox, and click the Apply button.
Figure 24 Select the TIBCO-Managed Entity Checkbox
When the TIBCO-Managed Entity checkbox is checked, TIBCO ActiveMatrix BusinessWorks SmartMapper will generate a key for the OAG_Party_ID entity if one is not returned in the look-up.
TIBCO ActiveMatrix BusinessWorks SmartMapper User’s Guide

36 | Chapter 3 Simple Tutorial: Seed and Lookup
Task C Define a Relationship Among Entities
Once the applications and their entities are created, create a relationship among those entities by completing the following steps:
1. Select the Relationships folder, then drag and drop a Relationship resource from the palette panel to the design panel.
Figure 25 Name the Relationship
2. In the Configuration panel, enter the Map_Siebel_Acct_to_OAG_Party relationship name in the Name field.
3. Click the Apply button.
4. Double-click the new Map_Siebel_Acct_to_OAG_Party relationship in the design panel.
5. Drag and drop the Participant resource icon from the palette panel to the design panel twice.
6. Click the first Participant resource icon.
TIBCO ActiveMatrix BusinessWorks SmartMapper User’s Guide

Creating the ER Model | 37
Click the browse button next to the Entity field.
Figure 26 Select a Resource
7. Select the Siebel_Account_ID entity from the Siebel application, and then click the OK button in the Select A Resource dialog.
8. Click the Apply button in the configuration panel.
9. Click the second Participant resource icon.
Click the browse button next to the Entity field.
10. Select the OAG_Party_ID entity from the OAG application, and then click the OK button in the Select A Resource dialog.
11. Click the Apply button in the configuration panel.
TIBCO ActiveMatrix BusinessWorks SmartMapper User’s Guide

38 | Chapter 3 Simple Tutorial: Seed and Lookup
Task D Create a Service
The service defines where the ER Model is physically stored.
1. Click the Storage folder on the project tree.
2. Drag and drop the File-Based SmartMapper Service resource from the palette panel to the design panel.
Figure 27 File-Based SmartMapper Service Added.
3. Enter %%SmartMapper.demo.directory%%\SmartMapper-SERVICE.xml in the Data File field in configuration panel.
4. Click the Apply button.
This global variable will be replaced with the actual value at runtime.
5. Select Project > Save.
6. Select Project > Exit.
SmartMapper.demo.directory is a user defined global variable. Before using it, you should define this new global variable first by clicking the button in the Global Variables dialog, as shown in Figure 29.
TIBCO ActiveMatrix BusinessWorks SmartMapper User’s Guide

Seeding Data into the Model | 39
Seeding Data into the Model
In building this project, after the ER Model is created, the actual data to be used at runtime is populated. While there are several options, the tutorial uses a TIBCO BusinessWorks process to seed the data.
This section shows how data was seeded into the model by looking at how the pre-defined Seeding Data process reads the Seed_Data.xml file and uses the data in the file to populate the ER Model.
Opening the Completed TutorialThis section explains how to open the completed tutorial and update the SmartMapper.demo.directory global variable, which provides the demo directory location for the project.
The specified locations of some files in the SmartMapper_Getting_Started tutorial file may not match the locations of these files on your machine. Complete the following steps to update your file location specifications in the Getting_Started Project tutorial file:
1. Select Start > All Programs > TIBCO > TIBCO Designer version_number > TIBCO Designer.
2. Click the Open Existing Project button.
3. Click the Browse button in the Open Project dialog to locate the sample project.
The directory for the Getting_Started project: install-path\tibco\smartmapper\version\examples\Getting_Started.
4. Click the OK button.
The Getting_Started project will open.
5. Click the Global Variables tab in the left panel.
TIBCO ActiveMatrix BusinessWorks SmartMapper User’s Guide

40 | Chapter 3 Simple Tutorial: Seed and Lookup
Figure 28 Global Variables Panel
6. Click the pencil button at the top.
The Global Variables dialog box appears.
Figure 29 Global Variables Dialog
TIBCO ActiveMatrix BusinessWorks SmartMapper User’s Guide
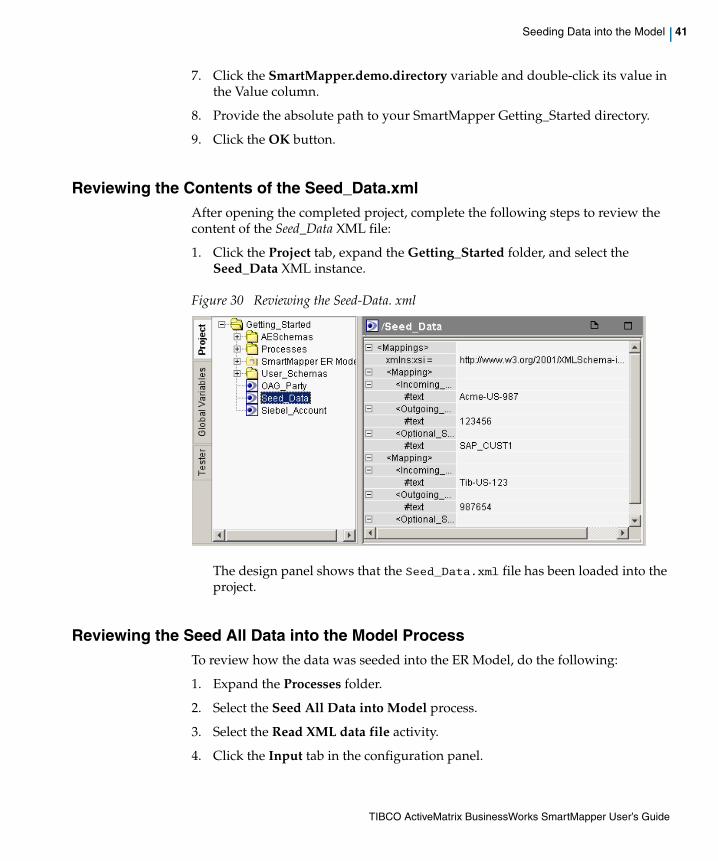
Seeding Data into the Model | 41
7. Click the SmartMapper.demo.directory variable and double-click its value in the Value column.
8. Provide the absolute path to your SmartMapper Getting_Started directory.
9. Click the OK button.
Reviewing the Contents of the Seed_Data.xmlAfter opening the completed project, complete the following steps to review the content of the Seed_Data XML file:
1. Click the Project tab, expand the Getting_Started folder, and select the Seed_Data XML instance.
Figure 30 Reviewing the Seed-Data. xml
The design panel shows that the Seed_Data.xml file has been loaded into the project.
Reviewing the Seed All Data into the Model ProcessTo review how the data was seeded into the ER Model, do the following:
1. Expand the Processes folder.
2. Select the Seed All Data into Model process.
3. Select the Read XML data file activity.
4. Click the Input tab in the configuration panel.
TIBCO ActiveMatrix BusinessWorks SmartMapper User’s Guide

42 | Chapter 3 Simple Tutorial: Seed and Lookup
Figure 31 Read XML Data: Input Tab
Note that the filename in the Activity Input pane is configured to point to the Seed_Data.xml file. The Seed_Data.xml file is stored in the directory, which is the value of the SmartMapper.demo.directory global variable.
The output for this activity is a string contained in the TextContent field in the Output tab. This will be used as an input for the Parse XML data activity.
5. Select the Parse XML data activity.
6. Select the Output Editor tab.
Figure 32 Parse XML Data: Output Editor Tab
Look at the Schema field to check for the existing schema location: http://www.tibco.com/ns/no_namespace_schema_location/ User_Schema/Seed_Data.xsd
TIBCO ActiveMatrix BusinessWorks SmartMapper User’s Guide

Seeding Data into the Model | 43
Note that the Seed Data XSD Schema points to the Seed_Data.xsd. This schema is used to validate the contents of the Seed_Data.xml file.
7. Click the Output tab and expand Mapping.
Figure 33 Parse XML Data: Output
Note that the output of this activity is a sequence of mappings that is based on the schema defined in the Schema field in the Output Editor tab.
8. Select the Create Relationship Instance activity.
Figure 34 Create Relationship Configuration
Note that the relationship in the Relationship field in the Configuration tab refers to the Map_Acct_Party_Cust relationship.
See Define a Relationship Among Entities on page 36 for more details.
9. Click the Input tab.
TIBCO ActiveMatrix BusinessWorks SmartMapper User’s Guide

44 | Chapter 3 Simple Tutorial: Seed and Lookup
Figure 35 Account_ID Mapping
Note that the Siebel_Account_ID and the OAG_Party_ID are passed into this activity as input. These were parsed from the Seed_Data.xml file.
10. Select the Add to Relationship Instance activity.
11. Click the Input tab.
Figure 36 Add to Relationship Input
Note that the OAG_Party_ID under the baseEntry node is an entity instance that already exists in an existing relationship. Sieble_Account_ID and SAP_Customer under the newEntries node are new entity instances that need to be created and added to the existing relationship.
TIBCO ActiveMatrix BusinessWorks SmartMapper User’s Guide

Seeding Data into the Model | 45
Running the Seed All Data into the Model ProcessTo seed all data into the model process, do the following:
1. Click the Tester tab in the left panel.
2. Click the button to display the Select Process to Load dialog.
Figure 37 Select Process to Load Dialog
3. Check the Seed All Data into model checkbox.
4. Click the Load & Start Current button.
The arrows in the processes in the design panel should turn green indicating success.
Figure 38 Process Test Success
TIBCO ActiveMatrix BusinessWorks SmartMapper User’s Guide

46 | Chapter 3 Simple Tutorial: Seed and Lookup
The SmartMapper-SERVICE.xml file is written to the Getting_Started directory.
5. Click the button to stop testing.
After seeding the data, you can use TIBCO Administrator to review the added data that is now available through the file-based storage service in the Getting_Started Project file.
See Chapter 6, Managing Projects and Services, on page 79 for details.
If you rerun the process, an error message will appear because the mapping has already been created in a specified file.
Use Update (or Delete) Relationship Instance activity to update the mappings if the mappings already exist.
To rerun the process, remove SmartMapper-SERVICE.xml under install-path\tibco\smartmapper\version\examples\Getting_Started.
TIBCO ActiveMatrix BusinessWorks SmartMapper User’s Guide

Reviewing and Running the Lookup Data Process | 47
Reviewing and Running the Lookup Data Process
You can now review and run the process to look up Siebel_Account_ID in the cross-reference tables.
The following two scenarios are described:
• The lookup fails. This occurs if the Siebel_Account_ID does not exist in the cross-reference table. In this case, a new OAG_Party_ID is dynamically generated at runtime and associated with the inbound Siebel_Account_ID and saved in the cross-reference table.
See Scenario 1: The Lookup Fails on page 49.
• The lookup returns a single value.
See Scenario 2: The Lookup Returns a Single Value on page 49.
Reviewing the Lookup Data ProcessClick the Lookup Data process in the project panel to see the Lookup Data Process, as shown in Figure 39.
Figure 39 Lookup Data Process
TIBCO ActiveMatrix BusinessWorks SmartMapper User’s Guide

48 | Chapter 3 Simple Tutorial: Seed and Lookup
The following activities verify the mappings:
• Read Incoming Data File Activity
— Input tab: the fileName in the Activity Input pane is configured to point to the Siebel_Account.xml file.
The Siebel_Account.xml file is stored in the directory which is defined in the SmartMapper.demo.directory global variable.
— Output tab: the output for this activity is a string contained in the textContent field. This will be used as an input for the Parse Incoming Data in XML activity.
• Parse Incoming Data in XML Activity
— Input tab: the xmlString field in Activity Input pane contains the output from the Read Incoming Data File activity.
— Output tab: content of the parsed Siebel_Account.xml file, based on the schema defined in the schema field in the Configuration tab.
— Output Editor tab: the Siebel_Account.xsd schema in the Schema field is used to validate the contents of the Siebel_Account.xml file that the Read Incoming Data File activity produces.
• Look-up OAG Party using Siebel_Account Activity
— Input tab: the Id field in the Activity Input pane is configured to point to the AccountId property of the Siebel_Account in the Process Data pane. The AccountId is the output of the Parse Incoming Data In XML activity.
— Output tab: the output for this activity is the OAG_Party_ID key that is returned by the mapping service.
Possible Process Outcomes
Running the Lookup Data process will result in one of the following outcomes:
• If using the Siebel_Account_ID, the OAG_Party_ID will not be found in the mapping table, the process takes the No Entry Found transition.
See Scenario 1: The Lookup Fails on page 49 for details.
• If using the Siebel_Account_ID, the OAG_Party_ID will not be found in the mapping table, the process takes the Entry Found transition.
See Scenario 2: The Lookup Returns a Single Value on page 49 for details.
TIBCO ActiveMatrix BusinessWorks SmartMapper User’s Guide

Reviewing and Running the Lookup Data Process | 49
Scenario 1: The Lookup FailsIn this case, using the Siebel_Account_ID, a key for the OAG_Party_ID is not found in the cross-reference mapping tables.
When the lookup fails, the Generate Key activity comes into play.
Figure 40 shows the route taken by the process in the event that a lookup failure occurs.
Figure 40 No Key Found in Mapping Tables
Scenario 2: The Lookup Returns a Single ValueIn this case, using the Siebel_Account_ID, a key for the OAG_Party_ID is found in the cross-reference mapping tables.
When the user runs the process for a second time, the process will succeed because a key for OAG_Party_ID was generated (corresponding to the input Siebel_Account_ID) in the scenario in which the lookup failed.
Figure 41 shows the route taken by the process in the event that a lookup succeeds.
TIBCO ActiveMatrix BusinessWorks SmartMapper User’s Guide

50 | Chapter 3 Simple Tutorial: Seed and Lookup
Figure 41 Key Found in Mapping Tables
TIBCO ActiveMatrix BusinessWorks SmartMapper User’s Guide

| 51
Chapter 4 Advanced Tutorial: SmartMapper Wizard
This tutorial shows how to use the SmartMapper Wizard in the context of a BusinessWorks process.
Topics
• Overview, page 52
• Updating Default File Locations in the Wizard Project, page 54
• Viewing the Create Sales Order Process, page 55
• Reviewing the SmartMapper Wizard Activity, page 57
• Reviewing the Map All Data Activity, page 62
TIBCO ActiveMatrix BusinessWorks SmartMapper User’s Guide

52 | Chapter 4 Advanced Tutorial: SmartMapper Wizard
Overview
As is often the case, when a new sales order arrives, a corresponding order on a remote system must be created at runtime and linked to the inbound sales order.
Business ScenarioIn this tutorial an order is mapped to a common data model so that it may be published out to the application. Some subscribers may be interested in doing billing, shipping, provisioning, or planning. All subscribers need to know that a new sales order was booked.
Because there are many things to cross-reference on a sales order, and because there are repeated elements like order lines, the SmartMapper Wizard is used.
TIBCO ActiveMatrix BusinessWorks SmartMapper SolutionThe SmartMapper Wizard maps several fields to produce output that is used to generate an OAG_SalesOrder.
The following steps show an overview of how TIBCO ActiveMatrix BusinessWorks SmartMapper works:
1. The inbound message is taken from a Siebel application.
2. The inbound order number is cross referenced with the generated order number.
3. An outbound message is created that can be understood by other services on the integration backbone.
(1) Inbound Message from Enterprise Application
<OrderNumber>100</OrderNumber><AccountId>abc-123</AccountId><OrderDate>2003-01-31</OrderDate><LineItems><LineNumber>10</LineNumber><ProductId>101111</ProductId><Quantity>3</Quantity>
</LineItems>……
TIBCO ActiveMatrix BusinessWorks SmartMapper User’s Guide

Overview | 53
Advanced Tutorial ProcessThe Create Sales Order TIBCO BusinessWorks process has been included in this example. This tutorial starts at a point mid-way through the overall setup. The following steps have already been performed, and are not described:
1. Defining user schemas. This means using the Schema Definition activity to set up schemas and link them to the .xsd schemas for the business documents to be used in this tutorial. These schemas are then used in the parse and render XML activities in the process.
2. Defining the ER Model. This means defining the applications and entities, and then defining the relationships.
3. Configuring a service for the ER Model. This means defining where the ER Model table data will be stored.
In the SmartMapper Wizard, the primary keys (SmartMapper mapping) and foreign keys (lookup) are mapped. The input data is dragged into the new key schemas to be looked up.
(2) TIBCO ActiveMatrix BusinessWorks SmartMapper Cross-Reference Tables
OrderNumber[1] 100
ID[1]cross-referenced with remote ID:1YrEz4qfZMI4v-Hjdxzzw4r-zzw
AccountId[1] abc-123
………
PartyId[1] z6ir7Zm8ZJhH7-jeStzzw4IUzzwcross-referenced with remote PartyId:Wc5jtvOUZMI4xUHjdyzzw4r-zzw………
(3) Outbound Message to Enterprise Application
<Id>1YrEz4qfZMI4v-Hjdxzzw4r-zzw</Id><PartyId>Wc5jtvOUZMI4xUHjdyzzw4r-zzw</PartyId><DocumentDateTime>2003-01-31
</DocumentDateTime><Line><LineNumber>
QvmSp5B3ZMI4xUHjdzzzw4r-zzw</LineNumber>
<ItemId>cd6Nfd5IZMI4xUHje-zzw4r-zzw</ItemId> <OrderQuantity>3</OrderQuantity>
</Line> ……
TIBCO ActiveMatrix BusinessWorks SmartMapper User’s Guide

54 | Chapter 4 Advanced Tutorial: SmartMapper Wizard
Updating Default File Locations in the Wizard Project
Because the specified locations of some files in the SmartMapper Wizard Tutorial project may not match the locations of these files on your machine, do the following to update your file location specifications in the SmartMapper_Wizard.dat tutorial file:
1. Select Start > All Programs > TIBCO > TIBCO Designer version_number > TIBCO Designer.
2. Click Open Existing Project.
3. Browse to the install-path\tibco\smartmapper\version\examples directory. Select the Wizard folder and click OK.
4. Click the Global Variables tab in the left panel.
5. Click the pencil button at the top.
A global variables dialog appears.
Figure 42 Global Variables Dialog
6. Click the SmartMapper.demo.directory variable and double-click its value in the Value column.
7. Provide the absolute path to your SmartMapper Wizard directory, such as D:\TIBCO\SmartMapper\version\examples\Wizard
8. Click OK.
TIBCO ActiveMatrix BusinessWorks SmartMapper User’s Guide

Viewing the Create Sales Order Process | 55
Viewing the Create Sales Order Process
To begin reviewing how the Create Sales Order process works, complete the following steps:
1. Click the Project tab in the left panel.
2. Select the Create Sales Order process under the Processes folder in the project tree.
Figure 43 Create Sales Order Process
TIBCO ActiveMatrix BusinessWorks SmartMapper User’s Guide

56 | Chapter 4 Advanced Tutorial: SmartMapper Wizard
3. Verify the location of the file Siebel_SalesOrder.xml on your machine and make sure that the following is true:
— The Siebel_SalesOrder.xml file is in the directory defined under the SmartMapper.demo.directory global variable, such as D:\tibco\smartmapper\version\examples\Wizard
— If this is not the case, change the SmartMapper.demo.directory global variable to reflect the correct location of your Siebel_SalesOrder.xml file.
TIBCO ActiveMatrix BusinessWorks SmartMapper User’s Guide

Reviewing the SmartMapper Wizard Activity | 57
Reviewing the SmartMapper Wizard Activity
The SmartMapper Wizard activity allows you to perform several operations such as lookups, automatic key generation and mappings in the same activity.
When configuring the Wizard, do the following:
1. Click the SmartMapper Wizard icon of the Create Sales Order process in the design panel.
Figure 44 SmartMapper Wizard Configuration Tabs
Edit or configure the Wizard using the following tabs in the configuration panel: Configuration, Input Editor, SmartMapper Calls, Input, Output, and Error Output.
2. Click the Configuration tab to assign the name and description for the Wizard.
3. Complete the fields under the Input Editor tab, SmartMapper Calls tab and Input tab, in that order.
Figure 45 Input Editor Tab
You must provide at least one element under the Input Editor tab, or no data will be available under the SmartMapper Calls tab.
TIBCO ActiveMatrix BusinessWorks SmartMapper User’s Guide

58 | Chapter 4 Advanced Tutorial: SmartMapper Wizard
4. Click the SmartMapper Calls tab.
When you check the Invoke SmartMapper checkbox, two Participant fields appear.
Figure 46 Smart Mapper Calls Tab
5. Define the SmartMapper operation for the selected schema node, as explained in Table 4:
Note that while the GUI does not enforce this, all operations within a SmartMapper Wizard activity must use the same ER Model. That is, when selecting a participant for a schema node, each schema node must use a participant from the same ER Model.
Table 4 SmartMapper Calls Tab Value
Field Name Value
Participant From the SmartMapper ER Model > Relationships > Customer folder select participants.
For example, click the button, and then select the SmartMapper ER Model > Relationships >
Customer > Siebel_Account folder in the Select a Resource dialogue for the first participant. And click the button, and then select the SmartMapper ER Model > Relationships > Customer > OAG_Party
folder in the Select a Resource dialogue for the other participant.
TIBCO ActiveMatrix BusinessWorks SmartMapper User’s Guide

Reviewing the SmartMapper Wizard Activity | 59
6. Click the Input tab.
The Process Date and Activity Input panes become available.
Figure 47 Input Tab Configuration
In this tab you can reference the actual fields in the inbound Siebel sales order. Because Maintain Mapping was chosen in the Invoke SmartMapper drop-down list in the SmartMapper Calls tab, you have the option to input the matched field, not just the input field.
If you do not want the SmartMapper Wizard to do the mapping, but rather give specific values for the input and output participants, complete both added elements, that is, all the participants under the xref node.
Note that the SmartMapper Wizard can only generate a key for an entity which is set as a TIBCO-Managed Entity. In this case, because the entities in the OAG application are all set as TIBCO-Managed Entity, their values can be empty, such as the OAG_SalesOrder and OAG_Party entities shown in the Activity Input pane.
TIBCO ActiveMatrix BusinessWorks SmartMapper User’s Guide

60 | Chapter 4 Advanced Tutorial: SmartMapper Wizard
7. Click the Output tab.
Figure 48 Output Tab
This tab contains the data mapped in the Input tab, and lists the output information for the activity.
8. Click the Error Output tab.
TIBCO ActiveMatrix BusinessWorks SmartMapper User’s Guide

Reviewing the SmartMapper Wizard Activity | 61
Figure 49 Error Output Tab
This tab contains Wizard operation exceptions and Activity or Timed Out Exceptions.
TIBCO ActiveMatrix BusinessWorks SmartMapper User’s Guide

62 | Chapter 4 Advanced Tutorial: SmartMapper Wizard
Reviewing the Map All Data Activity
Now that the lookup or creation of fields corresponding to certain fields in the inbound Siebel sales order has been set up, the OAG sales order can be created. The Mapper activity can be used to create the OAG sales order.
1. Select the Create Sales Order process in the project panel.
2. Select the Map All Data activity.
3. Click the Input tab.
Figure 50 Map All Data: Input Tab
The data passed as output from the SmartMapper Wizard activity is mapped into the fields of the OAG_SalesOrder schema in the Map All Data activity.
The green line from the SmartMapper Wizard LineItems field to the OAG sales order Line field indicates that the line sequence will contain the same number of elements as the inbound line item sequence.
The output of the Map All Data activity is an OAG sales order.
TIBCO ActiveMatrix BusinessWorks SmartMapper User’s Guide
| 63
Chapter 5 Loading and Extracting Data
This chapter explains the ER Model; the three methods used to load data; and one method used to extract data.
Topics
• Overview, page 64
• ER Model and BusinessWorks Activities, page 65
• Using the Bulk Load Activity, page 70
• Using the SmartMapper Wizard, page 73
• Using the Create Relationship Instance, page 75
• Extracting Data to the File, page 77
TIBCO ActiveMatrix BusinessWorks SmartMapper User’s Guide

64 | Chapter 5 Loading and Extracting Data
Overview
This chapter explains how to parse and load data. A project that contains three processes is described. Each process uses a different ActiveMatrix BusinessWorks SmartMapper activity to load the same data. A short example is also included that shows how to extract data using the Bulk Extract activity.
Bulk Load Activity
The Bulk Load activity is designed for two use cases. 1) seeding a large amount of data into SmartMapper and 2) enabling dynamic writes where the relationship name is passed in with the data rather than modeled at design time.
This allows you to seed multiple, different relationships from one set of data, and to link all participants in one call where the SmartMapper Wizard activity (described next) allows only pairs.
The activity provides mechanisms to “fail” a row at a time in the case of collisions.
SmartMapper Wizard Activity
The SmartMapper Wizard activity is designed for mapping a hierarchical object such as a sales order. It can do different operations such as seeding and lookups.
All writes in a SmartMapper Wizard operation succeed or none do, and running the operation multiple times gives the same result as running it once.
Create Relationship Instance Activity
The Create Relationship Instance activity provides a simple, functional mechanism for creating a logical “row” in ActiveMatrix BusinessWorks SmartMapper.
The activity seeds data into its respective entity table. It may not, however, have the speed or the exception handing capability when compared to the other activities, which are optimized for certain use cases.
Bulk Extract Activity
The Bulk Extract activity allows you to extract cross-referencing data for reporting purposes and filter the results. You can query either entity or relationship data by providing just name of the entity or relationship.
You can use participant-level timestamps for the relationship-based Bulk Extract activity.
TIBCO ActiveMatrix BusinessWorks SmartMapper User’s Guide

ER Model and BusinessWorks Activities | 65
ER Model and BusinessWorks Activities
Each process described in this chapter uses the same SmartMapper ER Model and BusinessWorks Data Format activity. This section provides an overview of the ER Model and the activity.
The ER Model has an entity associated with each application and each entity is assigned to a relationship. An entity represents something that is being referenced, such as a customer record. For example, Figure 51 shows the ER Model defined for the processes.
Figure 51 SmartMapper ER Model
This example uses a file-based SmartMapper service. Instead, a database can be used for storage and the JDBC-based SmartMapper service activity can define the connection to the database instance.
TIBCO ActiveMatrix BusinessWorks SmartMapper User’s Guide

66 | Chapter 5 Loading and Extracting Data
Applications and EntitiesTwo tabs are available for configuring an entity: Configuration and Schema.
Configuration Tab
The Configuration tab allows you to name the entity and enter its description.
Figure 52 Entity: Configuration Tab
An entity can be defined with the TIBCO-Managed Entity field selected. When the checkbox TIBCO-Managed Entity is selected, it allows SmartMapper to generate a key for an entity if one is not returned in the lookup. The goal here is to create a relationship among three applications — represented by three columns in the text file — and to generate a global, unique identifier (GUID).
Schema Tab
By default, schema is not defined for an entity. You must define the schema.
Figure 53 Entity: Schema Tab
Clicking the + button allows you to add and configure a schema. The default attribute name is id.
The name can be any value less than 31 characters. Each entity has a key set assigned with either a string or integer attribute.
TIBCO ActiveMatrix BusinessWorks SmartMapper User’s Guide

ER Model and BusinessWorks Activities | 67
Relationships and ParticipantsYou can configure relationships and participants that belong to these relationships. For more information, refer to Relationships on page 19.
Relationships
Select a relationship in the project panel.
Figure 54 Relationship
You can name a relationship, enter its description, and choose the relationship type. There are two types of relationships:
• Identity: used to keep corresponding keys for different applications
• Association: this relationship can have only two participants and is used to model relationships of two orthogonal entities
Participants
Select a participant in the project panel.
Figure 55 Participant
You can map this participant to a particular entity.
TIBCO ActiveMatrix BusinessWorks SmartMapper User’s Guide

68 | Chapter 5 Loading and Extracting Data
If the Cardinality Is Many checkbox is checked, the relationship can have a collection of entities as a peer with the other entities.
BusinessWorks Data Format ActivityThe BusinessWorks Data Format activity is used in ActiveMatrix BusinessWorks SmartMapper processes.
This activity contains the specification for parsing the string using the Parse Data activity. Refer to TIBCO ActiveMatrix BusinessWorks Palette Reference for details.
The source data is in a spreadsheet, so the configuration fields are defined as shown in Figure 56, Figure 57, and Figure 58.
Figure 56 Data Format Activity: Configuration Tab
Figure 57 shows five columns in the spreadsheet for each schema. Each element is defined with the same settings for the Cardinality field and two Type fields.
Figure 57 Data Format Activity: Data Format Tab
TIBCO ActiveMatrix BusinessWorks SmartMapper User’s Guide

ER Model and BusinessWorks Activities | 69
When processing fixed format text, you must specify the line length and column offsets. This allows the Parse activity to determine where columns and lines begin and end.
Figure 58 shows the Field Offsets tab that provides a way of specifying the format of fixed-width text.
Figure 58 Data Format Activity: Field Offsets Tab
TIBCO ActiveMatrix BusinessWorks SmartMapper User’s Guide

70 | Chapter 5 Loading and Extracting Data
Using the Bulk Load Activity
The Bulk Load activity allows you to load large amounts of data. Unlike other activities, the Bulk Load activity does not stop if an error occurs. That is, if a record fails to load into the database, the activity will not stop.
The Parse Data and Bulk Load activities are used to manage the amount of data. The Parse activity handles data in chunks and hands each chunk over to the Bulk Load activity before processing the next chunk of data. Both activities are placed in a group so the action can be repeated until all the data is parsed and loaded.
A file is used as input in this example, but the mechanism is nearly identical when loading from a database. Figure 59 shows the process defined.
Figure 59 Bulk Load Activity Diagram
The iterator group is used to prevent BusinessWorks from parsing the entire file into memory at once. Ten thousands records could be handled fairly easily, but 100,000 would result in a noticeable slow down. A loop like this enables the process to scale for any size.
The Group activity configuration is shown in Figure 60.
Figure 60 Group Activity Configuration Diagram
The group action repeats until the condition defined occurs.
TIBCO ActiveMatrix BusinessWorks SmartMapper User’s Guide

Using the Bulk Load Activity | 71
The Parse Data activity takes input from a file and processes it, turning it into a schema tree based on the Data Format activity. See BusinessWorks Data Format Activity on page 68 for details.
Figure 61 Parse Data Activity: In put Tab
Under the Input tab, the path name of the file that contains the records is given and the number of records to parse is defined. By setting the number of records, a limit is placed on the number of records that will be read or parsed at a time.
Figure 62 shows the Bulk Load Configuration panel. The Bulk Load activity allows you to load multiple records at once.
Figure 62 Bulk Load Activity: Configuration Tab
When the Criteria field is set to Index, it means the records will be loaded by index.
Any data load has a chance of collisions. If the Mode field is set to Create, the data is loaded with minimal collision detection. This is the fastest, most efficient way to seed an empty store. If the Mode field is set to Add, on the other hand, it checks for duplicate records first and ignores them, rather than throwing an error.
The Input structure is different depending on the Mode setting when the Input Format is set to One Participant Relationship Format.
See Create Mode Setting on page 127 for more information.
TIBCO ActiveMatrix BusinessWorks SmartMapper User’s Guide

72 | Chapter 5 Loading and Extracting Data
Figure 63 shows an example screen of the Bulk Load activity.
Figure 63 Bulk Load Activity: Activity Input
The Parse Data activity defined the elements for the input columns. The outcome of the Parse Data activity is used as the input of the Bulk Load activity.
In the Input tab, the Process Data and Activity Input panes are represented as schema trees. Under the Activity Input pane, click the icon to add an element to the schema tree.
TIBCO ActiveMatrix BusinessWorks SmartMapper User’s Guide

Using the SmartMapper Wizard | 73
Using the SmartMapper Wizard
The same data can be managed using the SmartMapper Wizard activity. The following diagram shows a process defined with three SmartMapper Wizard activities, one for each column in the source data file. The ER Model and Parse Data activity used in this process is the same as was described earlier in ER Model and BusinessWorks Activities on page 65.
Figure 64 Parse Data Activity: Diagram
Note that while this is functionally equivalent to that described in the previous section, and will work when there are no errors, but it does not provide the same level of error handing.
Each column is associated with a SmartMapper Wizard activity. Essentially, each activity uses the same definition, but for a different column in the input data file (col1, col2, col3). We’ll only describe how to define the first SmartMapper Wizard. The other Wizards are defined the same way, but with different column names.
Figure 65 shows the Input Editor.
Figure 65 Input Editor
TIBCO ActiveMatrix BusinessWorks SmartMapper User’s Guide

74 | Chapter 5 Loading and Extracting Data
Three elements are defined: col1, col2 and col3.
The SmartMapper Calls tab allows you to annotate the input schema for logical locations for keys or references.
Figure 66 SmartMapper Calls Tab
Select the checkbox Invoke SmartMapper, and then select Maintain Mapping (xref_map) in the drop-down list. This maintains a one-to-one mapping between the given two participants.
The Input Editor defined the schema for the columns in the data file. Note that ActiveMatrix BusinessWorks SmartMapper generates a GUID for each row and maps it to the values in the first column.
Figure 67 Generating a GUID
The second SmartMapper Wizard takes the output from the first and adds the data from the second column to the relationship.
TIBCO ActiveMatrix BusinessWorks SmartMapper User’s Guide

Using the Create Relationship Instance | 75
Using the Create Relationship Instance
This primitive operation creates a set of entity instances and associates them in a relationship instance. Figure 68 shows a process defined with the Create Relationship Instance activity.
The SmartMapper ER Model and Parse Data activity used in this process are the same as those described earlier.
Figure 68 Create Relationship Instance Diagram
As shown in Figure 68, two group activities are used in the process as follows:
• The outer group controls how much of the file is read into memory.
• The inner group puts each record into ActiveMatrix BusinessWorks SmartMapper.
The configuration for the create relationship instance is shown in Figure 69. It is assigned the Rel1 relationship defined in the ER Model.
Figure 69 Create Relationship Instance: Configuration
The Parse Data activity defined the elements for the input columns.
TIBCO ActiveMatrix BusinessWorks SmartMapper User’s Guide

76 | Chapter 5 Loading and Extracting Data
In the Input tab, the process data and activity input are represented as schema trees.
Under Activity Input, click the + icon to add an element to the schema tree.
Figure 70 Create Relationship Instance: Activity Input
TIBCO ActiveMatrix BusinessWorks SmartMapper User’s Guide

Extracting Data to the File | 77
Extracting Data to the File
The Bulk Extract activity allows you to retrieve cross-referencing data. In this example, the activity retrieves data and writes it to a file using the original data format.
Figure 71 shows the project. Similar to the other projects described, the activities are placed in a group where each record is read using ActiveMatrix BusinessWorks SmartMapper. The number of records to read before writing is configured in the Bulk Extract activity.
Figure 71 Extracting Data to the File
The Configuration tab for the Bulk Extract activity allows you to specify that the result set be processed in smaller batches rather than processing the entire result set at once. The Output Format field allows you to specify the relationship format, or entity format. The choice you make determines the structure that appears under the Output tab. See Output Tab on page 122 for more information.
To include record timestamps, select the Show Record Timestamp field.
Figure 72 Show Record Timestamp
Under the Input tab, a root element was created where the relationship name and the subset size is set (elements are created by clicking the + icon). The subset size sets the size of each batch of records you wish to process.
TIBCO ActiveMatrix BusinessWorks SmartMapper User’s Guide

78 | Chapter 5 Loading and Extracting Data
Figure 73 Bulk Extract: Input Tab
The Render Data activity allows you to retrieve a result set from a database. Figure 74 shows the Input tab in the activity where the output data from Bulk Extract activity is to be transformed to the columns used in the spreadsheet.
Figure 74 Bulk Extract: Activity Input
The Write File activity writes the text content to the specified file. The file name is given in the input field, which is shown in Figure 75.
Figure 75 Write File: Input Tab
TIBCO ActiveMatrix BusinessWorks SmartMapper User’s Guide

| 79
Chapter 6 Managing Projects and Services
This chapter describes monitoring and management options in TIBCO Administrator.
Topics
• Overview, page 80
• Building an Enterprise Archive (EAR), page 81
• Adding a SmartMapper Application, page 83
• Opening a SmartMapper Project, page 86
• Managing Relationships, page 88
TIBCO ActiveMatrix BusinessWorks SmartMapper User’s Guide

80 | Chapter 6 Managing Projects and Services
Overview
The TIBCO ActiveMatrix BusinessWorks SmartMapper plug-in for TIBCO Administrator allows you to view and manage runtime data in the ER Model tables. Using TIBCO Administrator, you can maintain relationship data whether or not the project is deployed. This allows you to seed the data for testing.
TIBCO ActiveMatrix BusinessWorks SmartMapper User’s Guide

Building an Enterprise Archive (EAR) | 81
Building an Enterprise Archive (EAR)
In TIBCO Designer, a project can have one or more Enterprise Archive (EAR) resources that correspond to an .ear file. To create an application definition in TIBCO Administrator, you must load an .ear file.
An Enterprise Archive consists of the SmartMapper Archive resource, which corresponds to a deployable service in TIBCO Administrator.
To learn more about enterprise archives and how they are built, see TIBCO Designer User’s Guide.
To Create a SmartMapper Enterprise Archive (EAR)
1. In TIBCO Designer, create a new SmartMapper project with at least one process and one service.
2. With the top-level folder selected, open the General palette.
3. Locate the Enterprise Archive resource and drag the resource to the configuration panel.
4. Double-click on the Enterprise Archive resource.
The Shared Archive resource appears in the design panel.
5. Click on the Resources tab.
Figure 76 Adding a Project to the Archive
6. Browse to the SmartMapper ER Model you have created.
7. Select the project and click OK.
TIBCO ActiveMatrix BusinessWorks SmartMapper User’s Guide

82 | Chapter 6 Managing Projects and Services
8. Click Apply.
9. Drag the Process Archive resource from the palette panel to the design panel.
10. Select the Processes tab.
Figure 77 Adding a Process to the Archive
11. Browse with the button “Add a non -process starter process to this archive” (binoculars without the green arrow) and select the process you wish to add to the archive, such as “Seed All Data into model”.
12. Click Apply.
13. Repeat steps 10 and 11 to add other processes if required.
14. Click the Enterprise Archive resource in the project panel, then click the Build Archive button and save the project.
TIBCO ActiveMatrix BusinessWorks SmartMapper User’s Guide

Adding a SmartMapper Application | 83
Adding a SmartMapper Application
To learn more about adding and administering TIBCO applications, see TIBCO Administrator User’s Guide.
To add a SmartMapper application, complete the following steps:
1. Select Start > All Programs > TIBCO > TIBCO Administrator version_number > TIBCO Administrator.
2. Select a domain and log in.
3. Click Application Management.
4. Click the New Application button on the Application Management panel.
The Upload EAR File dialog appears.
Figure 78 Upload EAR File
5. Browse to the archive file you wish to upload.
To learn how to build an enterprise archive file (EAR), see Building an Enterprise Archive (EAR) on page 81.
6. Click the OK button.
The new application appears.
TIBCO ActiveMatrix BusinessWorks SmartMapper User’s Guide

84 | Chapter 6 Managing Projects and Services
Figure 79 New SmartMapper Application
If you want to deploy the application immediately, check the Deploy On Save checkbox.
7. Click the Save button, as shown in Figure 79.
TIBCO ActiveMatrix BusinessWorks SmartMapper User’s Guide

Adding a SmartMapper Application | 85
8. Click the Deploy button.
9. Click the OK button.
The application is deployed.
TIBCO ActiveMatrix BusinessWorks SmartMapper User’s Guide

86 | Chapter 6 Managing Projects and Services
Opening a SmartMapper Project
To learn more about adding and administering TIBCO applications and services, see TIBCO Administrator User’s Guide.
Opening a Non-Deployed SmartMapper ProjectTo open a non-deployed project, complete the following steps:
1. Select Start > All Programs > TIBCO > TIBCO Administrator version_number > TIBCO Administrator.
2. Select a domain and log in.
3. Click the SmartMapper 5.5.0 node under the Resource Management folder.
4. Click Add Non-Deployed button on the right panel.
Type the file pathname to that project in the Non-Deployed Project text box, such as D:\tibco\smartmapper\version\examples\Getting_Started.
Figure 80 Add Non-Deployed Service
5. Click the OK button.
The project appears as a service.
Figure 81 Deployed SmartMapper Project
6. Click the service name to open the service. See Managing Relationships on page 88 to learn about managing relationships for the selected service.
TIBCO ActiveMatrix BusinessWorks SmartMapper User’s Guide

Opening a SmartMapper Project | 87
Opening a Deployed SmartMapper ProjectTo open a deployed project, complete the following steps:
1. Select Start > All Programs > TIBCO > TIBCO Administrator version_number > TIBCO Administrator.
2. Select a domain and log in.
3. Click the All Service Instance node under Application Management folder.
Figure 82 SmartMapper Project Deployed
4. Click the service name to open the service.
See Managing Relationships on page 88 to learn about managing relationships for the selected service.
TIBCO ActiveMatrix BusinessWorks SmartMapper User’s Guide

88 | Chapter 6 Managing Projects and Services
Managing Relationships
This section shows how to create a relationship instance, search for a relationship, and remove or edit keys in a relationship.
It assumes that you have opened a non-deployed project or a deployed service as explained in Opening a SmartMapper Project on page 86.
The Edit SmartMapper Detail screen allows you to do the following:
• Create a Relationship Map, page 89
• Search for a Relationship, page 90
• Remove or Edit Keys in a Relationship, page 92
TIBCO ActiveMatrix BusinessWorks SmartMapper User’s Guide

Managing Relationships | 89
Create a Relationship MapTo create a relationship, do the following:
1. Click the New Map button under Relationship Instances.
The New dialog appears.
Figure 83 Create a Relationship Map
2. Enter a value for each of the keys contained in that relationship.
3. Click the OK button.
This creates a relationship between the OAG_Party, which is a TIBCO-managed entity, and the listed accounts.
Note that a key was automatically generated for the TIBCO-managed entity (in this case, OAG_Orderline.
TIBCO ActiveMatrix BusinessWorks SmartMapper User’s Guide

90 | Chapter 6 Managing Projects and Services
Search for a Relationship1. In the Edit SmartMapper Detail panel, first select a relationship from the
Relationship dropdown list.
2. Select a participant from the Participant dropdown list.
Figure 84 Select a Participant
— If you select an entity that is an account ID (such as Siebel_Account_ID), the ID window will appear on the right.
— If you select an entity that represents a concept with multiple attributes (such as SAP_Customer), the KUNNR window will open on the right.
3. If the seleteced entity is an account ID, type the value in the ID field.
If the seleteced entity that represents a concept with multiple attributes, type the value in the KUNNR field.
4. Click the Search button. The query results appear.
TIBCO ActiveMatrix BusinessWorks SmartMapper User’s Guide

Managing Relationships | 91
Figure 85 Query Results for a Relationship Search
The relationship instance for the entity Siebel_Account_ID is displayed. It contains the account ID for the entity.
RelationshipInstance
TIBCO ActiveMatrix BusinessWorks SmartMapper User’s Guide

92 | Chapter 6 Managing Projects and Services
Remove or Edit Keys in a RelationshipTo remove or edit a key from a relationship instance, complete the following steps:
1. Click Edit beside the selected relationship instance, as shown in Figure 85.
The Edit dialog appears.
Figure 86 Edit Keys
2. On this screen you can:
— Remove an instance by clicking Remove.
— Edit an instance by changing the values.
— If a participant has more than one instance, you can add multiple instances of the participant to the relationship instance.
3. Click the OK button when done.
TIBCO ActiveMatrix BusinessWorks SmartMapper User’s Guide

| 93
Chapter 7 SmartMapper ER Model Resources
This chapter describes the ER Model resources. Other resources are described in SmartMapper Activities on page 117.
Topics
• SmartMapper ER Model, page 94
• Entity, page 96
• Relationship, page 98
• Participant, page 99
• JDBC-Based SmartMapper Service, page 100
• File-Based SmartMapper Service, page 107
• Adapter-Based SmartMapper Service, page 108
• SmartMapper Adapter Configuration, page 111
TIBCO ActiveMatrix BusinessWorks SmartMapper User’s Guide

94 | Chapter 7 SmartMapper ER Model Resources
SmartMapper ER ModelResource
The SmartMapper ER Model resource represents a logical data model that contains a set of applications, relationships and storage. It defines a set of relationships and their participating entities.
The tabs that are displayed depend on the status of the project: the tabs shown in this section are those displayed when the ER Model icon has been moved to the design panel.
Applications Folder
The applications folder contains one or multiple applications. An application must contain at least one entity. An application groups the entities based on logical systems.
See also Applications on page 17.
Relationships Folder
A relationship defines the set of participants that can be used for cross-referencing. Any entity instance that belongs to a relationship instance can be used to find any of the other entity instances in the same relationship instance. In other words, entity instances that participate in a relationship instance cross-reference each other.
See also Relationships on page 19.
Storage Folder
Assigning an ER Model to a service designates that service as the only data manager for that ER Model. An ER Model can only be assigned to one storage service at a time.
A storage service folder is available in the ER Model. When you open this folder, you can choose one of three storage services: JDBC, FIle and Adapter-based.
See also Storage on page 20.
TIBCO ActiveMatrix BusinessWorks SmartMapper User’s Guide

SmartMapper ER Model | 95
Configuration Tab
Advanced Tab
Table 5 SmartMapper ER Model: Configuration Tab
Field Description
Name The name to appear as the label for the resource
Description A short description of the resource.
Table 6 SmartMapper ER Model: Advanced Tab
Field Description
ID Generator Class
A fully-qualified Java class name of the class used to generate keys for TIBCO-Managed entities.
If this value is supplied, the specified class is used to generate keys for all of the ER Model entities that are marked as TIBCO-Managed.
Note that this class must implement the interface com.tibco.solution.xref.autoid.AutoIdGenerator.
This is defined in xref.jar:
package com.tibco.solution.xref.autoid;import com.tibco.solution.xref.XRefException;public interface AutoIdGenerator {String generateId( String entityName ) throws XRefException;
}
For more information, refer to Generate Key on page 148.
In some cases, the user may have id generators from a sequence in a database that supports sequences. In other cases, users can use custom JDBC classes to generate IDs.
For further information on using custom classes to generate IDs, refer to Appendix A, Adding your own GUID Generation Class, on page 156.
TIBCO ActiveMatrix BusinessWorks SmartMapper User’s Guide

96 | Chapter 7 SmartMapper ER Model Resources
EntityResource
An entity resource is an object that is being referenced, for example, a customer.
To place an entity in the TIBCO Designer design panel, you must have an application folder open in the panel.
For more information on entities, see Entity on page 17.
Configuration Tab
Table 7 Entity: Configuration Tab
Field Description
Name The name to appear as the label for the resource in the process definition
Description Short description of the resource.
TIBCO-Managed Entity
If this is selected, during TIBCO ActiveMatrix BusinessWorks processing, ActiveMatrix BusinessWorks SmartMapper will generate a key for this entity if one is not returned in the lookup.
Checking this checkbox also means that the schema is automatically completed for the entity.
An entity may be defined as TIBCO-Managed in support of a common data model.
The Generate Key activity generates a key for a TIBCO-Managed entity. See Generate Key on page 148.
Note that when you select TIBCO-Managed Entity, the key schema has only one attribute ID, which must be a string of length less than 100 characters, as in id(100).
TIBCO ActiveMatrix BusinessWorks SmartMapper User’s Guide

Entity | 97
Schema TabThe Schema tab defines the key set of the entity. Use the + button to add more attributes. Click Apply after adding attributes. All the attributes you add to the entity are keys.
Table 8 Entity: Schema Tab
Field Description
Name The name of the key
Some database implementations will have reserved words, which cannot be column names (and thus attributes).
For example, if you are using Microsoft SQL Server, do not name an attribute key. If an attribute is named key, an error will be returned when synchronizing the schema.
Type Type can be String or Integer. The string length becomes the actual length in the database. Therefore, if you are using double-byte data, you may want longer strings.
Length The maximum length. This applies only to the String type.
Key When selected, the attribute is part of the participant’s key.
TIBCO ActiveMatrix BusinessWorks SmartMapper User’s Guide

98 | Chapter 7 SmartMapper ER Model Resources
RelationshipResource
A relationship resource defines a relationship and identifies whether it is an identity or association relationship.
A relationship folder is available under the Relationships folder.
Configuration Tab
Table 9 Relationship: Configuration Tab
Field Description
Name The name to appear as the label for the resource
Description Short description of the resource.
Relationship Type Select Identity or Association:
• Identity There are one or multiple participants per relationship, where one of the participants acts as a primary object.
A primary object can exist independently of other objects.
For example, Customer, Order, and Employee are considered primary objects, but address, and account information are not because they are contained within a primary object.
• Association There are only two participants in each relationship.
TIBCO ActiveMatrix BusinessWorks SmartMapper User’s Guide

Participant | 99
ParticipantResource
A participant is a member of a relationship. The participant associates an entity to a relationship and specifies the entity's cardinality within that relationship.
A participant is the role that an entity plays in a relationship. You can add a participant to the design panel only when you have a Relationship folder open.
When a participant is added to a relationship in TIBCO Designer, an entity must be selected to represent the participant.
When the Cardinality is Many button is selected, you can link many instances to a single instance of other participants in the relationship. For example, you can link three different Siebel accounts, all referring to one customer, to a single SAP customer account.
Note that an association relationship is always many-to-many.
Configuration Tab
Table 10 Participant: Configuration Tab
Field Description
Name The name to appear as the label for the resource
Entity The entity selected to represent the participant
The entity must be from the same ER Model and cannot appear more than once in a relationship. However, it may participate in other relationships in the same ER Model.
Cardinality is many
If selected, this entity is on the many side of a one-to-many relationship. For an association relationship, the cardinality on both sides as assumed to be many.
If cleared, this entity has a one-to-one relationship.
TIBCO ActiveMatrix BusinessWorks SmartMapper User’s Guide

100 | Chapter 7 SmartMapper ER Model Resources
JDBC-Based SmartMapper ServiceResource
The JDBC-Based Service accesses a JDBC database directly to manage SmartMapper data. This service runs inside a TIBCO BusinessWorks engine and uses a JDBC driver to read and write data to a database.
To use this service, a database must be installed, a user must have appropriate permissions, and a script must be run to create the initial metadata tables. This is described in the TIBCO ActiveMatrix BusinessWorks SmartMapper Installation Guide, Setting Up Tables for Databases.
Under the JDBC Settings Tab, click the Synch ER Model to DB button to run the script.
Configuration Tab
If you assign two (or more) ER Models to the same database, you must configure each to use a different user account to prevent the tables from colliding.
Table 11 JDBC-Based SmartMapper Service: Configuration Tab
Field Description
Name The name to appear as the label for the resource
Active This sets this storage service as active. You can set many storage services, but only one can be active at a time.
If you have multiple services, checking the Active box on one automatically sets the Active boxes in the other services to inactive (unchecked).
TIBCO ActiveMatrix BusinessWorks SmartMapper User’s Guide

JDBC-Based SmartMapper Service | 101
JDBC Settings TabThis tab defines the storage mechanism. SmartMapper ER Model synchronization is a process of creating metadata table schemas in the database. Before running TIBCO ActiveMatrix BusinessWorks SmartMapper runtime activities, users synchronize the ER Model by clicking the Sync ER Model w/ DB button.
Smartmapper uses it own connection pool separate from BusinessWorks and hence none of the smartmapper activities supports the JDBC transaction feature that comes with BusinessWorks.
Table 12 JDBC-Based SmartMapper Service: JDBC Settings Tab
Field Description
Database The database type
Use the arrow to select your database type.
JDBC Driver Class The fully-qualified java class name of the JDBC driver. This is automatically given when you select your database type.
JDBC URL String The appropriate URL string for the driver
User The database user name
Password The database password
Connection Pool Size
TIBCO ActiveMatrix BusinessWorks SmartMapper database access always uses connection pooling. This value determines the maximum number of connections available in the pool.
Login Timeout (sec.)
The amount of time in seconds before the login attempt times out.
Test Connection Tests the JDBC properties by using them to connect to the database.
TIBCO ActiveMatrix BusinessWorks SmartMapper User’s Guide

102 | Chapter 7 SmartMapper ER Model Resources
ER Model and Database Synchronization
If the back-end SmartMapper service is JDBC-Based or Adapter-Based, the ER Model must be applied to the underlying JDBC database. This is done through the ER Model/database synchronization process.
Synchronization involves creating the database tables and indexes that are required for storing a ER Model in the database.
In the JDBC-Based Service the process is initiated using JDBC Settings Tab > Synch ER Model w/DB.
In the SmartMapper Adapter Configuration, the synchronization process is initiated using JDBC Settings Tab > Synch ER Model w/DB.
If you delete and recreate an entity, a new table will be created. You can then manually convert the data using whatever tools or algorithm seems appropriate.
When you click Synch ER Model w/DB, the Synchronize ER Model dialog displays.
Synch ER Model w/DB
The synchronization process creates new database tables. The database user specified in the User field needs to have 'create table' privileges.
SmartMapper activity runtime does not create any new database tables and hence the user running the activities does not need to have those privileges.
Currently, TIBCO ActiveMatrix BusinessWorks SmartMapper requires that the user running activities be the same user who has done the synchronization and hence created the tables.
In a multi-user environment, it is desirable that one database user can do the synchronization, and that other users who run the activities have privileges just to run the activities and not to be able to synchronize. This is not possible with current implementation of TIBCO ActiveMatrix BusinessWorks SmartMapper.
To avoid accidental database synchronization in such cases, follow the explanation given in Caching Tab on page 106.
Table 12 JDBC-Based SmartMapper Service: JDBC Settings Tab
Field Description
Generally, it is not good practice to modify an existing table. The data in the table may become inconsistent with the new schema.
Table 13 Synchronize ER Model Dialog
Field Description
Added Objects The ER Model objects that are created in the database when synchronization is invoked.
TIBCO ActiveMatrix BusinessWorks SmartMapper User’s Guide

JDBC-Based SmartMapper Service | 103
Reload ER Model from a Database
In multi-user environments, one user is usually responsible for designing and modifying the ER Model while other users use it for their projects in read only mode. The Reload feature allows the users to import an ER Model, previously synchronized by another user, from a SmartMapper database instance.
In the case of the JDBC-Based Service, you will proceed as follows:
• Create an instance of the ER Model by dragging an ER Model resource.
• Add an instance of the JDBC storage by dragging the JDBC-Based SmartMapper Service storage resource.
• Initiate the Reload process by using the tab JDBC Settings > Synch ER Model w/DB > Reload From DB.
In the SmartMapper Adapter Configuration, the synchronization process is initiated using the JDBC Settings > Synch ER Model w/DB > Reload From DB.
Audit When selected, auditing is enabled and all participant tables and relationship tables will include the creation_date and modified_date attributes. When cleared, the attributes are not included.
Removed Objects The ER Model objects that are removed.
The database tables for removed objects are not actually dropped during synchronization. Instead, they are marked as deleted and are not used by TIBCO ActiveMatrix BusinessWorks SmartMapper. In other words, the data is left intact for removed objects.
Perform Sync Creates or removes the TIBCO ActiveMatrix BusinessWorks SmartMapper objects in the database. This function will generate an SQL script, same as the one generated by the function “Generate SQL”, but in this case such script will not be displayed in a window for editing.
Generate SQL Brings up a window that contains the SQL that is executed if you click Synch ER Model w/DB. This is useful for database administrators that may want to edit the SQL and apply it manually.
Table 13 Synchronize ER Model Dialog
Field Description
TIBCO ActiveMatrix BusinessWorks SmartMapper User’s Guide

104 | Chapter 7 SmartMapper ER Model Resources
When you click the Reload From DB tab, the reload dialog will appear.
Figure 87 shows an example of using the feature Reload From Database.
Figure 87 Synchronize ER Model
Table 14 Reload from Database Dialog
Field Description
Added Objects The ER Model objects which will be added to the designer project from the database.
Remove all not in database
All the objects from the existing ER Model in the designer project will be removed
Perform reload Imports ER Model objects from the database to the designer project.
Use caution when selecting the checkbox Remove all not in database. It is better to leave it clear unless you want to explicitly remove the ER Model objects from your project.
TIBCO ActiveMatrix BusinessWorks SmartMapper User’s Guide

JDBC-Based SmartMapper Service | 105
Edited ER Model Objects and Synchronization
The synchronization process handles added and removed ER Model objects. ER Model objects that have been edited since the last synchronization, that is, entities that had keys added or had the key name or type changed, are not synchronized. This is because synchronization involves the creation of database tables.
It is not feasible to automate the editing of database table definitions. Actions like changing a database column data type may involve dropping the table and re-creating it. Also, the data in a table would have to be exported and then re-imported into the new table. Applying an edited ER Model to a database must be done manually.
If you edit an ER Model object that cannot be re-synchronized, the Synchronized ER Model dialog will have an additional list of objects that have changed and cannot be synchronized.
Figure 88 Changed Objects that Cannot be Synched
TIBCO ActiveMatrix BusinessWorks SmartMapper User’s Guide

106 | Chapter 7 SmartMapper ER Model Resources
Caching TabThere is a cache associated with the storage. The cache is controlled by the number of entries. The Least Recently Used algorithm swaps entries out of the cache as new ones are added.
The cache sync interval is important when multiple projects are accessing the same tables and doing updates or deletes. The cache sync interval controls the frequency at which the cache ensures its consistency with the database.
Table 15 JDBC-Based SmartMapper Service: Caching Tab
Field Description
Enable Caching Select to enable caching. Clear to disable caching.
Maximum Number of Entries
Determines the maximum number of entity instances to be stored in the cache. Once this number is exceeded, the excess cache entries are culled from the cache using a least-recently-used algorithm.
Cache Synchronization Interval (Seconds)
The time interval, in seconds, that cache housekeeping is performed. This involves the following:
Culling the appropriate cache entries when the cache has grown too big
Synchronizing the cache to the database for entries that have been changed by other SmartMapper processes
TIBCO ActiveMatrix BusinessWorks SmartMapper User’s Guide

File-Based SmartMapper Service | 107
File-Based SmartMapper ServiceResource
While the JDBC-based service accesses a database, the file-based services do not. Instead, the file-based services are 100% cached. The file seeds the cache. Writes may be done for seeding and maintaining the file, but this is not a substitute for a database where there are large volumes of writes.
The file-based service runs inside the TIBCO BusinessWorks process engine and reads and writes the SmartMapper data in an xml file.
The file-based service is used for small sets of data that are not often edited. Data stored in a file-based service are always read in their entirety into memory. The file-based service does not perform well in write-intensive applications.
File-based service is generally used:
• for development and demos
or
• when the data is more or less static. Often, in this case, read time is much more important than write time.
The integrity of a file-based data store is lower than a database. File-based storage should not be used for data that cannot be regenerated.
Configuration Tab
The Bulk Load, Bulk Extract, Dynamic Lookup, and Dynamic Delete activities are not supported for use with the File-Based SmartMapper Service.
Table 16 File-Based SmartMapper Service: Configuration Tab
Field Description
Name The name to appear as the label for the resource.
Active This sets this storage service as active. You can set many storage services, but only one can be active at a time. If you have multiple services, checking the Active box on one automatically sets the Active boxes in the other services to inactive (cleared).
Data File Specify the file that stores the SmartMapper data.
Click Browse to use an existing data file, or click New to specify a new file.
TIBCO ActiveMatrix BusinessWorks SmartMapper User’s Guide

108 | Chapter 7 SmartMapper ER Model Resources
Adapter-Based SmartMapper ServiceResource
The adapter-based service accesses a SmartMapper Adapter (Enterprise Server) to manage the data.
To use this service, you must have the TIBCO ActiveMatrix BusinessWorks SmartMapper Enterprise Server package installed.
If the SmartMapper Adapter is modified, it must be re-linked to this service.
Configuration Tab
Table 17 Adapter-Based SmartMapper Service: Configuration Tab
Field Description
Name The name to appear as the label for the resource.
Active Select to set this storage service as active. You can set many storage services, but only one can be active at a time. If you have multiple services, selecting the Active box on one automatically sets the Active boxes in the other services to inactive (cleared).
Transport Type • Rendezvous Reliable Ensures that each multicast or broadcast message is received as long as the physical network and packet recipients are working, and that the loss of a message is detected. This choice can compensate for brief network failures because it can retransmit a message on request if the first attempt failed.
• Rendezvous Distributed Queue Indicates load balancing should be enabled. An RVCMQ Session allows applications to use distributed queues for certified delivery, to any number of listeners using queuing member sessions that act together to process inbound task messages.
• JMS Queue A message sent to a queue is consumed by one and only one receiver. Each message has only one receiver though multiple receivers may connect to the queue. The first receiver to access the queue gets the message. The other receivers do not.
Load Configuration from Adapter
Displays a popup window from which you select a SmartMapper Adapter Configuration resource you created earlier. By loading the configuration from the adapter, you ensure that the subject name and quality of service are in synch between the client and the server.
TIBCO ActiveMatrix BusinessWorks SmartMapper User’s Guide

Adapter-Based SmartMapper Service | 109
Transport TabTable 18 provides descriptions of the fields in the Transport Tab under Rendezvous Reliable Transport. Refer to TIBCO Rendezvous Concepts and TIBCO Enterprise Message Service User’s Guide for more details about the following transport types: Rendezvous Distributed Queue and JMS Queue.
Table 18 Adapter-Based SmartMapper Service Transport Tab: Rendezvous Reliable Transport
Advanced Tab
Field Description
Subject Specify the subject name to be used when subscribing.
By default a service uses a message subject that is generated using the Domain and Deployment global variables, the adapter acronym, the adapter instance name and the service name. If you use this default subject, make sure the values for Domain and Deployment are not empty. You can type a different TIBCO Rendezvous subject name from the default in this field. See TIBCO Rendezvous Concepts for information about specifying subject names.
Service (default value = null)
The Rendezvous daemon divides the network into logical partitions. Each TibrvRvdTransport communicates on a single service. A transport can communicate only with other transports on the same service.
To communicate on more than one service, a program must create more than one transport. It must create one transport for each service.
Network (default value = null)
Every network transport communicates with other transports over a single network interface. On computers with more than one network interface, the network parameter instructs the Rendezvous daemon to use a particular network for all outbound messages from this transport.
Daemon The daemon parameter instructs the transport object how and where to find the Rendezvous daemon and establish communication.
TIBCO ActiveMatrix BusinessWorks SmartMapper User’s Guide

110 | Chapter 7 SmartMapper ER Model Resources
Table 19 Adapter-Based SmartMapper Service Advanced Tab
Field Description
Batch Size The SmartMapper Wizard activity sends requests to services in batches. The batch size parameter determines the number of requests included in a single message sent to the adapter. A value of 0 sends all requests generated by the Wizard in a single message.
Setting the batch size to 0 means that the entire object's worth of lookup requests is sent in one batch. This ensures that writes are done all or nothing. See Batching on page 149 for more information.
Timeout in seconds
The number of seconds to wait before a SmartMapper operation is considered to be timed out. If the timeout elapses before the SmartMapper Adapter replies, an exception is thrown.
TIBCO ActiveMatrix BusinessWorks SmartMapper User’s Guide

SmartMapper Adapter Configuration | 111
SmartMapper Adapter ConfigurationResource
The SmartMapper Adapter Configuration resource runs the service as an adapter.
To use this service, you must have the TIBCO TIBCO ActiveMatrix BusinessWorks SmartMapper Enterprise Server package installed.
The service usually runs on the database server, and usually runs when there are high throughput requirements and/or multiple projects wanting to access the same relationships. This service is otherwise identical to the JDBC service.
Most users do not need to configure this adapter, since the default configuration for this resource provides functionality for TIBCO ActiveMatrix BusinessWorks SmartMapper.
If you choose to use the Adapter Configuration resource, you must be at the project level to drag the Configuration resource from the palette to the design panel.
The default configuration for the services mentioned above is defined through global variables. For more information about services and global variables, see Appendix B, Adapter Service Configuration, on page 161
Configuration Tab
JDBC Settings TabThe fields in this tab are the same as the fields in the JDBC Settings Tab on page 101 with the following exception:
• SmartMapper ER Model Click the browse button to associate an existing entity relationship model with the adapter.
Caching TabThis tab has the same fields as the Caching Tab on page 106.
Table 20 SmartMapper Adapter: Configuration Tab
Field Description
Instance Name The name to appear as the label for the resource.
Description A short description of the resource.
TIBCO ActiveMatrix BusinessWorks SmartMapper User’s Guide

112 | Chapter 7 SmartMapper ER Model Resources
Thread Pooling TabThe SmartMapper Adapter employs a thread pool to execute all SmartMapper operations. This allows the adapter to be very efficient executing operations with a high degree of concurrency. The pool is initialized with the minimum number of threads in the pool and is allowed to grow to the maximum thread count as concurrent requests come in and existing threads are busy.
The number of threads in the pool determines the number of operations that can simultaneously be executed. The larger the thread-count, the more computer resources have to be used to maintain and switch contexts between threads.
It is generally not useful to have more threads than database connections.
Table 21 SmartMapper Adapter: Thread Pooling Tab:
Advanced TabThe advanced tab sets the ID Generator Class.
For information on the ID Generator Class, refer to Advanced Tab on page 95 and to Appendix A, Adding your own GUID Generation Class, page 156.
Field Description
Minimum Thread Count
The minimum number of threads to maintain in the Adapter thread pool.
Maximum Thread Count
The maximum number of threads to maintain in the Adapter thread pool.
TIBCO ActiveMatrix BusinessWorks SmartMapper User’s Guide

SmartMapper Adapter Configuration | 113
Logging Tab
Table 22 SmartMapper Adapter: Logging Tab
Field Description
Use Advanced Logging
When Use Advanced Logging is not selected (the default), you can set two standard output destinations (sinks) for trace messages and set the tracing level for the roles selected.
When Use Advanced Logging is selected, you have complete control to select the destinations and associating desired roles with each of the destinations.
To create and configure the sinks, select the log sinks folder under the Advanced folder in the project panel.
To create sinks, drag and drop the Generic Log Sink icon from the palette panel into the design panel. From the configuration panel, select the sink type. The following are the sink types available: File, Hawk, Network, STDIO.
When File and STDIO sinks are created from the Generic Log Sink they offer further configuration options. For the File sink, the file limit, file count, and the option to append or overwrite can be specified. When created by default, this is set to 30000 bytes, 3 and append mode respectively. For the STDIO sink, the option to write to stdout or stderr can be selected. When created by default, stdout is selected.
The Hawk sink uses the hawk session, created and used by the adapter for monitoring purposes, to send tracing messages to the TIBCO Hawk monitor or Display. The configuration for the Hawk sink involves specifying the MicroAgent Name that must be specified in the configuration panel.
The Network sink is used to publish tracing message on TIBCO Rendezvous. The configuration for the network sink involves specifying the session, and the subject on which the trace messages needs to be published.
For all the sinks, the name and description for the sinks can be provided optionally.
Log to Standard I/O
(STDIO Sink) When selected, trace messages are displayed in the command prompt window where the adapter is started. When not selected, trace messages are not displayed in the window.
Log File Specify the name of the log file (log sink) to which trace messages are written. Global variables can be used to specify the location of the log file.
The roles available are Info, Debug, Warning, and Error messages. The trace message generated depends on the roles selected. Turning on the roles can affect the performance of the adapter. Therefore, it is recommended that you turn on the required roles only.
Log Info, Debug, Warning, or Error Messages
Trace messages of the selected level(s) will be collected in the named log sink.
You can configure what levels of trace messages you want logged, and where trace messages are sent. There are three types of logs (log sinks) that you can configure to hold trace messages, corresponding to three levels (roles) of trace messages, Information, Warning and Error. A fourth level of trace messages, Debug, is reserved and should not be enabled unless requested by the TIBCO Product Support Group. This option writes a lot of information to the log file and significantly reduces the speed of the adapter.
TIBCO ActiveMatrix BusinessWorks SmartMapper User’s Guide

114 | Chapter 7 SmartMapper ER Model Resources
Startup TabThe Startup tab need not be configured for a standard adapter configuration. By default, the startup behavior of the adapter consists only of displaying a banner when it starts. No services are activated, and no schema is loaded.
Monitoring TabMany of the following fields make use of global variables. For more about global variables refer to Appendix B, Adapter Service Configuration, page 161.
Table 24 SmartMapper Adapter: Monitoring Tab
Table 23 SmartMapper Adapter: Startup Tab
Field Description
Show Startup Banner
When selected (the default), the startup banner displays the run-time adapter version, the infrastructure version on which the adapter is built, and copyright information in the console window when the adapter is started.
Metadata Search URL
The field specifies the location where the adapter searches for base schemas. The adapter searches for any schema that has been defined and saved at this location, and that should be loaded at startup. The default value is /[repo name]/Schemas/Classes/ae/baseDocument
Field Description
Enable Standard Microagent
Allows you to turn on or off the standard TIBCO Hawk Microagent. The way to turn it on or off is also configurable. By clicking the Globe icon, a standard checkbox or text value (true or false) can be used to turn the standard microagent on or off.
Standard Microagent Name
This is the name for the standard microagent that will be registered with the TIBCO Hawk system. In most cases the default value is used. The InstanceId variable need not be set because it is automatically set at run time by the run-time adapter.
Standard Microagent Timeout
Specifies the amount of time the Hawk Agent should wait for HMA method invocations to complete before timing them out. The default is 10000 milliseconds. Normally there is no need to change this value, however, on machines under extreme stress where method invocations are timing out, this option allows the timeout value to be increased.
Enable Class Microagent
Allows you to turn on or off the instance or class specific standard TIBCO Hawk Microagent. The way to turn it on or off is also configurable. By clicking the Globe icon, a standard checkbox or text value (true or false) can be used to turn the class microagent on or off.
Class Microagent Name
This is the name for the class microagent that will be registered with the TIBCO Hawk system. In most cases the default value is used.
TIBCO ActiveMatrix BusinessWorks SmartMapper User’s Guide

SmartMapper Adapter Configuration | 115
Class Microagent Timeout
Specifies the amount of time the Hawk Agent should wait for HMA method invocations to complete before timing them out. The default is 10000 milliseconds. Normally there is no need to change this value, however, on machines under extreme stress where method invocations are timing out, this option allows the timeout value to be increased.
Default Microagent Session
Specify the name of the TIBCO Rendezvous session that will be used by the standard, class, and custom microagents.
The session name and the corresponding session are automatically generated by TIBCO Designer. Do not change the session name or the session. However, you can modify the session parameters if required. Navigate to the Sessions folder under the Advanced folder to modify the session parameters.
Make sure you have set the correct parameter value for the global variables that correspond to the TIBCO Hawk configuration. If the session parameters are not set properly, the microagents will not display in the TIBCO Hawk Display.
Field Description
TIBCO ActiveMatrix BusinessWorks SmartMapper User’s Guide

116 | Chapter 7 SmartMapper ER Model Resources
TIBCO ActiveMatrix BusinessWorks SmartMapper User’s Guide

| 117
Chapter 8 SmartMapper Activities
This chapter explains the ActiveMatrix BusinessWorks SmartMapper activities that can be part of a BusinessWorks process.
Topics
• Bulk Extract, page 118
• Bulk Load, page 125
• Create Entity Instance, page 133
• Update Entity Instance, page 134
• Delete Entity Instance, page 135
• Create Relationship Instance, page 136
• Add to Relationship Instance, page 138
• Delete Relationship Instance, page 140
• Lookup, page 141
• Dynamic Lookup, page 143
• Generate Key, page 148
• SmartMapper Wizard, page 149
TIBCO ActiveMatrix BusinessWorks SmartMapper User’s Guide

118 | Chapter 8 SmartMapper Activities
Bulk ExtractActivity
This activity enables the bulk extraction of cross-referencing data for reporting purposes. You can query entity or relationship data by providing an entity name or relationship name in the Input tab.
Because bulk extraction could result in a large number of records, you can retrieve results in smaller subsets. The activity can then be used in
an iteration group to iterate over the results set. See Fetching Subsets of the Result Set in the TIBCO BusinessWorks Palette Reference manual for more information.
Configuration Tab
The Bulk Extract activity is not supported for use with the File-Based SmartMapper Service.
Table 25 Bulk Extract: Configuration Tab
Field Description
Name The name to appear as the label for the activity in the process definition.
Description A short description of the activity.
Output Format Choose the output format. The output structure (under the Output tab) changes depending on your selection.
• Entity Format Select to return entity data only.
• One Participant Relationship Format Select if the relationship is an identity relationship. That is, there is one or multiple participants per relationship.
• Two Participant Relationship Format Select if the relationship is an association relationship. That is, there are only two participants in each relationship and both relationships are many-to-many.
ER Model Click the browse button to select the ER Model to associate with this resource.
TIBCO ActiveMatrix BusinessWorks SmartMapper User’s Guide

Bulk Extract | 119
Input Tab
Process in Subsets Selecting this field specifies that you would like to process the result set in smaller batches rather than processing the entire result set at once. The subsetSize input element appears in the Input tab to allow you to specify the size of each batch of records you wish to process. Also, the lastSubset output element appears in the Output tab and is set to true when the last batch of records is being processed.
• When Process in Subsets is cleared, complete results are returned on one execution. If the result set is large, you may want to use a distributed queue to improve performance by balancing the load among services.
• When Process in Subsets is selected, performance cannot be improved significantly by using a distributed queue.
Show Record Timestamp
When selected, timestamps for records are included in the report. This works only if auditing is turned on.
When cleared, timestamps are not included in the report.
Table 26 Bulk Extract: Input Tab
Field Datatype Description
entityName String (repeating)
The name of the entity to be extracted. Appears only when Entity format is selected in the Output Format field under the Configuration tab.
relationshipName String (non-repeating)
The name of the relationship to be extracted. Appears only when Relationship format is selected in the Output Format field under the Configuration tab.
Table 25 Bulk Extract: Configuration Tab
Field Description
TIBCO ActiveMatrix BusinessWorks SmartMapper User’s Guide

120 | Chapter 8 SmartMapper Activities
extractionFilter repeating Each instance of the extraction filter is mapped to a condition in the SQL WHERE clause (WHERE <column> <operator> <value>).
participantFieldName maps to the column name in the WHERE clause and where/orWhere field maps to the operator and value part of the WHERE clause.
When multiple instances of the extractionFilter are provided, each of them is AND'ed if operator and value are specified using the where field. Conditions are OR'ed together if operator and value are specified using the orWhere field.
This filter contains the following:
• participantFieldName This name should include both the participant name and field name separated by a dot for relationship base lookup. Only the field name should be specified for entity base lookup. This field also supports the reserved words createTimestamp and updateTimestamp for timestamp based filter criteria.
• where Value of the where field will map to the operator and value part of the SQL where clause. The operator could be an SQL operator such as '>', '<', '=' or 'like'. When multiple instances of the extractionFilter are specified, the filter with the where field value is AND'ed with other filters.
• orWhere Value of the orWhere field will map to the operator and value part of the SQL where clause. The operator could be an SQL operator such as '>', '<', '=' or 'like'. When multiple instances of the extractionFilter are specified, the filter with the orWhere field value is OR'ed with other filters.
Example of the extractionFilter usage:
ExtractionFilter Instance 1 -> partFieldName = 'id', where = '> 345'
ExtractionFilter Instance 2 -> partFieldName = 'id', orWhere = 'like %345%'
will map to following SQL WHERE clause:
WHERE id > '345' OR id like '%345%'
Note An operator is a required part of the where/orWhere field value. Not specifying an operator could result in runtime errors. For more information refer to the example BulkExtractFilter, which is available in the following directory: TIBCO_HOME\smartmapper\5.4\examples.
Table 26 Bulk Extract: Input Tab
Field Datatype Description
TIBCO ActiveMatrix BusinessWorks SmartMapper User’s Guide

Bulk Extract | 121
Figure 89 shows an example for the extraction filter set to find a relationship that has been created yesterday.
Figure 89 Input Set for the Extraction Filter: Find a Relationship Created Yesterday
For more information refer to the example BulkExtractFilter, which is available in the following directory:
TIBCO_HOME\smartmapper\5.4\examples.
subsetSize integer This element specifies the number of records to process in each batch.
This allows you to process smaller batches of rows instead of retrieving one large result set.
Table 26 Bulk Extract: Input Tab
Field Datatype Description
Limitations to the extractionFilter are as follows:
• Filtering criteria cannot be parenthesized.
• For the Identity relationships, filtering criteria can be based only on one participant’s fields.
• For the Association relationship, if filtering criteria is based on both participants, the AND operation is assumed across all participants.
TIBCO ActiveMatrix BusinessWorks SmartMapper User’s Guide

122 | Chapter 8 SmartMapper Activities
Output TabThe structure under the Output tab display changes depending on the Output Format field setting as specified under the Configuration tab.
Entity Format Selected
The Output tab displays the following structure if Entity Format is selected in the Output Format field under the Configuration tab. Entity is a complex structure repeating datatype and provides the name of the entity as a string.
Table 27 Bulk Extract Output: Entity Format
Field Datatype Description
entity name String (repeating)
The name of the entity selected in the Output Format field under the Configuration tab.
createTimestamp The date when the timestamp for a record was created
updateTimestamp The date when the timestamp for a record was updated
field This is a complex structure repeating datatype that includes both key and non-key fields. The field order is dictated by the entity's schema definition. It contains the following elements:• index (integer)
• name (string)
• value (string)
lastSubset Boolean Appears only when Process in Subsets is selected under the Configuration tab. A value of true indicates that the current result set is the last subset.
TIBCO ActiveMatrix BusinessWorks SmartMapper User’s Guide

Bulk Extract | 123
One Participant Relationship Format Selected
The Output tab displays the following structure if One Participant Relationship Format is selected in the Output Format field under the Configuration tab.
The relationship instance ID is displayed only for the Identity relationship.
Table 28 Bulk Extract Output: One Participant Relationship Format
Field Datatype Description
relationship name String (repeating)
The name of the entity selected in the Output Format field under the Configuration tab.
relationshipInstance Contains the following elements:
• createTimestamp The date when the timestamp for a record was created
• updateTimestamp The date when the timestamp for a record was updated
• participant (see below for explanation)
participant Contains the following elements:
• name (string)
• createTimestamp The date when the timestamp for a record was created
• updateTimestamp The date when the timestamp for a record was updated
• field (see below for explanation)
field This is a complex structure repeating datatype that includes both key and non-key fields. The field order is dictated by the entity's schema definition. It contains the following elements:
• index (integer)
• name (string)
• value (string)
lastSubset Boolean Appears only when Process in Subsets is selected under the Configuration tab. A value of true indicates that the current result set is the last subset.
TIBCO ActiveMatrix BusinessWorks SmartMapper User’s Guide

124 | Chapter 8 SmartMapper Activities
Two Participant Relationship Format Selected
The Output tab displays the following structure if Two Participant Relationship Format is selected in the Output Format field under the Configuration tab.
The relationship instance ID is displayed only for the Identity relationship.
Error Output TabThe Error Output tab lists the possible exceptions that can be thrown by this activity. Refer to Error Output Tab on page 137.
Table 29 Bulk Extract Output: Two Participant Relationship Format
Field Datatype Description
relationship name String (repeating)
The name of the entity selected in the Output Format field under the Configuration tab.
relationshipInstance Contains the following elements:
• createTimestamp The date when the timestamp for a record was created
• updateTimestamp The date when the timestamp for a record was updated
• participant1, participant2 (see below for explanation)
participant1, participant2
Contains the following elements:
• name (string)
• createTimestamp The date when the timestamp for a record was created
• updateTimestamp The date when the timestamp for a record was updated
• field (see below for explanation)
field (for participant1 and participant2)
This is a complex structure repeating datatype that includes both key and non-key fields. The field order is dictated by the entity's schema definition. It contains the following elements: index (integer), name (string), and value (string).
lastSubset Boolean Appears only when Process in Subsets is selected under the Configuration tab. A value of true indicates that the current result set is the last subset.
TIBCO ActiveMatrix BusinessWorks SmartMapper User’s Guide

Bulk Load | 125
Bulk LoadActivity
The Bulk Load activity allows you to load large amounts of data. Unlike other activities, the Bulk Load activity does not stop if an error occurs. That is, if a record fails to load into the database, the activity will not stop.
Configuration TabTable 30 Bulk Load: Configuration Tab.
The Bulk Load activity is not supported for use with the File-Based SmartMapper Service.
Field Description
Name The name to appear as the label for the activity in the process definition.
Description A short description of the activity.
Input Format Choose the input format:
• Entity Format Select to load entity data only.
• One Participant Relationship Format Select if the relationship is an identity relationship. That is, there are one or multiple participants per relationship.
Note that you must have one participant in your ER Model where the Cardinality is many option is cleared if you select this option. That is, one participant must have a one-to-one relationship defined.
See Create Mode Setting on page 127 for information about the Input structure that must be used when this option is selected.
See Add Mode Setting on page 128 for information about the Input structure that must be used when this option is selected.
See Update Mode Setting on page 129 for information about the Input structure that must be used when this option is selected.
• Two Participant Relationship Format Select if the relationship is an association relationship. That is, there are only two participants in each relationship. The relationship is many-to-many.
ER Model Click the browse button to select the ER Model to associate with this activity.
TIBCO ActiveMatrix BusinessWorks SmartMapper User’s Guide

126 | Chapter 8 SmartMapper Activities
One Participant Relationship Format
When using the Input Format One Participant Relationship Format, the input structure is different depending on the Mode setting.
• Create If the Mode setting is Create, a participant with the Cardinality is many option selected can be assigned multiple values in the same relationship instance. When Create is selected, all participants must be provided in a single relationship instance.
• Add If the Mode setting is Add, a participant with the Cardinality is many option selected cannot be assigned multiple values in the same relationship instance. Instead, each value must be assigned using a unique relationship instance.
When this mode is selected, only one participant can be primary. That is, participant entries can be split across multiple relationship instances, but each relationship instance must contain one participant (primary participant) that is already included in some other relationship instance.
Criteria • Name For each entity, load records by name.
• Index Index is the order in which the fields are defined in the schema. Index starts from 1. If specified, loading is by index.
Mode This field only appears when the Input Format field is set to One Participant Relationship Format.
Select the mode:
• Create Any data load has a chance of collisions. When running in Create mode, the data is loaded in with minimal collision detection. This is the fastest, most efficient way to seed an empty store.
• Add This mode checks first for duplicate records and ignores them, rather than throwing an error.
• Update Used to replace a relationship instance with a new one. For all three modes, see more details in the section One Participant Relationship Format on page 126.
Enable Verbose Reporting
When selected, a succeeded field and failed field is reported for each record.
When cleared, the report will include details only about records that caused errors. A concise summary of successful loads and loads with warnings will be given.
The report will appear as part of the Output tab.
Field Description
TIBCO ActiveMatrix BusinessWorks SmartMapper User’s Guide

Bulk Load | 127
• Update If the Mode setting is Update, Lookup is performed based on the primary participant, and if no instance is found, a new one will be created. If a lookup returns an existing relationship instance, it will be replaced with the new participant.
Create Mode Setting
Figure 90 shows a Bulk Load activity where the Input format is set to One Participant Relationship Format and the Mode is set to Create.
There are two participants, P1 and P2. P1 has the Cardinality is many option cleared (it has a one-to-one relationship) and P2 has the Cardinality is many option selected (it has a many-to-many relationship). P2 has two values assigned in the same relationship instance.
Figure 90 Input Set to One Participant Relationship; Mode Set to Create
TIBCO ActiveMatrix BusinessWorks SmartMapper User’s Guide

128 | Chapter 8 SmartMapper Activities
Add Mode Setting
Figure 91 shows a Bulk Load activity where the Input format is set to One Participant Relationship Format and the Mode is set to Add.
There are two participants, P1 and P2. P1 has the Cardinality is many option cleared (it has a one-to-one relationship) and P2 has the Cardinality is many option selected (it has a many-to-many relationship). P2 has two values assigned and each value is set in a different relationship instance.
Note also that if there were multiple participants with one-to-one relationships defined, only one participant could appear in subsequent relationship instances.
Figure 91 Input Set to One Participant Relationship; Mode Set to Add
TIBCO ActiveMatrix BusinessWorks SmartMapper User’s Guide

Bulk Load | 129
Update Mode Setting
Figure 92 shows a Bulk Load activity where the Input format is set to One Participant Relationship Format and the Mode is set to Update.
There are two participants, P1 and P2. The lookupParticipant value of the P1 participant is 1, which means that the lookup is performed for a relationship instance based on this participant.
If there is a P2 Unlink Participant (value 1), then the value given in its field (b2000) will be replaced with the value given for the Replacement Participant (b2001).
If there is no P2 Unlink Participant (value 0), then the existing values in the database (such as b2003, b2004, b2005) will be replaced with the value given for the Replacement Participant (b2001). If there are no values to replace, a new value (b2001) will be added.
Figure 92 Input Set to One Participant Relationship; Mode Set to Update
Unlink Participant
Replacement Participant
Lookup Participant
TIBCO ActiveMatrix BusinessWorks SmartMapper User’s Guide

130 | Chapter 8 SmartMapper Activities
Input TabThe Input structure is different depending on the Mode setting.
See Create Mode Setting on page 127 for more information.
Table 31 Bulk Load: Input Tab
Field Datatype Description
entity Complex Structure Repeating
Appears only when Entity Format is selected in the Output Format field under the Configuration tab.
Provide the following as strings:
• Name of the entity
• Name of the field
• Field value The value field could be empty when the entity or participant is TIBCO managed: in this case, the system will generate an ID value for it.
relationship Complex Structure Repeating
Appears only when One Participant Relationship Format is selected in the Output Format field on the Configuration tab.
Provide the following as strings:
• Relationship name
For the relationshipinstance, provide:
• Participant name
• lookupParticipant Looks for a relationship instance based on this participant. Values 1 or 0 indicate whether the lookup is performed.
• unlinkParticipant Updates the existing participant with the new value. Values 1 or 0 indicate whether the update is performed.
• Name of the field
• Field value Key and non-key fields as specified by their schema definition. Each field includes the participant’s field name and value.
TIBCO ActiveMatrix BusinessWorks SmartMapper User’s Guide

Bulk Load | 131
Use the Participant > Statement > Duplicate option for the participant as shown in Figure 93, and Field > Statement > Duplicate option for the participant’s field as shown in Figure 94.
Figure 93 Duplicate Participant
relationship Complex Structure Repeating
Appears when Two Participant Relationship Format is selected in the Output Format field on the Configuration tab.
Provide the following as strings:
• Relationship name
For the relationshipinstance, provide:
• Participant1 name
• Participant1 field name
• Participant1 field value The key and non-key fields as specified by their schema definition. Each field includes the participant’s field name and value.
• Participant2 name
• Participant2 field name
• Participant2 field value The key and non-key fields as specified by their schema definition. Each field includes the participant’s field name and value.
Table 31 Bulk Load: Input Tab
Field Datatype Description
TIBCO ActiveMatrix BusinessWorks SmartMapper User’s Guide

132 | Chapter 8 SmartMapper Activities
Figure 94 DuplicateParticipant’s Field
Output TabThe structure under the Output tab display changes depending on the Output Format field setting as specified under the Configuration tab.
If Enable Verbose Reporting is selected under the Configuration tab, the structure under the Output tab will include a detailed report with an entry corresponding to each input record.
Error Output TabThe Error Output tab lists the possible exceptions that can be thrown by this activity.
Refer to Error Output Tab on page 137.
TIBCO ActiveMatrix BusinessWorks SmartMapper User’s Guide

Create Entity Instance | 133
Create Entity Instance Activity
This primitive operation creates the data for an entity instance without relating the instance to any other object. The entity instance cannot be looked up using activities or the TIBCO Administrator GUI because it is not yet in a relationship.
Configuration Tab
Input Tab
Output TabThis tab contains a copy of the input.
Error Output TabThe Error Output tab lists the possible exceptions that can be thrown by this activity.
Refer to Error Output Tab on page 137.
Table 32 Create Entity Instance: Configuration Tab
Field Description
Name The name to appear as the label for the activity in the process definition.
Description A short description of the activity.
Entity Click the browse button to select the entity for which you are creating an instance.
Table 33 Create Entity Instance: Input Tab
Field Description
Root The schema for the entity to create. This is a repeating node allowing for the creation of multiple entity instances.
See the TIBCO BusinessWorks Process Design Guide for an explanation of the activity input icons.
TIBCO ActiveMatrix BusinessWorks SmartMapper User’s Guide

134 | Chapter 8 SmartMapper Activities
Update Entity Instance Activity
This primitive operation updates entity instance data. It sets the values or keys of an entity instance. This affects all relationships that the entity instance may participate in.
Configuration Tab
Input Tab
Output TabThis tab contains a copy of the input.
Error Output TabThe Error Output tab lists the possible exceptions that can be thrown by this activity.
Refer to Error Output Tab on page 137.
Table 34 Update Entity Instance: Configuration Tab
Field Description
Name The name to appear as the label for the activity in the process definition.
Description A short description of the activity.
Entity The entity for which you are updating an instance.
Table 35 Update Entity Instance: Input Tab
Field Description
oldObject The schema for the entity. Map values here to identify the entity instance that is being updated.
newObject Map values here to supply the new key values for this entity instance.
TIBCO ActiveMatrix BusinessWorks SmartMapper User’s Guide

Delete Entity Instance | 135
Delete Entity Instance Activity
This primitive operation removes an orphaned entity from the system, that is, an entity which is not part of a relationship.
An exception is thrown if the entity is part of a relationship.
Configuration Tab
Input Tab
Output TabThis tab contains a copy of the input.
Error Output TabThe Error Output tab lists the possible exceptions that can be thrown by this activity.
Refer to Error Output Tab on page 137.
Table 36 Delete Entity Instance: Configuration Tab
Field Description
Name The name to appear as the label for the activity in the process definition.
Description A short description of the activity.
Entity The entity for which you are deleting an instance.
Table 37 Delete Entity Instance: Input Tab
Field Description
Root The schema for the entity to delete. This is a repeating node allowing for the removal of multiple entity instances.
TIBCO ActiveMatrix BusinessWorks SmartMapper User’s Guide

136 | Chapter 8 SmartMapper Activities
Create Relationship InstanceActivity
This primitive operation creates a set of entity instances and associates them in a relationship instance. The activity will also seed data into its respective entity table, if the data is not there.
For example, a relationship instance can link Customer abc-123 in Siebel to Customer 10000001 in SAP.
Configuration Tab
Input TabThe input contains the keys of all the entities that participate in the chosen relationship. Map values into the keys to create the entity instances and associate them in a new relationship instance.
See the TIBCO BusinessWorks Process Design Guide for an explanation of the activity input icons.
Output TabThe output contains the data for all the entity instances that were created. This will always be a copy of the input data.
Table 38 Create Relationship Instance: Configuration Tab
Field Description
Name The name to appear as the label for the activity in the process definition.
Description A short description of the activity.
Relationship The relationship for which this instance will be created.
showNonkeys When selected, non-key data is shown. Use this when data is not seeded into the entity tables.
TIBCO ActiveMatrix BusinessWorks SmartMapper User’s Guide

Create Relationship Instance | 137
Error Output TabThe error output tab contains any error messages that may be generated.
When an error occurs during the execution of an activity, error data is generated. The Error Output tab of the activity displays the schema for the error data. The following information is displayed:
For information on the error codes, refer to Appendix C, Error Codes, on page 167.
Table 39 Error Output for Activities (Except Wizard)
Field Description
msgCode The plug-in code for the error. This is the code for errors that are generated by the SmartMapper plug-in.
msg The text that describes the error.
errCode The error code for errors that are generated by the underlying SmartMapper engine.
Input Data Additional fields which are a copy of the data that was input to the Activity.
Since error tabs look substantially the same in most activities, and error messages are contained in an appendix, the error tab will not be illustrated for most other activities, except SmartMapper Wizard.
TIBCO ActiveMatrix BusinessWorks SmartMapper User’s Guide

138 | Chapter 8 SmartMapper Activities
Add to Relationship Instance Activity
This primitive operation adds entity instances to an existing relationship instance.
Use this activity to associate more entity instances to an existing relationship instance, and to seed data into its respective entity table (if the data is not there).
Note that this doesn’t apply to an association relationship: an “instance” is always a pair.
Configuration Tab
Input Tab
Table 40 Add to Relationship Instance: Configuration Tab
Field Description
Name The name to appear as the label for the activity in the process definition.
Description A short description of the activity.
Participant The participant for an existing entity instance that is already a member of a relationship instance.
This entity instance is used to locate the relationship instance to which the new entity instances will be added.
showNonkeys When selected, non-key data is shown. Use when data is not seeded into the entity tables.
Table 41 Add to Relationship Instance: Input Tab
Field Description
BaseEntry The schema for the existing entity instance specified by the Participant field. Map values for an entity instance that already exists and is part of an existing relationship instance.
See the TIBCO BusinessWorks Process Design Guide for explanation of activity input icons.
newEntries Contains the schemas for the other participants in this relationship.
Map values here to create new entity instances and add them to this relationship.
TIBCO ActiveMatrix BusinessWorks SmartMapper User’s Guide

Add to Relationship Instance | 139
Output TabThis tab contains a copy of the input values.
Error Output TabThe Error Output tab lists the possible exceptions that can be thrown by this activity.
Refer to Error Output Tab on page 137.
TIBCO ActiveMatrix BusinessWorks SmartMapper User’s Guide

140 | Chapter 8 SmartMapper Activities
Delete Relationship Instance Activity
This primitive operation removes entity instances from a relationship instance. It does not delete entity instances themselves, but it removes the user specified memberships if they exist. Sometimes this activity will leave orphan data, such as side entries in an identity relationship instance that is left; in this case, you need to use this activity multiple
times in order to clean the data.
To accomplish smart deletion, use Dynamic Delete, page 145.
To delete the entity instance as well, use Delete Entity Instance, page 135.
Configuration Tab
Input Tab
Output TabThis tab contains a copy of the input values.
Error Output TabThe Error Output tab lists the possible exceptions that can be thrown by this activity. Refer to Error Output Tab on page 137.
Table 42 Delete Relationship Instance: Configuration Tab
Field Description
Name The name to appear as the label for the activity in the process definition.
Description A short description of the activity.
Relationship The relationship from which to remove entity instances.
Table 43 Delete Relationship Instance: Input Tab
Field Description
keys Contains the schemas for the participants in this relationship. Map values here for each of the entity instances that should be removed from this relationship.
TIBCO ActiveMatrix BusinessWorks SmartMapper User’s Guide

Lookup | 141
Lookup Activity
This primitive operation accepts a participant as input, and then retrieves one or more participants by performing lookups on relationships. Null is returned whenever a lookup fails.
Configuration Tab
Input Tab
Table 44 Lookup: Configuration Tab
Field Description
Name The name to appear as the label for the activity in the process definition.
Description A short description of the activity.
Input Participant The participant which will be used to locate a relationship instance.
Output Participants
The list of participants to look up.
Note that the SmartMapper lookup activity supports lookup of only one output participant.
Table 45 Lookup: Input Tab
Field Description
Root The schema for the input participant. These values will be used to find a relationship instance.
See the TIBCO BusinessWorks Process Design Guide for an explanation of the activity input icons.
TIBCO ActiveMatrix BusinessWorks SmartMapper User’s Guide

142 | Chapter 8 SmartMapper Activities
Output Tab
Error Output TabThe Error Output tab lists the possible exceptions that can be thrown by this activity. Refer to Error Output Tab on page 137.
Table 46 Lookup: Output Tab
Field Description
Root The schemas for the participants that were found by the lookup. These will be the entity instances that were associated with the input participant in a relationship instance.
The output data will contain nodes only for the output participants that were found. Output participants that are not found will return no nodes in the output data.
TIBCO ActiveMatrix BusinessWorks SmartMapper User’s Guide

Dynamic Lookup | 143
Dynamic Lookup Activity
This activity retrieves one or more participants by performing lookups on relationships.
In a dynamic lookup, relationship and participant information is derived from the data, rather than modeled at design time. This allows
you to specify information during runtime (dynamically). You need not define data at design time.
If a lookup fails, the output is empty.
The activity also operates on a set of data, like the SmartMapper Wizard activity.
Configuration Tab
The Dynamic Lookup activity is not supported for use with the File-Based SmartMapper Service.
Table 47 Dynamic Lookup: Configuration Tab
Field Description
Name The name to appear as the label for the activity in the process definition.
Description Short description of the activity.
Input Format Select the input format: Relationship or Entity.
Dynamic Lookup can be key based or non-key based.
ER Model Click the browse button to select the ER Model to associate with this activity.
Criteria • Name For each entity, lookup records by name.
• Index Index is the order in which the fields are defined in the schema. Index starts from 1. If specified, loading is by index.
Show Record Timestamp
When selected, timestamps for records are included in the report. When cleared, timestamps are not included in the report.
TIBCO ActiveMatrix BusinessWorks SmartMapper User’s Guide
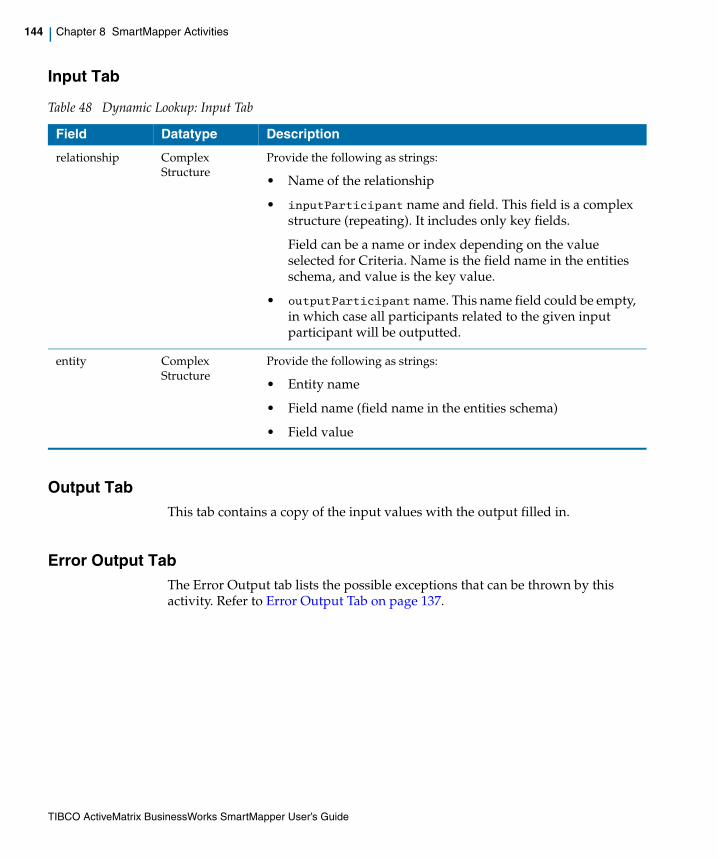
144 | Chapter 8 SmartMapper Activities
Input Tab
Output TabThis tab contains a copy of the input values with the output filled in.
Error Output TabThe Error Output tab lists the possible exceptions that can be thrown by this activity. Refer to Error Output Tab on page 137.
Table 48 Dynamic Lookup: Input Tab
Field Datatype Description
relationship Complex Structure
Provide the following as strings:
• Name of the relationship
• inputParticipant name and field. This field is a complex structure (repeating). It includes only key fields.
Field can be a name or index depending on the value selected for Criteria. Name is the field name in the entities schema, and value is the key value.
• outputParticipant name. This name field could be empty, in which case all participants related to the given input participant will be outputted.
entity Complex Structure
Provide the following as strings:
• Entity name
• Field name (field name in the entities schema)
• Field value
TIBCO ActiveMatrix BusinessWorks SmartMapper User’s Guide

Dynamic Delete | 145
Dynamic Delete Activity
This activity allows for deletion of a relationship instance using dynamic runtime inputs.
This activity is a smart deletion activity which means that it will not leave orphan data such as in the case of the activity Delete Relationship Instance, page 140.
Configuration Tab
The Dynamic Delete activity is not supported for use with the file-based SmartMapper service.
Table 49 Dynamic Delete: Configuration Tab
Field Description
Name The name to appear as the label for the activity in the process definition.
Description Short description of the activity.
Input Format Select one of the two input formats:
• Relationship A relationship is a collection of entities that a user wants to bind together in a particular way. For more details, see Relationships on page 19.
• Entity Something that is being referenced, such as a customer record. For more details, see Entity on page 17.
ER Model Click the browse button to select the ER Model to associate with this activity.
Criteria • Name For each entity, lookup records by name.
• Index Index is the order in which the fields are defined in the schema. Index starts from 1. If specified, loading is by index.
TIBCO ActiveMatrix BusinessWorks SmartMapper User’s Guide

146 | Chapter 8 SmartMapper Activities
Input Tab
Table 50 Dynamic Delete: Input Tab
Field Datatype Description
relationship Complex Structure
Provide the following as strings:
• Relationship name Name of the relationship
• inputParticipant name and field
The inputParticipant field is a complex structure (repeating), which includes only key fields. It can be a name or an index, depending on the value selected for Criteria.
The name entry is the field name in the entities schema, and the value is the key value.
• deletionParticipant name and field
The deletionParticipant field is a complex structure (repeating), which includes only key fields. It can be a name or an index, depending on the value selected for Criteria.
The name entry is the field name in the entities schema, and value is the key value.
This entry could be empty, which means that the whole relationship will be deleted.
If only the deletionParticipant name is specified, it means that only the entries belonging to the given participant will be deleted.
If all of the deletionParticipant entry is specified, it means that only the specified participant will be unlinked.
entity Complex Structure
Provide the following as strings:
• Entity name Name of the entity
• Entity field This structure contains entity field name and entity field value.
TIBCO ActiveMatrix BusinessWorks SmartMapper User’s Guide

Dynamic Delete | 147
Output TabThis tab contains a copy of the input values with the output filled in.
Error Output TabThe Error Output tab lists the possible exceptions that can be thrown by this activity. Refer to Error Output Tab on page 137.
Table 51 Dynamic Delete: Output Tab
Field Datatype Description
relationship Complex Structure
Contains the following elements:• StatusCode
• Msg
• name
• instanceID
• inputParticipant This structure contains the relationship name and field (with name and value strings)
• deletedParticipant This structure contains the relationship name and field (with name and value strings)
entity Complex Structure
Contains the following elements:• StatusCode
• Msg
• Entity name Name of the entity
• Entity field This structure contains the index, entity field name and entity field value.
TIBCO ActiveMatrix BusinessWorks SmartMapper User’s Guide

148 | Chapter 8 SmartMapper Activities
Generate Key Activity
This primitive operation generates a unique key for a TIBCO-Managed entity. The operation does not create the entity. It takes an entity as a parameter to generate the key.
If you want to add a special class to define GUIDs, refer to Appendix A, Adding your own GUID Generation Class, on page 156.
Configuration Tab
Input TabThis activity requires no input.
Output Tab
Error Output TabThe Error Output tab lists the possible exceptions that can be thrown by this activity. Refer to Error Output Tab on page 137.
Table 52 Generate Key: Configuration Tab
Field Description
Name The name to appear as the label for the activity in the process definition.
Description Short description of the activity.
Entity The entity for which a key is being generated. See Entity on page 96.
Table 53 Generate Key: Output Tab
Field Description
Name The name to appear as the label for the activity in the process definition.
id The generated key value.
TIBCO ActiveMatrix BusinessWorks SmartMapper User’s Guide

SmartMapper Wizard | 149
SmartMapper WizardActivity
The SmartMapper Wizard allows you to do lookups, generate new keys, and maintain mappings within a single activity.
Batching
The SmartMapper Wizard activity sends requests to SmartMapper services in batches. This is done for performance reasons and has different implications for the different service types.
• For the JDBC-Based SmartMapper Service, all operations invoked by the SmartMapper Wizard activity are done in one transaction.
• For the File-Based SmartMapper Service, all operations invoked by the SmartMapper Wizard activity are saved with one write to the file. In other words, if the SmartMapper Wizard activity involves creating three relationship instances, those three edits of the data result in one write operation to the file.
• For the Adapter-Based SmartMapper Service, the batch size parameter in the Advanced tab determines the size of the batches sent by the SmartMapper Wizard. In other words, if the SmartMapper Wizard activity invokes 100 operations and the batch size is set to 10, this will result in 10 messages being sent to the adapter each with 10 operations in them.
Each of these batches is executed as soon as they are received and with a high degree of concurrency. In other words, the adapter does not wait for all the batches to arrive before starting to execute them. Further, the adapter executes the batches at the same time as much as possible. Data that is inter-data dependent should be grouped in the same batch.
This makes the Adapter-Based SmartMapper Service very efficient for handling large maps with many SmartMapper operations. The batch size parameter can be used to tune this efficiency with small batch sizes yielding higher concurrency and large batch sizes minimizing network transmissions.
If the transport (set up under the Adapter-Based SmartMapper Service, under Subscriber) is set up in DQ model, multiple adapter services may work on the data to maximize throughput.
While the GUI does not enforce this, all operations within a SmartMapper Wizard activity must use the same ER Model.
TIBCO ActiveMatrix BusinessWorks SmartMapper User’s Guide

150 | Chapter 8 SmartMapper Activities
Configuration Tab
Input Editor TabThis tab is used to provide the logical source schema. The SmartMapper Wizard takes an XSD or you may build one, as with many activities.
See Appendix D, Specifying Data Schema, page 171.
SmartMapper Calls TabThis annotates the input schema for logical locations for keys or references. The field selected does not actually have to be part of the key. The location is important because of the way the mapper establishes context.
The Input Participant and Output Participant fields are for participants available in the Relationships folder. Note that all operations within a SmartMapper Wizard activity must use the same ER Model.
In the maintain case, the second participant is enabled for input too.
To start using this tab, select an attribute.
Table 54 SmartMapper Wizard: Configuration Tab
Field Description
Name The name to appear as the label for the activity in the process definition.
Description Short description of the activity.
Verbose If selected, and if the Error on empty results field under the SmartMapper Calls tab is cleared, the Wizard will generate the following output:
• groups — existing output
• SmartMapper Exception
• path. Path (XPath) pointing to the input member for which the Lookup failed.
• errorCode. Error code.
• Msg. Error message, detailing cause of error and possible resolution
• inputRow. Row of input data (entity or relationship) that caused this error. This could be used as is for retries later on
TIBCO ActiveMatrix BusinessWorks SmartMapper User’s Guide

SmartMapper Wizard | 151
Table 55 SmartMapper Wizard: Calls Tab
Lookup Operation
This operation takes the participant input and returns an output participant. The two participants are the parameters. More than one instance will be returned if the output participant is in the many relationship. For further information see, Invoke SmartMapper Listbox: Maintain Mapping Operation: One-to-Many on page 153.
If the input evaluates to null, a lookup will not be performed. Such a lookup will return null unless you check the checkbox to throw an exception.
Figure 95 SmartMapper Wizard: Lookup Operation
Field Description
Input Schema This is the schema tree in the left pane. It is used to browse the input schema and select the nodes where a SmartMapper operation should be invoked.
Invoke SmartMapper
Check this to invoke a SmartMapper operation at the selected schema node.
Choose from the operations:
• Lookup
• Maintain Mapping. See Invoke SmartMapper Listbox: Maintain Mapping Operation on page 152. This operation does not apply to the association relationship.
• Maintain Mapping - One to Many. See Invoke SmartMapper Listbox: Maintain Mapping Operation: One-to-Many on page 153. This operation does not apply to the association relationship..
TIBCO ActiveMatrix BusinessWorks SmartMapper User’s Guide
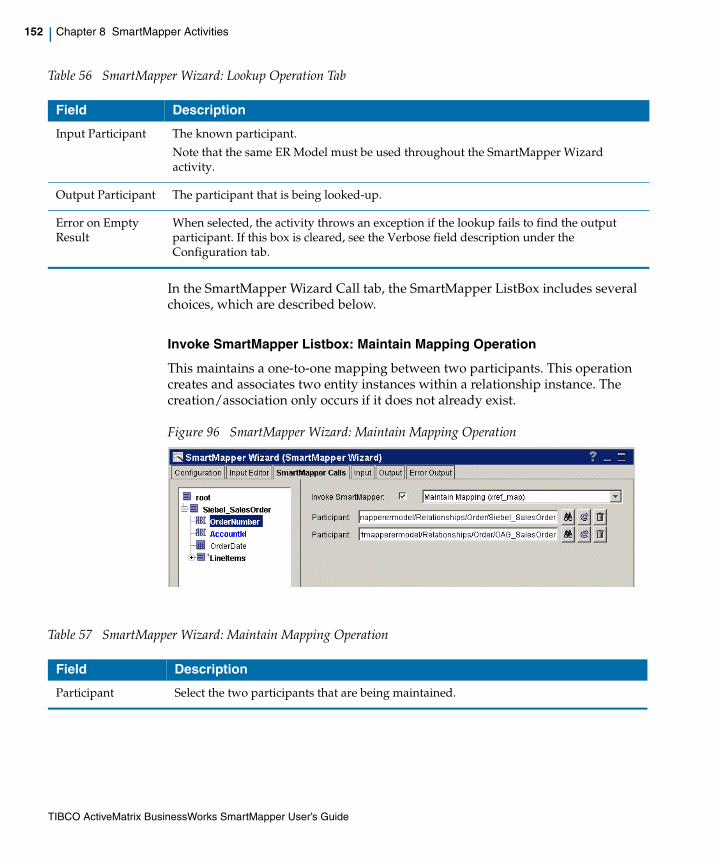
152 | Chapter 8 SmartMapper Activities
Table 56 SmartMapper Wizard: Lookup Operation Tab
In the SmartMapper Wizard Call tab, the SmartMapper ListBox includes several choices, which are described below.
Invoke SmartMapper Listbox: Maintain Mapping Operation
This maintains a one-to-one mapping between two participants. This operation creates and associates two entity instances within a relationship instance. The creation/association only occurs if it does not already exist.
Figure 96 SmartMapper Wizard: Maintain Mapping Operation
Table 57 SmartMapper Wizard: Maintain Mapping Operation
Field Description
Input Participant The known participant.
Note that the same ER Model must be used throughout the SmartMapper Wizard activity.
Output Participant The participant that is being looked-up.
Error on Empty Result
When selected, the activity throws an exception if the lookup fails to find the output participant. If this box is cleared, see the Verbose field description under the Configuration tab.
Field Description
Participant Select the two participants that are being maintained.
TIBCO ActiveMatrix BusinessWorks SmartMapper User’s Guide

SmartMapper Wizard | 153
Invoke SmartMapper Listbox: Maintain Mapping Operation: One-to-Many
This maintains a one-to-many mapping. This operation employs the same semantics as the Maintain Mapping operation above, but this operation also creates and associates entity instances in a one-to-many mapping.
This operation also observes the TIBCO-Managed entity rules and generates keys for TIBCO-Managed entities only if no values are mapped to them in the Input tab.
Figure 97 SmartMapper Wizard: Maintain Mapping Operation One-to-Many
Table 58 SmartMapper Wizard: Maintain Mapping Operation One-to-Many
Field Description
Participant (One) The participant on the one side of the one-to-many association.
Participant (Many) The participant on the many side of the one-to-many association. This participant must have selected the Cardinality Is Many checkbox in the ER Model definition.
Validation Option Choose the validation behavior when the relationship instance already exists.
Existing entries must match. In this case, the values passed into the Input tab must match the existing values with no additions or removal of entries on the many side of the relationship.
Replace exiting entries. In this case, the values passed into the Input tab are meant to replace any existing values on the many side of the relationship.
Add any new entries. In this case, the values passed into the Input tab are to be added if they do not already exist in the many side of the relationship.
TIBCO ActiveMatrix BusinessWorks SmartMapper User’s Guide
154 | Chapter 8 SmartMapper Activities
Input TabIn the Input tab for the SmartMapper Wizard Activity, the Activity Input schema is based on the schema provided in the Input Schema tab.
Also, the schema has been modified to include nodes for each operation defined in the SmartMapper Calls tab. These nodes are placed in the locations specified in the SmartMapper Calls tab. These SmartMapper nodes represent the input data to the SmartMapper operations defined in the SmartMapper Calls tab.
Dragging the Schema to the Design Window should bring up the autofill wizard to set all non-SmartMapper fields.
Only use copy on sub-schemas that do not contain cross-reference calls. This ensures that your final object will have both the lookups and the normal data in one object.
The SmartMapper Wizard allows calls to be batched to the database efficiently. Reads may be done in parallel. Writes may be done in one transaction. Exception semantics allow the capture of all lookup failures into one exception schema. Any real exception terminates the activity and rolls back any writes.
Configuration for all of this is set up in the service.
Your next activity should be a Mapper.
Output TabThe Output tab schema is also based on the schema provided in the Input Schema tab. SmartMapper nodes have also been placed in the output schema. These nodes represent the output returned by the SmartMapper operations.
You can view this in debug mode to see the new data
In SmartMapper Wizard, the input field values can be optional if both sides of the input entities participating in a relationship are null in the Maintain Mapping operation. Otherwise, you will get a message that the key value is not present if one of the entities is null.
TIBCO ActiveMatrix BusinessWorks SmartMapper User’s Guide

SmartMapper Wizard | 155
Error Output TabThe error data contains information about which operation failed as well as the data that was passed into the operation.
For information on error codes, refer to Appendix C, Error Codes, page 167.
Table 59 SmartMapper Wizard: Error Output Tab
Field Description
msgCode The plug-in code for the error. This is the code for errors that are generated by the SmartMapper plug-in.
msg The text that describes the error.
errCode The error code for errors that are generated by the underlying SmartMapper engine.
operationType The type of the operation that failed: LOOKUP, MAINTAIN, or MAINTAIN_ONE_TO_MANY
path The XPath path of the operation that failed.
input A copy of the input data for the operation that failed.
participant1 The first input participant. This will contain the name/value pairs for the data of the first input participant.
participant2 The second input participant. This will contain the name/value pairs for the data of the second input participant.
Note that for MAINTAIN_ONE_TO_MANY operations, this participant may have more than one instances.
TIBCO ActiveMatrix BusinessWorks SmartMapper User’s Guide

156 | Appendix A Adding your own GUID Generation Class
Appendix A Adding your own GUID Generation Class
This appendix describes an example of adding a GUID Generation class. This is an example of what you might choose to do, if it is appropriate to your system. This example is not meant to be implemented exactly as written.
Topics
• GUID Class Overview, page 157
• Class Overview, page 158
• Sample Code For GUID Generation, page 159
TIBCO ActiveMatrix BusinessWorks SmartMapper User’s Guide

GUID Class Overview | 157
GUID Class Overview
If appropriate to your system, you can add your own GUID generation class instead of using the class provided in the SDK. The class is per "ER Model" but it takes the entity name as a parameter. This appendix gives an example of such a class as a guideline.
For example you might build a SmartMapperSmartMapper ID Generator that generates ID's by incrementing an Oracle sequence.
For example, to install the ID generator, specify OracleSequenceBasedIdGenerator as the ID Generator Class for a ER Model (in Designer under the Advanced Tab of the ER Model configuration). Also, make sure this class will be found in the classpath.
A user cannot use the embedded Merant JDBC Drivers in TIBCO BusinessWorks for the use in their database-based ID Generation classes. This driver is locked for internal use only.
Users should include the classes of their JDBC drivers in their TIBCO BusinessWorks, TIBCO Runtime Agent and TIBCO Administrator classpath.
TIBCO ActiveMatrix BusinessWorks SmartMapper User’s Guide

158 | Appendix A Adding your own GUID Generation Class
Class Overview
Class OracleSequenceBasedIdGenerator
public class OracleSequenceBasedIdGenerator
A simple implementation of a SmartMapper ID Generator that is backed by an Oracle sequence. (This is an example only).
Table 60 GUID Class Overview: Constructor and Method Overview
OracleSequenceBasedIdGenerator () Constructor
generateId(java.lang.String entityName) Method
Table 61 GUID Class Overview: Constructor Detail
Name Description
OracleSequenceBasedIdGenerator public OracleSequenceBasedIdGenerator()
Default constructor (required). Initializes a connection to the database
Table 62 GUID Class Overview: Method Detail
Name Description
generateId public java.lang.String generateId(java.lang.String entityName)
throws com.tibco.solution.xref.XRefException
Generates an ID by incrementing a sequence
• Parameters entityName - The name of the SmartMapper Entity that is requesting a new ID
• Returns The generated ID
• Throws XRefException
TIBCO ActiveMatrix BusinessWorks SmartMapper User’s Guide

Sample Code For GUID Generation | 159
Sample Code For GUID Generation
This code is example only.
import com.tibco.solution.xref.autoid.DefaultAutoIdGenerator;import com.tibco.solution.xref.XRefException;import java.sql.*;
/** * A simple implementation of a SmartMapper ID Generator that * is backed by an Oracle sequence. */public class OracleSequenceBasedIdGenerator extends DefaultAutoIdGenerator { private Connection connection;
/** * Default constructor (required). Initializes a connection to the database */ public OracleSequenceBasedIdGenerator() { try { Class.forName("oracle.jdbc.OracleDriver"); connection = DriverManager.getConnection( "jdbc:oracle:thin:@myhost:1521:mySID" ); } catch (Exception e) { e.printStackTrace(); } }
/** * Generates an ID by incrementing a sequence * * @param entityName The name of the SmartMapper Entity that is requesting a * new ID * @return The generated ID * @exception XRefException */ public String generateId(String entityName) throws XRefException { try { //select the next sequence value from the sequence "myseq" Statement statement = connection.createStatement(); ResultSet rs = statement.executeQuery("select myseq.nextval from dual"); rs.next(); long nextVal = rs.getLong(1); return Long.toString(nextVal); } catch (Exception e) { throw new XRefException(e); } }}
TIBCO ActiveMatrix BusinessWorks SmartMapper User’s Guide

160 | Appendix A Adding your own GUID Generation Class
TIBCO ActiveMatrix BusinessWorks SmartMapper User’s Guide
| 161
Appendix B Adapter Service Configuration
This appendix is for advanced users only.
Topics
• Modifying the Subscriber Service, page 162
• Setting Global Variables, page 166
TIBCO ActiveMatrix BusinessWorks SmartMapper User’s Guide

162 | Appendix B Adapter Service Configuration
Modifying the Subscriber Service
When you bring a SmartMapper Adapter Configuration Resource to the design panel, TIBCO Designer adds a Subscriber service to the project tree. This service is added under the Adapter Services folder. The SmartMapper Enterprise Server uses this service to listen to the requests from the client process that uses SmartMapper activities.
To display the Subscriber service:
1. Select the SmartMapper Adapter Configuration Resource in the tree.
2. Expand Adapter Services.
3. Select Subscriber.
Configuration TabOnly the Description field is available for input.
Transport Tab
Table 63 Modifying the Subscriber Service: Transport Tab
Field Description
Message Subject Contains the subject on which the server listens. You can edit this field to change the subject.
Quality of Service Reliable. This chooses the Reliable quality of service. This choice determines what is displayed in the Advanced folder below the SmartMapper Adapter Services folder. See Modifying the Reliable Quality of Service on page 163.
Distributed Queue. This chooses the Distributed Queue quality of service. This choice changes what is displayed in the Advanced folder below the SmartMapper Adapter Services folder. See Modifying the Distributed Queue Quality of Service on page 164.
Session Reference Every adapter can have one or more sessions configured for it. Sessions encapsulate stateful connections to TIBCO Rendezvous and other messaging sources. The session object shown in this field is initially supplied by the adapter, depending on the Quality of Service selected. You can change the session by browsing for it in the project panel.
Endpoint Reference
You can drag a different endpoint, browse for another endpoint resource, go to the referenced endpoint to edit its properties or delete the endpoint. Endpoint reference objects are explained in the TIBCO Designer Adapter Resource Management Guide.
TIBCO ActiveMatrix BusinessWorks SmartMapper User’s Guide

Modifying the Subscriber Service | 163
Modifying the Reliable Quality of ServiceBefore proceeding, note that the Subscriber Quality of Service must be set to Reliable. Check the Quality of Service setting by selecting the Subscriber service and clicking the Transport tab.
1. Select the SmartMapper Adapter Configuration Resource in the tree.
2. Expand Advanced.
3. Expand Sessions.
4. Expand DefaultRVSession.
5. Select DefaultRVSession.
For further information on quality of service and SSL, refer to TIBCO Rendezvous documentation.
Table 64 Modifying Reliable QOS: DefaultRVSession
Field Description
Service (default value = null)
The Rendezvous daemon divides the network into logical partitions. Each TibrvRvdTransport communicates on a single service. A transport can communicate only with other transports on the same service.
To communicate on more than one service, a program must create more than one transport. It must create one transport for each service.
Network (default value = null)
Every network transport communicates with other transports over a single network interface. On computers with more than one network interface, the network parameter instructs the Rendezvous daemon to use a particular network for all outbound messages from this transport.
Daemon The daemon parameter instructs the transport object about how and where to find the Rendezvous daemon and establish communication.
SSL Check this box to enable SSL.
TIBCO ActiveMatrix BusinessWorks SmartMapper User’s Guide

164 | Appendix B Adapter Service Configuration
Modifying the Distributed Queue Quality of ServiceBefore proceeding, note that the Subscriber Quality of Service must be set to Distributed Queue. Check the Quality of Service setting by selecting the Subscriber service and clicking the Transport tab.
1. Select the SmartMapper Adapter Configuration Resource in the tree.
2. Expand Advanced.
3. Expand Sessions.
4. Expand DefaultRVCMQSession.
5. Select DefaultRVCMQSession.
Table 65 Modifying Distributed Queue QOS: DefaultRVCMQSession
Field Description
Service (default value = null)
The Rendezvous daemon divides the network into logical partitions. Each TibrvRvdTransport communicates on a single service. A transport can communicate only with other transports on the same service.
To communicate on more than one service, a program must create more than one transport. It must create one transport for each service.
Network (default value = null)
Every network transport communicates with other transports over a single network interface. On computers with more than one network interface, the network parameter instructs the Rendezvous daemon to use a particular network for all outbound messages from this transport.
Daemon The daemon parameter instructs the transport object how and where to find the Rendezvous daemon and establish communication.
SSL Check this box to use SSL
CMQ Name The name of the distributed queue. This name is in the same format as TIBCO Rendezvous subject names.
Worker Weight. The weight of the worker (this pertains to the worker processing queue requests, not to BusinessWorks process engines).
Relative worker weights assist the scheduler in assigning tasks. When the scheduler receives a task, it assigns the task to the available worker with the greatest worker weight.
TIBCO ActiveMatrix BusinessWorks SmartMapper User’s Guide

Modifying the Subscriber Service | 165
For further information on quality of service, refer to TIBCO Rendezvous documentation.
Complete time The complete time parameter of the scheduler affects the reassignment of tasks: If the complete time is non-zero, the scheduler waits for a worker to complete an assigned task. If the complete time elapses before the scheduler receives completion from the worker, the scheduler reassigns the task to another worker.
Zero is a special value, which specifies no limit on the completion time—that is, the scheduler does not set a timer and does not reassign tasks when task completion is lacking. All members implicitly begin with a default complete time, which is zero; programs can change this parameter. Complete time is in milliseconds.
Schedule Heartbeat
The scheduler sends heartbeat messages at this interval (in milliseconds). All members with the same name must specify the same value for this parameter. The value must be strictly positive.
Schedule Weight Weight represents the ability of this member to fulfill the role of scheduler, relative to other members with the same name. Cooperating distributed queue transports use relative scheduler weight values to elect one transport as the scheduler; members with higher scheduler weight take precedence. Acceptable values range from 1 to 65535.
Schedule Activation
When the heartbeat signal from the scheduler has been silent for this interval (in milliseconds), the member with the greatest scheduler weight takes its place as the new scheduler. All members with the same name must specify the same value for this parameter. The value must be positive.
Worker Weight Relative worker weights assist the scheduler in assigning tasks. When the scheduler receives a task, it assigns the task to the available worker with the greatest worker weight. The default worker weight is 1.
The scheduler applies a round-robin ordering to distribute tasks among several workers equivalent with equal weight.
Worker Tasks Sets the task capacity for the worker (this pertains to the worker processing queue requests, not to BusinessWorks process engines). Task capacity is the maximum number of tasks that a worker can accept. When the number of accepted tasks reaches this maximum, the worker cannot accept additional tasks until it completes one or more of them.
Field Description
TIBCO ActiveMatrix BusinessWorks SmartMapper User’s Guide

166 | Appendix B Adapter Service Configuration
Setting Global Variables
By default a number of global variables are defined for any TIBCO Designer project. These global variables configure the values for parameters such as session, subject, and so on. In most cases, it is recommended that developers keep and make use of these default configuration variables since they provide a flexible way of changing the adapter configuration at run-time without having to load, reconfigure and save the adapter configuration instance every time.
However, depending on your requirements, it may not be desirable to change an adapter configuration at run-time. In this case, an adapter can define fixed values for these parameters.
See the TIBCO Designer User’s Guide for information about modifying, adding and deleting global variables.
TIBCO ActiveMatrix BusinessWorks SmartMapper User’s Guide

Er | 167
Er
Appendix C Error Codes
This appendix contains the error codes for TIBCO SmartMapper.
Topics
• Error Codes for SmartMapper Engine, page 168
• Error Codes for SmartMapper Plug-In, page 170
TIBCO ActiveMatrix BusinessWorks SmartMapper User’s Guide

168 | Appendix C Error Codes
Error Codes for SmartMapper Engine
The SmartMapper Engine makes a number of error codes available.
Table 66 TIBCO SmartMapper Engine Codes
Code Description
ERR_GENERAL_EXCEPTION General exception. This exception is used as a catch-all for unexpected exceptions.
ERR_NO_ACTIVE_SERVICE No SmartMapper service was marked as “Active” in the storage configuration.
ERR_ADD_TO_MAPPING An error occurred while adding to a relationship instance.
ERR_CREATE_MAPPING An error occurred while creating a relationship instance.
ERR_CREATE_OBJECTS An error occurred while creating an entity instance.
ERR_UPDATE_OBJECTS An error occurred while updating an entity instance.
ERR_DELETE_MAPPINGS An error occurred while deleting a relationship instance.
ERR_DELETE_OBJECTS An error occurred while deleting an entity instance.
ERR_MAINTAIN_MAPPING An error occurred in a maintain mapping operation.
ERR_LOOKUP An error occurred in a lookup operation.
ERR_LOOKUP_ONE_TO_MANY An error occurred in a lookup one to many operation.
ERR_MAINTAIN_MAPPING_ONE_TO_MANY An error occurred in a maintain mapping one-to-many operation.
ERR_INVALID_ENTITY Invalid entity data was provided.
ERR_ENTRY_NOT_FOUND The input entity data does not exist.
ERR_WRONG_RELATIONSHIP Invalid relationship data.
ERR_ONE_TO_MANY_SAME_PARTICIPANT The many side of maintain mapping one to many operations must contain entities that belong to the same participant.
ERR_ENTRY_ALREADY_EXISTS The input entity data is a duplicate.
ERR_MAINTAIN_MAPPING_MISMATCH The data passed into a maintain mapping operation does not match the existing data.
TIBCO ActiveMatrix BusinessWorks SmartMapper User’s Guide

Error Codes for SmartMapper Engine | 169
ERR_INVALID_ARGS Invalid arguments were passed in.
ERR_LOAD_ER_MODEL_FAILED Could not load the ER Model
ERR_SYNC_ER_MODEL Could not synchronize the ER Model with the underlying database
ERR_SEQUENCE_FAILURE Failed to perform a sequence operation on the database.
ERR_ENTRY_EXISTS_IN_MAPPING The input entry is already a member of another mapping.
ERR_LOAD_XML_STORE Failed to load a file-based service
ERR_SAVE_XML_STORE Failed to save a file-based service
ERR_TIMEOUT The operation timed out.
Table 66 TIBCO SmartMapper Engine Codes
Code Description
TIBCO ActiveMatrix BusinessWorks SmartMapper User’s Guide

170 | Appendix C Error Codes
Error Codes for SmartMapper Plug-In
The SmartMapper plug-in makes a number of error codes available.
Table 67 TIBCO SmartMapper Plug-In Codes
Code Description
BW-SMARTMAPPER-100000 Participant is not specified
BW-SMARTMAPPER-100001 Entity is not specified
BW-SMARTMAPPER-100002 Relationship is not specified
BW-SMARTMAPPER-100003 Input participant is not specified
BW-SMARTMAPPER-100004 Output participant is not specified
BW-SMARTMAPPER-100010 Could not create the SmartMapper service.
BW-SMARTMAPPER-100011 Could not initialize a Participant. Perhaps the ER Model has not been synchronized with the data store.
BW-SMARTMAPPER-100012 Could not initialize a Relationship. Perhaps the ER Model has not been synchronized with the data store.
BW-SMARTMAPPER-100013 This SmartMapper Wizard operation is not fully configured
BW-SMARTMAPPER-100014 Wizard Operation Exception
BW-SMARTMAPPER-100015 Wizard General Exception
BW-SMARTMAPPER-100016 SmartMapper General Exception.
BW-SMARTMAPPER-100017 Entity key mismatch. Perhaps the ER Model has not been synchronized
BW-SMARTMAPPER-100018 Invalid input data
BW-SMARTMAPPER-101999 Unexpected error
TIBCO ActiveMatrix BusinessWorks SmartMapper User’s Guide

| 171
Appendix D Specifying Data Schema
Many activities allow you to specify a custom data schema for input or output of the activity. This appendix describes the mechanism for specifying a custom data schema for an activity’s input or output.
Topics
• Editor, page 172
TIBCO ActiveMatrix BusinessWorks SmartMapper User’s Guide

172 | Appendix D Specifying Data Schema
Editor
The Editor tab is used to specify a data schema for input or output of an activity. This is useful when the data does not have a well-known structure. The Editor tab is usually named for the type of schema you are creating. For example, the tab may be named "Input Editor" or "Output Editor".
For example, an email message has a well-known data structure, and therefore does not need a special datatype for its input. A JMS message, however, can have application-specific properties of any datatype. The Editor tab allows you to define the schema for any activities that require a specialized input or output schema.
You can use a simple datatype, or you can define a group of data elements on this tab. You can also reference XML schema or ActiveEnterprise classes stored in the project. Once defined, the schema appears on the appropriate tabs of the activity. The data in the schema then becomes available to other activities in the process definition.
The following illustrates the Editor tab. In this example, the Editor tab is labeled “Input Editor” indicating this is the activity’s input.
Figure 98 Editor Tab for Specifying Data Schema
To define a schema on this tab, use the icons above the schema tree to add, delete, or move data items. Then use the fields of the dialog to specify the datatype of each item.
TIBCO ActiveMatrix BusinessWorks SmartMapper User’s Guide

Editor | 173
Table 68 Editor Tab for Specifying Data Schema
The next table describes the potential content types for data elements.
Table 69 Content Types for Data Elements
Field Description
Content Defines the content of the element. The other fields that appear depend upon which content type is selected. See the next table for more information about the content type.
Name The name of the element.
Cardinality The qualification for the data item. Data items can be specified as one of the following:
Required — the data item is required and must be supplied when the process is called.
Optional (?) — the data item is optional.
Repeating, Zero or More (*) — The data item is a list that has zero or more elements.
Repeating, One or More (+) — The data item is a list that has one or more items.
Type The type of data. Can be any of the following:
XML Type Reference — must locate the stored XML schema definition.
Any of the content types described in the next table.
Schema Name The stored XML schema that contains the element or type you wish to reference.
Type Name The type in a stored XML schema you wish to reference.
Content Type Description Other Fields for This Content Type
Complex Element An element that contains other elements. This is like a structure in a programming language. The complex element can contain zero or more elements of other types, and it can contain other complex elements.
Name
Cardinality
Element of Type An element with a specified datatype. You can specify a scalar datatype (string, integer, and so on), you can reference an XML type, or specify the TIBCO ActiveEnterprise Any datatype.
Name
Cardinality
Type
Other fields depending upon the datatype selected
XML Element Reference
A reference to an element in a stored XML schema. See TIBCO Designer documentation for more information about XML schema.
Cardinality
Schema
Element
TIBCO ActiveMatrix BusinessWorks SmartMapper User’s Guide

174 | Appendix D Specifying Data Schema
The next table describes the datatypes available for data.
Attribute of Type An attribute with a specified datatype. You can specify a scalar datatype (string, integer, and so on), you can reference an XML type, or specify the TIBCO ActiveEnterprise Any datatype.
Name
Cardinality
Type
Other fields depending upon the datatype selected
Sequence A sequence of elements. Each item in the sequence is a structure of the sub-elements of this element.
Cardinality
Choice A choice of elements. The datatype of this element can be one of the sub-elements defined.
Cardinality
All The datatype of this element can be all of the datatypes of the sub-elements defined.
Cardinality
XML Group Reference
A reference to an XML group in a stored XML schema. See TIBCO Designer documentation for more information about XML schema.
Cardinality
Schema
Model Group
Any Element A reference to any XML Element. You can use the Coercion button to supply a reference to the XML Element for this item when it appears in the input or process data.
Cardinality
Validation
WSDL Message A reference to a message defined in a WSDL File resource. Use the Browse button to bring up a dialog for locating WSDL files within the project.
WSDL
Message
Content Type Description Other Fields for This Content Type
TIBCO ActiveMatrix BusinessWorks SmartMapper User’s Guide

Editor | 175
Table 70 Datatypes Available for Data
Icon Description
String or character value You can specify the type of string as one of the following:
• String
• Normailzed String
• Token
• Language
• Name
• NC-Name
• Q-Name
• Name Token
• Name Tokens
• ID
• ID ref
• ID refs
• Entity
• Entities
Integer value You can specify the size of the integer as one of the following:
• Byte
• Short
• Int
• Long
• Unsigned Byte
• Unsigned Int
• Unsigned Long
• Integer
• Positive Integer
• Negative Integer
• Non-positive Integer
• Non-negative Integer
Floating point number You can specify the size of the schema item as float, double, or decimal.
TIBCO ActiveMatrix BusinessWorks SmartMapper User’s Guide

176 | Appendix D Specifying Data Schema
Boolean value
Date or Time This can be any of the following datatypes:
• Time
• Date
• Date & Time
• Duration
• Day
• Month
• Year
• Year & Month
• Month & Day
Base 64 or hexidecimal value
An HTTP Uniform Resource Identifier
Complex element Container for other datatypes
XML element or group reference
Sequence Signifies that the contained sub-elements are repeated in an ordered sequence.
Any Type Represents a schema item with the TIBCO ActiveEnterprise datatype any. This node can be specified as any other datatype or a reference to an XML Type or AE Class.
Any Element Represents a schema item that can be a reference to any XML Element. You can use the Coercion button to supply a reference to the XML Element for this item.
Choice Specifies that the schema element can be one of a specified set of datatypes.
Icon Description
TIBCO ActiveMatrix BusinessWorks SmartMapper User’s Guide

| 177
Appendix E Relationships in TIBCO ActiveMatrix BusinessWorks SmartMapper
This appendix explains in detail the relationship concepts used in TIBCO ActiveMatrix BusinessWorks SmartMapper.
Topics
• Identity Relationship, page 178
• Association Relationship, page 180
TIBCO ActiveMatrix BusinessWorks SmartMapper User’s Guide

178 | Appendix E Relationships in TIBCO ActiveMatrix BusinessWorks SmartMapper
Identity Relationship
The identity relationship is used to keep different applications' corresponding keys. For example, after a company merger involving several applications, you are given the task to create a cross-reference of keys for three data file dumps, one for SAP, one for Siebel, and one for Oracle. A particular customer may be in one or more of the applications. Also, because of the imperfect nature of the system design, some customers may have more than one record in the application, although the majority would have just one.
An identity relationship should be used in each of the following cases.
In the simplest case described in Table 71, a customer record appears in each application once and only once. The table is as follows (the relationship cardinality is 1-1-1).
In the case described in Table 72, a customer record is not in all the applications, and if the record is in one application, it would be found only once. The table is as follows (the relationship cardinality is 1-1-1).
Table 71 Identity Relationship: Customer Record Appears Once
SAP_Customer Siebel_Account Oracle_Customer
A 1 1243 J
B 2 1222 K
C 3 1433 L
D 4 4123 M
Table 72 Identity Relationship: Customer Record Not in the Application
SAP_Customer Siebel_Account Oracle_Customer
NULL 1 1243 J
B NULL 1222 K
C 3 NULL NULL
D 4 4123 M
TIBCO ActiveMatrix BusinessWorks SmartMapper User’s Guide
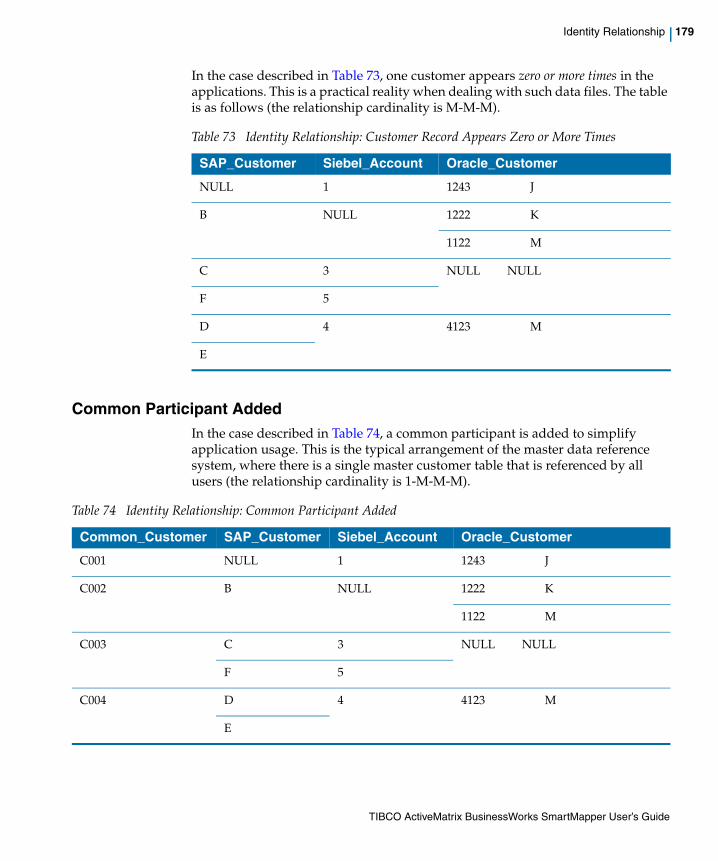
Identity Relationship | 179
In the case described in Table 73, one customer appears zero or more times in the applications. This is a practical reality when dealing with such data files. The table is as follows (the relationship cardinality is M-M-M).
Common Participant AddedIn the case described in Table 74, a common participant is added to simplify application usage. This is the typical arrangement of the master data reference system, where there is a single master customer table that is referenced by all users (the relationship cardinality is 1-M-M-M).
Table 73 Identity Relationship: Customer Record Appears Zero or More Times
SAP_Customer Siebel_Account Oracle_Customer
NULL 1 1243 J
B NULL 1222 K
1122 M
C 3 NULL NULL
F 5
D 4 4123 M
E
Table 74 Identity Relationship: Common Participant Added
Common_Customer SAP_Customer Siebel_Account Oracle_Customer
C001 NULL 1 1243 J
C002 B NULL 1222 K
1122 M
C003 C 3 NULL NULL
F 5
C004 D 4 4123 M
E
TIBCO ActiveMatrix BusinessWorks SmartMapper User’s Guide

180 | Appendix E Relationships in TIBCO ActiveMatrix BusinessWorks SmartMapper
Association Relationship
This kind of relationship can have two and only two participants. They can be used to model relationship of two typically orthogonal entities, like teacher and class; or a relationship of the same entity, like a part-subpart containment relationship.
This kind of relationship is very different from the identity relationship type. An identity relationship is for participants of same kind, such as customer, product, order, etc. An association relationship is used to model a relationship between an order and a product, rather than different order IDs of different systems.
An association relationship can also be used for one-to-many relationships where the many-side can grow very large.
ParticipantA participant is the role that an entity plays in a relationship. For the purposes of this software, the role that an entity plays is that of itself.
A relationship may require a collection of entities to be a peer with the other entities, so there is a Cardinality is many checkbox in the Participant resource. Note that Cardinality is many checkbox is only available for the identity relationship, not for the association relationship.
For example, the Customer relationship may contain an entity called Siebel_Account. In this case, Siebel_Account is a participant in the Customer relationship.
Table 75 Association Relationship
Teacher Class (grade, class number)
Jody 2 1
Jody 2 2
Dover 2 1
Dover 1 1
McDonald 1 2
TIBCO ActiveMatrix BusinessWorks SmartMapper User’s Guide

Association Relationship | 181
Figure 99 Participant Defined in the ER Model
TIBCO ActiveMatrix BusinessWorks SmartMapper User’s Guide

182 | Appendix E Relationships in TIBCO ActiveMatrix BusinessWorks SmartMapper
TIBCO ActiveMatrix BusinessWorks SmartMapper User’s Guide

| 183
Index
A
Adapter-Based SmartMapper Service 108Add to Relationship Instance 138Add to Relationship Instance, configuration tab 138Add to Relationship Instance, error output tab 139Add to Relationship Instance, input tab 138Add to Relationship Instance, output tab 139Architecture 8Assemble Phase 21Association Relationship 180
B
Batching 149Bulk Extract 118Bulk Extract, configuration tab 118Bulk Extract, error output tab 124Bulk Extract, input tab 119Bulk Extract, output tab 122Bulk Load 125Bulk Load, configuration tab 125Bulk Load, error output tab 132Bulk Load, input tab 130Bulk Load, output tab 132
C
Class Overview 158Compatibility 6Complexity of Relationships 6Configurable Business Rules 3Create Entity Instance 133Create Entity Instance, configuration tab 133Create Entity Instance, error output tab 133
Create Entity Instance, input tab 133Create Entity Instance, output tab 133Create ER Model Used in the Tutorial 31Create Relationship Instance 136Create Relationship Instance, configuration tab 136Create Relationship Instance, error output tab 137Create Relationship Instance, input tab 136Create Relationship Instance, output tab 136Create Relationship Map 89Cross-Referencing 2customer support xxii, xxii
D
Delete Entity Instance 135Delete Entity Instance, configuration tab 135Delete Entity Instance, error output tab 135Delete Entity Instance, input tab 135Delete Entity Instance, output tab 135Delete Relationship Instance 140Delete Relationship Instance, configuration tab 140Delete Relationship Instance, error output tab 140Delete Relationship Instance, input tab 140Delete Relationship Instance, output tab 140deployment
creating EAR files 81Deployment Phase 24Dynamic Delete, configuration tab 145Dynamic Delete, error output tab 147Dynamic Delete, input tab 146Dynamic Delete, output tab 147Dynamic Lookup 143Dynamic Lookup, configuration tab 143Dynamic Lookup, error lookup tab 144Dynamic Lookup, input tab 144Dynamic Lookup, output tab 144
TIBCO ActiveMatrix BusinessWorks SmartMapper User’s Guide
184 | Index
E
EAR filescreating 81, 81
Edited ER Model Objects 105Entity 17, 96ER Model and Database Synchronization 102Error Codes for ActiveMatrix BusinessWorks Smart-
Mapper Plug-In 170Error Codes for SmartMapper Engine 168Extracting Data to File 77
F
Features 5File-Based SmartMapper Service 107
G
Generate Key 148Generate Key, configuration tab 148Generate Key, error output tab 148Generate Key, input tab 148Generate Key, output tab 148GUID Class Overview 158
I
Identity Relationship 178Invoke SmartMapper Listbox
Maintain Mapping Operation 152One-to-Many 153
J
JDBC Settings Tab 101, 111JDBC-Based SmartMapper Service 100
L
Lookup 141Lookup Operation 151Lookup, configuration tab 141Lookup, error output tab 142Lookup, input tab 141Lookup, output tab 142Lookups 2
M
Management Phase 25Managing Relationships 88Maximize Throughput Scenario (Many Small
Objects) 10Minimize Latency Scenario (One Large Batch) 11Modifying
Distributed Queue Quality of Service 164, 164Reliable Quality of Service 163Subscriber Service 162
Monitoring Tab 114
O
Opening a Project or Service 86Opening the Completed Tutorial 47
P
Participant 99, 180Performance and Scalability 6
R
Relationship 98Relationships 19
TIBCO ActiveMatrix BusinessWorks SmartMapper User’s Guide

Index | 185
Relationships Folder 94Removing or Editing Keys in a Relationship 92
S
Sample Code For GUID Generation 159Scaling BusinessWorks SmartMapper 9Searching for a Relationship 90Seeding All Data into the Model 39Setting Global Variables 166SmartMapper Adapter Configuration 111SmartMapper Calls Tab 150SmartMapper ER Model 94SmartMapper Wizard 149SmartMapper Wizard, configuration tab 150Specifying Data Schema 171Storage 20Storage Folder 94support, contacting xxii, xxiiSynchronization 105
T
technical support xxii, xxiiTerms and Concepts 13Thread Pooling Tab 112TIBCO_HOME xixTIBCO-Managed Entity 18
U
Update Entity Instance 134Update Entity Instance, configuration tab 134Update Entity Instance, error output tab 134Update Entity Instance, input tab 134Update Entity Instance, output tab 134Updating Default File Locations in the Wizard
Project 54
Using a Common Data ModelThree Mapping Models 7
Using BusinessWorks SmartMapper Activities 21Using Create Relationship Instance 75Using the Bulk Load Activity 70Using the Bulk Load and Bulk Extract Activities 23Using the Wizard 22, 73
TIBCO ActiveMatrix BusinessWorks SmartMapper User’s Guide