threads of fate strategy guide - ignguidesarchive.ign.com/guides/12029/threadsoffate.pdf · threads...
TRANSCRIPT

Threads of Fate is a wonderfully put together game. You choose to play one of two characters - Rue ofMint. They are both on a quest to find a powerful 'relic', an artifact of unspeakable power. As theJapanese name for the game implies, the 'relic' is the Dewprism, the most powerful of all relics. It isrumored that this particular artifact can grant anyone's wishes.Both stars wish to get the 'relic' for their own purposes. Rue wishes to save his friend, Claire, who died afew years earlier. Mint, well, she wishes to rule the world. The two start off as rivals, but work more andmore together as the quest continues. They meet people who help them complete their quest. The listincludes Maya (Mint's sister), Duke and Belle (their rivals), Klaus and family (helpers), Wylaf (adragon!), Fancy Mel (magical advisor), and Rod (combat trainer). All of these people aid you greatly inyour quest.The world of Threads of Fate comprises of a single town with many outlying areas. All are beautifullydetailed and well laid out. If the game has one flaw though, it would be the lack of secrets and extralevels often found in other Square games! This game will offer many hours of entertainment, as it has tobe beaten twice to see everything! All I can say now is - Have fun!
Sean Kepper
As always, feel free to contact me about anything in this guide. E-mail me at [email protected], ifany more help is needed or a mistake is found in the guide.
Threads of Fate Strategy Guide
file:///C|/WINDOWS/Profiles/LordHaart/My Documents/FAQs/Threads of Fate/threads.html (1 of 42) [9/12/2000 9:53:30 PM]

Main CharactersHere you'll find some information on both the main characters. You'll find a list of Mint's spells, but nota list of their attacks - this is to be found in the combat section of the guide. As for Rue's transformationabilities, please look at the monster list for the abilities he gains.I didn't find it important to list the supporting cast, since I didn't want to reveal anything accidentally,Plus, any other important information on these characters can be found elsewhere in this guide.
RueRue is not human. He doesn't know what he is, but he doesn't really care. His duty is to find a means tobring his friend, Claire, back from the dead. Three years ago he vowed to find the 'relic' to do this. He isa kindhearted soul who is totally selfless. All he cares about is finding the means to cure his friend.Over the course of his adventure, he learns more of his past and who he is. Some of the revelations arequite startling, so watch out! You'll find out why he can turn into monsters and why he wears that damnhat...I don't want to reveal more. I'll shut up now!
MintMint is a red-headed princess. Her sister Maya rules that she is unfit to rule and she is thrown out ofhome and loses her position. She then vows to find the 'relic' in order to achieve world domination! Sheis a spunky character and totally fun to be around. She is the comic relief in the game. And cute besides!She is as selfish as Rue is selfless, and acts very childish most of the time. She also has a terrible dislikeand fear of pumpkins! (Don't ask!) In other words, I like her the most out of any characters in a recentlyplayed video game!Mint attacks with spells, unlike Rue who changes into monsters. Each type of magic can be cast indifferent ways. She can use two types of magic at the start - Blue and White magic. The other five typesshe has to find. Each type of magic can be used in up to six ways. You can only use the Normal andWide patterns at the start. The other four have to be found. Look in the secrets section for the locations ofthese things.
Blue MagicDroplets: Normal, Spell Cost: 2, Small drops of water fall with incredible speed and power.Cutter: Wide, Spell Cost: 4, Small waves of water fly in an arc in front of Mint.Icicle: Super, Spell Cost: 4, An icicle falls from the sky onto the opponent. Holding in the Trianglebutton makes more icicles fall than paid for.Ripple: Power, Spell Cost: 4, Creates small rings of water that increase in size a little.Crystal: Circle, Spell Cost: 6, A small ice crystal forms in Mint's hands. Push it into enemies to dealmajor damage.Restore: Hyper, Spell Cost: All MP (Min 100), Restores an amount of HP equal to your current MP.(Not tested - too lazy to!)
Threads of Fate Strategy Guide
file:///C|/WINDOWS/Profiles/LordHaart/My Documents/FAQs/Threads of Fate/threads.html (2 of 42) [9/12/2000 9:53:30 PM]

White MagicVulcan: Normal, Spell Cost: 1, Fires a particle of light. Holding the Triangle button fires a steady streamof light particles.Spread: Wide, Spell Cost: 4, An arc of light is fired from Mint's fingertips.Arrow: Power, Spell Cost: 4, Fires an arrow that plows through enemies.Satellite: Circle, Spell Cost: 10, Two crystals rotate around Mint, firing light particles at any enemies insight. Doesn't deal enough damage. Too expensive.
Red MagicBurner: Normal, Spell Cost: 2, A steady stream of fire is unleashed on any enemies dumb enough to getin the way.Bullet: Wide, Spell Cost: 4, A single little fireball is fired from Mint's hand.Napalm: Super, Spell Cost: 6, Fire spreads along the ground in front of Mint.Flare: Power, Spell Cost: 6, A small fireball that grows. Nifty. Hits multiple times.Delta: Circle, Spell Cost: 6, Three very fast fireballs are fired at the enemy.Fire Heart: Hyper, Spell Cost: All MP (Min 80), Mint gets a fire shield for a period of time determinedby the MP used to cast the spell. Touching an opponent results in massive damage being dealt!
Green MagicWave: Normal, Spell Cost: 3, Wind erupts from Mint's fingertips at incredible speed. Great rapid firetechnique die to its speed.Typhoon: Wide, Spell Cost: 2, Creates a spiral of wind from Mint's fingertips. Useful to start windmills.Impulse: Super, Spell Cost: 6, Wind erupts in all directions from Mint's body. Nice when surrounded.Gale: Power, Spell Cost: 3, Creates high winds that rush along the ground.Cyclone: Circle, Spell Cost: 3, A small cyclone that goes up to the sky. Useless, if you ask me.Nightingale: Hyper, Spell Cost: All MP (Min 80), Makes Mint invulnerable for an amount of secondsequal to half the MP used. (I think - I never timed it)
Black MagicBomb: Normal, Spell Cost: 5, A small bomb that bounces along the ground. Like all Black magic, it canbe used to destroy rocks.Dark Mist: Wide, Spell Cost: 6, A wall of poisonous mist forms in front of Mint.Dynamite: Super, Spell Cost: 10, Dynamite is thrown at the enemy. It explodes on impact.Graviton: Power, Spell Cost: 6, A sphere of anti-matter is fired at the enemy. Hits multiple times. Greatspell!Drill: Circle, Spell Cost: 6, A short lived drill of darkness is fired from Mint's hands. Useless spell.Shadow Strike: Hyper, Spell Cost: 50, Mint starts to flash and passes through any enemies in her way,causing massive damage. A tad expensive, but devastating!
Yellow MagicSpark: Normal, Spell Cost: 5, A single bolt of lightning is fired from Mint's palms.Cracker: Wide, Spell Cost: 6, A bunch of small bursts of electricity form in front of Mint.Trine: Super, Spell Cost: 8, Three lightning bolts are fired at the enemies.Bolt: Power, Spell Cost: 10, Lightning is called down from the heavens to strike a single target. Tooshort a range to be too useful.Force: Circle, Spell Cost: 8, An electrical barrier is created around Mint, damaging all those who touch
Threads of Fate Strategy Guide
file:///C|/WINDOWS/Profiles/LordHaart/My Documents/FAQs/Threads of Fate/threads.html (3 of 42) [9/12/2000 9:53:30 PM]

it.Final Flash: Hyper, Spell Cost: All MP (Min 100), Lightning lances out in every direction front Mint'sbody. The most devastating spell in the game, with the exception of Valiant.
Gold MagicValiant: Cosmos, Spell Cost: 10, Allow Mint to block attacks by holding in the Triangle Button. Lettinggo sends out a beam of pure, raw light.
The Town of CaronaThere are many services available in the town of Carona. There is an Inn, a hotel, a tavern, an equipmentshop and a potion shop. There are other people in town too, and you will want to talk to them onnumerous occasions. Here is a list of the various services available in town.
The InnYou can register (save) your game at the Inn. This can be done at any time during the game. Later youcan also stay here for free at the behest of Elena's parents. When staying here, you heal all your HP.
The HotelYou can also stay at the Hotel, but it will cost you 500 gil per night! The price is steep and it makesstaying there a bit expensive. The plus side to it, is that on several occasions you will be able to finditems or coins in the room. Just make sure to look for them before going to bed! Sleeping in the Hotelwill heal only your HP.
The ChurchThe Church is above the path to the docks. At the Church you can donate money. In return, you'll get acertain amount of coins. This is a very expensive way to get more coins if you are in trouble! For 1,000gil you'll get 10 Bronze Coins. For 5,000 gil you'll get 5 Silver Coins. For 10,000 gil you'll get 2 GoldCoins. A donation of 30,000 gil will result in a Platinum Coin!
The TavernThe Tavern is a great place to get information or to refill some of your MP. To do so, talk to Jargen, thebarkeep, and order a drink. Milk costs 50 gil and refills 10% of your MP, while Root Beer heals 25% ofyour MP for 120 gil. The best drink is Tropical Delight. It costs 220 gil and heals 50% of your MP.
Threads of Fate Strategy Guide
file:///C|/WINDOWS/Profiles/LordHaart/My Documents/FAQs/Threads of Fate/threads.html (4 of 42) [9/12/2000 9:53:30 PM]
The Equipment ShopYou can sell Monster Coins and items at the Equipment Shop. The proprietor, Tonio, also sells youupgrades to your armour. This comes in the form of better bracers and better belts. Once you have boughtone of them, all inferior models are dropped from the list.
BracersBronze Bracer - +4 Attack - 1,000 gilSilver Bracer - +8 Attack - 3,000 gil (2500 gil if you have both the Bronze Belt and Bracer)Gold Bracer - +12 Attack - 3,500 gil (after Prima Doll appears)Platinum Bracer - +16 Attack - 4,500 gil (after the Ghost Temple and Gamul Forest)Mythril Bracer - +20 Attack - 5,500 gil (after meeting Maya, or after saving Mira with Mint)Brave Bracer - +24 Attack - 6,500 gil (after talking to Wylaf a second time, or after beating Mode Masterwith Mint)
BeltsBronze Belt - +4 Defense - 1,000 gilSilver Belt - +8 Defense - 3,000 gil (2500 gil if you have both the Bronze Belt and Bracer)Gold Belt - +12 Defense - 3,500 gil (after Prima Doll appears)Platinum Belt - +16 Defense - 4,500 gil (after the Ghost Temple and Gamul Forest)Mythril Belt - +20 Defense - 5,500 gil (after meeting Maya, or after saving Mira with Mint)Brave Belt - +24 Defense - 11,000 gil (after talking to Wylaf a second time, or after beating ModeMaster with Mint)
The Potion ShopThis is Hobbs' Shop. You can find it by going through the dark alley. It is near to the Tavern. Here youcan buy upgrades to your health, magic, strength or endurance (defense). The price is steep, however,and costs 30,000 gil at a time! The price does go down, if you bring him a bottle of Rare Wine, whichcan be found in the Underground Ruins. The prices then goes down to 5,000 gil! You can also sell coinshere, but you shouldn't.
Elena and Her ParentsThis family owns an antique shop in town. The father, Klaus, is a treasure hunter of sorts. He is alsolooking for the 'relic', but unlike both Rue and Mint, he has no idea what he will do with it when he getsit! You can come to him for help throughout your travels - he is always there to help. He is also the onethat foots your bills at the Inn!
Threads of Fate Strategy Guide
file:///C|/WINDOWS/Profiles/LordHaart/My Documents/FAQs/Threads of Fate/threads.html (5 of 42) [9/12/2000 9:53:30 PM]
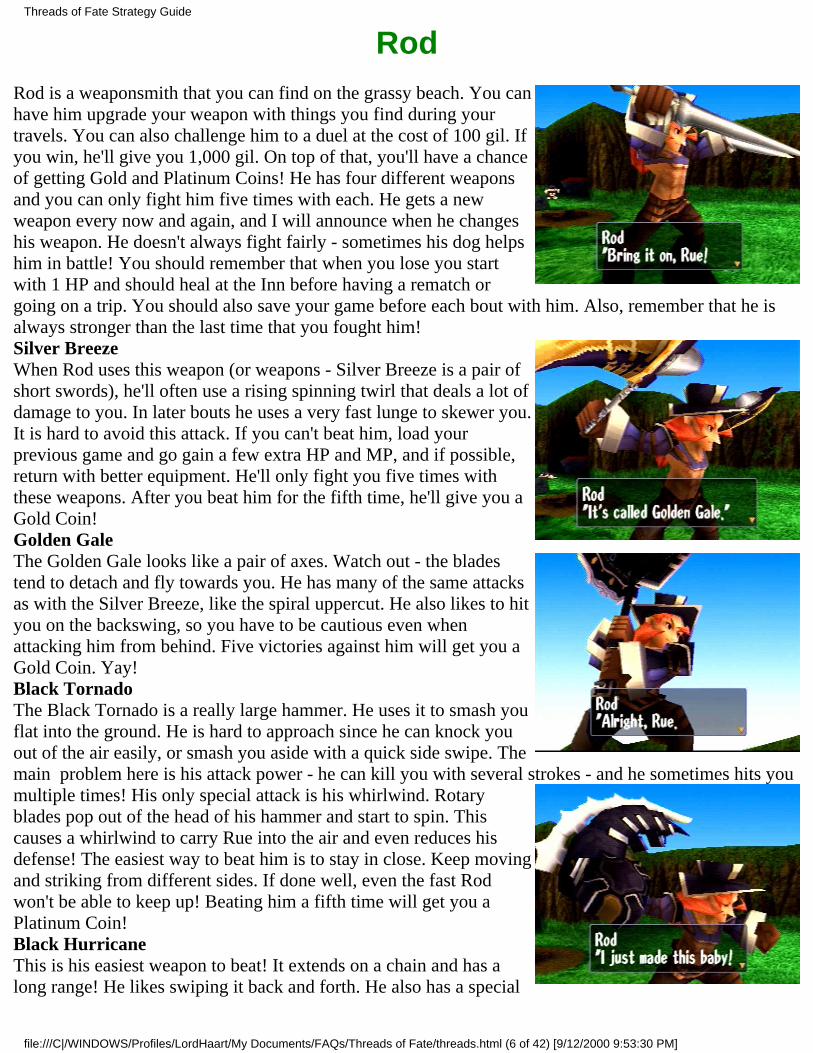
RodRod is a weaponsmith that you can find on the grassy beach. You canhave him upgrade your weapon with things you find during yourtravels. You can also challenge him to a duel at the cost of 100 gil. Ifyou win, he'll give you 1,000 gil. On top of that, you'll have a chanceof getting Gold and Platinum Coins! He has four different weaponsand you can only fight him five times with each. He gets a newweapon every now and again, and I will announce when he changeshis weapon. He doesn't always fight fairly - sometimes his dog helpshim in battle! You should remember that when you lose you startwith 1 HP and should heal at the Inn before having a rematch orgoing on a trip. You should also save your game before each bout with him. Also, remember that he isalways stronger than the last time that you fought him!Silver BreezeWhen Rod uses this weapon (or weapons - Silver Breeze is a pair ofshort swords), he'll often use a rising spinning twirl that deals a lot ofdamage to you. In later bouts he uses a very fast lunge to skewer you.It is hard to avoid this attack. If you can't beat him, load yourprevious game and go gain a few extra HP and MP, and if possible,return with better equipment. He'll only fight you five times withthese weapons. After you beat him for the fifth time, he'll give you aGold Coin!Golden GaleThe Golden Gale looks like a pair of axes. Watch out - the bladestend to detach and fly towards you. He has many of the same attacksas with the Silver Breeze, like the spiral uppercut. He also likes to hityou on the backswing, so you have to be cautious even whenattacking him from behind. Five victories against him will get you aGold Coin. Yay!Black TornadoThe Black Tornado is a really large hammer. He uses it to smash youflat into the ground. He is hard to approach since he can knock youout of the air easily, or smash you aside with a quick side swipe. Themain problem here is his attack power - he can kill you with several strokes - and he sometimes hits youmultiple times! His only special attack is his whirlwind. Rotaryblades pop out of the head of his hammer and start to spin. Thiscauses a whirlwind to carry Rue into the air and even reduces hisdefense! The easiest way to beat him is to stay in close. Keep movingand striking from different sides. If done well, even the fast Rodwon't be able to keep up! Beating him a fifth time will get you aPlatinum Coin!Black HurricaneThis is his easiest weapon to beat! It extends on a chain and has along range! He likes swiping it back and forth. He also has a special
Threads of Fate Strategy Guide
file:///C|/WINDOWS/Profiles/LordHaart/My Documents/FAQs/Threads of Fate/threads.html (6 of 42) [9/12/2000 9:53:30 PM]

attack - he spits water at you. The best thing about it is that he has to charge it up by drinking from thestream. Hit him to interrupt his drinking and he'll try to drink again. It is easy to beat him if all he tries todo is drink... You'll get a Platinum Coin after beating him five times.After he has lost with his final weapon, you can continue fighting him. He keeps the Black Hurricane andhis stats increase every time he loses. Fighting him now is just for fun!
ItemsHere is a list of all the items that you can find during the game.
StonesDream Stone: Sold for 2.000 gil. No particular use.Moon Stone: Sold for 1,000 gil. No particular use.Night Stone: Sold for 500 gil. No particular use.Star Stone: Sold for 3,000 gil. No particular use.
Secret ItemsBrooch: Found in the Gamul Forest (Mint only). Given to Marcum, or Annette (see secrets).Legendary Helmet: Found in Maya's Tower. Useful only as a complete set. Do not sell.Legendary Shield: Found in the Underground Ruins. Useful only as a complete set. Do not sell.Legendary Sword: Found on the Raging Mountain. Useful only as a complete set. Do not sell.Mysterious Statue: Found in the Ghost Temple (Rue only). Given to Klaus in exchange for an MP Pluspack.Rare Wine: Found in the Underground Ruins. Given to Hobbs to reduce his prices.The Last Hero: Found in Carona Forest. Given to Rod in exchange for four Strength Pluses.
Quest ItemsCube: Found in Elroy's Atelier. Holds the Prima Doll, the key to the Lake Ruins.Earrings: Found in the Gamul Forest. Needed to finish the Prima Doll.Gauntlets: Found in the Ghost Temple. Needed to finish the Prima Doll.Mel's Report: Mel's findings on the Cube.Phantomite: Gotten from Wylaf on the Raging Mountain. Needed to finish the Prima Doll.Sollerets: Found in the Ghost Temple. Needed to finish the Prima Doll.Tiara: Found in Elroy's Atelier. Part of the Prima Doll. Stolen by Belle and Duke.
Threads of Fate Strategy Guide
file:///C|/WINDOWS/Profiles/LordHaart/My Documents/FAQs/Threads of Fate/threads.html (7 of 42) [9/12/2000 9:53:30 PM]

WalkthroughsThreads of Fate is a game with two stories revolving around the same quest. Both stories contain thesame main components, but differ to keep you interested when you play the game a second time with adifferent character.I have purposely left out any information on the shops in Carona and on the characters themselves. Thisinformation can be found in the other sections of the guide, including a full section on Carona and itsservices.I have split this section into two - one following the story of Rue, and the other following the story ofMint. This is more for convenience on the reader's part (and my part), since it would make it ratherconfusing to blend the two together. Each adventure will be split into several chapters (that I decide uponmyself) with sub-headings for each individual area explored. Under each of these headings will be a listof items I found and monsters to look out for. Very important items (like spells) will be placed in boldtype.
The Mysterious Boy
Prologue - Learning the Way of RueThe game starts off with the intro. You watch as Rue and Claire talkabout a day that they shared two years ago. A disturbance draws Rueoutside and he confronts a weird, white-haired man with a grotesquehand. Before you know it, Claire is on the ground. She is dead. Ruethen sets off to look for a 'relic', which is rumored to be powerfulenough to resurrect his friend.You'll see him on board a ship, three years after his friend was killed.You'll meet Blood and Smokey. They are talking about a legendaryartifact that has been rumored to be in the area. The ship then hitssomething and you end up in the town of Carona.
The Town of Carona
Coins:1 Bronze Coin - Near the exit1 Silver Coin - Grassy beach1 Bronze Coin - Near the Tavern
Talk to the people in town to find out that Elena has run into the forest to find her wayward parents. Goto the Tavern (dark alley) and talk to Annette. She'll give you a drink on the house. It heals some of yourMP. Head to the Inn (not Hotel) in town and register (save) your game. Leave town by the gates and headto the Carona Forest.
Threads of Fate Strategy Guide
file:///C|/WINDOWS/Profiles/LordHaart/My Documents/FAQs/Threads of Fate/threads.html (8 of 42) [9/12/2000 9:53:30 PM]
Carona Forest
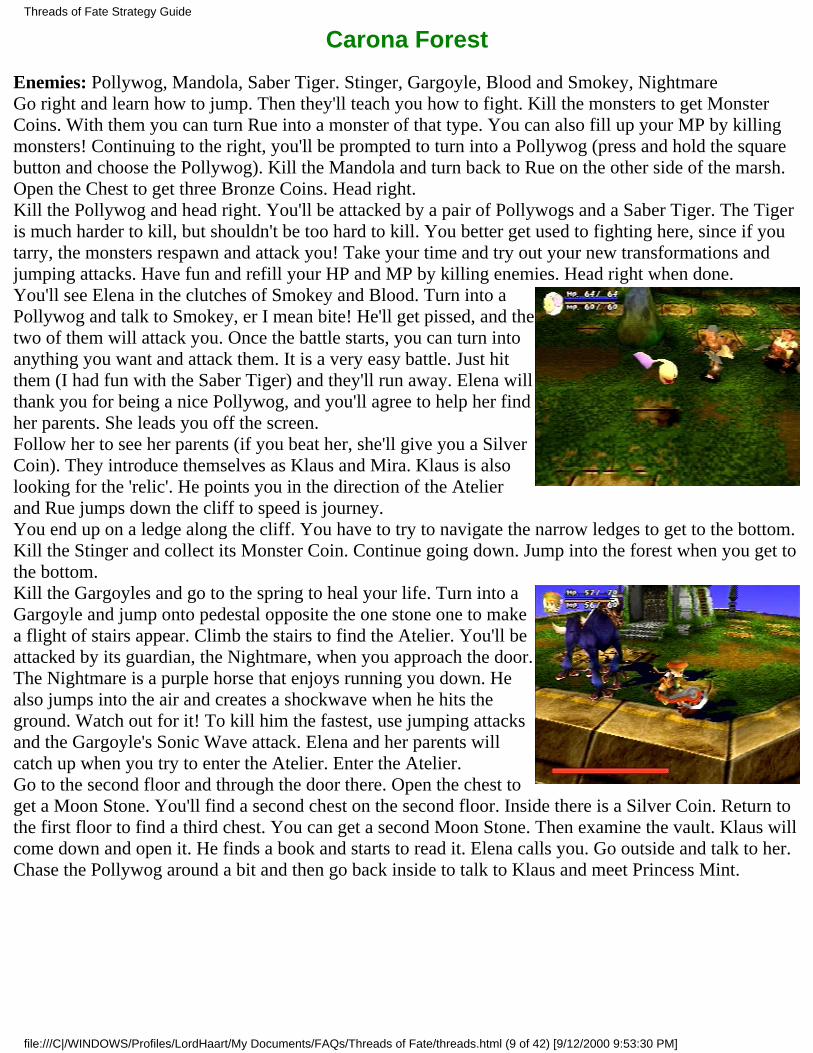
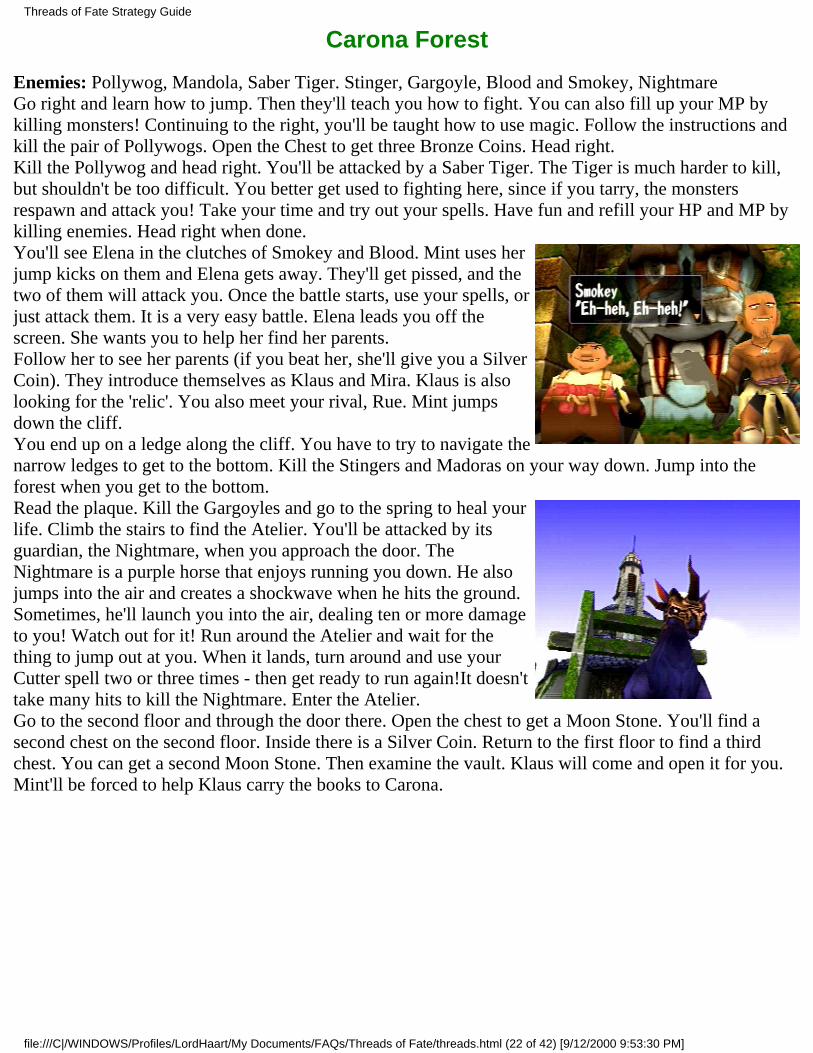
Enemies: Pollywog, Mandola, Saber Tiger. Stinger, Gargoyle, Blood and Smokey, NightmareGo right and learn how to jump. Then they'll teach you how to fight. Kill the monsters to get MonsterCoins. With them you can turn Rue into a monster of that type. You can also fill up your MP by killingmonsters! Continuing to the right, you'll be prompted to turn into a Pollywog (press and hold the squarebutton and choose the Pollywog). Kill the Mandola and turn back to Rue on the other side of the marsh.Open the Chest to get three Bronze Coins. Head right.Kill the Pollywog and head right. You'll be attacked by a pair of Pollywogs and a Saber Tiger. The Tigeris much harder to kill, but shouldn't be too hard to kill. You better get used to fighting here, since if youtarry, the monsters respawn and attack you! Take your time and try out your new transformations andjumping attacks. Have fun and refill your HP and MP by killing enemies. Head right when done.You'll see Elena in the clutches of Smokey and Blood. Turn into aPollywog and talk to Smokey, er I mean bite! He'll get pissed, and thetwo of them will attack you. Once the battle starts, you can turn intoanything you want and attack them. It is a very easy battle. Just hitthem (I had fun with the Saber Tiger) and they'll run away. Elena willthank you for being a nice Pollywog, and you'll agree to help her findher parents. She leads you off the screen.Follow her to see her parents (if you beat her, she'll give you a SilverCoin). They introduce themselves as Klaus and Mira. Klaus is alsolooking for the 'relic'. He points you in the direction of the Atelierand Rue jumps down the cliff to speed is journey.You end up on a ledge along the cliff. You have to try to navigate the narrow ledges to get to the bottom.Kill the Stinger and collect its Monster Coin. Continue going down. Jump into the forest when you get tothe bottom.Kill the Gargoyles and go to the spring to heal your life. Turn into aGargoyle and jump onto pedestal opposite the one stone one to makea flight of stairs appear. Climb the stairs to find the Atelier. You'll beattacked by its guardian, the Nightmare, when you approach the door.The Nightmare is a purple horse that enjoys running you down. Healso jumps into the air and creates a shockwave when he hits theground. Watch out for it! To kill him the fastest, use jumping attacksand the Gargoyle's Sonic Wave attack. Elena and her parents willcatch up when you try to enter the Atelier. Enter the Atelier.Go to the second floor and through the door there. Open the chest toget a Moon Stone. You'll find a second chest on the second floor. Inside there is a Silver Coin. Return tothe first floor to find a third chest. You can get a second Moon Stone. Then examine the vault. Klaus willcome down and open it. He finds a book and starts to read it. Elena calls you. Go outside and talk to her.Chase the Pollywog around a bit and then go back inside to talk to Klaus and meet Princess Mint.
Threads of Fate Strategy Guide
file:///C|/WINDOWS/Profiles/LordHaart/My Documents/FAQs/Threads of Fate/threads.html (9 of 42) [9/12/2000 9:53:30 PM]
Chapter 1: The Cube
The Town of Carona
Coins:1 Silver Coin - Near the docks
Sell your Monster Coins at either Hobbs' or Tonio's Shop, as well as your two Moon Stones. Upgradeyour equipment as well (If you buy both the Bronze Belt and Bracers, the Silver ones will reduce inprice!). Then head to Klaus' place and talk to him to get the key to the Underground Ruins. Head to theInn and save your game. Now you are ready to leave town and go to the Underground Ruins. (Note: youcan fight Rod at the grassy beach now, if you want to.)
The Underground Ruins
Enemies: King Ant, Gudon, Skull Beast, Duke
As soon as you get to the entrance, you'll come face to face with Princess Mint. Agree to work with herand then the two of you will enter the place. There are four floors in the ruins, and the first is a veritablemaze. The only way through the maze is to follow the left wall until you fins Mint. Watch out for theGudons and the King Ants. It is best to stay as a Gudon for the entire floor, since they deal around 40damage to the ants with their fire breath attack! (the breath isn't too effective against the Gudons though -just use regular attacks on them) It may take a while, but it is the only way for me to explain it. She'll tellyou about the waterfall. Continue following the left wall until you come across a pair of waterfalls. Goright and kill the Pollywog. Continue right. Wander around in these caverns and go into the rightpassages until you find a Night Stone and a Moon Stone. Once you have the two stones, you'll want tostart exploring the left branches until you find an area with a single waterfall. Go left here and jump intothe hole in the ground.You'll fight the same enemies on the second floor (as well as the third floor!). There are seven things tocollect on this floor - six coins and a bottle of Rare Wine (the latter one is extremely valuable!). In thisarea there are several passages filled with some harmful liquid on the ground. To avoid it, you have tojump from platform to platform to get across. It is very easy to ignore the Gudons on the platforms. Atthe end of the platforms there is always a King Ant waiting for you. Just pay attention to them and youwon't have a problem surviving this floor. Well, after going through the first such passage, you'll come toa junction. Go up and get the first coin. Return to the junction and go left. Use the platforms to get acrossagain, go into the north door and get the coin. Go right at the last junction and use the platforms to getacross again. Go up and get the third coin. Head left at the last junction and use the platforms again. Gointo the top door to get the fourth coin. Go right at the junction and you'll get to another junction. Headup to get the fifth coin. The sixth coin is to the right. To get it, you have to melt the ice block. Changeinto a Gudon and use its fire attack on the ice block to melt it. The ice block grows, so you have to use asteady stream of fire to melt them. Just rapidly press the triangle button until it melts. Pick up the coin.To the right there are two more blocks of ice. Try to melt them. The Rare Wine is behind them. If youcan't melt them, it means that you need more MP. Go back to the last King Ant and attack it with theGudon's tail to raise your MP. Then return to the blocks and use all your MP on them. Repeat this untilyou have about 110 MP, destroyed all three blocks and have the Rare Wine. Return to the first room you
Threads of Fate Strategy Guide
file:///C|/WINDOWS/Profiles/LordHaart/My Documents/FAQs/Threads of Fate/threads.html (10 of 42) [9/12/2000 9:53:30 PM]

were in on this floor and you'll see that the six coins are now platforms. Jump on them from the right tothe left without falling down to make them into a stairway. Climb the stairs and jump down the hole.You'll meet up with Mint on the third floor. She is standing in frontof a big boulder. Talk to her until the boulder starts rolling down theincline. Run away from it as fast as you can, but beware the fallingblocks. Try to stay on the left side so that you can jump into the tinyalcove at the end! The boulder takes out the wall, making you a newpassage. Go into the door and watch as Mint falls into the water.Jump onto any of the platforms and ride it to the other end and jumponto the ledge with the chest. Open it to get the Legendary Sword(do not sell this item). Now you have to time your jumps to jumponto the flashing platforms in order (the target one is alwaysflashing). You'll be brought to the fourth floor when this is done.Jump from platform to platform and go right. Here you'll fight theSkull Beast. It jumps from platform to platform and breaths fire onyou. To kill him, follow him around and strike at him when heflashes white. He isn't much of a challenge. Continue to the right tofind Elroy's Atelier. Step on the little flashing things to get broughtup to the Atelier. Inside there are three doors you can enter. You canfind 1 Gold Coin, 4 Bronze Coins, a Tiara, a Cube and a HPrecovery machine here. Pick them all up and then return to theplatform that brought you up to the Atelier. You'll meet Duke andBelle, a pair of miscreants looking for the 'relic'. You'll have to fightDuke here. Just strike him a few times with your weapon - he isn't too hard to kill. Belle steals yourTiara and they run away. Then follow them out of the room and you'll meet the Skull Beast again! Thistime you can't kill it - just run to the left (after having hit it once) and get on the platform.And he follows you! You'll have to run up the spiral staircase and avoid bouncing spiked balls to get tothe top. Stay on the inner track to avoid the balls and keep up your speed. If the beast catches up, you'llbe brought back to the bottom! So don't lose. At the top, the Skull Beast takes a deadly plunge, and you'llhead back to Carona when you notice that Duke and Belle are gone for good.
The Town of Carona
Give Hobbs the Rare Wine and talk to Klaus about the Cube. Go to the Hotel and stay there. Make sureyou get the Dream Stone from the armoire. Then go to the bed and go to sleep. You'll see a dream wherea shortcut is shown in the Carona Forest. Remember its location! Save your game and get ready to leavetown again.
Mel's Atelier
Enemies: Fungie, Cockadoo, Imp, Starlight Duke
When you choose to go to Mel's Atelier, you'll run into Mint. Just ignore her and go ahead. Head rightand you'll notice the drastic change in landscape. Head further to the right and jump onto the star lift.Knock on the door and you'll be told that Fancy Mel is not home and that you should play while youwait. You can save your game at the bird and play games with the others.
Threads of Fate Strategy Guide
file:///C|/WINDOWS/Profiles/LordHaart/My Documents/FAQs/Threads of Fate/threads.html (11 of 42) [9/12/2000 9:53:30 PM]
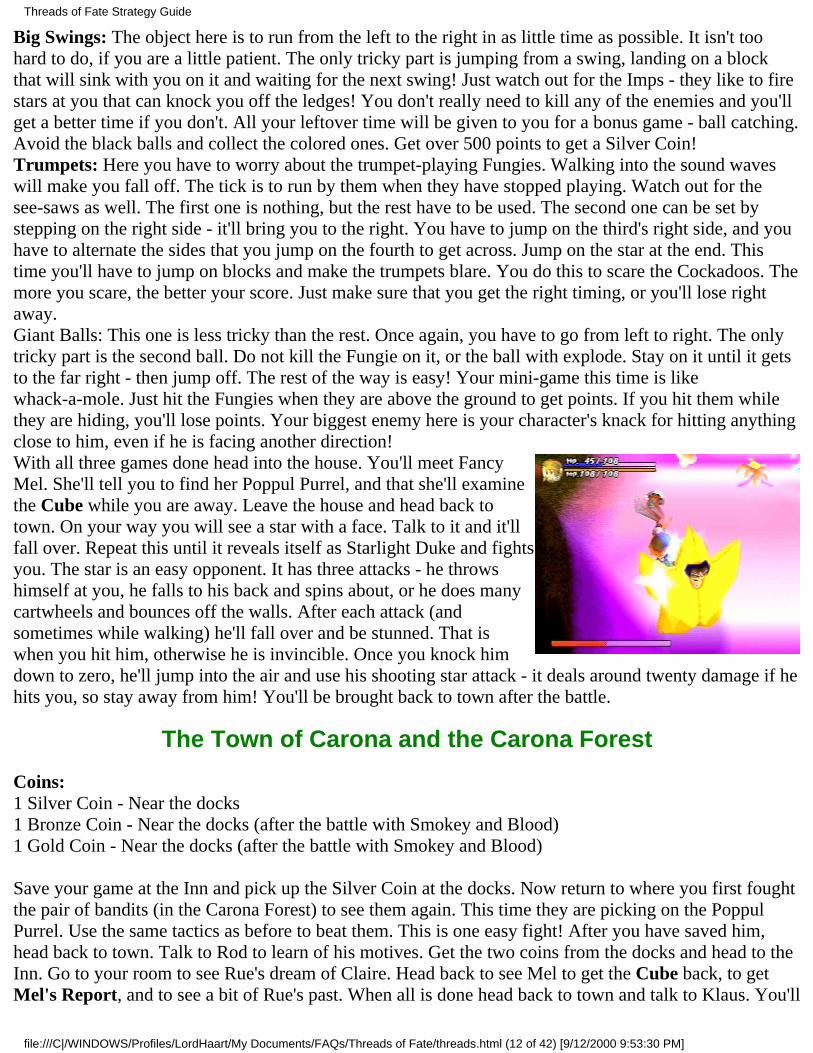
Big Swings: The object here is to run from the left to the right in as little time as possible. It isn't toohard to do, if you are a little patient. The only tricky part is jumping from a swing, landing on a blockthat will sink with you on it and waiting for the next swing! Just watch out for the Imps - they like to firestars at you that can knock you off the ledges! You don't really need to kill any of the enemies and you'llget a better time if you don't. All your leftover time will be given to you for a bonus game - ball catching.Avoid the black balls and collect the colored ones. Get over 500 points to get a Silver Coin!Trumpets: Here you have to worry about the trumpet-playing Fungies. Walking into the sound waveswill make you fall off. The tick is to run by them when they have stopped playing. Watch out for thesee-saws as well. The first one is nothing, but the rest have to be used. The second one can be set bystepping on the right side - it'll bring you to the right. You have to jump on the third's right side, and youhave to alternate the sides that you jump on the fourth to get across. Jump on the star at the end. Thistime you'll have to jump on blocks and make the trumpets blare. You do this to scare the Cockadoos. Themore you scare, the better your score. Just make sure that you get the right timing, or you'll lose rightaway.Giant Balls: This one is less tricky than the rest. Once again, you have to go from left to right. The onlytricky part is the second ball. Do not kill the Fungie on it, or the ball with explode. Stay on it until it getsto the far right - then jump off. The rest of the way is easy! Your mini-game this time is likewhack-a-mole. Just hit the Fungies when they are above the ground to get points. If you hit them whilethey are hiding, you'll lose points. Your biggest enemy here is your character's knack for hitting anythingclose to him, even if he is facing another direction!With all three games done head into the house. You'll meet FancyMel. She'll tell you to find her Poppul Purrel, and that she'll examinethe Cube while you are away. Leave the house and head back totown. On your way you will see a star with a face. Talk to it and it'llfall over. Repeat this until it reveals itself as Starlight Duke and fightsyou. The star is an easy opponent. It has three attacks - he throwshimself at you, he falls to his back and spins about, or he does manycartwheels and bounces off the walls. After each attack (andsometimes while walking) he'll fall over and be stunned. That iswhen you hit him, otherwise he is invincible. Once you knock himdown to zero, he'll jump into the air and use his shooting star attack - it deals around twenty damage if hehits you, so stay away from him! You'll be brought back to town after the battle.
The Town of Carona and the Carona Forest
Coins:1 Silver Coin - Near the docks1 Bronze Coin - Near the docks (after the battle with Smokey and Blood)1 Gold Coin - Near the docks (after the battle with Smokey and Blood)
Save your game at the Inn and pick up the Silver Coin at the docks. Now return to where you first foughtthe pair of bandits (in the Carona Forest) to see them again. This time they are picking on the PoppulPurrel. Use the same tactics as before to beat them. This is one easy fight! After you have saved him,head back to town. Talk to Rod to learn of his motives. Get the two coins from the docks and head to theInn. Go to your room to see Rue's dream of Claire. Head back to see Mel to get the Cube back, to getMel's Report, and to see a bit of Rue's past. When all is done head back to town and talk to Klaus. You'll
Threads of Fate Strategy Guide
file:///C|/WINDOWS/Profiles/LordHaart/My Documents/FAQs/Threads of Fate/threads.html (12 of 42) [9/12/2000 9:53:30 PM]

learn of the Prima Doll from Mint and you are given a list of things to find. Head to the Item Shop andbuy a pair of Gold Bracers and a Gold Belt. Save your game at the Inn.
Chapter 2: The Prima Doll
The Ghost Temple
Enemies: Puppet, Specter, Skeleton, Ootang, Guardian, Duke
At the entrance to the Ghost Temple, head into the right door (you can't open the left one). Follow theguards that you see. Kill the Puppets and leave the room. Go left and into the room the Puppets originallycame from. Kill the Puppet and Specter (watch out for the latter's water attacks!) and leave through thetop door. Watch out for the spiked ball in the next hall and jump over the pit. Enter both the door on theleft and the door on the right. Kill the four Puppets, the Gudon and the Saber Tiger. Turn into the SaberTiger and jump over the long pit. Kill the Puppet on the right pedestal. Jump onto the pedestal and turninto a Puppet. Punch towards the other one to make it turn towards you and the door will unlock.The Chimera that you fight in the next room is weak. Its main attackis throwing its blade, which flies about the room, striking anything inits path. It is very easy to get in several good strikes while this ishappening. Attack its back for the most damage. You'll get the LeftSolleret for your victory.Jump on the white platform to make the walls open up. Kill the fourSkeletons. There is a healing spring in the right room. When done gointo the door in the left room. Go into the room on the left and kill theOotang. Jump from platform to platform and kill the enemies as yousee them. Make sure you enter the rooms as they open up. In oneyou'll find three Bronze Coins and a Silver Coin. If you fall down here, just run to the bottom of the areaand use the ledges to get back up. At the top of the room there is an empty pedestal. Turn into a Skeletonand jump onto the pedestal. Face the other Skeleton to unlock the door. Behind the door is a secondChimera. This one uses fire and lightning magic. When the room darkens, it is getting ready to use alightning spell - run away when it does. The fire magic is much more devastating, but it is used a lot lessoften. Attack it in the same way as earlier to kill it. You get the Right Solleret from its dead body.Kill the two Specters and transform into an Ootang. Jump over the wall and kill the right Skeleton.Transform into a Skeleton, jump onto the empty pedestal, and use its Fall Apart attack to open the door.And fight a third Chimera! This one has all the attacks that the first two had, and a new lunge attack.Watch out for them and kill it in the same manner as the other two. You get the Left Gauntlet for yourvictory.Turn into a Specter and blow out the four torches to unlock the door. Once this is done, watch out for thespiked ball that falls from the ceiling! To avoid it stay on the sides. Go through the door and you'll benear to the entrance. Head left and through the door. You'll be back in the entrance hall. Go through thenow open left door. You'll see something ahead of you. Follow it and it turns out to be Elena. Talk to her.When the scene is over, go to where you caught her and smash the lever. Stand in front of the now opendoor and press the Triangle button to call her. Go through it.In the next hall, jump to the ledge in the center and call Elena. She'll come and both doors will open,revealing enemies. Kill them all, and when they start to shake, go in the left, then the right one and kill
Threads of Fate Strategy Guide
file:///C|/WINDOWS/Profiles/LordHaart/My Documents/FAQs/Threads of Fate/threads.html (13 of 42) [9/12/2000 9:53:30 PM]

all the enemies. Hit the wooden door in the right one to find a room with a Moon Stone in it. Walk up tothe hole in the left wall and Elena will tell you that you can get in if you were small. Talk to her somemore to get a Moon Stone. Turn into a Stinger and walk through. Kill the other Stingers and pick up theNight Stone on your way. Turn back to Rue and hit the switch. Elena will run in. Talk to her a few timesto get a Silver Coin. Leave by the top door.Run to the end of the hall and hit the switch to open the door. Hit the switch in the next room to open thedoor. Go through the door and Elena gets caught again! Go into the left room and kill all the enemies.Turn into a Puppet and step on the teleporter. Go one screen up to see Elena get taken by Puppets. Usethe teleporter again. Go into the left room and use it again. Go down and return to where Elena wasattacked earlier (where you went into the small hole). Go into the right room. Fight off the Puppets andthe Skeletons to save Elena. Return to where you broke the switch. Talk to Elena and she'll open the doorfor you. Go straight and use the rotating platforms to get across. Then call for Elena. You have to tell herwhen to jump. It isn't hard to do. Go through the door.Avoid the switch and go through the top door. You'll get a Mysterious Statue (don't sell this), Star Stoneand 3 Silver Coins for your troubles. Return to the room and head left now to see an event betweenanother Chimera and Duke. He gets the second Gauntlet and you are forced to fight with him. Hispunches are a thing to be reckoned with. He has several new ones to show off. Watch out for hisrepeating punch attack, as well as his flaming fist attacks. He can make flame sprout from the ground in acircle around him or in a line before him. To make matters worse, her is invincible when flashing. Thegood thing, is that he does this to warn you of his next attack. The crates and other obstacles in the roomcan also be attacked. Doing so makes them explode, damaging everything in a small area (includingyou!). Just wail on Duke to end the fight quickly.At the end of the fight one of the walls starts to close in on the three of you. Run to the right door andcontinue using your combos on it to weaken the door (use the X button). Once it opens, Duke will giveyou the Right Gauntlet and you'll end up back in Carona.
The Town of Carona
Save your game when you get back to town. Rod has made a new weapon, so you can challenge himagain. Once you are ready to, go talk to Klaus. The Prima Doll will be revived, but it is still apparent thatyou are missing a part. The last part is the amulet, which you have to make. The ingredients are held by adragon named Wylaf. Talk to Klaus again and give him the Mysterious Statue. You'll get a bonus of tento your MP! Buy the Platinum Belt and Bracer and save your game.Go to the Carona Forest and jump into the hollow log in the first area (you saw it in a dream). Turn into aSpecter and use your Water attack on the little plant near the exit on the right. It will grow. Jump on thenew plant and open the chest you see to get the Last Hero. Return to town and give it to Rod to get +4 toyour strength! Now it is time to head off to the Raging Mountain.
The Raging Mountain
Enemies: Ootang, Fire Blob, Bubba, Black Pollywogs, Duke and Belle, Wylaf
Go to the right and kill the Ootangs that fall from above. You'll also have to deal with some Fire Blobs asyou make your way to the right. You should watch out for the blobs' Sparks attack - they fire off a trio offlame sparks at you. At the end, there is a small ledge that falls down. You'll hear a loud rumbling noise.Jump into the hole in the ground and fall to the left to get to a small platform with a large boulder on it.
Threads of Fate Strategy Guide
file:///C|/WINDOWS/Profiles/LordHaart/My Documents/FAQs/Threads of Fate/threads.html (14 of 42) [9/12/2000 9:53:30 PM]

To the right and over a pit, there is a Bubba. Jump across and kill it. Get the coin it drops and return tothe Boulder. Transform into a Bubba and use its Hammer strike to destroy the boulder. Head up theincline and return to the right. Exit on the right side of the screen. Go up at the crossroads and use Bubbato destroy the rock. You'll get three Silver Coins. Now go to the bottom path and destroy the boulder.Continue right and leave the area.The next area comprises of an uncomplicated leap from platform to platform on your way to the right.Some platforms move and some try to tip over. There is also a healing spring in the top area of this room.Exit at the right once done. The next area is very windy. You'll have to watch out for the dust clouds.When it gets dusty don't jump, or you'll end up flying backwards! I tell you this, since you have to dosome platform jumping while on your way! Continue going to the right and you'll meet Duke and Belle.And you'll have to fight them.This fight is a bit more difficult than the last one! You have to fightboth of them at once, as well as the Hexagon. Stay as Rue for thisfight and get ready to have a long and hard fight with them.Concentrate on getting rid of Duke first - you'll get some room tomaneuver by doing this. He attacks you in the same way as last time,but has far fewer HP. Once he is out of the way, you have to get Belleoff of the Hexagon. The Hexagon attacks by trying to grab you andlaunching you into the air. It is very hard to avoid this. Once theHexagon is on the ledge, you should jump towards Belle and strikeher with your weapon. Do this about four times to knock her off.Watch out though - every time that you strike her, the Hexagon will launch you into the air! Believe it ornot, Belle does more damage than the Hexagon does! She uses fire and acid magic on you, so watch out!She can't really take any hits, so she is pretty easy to beat.Head to the right after the battle and kill the Bubba. Recover at thespring, then head up the incline to the left. Use the platforms to goright and open the chest to get the Legendary Shield (don't sellthis!). Go back to the left and up the second incline. Continueclimbing the mountain until you get to some Black Pollywogs. Killthem and climb the rest of the way up. You'll meet Wylaf whochallenges you to a dual, man to dragon. Wylaf has three attacks. Thefirst is his plunge attack - he flies into the air and then dives down atyou. His second is a wing buffet that blows you off your feet - justavoid the dust clouds to avoid this attack. His third attack is a firebreath attack that makes a cross-shaped flame appear on the ground. Be warned - the initial point ofimpact will be aflame for the rest of the battle! It is time to attack him when he hits the ground and comesat you. Strike him two or three times and then get away from him. Once he says "Enough!", don't strikehim anymore! If you do, you will have to start the battle from the beginning! He'll give you thePhantomite for your victory!
Threads of Fate Strategy Guide
file:///C|/WINDOWS/Profiles/LordHaart/My Documents/FAQs/Threads of Fate/threads.html (15 of 42) [9/12/2000 9:53:30 PM]
The Town of Carona, the Carona Forest, and Mel's Atelier
Coins:1 Silver Coin - To the left of the church1 Bronze Coin - In the passage to the docks1 Silver Coin - In the dark alley
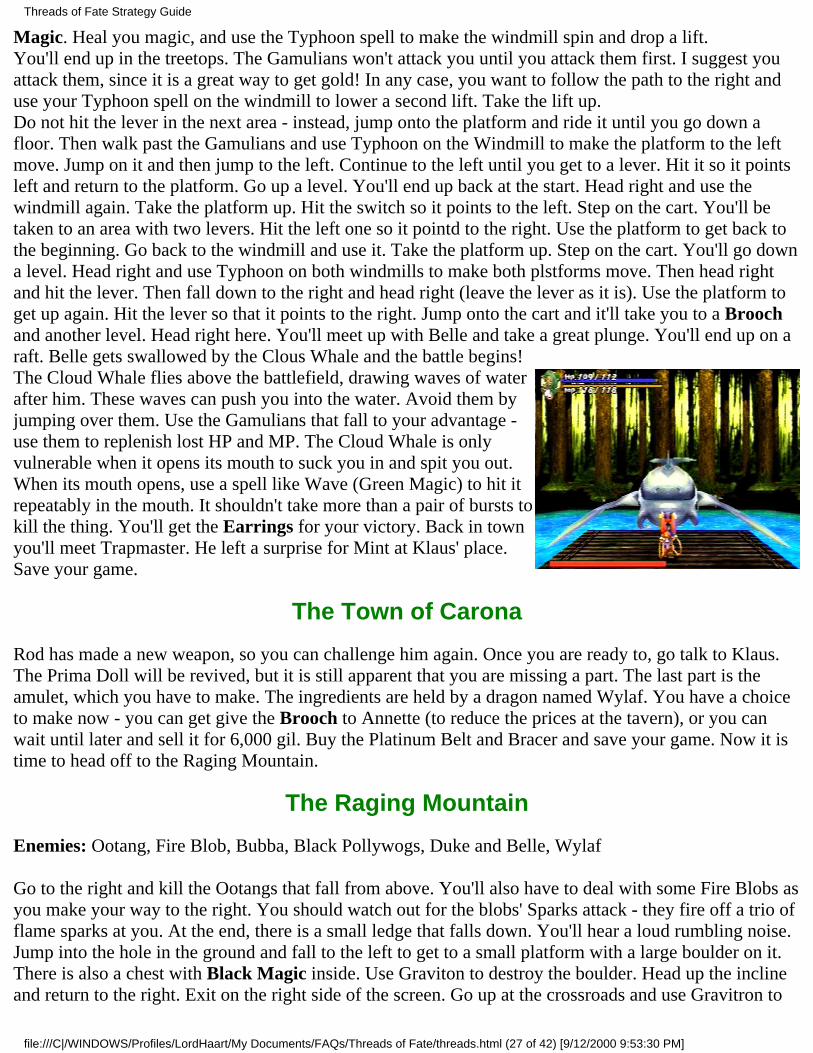
Upon returning to town, you will be challenged by Blood andSmokey. Save your game, then head to Carona Forest and to whereyou fought them the last time. This time you'll have to fight theirboss, the Trapmaster. You get transported to his very own battlefield.There are nine blocks here and he jumps from one to another. Whenone block starts to fill up with a shadow, it means that a spiked ball isabout to fall. You should also stay away from any flashing platforms,since they fill with flame in a couple of seconds. To beat him, justjump to a non-flashing block next to the one he is on and strike him afew times with your weapon. After the battle you'll have to fightBlood and Smokey again. They haven't gotten any more difficult since the first battle. Save your gameafter this battle and talk to Klaus.Follow his advice and go see Fancy Mel. Then go talk to the PoppulPurrel that you rescued. He'll transport you to the Gorotan's lair. Talkto the small little thing and it will transform into a giant cat. Gorotanhas only a few attacks. It fires stars in a spiral wave. To avoid them,just run circles around him (clockwise). He also uses a powerfullightning attack. He gets up on his hind legs when he does this, so itis easy to spot. When he is doing this, you can run around him and hithim on the rear. This does more damage than a frontal assault.Towards the end of the battle he'll send a barrage of lightning boltsagainst you. Just avoid them and finish him off. Return to Klaus afterthe battle to power the Prima Doll up.
The Town of Carona and Lakeside
Coins:1 Silver Coin - Near the hotel at night1 Bronze Coin - Near the fountain at night
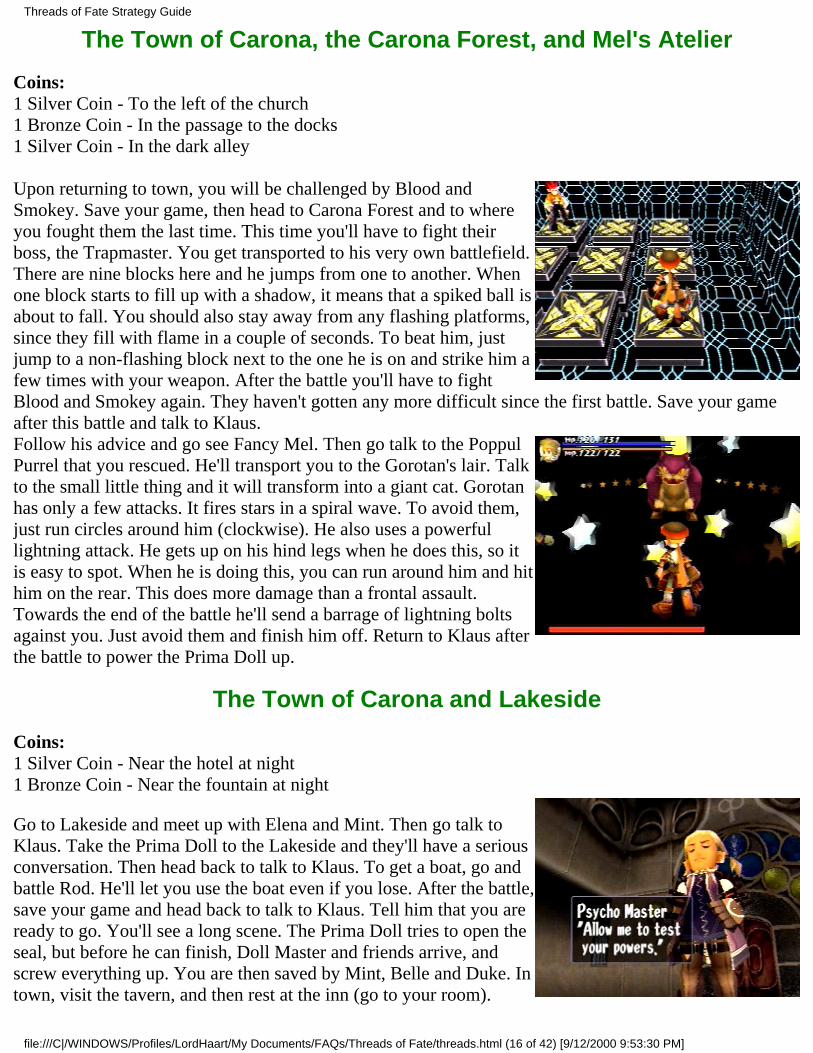
Go to Lakeside and meet up with Elena and Mint. Then go talk toKlaus. Take the Prima Doll to the Lakeside and they'll have a seriousconversation. Then head back to talk to Klaus. To get a boat, go andbattle Rod. He'll let you use the boat even if you lose. After the battle,save your game and head back to talk to Klaus. Tell him that you areready to go. You'll see a long scene. The Prima Doll tries to open theseal, but before he can finish, Doll Master and friends arrive, andscrew everything up. You are then saved by Mint, Belle and Duke. Intown, visit the tavern, and then rest at the inn (go to your room).
Threads of Fate Strategy Guide
file:///C|/WINDOWS/Profiles/LordHaart/My Documents/FAQs/Threads of Fate/threads.html (16 of 42) [9/12/2000 9:53:30 PM]

In the morning go buy the Mithril Bracer and Belt. You can also challenge Rod's Black Tornado now.Head to Lakeside now. You'll see the tower. When back in town go talk to Rod. Then go to your roomand sleep. You'll see Claire when you wake up. You have to follow her to the alley, and then talk to Dukeat the docks. Then you have to talk to Rod. Then you have to go to the Church to finally catch up withClaire. And do battle with Psycho Master. The guy is incredibly strong, and charging him won't do youany good - he'll just grab you and slam you to the ground. He also has a fire wave attack - he spins beforeusing it. On top of that, he teleports around and you can only hit him on the back. Around seven hits isenough to knock him out. Once he is beaten, he'll run off with Claire and tell Rue where to find her - inMaya's Tower.
Chapter 3: The Truth Revealed
Maya's Tower
Enemies: Wabbit, Pumpkin, Witch, Psycho Master, Atenacius
Go to the Tower of Maya. You'll meet the Trapmaster. Just go up the stairs and ignore him - unless youwant to take damage, of course. Kill the Wabbits and Pumpkins on the stairs as you climb higher. Whenoutside kill the Wabbits and then the Pumpkins that comes out the door. Get the two Gold Coins from thetreasure chest and then go inside. The next room is annoying. The object is to use the platforms to get tothe other side and kill the Witch. The problem is that some of the platforms are trapped and won't supportyour weight. If you fall to the ground, you'll be forced to fight some Pumpkins. To get across, jump onthe first moving platform and then onto the right platform. The left one is trapped. Then get onto the nextplatform, then onto the left of the three, and then onto the final moving one. Then just kill the Witch, getthe two Star Stones from the chest, and recover your HP at the spring. Go through the door. Jump ontothe platform and let it take you up. Kill the Pumpkins that fall and continue up the stairs when at the top.Kill the Wabbits and the Pumpkins when outside again. Get the two Gold Coins from the chest and gointo the door.Another tricky platform room. Jump to the ground and do jump attacks to kill the Wabbits on the left andright. Then jump on the middle platform at the bottom of the screen. Jump to the right one and then to thenon-moving one. From there you can do jump attacks to kill the remaining Wabbit. Then use the twoplatforms to the right of the stationary one to get to the stairs at the top of the screen. Open the chest toget the Legendary Helmet and use the spring to heal your lost HP. Go up the stairs. Open the chest inthe next room to get three Gold Coins. Then take the spiral stairs up. This time you'll have to watch outfor Pumpkins and Witches. When outside, kill the Wabbits and the Pumpkins again. Heal at the springand enter the door.You'll learn the truth of what happened to Claire in the next room. I won't reveal anything about it, justthat you can't win the next battle. After a long scene you'll be forced to fight Atenacius. He is a head on abook. You can hit him when he comes close to you. It takes less than ten hits to kill the thing. He likes touse blue fire to attack you and it is hard to avoid. At times, he'll fly off in the distance and you'll beforced to do some platform jumping to get at him. When you do the platform jumping, he sometimeslikes to throw a few waves of lightning at you. Just jump over them and go in for the kill. Another longscene awaits you after the battle, then you'll be brought to Carona with Maya.
Threads of Fate Strategy Guide
file:///C|/WINDOWS/Profiles/LordHaart/My Documents/FAQs/Threads of Fate/threads.html (17 of 42) [9/12/2000 9:53:30 PM]

The Town of Carona, Raging Mountain, and Mel's Atelier
Save your game. You can now fight Rod again. If you have the three Legendary Items (sword, helmetand shield) you can now access one of the games secrets (look at the secrets section for moreinformation). When you are ready, go see Klaus. Then talk to Fancy Mel. Your next goal is to see Wylafat Raging Mountain.You have to get to the Wylaf once again. You get there the exactsame way as before, with two exceptions. Right after you destroy theboulder at the fork, you'll have to fight the Trapmaster again. Hehasn't changed his tactics since your earlier battle with him. Thesecond difference is the Mode Master. You fight her right after theroom with the lava pit. She takes the form of Rue to attack. Duringthe battle she takes the forms of any enemies in your inventory, aswell as others that aren't. The secret to winning is to know what Ruecan do. Just use your weapon to wreak havoc on her. After the battlego to mountain summit to talk to Wylaf. He'll agree to help you.Back at Carona, go to the hotel and the tavern to watch the events with Maya, Mint, Duke and Belle. Youshould also buy the Brave Bracer and Belt at the Item Shop, and use the rest of your cash at Hobbs Shop.Then save your game and get ready for the last level (you might want to finish eating your ten legendarymeals and get more cash to bring your stats up).
Chapter 4: Conclusion
Valen's Tower
Enemies: Behemoth, Shaolon, Gargoyle, Fire Blob, Bubba, Jinn, Psycho Master, Doll Master, Valen,Valen 2
Watch the nice scene as Rue turns into a dragon and flies to the tower. There he meets the Prima Dolland then enter the first Arena. Go straight up and kill the Behemoth. Continue going straight and step onthe teleporter. Kill the three Gargoyles, then step on the next teleporter. Kill the Behemoth to thenortheast, as well as the Shaolon (use the Gargoyle's Sonic Wave to do so). Go into the next teleporter,then to the southeast. Kill the three Gargoyles, then use the spring. Return to the last teleporter andcontinue to the northeast. Kill the Behemoth and Shaolon, and continue on the path to the next teleporter.Use it. Now go to the north and use the second teleporter (the first is a trap). You'll end up on a new path- one with three platforms moving from side to side. Destroy the lever to the right of the gate and jumpon the platform. Wait until the next one is almost aligned with the one you are on before you jump. Whenon the other side, you'll be able to regenerate some HP until the time runs out. You can't run out of time.Step on the teleporter to go to the second Arena.Head northeast. Kill the Fire Blobs and Shaolons. Use the second teleporter. Kill the Bubba, then step onthe teleporter. Return to the first teleporter. Head west and turn into a Bubba to destroy the block. Use thepad under it. Head to the northeast and use the first pad. Kill the Hellhound and use the teleporting pad.Continue to the northeast and use the next pad. Go east and turn into a Fire Blob or Hellhound to destroythe ice block and use the pad beneath. Go to the lower left and use the teleporter. Now go east and usethe Hellhound's Ice Blow to put out the flames. Use the pad beneath it. You'll be in another platform
Threads of Fate Strategy Guide
file:///C|/WINDOWS/Profiles/LordHaart/My Documents/FAQs/Threads of Fate/threads.html (18 of 42) [9/12/2000 9:53:30 PM]

room. Hit the switch to open the gate, then jump on the platform. Watch out for the second platform -when it flashes flames are about to come out. Watch your timing, and you'll have no problems getting tothe end in time. If you beat the clock you'll get the chance to heal a bit, and depending on how well youdid, a Silver Coin. Step on the pad to go to the third Arena.Head to the lower left, if you need to heal. Otherwise, use the pad in the northeast. Head to the northwestand kill the Jinn (looks like a demon). Use the pad it was guarding. Head to the northeast and kill theJinns. Use the teleporting pad. Go southeast and use the pad. Then head northeast and use the teleporter.Head southeast and use the teleporter. Then head to the second teleporter to the northeast. You'll be at athird platform room. Here some of the platforms spew fire. Avoid them. Getting through them is tricky.If you get to the other side in time, you'll get to use the spring, and also get a Gold Coin! Use the pad togo to the last Arena.Head east and use the teleporter. Head north and kill the Behemoth. Then head all the way south and killthe other Behemoth. Return to the middle teleporter. Go west and use the last teleporter. Go to the southand kill the Behemoth, as well as the Behemoth to the north. Return to the middle teleporter. Return tothe middle teleporter and defeat the Behemoth to get to the last of the platform rooms. Here the platformsmove quickly. This means that you have to time your jumps! Use the three moving platforms and onefire platform to get there faster (using two of each is more dangerous). Getting there on time will healyou and will get you a Platinum Coin! Take the teleporter out of the Arenas.For the first time ever, you find a save point here! Use it and thenhead north. You'll now be in a long circular string of rooms. In eachroom there are four braziers. Head to the left and into the next roomwith the braziers. Change into the Hellhound and use its Ice Blow toextinguish the outer flames, leaving the inner two on fire. Pick up theorb and return to the first room. Now head to the next room on theright. Light the two middle flames with the Hellhound's Flame andreturn with the orb to the first room. Now head two rooms to the left.Turn into a Jinn and use its Tornado to power up the third brazier.Then change into the Hellhound and put out the left fire. Then lightthe second one from the left. Take the orb back to the first room. In the first room, put out the twobraziers, then re-light them to get the fourth orb. Go to the right and use the monsters to heal, then returnto the pad in the first room.When you reappear you'll be face to face with Psycho Master. He erects a ring around the battlefield andif you touch it, you'll take damage from it. Like in the last fight, he is only harmed by attacks to his back.He'll grab you and throw you (sometimes into the barrier), if you approach him from the front. He cannow grab you from anywhere. He also has a puny icicle attack - don't worry about this one! When heuses his icicle or flame wave attack, it is easy to get around him and hit him a few times. Try not to usejump attacks, since they tend to knock him to the ground. After the battle, you'll be transported to theCursed Crossways.
Threads of Fate Strategy Guide
file:///C|/WINDOWS/Profiles/LordHaart/My Documents/FAQs/Threads of Fate/threads.html (19 of 42) [9/12/2000 9:53:30 PM]

There are seven teleporters here. The ones in the four corners bringyou to enemy-filled rooms. The one to the left will bring you to aChimera. The one to the north brings you to a Nightmare. The one tothe east brings you to a Skull Beast. Kill the three as you did earlier.Use the save point after the three battles. Use the spring to the southto heal. You'll also be transported to the battle with Doll Master!Doll Master is a tough boss. Not only can he summon bats and strikeat you for enormous damage, but he is also extremely agile and fast.Watch out for his grasp attacks - he likes throwing you, or jugglingyou in the air. Near the end of the fight he'll juggle you continuously- just try to strike at him whenever you get dropped. Try to hit him multiple times in the back to beat himthe quickest. Just don't attack him from the front, unless it is a jumping attack! Rue then walks into theportal and views the Dewprism for the first time. And meets Valen. Claire gets resurrected and Valentakes the body for his own. He summons Morning Dew to protect him and Evening Dew to attack forhim!This is one tough battle. Valen floats above the battlefield. Runaround the circle to find where he is. Evening Dew runs around andheals him when necessary. Four or five strikes can kill Evening Dew,so be prepared to kill it when it reappears, then go after Valen.Evening Dew skips sometimes, causing you damage, if you are onthe ground when he hits. He also grows a razor blade and startsspinning around the screen really fast, bowling you over, if youhappen to get hit. Seven or eight blows to Claire (without them beinghealed) should be enough to win this fight.
Threads of Fate Strategy Guide
file:///C|/WINDOWS/Profiles/LordHaart/My Documents/FAQs/Threads of Fate/threads.html (20 of 42) [9/12/2000 9:53:30 PM]

Valen tries to take Rue's body, but Doll Master has other plans... Then he merges with the Dewprism.Valen in his final form transforms into other forms (gotta love that wording!). In his walking form, he isinvulnerable. He likes to jump. Another of his forms (wide wingspan) likes to grab you and drops you tothe ground. Another of his forms (low flying - very compact) likes to pull you in with a vacuum andnibbles on you. His final form is also a flying one. This is the only form of his that you can harm. You'llknow that it is the one, if the screen rotates behind Rue. At this point just charge and wail on Valen!Three or four strikes should be all you need to destroy this guy! You deal over 100 damage per stroke!You can block some of his attacks with the Triangle button. Sometimes, potions fall from the sky to helpyou defeat Valen. Also, run in circles to avoid the majority of his attacks. Enjoy the ending!
Epilogue: ReunionSave your game. Go talk to Duke and Belle in the tavern. Talk to Maya in the hotel. Talk to Rod. Go toKlaus' house. Leave and talk to Mint. Go back into Klaus' house and you'll be sent away. Reenter andyou'll see... Claire! Enjoy the show!After the credits roll, you'll be prompted to make an end save, if you haven't already played with Mint. Inorder to get the full ending of the game, you must then use this file to start Mint's quest. After havingbeaten both quests, you'll see a continuation of the endings and you'll be prompted to start a new one -with your old stats!And once again, congratulations!
The Spunky Girl
Prologue - Cast OutAt the start of the game, Mint is cast out of her castle. Why? She isjust not good enough to become a ruler of a county! She is threatenedby her sister (to eat nothing but pumpkins!) and runs away. She vowsto return with a 'relic' more powerful than the Book of Cosmos andbeat her sister up with it. After that it's world domination that shewants!
The Town of Carona
Coins:1 Bronze Coin - Near the exit1 Silver Coin - Grassy beach1 Silver Coin - Near the Tavern
Her search for the 'relic' leads her to the town of Carona. She meets Blood and Smokey upon her arrival.She should also talk to everybody and save her game at the inn. Go to the tavern (through the dark alley)and get a free Root Beer to get some MP. When ready, she should head off to Carona Forest.
Threads of Fate Strategy Guide
file:///C|/WINDOWS/Profiles/LordHaart/My Documents/FAQs/Threads of Fate/threads.html (21 of 42) [9/12/2000 9:53:30 PM]
Carona Forest
Enemies: Pollywog, Mandola, Saber Tiger. Stinger, Gargoyle, Blood and Smokey, NightmareGo right and learn how to jump. Then they'll teach you how to fight. You can also fill up your MP bykilling monsters! Continuing to the right, you'll be taught how to use magic. Follow the instructions andkill the pair of Pollywogs. Open the Chest to get three Bronze Coins. Head right.Kill the Pollywog and head right. You'll be attacked by a Saber Tiger. The Tiger is much harder to kill,but shouldn't be too difficult. You better get used to fighting here, since if you tarry, the monstersrespawn and attack you! Take your time and try out your spells. Have fun and refill your HP and MP bykilling enemies. Head right when done.You'll see Elena in the clutches of Smokey and Blood. Mint uses herjump kicks on them and Elena gets away. They'll get pissed, and thetwo of them will attack you. Once the battle starts, use your spells, orjust attack them. It is a very easy battle. Elena leads you off thescreen. She wants you to help her find her parents.Follow her to see her parents (if you beat her, she'll give you a SilverCoin). They introduce themselves as Klaus and Mira. Klaus is alsolooking for the 'relic'. You also meet your rival, Rue. Mint jumpsdown the cliff.You end up on a ledge along the cliff. You have to try to navigate thenarrow ledges to get to the bottom. Kill the Stingers and Madoras on your way down. Jump into theforest when you get to the bottom.Read the plaque. Kill the Gargoyles and go to the spring to heal yourlife. Climb the stairs to find the Atelier. You'll be attacked by itsguardian, the Nightmare, when you approach the door. TheNightmare is a purple horse that enjoys running you down. He alsojumps into the air and creates a shockwave when he hits the ground.Sometimes, he'll launch you into the air, dealing ten or more damageto you! Watch out for it! Run around the Atelier and wait for thething to jump out at you. When it lands, turn around and use yourCutter spell two or three times - then get ready to run again!It doesn'ttake many hits to kill the Nightmare. Enter the Atelier.Go to the second floor and through the door there. Open the chest to get a Moon Stone. You'll find asecond chest on the second floor. Inside there is a Silver Coin. Return to the first floor to find a thirdchest. You can get a second Moon Stone. Then examine the vault. Klaus will come and open it for you.Mint'll be forced to help Klaus carry the books to Carona.
Threads of Fate Strategy Guide
file:///C|/WINDOWS/Profiles/LordHaart/My Documents/FAQs/Threads of Fate/threads.html (22 of 42) [9/12/2000 9:53:30 PM]

Chapter 1: The Cube
The Town of Carona and the Carona Forest
Coins:1 Silver Coin - Near the docks
Sell your Monster Coins at either Hobbs' or Tonio's Shop, as well as your two Moon Stones. Upgradeyour equipment as well (If you buy both the Bronze Belt and Bracers, the Silver ones will reduce inprice!). Then head to Klaus' place and talk to him to get the key to the Underground Ruins. You'll alsoget Red Magic. Head to the Inn and save your game.Go to the Hotel and pay to stay there. Search the trunk to get a Dream Stone. Take a nap. Mint'll have adream in which she sees an Ootang jump into a tree trunk in the Carona Forest. Head there now. Jumpdown the hole in the stump. Go to the right until you find a small stump on the ground. Use Droplets onit to make it grow. Jump on it and then use it to get to the chest to the left. Open it to get the Last Hero.Head right and out of the cave. Head right when outside, until you end up where you last found Klausand Mira. Talk to the plant there to get back to town. Go give the Last Hero to Rod at the grassy area.He'll raise your strength by four!Now you are ready to leave town and go to the Underground Ruins. (Note: you can fight Rod at thegrassy beach now, if you want to. Use Red Magic to kill him.)
The Underground Ruins
Enemies: King Ant, Gudon, Skull Beast, Duke
As soon as you get to the entrance, you'll come face to face with Rue. Enter the ruins. There are fourfloors in the ruins, and the first is a veritable maze. The only way through the maze is to follow the leftwall until you find Rue. Watch out for the Gudons and the King Ants. Use Blue Magic on the enemieshere - two blows kill anything. It may take a while, but it is the only way for me to explain it. Continuefollowing the left wall until you come across a pair of waterfalls. Go right and kill the Pollywog.Continue right. Wander around in these caverns and go into the right passages until you find a NightStone and a Moon Stone. Once you have the two stones, you'll want to start exploring the left branchesuntil you find an area with a single waterfall. Go left here and jump into the hole in the ground.You'll fight the same enemies on the second floor (as well as the third floor!). There are eight things tocollect on this floor - six coins, Super Magic and a bottle of Rare Wine (the latter one is extremelyvaluable!). In this area there are several passages filled with some harmful liquid on the ground. To avoidit, you have to jump from platform to platform to get across. It is very easy to ignore the Gudons on theplatforms. At the end of the platforms there is always a King Ant waiting for you. Just pay attention tothem and you won't have a problem surviving this floor. Well, after going through the first such passage,you'll come to a junction. Go up and get the first coin. Return to the junction and go left. Use theplatforms to get across again, go into the north door and get the coin. Go right at the last junction and usethe platforms to get across again. Go up and get the third coin. Head left at the last junction and use theplatforms again. Go into the top door to get the fourth coin. Go right at the junction and you'll get toanother junction. Head up to get the fifth coin. The sixth coin is to the right. To get it, you have to meltthe ice block. Use the Fire Magic spell Burner to melt the ice. The ice block grows, so you have to use a
Threads of Fate Strategy Guide
file:///C|/WINDOWS/Profiles/LordHaart/My Documents/FAQs/Threads of Fate/threads.html (23 of 42) [9/12/2000 9:53:30 PM]

steady stream of fire to melt them. Just hold in the triangle button until it melts. Pick up the coin. To theright there are two more blocks of ice. Try to melt them. The Rare Wine and Super Magic is behindthem. If you can't melt them, it means that you need more MP. Go back to the last King Ant and attack itto raise your MP. Then return to the blocks and use all your MP on them. Repeat this until you haveabout 110 MP, destroyed all three blocks and have the Rare Wine and Super Magic. Return to the firstroom you were in on this floor and you'll see that the six coins are now platforms. Jump on them fromthe right to the left without falling down to make them into a stairway. Climb the stairs and jump downthe hole.You'll meet up with Rue on the third floor. He is standing in front ofa big boulder. Talk to him until the boulder starts rolling down theincline. Run away from it as fast as you can, but beware the fallingblocks. Try to stay on the left side so that you can jump into the tinyalcove at the end! The boulder takes out the wall, making you a newpassage. Go back to where Rue fell and talk to him to get a BronzeCoin. There is a recovery spring where the boulder started. Go in thedoor near to where the boulder crashed. Jump onto any of theplatforms and ride it to the other end and jump onto the ledge withthe chest. Open it to get the Legendary Sword (do not sell this item).Now you have to time your jumps to jump onto the flashing platforms in order (the target one is alwaysflashing). You'll be brought to the fourth floor when this is done.Jump from platform to platform and go right. Here you'll fight theSkull Beast. It jumps from platform to platform and breaths fire onyou. To kill him, follow him around and strike at him with your newNapalm (Super Fire magic) when he flashes white. Sometimes you'llhit him two or three times with it!. Continue to the right to findElroy's Atelier. Step on the little flashing things to get brought up tothe Atelier. Inside there are three doors you can enter. You can find 1Gold Coin, 4 Bronze Coins, a Tiara, a Cube and a HP recoverymachine here. Pick them all up and then return to the platform thatbrought you up to the Atelier. You'll meet Duke and Belle, a pair ofmiscreants looking for the 'relic'. You'll have to fight Belle here. She isn't too hard to beat. Watch out forher spells - she summons a trio of energy balls to surround her and then sends them after you! Hit herwith any spells to send her to her knees - spells like Napalm. After the battle Belle steals your Tiara andthey run away. Then follow them out of the room and you'll meet the Skull Beast again! This time youcan't kill it - just run to the left (after hitting it once) and get on the platform.And he follows you! You'll have to run up the spiral staircase and avoid bouncing spiked balls to get tothe top. Stay on the inner track to avoid the balls and keep up your speed. If the beast catches up, you'llbe brought back to the bottom! So don't lose. At the top, the Skull Beast takes a deadly plunge after Ruesaves you, and you'll head back to Carona when you notice that Duke and Belle are gone for good.
Threads of Fate Strategy Guide
file:///C|/WINDOWS/Profiles/LordHaart/My Documents/FAQs/Threads of Fate/threads.html (24 of 42) [9/12/2000 9:53:30 PM]

The Town of Carona
Coins:1 Bronze Coin - Near the church stairs
Give Hobbs the Rare Wine and talk to Klaus about the Cube. Save your game and get ready to leavetown again. Head to the Lakeside to see a scene in which Mint curses her sister. Then head back to theUnderground Ruins and go back to the spiral staircase and search the Skull Beast's body to find PowerMagic! Return to town and save your game.
Mel's Atelier
Enemies: Fungie, Cockadoo, Imp, Starlight Duke
Go to Mel's Atelier. Head right and you'll notice the drastic change in landscape. Head further to the rightand jump onto the star lift. Knock on the door and you'll be told that Fancy Mel is not home and that youshould play while you wait. You can save your game at the bird and play games with the others.Big Swings: The object here is to run from the left to the right in as little time as possible. It isn't toohard to do, if you are a little patient. The only tricky part is jumping from a swing, landing on a blockthat will sink with you on it and waiting for the next swing! Just watch out for the Imps - they like to firestars at you that can knock you off the ledges! You don't really need to kill any of the enemies and you'llget a better time if you don't. All your leftover time will be given to you for a bonus game - ball catching.Avoid the black balls and collect the colored ones. Get over 500 points to get a Silver Coin!Trumpets: Here you have to worry about the trumpet-playing Fungies. Walking into the sound waveswill make you fall off. The tick is to run by them when they have stopped playing. Watch out for thesee-saws as well. The first one is nothing, but the rest have to be used. The second one can be set bystepping on the right side - it'll bring you to the right. You have to jump on the third's right side, and youhave to alternate the sides that you jump on the fourth to get across. Jump on the star at the end. Thistime you'll have to jump on blocks and make the trumpets blare. You do this to scare the Cockadoos. Themore you scare, the better your score. Just make sure that you get the right timing, or you'll lose rightaway.Giant Balls: This one is less tricky than the rest. Once again, youhave to go from left to right. The only tricky part is the second ball.Do not kill the Fungie on it, or the ball with explode. Stay on it untilit gets to the far right - then jump off. The rest of the way is easy!Your mini-game this time is like whack-a-mole. Just hit the Fungieswhen they are above the ground to get points. If you hit them whilethey are hiding, you'll lose points. Your biggest enemy here is yourcharacter's knack for hitting anything close to him, even if he isfacing another direction!With all three games done head into the house. You'll meet FancyMel. She'll tell you to find her Poppul Purrel, and that she'll examine the Cube while you are away.Leave the house and head back to town.
Threads of Fate Strategy Guide
file:///C|/WINDOWS/Profiles/LordHaart/My Documents/FAQs/Threads of Fate/threads.html (25 of 42) [9/12/2000 9:53:30 PM]

The Town of Carona and the Carona Forest
Coins:1 Bronze Coin - Near the docks (after the battle with Smokey and Blood)1 Gold Coin - Near the docks (after the battle with Smokey and Blood)
Save your game at the Inn. Now return to where you first fought thepair of bandits (in the Carona Forest) to see them again. This timethey are picking on the Poppul Purrel. Use the same tactics as beforeto beat them. This is one easy fight! After you have saved him, headback to town. Talk to Rod to learn of his motives. Get the two coinsfrom the docks and head to the Inn. Go to your room to see Rue'sdream of Claire. Head back to see Mel to get the Cube back, andMel's Report. On your way you will see a star with a face. Talk to itand it reveals itself as Starlight Duke and fights you. The star is aneasy opponent. It has three attacks - he throws himself at you, he fallsto his back and spins about, or he does many cartwheels and bounces off the walls. After each attack (andsometimes while walking) he'll fall over and be stunned. That is when you hit him with magic (the Whitemagic spell Spread works wonders), otherwise he is invincible. Once you knock him down to zero, he'lljump into the air and use his shooting star attack - it deals around twenty damage if he hits you, so stayaway from him! You'll be brought back to town after the battle.When all is done head back to town and talk to Klaus. You'll learn of the Prima Doll from Mint and youare given a list of things to find. Head to the Item Shop and buy a pair of Gold Bracers and a Gold Belt.Save your game at the Inn. Go to the gate and Mira will tell you that the Gamul Forest is too far to walk.She suggests that you talk to Rod about the transportation. Go talk to him and he'll agree to help, but onlyif you beat him in combat (he helps you even if you lose). He'll attack you with his Golden Gale. Use theIcicle spell continuously to kill him the quickest. After the battle, go to the inn and save your game. Inthe morning talk to Rod, and away you'll go!
Chapter 2: The Prima Doll
The Gamul Forest
Enemies: Gamulian, Ootang, Wabbit, Belle, Cloud Whale
When Mint gets to the atelier, she finds it destroyed. You can use thepurple urn to heal her MP. Then read the book on the ground todiscover the location oif the Earrings. Unfortunately, they are in thebody of the atelier's guardian! Look at the windmill at the top of thescreen. Then walk around a bit until Belle attacks! This time shecomes astride her Hexagon. Don't get close to it, because it will grabMint and squish her. Belle uses Fire Magic every now and again.When she does, platforms appear in the air. Jump onto them and thengive Belle a nice swift kick to the head. It takes only three of fourkicks to knock her down. Talk to Belle after the fight to get Green
Threads of Fate Strategy Guide
file:///C|/WINDOWS/Profiles/LordHaart/My Documents/FAQs/Threads of Fate/threads.html (26 of 42) [9/12/2000 9:53:30 PM]
Magic. Heal you magic, and use the Typhoon spell to make the windmill spin and drop a lift.You'll end up in the treetops. The Gamulians won't attack you until you attack them first. I suggest youattack them, since it is a great way to get gold! In any case, you want to follow the path to the right anduse your Typhoon spell on the windmill to lower a second lift. Take the lift up.Do not hit the lever in the next area - instead, jump onto the platform and ride it until you go down afloor. Then walk past the Gamulians and use Typhoon on the Windmill to make the platform to the leftmove. Jump on it and then jump to the left. Continue to the left until you get to a lever. Hit it so it pointsleft and return to the platform. Go up a level. You'll end up back at the start. Head right and use thewindmill again. Take the platform up. Hit the switch so it points to the left. Step on the cart. You'll betaken to an area with two levers. Hit the left one so it pointd to the right. Use the platform to get back tothe beginning. Go back to the windmill and use it. Take the platform up. Step on the cart. You'll go downa level. Head right and use Typhoon on both windmills to make both plstforms move. Then head rightand hit the lever. Then fall down to the right and head right (leave the lever as it is). Use the platform toget up again. Hit the lever so that it points to the right. Jump onto the cart and it'll take you to a Broochand another level. Head right here. You'll meet up with Belle and take a great plunge. You'll end up on araft. Belle gets swallowed by the Clous Whale and the battle begins!The Cloud Whale flies above the battlefield, drawing waves of waterafter him. These waves can push you into the water. Avoid them byjumping over them. Use the Gamulians that fall to your advantage -use them to replenish lost HP and MP. The Cloud Whale is onlyvulnerable when it opens its mouth to suck you in and spit you out.When its mouth opens, use a spell like Wave (Green Magic) to hit itrepeatably in the mouth. It shouldn't take more than a pair of bursts tokill the thing. You'll get the Earrings for your victory. Back in townyou'll meet Trapmaster. He left a surprise for Mint at Klaus' place.Save your game.
The Town of Carona
Rod has made a new weapon, so you can challenge him again. Once you are ready to, go talk to Klaus.The Prima Doll will be revived, but it is still apparent that you are missing a part. The last part is theamulet, which you have to make. The ingredients are held by a dragon named Wylaf. You have a choiceto make now - you can get give the Brooch to Annette (to reduce the prices at the tavern), or you canwait until later and sell it for 6,000 gil. Buy the Platinum Belt and Bracer and save your game. Now it istime to head off to the Raging Mountain.
The Raging Mountain
Enemies: Ootang, Fire Blob, Bubba, Black Pollywogs, Duke and Belle, Wylaf
Go to the right and kill the Ootangs that fall from above. You'll also have to deal with some Fire Blobs asyou make your way to the right. You should watch out for the blobs' Sparks attack - they fire off a trio offlame sparks at you. At the end, there is a small ledge that falls down. You'll hear a loud rumbling noise.Jump into the hole in the ground and fall to the left to get to a small platform with a large boulder on it.There is also a chest with Black Magic inside. Use Graviton to destroy the boulder. Head up the inclineand return to the right. Exit on the right side of the screen. Go up at the crossroads and use Gravitron to
Threads of Fate Strategy Guide
file:///C|/WINDOWS/Profiles/LordHaart/My Documents/FAQs/Threads of Fate/threads.html (27 of 42) [9/12/2000 9:53:30 PM]

destroy the rock. You'll get three Silver Coins. Now go to the bottom path and destroy the boulder.Continue right and leave the area.The next area comprises of an uncomplicated leap from platform to platform on your way to the right.Some platforms move and some try to tip over. There is also a healing spring in the top area of this room.Exit at the right once done. The next area is very windy. You'll have to watch out for the dust clouds.When it gets dusty don't jump, or you'll end up flying backwards! I tell you this, since you have to dosome platform jumping while on your way! Continue going to the right and you'll meet Duke and Belle.And you'll have to fight them.This fight is a bit more difficult than the last one! You have to fight both of them at once, as well as theHexagon. Concentrate on getting rid of Duke first - you'll get some room to maneuver by doing this. Justkick him to kill them. He attacks with his fists. Once he is out of the way, you have to get Belle off of theHexagon. The Hexagon attacks by trying to grab you and launching you into the air. It is very hard toavoid this. Once the Hexagon is on the ledge, you should jump towards Belle and strike her with yourweapon. Do this about four times to knock her off. Watch out though - every time that you strike her, theHexagon will launch you into the air! Believe it or not, Belle does more damage than the Hexagon does!She uses fire and acid magic on you, so watch out! Use the Explosion spell to knock her out.Head to the right after the battle and kill the Bubba. Recover at thespring, then head up the incline to the left. Use the platforms to goright and open the chest to get the Legendary Shield (don't sellthis!). Go back to the left and up the second incline. Continueclimbing the mountain until you get to some Black Pollywogs. Killthem and climb the rest of the way up. You'll meet Wylaf whochallenges you to a dual, girl to dragon. Wylaf has three attacks. Thefirst is his plunge attack - he flies into the air and then dives down atyou. His second is a wing buffet that blows you off your feet - justavoid the dust clouds to avoid this attack. His third attack is a firebreath attack that makes a cross-shaped flame appear on the ground. Be warned - the initial point ofimpact will be aflame for the rest of the battle! It is time to attack him when he hits the ground and comesat you. Strike him two or three times with Gravitron and then run away from him. Once he says"Enough!", don't strike him anymore! If you do, you will have to start the battle from the beginning! He'llgive you the Phantomite for your victory!
The Town of Carona, the Carona Forest, and Mel's Atelier
Coins:1 Silver Coin - To the left of the church1 Bronze Coin - In the passage to the docks1 Silver Coin - In the dark alley
Upon returning to town, you will be challenged by Blood andSmokey. Save your game, then head to Carona Forest and to whereyou fought them the last time. This time you'll have to fight theirboss, the Trapmaster. You get transported to his very own battlefield.There are nine blocks here and he jumps from one to another. Whenone block starts to fill up with a shadow, it means that a spiked ball isabout to fall. You should also stay away from any flashing platforms,
Threads of Fate Strategy Guide
file:///C|/WINDOWS/Profiles/LordHaart/My Documents/FAQs/Threads of Fate/threads.html (28 of 42) [9/12/2000 9:53:30 PM]
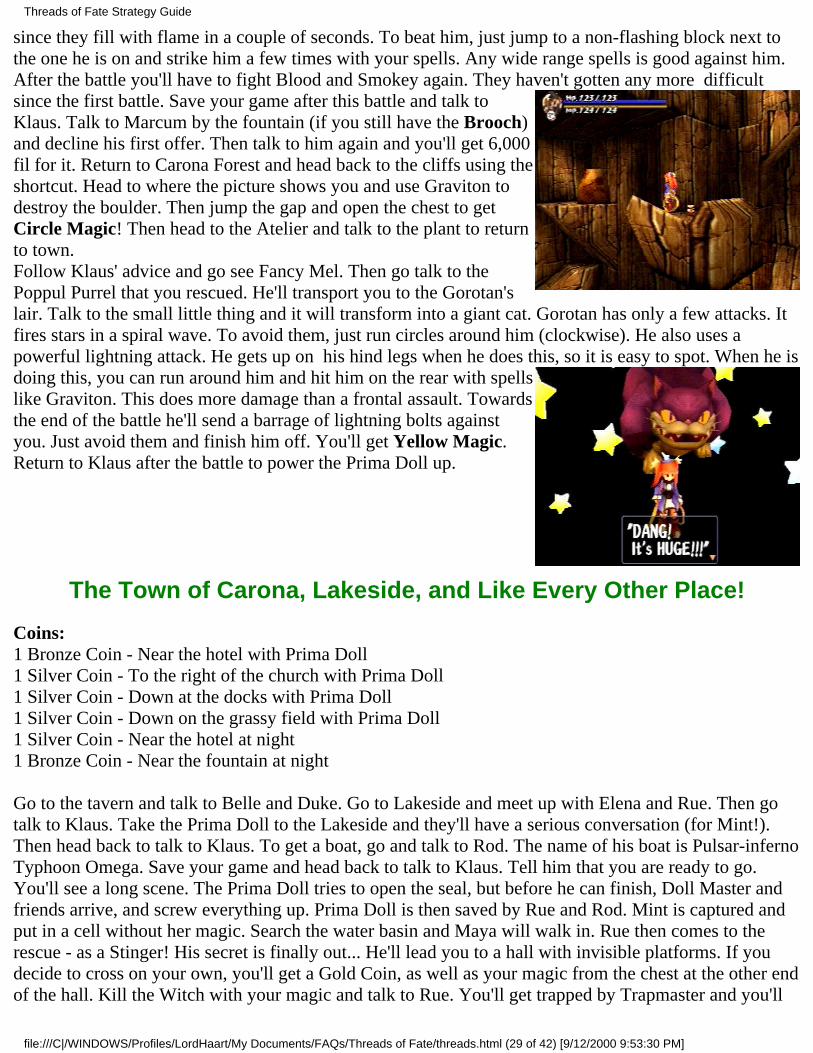
since they fill with flame in a couple of seconds. To beat him, just jump to a non-flashing block next tothe one he is on and strike him a few times with your spells. Any wide range spells is good against him.After the battle you'll have to fight Blood and Smokey again. They haven't gotten any more difficultsince the first battle. Save your game after this battle and talk toKlaus. Talk to Marcum by the fountain (if you still have the Brooch)and decline his first offer. Then talk to him again and you'll get 6,000fil for it. Return to Carona Forest and head back to the cliffs using theshortcut. Head to where the picture shows you and use Graviton todestroy the boulder. Then jump the gap and open the chest to getCircle Magic! Then head to the Atelier and talk to the plant to returnto town.Follow Klaus' advice and go see Fancy Mel. Then go talk to thePoppul Purrel that you rescued. He'll transport you to the Gorotan'slair. Talk to the small little thing and it will transform into a giant cat. Gorotan has only a few attacks. Itfires stars in a spiral wave. To avoid them, just run circles around him (clockwise). He also uses apowerful lightning attack. He gets up on his hind legs when he does this, so it is easy to spot. When he isdoing this, you can run around him and hit him on the rear with spellslike Graviton. This does more damage than a frontal assault. Towardsthe end of the battle he'll send a barrage of lightning bolts againstyou. Just avoid them and finish him off. You'll get Yellow Magic.Return to Klaus after the battle to power the Prima Doll up.
The Town of Carona, Lakeside, and Like Every Other Place!
Coins:1 Bronze Coin - Near the hotel with Prima Doll1 Silver Coin - To the right of the church with Prima Doll1 Silver Coin - Down at the docks with Prima Doll1 Silver Coin - Down on the grassy field with Prima Doll1 Silver Coin - Near the hotel at night1 Bronze Coin - Near the fountain at night
Go to the tavern and talk to Belle and Duke. Go to Lakeside and meet up with Elena and Rue. Then gotalk to Klaus. Take the Prima Doll to the Lakeside and they'll have a serious conversation (for Mint!).Then head back to talk to Klaus. To get a boat, go and talk to Rod. The name of his boat is Pulsar-infernoTyphoon Omega. Save your game and head back to talk to Klaus. Tell him that you are ready to go.You'll see a long scene. The Prima Doll tries to open the seal, but before he can finish, Doll Master andfriends arrive, and screw everything up. Prima Doll is then saved by Rue and Rod. Mint is captured andput in a cell without her magic. Search the water basin and Maya will walk in. Rue then comes to therescue - as a Stinger! His secret is finally out... He'll lead you to a hall with invisible platforms. If youdecide to cross on your own, you'll get a Gold Coin, as well as your magic from the chest at the other endof the hall. Kill the Witch with your magic and talk to Rue. You'll get trapped by Trapmaster and you'll
Threads of Fate Strategy Guide
file:///C|/WINDOWS/Profiles/LordHaart/My Documents/FAQs/Threads of Fate/threads.html (29 of 42) [9/12/2000 9:53:30 PM]

be saved by Belle and Duke. In town, visit the tavern, and then rest at the inn (go to your room).Exit the inn and you'll meet Psycho Master. Then Elena runs in andtells you that her mother was captured by a funny doll in the forest.Head to the Carona Forest and go to where you ususaly fight Bloodand Smokey. If you help them kill he Puppets, you'll get a SilverCoin. Continue going to the right and you'll see a battle betweenTrapmaster and Mira. Rue the Specter comes to help you. The threeof you can then leave the forest. When back in town, go buy theMithril Bracer and Belt. You can also challenge Rod's Black Tornadonow. Save your game and go talk to Klaus.Go to the Underground Ruins. Return to the second floor (you haveto return to where you met Rue the first time - follow the left passages. Then exit it and go up to find thehole). The platforms are gone on the second floor. You'll have to get them all back. Do it in the same wayas before, but they'll be guarded by Puppets! Now you can go to the third floor. You'll meet Maya in thespinning platform room. After a brief conversation you'll end up back in Carona.Now it is time to fight Psycho Master! The guy is incredibly strong, and charging him won't do you anygood - he'll just grab you and slam you to the ground. He also has a fire wave attack - he spins beforeusing it. On top of that, he teleports around and you can only hit him on the back. Around seven hits isenough to knock him out. Just use jump kicks to the back of his head to take care of him. After the battleyou get to watch as Prima Doll is taken away. Save your game and go off to Maya's Tower. (Rod has hisfinal weapon at this point)
Chapter 3: What? Two Mayas?
Maya's Tower
Enemies: Wabbit, Pumpkin, Witch, Trapmaster, Maya
The first thing you'll see is the seal getting broken. Then you'll see Valen's Tower. Go into Maya'sTower. Kill the Wabbits and Pumpkins on the stairs as you climb higher. When outside kill the Wabbitsand then the Pumpkins that comes out the door. Get the two Gold Coins from the treasure chest and thengo inside. The next room is annoying. The object is to use the platforms to get to the other side and killthe Witch. The problem is that some of the platforms are trapped and won't support your weight. If youfall to the ground, you'll be forced to fight some Pumpkins. To get across, jump on the first movingplatform and then onto the right platform. The left one is trapped.Then get onto the next platform, then onto the left of the three, andthen onto the final moving one. Then just kill the Witch, get the twoStar Stones from the chest, and recover your HP at the spring. Gothrough the door. Jump onto the platform and let it take you up. Killthe Pumpkins that fall and continue up the stairs when at the top. Killthe Wabbits and the Pumpkins when outside again. Get the two GoldCoins from the chest and go into the door.Another tricky platform room. Jump on the middle platform at thebottom of the screen. Jump to the right one and then kill the Wabbiton the non-moving one (use Graviton). Get on the stationary platform. From there you can do jump
Threads of Fate Strategy Guide
file:///C|/WINDOWS/Profiles/LordHaart/My Documents/FAQs/Threads of Fate/threads.html (30 of 42) [9/12/2000 9:53:30 PM]
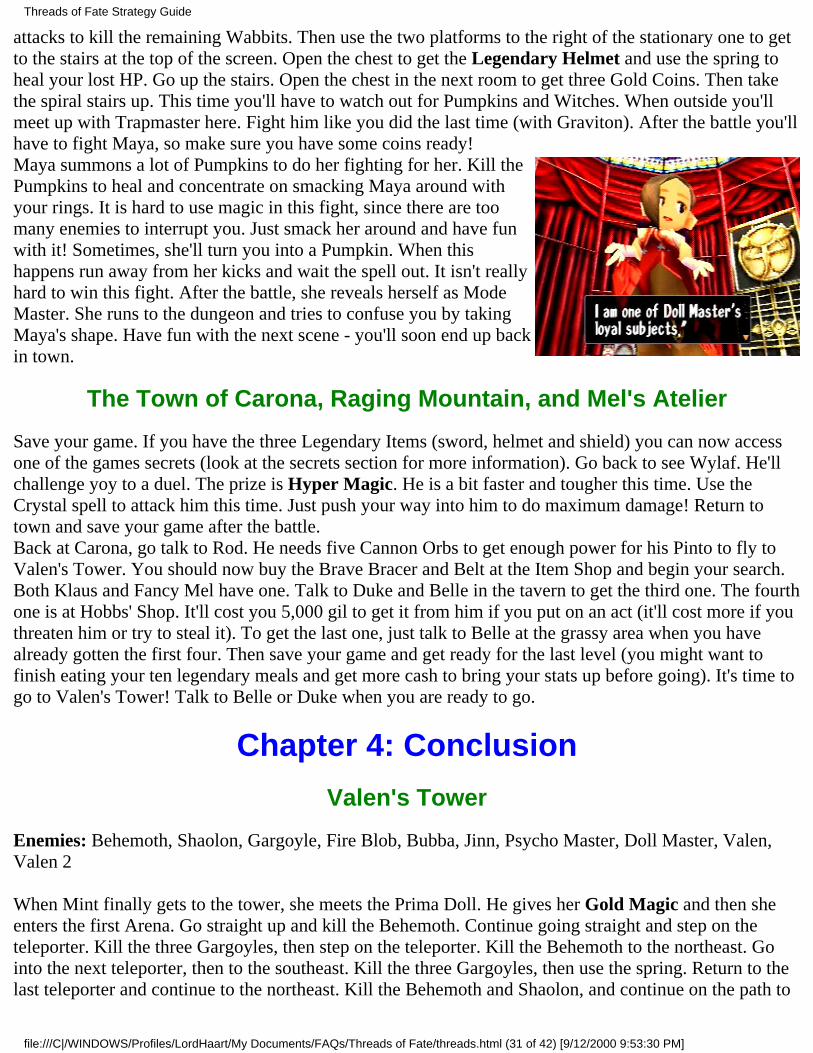
attacks to kill the remaining Wabbits. Then use the two platforms to the right of the stationary one to getto the stairs at the top of the screen. Open the chest to get the Legendary Helmet and use the spring toheal your lost HP. Go up the stairs. Open the chest in the next room to get three Gold Coins. Then takethe spiral stairs up. This time you'll have to watch out for Pumpkins and Witches. When outside you'llmeet up with Trapmaster here. Fight him like you did the last time (with Graviton). After the battle you'llhave to fight Maya, so make sure you have some coins ready!Maya summons a lot of Pumpkins to do her fighting for her. Kill thePumpkins to heal and concentrate on smacking Maya around withyour rings. It is hard to use magic in this fight, since there are toomany enemies to interrupt you. Just smack her around and have funwith it! Sometimes, she'll turn you into a Pumpkin. When thishappens run away from her kicks and wait the spell out. It isn't reallyhard to win this fight. After the battle, she reveals herself as ModeMaster. She runs to the dungeon and tries to confuse you by takingMaya's shape. Have fun with the next scene - you'll soon end up backin town.
The Town of Carona, Raging Mountain, and Mel's Atelier
Save your game. If you have the three Legendary Items (sword, helmet and shield) you can now accessone of the games secrets (look at the secrets section for more information). Go back to see Wylaf. He'llchallenge yoy to a duel. The prize is Hyper Magic. He is a bit faster and tougher this time. Use theCrystal spell to attack him this time. Just push your way into him to do maximum damage! Return totown and save your game after the battle.Back at Carona, go talk to Rod. He needs five Cannon Orbs to get enough power for his Pinto to fly toValen's Tower. You should now buy the Brave Bracer and Belt at the Item Shop and begin your search.Both Klaus and Fancy Mel have one. Talk to Duke and Belle in the tavern to get the third one. The fourthone is at Hobbs' Shop. It'll cost you 5,000 gil to get it from him if you put on an act (it'll cost more if youthreaten him or try to steal it). To get the last one, just talk to Belle at the grassy area when you havealready gotten the first four. Then save your game and get ready for the last level (you might want tofinish eating your ten legendary meals and get more cash to bring your stats up before going). It's time togo to Valen's Tower! Talk to Belle or Duke when you are ready to go.
Chapter 4: Conclusion
Valen's Tower
Enemies: Behemoth, Shaolon, Gargoyle, Fire Blob, Bubba, Jinn, Psycho Master, Doll Master, Valen,Valen 2
When Mint finally gets to the tower, she meets the Prima Doll. He gives her Gold Magic and then sheenters the first Arena. Go straight up and kill the Behemoth. Continue going straight and step on theteleporter. Kill the three Gargoyles, then step on the teleporter. Kill the Behemoth to the northeast. Gointo the next teleporter, then to the southeast. Kill the three Gargoyles, then use the spring. Return to thelast teleporter and continue to the northeast. Kill the Behemoth and Shaolon, and continue on the path to
Threads of Fate Strategy Guide
file:///C|/WINDOWS/Profiles/LordHaart/My Documents/FAQs/Threads of Fate/threads.html (31 of 42) [9/12/2000 9:53:30 PM]

the next teleporter. Use it. Now go to the north and use the second teleporter (the first is a trap). You'llend up on a new path - one with three platforms moving from side to side. Destroy the lever to the rightof the gate and jump on the platform. Wait until the next one is almost aligned with the one you are onbefore you jump. When on the other side, you'll be able to regenerate some HP until the time runs out.You can't run out of time. Step on the teleporter to go to the second Arena.Head northeast. Kill the Fire Blobs and Shaolons. Use the first teleporter. Head west and use Blackmagic to destroy the block. Use the pad under it. Head to the northeast and use the second pad. Go eastand use Red magic to destroy the ice block and use the pad beneath. Go to the lower left and use theteleporter. Now go east and use Blue magic to put out the flames. Use the pad beneath it. You'll be inanother platform room. Hit the switch to open the gate, then jump on the platform. Watch out for thesecond platform - when it flashes flames are about to come out. Watch your timing, and you'll have noproblems getting to the end in time. If you beat the clock you'll get the chance to heal a bit, anddepending on how well you did, a Silver Coin. Step on the pad to go to the third Arena.Head to the lower left, if you need to heal. Otherwise, use the pad in the northeast. Head to the northwestand kill the Jinn (looks like a demon). Use the pad it was guarding. Head to the northeast and kill theJinns. Use the teleporting pad. Go southeast and use the pad. Then head northeast and use the teleporter.Head southeast and use the teleporter. Then head to the second teleporter to the northeast. You'll be at athird platform room. Here some of the platforms spew fire. Avoid them. Getting through them is tricky.If you get to the other side in time, you'll get to use the spring, and also get a Gold Coin! Use the pad togo to the last Arena.Head east and use the teleporter. Head north and kill the Behemoth (the next five Behemoths are harderthan the alst ones). Then head all the way south and kill the other Behemoth. Return to the middleteleporter. Go west and use the last teleporter. Go to the south and kill the Behemoth, as well as theBehemoth to the north. Return to the middle teleporter. Return to the middle teleporter and defeat theBehemoth to get to the last of the platform rooms. Here the platforms move quickly. This means that youhave to time your jumps! Use the three moving platforms and one fire platform to get there faster (usingtwo of each is more dangerous). Getting there on time will heal you and will get you a Platinum Coin!Take the teleporter out of the Arenas.For the first time ever, you find a save point here! Use it and then head north. You'll now be in a longcircular string of rooms. In each room there are four braziers. Head to the left and into the next room withthe braziers. Use Blue magic to extinguish the outer flames, leaving the inner two on fire. Pick up the orband return to the first room. Now head to the next room on the right. Light the two middle flames withRed magic and return with the orb to the first room. Now head two rooms to the left. Use Green magic topower up the third brazier. Then use Blue Magic to put out the left fire. Then light the second one fromthe left. Take the orb back to the first room. In the first room, put out the two braziers, then re-light themto get the fourth orb. Go to the right and use the monsters to heal, then return to the pad in the first room.When you reappear you'll be face to face with Psycho Master. Heerects a ring around the battlefield and if you touch it, you'll takedamage from it. Like in the last fight, he is only harmed by attacks tohis back. He'll grab you and throw you (sometimes into the barrier),if you approach him from the front. He can now grab you fromanywhere. He also has a puny icicle attack - don't worry about thisone! When he uses his icicle or flame wave attack, it is easy to getaround him and hit him a few times (either with your spells orweapons). Try not to use jump attacks, since they tend to knock himto the ground. After the battle, you'll be transported to the Cursed
Threads of Fate Strategy Guide
file:///C|/WINDOWS/Profiles/LordHaart/My Documents/FAQs/Threads of Fate/threads.html (32 of 42) [9/12/2000 9:53:30 PM]
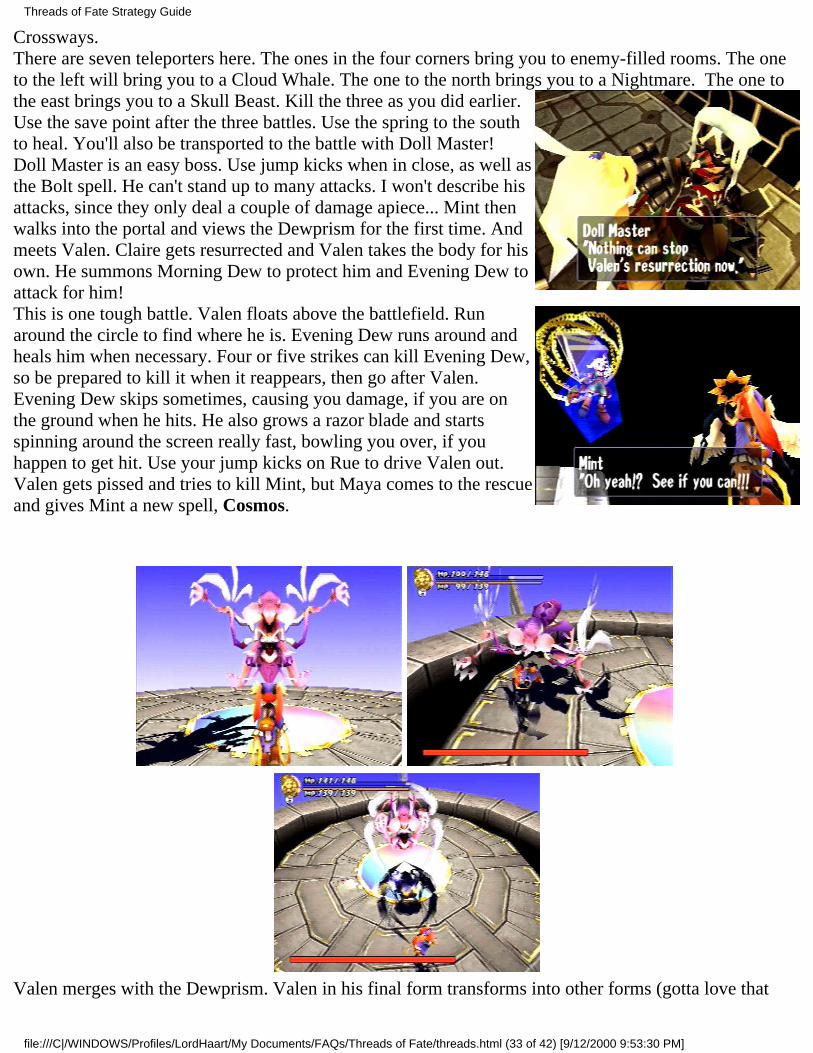
Crossways.There are seven teleporters here. The ones in the four corners bring you to enemy-filled rooms. The oneto the left will bring you to a Cloud Whale. The one to the north brings you to a Nightmare. The one tothe east brings you to a Skull Beast. Kill the three as you did earlier.Use the save point after the three battles. Use the spring to the southto heal. You'll also be transported to the battle with Doll Master!Doll Master is an easy boss. Use jump kicks when in close, as well asthe Bolt spell. He can't stand up to many attacks. I won't describe hisattacks, since they only deal a couple of damage apiece... Mint thenwalks into the portal and views the Dewprism for the first time. Andmeets Valen. Claire gets resurrected and Valen takes the body for hisown. He summons Morning Dew to protect him and Evening Dew toattack for him!This is one tough battle. Valen floats above the battlefield. Runaround the circle to find where he is. Evening Dew runs around andheals him when necessary. Four or five strikes can kill Evening Dew,so be prepared to kill it when it reappears, then go after Valen.Evening Dew skips sometimes, causing you damage, if you are onthe ground when he hits. He also grows a razor blade and startsspinning around the screen really fast, bowling you over, if youhappen to get hit. Use your jump kicks on Rue to drive Valen out.Valen gets pissed and tries to kill Mint, but Maya comes to the rescueand gives Mint a new spell, Cosmos.
Valen merges with the Dewprism. Valen in his final form transforms into other forms (gotta love that
Threads of Fate Strategy Guide
file:///C|/WINDOWS/Profiles/LordHaart/My Documents/FAQs/Threads of Fate/threads.html (33 of 42) [9/12/2000 9:53:30 PM]

wording!). In his walking form, he is invulnerable. He likes to jump. Another of his forms (widewingspan) likes to grab you and drops you to the ground. Another of his forms (low flying - verycompact) likes to pull you in with a vacuum and nibbles on you. His final form is also a flying one. Thisis the only form of his that you can harm. You'll know that it is the one, if the screen rotates behind Mint.At this point just wait for it to attack and press and hold the Triangle button to charge up the Cosmosspell! Let it go after four or five seconds to do major damage to Valen! Three or four strikes should be allyou need to destroy this guy! You deal over 100 damage per casting! Sometimes, potions fall from thesky to help you defeat Valen. Also, run in circles to avoid the majority of his attacks. Enjoy the ending!
Epilogue: ReunionSave your game. Go talk to Duke and Belle in the tavern. Talk to Rod. Talk to Klaus. Go to the church.Go to the hotel and enjoy the show!After the credits roll, you'll be prompted to make an end save, if you haven't already played with Rue. Inorder to get the full ending of the game, you must then use this file to start Rue's quest. After havingbeaten both quests, you'll see a continuation of the endings and you'll be prompted to start a new one -with your old stats!And once again, congratulations!
MonstersThis section is reserved for a discussion of the regular enemies found throughout the game. This listincludes all enemies, but for the bosses, who are discussed in the walkthroughs. Each entry includes anapproximate HP total, how much their coins are worth, and the abilities that they bestow on Rue when hetransforms into them. Furthermore, the list is not alphabetical, instead it is classified by the area in whichyou find them, and then in the order that you fight them. Weaknesses and strong points will be notedwhen necessary. Each enemy is placed in the area where first fought.
Carona Forest and the CliffsThese two areas are populated with low level enemies. These enemies are a great source of income forthose who don't want much of a challenge.
Pollywog
The Pollywog is a weak ball of fluff that flies about the battlefield. They try to take a bite out of yourcharacter. They are easy to kill - they can only withstand a hit at the most!Conferred Abilities: Triangle - Tail Slap, X - BiteOther Stats: 10 HP, worth 10 gil
Threads of Fate Strategy Guide
file:///C|/WINDOWS/Profiles/LordHaart/My Documents/FAQs/Threads of Fate/threads.html (34 of 42) [9/12/2000 9:53:30 PM]
Mandola
Mandola's are vicious plants. They just stand still and don't do anything particularly menacing unless youventure close to them... Their only particular weakness is that they are rooted to the ground!Conferred Abilities: Triangle - Bloom, X - SeedOther Stats: 30 HP, worth 15 gil
Saber Tiger
These cats are really fast! They can avoid your blows with an ease that will shock you! They are fast, butonce again, they shouldn't prove to be too hard for you to kill them. To kill them the fastest, I suggest towatch their movements and strike when they don't expect you to...Conferred Abilities: Triangle - Thrust, X - BiteOther Stats: 20 HP, worth 30 gil
Stinger
These little rat/porcupine things are annoying! If you don't watch out for them, they will get you bysurprise and wear you down really quickly. They are hard to hit due to their small size, and neverunderestimate their strength! The good thing is their really low supply of life - they never take more thana single hit to kill!Conferred Abilities: Triangle + Direction - Rolling Spine, X - SpineOther Stats: 3 HP, worth 20 gil
Gargoyle
These beings are made of solid granite. They are incredibly powerful and can lay you low in a shortamount of time. Use jump attacks for best results when fighting them. Try their Sonic Wave attack whenusing Rue - it is very powerful long-range attack!Conferred Abilities: Triangle - Sonic Wave, X - Kick, O O - Double JumpOther Stats: 30 HP, worth 50 gil
The Underground RuinsThe Underground Ruins are home to only two types of enemies. These are the Gudon and the King Ant.
Gudon
These lizards have powerful flame attacks. They are also strong to such attacks. They are easy to kill,taking only a pair of strikes to lay low.Conferred Abilities: Triangle - Flame, X - Tail SlapOther Stats: 30 HP, worth 40 gil
Threads of Fate Strategy Guide
file:///C|/WINDOWS/Profiles/LordHaart/My Documents/FAQs/Threads of Fate/threads.html (35 of 42) [9/12/2000 9:53:30 PM]

King Ant
These ants have hard carapaces. This means that physical strikes hardly damage them. You are better offusing the Gudon's Flame attack to kill them, or other magic (for Mint). They spew eggs at you thatlaunch you backwards, if they hit you. Just watch out for this attack.Conferred Abilities: Can't play as one.Other Stats: 40 HP, worth 35-45 gil
Mel's AtelierYou fight these weird creatures in the obstacle courses. They all have little to no HP and are easy to kill.
Imp
The Imp simply jumps up and down to block your passage. They shoots stars at you when they land.These stars tend to knock you off the platforms, so try to avoid them when possible.Conferred Abilities: Triangle - Shooting Star, X - StrikeOther Stats: 1 HP, worth 20 gil
Fungie
These little mushrooms can grow and clobber you. They ride on balls sometimes, and they also blow onthe trumpets. They are really annoying!Conferred Abilities: Triangle - Sparkle, X - Head SlamOther Stats: 1 HP, worth 20 gil
Cockadoo
These birds wither stay still, or they fly vertically to black your path. When you're close, they will lungeat you with their beaks and launch you off some platforms.Conferred Abilities: O O - Double Jump, X - PeckOther Stats: 1 HP, worth 20 gil
The Ghost TempleThe new monsters found in the Ghost Temple are the Puppets, Specters, Skeletons and Ootangs.
Puppet
These guards are extremely quick and difficult to combat when they come in large numbers. A couple ofhits will do them in. They seem to have a fear of fire and water.Conferred Abilities: Triangle - Combo, X - Strike
Threads of Fate Strategy Guide
file:///C|/WINDOWS/Profiles/LordHaart/My Documents/FAQs/Threads of Fate/threads.html (36 of 42) [9/12/2000 9:53:30 PM]

Other Stats: 30 HP, worth 20 gil
Specter
These ghosts attack you with ice and water magic. If you are using Rue, watch out - some forms of histake a lot of damage from such attacks. Gudons are a good example. Fire magic works well on them.Conferred Abilities: Triangle - Water, X - Ice BlowOther Stats: 40 HP, worth 70 gil
Skeleton
These bone warriors are extremely easy to kill. Try fire magic on them.Conferred Abilities: Triangle - Fall Apart, X - StrikeOther Stats: 36 HP, worth 50 gil
Ootang
I think these are monkeys, or something similar. They jump really high!Conferred Abilities: Triangle - Scratch, X - StoneOther Stats: 3 HP, worth 40 gil
The Gamul ForestThere is only one new monster here - the Gamulian.
Gamulian
The Gamulians don't attack you unless you attack them. But when pissed off, they are fierce defendersand will swarm you with sheer numbers. This makes them wonderful candidates to bring up your gilsupply!Conferred Abilities: Can't use.Other Stats: 25 HP, worth 20 gil
Raging MountainThe enemies here are a bit more powerful than usual, even the Pollywogs. You should watch your life alittle more carefully while here!
Threads of Fate Strategy Guide
file:///C|/WINDOWS/Profiles/LordHaart/My Documents/FAQs/Threads of Fate/threads.html (37 of 42) [9/12/2000 9:53:30 PM]

Fire Blob
These weird things spit sparks at you, but otherwise they are harmless. Just don't use fire magic on them!Conferred Abilities: Triangle - Sparks, X - Head ButtOther Stats: 32 HP, worth 50 gil
Bubba
These bruisers can really smack you around. Watch out for their tremendous strength and their highamount of HP! Use jump attacks to take them out the quickest while staying away from them!Conferred Abilities: Triangle - Hammer, Hold Triangle - Final Strike, X - Head ButtOther Stats: 62 HP, worth 90 gil
Black Pollywog
A bit stronger than the regular Pollywog, but not remarkably so.Conferred Abilities: Counts as a regular Pollywog.Other Stats: 22 HP, worth 10 gil
Maya's TowerThe enemies in this tower are easier than they have the right to be.
Wabbit
These pesky rabbits bat at you with their ears! Plus they are really fast, so you have to strike quickly tohit them!Conferred Abilities: Triangle - Duck, X - Wing Slap, O O - Double JumpOther Stats: 35 HP, worth 100 gil
Pumpkin
These little bastards swarm you and when that doesn't work, they commit suicide and blow up! Oh I hatethem! Even when playing one, the explosion ability is available, but watch out! It damages you too!Conferred Abilities: Hold Triangle - Blow Up, X - CollideOther Stats: 25 HP, worth 20 gil
Witch
These enemies are stationary - even if Rue becomes one. They swivel on a cannon that fires pumpkins -yes you heard right. Just because they can't move doesn't make them easy! The pumpkins usually dodouble digit damage!Conferred Abilities: Triangle - Spin, X - Pumpkin CannonOther Stats: 10 HP, worth 150 gil
Threads of Fate Strategy Guide
file:///C|/WINDOWS/Profiles/LordHaart/My Documents/FAQs/Threads of Fate/threads.html (38 of 42) [9/12/2000 9:53:30 PM]

Valen's FortressThe monsters here a grade above those found elsewhere, There is a raw power about them - especiallythe Behemoth!
Behemoth
These massive beasts are powerful. They strike you for massive damage, plus they can take a lot ofpunishment. Thank the heavens that you only fight them one at a time!Conferred Abilities: Can't play as a Behemoth.Other Stats: 65 HP, worth 250 gil
Shaolon
Shaolons are velociraptor-like creatures. They can be difficult to kill in larger groups, but alone theyshouldn't be too much of a problem.Conferred Abilities: Triangle - Lightning, X - ThrustOther Stats: 40 HP, worth 150 gil
Hellhound
These two-headed dogs have both ice and fire attacks. Just stay as Rue to kill them, so that you don't risktaking on a weakness to any of their attacks.Conferred Abilities: Triangle - Ice Blow, X - FlameOther Stats: 45 HP, worth 150 gil
Jinn
These are large demons. They can wear you down quickly in close damage since they are faster than bothRue and Mint. Attack using magic or jump attacks, or come in with combos (sometimes you'll be carriedforward when doing combos!). They have some wind magic, so watch out!Conferred Abilities: Triangle - Tornado, X - Tail Whirl, O O - Double JumpOther Stats: 50 HP, worth 200 gil
Threads of Fate Strategy Guide
file:///C|/WINDOWS/Profiles/LordHaart/My Documents/FAQs/Threads of Fate/threads.html (39 of 42) [9/12/2000 9:53:30 PM]

CombatBoth Rue and Mint attack differently. They both have their own unique attacks that I will discuss here.The battles themselves play the same, and they move the same too. In order to get stronger, each of thecharacters have to survive a lot of battles. Sometimes enemies drop blue vials that heal your HP andsometimes they drop red vials that heal your MP. Sometimes, if you are lucky, your HP will bepermanently raised by one. Raising your HP is essential to the success of your quest. That means you'llhave to fight a lot to raise your HP. Your MP can also be raised in this manner, but there is onedifference. Besides from boss battles, your MP can only raise itself by a point when you magic. Thatmeans that you have to use MP to gain MP. Easy enough?Later in the game you may want to increase your stats at Hobbs' Shop in Carona. This is in fact a wisething to do. Not only can you raise your HP and MP, but you can also raise your defense and strength!Raising your defense is probably your best plan, since it'll save you the most often!If you manage to die in battle or in any of the events (like the rolling boulder), you'll be prompted to usea Coin to continue. Each Coin has a different effect. Each Coin heals all your HP. A Bronze one heals aquarter of your MP, a Silver one heals half your MP, and the other two types heal all your MP. On top ofthat, a Platinum Coin also brings your strength and defense up by one.
RueRue attacks with a large axe-like weapon that he calls the Arctic Cleaver, or something like that. Bypressing the Triangle button he swings the thing straight out. By holding the Square button he can accesshis monster list and change into one by letting go of it. By tapping the X button once, twice, or thrice, hedoes that many blows with his weapon. He can do an airborne attack by jumping with the O button andpressing the X button while in the air. These are his basic attacks.In the form of a monster, Rue gains two or three abilities. These he uses as indicated on the monstertransformation screen. I have reprinted those and put them into the Monsters section of the guide. Youcan't turn into any of the boss monsters, or into several normal ones. Note: Usually, only the Triangleabilities cost MP to use. The others are free.
MintMint attacks with a pair of golden rings. She jumps with the O button and can do a devastating jump kickby pressing the X button while off the ground. She can also strike an opponent up to three times in rapidsuccession by tapping the X button that many times in a row. She casts spells a bit differently than Ruethough. She can only have one spell equipped at a time and she can pick it by pressing the Square buttonand choosing a spell type. She then has to choose which effect she wants to use by pressing up or down.Each spell type has different characteristics that you'll have to learn over the course of the game. She canthen cast the spell by pressing the Triangle button. A list of her spells is available under her name in thecharacters portion of the guide.
Threads of Fate Strategy Guide
file:///C|/WINDOWS/Profiles/LordHaart/My Documents/FAQs/Threads of Fate/threads.html (40 of 42) [9/12/2000 9:53:30 PM]
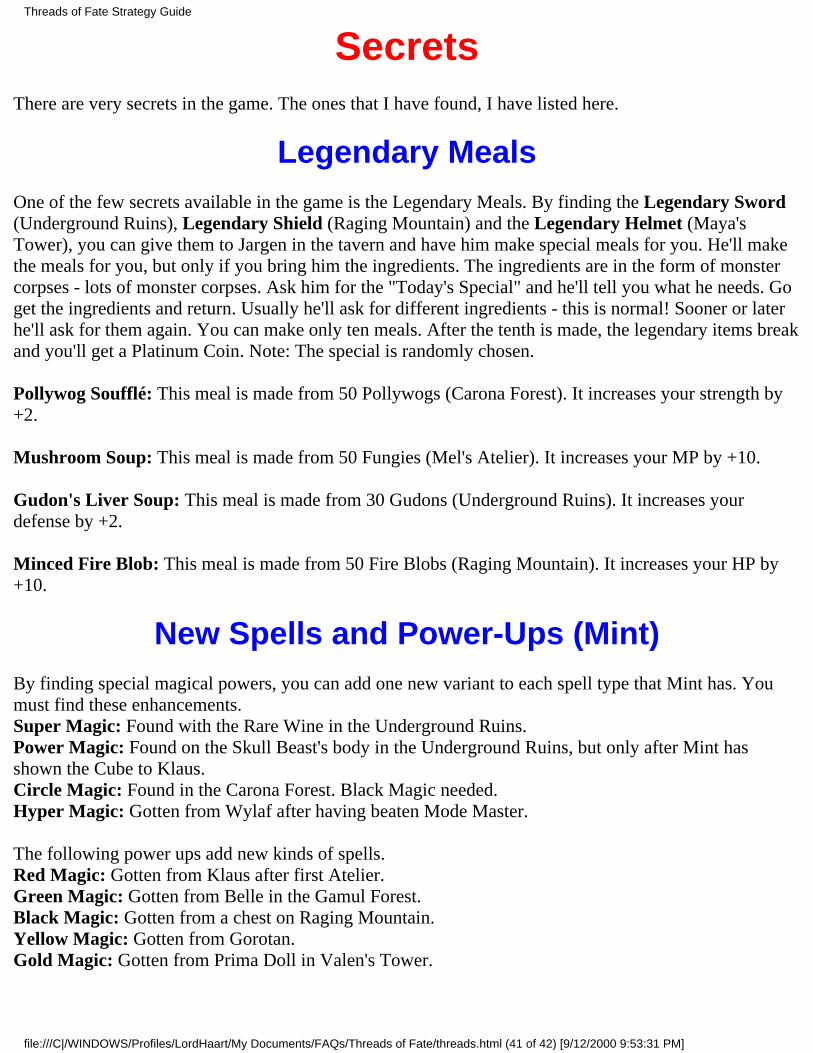
SecretsThere are very secrets in the game. The ones that I have found, I have listed here.
Legendary MealsOne of the few secrets available in the game is the Legendary Meals. By finding the Legendary Sword(Underground Ruins), Legendary Shield (Raging Mountain) and the Legendary Helmet (Maya'sTower), you can give them to Jargen in the tavern and have him make special meals for you. He'll makethe meals for you, but only if you bring him the ingredients. The ingredients are in the form of monstercorpses - lots of monster corpses. Ask him for the "Today's Special" and he'll tell you what he needs. Goget the ingredients and return. Usually he'll ask for different ingredients - this is normal! Sooner or laterhe'll ask for them again. You can make only ten meals. After the tenth is made, the legendary items breakand you'll get a Platinum Coin. Note: The special is randomly chosen.
Pollywog Soufflé: This meal is made from 50 Pollywogs (Carona Forest). It increases your strength by+2.
Mushroom Soup: This meal is made from 50 Fungies (Mel's Atelier). It increases your MP by +10.
Gudon's Liver Soup: This meal is made from 30 Gudons (Underground Ruins). It increases yourdefense by +2.
Minced Fire Blob: This meal is made from 50 Fire Blobs (Raging Mountain). It increases your HP by+10.
New Spells and Power-Ups (Mint)By finding special magical powers, you can add one new variant to each spell type that Mint has. Youmust find these enhancements.Super Magic: Found with the Rare Wine in the Underground Ruins.Power Magic: Found on the Skull Beast's body in the Underground Ruins, but only after Mint hasshown the Cube to Klaus.Circle Magic: Found in the Carona Forest. Black Magic needed.Hyper Magic: Gotten from Wylaf after having beaten Mode Master.
The following power ups add new kinds of spells.Red Magic: Gotten from Klaus after first Atelier.Green Magic: Gotten from Belle in the Gamul Forest.Black Magic: Gotten from a chest on Raging Mountain.Yellow Magic: Gotten from Gorotan.Gold Magic: Gotten from Prima Doll in Valen's Tower.
Threads of Fate Strategy Guide
file:///C|/WINDOWS/Profiles/LordHaart/My Documents/FAQs/Threads of Fate/threads.html (41 of 42) [9/12/2000 9:53:31 PM]

The Brooch (Mint)Mint finds this item in the Gamul Forest. She has three choices for the thing. She can sell it for 1,200 gilright away, or you can give it to Annette to reduce the tavern's prices. Or you can wait until after yourfirst encounter with Wylaf and sell it to Marcum. You can get up to 6,000 gil for it!
The Last HeroThis book is found in the shortcut under Carona Forest. If you give it to Rod, he'll raise your strength byfour! Obviously, this is a very valuable find!
The Mysterious Statue (Rue)When Rue finds this statue (Ghost Temple), he has the choice of selling it for 500 gil, or giving it toKlaus. By doing the latter, he gives you a potion that raises your MP by ten.
The Rare WineBy finding this item in the Underground Ruins, both Mint and Rue can give it to Hobbs to have himlower his prices. This is probably the most valuable item in the game!
Threads of Fate Strategy Guide
file:///C|/WINDOWS/Profiles/LordHaart/My Documents/FAQs/Threads of Fate/threads.html (42 of 42) [9/12/2000 9:53:31 PM]