thesis writing using word
TRANSCRIPT

Using Microsoft Word for Writing a Thesis:
Hints and Tips
(Revised April 2009)
©Prof. Martin Fahey
School of Civil & Resource Engineering
The University of Western Australia

Thesis Writing Using Microsoft Word School of Civil and Resource Engineering
Hints and Tips The University of Western Australia
(i)
FOREWORD
The aim of this document is to encourage you to take a little time to learn some of the basic
features of Microsoft Word that are relevant to the preparation of long documents, such as your
thesis1. It explains how to use these basic features. The time you put into learning these features
will save you lots of time in the end.
The aim is not to force you to follow this format exactly – you can do so if you wish, or you can
modify the format to suit your own taste. However, I strongly encourage you to adopt the
formatting principles outlined, as these will be useful not just for the exercise of writing your
thesis, but will prepare you for report writing in a team environment in your subsequent
employment, where it will almost certainly be mandatory to adhere strictly to company
formatting policies (which will be based on principles similar to those outlined here).
The ideal is to use the procedures here right from the start of writing your thesis. If you start by
using manual formatting etc (i.e. breaking all the rules), it is much more difficult afterwards to
apply these rules without first undoing all the manual formatting you have applied.
I have made the recommendations on the best techniques for doing various operations on the
basis of my own experience (from more than 20 years of frustration with many different word
processors and many different versions of Word). However, if anyone has a better way of doing
something, I would welcome the feedback (and likewise, any feedback on grammatical or other
errors).
I initially set out with this document to write a few pages with some brief tips about how to use
Microsoft Word for thesis writing – and got carried away, and produced this, which is now 442
pages long!
I used Microsoft Office Word 2003 to prepare the latest version of this document. Anyone using
a later version might have to adopt the procedures slightly.
(Note: On the title page, I used a ‘text box’ for inserting the title, and my name etc. This allowed me to locate this
block in the centre of the page, without using paragraph returns. If you click within the text, and then click on the
frame boundary that appears, and select ‘Advanced…’ in the “Format Text Box’ window that appears, you will see
how I have done this).
1 This document was written to provide guidance to final year undergraduate students in the School of Civil &
Resource Engineering to help in the preparation of their Final Year Honours theses. However, it could also be used
as a guide to thesis or technical report writing in any technical area.
2 The ‘shading’ on number of pages indicates that this number was generated using an automatic ‘fields’ function of
some sort. This shading option can be switched on or off – see Figure 1.1 on Page 2.
Thesis Writing Using Microsoft Word School of Civil and Resource Engineering
Hints and Tips The University of Western Australia
(ii)
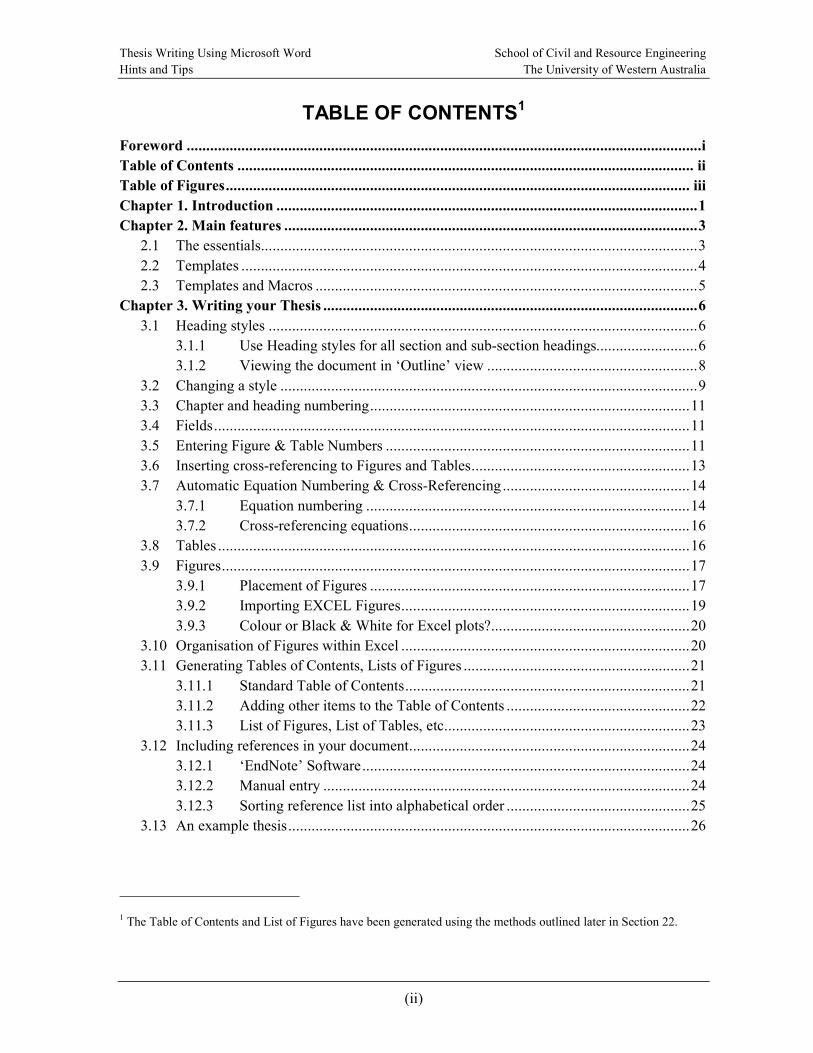
TABLE OF CONTENTS1
Foreword .................................................................................................................................... i
Table of Contents ..................................................................................................................... ii
Table of Figures ....................................................................................................................... iii
Chapter 1. Introduction ............................................................................................................ 1
Chapter 2. Main features .......................................................................................................... 3
2.1 The essentials ................................................................................................................ 3
2.2 Templates ..................................................................................................................... 4
2.3 Templates and Macros .................................................................................................. 5
Chapter 3. Writing your Thesis ................................................................................................ 6
3.1 Heading styles .............................................................................................................. 6
3.1.1 Use Heading styles for all section and sub-section headings.......................... 6
3.1.2 Viewing the document in ‘Outline’ view ...................................................... 8
3.2 Changing a style ........................................................................................................... 9
3.3 Chapter and heading numbering .................................................................................. 11
3.4 Fields .......................................................................................................................... 11
3.5 Entering Figure & Table Numbers .............................................................................. 11
3.6 Inserting cross-referencing to Figures and Tables ........................................................ 13
3.7 Automatic Equation Numbering & Cross-Referencing ................................................ 14
3.7.1 Equation numbering ................................................................................... 14
3.7.2 Cross-referencing equations ........................................................................ 16
3.8 Tables ......................................................................................................................... 16
3.9 Figures ........................................................................................................................ 17
3.9.1 Placement of Figures .................................................................................. 17
3.9.2 Importing EXCEL Figures .......................................................................... 19
3.9.3 Colour or Black & White for Excel plots?................................................... 20
3.10 Organisation of Figures within Excel .......................................................................... 20
3.11 Generating Tables of Contents, Lists of Figures .......................................................... 21
3.11.1 Standard Table of Contents ......................................................................... 21
3.11.2 Adding other items to the Table of Contents ............................................... 22
3.11.3 List of Figures, List of Tables, etc ............................................................... 23
3.12 Including references in your document ........................................................................ 24
3.12.1 ‘EndNote’ Software .................................................................................... 24
3.12.2 Manual entry .............................................................................................. 24
3.12.3 Sorting reference list into alphabetical order ............................................... 25
3.13 An example thesis ....................................................................................................... 26
1 The Table of Contents and List of Figures have been generated using the methods outlined later in Section 22.

Thesis Writing Using Microsoft Word School of Civil and Resource Engineering
Hints and Tips The University of Western Australia
(iii)
Chapter 4. Language, and some common errors ................................................................... 28
Appendix A. Humorous grammar rules ................................................................................. 35
Appendix B. Macro listing ...................................................................................................... 38
TABLE OF FIGURES1
Figure 1.1. Selection in ‘Tools – Options’ menu to shade text generated by Field Codes. ........... 2
Figure 3.1 ‘Styles’ pane open on the right of the screen ............................................................... 7
Figure 3.2. Part of the ‘Outline’ view of this document, with ‘Show Level 3’ selected. ............... 8
Figure 3.3. Selecting ‘Show All Levels’. .................................................................................... 9
Figure 3.4. Example of Figure numbering ................................................................................. 12
Figure 3.5. Cross-referencing window – cross-referencing to a Figure number. ........................ 13
Figure 3.6. The ‘Eq_with_number_at_start’ Macro puts equation number at the start of the
line (Alt-N)....................................................... Fehler! Textmarke nicht definiert.
Figure 3.7. The “Equation” Macro (Alt-N) puts equation number at the end of the line, but
this cannot be (easily) cross-referenced. ............ Fehler! Textmarke nicht definiert.
Figure 3.8. A drawing created using Word’s drawing toolbar ................................................... 18
Figure 3.9. The Table of Contents window. .............................................................................. 22
Figure 3.10. Including additional style items in the Table of Contents ...................................... 23
Figure 3.11. Inserting a List of Figures. .................................................................................... 24
Figure 3.12. ‘Bullets and numbering” settings for setting the Appendix headings in the
thesis document. .................................................................................................... 27
1 If you insert the cursor on any of these table entries, you will see from the top ruler that the right margin marker is
set with an indent (at 15.5 cm), and the ‘right tab’ is set at the right margin (16.5 cm). This allows the page number
(which is set at the tab) to be always outside the text, even with multiple-line table entries (as in the final entry in the
table above). A bit neater than the alternative that would result from having the right tab marker and the right margin
marker at the same location.

Thesis Writing Using Microsoft Word School of Civil and Resource Engineering
Hints and Tips The University of Western Australia
1
CHAPTER 1. INTRODUCTION
Microsoft Word is a very powerful (and at times very frustrating!) software package that has
become practically the only word processor used in academic and industry sectors for production
of reports, research papers, and theses.
It has very powerful formatting capabilities. These can make your life very easy – or if you
misuse them or don’t use them at all, they can make your life much more difficult that it should
otherwise be.
You might be able to produce a thesis with a perfectly-acceptable overall appearance without
using any of the tools referred to above. However, this is definitely not a good idea as:
You will be wasting lots of valuable time in formatting, when you could be doing other things.
• Certain tasks, such as numbering of figures, equations, and table, and preparation of a
Table of Contents, are made very much more labour-intensive (and subject to error).
• You can use automatic cross-referencing to Figures and Tables, which saves a lot of work
later when these numbers change.
• It is not good preparation for working later on in a team environment, where it is common
for many people to be working on the same document, so adherence to the formatting
‘rules’ is absolutely essential. You will be murdered (ok, maybe not literally) by others in
the organisation if you do not know how to follow the formatting rules used by that
organisation.
So, this very brief (well, it started out as being very brief!) document outlines some of the most
important rules with regard to using Word for the purposes of writing your Thesis. To aid in this,
I have applied them to a thesis written a few years ago by an undergraduate student, which I will
use as an example of how to go about setting up your thesis. The formatting I have used is not
meant to be taken as an absolute requirement, but rather to illustrate the principles that should be
used.
I have applied exactly the same formatting to this document, so it is formatted like a Thesis, when
in other circumstances I would probably have formatted it differently.
I have assumed that you already know the basics of word processing – i.e. finding, replacing,
cutting, pasting, etc – and also that you know how to use the inbuilt Equation Editor1. This
document is aimed at those who have never gone much beyond these basic functions – i.e. have
1 There are far better equation editors available than the Equation Editor 3.0 built into Word. However, you might as
well get used to the fact that almost everyone uses Word and the inbuilt Equation Editor, and you will only make life
awkward for yourself and others if you choose to go in a non-standard direction in this regard.

Thesis Writing Using Microsoft Word School of Civil and Resource Engineering
Hints and Tips The University of Western Australia
2
used Word as no more than a glorified typewriter, using only manual formatting. For those who
have gone well past this, much of what is in here is probably redundant (and you may in fact have
devised better ways of doing various operations yourself). Nevertheless, I hope you will find
something useful in here to help. (Look through the table of contents to see if anything sparks
your interest).
This document has been prepared using Styles and other settings identical to those in the example
thesis provided elsewhere. It uses automatic numbering of Headings and Figures, and uses
automatic cross-referencing to Heading and Figure numbering. These automatic features
generate what are called ‘Fields’, containing ‘Field Codes’. In the ‘Tools – Options’ menu (see
Figure 1.1 below), I have selected to ‘Always’ show ‘Field shading’, so that throughout the
document, anywhere there is a hidden Field Code, the text generated by that Field Code is shown
shaded. This shading will not appear in the printed version of the document, so it can be left
switched on.
Figure 1.1. Selection in ‘Tools – Options’ menu to shade text generated by Field Codes.1
If you want to see all field codes, you can tick the ‘Field codes’ box in Figure 1.1. You can also
see an individual field code by ‘right clicking’ within the shaded area in any of the fields, and
selecting ‘Toggle field codes’. Note that the whole Table of Contents is an example of text
generated using field codes.
1 The two versions of the figure are different. In the version on the left, I pasted the screen capture image into Word,
cropped it, and then drew the oval and arrow onto it within Word. These elements are anchored to the drawing, but
under some circumstances can become ‘unstuck’, and end up in unpredictable places. The version on the right was
done in Powerpoint, and all three elements grouped, before pasting into Word as a picture – with no risk of the
elements being separated. This is a much safer way of doing things.
Thesis Writing Using Microsoft Word School of Civil and Resource Engineering
Hints and Tips The University of Western Australia
3
CHAPTER 2. MAIN FEATURES
2.1 THE ESSENTIALS
I have tried here to list what I consider the most important features of Word that you must master
if you are going to be efficient in writing any major document, such as a thesis. There are lots of
other features that I have not included, as I consider that they are not particularly useful for a one-
off document, such as your thesis.
The main features are:
• Formatting of paragraphs is always done using Styles, and never by directly formatting
the paragraph. A style can be considered a ‘tag’ that contains all the information with
regard to how a paragraph should be formatted (line spacing, spacing before and after the
paragraph, justification, font type and size, etc.) Applying a tag style to a paragraph
immediately forces the formatting of that paragraph to conform to the formatting
contained in that style.
• The default style is ‘Normal’. The first stage in formatting any document is to set up the
Normal style for the document – i.e. set up the required line spacing, and spacing between
paragraphs. The ‘Normal’ style is used for normal paragraphs within the document.
• Spacing between paragraphs should never be done using extra paragraph returns. (The
spacing between paragraphs is set up in the Style for those paragraphs).
• Word has certain style names reserved for certain functions; the most important of these
are the Heading styles (Heading1, Heading2, etc). As the name implies, these are used to
tag 1st level headings, 2
nd level headings, etc. It is essential that these be used for this
purpose (and this purpose only), as they form the basis of
o how a Table of Contents is prepared automatically;
o being able to overview the document using the Outline View option (in ‘View –
Outline’ menu);
o as a means of automatic section numbering using the ‘Bullets and Numbering’
function in the Format menu.
• If you want a Heading to have a particular appearance, do the formatting in the style, and
not directly – e.g. you want it to be in CAPITAL LETTERS, don’t use ‘Caps Lock’ to
format headings, but in the style specification the ‘All Caps’ tag should be ticked (in the
‘Format – Font’ menu). See Section 3.2 on Page 9 for alternative methods of changing a
style.
• Numbering of Figures and Tables should always be done using the ‘Caption’ function,
located within ‘Insert – Reference – Caption’ menu. These can be set up to number
sequentially all through the document, or to have numbering that incorporates the Chapter

Thesis Writing Using Microsoft Word School of Civil and Resource Engineering
Hints and Tips The University of Western Australia
4
number with numbering starting at the start of each chapter. The advantages of using
Captions for this are:
o Word automatically updates all such numbers if an additional one is inserted earlier in
the text, or if one is deleted earlier in the text.
o When referring to an individual Figure or Table, we can use the ‘Cross-referencing’
function within ‘Insert – Reference – Cross-reference’ menu. Then, if a Figure number
or Table number changes, the references to it also change automatically. This is a very
useful feature in long documents with lots of Figures and Tables.
o When captions are used in this way, it is easy to automatically prepare a List of
Figures, and a List of Tables, to follow the Table of Contents.
o Equation numbering can also be automated in a similar way, but it is slightly more
complicated than Figure and Table numbering, and will be discussed in detail later.
• It is a good idea to break your document up into Sections (using the ‘Insert – Break –
Section Break Types – New Page’ menu item). For the thesis, the first section contains
only the Title Page, and (following a Page Break) the letter of transmittal to the Dean.
The second section contains the Abstract, Acknowledgements, Table of Contents, List of
Figures, Nomenclature, etc. The third section contains the thesis proper. The final
section contains the Appendices (if any).
• In the Thesis document, I have set up automatic page breaks at the start of each Chapter.
This could be done manually, but I have done it by incorporating it into the Heading1
style definition (‘Page break before’ tag).
2.2 TEMPLATES
Every new blank document you start has a ‘template’ associated with it. The default template is
‘Normal.dot’ (the ‘.dot’ identifies it to Word as a ‘document template’). Template files are kept
in a special Templates directory by Word – you can see where this is by trying to save a
document as a template using ‘Save As..’, and selecting ‘Document Template (*.dot)’.
When a new blank document is opened using a given template, all of the pre-set styles associated
with that template are automatically incorporated into that document. Subsequent changes to the
template are not brought into documents created using the template. Nor are changes to the
document reflected back as changes to the style (unless this option is specifically selected for the
individual styles). By default, all new documents are opened with the ‘Normal.dot’ template,
unless another one is specifically selected.
Any document can be saved as a template. Once a document has been formatted properly for a
given purpose, a template for this can be prepared by deleting all the content, and saving the
resulting blank document as a template.

Thesis Writing Using Microsoft Word School of Civil and Resource Engineering
Hints and Tips The University of Western Australia
5
The alternative to using a template to open a new blank document incorporating specific
formatting is to simply open an existing document with the required formatting, deleting all the
contents, and saving it as your new document. This is what I recommend here with your thesis –
just start with this document, save it with the name of your thesis, and go from there.
So, even though templates are very important, you don’t need to know very much about them for
the purposes of this exercise.
2.3 TEMPLATES AND MACROS
When you write a macro (a set of commands to carry out a series of instructions), by default it
gets stored in the normal.dot template on your computer, so that such a macro will then be
available from within any document that is based on this normal.dot template (all new documents
are created with this default template, unless you specifically choose otherwise). However, one
disadvantage of this (as I found in doing this exercise) is that simply providing this document to
people to use as the basis for a thesis does not provide access to these macros.
Therefore, in this case, I have also embedded these macros into this document. On your own
setup, you could use the Organizer (under “Tools_Templates and Add-Ins”) to copy the macros
from this file to your own Normal.dot file, which would give you access to the macros from
within any Word document created with the Normal.dot template. There is no need to do this if
you use this document as the starting point for your thesis. You can user the same Organizer
within “Tools_Templates and Add-Ins” to copy Styles from this document to your Normal.dot
template, so that the styles in this document would then be the default styles for any Word
document you create from scratch.

Thesis Writing Using Microsoft Word School of Civil and Resource Engineering
Hints and Tips The University of Western Australia
6
CHAPTER 3. WRITING YOUR THESIS
3.1 HEADING STYLES
3.1.1 Use Heading styles for all section and sub-section headings
The easiest way to begin is to start from this document: ‘save as’ a new title (your Thesis title),
and delete the text, but do so carefully, so as to preserve the section breaks. I recommend
deleting everything except the chapter headings and the first paragraph of each chapter, leaving
the Introductory sections intact (to be completed later automatically). Then use this as the
starting point for your Thesis.
If you wanted to start from scratch, you could save this document as a template document (i.e.
“save as …template file”, which will put a “.dot” file extension on it, and save it in the Templates
directory. You could actually delete everything from it first and then save as a template file,
which would preserve the heading definitions, etc. Then, starting from scratch, just open a blank
document using this template.
On the first page, just as a temporary ‘placeholder’, type “Thesis title”, followed by a return.
Then insert a Section Break (new page). Again type a temporary placeholder ‘Abstract etc’,
followed by another Section Break (new page). This will reserve these first two sections for
these items, which you can add later.
You are now at the start of Section 3.
Type ‘Introduction’ – just like that, in plain text – no other formatting. The default style for
anything you type (in this template) is “Normal”, and this shows up in the Styles window in the
toolbar at the top of the document.
If you look under ‘Format – Paragraph’ you will see that this paragraph is Left Justified1, No
indents, with 0 points2 before and 8 points after, and ‘At Least 16 point’ line spacing. In the
1 Overall appearance of a block of text is probably improved if you use ‘Alignment’ (i.e. justified both sides), but
readability is better using left justification. This is a matter of personal preference. One thing to remember if you
use ‘justify both sides’ is that ‘soft line breaks’ (‘Control – Enter), which gives a new line without giving a new
paragraph, require a ‘tab’ before the line break, otherwise the text in the line will be stretched to fit the whole line.
2 A ‘point’ is a unit of measurement used in traditional hot-press printing – there are 72 points to an inch (i.e. a point
is about 0.35 mm, or, in round terms, 3 points ≈ 1 mm.

Thesis Writing Using Microsoft Word School of Civil and Resource Engineering
Hints and Tips The University of Western Australia
7
“Line and Page Breaks” tab of ‘Format – Paragraph’ you will see that only ‘Window and Orphan’
control is ticked (this forces the formatting not to have only one line of a paragraph on its own on
a page either at the start of the paragraph (a ‘Widow’) or at the end (an ‘Orphan’).
Now, with the cursor still in this Introduction paragraph, open the drop-down Styles menu by
clicking on the down-arrow beside this window, and select the style “Heading1”, which in this
case I have formatted to insert the Chapter Number before the actual Heading 1 title. So this will
give you Chapter 1. Introduction, with all the style attributes imposed – in this case, All Caps,
Font Ariel 16 Bold.
You can also see all the styles by selecting ‘Format – Styles and Formatting’ in the ‘Format’
menu. This opens a pane on the right of the screen (Figure 3.1). If the cursor is within a
paragraph, any style can be applied to the paragraph by simply clicking on the style name in this
pane.
Figure 3.1 ‘Styles’ pane open on the right of the screen
Back to the Introduction….
Thesis Writing Using Microsoft Word School of Civil and Resource Engineering
Hints and Tips The University of Western Australia
8
Once the Heading1 style has been applied, and the cursor is at the end of ‘Introduction’, a
carriage return will open a new paragraph, which will have the Normal style (this option is
chosen in the Heading1 style definition). At the end of the paragraph, a carriage return will start
a new Normal paragraph. The Normal style already has an appropriate paragraph spacing built in
(8 points), so there is no need to enter an extra carriage return to leave space between paragraphs
(this should be avoided). If you would like more space between paragraphs by default, just
change the paragraph spacing in Normal style (as below).
And so on….
If you want to have sub-headings within the Chapter, simply tag them using Heading2 style for
second-level headings, Heading3 for 3rd level headings, etc. These will be numbered
appropriately – i.e. 1.1, 1.2, 1.3 etc for Level 2 headings in Chapter 1, 1.1.1, 1.1.2, 1.1.3 for Level
3 headings in part 1 of Chapter 1, etc, etc. I have not numbered Level 4 headings (they appear as
Italic), as numbering beyond 1.1.1 is a bit meaningless from a continuity point of view.
There’s a note on setting and changing the numbering system for headings in Section 3.3 below.
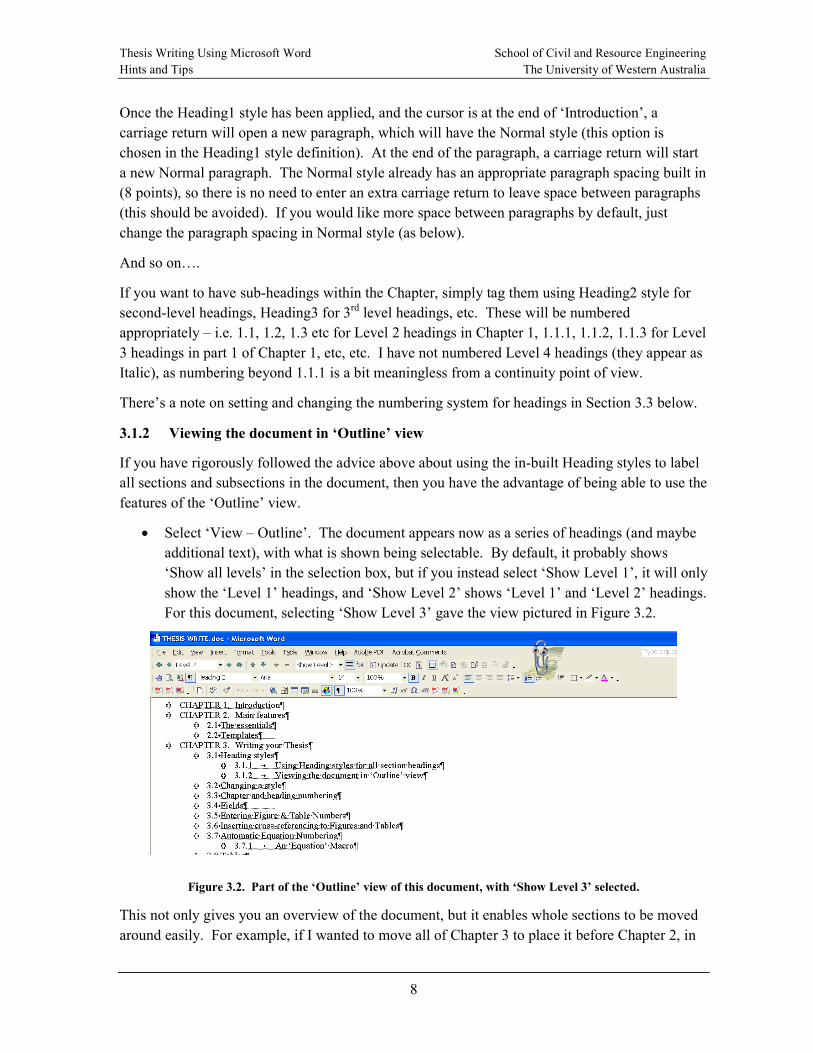
3.1.2 Viewing the document in ‘Outline’ view
If you have rigorously followed the advice above about using the in-built Heading styles to label
all sections and subsections in the document, then you have the advantage of being able to use the
features of the ‘Outline’ view.
• Select ‘View – Outline’. The document appears now as a series of headings (and maybe
additional text), with what is shown being selectable. By default, it probably shows
‘Show all levels’ in the selection box, but if you instead select ‘Show Level 1’, it will only
show the ‘Level 1’ headings, and ‘Show Level 2’ shows ‘Level 1’ and ‘Level 2’ headings.
For this document, selecting ‘Show Level 3’ gave the view pictured in Figure 3.2.
Figure 3.2. Part of the ‘Outline’ view of this document, with ‘Show Level 3’ selected.
This not only gives you an overview of the document, but it enables whole sections to be moved
around easily. For example, if I wanted to move all of Chapter 3 to place it before Chapter 2, in

Thesis Writing Using Microsoft Word School of Civil and Resource Engineering
Hints and Tips The University of Western Australia
9
this view I would simply hold the mouse button down on the ‘+’ bullet at the start of the ‘Chapter
3’ line, and move the selection upwards to above the ‘Chapter 2’ line – everything (headings,
text, figures, tables) gets moved backwards, all headings are re-numbered appropriately (and, if
you follow the Figure and Table numbering and cross-referencing recommendations made later,
all these are also automatically looked after. (Equation numbers are also automatically looked
after, but references to equation numbers are only looked after if you use the ‘equation number at
the start of the line’ option explained later). Similarly, I can move sections within a Chapter,
using the same technique – very powerful.
Within the ‘Outline’ view, section headings can be ‘promoted’ or ‘demoted’ – e.g. a Level 3
heading can be promoted to a Level 2 heading by selecting the appropriate ‘+’ bullet, and using
the appropriate ‘green blue’ arrows on the menu (the ‘double arrows’ have a different function –
the left-pointing one promotes any heading all the way to Heading1, while the right-pointing one
demotes any heading to normal text.
You can change the ‘Outline’ view to see all paragraphs, and, in this case, have the option of
seeing only the first line of each paragraph:
Figure 3.3. Selecting ‘Show All Levels’.
The buttons to the right allow the choice of viewing only the first line of each paragraph,
or the whole paragraph, and viewing with or without formatting applied. The view above has
first line only selected, and formatted selected.
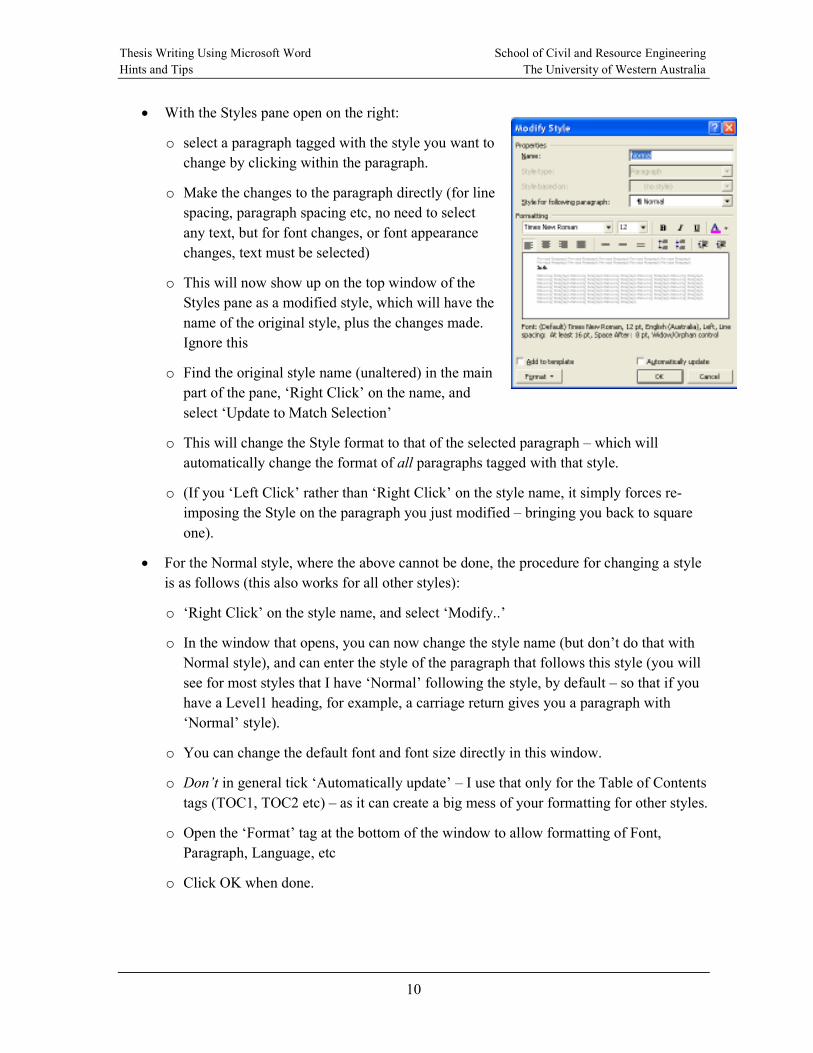
3.2 CHANGING A STYLE
There are a number of ways of changing a style. The first one below does not work for Normal
style:
Thesis Writing Using Microsoft Word School of Civil and Resource Engineering
Hints and Tips The University of Western Australia
10
• With the Styles pane open on the right:
o select a paragraph tagged with the style you want to
change by clicking within the paragraph.
o Make the changes to the paragraph directly (for line
spacing, paragraph spacing etc, no need to select
any text, but for font changes, or font appearance
changes, text must be selected)
o This will now show up on the top window of the
Styles pane as a modified style, which will have the
name of the original style, plus the changes made.
Ignore this
o Find the original style name (unaltered) in the main
part of the pane, ‘Right Click’ on the name, and
select ‘Update to Match Selection’
o This will change the Style format to that of the selected paragraph – which will
automatically change the format of all paragraphs tagged with that style.
o (If you ‘Left Click’ rather than ‘Right Click’ on the style name, it simply forces re-
imposing the Style on the paragraph you just modified – bringing you back to square
one).
• For the Normal style, where the above cannot be done, the procedure for changing a style
is as follows (this also works for all other styles):
o ‘Right Click’ on the style name, and select ‘Modify..’
o In the window that opens, you can now change the style name (but don’t do that with
Normal style), and can enter the style of the paragraph that follows this style (you will
see for most styles that I have ‘Normal’ following the style, by default – so that if you
have a Level1 heading, for example, a carriage return gives you a paragraph with
‘Normal’ style).
o You can change the default font and font size directly in this window.
o Don’t in general tick ‘Automatically update’ – I use that only for the Table of Contents
tags (TOC1, TOC2 etc) – as it can create a big mess of your formatting for other styles.
o Open the ‘Format’ tag at the bottom of the window to allow formatting of Font,
Paragraph, Language, etc
o Click OK when done.

Thesis Writing Using Microsoft Word School of Civil and Resource Engineering
Hints and Tips The University of Western Australia
11
3.3 CHAPTER AND HEADING NUMBERING
Chapter and Heading numbering can be quite tricky, and requires experimentation to get it right.
I recommend that unless you know what you are doing, you do not change what I have set up.
Numbering can be done using the ‘Format – Bullets and Numbering – Outline Numbered’ item in
the Format menu. Play with it if you wish, but you may get into a mess.
The default numbering I have set up will number Level 1 headings (i.e. Chapters), and Level 2
and 3 headings, but not Level 4 headings. I have included the word ‘Chapter’ before the number
in the Heading1 numbering, and set the style as Ariel, 16 point bold, centred, with an automatic
page break before. I have also used Heading1 level for the Appendices, and changed the
numbering for these. There is a further note on this later.
3.4 FIELDS
Many of the automatic functions with Word generate hidden ‘Fields’, which are really a type of
inbuilt macro language for doing something automatic. The instructions below for generating
automatic figure and table numbering, and for generating automatic cross-references to these,
generate ‘Fields’. These are hidden, but you can see the field codes by placing the cursor within
the text generated by the field, and doing ‘Right Click’. For example, I used the instruction in the
next section to generate here a cross-reference to Figure 3.4. If you put your cursor anywhere
with the text ‘Figure x.x’ in the previous sentence, do ‘Right Click’, and select ‘Toggle Field
Codes’, it will show the following text ‘{ REF _Ref124823772 \h }’. If you repeat “Toggle Field
Codes’, it will revert to showing ‘Figure x.x’. Try it. If you get brave (i.e. if you get foolish!),
you can edit these field codes. Don’t do it unless you know what you are doing!
In this document, I have selected ‘Tools – Options – View – Field shading: Always’, so that all
text generated by a field code is shown shaded (including the whole of the Table of Contents).
NOTE: Fields do not update automatically – that is, if, for example, you delete a Figure (with its
number and caption), the numbers of the following figures do not change automatically right
away. To get them to change, you have to select the caption, and use either:
• ‘Right Click’ and ‘Update Field Codes’; or
• F9
Saving or printing the file updates them automatically. More about this later.
3.5 ENTERING FIGURE & TABLE NUMBERS
The way to enter Figure and Table numbers in the titles of figures and tables is to use the ‘Insert –
Reference – Caption’ feature in the ‘Insert’ menu.
For example, to enter a Figure number and Figure title, do the following:

Thesis Writing Using Microsoft Word School of Civil and Resource Engineering
Hints and Tips The University of Western Australia
12
• Immediately below the figure, enter ‘Insert – Reference – Caption’ and select ‘Figure’ as
the Label in this window. This is shown on the left of Figure 3.4 below.
Figure 3.4. Example of Figure numbering
• Clicking ‘OK’ at this stage will put ‘Figure 1’ (or 2, 3 etc, in sequence) into this position,
if you just use the default. The default will give you figure numbering that starts from
Figure 1 and continues sequentially right through the document. You then manually enter
a ‘period’ and a space and then the figure title after the ‘Figure 1’. The whole thing will,
by default, be given the ‘Caption’ style.
• If you want to have alternative numbering (including the Heading1 level number for
example – which is the chapter number in this case, with numbering starting afresh in
each chapter), then, when you have the Caption window open, select ‘Numbering …’, as
above.
o By ticking ‘Include chapter number’ and ‘Chapter starts with Heading 1’, and ‘Use
separator .(period)’, the Figure number appears as shown above for Figure 3.4. This is
the format I have used in the example thesis document.
o You can also change the actual number format by choosing from the list in the top
panel.
• The Figure itself should be given the ‘Figure’ style (this style has ‘Keep with Next’
selected, so that the figure will then never be separated from the Figure title). The
‘Caption’ style has ‘Keep lines together’ selected, so that the Figure caption will not break
across a page break.
Exactly the same procedure is used for Table Numbers (selecting ‘Table’ as the caption, and
ticking ‘include chapter number’ and choosing ‘.(period) as the separator (it’s neater than the
default hyphen).
Note that I have built these steps into two Macros, one for entering the Figure number
(simultaneously hold down ‘Alt-F’), and one for Table number (‘Alt-T’). However, these will

Thesis Writing Using Microsoft Word School of Civil and Resource Engineering
Hints and Tips The University of Western Australia
13
only work if you have gone through the process once (for both Figure and Table captions) of
setting up the ‘Numbering’ as shown in Figure 3.4.
The method of numbering and cross-referencing equation will be explained in Section 3.7.
3.6 INSERTING CROSS-REFERENCING TO FIGURES AND TABLES
If you rigorously follow the procedures above for labelling Figures and Tables, then it is
straightforward to insert automatic cross-referencing to these. What this means is that if you refer
to a particular Figure by its number in the text, and subsequently the number for that Figure
changes, then if you have used cross-referencing, the number in the text will also change, as it is
linked by the cross-referencing procedure to the actual Figure caption.
The easiest way is to demonstrate. Suppose I want to refer to the figure with the title ‘Styles pane
open on the right of screen’ earlier, I do the following:
• where I want to insert the reference, I do ‘Insert – Reference – Cross-reference’, and this
brings up the panel shown here (Figure 3.5).
• In the first window, select ‘Figure’ (or ‘Table’ if you are cross-referencing to a Table).
• In the bottom window, select the Figure you want to reference
• In the top right window, don’t select ‘Entire caption’ – that would insert the word
‘Figure’, plus the number, plus the whole text in the caption. Instead, select ‘Only label
and number’. Then click ‘Insert’, and ‘Close’. Result: Figure 3.1
Figure 3.5. Cross-referencing window – cross-referencing to a Figure number.
As explained in Section 3.4, the Figure and Table numbering using ‘Caption’, and the cross-
referencing to these, generate ‘Field codes’ hidden behind the text generated – you can see these
by ‘Right Clicking’ in the generated text and selecting ‘Toggle Field Codes’ to see the field code
(and repeating the ‘Toggle Field Code’ to hide it). Also, Fields do not automatically update, so
the Figure and Table numbering have to be forced to update using the options presented in
Section 3.4.

Thesis Writing Using Microsoft Word School of Civil and Resource Engineering
Hints and Tips The University of Western Australia
14
Note you can also cross-reference to other standard items, as you can see when you do an ‘Insert
– Reference – Cross-reference’ sequence. I used this to generate the reference to the ‘Fields’
section in the previous sentence, where I selected ‘Heading’ as the cross-reference item, and
selected the ‘Fields’ section heading, and selected ‘Heading number’ in the top right window of
the panel. If I subsequently inserted another section earlier than the ‘Fields’ section, the
reference to this section number would update correctly.
When cross-referencing to any of the above, it is also possible to cross-reference to the page on
which it appears – so I could refer to Section 3.1, where I choose to refer to ‘Heading number’,
and repeat this to show that this is located on Page 6 (by selecting ‘Page number’ in the options
menu).
If an item to which you have cross-referenced is deleted, the field containing the cross-reference
shows up as an error, like this: Fehler! Verweisquelle konnte nicht gefunden werden. (but only
when the field is updated).
To update all fields in a document, simply ‘Select All’, and ‘Right Click’ and select ‘Update
Fields’ (and selecting ‘update entire table’ if a choice is provided for the various tables of
contents).
3.7 AUTOMATIC EQUATION NUMBERING & CROSS-REFERENCING
I am most grateful to UWA PhD student Kok Kuen Lee for this method, and for permission to
include it in this document. It makes all of the descriptions of other tortuous methods on this
topic in my original document redundant, and hence I have removed it and replaced it with this
method.
The method (which I have modified slightly, and for which I have written a macro) involves
putting the equation and caption in a table1 (with border not shown). An example is shown
below:
2mcE = (1)
3.7.1 Equation numbering
Create a 2-column 1-row table, and type the equation using Equation Editor. Then select the
Equation, and do Insert_Caption_Equation; select Below selected item; and Exclude label from
caption.
1 For the aficionados, the reason for putting the number in a table is that it splits the number from the equation within
the caption, so that cross-referencing, and choosing ‘Entire caption’ does not include the equation itself in the cross-
referenced number.

Thesis Writing Using Microsoft Word School of Civil and Resource Engineering
Hints and Tips The University of Western Australia
15
This is the result:
2mcE =
2
In this case, I used the “Equation” label, or I could create any new label. You can choose to add
chapter numbers (numbering equations by chapter) or not, as you wish (by selecting
“Numbering” in the Caption box, as in the figure above.
Then, Cut and paste the equation number into the second column, and add an opening and a
closing bracket. Also delete the paragraph marker below the equation, adjust the cell widths to
choice, ‘centre justify’ equation in first cell, and ‘right justify’ the equation number in the second
cell. This is the result:
2mcE = (3)
As shown by the “Field Code” shading, the number, but not the brackets, are part of the Field
Code. You may also have to select the table, and use “Format _ Borders and Shading_None” to
get rid of borders (the light-grey borders showing on the document after this do not get printed).
I have written an “Equation” macro (Alt-N) that does all of this, except to change the cell width
of the first cell). If you run ‘Alt-N’, the result is as follows (and exits with the Equation Editor
open):
(4)
Just enter the equation in the normal way, or copy in a previous equation for editing, and change
the width of the first cell by dragging the vertical boundary line to the right.
The alternative macro ‘Alt-Q’ does exactly the same, but includes the Heading1 level number
with the equation, and re-starts the numbering with every new Heading1.:
I have not shown this here, as running ‘Alt-Q’ changes all the previous ‘Equation’ tags to include
Chapter (i.e. Heading1) number also. Of course, you would choose either Alt-N or Alt-Q, but not
both, in the same document.

Thesis Writing Using Microsoft Word School of Civil and Resource Engineering
Hints and Tips The University of Western Australia
16
For the subsequent equations in the same document, there is no need to repeat the above
procedures, but just copy the entire table (including all its contents) to the relevant place, and then
delete the old equation and replace it with the new one. The equation number remains. Highlight
the entire table and update the code (i.e. press F9), and the equation number will automatically
update following the correct sequence. Of course, it is easier to use the option of running the
macro ‘Alt-N’, or ‘Alt-Q’.
3.7.2 Cross-referencing equations
With the way the equations are numbered above, the equation can be cross-referenced in the
usual way – e.g. as in “The mass-energy relationship is given by Equation (1)”.
This is done by the usual manner of Insert – Reference – Cross-reference – Equation and select
the corresponding equation number and insert with the option of “Entire caption”. Though the
brackets are not part of the Field Code, they are included because of the selection of “Entire
caption”.
If you select the box ‘Insert as hyperlink’, this makes the number a clickable link back to the
equation it refers to.
3.8 TABLES
Tables are inserted using the Table menu in Word. The default style for the text in a Table is
‘Normal’ – which is fine, but it will give excessive spacing (as we have set up Normal style to
have ‘8-point after’ paragraph spacing. Don’t panic – just use a different style for text within a
table.
I have set up a Style ‘Table text’ which can be applied to all cells in the table, which will give ‘3-
point before’ and ‘3-point’ after spacing, and will centre the items in the table. This, of course,
can be changed, either by changing manually, or by changing the ‘Table text’ style.

Thesis Writing Using Microsoft Word School of Civil and Resource Engineering
Hints and Tips The University of Western Australia
17
Item 1 Item 2 Item 3 Item 4 Item 5
23 44 55 66 77
Table 3.1 Table with ‘Table text’ style applied.
The normal ‘Format – Borders and Shading’ menu item is used to put borders around the whole
table (and individual cells or groups of cells) as required. In this example, I have put the Table
caption below the table, but it is common also to put it above the table.
3.9 FIGURES
3.9.1 Placement of Figures
• Traditionally, the only practical way of including Figures in a thesis document was to
group them all together at the end of the document, as it was too difficult to incorporate
them into the text. This is still a perfectly acceptable method, and in some ways, I find it
easier to read a thesis if this is done, but I recognise that this may be old-fashioned. It is
generally the method used in engineering consulting practices to incorporate figures
within a report (mainly because figures come in such a variety of formats that it is not
always practical to incorporate them into the text).
• A slight alternative to this is to group Figures for each Chapter together at the end of each
Chapter.
• Most people seem to want to embed the Figures in the text (as is done in most textbooks,
for example). This is definitely more work than the previous alternatives – in fact, it looks
like Microsoft has conspired to make it as difficult as possible, and with each new version
of Word, some previous faults are rectified, and new ones are introduced!
Word has different options for how a figure is embedded with the text. The most simple to deal
with is to always have the figure ‘In line with text’, where it is treated like any other paragraph.
(This default is set in the ‘Tools – Options’ menu in the ‘Insert/Paste pictures as’ box.)
With some of the other options, the figure can be moved to any location on the page, with the text
‘flowing around’ the figure, or hidden behind the figure (and, for example, allowing the figure to
be anchored at the top of the page, or the bottom of the page). However, these other options give
much more hassle than they are worth for long documents. (The way the figure jumps around the
page as extra text is inserted earlier in the document is very difficult to control). The figure also
tends to get separated from the figure caption. To overcome this, the figure caption and the
figure can be enclosed with the same text box, but then the possibility of automatic cross-
referencing is lost. (The text within the text box is ‘invisible’ to the document).
Drawing within Word
You can draw simple diagrams with Word directly using the Drawing toolbar, which you can
open permanently using ‘View – Toolbars’, and ticking the ‘Drawing’ box. To do a drawing, go
to a new paragraph, and click on any of the drawing tools. See Figure 3.6. A box opens on the

Thesis Writing Using Microsoft Word School of Civil and Resource Engineering
Hints and Tips The University of Western Australia
18
page with ‘Create your drawing here’ written in it. Note that this only occurs if you have ticked
‘Automatically create drawing canvas when inserting AutoShapes’ in the ‘Tools – Options –
General’ menu window. If you don’t have this ticked, then drawing within Word can produce
very bizarre results – with the output lying on top of the text as a floating object.
Once it is drawn, the bounding box can be cropped to fit the drawing. Clicking outside the
drawing closes the box. Clicking inside it again opens the box.
Figure 3.6. A drawing created using Word’s drawing toolbar
Once the drawing is selected, any element within the box can be edited, and this includes moving
it outside the box. This is when the fun (i.e. frustration) starts, as this element then becomes a
separate drawing, and, by default does not have the ‘Align with text’ format. Try it with the
drawing above. Click the green square for example, and drag it outside the bounding box. It is
now a ‘floating drawing’, and, if it is lying on top of text, the text will be invisible beneath it.
This can be changed using ‘Right Click’ on the object, and selecting ‘Format picture’ or ‘Format
autoshape’ or ‘Format text box’ (if you clicked on the text). Very quickly, everything goes awry.
To avoid this, when you want to edit the picture in a way that requires more room that is currently
with the bounding box, just enlarge the bounding box first using the crop handles, and then edit
away, keeping all drawing within the box.
Drawing within Powerpoint
A drawing created within Powerpoint behaves exactly as just described if the drawing is pasted
directly into Word using the ‘Paste’ command. This is the case even if all the elements are
‘Grouped’ together in Powerpoint before pasting. If you use ‘Paste As…’, and select ‘Picture’, it
will be pasted in as a picture that you can’t edit in Word.
So, you could use Powerpoint to create your drawings, and keep all the drawings in a single
Powerpoint file (e.g. one per page), and paste them as ‘pictures’ into Word. This keeps all your
original drawings together, and, as pictures within Word, prevents them being accidentally
separated into different bits.
Click anywhere within
drawing area to see the
drawing bounding box.
Use the handles to enlarge
or to crop to size
Thesis Writing Using Microsoft Word School of Civil and Resource Engineering
Hints and Tips The University of Western Australia
19
Drawings created with Drawing Programs or Computer Output
More detailed drawings created using drawing or graphics packages (e.g. Autocad, Corel Draw,
etc) may be pasted into the Word document – probably best done as ‘Paste As..Picture’. The
original drawing, saved in the format native to the drawing package, can be edited and re-pasted,
as required, within the drawing package. Graphic output created by (for example) various Finite
Element packages may also be importable into Word, depending on the format of the output –
experiment to see how to do it.
As a last resort, you can do ‘screen capture’ (‘Control – PrtScn’), which puts a snapshot of the
screen into the clipboard, and paste this into your document as a bitmap. The normal picture
editing tools can be used – e.g. use the ‘crop’ tool to get rid of the part of the picture you don’t
want, and the sizing handles to adjust the size. This is how I created the screen shots shown
earlier.
3.9.2 Importing EXCEL Figures
‘Paste Special…Paste as …Picture’
To import an Excel figure (or Excel Chart in Microsoft-speak) into Word, do not paste it in as a
‘Microsoft Excel Chart Object’, but always as a ‘Picture’. I repeat - do not paste it in as a
‘Microsoft Excel Chart Object’, but always as a ‘Picture’. (Different versions of Word have
different defaults for ‘Paste’ – my current version defaults to pasting an Excel chart as a picture,
so there is no problem, but on other versions, I know that the default would paste as an Excel
Chart object, and I had to always use ‘Paste Special … Paste As …Picture’).
If you paste the figure in directly, you are also pasting in the entire worksheet hidden behind the
Figure, with the result that your file size will increase dramatically each time you paste a Chart –
not a good idea if you are going to paste in dozens of charts!
‘Paste Special … Paste Link’
There is another option, which is to do ‘Paste Special..” and choose ‘Paste Link..’. This still
pastes the Chart in as a Picture, but maintains a link to the Chart in the Excel workbook. Thus,
you can click on the Chart picture within Word, and it opens up the Chart within the Excel
workbook. This link is maintained, even if you move the Excel workbook to another directory on
your computer.
In previous versions of Word, this feature never worked very well, and I after trying to use it for a
few years, I gave up in frustration. However, I re-looked at it in writing this document, and now
it appears very robust. It has the advantage that you can always find the original Chart, even
though in Word it simply appears as a picture. Nevertheless, I cannot recommend this method
with a large thesis document and a large number of linked Excel Charts, as I do not know how it
would perform in these circumstances.
The method I use for large documents is outlined in the next section.
No matter which method you use to import your Excel figures, do not add any additional
annotation, comments, or other graphics onto the image within Word. Do so back in the Excel

Thesis Writing Using Microsoft Word School of Civil and Resource Engineering
Hints and Tips The University of Western Australia
20
spreadsheet (this is similar to the recommendation given earlier with regard to adding graphics to
pictures – refer to Figure 1.1)
3.9.3 Colour or Black & White for Excel plots?
Since we still don’t have readily-available (and cheap) colour photocopiers (and most journals
and other means of publishing technical papers use B&W), you should probably prepare all
charts using B&W only. This means careful choice of symbols to differentiate between different
curves on the same chart. You could use colour, but you will have to have access to a colour
printer, as we will not be providing colour printing for theses anytime in the near future, and you
will also have to have a colour photocopier to make additional copies (or print each copy
separately on your colour printer).
3.10 ORGANISATION OF FIGURES WITHIN EXCEL
For many technical theses, the bulk of the Figures in the document will consist of Excel-
generated graphs (‘Charts’), originating from output from experimental work or computer
modelling work, and manipulated and processed within Excel. Inevitably, these Charts will come
from many different Excel workbooks. If the recommendation regarding ‘pasting as picture’
given above is followed, there is no link between the figure in the text and the original Excel
workbook (maintaining the link, by pasting in as an Excel Chart Object, is definitely not a good
idea, for the reasons given above).
The method that I use in preparing any significant-sized document with lots of Excel Charts is as
follows:
• Do the manipulation of the data within the original workbook, getting the format more-or-
less correct (i.e. the final format you require in the Word document).
• Having done this for all the figures in a section, create a new Workbook, and give it a
name such as: “Thesis Figures” or “Thesis Figures Chapter 3”, or whatever. If the former,
maybe use different spreadsheets within the workbook for the figures in each Chapter
(with appropriate labelling of these spreadsheets).
• Copy the first Chart, and paste it into a Spreadsheet in that Workbook. (Make sure that
you use ‘Paste’, and not ‘Paste As..’, to preserve the dynamic link between the Chart and
the data from the original worksheet). Adjust the size, line thicknesses, fonts, grid line
types and thicknesses (if any), etc, until satisfied. Select, and paste into your Word
document as a picture. (By the way, be sure to switch off the ‘Auto Scale’ option in the
‘Format Chart Area – Font’ menu, or it will drive you mad!).
• If the size is what you want (e.g. about a third of the size of your A4 page), then proceed.
If not, go back to the Excel “Thesis Figures” workbook, and adjust the size etc, and repeat
the paste into Word, and repeat this until you are happy with the final format. Ideally,
after you paste into Word, you should not have to adjust the size (this changes font sizes
etc).

Thesis Writing Using Microsoft Word School of Civil and Resource Engineering
Hints and Tips The University of Western Australia
21
• Now you can paste successive figures into the same Excel worksheet, and since you know
what the first one looks like, the others can be easily adjusted to be the same size and
format. When completed, do ‘Paste as…Picture’ for each in turn into the appropriate
location in the Word document.
• Note that if you line up the borders of the charts with cell boundary lines, it is easy to
change the widths of all charts by just changing the width of the columns in which the
row of charts lie (or the heights of all charts by changing the heights of the rows)
• Save this Excel ‘figures’ workbook in the same directory as your thesis document, so you
always know where to find it. If you need to edit any Excel figure in the thesis, go to
Excel ‘figures’ workbook, and do the editing there, and re-paste (‘as picture’) into Word.
• Some editing requires that the original source file be open when doing the editing; finding
this is now no problem, because selecting any data point in the figure will show you the
directory path to find the original data file.
• If you organise your data in this way, it is very important to not move original data files
around from one directory to another. If you do so, the link between the Excel figure in
the ‘figures’ workbook and the original data may be broken. So, setting up a logical
directory structure at the start helps enormously to keep you organised.
3.11 GENERATING TABLES OF CONTENTS, LISTS OF FIGURES
3.11.1 Standard Table of Contents
If you have followed the rules above with regard to using the Heading styles, then generating a
Table of Contents automatically is relatively simple.
In the ‘starting’ instructions in Section 3.1, we reserved the first section of the document of the
Title Page and the Letter to the Dean, and the second section to Abstract, Table of Contents, etc.
Go back now to that section. In the Table of Contents, we will want to include these initial bits
and pieces. So, just enter the headings you will need in this section – i.e. Abstract,
Acknowledgements, Table of Contents, List of Tables, List of Figures, Nomenclature, with a
blank paragraph between them (do not apply any formatting to them).

Thesis Writing Using Microsoft Word School of Civil and Resource Engineering
Hints and Tips The University of Western Australia
22
Figure 3.7. The Table of Contents window.
Place the cursor in the blank paragraph below Table of Contents, and
• Select ‘Insert – Reference – Index and Tables’ and click on the ‘Table of Contents’ tab.
Figure 3.7 shows the window that opens, with the correct choices made.
• In this case, under ‘Show levels’, we have asked to include up to 3 levels of headings
(Heading1, Heading2, Heading3, but not Heading4). The format we have chosen is
‘From template’, which we will explain in a minute.
• We have also ticked ‘Show page numbers’, and ‘Right align page numbers’ (which will
show page numbers placed on the right-hand margin with a ‘right tab’. The ‘Tab leader’
selected is ‘…….’, which will place a dotted line between the end of the entry and the
page number. See the Table of Contents at the start of this document for an example.
• By selecting ‘From template’ as the format, the Table of Contents entries are
automatically tagged with styles TOC 1, TOC 2, TOC 3 etc for the various heading levels.
These styles can be edited using the normal style editing procedures.
• Note that with the TOC styles in this document, I have ticked them to ‘Automatically
update’, such that if you manually adjust one entry with TOC 1 style, for example, then
all entries, and the style definition itself, changes to reflect this change. Do not do this for
general styles.
• The Table of Contents does not update automatically (otherwise, it would be continually
updating as you typed in new material). To force it to update, just ‘Right click’ anywhere
with the Table, and select ‘Update Fields’, and then select ‘Update entire table’.
3.11.2 Adding other items to the Table of Contents
The Table of Contents generated using the above procedure will contain only entries
corresponding to the selected number of Heading levels (3 in this case). There are a number of
ways to include other items:

Thesis Writing Using Microsoft Word School of Civil and Resource Engineering
Hints and Tips The University of Western Australia
23
• We could label the extra items (Abstract, etc) in the preliminary sections as Heading1, and
re-do the numbering to have ‘None’. This will strip the numbering from all headings
throughout the document. To then re-establish the numbering for the headings in the main
part of the document, go forward to the Introduction, and re-apply the numbering, but
select ‘Apply changes to this point forward’. This is not what I have done.
• The alternative is to use some general non-heading style – which, perhaps confusingly, I
have called ‘General Heading’.
• To include these headings in the Table of Contents, re-do the ‘Insert – Reference – Index
and Tables – Table of Contents’ sequence above, but now select ‘Options’, and include
the ‘General Heading’ style as a Table of Contents level 1 entry (enter a ‘1’ in the box
following this style (a ‘tick’ appears in front of the style name) – see Figure 3.8
• Scrolling through this table shows that already the Heading1, Heading2 and Heading3
levels are selected, with appropriate TOC levels assigned.
Figure 3.8. Including additional style items in the Table of Contents
3.11.3 List of Figures, List of Tables, etc
The procedure for generating a List of Figures is practically identical to that just described.
• Put the cursor into the location where you want the List of Figures entered (after the
heading ‘List of Figures’ in the preliminary section.
• In ‘Index and Tables, select ‘Table of Figures’ (irrespective of whether it’s a List of
Figures, or a List of Tables, or a list of any other ‘Captioned’ items).
• In the ‘Caption label’ box, select ‘Figure’, and tick ‘Include label and number’ to include
the Figure number with the Figure text, and click ‘OK’. See Figure 3.9.
• Do exactly the same to insert a List of Tables, except that ‘Table’ instead of ‘Figure’ is
selected as the ‘Caption label.

Thesis Writing Using Microsoft Word School of Civil and Resource Engineering
Hints and Tips The University of Western Australia
24
• The style ‘Table of Figures’ is the default style for these – this style is also tagged as
‘Automatically update’, so that altering the appearance of any one entry automatically
updates the style, and hence updates all entries.
Figure 3.9. Inserting a List of Figures.
3.12 INCLUDING REFERENCES IN YOUR DOCUMENT
The attached thesis document shows examples of how to refer to a list of references at the end of
the document, and how to present the list of references.
3.12.1 ‘EndNote’ Software
In fact, there is very powerful software for doing this, which is used for major works, but it is
probably not warranted for an undergraduate thesis in engineering. This software is called
‘EndNote’ (not to be confused with the Footnote and Endnote functions within Word), and is free
to UWA staff and students. This is used first to generate a whole data base of references, as you
go about your background reading, which can then be referred to from within any document, and
which allows a list of references for that document to be constructed automatically. I have not
used it for this purpose, and so cannot offer advice on whether or not it is worth the effort to use it
for your thesis.
If you are interested, you can find details at this link, and the staff in the library can give help in
its use:
http://www.library.uwa.edu.au/guides/endnote/index.html
3.12.2 Manual entry
I have only ever used a ‘manual’ method of referencing. There are different accepted formats for
the references, and how to refer to them, in different fields of study, and in different journals, but
the most commonly used in my field (geomechanics) is as set out below.
When referring to an article within the text, use the format:

Thesis Writing Using Microsoft Word School of Civil and Resource Engineering
Hints and Tips The University of Western Australia
25
• “…..Author_surname & Author_surname (date)…” if there are two authors, or
“…..Author et al. (date)…” if there are more than two authors.
• Thus, for the references given below, these would be referred to in the text as “….
Whitlow (2001)…”; “….Wu (2002)….”; “….Kohata et al. (1997)…”; “….Baldi et al.
(1989)…” and “….Foti & Fahey 2003)…”
The list of references is assembled at the end of the text, using the format: Author1, Initials,
Author2, Initials,…..& AuthorLast, Initials (year). Reference.
The form of the ‘Reference’ depends on the type of publication (Note no inverted commas
around titles):
• For a book: Book title. Edition No, Publisher details:
o Whitlow, R. (2001). Basic Soil Mechanics. 4th Ed., Prentice-Hall, UK.
• For a thesis: Thesis title. Type of Thesis (i.e. PhD thesis, Honours thesis, etc), University
name:
o Wu, L. (2002). Dilatometer testing in Perth soils compared to other in situ testing
techniques. Honours thesis, The University of Western Australia.
• For a journal article: Title of the article. Title of Journal, Vol. xx, No. xx, xxx-xxx (where
No. xx is the issue number, and xxx-xxx indicates page range)
o Kohata, Y., Tatsuoka, F., Wang, L., Jiang, G.L., Hoque, E. & Kodaka, T. (1997).
Modelling of non-linear deformation properties of stiff geomaterials. Géotechnique,
Vol. 47, No. 3, 563-580.
• For an article in a Conference Proceedings: Title of Article. Proc. of Title of Conference,
Conference City, Vol. xx, xxx-xxx, Publisher of Proceedings.
o Baldi, G., Belloti, R., Ghionna, V.H., Jamiolkowski, M. & Lo Presti, D.C. (1989).
Modulus of sands from CPTs and DMTs. Proc. 12th International Conference on
SMFE, Rio de Janeiro, Vol. 1, 165-170, Balkema, Rotterdam.
o Foti, S. & Fahey, M. (2003). Applications of multistation surface wave testing. Proc.
3rd International Symposium on Deformation Characteristics of Geomaterials (IS-
Lyon), Lyon, France, 13–20, Balkema, Lisse.
• The common elements are that the actual book title is the only part in italics, and that the
date is in brackets. Journal titles have standardised abbreviations (e.g. J. Geotech. Engng
for Journal of Geotechnical Engineering) but you can write the whole title rather than
trying to invent abbreviations if you are not familiar with the standard abbreviations.
3.12.3 Sorting reference list into alphabetical order
The reference list should put into alphabetical order. This can be done very easily:

Thesis Writing Using Microsoft Word School of Civil and Resource Engineering
Hints and Tips The University of Western Australia
26
• Select the whole reference list, once all references are entered.
• Select ‘Table – Sort’, and select ‘Sort by - Paragraphs’ and ‘Type – text’ and ‘Ascending’
and ‘No heading row’. Done.
3.13 AN EXAMPLE THESIS
The example thesis provided illustrates most, or all, of the points made in the preceding sections.
Since it is mostly covered above, only a few additional comments are given here.
I used the style ‘General Heading’, which is not a ‘Heading’ style in the Word sense, to tag the
headings in the first section, and then, when inserting the Table of Contents, included this style as
one of the ‘Options’ in the ‘Table of Contents’, being treated (for this purpose only) like a
Heading Level 1.
The thesis contains a number of Appendices, which were used to present extra data plots. The
appendices are numbered A to G. The easiest way of labelling them would be to do so manually.
However, this will then not allow the subsections within the various appendices, and the figure
numbering in the appendices, to be done automatically. In spite of this, manual entry may be the
most efficient.
However, just to show what can be done, I used automatic numbering. As the author of the thesis
wanted to continue the figure numbering convention used earlier (i.e. figures numbered by
Chapter, with the Chapter number included in the Figure number), the Appendix headings had to
be given ‘Heading 1’ style, but the ‘Chapter’ was not required before the number.
To get around this, the appendices are numbered as follows:
• Each appendix starts with a blank line. This blank line is then tagged with the ‘Heading
1’ style. This labels these appendices Chapter 10, Chapter 11, etc., with no chapter title.
• The cursor is placed in the first of these (Chapter 10), and ‘Format – Bullets and
Numbering – Outline numbered’ selected. Then, select ‘Customize’, and fill in the fields
as in Figure 3.10. Instead of ‘Chapter’ before the number, enter ‘Appendix’, and then
select the number type to be ‘A, B, C…’, and ‘Starts at A’.
• It is very important to select ‘Apply changes to this point forward’, otherwise the changes
you make will affect all the previous chapter numbering.

Thesis Writing Using Microsoft Word School of Civil and Resource Engineering
Hints and Tips The University of Western Australia
27
Figure 3.10. ‘Bullets and numbering” settings for setting the Appendix headings in the thesis document.
This works, after a fashion. However, it should be noted that re-defining headings like this can
be very troublesome - because the numbering is related to Heading styles, the change you make
here can rebound back into the earlier part of the document, so you can end up going around in
circles. If you are going to adopt this approach, don’t do so until the very last operation (just
before you print the document), or it will drive you crazy as you go around in circles!
Note that this complicates page numbering. In this document, I have just numbered the pages
consecutively, but it is also common to have page numbers in the format 1.2, where the ‘1’ refers
to the Chapter number, and the ‘2’ refers to the page number in the chapter (just as for Figure
numbering). However, changing the Heading1 styles as above makes this sort of numbering
behave erratically. (In fact, I could not work out how to have the chapter page numbers as 1.1, 1.2
etc mixed up with the Appendices having page numbers A.1, A.2, etc., so if anyone has a
suggestion ….).
If you can’t see all of
this, be sure to select
“More” here

Thesis Writing Using Microsoft Word School of Civil and Resource Engineering
Hints and Tips The University of Western Australia
28
CHAPTER 4. LANGUAGE, AND SOME COMMON ERRORS1
This is not meant to be an English language or grammar tutorial; it just discusses some of the
most common sources of error that I come across in reviewing students’ work2.
• Writing style for technical work tends to be in the 3rd person impersonal (‘passive voice’),
rather than in a personal ‘active voice’. ‘The testing was carried out using…’ rather than
‘I carried out the testing using …’. Many people see this as awkward and unnatural (and
the Word style checker always objects to it), but for the present that is the common usage
in engineering writing.
• Try not to mix tenses in describing experimental work, or other work. Generally, use past
tense. In come cases, the present tense can be used to describe a general procedure – e.g.
if describing how to do a triaxial test in general, you might use the present tense (but do
so consistently): ‘… a triaxial test is carried out by first selecting the sample. The sample
is then set up in the cell …..” etc. However, when talking about a particular experiment
or series of experiments that you did, use the past tense.
• Agreement of number: Know what is the subject of the sentence (is it singular or plural),
and make sure the verb agrees. Mistakes occur in this regard when the subject is separated
from the verb by clauses that contain plurals. ‘The aim of all the tests presented in these
documents is….”: the singular verb (is) agrees with subject (aim); do not get tricked by
the plurals in “tests” and “documents” into using the plural “are”3.
• Standard usage in Australia is to use ‘Australian’ rather than ‘US’ spelling. This is
selected at the start of any document under ‘Tools – Language’, and, after selecting
‘English (Australia)’ select this as ‘Default..’. Having the correct language selected will
allow the spell checker to check spelling according to the language selected.
o The main differences are in some spellings – ‘colour’, ‘labour’ (Aus) rather than
‘color’, ‘labor’ (US), and many more. The SI units in Australian are ‘metre’ and ‘litre’,
not ‘meter’ and ‘liter’ as in US. A ‘meter’ is a gauge for measuring something (not a
‘gage’). Our cars have ‘tyres’; US cars have ‘tires’.
o Whether there is a single or double ‘l’ in going from the verb to the present or past
participle – as ‘to model’ – ‘modelling’ (Aus), or ‘modeling’ (US) – and likewise for
1 I recommend that if you feel you need to, grab a copy of simple books on writing English, such as R.F. Bailey’s “A
Survival Kit for Writing English” (Longman Cheshire).
2 The initial version of this section was very much shorter, but feedback from other members of staff, and others, has
resulted in it growing to its present size.
3 This type of error is called an “attraction error”, in which the verb is “attracted” to the nearest preceding (plural)
noun rather than to the correct singular noun that is the subject of the sentence.

Thesis Writing Using Microsoft Word School of Civil and Resource Engineering
Hints and Tips The University of Western Australia
29
‘labelling’, etc. A ‘programme of work’ in Australia, would be ‘a program of work’ in
the US, though even in Australia we seem to have adopted ‘program’ for ‘computer
program’ (and I think the ‘programme’ battle is just about lost generally).
o Where US practice has many verb endings in ‘..ize’, Australian practice is to use
‘…ise’ – e.g. ‘realize’, ‘customize’, ‘pressurize’, etc, in US usage would be ‘realise’,
‘customise’, ‘pressurise’ in Australia. If you universally follow the ‘..ise’ practice, you
get into less trouble than if you use the ‘…ize’ practice, though blanket rules don’t
work either way (the boat in Australia capsizes, just as in the US)1. When the ‘Tools –
Language – Set Language’ option is set to English (Australia) as the default (as in this
document) the Word spelling checker will indicate a spelling error if US practice is
followed.
o Note that many miss-spelt words are automatically corrected if you have ‘AutoCorrect’
switched on. To find out, open ‘Tools – AutoCorrect Options’, and if ‘Replace text as
you type’ is ticked, then the corrections given in the list on that menu are automatically
made as you type. Take note also of the other ‘AutoCorrect’ options on this menu.
• Correct case for personal pronouns. “He gave the job to John and I” is incorrect; “He
gave the job to John and me” is correct. You can see this by leaving out the ‘John and’ – I
don’t think anyone would say “He gave the job to I”. (I’m sure this is a left-over from
everyone being belted behind the ears as kids for saying such things such as “Him and me
went to the movies”. Certain ABC sports commentators obviously got belted behind the
ears for this more than most!). So, these are correct: “He and I went to the movies”. “I
gave the money to John and him”. “The note came from me and him” (though here you
would usually put the other person before yourself!).
• The ‘apostrophe disease’ is rampant in English usage in Australia, when in fact the rules
are very simple. An apostrophe is used:
o To indicate the possessive case – before the final ‘s’ in the singular case, and after the
final ‘s’ for the plural case: John’s hat; the woman’s hat; the farmer’s work (one
farmer), the Farmers’ Journal (more than one farmer)2. But the possessive case for
personal pronouns does not use the apostrophe. This is obvious with ‘his’ or ‘hers’ or
‘yours’ or ‘ours’, so why would you want to write ‘it’s’ or ‘their’s’ for the possessive
case of ‘it’ or ‘their’? (The possessive case of ‘it’ is ‘its’).
1 Actually there are rules. Whether you use the ‘-ise’ or ‘-ize’ ending depends on the origin of the word (Greek or
Latin).
2 Inanimate objects do not ‘possess’ anything, so use of the possessive case for inanimate objects is somewhat
awkward : ‘ … the experiment’s aim..’ is hardly good English, when you mean ‘…the aim of the experiment..’.
Ditto ‘… the car’s door …, ‘….the sample’s size ..’ would be better written as ‘… the door of the car..’ or ‘…the size
of the sample …’

Thesis Writing Using Microsoft Word School of Civil and Resource Engineering
Hints and Tips The University of Western Australia
30
o Words already ending in ‘s’: “…James’s version of events…” is better than “…James’
version of events...”. (“Guinness has been brewed at the St James’s Gate Brewery in
Dublin since 1756”).
o An apostrophe is used to indicate missing bits of words: don’t = do not; can’t = can
not; wouldn’t = would not; etc. This is where the confusion regarding it’s comes from:
it’s = it is, and is not the possessive case of ‘it’. (Often, the ‘missing bits’ apostrophe
is dropped over time – it would be simply ostentatious to write ’phone, ’plane, ’bus,
photo’, even though there are bits left out of the original words: telephone, aeroplane,
omnibus, photograph).1
o Common sense has to be used to recognise the difference between the possessive case
and the ‘missing letter’ case: ….John’s briefcase…. John’s mad… John’s mad
brother..
o The ‘apostrophe disease’ refers to the idiotic practice of using an apostrophe + s to
indicate simple plural – the thinking being that: if an ‘s’ is added to a word, then it
‘feels’ right that it should be separated from the word by an apostrophe, because that is
what is done for possessive case! (Thus the signs such as “Hamburg’s and Chip’s for
sale” - aaaagghhhhhh. For some reason or another, this is called a Grocer’s
Apostrophe in the UK). The temptation to stray is strongest when the word ends with
a vowel – e.g. these are all incorrect as plurals, but many people succumb: comma’s,
hernia’s, pea’s in a pod, flea’s on the dog, toe’s, shoe’s, etc. (If you were really
pedantic, you might argue that photo’s is a correct plural, where the apostrophe here
indicates the missing bit of the word ‘photographs’).
o Another variant of the ‘apostrope disease’ uses it for plurals of words ending in ‘y’ –
e.g. “the lady’s went to the races”, when the correct plural is “ladies”. A certain pet
shop on Canning Highway in South Perth compounds this – the shop is called
“Guppy’s and Puppy’s”, when presumably they meant it to be “Guppies and Puppies”.
o Plurals of acronyms should not be given an apostrophe: Thus, LVDTs is the plural of
LVDT (and not LVDT’s). This allows there to be a different meaning to: “.. the PM’s
mad..” (the Prime Minister is mad2) and “…the PMs are mad ..” (not just our PM, but
all PMs, are mad). Common sense realises there is a difference between “…the PM’s
mad..” and “….the PM’s wife…” and “…the PM’s wives…” (no, I don’t think he has
more than one, but that’s how we would say it if he had!) and “….the PMs’ wives…”
(the wives of all the PMs).
1 Colloquial-style writing accepts these contractions – and I’ve used them in this document to ‘lighten’ the style – but
in general they are not used in technical writing.
2 Historical note: I wrote this when John Howard was Prime Minister of Australia.

Thesis Writing Using Microsoft Word School of Civil and Resource Engineering
Hints and Tips The University of Western Australia
31
o However, individual letters need an apostrophe in the plural – “ there are four ss, two
ps and two is in Mississippi…” should be “…there are four s’s, two p’s and two i’s in
Mississippi..”. Similarly “don’t forget to dot your i’s and cross your t’s” is a terrible
cliché, but at least it’s grammatically correct.
• Relative pronouns ‘that’ and ‘which’: The simplest rule to follow is:
o the relative pronoun ‘ that’ (never with a comma before it) indicates that the clause
that follows is ‘defining’ – it defines the noun it refers to: ‘I avoid all plants that are
poisonous to people’ - indicates that it is only those particular plants that I avoid, and
not plants in general. Very often, the “that are” or “that is” can be omitted: “Find the
needle in the haystack” is more efficient, and just as correct as: “Find the needle that is
in the haystack”.
o the relative pronoun ‘which’ (always with a comma before it) indicates that the clause
that follows is ‘descriptive’ – it gives additional description of the noun, but could be
left out without making a nonsense of the sentence. Thus: ‘The term in situ, which
comes from the Latin, is used to describe conditions in the ground’. The ‘which’
clause could be left out – it is simply providing extra description, and removing it does
not alter the basic meaning of the sentence1.
• Relative personal pronouns (actually not really an issue in technical thesis writing): The
English language does not have separate relative pronouns for ‘defining’ and ‘descriptive’
purposes, so the difference between ‘defining’ and ‘descriptive’ clauses has to be shown
using the ‘comma’ rule – no comma before the relative pronoun indicates a defining
clause, whereas a comma before it indicates a descriptive clause:
o “All Australians who love cricket drink lots of beer” has a different meaning to “All
Australians, who love cricket, drink lots of beer”. The former means that “only those
Australians who love cricket drink lots of beer”, but the latter means that “all
Australians, irrespective of who they are, drink lots of beer – and by the way, all
Australians love cricket”.
o “I swore at the man who hit me on the nose” has a completely different meaning to: “I
swore at the man, who hit me on the nose”. In the first, the hitting brought about the
swearing, whereas in the second, the swearing came first, resulting in the hitting.
Similarly, there is a big difference between: “The preacher berated the man who killed
his dog” and “The preacher berated the man, who killed his dog”. (Yes, OK, being
berated by a preacher might make you do strange things, including killing his dog).
1 It is not incorrect to use a ‘which’ clause as a qualifying clause, but you must do so without a comma before it (i.e.
a ‘which’ clause without a preceding comma is exactly the same as a ‘that’ clause). However, I think (and others
agree) that the “that – which” rule explained above ensures clarity.

Thesis Writing Using Microsoft Word School of Civil and Resource Engineering
Hints and Tips The University of Western Australia
32
• ‘the effect’, ‘to effect’, ‘to affect’,
o The noun is ‘effect’: ‘The effect of his error was that the bridge collapsed’. There is
no noun ‘affect’.
o The verb ‘to affect’ has different meaning from the verb ‘to effect’. “To affect’ means
‘ to have an influence on something’ (or ‘to have an effect on something)’, but ‘to
effect’ means to bring it about: “His error affected the stability of the bridge” (it had
some effect on it – could even improve the stability). “His error effected the collapse
of the bridge” = it was the direct cause of the collapse. Similarly, ‘Ricky Ponting
effected a run out’ (he brought it about – in cricket for the uninitiated); ‘his broken arm
affected his batting’ (influenced it – as it probably would).
• ‘However’ is one of the most abused words in technical writing. Do not use ‘however’ to
link sentences together to form one in the same way as you can use normal ‘coordinating’
conjunctions “For-And-Nor-But-Or-Yet-So”. (‘However’ is a conjunctive adverb, not a
normal ‘linking’ or ‘coordinating conjunction’ – the latter are remembered by the aconym
FANBOYS: For-And-Nor-But-Or-Yet-So).
o This is OK: ‘I used to use a dictionary to check my spelling, but now I just rely on the
spell-checker…’, but not: ‘I used to use a dictionary to check my spelling, however
now I just rely on the spell-checker…’.
o ‘However’ can be used at the start of a sentence (followed always by a comma), or, if
used in the middle of a sentence in this way, requires a semi-colon before and a comma
afterwards: “I used to use a dictionary to check my spelling. However, now I just rely
on the spell-checker…” or “I used to use the dictionary to check my spelling; however,
now I just rely on the spell-checker…”. (‘Nevertheless’ often gets abused in the same
way as ‘however’, and there are many others.)
• Plurals used as singular – particularly ‘criterion’ (singular), with the plural being
‘criteria’. Also ‘phenomenon – phenomena’, ‘automaton – automata’, ‘symposium –
symposia’. There are lots of other words of similar Greek origin where we use the regular
English way of forming plural – ‘electron – electrons’, etc. (Probably also ‘moron –
morons’. The statement: ‘You are all mora’ may be true, does it does not sound quite
right, and does not have same emotional impact as “You are all morons”).
• There are also English words of Latin origin that follow the Latin rules for plural. Latin
nouns are grouped into ‘declensions’, with different rules for each:
o 1st Declension: singular – a, plural –ae: ‘antenna – antennae’, ‘formula – formulae’,
‘vertebra – vertebrae’
o 2nd Declension (masculine) singular –us (or –ius), plural –i (or ii): ‘stimulus – stimuli’;
‘cactus – cacti’; ‘nucleus – nuclei’, ‘focus – foci’, ‘radius – radii’.

Thesis Writing Using Microsoft Word School of Civil and Resource Engineering
Hints and Tips The University of Western Australia
33
o 2nd Declension (neuter) singular –um , plural –a: ‘quantum – quanta’, ‘spectrum –
spectra’, ‘quorum – quora’, ‘erratum – errata’, ‘medium – media’, etc. Also ‘data’ is a
plural word (singular is ‘datum’, but the singular and plural have evolved into
somewhat different meanings). “The data from the test are of very high quality...”.
o 3rd Declension: singular –is, plural –es: ‘thesis – theses’, ‘analysis – analyses’, ‘axis –
axes’, ‘basis – bases’, ‘crisis – crises’, ‘synopsis – synopses’.
• Though going out of fashion, hyphens still have a place in keeping meaning clear: “He
has a second hand grenade” is ambiguous – is it “He has a second-hand grenade” or “He
has a second hand-grenade”? Also used with hyphenated adjectives (where a group of
words forms an adjective): “…we have an ugly bearded lecturer” has a different meaning
to “…we have an ugly-bearded lecturer” (the first actually means that the lecturer is ugly
and bearded – may be true – while the second is clear that it’s the beard that’s ugly).
Also: “..a red winged butterfly..” (the butterfly is red and has wings), or “…a red-winged
butterfly…” (the butterfly has red wings). And: “he has a never-forgotten face”, but “his
face is never forgotten”. Generally, lists of adjectives are separated by commas (not
comma’s!), so the examples above where the adjectives are separate should probably be
written “…the ugly, bearded lecturer..”, and “…the red, winged butterfly…”.
• If you are pedantic (like me), you might insist that there should be a hyphen in “… he is a
well-meaning guy..”. However, it is probably generally accepted that if it does not result
in ambiguity to leave it out, it could be left out1.
• Dangling participles: These are called ‘dangling’ because they are placed too far from the
word they are referring to, and become attached to the wrong word: “Having cracked
down the middle, I removed the sample from the testing machine” (wrong – unless you
actually did crack down the middle). “Having taken the reading, the sample was removed
from the balance” (wrong – no, the sample cannot take readings). This error has formed
the basis of (weak) jokes: “If boiled long enough, your child should not get ill from
drinking the water” (hmmm, may be good advice…). “If properly nailed down, the cat
will not be able to move the box” (but the RSPCA might be interested in you…). “I shot
an elephant in my underwear” (Groucho Marx).
• Articles: definite article “the”, indefinite article “a” or “an”. If you are not a native
English speaker, you will probably find that the rules for using the definite article,
indefinite article (or no article at all) are very confusing. Wrong use of the article (or
leaving out the article) is the most common mistake I come across in writing by non-
native English speakers. The names help: use the definite article when something
‘definite’ is being referred to (if it is not already ‘definite’), and use the indefinite article
1 Copy editors for most international journals generally insist on a very strict use of hyphens in such cases.
Thesis Writing Using Microsoft Word School of Civil and Resource Engineering
Hints and Tips The University of Western Australia
34
when the object referred to is ‘indefinite’. Use no article when referring to general or
generic objects in the plural (there is no plural indefinite article).
o Proper nouns are already definite, so generally no article is required. Exceptions: some
cities and countries: The Hague, The Netherlands, The Levant.
o ‘Look for the sample’ refers to a particular sample; ‘look for a sample’ refers to any
sample. Likewise, in the plural: ‘Look for the samples’ (definite samples referred to);
‘look for samples’ (general).
• There, their, they’re; there’s, theirs: “There are many reasons for their lack of knowledge.
They’re just not trying to learn, and the loss is theirs. There’s not much we can do about
it”. Similarly: Your, you’re, yours. “The fault is yours, and if you’re not careful, you’re
going to fail your exam”.
• ‘Able to be’: “The result was able to be calculated …”; “the test was able to be done…”;
“the sample was able to be trimmed…”. Inanimate objects are not able to do anything.
They are also probably not ready to do anything, as in “…the test was ready to be
done…”, or “…the car was ready to be started…”.
• Reflexive pronouns – use only when there is reflexive meaning: “I hit myself on the
head”; “he shot himself in the foot”. But: “The boss gave the credit to John and me”, and
not “The boss gave the credit to John and myself”. (Again, a left-over from reluctance to
use ‘me’).
• Avoid using strings of nouns as adjectives, as in “…the sample density measurement error
estimation technique...”. The solution is to re-write, e.g. “…the technique for error
estimation in measurement of sample density…”.
• Finally, before you print the final version of your document: “Proofread carefully to see if
you any words out”.1
1 See the full list of ‘rules of grammar’ like this in the appendix.

Thesis Writing Using Microsoft Word School of Civil and Resource Engineering
Hints and Tips The University of Western Australia
35
APPENDIX A. HUMOROUS GRAMMAR RULES
No comment required (taken from www.creativeteachingsite.com/humorgrammar.htm ):
1. Verbs HAS to agree with their subjects.
2. Never use a preposition to end a sentence with1. Winston Churchill, when once corrected on
this error, responded to the young man who corrected him by saying "Young man, that is the kind
of impudence up with which I will not put!”
3. And don't start a sentence with a conjunction.
4. It is wrong to ever split an infinitive2.
5. Avoid clichés like the plague. (They're old hat.)
6. Also, always avoid annoying alliteration.
7. Be more or less specific.
8. Parenthetical remarks (however relevant) are (usually) unnecessary.
9. Also too, never, ever use repetitive redundancies endlessly over and over again.
10. No sentence fragments.
11. Contractions aren't always necessary and shouldn't be used to excess so don’t3.
12. Foreign words and phrases are not always apropos.
13. Do not be redundant; do not use more words than necessary; it's highly superfluous and can
be excessive.
14. All generalizations are bad.
15. Comparisons are as bad as clichés.
16. Don't use no double negatives.
17. Avoid excessive use of ampersands & abbrevs., etc.
18. One-word sentences? Eliminate.
1 This rule can now be considered dead (but has not been finally buried). But care is still required: “Mom, what did
you bring that book I don't like to be read to out of up for?”
2 This ‘rule’ is also just about dead: splitting infinitives is now acceptable, where appropriate: after all, the mission of
the Starship Enterprise was “…to boldly go where no man had gone before…”
3 In this document, in the interest of informality, I have used contractions widely, but I would never do so in a formal
document – so don’t use them.

Thesis Writing Using Microsoft Word School of Civil and Resource Engineering
Hints and Tips The University of Western Australia
36
19. Analogies in writing are like feathers on a snake (Unless they are as good as gold).
20. The passive voice is to be ignored1.
21. Eliminate commas, that are, not necessary. Parenthetical words, however, should be enclosed
in commas.
22. Never use a big word when substituting a diminutive one would suffice.
23. Don’t overuse exclamation points!!!
24. Use words correctly, irregardless of how others use them.
25. Understatement is always the absolute best way to put forth earth-shaking ideas
26. Use the apostrophe in it's proper place and omit it when its not needed and use it correctly
with words’ that show possession.
27. Don’t use too many quotations. As Ralph Waldo Emerson said, "I hate quotations. Tell me
what you know."
28. If you've heard it once, you've heard it a billion times: Resist hyperbole; not one writer in a
million can use it correctly. Besides, hyperbole is always overdone, anyway.
29. Puns are for children, not groan readers.
30. Go around the barn at high noon to avoid colloquialisms.
31. Even IF a mixed metaphor sings, it should be derailed.
32. Who needs rhetorical questions? However, what if there were no rhetorical questions?
33. Exaggeration is a billion times worse than understatement.
34. Avoid "buzz-words"; such integrated transitional scenarios complicate simplistic matters.
35. People don’t spell "a lot" correctly alot of the time.
36. Each person should use their possessive pronouns correctly.
37. All grammar and spelling rules have exceptions (with a few exceptions)....Morgan’s Law.
38. Proofread carefully to see if you any words out.
39. The dash – a sometimes useful punctuation mark – can often be overused – even though it’s a
helpful tool some of the time2.
1 Unfortunately or otherwise, the passive voice is used extensively in technical writing – see advice earlier on the
passive voice in Chapter 4.
2 I am probably guilty of overuse of hyphens for punctuation, as you will probably see from this document.

Thesis Writing Using Microsoft Word School of Civil and Resource Engineering
Hints and Tips The University of Western Australia
37
40. Proofread carefully to make sure you don’t repeat repeat any words.
41. In writing, it’s important to remember that dangling sentences.
41. When numbering in a written document, check your numbering system carefully.
42. It is important to use italics for emphasis sparingly.
43. In good writing, for good reasons, under normal circumstances, whenever you can, use
prepositional phrases in limited numbers and with great caution.
44. Avoid going out on tangents unrelated to your subject – not the subject of a sentence – that's
another story (like the stories written by Ernest Hemingway, who by the way wrote the great
fisherman story The Old Man and the Sea).
45. Complete sentences. Like rule 10.
46. Unless you're a righteous expert don't try to be too cool with slang to which you're not hip.
47. If you must use slang, avoid out-of-date slang. Right on!
48. You'll look poorly if you misuse adverbs.
49. Use the ellipsis ( . . . ) to indicate missing . . .
50. Use brackets to indicate that you [ not Shakespeare, for example ] are giving people [ in your
class ] information so that they [ the people in your class ] know about whom you are speaking.
But do not use brackets when making these references [ to other authors ] excessively.
51. Note: People just can't stomach too much use of the colon.
52. Between good grammar and bad grammar, good grammar is the best.
53. There are so many great grammar rules that I can't decide between them.
54. In English, unlike German, the verb early in the sentence, not later, should be placed.
55. When you write sentences, shifting verb tense is bad.

Thesis Writing Using Microsoft Word School of Civil and Resource Engineering
Hints and Tips The University of Western Australia
38
APPENDIX B. MACRO LISTING
These macros are embedded in this document (You can see them under “Tools_Macros” and
select one of them, and “Edit”). They will run with this document provided you have gone
through setting up the numbering options for the Figure and Table captions (See Section 3.5).
Note that you can change the shortcuts for these using the ‘Tools – Customize – Keyboard’, and
select ‘Macros’ from the drop-down list, and choose ‘Save in..’ ‘Thesis template.dot’. The full
list of macros within this template is shown – just scroll down to find the one you want to change,
and change the shortcut keys.
Equation with
number – not
including
chapter number
(Alt-N)
Sub Equation_No()
'
' Equation_No Macro
' Macro recorded 8/04/2009 by Martin Fahey
'
ActiveDocument.Tables.Add Range:=Selection.Range, NumRows:=1, NumColumns:= _
2, DefaultTableBehavior:=wdWord9TableBehavior, AutoFitBehavior:= _
wdAutoFitFixed
With Selection.Tables(1)
If .Style <> "Table Grid" Then
.Style = "Table Grid"
End If
.ApplyStyleHeadingRows = True
.ApplyStyleLastRow = True
.ApplyStyleFirstColumn = True
.ApplyStyleLastColumn = True
End With
Selection.InlineShapes.AddOLEObject ClassType:="Equation.3", FileName:="", _
LinkToFile:=False, DisplayAsIcon:=False
Selection.MoveLeft Unit:=wdCharacter, Count:=1, Extend:=wdExtend
Selection.ParagraphFormat.Alignment = wdAlignParagraphCenter
Selection.InsertCaption Label:="Equation", TitleAutoText:="InsertCaption3" _
, Title:="", Position:=wdCaptionPositionBelow, ExcludeLabel:=1
Selection.MoveLeft Unit:=wdCharacter, Count:=1, Extend:=wdExtend
Selection.Cut
Selection.MoveDown Unit:=wdLine, Count:=1
Selection.TypeBackspace
Selection.TypeBackspace
Selection.MoveRight Unit:=wdCell
Selection.TypeText Text:="("
Selection.PasteAndFormat (wdPasteDefault)
Selection.TypeText Text:=")"
Selection.ParagraphFormat.Alignment = wdAlignParagraphRight
Selection.MoveLeft Unit:=wdCharacter, Count:=4, Extend:=wdExtend
With Selection.Tables(1)
.Borders(wdBorderLeft).LineStyle = wdLineStyleNone
.Borders(wdBorderRight).LineStyle = wdLineStyleNone
.Borders(wdBorderTop).LineStyle = wdLineStyleNone
.Borders(wdBorderBottom).LineStyle = wdLineStyleNone
.Borders(wdBorderVertical).LineStyle = wdLineStyleNone
.Borders(wdBorderDiagonalDown).LineStyle = wdLineStyleNone
.Borders(wdBorderDiagonalUp).LineStyle = wdLineStyleNone
.Borders.Shadow = False
End With

Thesis Writing Using Microsoft Word School of Civil and Resource Engineering
Hints and Tips The University of Western Australia
39
With Options
.DefaultBorderLineStyle = wdLineStyleSingle
.DefaultBorderLineWidth = wdLineWidth050pt
.DefaultBorderColor = wdColorAutomatic
End With
Selection.MoveLeft Unit:=wdCharacter, Count:=1
End Sub
Equation with
number –
including
chapter number
(Alt-Q)
Sub Eq_No_with_Chapter()
'
' Eq_No_with_Chapter Macro
' Macro recorded 8/04/2009 by Martin Fahey
'
ActiveDocument.Tables.Add Range:=Selection.Range, NumRows:=1, NumColumns:= _
2, DefaultTableBehavior:=wdWord9TableBehavior, AutoFitBehavior:= _
wdAutoFitFixed
With Selection.Tables(1)
If .Style <> "Table Grid" Then
.Style = "Table Grid"
End If
.ApplyStyleHeadingRows = True
.ApplyStyleLastRow = True
.ApplyStyleFirstColumn = True
.ApplyStyleLastColumn = True
End With
Selection.InlineShapes.AddOLEObject ClassType:="Equation.3", FileName:="", _
LinkToFile:=False, DisplayAsIcon:=False
Selection.MoveLeft Unit:=wdCharacter, Count:=1, Extend:=wdExtend
Selection.ParagraphFormat.Alignment = wdAlignParagraphCenter
With CaptionLabels("Equation")
.NumberStyle = wdCaptionNumberStyleArabic
.IncludeChapterNumber = True
.ChapterStyleLevel = 1
.Separator = wdSeparatorPeriod
End With
Selection.InsertCaption Label:="Equation", TitleAutoText:="InsertCaption4" _
, Title:="", Position:=wdCaptionPositionBelow, ExcludeLabel:=1
Selection.MoveLeft Unit:=wdCharacter, Count:=3, Extend:=wdExtend
Selection.Cut
Selection.MoveDown Unit:=wdLine, Count:=1
Selection.TypeBackspace
Selection.TypeBackspace
Selection.MoveRight Unit:=wdCell
Selection.TypeText Text:="("
Selection.PasteAndFormat (wdPasteDefault)
Selection.TypeText Text:=")"
Selection.ParagraphFormat.Alignment = wdAlignParagraphRight
Selection.MoveLeft Unit:=wdCharacter, Count:=6, Extend:=wdExtend
With Selection.Tables(1)
.Borders(wdBorderLeft).LineStyle = wdLineStyleNone
.Borders(wdBorderRight).LineStyle = wdLineStyleNone
.Borders(wdBorderTop).LineStyle = wdLineStyleNone
.Borders(wdBorderBottom).LineStyle = wdLineStyleNone
.Borders(wdBorderVertical).LineStyle = wdLineStyleNone
.Borders(wdBorderDiagonalDown).LineStyle = wdLineStyleNone
.Borders(wdBorderDiagonalUp).LineStyle = wdLineStyleNone
.Borders.Shadow = False
End With
With Options
.DefaultBorderLineStyle = wdLineStyleSingle

Thesis Writing Using Microsoft Word School of Civil and Resource Engineering
Hints and Tips The University of Western Australia
40
.DefaultBorderLineWidth = wdLineWidth050pt
.DefaultBorderColor = wdColorAutomatic
End With
Selection.MoveLeft Unit:=wdCharacter, Count:=1
End Sub
Figure Number
(Alt-F)
Sub Figure_Number()
'
' Figure_Number Macro
' Macro recorded 8/04/2009 by Martin Fahey
'
With CaptionLabels("Figure")
.NumberStyle = wdCaptionNumberStyleArabic
.IncludeChapterNumber = True
.ChapterStyleLevel = 1
.Separator = wdSeparatorPeriod
End With
Selection.InsertCaption Label:="Figure", TitleAutoText:="InsertCaption1", _
Title:="", Position:=wdCaptionPositionBelow, ExcludeLabel:=0
Selection.TypeText Text:=". "
End Sub
Table Number
(Alt-T)
Sub Table_Number()
'
' Table_Number Macro
' Macro recorded 8/04/2009 by Martin Fahey
'
Selection.InsertCaption Label:="Table", TitleAutoText:="InsertCaption2", _
Title:="", Position:=wdCaptionPositionAbove, ExcludeLabel:=0
Selection.TypeText Text:=". "
End Sub