thermal photo printer ask-300 printer driver software · 6 31 installation if the printer driver...
TRANSCRIPT

Second EditionRef.No. PP3-B1399E2
INSTRUCTION GUIDE
THERMAL PHOTO PRINTER
ASK-300PRINTER DRIVER SOFTWARE
Ver. 2.00 (Version adapted to Matte / High quality Mode) or later

2
Microsoft, Windows, Windows XP, Windows Vista and Windows 7 are registered trademarks of Microsoft Corporation in the United States and/or other countries.Adobe, Adobe Photoshop are registered trademarks of Adobe Systems.The various software packages mentioned in this manual are the registered trademarks of their respective companies.

3
Contents
1. System requirements ................................................................. 4
2. Download and decompression of printer driver and ICC profile .. 5
3. Installation .................................................................................. 6
3.1 Windows XP .................................................................................................6
3.1.1 Installing the USB port ........................................................................6
3.1.2 Installing the driver .............................................................................6
3.2 Windows Vista ..............................................................................................7
3.2.1 Installing the USB port ........................................................................7
3.2.2 Installing the driver .............................................................................8
3.3 Windows 7 ....................................................................................................9
3.3.1 Installing the driver .............................................................................9
3.3.2 Installing the USB port ...................................................................... 11
4. Installation of ICC profile .......................................................... 12
5. Uninstallation ........................................................................... 15
6. Function explanation ................................................................ 17
6.1 Paper dialog ................................................................................................ 17
6.2 Option setting dialog ................................................................................... 18
6.3 Color adjustment ......................................................................................... 19
6.3.1 Color Adjust dialog ............................................................................20
6.3.2 Fine Adjust dialog .............................................................................21
6.4 Error indication ............................................................................................22
7. Notes and other information ..................................................... 24
7.1 Notes ..........................................................................................................24
7.2 Operating directions for customer’s purpose ..............................................26
7.2.1 When you want to adjust the color of the print image. ......................26
7.2.2 To adjust the gray balance in the low gray levels,
use “Color correction” on the option tab. ...........................................27
7.3 Prohibition matter ........................................................................................27
7.4 Exemption from responsibility ....................................................................27

4
System requirements11
Computer : Computer equipped with Pentium class CPU or moreMain storage memory : 512 Mbytes or moreHard disk : Empty capacity 512 Mbytes or moreUSB cable : Be sure to use a cable 2m or shorter.OS : Windows XP, Windows Vista, or Windows 7 (32-bit or 64-bit type)
* Use a printer driver compatible with the operating system of your computer. In case of Windows Vista or Windows 7, check the system type: 32-bit or 62-bit.
To confirm the system type of your computer, take the following steps.
Click “Start,” open “Control Panel,” select “System and Maintenance,” and then click “System.”1) The system type is displayed in the “System” area.2)
Driver folder Supported operating system
ASK300_WinXP Microsoft® Windows® XP
ASK300_WinVista7 Windows Vista® (32-bit)Windows® 7 (32-bit)
ASK300_WINVista7_x64_Ver100 Windows Vista® (64-bit)Windows® 7 (64-bit)
* ASK-300 supports USB 2.0 (Hi-Speed USB) interface. As USB 2.0 is fully upward-compatible with USB 1.1, ASK-300 can be used with a personal computer that supports USB 1.1 interface.
To use ASK-300 based on USB 2.0 (Hi-Speed USB), connect with a personal computer that supports USB 2.0 (Hi-Speed USB). For USB 2.0 (Hi-Speed USB) compatibility of your personal computer, contact the manufacturer of the personal computer.
* When you use Windows 7, install the printer driver first, and then connect the printer to the personal computer.
* The Matte / High quality (UltraFine) Modes are only available on printers with the new version of firmware adapted to the modes.

5
Download and decompression of printer driver and 21 ICC profile
For printer driver and profile, contact the dealer of the printer.1) Decompress the compressed files by double-clicking them, and save them in an arbitrary folder.2)

6
Installation31
<Note> If the printer driver of old version has been already installed, uninstall it first, and then install
the printer driver newly.
Windows XP3.1
Installing the USB port3.1.1
Start Microsoft1) ® Windows® XP operating system.Logon as an Administrator or Administrator group members.2) Connect a USB cable between the computer and the printer before starting the installation.3) Turn on the printer.4) A USB Printing Support will be installed automatically.5) “Found New Hardware Wizard” appears. (Fig.1)6)
Installing the driver3.1.2
Select “No, not this time” on “Found New Hardware Wizard” and click “Next” button. (Fig.1)1) Select “Install from a list of specific location (Advanced)” on “Found New Hardware Wizard” 2) and click “Next” button. (Fig.2)
<Fig.1> <Fig.2>
Select “Include this location in the search”, and then click “Browse” button. Open the 3) downloaded Windows XP printer driver folder, and then ASK-300N0.ini. When the screen shown in <Fig.3> reappears, click “Next” button. (Fig.3)Click “Continue Anyway” button. (Fig.4)4)
<Fig.3> <Fig.4>

7
Click “Finish” button. (Fig.5)5)
<Fig.5>
In the printer properties, select the paper size set for the printer, and then carry out “Test print” 6) to check the printer setting works correctly.
Windows Vista3.2
Installing the USB port3.2.1
Start Windows Vista1) ® operating system.Logon as an Administrator or Administrator group members.2) Connect a USB cable between the computer and the printer before starting the installation.3) Turn on the printer.4) A USB Printing Support will be installed automatically.5) Click “Locate and install driver software” button on “Found New Hardware Wizard.” (Fig.6)6)
<Fig.6>

8
Installing the driver3.2.2
Click “Continue” button on “User Account Control” dialog. 1) Select “I don’t have the disc. Show me other options.” (Fig.7)2) Select “Browse my computer for driver software.” (Fig.8)3)
<Fig.7> <Fig.8>
Click “Browse” button. Open the downloaded Windows Vista/Windows 7 printer driver folder, 4) and then ASK-300N0.ini.When the screen shown in <Fig.9> reappears, click “Next” button. (Fig.9)Select “Install this driver software anyway.” (Fig.10)5)
<Fig.9> <Fig.10>
Click “Close” button. (Fig.11)6)
<Fig.11>

9
Windows 73.3
Installing the driver3.3.1
<Note> With Windows 7, make sure to install the printer driver before connecting the printer to the
computer.
Start Windows1) ® 7 operating system.Logon as an Administrator or Administrator group members.2) Click Start button and select “Devices and Printers” from Start Menu. (Fig.12)3) In “Devices and Printers” window, while any of the icon listed under “Printers and Faxes” is 4) selected, click “Print server properties.” (Fig.13)
<Fig.12> <Fig.13>
Open “Drivers” tab of “Print Server Properties”, and click “Add…” button. (Fig.14)5) Click “Next” button on “Welcome to the Add Printer Driver Wizard” (Fig.15)6)
<Fig.14> <Fig.15>
10
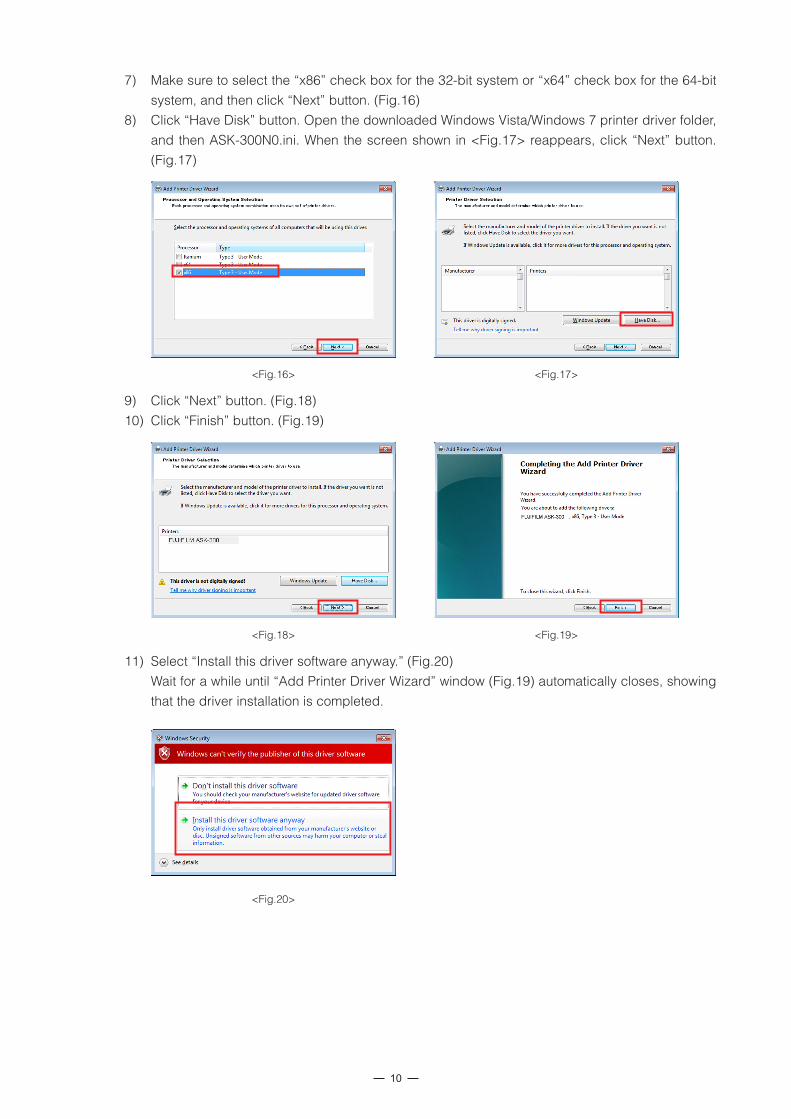
Make sure to select the “x86” check box for the 32-bit system or “x64” check box for the 64-bit 7) system, and then click “Next” button. (Fig.16)Click “Have Disk” button. Open the downloaded Windows Vista/Windows 7 printer driver folder, 8) and then ASK-300N0.ini. When the screen shown in <Fig.17> reappears, click “Next” button. (Fig.17)
<Fig.16> <Fig.17>
Click “Next” button. (Fig.18)9) Click “Finish” button. (Fig.19)10)
<Fig.18> <Fig.19>
Select “Install this driver software anyway.” (Fig.20)11) Wait for a while until “Add Printer Driver Wizard” window (Fig.19) automatically closes, showing that the driver installation is completed.
<Fig.20>

11
The installed printer driver will be displayed in Drivers tab on “Print Server Properties.”12) Click “Close” button. (Fig.21)
<Fig.21>
Installing the USB port3.3.2
Now, power on the printer and connect it to your personal computer with USB cable. 1) The driver software will be automatically installed. Click the balloon to check the installation 2) status. (Fig.22)
<Fig.22>
Click “Close” button to finish the installation. (Fig.23)3)
<Fig.23>

12
Installation of ICC profile41
<Note> •InstalltheprinterdriverbeforeinstallingtheICCprofile.
•ScreenshotstakenfromWindows7areusedinthissection.Theinstallationprocedureis
the same as in other operating systems.
Installation of ICC profile (Fig.24)1) Right-click the downloaded ICC profile. • Select “Install Profile” to install ICC profile.•
Select “Devices and Printers” in the Start menu to open.2) Right-click “FUJIFILM ASK-300”, and select “Properties” in the menu displayed. (Fig.25)3)
<Fig.24> <Fig.25>
Select “Color Management” tab and click “Color Management” button. (Fig.26)4) Select “FUJIFILM ASK-300” for “Device:”. (Fig.27)5)
<Fig.26> <Fig.27>

13
Select “Use my settings for this device” check box. (Fig.28)6) Change the “Profile selection:” setting into “Manual”.7) (Important) (Fig.28)Click “Add” button to select the ICC profile that has been installed. (Fig.28)8) Click “Close” button to finish the operation. (Fig.28)9)
<Fig.28>
<Note> Under “Options” tab in the “Printing Preferences” dialog, “Color matching” is selected by
default. If this check box is deselected, ICC does not work. (Fig.29)
<Fig.29>

14
As the color matching is enabled by default, ICC profile is automatically applied with Microsoft Paint, Windows Picture or FAX Viewer when printing. However, with Adobe Photoshop or other application software, it is necessary to apply ICC profile manually. (Fig.30)
<Fig.30>
15
Uninstallation51
Operate the following procedures to uninstall the printer driver. When uninstalling the printer driver, confirm that the printer driver is not used from the application or the print job does not remain in the spooler.When you use the printer in Windows Vista or Windows 7, confirm that the printer is not set as default printer.When you uninstall and then reinstall the printer driver in Windows Vista or Windows 7, restart the computer after the reinstallation is completed.
Windows XP
Start up Rem300.exe in the printer driver folder.1) After confirming that “FUJIFILM ASK-300” is listed in the list box, press the “Uninstall” button.2) When uninstallation is completed, a message of “Uninstallation was completed. Is a computer 3) rebooted?” is displayed. When you reboot the computer immediately, click the “Yes” button. When you reboot it later, click the “No” button. Make sure to reboot the computer.
Windows Vista
Click “Start” and open “Control Panel.”1) Select “Printers.”2) Right-click the printer icon in “Printers” folder and select “Delete.”3) Click “Yes” on printer delete acknowledge dialog.4) Right-click in “Printers” folder and select “Run as Administrator.”5) Click “Server Properties” then “Printer Server Properties” window is displayed.Open “Drivers” tab on “Printer Server Properties” dialog and select a driver to be uninstalled 6) from the tab. Then, click “Remove” button.Select “Remove driver and driver package.” in “Remove Driver And Package” dialog and click 7) “OK” button.Click “Yes” button on “Printer Server Properties” dialog.8) If “Driver package information collected.” is displayed in “Remove Driver And Package” dialog, 9) click “Delete” button.Click “OK” button when “Driver package deleted” is displayed in “Remove Driver Package” 10) dialog.Restart the personal computer.11)
Windows 7
Click Start button and select “Devices and Printers” from Start Menu.1) Right-click the printer icon to be removed and select “Remove device”.2) Click “Yes” button in the “Remove Device” confirmation dialog. 3) While selecting any of the icon under “Printers and Faxes” category in the “Devices and 4) Printers” window, select “Printer server properties” at the top of the window. Open “Drivers” tab of “Printer Server Properties” and click “Change Driver Settings” button. 5) The similar window taht doesn’t have “Change Driver Settings” button at the bottom left is 6) displayed. Select the printer driver to be removed and click “Remove” button.
16
Select “Remove driver and driver package.” in “Remove Driver And Package” dialog and click 7) “OK”. Click “Yes” button in “Printer Server Properties” confirmation dialog.8) Click “Delete” button when “Driver package information collected” is displayed in “Remove 9) Driver Package” dialog. Click “OK” button when “Driver package deleted” is displayed in “Remove Driver Package” 10) dialog.Restart the personal computer.11)
17
Function explanation61
This section describes the printing preferences (with the Paper, Options and Color Adjust tabs) in the printer driver and the error indications.
To set the default printing preferences, take the following steps.Click “Start” and select “Printers and Faxes.” Right-click the ASK-300 icon on the window, and select “Properties.” After making settings in the FUJIFILM ASK-300 Printing Preferences dialog, click “Apply” and then “OK” to close the dialog.
Paper dialog6.1
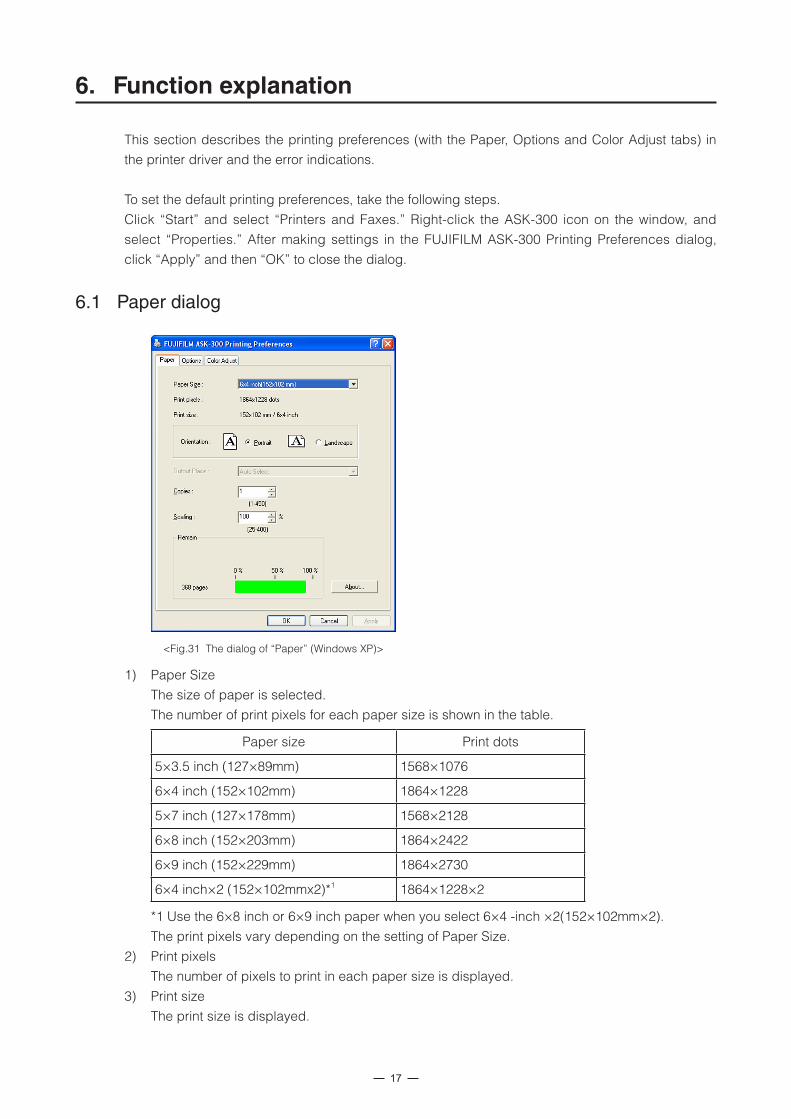
<Fig.31 The dialog of “Paper” (Windows XP)>
Paper Size1) The size of paper is selected. The number of print pixels for each paper size is shown in the table.
Paper size Print dots
5×3.5 inch (127×89mm) 1568×1076
6×4 inch (152×102mm) 1864×1228
5×7 inch (127×178mm) 1568×2128
6×8 inch (152×203mm) 1864×2422
6×9 inch (152×229mm) 1864×2730
6×4 inch×2 (152×102mmx2)*1 1864×1228×2
*1 Use the 6×8 inch or 6×9 inch paper when you select 6×4 -inch ×2(152×102mm×2).The print pixels vary depending on the setting of Paper Size.Print pixels2) The number of pixels to print in each paper size is displayed. Print size3) The print size is displayed.

18
Orientation4) The direction of paper is set. Copies5) The printer prints the number of printouts which is shown in dialog. (Range : 1 - 450)* When multiple copies are printed, it becomes like the example below usually. (example) The print result of 2 copies of 3 pages:1p 1p 2p 2p 3p 3p* Some applications might not transmit as the above method. (example) The print result of 2 copies of 3 pages To achieve 1p 2p 3p 1p 2p 3p, the application outputs each image twice.Scaling6) Enlargement scale is set. (Range : 25-400%)Remain7) The remaining amount of the ink ribbon in the connected printer is displayed in a bar.When a printer is not connected or information from the printer can not be read, this bar is displayed in gray.About...8) Displays the version information of this driver.
Option setting dialog6.2
<Fig.32 Option setting dialog (Windows XP)>
Sharpness1) none / -3 / -2 / -1 / 0 / 1 / 2 / 3 Level of outline correction is changed. none : Not perform the outline correction.-3 to 3 : The value is smaller, the outline becomes softer. The value is larger, the outline becomes sharper.Matte2) Print finish of matte is set.

19
Print Speed3) Printing speed is set.Fine : Printing is performed at the standard speed. (Standard quality picture mode)UltraFine : Printing is performed at the speed slower than the standard speed. (High quality
picture mode)* When Matte is selected, printing is performed at the UltraFine speed regardless of the print
speed setting.Color correction4) The tone of light colors can be changed.R : -200 - +200 As the value is smaller, the red tone is weakened. As the value is larger, the red tone is intensified.G : -200 - +200 As the value is smaller, the green tone is weakened. As the value is larger, the green tone is intensified.B : -200 - +200 As the value is smaller, the blue tone is weakened. As the value is larger, the blue tone is intensified.Color matching5) Color matching is carried out according to the ICC profile set in the “Color control” tab.When the ICC profile is not set in the “Color control” tab, set the “Color matching” to OFF because the color matching is not carried out in this case.Defaults6) All the settings in Option dialog are reset to the defaults.
Color adjustment6.3
If the color adjustment values are saved or loaded by clicking “Save” or “Load,” those values are applicable to the printing preferences in other computers. The value file is saved as “***.cpd” (an arbitrary text is filled in “***”). (The path to save the file at default: C:¥WINDOWS¥system32¥spool¥drivers¥color)
<Fig.33 Color adjustment dialog (Windows XP)>

20
Color Adjust dialog6.3.1
Adjust1) Tick the box for the color adjustment.Gamma2) Adjusted value (-5 - +5)When you want to increase the density of the middle tones, decrease the value of “Gamma” of the color adjustment dialog.Same check box ON: R,G and B are same value, OFF:R,G and B are individually adjusted.
255White
(Output data)
0Black
255(Input data)White
Larger
Smaller
Gamma
Brightness3) Adjusted value (-128-+128)When you want the brightness of the print picture to be dark, the value of “Brightness” of the color adjustment dialog must be decreased.Same check box ON: R,G and B are same value, OFF:R,G and B are individually adjusted.
Brightness
255White
(Output data)
0Black
255(Input data)White
Larger
Smaller
Contrast4) Adjusted value (-128-+128)When you want the contrast of the print picture to be strong, the value of “Contrast” of the color adjustment dialog must be increased.Same check box ON: R,G and B are same value, OFF:R,G and B are individually adjusted.
Contrast
255White
(Output data)
0Black
255(Input data)White
Larger
Smaller
21
Fine adjust5) The more minute color adjustments are carried out by the Gamma adjustment tone curve.Defaults6) All adjustable values in Color Adjust dialog become 0. Load...7) The color adjustment setting file is loaded.Save...8) The color adjustment setting is saved.
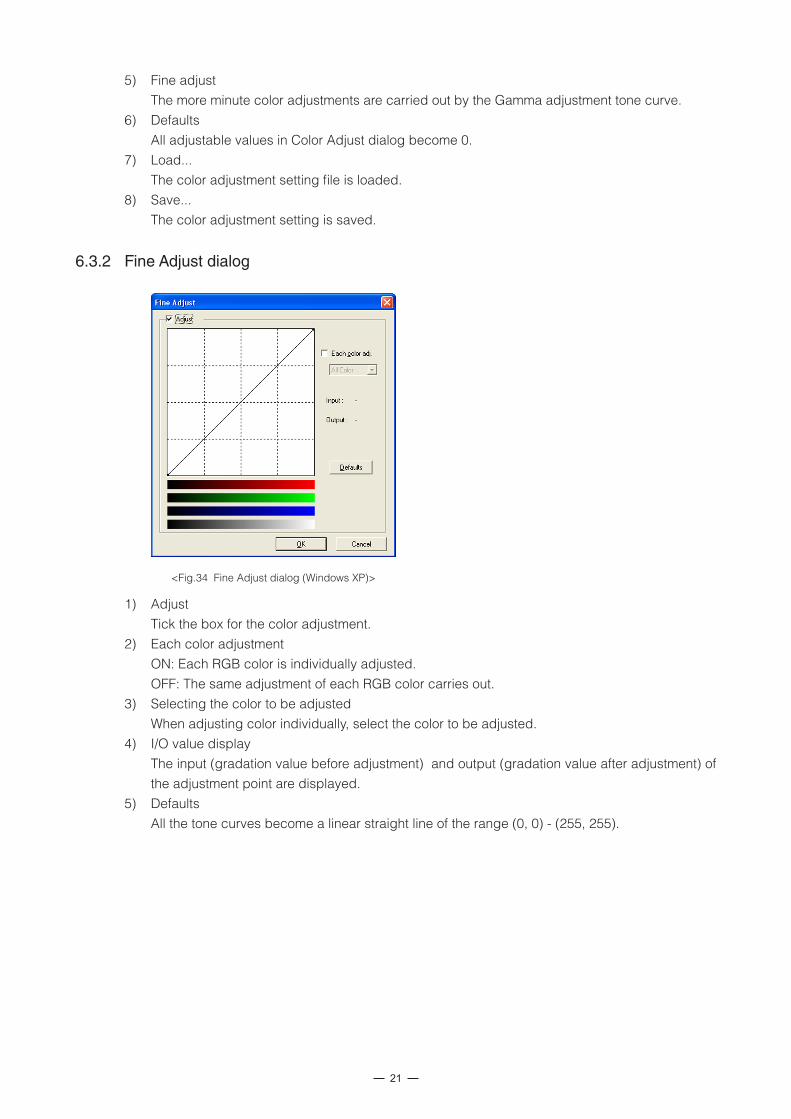
Fine Adjust dialog6.3.2
<Fig.34 Fine Adjust dialog (Windows XP)>
Adjust1) Tick the box for the color adjustment.Each color adjustment2) ON: Each RGB color is individually adjusted. OFF: The same adjustment of each RGB color carries out.Selecting the color to be adjusted3) When adjusting color individually, select the color to be adjusted.I/O value display4) The input (gradation value before adjustment) and output (gradation value after adjustment) of the adjustment point are displayed.Defaults5) All the tone curves become a linear straight line of the range (0, 0) - (255, 255).
22
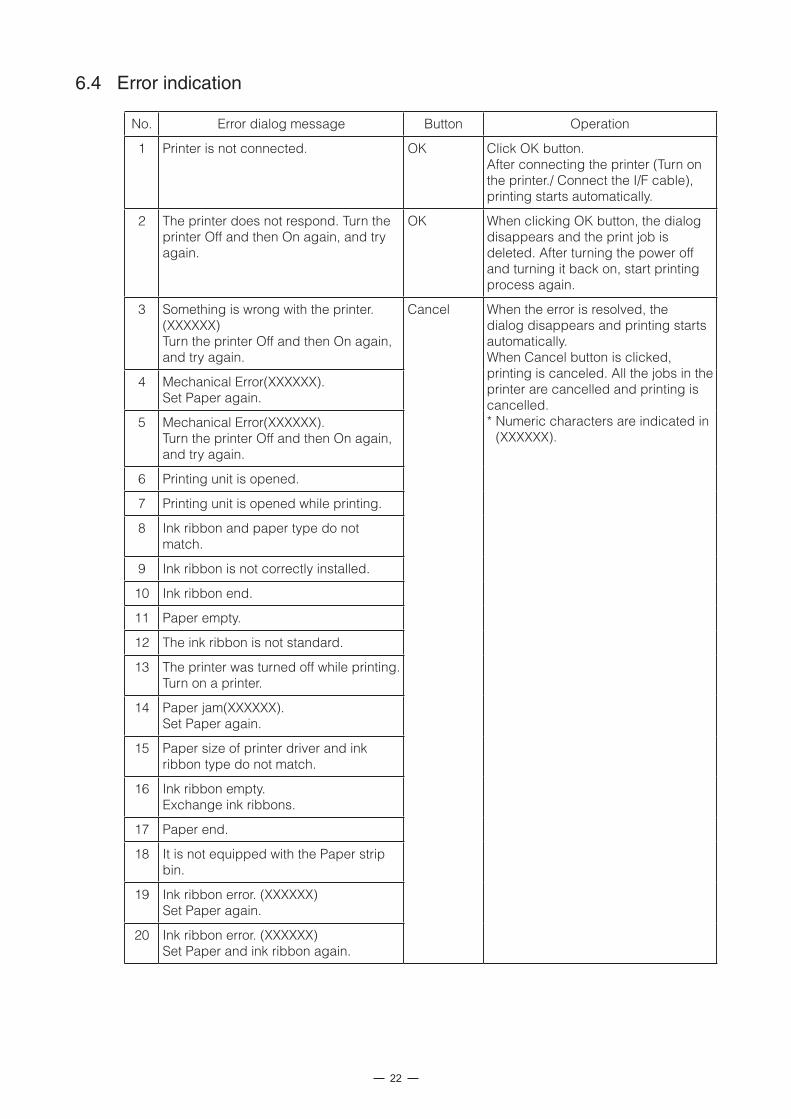
Error indication6.4
No. Error dialog message Button Operation
1 Printer is not connected. OK Click OK button.After connecting the printer (Turn on the printer./ Connect the I/F cable), printing starts automatically.
2 The printer does not respond. Turn the printer Off and then On again, and try again.
OK When clicking OK button, the dialog disappears and the print job is deleted. After turning the power off and turning it back on, start printing process again.
3 Something is wrong with the printer.(XXXXXX)Turn the printer Off and then On again, and try again.
Cancel When the error is resolved, the dialog disappears and printing starts automatically.When Cancel button is clicked, printing is canceled. All the jobs in the printer are cancelled and printing is cancelled.* Numeric characters are indicated in
(XXXXXX).
4 Mechanical Error(XXXXXX).Set Paper again.
5 Mechanical Error(XXXXXX).Turn the printer Off and then On again, and try again.
6 Printing unit is opened.
7 Printing unit is opened while printing.
8 Ink ribbon and paper type do not match.
9 Ink ribbon is not correctly installed.
10 Ink ribbon end.
11 Paper empty.
12 The ink ribbon is not standard.
13 The printer was turned off while printing.Turn on a printer.
14 Paper jam(XXXXXX).Set Paper again.
15 Paper size of printer driver and ink ribbon type do not match.
16 Ink ribbon empty. Exchange ink ribbons.
17 Paper end.
18 It is not equipped with the Paper strip bin.
19 Ink ribbon error. (XXXXXX)Set Paper again.
20 Ink ribbon error. (XXXXXX)Set Paper and ink ribbon again.

23
* When no error message is displayed on the monitor and printing is not carried out, check the indicators on the front of the printer.
* When an error occurs in the printer, printing starts automatically by resolving the error. For the details of the indicators on the printer, see the detailed manual of the printer. The error may not be displayed in the case of system configurations other than that shown below.
Interface Operating system Setting
USB Windows® XP Set “Enable bidirectional support” for printer properties.
Windows Vista®
Windows® 7
* In Windows XP/Vista/7, the print job is not deleted if the printer is not turned on or the I/F cable is not connected. By turning on the printer or connecting the I/F cable, the data will be transferred again.

24
Notes and other information71
Notes7.1
Secure of Hard disk for spool file1) Secure the capacity of Hard disk for spool file enough for the printer operation and the number of printing sheets. The printing cannot be correctly carried out when the capacity is running short. The drive for spool file is the same drive as the drive of Windows system usually.
Operation of the printer2) Refer to the operation manual of the printer.Do not turn off the power switch during data transfer or print.If you turn off the power switch, restarting of a computer may be needed.(When deletion of a printing data cannot be performed, restarting of a computer is required.)
Applicability of color adjustment3) The color adjustment is applied to the entire printing range including the background.
About “Print directly to the printer”4) With some applications, if “Print directly to the printer” is selected, objects may not be printed correctly.In that case, select “Spool print documents ...” for printing.FUJIFILM ASK-300 : the “details” page of printer property sheet
About connection of a computer and a printer5) Do not disconnect the interface cable during data transfer.If the interface cable is disconnected, wait 1 minute or more after disconnecting the cable to connect it again. If the cable is connected without leaving an enough interval, the printer driver may not work correctly.
System requirements for USB interface6) Use a personal computer with Windows XP, Windows Vista, or Windows 7 pre-installed, and make sure that its USB operation is guaranteed by the manufacturer.ASK-300 supports USB 2.0 (Hi-Speed USB) interface. As USB 2.0 is fully upward-compatible with USB 1.1, ASK-300 can be used with a personal computer that supports USB 1.1 interface.To use ASK-300 based on USB 2.0 (Hi-Speed USB), connect with a personal computer that supports USB 2.0 (Hi-Speed USB). For USB 2.0 (Hi-Speed USB) compatibility of your personal computer, contact the manufacturer of the personal computer.
Connection of USB cable7) When you take out and insert a USB cable after installation of a printer driver, wait 10 seconds or more after extracting a cable.If the cable is reinserted without leaving an interval, the printer may not operate normally.

25
Print job8) Do not delete the print job in the spooler during data transfer. When deleting it, do not start printing until the printer becomes to the initial status.
Number of prints9) With some applications, the number of prints set by the printer driver does not work. Set the number of prints from the print dialog box of the application.
Remainings10) Remainings on the Paper tab shows the remainings of the ink ribbon by a bar, by reading information from the printer when the Paper tab is displayed. The correct information may not be acquired during printing.
When the USB port to connect is changed11) When you change the USB port after installing the printer driver, “Found New Hardware Wizard” is displayed. Then, the installation of the printer driver is carried out.
Errors during printing12) When an error occurs during printing, it may not be displayed on the monitor. To resume printing, check the indicator on the front of the printer and take the countermeasure. For the indication by the indicator of the printer and the countermeasures, see the detailed manual of the printer.
Setting of the color matching13) Even if the color matching is set to ON by the printer driver, color matching may not be available with some applications.With some applications, color matching is effective even if it is set to OFF.
When you print and “Parameter’s value is invalid.” is displayed, perform the following 14) operations.a) Select “Device Manager” from “Hardware” tab of “System Properties.”b) Select “Scan for hardware changes.”
When you use Windows Vista, printing may not be performed properly if you reboot the 15) personal computer or wake it up from the suspend mode with the print jobs stored in the print spooler. In this case, delete the print job(s) in the spooler dialog and print again.
When you use Windows 7, install the printer driver first, and then connect the printer to the 16) personal computer.
When the printer is in standby status, the printer driver may not be installed correctly. Install the 17) printer driver while the printer is activated. Check the printer status by the indicator on the front of the printer. For the indication by the indicator of the printer, see the detailed manual of the printer.
You can set the number of printouts from 1 to 450 in the Paper dialog, however, the maximum 18) number of printouts per one paper roll varies depending on the paper size.

26
When “6×4 inch×2(152×102mm×2)” is selected in “Paper size”19) When the number of pages or copies is odd, the last print of 6×4 inch size paper is output as a blank page. Depending on the application software, a blank page may be set every other page.
Uninstallation and reinstallation of the printer driver20) When you use the printer in Windows Vista or Windows 7, confirm that the printer is not set as default printer and then uninstall the printer driver.When you uninstall and then reinstall the printer driver in Windows Vista or Windows 7, restart the computer after the reinstallation is completed.
When Matte finish is selected in “Matte”21) The Matte finish is only available on printers with the new firmware adapted to it.Printers without adapted firmware will ignore the Matte setting and print without Matte finish.
When “UltraFine” is selected in “Print Speed”22) The UltraFine is only available on printers with the new firmware adapted to it.Printers without adapted firmware will ignore the UltraFine setting and print with the printing speed of Fine.
Operating directions for customer’s purpose7.2
When you want to adjust the color of the print image.7.2.1
(Note that the effects are invalid on the display even if you make following setting.)When you want the density of entire print picture to be thick (dark), decrease the value of 1) “Brightness” of the color adjustment dialog.
When the print picture is out of focus (the contrast is weak), increase the value of “Contrast” of 2) the color adjustment dialog. The contrast becomes stronger.
When you want to change the color of printout.3) Change the value of “Brightness” of the color adjustment dialog.Increase Red : Increase the “R” value of the color adjustment dialog. Increase Green : Increase the “G” value of the color adjustment dialog. Increase Blue : Increase the “B” value of the color adjustment dialog.
When you want to adjust Gamma of the printout.4) By moving the graph of the Gamma adjustment dialog with a mouse, the density of the entire image can be adjusted to the arbitrary Gamma curve. The density becomes high (dark) when you decrease the output value compared with the input value. The density becomes low (bright) when you increase the output value compared with the input value.
27
To adjust the gray balance in the low gray levels, use “Color correction” on the option 7.2.2 tab.
To weaken the Yellow tone : Increase the “B” value.To weaken the Magenta tone : Increase the “G” value.To weaken the Cyan tone : Increase the “R” value.To weaken the Red tone : Decrease the “R” value.To weaken the Green tone : Decrease the “G” value.To weaken the Blue tone : Decrease the “B” value.
Prohibition matter7.3
We prohibit Reverse Engineering, decompiling or reverse assembling of this driver software.
Exemption from responsibility 7.4
Occasionally, this software does not operate normally depending on operating environment.Moreover, Mitsubishi Electric Co. will not assume any responsibility for damage (including, but not limited to, lost profit or damage caused from special circumstances etc.) occurring during the use of this driver.

Ref.No.PP3-B1399E2 13.02-FP
FUJIFILM Corporation7-3, Akasaka 9-chome, Minato-ku, Tokyo 107-0052, Japan