there goes the schoolyard! plan - henderson county public schools
TRANSCRIPT

Cara Vaughn
Title: There Goes the Schoolyard!
Using Outdoor Inquiry to Investigate Erosion and Weathering on the School Grounds
Introduction:
Conducting science investigations beyond the four walls of the classroom is the best way to encourage
students to develop and apply 21st Century critical thinking and problem solving skills. The lessons
included in this integrated unit incorporate inquiry-based classroom instruction, outdoor investigations,
and culminates with a multi-media research project. The lessons address the objectives of the North
Carolina 4th grade Science Essential Standards for Earth History and Ecosystems. Students will apply
mathematics skills in the context of scientific investigations, as they collect, analyze, and interpret data,
as well as utilize multi-media resources throughout the unit. If you are interested in utilizing outdoor
inquiry to make your science instruction relevant and engaging, these lessons are a great way to get
started.
Learning Outcomes
Students will identify and describe the process of weathering, erosion, and deposition
Students will identify different types of erosion
Students will use stream table models to investigate the effect of water on land
Students will use stream tables to investigate and explain the effect of slope and flooding on land
Students will investigate the effect of wind on land
Students will investigate the effect of ice on land
Students will investigate and draw conclusions about the best ways to control/reduce erosion
Students will identify, measure, and document evidence of erosion on the school grounds
Students will research landforms.
Students will use technology to create final landform research projects.
Curriculum Alignment
This project is aligned with Common Core State Standards and the North Carolina Science Essential Standards for 4th grade.
Science Essential Standards:
4.E.2.3 Give examples of how the surface of the earth changes due to slow processes such as erosion and weathering, and rapid processes such as landslides, volcanic eruptions, and earthquakes.
4.L1.3 Explain how humans can adapt their behavior to live in changing habitats (e.g., recycling wastes, establishing rain gardens, planting trees and shrubs to prevent flooding and erosion).

Language Arts:
RI.4.4. Determine the meaning of general academic and domain-specific words or phrases in a text relevant to a grade 4 topic or subject area.
Information & Technology:
4.TT.1.1 Use a variety of technology tools to gather data and information (e.g., Web-based resources, e-books, online communication tools, etc.).
4.TT.1.2 Use a variety of technology tools to organize data and information (e.g., word processor, graphic organizer, audio and visual recording, online collaboration tools, etc.).
4.TT.1.3 Use technology tools to present data and information (multimedia, audio and visual recording, online collaboration tools, etc.).
Classroom Time Required
Classroom time required is approximately 10 one-hour class periods, including pre-activities and summative assessment.
Additional time for landform research and creating final project presentations can be scheduled and completed through collaboration with the computer lab and/or media specialists.
Additional time will also be required for writing a plan and proposal for controlling erosion on the school grounds (see extension ideas in Investigation 2- Lesson 2: Investigating What Can Be Done to Control Erosion).
Materials Needed
Each lesson includes a specific list of materials needed. The following are materials that will be utilized throughout the unit.
Science notebooks-one for each student (sewn composition books are recommended)
Chart paper and markers for anchor charts
Pencils & crayons/colored pencils
Post-it notes
Rulers & tape measures
Glue sticks
Scissors
Technology Resources
Cameras (digital required and video if available) At least one, more would be ideal
Document camera and projector
Computers (one per student is optimal, but students can work in small groups) Used for research and projects throughout the unit
Software for labeling digital photos (We used Microsoft Paint- Evernote or similar software will also work)
Software for creating presentations (Microsoft Word, Power Point, Prezi, Photo Story, Voice Thread, etc.)

Pre-activities:
Note: This unit is a natural extension of the North Carolina 4th
grade science Essential Standards; 4.P.2.2(Explain how minerals are identified using tests for the physical properties of hardness, color, luster, cleavage and streak) 4.P.2.3 (Classify rocks as metamorphic, sedimentary or igneous based on their composition, how they are formed and the processes that create them) 4.E.2.1 (Compare fossils (including molds, casts, and preserved parts of plants and animals) to one another and to living organisms) and 4.E.2.2 (Infer ideas about Earth’s early environments from fossils of plants and animals that lived long ago). While study of these units is not a prerequisite, the class that piloted this unit had completed those units, had prior knowledge to those concepts, and quickly applied that knowledge and learning throughout this unit.
See Appendices below for Instructional plans along with documents, photographs, video links, and student work samples:
1. Anticipation Guide & Landforms Slideshow (See Appendix A)
2. Write Like a Scientist- Rocks Journaling Activity (See Appendix B)
3. Weathering and Erosion Video & T-Chart (See Appendix C)
Activities:
Investigation 1: Stream Tables (Building Background Knowledge)
Learning Outcomes:
Students will investigate the effect of water over land
Students will observe the process of erosion and deposition
Students will identify and explain the effect of slope and water flow on land and erosion
Students will identify and label content vocabulary
Lesson 1: (1 hour)
Purpose of Activity:
To introduce students to the stream table model and investigate the effects of water on land.
To introduce content vocabulary and encourage accurate data collection and recording in science notebooks.
Materials Needed:
Large aluminum baking pans (at least 5cm deep and 40-50 cm long) one for each group- poke a 3 cm. hole in one end of the pan for drainage
Earth material- sand, clay, soil- I mixed 2 parts sand to 1 part clay- each group will need about 1 liter
Plastic tarp or newspapers for each table
Small plastic cups- two per group- (in the center of one cup, drill a 1/8" hole- label it “normal”: drill three 1/8” holes in the second cup- label it “flood”)
Pitchers –1 or 2 liter- one per group
Water supply

Large plastic tubs to catch runoff
Large blocks or other means to raise one end of the pan to increase slope
Digital cameras
Stop watches- one for each group
Post-it notes
Toothpicks
Rulers & meter measuring tapes – for each group
Landform vocabulary poster (teacher created prior to lesson)
Chart paper and markers
Instructional Plan/Directions:
1. Say: Today we are going to begin an investigation that will help us observe the effect that water has on land. Explain that scientists often use models to help simulate concepts they are studying.
2. Divide students into groups of three or four. Assign roles for each of the members of the group- Recorder (records group data), Reporter (shares group data with the class), Team Leader (endures investigation procedures are followed and keeps group on task), and Materials Manager (collects and returns materials for the investigation). Throughout the unit student groups will stay the same and students will rotate daily through the different jobs.
3. Introduce and set up stream tables- (See Appendix D) Follow directions step by step.
4. Refer to the “Write Like a Scientist” anchor chart.
Say: Throughout the next few days you will be keeping thorough observations in your science notebook. What are some ways we can document our investigations. I can use diagrams and drawings. I can use vocabulary to label my diagrams. I can use writing and step by step descriptions to record what I see. Say: Today before we begin I want you to sketch the stream table set up and soil conditions in your science notebook. I also want you predict what you think will happen to the land when we pour 1 liter of water through the plastic cup.
5. Begin the investigation. Explain that the procedure will be to slowly pour 1 liter of water into the plastic cup labeled “normal” and observe the effects on the land. (It is important to tell students not to touch or shake the stream tables or earth material once the water is flowing). Have recorders use a stop watch to time how long the water took to run through the earth material. As students are observing the changes to their stream tables, circulate from group to group, introducing key content vocabulary: landform, plateau, canyon, and delta. Ask: What happened to the earth material that filled the area that is now the canyon? Some possible answers: It washed down to the bottom of the table; It moved down and is now the delta. Reinforce the understanding during questioning and conversations with groups that canyons are created by erosion and deltas are made by deposition.
6. After all groups have finished Say: Now we need to discuss and record our observations in our notebooks. I would like you all to take a few minutes in your group to discuss the changes you observed, then draw an “after” diagram and record your notes.
7. Bring students back together after an appropriate amount of time has been given for journaling. Say: I want you to take another look at your stream tables and lets work together to identify the landforms that were created during the process of erosion and deposition. Erosion is the process of moving earth material by water, wind, or ice, and deposition is the laying down or “depositing” of those earth materials in a new place. (Use a document

camera to show a stream table or pull all students together around one stream table during this discussion) Refer to the landforms vocabulary poster and use post-it notes to label the canyon, delta, and plateau. Introduce other landforms that may have been created in their stream tables; meanders, flood plains, valleys, and the mouth of the river. Label each of these on the vocabulary poster and allow time for students to look for these landforms on their stream table. Ask students to add labels with the new vocabulary to their stream table diagram.
8. Walk students through the process of setting their stream tables up for another investigation. Say: This time when we pour water over the earth material I want you to pay careful attention to how the water flows over the land. (The goal of this stage of the investigation is for students to observe the path water follows, changes in its course or direction, and destination). As students observe the water flowing through the stream table, introduce the word channel and meander. If students don’t readily observe changes in to direction of the stream channel, point it out and Ask: Why do you think the stream changed its path at this point? There was something (sediment) in the way.
9. Add new vocabulary (meander and channel) to landform vocabulary poster and science notebooks.
10. Set up stream tables for Part 2 of the Stream Tables lessons in this unit.
Lesson 2: (1 hour)
Purpose of Activity: Use stream table models to investigate the effect of slope and flow of water of the
land
Materials Needed: See Lesson 1
In addition: prior to this lesson, make a baggie for each group that contains about 10 toothpicks and 10- 3 x 3 size post-it notes.
Instructional Plan/Directions:
1. Say: Today we are going to use the stream tables once again to investigate two variables; slope and amount of water flow have on erosion. Before we begin the investigations, I want you to predict what you expect those variables will have on the land in our stream tables. Allow time for journaling.
2. Assign each group a different variable to investigate. No slope/regular flow of water, no slope/flood flow of water, increased slope/regular flow of water, increased slope/flood flow of water etc. Depending on the number of groups some variable may be repeated and compared.
3. Have Materials Manager from each group gather required materials to complete their specific investigation. Remind them that each time they complete the investigation the same amount of water (1 liter) will be used. As in Lesson 1, have recorders time how long it takes for the water to flow through the earth material. This will be important as groups explore the variables and discover the effect of slope on the rate water flows.
4. As students complete the investigations ask groups the following guiding questions that apply to their investigation and variables:

How did slope affect the landforms that were created on the stream tables? Canyons are deeper/longer. Deltas are bigger/longer.
How did the flow of water affect the stream table? The flood cup caused more erosion.
Ask students to point out the variety of landforms (vocabulary review) that are created.
5. When all the water has flowed through the earth material and the students have had time to observe, discuss, and record their individual group results. Create a class record of the variable each group tested, along with the time required to run water through the table. Students will be able to see the affect slope has on the rate water flows.
6. Pass out the baggies of toothpicks and post-it notes. Explain that the next step in this lesson is to create “flags” or signs to label the landforms that have been created on their stream tables. (Fold the post-it note in half around the toothpick, sticky to non-sticky side. Label each post-it note and place them in the stream tables. Also have each group write their variables on a post-it and affix it to their stream table.
7. After students have labeled their landforms, have a “gallery walk” and have all groups look at the variety of landforms and effects of the variables on the stream tables. Encourage discussion related to the effect of slope and flow of water on the landforms. Students can take “after” photos to document their results.
*A multi-media extension of this stream table labeling activity would be to have groups take a digital photo of their stream table. Using a program like Microsoft Paint, groups could digitally label their stream tables.
Print each group’s photo and display. Students can refer to them (review vocabulary) as the unit progresses.
8. Assessment: After completing Investigation 1 have students summarize their investigations and learning by writing to explain the process of weathering, erosion, and deposition in their science notebooks. Ask to students to further explain the effect of slope and flow of water in erosion.

9. Clean up materials and spread the earth material out in the stream tables to dry. Store stream tables for later investigations and task oriented assessment.
Investigation 2: It’s time for Outdoor Investigation!
Learning Outcomes:
Students will identify, measure, and document evidence of erosion on the school grounds.
Students will investigate and draw conclusions about the best ways to control/reduce erosion.
Students will collaborate and formulate a plan with possible solutions to the erosion problem identified on the school grounds.
Lesson 1: Investigating Our School Grounds (1 hour)
Materials Needed:
Science notebooks
Pencils
Measuring tape for each group
Digital cameras if possible
Whistle- or some way to call students back together
Teacher Preparation:
Prior to conducting this investigation, explore the school yard and become familiar with the possible areas which will be the best location for students to explore and find evidence of erosion and deposition. Define the space where students will be allowed to explore. Note any safety hazards that need to be discussed with students prior to completing the outdoor inquiry.
Instructional Plan/Directions:
Note: While the schoolyard where this unit was piloted had a numerous areas where erosion could be observed, every schoolyard provides unique opportunities for completing these investigations. Adapt the lessons as needed depending on your schoolyard and what resources are available to you. Use the following directions as a reference to guide student questioning and exploration.
1. Introduce the investigation. Say: Today we are going to investigate our schoolyard to look for evidence of erosion and deposition. We are going to take what we have learned investigating the stream tables and observe the effects of erosion on real earth materials. What kinds of things will we need to look for that will be evidence of erosion? Soil that has been “carried” away, deposition, bare land.
Where might be the best places to look for erosion? Slopes, hills
Why do you think so? We learned slope affects the amount of soil that is eroded. Slope makes the canyon deeper, and the deltas bigger.
2. Outline the plan and expectations for conducting the investigation.
Students will be documenting evidence of erosion in their science notebooks, measuring the evidence,
and making detailed observations. Make sure to encourage students to make observations about the area

surrounding the erosion site as well. (Refer to the Write Like a Scientist anchor chart as expectations are
discussed).
Students will photograph evidence of erosion for later reference.
*This lesson was piloted after several days of rain, making optimal conditions for observation.
3. Discuss possible safety concerns and procedures/expectations for outdoor investigation prior to taking students outside. These procedures/expectations will vary depending on the class and school site. Decide ahead of time what your particular classroom procedures/expectations will be.
4. Outdoor Inquiry: Take students to the site and point out the boundaries for investigation. Explain that the call to come back together will be the sound of the whistle. Explain that groups will have approximately 30 minutes to complete their inquiry. As necessary, review the task, boundaries, and expectations. Dismiss students.
5. As students conduct their investigation, circulate among groups to facilitate discussion, guide inquiry, and provide assistance as needed. Students will record their observations with words, drawings, measurement, and photographs. Facilitate with the following questions:
Where do you see evidence of erosion? What do you think caused the soil to move to this area? What evidence is there that water flowed in this area? How do you know? Was sediment carried along by the water? Why do you think erosion is a problem in this area?
Direct students as needed to slopes with run-off, areas where concrete meets soil/grass, deposition near sidewalks or driveways, and crumbling or broken asphalt. Also call attention to areas on the school grounds where erosion is not taking place. Ask students to think about what is keeping the soil from eroding in those areas.
6. After student groups have documented their evidence of erosion and identified areas where erosion is and is not occurring on the school grounds, call them back together and return to the classroom. Explain that their teams will report their findings in the next class. Allow for time if needed to add information or refine their entries in their science notebooks.
*After a rain storm plan on revisiting the sites where students identified erosion and allow them to document the changes that have occurred, using measurement, photographs, written description, and drawings. I planned this portion of this unit during a rainy season. If that is not an option, students can create the flow of water using pitchers of water or a garden hose if available. Even though we had just experienced a heavy rain, students wanted to use pitchers of water to create and observe the actual flow of water over the soil. You may want to continue to go outside several times during this unit to revisit the sites and make continued observations, measure and collect date, and add science notebook entries.
Lesson 2: Investigating What Can Be Done to Control Erosion (1 hour)
Materials Needed:
Science Notebooks
Digital Cameras
Stream Tables (and all accompanying supplies- See Investigation 1)
Water Source
Photos from Outdoor Inquiry Lesson 1- to show areas where erosion was and was not evident.
A variety of plant material including grass tufts, small plants, mulch, etc.
Instructional Plan/Directions:
1. Say: Today we are going to identify areas on our school grounds where erosion is not taking place or is being controlled. We are then going to use our observations to design investigations that will help us learn how to best stop or control erosion. Allow students to talk in their groups and look back over their notes and photos to

identify where to lead the inquiry. After time for discussion, ask reporters from each group to share their observations and ideas.
*There are several options for this step of the investigation. Adapt the instructional plan as needed for your particular school ground and resources that are available.
2. Take student groups outside to explore and observe the sites again where erosion is both occurring and controlled. On our school grounds there were several steep hills where natural plants were controlling erosion and bare spots on the same slope were eroding. Look for similar areas, along with landscaped and terraced areas. These observations will fuel the next student planned inquiry activity.
3. As appropriate, allow student groups to pour water on the slopes to observe/compare the run-off on bare soil and erosion control provided by plants. Encourage students to make detailed observations throughout these activities.
4. Ask: What can be done to control erosion? Have students record their thinking in their science notebooks. After providing time for journaling, ask students to share their ideas and observations. Facilitate the discussion to address the role plants, grass, and trees (and man) can play in controlling erosion.
5. Explain that the next step in this lesson will be to use the stream table models to test their ideas for controlling erosion. Since students will be familiar with the basic steps in setting up and running stream table investigations have them set up their tables and decide what variable (plants, grass, mulch, etc.) they want to explore as a way to control erosion.
*Be open to student suggestions for variables they want to explore. For example, on our school grounds we have a very steep bank that is covered with boulders. My students naturally wanted to try rocks because of our outdoor observations.
6. Allow students to conduct stream table tests. Record data in science notebooks, and take before and after photos of their erosion control investigation.
7. Close the investigation by allowing groups to share their observations and specific ways they found to control erosion.
*An optional extension to this lesson is to have students work together to formulate a proposal and plan for controlling erosion on the school ground. Students who piloted this unit wrote proposals for adding plants to an eroding slope near our track. Proposals were sent to a local nursery, the principal, and Parent Teacher Organization. Another group wrote an article for the PTO newsletter highlighting their proposal and needs for erosion control. Plans for implementing their proposal are underway and will be completed in the spring utilizing community partners.
Investigation 3: Other Agents of Erosion
Purpose of Investigation:
The primary focus of this unit is on the effects of water on land because it is the most powerful agent in the process that is constantly reshaping the Earth’s surface. Students also need to explore the affect wind and ice erosion can have in the process.
Learning Outcomes:
• Students will identify different types of erosion
• Students will investigate the effect of wind on land
• Students will investigate the effect of ice on land

Lesson 1: Wind Erosion (1 hour)
Materials Needed:
Photos of landforms created by wind erosion like Jockey’s Ridge or the Sahara Desert:
Examples:
Stream tables with earth material
Drinking straws
Science notebooks
Instructional Procedures/Directions:
*Prior to beginning this lesson: Collect additional photos of landforms created by wind erosion.
1. Draw students’ attention to the photos of landforms created by wind erosion (I played them as a slide show). Say: We know from our earlier investigations and discussion about erosion that it is a process that is constantly shaping and changing the Earth’s surface. As you show the variety of photos, ask students to think about what force of nature could have shaped the landforms. Guide the discussion as necessary to point out that wind is also a powerful agent or cause of erosion.
2. Explain that today they will investigate the effects of wind on the earth material used in earlier stream table investigations.
3. Have Materials Managers collect stream tables, including earth material and drinking straws.
4. Instruct students to create a mountain out of the earth material in the center of their stream tables. Have students gently blow on the earth material and record the results. Students will continue to blow on the earth material with varying levels of force, recording their observations throughout the investigation.
Facilitate discussion with the following key concept questions: How did the landform change because of the wind? How can wind erode material from the Earth? Where do the materials go? Does wind move different sizes of sediment different distances?
Additional Investigation: Create a mountain on one of the stream tables using water and earth material that is mostly clay so it will be very hard when it dries. Allow the landform to completely dry. Have students observe describe and draw the landform. Place the stream table in a large cardboard box with one open side. Position a fan next to the stream table so it blows directly on the mountain. Adjust the speed of the fan to ensure earth material is being moved. Leave the fan on all day. In the middle of the day, pull the stream table out of the box and have students write and draw what they observe. Return the stream table and turn the fan on again. At the end of the day pull the stream table back out and have students complete a final observation.
Lesson 2: Ice Erosion (1 hour)
Materials Needed:
Photos of glaciers

Examples:
Empty and clean milk cartons (enough for 1 for each pair of students)
Sand
Gravel
Pebbles
Twigs
A variety of surfaces such as poster board, modeling clay, sandpaper, soil, wood, rock (preferably shale, limestone, sandstone)
Instructional Plan/Directions:
Prior to this lesson: Collect additional photos of glaciers/glacial erosion. In the lunch room collect enough milk cartons for pairs of students. Have students create glaciers by filling milk cartons with water and sand, gravel, pebbles, and twigs etc. Freeze.
1. Say: Today we are going to investigate another force of nature that causes erosion. As in the wind investigation, show pictures of glaciers and landforms created by glacial erosion. Ask: Predict what you think changed the shape of the land in the photos. (Ice). Define glacier. Explain that the next investigation will be to observe the effects of a glacier as is moves over a surface.
2. Instruct students to feel the different surfaces that their glaciers are going to be moving over. Have them predict what will happen when they rub the glacier over each surface. Record predictions in science journals. Ask students to draw a diagram of their glacier.
3. Explain that for each surface they will rub the glacier over the surface. They will need to record observations about the surface of the glacier before and after as well as the surface it moved over. They will need to make visual observations as well as feel the surfaces.
Additional Investigation:
Create a landform in the center of a stream table (this can be made of the same clay soil that was used in the wind investigation). Also create a miniature glacier in a milk carton as described in Ice Erosion (Lesson 2). When you are ready to begin explain to students that this model will demonstrate what happens to land when it is eroded by ice, as well as how sediment is deposited in the process. Place the mini-glacier on top of the landform. Have students write and draw a detailed observation of the glacier and landform before, during, and at the end of the investigation.
Extension Activity: Landforms Research & Multimedia Presentation:
As a culminating activity, students will choose a type of landform to research, identify a well-known example of that landform, and collect a number of interesting facts to share in their presentation. To introduce the project, show a power point (http://geography.mrdonn.org/powerpoints/landforms.html) to review types of landforms. This research and final project can be completed through collaboration with the media center and computer lab specialists. Students who piloted this project compiled their research using Photo Story software. Variations of this project can be made based on resources and technology that is available in your school.

Assessments:
Formative assessment opportunities are woven throughout this unit. Science notebooks provide a rich collection of authentic student work for assessment. Use the rubrics attached below for student self-assessment and teacher assessment.
The assessment resources below can be found in the Appendices.
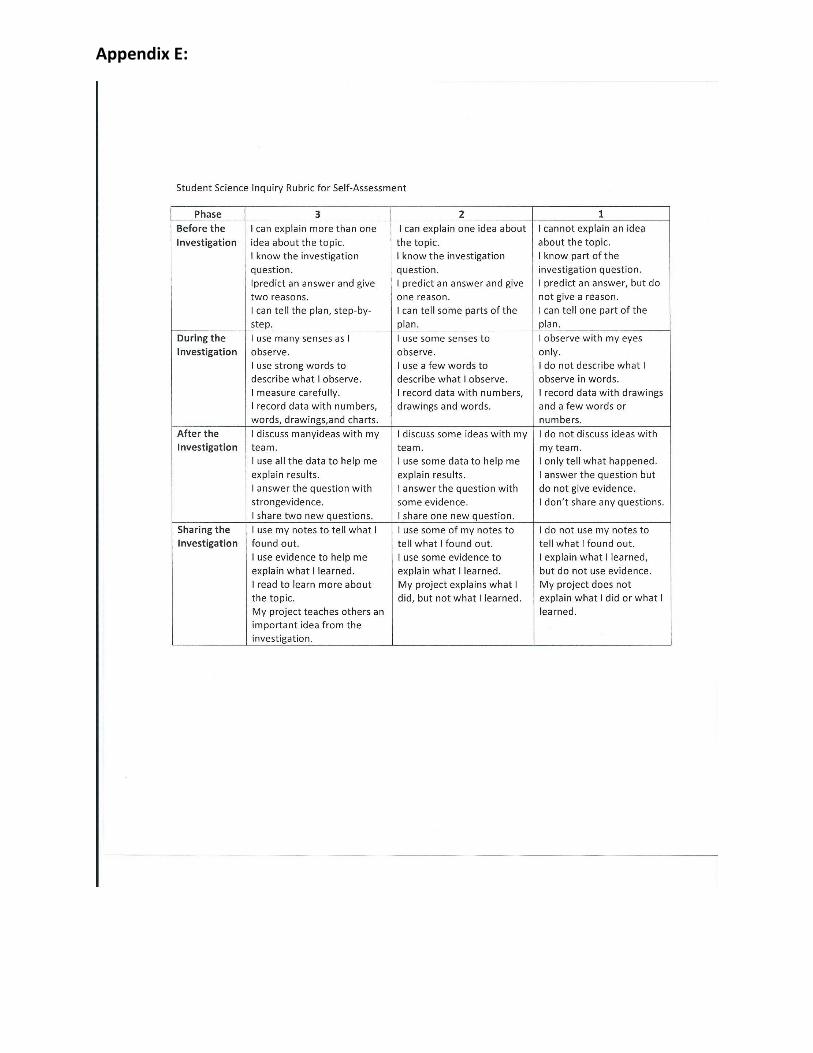
Student Science Inquiry Self-assessment (See Appendix E)
Teacher Science Inquiry Rubric (See Appendix F)
I Have, Who Has Vocabulary Review (See Appendix G)
Give Me a . and a ? Summarizer (See Appendix H)
Critical Vocabulary
• Erosion- the movement of earth materials by wind, water, and ice.
• Landform- a natural shape or feature found on the Earth’s surface, such as mountains, valleys, hills, and plateaus
• Weathering-the breaking down of earth material
• Deposition- the laying down (depositing) of earth materials by wind, water, or ice
• Sediment-Small pieces of earth materials that are carried along and deposited by wind, water, or ice
• Slope- the angle or slant of a stream channel or landform
• Meanders- curves or bends in a streambed formed by slow-moving water on gently sloping land
• Tributary- a stream or river that feeds into a larger body of water
• Canyon- a narrow, deep valley with steep sides, often with a stream or river flowing through it
• Delta- a fan-shaped deposit of sand, silt, clay, and/or gravel that forms at the mouth of a river where it empties into another body of water
• Plateau- a large area of land that is higher than the land around it with a relatively level surface
• Alluvial fan- a fan-shaped deposit of sand, silt, or clay where a fast-flowing stream reaches flatter land
• Flood plain- level land that may be covered by floodwaters
• Valley- a low area between hills and mountains, often where a river flows (River valley)

• Glacier- a large body of slowly moving ice
• Flood- a very heavy flow of water, which exceeds the stream’s normal channel and covers land that is normally dry
• Flash flood- a type of flood that rises and falls rapidly with little or no warning
• Levee- a natural or man-made wall along a river or sea that keeps the land from being flooded
• Dam- natural or man-made barrier across a river that stops the flow of water
Websites:
National Geographic Education video (Brief overview of weathering and erosion):
http://www.natgeoeducationvideo.com/film/1056/erosion
Virtual tour of the Grand Canyon:
http://naturevalleytrailview.com/grand-canyon
Types of landforms Power Point:
jpostema.napsk12.org/blob/download/232174 (cut and paste into browser)
Erosion and weathering Power Point:
http://science.pppst.com/erosion.html
U.S. Landforms map:
http://www.worldatlas.com/webimage/countrys/usanewe.htm
Google Earth (student and teacher resource):
http://earth.google.com/
Study Jams (A large variety of engaging and informative videos):
www.studyjams.com
Landforms Powerpoints (Several grade level appropriate slideshows to choose from)
http://geography.mrdonn.org/powerpoints/landforms.html
Supplemental Information
Background Reading:
Outdoor Inquiries Author: McGlashan, P. Portsmouth: Heinemann. 2007.
America’s National Parks: The Spectacular Forces That Shaped Our Treasured Lands, Author: Paul Schullery Tehabi Books/DK Publishing 2001 - ISBN: 0 7894 8016 6

Schoolyard-Enhanced Learning: Using the Outdoors as an Instructional Tool, Author: Herbert W. Broda - ISBN: 1571107290
Ten-Minute Field Trips: A Teacher’s Guide to Using the Schoolgrounds for Environmental Studies (3rd edition) Author: Helen Ross Russell - ISBN: 0873550986
Author Info
I have been teaching for eight years in Henderson County Public Schools. I teach 4th grade at Glenn C. Marlow Elementary School in Mills River, N.C. While I have previously taught all subject areas, our grade level has departmentalized this year and I am currently teaching math and science. I graduated from Mars Hill College in 2005 with a Bachelor of Science in Elementary Education and completed my Master's in Elementary Education at Montreat College in 2009. My most recent accomplishments were receiving my National Board Certification in 2010, and being honored as a 2013 Kenan Fellow.

TABLE OF CONTENTS – APPENDICES
Appendix A: Anticipation Guide & Landforms Slideshow Activity
Appendix B: Write Like a Scientist- Rocks Journaling Activity
Appendix C: Weathering and Erosion Video & T-Chart Activity
Appendix D: Stream Table Set-Up Directions and Extension Ideas
Appendix E: Student Science Inquiry Self-assessment Rubric
Appendix F: Teacher Science Inquiry Rubric
Appendix G: I Have, Who Has Vocabulary Review
Appendix H: Give Me a . and a ? Summarizer
Appendix I: Unit Summative Assessment

Appendix A:
Anticipation Guide & Landforms Video
Purpose of Activity:
To introduce students to the unit topic of landforms, erosion, and weathering.
Collect formative assessment through the anticipation guide and class discussion throughout the video to guide
instruction and planning.
Materials Needed:
• Copies of anticipation guide – one for each student
• Internet connection
• Projector
• Post-it notes
• “Give Me a . and a ?” summarizer -copied on cardstock and laminated (one for each student)
(See Appendix H)
Instructional Plan/Directions:
1. Provide each student a copy of the anticipation guide, read through the directions, and have them complete the
“Before” column.
2. Go to the National Geographic web site linked below:
http://www.natgeoeducationvideo.com/film/1056/erosion
Note: If this web site or video is not available, numerous web sites are available to show a brief overview of
different types of landforms.
Ask key questions to stimulate discussions and predictions:
1. What do you see? Do you think this landform has changed over time?
2. What do you think may have caused the changes? How can you tell?
3. Were these changes constructive or destructive? Did they create or destroy the landform?
4. Do you think these changes happened quickly or slowly over time?
3. After viewing and discussing the different landforms found on Earth, explain that the Earth’s surface and
landforms are constantly being changed by a process of building up and wearing away. Introduce the concepts of
erosion and weathering at this time.
4. Summarizing activity: Have students complete the attached “Give Me a . and a ?” activity. On post-it notes
students will write one statement related to today’s activity and one question they have for a friend.

Name: _____________________#_________Date:__________________
Weathering and Erosion Anticipation Guide
Read each statement below and decide whether you agree or disagree.
Mark your answer in the Before column. After completing our unit on
Weathering and Erosion, we will reread the statements and complete the
After column. Correct any statements that are incorrect by crossing out or
adding words.
Before
Agree? Disagree?
After
Agree? Disagree?
1. Weathering, erosion, and deposition are
forces which are working all of the time.
2. Weathering is a fast process that makes
rocks larger.
3. The movement of rocks and soil to other
areas is called deposition.
4. Rain, snow, and wind cause weathering.
5. Animals and plants are capable of breaking
rocks and causing erosion.
6. Wind is the most dominant force in the
erosion process.
7. The angle or slant of a channel or land
surface is the slope.
8. Laying down broken rock in a new location
is called erosion.
9. The amount of water flowing through a
stream channel affects the amount of erosion
and deposition.
10. A landform is a natural feature of the
earth’s surface.

Appendix B:
“Write Like a Scientist” Science Notebook Modeling & Expectations
Purpose of Activity: To provide a prerequisite science journaling activity to allow students to begin
recording ideas, pondering questions, and voicing their thoughts. In subsequent journaling activities students will
refine their thinking and recording skills, referring back to the “Write Like a Scientist” anchor chart that they will be
introduced to in this lesson.
Materials Needed:
Chart Paper and markers
Photo of “Write Like a Scientist” anchor chart for reference:
Science notebooks (sewn composition books are recommended)
Pencils
Crayons or colored pencils
Rulers or measuring tapes
River rocks- 1 smooth and 1 rough/jagged for each pair or group of students
Instructional Plan/Directions:
1. Explain to students that one of the most important tools they will be using in science this year is their science
notebooks. Say: Today’s lesson will give us an opportunity to observe, measure, record and describe an
investigation related to rocks that will prepare us for our next unit of study in science.
2. Distribute science notebooks. Discuss whole group the following questions and create an anchor chart that can
be referred back to and added to throughout the year:
• Why should we keep a science notebook?
• What kinds of information might you record in your notebook? (detailed descriptions, observations, new
questions, answers to questions, predictions)
•How can we record information? (possible answers: detailed drawings, labels on the drawing, measurements
detailed descriptions)
• How might you use the information you record?
3. Distribute copies of Student Science Inquiry Rubric for Self-Assessment (See Appendix E). Go over the required
elements and levels of proficiency prior to beginning the investigation. Explain that while they will be working
together and discussion their observations and ideas, everyone will be recording their own observations.
4. Explain that their task today will be to observe two different rocks that were collected from the same location.
5. Remind students of the different ways they can record information. For today’s investigation ask students to use
detailed descriptions and drawings in their notebooks because they are learning how to thoroughly and accurately
record their investigations. They can measure their rocks, color their drawings, and describe the features of their
rocks (shape, color, texture, length, width, etc.) See photo of attached student notebook:
5. After allowing plenty of time for students to make entries in their notebooks, ask them to explain why they think
two rocks from the same river could be so different. This hypothesis will lead to future lessons/discussion on
weathering.
6. Throughout the investigation have students revisit the rubric and assess their work.

7. Summarizing activity: Explain that the two rocks have such different surfaces because one of the rocks has been
smoothed and broken down by a process called weathering. Go to the Brain Pop web site linked below and show a
brief video on the weathering process.
http://glencoe.mcgraw-hill.com/sites/dl/free/0078778026/164213/00050754.html

Appendix C:
The Difference Between Weathering and Erosion
Purpose of Pre-Activity:
To compare the process of weathering and erosion.
Students need to understand that weathering is the breaking down of earth materials, and erosion moves that
broken material (sediment) to a new location.
Materials Needed:
Science Notebooks
Pencils
Projector
Internet connection
Chart paper and markers
Post-its (if using Ticket Out the Door summarizer)
Instructional Plan/Directions:
Prior to lesson: Create a t-chart on chart paper. At the top write: What is the Difference Between Erosion and
Weathering? Label two sections: Erosion / Weathering.
1. To begin this activity, instruct students to create a t-chart like the one on chart paper in their science
notebooks. Explain that science the learning target for the day is to be able to explain the difference between
weathering and erosion.
2. Go to the Study Jams video linked below:
http://studyjams.scholastic.com/studyjams/jams/science/rocks-minerals-landforms/weathering-and-erosion.htm
3. This video systematically compares the two processes, with clear breaks in between information. Have students
take notes throughout the video, pausing as needed to make sure students have noted important points and
information.
After the video have students play “Give One, Get One.” Students find a partner and give one fact, then get one
fact from a partner. Repeat the process 3-4 times.
Bring students back together and create the class t-chart with the differences between erosion and weathering by
calling on individual students to add information.

Student science notebook sample:
*A modified instructional option is to walk students through note-taking step-by-step as outlined below:
Explain that throughout the video you will be adding information to the t-charts and discussing the information.
This video systematically compares the two processes, with clear breaks in between. At each break in the video,
pause and add information to the t-charts. Rewind video as necessary to clarify or review important points.
4. Summarizing Activity: “Ticket Out the Door” Have students write to explain what the difference is between
weathering and erosion.

Appendix D:

Possible Extension Activities:
Appendix E:

Appendix F:
Teacher Science Inquiry Rubric for Student Assessment
Phase 3 2 1
Pre-Investigation:
Explains existing ideas
Describes purpose
States investigation question
Makes predictions based on existing ideas
Describes plan/explains procedures
Completes all
indicators accurately.
Clearly explains how
prediction is based on
prior knowledge or
experience.
Completes most
indicators accurately.
Prediction is stated,
but explanation is
unclear or unrelated
to the question.
Completes few
indicators accurately.
Prediction is stated
but not explained.
Investigation:
Records observations is words, pictures, numbers
Records ideas about investigation based on observations
Creates drawings, charts, tables to organize data
Completes all
indicators accurately.
Uses precise
vocabulary to describe
observations. Data is
organized and
understandable.
Completes most
indicators accurately.
Uses some precise
vocabulary to describe
observations. Some
data is organized and
understandable.
Completes few
indicators accurately.
Uses vague vocabulary
to describe
observations. Most
data is unorganized or
missing.
Post-Investigation:
Summarizes data
Uses observations and data to explain results
Answers question using observations and data as evidence
Reflects on predictions
Generalizes underlying science concept(s)
Asks new questions
Completes all
indicators accurately.
Effectively collaborates
to analyze and
summarize data.
Answers the question
clearly with reasonable
evidence. Explanations
demonstrate clear
understanding of
science concept(s).
Completes most
indicators accurately.
Tries to collaborate to
analyze and
summarize data.
Answers the question,
but evidence is vague
or unreasonable.
Explanations
demonstrate some
understanding of
science concept(s).
Completes few
indicators accurately.
Does not collaborate
to analyze and
summarize data.
Answers the question
but does not support
with evidence.
Explanations reveal
major misconceptions.
Communication:
Uses information in notebook to share and communicate findings with others
Uses other resources to explain or elaborate findings (article, book)
Summarizes investigation and concepts in a project*
Completes all
indicators. Clearly
communicates
reasonable findings.
Demonstrates accurate
knowledge of science
concept(s) and
processes through
discussion and project.
Completes two
indicators, clearly
communicating
reasonable findings
OR completes all
indicators, but
findings are not
clearly communicated
or are unreasonable.
Completes one
indicator, clearly
communicating
reasonable findings
OR completes some
indicators, but
findings are not
clearly communicated
or are unreasonable.

Appendix G:
I have gravity.
Who has the flat land near a river
formed by flooding?
I have flood plain.
Who has a barrier across a river
that stops the flow of water?
I have dam.
Who has the way ice causes
weathering?

I have freezing and thawing.
Who has a long depression in the
Earth’s surface which usually
holds a river?
I have canyon.
Who has a loop or curve in a
river?
I have meander.
Who has a river or stream that
feeds into a larger river or
stream?

I have tributary.
Who has a large, flat landform
that is lifted above its
surroundings?
I have plateau.
Who has a shape or feature on
the Earth’s surface?
I have landform.
Who has the movement of earth
materials by wind, water, or ice?

I have erosion.
Who has the depositing or
dropping of sediment in a new
area?
I have deposition.
Who has a low, flat, fan-shaped
land at or near the mouth of a
river?
I have delta.
Who has the process of breaking
down rocks?

I have weathering.
Who has the angle or slant of the
land?
I have slope.
Who has the main cause of
weathering and erosion?
I have water.
Who has the force that pulls
objects toward Earth?

Appendix H:
Give me a. and a?
A statement about what I’ve learned. A question to ask a friend about what I’ve learned.

Appendix I:


