the wonderful world of sstv - · pdf fileapril 2, 2014 the wonderful world of sstv there is a...
TRANSCRIPT

April 2, 2014
The Wonderful World of SSTV
There is a wonderful fraternity of hams operating SSTV. You will find many stations on 14.230
MHz, a frequency I often visit. This guide endeavors to provide ideas, hints and tips for the new
SSTV operator: to help get you started quickly to enjoy this fascinating area of amateur radio.
The guide is long, but definitely not exhaustive. It is written to give you some resources and
guidance. If you are stumped, better if you simply jot me an email on the specific topic and
perhaps I can further assist with some details. My email: [email protected]
Can You Hear Me Now?
I quickly realized the importance of good signal reception. You certainly want to copy the
ham’s call sign when answering the CQ! I discovered that QRN plays a big role in quality image
reception. So I did several things to enhance my ability to receive signals. Here are three major
steps I initially took:
1. I first inserted Signalink between my Kenwood transceiver and my Asus netbook
computer. This replaced the inferior sound card in my computer.
2. The next improvement was to hone in on the signal with an MFJ-784B audio filter. That
connects to my headphone jack. It offers a special SSTV dual band-pass filter. The first
filter it tightly set for the VIS tone. The other filter passes the picture content at 1,450
to 2,350 Hz. This now allows me to set my receive RF control at full gain and turn up my
AF gain moderately high. I can still comfortable adjust the listening volume for my
speaker or headphones via the MFJ unit control.
3. Then I added an MFJ-1040C preamplifier. That jumps the S-signal level on a clear
channel from S-4 to S-8.
I routinely monitor sister SSTV cam stations and compare my copy. I nicely improved my
reception ability with the measures above even through I had a simple attic dipole.
That was 2012. Now I have an AN Wireless tower and a Force 12 C-3 Yagi at 51’. The Kenwood
transceiver I received from my father-in-law KAØUKG no longer operates. I now use a Kenwood
TS-590S, and that is run through a RIGblaster plus II into an Acer laptop. Each step of the way, I
have improved & improved & improved my ability to copy SSTV signals.

April 2, 2014
Check Those Pics
There are some hams that go a step further and routinely port their received SSTV images to
the Internet. I do so at www.WB9KMW.com I have found many sister SSTV cams which TEND
to receive the same images as I do. They spread out nicely from the east to west in the US, plus
one in Nova Scotia and one in Calgary. When you transmit your picture, you can quickly go to
my 20M SSTV tab to see my copy, or that of other stations and observe the propagation at that
moment.
You can look at even more SSTV cams. Just go to the bottom of my SSTV web page and click on
links for GØHWC, CX2ABP and World SSTV. WB9KMW is featured in each of these international
SSTV cam listings.
The Silent QSO
Most SSTV QSOs are done is silence. No talking like the typical SSB contact. Sure, it’s OK to talk
on 14.230 MHz, but most of the time hams ‘talk’ by trading pictures overlaid with a template of
printed information. How is that done?
The typical SSTV QSO involves four (sometimes three) exchanges. It goes like this.
Station A Station B
Calls ‘CQ SSTV’ Replies with call signs and RSV signal report
Replies with RSV, etc. Transmits another picture and other info*
Transmits other info* Sends a 73 transmission
Sends a 73 transmission
*Hams exchange lots of things: name, QTH, very brief personal message (MMSSTV allows a
free-form message to be inserted on the template), etc.
Each transmission takes about 1 minute and 50 seconds in Scottie 1 (1 minute 11 seconds in
Scottie 2). So you can see it is easy to hold a one-quarter hour QSO!! I will have more on how
to efficiently prepare your next transmission while receiving a subsequent picture from the
other station.
Often for DX QSOs I have, such as in Europe, we eliminate one round in the process, since we
are in a weaker signal environment with QRM & QRN. Hence, I reply to someone’s CQ with a
signal report and my next & final transmission is a 73 template with picture.

April 2, 2014
Pretty in Pink
A major aspect of SSTV is the pictures we share with one another. They represent the
personality and interests of each ham. I attempt to find striking images. I get them from
friends who pass those emails around! I do Google searches sometimes. Other times I just
stumble across an image while reading something on the web.
The picture editor in MMSSTV is very limited. Hence, I do all my image manipulation on my
desktop computer using GIMP 2 software to edit those JPG images.
The most common SSTV image format is 320 pixels WIDTH by 256 pixels HEIGHT. So I will size
and crop a desired picture to those dimensions, if possible. If not, I may set the height to 256
and crop the edges while still attempting to retain a decent photo, or I will set the WIDTH to
320 and settle for an SSTV presentation which runs out of picture before the end of my
transmission.
I suggest to begin with you have a dozen nice pictures stored in your MMSSTV software.
How?
Simply set up a file folder. I call mine ‘My Pictures’ and place that folder inside the
HAM>MMSSTV sub-directory. That’s my storage site. You will then grab a picture from this
file, process it and store the final version for ongoing SSTV transmissions.
I now go a step further and categorize pictures thematically, and therefore, I organize sub-
directories within ‘My Pictures’ for further ease of access. Eg, sub-directories for themes like:
cowboys, islands of the Caribbean, Halloween, sunsets, etc, etc.
First, go to the TX tab, then right mouse click in the window to bring up the following dialog box
and click on the ‘Load from file…’ option. Look for that file folder of your source pictures and
select the image you wish to load into MMSSTV.

April 2, 2014
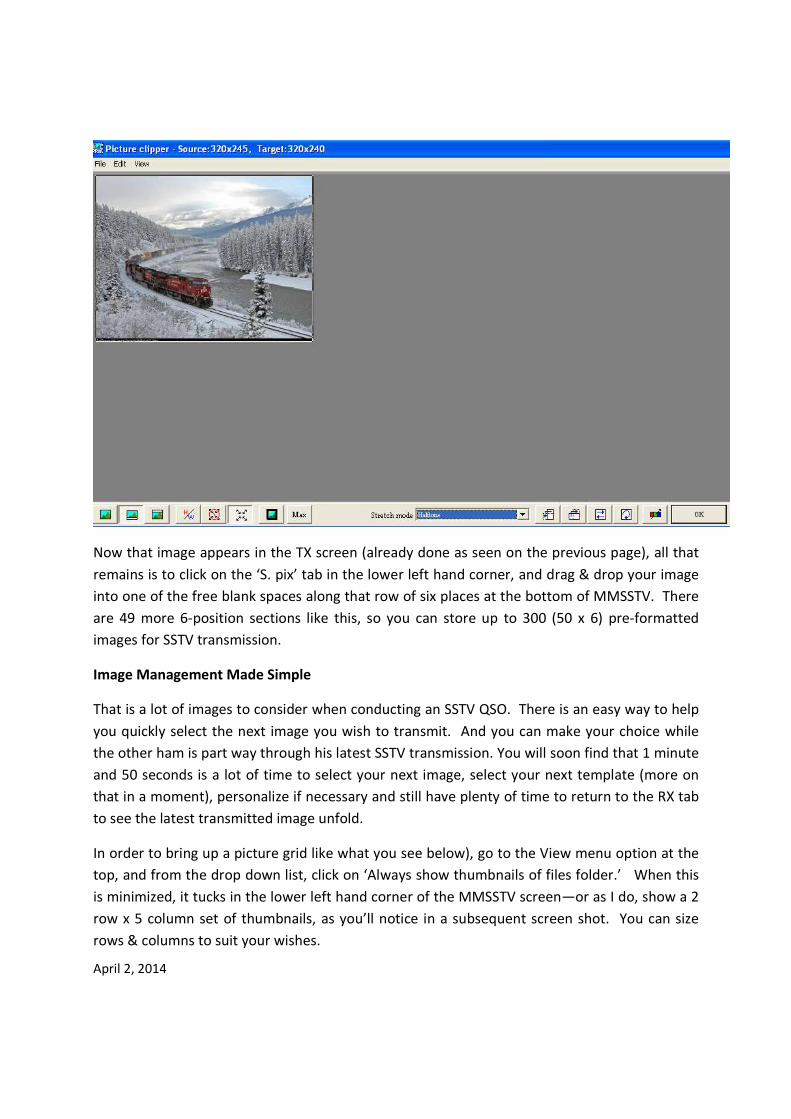
Next you will see the following Picture Clipper box. If you have done a nice job of pre-sizing
your image with GIMP 2, you will see a full-screen view like this, and all you will need to do is
click OK.
April 2, 2014
Now that image appears in the TX screen (already done as seen on the previous page), all that
remains is to click on the ‘S. pix’ tab in the lower left hand corner, and drag & drop your image
into one of the free blank spaces along that row of six places at the bottom of MMSSTV. There
are 49 more 6-position sections like this, so you can store up to 300 (50 x 6) pre-formatted
images for SSTV transmission.
Image Management Made Simple
That is a lot of images to consider when conducting an SSTV QSO. There is an easy way to help
you quickly select the next image you wish to transmit. And you can make your choice while
the other ham is part way through his latest SSTV transmission. You will soon find that 1 minute
and 50 seconds is a lot of time to select your next image, select your next template (more on
that in a moment), personalize if necessary and still have plenty of time to return to the RX tab
to see the latest transmitted image unfold.
In order to bring up a picture grid like what you see below), go to the View menu option at the
top, and from the drop down list, click on ‘Always show thumbnails of files folder.’ When this
is minimized, it tucks in the lower left hand corner of the MMSSTV screen—or as I do, show a 2
row x 5 column set of thumbnails, as you’ll notice in a subsequent screen shot. You can size
rows & columns to suit your wishes.

April 2, 2014
Whenever you add new pictures, click on the right file folder icon in the upper left hand corner
and it will refresh your picture content. When ready, you will simply double click on the desired
image and it will automatically load into your TX screen, and after you then select a suitable
template, you will be cued up to transmit!
Template Talk
Well, that took long enough, didn’t it to get to templates!? Templates are the word overlays to
your pictures which round out your next transmission message. You need a variety of
templates in order to carry on an intelligent QSO via pictures. You are now going to learn how
to do this.
Recall I said there are generally four parts to a QSO? Please review ‘The Silent QSO.’ I create
and organize my templates so that I very easily move from one phase of the QSO to the next,
and still have lots of time to go back to view the latest picture I am receiving.
MMSSTV offers a wonderful way to organize things. See ‘S. templates 1’ in the screen shot on
the previous page? Next to that is 2, 3 and 4. Well, I take full advantage of that organizational
potential. Here is how I choose to do it.

April 2, 2014
If you click on ‘S. templates 1,’ you will again see six place in a row and towards the lower right
hand corner you will see x/50 next to the right & left arrows. That means just in this #1 section
you could store a whopping 300 templates. You may notice in the previous screen shot, that I
have set my MMSSTV window to display two rows of six templates.
I store all my CQ, QRZ?, Testing and ‘to a specific call sign’ templates in this section. I liberally
space them out over the next couple of pages, so, for example, all my ‘Test SSTV’ templates are
in one cluster. I create a new template whenever I get a new idea for one.
As a beginner, you need just one CQ SSTV template. That’s it. You could use one of the pre-
built templates that comes with MMSSTV. By now, I have discarded every one of them in favor
of all my own designs.
Now that you get the idea, I then have my ‘first reply with RSV’ templates all stored and sorted
into a few six-section pages in ‘2.’ I have many to choose from.
Section ‘3’ is naturally reserved then for any subsequent QSO reply. I again have many stored
templates. This would help me express things like: my equipment, QTH (including a picture of
Wisconsin), info about my ham web site and so on.
Section ‘4’ is for good-byes. I have many different 73s templates. Of course, to begin with, you
only need one.
For a few of my templates in sections 2-4, I also have them set up for variable data, ie, Name or
Note, as drawn from the logging area of MMSSTV (below the signal spectrum display). More
about logging later.
Template Time
Enough talk, now let’s build a template. It will be easiest if you take an existing stock MMSSTV
template and modify it. Once you get the hang of it, you’ll be creating them at will.
So very basically, please go to ‘S. template 1’ and double click on a template you wish to
modify. It will then appear in the Template tab screen. You can then begin to work on it. When
you double click on any existing text entry, eg, de WB9KMW, the Text & Colors dialog box will
appear. (See example on next page).
You can then change the text, play around with all the different color controls, and even use
controls such as Vert to display your text from top to bottom, or even rotation with the
Rotation control.

April 2, 2014
When satisfied, click OK. You can drag the newly created image around the template screen
until you are satisfied with its placement.
Continue until you are satisfied with all text entries. And if you need a new one, simply click on
the big T in the menu choices under the picture and the Text & Colors dialog box will again
appear.
Now there is a nice feature in the upper right hand corner of the dialog box, called Macro. Click
on that and you will see some handy items which pick up data from the MMSSTV log and post it
into your template.
For example, %c is the other station’s call sign. Other useful macros are:
• %r for the RSV signal report you are sending him
• %n for the other ham’s name
• %o for your very brief note
Once you are done, simple click somewhere in the middle of your screen (not on any text area),
and drag & drop into any open template square below (or into one of the other 49 sections).
You could also simply drag and drop over an existing template to permanently replace it.

April 2, 2014
Isn’t It About Time I Get On The Air??
Guess what? You ARE ready. If you have your picture and template loaded as you wish, simply
click on the TX tab and you will see the same thing you just readied appear in this transmit
screen. IF the template does not appear, simply right click in the transmit window and be sure
that ‘Show with template’ is checked. Click on the TX in the left corner below your picture and
you are on the air for the next 1 minute and 50 seconds.
Oh yes, did we ever mention this is a 100% duty cycle—like full key down? You can get a real
hot & bothered transmitter if you don’t scale things back a little bit, say cut your power in half.
I typically run my Kenwood at 25 to 50 watts, per my power meter.
Log that QSO
MMSSTV has a nice, little logging feature which I like to use for all my SSTV QSOs. (I also use it
to log SSB QSOs.) If you are into exporting this into a master log, that function is there for you.
But for now, let’s just concentrate on the logging.
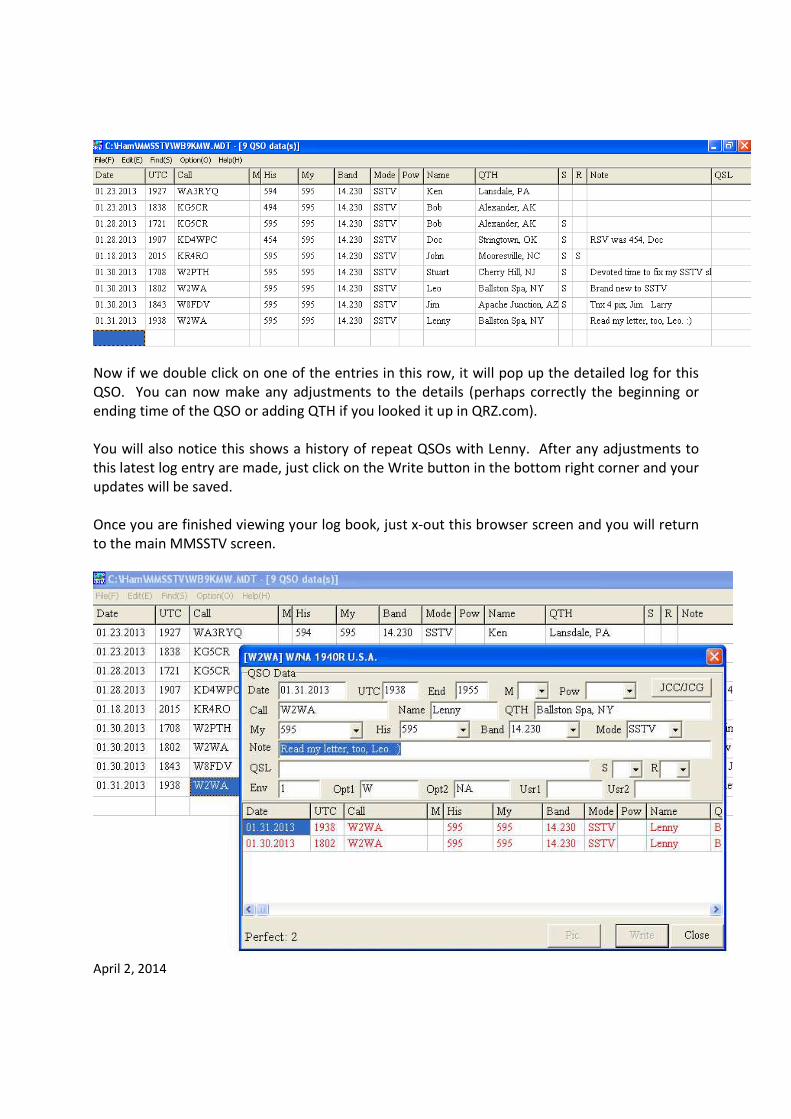
Above is the basic logging entries for my QSO with Lenny, W2WA. Since I have worked him
before, his call sign appears in red, and his name and QTH are automatically set in place. All I
need to do is select today’s RSV signal report from the drop down box, or type one in, and also
insert the RSV report he gives me.
To log this QSO, simply click on the QSO button in the lower left portion. It will post the current
time (UTC). If not accurate, you can always adjust on the detail screen after your QSO.
Once you are finished with the QSO, click that QSO button once again to restore it to its normal,
‘off’ position.
Now let’s take a look at our log book. Simply click on List and up pops the following log book
entries. You will see W2WA listed at the bottom representing my latest entry in this log book.
April 2, 2014
Now if we double click on one of the entries in this row, it will pop up the detailed log for this
QSO. You can now make any adjustments to the details (perhaps correctly the beginning or
ending time of the QSO or adding QTH if you looked it up in QRZ.com).
You will also notice this shows a history of repeat QSOs with Lenny. After any adjustments to
this latest log entry are made, just click on the Write button in the bottom right corner and your
updates will be saved.
Once you are finished viewing your log book, just x-out this browser screen and you will return
to the main MMSSTV screen.
April 2, 2014
Congratulations
There. You have done it. You are ready now to be a proficient member of the SSTV fraternity!
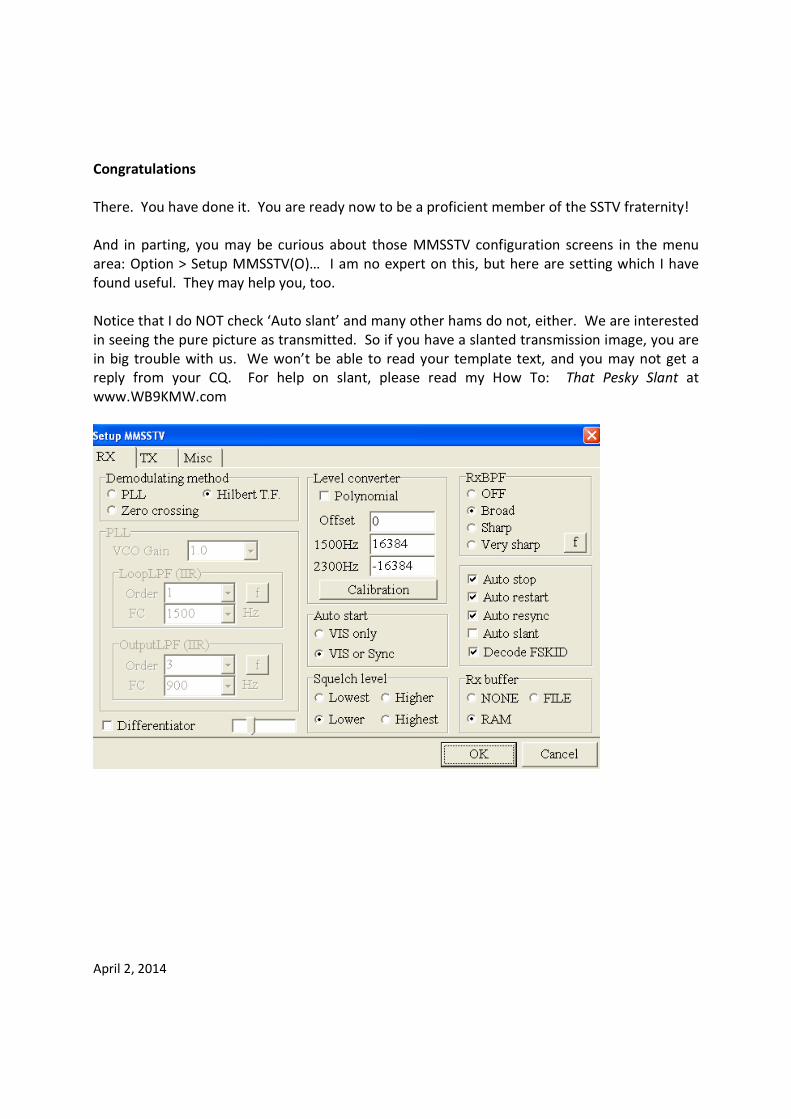
And in parting, you may be curious about those MMSSTV configuration screens in the menu
area: Option > Setup MMSSTV(O)… I am no expert on this, but here are setting which I have
found useful. They may help you, too.
Notice that I do NOT check ‘Auto slant’ and many other hams do not, either. We are interested
in seeing the pure picture as transmitted. So if you have a slanted transmission image, you are
in big trouble with us. We won’t be able to read your template text, and you may not get a
reply from your CQ. For help on slant, please read my How To: That Pesky Slant at
www.WB9KMW.com

April 2, 2014
The PTT info in the TX tab will be very specific to your set up. You may need to designate a
COM port. Hams use a variety of interfaces between their rig. I have used direct cabling,
SignaLink and (currently) RIGblaster plus II.
If you want a CW identification after your transmissions, click CW for the CWID. Most hams do
not use this, and generally I do not either.
‘Encode FSKID’ is handy. This means that your call sign will be encoded into your transmission
and it will automatically pop into my MMSSTV log at the end of your transmission, assuming in
the previous RX screen that I have checked the ‘Decode FSKID’ box.

April 2, 2014
The Misc tab is also very important. You must have your Sound Card correctly set to the
soundcard you are using. Otherwise, no reception and/or no transmission! In this example, it is
pointing to CODEC for SingnaLink.
The Clock settings are vital for straight reception of images AND straight transmission of
images. This is covered in detail in an outstanding tutorial on my web page, That Pesky Slant.
Happy hamming. I look forward to many SSTV QSOs on 14.230 MHz with you.
Larry, WB9KMW @ www.WB9KMW.com