the vertical dance workout instructor course. instructor ...verticaldance.com/docs/vd online manual...
TRANSCRIPT

©Vertical Dance Ltd. The Vertical Dance Workout Instructor Course 2011
1
Beginner
The Vertical Dance Workout
Instructor course.
Instructor Manual
©Vertical Dance Ltd. The Vertical Dance Workout Instructor Course 2011
2
Content Page
Chapter 1 Page 3 – 12
Health and Safety
Chapter 2
Injuries and prevention Page 13 - 17
Chapter 3 Page 18 - 25
Basic Principles of Vertical Dance
Chapter 4 Page 26 - 30
Basic Pole Technique of Vertical Dance
Chapter 5 Page 31 - 35
Teaching Technique
Chapter 6 Page 36 - 64
Vertical Dance Moves
Chapter 7 Page 65 - 72
Designing a Vertical Dance Class

©Vertical Dance Ltd. The Vertical Dance Workout Instructor Course 2011
3
Chapter 1
Health and safety -- Watch pregnancy and pole videos online
Safety is your main concern when teaching. Vertical Dance can be more dangerous than many other forms of fitness if taught incorrectly. You are asking participants, to hold their body weight off the floor with either one or two hands, and to add speed as well as height to their movement. Performing this incorrectly or on faulty or badly erected equipment is a recipe for disaster. There is no excuse for bad health and safety. You need to make sure that every eventuality is covered and that the student understands that by taking part in the class they may incur an injury.
2009 saw the worst injury to date when a student fell from her pole and on to her face. As a result of the accident, she bent her spinal cord and is paralyzed from the neck down. She is now unable to breathe unaided. Spotting, matting, good health and safety practice is the key to minimize or prevent accidents. Informed consent, health questionnaires and insurance Before you begin your class, you must ensure you have insurance, informed consent and health questionnaires. Insurance Before you commence your class you will need to purchase insurance cover. If you already have cover make sure you inform your existing fitness insurance company that you wish to include pole fitness in your cover. You may be charged a fee or you may not, but if you do not inform your insurance company you may not be covered and therefore libel to pay court costs. Make sure you obtain the correct insurance cover and receive all queries in writing, Always Remember! The spoken word is not a guarantee of cover. You do not want to be left without proof.
REPs insurance will not cover you for pole fitness. You will need to locate another insurance company to assist you in this.
The UK requires by law, that you have a license to play music by a recognized artist. If you are an individual, you will require a PPL license, if you are a business you will require a PRS license. Informed consent As a qualified instructor you should already be using an informed consent form. An informed consent form outlines the structure and content of the class along with any information that the participant should be aware of. This information needs to be specific to Vertical Dance by including, bruising, chaffing, muscle soreness, and injury and in extreme cases the possibility of death. You should also verbally state this before the class begins and ask if any of your class has an injury or disability that could affect their participation. Please remember that signing a piece of paper does not remove your responsibility as an instructor. If an accident occurs and the instructor is negligent the instructor will be libel. Health Questionnaire (PARQ form) Everyone in your class should fill out their questionnaire before lesson commencement. Please see an example of this on page 8. The informed consent and health questionnaire can be combined on one sheet of paper.

©Vertical Dance Ltd. The Vertical Dance Workout Instructor Course 2011
4
INCIDENT / ACCIDENT REPORT FORM
Details concerning the person reporting the incident (yourself):
Full name:
Occupation:
Address:
Postcode:
Signature: Date:
Details concerning the person who had the accident:
Full name:
Occupation:
Address:
Postcode:
Signature: Date:
Details of any other persons involved (witnesses?):
Full name:
Occupation:
©Vertical Dance Ltd. The Vertical Dance Workout Instructor Course 2011
5
Address:
Postcode:
Signature: Date:
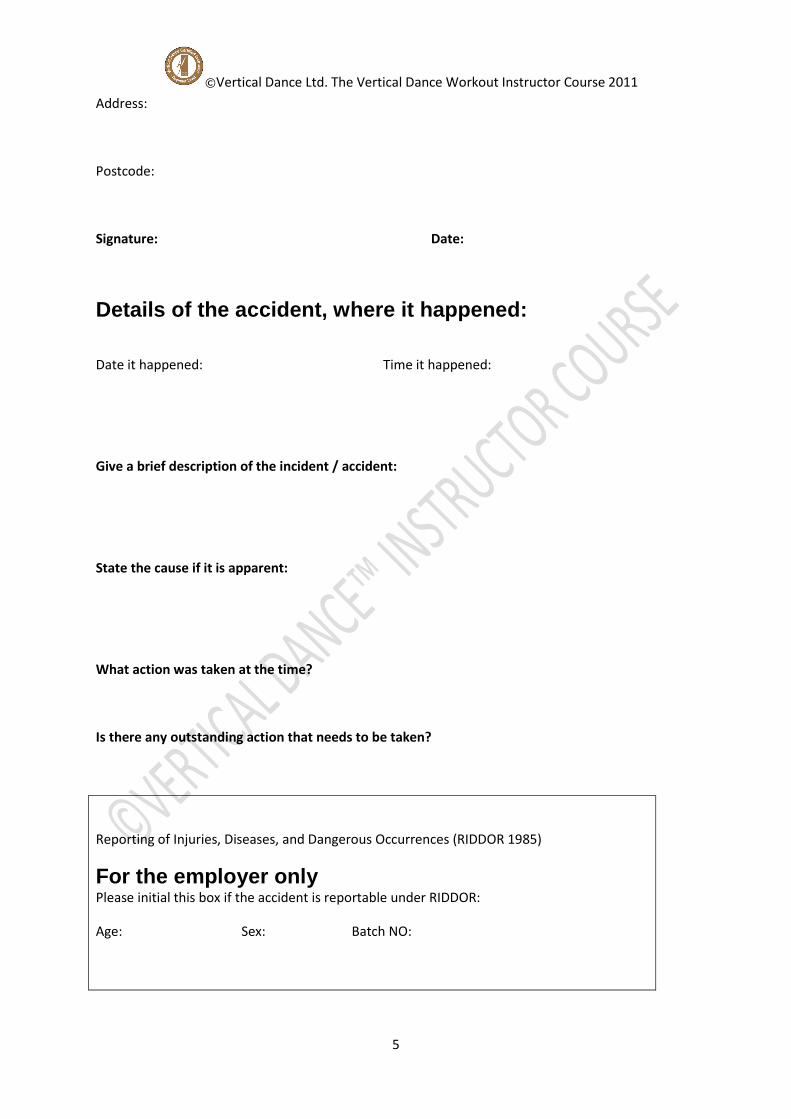
Details of the accident, where it happened:
Date it happened: Time it happened:
Give a brief description of the incident / accident:
State the cause if it is apparent:
What action was taken at the time?
Is there any outstanding action that needs to be taken?
Reporting of Injuries, Diseases, and Dangerous Occurrences (RIDDOR 1985)
For the employer only Please initial this box if the accident is reportable under RIDDOR:
Age: Sex: Batch NO:

©Vertical Dance Ltd. The Vertical Dance Workout Instructor Course 2011
6
Incident / Accident Report Form The above form should be used if incident or accident occurs, no matter how trivial it may be. It should be completed at the earliest opportunity and with as much information and detail given as possible. This will facilitate an accurate and informed overview if the matter were to be taken further.
Pregnancy and Pole Dancing – See online video Students Recent research into pre and post natal exercise would indicate that even high impact and weight bearing exercise has no derogatory effect on pregnant women who are without medical issues. Exercise has a great many benefits including increasing the well being of the mother and baby. However, pole fitness should not be compared to a normal group exercise class and must be recognized as so.
In the first and second trimester, a hormone called relaxin is released which relaxes the soft tissue in the body for two reasons. Firstly, to enable the hip area to increase in size to accommodate the growing baby, and secondly, to relax the blood vessels allowing them to stretch in order to accommodate the extra blood needed to increase the nutrients and oxygen to the baby. The problem with relaxin is that it cannot be released in specific areas so all the muscles, ligaments, and tendons, become softer and unstable. The technique of pole fitness requires that we hang from our arms and legs. During pregnancy this would increase the chances of damaging joints and increases chances of injury and is thus ill advised. The abdomen will start to protrude as the baby begins to grow and will affects the body in two ways. Firstly the body’s center of gravity is moved, which affects the mothers balance. Secondly, the weight of the baby at the front of the body will place added pressure on the lower spine. Balance is the key to pole fitness as there are many one footed moves and turns, not to mention continually spinning which may cause dizziness. Much of pole fitness comes from above the waste with a great deal of pressure on the lower back and abdominals. A pregnant woman runs the risk of pulling weak muscles in the lower back and increasing the abdominal separation that naturally occurs when the abdominal wall separates to accommodate the baby. As the abdomen grows, the muscles at the front lengthen to their full capacity while the muscles of the lower back contract making both apposing muscles weak. Pole fitness will put undue pressure on already weak muscles and is ill advised for pregnant women. Reasons not to teach pregnant women: Relaxin Loose joints – stretches should only be held for 8-10 seconds. Balance Misjudging the distance between yourself and the pole. Abdominal separation Pressure to the abdominals may cause lasting damage. Spine Curvature of the spine adding pressure on an already weak back. Falls Extra weight mixed with loss of balance. Sweat Sweat may cause a slip or fall as a result of sweaty palms. We strongly advise that you do not instruct pregnant women. Either give them a refund or keep their course open until they have given birth and are fit to return to class.
©Vertical Dance Ltd. The Vertical Dance Workout Instructor Course 2011
7
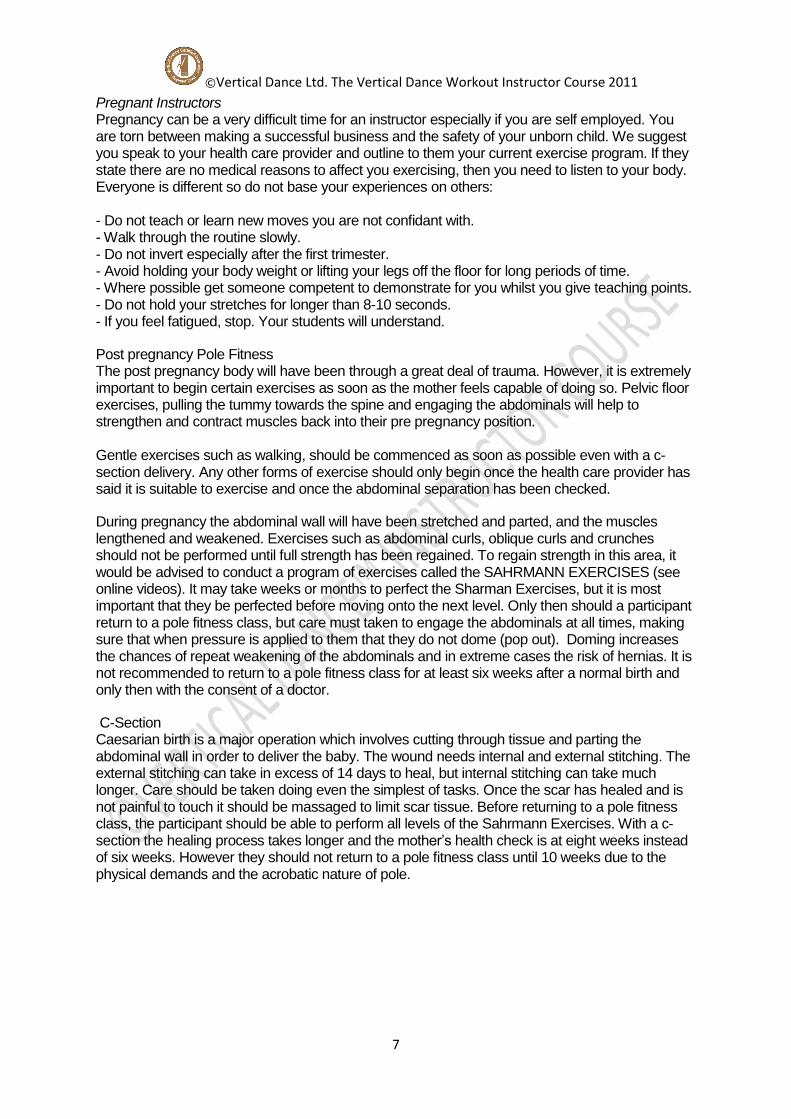
Pregnant Instructors Pregnancy can be a very difficult time for an instructor especially if you are self employed. You are torn between making a successful business and the safety of your unborn child. We suggest you speak to your health care provider and outline to them your current exercise program. If they state there are no medical reasons to affect you exercising, then you need to listen to your body. Everyone is different so do not base your experiences on others: - Do not teach or learn new moves you are not confidant with. - Walk through the routine slowly. - Do not invert especially after the first trimester. - Avoid holding your body weight or lifting your legs off the floor for long periods of time. - Where possible get someone competent to demonstrate for you whilst you give teaching points. - Do not hold your stretches for longer than 8-10 seconds. - If you feel fatigued, stop. Your students will understand.
Post pregnancy Pole Fitness The post pregnancy body will have been through a great deal of trauma. However, it is extremely important to begin certain exercises as soon as the mother feels capable of doing so. Pelvic floor exercises, pulling the tummy towards the spine and engaging the abdominals will help to strengthen and contract muscles back into their pre pregnancy position. Gentle exercises such as walking, should be commenced as soon as possible even with a c-section delivery. Any other forms of exercise should only begin once the health care provider has said it is suitable to exercise and once the abdominal separation has been checked.
During pregnancy the abdominal wall will have been stretched and parted, and the muscles lengthened and weakened. Exercises such as abdominal curls, oblique curls and crunches should not be performed until full strength has been regained. To regain strength in this area, it would be advised to conduct a program of exercises called the SAHRMANN EXERCISES (see online videos). It may take weeks or months to perfect the Sharman Exercises, but it is most important that they be perfected before moving onto the next level. Only then should a participant return to a pole fitness class, but care must taken to engage the abdominals at all times, making sure that when pressure is applied to them that they do not dome (pop out). Doming increases the chances of repeat weakening of the abdominals and in extreme cases the risk of hernias. It is not recommended to return to a pole fitness class for at least six weeks after a normal birth and only then with the consent of a doctor.
C-Section Caesarian birth is a major operation which involves cutting through tissue and parting the abdominal wall in order to deliver the baby. The wound needs internal and external stitching. The external stitching can take in excess of 14 days to heal, but internal stitching can take much longer. Care should be taken doing even the simplest of tasks. Once the scar has healed and is not painful to touch it should be massaged to limit scar tissue. Before returning to a pole fitness class, the participant should be able to perform all levels of the Sahrmann Exercises. With a c-section the healing process takes longer and the mother’s health check is at eight weeks instead of six weeks. However they should not return to a pole fitness class until 10 weeks due to the physical demands and the acrobatic nature of pole.
©Vertical Dance Ltd. The Vertical Dance Workout Instructor Course 2011
8
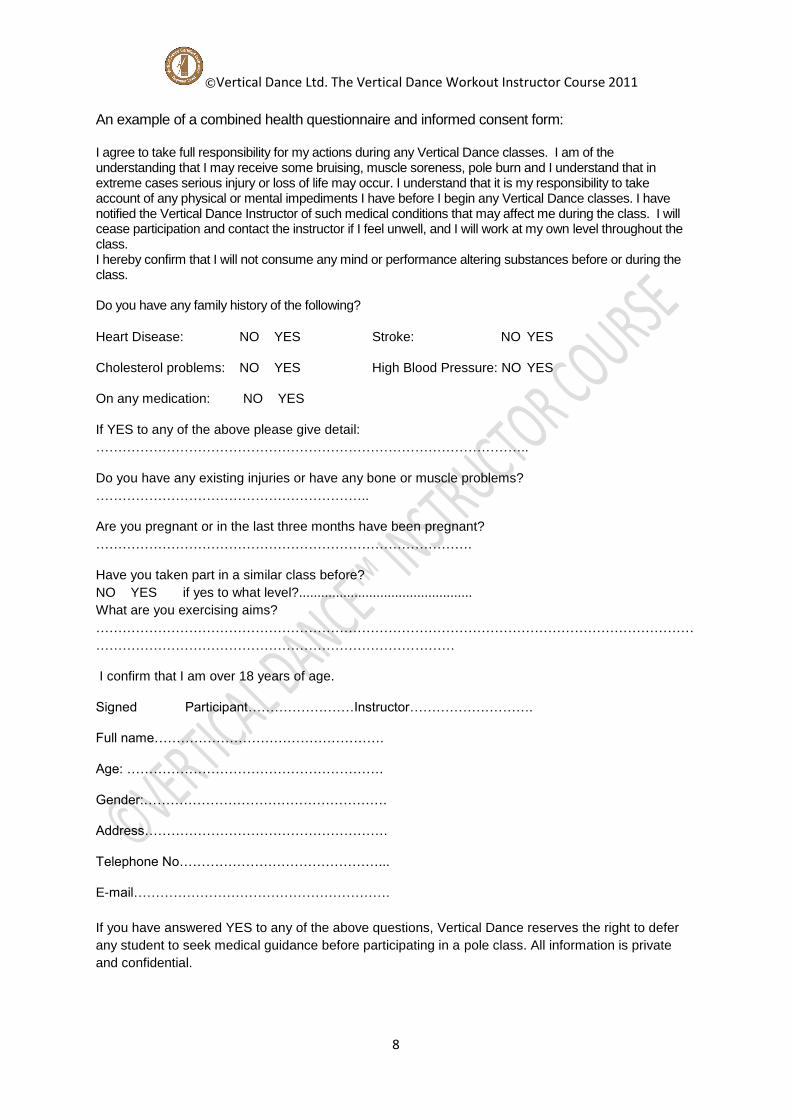
An example of a combined health questionnaire and informed consent form: I agree to take full responsibility for my actions during any Vertical Dance classes. I am of the understanding that I may receive some bruising, muscle soreness, pole burn and I understand that in extreme cases serious injury or loss of life may occur. I understand that it is my responsibility to take account of any physical or mental impediments I have before I begin any Vertical Dance classes. I have notified the Vertical Dance Instructor of such medical conditions that may affect me during the class. I will cease participation and contact the instructor if I feel unwell, and I will work at my own level throughout the class. I hereby confirm that I will not consume any mind or performance altering substances before or during the class. Do you have any family history of the following?
Heart Disease: NO YES Stroke: NO YES
Cholesterol problems: NO YES High Blood Pressure: NO YES
On any medication: NO YES
If YES to any of the above please give detail:
……………………………………………………………………………………..
Do you have any existing injuries or have any bone or muscle problems?
……………………………………………………..
Are you pregnant or in the last three months have been pregnant?
………………………………………………………………………….
Have you taken part in a similar class before?
NO YES if yes to what level?...............................................
What are you exercising aims?
………………………………………………………………………………………………………………………
………………………………………………………………………
I confirm that I am over 18 years of age.
Signed Participant……………………Instructor……………………….
Full name…………………………………………….
Age: ………………………………………………….
Gender:……………………………………………….
Address……………………………………………….
Telephone No………………………………………...
E-mail………………………………………………….
If you have answered YES to any of the above questions, Vertical Dance reserves the right to defer
any student to seek medical guidance before participating in a pole class. All information is private
and confidential.
©Vertical Dance Ltd. The Vertical Dance Workout Instructor Course 2011
9
Participant preparation
Before any student joins your class or books a lesson, they should be made aware of the
following:
Creams and Lotions
Due to oil content, creams and body lotions will coat the pole making it both slippery and
dangerous. They should not be worn at any time during a pole class. Pay special attention
to ethnic skinned clients as dark skinned people wear Coco butter and high oil content
creams that some times take days to remove from the skin. You should also inform your
client that they will not be eligible for a lesson if they have just taken a sun bed session.
On the odd occasion that you find a student forgets to remove creams and lotions, you have
a choice. You can either ask them to wash it off after which they must continue to use the
same pole for the duration of the lesson, or advise them that they will be unable to take
further part in the class due to safety reasons.
Correct Clothing
Clothing is an important part of pole fitness. You will need to keep warm, but some moves
require you to have skin traction with the pole. In the first few lessons it is best for the
participant to cover up to protect them from pole burn. You do not want to deter them from
returning to the class. As they progress to the third or fourth lesson they should be expected
to wear shorts. It would be good policy to be diplomatic with some ladies as they lack the
confidence to wear shorts and may need to be asked to wear what is comfortable. However,
you must outline that for health and safety reasons that the participant will at some point
need leg traction on the pole. In our experience participants tend to go along with the rest of
the class and will have their legs out in no time.
Nails
Long nails can be a hazard to the participant and other students. Make they are aware of the
danger of scratching themselves and each other.
Jewellery
It is most important that hanging jewellery such as earrings, bracelets, necklaces and rings
are removed before the class begins. Do not hold any valuables for your students. Request
them not to wear jewellery and keep them safely in their bags. Make it clear that they are
stored at their own risk.
Hanging jewellery can get caught in clothing. Rings can cause scratching to the pole which
can cause cuts and scratches to student. It is most important that rings and hanging
jewellery are completely removed by all students during pole classes.
Alcohol or Drugs
If you are aware that a student may have been consuming alcohol or indulged in recreational
drugs prior to their lesson, under no circumstances should they be allowed to participate.
Your insurance will most certainly not cover you in the event of an accident.
©Vertical Dance Ltd. The Vertical Dance Workout Instructor Course 2011
10
Pole Safety
Without the pole you have no class. The pole is without a doubt the most important piece of
equipment you will need to invest in. You need to think carefully about how many and what
type of pole will be suitable for the room/area/venue where you intend the poles to be sited,
ie:
Are you planning to use more than one venue?
How many students do you plan teaching in a class?
What is your budget?
Can you leave the poles erected on site?
If you have any queries with regards to the correct type of pole for you and your class and
from where to purchase please contact Vertical Dance.
Selecting your pole
You may just think a pole is a pole but it is not the case.
Firstly the pole needs to be the correct diameter of either 50mm or less. I would always
recommend the 50mm pole. It is easier to work on a thinner pole but you will find it more
difficult when graduating to a wider one.
Secondly the pole needs to be made of the correct metal, so either stainless steel (not
brushed stainless like scaffold poles), chrome plated, titanium plated or brass would be
ideal.
Thirdly you need will to decide if your pole preference would be for a fully removable pole, a
semi permanent pole, a permanent pole or a stage pole. Each has its merits specific to the
room dimensions you will be using. We recommend you use a fully removable pole or a
stage pole depending on the available height of the building, thus giving you flexibility usage
at many venues.
Fourthly, and finally. Do not be persuaded by people offering you a cheap pole or installation
because you can almost guarantee that if you buy cheap you will buy twice. You will also be
placing your students at risk. Call the company and ask them if they have pole liability
insurance. If they have, then they are a reputable company. Do not be tempted by poles
costing less than £100. These are novelty poles and are used for walking around the pole,
not for dancing on.
Distance between poles
It is most important to make sure that there is enough leg/arm room around each pole so
that the participant has plenty of free space. To measure the distance required hold the pole
with one hand and reach out as far as you can with the other, and then walk around the
pole. If you come into contact with any object, either move it or move the pole.
Assembling and erecting the pole
Never allow another person to either assist you or install the pole for you. They could get
injured or install the pole incorrectly. You would be surprised how many people do not
bother to read and follow the instructions in the pole assembly manual. Make sure you do!

©Vertical Dance Ltd. The Vertical Dance Workout Instructor Course 2011
11
Give your self plenty of time to install the poles. You do not want to be rushing or worst still,
installing them with a clock watching audience.
Always check your poles first by shaking them and then gently swing on them, building up
the swing. Do this through out the lesson to check pole security.
Dismantling the poles
Do not let others help you. They could get hurt. Watch out for flying spanners and loose pole
parts falling and rolling.
Looking after your pole Make sure you clean your pole on a regular basis. If it is removable pole, clean and oil the working parts and make sure you store the pole away in its case. This will prevent it from becoming scratched or dirty. Make sure it can easily be undone. Store the poles in a secure location away from the public as they have a tendency to try erecting the poles themselves. Poles should be replaced every two years or where and when necessary. You should also take note of the manufactures instructions. Unattended poles Make sure that no one has access to play on unattended poles. You do not want people hurting themselves or breaking your expensive equipment. Sweaty Hands – hyper hydration Many people may be unaware that they suffer from sweaty hands until they attend a class. Their hands will become too wet to grip the pole and will slide off it. They will have to be careful not to injure themselves or others by leaving a moist pole. Get them to experiment with different forms of grip enhancers, as some are better than others. Make sure your participants attend your classes with a clean dry towel. It is possible to see when people have sweaty hands by the way they hold the pole. They tend to bend their arms and cuddle the pole to over compensate for the lack of grip. They also place lead and secondary hand in position one to try and increase their grip. They will bruise and sustain more chafing than those without sweaty hands as they try and over compensate with other parts of their body. An easy test for sweaty hand syndrome is to ask them to face the pole with both hands in position one (please see chorography module for grips) at full stretch and then ask them to hang from their arms lifting their feet into the prayer position (please see chorography module for moves and positions) and slide down the pole. If they are unable to lift their legs or they slide down a rapid rate then they have sweaty hands. Cleaning your pole It is most important to clean all poles at regular intervals during class. The pole will become sweaty and greasy. It is advisable to have cleaning product to hand to maintain pole cleanliness. Alcohol wipes would be ideal as they will remove dirt and grease and at the same time kill off germs and bugs. Be aware of students using grip enhancers. Jointed poles can become clogged with products making them difficult to separate. Make sure poles are cleaned properly. The correct pole/student ratio Poles cost a lot of money so you may be limited to the number of poles you can instruct with. We would recommend never having more than three students per pole. You need a balance between making a profit and giving value for money. You will also have to remember that this is a pole fitness class, not a pole watching class. The least time spent waiting is far better for a higher
©Vertical Dance Ltd. The Vertical Dance Workout Instructor Course 2011
12
standard of fitness levels. Consideration should be taken as to the amount of available space in the class. Although you may have a large enough room to accommodate many poles, you as an instructor can only safely teach approximately 15 students in a session, irrespective of the amount of poles you have available. You will only be able to safely teach approximately 15 participants per lesson. Obligations as an instructor As an instructor, you are obligated to follow the code of ethics outlined within this manual. Please remember that care should be taken when teaching others. It is your responsibility to demonstrate all the moves and movements that you instruct. If you do not, then you will be liable in the event of an accident occurring. Many instructors make the mistake of trying to teach movements that they have seen but cannot perform themselves. If you cannot do it you cannot teach it! It is your obligation as an instructor to work at advancing your own level. Many students become complacent and feel they know enough already. This will never be the case. As students approach your own level of performance they may become complacent with the routine and take fewer lessons. You owe it to your students to continue learning yourself in order to continue teaching them. If you need to leave the room at any time, make sure you ask all students to keep off the poles during your absence to prevent injury. Make sure you address the whole class so that everyone can hear. Give the group an alternative to the pole such as floor work or MSE to keep them occupied. Never allow participants to play or practice on the pole unsupervised before or after the class. To request without offence we would suggest you tell them that your insurance policy does not cover unattended student practice. Check all of your equipment including the room you intend to use and have a good knowledge of the emergency procedures at the venue. Although it is not a requirement for the course we strongly recommend a basic first aid course. You should always be prepared. Vertical Dance often requires maneuvering the participant in to various pole positions. Please ask participants permission before you make physical contact. Generally, people will not object but you do not want to run the risk of making them feel uncomfortable.
Please refer to the code of conduct for more information on ethical practice.
Obligations as a student
It is not just pole instructors that have an obligation to their students, the students
themselves also have an obligation to their instructor. They must be tentative and digest the
instructions given at all time. It is essential that you have full control of your class. The
instructor should lead the session, not the participants.
An accident caused as a result of a participant doing some thing he/she was told not to do
would leave the participant at fault. It would not be the responsibility of the instructor.
©Vertical Dance Ltd. The Vertical Dance Workout Instructor Course 2011
13
Chapter 2
Injuries and their prevention - Watch shoulder joint and shoulder strengthening videos online
Previously this section was included with health and safety but after suffering two rotator cuff injuries and hearing numerous other injury stories, we thought it best that it has a section all to itself. The Register of Exercise Professionals no longer requires you to have a current first aid certificate to qualify as a level two instructor. This means that the choice is given to the instructor. Remember it is more than likely that an injury or accident will happen at some time. We recommend that you take at least a half day first aid course or your countries equivalent.
On a class to class basis it is inevitable that participants will receive bumps and bruises due to the very nature of the fitness session. Unfortunately such minor injuries cannot be eliminated altogether, but they can be considerably reduced by wearing a tracksuit or leggings. Building up your strength and technique will also reduce unwanted bumps and bruising. Remember, you want your participants to return and they will not do so if they are constantly in pain. Bruising and chaffing (pole burn) Bruising and chaffing go hand in hand with pole exercise. Regrettably this is an affliction that affects every single one of us including instructors. There are certain step that can be taken to minimize the problem . Bad technique and lack of strength are the main cause. The more proficient and stronger the participant becomes with the technique the lesser will be the problem. Other body parts such as legs are relied on more than they usually would be. To give you an example, a common area that bruising occurs on news students when performing the fireman spin, is the shin/ankle area and the inner thighs. This is a direct result of over compensation of the legs due to the lack of strength in the arms. It can also be a result of jumping into the spin and knocking the shins on the pole. The main body areas subject to pole burn are the wrists and the inner thighs. The wrists become sore because the participant grips the pole too tightly during a spin. The result of gripping too tight is that the body moves around the pole but the hands do not. This action will twist the wrist around the pole and will cause pole burn. After a few classes the participant will soon gain confidence to regulate their grip. Once this has been achieved the burns will become less. Should the student be suffering much discomfort, we recommend they wear sweat bands to act as a barrier. You must observe and correct the participant when you see them twisting their wrist. Pole burn and bruising of the inner thighs or the back of the legs mainly occurs when the legs grip the pole rather than resting against it. One of the best ways to overcome leg burn is to wear leggings. Please note! Once the participant advances to pole sitting, they should be asked to wear shorts as further progress will not be possible. DOMS or The 48 Hour Principle DOMS or Delayed Onset Muscle Soreness is thought to result from microscopic tearing of muscle fibers. Pain or muscular tightness generally increases within a 48 hour period. DOMS is a result of training inactive, unprepared muscle to hard. No matter what training you may have done prior to a Vertical Dance class (unless it is aerial circus) nearly all new participants will suffer in subsequent days. DOMS has been intensely researched but as yet without an answer as to how it should be treated. It is more than likely that is specific to the individual. Listed below are some suggestions and idea on how to help prevent DOMS. You may need to try a few before you find the one that is suitable for both yourself and your participants: How to help relieve the symptoms of DOMS - Rest, relax and do nothing, allowing the muscles time to heal. - Gentle stretching of the area’s most affected. - Perform basic low impact aerobic exercises to increase blood flow to the muscles. - Use RICE – Rest , Ice, Compression and Elevation. - Light massage has been known to elevate pain by up to 30%.
©Vertical Dance Ltd. The Vertical Dance Workout Instructor Course 2011
14
How to prevent DOMS - Warm up and cool down thoroughly before and after exercise. - When commencing Vertical Dance for the first time, work at only 10% of your normal work out rate. - Get the participant to work on target muscle groups in the gym prior to coming to the next class. - Limit Vertical Dance time, increasing it gradually. The pain that is felt in the muscles actually means that they are becoming stronger. After just two or three sessions the likely hood of suffering DOMS hugely decreases. You must remember that recovery can take up to 48hours so heavy training on the same muscle groups should be avoided. Although not an injury as such DOMS can be very painful and can lead participants to not wanting to return to your class. Always complete a good cool down stretch and encourage your students to undertake a stretching program at home. Muscle Injuries Muscle injuries can happen from time to time no matter how well you warm up. You must remember that you are an instructor and not a doctor and as such you cannot diagnose with authority. Subject to the severity, you should advise the injured participant to do the following if they have minor injuries: RICE - Rest, Ice, Compression and Elevation until they can get to their GP. Under no circumstances should you offer the injured party any form of medication. There can be a great deal of impact on both the muscles and connective tissue when taking part in a pole fitness routine. The need for flexibility and strength can cause injury when we push ourselves that little bit too hard. The most common injuries suffered are in the upper torso area, such as the wrist, elbow, abdominal, intercostals and the shoulder and neck area. Extra time should be given to stretching and strengthening these areas. However, the shoulder area suffers the most. In some cases we hold our entire body weight on just one arm without contracting the muscles to protect it. To combat this you should limit the amount of time spent rehearsing one armed movements. Make sure you change the lead arm to the secondary arm when practicing. The Intercostals are the muscles that sit between the rib cage. These may become injured as a result of incorrect technique during inverting on the pole. It can also occur as a result of lifting the body weight with one arm. We would suggest that you limit one arm movements. Abdominals are one of the most used muscle groups in pole fitness. Some students may be weak in the mid part of their body, especially those who have had children, so care should be taken and moves built up slowly. The shoulder Joint The shoulder joint is one of the most complex and important joints in the body. Without it, we would be unable to lift, dress, or take part in a pole session. A great deal of time is spent learning new moves yet no time at all on protecting and strengthening this key joint. Hopefully the next few pages and the video to accompany this section, will help you to understand and improve the strength and stability of the shoulder joint.
©Vertical Dance Ltd. The Vertical Dance Workout Instructor Course 2011
15
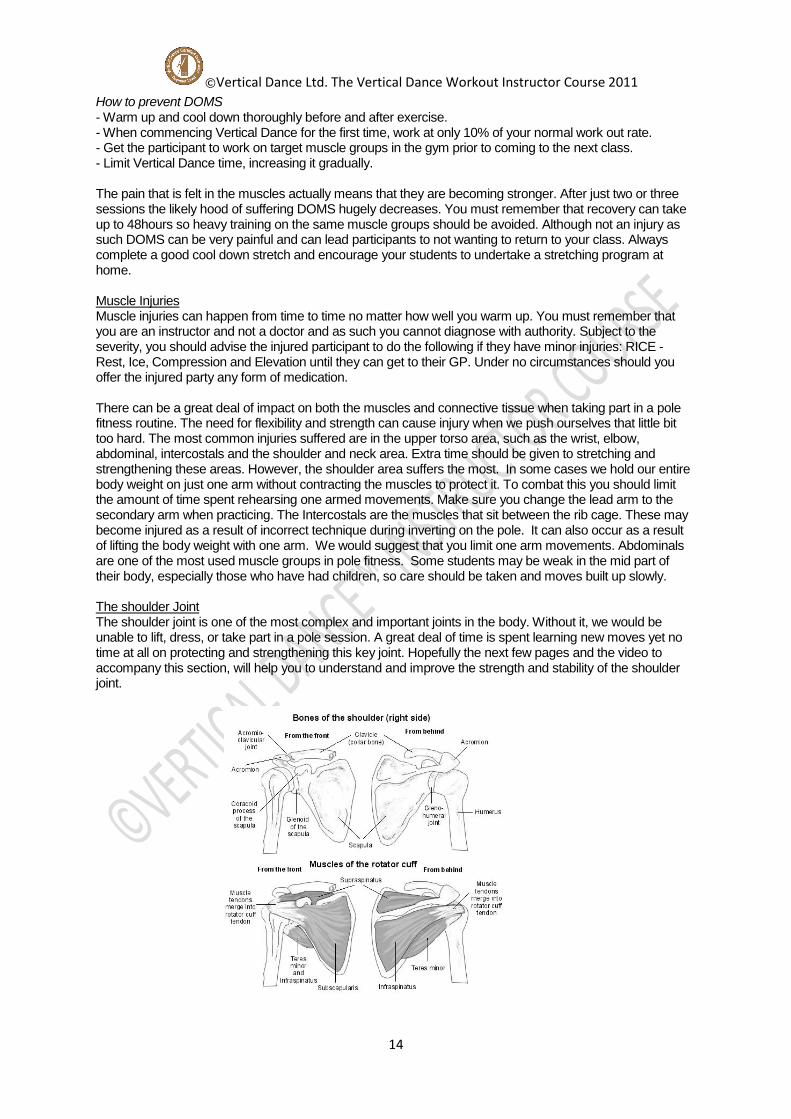
The shoulder girdle The shoulder girdle comprises of a set of complex joints that work in unison. For effective movement of the shoulder the following joints are utilized: Glenohumeral Joint The humorous and scapular bone structure is known as the Glenohumeral joint. It comprises of a ball and socket joint. This allows flexion, extension, adduction, and abduction, internal and external rotation. The glenohumeral joint relies on the surrounding muscles for stability as it is not a perfect fit. The joint is also stabilized by the joint capsule, the rotator cuff and the ligaments of the Glenohumeral (anterior, middle and inferior). These ligaments help strengthen the capsule, limit external rotation, and help prevent anterior dislocation of the shoulder. The coracohumeral ligaments sit in the space between the supraspinatus and the subscapularis tendons to complete the Rotator Cuff. This helps counteract the downward pull of gravity and stops the head of the humorous from moving (dislocating). Acromioclavicular Joint Otherwise known as the AC Joint. This joint consists of the scapular and trapezoid. This sliding joint enables the shoulders to shrug up and down, to push the shoulders forward and back, and to rotate the shoulders. The joint is protected by the superior and inferior Acromioclavicular and Coracoclavicular ligaments. This prevents the head of the Humorous dislocating superiorly. Sternoclavicular Joint The SC joint is located where the clavicle meets the sternum. The point of movement is called the Manubrium. It is a saddle shaped joint and relies heavily on ligaments for stability. The movements at this joint includes elevation (lifting), depression (lowering), protraction (push forwards), retraction (pull back) and rotation (circular movement). The joint is protected by the anterior and posterior Sternoclavicular, and Costoclavicular . Scapulothorasic Joint The scapulothorasic joint is not considered as a true joint, but it is an integral part of the shoulder. The scapular bone must be able to slide along the rib cage in order for the arm to elevate. The movements that occurs at this joint are elevation, depression, protraction and retraction. The following bone structures are also associated with the scapulothorasic joint, the upper thoracic vertebrae, first and second ribs, manubrium, scapular, and clavicle. The Shoulder Muscles Shoulder movement requires the activation of many muscles. The most important group of muscles from a pole fitness point of view is the Rotator Cuff. The Rotator Cuff forms a band of interconnecting fibers that cover the shoulder. It has three major functions. (a) To rotate the shoulder enabling over head arm movements (b) To depresses the humeral head into its socket so the arm can lift (c) Stabilizes the Glenohumeral joint so that the humeral head stays in place. Rotator Cuff The Cuff is made up of the following muscles that provide both stability and mobility (SITS): Supraspinatus – Abducts the shoulder Infrasupinatus – External rotation Teres Minor – External rotation Subscapularis – Internal rotation Injuries Research has shown that shoulder injuries are more common in women than men and that age does play a factor. Such an injury can happen before you have even started to participate in a pole fitness class. Studies have shown that an injury or incorrect alignment in one part of the body can affect a different part of the body. As one part repairs itself another part will over compensate causing another injury. The shoulder is the most mobile joint in the body and also the least stable. The rotator cuff gives the Glenohumeral Joint its stability. If the muscles that make up the rotator cuff are not functioning correctly, the arm cannot be lifted over the head.
©Vertical Dance Ltd. The Vertical Dance Workout Instructor Course 2011
16
It is important for you to understand and identify possible shoulder injuries and to include strengthening and stretch exercises in your class as a preventative measure. However, you are not a doctor and are not qualified to give medical advice, so if a participant in your class is suffering from an injury, they should be referred to the doctor for medical advice.
The following injuries are most common to pole fitness participants:
Impingement The rotator cuff is particularly susceptible to injuries caused by over use. The cause is believed to be related to decreased blood flow to the rotator cuff muscles, and usually occurs when tendons of the rotator cuff muscles become inflamed and irritated as they pass through the subacromial space (the passage beneath the acromion). The injury is commonly known as impingement. As a result of impingement, the inflamed tendons will be pinched and result in weakness, pain and loss of shoulder movement. This is one of the most common injuries suffered by the pole performer. Later in this chapter we will illustrate a few exercises to stretch and strengthen the rotator cuff thus helping to prevent unwanted injuries. Another way of reducing possible injury is to make sure that one handed movements are not over practiced on the favored arm. Adequate rest must be given to both arms. The ideal is to work both arms the same to create a balance in the shoulders, thus reducing the chance of injury through over compensation of muscles. Signs of a possible injury: - Pain around the shoulder including the upper and outer arm. - Increased pain with overhead movements when lifting and reaching. - Loss of strength. - Limited motion of shoulder movement, especially behind your back or across the body. - Pain at night especially when lying on the affected arm.
Management – to reduce pain and swelling, rest, ice and physical therapy. Rotator Cuff Tears Rotator tears occur at the point where the tendon meets the bone and is usually caused as a result of constant wearing by the tendon against the bones surface. Unfortunately it is unlikely that this injury will heal as the lack of blood supply will restrict healing process. The constant tension from muscle movement and fluid from the bursa may fill the gap preventing the healing process.
Signs of a possible injury: - Pain around the shoulder, outer and upper arm. - No possibility of lifting the arm above the head. - Loss of strength. - Limited motion of the shoulder. - Pain at night especial when lying on the affected arm.
Management – to reduce pain and swelling, rest, ice and physical therapy. Tendonitis Tendonitis is an inflammation of the tendon caused by overuse, trauma, and excessive force on the tendon, by the full body weight pulling on the tendon during a pole move. This also occurs with faulty shoulder girdle complex or injury to the soft tissue surrounding this area. Due to poor blood supply to the tendons of the rotator cuff, they may become susceptible to tendonitis and could be limited to just one tendon or could involve the whole rotator cuff. When the tendon becomes inflamed it swells and increases the chance of being squeezed under the acromion when the arm is elevated. Management – to reduce pain and inflammation before rehabilitation.
©Vertical Dance Ltd. The Vertical Dance Workout Instructor Course 2011
17
Bursitis and or Tendonitis Bursitis is an inflammation of the bursa usually caused by over use or trauma. Bursae are fluid filled sacks used to reduce friction between two surfaces, such as a tendon or a bone. The subacromial or subdeltoid bursa allows the tendons of the rotator cuff to slide near the acromion without friction. Bursae are susceptible to overuse and inflammation. Tendonitis (inflammation of the tendon) and impingement often occur simultaneously with bursitis. Management – to reduce pain and inflammation before rehabilitation. Prevention Always remember, prevention is better than cure! The following information will help you develop and create a safe and effective base for strength and stability training sessions. Please take the following into account:
Posture (see online video) The correct alignment of the body posture should be the following: Feet hip width Feet hip width distance can often be misunderstood. Students will tend to adopt a wider stance than is necessary. To insure correct body alignment, place the sides of the little fingers onto the hip bones and slide the hands down towards the knees, the knees should now be in line with the hips bones. Good Posture The correct posture position is when the ear, shoulder, hip and ankle are all in the same vertical line. Shoulders should be pressed back, pulled down and the abdominals engaged and the head facing forward. Working within your zone There are three zones to consider in your work load. Each shoulder may have a different zone when performing exercises. The zones relate to three kinds of shoulder movements. These are opening the arms (abduction). Opening the arms and lift the arms forward (flexion), lifting the arms behind the body (extension). If pain is felt you are working in your red zone and you should reduce your range of movement.
Green Zone – This is the range of motions where most participants can work comfortably and has the least amount of stress. Yellow Zone – This is a zone which only has a moderate stress placed upon it. Caution should be taken not to sustain an injury. Red Zone – This is a zone that suffers the most amount of stress. Excessive stress in this zone can make the joint unstable and prone to injury. Stretching and Strengthening the Shoulder Please watch the online video for safe and effective exercises to perform. These can be incorporated into warm up, MSE and cool down routines. Remember, correct technique is the most important thing when performing exercises. When the correct form is lost, either the exercise should be terminated or the weight should be reduced.
©Vertical Dance Ltd. The Vertical Dance Workout Instructor Course 2011
18
Chapter 3
The Basic Principals of Vertical Dance-- Watch pole warm up and pole MSE
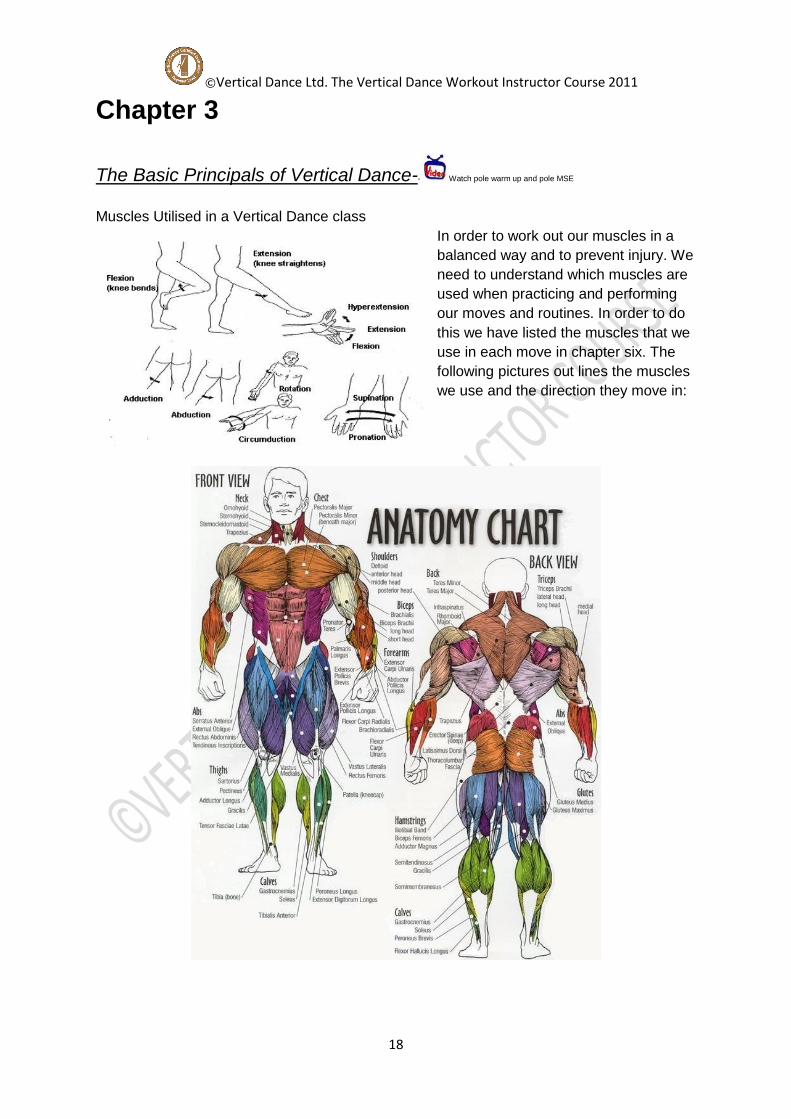
Muscles Utilised in a Vertical Dance class
In order to work out our muscles in a
balanced way and to prevent injury. We
need to understand which muscles are
used when practicing and performing
our moves and routines. In order to do
this we have listed the muscles that we
use in each move in chapter six. The
following pictures out lines the muscles
we use and the direction they move in:
©Vertical Dance Ltd. The Vertical Dance Workout Instructor Course 2011
19
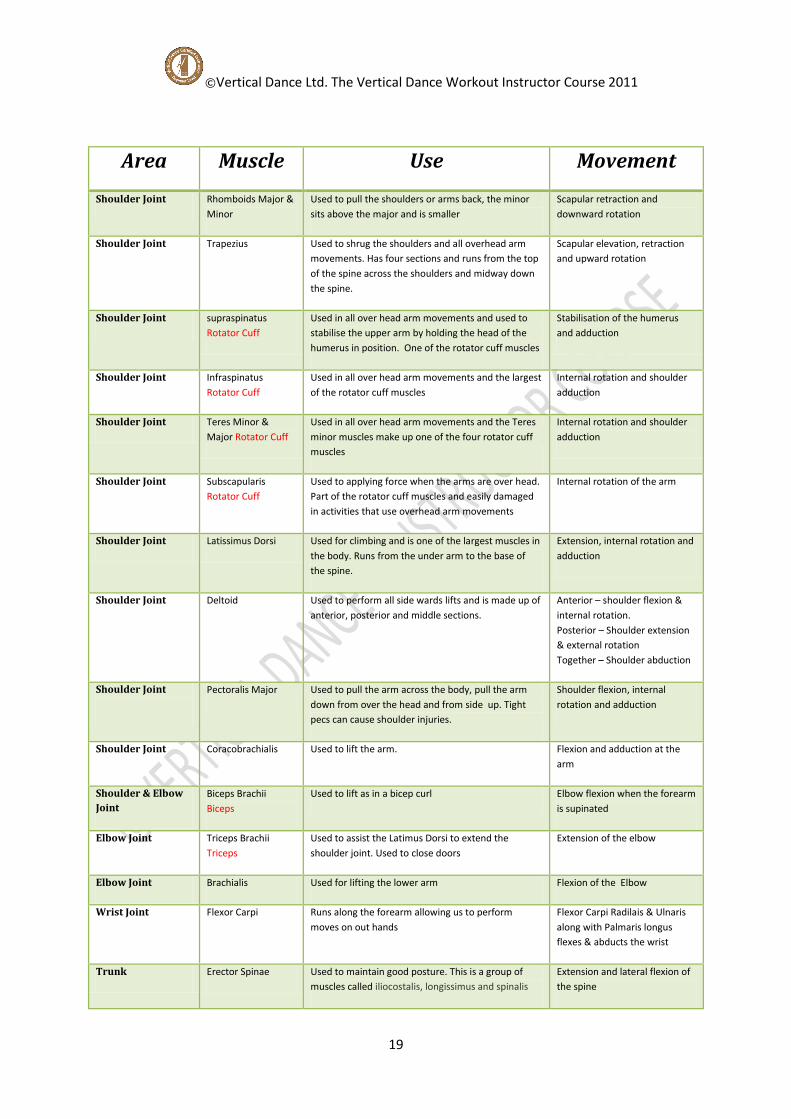
Area Muscle Use Movement
Shoulder Joint Rhomboids Major &
Minor
Used to pull the shoulders or arms back, the minor
sits above the major and is smaller
Scapular retraction and
downward rotation
Shoulder Joint Trapezius Used to shrug the shoulders and all overhead arm
movements. Has four sections and runs from the top
of the spine across the shoulders and midway down
the spine.
Scapular elevation, retraction
and upward rotation
Shoulder Joint supraspinatus
Rotator Cuff
Used in all over head arm movements and used to
stabilise the upper arm by holding the head of the
humerus in position. One of the rotator cuff muscles
Stabilisation of the humerus
and adduction
Shoulder Joint Infraspinatus
Rotator Cuff
Used in all over head arm movements and the largest
of the rotator cuff muscles
Internal rotation and shoulder
adduction
Shoulder Joint Teres Minor &
Major Rotator Cuff
Used in all over head arm movements and the Teres
minor muscles make up one of the four rotator cuff
muscles
Internal rotation and shoulder
adduction
Shoulder Joint Subscapularis
Rotator Cuff
Used to applying force when the arms are over head.
Part of the rotator cuff muscles and easily damaged
in activities that use overhead arm movements
Internal rotation of the arm
Shoulder Joint Latissimus Dorsi Used for climbing and is one of the largest muscles in
the body. Runs from the under arm to the base of
the spine.
Extension, internal rotation and
adduction
Shoulder Joint Deltoid Used to perform all side wards lifts and is made up of
anterior, posterior and middle sections.
Anterior – shoulder flexion &
internal rotation.
Posterior – Shoulder extension
& external rotation
Together – Shoulder abduction
Shoulder Joint
Pectoralis Major Used to pull the arm across the body, pull the arm
down from over the head and from side up. Tight
pecs can cause shoulder injuries.
Shoulder flexion, internal
rotation and adduction
Shoulder Joint Coracobrachialis Used to lift the arm. Flexion and adduction at the
arm
Shoulder & Elbow
Joint
Biceps Brachii
Biceps
Used to lift as in a bicep curl Elbow flexion when the forearm
is supinated
Elbow Joint Triceps Brachii
Triceps
Used to assist the Latimus Dorsi to extend the
shoulder joint. Used to close doors
Extension of the elbow
Elbow Joint Brachialis Used for lifting the lower arm Flexion of the Elbow
Wrist Joint Flexor Carpi Runs along the forearm allowing us to perform
moves on out hands
Flexor Carpi Radilais & Ulnaris
along with Palmaris longus
flexes & abducts the wrist
Trunk Erector Spinae Used to maintain good posture. This is a group of
muscles called iliocostalis, longissimus and spinalis
Extension and lateral flexion of
the spine

©Vertical Dance Ltd. The Vertical Dance Workout Instructor Course 2011
20
Trunk Quadratus
Lumborum
Used to lift or twist the trunk. Often associated with
back pain
Lateral flexion of the trunk
Trunk Rectus Abdominus
Abdominals
Used to move from a laying position to sitting. This
muscle give the shape of a six pack.
Flexion of the lumbar spine
Trunk Transverse
Abdominus
Abdominals
Used to help stabilise the spine and assist with
breathing
Flexion of the lumbar spine
Trunk Internal & External
Oblique’s
Used for side to side movement. The internal and
external oblique’s connect doesn’t the centre of the
body into the lines alba. Compresses the abdomen
helping to create a flat abdomen
Laterally bends and rotates the
trunk
Trunk Illiopsoas Used to fold or bend forward . Attached to the lower
spine.
Flexion & lateral rotation of the
hip. Flexes the torso when the
legs are static.
Hip & Pelvic Girdle Gluteus Maximus
Glutes
Hip & Pelvic Girdle Gluteus Medius
Glutes
Hip & Pelvic Girdle Gluteus Minimus
Glutes
Used to push out of a squat position and can be
located under the gluteus Medius
Hip abduction & internal
rotation of the hip
Hip & Pelvic Girdle Adductor Longus,
Brevis & Magnus
Adductors
Used to bring the legs together
Adductor Brevis - Smallest
Adductor Longus – Medium
Adductor Magnus – The largest groin muscle.
Hip adduction & hip Flexion
Hip & Pelvic Girdle Gracillis Used to assist the adductors in closing the legs Hip adduction, knee flexion,
internal rotation of the hip
when the knee is in flexion
Hip & Pelvic Girdle Rectus Femoris
Quads
Used to kick. it is the only muscle of the quad to cross
the knee.
Knee extension
Hip & Pelvic Girdle Vastus Intermedius
Quads
Used to climb or hook and can be located under the
Rectus Femoris
Knee extension
Hip & Pelvic Girdle Vastus Lateralis
Quads
Used to hook the knee and is the surface muscle you
feel when touching the front of the thigh.
Knee extension
Hip & Pelvic Girdle Vastus Medialis
Quads
Used to stabilise the knee joint and is the deepest of
the quad muscles.
Knee extension
Hip & Pelvic Girdle Biceps Femoris
Hamstring
One of three of the hamstrings know for having a
large and small attachment.
Flexion and lateral rotation of
the knee
Hip & Pelvic Girdle Semimembranosus
Hamstring
The most medial of the three hamstrings. Chronically
tight hamstrings can contribute to lower back pain
Hip extension, knee flexion &
internal rotation of the hip
Hip & Pelvic Girdle Semitendinosus
Hamstring
Used to bend the knee. Very easily injured if not
warmed up correctly
Hip extension, knee flexion &
internal rotation of the hip
Leg Tibialis Anterior Used to lift the foot from the ground when walking.
Inversion and Dorsi flexion.
Hip extension, knee flexion &
internal rotation of the hip
when the knee is extended.
©Vertical Dance Ltd. The Vertical Dance Workout Instructor Course 2011
21
Leg Peroneus Longus Used to keep balance when walking on uneven
surfaces. It allows the foot to turn outwards
Evert’s and plantar Flexion of
the foot
Leg Gastrocnemius Calf Used to help moves such as climbs and holds. The
most important of the plantar flexor muscles and the
largest.
Plantar flexion of the foot and
knee
Leg Soleus Calf Used to flex the foot to uses as an anchor in move
such as climbs and holds. It helps to stabilise the
ankle
Plantar flexion of the foot
Leg Plantaris Used to flex the foot and knee to hook apparatus Flexion of the foot and knee
Leg Tibialis Posteriour Used to point the foot to give a move the correct
lines
Assists with plantar Flexion and
inversion of the foot
Body Requirements
There are five specific qualities required by the body and mind to become competent at
Vertical Dance.
1, Strength
2, Endurance
3, Power
4, Mobility
5, Swing motion
STRENGTH
Strength in relation to Vertical Dance is when the mind tells the muscle to contract against
the resistance to produce force, thus enabling the body to be lifted or swung up or around
the pole.
ENDURANCE
There are two categories of endurance. Cardio endurance and muscular endurance.
Cardio-respiratory endurance is the ability of lungs to breath in oxygen and its transportation
via the blood to the muscles. The longer and faster you make your Vertical dance routine the
more likely you are to improve the endurance of your cardiovascular system.
Muscle endurance is the ability of the muscle to continue contracting under a weight. In
Vertical Dance this would be the length of time the body could be suspended by the arms or
legs either upright or in the inverted position.
POWER
Power is a combination of force (strength) and velocity (speed). When performing a
Fireman’s spin (see online video) you will require both strength to hold the spin in position
and speed to push the spin around the pole.
MOBILITY
Mobility is the range of movement (ROM) in a joint or a number of joints. ROM along with the

©Vertical Dance Ltd. The Vertical Dance Workout Instructor Course 2011
22
ability to lengthen your muscles, determines your flexibility. Being flexible is not only an
advantage in Vertical Dance, it also makes movement during every day life easier. Vertical
Dance mobility is the key to making many moves look both effortless and attractive. It also
decreases the possibility of injury.
SWING MOTION
The swing motion is a combination of power, strength, technique and control. This
combination will create the foundation for all inside foot launch movements (see online
videos) from beginner to advance. This movement will also familiarise the student with the
pole and teach the participant how to control their speed without lifting both feet from the
floor. This is one of the
The Principals of Training in Vertical Dance
Overload Principal
To reap the benefits from strength, power and endurance training, the muscles must be
overloaded or exercised to the point of near exhaustion. During a Vertical Dance class we
must be continually aware that we are performing acrobatic moves that hold an element of
danger if not performed with correct technique. Performing a move with incorrect technique
could be a result of poor teaching skills, lack of participant understanding, or fatigue.
Overloading the muscle will cause fatigue, so as an instructor you have to be aware of your
participant’s limitations. They should not be pushed further than their body or mind will allow.
Do not push too hard or you could be leaving them open to injury and yourself into
complaint.
Progressive Resistance Principal
The progressive resistance principle relates to the overload principle. As the muscle
increases in strength, the intensity of the training must also increase. Vertical Dance
participants should be encouraged to work at their own level and not compete with other
participants in the class as this could lead to an injury. Each student should be visually and
verbally assessed. They should not proceed to a more advanced movement until competent
to do so. They should continue improving their technique on their existing moves. You will be
able to see if they have successfully mastered the move. If they have not, the correct
teaching points should be given. You can also ask if they feel confidant enough performing
the move, if they do, only then should a new move be taught.
Specificity Principal
The specificity principal is when the conditioning exercises being performed are as closely
related to a particular skill. In Vertical Dance many students ask the question what can they
do to help build the correct muscles for pole. You as an instructor need to assess the move
they would like to master and give them the equivalent on or off the pole exercises to
improve the five principles of Vertical Dance (strength, endurance, power, mobility or swing
motion). For example, if a participant wishes to master ‘the front hook knees open’ (See
online video).They must work on improving their arm, shoulder and abdominal strength.
Exercises such as abdominal crunches, press ups or pull ups on the pole will help build their
strength. Ask your participants to write a training diary noting how many exercises they have
completed. They will then have a record of what they need to improve upon. This will almost
©Vertical Dance Ltd. The Vertical Dance Workout Instructor Course 2011
23
certainly help them to improve in their required areas.
Devising a Vertical Dance conditioning program
As we discussed in the specificity section, when devising a conditioning program, each
participant will need to be assessed in conjunction with the moves they require to learn and
improve upon. No two people are the same, so what is a good program for one may not be
good for another.
Each move can be broken down into different categories:
BODY MOVEMENT
MOVE EXAMPLE
SHOULDER MOVEMENT
Opening shoulder forwards The Seat
Closing shoulder forwards Tuck Spin
Opening shoulder sideways Side spin
Closing shoulder sideways Cradle
TRUNK MOVEMENT
Closing trunk Cradle/Tuck spin
Opening trunk Side Spin
Tension in trunk Carousel/Boomerang
ARMS/LEG MOVEMENT
Arm push Chair Spin
Arm Flexion Pole Circle
Leg push Deep body way/Pole Squat
To clarify the above table. If we perform a basic invert, this will require the following
movement:
1. The forward closing of the shoulders.
2. The closing or tucking of the trunk.
With this in mind the conditioning exercises we choose should include exercises that
strengthen both of these areas.
Many of the movements in Vertical Dance require a great deal of core strength. We need the
abdominals to help lift the legs and to remove some of the strain from the arms. The
following exercises will help improve this. They can either be performed standing or with the
aid of a stability ball.
Balance with one leg in the air. Building up to 30 seconds
Sit up. Building up to 20 reps
Back extensions. Building up to 20 reps
Perform a v sit. Building up to 30 seconds
©Vertical Dance Ltd. The Vertical Dance Workout Instructor Course 2011
24
Alternate arm and leg lift. Building up to 20 reps on each side.
Other exercises can include:
Holding the pole and lifting legs into the V position
Pull ups, moving into a climb up the pole
Triceps dips off the stage or on the floor
Squat jumps building up to 30 reps
Half or full press ups
Reverse curl on or off the pole.
Mobility for Vertical Dance
Students assume that because they can not touch their toes they will never be able to touch
them. This is incorrect. You can achieve maximum flexibility at any age with the correct
stretching technique and some will-power.
Flexibility is very important for Vertical Dance. It can make the most simple of movements
look both graceful and effortless.
What sets the limits of mobility?
The joint will not move further due to the position of the bones.
The ligaments begin to harden after puberty.
The muscle becomes shortened during every day movement.
The participant should be encouraged to perform a routine of stretches outside of the class.
This will enhance their flexibility. Stretches should be performed every day after warming up
and should be held for a minimum of 30 sec.
The pole should be included in the mobility, pulse raiser and prep stretch as much as
possible. This will give the participant the opportunity to become familiar with the pole. Much
of the warm up can be safe and effectively transferred to the pole. Please take a look at the
examples below:
Move off the pole
Move on the pole Benefit
March forwards March round the pole Aids understanding of hip distance
Step Touch Step touch holding the pole Aids coordination of both hands
Hip circles Hip circles while holding the pole
Rehearsal of transitional and mobility move
Squats Squatting on the pole Rehearsal of transitional, mobility and MSE moves
Quad Stretch Holding the pole Helps balance and grip on the pole
©Vertical Dance Ltd. The Vertical Dance Workout Instructor Course 2011
25
What should be stretched?
As with any type of fitness the whole body approach should be used. However, stretching
should be specific to Vertical Dance. As the majority of moves in the beginner syllabus
require the use of the upper body, extra care should be taken whilst mobilizing and
stretching this area.
The Shoulder Joint
The shoulder joint is the most important area for Vertical Dance and the most susceptible to
injury. Extra care should be taken when warming up, strengthening and rehearsing moves.
Greater care with technique should be taken, especially when performing one handed
moves and movements that require a wide swing motion. Keep the shoulders back and
down, making sure the chest is open. Always give your arms a rest and make sure the move
is performed on the weaker side as well as the stronger side to give body balance.
Warming up the shoulder joint
The entire body should be warmed up gradually. Mobilise all of the joints. Take extra care
with the shoulders circling them for 15 - 20 rotations forward and back slowly (see online
video) then add the elbows and arms into the rotations. Make sure that every rotation circles
level with the ears and down to the lowest point of the shoulders. The spine should be in
neutral and the abdominal should be engaged.
Stretching the shoulder joint
The following areas and stretches should be performed to achieve maximum mobility:
Trapezium
Deltoids
Lats
Shoulder extensions
Shoulder stretch with bar
Strengthening the shoulder joints – (please see online video)
A strong shoulder joint is incredibly important in Vertical Dance. All of the body weight is held
by either one or both of the arms during spins and holds. It is essential that both joints
should be strengthened and protected by using the strengthening exercise video clips
online.
Please remember to consult your GP if you have an existing injury before trying out any new
exercises.
Understanding the Biomechanics of Vertical Dance
It is important that you understand how the body works in order to achieve the best results
from it. The following definitions will help you to understand basic biomechanics:
Mass:
©Vertical Dance Ltd. The Vertical Dance Workout Instructor Course 2011
26
Mass is an amount of matter. Any thing of substance is made of matter. Every thing has a
mass. Mass is usually measured in kilograms (Kg)
Centre of Mass (CoM) (or Centre of gravity)
The centre of mass is the point of balance within the body where all axes pass through. For
example, if you were to balance on a ball, your CoM would need to stay above the ball or
you will fall off.
Gravity:
Gravity is a force which attracts other objects towards it. Every mass has gravity. Gravity is a
weak force, only becoming significant in large objects such as planets and stars. Gravity is
usually measured as an accelerating force in meters per second. For example if you drop a
stone from a building its velocity will increase 10 meters per second, every second, therefore
we can say that the earth attracts objects at an acceleration of 10 meters per second, per
second.
Weight:
Weight and mass are completely different. Your weight is the effect of the earths gravity on
your mass, you may weigh 60kg but in fact you actually weigh 1/10 of this because of the
effect of the earths gravity.
Speed:
This is the rate of change. Speed can be any thing from the time it takes for a car to get from
one point to another or the speed of a chemical reaction. Speed doesn’t necessarily have a
direction.
Velocity:
Velocity is different from speed in that it has a set direction.
Acceleration:
Acceleration is a change of velocity at any given time.
Force:
To move an object requires force. The size of the mass and how fast you want to accelerate
the mass to a given speed will define the speed of the force.
Inertia:
This is normally a resistance to change. If an object is at rest it requires an outside force to
move it. The mass of the object will define the amount of force required to move it. This
resistance to movement is called inertia.
Rotational Movement:
All of the above are terms for movement in a straight line. Balancing is also connected with
rotating.
Moments:
A moment is a rotational equivalent to mass. When mass is attached to a pivot, the moment
it creates are dependant on the size of the mass and the distance from the pivot i.e. the

©Vertical Dance Ltd. The Vertical Dance Workout Instructor Course 2011
27
swing motion. Imagine two children are playing on a see-saw. One weighs 20kg and the
other weighs 40kg. The heavier child will have the see-saw tip his way. He now starts to
move along the see-saw towards the pivot. As he moves, his body exerts a lesser moment
and at a certain point they will be perfectly balanced like a set of doctor’s adjustable scales.
Once he passes that point the lighter child then begins to lower his side of the see-saw.
This is an important concept when performing any acrobatic movement on the pole, as it
shows that as a mass moves further from the pivot or axis of rotation such as a pole, it
exerts greater moment and therefore is harder to rotate, however it will rotate a lot faster due
to the weight of the mass (This is demonstrated in the swing motion)
Axis of Rotation:
The body can rotate around any one of three different axes all of which run through the
centre of the mass (body):
1, The longitudinal axis runs through the centre of the body from top to bottom. This is also
known as the twisting axis
2, The medial axis runs through the centre of the body from left to right. This is also known
as the somersaulting axis.
3, The Saggital axis runs through the centre of the body from the front to the back. This is
also known as the cart wheeling axis
Understanding Balance:
If the body is to remain stationary in a stable condition, then the centre of mass must be
within the area of its base. For instance, a pyramid is very stable because it has a wide base
and therefore it is easy to keep its CoM within its base. It is the same when performing a
back bend/crab. If the feet are together during a back bend, the base becomes too small and
the move will become unbalanced. However if you open the legs the base becomes wider
and therefore balance will be achieved.
A headstand compared to a handstand is easier to perform as there is a triangular pattern
between the head and the hands, making a stronger base. This will allow a certain amount
of body movement within the area of the base. The handstand only has hands providing a
base which makes the body longer and less steady.
When the body assumes different shapes such as moving the straight legs into a bent
position during a headstand, the CoM will move around to different points in the body.
Balance is very important in Vertical Dance. Some moves require holding a position on one
foot such as a ‘pirouette’ or balancing on the pole in the seated position (See online videos
for moves). A participant needs to learn how to minimise movement of the upper body in
order to keep the lower body balanced. For example, when performing a ‘pirouette’ or a ‘step
around’, many participants will loose their balance and continue to pivot falling forward. The
reason for this is the body continues leaning forward into the turn making the lower half
unbalanced. The body should be kept upright without leaning forwards or backwards and the
abdominals should be engaged.
©Vertical Dance Ltd. The Vertical Dance Workout Instructor Course 2011
28
Rotational Movement:
Lay the pole down on the floor. Place your hands on the centre of the pole and roll it forward
You will see that rolls in a straight line. However, if you move to the end of the pole and push
it, it will begin to turn. The same principle applies to the swing motion. As you hold the pole
in the hand, it becomes your axis to turn around. By keeping the leg out to the side you are
now pushing your weight around the pole, not just forward in a straight line. When trying to
create the swing motion, draw imaginary circles with your big toe. This will be covered in
greater detail in the technique section of this manual and online videos.
©Vertical Dance Ltd. The Vertical Dance Workout Instructor Course 2011
29
Chapter 4
Basic Pole Technique-- Watch introduction to the pole and teaching technique
Strength and technique are most important in Vertical Dance. In this section we will be
talking about the technical side of pole fitness. The written description of a movement can
sometimes be rather difficult to understand, but will be explained in the techniques section in
the online video clips.
Hand Positioning
It is important that you find the correct hand position for every move. Below is a list of the
most common positions used at beginner level.
Position 1 – At position 1 the arm is held at full stretch with the shoulder depressed and the
thumb in the up position. The knuckles are on the opposite side of the pole to the body
keeping them inline with the wrist.
Position 2 – At position 2 the hand is held in either the thumb up position at chest height on
the pole or in the half bracket grip. This is used in most spins as a secondary hand position.
Position 3 – At position 3 the hand is at full stretch at the lowest reach point on the pole, this
is usually the secondary hand.
Thumb up grip – With the ‘thumb up grip’ the hand is holding the pole with the fingers placed
on one side of the pole and the thumb on the other. Keep the thumb is in the upward
position.
Thumb down grip – The ‘thumb down grip’ is the opposite to the above.
Half Bracket – With the secondary hand on the pole (see position 2 above) and the thumb
pointing outwards in an ‘L shape’ position and the arm is locked out at the elbow to push the
body away from the pole.
Full Bracket – With the secondary hand on the pole (see position 3 above) the thumb is in
an ‘up-side-down L’ position and the arm locked out at the elbow to push the body away
from the pole.
The cup – Your back is against the pole pressing either into your shoulder or spine,
depending on which move you are performing. With your hands in a cup position with the
side of the thumb pressed against the side of the index finger, place them on the pole above
©Vertical Dance Ltd. The Vertical Dance Workout Instructor Course 2011
30
your head. The hands pull the pole into your back and your back will push into the pole. This
creates traction so that the legs can be lifted.
The correct shoulder joint technique
As an instructor teaching a beginner class, you will be the first contact with new students.
They are a blank canvas and will not have picked up any bad habits. If shown correctly, you
will be able to give them safe technical foundation to build their pole skills upon.
Holding the pole
We would suggest you try this experiment. The incorrect way is to reach your arms as high
above your head as possible until you can feel the arms pulling away from their sockets.
This arm positioning is the incorrect technique to adopt. Now keep the arms reaching
upwards, lower the shoulders down, moving them away from the ears, you will feel a tensing
of the muscle area around the should joint. This is the correct way
Try this next incorrect experiment. With the wrist bent, hold the pole in a ‘thumb up grip’ and
begin walking around the pole. You will note that your wrist now begins to rub on the pole.
This demonstrates the incorrect technique of holding onto the pole. Holding onto the pole too
tightly during a spin will result in a bent wrist, as the body will keep moving due to the
momentum of the spin. This will make the wrist twist around the pole causing a possible
friction burn. Students will adopt these bad habits if not corrected. Make sure the
participants have their wrists in the extended position at all times.
Using the pole to its full potential
If a participant grips the pole at their head or shoulder height, they reduce the distance that
the hand can travel down the pole. In turn this will reduce the length of the spin. The same
principle will work with the legs. For example, the higher the foot is hooked on the pole when
performing the attitude spin more rotations of the pole can be performed. Therefore
lengthening the spin. Do not to jump into the spin to gain height. Always swing or hook
higher. This will avoid spoiling the technique and bruising the body on the pole.
Bending the lead arm and cuddling the pole
Another reason the participant should always hold the pole (unless other wise stated) with
their lead arm fully extended and with the shoulders back and down, is to avoid the
temptation to pull the body into the pole. When the lead arm is bent, the participant feels the
need to pull their body up the pole which in turn will pull them closer to it. As a result they
tend to cuddle the pole thus reducing the hip width distance, which in turn will ruin spin
technique.
Body position
Body positioning is a very important part of the preparation of a spin. You must get the body
position correct in relation to the pole. In most cases your body should be at least a hip width
distance between the body and the pole, if not more depending on the speed of the spin.
The hip width distance should be maintained at all times including walking around the pole
©Vertical Dance Ltd. The Vertical Dance Workout Instructor Course 2011
31
and throughout the duration of the spin. If participant swing into a spin when their body is
less then a hip width distance between themselves and the pole, their technique will be
affected and they will run the risk of again cuddling the pole thus creating a spin with out
momentum.
The swing motion and foot circles – Please see online video
Every spin that we perform requires momentum. We can produce this momentum in various
ways:
- Walking into a spin
- Using a leg, arm or body whip
- Swing motion
The swing motion is one of the most important moves a student can master as it is the
foundation to inside leg launch moves. Think of a pole as a circle and every thing you do
around it needs to be a circular movement to create momentum. The wider the circle
becomes the faster the spin will be. Imagine you have a piece of chalk attached to the big
toe of your outside leg. Every time you want to create momentum you draw an imaginary
circle with your chalked toe. If you do not draw a full circle but cut the imaginary circle in half
by crossing your leg in front of your body, you will decrease the momentum and as a result
the body will tend to pull in towards the pole causing the arms to bend resulting in the
cuddling of the pole. Spin technique could be ruined. When performing an inside leg take off
move your outside leg should be drawing an imaginary circle. This can work not only with
spins but also transitions as well such as the ‘pirouette’, ‘pole circles’ and a ‘pivot turn’ during
a walk.
Jumping or swinging into a spin
The difference between jumping and swinging into a spin will have an affect over the artistic
presentation. Jumping into a spin will often result in bending of the lead arm and cuddling the
pole. An example of a jump in to a spin would be lifting both feet from the floor
simultaneously. A swing into a spin is performed by connecting the outside foot on to the
pole before the inside foot is allowed to leave the floor. This technique is the correct
technique and will reduce the aggressive contact on the pole with either the leg or foot. The
possibility of bruising will be reduced. You can identify a jump because the student will
complain of bruising on the feet and legs and will tend to bend the arms pulling themselves
up the pole.
Controlling speed
Increasing or decreasing speed on the pole can be achieved in the following ways. Grip
control, body distance from the pole, leg or body whip. The force that the participant will
launch themselves off the floor will also affect the speed as well as walking or swinging into
a move.
Grip control
The more strength you apply to grip the pole, the slower the spin will become. This will also
be the case with any body parts that touch the pole such as the inner thighs. The greater the
©Vertical Dance Ltd. The Vertical Dance Workout Instructor Course 2011
32
skin contact with the pole, the slower the spin will become. Skin contact on the pole has a
breaking effect.
Body Distance from the pole
The further away the body is from the pole when the spin begins, the fast the rotations will
become.
Leg/body whip
Spin can become faster by the inclusion of a ‘whip’. When a body part such as the leg is held
away from the pole at the start of the spin, the leg is pulled into the pole at high speed
increasing the spins momentum. This movement can also be performed by using the arms to
pull the body into the pole.
Slowing down the spin
Slowing down the spin can be performed in the opposite way to the leg/body ‘whip’, by
leaning the body away from the pole. This action works best on a spinning pole.
Creating flow
The best way to describe flow is by how smooth and fluid the performers movements are. If
a performer makes their routine look easy it means they have flow. Flow is making the link
between moves look seamless so that you are unable tell where one move begins and
another ends. Flow comes with practice. Some participants achieve good flow to a degree
by the 4th or 5th lesson. However some do not have the gift of rhythm and unfortunately
rhythm is not a skill that can be taught. You either have rhythm or you do not this can effect
flow.
A good way to encourage flow is to make students listen to the beat. Another way is to get
them to reduce the number of steps they make in a move. For example, a ‘pirouette’ looks
far more flowing when spinning on one foot than taking three or four steps to turn.
Holding the pole too tight
Most new students hold the pole too tight. The reason for this is that their brain is telling their
body to hold on to the pole so they do not hurt themselves. Lack of strength also plays a
part. This can result in a slow or non existent spin, chaffing, incorrect wrist alignment,
cuddling the pole and blisters on the palm of the hands. Holding the pole too tight can be a
difficult thing to over come in one lesson. It is almost impossible as an instructor to teach
participants not to be scared, they need reassurance and made to feel comfortable by
performing simple moves to begin with.
Leaning away from the pole and lifting the legs
Many students have a problem lifting their legs during a spin or a hold. Their legs will not
stay in the right position while they try to execute spin or hold with flow. Moves that require
you to lift the legs to the side or forward are particularly prone to this problem, such as the
‘attitude’ and ‘boomerang’.
We suggest you try this experiment in a standing position. Lift your right leg to the side as
©Vertical Dance Ltd. The Vertical Dance Workout Instructor Course 2011
33
high as you can. Now repeat this again, but this time lean the body away from the raised leg.
You will now be able to see just how difficult it is to lift the leg with the body in the upright
position. When you are performing a spin that requires the legs to be raised to the side, lean
the body away from the pole. You will now find it a lot easier to lift them.
Body lines and execution of moves
It is most important to have the correct posture throughout your moves for two reasons.
Firstly, it helps to keep your body aligned thus reducing the risk of injury. Secondly, it makes
the move much more attractive. For example, in the ‘b-hook’ move the knee should be at hip
height. Keeping the knee at right angles to the body, looks far better than an incorrectly
aligned knee.
All moves have a beginning, middle and an end. Unfortunately many students forget to add
on the end. It is important to complete all moves from the beginning to the end no matter
how small. The move will become more polished. For example the Fireman:
Beginning – The swing and hook
Middle – The rotation around the pole
End – Placing the feet on the ground and performing a ‘frog’ to finish.
Pointing Toes
Even if your students fails at every thing else, there is no excuse for not pointing their toes.
You as the instructor should correct the participants when ever wrong moves are made. To
encourage the ‘pointed foot’, ask them to walk round the pole on their balls of the feet. Not
only will this encourage the ‘pointed foot’, but it will also help to strengthen and tone the calf
muscles and lengthen the leg.
The wrist roll
The ‘wrist roll’ is an extremely useful move to teach you participants from the first few weeks
of a Vertical Dance course. It helps them build confidence with one handed moves whilst
keeping contact with the pole, particularly when doing pirouettes and other pirouette based
moves.
- Place the lead hand in the thumb up position on the pole at nose height.
- Roll the wrist in an anti-clockwise movement up the pole at 180 degrees
- When you can not turn the wrist further, lead with the head and turn clockwise under the
lead arm at 360 degrees.
This move is rather difficult to describe in word so please see the online video clip that
corresponds with this section of the manual.
©Vertical Dance Ltd. The Vertical Dance Workout Instructor Course 2011
34
Chapter 5
Teaching Technique- Watch teaching technique
The beginner ‘Vertical Dance teacher training course’ is designed to give you the foundation
of becoming a Vertical Dance instructor. This foundation is based on our experience and
expertise. However, your skills as an instructor will improve every time you teach and you
will develop new ways of interpretation, correction and communication. Do not limit your self
to the following list but build upon it. Remember! We are giving you the paint and canvas. It
is up you to paint the picture!
To show or not to show?
This is a difficult question. Do you demonstrate the complete move to your students risking
overwhelming them or do you break down the move piece by piece until they achieve
complete understanding?
Vertical Dance believe it is much easier to teach a participant small step by step pieces to
achieve a polished end move, rather than just demonstrate the complete move, which they
will then try and generally fail to copy. It is important to break down the move into the
smallest parts, allowing the participant to watch and practice with correction before moving
on to the next part of the move.
Ask the to copy the following moves:
- Begin by showing your participants hand and body positions.
- Demonstrate swinging or steps into the move.
- Show the hook or grip on to the pole.
- Combine the steps with momentum.
- Show the completion of the move including any move to return them back into an upright
position. Throughout each step, you yourself should be moving around the poles asking
participants to demonstrate and then correct (please see ‘how to manage your time in the
class’ below).
What to look for when correcting
If the participant is struggling with a move ask the participant to demonstrate the move
before you show them the corrected version. You can then point out any faults or
improvements before you show them how it should be done.
There are three main areas to look at when correcting a participant. If you use the following
steps when correcting you understand what needs to be corrected much quicker.
©Vertical Dance Ltd. The Vertical Dance Workout Instructor Course 2011
35
Arm/hand position
Is the lead arm high enough up the pole?
Is the lead arm bent?
Does the lead arm/hand begin straight and then become bent?
Are they putting their secondary hand above their lead hand or in the wrong position?
Are they using their correct lead hand in the first place?
Body position
Is the body too far away from the pole?
Is the body too close to the pole?
Are the particapants turning in the wrong direction?
Feet/leg position
Are the feet too close to the pole?
Are the feet too far away from the pole?
Are the participants using their legs to swing properly into the move?
Are the legs and feet in the correct position on the pole?
Are the participants launching off the correct foot?
Are they jumping into the move?
How to give constructive criticism
Giving criticism can occasionally become difficult to convey to sensitive participants. They
will come to the session with friends and find the Vertical Dance technique more difficult to
master than their friends. The participant may become embarrassed when corrected. Care
should be taken when advising sensitive participants. The following advice may help when
giving correction and feedback.
Always mention the positives before you mention negatives and finish your feedback on a
positive. Make the participant feel that although they did not quite achieve the move, they
are making a great effort at trying. At the same time give teaching points. Balance your
feedback and give positive as well as negative feedback making sure you always end with a
positive.
Get the whole group to demonstrate the move you wish them to perform irrespective of who
may have completed the move correctly. Slowly repeat all of the components of the move
again indicating corrections and teaching points, getting the whole group to repeat the move
by doing so you have avoided singling out a particular individual.
If after repeated efforts of performing the move, some members of your class are still
struggling to master it, stop the class and give the whole group a simple variation of the
move to perform. For example, offer the ‘step around’ if the ‘fireman’ is too difficult to
perform. Once they have mastered the easier variation, then give them the option to use
either move in the routine. This way the more skilled participant will choose the harder move,
while those that struggle will choose the easier move. Both will now feel a sense of
achievement. Never leave a participant to struggle. Always offer them an alternative or they
may end up feeling a failure and not return to the class. The same applies when participants

©Vertical Dance Ltd. The Vertical Dance Workout Instructor Course 2011
36
perform the routine. If they make a mistake, always get them to repeat the routine so that it
gives them a chance to correct their steps. You do not want then leaving the class on any
thing but a high!
If a participant is still finding it hard, ask them if any one would like a little more advice at the
end of the class. By doing so you are giving them the opportunity to have a one to one chat
with the instructor.
If a student is unable to grasp many of the moves they should be asked to attend a slightly
less skilled class. Your main concern is the whole class. If you spend too much time with
one person the rest of the class will suffer.
Never laugh at a participant and never push them beyond their comfort zone. Never give
them a move to do that is above their skill level. Never make their mistakes the focus of the
whole group.
How to manage in you class
You need to speak to each individual in the class in order to give feedback and correction.
You must do things in a non biased way. The following Vertical Dance suggestions may
help.
Begin at your first pole. Ask the first participant on that pole to show you the move they have
been working on. Tell them that it’s great and give them constructive feedback if necessary.
Repeat this for every one on the first pole. Leave them practicing the move with your
feedback. Move on to the next pole and repeat the above. Follow this method on each pole
until you arrive back at the first. Once back at the first pole ask them to show you their
improvements. If they have achieved the move and you can see the rest of the class also
have achieved the move, move on. If they have not achieved the move, give them more
feedback and move to the next pole and so on until the class has mastered it.
In all classes there will be participants that advance at a faster rate than the rest of the class.
They generally gravitate towards each other. If not put them together on the same pole, this
will help you to save time when giving feedback. If on your correction round you find that the
faster learning group has achieved the move a lot quicker, you must as an instructor keep
them focused. If you do not, then they can some times become disruptive to the rest of the
class. Give them a variation of the move you are teaching. It can be either changing to their
weaker side, performing the move one handed or combining it with a move they already
know. However, be careful when doing this. If the explanation is to complex you will run the
risk of concentrating your time for too long on that group. Alternatively, if the move is highly
advanced, those that are at a lesser level may wish to try it and run the risk of injury.
Demonstrating the move correctly at all times
As an instructor you have a responsibility to give the best possible instruction at all times and
not just in heath and safety. You also have a responsibility to demonstrate the moves
correctly, whilst at the same time allowing the participant’s time to practice. It can become
easy for you to forget to demonstrate a move correctly or you can get into the habit of only
©Vertical Dance Ltd. The Vertical Dance Workout Instructor Course 2011
37
doing one handed moves. You need to avoid doing this at all cost because your participants
will do exactly as you show them. If you do the move incorrectly so will they.
One handed and two handed moves
Sometimes it is not just enough to show a move with two hands. You have to vocally tell the
class that the move you are demonstrating is a two handed move. Some students will
develop a habit of just using one hand. Whilst this is acceptable when they are competent at
the move, it can be dangerous when they are learning it for the first time.
Introducing one handed moves
There are only a certain number of moves you can teach to participants who are at lower
level. Instead of running out of moves to teach, you can try altering the moves they already
know by performing them one handed.
You need to assess a student’s strength before you suggest to them one handed moves.
You must point out very clearly that if they intend to perform a one handed move, they
should only do so it if they feel they have the strength to hold on. Explain that it is only the
secondary hand that is removed from the pole and not the lead hand. You will be surprised
by how many participants try to take off their lead hand.
If you think that the participant is competent enough to execute the move with both hands,
demonstrate the move yourself and in the middle of you spin, show them how to release the
secondary hand from the pole keeping the hand close to it. Once they have successfully
completed this move, they can then move their hand to rest on either their knee or their hip.
If they can successfully do this, only then can they completely take their hand away from the
pole and incorporate it into the move.
Dealing with over confidant participants
As an instructor you will come across different situations whereby over confidant participants
can disrupt your class. In some cases this can cause a hazard. Such situations can be a
very tricky to deal with and frustrating. You are torn between asking them to stop and not
wanting to scare them away. Below is a list of some examples and how to deal with them in
a diplomatic way.
The participant has mastered the move that class is working on and is now showing off by
performing other moves not included in the classes current skill level.
- This leads to other less experienced participants trying to copy them making the situation
dangerous
- The class becomes disrupted and other participants feel embarrassed that they have not
achieved a higher level.
The solution is to give the ‘show off’ a more difficult variation of the current move.
A participant starts trying to teach moves to other student.
Participants helping each other is good for the group dynamic. You must remember that over
helpful participants who try to take over are not qualified to do so. Therefore your insurance
becomes invalid. You have to ask yourself if you are committing enough time for corrections.

©Vertical Dance Ltd. The Vertical Dance Workout Instructor Course 2011
38
If you are, then you need to quietly point out that for insurance purposes they cannot assist
you in teaching.
A participant gets angry because he or she thinks the class is too easy for them.
- This will lead to a disheartened group
You need to assess whether or not the participant is progressing too quickly for the class. if
they are, then they need to be moved up a level. If they are not you need to explain that
whilst they can do the moves they also need to perfect them before moving up a level.
A participant for some reason has ill feeling towards you and is causing a disruption
- This totally disrupts the class and makes you look unprofessional as an instructor.
Take the person aside and ask them what the problem is. If it can be resolved, solve it as
soon as possible. If it cannot be resolved, offer the person a full refund and continue the
class as soon as possible.
Always think about safety
As an instructor you have to think it is not if an accident is going to happen but when. Do
every thing you possibly can to prevent an accident from happening. Accidents generally
happen when instructors or participants get too lazy or too confidant. The following examples
may help:-
- Always repeat teaching and safety points. You can never repeat them enough. Many
people need to be told three or four times before they remember.
- Make sure that every one hears you. If an incident does happen, you have other people in
the group who will confirm that you did explain everything correctly.
- Never teach something that you would not do yourself or something you can not do
yourself. Many people do not know that insurance companies will hold you liable if an injury
was caused to a participant who was not physically shown a move.
- Your students have a responsibility to listen to you and follow the health and safety rules. If
they do not, you need to stop the class until everything is understood. If the participants are
talking whilst you are, then you can guarantee they are not listening to you.
- Make sure you cover yourself at every point. You never know when you actions may come
into question.
©Vertical Dance Ltd. The Vertical Dance Workout Instructor Course 2011
39
Chapter 6
Vertical Dance beginner moves – Watch spins, seats, transitions, floor work moves and introduction to the pole.
Note: Most important – Always remember. One handed variations must only be performed when
the 2 handed variation has been mastered. Before reading this chapter make sure you are
familiar with hand positioning. See chapter 4
Although this is a comprehensive list of beginner moves, it is by no means all of them. If you
would like to include other beginner moves in your session plans that are not listed, please
feel free to do. But remember, they must be safe and effective.
The moves listed below can also be found in the online video clips. If you have any
questions concerning the moves, please do not hesitate to contact Vertical Dance at
The main muscle group’s utilised for each base move have been listed in red. The following
muscles have been grouped:
Hamstring Biceps
Femoris
Semimembranosus Semitendinosus
Quads Rectus
Femoris
Vastus Intermedius Vastus Lateralis Vastus
Medialis
Calf Gastrocnemius Soleus
Abdominals Internal
Oblique’s
External Oblique’s Transverse
Abdominus
Rectus
Abdominus
Glutes Gluteus
Maximus
Gluteus Medius Gluteus Minimus
Adductor Adductor
Longus
Adductor Brevis Adductor Medius
Rotator Cuff Supraspinatus Infraspinatus Teres Minor Subscapularis
Hip Flexors Psoas Iliacus Rectus Femoris Sartorius

©Vertical Dance Ltd. The Vertical Dance Workout Instructor Course 2011
40
MOVE – Swing motion
The swing motion is a preparation move. It applies to all inside leg launch movement. For
example, the fireman, attitude, chair, carousel, boomerang as well as transitions and more
advanced moves.
MOVE INSTRUCTIONS
Main Muscles Utilised – Quads, Calves, Glutes, Hamstrings, Trapezius, Latissimus
Dorsi, Abdominals, Rotator Cuff
Place your lead hand in position 1, with a hip width distance between the body and pole,
keep the inside foot planted on the floor, swinging your outside foot in a large circular motion
around the pole. As you begin to loose balance, place secondary hand on the pole in
position 2. Pivot on the inside foot so that you are now facing the pole. Perform a 360
degree turn around the pole placing the outside foot on the floor. You can perform this move
either one or two handed.
TEACHING POINTS
- The outside foot should have a pointed toes and be out stretched away from the inside leg.
The larger the imaginary circle that you draw with you foot, the greater the speed of the
swing.
- The inside foot should be pointed and pivot in its position. This will allow the body to face
the pole until the swing is complete.
- Lean slightly away from the pole keeping the arm straight and not bent.
-The secondary hand should be placed on pole in position 2 as balanced is lost.
-Keep a hip width distance between yourself and the pole.
-Pivot on the inside foot making sure the front of the body is parallel to the pole.
- Draw an imaginary circle around the pole with the outside foot, ensuring you do not cut the
circle by crossing the outside leg over the inside leg.
PROGRESSION /VARIATION – Step around
Main Muscles Utilised – Quads, Calves, Glutes, Hamstrings, Trapezius, Latissimus
Dorsi, Abdominals, Rotator Cuff
The ‘swing motion’ can also be used as a transitional move called ‘step around’. The only
difference between the two is that the ‘step around’ is used as a transitional move. This
means that it is linked to another move, such as a hook or a spin etc. Lift the inside foot and
replace it with the outside. You can continue to perform a transition such as a ‘pirouette’ and
a ‘back hook’, or continue into another ‘step around’. The ‘step around’ move can be
performed either one or two handed.
TEACHING POINTS
- The toes of the outside foot should be pointed and stretched away from the inside leg. The
larger the imaginary circle that you draw with your foot, the greater the speed of the swing.
- The inside foot should pivot in its position. This will allow the body to face the pole until the
swing is complete.
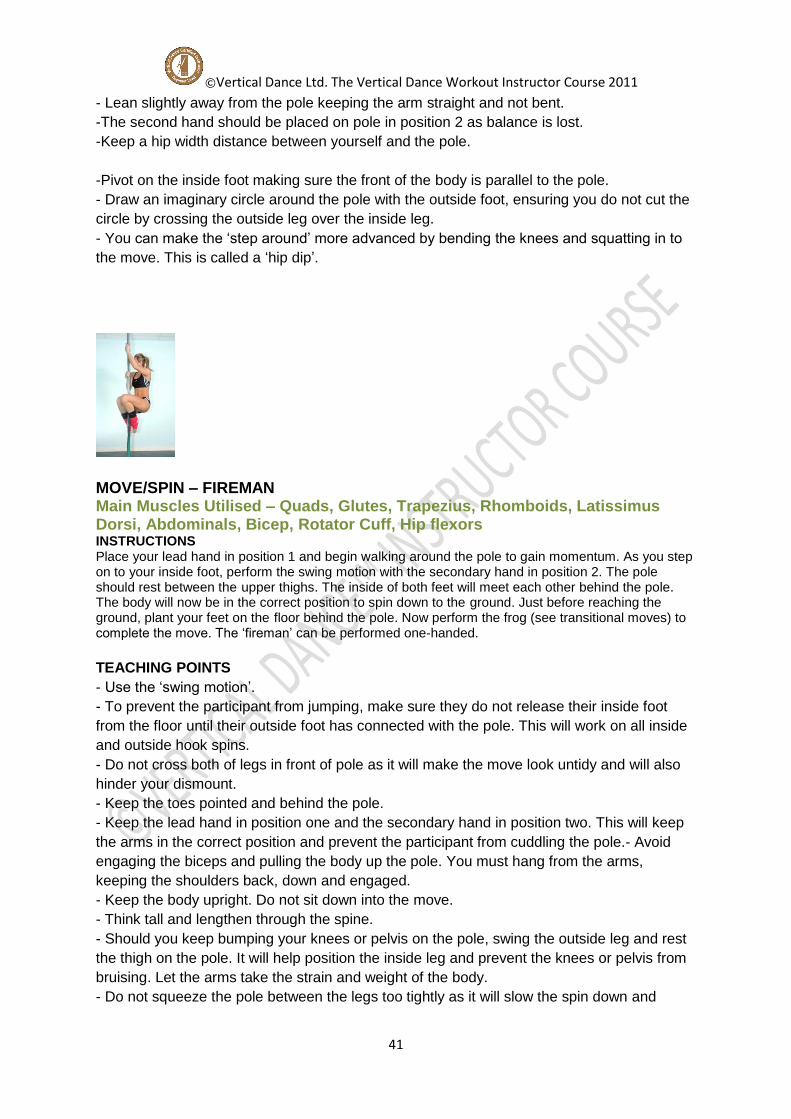
©Vertical Dance Ltd. The Vertical Dance Workout Instructor Course 2011
41
- Lean slightly away from the pole keeping the arm straight and not bent.
-The second hand should be placed on pole in position 2 as balance is lost.
-Keep a hip width distance between yourself and the pole.
-Pivot on the inside foot making sure the front of the body is parallel to the pole.
- Draw an imaginary circle around the pole with the outside foot, ensuring you do not cut the
circle by crossing the outside leg over the inside leg.
- You can make the ‘step around’ more advanced by bending the knees and squatting in to
the move. This is called a ‘hip dip’.
MOVE/SPIN – FIREMAN Main Muscles Utilised – Quads, Glutes, Trapezius, Rhomboids, Latissimus Dorsi, Abdominals, Bicep, Rotator Cuff, Hip flexors INSTRUCTIONS Place your lead hand in position 1 and begin walking around the pole to gain momentum. As you step on to your inside foot, perform the swing motion with the secondary hand in position 2. The pole should rest between the upper thighs. The inside of both feet will meet each other behind the pole. The body will now be in the correct position to spin down to the ground. Just before reaching the ground, plant your feet on the floor behind the pole. Now perform the frog (see transitional moves) to complete the move. The ‘fireman’ can be performed one-handed.
TEACHING POINTS
- Use the ‘swing motion’.
- To prevent the participant from jumping, make sure they do not release their inside foot
from the floor until their outside foot has connected with the pole. This will work on all inside
and outside hook spins.
- Do not cross both of legs in front of pole as it will make the move look untidy and will also
hinder your dismount.
- Keep the toes pointed and behind the pole.
- Keep the lead hand in position one and the secondary hand in position two. This will keep
the arms in the correct position and prevent the participant from cuddling the pole.- Avoid
engaging the biceps and pulling the body up the pole. You must hang from the arms,
keeping the shoulders back, down and engaged.
- Keep the body upright. Do not sit down into the move.
- Think tall and lengthen through the spine.
- Should you keep bumping your knees or pelvis on the pole, swing the outside leg and rest
the thigh on the pole. It will help position the inside leg and prevent the knees or pelvis from
bruising. Let the arms take the strain and weight of the body.
- Do not squeeze the pole between the legs too tightly as it will slow the spin down and
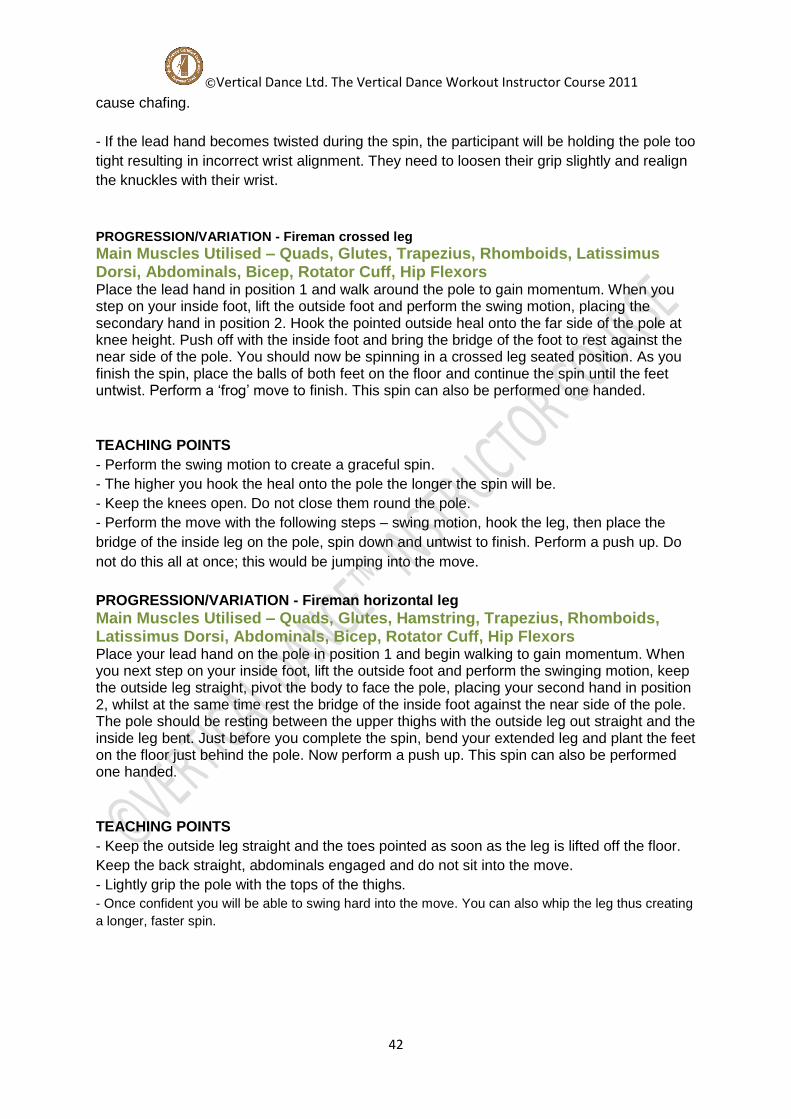
©Vertical Dance Ltd. The Vertical Dance Workout Instructor Course 2011
42
cause chafing.
- If the lead hand becomes twisted during the spin, the participant will be holding the pole too
tight resulting in incorrect wrist alignment. They need to loosen their grip slightly and realign
the knuckles with their wrist.
PROGRESSION/VARIATION - Fireman crossed leg
Main Muscles Utilised – Quads, Glutes, Trapezius, Rhomboids, Latissimus Dorsi, Abdominals, Bicep, Rotator Cuff, Hip Flexors
Place the lead hand in position 1 and walk around the pole to gain momentum. When you step on your inside foot, lift the outside foot and perform the swing motion, placing the secondary hand in position 2. Hook the pointed outside heal onto the far side of the pole at knee height. Push off with the inside foot and bring the bridge of the foot to rest against the near side of the pole. You should now be spinning in a crossed leg seated position. As you finish the spin, place the balls of both feet on the floor and continue the spin until the feet untwist. Perform a ‘frog’ move to finish. This spin can also be performed one handed.
TEACHING POINTS
- Perform the swing motion to create a graceful spin.
- The higher you hook the heal onto the pole the longer the spin will be.
- Keep the knees open. Do not close them round the pole.
- Perform the move with the following steps – swing motion, hook the leg, then place the
bridge of the inside leg on the pole, spin down and untwist to finish. Perform a push up. Do
not do this all at once; this would be jumping into the move.
PROGRESSION/VARIATION - Fireman horizontal leg
Main Muscles Utilised – Quads, Glutes, Hamstring, Trapezius, Rhomboids, Latissimus Dorsi, Abdominals, Bicep, Rotator Cuff, Hip Flexors
Place your lead hand on the pole in position 1 and begin walking to gain momentum. When you next step on your inside foot, lift the outside foot and perform the swinging motion, keep the outside leg straight, pivot the body to face the pole, placing your second hand in position 2, whilst at the same time rest the bridge of the inside foot against the near side of the pole. The pole should be resting between the upper thighs with the outside leg out straight and the inside leg bent. Just before you complete the spin, bend your extended leg and plant the feet on the floor just behind the pole. Now perform a push up. This spin can also be performed one handed.
TEACHING POINTS
- Keep the outside leg straight and the toes pointed as soon as the leg is lifted off the floor.
Keep the back straight, abdominals engaged and do not sit into the move.
- Lightly grip the pole with the tops of the thighs.
- Once confident you will be able to swing hard into the move. You can also whip the leg thus creating
a longer, faster spin.
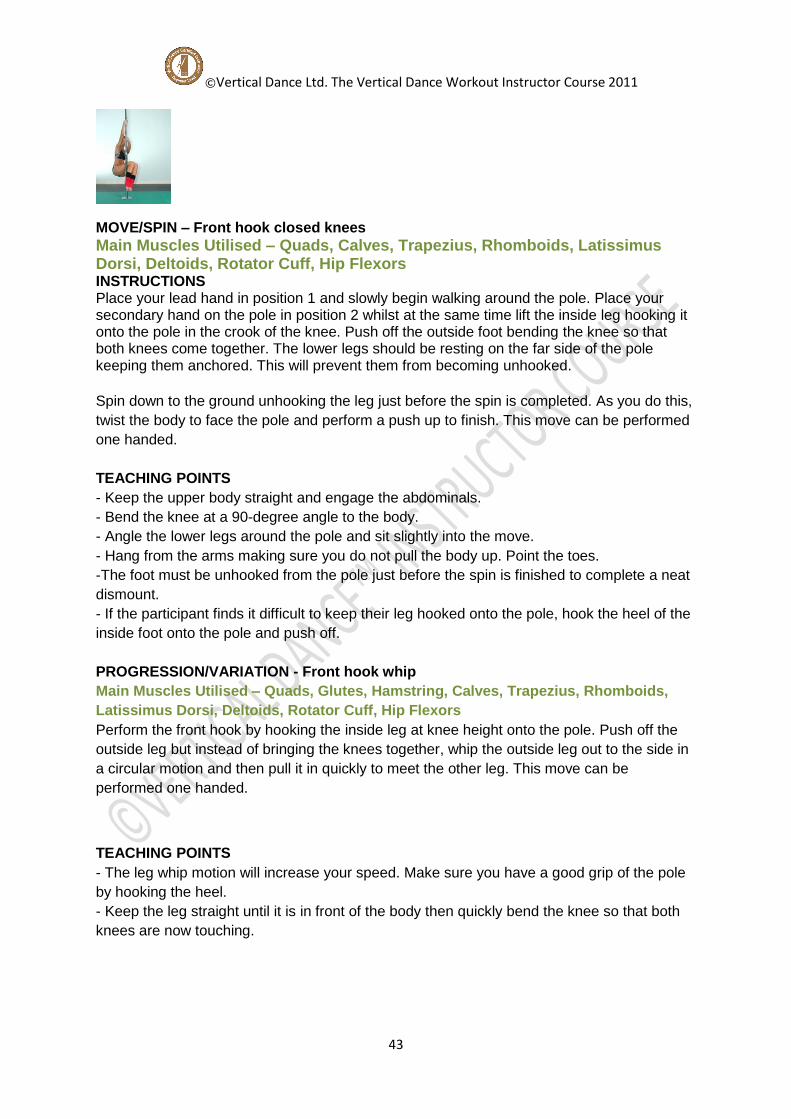
©Vertical Dance Ltd. The Vertical Dance Workout Instructor Course 2011
43
MOVE/SPIN – Front hook closed knees
Main Muscles Utilised – Quads, Calves, Trapezius, Rhomboids, Latissimus Dorsi, Deltoids, Rotator Cuff, Hip Flexors INSTRUCTIONS Place your lead hand in position 1 and slowly begin walking around the pole. Place your secondary hand on the pole in position 2 whilst at the same time lift the inside leg hooking it onto the pole in the crook of the knee. Push off the outside foot bending the knee so that both knees come together. The lower legs should be resting on the far side of the pole keeping them anchored. This will prevent them from becoming unhooked.
Spin down to the ground unhooking the leg just before the spin is completed. As you do this,
twist the body to face the pole and perform a push up to finish. This move can be performed
one handed.
TEACHING POINTS
- Keep the upper body straight and engage the abdominals.
- Bend the knee at a 90-degree angle to the body.
- Angle the lower legs around the pole and sit slightly into the move.
- Hang from the arms making sure you do not pull the body up. Point the toes.
-The foot must be unhooked from the pole just before the spin is finished to complete a neat
dismount.
- If the participant finds it difficult to keep their leg hooked onto the pole, hook the heel of the
inside foot onto the pole and push off.
PROGRESSION/VARIATION - Front hook whip
Main Muscles Utilised – Quads, Glutes, Hamstring, Calves, Trapezius, Rhomboids,
Latissimus Dorsi, Deltoids, Rotator Cuff, Hip Flexors
Perform the front hook by hooking the inside leg at knee height onto the pole. Push off the
outside leg but instead of bringing the knees together, whip the outside leg out to the side in
a circular motion and then pull it in quickly to meet the other leg. This move can be
performed one handed.
TEACHING POINTS
- The leg whip motion will increase your speed. Make sure you have a good grip of the pole
by hooking the heel.
- Keep the leg straight until it is in front of the body then quickly bend the knee so that both
knees are now touching.
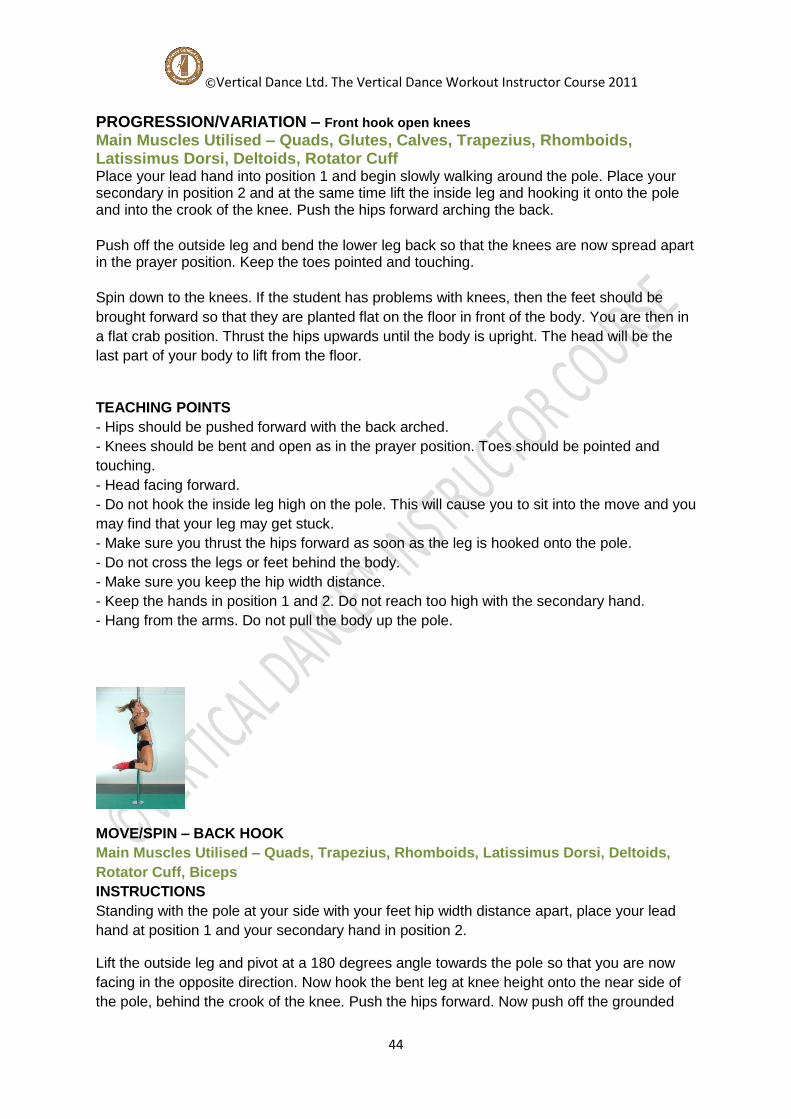
©Vertical Dance Ltd. The Vertical Dance Workout Instructor Course 2011
44
PROGRESSION/VARIATION – Front hook open knees
Main Muscles Utilised – Quads, Glutes, Calves, Trapezius, Rhomboids, Latissimus Dorsi, Deltoids, Rotator Cuff Place your lead hand into position 1 and begin slowly walking around the pole. Place your secondary in position 2 and at the same time lift the inside leg and hooking it onto the pole and into the crook of the knee. Push the hips forward arching the back.
Push off the outside leg and bend the lower leg back so that the knees are now spread apart in the prayer position. Keep the toes pointed and touching.
Spin down to the knees. If the student has problems with knees, then the feet should be
brought forward so that they are planted flat on the floor in front of the body. You are then in
a flat crab position. Thrust the hips upwards until the body is upright. The head will be the
last part of your body to lift from the floor.
TEACHING POINTS
- Hips should be pushed forward with the back arched.
- Knees should be bent and open as in the prayer position. Toes should be pointed and
touching.
- Head facing forward.
- Do not hook the inside leg high on the pole. This will cause you to sit into the move and you
may find that your leg may get stuck.
- Make sure you thrust the hips forward as soon as the leg is hooked onto the pole.
- Do not cross the legs or feet behind the body.
- Make sure you keep the hip width distance.
- Keep the hands in position 1 and 2. Do not reach too high with the secondary hand.
- Hang from the arms. Do not pull the body up the pole.
MOVE/SPIN – BACK HOOK
Main Muscles Utilised – Quads, Trapezius, Rhomboids, Latissimus Dorsi, Deltoids,
Rotator Cuff, Biceps
INSTRUCTIONS
Standing with the pole at your side with your feet hip width distance apart, place your lead
hand at position 1 and your secondary hand in position 2.
Lift the outside leg and pivot at a 180 degrees angle towards the pole so that you are now
facing in the opposite direction. Now hook the bent leg at knee height onto the near side of
the pole, behind the crook of the knee. Push the hips forward. Now push off the grounded

©Vertical Dance Ltd. The Vertical Dance Workout Instructor Course 2011
45
foot, backwards. Bend the knee keeping the toes touching behind the body. Keep the knees
wide. Spin backwards down to the floor. When you have mastered the pivot hook and push
back, then you can add in the walk.
Place the lead hand in position 1 and begin walking. When you next step on to your inside
foot, lift the outside and then perform the above sequence of moves.
This move can be performed one handed.
TEACHING POINTS
- It is important that your hands do not change position. Let the pole glide through the
fingers.
- Hook the outside leg onto the pole behind the crook of the knee and squeeze gently. Do
not hook at the ankle or toes.
- Make sure you do not hook the leg higher than knee height or you will sit into the move.
- Swing the grounded leg out to the side and pull it in quickly to increase your speed.
- If you are struggling with adding the ‘walk’ in to the hook, try clearing your mind and
perform the sequence with out thinking about it.
PROGRESSION/VARIATION – One handed back hook
Main Muscles Utilised – Quads, Trapezius, Rhomboids, Latissimus Dorsi, Deltoids,
Rotator Cuff, Biceps
When you are confident at performing the basic back hook at speed and your transition
between the walk and the pivot is smooth, you can perform this spin one handed. Your hand
needs to be held out to the side at a 90-degree angle to the body. This will help with the
balance and also prevent you from pulling your arm in.
Walk around the pole with the arm outstretched. As you step on the inside leg, pivot hooking
the outside leg on the pole tightly behind the crook of the knee. Arch your back pushing the
hips forward. You can use your free hand to grab your toes or move it in time to the music.
Remember if you are performing this spin for the first time it is important to try the basic
version to remind yourself what you are doing. This will prevent injury
TEACHING POINTS
- Hook the leg at knee height and make sure you squeeze the pole behind the back of the
knee for a good grip.
- As soon as you have hooked the leg, lean back into the move and push the hips forward.
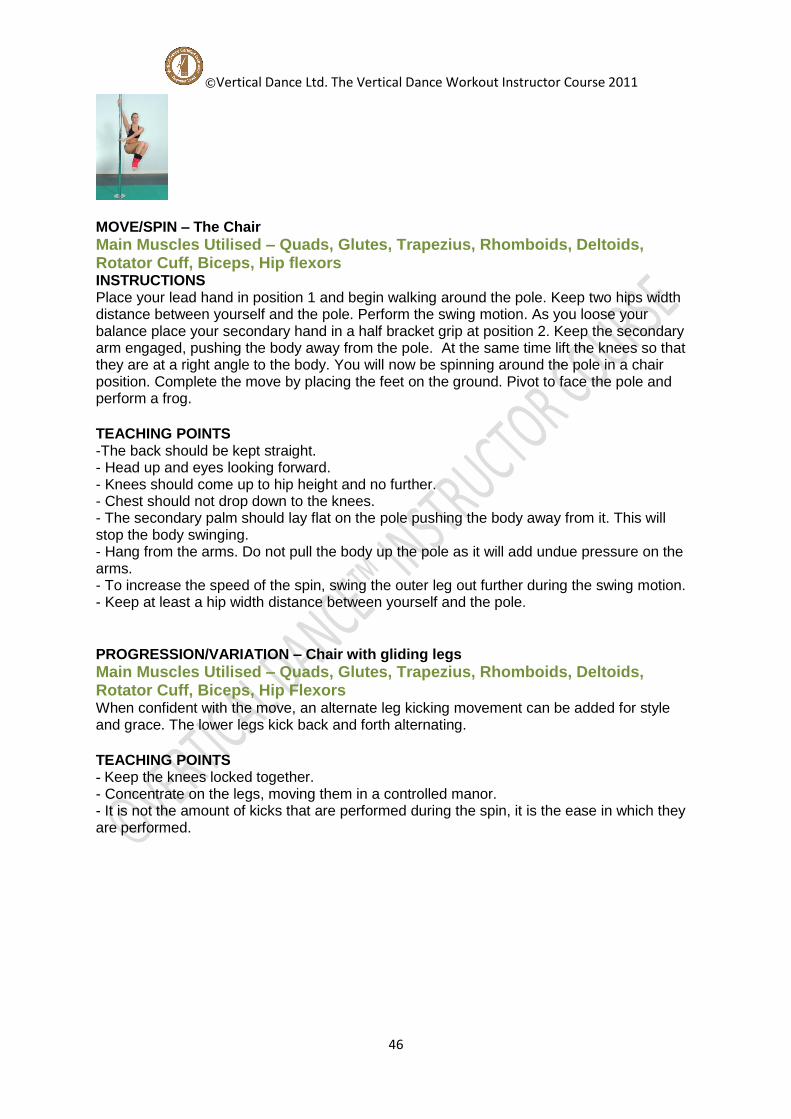
©Vertical Dance Ltd. The Vertical Dance Workout Instructor Course 2011
46
MOVE/SPIN – The Chair
Main Muscles Utilised – Quads, Glutes, Trapezius, Rhomboids, Deltoids, Rotator Cuff, Biceps, Hip flexors INSTRUCTIONS Place your lead hand in position 1 and begin walking around the pole. Keep two hips width distance between yourself and the pole. Perform the swing motion. As you loose your balance place your secondary hand in a half bracket grip at position 2. Keep the secondary arm engaged, pushing the body away from the pole. At the same time lift the knees so that they are at a right angle to the body. You will now be spinning around the pole in a chair position. Complete the move by placing the feet on the ground. Pivot to face the pole and perform a frog.
TEACHING POINTS -The back should be kept straight. - Head up and eyes looking forward. - Knees should come up to hip height and no further. - Chest should not drop down to the knees. - The secondary palm should lay flat on the pole pushing the body away from it. This will stop the body swinging. - Hang from the arms. Do not pull the body up the pole as it will add undue pressure on the arms. - To increase the speed of the spin, swing the outer leg out further during the swing motion. - Keep at least a hip width distance between yourself and the pole.
PROGRESSION/VARIATION – Chair with gliding legs
Main Muscles Utilised – Quads, Glutes, Trapezius, Rhomboids, Deltoids, Rotator Cuff, Biceps, Hip Flexors
When confident with the move, an alternate leg kicking movement can be added for style and grace. The lower legs kick back and forth alternating.
TEACHING POINTS
- Keep the knees locked together. - Concentrate on the legs, moving them in a controlled manor. - It is not the amount of kicks that are performed during the spin, it is the ease in which they are performed.

©Vertical Dance Ltd. The Vertical Dance Workout Instructor Course 2011
47
MOVE/SPIN – Attitude
Main Muscles Utilised – Glutes, Latissimus Dorsi, Trapezius, Rhomboids, Deltoids, Rotator Cuff, Biceps INSTRUCTIONS Place the lead hand in position 1 and begin walking around the pole. Make sure you keep 2 hips width distance between yourself and the pole. When you next step on your inside leg, perform the swing motion placing your secondary hand in position 2. Hook the crook of your outside heel onto the pole pointing your toes. Push off your inside leg and spread it behind the body. You will have the choice of either spinning down to the floor in this position, or sliding the hooked foot down the pole, bring the other foot to rest on the floor. Now perform a frog. This move can be performed one handed. TEACHING POINTS - It is important to keep the hand high on the pole, keeping as much distance between yourself and the pole as possible. - Swing the outside leg in a large circular motion hooking it on to the pole. Hook the leg high to increase the length of the spin. - Do not face the pole, but lean slightly away and to the side. This will help with lifting the back leg. - Spread the legs as far apart as you can.
MOVE/SPIN – Carousel
Main Muscles Utilised – Quads, Latissimus Dorsi, Trapezius, Rhomboids, Deltoids,
Rotator Cuff, Abdominals
INSTRUCTIONS
Place your lead hand in position 1 and begin walking around the pole. Perform the swing
motion turning to face the pole. Place the secondary hand at full stretch down towards the
base of the pole in the full bracket grip in position 3, pushing the body away from the pole. (If
the student cannot perform the full bracket grip, they can perform this move in a half bracket
grip in position 2). At the same time lift the outside foot off the floor, bending the lower legs
backwards. Spreading the knees and point the toes so that they are touching behind the
body. To complete the move either, spin down to floor on the knees, or pivot your hips to
finish in the chair position or hook outside leg to finish in a back hook.

©Vertical Dance Ltd. The Vertical Dance Workout Instructor Course 2011
48
This move can be performed one handed.
TEACHING POINTS
- The swing motion is the key to this move. It should be perfected before the spin is
demonstrated. This move can also be difficult to perform. The moves above should be
perfected before proceeding so that strength and technique is mastered.
- Lead with the outside leg.
- Do not swing with excessive force when first learning this spin. It would add too much
pressure on the lead arm.
- Spread your arms as far apart as possible on the pole. This will relieve pressure at the
elbow and wrist joints.
- If a student places their secondary hand too high on the pole the joints will become painful
and as a result the spin will stop mid flow. Make the participants slide their secondary hand
down the pole quickly. This will restart the spin, relieve joint pressure and get them to
understand their hand placement.
- The front of the body must be paralleled to the pole or the body will start to move from side
to side. The body should be diagonal to the pole keeping the head close and the legs further
away.
PROGRESSION/VARIATION – Boomerang
Main Muscles Utilised – Quads, Latissimus Dorsi, Trapezius, Rhomboids, Deltoids,
Rotator Cuff, Abdominals, Hip Flexors
Place your lead hand in position 1 and begin walking around the pole. Perform the ‘swing
motion’ and pivot to face the pole. Place the secondary hand at full stretch down towards the
base of the pole in the full bracket grip in position 3, pushing the body away from the pole. (If
the student cannot perform the full bracket grip, they can perform this move in a half bracket
grip in position 2). When the outside foot swings to the side, keep it straight. Pointing the
toes, push off the inside foot splitting the legs wide into the box splits position. To complete
the move, bend the legs at the knees and close them together. Place the feet on the floor
and perform a frog.
TEACHING POINTS
- This move is exactly the same as the carousel except the legs are positioned forward
instead of backwards. Once you have mastered the carousel this move will become easy.
- You must lead with the outside leg straight.
- If you need to bend down slightly into the move place the secondary hand lower on the
pole. You may find it easier to lift the legs.
- Leaning away from the pole will help to lift the legs.
- Do not swing too hard into the move as it will put too much pressure on the lead hand.
- Keep the body straight. Do not lean the chest down to the knees or bring the knees up to
the chest.
- Keep the arms wide apart and use the second hand to push away from the pole.
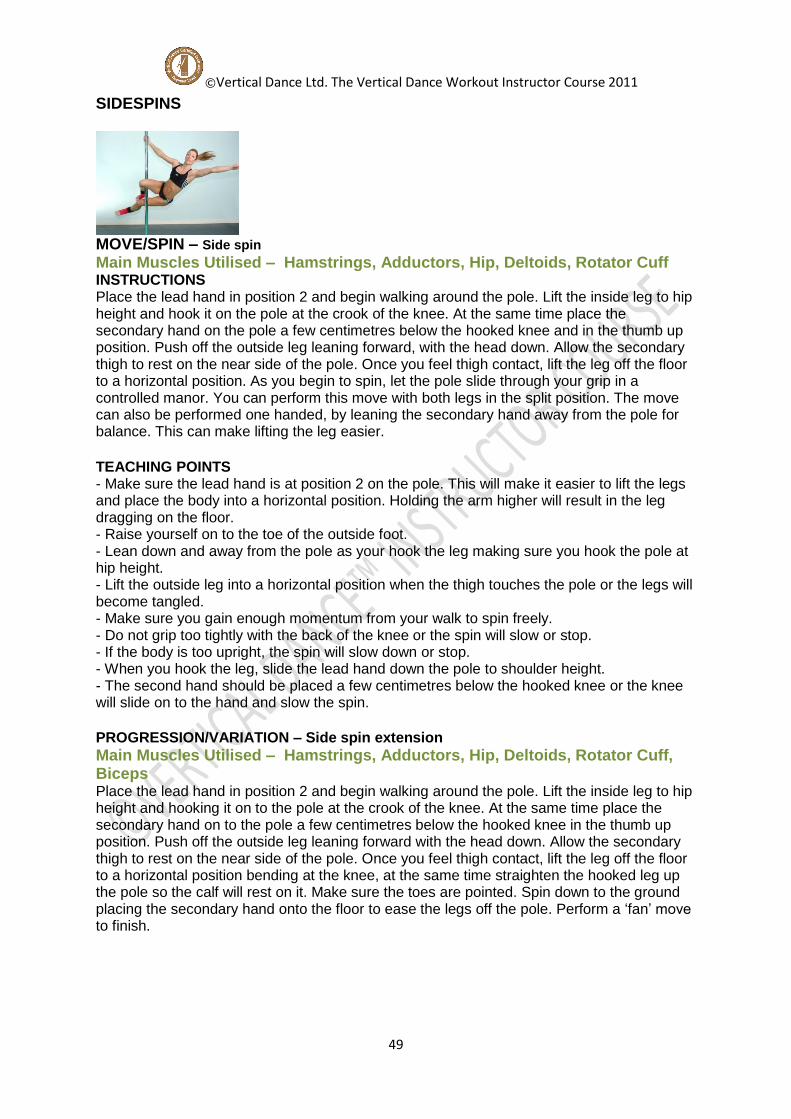
©Vertical Dance Ltd. The Vertical Dance Workout Instructor Course 2011
49
SIDESPINS
MOVE/SPIN – Side spin Main Muscles Utilised – Hamstrings, Adductors, Hip, Deltoids, Rotator Cuff INSTRUCTIONS Place the lead hand in position 2 and begin walking around the pole. Lift the inside leg to hip height and hook it on the pole at the crook of the knee. At the same time place the secondary hand on the pole a few centimetres below the hooked knee and in the thumb up position. Push off the outside leg leaning forward, with the head down. Allow the secondary thigh to rest on the near side of the pole. Once you feel thigh contact, lift the leg off the floor to a horizontal position. As you begin to spin, let the pole slide through your grip in a controlled manor. You can perform this move with both legs in the split position. The move can also be performed one handed, by leaning the secondary hand away from the pole for balance. This can make lifting the leg easier.
TEACHING POINTS - Make sure the lead hand is at position 2 on the pole. This will make it easier to lift the legs and place the body into a horizontal position. Holding the arm higher will result in the leg dragging on the floor. - Raise yourself on to the toe of the outside foot. - Lean down and away from the pole as your hook the leg making sure you hook the pole at hip height. - Lift the outside leg into a horizontal position when the thigh touches the pole or the legs will become tangled. - Make sure you gain enough momentum from your walk to spin freely. - Do not grip too tightly with the back of the knee or the spin will slow or stop. - If the body is too upright, the spin will slow down or stop. - When you hook the leg, slide the lead hand down the pole to shoulder height. - The second hand should be placed a few centimetres below the hooked knee or the knee will slide on to the hand and slow the spin.
PROGRESSION/VARIATION – Side spin extension
Main Muscles Utilised – Hamstrings, Adductors, Hip, Deltoids, Rotator Cuff, Biceps
Place the lead hand in position 2 and begin walking around the pole. Lift the inside leg to hip height and hooking it on to the pole at the crook of the knee. At the same time place the secondary hand on to the pole a few centimetres below the hooked knee in the thumb up position. Push off the outside leg leaning forward with the head down. Allow the secondary thigh to rest on the near side of the pole. Once you feel thigh contact, lift the leg off the floor to a horizontal position bending at the knee, at the same time straighten the hooked leg up the pole so the calf will rest on it. Make sure the toes are pointed. Spin down to the ground placing the secondary hand onto the floor to ease the legs off the pole. Perform a ‘fan’ move to finish.
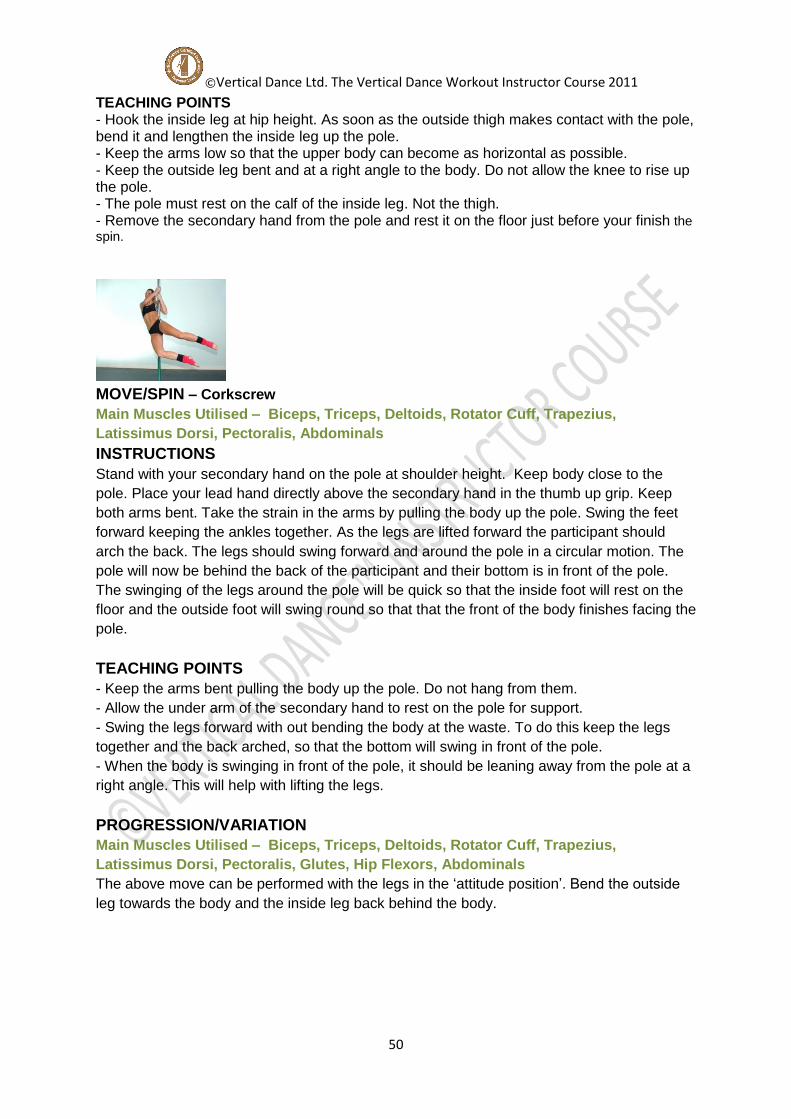
©Vertical Dance Ltd. The Vertical Dance Workout Instructor Course 2011
50
TEACHING POINTS - Hook the inside leg at hip height. As soon as the outside thigh makes contact with the pole, bend it and lengthen the inside leg up the pole. - Keep the arms low so that the upper body can become as horizontal as possible. - Keep the outside leg bent and at a right angle to the body. Do not allow the knee to rise up the pole. - The pole must rest on the calf of the inside leg. Not the thigh. - Remove the secondary hand from the pole and rest it on the floor just before your finish the spin.
MOVE/SPIN – Corkscrew
Main Muscles Utilised – Biceps, Triceps, Deltoids, Rotator Cuff, Trapezius,
Latissimus Dorsi, Pectoralis, Abdominals
INSTRUCTIONS
Stand with your secondary hand on the pole at shoulder height. Keep body close to the
pole. Place your lead hand directly above the secondary hand in the thumb up grip. Keep
both arms bent. Take the strain in the arms by pulling the body up the pole. Swing the feet
forward keeping the ankles together. As the legs are lifted forward the participant should
arch the back. The legs should swing forward and around the pole in a circular motion. The
pole will now be behind the back of the participant and their bottom is in front of the pole.
The swinging of the legs around the pole will be quick so that the inside foot will rest on the
floor and the outside foot will swing round so that that the front of the body finishes facing the
pole.
TEACHING POINTS
- Keep the arms bent pulling the body up the pole. Do not hang from them.
- Allow the under arm of the secondary hand to rest on the pole for support.
- Swing the legs forward with out bending the body at the waste. To do this keep the legs
together and the back arched, so that the bottom will swing in front of the pole.
- When the body is swinging in front of the pole, it should be leaning away from the pole at a
right angle. This will help with lifting the legs.
PROGRESSION/VARIATION
Main Muscles Utilised – Biceps, Triceps, Deltoids, Rotator Cuff, Trapezius,
Latissimus Dorsi, Pectoralis, Glutes, Hip Flexors, Abdominals
The above move can be performed with the legs in the ‘attitude position’. Bend the outside
leg towards the body and the inside leg back behind the body.
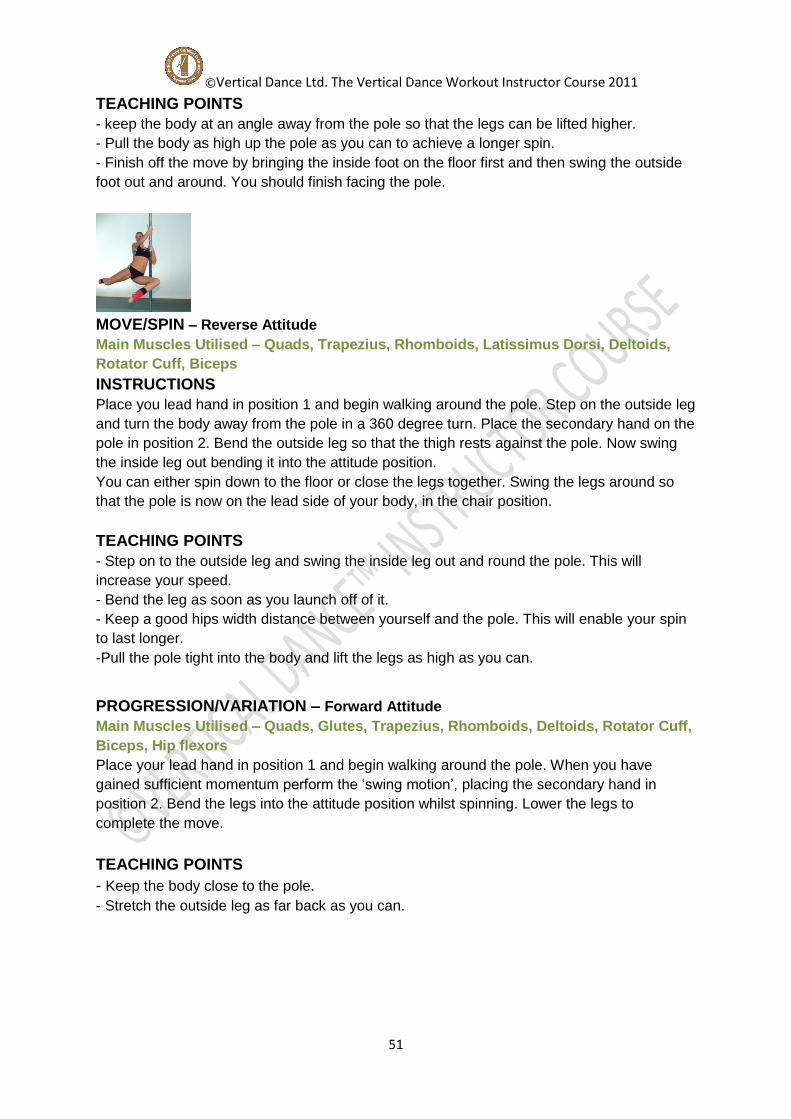
©Vertical Dance Ltd. The Vertical Dance Workout Instructor Course 2011
51
TEACHING POINTS
- keep the body at an angle away from the pole so that the legs can be lifted higher.
- Pull the body as high up the pole as you can to achieve a longer spin.
- Finish off the move by bringing the inside foot on the floor first and then swing the outside
foot out and around. You should finish facing the pole.
MOVE/SPIN – Reverse Attitude
Main Muscles Utilised – Quads, Trapezius, Rhomboids, Latissimus Dorsi, Deltoids,
Rotator Cuff, Biceps
INSTRUCTIONS
Place you lead hand in position 1 and begin walking around the pole. Step on the outside leg
and turn the body away from the pole in a 360 degree turn. Place the secondary hand on the
pole in position 2. Bend the outside leg so that the thigh rests against the pole. Now swing
the inside leg out bending it into the attitude position.
You can either spin down to the floor or close the legs together. Swing the legs around so
that the pole is now on the lead side of your body, in the chair position.
TEACHING POINTS
- Step on to the outside leg and swing the inside leg out and round the pole. This will
increase your speed.
- Bend the leg as soon as you launch off of it.
- Keep a good hips width distance between yourself and the pole. This will enable your spin
to last longer.
-Pull the pole tight into the body and lift the legs as high as you can.
PROGRESSION/VARIATION – Forward Attitude
Main Muscles Utilised – Quads, Glutes, Trapezius, Rhomboids, Deltoids, Rotator Cuff,
Biceps, Hip flexors
Place your lead hand in position 1 and begin walking around the pole. When you have
gained sufficient momentum perform the ‘swing motion’, placing the secondary hand in
position 2. Bend the legs into the attitude position whilst spinning. Lower the legs to
complete the move.
TEACHING POINTS
- Keep the body close to the pole.
- Stretch the outside leg as far back as you can.

©Vertical Dance Ltd. The Vertical Dance Workout Instructor Course 2011
52
MOVE/SPIN – Cradle
Main Muscles Utilised – Quads, Glutes, Trapezius, Rhomboids, Deltoids, Rotator Cuff,
Biceps, Hip flexors, Abdominals, Latissimus Dorsi, Erector Spinae, Pectoralis
INSTRUCTIONS
Stand with your secondary hand in position 3 in full bracket grip and begin walking around
the pole. Place the lead hand in the thumb up grip in position 2. Swing the outside leg and at
the same time push off and upwards on the inside foot. Use the arms to pull the body into
the pole horizontally. Bring both legs together in mid air and bend the knees as close to the
chest as possible. Make sure the pole is cradled in the lap and tummy area. The body needs
to be as horizontal as possible. Spin as many turns as your grip will allow. Complete the
move by placing the inside foot on the floor followed by your outside foot. You should now be
facing the pole.
TEACHING POINTS - Both arms should be bent in order to pull the body towards the pole. If your lead arm is in position 1 you will find it difficult to lift the body horizontally. - As the leg swings out, pull the pole into the chest using your lead hand to pull. Your secondary hand will take the weight. - Drop the shoulder and ear towards the floor and the hip towards the ceiling. This will allow you to position yourself horizontally. PROGRESSION/VARIATION
Main Muscles Utilised – Quads, Glutes, Hamstrings, Trapezius, Rhomboids, Deltoids, Rotator Cuff, Biceps, Hip flexors, Abdominals, Latissimus Dorsi, Erector Spinae, Pectoralis
You can adjust your leg positions by either having one leg straight, one bent or both split.
TEACHING POINTS - As above.
PROGRESSION/VARIATION – Tuck Spin
Main Muscles Utilised – Quads, Glutes, Trapezius, Rhomboids, Deltoids, Rotator Cuff, Biceps, Hip flexors, Abdominals, Latissimus Dorsi, Erector Spinae, Pectoralis
Standing on the opposite side of the pole than normal, place your secondary hand in between position 1 and 2, begin walking. Mid walk place the lead hand on the pole above the secondary hand. Bend the arms pulling the body up the pole. At the same time bend the knees into the cradle position, turning the body horizontal. Spin down to the ground placing the inside foot, then outside foot on the floor to dismount.

©Vertical Dance Ltd. The Vertical Dance Workout Instructor Course 2011
53
TEACHING POINTS - Pull the body up the pole. Do not hang from the arms. - Cradle the pole tightly between the tummy and lap. - Keep the body as horizontal as possible. Dropping the ear and shoulder to the floor and the hip to the ceiling. - Swing the legs to speed up the spin.
MOVE/SPIN – The Seat
Main Muscles Utilised – Quads, Glutes, Trapezius, Rhomboid, Biceps, Hip flexors, Abdominals, Latissimus Dorsi,Pectoralis INSTRUCTIONS Stand facing the pole with the front of the body touching it. Place both hands in position 2, with the lead hand directly above the secondary hand. Bend the leg of your choice to hip height, locking the bridge of the foot on the near side of the pole. Make sure that the front of the body continues to keep contact the pole. Take the weight with your arms. Push off the grounded foot crossing this leg over the bent knee. Make sure that the chest has not moved off the pole and that the pole is gripped by the very top of the thighs. When you are confident with your grip and balance, lean into the pole and release both hands. To dismount, use the jump and slide descent, twist decent or a prayer dismount. Please note that you can pull the body up into this position. Make sure you keep your knee at hip height when pulling the body up the pole (see online video clips for demonstration). TEACHING POINTS - Keep the front of the body against the pole at all times. This will keep the pole between the tops of the thighs. - Do not jump up the pole, as this can ruin technique and damage your pubic bone. - Take the weight of the body in the arms. - Cross the legs over, keeping the pole at the very top of the thighs. - Make sure that the bent knee stays at hip height at all times, do not let it slide down the pole or your balance will be lost. - Never lean away from the pole or your balance will also be lost. - Do not remove the bridge of the foot from the back of the pole as this will also affect balance. - This move will pinch the inside of the legs, but the more you practice the easier and less painful it will become. PROGRESSION/VARIATION – The crucifix
Main Muscles Utilised – Quads, Glutes, Trapezius, Biceps, Hip flexors, Abdominals, Latissimus Dorsi, Erector Spinae, Pectoralis
Stand facing the pole with the front of the body touching it. Place both hands in position 1 with the lead hand directly above the secondary hand. Bend the leg of your choice to hip height, locking the bridge of the foot on the near side of the pole. This will become your point of traction to push against the pole helping to lift the body. Make sure that the front of the body maintains contact with the pole. Take the weight with the arms, keeping the shoulders pulled back and down. Pull the body up the pole, pushing off with the grounded foot. Lengthen the bent knee so that it becomes almost straight and cross the other leg on the far side of the pole. The pole should now be trapped between the upper thighs, the sides of the

©Vertical Dance Ltd. The Vertical Dance Workout Instructor Course 2011
54
knees, the calves and the feet. Lean into the pole to find your centre of balance and then release the arms wide. To dismount twist the pole in the hands, at the same time release the leg slightly from the pole. Spin down to the ground and perform a frog.
TEACHING POINTS - Keep the shoulders pulled back and down and engage the upper body muscles when pulling the body up the pole. - Do not hang from the arms. Keep the muscles engaged and arms bent. - Wrap as much of the legs around the pole as possible to maximise grip. - Lean into the pole to keep the balance. - Straighten the body up the pole, rather then lengthening the legs down the pole to keep your height. PROGRESSION/VARIATION – Thigh hold
Main Muscles Utilised – Quads, Glutes, Calves, Trapezius, Rhomboids, Biceps, Abdominals, Latissimus Dorsi, Erector Spinae, Pectoralis
Stand facing the pole with the front of the body touching it. Place both hands in position 1 with the lead hand directly above the secondary hand. Bend the leg of your choice to hip height, locking the bridge of the foot on the near side of the pole. This will become your point of traction to push against the pole, which will help to lift the body. Make sure that the front of the body maintains contact with the pole. Take the weight with the arms, keeping the shoulders pulled back and down. Pull the body up the pole, pushing off the grounded foot. Lengthen the bent knee so that it becomes almost straight. Push off the other foot lifting the leg as high and as straight as possible, resting the inner thigh against the pole. The raised leg should be higher than the bent leg. Lean into the pole to get your balance and then release your arms. Choose a dismount of your choice. TEACHING POINTS - Make sure that the pole is gripped at the very tops of the thighs. - Lengthen the bent leg down the pole after the other leg is positioned. - Push the raised thigh in to the pole as hard as you can to gain traction. - Keep the bridge of the foot against the pole at all times. - When you have achieved the right balance you can arch your back and lean away from the pole.
TRANSITIONS WITH TEACHING POINTS AND
VARIATIONS
TRANSITION – Walk
Main Muscles Utilised – Quads, Glutes, calves, Hamstrings, Deltoids, Rotator Cuff, Biceps INSTRUCTIONS – Model Walk (The walks can be performed either on or off the pole) Hands should be placed on the hips, by the sides or on the pole. If on the pole the lead hand should be in position 1 with a hips width distance between yourself and the pole. Begin walking on your toes, and with every step you take, the feet should cross over each other. The back should be straight, chest lifted, the hips exaggerated and the head facing forward. This should be performed in time to the music.
©Vertical Dance Ltd. The Vertical Dance Workout Instructor Course 2011
55
TEACHING POINTS Walk on toes Chest lifted Shoulders down Abdominals engaged Straight back Exaggerate the hip movements Head held high Secondary hand on hip or moving with the music. Lean slightly away from the pole. PROGRESSION/VARIATION – Knee high walk
Main Muscles Utilised – Quads, Glutes, Hamstrings, Deltoids, Rotator Cuff, Biceps, Hip Flexor
Hands Should be placed on the hips, by the sides or on the pole. If the lead hand is on pol it should be in position 1, with a hips width distance between yourself and the pole. Begin walking around the pole on the toes and with every step, the knee should be lifted to hip height.
TEACHING POINTS
Walk on toes Chest lifted Shoulders down Abdominals engaged Straight back Exaggerate hip movements Head held high Secondary hand on hip or moving with the music. Lean slightly away from the pole. Lift the knees to hip height PROGRESSION/VARIATION – Drag walk
Main Muscles Utilised – Quads, Glutes, Calves, Hamstrings, Deltoids, Rotator Cuff, Biceps, Hands should be on the hips, by the sides or on the pole. If the lead hand is on the pole it should be in position 1, with a hips width distance between yourself and the pole. Begin walking on the toes and with every step you take lightly drag the top of the toes on the floor. This will slow the walk down.
TEACHING POINTS
Walk on toes
Chest lifted
Shoulders down
Abdominals engaged
Straight back
Exaggerate hip movements
Head held high
Secondary hand on hip or moving with the music.
Lean slightly away from the pole.
Drag the tops of the toes lightly so as not to hurt your feet.
©Vertical Dance Ltd. The Vertical Dance Workout Instructor Course 2011
56
PROGRESSION/VARIATION – The step around walk
Main Muscles Utilised – Quads, Calves, Glutes, Hamstrings, Trapezius, Latissimus
Dorsi, Abdominals, Rotator Cuff
Place the lead the hand in position 1 with a two hip widths between yourself and pole. Keep
the inside foot planted on floor. Swing the outside foot out straight and as wide as you can.
As you loose balance, place the secondary hand on the pole in position 2 and pivot on the
inside foot so that you face the pole. Perform a full 360 degree turn around pole, before
placing your outside foot on the floor, lift the inside foot and place the outside foot in its
place. You can continue this move and perform another ‘step around’, or you can follow by a
pirouette, back hook or any number or moves. You can also perform this move either one or
two handed.
TEACHING POINTS
The inside foot should stay planted until the swing is complete.
Lean away from the pole so that the arm is straight and not bent.
The secondary hand should be placed on the pole when balance is lost.
Swing the outside leg out wide drawing and invisible circle. Whip it in to increase your speed.
Keep as much distance between yourself and pole as you can.
Make sure you pivot on the inside foot so that the front of the body is facing the pole.
----------------------------------------------------------------------------------------------------------------------------------
TRANSITION – Hooks
INSTRUCTIONS – B-Hook
Main Muscles Utilised – Quads, Calves, Glutes, Hip Flexors
Stand facing towards the pole with roughly a hips width distance between yourself and the
pole. Place both hands on the pole at position 2 in a thumb up grip. Hook the lead leg at hip
height and around the outside of the pole at the crook of the knee. The pole rests against
calf and wedge at the side of the heal. The leg will now be in a locked in position. Remove
your secondary hand from the pole, lean back, drop the head and stroke up the torso. If you
are feeling confident and safe, you can release both hands away from the pole and stroke up
the body. To complete the move, grab the pole and unhook the knee. Kick it out and then
into a step to continue into another move.
TEACHING POINTS
Make sure that the secondary foot is slightly turned outwards, it will help with your balance.
Keep the arm that is holding the pole low so you can lean further away.
Pull slightly on the hooked leg. This will ensure that you will maintain a steady position.
If you find that arching your lower back is difficult then only tip the shoulder and head back.
©Vertical Dance Ltd. The Vertical Dance Workout Instructor Course 2011
57
PROGRESSION/VARIATION – Ballerina
Main Muscles Utilised – Quads, Calves, Glutes, Hip Flexors
Standing to the side of the pole, make sure there is hips width distance between yourself
and the pole. Place your lead hand on the pole at position 2 in the thumb up grip. Lift the
inside leg to hip height whilst leaning the upper body away from the pole. Hook the crook of
the knee onto the pole and squeeze. From this position you can either lean away further by
sliding the lead hand down the pole, or if you are balanced you can release both hands
moving them in time to the music.
TEACHING POINTS
Keep the back straight, the abdominals engaged and the hips pushed forward.
When leaning away, make sure you do not push your bottom out or your balance will be lost.
Keep the hooked leg at hip height or the move will look incorrect.
Lean out so that there is a straight line from the hooked knee to the tips of the fingers.
----------------------------------------------------------------------------------------------------------------------------------
TRANSITION – Kicks
Main Muscles Utilised – Quads, Glutes, Hamstrings, Hip
INSTRUCTIONS
The lead hand is in the thumb up grip at position 1 on the pole. You can perform this move
either facing the pole, or with the pole at your side. You can either kick in front, to the side or
kick around the pole. Raise the leg as high as your flexibility will allow. For a basic or limited
flexibility kicks, you can kick the leg with a bent knee and a pointed toe. If you have
increased flexibility, you can kick as high as possible with a straight leg keeping the toes
pointed. You can also kick out of a move, using the pole to push the leg off.
TEACHING POINTS
Back straight. Chest lifted. Abdominals engaged.
Kick the leg as straight and as high as you can unless you are performing a bent knee kick.
Do not over stretch yourself.
For extra height you can raise yourself on to the toes of your supporting leg.
--------------------------------------------------------------------------------------------------------------
TRANSITION – Hip movements
Main Muscles Utilised – Glutes, Erector Spinae, Abdominals,
INSTRUCTIONS – Hip circles
Facing the pole, place the lead hand on the pole in position 2 and the secondary hand either
below it, on the hip or moving it in time to the music. The arms should be at half or full
stretch. The feet should be 1 ½ hip width distance apart with knees soft, turning the hips in a
circular motion, bending alternate knees slightly.
©Vertical Dance Ltd. The Vertical Dance Workout Instructor Course 2011
58
TEACHING POINTS
Keep the abdominals engaged to protect the lower back.
Do not lock out the knees.
Imagine a beam of light is running through the body draw a circle on the floor with the beam
of light.
Perform as large a circle as you can and moving it in time to the music.
PROGRESSION/VARIATION – Figure of 8
Main Muscles Utilised – Glutes, Abdominals, Erector Spinae
Facing the pole, place the lead hand on the pole in position 2 and the secondary hand either
below it, on the hip or moving it in time to the music. The arms should be at half, or full
stretch. Feet should be 1½ hip width distance apart with knees soft. Turn the hips in a figure
of 8 motion, bending alternate knees slightly.
TEACHING POINTS
Keep the abdominals engaged to protect the lower back.
Do not lock out the knees.
Imagine a beam of light is running through the body and you would like to draw a figure of 8
on the floor with it.
Lead with the hip.
PROGRESSION/VARIATION – Body wave
Main Muscles Utilised – Quads, Glutes, Hamstrings, Erector, Abdominals
Facing the pole, place the lead hand on the pole in position 2 and the secondary hand either
below it, on the hip or move it in time to the music. The arms should be at half or full stretch.
The Feet should be 1½ hip width distance apart with knees soft.
Bring the chest forward to the pole and at the same time arch the back. Run the chest along
the pole until the hips are pushed towards it. Now round off the back pushing the hips away.
Bring the chest forward and repeat the sequence of moves. The move as a whole should
look like a wave that begins at the head and keeps rippling.
If you are looking for a deep wave then come up on to your toes. You can perform the body
wave very low by bending the knees and waving the body up and down. You can also
alternating hands while holding the pole. Another option is to perform the body wave with
your back to the pole, leaning your shoulder blades against it and your hands in position 1.
When you have mastered this move it can be performed in reverse. By doing so you will
begin at the hips and finish at the head. You can then alternate between the two styles of
body wave, locking the body as you alternate.
TEACHING POINTS
Feet should be 1 ½ hips width distance apart.
Hands in position 2.
Knees soft.
Lead with the chest or you will risk performing the move backwards.
©Vertical Dance Ltd. The Vertical Dance Workout Instructor Course 2011
59
Use the whole body in the move.
When you are confidant you can step further away from the pole so your chest does not
touch it.
Move in time to the music.
--------------------------------------------------------------------------------------------------------------
TRANSITION – Pirouette
Main Muscles Utilised – Quads, Calves, Glutes, Hamstrings, Rotator Cuff
INSTRUCTIONS
Place the lead hand in a thumb down grip in position 1 and begin walking around the pole.
When you next step on to your inside foot, lift the outside knee to hip height and at the same
time place the secondary hand on the pole. it is important at this point, to stop your forward
momentum, or as you turn you will loose balance. Place the secondary hand on the far side
of the pole at position 3. Your secondary hand has now become your lever to push yourself
under your arm in a clockwise motion. As you do this, your lead hand must slide up the pole
so that your head can fit under your arm. When you have performed a full 360 degree turn
and are comfortable with your balance you can then turn your lead hand back into the thumb
up grip and step forward repeating the sequence again or change into a different move. You
can also perform a half pirouette, so that your back finishes against the pole.
TEACHING POINTS
The lead hand must be kept high at all times. If it lowers down the pole you must slide it back
up.
Make sure you keep the hips width distance or you will have no room to turn.
Lean in slightly as you turn.
Lifting the outside knee to hip height helps the spin and makes the move more attractive.
Do not step back once you have lifted your leg. Only step forward.
It is extremely important to stop the momentum when you step on the inside leg.
Use the secondary hand as you push, to enable you to perform the 360 degree turn. If this
hand does not push you will struggle to complete a full turn.
Always turn inwards under the arm, not outwards.
PROGRESSION/VARIATION – Side pirouette
Main Muscles Utilised – Quads, Calves, Glutes, Hamstrings, Rotator Cuff
Standing next to the pole with the lead hand in position 2 fully stretch. Turn in on yourself
behind the pole, changing your lead hand for your secondary and swing out using your
secondary hand to keep you from spinning off the pole. You can repeat this move as many
times as you like.

©Vertical Dance Ltd. The Vertical Dance Workout Instructor Course 2011
60
TEACHING POINTS
Keep your movement behind the pole, not in front.
You can start with your secondary arm outstretched and use it as a lever to speed up your
pirouette.
Start performing this move slowly, until you have built up enough confidence.
Keep a hips distance from the pole when turning to avoid colliding with it.
--------------------------------------------------------------------------------------------------------------
TRANSITION – Pole push
Main Muscles Utilised – Quads, Calves, Glutes, Abdominals
INSTRUCTIONS
Rest the back on the pole. The legs should be 1½ hip width distance apart and slightly
forward of the body. Rest your body weight by pushing back against the pole. You are now
in a half seated position and your hands should be at your sides. Thrust your hips forward
pealing off the pole. Let your shoulder blades and head come off the pole last. As they come
off the pole, pivot on the lead foot so that the pole is now too your side. Grab the pole in
position 1 in a thumb up grip. You can now move into a different spin or transition.
TEACHING POINTS
Keep the back straight. Keep the shoulder back and down and the chest lifted.
The pole should be resting down the spine.
Keep the feet wide for stability.
Do not bend the legs too much or it becomes difficult to peal off the pole.
Make sure you do not thrust off the pole too hard or you may loose your balance.
As soon as you thrust, pivot and grab the pole.
TRANSITION – Pole circles
Main Muscles Utilised – Quads, Calves, Glutes, Hip Flexors, Trapezius, Latissimus
Dorsi, Abdominals, Biceps
INSTRUCTIONS
Place the lead hand in position 1 and begin walking around the pole. When you next step on your
inside leg, pivot to face the pole using the swing motion, push off hard bending your outside leg as
high as possible. At the same time, place the secondary hand on the pole just under the lead hand
and pull the body upwards. Now bend the inside leg and lower the outside leg to the floor. Try to
complete a 360 degree turn of the pole. Turn the body away from the pole, and transition into a move
such a back hook or a crab.
TEACHING POINTS
Keep the shoulders back and down, chest lifted, spine in neutral and the abdominals engaged.
Engage the triceps and do not hang from the arms when pulling the body up the pole.
Use the lower arm to keep the body from crashing into the pole in mid air.
Keep the body facing the pole. Do not keep the hips to the side.

©Vertical Dance Ltd. The Vertical Dance Workout Instructor Course 2011
61
Stagger the leg movements to make the transition look graceful.
--------------------------------------------------------------------------------------------------------------
TRANSITION – The crab
Main Muscles Utilised – Quads, Calves, Glutes, Abdominals, Biceps
INSTRUCTIONS
Standing next to the pole, with the lead hand in position 2 and the hips 1 ½ hip widths
distance apart, engage the abdominals to protect the lower spine and begin bending
backwards. When you can bend no further bend the knees slightly and slid the hand down
the pole. Stroke up and off the body, lowering the head. To return to the upright position,
push up through the hips, straightening the legs and making sure the head comes up last.
TEACHING POINTS
Keep the both hands low, bend the knees and come up on to your toes to deepen the arch.
You can cross your inside foot over the pole and also rest your hip on it to add stability.
For those with limited flexibility you can just drop your head back and stroke up your body.
Your head should be the first part of the body to be lowered and the last part to rise.
PROGRESSION/VARIATION – Two handed crab
Main Muscles Utilised – Quads, Calves, Glutes, Abdominals
Stand to the side of the pole with the legs 1 ½ hips width distance apart, the secondary hand
in the full bracket in position 3 and the lead hand on the pole in position 1. Drop the head,
arch the back and bend the knees, while at the same time slide the hands down the pole
slowly. To return into the upright position, push up through the hips, pulling on the arms
bringing the head up last.
TEACHING POINTS
Slide the hands smoothly down the pole by using grip control.
Use the lead hand to take the weight of the body and the secondary hand to keep your
balance.
You can cross your inside foot over the pole and also rest your hip on it to add stability.
For those with limited flexibility you can just drop you head back and stroke up your body.
Your head should be the first part of the body to low and the last part to rise.
---------------------------------------------------------------------------------------------------------------------------
FLOOR TO POLE TRANSITION - The frog or push out
Main Muscles Utilised – Quads,Glutes, Trapezius, Latissimus Dorsi
INSTRUCTIONS
From a kneeling or crouching position in front of the pole, you can tuck the toes under and
either use your hands on the floor or the pole to push yourself back on to your feet, so that
you are now in the crouching position. Lead with your bottom arching your back. When you
cannot lift your bottom any further, lead with your chest until you have reached an upright
position. You can pivot slightly and turn to the side when performing this move.
©Vertical Dance Ltd. The Vertical Dance Workout Instructor Course 2011
62
TEACHING POINTS
Keep the knees locked together.
Always lead with the bottom and then the chest. Make sure your back is arched and not
rounded.
---------------------------------------------------------------------------------------------------------------------------
FLOOR TO POLE TRANSITION - The Demi
Main Muscles Utilised – Quads, Calves, Glutes,
INSTRUCTIONS
From a crossed leg seated position on the floor, take the heel of the lead foot and cross it
over the secondary knee. Place both hands either side of the legs with the palms on the
floor, lean your body weight forward and use the arms to push the body into the upright
position. You can add a pivot on the way up so that you end up facing in a different direction.
This move works well with the ‘fan’.
TEACHING POINTS
Make sure the foot is correctly placed over the knee or the move will be difficult to execute.
Make sure that the body is upright and the hands are placed equally either side of the legs.
Do not move directly in to an upright position. Lean forward so you rise at an angle.
If you are adding in a pivot, turn on the lead leg.
If you are performing this move from a ‘fan’, take the foot and place it across the bent leg,
pushing the body into an upright position.
---------------------------------------------------------------------------------------------------------------------------
FLOOR TO POLE TRANSITION - The spin up
Main Muscles Utilised – Quads, Calves, Glutes, Trapezius, Latissimus Dorsi,
Abdominals, Biceps, Hip Flexors
INSTRUCTIONS
From an upright kneeling position in front of the pole, place both hands in the thumb up grip
in position 1, keeping both arms at full stretch. Lengthen the secondary leg behind the body
keeping the toes pointed. Swing the leg in a circular motion (swing motion) around the pole
engaging the arm muscles. Pull the body upward, lift the knee off the ground and towards
the chest and then bend the outside leg, landing with both feet on the ground. Tilt the lead
hip upwards. Pivot on the balls of the feet and rise at an angle.
TEACHING POINTS
Make sure the lead hand is on top of the secondary hand.
Pull with the arms. Do not push off the floor with the feet.
Keep the swinging leg straight pulling it towards the pole. Bend to increase your speed. Lift
the inside knee to the chest as quick as possible or it will drag on the floor.
©Vertical Dance Ltd. The Vertical Dance Workout Instructor Course 2011
63
PROGRESSION/VARIATION – Spin up attitude
Main Muscles Utilised – Quads, Calves, Glutes, Trapezius, Latissimus Dorsi,
Abdominals, Hip Flexors, Biceps
From an upright kneeling position in front of the pole, place both hands in the thumb up grip
in position 1, keeping both arms at full stretch. Lengthen the secondary leg behind the body
keeping the toes pointed. Swing the leg in a circular motion (swing motion) around the pole
engaging the arm muscles. Pull the body upwards, lifting the knee off the ground trailing and
it behind the body. You are now spinning around the pole in the attitude position. Just before
your spin get too close to the floor place your feet down and perform a push up.
TEACHING POINTS
Pull the body as high up the pole as you can.
Whip the swing leg into the attitude position as soon as possible to create momentum.
You will only be able to ‘spin up’ to one full turn therefore you need to get into position fast.
PROGRESSION/VARIATION – The spin up boomerang
Main Muscles Utilised – Quads, Calves, Glutes, Hamstrings, Trapezius, Latissimus
Dorsi, Abdominals, Rotator Cuff, Biceps, Hip Flexors
From an upright kneeling position in front of the pole, place both hands in the thumb up grip
in position 1, keeping both arms at full stretch. Lengthen the secondary leg behind the body
keeping the toes pointed. Swing the leg in a circular motion (swing motion) around the pole
engaging the arm muscles. Pull the body upwards, lifting the knee off the ground and
splitting the legs, so that you are spinning around the pole in a straddle position. Just before
your spin gets too close to the floor place your feet down and perform a push up.
TEACHING POINTS
Use the secondary arm to lift the body whilst pushing the body slightly away from the pole.
You need to pull the body upwards as much as you can.
Spread your legs as wide apart as you can.
Make sure you return your feet to the floor before you run out of spin.
-----------------------------------------------------------------------------------------------------------
POLE TO FLOOR TRANSITION – The jump and slide
Main Muscles Utilised – Quads, Glutes, Hamstrings, Trapezius, Latissimus Dorsi,
Abdominals, Biceps, Hips Flexors
INSTRUCTIONS
Standing in front of the pole with the hands in position 1 (lead on top of secondary), bend the
knees and jump onto the pole gaining as much height as possible. If you have good upper
body strength pull yourself as high as you can. Grab the pole between the tops of the thighs.
Bend your leg so that the toe is pointing towards the floor. Release the thigh grip on the pole
slightly so that you can slide down the pole. Be sure to place the sole of the foot on the floor
first. This will protect the coccyx. You can perform this move by jumping on the pole but
©Vertical Dance Ltd. The Vertical Dance Workout Instructor Course 2011
64
instead of grabbing the pole between the thighs, swing the lower legs backwards, spreading
the knees and pointing the toes together (prayer position). Slide down to your knees in a
controlled manor.
TEACHING POINTS
Keep the back straight. Chest lifted. Abdominals engaged.
Lift the legs so that they are at a 90 degree angle to the body.
Do not hang from the arms, keep the biceps and triceps muscles engaged.
If you find it too difficult to gain height, grab the pole and enclose the thighs around it and
slide down.
Drop your bottom slightly lifting your legs. This will take the strain away from your
abdominals.
----------------------------------------------------------------------------------------------------------------------------------
FLOOR WORK WITH TEACHING POINTS AND
VARIATIONS
FLOOR MOVE – The fan
Main Muscles Utilised – Abductors, Glutes, Hamstrings,
INSTRUCTIONS
Lie with your least flexible side so that your most flexible leg is on top.
Bend your elbow and place the palm of the hand on the floor for support.
Bend the lower knee to add stability.
Lift your leg up to the side and at the same time take the hand between the legs and grab
the heel.
Pull the heel up as close to the head as possible. Point the toes and hold for a few seconds.
If you have the flexibility you can split both legs at the same time
TEACHING POINTS
If you have limited flexibility you can hold the hamstring and kick the lower leg above the
head.
The hand needs to pass through the front of the legs, not the back other wise it too difficult to
grab the heel.
Make sure the lower leg is bent otherwise you will roll onto your back.
©Vertical Dance Ltd. The Vertical Dance Workout Instructor Course 2011
65
FLOOR MOVE – The kneeling arch.
Main Muscles Utilised – Quads, Erector Spinae
INSTRUCTIONS
In a kneeling position, with the knees open, the toes touching behind, and hips pushed
forward, circle the lead hand in a clockwise motion placing the palm of the hand on the floor
behind the feet for support. At the same time stroke the secondary hand, from the navel to
the nose, throwing the head back.
TEACHING POINTS
Place the hands just in behind the pointed toes for support.
Do not sit on the legs. Push the hips forward arching the back.
Make a big show of circling the lead arm and stroking up the body.
The knees must be spread apart or your balance will be lost.
--------------------------------------------------------------------------------------------------------------
FLOOR MOVE – Backwards roll
Main Muscles Utilised – Trapezius, Abdominals,
INSTRUCTIONS
Lay flat on your back with your hands outstretched and the palms facing the floor.
Push the weight of your body onto your shoulders so that your legs are above your head.
Bend the lead leg keeping the secondary leg straight.
Use the arms to push yourself over your lead shoulder. You will land on your bent knee.
You are now in the perfect position to crawl.
TEACHING POINTS
Use the back of the arms to push your body in to the inverted position.
Make sure the movement is over your lead shoulder. Do not try to go over your head.
Push your body over the shoulder onto your bent knee before you move any other body part.
It will prevent you from hurting yourself.
If your body falls to the side it is because your hips are not high enough at the beginning of
the move.
When performing this move use your legs to swing into position. Turn your arms as you roll
over your shoulder.
--------------------------------------------------------------------------------------------------------------
©Vertical Dance Ltd. The Vertical Dance Workout Instructor Course 2011
66
FLOOR MOVE – Knee circles
Main Muscles Utilised – Quads, Glutes, Hips Flexors
INSTRUCTIONS
Lay flat on your back with your hands outstretched and the palms facing the floor.
Bend both knees, lifting them so that they are at a 90 degree angle to the body.
Lock the knees and ankles together and draw an imaginary circle either clockwise or anti
clockwise in the air. To complete the move you can perform a box split quickly and then
bring the legs back to the ground.
TEACHING POINTS
Keep the abdominals engaged to support the back.
Use the arms to keep the body balanced and lift the legs.
Keep the knees locked together.
Draw an imaginary circle with the toes.
You can also keep the knees locked and alternate the legs in a circular motion.
--------------------------------------------------------------------------------------------------------------
FLOOR MOVE – Cat stretch
Main Muscles Utilised – Glutes, Abdominals, Biceps,
INSTRUCTIONS
Lay on your front. Place the hands palm down at the side of the head, in a press-up position
Isolate the bottom lifting it into the air whilst keeping the legs and chest on the ground. Using
the hands push the body backwards keeping the chest on the floor until the last possible
moment. At the same time lead with the bottom. You should finish in a kneeling position.
The cat stretch can also be performed in reverse by keeping the bottom in the air at all times
and arching the back with the arms under the shoulders. Bend the elbows and slide the
chest along the floor until you are in a supine position.
TEACHING POINTS
Keep the bottom in the air until the body is flat on the floor.
Keep the arms under the shoulders.
Slide the chest along the floor using the arms to push.
--------------------------------------------------------------------------------------------------------------
©Vertical Dance Ltd. The Vertical Dance Workout Instructor Course 2011
67
FLOOR MOVE – Shoulder Bridge
Main Muscles Utilised – Quads, Glutes, Erector Spinae
INSTRUCTIONS
Lay on your back, bend your knees so that the feet are hips width distance apart. Place the
hands by the side, with the palms facing down.
Raise the hips in the air so that the weight is on the feet and shoulders.
Circle the hips.
TEACHING POINTS
Engage the abdominals to protect the back.
Keep the knees open to support the weight.
Keep the arms out to the side to keep balance.
---------------------------------------------------------------------------------------------------------------------------
FLOOR MOVE – Paddle
Main Muscles Utilised – Quads, Calves, Abdominals, Hips Flexors
INSTRUCTIONS
Lay on your back and rest on your elbows. Lift the legs in the air at a 90 degree angle to the
body. Keep the toes pointed and begin kicking them in time to the music.
TEACHING POINTS
Keep the palms flat and the elbows bent to support the upper body weight.
Imagine you are riding a bicycle when you kick your legs.
Keep the abdominals engaged to protect the back.
---------------------------------------------------------------------------------------------------------------------------

©Vertical Dance Ltd. The Vertical Dance Workout Instructor Course 2011
68
Chapter 7
Designing a Vertical Dance class- Watch demonstration class, moves, six routines and pole based MSE
Components of a Vertical Dance class
A Vertical Dance session should be based on the following structure:
Mobility – lubricate joints in preparation for the pole.
Pulse Raiser – Increase core temperature, oxygen and nutrients in preparation for the pole.
Prep Stretch – Increase range or motion in preparation for spins, holds and chorography.
Vertical Dance Routine – Improve the components of physical fitness.
MSE – Build muscular strength and endurance to improve pole performance.
Cool Down Stretch – Relax participants and improve flexibility for move execution
Be specific to pole
It is important to base each component of the warm up, MSE and cool down around your
pole choreography. Warming up should be specific to the chorography in your session. For
example, if the routine contains squats and hip circles, they should be added to your warm
up. Remember during a beginners class participants will continually use their upper body.
Therefore the whole body should be stretched spending more time on stretching the upper
body. If participants prominently use their upper body during the class, time should be spent
during the MSE section building the lower body, so that you are giving a full body work out.
Incorporating the pole as much as possible
Participants specifically take part in the class to work out on the pole. Incorporate the pole
into each component of your session, from mobility to stretching. Please see the online
videos giving examples of this.
Assessing a student’s ability and muscle memory
There are many ways to see if a student is suitable to perform a move.
Are they strong enough?
Watch them when they perform a spin or hold. Can they hold their body weight? Can they
control the move?
Are they confidant enough?
Watch them when performing the routine. Do they perform the moves with ease? Do they
keep in time with the music?
Are they eager to move on?
Watch as they perform their moves. Are they completely at ease? Do they ask for a move
that is more challenging?
Muscle memory
We all have muscle memory. It is what helps us remember how to ride a bike, even if we

©Vertical Dance Ltd. The Vertical Dance Workout Instructor Course 2011
69
have not ridden one for many years. It is the muscles ability to remember a position. It is how
we remember to perform a fireman time and time again. This shows you how important it is
to allow students time to rehearse and practice moves. Muscles memorise the positions
required to execute the moves each time.
Building a Routine
Break down the routine into moves and then break the moves down into sections. Each time
a move has been mastered, ask the class to perform it to your chosen music. Add on the
next move to the first until you have built up the routine. This will give the participants the
chance to practice each move many times. It will also get them used to working with the beat
and phrase of the music and help them practice the transitions between the moves. If each
move is taught separately and a participant is then asked to add them all together with the
music, they will have great difficulty in doing so, as they have not practiced adding them
together. If the routine is completed correctly, the class will get a great sense of
achievement. However, if it is performed incorrectly the participant will feel let down. Make
sure you have enough time to repeat the routine a few times before cooling down. This will
give them the opportunity to execute the routine correctly at least one or more times, giving
them a sense of achievement and boosting their confidence.
When teaching courses, a great way to structure your routine is by selecting a song and
creating a routine for the whole song. Split the song into sections and teach one section
each week. If you plan to do this, then start the next class with last week’s routine. At the
end of the course have a big performance of the entire routine.
There is no reason why you cannot teach a different routine in every class if you wish.
However, it is important that you plan you class prior to teaching.
Please remember that it is not a good idea to put spins back to back. It will tire out the
participant and will make the routine disjointed. Combining moves such as front hook/back
hook are ok as the feet do not touch the floor in between the moves.
How many moves?
The average person who attends a beginner Vertical Dance class, generally has little
experience in dance and fitness. They do not have the skills to memorise and perform a lot
of complex chorography. Therefore, we recommend keeping the routine to no more than 10
moves. You will find it difficult to teach a long routine because you will need to allow time for
warm up/cool down and practice moves as well as performing the routine. As the group
becomes more proficient with pole fitness, their skills will develop and moves will begin to
come naturally. As a result they will be able to lengthen the routine.
Making the most of the moves
There are only a limited amount of beginner Vertical Dance moves to show your participants.
As an instructor you need to be creative with music and combining moves. There are
thousands of different combinations of moves that can be combined together to make up
routines. You just need to select the ones that flow together well. Create routines around
themes, such as 70’s music. Add 70’s dance moves as well as pole moves. Making a class
creative and fun will encourage your participants coming back time and time again.
©Vertical Dance Ltd. The Vertical Dance Workout Instructor Course 2011
70
Keep classes fresh by looking at other dance forms such as street dance, salsa, ballet etc to
incorporate into your routines. DVDs and YouTube can also be a great source of inspiration.
Just tricks?
Firstly we need to define the difference between a trick and a move? A move encompasses
all of the movements you perform in a vertical dance routine such as, spins, transitions,
sitting on the pole, floor work and floor to pole work. A trick is a spin, invert, sitting on the
pole or a hold. These moves are generally considered technically more difficult. Tricks
generally have the wow factor and with a few exceptions you have both you feet off the
ground when performing them.
Teaching a ‘trick only’ class is not beneficial to beginners. Participants who are only taught
tricks will not develop skills such as timing, flow and working with the beat. They will find
performing and creating their own routines very difficult as they will not have been taught
transitional moves to accompany the tricks. Another factor is that whilst they build a great
deal of strength, they also run the risk of injuring themselves by repeatedly working on back
to back weight bearing moves such as spins and inverts. Another consideration is that the
cardiovascular system is not being improved which is not good for fitness levels.
Body Balance
When teaching moves, both lead and secondary hands should be used equally so that both
sides of the body are strengthened. This will also help reduce the risk of repetitive strain
injuries. As an instructor it is very important to master all moves on both sides of the pole
because you can guarantee a left handed participant will always ask you to demonstrate with
your left.
Giving a weaker side option to some one that needs to be challenged is a great tool for
keeping the participant occupied while you help those that are struggling.
Keeping the class moving
The purpose of a Vertical Dance class is to increase the participant’s fitness level and
wellbeing. This can only be achieved if the heart rate is increased. Design your routine so
that all the participants are on the pole as much as possible. Think about moves that can be
practiced with more than one person on the pole at the same time. For example, walking, hip
circles, body waves and crabs. You will keep the whole class entertained and continually
moving, thus giving them more time on the pole, better value for money and of course an
improved fitness level.
Creating a good atmosphere
Unlike other exercise classes such as aerobics, participants have to work in small groups on
or around the pole. It is a great social experience for them, but some times this can create
an atmosphere, especially if some advance faster than other or participants have a
disagreement. You can overcome this by making you participants to change poles after each
move or lesson.
©Vertical Dance Ltd. The Vertical Dance Workout Instructor Course 2011
71
Starting the routine off the pole
There is no reason why you cannot start or finish you routine off the pole. In fact it is a great
way of keeping the whole class active, especially if you have a very large group and few
poles. By taking a few dance steps or aerobic moves towards the pole to upbeat music you
can make a really fun class. You can even create a routine that gets participants swapping
poles.
Flowing Routine
A flowing routine will not come naturally to those that have little experience in Vertical
Dance. There are of course exceptions to this. Participants that have had dance, fitness or
gymnastic training will have achieved enhanced motor skills and muscle memory. For those
that have little or no skill, it is your responsibility as in instructor to create simple flowing
routine that all participants can master. If some one is struggling, it is your job as the
instructor to give an easy alternative so that they can keep up with the rest of the class and
not feel defeated.
After approximately 4 – 6 classes the participants is often showing a marked improvement
on flow, due to growing confidence, technique, knowledge of the moves and muscle
memory. The more the participant is encourage to practice the more flowing they become.
Moves that combine well together Listed below are a few of the moves that combine together. You will find they will assist you
when designing your routine. These are by no means all of them. Please feel free to add in
your own.
Step around – pirouette – crab
Step around – hook
Step around – pirouette – front hook
Step around – pirouette – back hook
Pirouette - pole circle – back hook
Front hook – Back hook
Carousel – Boomerang
Boomerang – attitude
There are many more moves and combinations, but as long as they are safe, there is
nothing to stop you using your imagination and making up new moves. As long as you know
how to successfully execute and break down the move or combination and your participants
are at a suitable level, then create as many moves as you like.
Course Structure - levels
You need to decide how you would like to structure your classes. Would you like people to
drop in? Would you like set courses? Would you like multi level classes? or would you like
every one on the same level? The best way is to have levels such as:
level1 - Introduction to the pole.
level 2 - Beginner
level 3 - Intermediate beginner
level 4 - Advanced beginner
and so on….
©Vertical Dance Ltd. The Vertical Dance Workout Instructor Course 2011
72
The only problem with this structure is that a percentage of participants invariably drop out at
each level, so you may not have enough people to make the higher level classes financially
viable. If you choose to have a multi level class, this can be a difficult class to teach.
Although you are teaching the same routine, you are changing the tricks within that routine
to challenge the more advanced student. You have to make sure you are able to give
enough time to each person and make sure that what you are teaching is safe in the limited
time you have.
Another problem you will face is that if you run a course and someone cannot make it one
week, you need to decide what your policy is going to be? Will you let them carry a class
forward or will you be strict. After all you were there and you need to cover your over heads.
Whatever you choose make sure your rules are clear at the time of booking so that no one
can complain to you.
MSE
Do we need to include a muscle strength and endurance section in our class? The answer is
yes! The online course will teach you how to build strength incorporating the pole. However,
a Vertical Dance class is structured around weight bearing moves that lift the whole body off
the floor. This builds strength specifically in the areas that require it, so you are killing two
birds with one stone ie. Building strength and mastering a move. At beginner level the moves
that are taught are predominantly upper body based, so if you wanted to add in MSE to your
class it is a good idea to work out the legs and the abdominal area. You will then be keeping
the body balanced. It is important to start working on strength building preparation for
inverting, from the first class. You can find these exercises in the pole MSE video clips.
cool down
A cool down is a very important part of the class, you need your participants to improve their
flexibility so extra care should be taken around the shoulder and leg areas to increase ROM
(Range of movement). Give them easy stretches that they can recreate at home and always
give stretching as home work.
Home work
Hand outs are always a great way of reminding the students of the names or the moves and
the chorography. It gives them the opportunity to practice at home if they have their own
pole. They should also be encouraged to stretch on a daily basis to improve flexibility in
preparation for the more technically difficult moves.
Session Plans
On the next page is an example session plan for you to follow when designing your
Assessment. Please use the blank session plan in the workbook to photo copy and use. You
are only required to write out 5-7 moves. Only one should be a spin. The other moves should
be transitions and or floor work. Floor work is optional. You only need to create the routine
section of the class if you are already fitness qualified.
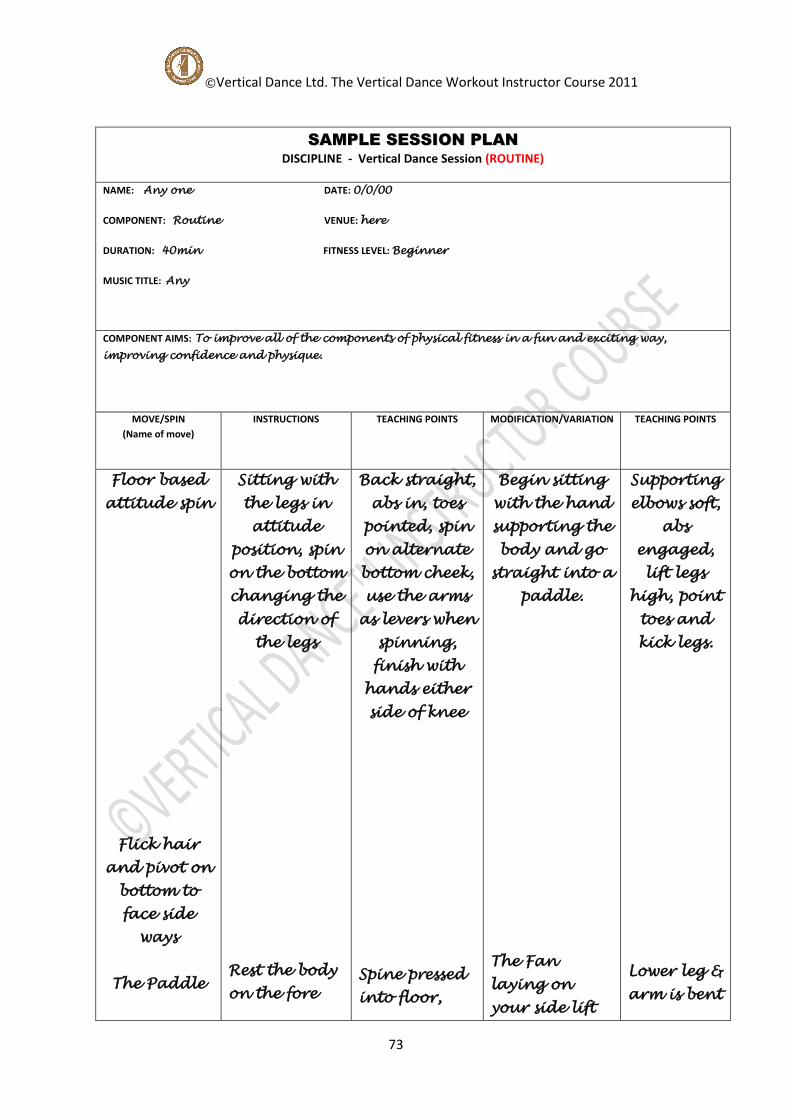
©Vertical Dance Ltd. The Vertical Dance Workout Instructor Course 2011
73
SSAAMMPPLLEE SSEESSSSIIOONN PPLLAANN
DISCIPLINE - Vertical Dance Session (ROUTINE)
NAME: Any one DATE: 0/0/00
COMPONENT: Routine VENUE: here
DURATION: 40min FITNESS LEVEL: Beginner
MUSIC TITLE: Any
COMPONENT AIMS: To improve all of the components of physical fitness in a fun and exciting way,
improving confidence and physique.
MOVE/SPIN
(Name of move)
INSTRUCTIONS
TEACHING POINTS MODIFICATION/VARIATION TEACHING POINTS
Floor based
attitude spin
Flick hair
and pivot on
bottom to
face side
ways
The Paddle
Sitting with
the legs in
attitude
position, spin
on the bottom
changing the
direction of
the legs
Rest the body
on the fore
Back straight,
abs in, toes
pointed, spin
on alternate
bottom cheek,
use the arms
as levers when
spinning,
finish with
hands either
side of knee
Spine pressed
into floor,
Begin sitting
with the hand
supporting the
body and go
straight into a
paddle.
The Fan
laying on
your side lift
Supporting
elbows soft,
abs
engaged,
lift legs
high, point
toes and
kick legs.
Lower leg &
arm is bent

©Vertical Dance Ltd. The Vertical Dance Workout Instructor Course 2011
74
Roll on to all
fours
The Frog
Crossed leg
fireman
arms and lift
legs in the
air, paddling
alternate legs
Tuck toes
under, push
back into a
crouch
position; put
hands on
knees, lead
with the
bottom and
then chest.
Walk around,
swing motion
into the cross
leg fireman,
spin down
and perform
a push up.
weight on
forearms, lift
legs high,
engage abs,
point toes
and kick legs
smoothly.
Tuck toes
rolling on to
the soles of
feet, keep
knees
together, push
out with the
bottom, then
forward with
the chest.
Hand in
position 1,
hips width
distance,
swing motion,
outside hook
in front,
inside foot
behind, knees
open,
continue spin
to uncross
leg.
leg and to
your
maximum
flexibility
Spin up.
Holding the
pole at full
stretch swing
the leg
bringing the
knees to the
chest as quick
as possible.
Straight leg
fireman.
Walking,
swing motion,
both legs
straight, spin
down and
perform the
push up.
to support
weight,
grab heal
through
legs, point
toes.
Arms at
full stretch,
leg behind
the body,
swing leg
in a circle,
bring
knees to
chest, lead
with the
hip.
Hand in
position 1,
hips width
distance,
pole centre
of thighs,
outside leg
leads way,
feet behind
pole, point
toes.

©Vertical Dance Ltd. The Vertical Dance Workout Instructor Course 2011
75
Step around
Half
pirouette
Keep inside
foot
stationary &
step a 360
around the
pole
Turn under
lead arm
180, finish
with the back
to pole and
foot on it.
Lead in
between 1/2,
lean away,
swing motion,
full 360, keep
2 hip
distances, lift
inside &
replace wit
outside.
Keep inside
foot off floor
at all time,
lead hand
upside down
& slide it up
pole, engage
abs to stop
momentum,
put second
hand on pole
to push body
under arm,
straight back,
Step Around
Hook.
step
around 360,
hook inside on
pole.
Full pirouette.
Turn under
arm 360 finish
next to the
pole in the
start position.
½ position
on pole, 2
hips
distance
outside leg
wide, 360
& hook
inside on
pole at the
knee &
heel.
Keep inside
foot off
floor at all
time, lead
hand
upside
down &
slide it up
pole,
engage abs
to stop
momentum
put second
hand on
pole to
push body
under
arm,
straight
back