the urban cultivator commercial cultivator | 1-877-352-0490 | urbancultivator.net page 2 please read...
TRANSCRIPT

The Urban Cultivator CommercialUser Manual
®
Page 2Urban Cultivator | 1-877-352-0490 | urbancultivator.net
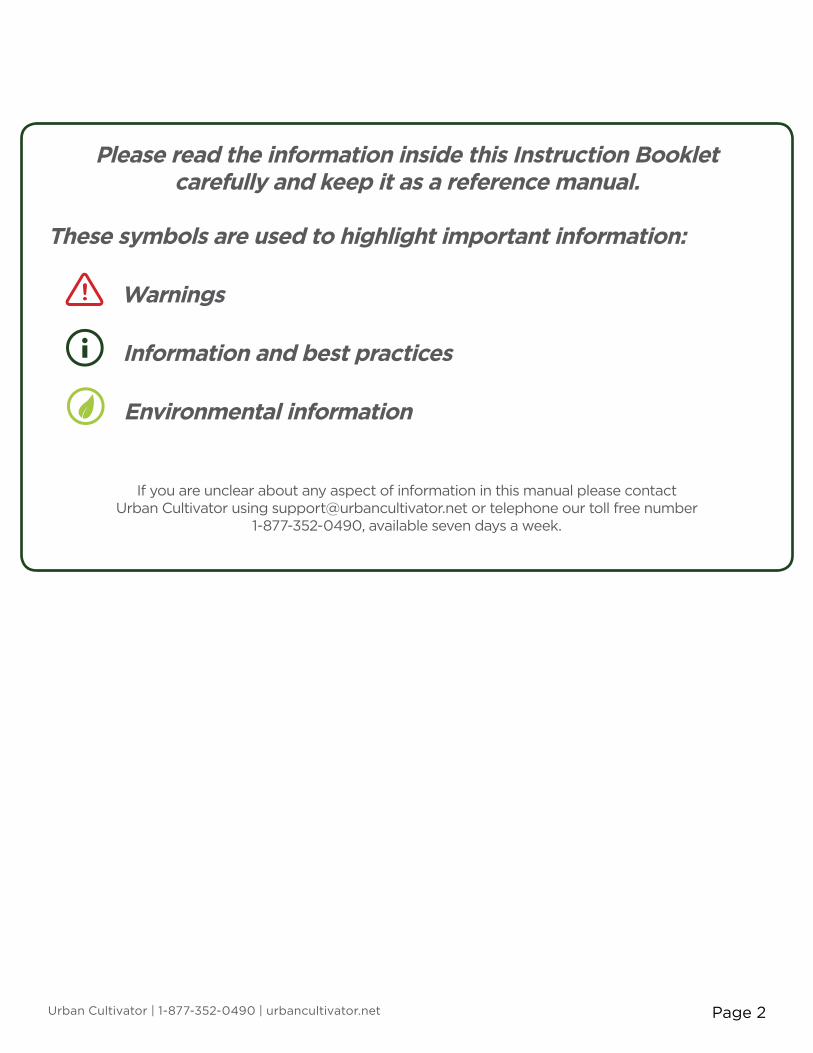
Please read the information inside this Instruction Booklet carefully and keep it as a reference manual.
These symbols are used to highlight important information:
Warnings
Information and best practices
Environmental information
If you are unclear about any aspect of information in this manual please contact Urban Cultivator using [email protected] or telephone our toll free number
1-877-352-0490, available seven days a week.
Page 3Urban Cultivator | 1-877-352-0490 | urbancultivator.net
TM
Technical Specifications
Safety Precautions
Child safety
Safety precautions in daily use
How the Cultivator Works
The touch screen
Password protection
Before You Installl...
Hardware and accessory checklist
Give your Cultivator ample space
Electrical connection
Running the Cultivator for the First Time
Set up the clock
Fill the reservoir
Set up the pH doser
Calibrate the pH sensor
Calibrate the TDS sensor
Water Mover/aerator function
Main water pump function
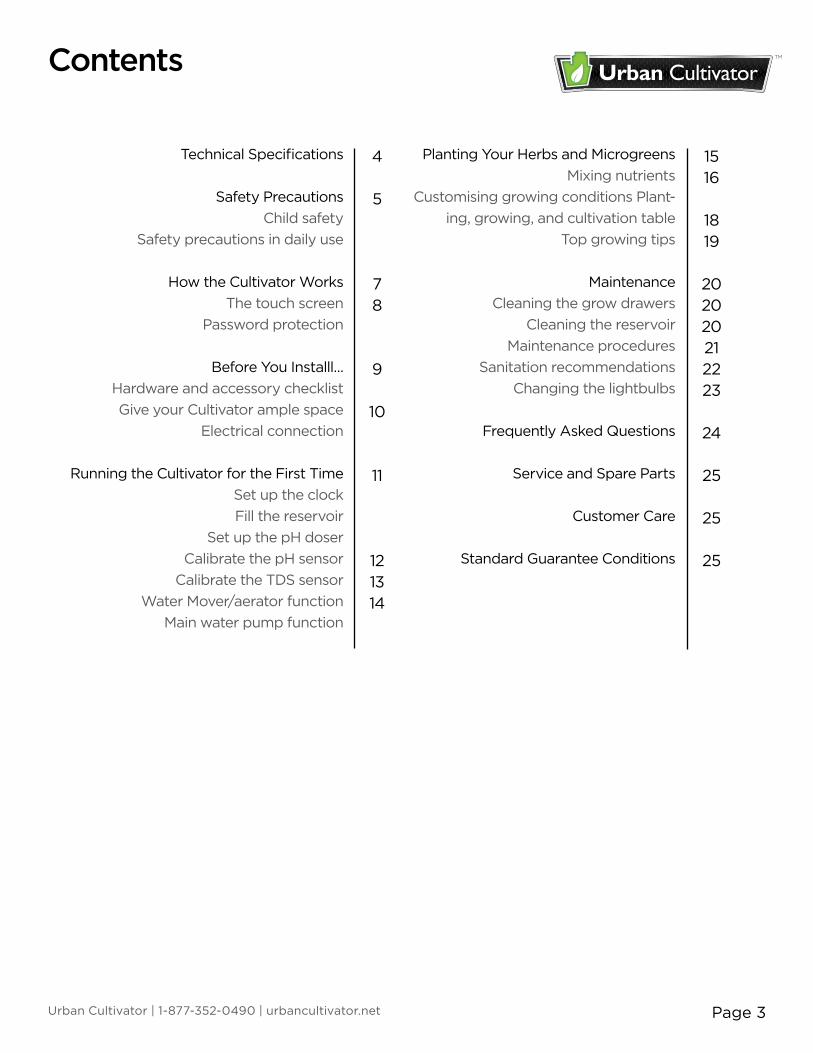
Contents
4
5
78
9
10
11
121314
Planting Your Herbs and Microgreens
Mixing nutrients
Customising growing conditions Plant-
ing, growing, and cultivation table
Top growing tips
Maintenance
Cleaning the grow drawers
Cleaning the reservoir
Maintenance procedures
Sanitation recommendations
Changing the lightbulbs
Frequently Asked Questions
Service and Spare Parts
Customer Care
Standard Guarantee Conditions
1516
1819
202020212223
24
25
25
25

Page 4Urban Cultivator | 1-877-352-0490 | urbancultivator.net
Technical SpecificationsExterior Finish: Powdercoated whiteTemperature Control: Based on room temperature (no compressor)Weight: 545 lbsGrowing Capacity: 16 flatsPlumbing requirements: 1/4” MPT fittingsElectrical requirements: Grounded 110v wall plug (15 Amp Breaker)
65-1/4"1658mm
26-1/4"665mm
52-1/2"1335mm
30-1/2"777mm
27-1/2"696mm
25-3/4"653mm
68-1/2"1740mm 74-3/4"
1898mm 77-3/4"1976mm
25-1/2"650mm
54"1373mm
28-1/4"720mm

Page 5Urban Cultivator | 1-877-352-0490 | urbancultivator.net
Safety PrecautionsUrban Cultivator cares about your safety and your plants. We want you to be familiar with the following safety instructions.
This manual should remain with the Urban Cultivator Commercial appliance so that new owners may learn about the product and relevant safety precautions.
You must carefully read through this instruction manual before installing and using the Urban Cultivator Commercial.
If you are unclear about any aspect of information within please contact Urban Cultivator using [email protected] or telephone our toll free number 1-877-352-0490 available seven days a week.
Child safety• This appliance is designed to be operated by adults.• The water from your Urban Cultivator Commercial is not for drinking.• Keep your Seeds, Nutrients and Growing Mediums in a safe, dry storage area.
The Cultivator’s control panel has a child safety lock. Refer to the Control Panel Table for more information.
Safety precautions in daily use
Contaminated items and/or garbage must not be present in the appliance
• Keep the door closed when not working with the Cultivator.
• Do not remove the grow drawers when the machine is watering. Refer to the Control Panel table for instructions on controlling the watering & lighting schedules.
• Only use products that have been designed to be used with the Urban Cultivator Commercial.
• Do not sit or stand on the open door or grow drawers.
• Always unplug the power cord from the outlet and disconnect the water mains when the Cultivator is not in use. The pH sensor has to be placed back into its case with storage solution when not in use.
• The Urban Cultivator Commercial should be serviced by a licensed professional.
• Use genuine spare parts and supplies that have been provided by Urban Cultivator.
• Any attempts to fix the Urban Cultivator Commercial without an authorised professional can be dangerous and will void your warranty.
• Do not place any items on top of the Urban Cultivator Commercial.
• Be careful when removing the grow drawers as they can weight up to 100 pounds when fully loaded with soil, plants and water.
• When moving your Cultivator, ensure there is no water inside the reservoir. Extra water may cause level issues if left in the Cultivator while being moved.

Page 6Urban Cultivator | 1-877-352-0490 | urbancultivator.net
Whenever you take a grow drawer out be careful of standing water. It can take up to ten minutes for the grow drawer to drain after a watering cycle.
The Cultivator may tip dangerously forward when removing fully loaded grow drawers from the top two levels. The Reservoir should be full with water to avoid this potential tipping hazard. Please secure the Cultivator to the building structure using the strap and fixing provided. See below.
Attach To Wall
Affix Straps To Top Body Screws
WARNINGThe Cultivator could tip
dangerously forward.
Do not use the Cultivator until it is fully installed.
Page 7Urban Cultivator | 1-877-352-0490 | urbancultivator.net
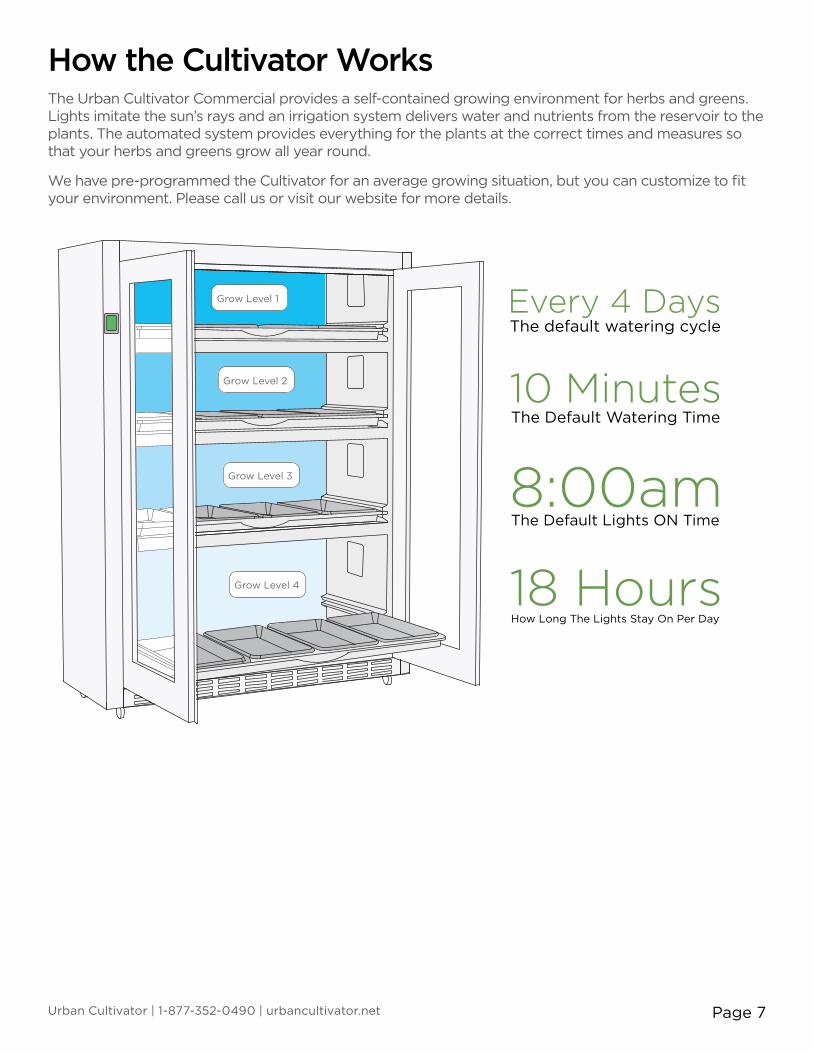
How the Cultivator WorksThe Urban Cultivator Commercial provides a self-contained growing environment for herbs and greens. Lights imitate the sun’s rays and an irrigation system delivers water and nutrients from the reservoir to the plants. The automated system provides everything for the plants at the correct times and measures so that your herbs and greens grow all year round.
We have pre-programmed the Cultivator for an average growing situation, but you can customize to fit your environment. Please call us or visit our website for more details.
Grow Level 4
Grow Level 3
Grow Level 2
Grow Level 1 Every 4 DaysThe default watering cycle
The Default Watering Time
The Default Lights ON Time
10 Minutes
8:00am
How Long The Lights Stay On Per Day
18 Hours

Page 8Urban Cultivator | 1-877-352-0490 | urbancultivator.net
Touch screenThe liquid crystal touch screen enables you to control the Cultivator’s functions and allows the Cultivator to communicate watering, lighting, temperature, relative humidity and nutrient data back to you. Below is an illustration of the status screen of the program.
Password protection
The main menu is password protected. If you’ve forgotten your password, you may also use the master password: 1821

Page 9Urban Cultivator | 1-877-352-0490 | urbancultivator.net
Before You Install...Hardware and accessory check listPlease check that all the components for your Urban Cultivator Commercial are accounted for and that none have been damaged in shipping. Please refer to the Checklist provided.
1
2
5
4
9
1. Touch Screen Control
2. Grow Drawers (x4)
3. Reservoir Cover
4. Castor Wheels x4 (front 2 are lockable)
5. Splash Plates (x3)
6. Grow Trays (x16)
7. Humidity Domes (x16)
8. Grow Lights (x16 installed x4 extra)
9. Consumable's (seeds, nutrients, 2x packs of soil screens, pH down bottle, pH Bu�er #4, pH Bu�er #7, EC PPM, Storage Solution).
Component Names
6 7
8
3
Check the unit for any shipping damage. Never connect or start growing with a damaged machine. Please contact us if your Urban Cultivator Commercial is damaged.

Page 10Urban Cultivator | 1-877-352-0490 | urbancultivator.net
Give your Cultivator ample spaceAll plumbing and electrical work should be done by a certified professional. To successfully install the Cultivator you need to:
• Position the Cultivator on level ground so that the water inside flows evenly and lock the front two castor wheel brakes so the unit doesn’t move when the doors and grow drawers are operated.
• Leave at least 36 inches at the front of the Cultivator for the doors, drawers and yourself.
• Allow at least a 2-6 inch ventilation gap from the top of the Cultivator to the ceiling.
• Connect the city water supply and city drain to the 1/4-inch NPT female fittings at the back left of the Cultivator. See the photograph below.
• City water connection must not be further than 10 feet from the Urban Cultivator Commercial and no higher than 6 feet from the Urban Cultivator Commercial connections.
• The 120V (240V outside of North America) electrical outlet should be within 6 feet from the Cultivator.
Pipes that have not been in regular use should be cleaned with running water before connecting the Urban Cultivator Commercial.
Make sure that the water inlet hose is not twisted, crushed, entangled or leaking in any way. Do not use connection hoses that have been used previously by other appliances.
If building the unit into a wall or stucture, please ensure that unit can be easily moved for access to the back panel. The back panel is needed for upgrades and maintenance.
City Fill Connection1/4" NPT female fitting
City Drain Connection1/4" NPT female fitting
WARNINGThe Cultivator could tip
dangerously forward.
Do not use the Cultivator until it is fully installed.
Electrical connection
The Urban Cultivator Commercial must be grounded (i.e. connected to the earth). Urban Cultivator does not accept any responsibilty should this safety measure not be followed.
Electricity can be dangerous and an unsafe plug inserted into a power socket could result in a serious safety hazard. Do not connect the Urban Cultivator Commercial via an extension cable.
Ensure that the plug is accessible after the Cultivator has been installed.

Page 11Urban Cultivator | 1-877-352-0490 | urbancultivator.net
Running the Cultivator for the First TimeNote: the appliance must be plugged in and plumbed by a professional.Follow the steps below to setup your Cultivator for the first time. The MENU Password is 1821.
1. Set up the clock• Press MENU , > , then OPTION . Set your “Date,” “Time,” and “Format.”
• Press SAVE and return to the setup menu.
Ensure water lines are hooked up first (see page 9)
2. Fill the reservoir• Remove the lower grow drawer and reservoir cover to access the pH Bottle Shelf.
• Press MENU , SET RESERVOIR , Stand Alone Mode and Change To City to switch to city water mode.
• Press FILL and check to make sure the water is filling into the reservoir.
• Once full, the Cultivators onboard computer will maintain a constant water level.
Ensure reservoir is free of dirt and foreign objects before filling.
3. Set up the pH doser• Remove the lower grow drawer and reservoir cover to access the pH Bottle Shelf.
• Place the pH Down bottle (#1) into the shelf (see arrow below) replacing its bottle cap with the one fixed to the Cultivator with a hose (#2).
21
3
1
2
3
pH Down Bott le. Remove the Cap and place the bott le into the hole.
I nser t the tube into the pH Down Bott le and t ighten the cap.
Cult ivators pH Dosing L ine
• Press MENU , SET RESERVOIR , PH SENSOR then press PRIME PUMP once or twice until you see a single drop come out from the Cultivators pH Dosing Line. Refer to the photograph above.
Due to customs regulations, we may not be able to ship pH down to your area. In preparation for this situation we have included an empty bottle with fittings. Please source pH Down locally.

Page 12Urban Cultivator | 1-877-352-0490 | urbancultivator.net
4. Install and calibrate the pH sensor
To enter the pH calibration screen, press MENU , Set RESERVOIR , pH SENSOR , CALIBRATE
Attach The pH Sensor CableTo the Port On The Left Reservoir Wall
Remove cap and gently wash the pH probe in the water and dry on a cloth
Fill one cup of water, one of pH Bu�er #4, and one of pH Bu�er #71
3 Gently swish the probe in pH Bu�er #4 and press4
2
60Sec
#4
#4 #7Water
Water
Repeat steps 3 and 4 for pH Buffer #7 Solution.
Attach PH probe to reservoir wall using suction cup.
Safely store the pH Sensor cap and use it to stop the sensor from drying out when the Cultivators Reservoir is empty. Do not let the pH Sensor dry out as it will void your warranty.
CALIBRATE 4
Page 13Urban Cultivator | 1-877-352-0490 | urbancultivator.net
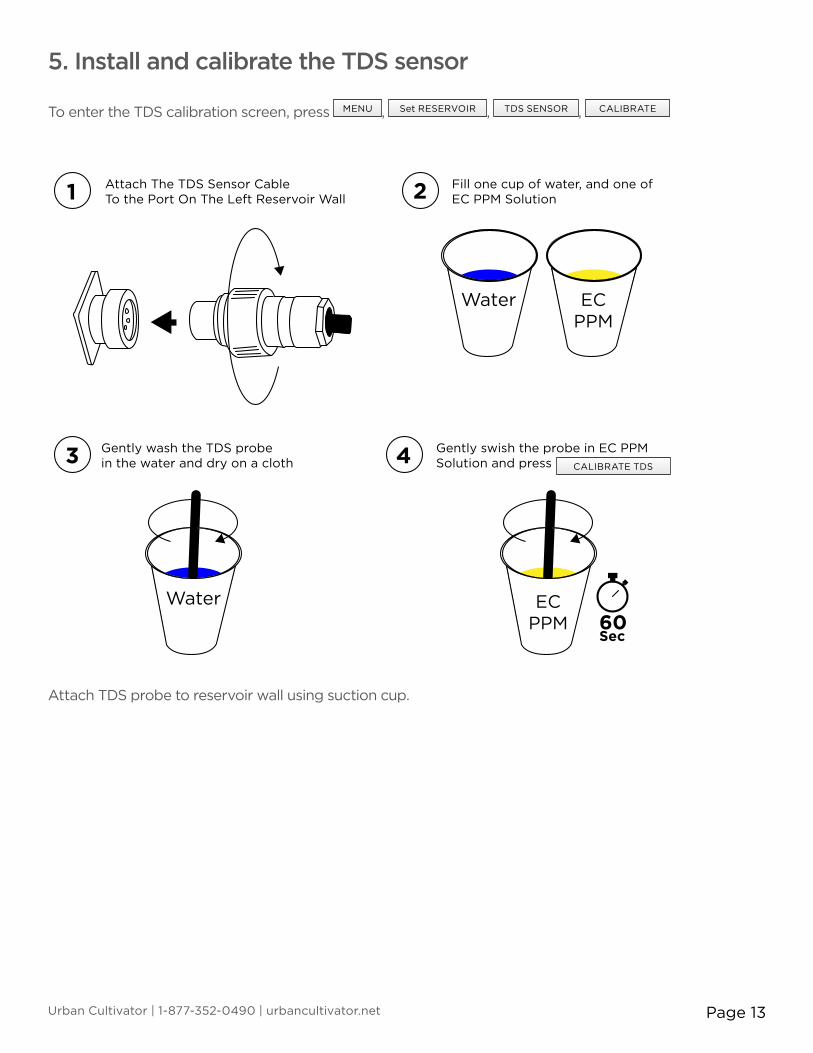
5. Install and calibrate the TDS sensor
To enter the TDS calibration screen, press MENU , Set RESERVOIR , TDS SENSOR , CALIBRATE
1 Attach The TDS Sensor CableTo the Port On The Left Reservoir Wall
Fill one cup of water, and one ofEC PPM Solution2
ECPPM
Water
Gently wash the TDS probein the water and dry on a cloth3 Gently swish the probe in EC PPM
Solution and press4
60Sec
Water ECPPM
Attach TDS probe to reservoir wall using suction cup.
CALIBRATE TDS

Page 14Urban Cultivator | 1-877-352-0490 | urbancultivator.net
6. Ensure water mover/aerator is functioning• Check that the level of water is above 50%. If there is no movement of water or air bubbles
happening, grab the water mover (6 in image below) and shake out the air bubble till it starts operating.
• If there is still no movement of water or air bubbles: 1. Clean out the intake strainer of any seeds or debris2. Pull off the small clear air intake line and unscrew the out take fitting3. Clean out any debris/seeds inside the fitting and re-screw back onto the pump and re-insert the
clear tube
7. Ensure that your water pump is primed before operating. Please follow these steps:
A: ACCESS RESERVOIR
1. Remove the bottom grow tray. 2. Slide out the lid as shown in Figure 1 to gain
access to the reservoir.
Figure 1
B: FILL RESERVOIR
1. Make sure that the unit has been connected to the water and power as per the local codes.
2. Press the touchscreen and enter: 1821
3. Next go to MENU > SET RESERVOIR > FILL.
4. Wait until the Reservoir is full with water.
5. Press touchscreen MENU > SET WATER > Press the water icon on LEVEL 4
6. At this point the priming valve will be in the open position and water will be flowing downwards into the reservoir.
Figure 2
Figure 3
C: CLOSE VALVE
1. Wait for steady stream of water to come out of the tube marked by the blue arrow (Figure 2).
2. Turn the valve to its off position as shown in Figure 3.
3. The water should now be flowing at a steady rate on Level 4.

Page 15Urban Cultivator | 1-877-352-0490 | urbancultivator.net
Planting Your Herbs and Microgreens
PUT SOIL IN TRAY AND SMOOTH
Soil-Free Grow Mat
Sunshine #4or
Premier HP Soil
*
2
Ensure Vents Are Tightly Closed
PUT SOIL IN TRAY AND SMOOTH
Soil-Free Grow Mat
Sunshine #4or
Premier HP Soil
*
2
Ensure Vents Are Tightly Closed
PUT SOIL IN TRAY AND SMOOTH
Soil-Free Grow Mat
Sunshine #4or
Premier HP Soil
*
2
Ensure Vents Are Tightly Closed
PUT SOIL IN TRAY AND SMOOTH
Soil-Free Grow Mat
Sunshine #4or
Premier HP Soil
*
2
Ensure Vents Are Tightly Closed
PUT SOIL IN TRAY AND SMOOTH
Soil-Free Grow Mat
Sunshine #4or
Premier HP Soil
*
2
Ensure Vents Are Tightly Closed
PUT SOIL IN TRAY AND SMOOTH
Soil-Free Grow Mat
Sunshine #4or
Premier HP Soil
*
2
Ensure Vents Are Tightly Closed
*Screen not needed for Residential OR soil free grow mat
Amount of seed
1 tsp
1 tsp
½ cup
1 tbsp
2 tbsp
2 tbsp
¼ cup
1 tbsp
1 tbsp
1 tbsp
2 tsp
21
35
14
7
14
14
21
21
14
14
14
30
7
14
7
14
30
14
14
7
7
7
2 tsp
½ cup
1 tbsp
½ cup
2 tbsp
1 tbsp
2 cups
2 tbsp
2 tbsp
1 cup
2 cups
Cabbage
Dill
Flax
Komatsuna
Lemon Balm
Lentils
Mustard
Nasturtium
Onion
Parsley
Pea Shoots
Peppercress
Radish
Sunflower
Wheat Grass
Optimal pH level is 5.0 - 7.0
PUT THE HUMIDITY DOME BACK ON (if necessary)
TWO WAYS TO HARVEST
Thin out greens and useas they grow
Harvest all greens
TWO WAYS TO HARVEST
Thin out greens and useas they grow
Harvest all greens
Please refer to the sanitation guidelines and recommendations page in this manual for safety tips to observe while harvesting.
Press then set water schedule according to the seed guide.
PUT SOIL IN TRAY AND SMOOTH
Soil-Free Grow Mat
Sunshine #4or
Premier HP Soil
*
2
Ensure Vents Are Tightly Closed
Water this level
Edit the watering schedule
The current settings for this level
Save your changes
1 PER 4 DAYSFOR 10 MINUTES

Page 16Urban Cultivator | 1-877-352-0490 | urbancultivator.net
Mixing nutrients
• Your Commercial unit will tell you the amount of nutrients in your reservoir. This is the “TDS” reading on your touchscreen.
• When TDS is 0, add 80 mL of nutrients into the reservoir through the hole in the reservoir lid.
• Ideal TDS is 100 to 250. If TDS gets low, add nutrients in 60 mL increments every 15 minutes until TDS reads 100 - 250.
Customising growing conditions for each grow level
The “Set Fan” Menu
The fans are controlled by the temperature setting on your unit. Choosing a lower temperature will cause the fans to turn on more often to try and maintain that temperature. Choosing a higher temperature will cause the fans to stay off for a longer period of time.
Note: There is no heater or air conditioning in the unit. The unit’s ability to reach a set temperature depends on the temperature of your room.

Page 17Urban Cultivator | 1-877-352-0490 | urbancultivator.net
The “Set Water” Menu
You can customize the watering schedule of each level to suit your needs. We recommend not changing these settings unless you are familiar with the needs of the plants you are growing.
Water this level
Edit the watering schedule
The current settings for this level
Save your changes
The “Set Lights” MenuYou can customize the lighting schedule of each level. You can set the lights to be on 12 hours per day, 18 hours per day, 24 hours per day, or to be always off.
Change this level’s settings
The current settings for this level
The time that the system turns on
Save your changes
Page 18Urban Cultivator | 1-877-352-0490 | urbancultivator.net
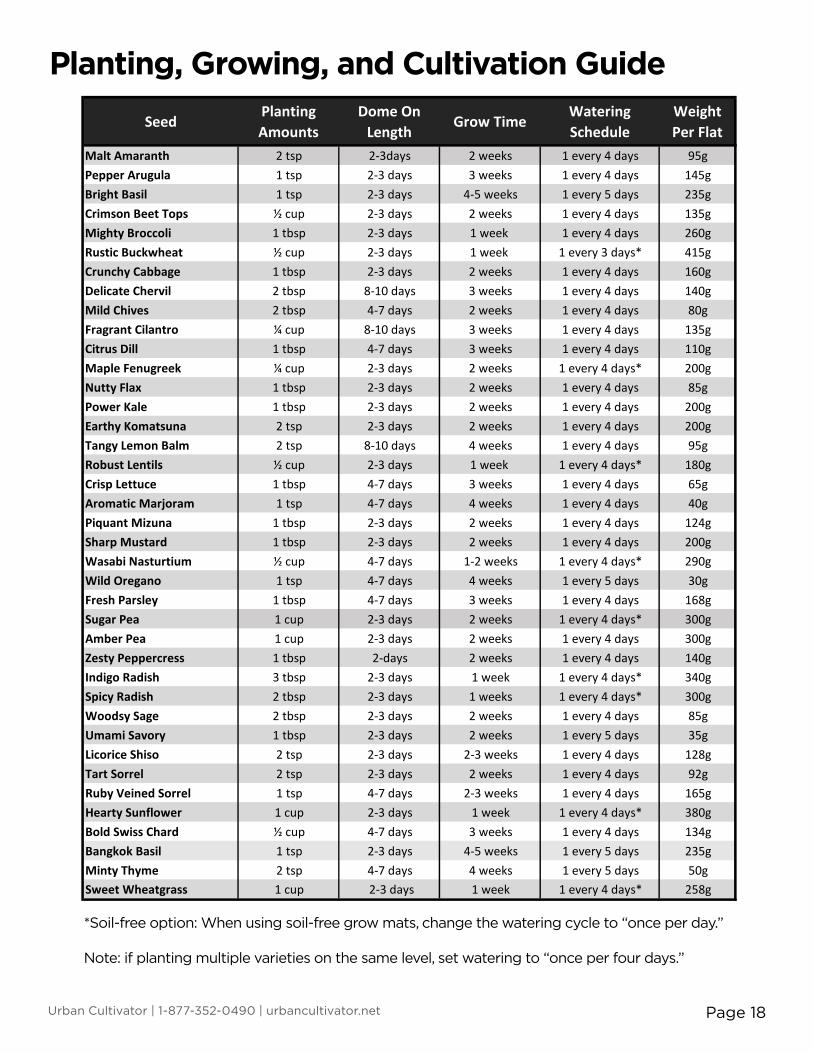
Planting, Growing, and Cultivation GuideSeed Planting
AmountsDome On
Length Grow Time Watering Schedule
Weight Per Flat
Malt Amaranth 2 tsp 2-3days 2 weeks 1 every 4 days 95gPepper Arugula 1 tsp 2-3 days 3 weeks 1 every 4 days 145gBright Basil 1 tsp 2-3 days 4-5 weeks 1 every 5 days 235gCrimson Beet Tops ½ cup 2-3 days 2 weeks 1 every 4 days 135gMighty Broccoli 1 tbsp 2-3 days 1 week 1 every 4 days 260gRustic Buckwheat ½ cup 2-3 days 1 week 1 every 3 days* 415gCrunchy Cabbage 1 tbsp 2-3 days 2 weeks 1 every 4 days 160gDelicate Chervil 2 tbsp 8-10 days 3 weeks 1 every 4 days 140gMild Chives 2 tbsp 4-7 days 2 weeks 1 every 4 days 80gFragrant Cilantro ¼ cup 8-10 days 3 weeks 1 every 4 days 135gCitrus Dill 1 tbsp 4-7 days 3 weeks 1 every 4 days 110gMaple Fenugreek ¼ cup 2-3 days 2 weeks 1 every 4 days* 200gNutty Flax 1 tbsp 2-3 days 2 weeks 1 every 4 days 85gPower Kale 1 tbsp 2-3 days 2 weeks 1 every 4 days 200gEarthy Komatsuna 2 tsp 2-3 days 2 weeks 1 every 4 days 200gTangy Lemon Balm 2 tsp 8-10 days 4 weeks 1 every 4 days 95gRobust Lentils ½ cup 2-3 days 1 week 1 every 4 days* 180gCrisp Lettuce 1 tbsp 4-7 days 3 weeks 1 every 4 days 65gAromatic Marjoram 1 tsp 4-7 days 4 weeks 1 every 4 days 40gPiquant Mizuna 1 tbsp 2-3 days 2 weeks 1 every 4 days 124gSharp Mustard 1 tbsp 2-3 days 2 weeks 1 every 4 days 200gWasabi Nasturtium ½ cup 4-7 days 1-2 weeks 1 every 4 days* 290gWild Oregano 1 tsp 4-7 days 4 weeks 1 every 5 days 30gFresh Parsley 1 tbsp 4-7 days 3 weeks 1 every 4 days 168gSugar Pea 1 cup 2-3 days 2 weeks 1 every 4 days* 300gAmber Pea 1 cup 2-3 days 2 weeks 1 every 4 days 300gZesty Peppercress 1 tbsp 2-days 2 weeks 1 every 4 days 140gIndigo Radish 3 tbsp 2-3 days 1 week 1 every 4 days* 340gSpicy Radish 2 tbsp 2-3 days 1 weeks 1 every 4 days* 300gWoodsy Sage 2 tbsp 2-3 days 2 weeks 1 every 4 days 85gUmami Savory 1 tbsp 2-3 days 2 weeks 1 every 5 days 35gLicorice Shiso 2 tsp 2-3 days 2-3 weeks 1 every 4 days 128gTart Sorrel 2 tsp 2-3 days 2 weeks 1 every 4 days 92gRuby Veined Sorrel 1 tsp 4-7 days 2-3 weeks 1 every 4 days 165gHearty Sunflower 1 cup 2-3 days 1 week 1 every 4 days* 380gBold Swiss Chard ½ cup 4-7 days 3 weeks 1 every 4 days 134gBangkok Basil 1 tsp 2-3 days 4-5 weeks 1 every 5 days 235gMinty Thyme 2 tsp 4-7 days 4 weeks 1 every 5 days 50gSweet Wheatgrass 1 cup 2-3 days 1 week 1 every 4 days* 258g
*Soil-free option: When using soil-free grow mats, change the watering cycle to “once per day.”
Note: if planting multiple varieties on the same level, set watering to “once per four days.”

Page 19Urban Cultivator | 1-877-352-0490 | urbancultivator.net
Top Growing Tips
Do Keep the Right Room Temperature and Humidity LevelsKeep your room temperature between 55°F and 90°F (13°C and 32°C), and humidity levels between 30% and 60%.
Do Keep Everything CleanKeep your growing environment clean. Clean your reservoir, reservoir filter, and grow drawers every month, and rinse out the filter inside the grow drawers every week or two.
Don’t OverwaterDon’t overwater your plants, especially at the beginning of their lives, as it may bring on mould and mildew. We have factory set the watering levels for once every four days, but this will vary depending on what your ambient temperature and humidity is.
Do Use the Humidity Domes During GerminationUse the humidity domes to increase temperature and humidity in the grow trays when germinating seeds. Keep the domes on for the first two or three days after the seeds have been planted with the air vents closed.
Do Use Proper Soil or PadsWe highly recommend the soil brands Sunshine #4 or Premiere HP. You can use other mediums, such as our Versapak fabric sheets, but we have found better results with soil.
Don’t Add Too Much NutrientsOverfeeding can cause damage to the plants listed in our Planting, Growing, and Cultivation Table. For best re-sults refer to the instructions on the back of your nutrient bottle.
Most quick-growing microgreens (one to two weeks) do not require any nutrients. Only longer growing greens (herbs, arugula, etc) require nutrients, and should only be added after week one or two at the earliest.
Do Keep pH Levels Between 5 and 7Balance your pH level at 5 for optimal results, as the pH will increase throughout the week.
Do Sow Seeds a Little Heavy and Thin Out Young PlantsPluck out young plants to allow others to grow and fill out.
Do Use Hydrogen PeroxideIf you accidentally keep your humidity domes on too long or overwater your plants, and your plants develop powdery mildew, you can spray them with Hydrogen Peroxide and water (1 tbsp of 17%-35% food-grade hydrogen peroxide to 1L of water). Only spray the soil, though, as this can cause your plants to rot in on themselves
Do Love Your PlantsTake time and care with your plants. Give them the proper attention by checking for mold or signs of stress.
Page 20Urban Cultivator | 1-877-352-0490 | urbancultivator.net
MaintenanceCleaning the grow drawers
Clean your grow drawers between each harvest however you should immediately clean mould or unwant-ed organic matter.
Do not use any chemically damaging or unhealthy cleaning products such as bleach. Using chemical cleaning products may be toxic and could potentially erode the grow drawers. You can use 30% Hydrogen Peroxide to clean the reservoir and water lines (5 tsp per gallon). Read all warning labels on the H202 labels.
Keep your growing environment clean. Clean your Reservoir, Reservoir Filter and grow drawers every month and rinse out the filter inside the grow drawers every week or two weeks.
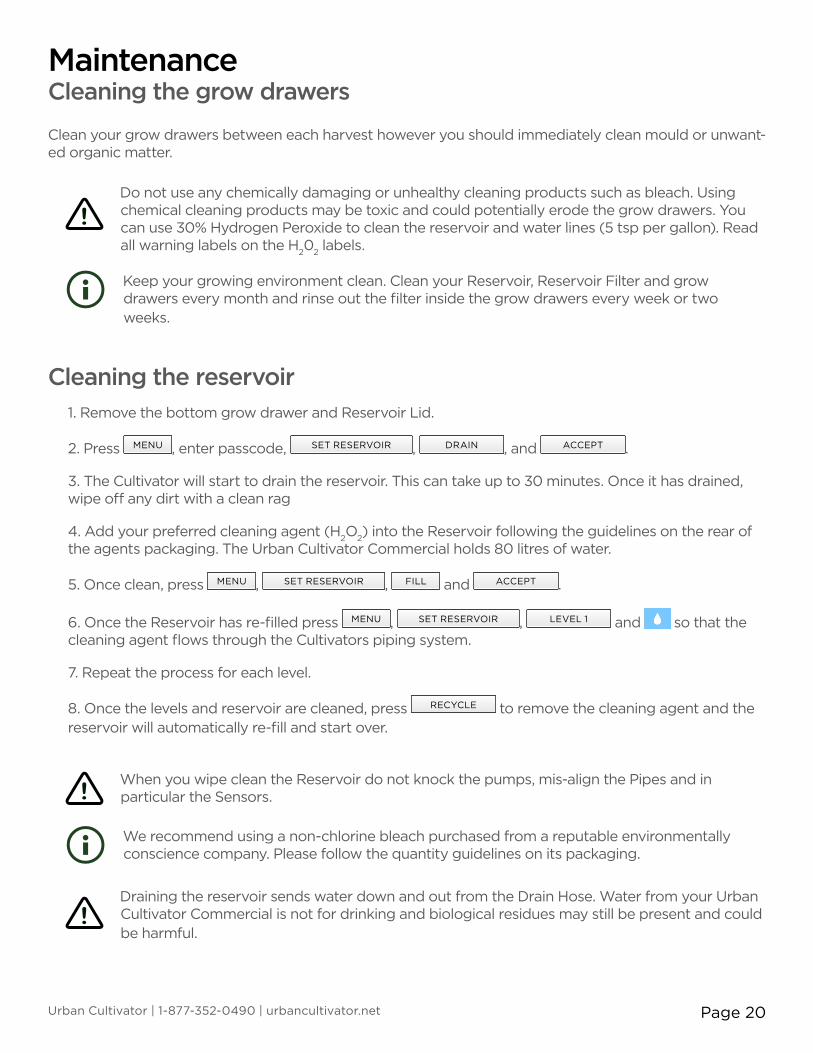
Cleaning the reservoir1. Remove the bottom grow drawer and Reservoir Lid.
2. Press MENU , enter passcode, SET RESERVOIR , DRAIN , and ACCEPT .
3. The Cultivator will start to drain the reservoir. This can take up to 30 minutes. Once it has drained, wipe off any dirt with a clean rag
4. Add your preferred cleaning agent (H2O2) into the Reservoir following the guidelines on the rear of the agents packaging. The Urban Cultivator Commercial holds 80 litres of water.
5. Once clean, press MENU , SET RESERVOIR , FILL and ACCEPT .
6. Once the Reservoir has re-filled press MENU , SET RESERVOIR , LEVEL 1 and so that the cleaning agent flows through the Cultivators piping system.
7. Repeat the process for each level.
8. Once the levels and reservoir are cleaned, press RECYCLE to remove the cleaning agent and the reservoir will automatically re-fill and start over.
When you wipe clean the Reservoir do not knock the pumps, mis-align the Pipes and in particular the Sensors.
We recommend using a non-chlorine bleach purchased from a reputable environmentally conscience company. Please follow the quantity guidelines on its packaging.
Draining the reservoir sends water down and out from the Drain Hose. Water from your Urban Cultivator Commercial is not for drinking and biological residues may still be present and could be harmful.

Page 21Urban Cultivator | 1-877-352-0490 | urbancultivator.net
Maintenance Procedure and Tips
A B
C
D
E
F
G
1. Empty reservoir of all plant material. 2. Drain reservoir. 3. Use a clean cloth with hot soapy water or
a spray solution of hydrogen peroxide to wipe down the entire interior.
4. Fill reservoir half-full with fresh water.5. Add 800mL of 35% hydrogen peroxide to
the reservoir6. Run the machine for each level as you
would to water. 7. Once that is complete press ‘Recycle’ to
drain and fill the reservoir with fresh new water.
A-D: Inside the reservoirA. DRAIN, CLEAN, AND FLUSH RESERVOIR
B. CHANGE FILTER
1. Locate the filter (large blue or white canister in the middle of the reservoir) and unscrew the canister clockwise.
2. Remove and discard excess water. 3. Clean or change the filter and screw the
canister back into place. You may need to re-prime the pump after this process. Please refer to our instructions on how to prime the pump.
D. CHECK WATER MOVER / AERATOR
1. Locate the water mover/aerator (black pump attached to the right side of the reservoir wall).
2. Check the outtake nozzle to ensure it is clear of debris.
3. Check the water intake tube and the green filter at the end to ensure it is clear of debris.
E-F: Inside the grow levels
F. CLEAN FAN SCREENS
(every month)E. CLEAN DRAWERS
1. Remove the grow drawer from the Cultivator. 2. Use a clean cloth with hot soapy water or
hydrogen peroxide solution to wipe down the grow drawer.
3. Rinse off the drawer to wash away any residual cleaning solution.
4. Remove the drawer filter sponge and wash in hot, clean soapy water or hydrogen peroxide solution.
5. Rinse and replace in the grow drawer.
1. Remove the fan screen cover on each level to access the fan screen filter.
2. Clean off the dust and debris and replace.
(every month)
(every month)
(every month)
(once per year - more often in areas with hard water.)
C. CHECK AND CLEAN FILTER CAP(every month)
1. Remove the small white cap at the bottom of the blue pump (the pump is the smaller blue cylinder attached to the larger blue or white water filter canister).
2. Rinse the cap.3. Replace the cap back on the pump.
G. CLEAN DRAWER FILTER
1. Remove the black sponge filter from drawer2. Soak in 35% hydrogen peroxide + water solution -
see instructions on bottle for dilution rate.3. Rinse clean.4. Replace in grow drawer.
(every month)

Page 22Urban Cultivator | 1-877-352-0490 | urbancultivator.net
At Urban Cultivator your health and safety is our number one concern. We want to ensure that a healthy lifestyle is available for everyone. Please read the information below regarding sanitation, growing, and food safety.
People have been concerned about food safety—and naturally so, considering recent reports of food poisoning in Europe. Many people are hesitant to eat uncooked sprouts as they seem to have been the source of the outbreak. You will be happy to know that microgreens are a safe alternative to sprouts.
Microgreens are not sprouts, but rather, baby plants that are intensely flavorful and loaded with nutrients. There are differences in growing and harvesting microgreens that make them much safer than sprouts.
Starting with SeedsMake sure that all seeds you buy have been handled as a food crop and not a farm planting seed crop. Seeds that have been in contact with animals or animal waste could be contaminated with salmonella or E. coli O157 H7, leading to food poisoning. Reputable sprouting seed suppliers test all lots of seed for contamination.
At Urban Cultivator, we follow the steps for all of our seed, as recommended by the CFIA’s Code of Practice for the Hygienic Production of Sprouted Seeds1:
“We insist that our seed producers adopt GAP (Good
Agricultural Practice) and provide evidence that the product was grown according to section 3 of this Code.”
We have obtained certificates of analysis for microbial pathogens of concern from our seed producers or distributors for each incoming lot.
We maintain a documented history of our seed suppliers’ adherence to specifications (e.g. analytical results, GAP records, etc.).
Each bag of seed is labelled with the name of the seed producer or distributor, the lot number, and the country of origin.
Records are kept to facilitate trace-back and recall procedures.
SanitationAlways use clean seed (as stated above) and soil, tested for salmonella and E. coli contamination.
Sanitize equipment; regularly clean and sanitize all trays,
machine and reservoir with the hydrogen peroxide rate recommended below. We recommend a thorough cleaning/disinfecting weekly, or when new trays are planted.
Don’t let sprouts or seed come in contact with manure, etc.
that may have bacterial contamination.
Hands and equipment must be clean at all times for handling microgreens.
Water in your reservoir should be clean, potable water, tested for bacterial contamination.
CFIA has approved 2% chlorine from Calcium Hypochlorite as a seed sanitation method before sprouting; this is not necessary for microgreens, but can be done as an extra precaution. Ensure that there are no residual remains on finished sprouts or greens.
Rate: 85 mL Calcium Hypochlorite in 3.75 L of warm water. Mix thoroughly, and soak the seed for 20 minutes. Rinse seed thoroughly in clean water, then finish soaking time in clean water. Avoid breathing the fumes of chlorine. Masks should be worn to filter out the fumes if you choose this method. This method is extensive for the home owner growing microgreens and not necessary; it is instead recommended for sprout growers.
Alternative to using Calcium Hypochlorite:
Soak seeds in hydrogen peroxide. Add 140 mL of 5% hydrogen peroxide (20 mL if using 35% peroxide) and 20 mL of vinegar to 1L of room temperature water. Pour the solution over the seed, and let stand for 5 minutes. Make sure all of the seed is in contact with the solution. Drain and rinse the seeds several times to ensure that all of the solution has been removed. Next, plant seed as usual. This again is recommended for sanitizing seed before sprouting, and not necessary for microgreens.
Growing ConditionsThe environment in which the E. coli and salmonella pathogens thrive is warm and moist. Most commercial sprouts are grown in large tanks of water, which tumble the seeds much like a washing machine tumbles clothes. In these conditions, if one sprout becomes contaminated, it will be spread to all the other sprouts in the water bath.
Microgreens are not grown in water. We recommend growing them in sterile soil or another sterile media. While a sprout bath spreads pathogens from one sprout to another, soil acts like a filter, actually removing the source of contamination.
HarvestingWhile a sprout is consumed with the whole root system, seed and all, microgreens are new, small plants, just like you would find in your garden very early after seed germination. All microgreens should be harvested with clean hands, clipped at least 4 cm away from the root system and away from soil using clean, disinfected scissors (a simple wipe with hydrogen peroxide will disinfect them). Ensure all visible debris is removed from microgreens and cleaned thoroughly before consumption.
Refrigerate cut microgreens. Treat microgreens and foods containing them as you would any nutritious food.
If you love sprouts, consider microgreens. Their bright and intense flavor profiles will be much more enjoyable now that you have confidence over the fact that they are also safe to enjoy.
Sanitation and Food Safety Recommendations

Page 23Urban Cultivator | 1-877-352-0490 | urbancultivator.net
Installing/replacing the lightsThe 16 grow lights have been pre-installed in your Cultivator. To replace a grow light, follow these steps:
Your Urban Cultivator Commercial comes with 16 grow lights and four replacements.
Do not use UV rated lights.
1. Turn black knobs located above the very top shelf of the Cultivator counter-clockwise to remove
2. Gently pull the plastic light cover out from Cultivator
3. Carefully insert each florescent tube straight into the socket
4. Gently twist lights a quarter turn to lock them in place
5. Replace the plastic light cover back, and screw back on the black knobs
2
x16
1

Page 24Urban Cultivator | 1-877-352-0490 | urbancultivator.net
Frequently Asked QuestionsHow many trays will I get out of one of my seed containers?You will get four flats out of every Urban Cultivator seed containers. You can plant heavy and thin out young plants and use as you go or plant more flats thinner and let them grow out before you harvest. Try using the shaker to sow seeds evenly.
How much soil should I put in my trays?You should fill each tray ½ to ¾ with our recommended potting soil (Sunshine #4 and Premiere HP). ½ full for shorter life cycle (1-2 weeks) plants such as peashoots, wheatgrass, etc. Fill your tray ¾ full when planting longer life cycle (2-14 weeks) plants such as basil, oregano, arugula, etc.
Do I mix in my seeds or cover them with dirt?We have found great results by covering the newly sown seeds with a light dusting of soil that’s been shifted through a regular strainer. The finer soil spreads nicely and makes a protective blanket during germination. Sow your seeds over the soil and cover with a fine layer of sifted soil.
When should I use plant nutrients?Your cultivator will display the TDS (Total Disolved Solids) of the water in the reservoir. Make note of what the TDS is when you first fill the reservoir and try to maintain a TDS of 100-250 above that number. Add 80ml of nutrients at a time and wait 15 minutes to adjust TDS.
What is the password for the child lock screen?1821 or your own personal 4 digit password.
Is my Cultivator pre-programmed?Yes, it comes pre-programmed for an average growing environment and an average for all plants needs. To set it to your environment or specific plant’s needs check the manual, call our support line or check urbancultivator.net/videomanual
How often should I do maintenance on my cultivator?Maintenance should be done once a month. Please refer to the maintenance procedures outlined in this manual.
Does my water reservoir keep itself filled?Yes, if you received your Cultivator with City Hook-up capabilities and have it plumbed in, then it is pre-programmed to exchange the water in the reservoir once a week and top up as needed.
What do I do if my reservoir won’t recycle?Check to ensure the connection on your city drain is open and free of blockage. If the cultivator is new it may not be primed. Please refer to the pump priming instructions located in this manual.
What do I do if my level won’t water?Make sure another level is not currently being watered. Ensure that the level is set into a schedule and not in Always Off. If still no watering, get access to your reservoir and insure the pump is on and primed, as listed above.

Page 25Urban Cultivator | 1-877-352-0490 | urbancultivator.net
Service and Spare PartsPlease call our toll free number 1-877-352-0490 or email [email protected] if you think there is a problem with your Urban Cultivator Commercial.
Customer CareIn the event that your Urban Cultivator Commercial requires service, or you wish to purchase plant supplies and spare parts please call us toll free on 1-877-352-0490 or email [email protected].
Please provide the following information when you are calling to arrange for an engineer or return of goods:
• Your name, address, zip number or postal code.
• Your contact telephone number and best time to be reached.
• Clear and concise details of the problem.
• The purchase date and name of the sales representative who sold you the unit.
• Serial # (this is located on the back of your machine)
Standard Guarantee ConditionsUrban Cultivator Limited guarantee that if within 12 months (labour) or within 3 years (parts) of the date of purchase this Urban Cultivator Commercial appliance or any part thereof is proved to be defective due to faulty workmanship or materials, we will, at our option repair or replace the same FREE OF CHARGE for labour, materials or carriage on condition that:
• The Urban Cultivator Commercial has been correctly installed and used only on the electricity supply stated on the rating plate.
• The Urban Cultivator Commercial has been used in accordance to the manufacturer’s instructions.
• The Urban Cultivator Commercial has not been tampered with by any person not authorised by us.
• All service work under this guarantee must be authorised by Urban Cultivator.
• Any appliance or defective component shall become the property of Urban Cultivator.
• This guarantee is in addition to your statutory and other legal rights.
• Urban Cultivator DOES NOT warranty light bulbs.
Connect With Us
/urbancultivator @urban.cultivator @urbancultivator