the sierra avalanche center is a 501(c)(3) not for profit · avalanche gear for everyone is a must,...
TRANSCRIPT


The Sierra Avalanche Center is a 501(c)(3) not for profit organization, whose mission is to inform and educate the public about backcountry avalanche conditions in the greater Lake Tahoe area.
Copyright 2018 by the Sierra Avalanche Center
All rights reserved. No portion of this work may be reproduced or transmitted in any form or by any means, electronic or me-chanical, including photocopying and recording, or by an in-formation storage or retrieval system, without permission in writing from the Sierra Avalanche Center.
Content and Project Lead: Travis FeistEditing and Technical Advice: Lynne Wolfe and Blase Reardon Illustrations: Jon Miller, Matt Schebaum, and Pete ConnollyInterior Layout: Maeko BradshawPrinting and Binding: Bookmobile — Minneapolis, MN
Special thanks to: Andy Anderson, Ben Pritchet, Brandon Schwartz, Brian Lundstedt, Colin Zacharias, Doug Chabot, Duncan Lee, Dustin Evans, Kyle Anton, Mark Staples, and Marissa Muscat.
Orders, inquiries, and correspondence should be addressed to: Sierra Avalanche Center11260 Donner Pass Rd. Ste. C1 - PMB 401 Truckee, CA 96161SierraAvalancheCenter.org

1
Dying in an avalanche is probably a horrible way to go. Just prior, you were having the time of your life (liter-ally), and now you are buried under chest-crushing snow, gasping for breath, unable to move an inch while suffer-ing the pain of a shattered leg or some similarly awful trauma. At least it will probably only last about 15 min-utes, but that’s a long time to replay the last decision you will ever make, trying in vain to will yourself just a few moments back in time to do it differently.
Surviving an avalanche, while significantly better, is likely the same experience right up to that point that your partners finish digging through a ton of snow to clear your airway. Instead of dying, now you only have the night-mare of dealing with your friend who was also caught but didn’t survive. You and your remaining partners decide to leave the body for authorities to recover, and begin the task of getting back to the trailhead with your injuries and without your sled. Eventually, your focus will turn to the loved ones that your friend left behind, and what you’re going to tell them.
0.1 Introduction

2 3
Introduction Introduction
1. Dig a “snowpit” to determine if avalanches are likely
2. Go left or right depending on the hole you dug in the snow3. Wear protective gear and carry avalanche gear
Unfortunately, it isn’t that simple. Mountain riding, in-cluding the people who do it and the environment it’s done in, is incredibly complex and dynamic. Uncertainty about avalanches, exposure, and consequences can be reduced but never eliminated, and always remains a factor.
Donald Rumsfeld (US Secretary of Defense, 2001-06) summarized uncertainty well when he said, “There are known knowns; there are things we know we know. We also know there are known unknowns; that is to say we know there are some things we do not know. But there are also unknown unknowns — the ones we don’t know we don’t know.”
The conundrum is that reducing uncertainty takes practice and learning, which implies mistakes, and in avalanche terrain mistakes can have very serious conse-quences. You need to create conservative enough safety margins to practice and learn without getting killed while doing it. And as you learn, be cautious that your level of confidence doesn’t outpace your competence. Acknowledge the “unknown unknowns” by creating your safety margins with room for error.
Although your risk management process needs to be more robust than just digging holes and wearing safety gear, it also doesn’t need to be burdensome. When ap-plied well, the “Daily Flow” explained by this text is an elegant way to structure your riding day. It allows for fun
Either way, if you die or if a partner dies, the real bur-den will be on the survivors. At least the dead only spend a few minutes second guessing that final decision; the surviving friends and family will spend a lifetime. It’s for this reason that you owe it to your loved ones to avoid dying in an avalanche.
The good thing is that avalanches are not mysterious things that come crashing down from above with no warning signs. They require people to trigger them, in the wrong combination of conditions and terrain. With practice, you can learn to recognize the conditions and terrain required, so that you can avoid being the trigger.
Although this learning continues for a lifetime, there is a process to follow that can help you reduce your risk even as you gain experience. “Risk management” is this process in general terms, and this text describes a risk management process specific to riding snowmobiles or snowbikes in avalanche terrain.
Risk is defined as “the effect of uncertainty on objec-tives”. Given this definition, risk reduction is the attempt to reduce uncertainty, to reduce exposure to the effects of uncertainty, and to reduce the consequences of errors. Risk management is the process that’s applied to achieve this. In the context of avalanches, risk management is the process applied to:
1. Reduce uncertainty about avalanches 2. Reduce exposure to avalanches3. Reduce the consequences of errors
If avalanches, exposure, and consequences were simple things, the risk management process would be equally simple, and probably go something like this:

4 5
Introduction
riding while reducing uncertainty, reducing exposure, and reducing the consequences of errors. It also provides opportunities for lifelong learning. Each chapter in this text corresponds to a step in the Daily Flow. The follow-ing is a summary:
Consider Your Partners: Consider the qualities of your riding partners as they relate to risk; including both ava-lanche and non-avalanche risk.
Anticipate Conditions: Use the regional avalanche forecast and other resources to anticipate weather, snowpack, and avalanche conditions for the day.
Create Safety Margins: Based on what you expect from your partners and conditions, create safety margins using terrain and timing. Allow room for error.
Confirm Details: Evaluate options within your safety margins. Confirm details like possible routes, a time plan, and an emergency response plan.
Stop to Talk: At the trailhead and then throughout the day, stop to talk about conditions, terrain, and group management.
Manage Your Group: Use communication techniques and spacing and spotting techniques that are appropriate for the conditions and terrain.
Maintain Awareness: As you ride, use the Conditions Alerts and Terrain Alerts checklists to maintain aware-ness. If you observe anything unexpected, stop your group. Otherwise, continue until your next planned stop.
Debrief: At the end of the day, debrief what went well and what didn’t. Did you do things right or just get lucky?
Submit Observations: Let the nearest avalanche cen-ter know what you observed, using language that you are comfortable with, and/or images and videos.

6 7
Before Leaving: Consider Your Partners
It’s rare that avalanches come crashing down from above with no warning. Over 90% of avalanche accidents occur when conditions indicate avalanches are likely. They in-volve avalanches that are triggered by the very people who get harmed. In many ways, avalanches aren’t the problem; people are. This is why the first step in ava-lanche risk management is careful consideration of your riding partners.
To “consider your partners” means to think about their qualities in terms of:
1. Formal training and tangible skills2. The mental shortcuts they often take
In the context of avalanche risk management, your pri-mary goal when considering partners is to reduce your uncertainty by thinking about their qualities in advance. You’ll reduce exposure by factoring the qualities of your partners into your safety margins. You’ll reduce the con-sequences of errors by choosing partners who agree to follow the Daily Flow.
You probably don’t have an unlimited choice of who to ride with, so the idea is to not be exclusive and only ride with “perfect” partners. Each day, you can choose ap-propriate partners for the day’s objectives, or choose ap-propriate objectives for your partners. Over time, these daily considerations will help you develop a great riding crew.
FORMAL TRAINING AND TANGIBLE SKILLS
Avalanche training is the primary quality to consider. In the United States, the American Avalanche Association, or A3, is the organization responsible for overseeing ava-lanche education. The A3 writes the guidelines that ava-lanche educators adhere to, so that there is consistency from one class to another, and a clear progression for students to follow. Ask your partners what level of ava-lanche training they have, and more importantly, watch their behaviors to see if they put their education into practice.
Awareness level classes are very short — usually only a few hours. These are typically indoor presentations that happen at shops or special events, and might include short videos and slide shows, but not in-depth instruc-tion. Although valuable information can be communi-cated during Awareness classes, they are not intended to prepare anyone to travel in avalanche terrain. Instead, they just make people aware that avalanches do occur and are dangerous, so that they can seek out further edu-cation if they plan to travel in avalanche terrain.
Intro classes last about one day and introduce basic skills, but are not intended to stand alone as an avalanche
1.1 Consider Your Partners

8 9
Before Leaving: Consider Your Partners Before Leaving: Consider Your Partners
Recent changes to the A3 guidelines for the Level 2 may result in more riders seeking this level of training, and more classes becoming available. If there was something covered on your Level 1 that you want more information about, especially anticipating and maintaining awareness of conditions, a Level 2 is a good choice.
Medical training in the U.S. is significantly more com-plicated than avalanche training, due to the numerous specialized disciplines and environments. While riding snowmobiles in avalanche terrain, the most relevant dis-cipline is wilderness medicine. However, don’t dismiss other types of training; your riding partner who works as an E.R. nurse will probably be invaluable in an emergency.
Wilderness medicine classes have similar progressions to avalanche classes, but without a single organization like the A3 overseeing wilderness medicine, there isn’t as much standardization. Usually, Wilderness First Aid is introductory and lasts a few days; Wilderness First Responder is more thorough and lasts around a week; and Wilderness EMT borders on professional-level training — taking at least several weeks to achieve.
In general, all wilderness medicine classes teach stu-dents to “pack and ship” — to assess, stabilize, and evac-uate patients. It’s important to recognize that miles from the truck, there’s often not much more to be done for an injured partner. Getting them back to the truck with-out causing more harm, or deciding when to stop messing around and call for outside assistance, might be the best that you can do.
As with avalanche classes, all the training available does no good it if can’t be implemented. Besides check-ing with your partners regarding their level of training,
education. Unfortunately, the short time commitment makes this level of training very attractive to people who just want to “check the box” without taking additional classes. Recognize the limitations if you or your partners take an Intro class.
Rescue classes are also typically just one day and focus only on companion rescue, not on avoiding the need for rescue. Simply being good at rescue is not an effective risk management plan; a significant percentage of av-alanche fatalities are due to trauma, not suffocation, so a quick rescue wouldn’t reduce their consequences. However, there’s also no excuse not to be good at rescue, and you’ll never forgive yourself if a friend dies because you didn’t practice enough. Take a Rescue class, practice the skills often, and take regular refresher classes.
Level 1 classes usually take place over three days, with a significant portion of the class taking place on the snow instead of indoors. Because avalanche accidents require the wrong combination of people, conditions, and ter-rain, most Level 1 classes will focus on these three top-ics. Many will also include a rescue component, though not as thorough as in a stand-alone Rescue class. The Level 1 is considered the standard level of training in the U.S., and a reasonable goal would be for yourself and all your riding partners to take a Level 1 and commit to putting the education into practice.
The Level 2 is also typically a three-day course, and gets more in detail on the same topics as a Level 1 (peo-ple, terrain, and conditions). Often the emphasis is on conditions, to better reduce uncertainty when no re-gional avalanche forecast is available. At the time of this writing, motorized Level 2 classes are uncommon.

10 11
Before Leaving: Consider Your Partners Before Leaving: Consider Your Partners
moves. Both examples demonstrate effective consider-ation of your partners’ riding skill.
Riding style deserves similar attention. Mountain riding has become incredibly diverse, with many sub-disciplines like boondocking and hill climbing. Manufacturers and the aftermarket have responded with specialized equip-ment, and it’s now possible to own multiple machines for different purposes.
Almost by definition, different riding styles approach terrain differently. Although someone who prefers boon-docking tight trees can still have fun riding with someone who prefers steep hill climbing, the reality is they will have disagreements about where to ride and how to ride it. Good friends in non-avalanche terrain can probably work through these disagreements. But in avalanche ter-rain, these different approaches are likely to impact your group management and increase your risk. Either ride with people who share similar riding styles, or choose a riding area with limited exposure to avalanches.
Navigation and mechanical skills are qualities that may be difficult to observe until something goes wrong. Imagine a day of riding with partners who lack these skills; the ride would be full of wrong turns and break-downs. So long as you’re not in avalanche terrain, this would be frustrating and stressful, but it probably won’t kill you. But in avalanche terrain, these problems could become consequential. A wrong turn or the difficulty of towing a broken sled might lead you to go someplace you didn’t plan to. More generally, the frustration and stress might negatively impact your ability to maintain aware-ness and manage the group. Make sure some people in your group have navigation and mechanical skills and
also make sure they carry first aid kits to put that training to use if it’s needed. At least some of the supplies should be carried in vests or backpacks and not on machines, in case rider and machine are separated.
Riding skill is an easy quality to observe and consider in your partners. For most mountain riders, pushing their skill level and having minor misadventures is part of the fun and learning process. But where is the line between a minor misadventure and a major one, and does that line move when you’re in avalanche terrain?
On some days, you may not want to invite people who can’t reliably ride the terrain you have in mind. Maybe where you plan to go, the easy riding has avalanche ex-posure, or there are difficult moves needed to avoid ex-posure. On other days, you may appreciate the company of riding partners regardless of their riding skill. On these days, you can choose a different area where avoiding avalanches doesn’t mean difficult riding or must-make

12 13
Before Leaving: Consider Your Partners Before Leaving: Consider Your Partners
is likely to be present anytime you ride with other social people. Consider what form this shortcut might take, and factor it into your safety margins. For example, if you have a new person in the group who might feel the need to im-press the rest of you, you could agree to stay farther away from anticipated avalanches than you would otherwise.
Consistency/Commitment is when you’re likely to keep anchoring off an earlier decision. It’s easier than com-pletely re-analyzing every subsequent decision, especially if you assume little has changed or if you’re too commit-ted to acknowledge the change. Picture this happening on a riding vacation away from home: You’ve already decided where to go, and when you get there you’re likely to ride regardless of the avalanche conditions. This shortcut is used in more subtle ways and on different scales, and is most likely to be present when there are stated goals or time constraints on your ride. As you near a goal or push a time constraint, you’re probably using this shortcut if you or your partners show less engagement when you stop to talk. If this is a pattern for you and your partners, try to plan for rides with several options (or open-ended goals) and minimal time constraints.
The Expert Halo is the mental shortcut that assigns expertise and leadership to a person based on non-rele-vant factors. The “natural” leader isn’t always the per-son with the most avalanche knowledge. It might be the most assertive person in the group, or the best rider, or the common social link between people. Make sure you don’t just follow a leader in silence, and if the expert halo is assigned to you, elicit opinions from other group members throughout the day. If you know you’re riding with someone likely to assume the expert halo but who
carry the appropriate tools, or else choose to stay close to the trucks and far away from avalanche terrain.
MENTAL SHORTCUTS
Less obvious than formal training and tangible skills, but equally important qualities to consider, are the men-tal shortcuts that you and your partners regularly take. People use mental shortcuts when decision making in ev-eryday life, and these are so common they are often sub-conscious. But mental shortcuts can become dangerous in avalanche terrain. Pay close attention to the shortcuts that you often take, in addition to those of your part-ners. If any of the following mental shortcuts are shared between group members or otherwise cause concern, ac-count for them when you create safety margins.
Familiarity is the tendency to feel safer in familiar set-tings, and to think that past experiences in these settings help predict future ones. If you haven’t seen something happen in the past, you’re less likely to spend the men-tal energy on it looking forward. You may assume that familiar terrain is safe because you haven’t experienced avalanches there before, or that familiar conditions are safe because in similar conditions you haven’t triggered avalanches. When going to familiar terrain or riding in familiar conditions, make sure your safety margins allow room for the unexpected.
Acceptance describes the shortcut of allowing social fac-tors to dominate decisions. One self-explanatory version of this used to be known as “Kodak courage” and is now “doing it for the ‘Gram.” But cameras or cellphones need not be involved — this shortcut can take many forms and

14 15
Before Leaving: Consider Your Partners
doesn’t actively engage in avalanche risk management, create conservative and very clear safety margins to mit-igate the leadership void.
Tracks in the snow or other people riding in the area may lead you to assume it’s safe just because someone else is doing it (this mental shortcut is also called Social Proof). If you’ve ever walked in a busy city, you may have used this shortcut by following a crowd across a busy in-tersection without first checking the traffic light. It can be a reasonable shortcut in that environment but not in avalanche terrain. The first person on a slope is not al-ways the one to trigger an avalanche, and there have been many accidents where the slope was full of tracks before someone triggered it. Even if people aren’t riding the same slope, their mere presence in the area might give you a false sense of security. If you ride in popular areas, your safety margins should minimize avalanche ex-posure. If this isn’t satisfying, create safety margins that minimize popular areas.
Scarcity is the subconscious inclination to ignore infor-mation if a scarce resource is at stake. Most snowmobilers know this as “powder fever.” Of course, riding fresh pow-der is an important goal for most mountain riders. When untracked snow is involved, you can probably assume that you and your partners might ignore some potentially important information. Instead of worrying about who is most likely to do this, the key is to know when to plan for it. If a bad season or limited riding days make untracked snow scarce, create appropriate safety margins on the few powder days you experience. Or if where you’re rid-ing gets tracked-out quickly, use timing margins to miti-gate this mental shortcut as the day progresses.

16 17
Before Leaving: Anticipate Conditions
pens in between storms, is what builds the snowpack. The snowpack and the weather that continues to act upon it determine the day’s avalanche problem; includ-ing problem type, the location in the terrain it might be encountered, and its likelihood and potential size.
WEATHER
Look back at the season’s weather trends and notable events to better anticipate the structure of the snowpack. Give extra scrutiny to recent history, from the past week to the night before you ride. Then use a weather fore-cast to anticipate the weather’s influence on snowpack and avalanche conditions. Also anticipate the weather’s influence on comfort, riding quality, visibility, communi-cation/navigation, and emergency preparedness.
Anticipate conditions by using an avalanche forecast. If one isn’t available, factor a high level of uncertainty into the rest of your plans by creating conservative safety margins. Either way, anticipate conditions in three categories:
1. Weather2. Snowpack3. Avalanches
In the context of avalanche risk management, your primary goal when anticipating conditions is to reduce your uncertainty about the weather, snowpack, and av-alanches expected for the day. Based on what you an-ticipate, and allowing for remaining uncertainty, you’ll reduce exposure and consequences when you create safety margins, and again once you’re out on the snow.
Weather, snowpack, and avalanches are very closely connected, and can be viewed as building blocks in that order. The weather, including storms and whatever hap-
1.2 Anticipate Conditions
Avalanche.org map of regional avalanche centers

18 19
Before Leaving: Anticipate Conditions Before Leaving: Anticipate Conditions
outside to witness the snowfall, feel the wind moving the snow, and observe how the temperatures and sun change the snow that’s on the ground.
To view a weather forecast for the day you plan to ride, the best resource is the weather forecast imbedded in an avalanche forecast. If an avalanche forecast isn’t avail-able, choose an online weather resource and stick with it. Using different resources can increase your uncertainty, because of the variability between different forecasts.
In the simplest terms, there are 4 weather effects that build the seasonal snowpack and then act upon it when you ride: Precipitation, Wind, Temperature, and Sun.
Precipitation can fall as two types; snow or rain. Which one falls will be a function of the temperature in the clouds where the precipitation is forming. It can still snow even when the temperature near the ground is above freezing.
Snow crystals will have different shapes and sizes as they fall from the sky, depending on environmental con-ditions where they are formed. When they land, the dif-
Online resources can be helpful if you’re not personally tracking weather where you plan to ride. The home page at avalanche.org displays a map of the Western US with every regional avalanche center. The shaded areas repre-sent the terrain covered by the regional forecasts. If you click anywhere within the shaded areas, you’ll be linked to that avalanche center’s website. Instead of going right to the current avalanche forecast, you can find archived weather data for the season, including recent history. Some avalanche centers make this easier than others.
You’ll notice that major voids exist where no avalanche forecast is available. Within these voids are many pop-ular snowmobiling regions. Fortunately, even where an avalanche forecast isn’t available, there are automated weather stations that you can use to view seasonal trends and recent weather. SNOTEL stations managed by the US Dept of Agriculture are some of the most ubiquitous and helpful. Use a search engine to find the SNOTEL station(s) of interest. To view seasonal trends and notable events, find the 30 Day Daily Table and change the time period to the Current Water Year, or use custom date ranges. To view recent history, use the 7 Day Hourly Table. The tem-perature and snowfall history can be invaluable for areas not covered by an avalanche center. But because SNOTEL stations are purposefully sheltered from the wind, you won’t find any wind data. You can find links to wind data through the National Weather Service.
Of course, if you live near the mountains and/or ride often enough, the best way for you to track the seasonal weather is to do so in person. Remote data can be hard to find and hard to interpret, and the instruments collecting the data are prone to error. It’s no comparison to getting
SNOTEL data table from a region without an avalanche forecast

20 21
Before Leaving: Anticipate Conditions Before Leaving: Anticipate Conditions
tent, and thus weight, as a 6” storm of 10% density snow. Instead of “light” vs. “heavy,” it makes more sense to characterize snow as cold vs. warm, or low density vs. high density.
Given the same amount of water in a storm, in the short term a cold storm will create a thicker layer of new snow than a warm storm. Cold snow is also more easily moved by the wind than warm snow. Cold snow has more air in it than warm snow (5% density snow is 95% air, and 15% snow is 85% air), and will settle more than warm snow (settlement is the slow deformation of snow under the influence of gravity, resulting in higher density over time). Because they both have a lot of air, they both insu-late well; so cold snow tends to stay cold and warm snow tends to stay warm. All of these differences have import-ant implications for the development of the snowpack, and thus avalanches.
Rain is quite a different precipitation type than snow because it’s warm relative to the snow, and it consists of liquid water instead of ice and air. Because it’s warm, it transfers heat to the snow it lands on and breaks bonds be-tween grains. Because it’s liquid, it penetrates the snow and can lubricate between grains and/or layers. Once it refreezes, it can create bonds between grains forming large melt/freeze grains and rain crusts. Although these specific areas within the snowpack structure can be rel-atively strong, they deserve particular attention if cold, low density snow is nearby.
Besides precipitation type, another important charac-teristic to keep track of is rate. Rate of snowfall is mea-sured in inches or centimeters per hour and is the height the new snow would be in an hour (both ice and air, not
ferent crystals have a short-term influence on how well they bond to each other and to the old snow surface they land on. The differences quickly lose significance as grav-ity and additional weather change the original shapes and sizes into new ones. An important exception to this is a snow type called graupel, which are spherical like tiny hail. Graupel doesn’t bond well to itself or the old snow surface. Graupel can retain its shape, size, and bonding properties for longer periods than other new snow types.
Cold snow will land on the ground with a low water content by volume; this can also be expressed as low density. Warm snow will have a higher density. A typical range for new snow is 5-15% density. Although people call cold snow “light” and wet snow “heavy,” this is mislead-ing without considering the volume. For example, a 12” storm of 5% density snow has the same total water con-
Precipitation, wind, temperature, and sun build the seasonal snowpack

22 23
Before Leaving: Anticipate Conditions Before Leaving: Anticipate Conditions
to leeward. In the west wind example, snow would be moved from west (windward) to east (leeward).
As wind interacts with terrain features, it moves faster on windward sides and slower on leeward sides. The faster wind will erode snow from windward sides. As the wind decelerates on leeward sides, it may no longer be strong enough to carry snow, so the snow falls to the ground. This redistribution process creates snowpacks with different thicknesses and layering on windward and leeward slopes.
Temperature affects the type of precipitation that falls and continues to influence the snowpack on the ground. Snow is especially sensitive to temperature because win-ter temperatures are close to water’s triple point. At 32°F, water can exist as solid, liquid, and gas. And often, all three phases of water exist together in the snowpack.
The ground is consistently near 32°F, and the early sea-son snow that falls on the ground is often much colder. Not only is this interface right at water’s triple point, but there’s also a big temperature difference between the warm ground and cold snow. Significant changes can occur here. As you look back at the season’s weather history, an important distinction to make is if the early season snow fell cold and/or remained exposed to cold air temperatures, or if it fell warm and/or was quickly buried by additional snow and insulated from cold air temperatures.
At the surface, the snow is barraged with daily tem-perature changes and the slow march of seasonal changes — often close to water’s triple point. The effects of air temperatures are most apparent within the top several inches of snow. Warm temperatures can soften and even
melted into liquid water). Rate of rainfall is measured the same, but as liquid water there’s no air in the mix.
Wind sculpts the snow; both in the air and on the ground, and on different scales; from the individual crys-tal and grain to the entire landscape.
Wind breaks individual crystals and grains into differ-ent shapes and smaller sizes. That “perfect” snowflake that falls on a windless day may be unrecognizable once it’s been blown around and finally comes to rest. New and old snow alike can be battered by the wind into ever smaller and smaller pieces, until they look and behave more like tiny grains of sand than that original “perfect” snowflake.
At the larger scale, massive amounts of snow can be moved by the wind, resulting in distribution patterns that vary throughout the landscape. To visualize this, it’s im-portant to keep track of wind speed and direction, and the amount and density of new or old snow that’s avail-able for transport.
At weather stations, wind speed is measured in miles per hour. While you’re out riding, wind speed is estimated with the terms “calm, light, moderate, strong,” and “ex-treme.” Moderate winds are the most efficient at moving snow, but the density of snow available for transport is an important variable. Low density snow can be moved by lighter winds, and high density snow needs stronger winds. As the winds get too high, the snow travels so far as to effectively be gone.
Wind direction is communicated in reference to its ori-gin, so a wind that comes from the west is a “west wind.” If there’s new snow falling, or snow on the ground avail-able for transport, wind will move snow from windward

24 25
Before Leaving: Anticipate Conditions Before Leaving: Anticipate Conditions
the sun’s energy instead of absorbing it. Southeast and southwest aspects will get some direct sun at the right time of day, but because mornings are generally colder than afternoons, the southeast aspects will warm less than the southwest. Even when it hits the snow at ideal angles, early season sunlight has more atmosphere to pass through before hitting the snow, making it weaker than other times of year.
As the season progresses, the sun stays out longer and gets higher in the sky. Slopes that received indirect sun early in the season will receive more and more energy from the sun, including low angle slopes and even north facing slopes very late in the season. The sunlight also gets filtered through less atmosphere when it’s more di-rectly overhead, and transmits more energy to the snow.
Though snow does absorb and reflect energy from sun-light throughout the winter, low density snow absorbs more and reflects less than high density snow. You can observe this by digging into the snow on a sunny day; remove thin pieces of low density and high density snow, and hold them to the sky to see which allows more light to pass. When on the surface, lower density snow will allow some light to pass and become absorbed several inches into the snowpack. Higher density snow will ab-sorb some energy right at the surface, but allow less to pass beneath it. Similarly, dirty snow and other dark ob-jects like rocks, exposed soil, and vegetation all absorb more sunlight energy than clean, reflective snow.
Equally important to where the sun shines, is where it doesn’t. Shaded aspects and low angle sunny slopes early in the season will receive little energy from the sun and remain colder than steep sunny slopes. Rapid change can
melt the surface snow, which is likely to re-freeze again. Cold temperatures will help preserve whatever surface condition is in place.
Daily swings in temperature from day to night will al-ternately heat and cool the surface snow. Similarly, cold fronts and warm fronts will cause temperature changes within relatively short time periods. These diurnal and frontal changes can result in wildly different tempera-tures within a few inches of the surface. If temperatures within a few inches of snow are different enough, rapid changes can occur where they meet.
During the early winter, days are short and nights are long, making average temperatures cold. Even if specific days heat up, at least the surface snow will remain cold on average. If the early season snow is shallow, often the whole snowpack is cold. As the season progresses, the days get longer and warmer, and the nights get shorter and also warmer. Both the surface snow and the deeper snowpack eventually get warm, but the change can occur slowly.
The Sun has a similar effect on the surface snow as air temperatures, but strong sun is not always associated with warm air temperatures, and sunlight plays by dif-ferent enough rules that it needs to be thought of sep-arately from air temperature. Although both heat and light are energy, they are transmitted, absorbed, and re-flected differently.
Early in the winter, the sun is only out for a few hours, and is low in the sky even at its highest point during the day. It will affect south-facing slopes, or south aspects, but they need to be steep enough to face the low sun as directly as possible. Less steep slopes will tend to reflect

26 27
Before Leaving: Anticipate Conditions Before Leaving: Anticipate Conditions
back at the seasonal and recent weather history, look for atypical precipitation, wind, temperature, and sun events that might indicate layers with different charac-teristics and a potentially unstable snowpack.
However, this generalization can’t be applied to risk management for a specific day without an unacceptably high level of uncertainty. If you have an avalanche center that covers your region, you can look back at archived observations and link specific weather events to the de-velopment of the snowpack. Many centers publish a snow-pack synopsis as part of their daily avalanche forecast, or have a “week in review” or similar informational product available. To understand how this links to the day’s fore-casted avalanches, or if you plan to go into avalanche terrain not covered by a forecast, you need a good un-derstanding of snowpack structure and development.
The Structure of the snowpack consists of water and air. When the snowpack is below 32°F, no liquid water is present, and the snow is considered dry. Water mole-cules in dry snow are constantly shifting back and forth between ice and vapor, skipping the liquid phase. This phase change is known as sublimation.
When snow is 32°F (it never gets warmer while it’s still snow), liquid water can also exist, and the snow is con-sidered wet. Water molecules go through a simple phase change when they transition between ice and liquid.
Because dry snow and wet snow undergo different phase changes, the outcomes are different. Layers — that were already different because of the weather events that formed them — undergo these changes both at the surface and when they’re buried. The result is a layered snowpack that continues to change throughout the season.
occur if weather events put warm snow onto otherwise cold slopes, cold snow onto warm ground, or any vari-ation of warm and cold next to each other. And overall, just like your refrigerator does for food, cold slopes pre-serve the layers formed by other weather events. Layers on cold slopes can remain intact for extended periods — sometimes until the snow melts in spring.
SNOWPACK
As precipitation, wind, temperature, and sun build the snowpack, they create layers in the snow. The re-lationship between these layers, including changes be-tween them, is what leads to conditions that promote avalanches.
In the simplest terms, big differences between snow-pack layers increase avalanche conditions, and unifor-mity between the layers decreases them. When you look

28 29
Before Leaving: Anticipate Conditions Before Leaving: Anticipate Conditions
grain — cumulatively growing the grains. This growth pro-cess is called faceting, and facets can be distinguished from rounds because they are bigger and angular. Often a magnifying glass is not required to see individual fac-ets and their angular shapes, and your hand can feel the difference just as easily. Facets feel like sugar and won’t bond if you make a fist, whereas rounds will bond when pressed together.
The normal sources for temperature differences are the contact points between warm ground and cold snow, or the variable weather events near the surface. Vapor movement occurs across these warm/cold boundaries, and can move either up or down (if cold is on top of warm or vice versa). The resulting vertical growth does have some vertical strength associated with it, but very lit-tle shear strength (like dominoes placed on end). Facets occur in low density snow and have relatively weak bonds compared to rounds.
Settlement is the snow’s gradual increase in density over time. As individual snowflakes are buried by further precipitation, broken by wind, and warmed by tempera-ture or sun, they become smaller, more compressed to-gether, and sometimes melt and refreeze. As gravity pulls on them, they settle downward and compress further. In combination, this results in an increase in density over time. People often incorrectly say the snow is “getting heavier” but it’s important to recognize that simply in-creasing density does not add any weight — that requires additional precipitation. The density of settled snow is often around 20-40%, and gets much higher when wet.
Rounding and Faceting are the two possible results of sublimation in dry snow. Sublimation causes snow grains — the individual pieces of ice — to either shrink or grow, depending on what the water molecules do when they’re in vapor form. Water vapor sublimates from the end points of a grain, and if a vapor molecule stagnates in stable temperatures and/or is blocked from moving by high density snow, it reattaches itself toward the middle of a grain, ultimately making the grains smaller. When grains shrink, they lose any remaining angles and shapes from their original form, and begin to look more like puz-zle pieces that are so small they can require a magnify-ing glass or microscope to see. These are called rounds, and like the tiny puzzle pieces they look like, they fit together well and create high density and strong layers in the snowpack.
If relatively warm and cold snow are next to each other, at low enough densities for vapor to move through, the vapor moves from warm areas to cold and attaches to the first thing it hits — often the end point of another The development of rounds (top) vs. facets (bottom)

30 31
Before Leaving: Anticipate Conditions Before Leaving: Anticipate Conditions
available in the air near the snow surface, on how thick the layer of cold air right above the snow is, and on how long the conditions exist that promote their growth. They grow well during cold, cloudless, and windless condi-tions and often grow more at night than during the day. Although surface hoar formation can occur throughout the season, not every event survives its time on the sur-face or survives getting buried by subsequent storms to become a layer within the snowpack. As facets are like dominoes, surface hoar is like a house of cards; they re-quire very gentle handling to build upon. But if buried intact, they create a weak layer very similar to buried facets.
Melt Forms occur when water molecules transition be-tween solid and liquid. When rain falls on snow, or warm air temperatures and/or strong sun bring the snow sur-face up to 32°F, the snow will end up with some liquid water present. Usually in winter this water will stay near the surface and refreeze to form a melt-freeze crust, or percolate and refreeze deeper in the snowpack. Any of these melt-freeze layers are weak when wet but strong when frozen.
However strong the crusts themselves are, because they are relatively warm, facets are likely to grow if there’s cold snow next to them. Expect to find facets if the crusts form at the surface on top of cold, low den-sity snow; or if they are exposed to prolonged cold tem-peratures near the surface; or if cold, low density snow falls on top of them. When facets form below a crust, the crust can preserve them for subsequent burial. When facets form above a crust and later get buried, the crust makes an efficient sliding surface for the facets above it.
Surface hoar is a potential layer that’s structurally sim-ilar to facets but formed differently. Surface hoar grows at the snowpack surface, and only at the surface, when a very thin layer of air right above the snow cools to its dewpoint. This air has some water vapor present, and at its dewpoint it reaches 100% relative humidity. The water vapor attaches right to the surface or to vegetation and other objects in contact with the layer of cold air. The same process can be replicated by taking a cold beer mug out of your freezer; the frost that forms is because the air that touches the cold mug reaches its dewpoint.
Surface hoar grows “feathery” structures that, like facets, have some vertical strength but almost no shear strength. They can be small and hard to see or grow to near an inch — depending on how much water vapor is
If buried intact, surface hoar creates a weak layer very similar to buried facets

32 33
Before Leaving: Anticipate Conditions Before Leaving: Anticipate Conditions
Anticipating the whole problem, instead of just a single component of the problem, better reduces uncertainty and helps you create safety margins.
Avalanche Problem Type (hereafter avalanche type or just type) is a way to categorize avalanches that re-sult from similar snowpack structures and display similar characteristics. Different avalanche types behave differ-ently, and deserve different safety margins and group management techniques.
Dry Loose avalanche types are the release of dry unconsolidated (weak) snow at the surface. Other names for Dry Loose avalanches in-clude “point-release” avalanches, or “sluffs.”
Dry Loose avalanches behave by starting at a trigger point and entraining snow as they move downhill, forming a fan-shaped avalanche. The trigger point is where the initial failure takes place, and for human triggered avalanches, it’s where the per-son is when they trigger it. Dry Loose avalanches often have less mass than other avalanche types. This can lead snowmobilers to underestimate their destructive poten-tial, dismissing them as “just sluff.” However, Dry Loose avalanches can be destructive if enough snow gets en-trained, or by stepping down to a deeper weak layer and triggering a different avalanche type. Even Dry Loose av-alanches that remain small can be consequential in the wrong terrain.
The structure for Dry Loose conditions is weak snow at the surface — often weaker than the snow under it. Most
Often, facets will form both below and above a crust, and get buried to make a complex weak layer combination.
If enough rain falls or enough surface snow melts, the water can percolate deep into the snowpack. While still in liquid form, the water will break existing bonds in the snowpack, making it weaker. If it hits a layer that slows or stops it from percolating downward, water can spread along that layer and act as a lubricant. In springtime in a warm snowpack, the liquid water might not refreeze, and eventually drain through the bottom of the snowpack and lubricate at the ground.
AVALANCHES
You should develop the habit of anticipating avalanches as the problem they present. The avalanche problem is a holistic way to describe them that includes: Problem Type, Location, Likelihood and Size.
A typical loose avalanche

34 35
Before Leaving: Anticipate Conditions Before Leaving: Anticipate Conditions
trauma even at slow speeds. Burial in a relatively shallow Wet Loose avalanche can be impossible to self-extricate from, and if your head is buried, there is very little air available in the debris for breathing. Like Dry Loose av-alanches, they can step down and trigger different ava-lanche types — often a wet slab.
The structure for Wet Loose conditions is wet, uncon-solidated snow at the surface—often wetter and weaker than the snow under it. They can occur within new snow or old snow. Liquid water breaks existing bonds and lu-bricates between grains. If a crust or similar strong layer exists under the wet snow, liquid water can also pool and lubricate right above it.
Wet snowfall, rain, and warming from air tempera-ture and sun all contribute to Wet Loose conditions. Wet Loose conditions can remain for as long as liquid water is present in the surface snow. During mid-winter rain-on-snow or rapid warming events, Wet Loose conditions can develop quickly but also stabilize quickly when cold temperatures return. In the springtime, Wet Loose condi-tions may exist during the heat of the day but not during cooler hours. Eventually, nights become too warm for effective overnight refreezes, and Wet Loose conditions can exist any time of day.
Cooling temperatures refreeze water in the snowpack, reducing the likelihood of Wet Loose avalanches. During late winter and spring, the diurnal cycle of warm days and cold nights eventually creates a melt/freeze struc-ture with large grains, or “corn” snow, and drainage paths for the liquid water. Wet Loose avalanches become less likely once this melt/freeze structure is established, except during times of day with the highest temperatures
Dry Loose avalanches occur within new snow, or at the new/old interface.
Notable weather that leads to Dry Loose conditions is a recent (within 24-48 hours) storm. The rate of new snow accumulation needs to outpace bonding within the new snow or at the new/old interface. High intensity and/or cold storms are more problematic than low intensity and/or warm storms. Similar weather events can lead to Storm Slab and Wind Slab conditions, or can add enough load to trigger other avalanche types.
Settlement within the new snow promotes bonding, and over time makes Dry Loose avalanches less likely. The time after a storm that Dry Loose avalanches remain possible can be prolonged if subsequent weather doesn’t promote settlement and bonding.
Although not common, it’s possible for enough old snow at the surface to facet and become the weak layer for Dry Loose avalanches.
A Wet Loose avalanche is the re-lease of wet unconsolidated snow at the surface.
Like Dry Loose avalanches, Wet Loose avalanches behave by starting at the trigger point and entraining snow as they move downhill, form-
ing a fan-shaped avalanche. They tend to start small and move slowly, but gain significant mass as they en-train additional snow. This can make them more conse-quential than a Dry Loose avalanche of equivalent size. A slight nudge from a small one can push your machine off-line, and if you’re caught, the mass can cause serious

36 37
Before Leaving: Anticipate Conditions Before Leaving: Anticipate Conditions
the thicker slab better allows failures to travel or prop-agate farther and has enough volume and mass to make full burial and/or traumatic injury more likely.
Storms resulting from a warm front (a warm air mass displacing an existing cold one) are especially notable be-cause they are more likely to produce warm snow on top of cold, or “upside down” storm snow. Other causes can be subtle changes in temperature, precipitation type, and rate. It can be difficult to detect these changes, so you should assume a high level of uncertainty after any recent storm with ±12” or more of new snow.
Settlement within the new snow promotes bonding, and over time (typically 24-48 hours), makes Storm Slab avalanches less likely. This is the source of the poorly understood and poorly applied “24-hour rule” that peo-ple use to convince themselves avalanche danger has diminished after a storm. Instead of betting your life
and most direct sun. Even as the nights get warmer than 32°F, radiational cooling can still allow the snow surface to refreeze if skies are clear and tree cover is minimal.
Storm Slab avalanches are the release of a cohesive layer of new snow, or slab, that fails on a weak layer within the new snow or at the new/old interface.
Slab avalanches behave quite dif-ferently from loose snow avalanches.
They fail because a collapse in a weak layer quickly travels from the initial trigger point. The slab above the collapse releases with boundaries some distance away — including uphill from the trigger point. Storm Slab av-alanches tend to form across the landscape more uni-formly than other slab types, so trigger points for Storm Slabs are somewhat more predictable. This doesn’t mean they are any less destructive.
The structure for Storm Slabs is a relatively stronger slab of new snow on top of a weaker layer of new snow. Sometimes, the difference between the slab and the weak layer can be dramatic, like warm snow (strong) on top of cold snow (weak). Other times, the difference can be more subtle and difficult to observe. The slab itself may not behave like “strong” snow and can still ride like soft powder. It just needs to be slightly stronger than the weak layer under it.
A notable event for Storm Slabs is a storm with more than ±12” of snow within the past 48 hours. Although shallower slabs can still be dangerous if they entrain enough snow or if they’re triggered in the wrong terrain,
A typical slab avalanche

38 39
Before Leaving: Anticipate Conditions Before Leaving: Anticipate Conditions
the landscape. On the scale of an individual slab, Wind Slabs can be thinner near their edges, and thicker to-wards their middle.
Notable events for Wind Slabs include recent snowfall with wind, and/or recent wind without snowfall but with snow on the surface available for transport. Low density snow can be moved by lighter winds, and high density snow may require stronger winds. As the winds get too high, redistribution patterns become irregular, and some-times the snow travels so far as to effectively be gone.
Settlement does act upon the weak layer in a Wind Slab, but often not as predictably as with Dry Loose and Storm Slabs. The stiffness of the Wind Slab can help support the slab over the weak layer, delaying settlement. Because new Wind Slabs can form after snowfall has ended, timing estimates for settlement are difficult. Wind events that continue for extended periods can result in prolonged haz-ard. Similarly, as winds shift directions, the anticipated location of Wind Slabs can change. They can reduce like-lihood in one location, but increase formation in another.
Cornice Fall avalanches are closely related to Wind Slabs, because they are formed by similar weather. They are the release of an overhanging mass of snow that forms as the wind decelerates over terrain features, and deposits snow immediately on
the leeward side. Cornices can vary in size and thickness, and their di-
mensions can be difficult to estimate — especially from above. Cornices overhang slopes, causing a constant bat-
on a rule of thumb, it’s better to actually observe set-tlement and bonding at the weak layer(s) before decid-ing Storm Slab conditions are no longer present. And, while storm snow settlement decreases the likelihood of some avalanche types, it doesn’t always do the same for others.
Wind Slab avalanches are the re-lease of a cohesive layer of snow formed by the wind.
Wind Slabs fail and propagate sim-ilarly to Storm Slabs, but they do not form across the landscape as uni-formly. Wind Slabs form on leeward
terrain features. Wind Slab locations can be recognized by seeing or knowing wind patterns and their interactions with terrain. If visibility is good, you may be able to see changes in surface texture between areas with and with-out wind deposits. Other clues include increased snow depth, reduced ski or track penetration, and a different “feel” on leeward features, but these observations re-quire you expose yourself to the potential slab.
The structure for Wind Slabs is formed when wind moves snow as it falls from the sky, or redistributes snow from windward sides of terrain features. The wind breaks the snow into smaller pieces, which then land on leeward features as the wind decelerates. When these smaller pieces accumulate, they fit closely together and can form a stronger layer than the snow they land on. As with Storm Slabs, ±12” is a common threshold for Wind Slabs to present concern. Because of their redistribution patterns, slab thickness is often highly variable across

40 41
Before Leaving: Anticipate Conditions Before Leaving: Anticipate Conditions
surface, and surface hoar. Persistent Slabs are known for their unpredictable na-
ture. They can be triggered from features not considered to be “typical” trigger points, including flat terrain ad-jacent to them and from seemingly unconnected slopes (known as a remote trigger). Often their dimensions ex-tend beyond what would be expected of a Storm Slab or Wind Slab in the same terrain.
The structure for Persistent Slabs is a layer of cohesive snow (a slab) on top of a facet layer or surface hoar layer. Both facets and surface hoar are the result of vertical growth. These forms have more vertical strength than shear strength, and can support some weight on top of them. This structure is comparable to building on top of a row of dominoes or on top of a house of cards. Once the burden above facets and surface hoar becomes too much (additional snowfall, deposits from wind, and/or the weight of a person), they can collapse and propagate long distances. As with other slab types, ±12” of cohe-sive slab above a persistent weak layer is an important threshold. However, both slab thickness and weak layer distribution can be highly variable in Persistent Slabs.
A notable event for facet formation near the ground is a cold and shallow snowpack, or a history of one. For facet formation near the surface, notable events include low density snow and/or a crust near the surface that’s then exposed to cold temperatures. The longer the sur-face snow and/or crust is exposed to cold temperatures, the more likely facets will form. For surface hoar for-mation, a notable event is a cold, clear and calm night, or series of such nights (or similar conditions during the day). All of these events can form the weak layer; they
tle between gravity and the strength of the cornice. They can droop slowly over time or break suddenly. They can fail where they are visibly overhung or fail at unexpected distances along the flat ground above them. Cornice Falls can do damage by striking you, by breaking from under you and causing a fall, and by triggering a secondary ava-lanche type — or any combination of these.
Notable events for cornice formation are similar to those for Wind Slab formation; including recent snowfall with wind, and/or recent wind without snowfall but with snow on the surface available for transport. Recent for-mation is also a notable event for their failure. After time has passed, notable events for cornice fall are increased sun and warming air temperatures; especially overnight temperatures without a decent refreeze.
Because cornices overhang slopes, gravity and settlement act upon them differently than other avalanche types, and don’t necessarily represent a “healing” process. A complex relationship exists between gravity, the strength of the cor-nice and its deformation properties, and further weather events that act upon the cornice. Time can reduce their hazard, or bring them closer to failure. Testing a cornice by creeping out on it is a terrible way to learn how unpredict-able and dangerous they can be. Observe cornices from a safe spot on the side.
Persistent Slab avalanches are the release of a cohesive layer of snow that fails on a buried persistent weak layer. Persistent weak layers include facets that form near the ground, facets that form near the

42 43
Before Leaving: Anticipate Conditions Before Leaving: Anticipate Conditions
well into the flats below. Deep Slabs are low likelihood and high consequence events. This makes them easy to forget about or dismiss as unlikely, but when they hap-pen not many people survive them to learn from their mistakes.
It’s not uncommon for Deep Slabs to last an entire sea-son, with cycles of varying reactivity. A high level of un-certainty is associated with these avalanches.
Wet Slab avalanches are the re-lease of a cohesive layer of snow that is near 32°F and moist or wet.
Wet Slabs can be very unpredict-able. Dry slab types are triggered when people or weather add weight that tips the stress side of the stress
vs. strength balance in the snowpack. Wet Slabs can be triggered this way, but they can also fail due to decreas-ing strength. This is a fundamentally different and less predictable trigger. Once triggered, the wet debris will flow differently from dry debris. It often moves more slowly and follows the contours of the landscape more closely. Though with more mass for the equivalent vol-ume, wet debris can be more destructive.
The structure for Wet Slab avalanches can be very sim-ilar to their dry counterparts but with liquid water in the slab or weak layer. Storm Slabs, Wind Slabs, Persistent Slabs, and Deep Slabs can all become Wet Slabs. But the structure for one of these other slab types is not required for Wet Slabs. Water can weaken and lubricate layers and interfaces within the snowpack that wouldn’t otherwise represent weaknesses when dry. And wetting due to rain
still require slab formation above them for Persistent Slab conditions.
Because facets and surface hoar have some vertical strength, they tend to resist settlement and persist for extended periods and sometimes even whole seasons. Settlement is less likely to act upon these weak layers; instead, it’s more likely to act upon any new snow above them, forming the layer of cohesive snow that becomes the slab. Damage to the vertical structure can occur slowly over time without causing collapse, eventually bonding the weak layer. Another way for persistent weak layers to “heal” is that when the conditions within the snowpack promote rounding, both facets and surface hoar can sublimate into rounds over time. Snowpack tests and avalanche activity around this layer will help you de-cide if it has gone dormant or is still a primary concern.
Deep Slab avalanche types are Persistent Slabs that are deep enough to be difficult to trigger, and capable of producing very large and destruc-tive avalanches.
Deep Slabs are often triggered from areas where the slab is rel-
atively shallow, and then the fracture propagates to where it is relatively deep. Because they are deep, dif-ficult to trigger, and remain unstable for prolonged peri-ods, maintaining awareness of the danger they pose can be difficult without significant digging and/or detailed tracking of the snowpack’s development. Because they are capable of producing large avalanches, they often run much farther than expected, and can cause harm

44 45
Before Leaving: Anticipate Conditions Before Leaving: Anticipate Conditions
Glide avalanches occur when a generally uniform snow-pack rests on top of smooth ground or rock slabs, and liquid water lubricates between the two. They typically involve a wet or refrozen snowpack. The gliding motion can begin slowly and remain slow, or climax into a de-structive avalanche. Glide avalanches are often preceded by a visible glide crack that grows over time as the full depth of the snowpack glides downhill. It’s uncommon for them to be triggered by a person adding weight to tip the stress vs. strength balance; instead they are almost exclusively triggered due to loss of strength.
Weather events leading up to Glide avalanches are varied and not as directly tied to their release as with other avalanche types. This is because the source of liquid water at the ground/snow interface need not be from rain or snowmelt percolating from the surface. The warmth of the ground can also melt snow to lubricate at this interface. Warm air temperatures do contribute, as does sunlight warming exposed dark soil and rock, but these are not easily timed with the release of Glide avalanches.
Once the snowpack structure for Glide avalanches has formed over the necessary terrain, the threat is likely to remain for extended periods. Cold temperatures can refreeze the layer of water at the ground, but at some point, it’s likely to return to its liquid phase. An avalanche or seasonal melting of the snowpack may be what’s required for the final destruction of this setup.
Location in the terrain will vary for each avalanche type predicted for the day, because weather does not build the snowpack uniformly across the landscape. After de-
can add significant load to the snowpack in addition to decreasing strength.
Notable events include any rapid introduction of liquid water to the snowpack — by rain, or by prolonged periods of melt due to warm air temperatures and/or strong sun. This can be accentuated if overnight temperatures do not drop significantly below 32°F. It’s challenging if not impossible to predict the timing when these events will have their greatest impact on Wet Slab avalanches; dif-ferent snowpack structures will accept different amounts of liquid water before reaching their stress vs. strength tipping points.
Wet Slab avalanche cycles will subside after a complete refreeze, though they still occur along the continuum of refreezing. Just because the surface has refrozen does not mean liquid water is no longer present elsewhere in the snowpack. Without a complete refreeze, Wet Slab cycles can decrease once drainage channels become well estab-lished to prevent pooling, and again in late spring to early summer after the snowpack has fully transitioned to wet.
Glide avalanches are the release of the full depth of the snowpack as a result of gliding over the ground.
Glide avalanches are a very un-predictable avalanche type, but ac-cidents involving people are rare. When they happen, snow quality
isn’t very good and people don’t tend to be out recre-ating. Glide avalanches usually occur in the same loca-tions from year to year, so management involves avoiding these areas when Glide avalanche conditions exist.

46 47
Before Leaving: Anticipate Conditions Before Leaving: Anticipate Conditions
tracks. For example, when storms pass over the region, they tend to produce more snowfall over the first high elevation terrain they encounter, and have less moisture available over downstream terrain. This rain shadow ef-fect can result in a dry micro climate at the downstream locations. Similar micro climates can be created by major drainages or gaps between mountains that channel wind and focus storms on some mountains more than others, and large bodies of water that store heat and provide storms with warm and moist air. These micro climates can cause the avalanche problem to differ by location within the region.
Elevation is another location factor to consider; it influences precipitation, temperature, wind, and sun. Elevation can be measured in feet above sea level, but it’s also common to reference three elevation bands; below treeline, near treeline, and above treeline. These are generalizations that can vary in actual elevation from one mountain range to another, and the terms are prob-lematic in mountain ranges of the Great Basin, where vast areas of near-treeless sageland can dominate at sev-eral elevations. Elevations can also be referenced simply as low, mid, and high.
As elevation changes, the resulting precipitation and temperature changes are closely related, due to oro-graphic lifting and lapse rate. Orographic lifting is the mechanism by which air masses are forced upwards when they move over terrain, like a mountain or group of mountains. As the air mass rises, it expands and cools predictably, according to its lapse rate. Dry air, at less than 100% relative humidity, will cool 5°F per 1,000ft of elevation gain. Moist air, at 100% relative humidity, has a
termining what avalanche types are possible for the day, the next step for anticipating conditions is to determine where they might be encountered.
Snow climates exist on a broad scale across North America, formed by continent-wide weather patterns and their resulting weather and snowpack. As warm and moist air travels from the Pacific and first makes land-fall, storms often produce a relatively warm and abun-dant snowfall. Regions with a typically warm and deep snowpack, like the Sierra, Cascades, and the Coast Range through Canada and Alaska, are known for their maritime snow climate. As storms move inland, they lose moisture and get colder. Along the Rocky Mountains and Canadian Rockies, the typical storms are cold, with low density snow and low accumulation rates. These regions with a cold and shallow snowpack are known to have a continen-tal snow climate. In between the maritime and continen-tal climates, throughout the numerous mountain ranges in Nevada, Utah, Idaho, and Interior BC and Alaska, the winter season often begins like a continental climate and ends like the maritime. This is known as the transitional or intermountain snow climate.
These snow climates are typical but not guaranteed. Don’t just assume that a maritime region will have a warm and deep snowpack; that a continental region will have a cold and shallow snowpack; or that a transitional region will have something in between. Instead, look for data to support or challenge these assumptions. Atypical weather, either at the regional or local scale, will likely build an atypical snowpack.
Micro climates are areas that behave differently from the rest of the region due to local topography and storm

48 49
Before Leaving: Anticipate Conditions Before Leaving: Anticipate Conditions
elevations where the fog and clear skies have some over-lap, or at reverse elevations from “normal,” due to warm daytime air at high elevations that cools at night.
Elevation will also influence wind speed and direction, and thus the locations for avalanche types associated with wind and/or lack of wind. At higher elevations, without terrain to interrupt the flow of wind, wind speeds can be stronger and more directionally consistent than at lower elevations, where more terrain disrupts and redirects the flow of wind. As a result, Wind Slab and Cornice Fall ava-lanches are more likely to be encountered at mid to high elevations, and Storm Slabs and Persistent Slabs on surface hoar at mid to lower elevations. Local topography and/or unusual wind events can change these generalizations.
Elevation also influences the sun’s impact on the snow through atmospheric filtering, the radiation balance be-tween sunlight and air temperature, and cloud heights. Atmospheric filtering is the absorption of energy from the sun by the atmosphere, resulting in more energy trans-mitted to the snow at higher elevations and less at lower elevations. This energy is in a complex balance with heat energy from air temperatures (input and output to/from the snow), and each of these are also affected by cloud cover. Because all three of these change over elevation, the balance between them changes as well. As a result, avalanche types associated with heat can be distributed by elevation. And surface conditions associated with heat, like melt layers, crusts, surface hoar, and near sur-face facets, can change with elevation, influencing distri-bution of avalanche types once buried.
Aspect is the direction that terrain faces. Aspect to the wind and aspect to the sun are two important contribu-
more variable lapse rate, but a typical value is 2.5°F per 1,000ft.
As a snowmobiler, you want warm and moist air masses to rise and cool. This is what causes snow to fall. However, because orographic lifting will increase precip-itation rates as elevation increases, avalanche problems that are connected to recent loading can be different at higher elevations, with larger avalanches possible where accumulation is greatest.
Precipitation type can also change as temperatures vary across different elevations. Rain might fall at lower elevations, wet snow at mid elevations, and dry snow at higher elevations. Avalanche problems connected to pre-cipitation type will thus be found at different elevations. For example, an avalanche problem related to a rain crust will be located at the elevations where it rained.
Even without precipitation, temperature changes across elevations can have influence over the snow-pack and the resulting location of avalanche problems. Typically in mid-winter, avalanche problems connected to warm temperatures will be found at lower elevations, and problems connected to cold temperatures at higher elevations — though of course, mid-winter warming can also occur at high elevations. A special case of this is during inversions, when cold air pools at low elevations and warm air rises to high elevations. If the cold air has enough moisture content, inversions can also trap fog at lower elevations. Inversions influence and can even re-verse the likely elevations for avalanche problems con-nected to warm or cold temperatures, or the balance between sun and humidity from fog. For example, an inversion can cause surface hoar to grow at the specific

50 51
Before Leaving: Anticipate Conditions Before Leaving: Anticipate Conditions
are generally cold, shady slopes will remain cold and are likely to facet above a relatively warm ground, and are also likely to preserve whatever other snowpack struc-ture exists. During the same times, warmer sunny slopes will change faster and be more susceptible to settlement. They can also develop warm melt layers and crusts near the surface that put warm and cold next to each other and promote faceting. As the season progresses, previ-ously cold shady slopes get warmer and change faster than earlier in the season, and sunny slopes may have liquid water present in the snowpack. Sunny slopes will begin their springtime transition to a diurnal melt/freeze cycle sooner than their shaded counterparts.
Likelihood and Size are the final components to the av-alanche problem. Similar concepts are also connected to the danger rating provided by an avalanche forecast. Although the danger rating is one of the most noticeable components of a forecast, it isn’t as complete a way to anticipate conditions as the avalanche problem, and won’t be discussed in detail here. Very roughly, a low danger rating reflects a low likelihood and small size, and a high danger rating reflects a high likelihood and large size. However, the low and high ends of the danger scale often have high levels of certainty. The middle of the danger scale tends to have less certainty, and thus more risk. Most avalanche accidents occur when the forecasted danger rating is near the middle of the scale.
Likelihood is the chance of encountering and trigger-ing a particular avalanche type. It combines the spatial distribution of the type with its sensitivity to triggering. The spatial distribution is an estimate of how much ter-
tors to the development of the snowpack, and therefore to the location of avalanches.
Aspect to wind is referenced as windward (facing into the wind) and leeward (facing away from the wind). Wind will remove snow from windward terrain and de-posit it onto leeward terrain. Wind also prevents surface hoar from forming, and can knock it down if it’s already formed but still on the surface. In general, hazardous av-alanches are more likely to be encountered on leeward aspects because of the volume of snow that is deposited, and depending on the snowpack structure, just about any avalanche type can be located there. If windward aspects have enough snow to be of concern, the avalanche types there are either likely to be associated with a shallow snowpack, or with recent snow if little wind accompa-nied it. Because elevation also influences wind speed and direction, the relevance of aspect to wind can vary by elevation, often decreasing as elevation decreases.
Aspect to sun is referenced simply as sunny or shady. Of course, this changes from sunrise to sunset, but it also changes as the height of the sun in the sky changes throughout the season (or if you move significantly in latitude). In early to mid-winter, when air temperatures
The avalanche problem includes the type, location, likelihood, and size

52 53
Before Leaving: Anticipate Conditions Before Leaving: Anticipate Conditions
old is D2, so distinction between the rest is somewhat pointless.
After anticipating conditions, you need to acknowledge your uncertainty about them before creating safety mar-gins. If you’re using an avalanche forecast, how certain do you think the forecasters are? Are the weather, the snowpack, and the avalanche problems straightforward and well supported by data? Or are any of these three un-usual or seemingly disconnected from each other? Some avalanche forecasters will include language in their nar-rative to communicate their uncertainty, or use a graphic to visually represent this. Even if the forecast implies a level of certainty, how familiar are you and your partners with managing yourselves in the forecasted conditions?
If you don’t have an avalanche forecast available to anticipate conditions, and are instead gathering your in-formation from other sources, assume a very high level of uncertainty when you create safety margins.
Either way, remember that uncertainty is both the “known unknowns” and the “unknown unknowns.” If you’re able to identify uncertainty in the avalanche fore-cast or in your own information, it’s because of known unknowns, and with practice you can better manage these uncertainties and strive to reduce them. However, the unknown unknowns have the potential to surprise you no matter your level of preparation and experience. Recognition of this is the difference between an overcon-fident rookie and a seasoned veteran. The true sign of an “expert” is to acknowledge the unknown unknowns with humility and appropriate safety margins.
rain the problematic structure covers within the antici-pated locations: Is everywhere, only in specific places, or is it isolated? The sensitivity is an estimate of how easy it might be to trigger if you do encounter it: Is it touchy, stubborn, or somewhere in between?
Counterintuitively, the highest likelihood may not rep-resent the highest risk. The highest likelihood means that a particular avalanche type is sure to be encountered and is easy to trigger. If you are at all capable of maintaining awareness while riding, this likelihood would be obvious, and you and your partners would keep your distance from avalanche terrain without much need for discussion.
Risk involves uncertainty, which increases as likelihood decreases. During low likelihood conditions, the proba-bility is low that you’d happen to ride where avalanche conditions are located, and even if you did, the proba-bility of triggering something is also low. Without a de-liberate way to maintain awareness, you might not even recognize that you’re riding in avalanche conditions, and you wouldn’t see any reason to avoid avalanche terrain. The uncertainty plus exposure would represent high risk. The only missing component of risk is consequence.
Size is based on the destructive potential of avalanches, so has a direct connection to consequence. Small ava-lanches are relatively harmless to people unless the ter-rain is unusually high consequence. Medium avalanches could bury, injure or kill a person. Large avalanches could bury cars, destroy a house, or break trees. The destruc-tive scale is a common way to describe avalanche sizes. D1 avalanches are small, D2 are big enough to bury, in-jure or kill a person, and D3 avalanches are large. There are also D4 and D5 avalanches, but the important thresh-

54 55
Before Leaving: Create Safety Margins
just after riders said something like “I know we agreed not to do this, but…”
Make sure your safety margins are straightforward and easy to follow. They should be simple enough that they’re easy to communicate without confusion.
Create your safety margins without skipping ahead and applying them to the actual terrain you might be riding in. Save this for when you confirm details. Otherwise, you’d probably create biased margins to justify going some-place you’ve already decided upon for other reasons.
TERRAIN SAFETY MARGINS
The Avalanche Terrain Exposure Scale, or ATES, is a system to categorize avalanche terrain according to its level of exposure. Avalanche exposure is a function of your position in the terrain, and is the most controlla-ble and therefore important way that you can manage your risk. The reality of human nature is that your rid-ing partners come with a high level of uncertainty, and even expert group management doesn’t represent 100% control. Avalanche conditions often have a high level of uncertainty, and you have zero control over them. Your position in the terrain is the third ingredient required for an avalanche accident (people, conditions, and terrain), and you do have a high level of control over where you go. This is why it’s vital to predetermine what level of terrain exposure is acceptable for the day.
Although the ATES formally uses only three categories of avalanche terrain, Simple, Challenging, and Complex, a fourth category that’s Non-Avalanche is implied and will be included here. The ATES ratings themselves are
Mountain riding is too dynamic to make specific, linear plans. The dynamic nature of the sport contributes to the sense of freedom that’s inherent to its enjoyment. But the line between freedom and chaos is a thin one, and crossing it in avalanche terrain can be deadly. Safety margins are the rules that you create before leaving, to keep from crossing that line once you’re out on the snow. Predetermined safety margins make decisions easier during the “stoke” of the day.
Create safety margins based on your riding partners and anticipated conditions, with room for error and un-certainty. Decide in general terms where you’re willing to go and where you’re not, and when. Safety margins can be based on:
1. Terrain2. Timing
In the context of avalanche risk management, by iden-tifying and maintaining safety margins, you can begin to reduce exposure, and by extension the consequences of errors. Once you’re out on the snow, you can decide to rein in on your margins, but don’t allow yourself to let loose on them. Bad things happen when people break their own rules. Innumerable accidents have occurred
1.3 Create Safety Margins

56 57
Before Leaving: Create Safety Margins Before Leaving: Create Safety Margins
assume the worst. Conservatism is justified on days that you’ve agreed to avoid avalanche terrain.
Non-Avalanche terrain includes flat meadows and low angled, gladed or forested terrain. If groups of trees show any slope-parallel patterns in density or age; if uphill branches are broken; or if trees themselves are broken and laying downhill, these are vegetation clues that an avalanche path is overhead, and you are in avalanche ter-rain. Above treeline, Non-Avalanche terrain can be hard to discern, so even small slopes need to be very low angle.
Simple terrain is generally less than 30°, but it can include the runout zones of small and infrequent ava-lanche paths, and small steep features that are low con-sequence. Common group management techniques can reduce exposure and consequences, or avoid exposure altogether. In Simple terrain, it’s easy to recognize where the exposure is, and numerous options exist for riding without any exposure.
independent of people and conditions. For example, Complex terrain doesn’t become Simple just because you have an amazing crew and don’t anticipate avalanches. However, if you have an amazing crew, don’t anticipate avalanches, and have a high level of certainty regarding each of these, you might decide that that Complex ter-rain is appropriate for the day.
Non-Avalanche terrain is well under 30° in steepness, and will never produce an avalanche big enough to bury or kill a person (a D2 avalanche). This needs to include the terrain that’s overhead — it doesn’t count as Non-Avalanche terrain if there’s exposure to avalanches from above.
There may be small features that are 30° or steeper, but they can’t be big enough to produce a D2 avalanche, or have additional components such as a cliff below that would kill you even in a D1 avalanche. Judging the poten-tial size of an avalanche is difficult; if you’re in doubt,
Non-avalanche terrain
Simple avalanche terrain

58 59
Before Leaving: Create Safety Margins Before Leaving: Create Safety Margins
rain, but it is still possible. It requires skill at identifying the characteristics that make terrain prone to avalanches and skill at group management. Some options exist for riding without significant exposure.
Terrain Traps may become more consequential in Challenging terrain. Avalanche paths can run into creek beds or other depressions that would increase burial depths, or into tree islands and rocks that would cause trauma. Terrain traps in Challenging terrain should not represent certain death.
Tree cover can vary in Challenging terrain, and ava-lanche paths can run from above treeline all the way to valley floors. However, these large paths should be few and separated from each other. Above treeline, it can be more difficult to determine where avalanche paths are, but with skill you should still be able to identify options for riding without significant exposure.
Complex terrain can include multiple avalanche paths, with a high percentage of terrain between 30-45°. It can be very difficult or impossible to reduce or avoid expo-
Some Terrain Traps can be present; these are terrain features that increase the consequences of even small avalanches. In Simple terrain, terrain traps should be minimal, like creek banks without overhead exposure, or small rocks you might jump off but wouldn’t want to be pushed off inadvertently.
Simple terrain can be tree-free when it’s low angle, but as slopes approach 30°, they should have tree cover that’s dense enough to require advanced riding skill. Tree cover indicates that large avalanches don’t occur often, and dense tree cover can anchor the snowpack. Look for vegetation clues to avoid misjudging your exposure. Simple terrain above treeline should be mostly low angle, with any slopes above 30° easy to recognize and avoid.
Challenging terrain can include a few well defined av-alanche paths above 30°, including start zones between 35-40° (statistically where most avalanches start). It’s difficult to reduce or avoid exposure in Challenging ter-
Challenging avalanche terrainComplex avalanche terrain

60 61
Before Leaving: Create Safety Margins Before Leaving: Create Safety Margins
and thin snow coverage on sunny aspects below treeline, you can agree in advance not to go to those locations.
You can also combine elevations and aspects with the ATES. Using the previous example, you might agree to only ride Simple terrain on shady aspects near and above treeline, and to avoid all sunny aspects below treeline.
Use caution when using elevations and aspects for safety margins. If you have a forecast available, the locator rose is a broad generalization across the whole forecast region that may have high levels of uncertainty. Actual conditions where you ride might be different. If you don’t have a forecast available, you should assume a very high level of uncertainty.
Resist the temptation to apply elevation and aspect margins to a small scale once you’re out on the snow. Don’t assume you’re “safe” just a few yards away from where you agreed not to go. And don’t forget to con-sider your partners when creating these margins; if you have any doubts about them, don’t plan to go where one quick twist of the throttle can put them over the line. Elevation and aspect margins can be especially problem-atic in big and/or convoluted terrain, where snowpack characteristics from several elevations and aspects can exist on one slope.
Slope and Feature safety margins can be used by agreeing to avoid slopes and features with specific char-acteristics, or with combinations of features like Terrain Traps and Trigger Points.
Specific characteristics can be anything in addition to elevation and aspect that makes a particular avalanche type more likely to exist there. For example, surface hoar is more likely to form and become buried on slopes
sure. Riding here should be saved for the days when you are confident you won’t encounter avalanches.
Terrain Traps in Complex terrain can be very conse-quential, including combinations of depressions, gullies, and cliff bands within avalanche paths, and terrain traps with hidden avalanche paths above them.
Tree cover can be sparse to non-existent in Complex terrain. Avalanches may not follow well defined paths, and can even converge and overlap.
Elevations and Aspects are helpful safety margins to use in addition to ATES. When you anticipate conditions, you might include elevations and aspects as part of the avalanche problem. If you’re using an avalanche fore-cast, elevations and aspects are almost sure to be part of the avalanche problem; nearly all avalanche centers use a “locator rose” to show you the general elevations and aspects where an avalanche type is most likely to exist. Forecasts that don’t include a locator rose usually communicate similar information within their narrative instead of graphically.
You can create elevation and aspect safety margins by agreeing to avoid the lo-cations where encountering avalanches is most likely. Similar margins can be used when you expect riding con-ditions to be poor by loca-tion. For example, if you anticipate Persistent Slab avalanches on shady aspects near and above treeline,
N
W E
S
NW NE
SESW
ABOVE TREELINE
NEAR TREELINEBELOW TREELINE

62 63
Before Leaving: Create Safety Margins Before Leaving: Create Safety Margins
Trigger Points are features where avalanches are most likely to be triggered. These are places where either the weak layer is especially weak, where the slab above the weak layer is especially thin, or where the stress on the snowpack is greatest. Common Trigger Points include any part of the slope between 35-40°, convexities and con-cavities, shallowly buried rocks, below cornices, and near trees or exposed rocks that interrupt the slab and/or ab-sorb heat from the sun. For example, you could agree to avoid all Trigger Points when you anticipate shallow Storm Slabs; for small Dry Loose avalanches, you could agree to avoid steep terrain; for small Wet Loose, avoid steep terrain with exposed rocks; etc.
Slope and feature safety margins typically only reduce your exposure to small human triggered avalanches, and their scale is quite small compared to the ATES and to el-evations and aspects. If large and/or natural avalanches are possible, or when uncertainty is high about either your partners or conditions, use the broader margins. Additionally, trigger points are not appropriate safety margins when the anticipated avalanche types don’t follow predictable triggering patterns (Persistent Slabs, Deep Slabs, Wet Slabs, and Glide Avalanches).
TIMING SAFETY MARGINS
Timing margins can be based on the time of day, or linked to easily observable events. These margins are usually straightforward, but they’re often the rules that are most tempting to break. If one last lap through a play zone could be the difference between life and death, your timing margins aren’t robust enough. Make sure to
sheltered from the wind and with minimal tree cover; Glide Avalanches are most likely to occur on slopes with smooth ground cover; Wind Slab is more likely to form on leeward features and places where wind decelerates; graupel often rolls downhill and is likely to accumulate in concavities; etc. Use of specific characteristics as safety margins requires advanced understanding of snowpack formation, and high levels of certainty.
Terrain Traps are features that increase the conse-quences of even small avalanches, by increasing possi-ble burial depths, increasing the chances of trauma, or by making drowning and/or hypothermia likely. Terrain Traps include depressions, open holes, abrupt transitions, trees, rocks, cliffs, cornices, and any open water in or near an avalanche path. Terrain Traps in general can be added to other safety margins, like “Challenging terrain is OK, but avoid all Terrain Traps.” Or, when some Terrain Traps are more concerning than others, they can deserve their own margins, like cornices after a wind event or open water during early and late season.
An open creek at the bottom of this test slope increases the consequences

64 65
Before Leaving: Create Safety Margins Before Leaving: Create Safety Margins
your exposure as the day progresses, remember that “absence of evidence is not evidence of absence.” Just because you don’t see evidence of avalanches does not mean that avalanches can’t happen. To apply these mar-gins correctly, you need to clearly define what evidence is needed to increase your exposure, and then go find it in abundance.
As with your terrain margins, factor your partners into your timing margins. If you think you’ll have difficulty fol-lowing the rules, don’t make them to begin with. Instead keep your margins broad and easy to maintain.
give yourself some room for this, in addition to allowing for error and uncertainty.
Time of Day safety margins can be used when the like-lihood of avalanches will either increase or decrease while you’re out riding, but there’s no easily observable event to use as a threshold. Rapid warming in the spring-time is a classic example; it’s often predictable every day, but the difference between softening and wet av-alanching isn’t easy to observe until the avalanching be-gins. If you agree to ride sunny slopes until you see the first avalanche of the day, it might be one avalanche too late. Instead, you could agree to ride sunny slopes until you take a lunch break, or until a specific time.
Observable Events are useful as timing thresholds for safety margins. For example, you could agree to certain margins until it begins to rain, and more conservative margins after. However, make sure the events you iden-tify as timing thresholds are both observable and easy to confirm once you’re out riding. If you agree to reduce your exposure once you receive 12” of new snow, you and your partners might convince yourselves that 13” is only 11” to justify more powder riding!
Most timing margins will suggest reducing exposure as the likelihood of avalanches is anticipated to increase. Likelihood can also decrease, but timing margins that in-crease exposure as the day progresses are not generally recommended. They can be used to rationalize breaking your own rules and defeating the whole purpose of creat-ing safety margins in the first place. Save these for days with very reliable partners, high levels of certainty about conditions, and low consequence avalanches.
When you choose to use timing margins that increase

66 67
Before Leaving: Confirm Details
education. Using either of these versions provides struc-ture to help you avoid missing any details, and serves as a contract between everyone you’re riding with for the day. It also makes the details easy to share with someone who’s not going, in case outside assistance becomes necessary.
TRAILHEAD NAME, START TIME AND RETURN TIME
Your trailhead should be chosen to provide high quality riding within your safety margins. Don’t go someplace where you’d have to break your own rules for good rid-ing; this is a sure setup for failure. Use maps and online resources when discussing options with your riding part-ners. Many online resources have slope angle shading fea-tures to help you identify terrain that fits your margins. Satellite imagery with 3D viewing capability can be very helpful for terrain visualization. You might even discover new riding areas to explore.
A start time and return time are important to agree upon in advance. Unexpected time constraints can be more than annoyances; they can interfere with group management and compromise your risk management process. Make sure everyone is aware of any time con-straints, and that fuel limitations and sunset times are also discussed. To make it back to the trailhead by your return time, you’ll agree on turn-around times specific to Plan A and Plan B.
PLAN A AND PLAN B
Plan A and Plan B should each be viable, enjoyable plans. Success needs to be defined by achieving either one.
Riding a +150hp machine through avalanche terrain is no time for depending on assumptions. Instead, before leaving, make sure that you and your partners have con-firmed important details. This can help prevent surprises and minimize confusion once you’re out on the snow, re-ducing risk, and providing better flow at the same time. Confirm all the details about your partners, conditions, and safety margins, and then agree to final details that account for them. The final details should include:
1. Trailhead name, start time and return time2. Plan A and Plan B3. Emergency preparedness
In the context of avalanche risk management, confirm-ing the details reduces uncertainty as it relates to your whole risk management plan, and emergency prepared-ness can help reduce the consequences of errors. Although confirming the details can be done verbally, it’s recom-mended that instead, you develop the habit of record-ing the details either on paper or electronically. Several copies of a sample format are provided in this chapter, and a fillable PDF is hosted at sierraavalanchecenter.org/
1.4 Confirm Details

68 69
Before Leaving: Confirm Details Before Leaving: Confirm Details
EMERGENCY PREPAREDNESS
No plan is infallible, and with the nature of mountain rid-ing, something might eventually go wrong. Make sure you and your partners are ready for this. Carrying the neces-sary gear can help prevent emergencies and also reduce the consequences of them.
Avalanche gear for everyone is a must, even if you don’t plan to go into avalanche terrain. Accidents have occurred to riders who had the best intentions to avoid avalanche terrain, but for various reasons ended up in it. Accidents have also occurred to riders who didn’t even realize they were in avalanche terrain.
Carrying avalanche gear is no excuse to trigger ava-lanches. Many victims die from trauma, not suffocation, so a quick recovery has little effect on their outcome. And those who don’t die still have a high trauma rate, which can ruin a day, or worse.
Resist the urge to create “ideal” and “backup” plans, so you don’t create bias toward one vs. the other. However, the plans need to be different enough to help you man-age uncertainty, with each plan conditional upon the sources of uncertainty you can best identify (the known unknowns). It can be helpful to use “if-then” statements to evaluate potential plans, like “if there’s more new snow than anticipated, then we go to…”
Remember to account for the weather’s influence on things other than avalanche conditions. How will it influ-ence comfort, riding quality, visibility, communication/navigation, and emergency preparedness? Is any of this changed by where you go?
Use maps and online resources, or expert local knowledge if you have it, to evaluate options within your safety margins. These should not be overly linear and specific, except when established trails are used. Instead, link various options together at the drainage and mountain scale, like “use the Chicken Creek drain-age to gain Jacks Peak, then link to Pratt Creek.” This allows the flexibility to go where you want along the way, with decisions made at critical junctures when you manage your group.
Include a turnaround time for each plan that gets you back to the trailhead by your return time. Often your turnaround time will be your halfway point, which means you could be at your farthest point from the trailhead with half your ride remaining. Lots can still go wrong, so be conservative with your turnaround time. If you get ahead of schedule, you can always add a few more play riding sessions toward the end of the day.

70 71
Before Leaving: Confirm Details Before Leaving: Confirm Details
excuse to have multiple people caught in an avalanche, it would be horrible to get caught and survive, unable to recover your partner because your shovel was ripped from your pack and lost.
Secondary shovels are recommended for everyday use like analyzing the snowpack and digging out stuck sleds. These shovels can be carried on machines for conve-nience. They will suffer more wear and tear than your rescue shovel, which should be saved for emergencies.
Probes need to be long and strong, and carried inside your pack or vest like your shovel. Lightweight probes are often short and weak. Short probes may not reach a buried victim, and weak probes can break during rescue practice or while doing the real thing. Secondary probes can be carried on the machine for snowpack analysis.
Radios help prevent emergencies, and can be invalu-able for communication if one has occured. You and your partners should all carry radios capable of operating on FRS/GMRS channels, and ride with them turned on and accessible, but separate from your avalanche beacons. Don’t try to save batteries by keeping them turned off until an emergency occurs, and don’t carry radios in a tunnel bag or buried deep in your pack. It’s helpful to wear speaker mics on the shoulder strap of your pack or vest. Voice activated in-helmet options exist, but these may lead to unwanted noise and distracting chatter. The FCC requires licenses for certain frequencies, so make sure you’re operating radios legally.
Personal care gear includes weather-appropriate clothing, extra goggles and gloves, food and water, and any necessary personal medications. Some thought is re-quired to decide where to store this gear. Carry at least
The bare minimum avalanche gear is a beacon, shovel, and probe. These three are often referred to as “the es-sential gear,” and they must be carried together; each is dependent on the other two. Airbag packs/vests are not replacements for them. In some circumstances airbags can help prevent burial, and there’s nothing wrong with stacking the odds in your favor by wearing one, but you and your partners still must carry beacons, shovels, and probes.
Beacons should have 3 antennae and be within the man-ufacturer’s recommended service life. As of this writing, some 2 antennae models are still being sold. These are functional, but not ideal. Although they can be made to perform almost as well as their 3 antennae counterparts, it takes much more practice. Check your beacon, and if it’s a 2 antennae model or beyond the manufacturer’s recommended service life, you should replace it.
Beacons need to be worn on the body according to the manufacturer’s recommendation. If you don’t have an owner’s manual, you should be able to find this informa-tion online. Keep your beacon separate from any other electronic device, especially if you ever perform a search with it. Don’t put a transmitting beacon onto your ma-chine so that you can find it in case of burial. If you’re ever buried, your partners might recover your sled before they find you.
Shovels should be made specifically for avalanche rescue, and made from metal, not plastic. Your rescue shovel needs to be carried on your body, ideally inside your pack or vest. Some packs and vests come with ex-ternal carry systems, but these can snag on trees while riding and can fail in an avalanche. Although there’s no

72 73
Before Leaving: Confirm Details Before Leaving: Confirm Details
tomize it according to your level of training. At least one person in the group should have a first aid kit, but several kits distributed among the group can help improve the chances you’ll have what you need. Consider carrying a minimal kit in your pack or vest, and a more thorough kit on your machine.
Navigation tools like a map, compass, and GPS need to be carried. They have different strengths and weak-nesses, so don’t carry just a map and compass, or just a GPS. Equally important is the knowledge to use them. Consider taking a navigation class if you’re not familiar with this skill.
Rescue kits can vary depending on the terrain you typ-ically ride in, and what type of machines you and your partners use. A single tow rope might be enough, but you may want a second rope for downhills and traverses, or additional gear to tie-off to machines, build anchors, and rig a mechanical advantage. Snowbikes are notoriously difficult to tow, so be prepared to drag them on their side. More than one rope and a durable piece of plastic, like a kid’s roll-up sled, can be helpful. There are some interesting pre-packaged rescue kits available commer-cially, but as with first aid kits, give these some thought before deciding they’ll work for you. Rescue kits can also include folding wood saws, though many snow saws in-tended for snowpack analysis also cut wood.
Someone external needs to know the details you’ve agreed to, in case outside assistance becomes necessary. You can print a copy of the following format, or use the “Daily Plan” fillable PDF at sierraavalanchecenter.org/education.
the bare minimum in your pack or vest, in case you be-come separated from your machine.
Repair kits should be well thought-out and somewhat machine specific. Carry at least the correct drive belt for your machine and the tools to change it. Consider adding additional tools and hardware for both common repairs and improvised repairs. A siphon can be helpful for trans-ferring fuel, especially if everyone is on fuel injected ma-chines that limit gravity assisted options. You can learn what to prioritize in your field repair kit by trying to use it for basic maintenance at home.
Overnight gear can be the difference between life and death after even a minor mishap. An emergency bivy sack, warm hat, and a fire starting kit don’t take up much space, and while they may not keep you comfortable overnight, they can help keep you alive. Carry these in your pack or vest, not on your machine. The knowledge to build a snowcave or similar emergency shelter is as important as the gear you carry.
External communication like a satellite device, or cell phone if coverage is available, is vital for emergencies that require outside assistance. They can also help com-municate with loved ones if your return will be delayed for any reason. Make sure your subscription is up-to-date and batteries are charged, and carry this on your person, not on your machine. If your external communication is powered up while you ride, keep it separate from your avalanche beacon.
First aid kits can run the gamut from minimal to over-kill. Many pre-packaged first aid kits are not much more than an expensive assortment of band-aids. As with re-pair kits, put some thought into what you carry, and cus-

74 75
Consider Your Partners certain 1 2 3 4 5 uncertain (circle one)
Anticipate Conditions certain 1 2 3 4 5 uncertain (circle one)Weather (precipitation, wind, temps, sun and cloud cover)
Snowpack (new snow, riding quality, weak layers)
Avalanches (avalanche type, location, likelihood and size)
Create Safety Margins certain 1 2 3 4 5 uncertain (circle one)Non-avalanche □ Simple □ Challenging □ Complex □
Describe other safety margins that are easy to maintain (eleva-tions and aspects, slope and feature descriptions, timing):
Confirm Details certain 1 2 3 4 5 uncertain (circle one)
Trailhead name, start time, return time:
Plan A including peaks, drainages, and turn-around time:
Plan B including peaks, drainages, and turn-around time:
Radios? □ Personal care? □ Repair kits? □ Overnight gear? □
Someone has external communication like a satellite device? □
First aid kit? □ Navigation tools? □ Rescue kit? □
Someone external has a copy of this? □
Name: Emergency Contact:
Everyone has avalanche gear? □

76 77
On the Snow: Stop To Talk
All the planning done before you leave would go to waste if you don’t occasionally stop to talk once you’re out on the snow. Your typical day of riding probably already has several stops to catch your breath, take in the views, have a snack, change gloves, etc. To follow the Daily Flow, take advantage of these stops to talk with your partners about conditions, terrain, and group manage-ment. These stops can be timed to coincide with natural transitions during the day, including the following:
1. At the trailhead2. Prior to riding in non-avalanche terrain3. Prior to riding in avalanche terrain
In the context of avalanche risk management, stopping to talk serves to reduce uncertainty about your plan to reduce exposure and consequences. Note that the best way to reduce exposure and consequence might be to avoid the terrain entirely, and you should always consider
2.1 Stop To Talk
this as an option. If you do choose to proceed, you and your partners are accepting some degree of exposure and consequence, so make sure that everyone acknowledges this and agrees to it.
AT THE TRAILHEAD
At the trailhead you should review your plan, discuss group management for the first part of your ride, and check emergency gear. Although it’s tempting to do this casually, with one person walking from truck to truck as everyone else prepares for the ride, this allows too much room for error and sets a bad precedent for the rest of the day. Instead, make this dedicated and organized, with motors off and everyone together for face-to-face communication. You can have your partners circle-up on foot or on machines. If the trailhead is crowded or noisy, you may want to ride a short distance from these distrac-tions — but not too far, in case you discover any issues that require turning back.
Review the anticipated conditions, your safety mar-gins, and Plans A and B including turn around and re-turn times. Make sure everyone clearly understands and agrees to these details. If you’ve already noticed some-thing about your partners or conditions that isn’t as ex-pected, make adjustments now.
Discuss group management for the first part of the ride. Preview the route up until your next stopping point, and agree to the spacing and spotting techniques you’ll use to get there. Because most trailheads are in non-av-alanche terrain, typically this first leg of your ride will also be through non-avalanche terrain. Plan to stop for

78 79
On the Snow: Stop To TalkOn the Snow: Stop To Talk
another talk at least before you transition into ava-lanche terrain, if not sooner. See chapter 2.2, Manage Your Group, for guidance on management techniques in non-avalanche and avalanche terrain.
Check emergency gear before leaving the trailhead, where you may still have access to spare batteries or other equipment if you need it. The gear check can be a good segue into the first leg of your ride, so save this for the last part of your trailhead stop.
Begin with a radio check, and verbal confirmation that everyone has the non-avalanche related gear that you planned for when you confirmed details. If there’s any reason for the group to be aware of the location of spe-cific items, clarify this.
If you don’t often ride with this group, or if it’s the first ride of the season, you may want to perform an av-alanche gear drill. Tell your partners that on the count of three, everyone needs to assemble their probe and shovel and place them upright into the snow, close packs or vests and put them back on, and switch beacons to “search” and hold them at the ready. This is an oppor-tunity to practice getting this gear ready quickly, and also to see that everyone has the appropriate gear. If your group has already done this drill recently, you can instead verbally confirm that everyone has shovels and probes. However, a thorough beacon check is always necessary.
To perform the beacon check, follow these steps:
• Go around in a circle with everyone reporting their battery strength. On some beacons, this requires pow-ering the beacon off and back on again. If anyone has low batteries, replace them now.
• Have everyone switch to “search.” All beacons should become quiet once everyone is on search, unless a rider not in your group is nearby. Once you’ve confirmed that everyone is on search, you alone switch to “send” and check that all other beacons receive your signal.
• Have everyone switch to send and stow beacons for the day (how and where, including proximity to other electronic devices, according to the manufacturer’s recommendations). You can now switch your own bea-con to search, to confirm one at a time that all other beacons are sending. Some models have a “group check” function to assist with this.
• Finally, switch your own beacon back to send (you can choose to have someone witness this) and stow it for the day.
With practice, this beacon check takes little time. There are some variations that suggest riding machines past the person leading the check. This technique has the advantage of getting everyone onto the snow and riding, but it has several disadvantages due to technical limita-tions of the searching beacon. This is an advanced tech-nique, and if you want to use it, practice it on a day that you’re not in a hurry. Read your beacon manufacturer’s manual carefully, but recognize that it may not address snowmobile-specific issues like the electronic interfer-ence introduced by a running motor.
PRIOR TO NON-AVALANCHE TERRAIN
Prior to entering non-avalanche terrain, stop to review the conditions you’ve observed and discuss what you expect to encounter moving ahead. Preview the terrain

80 81
On the Snow: Stop To TalkOn the Snow: Stop To Talk
you’re about to ride. And, determine the group manage-ment techniques you’ll use to reduce exposure to non-av-alanche hazards and reduce the consequences of errors.
Stop in a safe place, ideally with a view of the terrain you’re about to ride. Have everyone turn off motors, and park close enough that they can hear each other. If it’s windy or visibility is poor, try to find a sheltered area. Don’t block the trail if you’re on one.
Review the conditions you’ve observed and discuss what you expect to encounter moving ahead. Even though you’re entering non-avalanche terrain, you can still reference the Conditions Alerts checklist. If you later plan to enter avalanche terrain, this can help pre-vent overlooking important avalanche related condi-tions. However, emphasis during this stop should be more on conditions that influence riding quality and group management.
Discuss the good things, like where to find the best snow, and address any conditions that represent non-av-alanche hazards, like shallow snow or firm surfaces. How do conditions affect visibility and communication? If there’s flat light or blowing snow, acknowledge this and factor it into your group management techniques.
Preview the terrain you’re about to ride. Reference the Terrain Alerts checklist to confirm that you are not about to enter avalanche terrain. Clearly define where you’re going, including any important boundaries, terrain hazards, and your next stopping point.
Boundaries should be established to avoid avalanche terrain, and to keep your group within a manageable space. Whenever possible, use obvious features or land-marks as “handrails” to define the boundaries. As hand-
rails are to a staircase, these features and landmarks help guide your group to stay within the intended riding area. When available, linear handrails are helpful, like creeks, ridgelines, roads or trails, and distinctive patterns in tree cover. Vague handrails, or handrails that are difficult to communicate or observe, are potential sources of uncer-tainty that could increase exposure and/or compromise group management.
Identify any terrain hazards, like open water, deep holes, drainages with abrupt transitions, cliffs, and tight trees. Some groups will gravitate towards these features on purpose, so make sure if this is the case that everyone agrees to it. Otherwise, identify these hazards as places to avoid.
Discuss your next stopping point, including a rough time estimate to get there. If time is not an issue, you can widen your boundaries, and to simplify management consider meeting back at the same place. If you need to save time, narrow your boundaries to make the next leg somewhat linear, and designate a stopping point far-ther along in the terrain. Choose a natural transition, like when gaining a ridgeline, entering a new drainage, or crossing a handrail like a road or trail. Stop again at least before you transition into avalanche terrain.
Determine the group management techniques you’ll use to reduce exposure to non-avalanche hazards and consequences of errors. These are discussed in detail in chapter 2.2, Manage Your Group. Don’t make assump-tions about the techniques you’ll use; make sure that they are clear to everyone in the group before you end this stop and begin riding.

82 83
On the Snow: Stop To TalkOn the Snow: Stop To Talk
PRIOR TO AVALANCHE TERRAIN
Prior to entering avalanche terrain, stop to review the conditions you’ve observed and discuss what you expect to encounter moving ahead. Preview the terrain you’re about to ride. Then determine the group management techniques you’ll use to reduce exposure to avalanche hazards and non-avalanche hazards, and reduce the con-sequences of errors.
Stop in a safe place with a view of the terrain you’re about to ride. Because you’re entering avalanche terrain, “safe” is a relative term. Whatever you do, don’t park in an avalanche path or runout zone. Any slope steeper than 30° should be considered an avalanche path, especially where there are vegetation clues like a lack of trees, bro-ken trees, or broken uphill branches.
To determine if you are in the runout zone, use vegeta-tion clues, old avalanche debris, and/or use a compass or phone app to see if you are within 20° from obvious start
zones. Some avalanches can run farther than 20° from start zones, so if avalanche conditions are heightened, or if you have high levels of uncertainty, move farther away. You can also take advantage of terrain barriers that would block or deflect moving avalanche debris, like a creek, small hill, or dense stand of trees.
Stopping above or well to the side of avalanche terrain are also options, though these can make it harder to see the terrain. If you can’t find a safe place with a view of the terrain, it will seriously compromise your group manage-ment, and you should consider moving to different terrain.
Everyone needs to park close enough that they can eas-ily hear each other. Turn motors off. If it’s windy enough to compromise verbal communication, or if visibility is poor, consider moving to different terrain.
Review conditions by referencing the Conditions Alerts checklist. Go down the checklist to discuss what you’ve
Use a compass or phone app to stay farther than 20° from obvious start zones.
Preview avalanche terrain prior to exposure

84 85
On the Snow: Stop To TalkOn the Snow: Stop To Talk
seen, and what you expect to see in the terrain you’re about to enter. The details of observing these conditions are discussed in chapter 2.3, Maintain Awareness. With all the conditions alerts, an absence of evidence is not evidence of absence. Just because you didn’t see some-thing doesn’t mean it doesn’t exist. Don’t allow yourself or your partners to forget this, and always acknowledge uncertainty when discussing the conditions alerts.
As the day progresses, it can become repetitive to dis-cuss the same conditions over and over again at every stop. Instead of going through the Conditions Alerts checklist item by item, you can focus your attention on only those things that have changed. However, don’t skip this step or limit conversation about conditions under the assumption that they remain static for the day.
Preview the terrain you’re about to ride. First, con-firm that it does not violate the safety margins you cre-ated. Next, reference the Terrain Alerts checklist, which is discussed further in chapter 2.3, Maintain Awareness. The more terrain alerts you identify, the more potential exposure and consequences this terrain represents.
The more conditions alerts that are present, the more terrain alerts you should avoid. Resist the temptation to assign thresholds to make decisions by adding up items from the checklists; they are intended to help you main-tain awareness, and to promote discussion among your group, not for rule-based decision-making.
If your group decides to proceed, use the Terrain Alerts checklist and the avalanche problem(s) to identify where avalanches might be triggered, where they might flow, and where consequences would be increased by terrain traps. Based on this, agree on specific places to ride and
to avoid. Use features that are unique and easy to de-scribe for clarification purposes.
Discuss boundaries, non-avalanche hazards, and your next stopping point. Use similar guidance as with non-av-alanche terrain, but on a smaller scale since this terrain represents some degree of exposure and requires tighter group management.
Finish this stop by determining the group management techniques you’ll use. These are discussed in detail in chapter 2.2, Manage the Group. However, two techniques are so vital they deserve mention here as well:
• Only expose one person at a time. If they get stuck, don’t rush to help.
• Spotters need to maintain visual contact with the ex-posed rider.
After you stop to talk, use specific group management techniques to ride your chosen terrain. While riding, maintain awareness of condi-
tions and terrain, and then stop to talk again.

86 87
On the Snow: Manage Your Group
COMMUNICATION TECHNIQUES
The nature of mountain riding does not always allow for face-to-face verbal communication, so other commu-nication techniques are necessary to reduce uncertainty in between the times that you stop to talk. Typically, these techniques will include the use of radios and hand signals.
Radios have become more and more common among mountain riders in recent years. If you and your partners don’t already use them, you should. Very quickly, you’ll wonder how you ever rode without them.
You might be familiar with the radios that trail riders adapt from summer motorcycle touring. These often have a speaker/mic in the helmet that’s voice activated for hands-free use. These are not recommended for mountain riding for several reasons. The voice activation compo-nent is difficult to setup properly and is prone to failure. The microphone can be activated by your movements and breathing, by riding through branches or brush, and by your exhaust when the sled is tipped to the side. During inclement weather, it can fail to work altogether. Further, the popular wireless links between in-helmet speaker/mics and radios can interfere with avalanche beacons.
Instead, choose a simple FRS/GMRS radio with a wired and weather-resistant speaker/mic attached to your vest or pack strap at your shoulder. Although you’re not likely to use the radio while applying throttle, it might be helpful to arrange the speaker/mic so it can be operated with your other hand. Test the speaker/mic attachment prior to riding, and add cable ties or something similar if needed to secure it. The radio itself should be stored away from your avalanche beacon, and be easily acces-
As you ride, you need to manage your group using well-defined communication techniques, and spacing and spotting techniques appropriate for the terrain. The fol-lowing techniques represent best practices for motorized users. Try to use these techniques as consistently as pos-sible from day to day, and among different riding part-ners. You’ll minimize confusion, develop good habits, and demonstrate good technique to other riding groups you might encounter. Use these techniques for:
1. Communication2. Spacing and Spotting for Non-Avalanche Terrain3. Spacing and Spotting for Avalanche Terrain
In the context of avalanche risk management, manag-ing your group serves to reduce uncertainty, to reduce exposure, and to reduce consequences or errors. Good group management is the glue that holds your risk man-agement plan together when you’re out on the snow.
2.2 Manage Your Group

88 89
On the Snow: Manage Your Group On the Snow: Manage Your Group
sible in case you need to change channels or turn it off. Orient the antenna vertically.
Research FCC regulations before choosing a frequency or setting your radio’s power level. If you’re using a low powered pre-programmed radio, you may still technically need a license even though enforcement isn’t common. If you’re using a high powered, programmable or commer-cial radio, you’re more likely to need a license.
Most manufacturers of pre-programmed radios use the same channel/frequency/privacy code conventions, so different brands should be able to communicate with each other. If anyone in the group is using a program-mable radio, you might want to print a frequency chart or download it to your phone. Go to www.backcountry-access.com and find the “downloads” tab for a simple frequency chart. Note that not all programmable radios are able to operate on FRS/GMRS frequencies, and even if they can, it might not be legal to do so.
Communication via radio should be brief and to-the-point. There may be other people on the same frequency, and even if not, brevity can help minimize confusion. Think about what you’re going to say before you press the button to talk. When you do talk, address the re-cipient by name and use clear and simple language. If you’re directing someone through terrain, only give pos-itive direction, not negative. If you break this rule, and tell someone “don’t go left,” they may only hear “left” and go that way in error. Avoid unnecessary chatter, es-pecially when someone is riding through exposed terrain.
Some “10 codes” are helpful, but if you plan to use these, make sure everyone in your group knows them be-fore you leave the trailhead:
• Affirmative = 10-4
• Repeat = 10-9
• Return = 10-19
• Location = 10-20 When used as a question this is often phrased “what’s your twenty?”
• Accident = 10-50 This implies an injury or that assis-tance is needed
Bring extra radios and extra batteries to the trailhead in case your partners need them. Even if everyone in the group has a functioning radio when you leave the trail-head, they are prone to failure, so your communication shouldn’t rely on them entirely.
Hand signals are complementary to radios, and can serve as backup if radio communication fails. For trail riding, a few hand signals have been adopted as standard by various organizations. If your mountain riding requires
The “all-clear” signal indicates this stuck rider is OK

90 91
On the Snow: Manage Your Group On the Snow: Manage Your Group
trail riding for access, you should be familiar with them. Visit www.snomobile.org and in the main menu click on “safety” to see illustrations and descriptions of these hand signals. Unfortunately, they aren’t as useful for mountain riding as they are for trail riding, and in some cases they conflict with what’s used by mountain riders.
The following are descriptions of common hand signals for mountain riders. It’s far from exhaustive, but rep-resents a good base to start with. As with radio 10 codes, make sure your partners understand these hand signals before you start using them:
• Stop can be communicated with an open hand raised to head level, like you’d see a policeman use to direct traffic. Many people also use a closed fist for the same purpose.
• Stay Away is communicated by crossing arms to form an “X.” If you’re around skiers, they might cross their poles.
• All Clear is a helmet tap, with a palm to the top of the helmet or over the visor. There are many applica-tions for this while mountain riding; it can mean “I’m ok” or “It’s safe to come to me” or “That line of travel is clear,” etc. Be very careful with this hand signal, as motorcyclists use it to communicate a hazard, like a speed trap or gravel in the road. Clarify its meaning with your partners before you ride, especially if any of them are on snowbikes or if you know they ride motorcycles.
• Good and Bad are simple thumbs up and thumbs down. Put your hand off to the side so it’s distinguishable from the rest of your body. Thumbs up is somewhat in-terchangeable with the head tap, but can be harder to
see. If visibility is poor or you’re a distance from your partners, choose the head tap over thumbs up.
• Point Positive is to tell your partners where to go. Just point in the correct direction. Don’t ever do the opposite. Although it’s tempting to point at hazards, there’s no way for your partners to know the differ-ence. Always point positive. If needed, you can add emphasis by moving your arm back and forth from the elbow, or add a sense of urgency by moving both arms from the shoulders.
• Turn Around is communicated by drawing a circle with your index finger pointing downward.
• Let’s Go is communicated by drawing a circle with your index finger pointing up in the air, like a lasso mo-tion. It can be followed by pointing at the person who should lead, or at yourself if you’re taking lead, or in the direction you’re heading.
• Eyes On is to tell your partners you’re watching them, or to confirm they’re watching you. Spread your index and middle fingers and point at your goggles, followed by pointing at who will be watched.
• I’ll Sweep is to tell your partners that you’ll go last. Tap your knuckles to your chest, or point to your chest and then make a fist. If you want someone else to sweep, point at that person and then make a fist. Context should prevent confusing this with “stop.” If there’s any doubt, wait for the person to respond with the “I’ll sweep” signal, or a thumbs up or head tap.
Your group might use or learn other hand signals. None of these have been standardized by any organization or authority, like the trail-oriented signals have. If you come across other riding groups, don’t assume they’ll be

92 93
On the Snow: Manage Your Group On the Snow: Manage Your Group
using the same hand signals, or that their use of similar motions communicates the same meaning.
SPACING AND SPOTTING FOR NON-AVALANCHE TERRAIN
Stop to talk prior to entering non-avalanche terrain, as described in chapter 2.1, Stop to Talk. At the end of your stop, determine the spacing and spotting techniques you’ll use to reduce exposure to non-avalanche hazards, and reduce consequences if anything goes wrong. The “buddy system” and the “tap out” are two popular tech-niques in non-avalanche terrain.
The buddy system refers to riding simultaneously in groups of twos or threes. If you have more people in your group, break out into multiple smaller groups. Space out enough to reduce exposure to non-avalanche hazards. For example, if you’re riding near open water, only one person at a time should go near it. For spotting purposes, keep visual contact as you ride.
In terrain without good lines-of-sight, like in trees or low angled rolling terrain, keeping constant visual con-tact may be unrealistic. If this is the case, spot by re-maining within hearing distance of exhaust sounds. Regularly stop to listen, and ride towards exhaust sounds to regain visual contact often.
Losing visual contact is likely to increase the conse-quences of an accident by delaying response times, so make sure everyone accepts this. If not, choose terrain where keeping constant visual contact is possible. Or use the spacing and spotting techniques for avalanche ter-rain, even in non-avalanche terrain.
The tap-out is a reference to the “all clear” hand sig-nal, or helmet tap. As a spacing and spotting technique, it means to ride simultaneously, taking responsibility for the person behind you. Each rider in the group regularly looks back to receive a tap-out from the rider behind.
If you ever miss a tap-out from the rider behind you, stop to wait for them, or turn around and ride back to them. This in turn will trigger riders in front to do the same, and either result in radio communication, or it will bring the whole group back to the rider who might need assistance.
The tap-out accommodates larger groups than the buddy system, but only works well for linear sections of riding. It’s especially common on trails, but does work for mountain riding if nobody strays far off route or gets out of order. Apply this technique only when your group is following a distinct handrail, and everyone agrees to stay close to it. In undisturbed snow, the handrail could be the track left by the first rider, instead of a terrain feature.

94 95
On the Snow: Manage Your Group On the Snow: Manage Your Group
SPACING AND SPOTTING FOR AVALANCHE TERRAIN
Stop to talk prior to entering avalanche terrain, as de-scribed in chapter 2.1, Stop to Talk. Use the location you’ve chosen to stop, with minimal exposure and a clear view of the avalanche terrain, as a staging area for your riding session. If you come across another riding group, stay out of their terrain until you’ve checked-in with them at their staging area.
One at a time should be the norm for spacing in ava-lanche terrain. It very effectively reduces your group’s exposure to only one person. If you’re riding with a large group, and riding one at a time would result in too much down time, break out into multiple smaller groups. Each group needs to find their own terrain; although it can be in the same general area, there should be no overlap within the same avalanche path. Don’t expose more than one person in the same path just because you’ve split into smaller groups.
Spotters need to remain in the staging area, with eyes on the exposed rider at all times. If your group is so-cializing, eating, tinkering with sleds, etc., then one person needs to avoid distractions and take responsibil-ity for spotting. If you’ve split into multiple groups, you should consider using multiple staging areas to minimize confusion.
If you’re moving through avalanche terrain and need to regroup on the other side of it instead of returning to the same staging area, clearly communicate where this place will be. Try to identify a second staging area that meets the same criteria; it has minimal exposure and a clear view back at the terrain. If you’re regrouping on a ridge or at the top of a hill, make sure to regroup far enough from the edge to reduce exposure and give riders room to finish the climb with the required speed. If this location doesn’t allow spotting from above, one spotter may need to stay close to the edge but off to the side until the last rider makes the climb. Similar scenarios may present themselves when descending or traversing through ava-lanche terrain.
STUCKS is a memory aid helpful for deciding what to do when a rider is stuck in avalanche terrain:• Stop. Don’t to rush to help.
• Talk briefly among your group to decide what to do. Is the stuck rider hurt, pinned under their sled, or caught in a spinning track? If not, there’s probably no justifica-tion to expose another rider.
• Understand Consequences of exposing another rider. You’re essentially doubling your group’s exposure, and if an avalanche occurs, two victims are significantly harder to deal with than one.Expose only one person at a time, and spot from a safe distance

96 97
On the Snow: Manage Your Group On the Snow: Manage Your Group
• Keep Spotters if you do decide to expose another rider. Note that “spotters” is plural, because if two rid-ers are caught in an avalanche, one rescuer might not be enough. If there are only three of you, and one is stuck, there needs to be a serious and urgent reason to leave just one spotter while exposing two.
The buddy system and the tap-out can be applied in avalanche terrain, but these are advanced techniques that result in increased exposure no matter how expertly they are applied. If the riders understand how to read the terrain very well, they can adjust spacing as they ride, using terrain features to provide some separation yet remain in visual contact. These techniques should only be used when there are high levels of certainty about partners and conditions, and when all riders have acknowledged and accepted the increased consequences associated with the exposure. If the anticipated condi-tions involve large avalanches, or avalanche types known
for their unpredictable behavior, the buddy system and the tap-out may represent unacceptable levels of expo-sure and consequence.
Don’t rush to help a stuck rider

98 99
On the Snow: Maintain Awareness
Mountain riding is exciting; it’s physical, fast, and shared with friends in a dynamic environment. It can be easy to get lost in the moment and lose focus, but in avalanche terrain you need to maintain awareness. To do this as it relates to avalanche risk, it helps to use simple checklists like:
1. Conditions Alerts checklist2. Terrain Alerts checklist
In the context of avalanche risk management, main-taining awareness of conditions reduces uncertainty, and maintaining awareness of terrain can help you reduce ex-posure and consequences.
CONDITIONS ALERTS
As you ride, maintain awareness of conditions. This is es-pecially important to do before entering avalanche ter-rain. Use the Conditions Alerts checklist to direct your observations as you ride and to structure your conver-sation when you stop to talk. Some observations require deliberate actions, including getting off your machine to look at the snowpack, but many can be made on-the-go. For these, you don’t need to interrupt the flow; just in-corporate them into your ride, and then discuss them when you stop to talk. However, if you notice anything alarming or unexpected, you may want to stop to talk sooner than originally planned.
With all of the observations made to maintain aware-ness of conditions, an absence of evidence is not evi-dence of absence. Just because you don’t see something doesn’t mean it doesn’t exist. Don’t allow yourself or your partners to forget this, and always acknowledge un-certainty when making these observations and discussing them.
Avalanche activity, either recent or current, is a pri-mary indicator that the snowpack is unstable. This is why it appears first on the Conditions Alerts checklist.
As you ride, keep your eyes open for recent avalanches. If there’s also been recent snowfall, look for new snow covering the evidence to determine if the avalanche occurred before or after the snow. If there isn’t recent snow covering the evidence, look at it closely. If shapes appear angular and sharp, the avalanche was more re-cent than if they appear worn and rounded.
However, some avalanche types are more angular than others to begin with, and various weather events after
2.3 Maintain Awareness

100 101
On the Snow: Maintain Awareness On the Snow: Maintain Awareness
the avalanche can hasten or delay the wear on the ev-idence. Estimating the age of an avalanche is an inex-act observation that takes practice. And remember that some types of avalanches are associated with longer lasting instabilities than others. What you consider “re-cent” for one avalanche type may not be recent for an-other. See chapter 1.2, Anticipate Conditions, for more on this.
Current avalanching could be due to natural triggers (weather) or human triggers. Although natural avalanch-ing might be more alarming than human triggering, any current avalanching regardless of the trigger should prompt you to stop to talk. If you didn’t anticipate cur-
rent avalanching, you should probably rein in your safety margins.
Test slopes are a useful way to test for human trigger-ing. These are small and relatively harmless slopes that are steep enough to avalanche but not big enough to bury or kill a person. Test slopes that mimic the characteris-tics of the avalanche terrain where you plan to ride are especially valuable places to gather information. Try to trigger inconsequential avalanches on test slopes before you commit to consequential terrain. If you have any doubt about the potential consequences of test slopes, use spacing and spotting techniques for avalanche ter-rain. Riding on test slopes without a spotter can increase the consequences of even minor accidents.
While riding on test slopes can be unstructured, testing them deliberately can be more informative. A slope cut is to sidehill purposefully on the slope. You can cut across, trend upward or downward, or cut in an arc. If you don’t get results from the first cut, you can add sequentially higher cuts above it, to see if an instability will present itself after first “undercutting” the slope. Although you can also work from the top down, this doesn’t undercut in the same way. You can also jump onto test slopes, ride straight up or straight down them, or purposely trench your track to test deeper weak layers. Your creativity is welcome; think of this as play riding with a purpose.
Cornice drops are similar to slope cuts, in that the goal is to trigger an avalanche without consequence, but some exposure is required. High levels of uncertainty are as-sociated with cornices, so make sure you practice this over low consequence slopes. You might decide to never drop cornices over consequential slopes. Approach the
Stop to examine recent avalanches
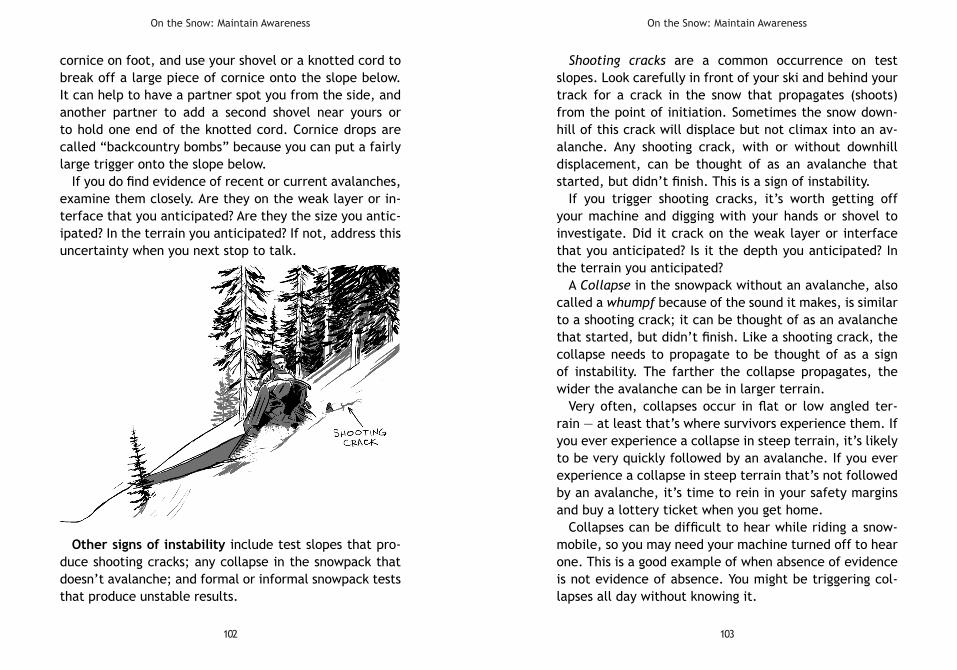
102 103
On the Snow: Maintain Awareness On the Snow: Maintain Awareness
cornice on foot, and use your shovel or a knotted cord to break off a large piece of cornice onto the slope below. It can help to have a partner spot you from the side, and another partner to add a second shovel near yours or to hold one end of the knotted cord. Cornice drops are called “backcountry bombs” because you can put a fairly large trigger onto the slope below.
If you do find evidence of recent or current avalanches, examine them closely. Are they on the weak layer or in-terface that you anticipated? Are they the size you antic-ipated? In the terrain you anticipated? If not, address this uncertainty when you next stop to talk.
Other signs of instability include test slopes that pro-duce shooting cracks; any collapse in the snowpack that doesn’t avalanche; and formal or informal snowpack tests that produce unstable results.
Shooting cracks are a common occurrence on test slopes. Look carefully in front of your ski and behind your track for a crack in the snow that propagates (shoots) from the point of initiation. Sometimes the snow down-hill of this crack will displace but not climax into an av-alanche. Any shooting crack, with or without downhill displacement, can be thought of as an avalanche that started, but didn’t finish. This is a sign of instability.
If you trigger shooting cracks, it’s worth getting off your machine and digging with your hands or shovel to investigate. Did it crack on the weak layer or interface that you anticipated? Is it the depth you anticipated? In the terrain you anticipated?
A Collapse in the snowpack without an avalanche, also called a whumpf because of the sound it makes, is similar to a shooting crack; it can be thought of as an avalanche that started, but didn’t finish. Like a shooting crack, the collapse needs to propagate to be thought of as a sign of instability. The farther the collapse propagates, the wider the avalanche can be in larger terrain.
Very often, collapses occur in flat or low angled ter-rain — at least that’s where survivors experience them. If you ever experience a collapse in steep terrain, it’s likely to be very quickly followed by an avalanche. If you ever experience a collapse in steep terrain that’s not followed by an avalanche, it’s time to rein in your safety margins and buy a lottery ticket when you get home.
Collapses can be difficult to hear while riding a snow-mobile, so you may need your machine turned off to hear one. This is a good example of when absence of evidence is not evidence of absence. You might be triggering col-lapses all day without knowing it.

104 105
On the Snow: Maintain Awareness On the Snow: Maintain Awareness
Formal tests require practice, but the practice itself promotes lifelong learning and is highly valuable. Over the long term, if you want to gain experience instead of just gaining mileage, you should perform formal tests regularly. Once you’ve practiced, they take little time, and several can be done as you move around during the day.
However, in the short term, each test is only done in a singular hole in the snow that may not be representative of the snow right around the corner. For this reason, for-mal tests can never provide evidence of absence. If you don’t find signs of instability, it doesn’t mean the insta-bility doesn’t exist. But if you do find signs of instability, it’s prudent to assume the instability exists elsewhere.
Many videos of these formal tests can be found online. When they publish their observations, most avalanche centers include videos of people performing these tests.
You can learn proper technique by watching these vid-eos, but for learning purposes, make sure they were per-formed by a professional.
To perform formal tests, find terrain similar to a test slope. It should be low consequence and mimic the char-acteristics of the avalanche terrain you plan to ride in. Unlike a test slope, it doesn’t need to be steep. If you haven’t already tracked-out a test slope, you can simply move uphill from your trench into undisturbed snow.
To perform a compression test, follow these steps: • Probe around in undisturbed snow to make sure you’re
not wasting your time by digging right on top of a bur-ied rock or log. Probe gently to feel for suspected weak layers.
• Excavate a clean, plumb wall across the slope, about an arm span wide, and a little deeper than your suspected weak layer. As you excavate, examine the snow to de-termine if it’s similar to the structure you anticipated.
• On either side of your wall, use a wood saw or dedi-cated snow saw to help excavate around a plumb 30cm by 30cm column (about 1ft by 1ft). This needs to be free from the snow around it on all sides, down to below the suspected weak layer. This test is useful to about 4ft down from the surface.
• Gently place your shovel blade on top of the col-umn, and watch the suspected weak layer. Holding the shovel on the column, tap it slowly with your free hand using the following progression: 10 easy taps from the wrist, 10 moderate taps from the elbow, and 10 hard taps from the shoulder.
• If you notice the column fail, stop tapping and look closely at the failure. Isolating a compression test

106 107
On the Snow: Maintain Awareness On the Snow: Maintain Awareness
• The following are signs of instability: A sudden failure that happens on an individual tap, and the failure is very clearly along the same plane as the layers in the snow, or the column drops because the weak layer is thick or has large grains.
• If you observe the above signs of instability, remove the column of snow from above the weak layer by drag-ging it along the weak layer to see how easily it comes off. Examine the grains in the weak layer to see if they are what you anticipated.
• If you don’t observe the above signs of instability, then don’t remove the snow above the weak layer. Instead continue with the taps where you left off.
• Repeat the test right next to the first one, to see if you get similar results.
To perform an extended column test, follow these steps: • Probe around in undisturbed snow to make sure you’re
not wasting your time by digging right on top of a bur-ied rock or log. Probe gently to feel for suspected weak layers.
• Excavate a clean, plumb wall across the slope, about an arm span wide, and a little deeper than your suspected weak layer. As you excavate, examine the snow to de-termine if it’s similar to the structure you anticipated.
• Use a wood saw or dedicated snow saw to help ex-cavate around a plumb column that’s 90cm wide and 30cm upslope (about 3ft by 1ft). This needs to be free from the snow around it on all sides, down to below the suspected weak layer. Like the compression test, this test is useful to about 4ft down from the surface. It’s challenging to make the cut behind the column, and typically requires a knotted cord or a long folding saw. Depending on how you make this cut, you may need two people.
• Gently place your shovel blade on top of the col-umn all the way to one side, and watch the suspected weak layer across the column. Holding the shovel on the column, tap it slowly with your free hand using the following progression: 10 easy taps from the wrist, 10 moderate taps from the elbow, and 10 hard taps from the shoulder.
• If you notice the column fail, stop tapping and look closely at the failure.
• The following is a sign of instability: A sudden failure that happens on an individual tap, and the failure prop-agates across the whole column.
Isolating an extended column test

108 109
On the Snow: Maintain Awareness On the Snow: Maintain Awareness
• If you observe the above sign of instability, remove the column of snow from above the weak layer by drag-ging it along the weak layer to see how easily it comes off. Examine the grains in the weak layer to see if they are what you anticipated.
• If you don’t observe the above sign of instability, then don’t remove the snow above the weak layer. Instead continue with the taps where you left off.
• Repeat this test again someplace else nearby, to see if you get similar results.
Informal tests are easier to perform than formal tests, but they’re harder to interpret. It helps to practice infor-mal tests right next to formal tests, so you can calibrate results. Once you become comfortable with interpreting them, they can be performed on their own. This saves time and allows you to perform numerous informal tests throughout the day.
The hand shear is a common informal test that’s very quick. It’s helpful to find or investigate weak layers near the surface. To perform a hand shear, use terrain similar to a test slope or where you’d perform formal tests, and follow these steps:• In undisturbed snow, including just uphill from your
trench, use your hands to isolate a column similar in dimensions to a compression test.
• Use the back of your hand to clean up the part of the column facing you. Feel and look at the snow to find suspected weak layers. Make sure your column is iso-lated down to below the weak layer you plan to test.
• Reach behind the column and attempt to drag it along the weak layer. Use a pulling motion instead of a lever-ing one.
• The following is a sign of instability: The column drags easily along the same plane as the layers in the snow, and it leaves a clean, flat surface behind, or a rough surface if the weak layer is thick or has large grains.
• If you can’t identify a weak layer prior to pulling on the column, use a hand shear to find the weak layer, then repeat again to focus the test on it.
Probing for weak layers is also quick, especially if you carry a second probe in your tunnel bag. First, probe gen-tly next to your other tests where you’ve already found weak layers and observed test results. Feel the snow with your probe, then move away from your tests and com-pare what the snow feels like. Once you’ve calibrated what the suspected weak layer feels like, you can track its depth and location throughout the day. If you’re con-
Take advantage of any opportunity to study the snowpack

110 111
On the Snow: Maintain Awareness On the Snow: Maintain Awareness
fident in your calibration, you can use probing without digging to find signs of instability.
A Persistent Problem refers to any instability associ-ated with facets or buried surface hoar. If the avalanche forecast warned of a Persistent Slab or Deep Slab prob-lem, or mentioned a faceted or surface hoar layer in the snowpack, this counts as a Conditions Alert. These con-ditions are notoriously difficult to manage, and accident rates are high when they’re present.
You can also look for buried facets or surface hoar your-self. This is especially important if you’re riding in an area without an avalanche forecast. Facets are large, an-gular and weak grains. Look for them near the ground, in low density snow, near crusts, and anywhere that warm and cold are next to each other in the snowpack. Buried surface hoar can sometimes be identified as a “grey stripe” in the snowpack. If you don’t find buried facets or surface hoar, this isn’t evidence of absence. But if you do find them, you should assume they exist elsewhere.
Recent Loading can be from snowfall, wind, or rain. Be careful with numerical thresholds when it comes to avalanches, but in general, ±12” of snow or ±1” of water that has accumulated within the past 48 hours is con-sidered recent loading (including current loading). Don’t ignore recent loading that doesn’t quite meet these thresholds, and recognize that loading could be greater just around the corner. Loading from wind can be highly variable. Overall, the more loading and the more recent, the more concerning it is.
Rapid Warming can introduce liquid water into the snowpack if temperatures rise above 32°, so this is an important temperature threshold. Rapid warming is es-
pecially concerning when temperatures go above 32o for the first time in a while, when they go above 32° very quickly, or if they remain above 32° overnight.
“Roller balls” are clumps of wet snow that roll downhill and collect additional snow. They are often precursors to wet avalanches when temperatures are above 32°, and make good indicators for rapid warming.
Sometimes rapid warming that doesn’t reach 32° can also influence the surface snow by softening it without wetting it. If there is a shallow instability that becomes more sensitive under softer snow, then rapid warming can increase the likelihood of avalanches even if tem-peratures don’t go above 32°.
Recent Loading can be from snowfall, wind, or rain

112 113
On the Snow: Maintain Awareness On the Snow: Maintain Awareness
TERRAIN ALERTS
Use the Terrain Alerts checklist to maintain awareness as you ride and also to evaluate terrain when you stop to talk. The checklist can help you confirm non-avalanche terrain, and when you are entering avalanche terrain, it can help you evaluate the exposure and consequences ahead.
The more Conditions Alerts that are present, the more Terrain Alerts you should avoid. However, these check-lists aren’t intended for rule-based decision-making. They are intended to help you maintain awareness, and to promote discussion among your group before deciding if to proceed and how.
Slopes Steeper than 30° are considered avalanche terrain. Although occasionally avalanches can occur on lower angled terrain, they are rare. Use an app on your phone with a slope meter, or a compass with a slope meter, to teach yourself to recognize >30° slopes. Also
treat any terrain below or immediately adjacent to >30° slopes as avalanche terrain.
Take slope size into account. To be considered ava-lanche terrain, it needs to be able to produce a D2 ava-lanche or have additional components that would kill you even in a D1 avalanche. Judging the potential size of an avalanche is difficult; if you’re in doubt, assume its ava-lanche terrain. Also discuss the consequences related to slope size by estimating the maximum potential given the anticipated avalanche problem, and the maximum poten-tial if you’re wrong about it.
Obvious Slide Paths below treeline are distinctly free of trees, or have thin or young tree cover compared to adjacent terrain, or have other vegetation clues like bro-ken trees and broken branches. Above treeline, obvious avalanche paths are clearly steep with start zones be-tween 35-40° and may have evidence of previous ava-lanches remaining in the snow.
Terrain that Matches the Advisory refers to the lo-cations where you anticipated avalanches to occur. Typically, this is defined by elevations and aspects, but it may include further location descriptions.
In big or convoluted terrain, classifying a particular slope to a specific elevation or aspect can be problem-atic. These slopes may have characteristics of multiple elevations and aspects because of their length and size. Allow room for error.
Remember, avalanche forecasts are broad generaliza-tions across the whole region that may have high levels of uncertainty. Don’t try to convince yourself that terrain doesn’t match the advisory because it’s just slightly dif-ferent from what was described in the forecast.
Keep an eye out for signs of warming

114 115
On the Snow: Maintain Awareness On the Snow: Maintain Awareness
Trigger Points are features where avalanches are most likely to be triggered. These are places where either the weak layer is especially weak, where the slab above the weak layer is especially thin, or where the stress on the snowpack is greatest. Common trigger points include any part of the slope between 35-40o, convexities and con-cavities, shallowly buried rocks, steep slopes below cor-nices, and open areas near trees or exposed rocks that interrupt the slab and/or absorb heat from the sun.
Terrain Traps are features that increase the conse-quences of even small avalanches, by increasing possi-ble burial depths, increasing the chances of trauma, or by making drowning and/or hypothermia likely. Terrain Traps include depressions and gullies, open holes, abrupt transitions from steep to flat, trees, rocks, cliffs, cor-nices, and any open water in or near an avalanche path. Prior to entering avalanche terrain, identify locations of
Terrain Traps in order to avoid them. Even if you’ve es-tablished that you’re not in avalanche terrain, it’s help-ful to identify Terrain Traps since they may also represent non-avalanche hazards.
Terrain that matches the advisory

116 117
End of the Day: Debrief
The mountains rarely provide feedback, but the lack of feedback doesn’t mean you’re doing it right. And when the mountains do provide feedback, it’s often violent and unsurvivable. Use the debrief to learn and improve be-fore the mountains teach you the hard way.
WHAT WORKED AND WHY
Discussing what worked is often the easy part. When you and your partners share excitement about where you found the best snow, where you made challenging moves, and where the best terrain was; these are the moments that you already dwell on at the end of the day.
Encourage this conversation, and guide it with the Daily Flow to give yourselves feedback for each step in the process. Many things contributed to your success, some more exciting and memorable than others, so re-flecting step-by-step on the process can help capture the complete picture. It also helps you address why things worked. If you found great snow, look to the steps in the Daily Flow that got you there. If it was planned for, then you did it right. If not, then acknowledge your luck and discuss how to plan for it next time.
WHAT TO CHANGE AND WHY
If anything did not go as planned, suggest changes to how you would follow the Daily Flow. Where were you most exposed? Describe what you’d do differently next time, given the same partners and conditions.
Considering the possible consequences of errors in av-alanche terrain, it’s worth accepting responsibility and
When you return to the trailhead, spend a few mo-ments on a debrief. You probably already share stories about how the day went, and these casual conversa-tions are great starting points for a debrief. But to have valuable implications for the future, you need to ad-dress why the day went the way it did. To learn from each day, add some structure to these conversations by addressing:
1. What Worked and Why2. What to Change and Why3. Summarize Conditions
In the context of risk management, debriefing serves to reduce uncertainty over the long term. It’s the vital link between today’s ride and the next one. At the heart of the debrief is the question “did we do it right, or just get lucky?” By answering this, including the why, you can better do it right the next time, and continue to improve throughout your riding career.
3.1 Debrief

118 119
End of the Day: DebriefEnd of the Day: Debrief
striving for improvement. Keep the conversation as con-structive as possible. With practice, you and your part-ners should become comfortable with it.
To minimize finger pointing and to address the why, focus on sources of uncertainty. Identify the steps in the Daily Flow that didn’t reduce uncertainty enough, and discuss how to improve under similar circumstances.
If you had any close calls with avalanches, treat them as learning opportunities. To debrief a close call, go back to chapter 1.4, Confirm Details, and create a new plan that would prevent it under the same circumstances. If time constraints prevent you from doing this as a group at the trailhead, do it on your own before the day ends and your memories fade. Share your thoughts with your partners before your next ride.
SUMMARIZE CONDITIONS
To wrap-up your debrief, facilitate a discussion summa-rizing the conditions you and your partners observed. This is a great way to prepare to submit observations to the local avalanche center and to promote continued learning among your group.
The Conditions Alerts checklist is a useful tool to struc-ture this discussion. Because you already used this for similar purposes as you stopped to talk throughout the day, a final summary should be straightforward. Discuss what you observed and where, focusing on trends as you moved through terrain and as weather and time acted on the conditions you observed. Reach consensus on a few short sentences that could be used to communicate your
observations with the local avalanche center. See chap-ter 3.2, Submit Observations, for more on this.
As with the other debrief topics, identify why you saw what you did, where you did. Try to explain the trends as you moved through terrain, and as weather and time acted on the conditions you observed. Did you correctly anticipate conditions? Acknowledge the uncertainty you had about conditions before you left, and discuss ways to reduce it in the future.

120 121
End of the Day: Submit Observations
At the end of the day, find a cell or wifi signal to sub-mit observations to the local avalanche center. Let them know what conditions you observed, using language that you are comfortable with, and/or images and videos. By doing so, you will:
1. Continue Your Learning2. Contribute to the Community
In the context of risk management, submitting observa-tions serves to reduce your own uncertainty by promoting learning and to reduce the greater community’s uncer-tainty at the regional scale.
CONTINUE YOUR LEARNING
Developing the habit of submitting observations teaches you to maintain awareness of conditions in a thoughtful, systematic way so that you can communicate them effec-tively to the local avalanche center. If the avalanche cen-ter makes other public observations available, don’t bias
your own submission by looking at them first. Instead, look at them after you submit, and then read the next forecast to see how all the observations influenced it. This process will teach you to think about conditions from the forecaster’s perspective. Your observations will be-come more valuable, and over time you’ll gain better ap-preciation and understanding of how weather, snowpack, and avalanches relate to each other.
Don’t feel obligated to use technical or unfamil-iar terminology in your submission. Doing so can short circuit your own learning process, and doesn’t bene-fit anyone else. Use language that you’re comfortable with, that most accurately communicates what you ob-served. To improve your avalanche-specific language, you can use the wiki that your avalanche center links to, and/or the avalanche encyclopedia at avalanche.org/avalanche-education.
CONTRIBUTE TO THE COMMUNITY
Most avalanche centers cover a broad region, with limited resources. As a motorized user, you cover significantly more terrain than other people, and have the ability to contrib-ute in ways that they can’t. The forecasting process is data driven, and every bit of data contributes to the whole and has the potential to be valuable. Submissions need to be timely, so make them before the end of the day.
Some avalanche centers have a specific format for sub-mitting observations, and others have open formats or accept email reports. Follow the preferred format, but consider organizing your thoughts using the Conditions Alerts checklist.
3.2 Submit Observations

122 123
End of the Day: Submit Observations End of the Day: Submit Observations
Report Recent Avalanches with as many details as possible: • Location should be specific with a named landmark in
case the forecasters choose to investigate. Also include approximate elevation and aspect. If you saw more than one, approximate the number and generalize the elevations and aspects.
• Timing can be hard to estimate, but do your best as described in chapter 2.3, Maintain Awareness.
• Was there evidence that previous avalanches were naturally or human triggered? If you saw current av-alanching, you should know the trigger. Include test slopes that produced avalanches. For unintentional av-alanches, was anyone caught or buried?
• Estimate the size and slope angle. Size can include the destructive potential (D1, D2, etc.) and the dimen-sions, including depth, width and length of the ava-lanche and the debris.
• Specify the weak layer, if known. Was it within the new snow, on facets, or was it a wet avalanche? Was it on a weak layer that the forecast center has been tracking?
Other Signs of Instability:
• If test slopes produced shooting cracks, on what weak layer, and at what elevations and aspects?
• Did you experience snowpack collapse (whumpfing)? Where?
• Briefly describe any formal test results, including the locations they were performed and the weak layers tested.
• Briefly describe any informal tests, including locations.
Persistent Problem:
• Did you find any facets or surface hoar?
• How far down from the surface were they, or how far above the ground?
• For identification purposes, include information about nearby crusts or other distinct layers.
• Describe the elevations and aspects where you found them, and where you looked but didn’t find them.
Recent Loading:
• Estimate recent snowfall that fell prior to your arrival at the trailhead.
• Estimate total snowfall or rain that fell while you were riding, including trends in rates or type of precip-itation. What was the timeframe of this observation?
• Describe distribution patterns of recent wind loading prior to your arrival, and rates and distribution pat-terns of active wind loading while you were riding.
Rapid Warming:
• Did you observe temperatures climb above 32° for the first time in a while, or climb above 32° very quickly? Was there evidence that temperatures remained above 32° overnight?
• Did you observe or did you trigger any roller balls? Did they entrain additional snow, or remain relatively harmless? Include the elevations and aspects, and the time of the day.

124 125
End of the Day: Submit Observations
Throughout the season, take steps to improve your res-cue skills. You need to be good at this, and there’s much more to it than just searching with a beacon. Rescue skills include the knowledge of:
1. Practicing Rescue2. Performing a Rescue 3. What to Do if You’re Caught
In the context of risk management, rescue skills serve to reduce the consequences of an accident. However, being good at rescue is no excuse for allowing accidents to happen. A significant percentage of avalanche fatali-ties are due to trauma and not suffocation. A quick res-cue would not change the outcome of these accidents.
PRACTICING RESCUE
Strong rescue skills include the knowledge to organize good practice sessions with your partners, and the ini-
Don’t feel the need to address every bullet point above. Keep your submission simple and accurate. If your group has lots of valuable information to contribute, you can share the load, but otherwise only one person from the group should submit to avoid confusion.
4.1 Rescue

126 127
AppendixAppendix
tiative to act on it. An easy way to achieve this is for you and your partners to take an organized Rescue class, and then repeat the exercises regularly, until you retake the class again as a refresher. The details are just different enough on a snowmobile that you should try to find a Rescue class dedicated to motorized users. Classes for skiers can still be valuable, and if you don’t also ski, you should be able to participate on snowshoes.
To practice outside of a structured class, use a combi-nation of short breakout sessions and dedicated longer sessions. Any practice needs to be done in non-avalanche terrain, since you’ll be using equipment instead of wear-ing it, and turning beacons on and off.
For short breakout sessions, focus on just one compo-nent of rescue. Digging skills, probing skills, and beacon skills can all be practiced separately to save time and minimize the impact on your riding day.
Emphasis should be on developing proper technique instead of speed. As technique improves, speed fol-lows. Once you and your partners feel ready, it’s ok to introduce time-based competition, but if you do this too soon, you’ll encourage shortcuts that can lead to bad technique. Proper technique is described here, and is also available at beaconreviews.com and the websites of most manufacturers of rescue equipment.
For digging practice, it’s helpful to have high density snow like avalanche debris would be. If you come across a recent avalanche while riding, take advantage and spend a few moments practicing there. If your trailhead is plowed, the snow piles are also good places for practice.
Place a probe into the snow at least 3ft deep (3-5ft is the average burial depth). Your probe probably has met-
ric markings, and 3ft is about 1m. Discuss the following steps with your partners, and then practice digging to the bottom of the probe:• Step back from the probe, a little farther away than
the depth of the burial, or about 1.5x away if you want to do the math. Move downhill if you’re on a slope.
• Organize rescuers into a “V” shape, with one or two people at the front, and more people behind. If only two rescuers are available, they should work side-by-side.
• Rescuers kneel on the snow, and hold shovels on the side away from the rescuer they’re next to (to prevent injuring a fellow rescuer).
• Using chopping motions instead of prying motions, dig down and forward towards the point of the probe. Rescuers in front move the snow to the rescuers be-hind, and subsequent rescuers move that same snow.
• If enough rescuers are available, rotate positions reg-ularly. The rescuers at the front of the “V” will tire quickly.
Again, practice this correctly before adding speed. Once you do add speed, you can create incentives by burying a prize at the bottom of the probe. Or place two

128 129
AppendixAppendix
probes side-by-side for competition and wager on the winner.
For probing practice, follow these steps:
• Probe around the area to make sure there’s enough snow for at least a 3ft burial, and to check for distract-ing items like buried rocks and logs. Distracting items can be helpful for learning purposes.
• Bury something soft, like a tunnel bag or a backpack. If you think there’s any chance you’ll lose the item you’re burying, place a transmitting beacon into it. Bury the item with the durable side facing up, and remind your partners not to probe so hard as to damage it.
• Disturb the surface snow after burying the item so the general location is obvious, but the specific location is not.
• One-at-a-time, have your partners probe in an out-ward spiral, about 1ft between each attempt.
• Probing should be plumb if the area is flat. If you’re on a slope, probing should be 90o to the slope.
• Each attempt should go at least as deep as the sus-pected burial depth.
• Probing should be deliberate, not wild. You don’t want to damage whatever you buried, but deliberate probing will also make it easier to tell the difference between distracting items and the item you’re looking for.
• Encourage your partners to stay calm and stick with their pattern. Frustrated rescuers will want to resort to hunches and luck instead of their pattern.
• After a successful probe strike, kick snow over probe holes and footprints, and add a few distracting probe holes in the wrong places.
To set up beacon practice, it’s helpful to have deep snow and a large, open area to stage the practice ses-sion. A meadow or low angled slope full of previous tracks, but without current traffic, is ideal. Maybe you’ll have to track it out yourselves — a great incentive for beacon practice. Early season practice done without snow on the ground can still be valuable, but it doesn’t stand on its own. You need to practice on snow. Follow these steps:
• Place a transmitting beacon into a tunnel bag or back-pack and bury it at least 3ft deep. Have everyone else turn off their own beacons.
• Disturb the area above the burial, and at least 100ft around it — the bigger the better. You can start in a tracked-out area, or bury the beacon and then track it out.
• Clearly define the boundaries of an imaginary debris pile. Make a track with several passes to help rescuers visualize the boundaries.

130 131
AppendixAppendix
• One-at-a-time, practice the Signal Search, Coarse Search, and Fine Search. For short breakout sessions, don’t add probing or digging. You’re practicing tech-nique only, so “close enough” is all that’s needed. It’s ok if people watch each other; it can help generate discussion and promote learning.
• All phases of the beacon search need to be done on foot, as a running motor has electronic interference that can render a searching beacon useless. Don’t get caught up in discussions about whose machine does and does not interfere with a searching beacon — this is nothing you want to deal with in a real rescue. Just assume that all machines interfere. In a very large ava-lanche, you might need to get on and off your machine to search effectively, but for practice, keep it simple and do it all on foot.
• The Signal Search is done by zig-zagging through the debris until a signal is received. Different beacon manu-facturers recommend different spacing between each zig and zag, and to the edge of the debris. In general, pru-dent spacing is about 50ft between each zig and zag, and 25ft from the edge of the debris. But in a large debris pile, this spacing might be too conservative and slow.
• The Coarse Search is done by following the directions of the searching beacon. Keep the directional indicator in the middle and move forward so the numbers get smaller.
• The Fine Search needs to be very methodical. Slow is fast in this case. When the searching beacon indicates a distance around the number 10, stop and sweep side to side to be sure of the indicated direction. This direction becomes the X axis; keep your beacon aligned with it for the rest of the search, and on your hands and knees look for the lowest number along it without moving signifi-
cantly to one side or the other. Once you find the lowest number on the X axis, move 90o to it along the Y axis and find the lowest number there. Mark this spot with your foot, and keep it there until you begin probing.
For dedicated longer sessions, choose a day when the riding isn’t very good, and make sure everyone agrees to focus on rescue practice for a few hours without distrac-tion. Set up a practice scenario, and perform a complete rescue as described below.
The individual components that you’ve practiced in short breakout sessions are relatively easy when com-pared to performing a complete scenario. Even profes-sionals who are very good at the individual components can be caught off guard by the confusion and complexity of a complete scenario — either practice or real.
PERFORMING A RESCUE
If a partner is ever caught in an avalanche, perform a rescue by following these steps:• Alert your fellow spotters by yelling “avalanche.” Use
the radio if necessary.

132 133
AppendixAppendix
• Keep your eyes on the victim, and if they become bur-ied, remember the last point at which you see them.
• Don’t allow anyone to start their motors. Someone needs to take charge, and you need to discuss a rescue plan before rushing in.
• Assess rescuer safety. Look for any remaining snow above the avalanche that could still release. Decide with your partners if you can safely approach the last point seen.
• Once you’ve agreed to proceed, have all rescuers switch their beacons to search, and confirm that this has been done. A real accident site will be chaotic enough without inadvertent transmitting signals — you can’t afford to miss this step.
• Assign tasks to rescuers, as resources allow.
• Turn off radios, which can interfere with searching beacons.
• If possible, ride machines to the last point seen (sometimes debris will be difficult or impossible to ride through, and you’ll need to proceed on foot). Keep your eyes open for clues as you do this. If you have the re-sources, some rescuers can begin searching near clues.
• Begin a Signal Search at the last point seen. If you have the resources, divide responsibility for searching the debris (“You search left, I’ll go right”).
• As soon as anyone receives a signal, they need to yell to everyone else so that resources aren’t wasted on a duplicated Coarse Search.
• The person with the signal continues with the Coarse Search while everyone else turns their beacons off and assembles shovels.
• The person closest to the likely burial site should as-semble their probe, and await direction from the per-son performing the Coarse Search.
• Once the searching beacon indicates the number 10, the prober can begin just in case they get lucky.
• After a Fine Search indicates the burial site, probe and dig as described earlier.

134 135
Appendix
IF YOU’RE CAUGHT
If you’re ever caught in an avalanche, follow these steps as best as you can:• Deploy your airbag if you have one. Don’t hesitate to
do this. Commit to deploying it without thinking about the headache of refilling your cannister, or calculating your chances of outrunning the avalanche.
• Try to ride out of the avalanche. If you’re already moving downhill, keep going. If you’re climbing, decide immediately if you should continue to climb, or turn to try outrun it downhill. If you’re sidehilling, you’re probably going to get thrown off your line, so consider turning downhill before you get separated from your machine. Recognize that outrunning an avalanche is unlikely, and you might expose yourself to additional trauma in the attempt.
• Once you become separated from your machine, do what you can to maintain that separation to minimize trauma and avoid getting buried under it.
• Use a swimming motion to try to stay above the mov-ing debris. Face upwards, with your feet downhill to absorb impacts.
• As the debris slows to a stop, do whatever you can to keep your head and airway exposed.
• If your head is going to get buried, maintain your air-way with one hand, while you thrust the other towards the surface. If you manage to keep any part of your body exposed, it will greatly reduce your burial time.
• Once buried, keep your airway clear and try to remain calm. Your partners are really good at rescue, right?

136 137
References:
Canadian Avalanche Association (2016). Technical Aspects of Snow Avalanche Risk Management—Resources and Guidelines for Avalanche Practitioners in Canada, Revelstoke, BC.
Csikszentmihalyi, Mihaly (2009). Flow: The Psychology of Optimal Experience, New York, NY: Harper Perennial Modern Classics.
Haegeli, Pascal (2010). Avaluator: Avalanche Accident Prevention Card, 2nd edition. Canadian Avalanche Centre, Revelstoke, BC.
ISO 31000 (2018). Risk management — Guidelines. International Organization for Standardization, Geneva, Switzerland.
Kotler, Steven (2014). The Rise of Superman: Decoding the Science of Ultimate Human Performance, New York, NY: New Harvest.
McCammon, Ian (2002). Evidence of heuristic traps in recreational avalanche accidents. International Snow Science Workshop, Penticton, BC.
McClung, David, and Peter Schaerer (2011). The Avalanche Handbook, Seattle, WA: The Mountaineers Books.
Statham, Grant, Bruce McMahon, and Ian Tomm (2006). The Avalanche Terrain Exposure Scale. International Snow Science Workshop, Telluride, CO.
Tremper, Bruce (2008). Staying Alive in Avalanche Terrain, Seattle, WA: The Mountaineers Books.
Uttl, Bob, Joanna McDouall, and Christina Mitchell (2012). Evaluating the Avaluator Avalanche Accident Prevention Card 2.0. International Snow Science Workshop, Anchorage, AK.
Wagner, Wendy, and Drew Hardesty (2014). Travel advice for the avalanche problems: A public forecasting tool. International Snow Science Workshop, Banff, AB.