the one-on-one partnering™ system tutorial for companies bookmark companies save custom searches 5...
TRANSCRIPT

Instructions for BIO’s One-on-One Partnering™ System
The One-on-One Partnering™ System Tutorial

Logging In
• Typically, you will receive a confirmation with login instructions from BIO Partnering within one to three business days after registering for the event.
• If you used BIO’s new partnering
system at a previous event, you may use the same password. The email will also contain a link to reset your password in case you have forgotten it.
• If this is your first time using
BIO’s new partnering system, you will need to reset your password using the link provided in the email.
PLEASE NOTE: Access to partnering
requires that delegates use a company email address
with their name attached to it. Generic (e.g.
[email protected], personal (e.g.
Gmail/Hotmail) and executive assistant email addresses do not qualify.
Click here to reset your password

Home Page
Log out/Reset Password Access Delegate Profile
3 Search Search for companies Bookmark companies Save custom searches
5 Message Center Send, accept, or decline requests
Manage outgoing & incoming requests
6 Bookmarks View bookmarked companies, delegates, assets, products,
and services
1 Company/Investor Profile
Add company information Add company logo
4 Calendar Update availability
Add events & programming
2 Delegate Profile Add personal information
Update notification preferences Add your personal profile
picture
Return Home
1
2
3
4 5
1
3
4
5 6

Company Profile
Company Profile
Complete all applicable fields, especially those in the Description, Areas of Interest, Financials, and Contact Information sections
Add Assets, Services, and Market Products if applicable
Upload your company’s logo
Upload documents, graphics, and videos
TIP: There are no required fields, but all information entered is searchable. The more
thorough your Company Profile, the better
visibility your company will have in search
results!
Click to save or X to
cancel for each field
TIP: Craft a Brief Description, which will be directly visible in
search results.
Access individual Delegate Profiles
PLEASE NOTE: Your profile is published by default. Click “Unpublish” to temporarily unpublish it
and keep it hidden in search results.
Click here to upload your company’s logo

Assets, Services, and Market Products
1. Click Manage drug assets, services, or market products 2. Type in the item’s name to add a new name, or click Add to re-add existing item 3. Click Create 4. Complete all applicable fields, especially those found under Description and Classification 5. Upload supporting documents, graphics, and videos
Specify whether the asset is partnered or
unpartnered
Click “X” once finished. All
information is automatically
saved.

Delegate Profile & Notification Preferences
Complete all applicable fields, especially Job Title, Professional Background, and Area of Expertise
Upload your photo
Tailor your
notification preferences
TIP: Click here to CC an additional recipient, such
as an assistant or a colleague helping to
manage your meeting activity, on your email
notifications.
TIP: As with your Company or Investor Profile,
there are no required fields,
but all information is searchable.
Click here to upload your photo

Calendar
Update your availability
View your scheduled partnering meetings
Add programming
sessions and presentations
Add personal events for personal engagements outside of programming and partnering
Export your individual and/or combined company schedule
PLEASE NOTE: Personal events are separate from partnering
meetings. Only partnering meetings are assigned to meeting booths or rooms.
PLEASE NOTE: Delegates do not schedule their own meetings. BIO
Staff will begin scheduling “Accepted” meetings at
mutually available times 2-4 weeks before the event.
Export your individual or entire company schedule
View and add programming

Updating Calendar Availability
1. Select the appropriate delegate from the top left drop-menu 2. Select the correct day of the week 3. Click Change availability 4. Mark the timeslots available (or unavailable) by clicking Change, or update the entire day 5. Click Save and return to calendar
PLEASE NOTE: Your Calendar is unavailable by default. You must
have at least one available timeslot in order to send and accept meeting
requests.
TIP: Save time by first updating the
entire day and then updating individual
timeslots as necessary.
Update your colleagues’ Calendars
1 2
3
4
5
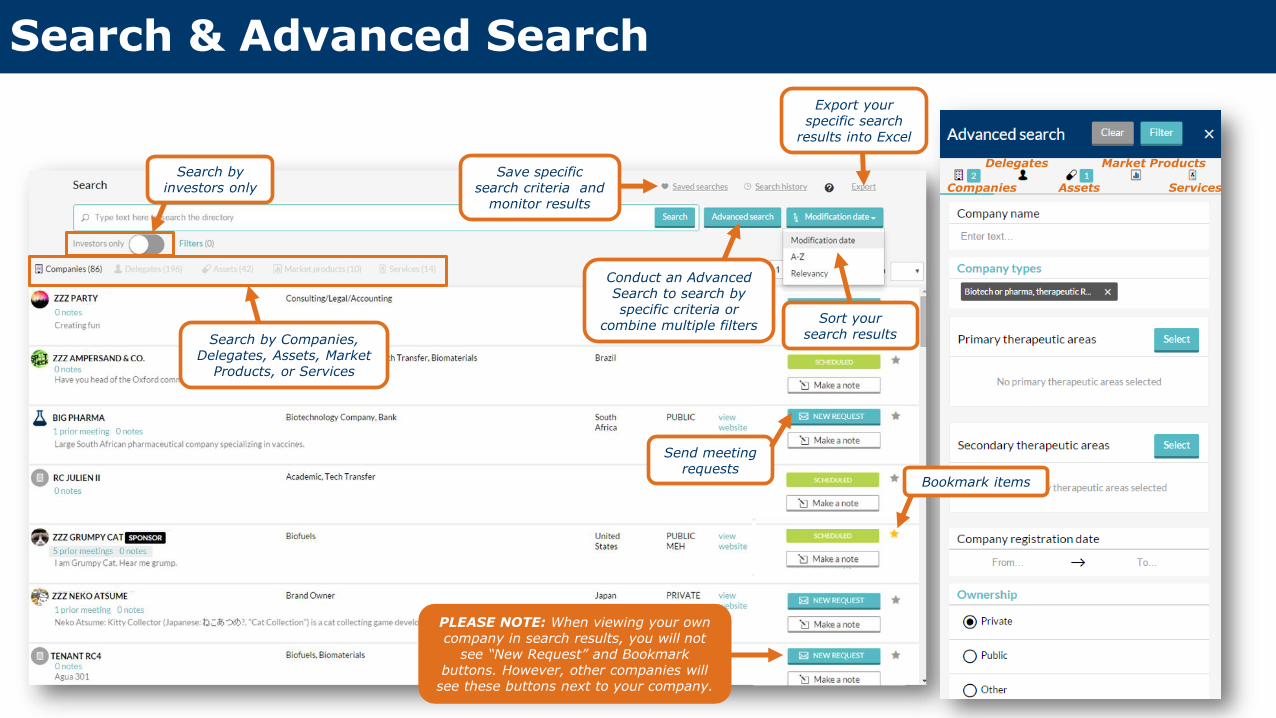
Search & Advanced Search
Companies Assets Services
Delegates Market Products Search by
investors only Save specific
search criteria and monitor results
Export your specific search
results into Excel
Conduct an Advanced Search to search by specific criteria or
combine multiple filters Search by Companies,
Delegates, Assets, Market Products, or Services
Sort your search results
Send meeting requests
Bookmark items
PLEASE NOTE: When viewing your own company in search results, you will not
see “New Request” and Bookmark buttons. However, other companies will
see these buttons next to your company.

Collaboration Features
PLEASE NOTE: Only members of your company can see these notes and meetings.
View meetings your company had with this company at current & prior BIO events
Enter notes and assign follow-up
tasks with regard to the company
2
1
1. Prior Meetings 2. Notes
2

Message Center
Filter by… 1. Personal Tag 2. Unread Messages 3. Incoming & Outgoing 4. Meeting Status
PLEASE NOTE: The Message Center is set up at a company level. The same content will be displayed for all members
of your company attending the conference.
1
2
3
4
Refine and combine multiple filters
PLEASE NOTE: Delegates do not schedule their
own meetings. BIO Staff will begin scheduling “Accepted” meetings at
mutually available times 2-4 weeks before the event.
Sort by date, status, sender,
or recipient
Export your Message Center contents into
Excel
Meeting Requests that are “Accepted”
but with no timeslot available to schedule it will be marked with a red “No Mutual Availability” tag.

Sending Meeting Requests
1. Click New Request at the top of the page, or the envelope in your search results 2. Type in the name of the company you’d like to meet with in the To field 3. Add a tailored subject and message in the Title and Message fields 4. Update meeting participants and availability, if necessary 5. Click Send Request
1
PLEASE NOTE: The default participant will be you. Don’t forget to replace yourself with another
participant if you do not intend to attend the meeting, or add additional participants as necessary.
2
3
4
5
4
PLEASE NOTE: Outgoing requests
are sent to companies rather
than individuals. The
receiving company
will determine which participants to add
to the meeting.
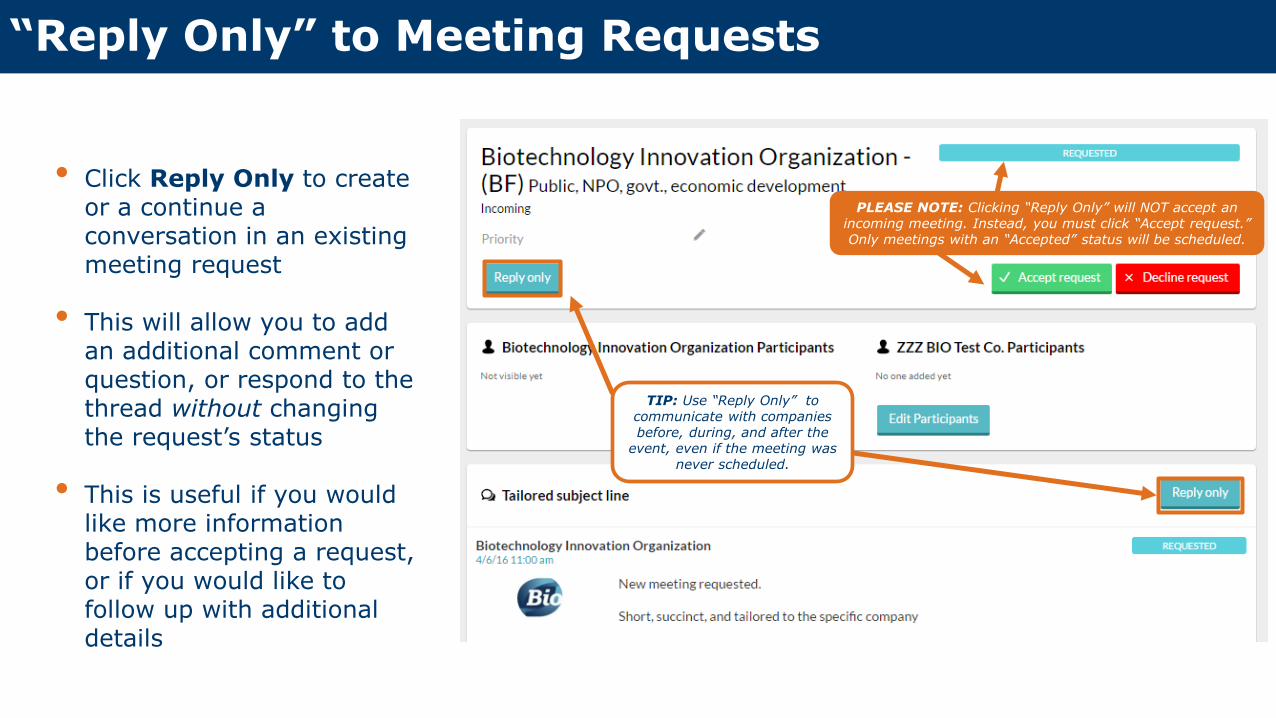
“Reply Only” to Meeting Requests
• Click Reply Only to create or a continue a conversation in an existing meeting request
• This will allow you to add
an additional comment or question, or respond to the thread without changing the request’s status
• This is useful if you would
like more information before accepting a request, or if you would like to follow up with additional details
TIP: Use “Reply Only” to communicate with companies before, during, and after the
event, even if the meeting was never scheduled.
PLEASE NOTE: Clicking “Reply Only” will NOT accept an incoming meeting. Instead, you must click “Accept request.” Only meetings with an “Accepted” status will be scheduled.

Accepting, Declining, & Canceling Meeting Requests
Accept 1. Click Accept Request 2. Include an explanation in the Messages field (optional) 3. Update meeting participants and availability, if necessary 4. Click Accept Request Decline (not pictured) 1. Click Decline Request 2. Include an explanation in the Messages field (optional) 3. Click Decline Request
PLEASE NOTE: The default participant will be you. Don’t
forget to replace yourself with another participant if you do
not intend to attend the meeting, or add additional participants as necessary.
1
2
3
4
TIP: If you accidentally decline a meeting, or your change your mind, you will have the
option to undecline the meeting. This
will revert meeting’s status back to “Requested.”

Updating Meetings
Add customized tags
View meeting time & location
PLEASE NOTE: The displayed time will be in the same time
zone as the conference.
PLEASE NOTE: Meetings that cannot be rescheduled due to lack of mutual availability will not be canceled but will display a “Rescheduled”
status and a message indicating that the meeting is still scheduled for the same time and date as when
it was previously scheduled.
Update meeting participants
TIP: If you accidentally cancel a meeting, or your plans change, you will be given the option to uncancel
the meeting. This will revert the meeting back to “Requested.”

Contact Information
Email: [email protected]
Phone: +866.356.5155 (U.S.)
+1.202.962.6666 (International)
@bio1x1
Customer Service: Monday–Friday, 9 AM-5 PM ET