the one-arm stent for canalicular laceration the one-arm stent for canalicular laceration mini...
TRANSCRIPT

The one-arm stent for The one-arm stent for canalicular lacerationcanalicular laceration
Mini Monoka
Simplified repair of canalicular Simplified repair of canalicular lacerationlaceration
Maintains proper alignment Prevents stricture after repair Soft, pliable silicone minimizes
ocular irritation and tissue trauma
Inert and stable

Monocanalicular Monocanalicular vsvs
BicanalicularBicanalicular
Monocanalicular intubation:Avoids manipulation of normal
canaliculus and nasolacrimal duct (eliminating any possibility of injury to them)
Stents are easily placed (no intranasal manipulation)
May be placed using local anesthesia in an office or procedure room setting

Monocanalicular Monocanalicular vsvs
BicanalicularBicanalicular
Monocanalicular intubation (cont.):Easy to remove at the slit lampNo danger of “cheesewiring” or
erosion of punctum (occasionally occurs with bicanalicular stents)
No need for any knots or sutures – stent is anchored at the punctum

Wide/MediumWide/MediumCollarette MonokaCollarette Monoka
For Canalicular Laceration or Imperforate Nasolacrimal Duct

Wide/MediumWide/MediumCollarette MonokaCollarette Monoka
Securely anchored at punctum by plug
Malleable stainless steel probeSilicone tubing swaged into probe
(less likely to separate)No knots, no sutures
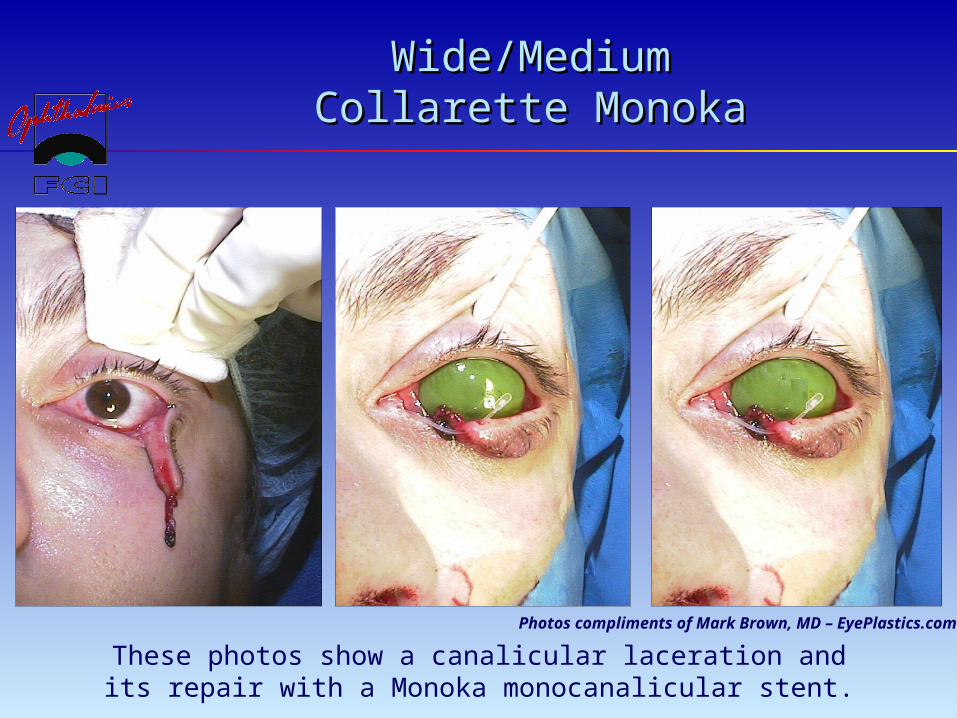
Wide/MediumWide/MediumCollarette MonokaCollarette Monoka
These photos show a canalicular laceration andits repair with a Monoka monocanalicular stent.
Photos compliments of Mark Brown, MD – EyePlastics.com

Self-ThreadingSelf-ThreadingMonokaMonoka
Available in 3mm or 4mm collarette sizes

Self-ThreadingSelf-ThreadingMonokaMonoka
Securely anchored at punctum by plug Less traumatic (no metal to remove
from nose) Easier to retrieve from nose Able to pass through tight passages
without separating No knots, no sutures

Required InstrumentsRequired Instruments
For all monocanalicular stents: Disposable plug inserter/dilator

Required InstrumentsRequired Instruments
For the Self-Threading Monoka(and Ritleng Bicanalicular Stents):
Reusable Ritleng Probe
Reusable Ritleng Hook

Ritleng Probe ProcedureRitleng Probe Procedure
The Ritleng Probe is backed out of the lacrimal duct and separated from the polypropylene thread-guide at its thinner section (the light blue portion of the thread) by sliding it out from the open slit that lines the entire length of the probe.
Figure 1

Ritleng Probe ProcedureRitleng Probe Procedure
The thinner section of the thread-guide is shown separating from the probe by sliding out from the open slit.
Figure 2

Ritleng Probe ProcedureRitleng Probe Procedure
The Ritleng Probe is shown completely separated from the thread-guide.Figure 3

Ritleng Probe ProcedureRitleng Probe Procedure
Following dilation and preliminary probing of the lacrimal ducts, the Ritleng Probe is introduced into the canaliculus and nasolacrimal duct until contact is made with the nasal fossa floor.
The probe is pulled back slightly (1cm) to facilitate the introduction of the prolene thread-guide into the nasal cavity.
The probe is oriented with its slit side facing anteriorly and pushed backwards so that the interior end of the probe is facing anterior, thus directing the prolene towards the front of the nasal cavity.
The prolene is threaded through the probe to obtain a large loop which spreads out in the nasal cavity making it easy to locate.
Retrieval of the blue prolene is easy when it appears in the anterior portion of the nose.
The prolene is retrieved under nasal illumination and visual control (nasal endoscope) with endonasal forceps with the Ritleng Hook.
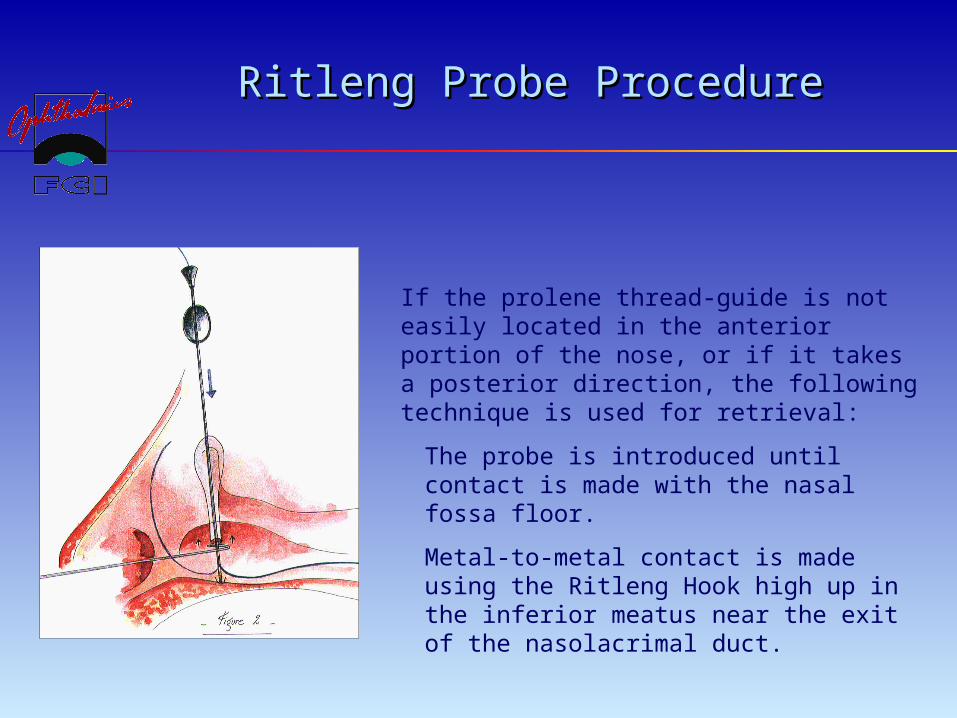
Ritleng Probe ProcedureRitleng Probe Procedure
If the prolene thread-guide is not easily located in the anterior portion of the nose, or if it takes a posterior direction, the following technique is used for retrieval:
The probe is introduced until contact is made with the nasal fossa floor.
Metal-to-metal contact is made using the Ritleng Hook high up in the inferior meatus near the exit of the nasolacrimal duct.

Ritleng Probe ProcedureRitleng Probe Procedure
The probe is then rotated 180° while keeping the metal-to-metal contact with the hook thus orienting its inferior opening towards the back.
The hook should be above the probe’s opening and the prolene. This will enable the hook to catch the prolene loop when removing from the nose.

Ritleng Probe ProcedureRitleng Probe Procedure
The probe is slowly back out of the inferior meatus and as soon as the metal-to-metal contact between the probe and the hook is lost, the hook catches the prolene loop and is carefully removed from the nose.
The probe is removed from the canaliculus and detached from the stent by sliding the thinner light blue portion of the prolene out through the probe’s slit.
The prolene thread-guide is pulled out the nose along with the attached silicone tubing.
This same technique is used to intubate the second canaliculus in the case of a bicanalicular intubation.
In the case of a monocanalicular intubation, the punctal plug at the other end of the silicone tubing is seated in the puctum using a punctal plug dilator and inserter.

Ritleng Probe ProcedureRitleng Probe Procedure
These photos show a canalicular laceration and its repair with amonocanalicular stent using the Ritleng probe.
Photos compliments of Mark Brown, MD – EyePlastics.com

The Future in SightThe Future in Sight
Contact Information:
FCI OPHTHALMICS
P.O. Box 465Marshfield Hills, MA 02051
Tel: 800-932-4202Tel: 781-826-9060Fax: 781-826-9062
Email: [email protected]
Web: www.fci-ophthalmics.com